

Page 1
Samsung Auto
Backup User
Manual
Page 2

[Rev. 06 06/05/2009 Samsung Auto Backup User Manual First edition
October 2008 This revision - 05] Copyright © 2008 Clarus, Inc. All Rights
Reserved. No part of this document may be communicated, distributed,
reproduced, or transmitted in any form or by any means without the prior
written permission of Clarus, Inc., except as allowed under the copyright
laws. All brand and product names are trademarks of their respective
companies. Samsung and Clarus, Inc. is a registered trademark of Samsung
Electronics Co. and Clarus, Inc. Samsung Auto Backup is a trademark of
Samsung Electronics Co. Linux is a registered trademark of Linus Torvalds
in the United States, other countries, or both.
Microsoft, Windows, Windows NT, and the Windows logo are trademarks
of Microsoft Corporation in the United States, other countries, or both.
Microsoft® Microsoft, Encarta, MSN, Windows, Microsoft Word, and
Windows Vista™ are either registered trademarks or trademarks of
Microsoft Corporation in the United States and/or other countries.
IBM®, PC-DOS, PC are register trademark of International Machine
Corporation. IBM, the IBM logo and ibm.com are trademarks of
International Business Machines Corp., registered in many jurisdictions
worldwide. Other product and service names might be trademarks of IBM
or other companies.
Intel, Intel logo, Intel Inside, Intel Inside logo, Intel Centrino, Intel Centrino
logo, Celeron, Intel Xeon, Intel SpeedStep, Itanium, and Pentium® are
trademarks or registered trademarks of Intel Corporation or its subsidiaries
in the United States and other countries.
Patents
Samsung Electronics Co., Ltd. Moreover, Clarus, Inc. may have patents or
patent pending applications, trademarks, copyrights, or other intellectual
property rights covering subject matter in this document. The furnishing of
this document does not give the recipient or reader any license to these
patents, trademarks, copyrights, or other intellectual property rights.
IMPORTANT
Please read and understand the complete contents of this manual. The
contents of this manual may be modified without prior notice.
Though every care has been taken to ensure the accuracy of this document,
Clarus, Inc. cannot accept responsibility for any errors or omissions or for
any loss, whether legal or natural, occurring to any person when acting, or
refraining from action, because of the information contained herein.
Information in this document is subject to change without notice.
For more information, please visit
Clarus, Inc. Homepagehttp://www.clarussoft.com/
2
Page 3

Chapter 1 Introduction ..................................... 5
Chapter 2 Handling Precautions ...................... 7
Regular Virus Scanning ............................ 7
Safely Remove Hardware ......................... 7
Always Backup your important Data .......... 7
Chapter 3 Terms and Concepts of Backup ....... 8
Chapter 4 Installing the Software .................. 12
Before Installation ....................................... 13
Preparing your Computer .............................. 14
System Requirements ........................... 14
Connecting the Drive to Your Computer .......... 15
Installing the Software ................................. 16
Startup Screen ..................................... 17
Choose your Language .......................... 17
Welcome message ................................ 18
License Agreement ................................ 19
Choose the Destination Folder ................ 20
Chapter 5 Setting up the Auto Backup............ 23
Getting Started ........................................... 24
Setting up your Preferences .......................... 25
Creating a Folder .................................. 26
Creating a Password .............................. 27
Setting the Task Log Options .................. 29
File Filter ............................................. 31
Backup Groups of Files .......................... 32
Backup Types of Files by Extension ......... 33
Setting the Backup Schedule .................. 34
Chapter 6 Managing Data ............................... 36
Starting Data Management ........................... 37
First Backup ......................................... 38
Disk Space Information ......................... 39
Samsung Auto Backup Main Screen ......... 39
Menu Bar ............................................. 40
Task Menu ........................................... 41
3 4
Page 4

View Menu ........................................... 41
Tools Menu .......................................... 42
Tools Menu Help ................................... 42
Icon Bar .............................................. 43
Quick Backup ....................................... 44
Viewing Backup Results ......................... 45
Check the Backup from Windows Explorer 46
Chapter 7 Advanced ....................................... 47
Changing Options ........................................ 48
Set Task Options .................................. 48
File Filter ............................................. 50
Schedule ............................................. 50
Login Password..................................... 51
Backup Mode ....................................... 52
Deleting Backed up Data .............................. 54
Restoring Data ............................................ 57
Settings Information ............................. 59
Task Log.............................................. 60
Tools Menu ................................................. 64
Setting the Backup Device ..................... 64
Changing the Backup Device .................. 65
Replicating the Backup Device ................ 66
Restoring the Backup Information ........... 68
Using Migration .................................... 68
Connecting to a Network Folder ..................... 73
Disconnecting a Network Drive ............... 75
Checking the Integrity of Backed up Data ....... 76
About Samsung Auto Backup ........................ 78
Page 5

Introduction
Chapter 1 Introduction
Congratulations on becoming an owner of the
Samsung Auto Backup Program. You made an
excellent choice and we hope you will enjoy all its
capabilities.
Samsung Auto Backup User Manual Ver 2.0
5
Page 6

Introduction
Samsung Auto Backup is the ultimate backup solution
for creating reserve copies of data. You can make full,
custom, and scheduled backups. With Samsung Auto
Backup, you will get encryption, compression,
scheduled backups, and extracting tool. Here is what
you get:
• Two ways to backup: Scheduled or in real-time
• SafetyKey™ for protecting your precious contents
• Capacity Gauge through tray icon (Windows O/S)
NOTE: PLEASE READ AND UNDERSTAND THE
COMPLETE CONTENTS OF THIS MANUAL. THE
CONTENTS OF THIS MANUAL MAY BE MODIFIED
WITHOUT PRIOR NOTICE.
For more information, please visit Clarus, Inc.
Homepage http://www.clarussoft.com/
Samsung Auto Backup User Manual Ver 2.0
6
Page 7

Chapter 2 Handling Precautions
The following are precautions that must be followed to
enjoy a long Samsung External Hard Disk Drive life.
NOTE: PLEASE READ AND UNDERSTAND ALL THE
FOLLOWING PRECAUTIONS BEFORE
PROCEEDING TO USE YOUR SAMSUNG EXTERNAL
HARD DISK DRIVE
Regular Virus Scanning
Frequently scan the device for viruses and
protect the device from virus infection.
Safely Remove Hardware
Always use the Safely Remove Hardware
feature before shutting down the Samsung
External Hard Disk Drive or disconnecting the
USB cable.
Always Backup your important Data
The Samsung External Hard Disk
Drive manufacturer does not guarantee data
stored in the Samsung External Hard Disk
Drive and will not assume responsibility for any
mental or material damage incurred during
data recovery.
Samsung Auto Backup User Manual Ver 2.0
7
Page 8

Chapter 3 Terms and Concepts
of Backup
Samsung Auto Backup User Manual Ver 2.0
8
Page 9

Terms of Concepts of Backup
This chapter explains the concepts and terms you
need to know before using Samsung Auto Backup.
•
What is Backing Up ?
Backup means storing data safely on storage devices such as
hard disks.
• Backup Source
Backup source is the files or folders that you want to backup.
• Backup Device
Backup device is the device (local hard disks, NAS, DVDRAM,
etc.) onto which you want to store the backup data. In the case of
the Samsung Auto Backup program, the backup device is the
Samsung External Hard Disk Drive.
• Scheduled Backup
In the scheduled backup, the software program runs the backup
procedure according to a schedule yo u set in advance.
• Manual Backup
In the manual backup, you perform the backup procedure
yourself using the software.
• Full Backup
All the files and folders in a backup source you specify are
backed up.
• Incremental Backup
When you back up data from the same source repeatedly, only
data that has changed or been added since the last backup is
backed up.
Samsung Auto Backup User Manual Ver 2.0
9
Page 10

Terms of Concepts of Backup
• Real-Time Backup
This backup procedure is performed in real time. That is, the
backup source is monitored continuously, and when a folder or
file is changed or added to it, the corresponding folder or file is
backed up in real time.
• Backup Log
This log contains detailed information on the backup process,
including the start time, completion time, number of files backed
up, etc.
• What is Backup Information?
Backup Information’ is actually a database of important
information on your backups, such as which data Sam s un g Auto
Backup backed up and the result of the process. Based on this
database, the program performs its tasks such as backing up,
restoring, and deleting.
• What is ‘compression of Backup Information?
When a user deletes data such as a backup file and task log in
Samsung Auto Backup, the actual files are deleted. However,
the information related to the deleted files is only flagged as
‘deleted’ but actually still remains hidden within the backup
information. Therefore, if there are too many deleted files, the
program has to check through lots of information when
performing the next backup, and the backup process is slowed
down. Also, the size of the backup information file is itself
limited. When the backup information file reaches a certain size,
backups cannot be performed. To resolve these prob lems, the
compression function removes useless data from the backup
information and optimizes the remaining data.
• Defrag
In a disk drive, there is a ‘platter’ or disk that spins to read data
and write data. The data that is read, is usually the program files.
The data that is written is usually the information that you create
Samsung Auto Backup User Manual Ver 2.0
10
Page 11

Terms of Concepts of Backup
with the program. For instance, if you are using Microsoft Word
to create a letter, the letter is the data that is written to the disk.
Remember that the disk is spinning when you are on your
computer. When you save your data (letter), it is saved on
various places on the disk. When you defrag your disk, you are
putting all the pieces of your data (letter) in one place. When all
the pieces of the files are put together, your drive is ‘optimized’.
Samsung Auto Backup User Manual Ver 2.0
11
Page 12

Chapter 4 Installing the
Software
Samsung Auto Backup User Manual Ver 2.0
12
Page 13

Installing the Software
Before Installation
Samsung Auto Backup is a backup solution that allows
you to back up important data locally, or through a
network. This solution provides various options that
allow you to perform manual backups, as well as
scheduled backups, and compress the data during the
process.
When you back up data using Samsung Auto Backup,
you first should perform a full backup on all your data.
After that however, you can perform real-time
backups that monitor the source and back up only the
data that has changed. In addition, this solution uses
a disk-based backup method, minimizing the time
required to restore the backup data significantly.
Using incremental backups, you only backup the data
that has changed or added since the last backup. This
option is much faster than a full backup, as it is only
updating some files and not backing up all the files.
Samsung Auto Backup User Manual Ver 2.0
13
Page 14

Installing the Software
Preparing your Computer
We recommend that you check the current condition
of your system and take any necessary measures to
optimize or defragment it before using this software.
For help with optimizing and defragmenting your
computer, please see the manufacturer's
recommendations.
If your system is unstable, for example if it displays
blue screens, you encounter an error message while
booting the system, or crashes frequently in everyday
use, you must resolve these problems before using
this software. If you think your system is stable,
optimize it anyway by running the recommended
optimizing software before using this software.
System Requirements
The following is a list of the minimum system
specifications for Samsung Auto Backup:
TABLE 1. Minimum System Requirements
Component Minimum Specification
CPU Intel® Pentium® equivalent 1GHz
MEMORY 512 MB
HDD 500 MB
Operating
System
Web Browser Microsoft Windows® Internet Explorer®
Samsung Auto Backup User Manual Ver 2.0
Microsoft Windows® XP SP2 or
Windows Vista™ or Windows 7
5.5
14
Page 15
Installing the Software
Connecting the Drive to Your Computer
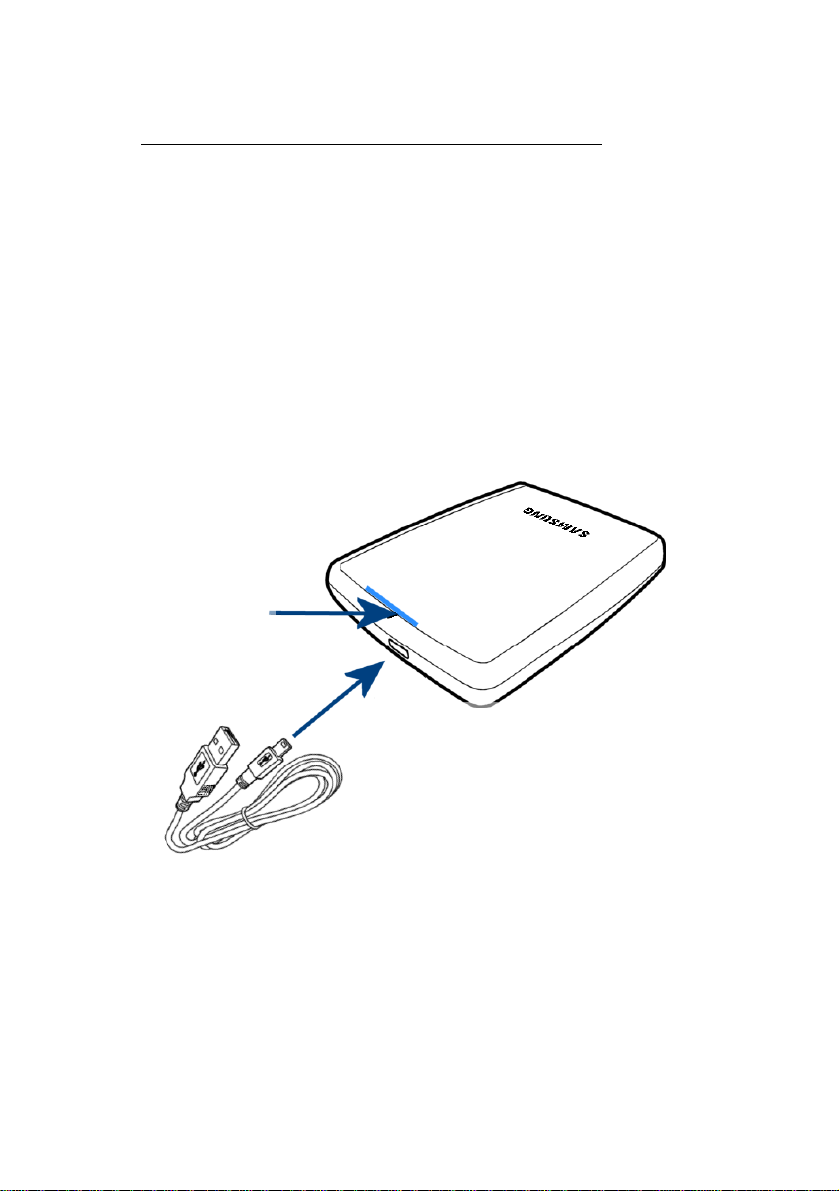
Contained in the packaging is a USB cable. The small
end of the cable plugs into the Samsung External
Hard Disk Drive and the large end plugs into your
Computer. This is keyed so you can only plug it in on e
way.
Figure 4-1 Connecting your External drive to your Computer
LED
Connect to
Samsung Auto Backup User Manual Ver 2.0
Connect to Samsung
External Hard Disk Drive
15
Page 16
Installing the Software
Installing the Software
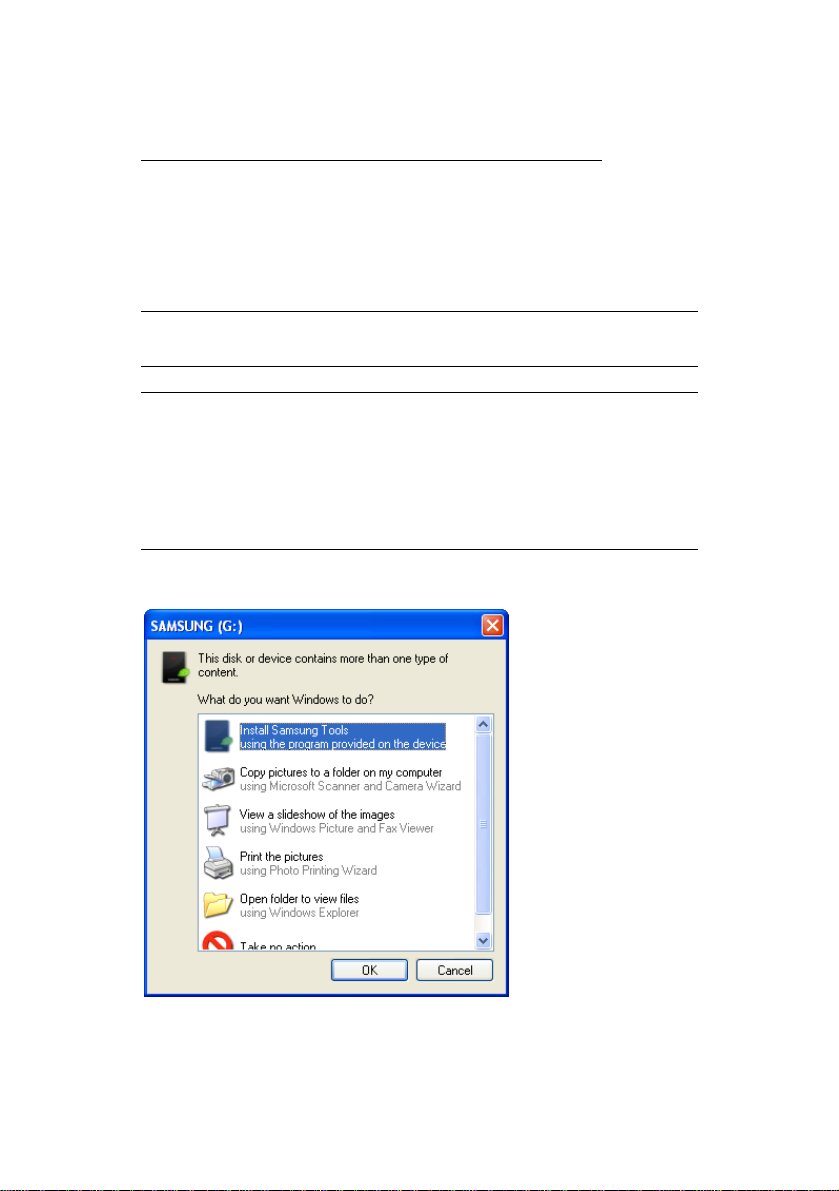
When you connect the Samsung External Hard Disk
Drive to your computer, there will be a short pause.
After the pause, the Welcome screen appears.
NOTE: IF YOU SEE A MICROSOFT SCREEN APPEAR,
CLICK ‘OK’
NOTE: WHEN YOU INSTALL THE AUTO BACKUP
PROGRAM ON THE WINDOWS 7,
YOU SHOULD RUN THE "APPINST.EXE"
MANUALLY IN SAMSUNG EXTERNAL HARD DRIVE.
THE WINDOWS 7 DOES NOT SUPPORT THE
AUTORUN FUNCTION.
Figure 4-2 Click OK if the Microsoft Install Wizard appears
Samsung Auto Backup User Manual Ver 2.0
16
Page 17
Installing the Software
Startup Screen
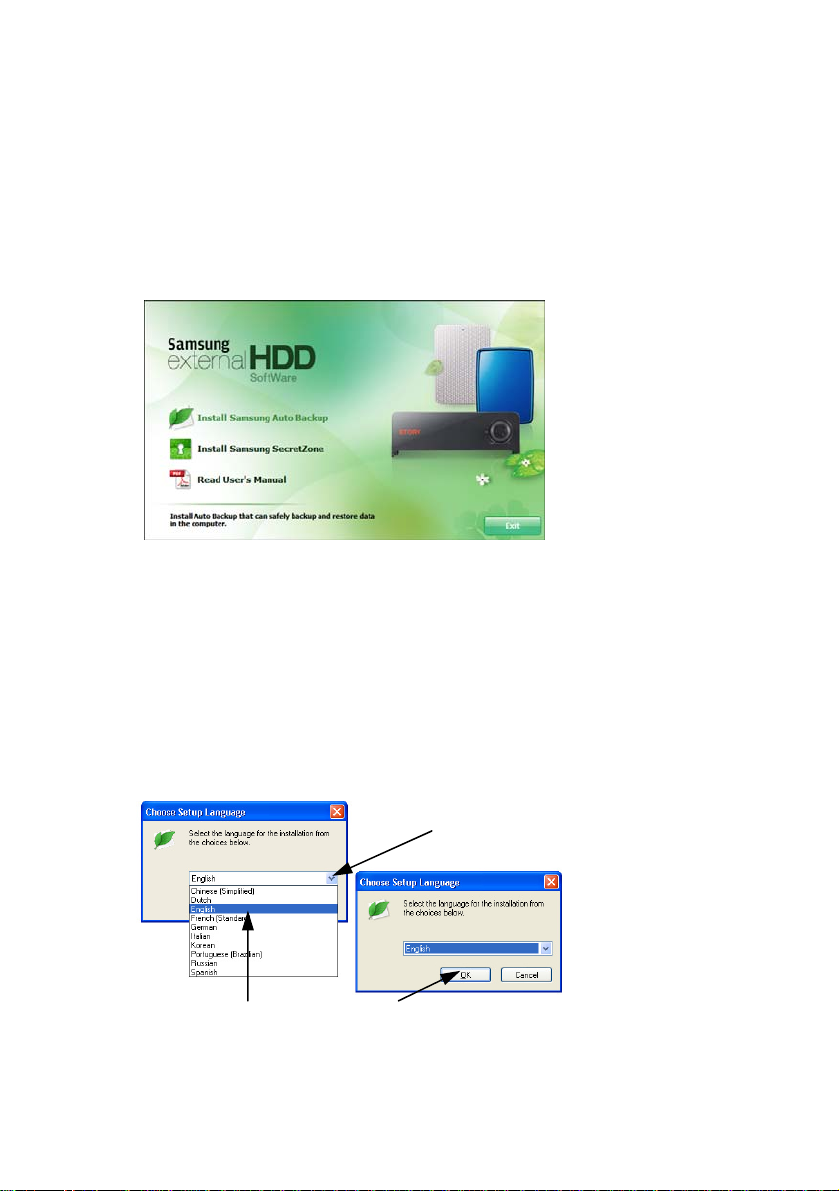
From the Samsung External Hard Disk Drive:
Click Install Samsung Auto Backup
1.
Figure 4-3 Samsung External Hard Disk Drive Setup Screen
Choose your Language
From the Pull-Down, choose your desired language.
Click the Pull-Down Arrow
1.
2.
Choose your language
Click OK
3.
Figure 4-4 Choosing the Language
2.Click on your desired
language
Samsung Auto Backup User Manual Ver 2.0
3.Click OK when you
are done
1.Click this arrow for
the pull-down menu
17
Page 18
Installing the Software
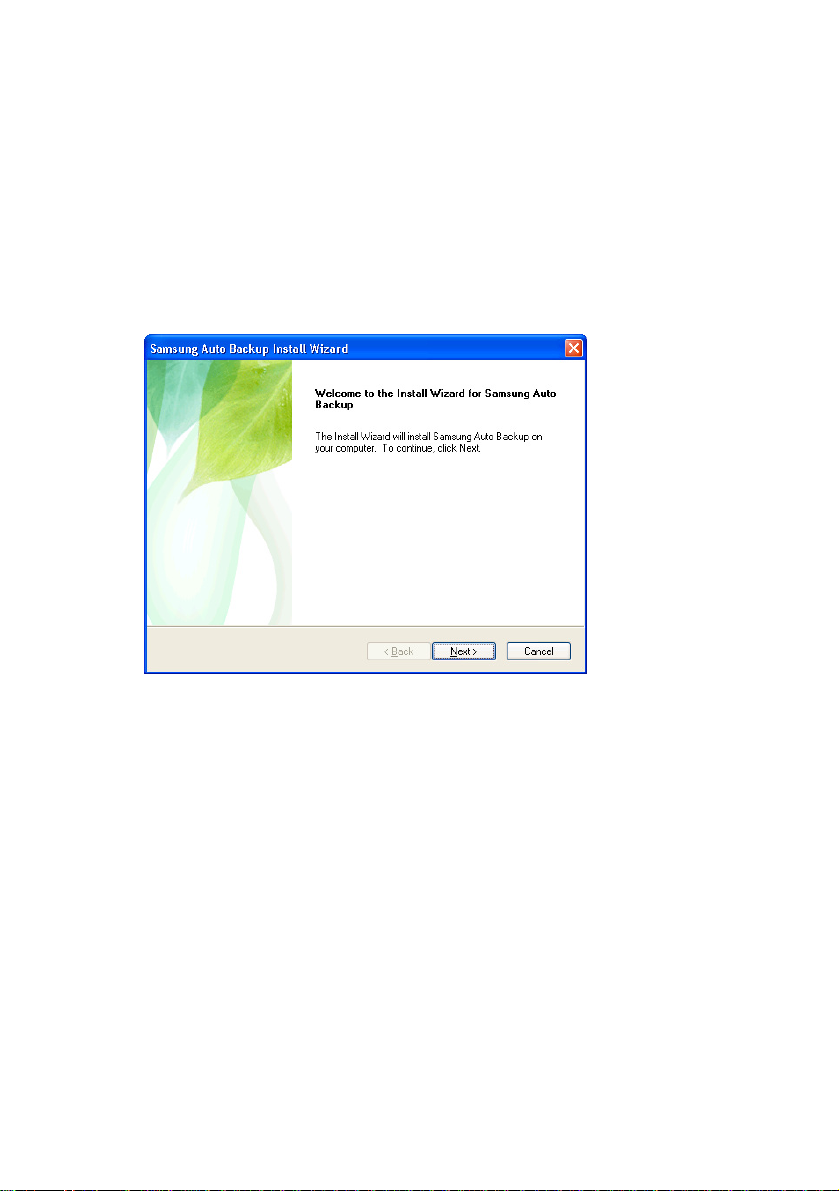
Welcome message
The Welcome Screen appears to indicate that the Install
Wizard is ready to start installing your Auto Backup
software. From the Samsung Auto Backup Install Wizard:
Click Next >>
4.
Figure 4-5 Samsung Auto Backup Install Wizard
Samsung Auto Backup User Manual Ver 2.0
18
Page 19
Installing the Software
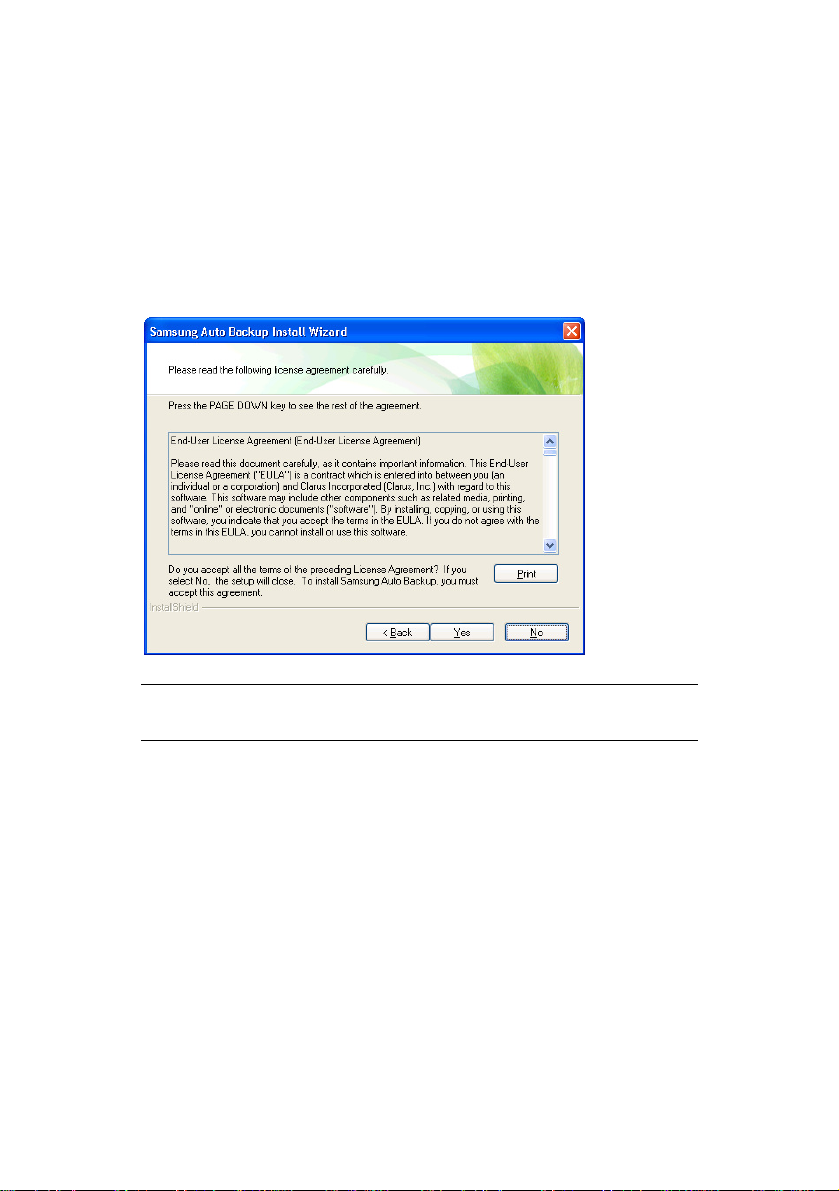
License Agreement
The next screen is the end user license agreement. If
you agree to the license agreement:
Click Yes
5.
Figure 4-6 End User License Agreement
NOTE: PLEASE READ AND UNDERSTAND THE
AGREEMENT.
Samsung Auto Backup User Manual Ver 2.0
19
Page 20
Installing the Software
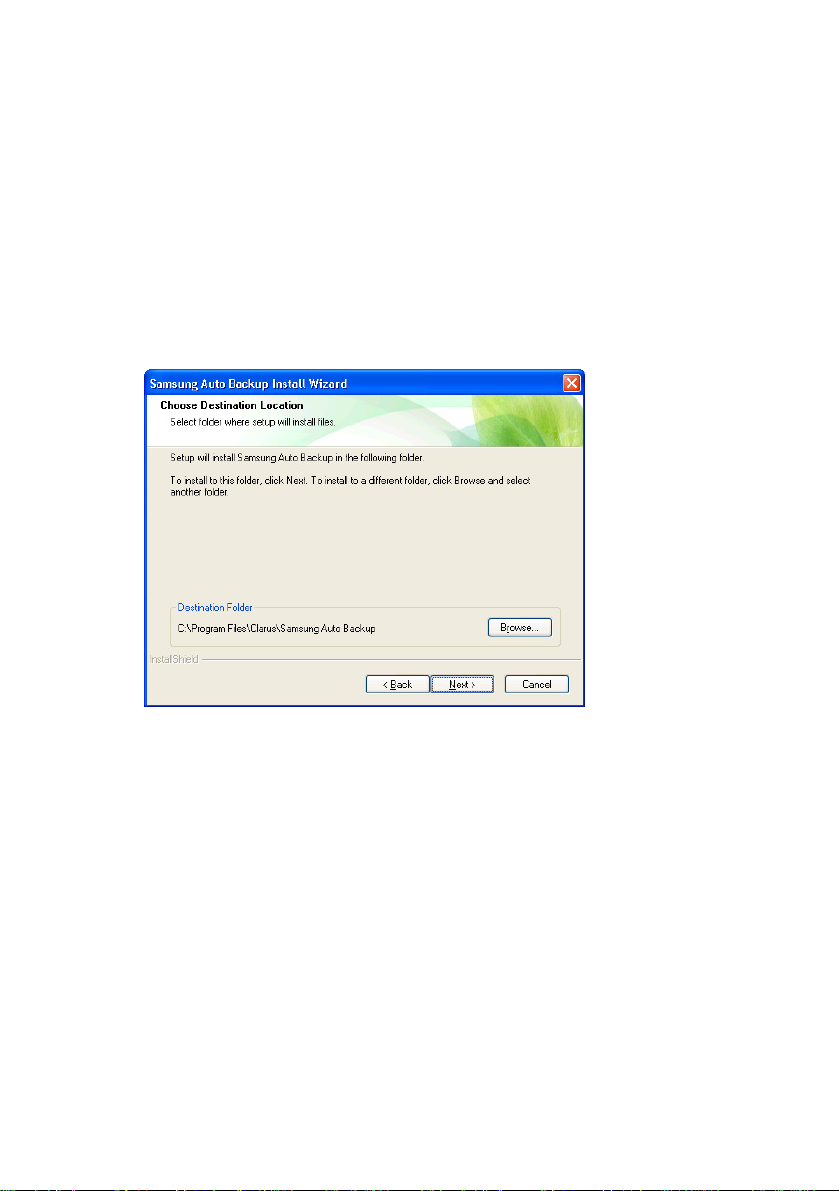
Choose the Destination Folder
The following screen will determine where to install
the software. The default folder is C:\Program
Files\Clarus\Samsung Auto Backup.
You may click Browse and choose a different
6.
folder or click
Figure 4-7 Choose the backup destination
Next>> to use the default destination
Samsung Auto Backup User Manual Ver 2.0
20
Page 21
Installing the Software
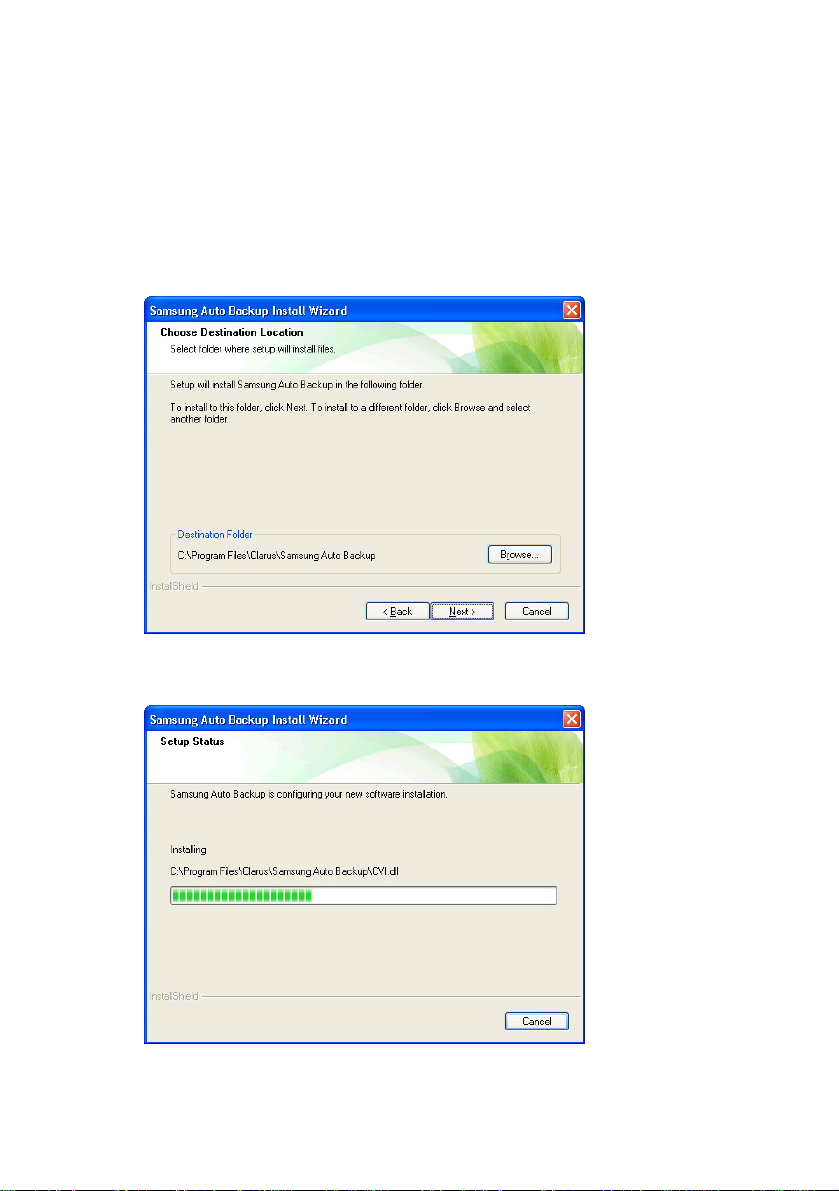
Choose the Program Folder from the Existing
Folders: where you would like to add the program icon.
The default folder is the Windows Accessories.
Click Next>>
7.
Figure 4-8 Choose the folder for the program icon
The installations progress bar appears.
Figure 4-9 Progress bar
Samsung Auto Backup User Manual Ver 2.0
21
Page 22
Installing the Software
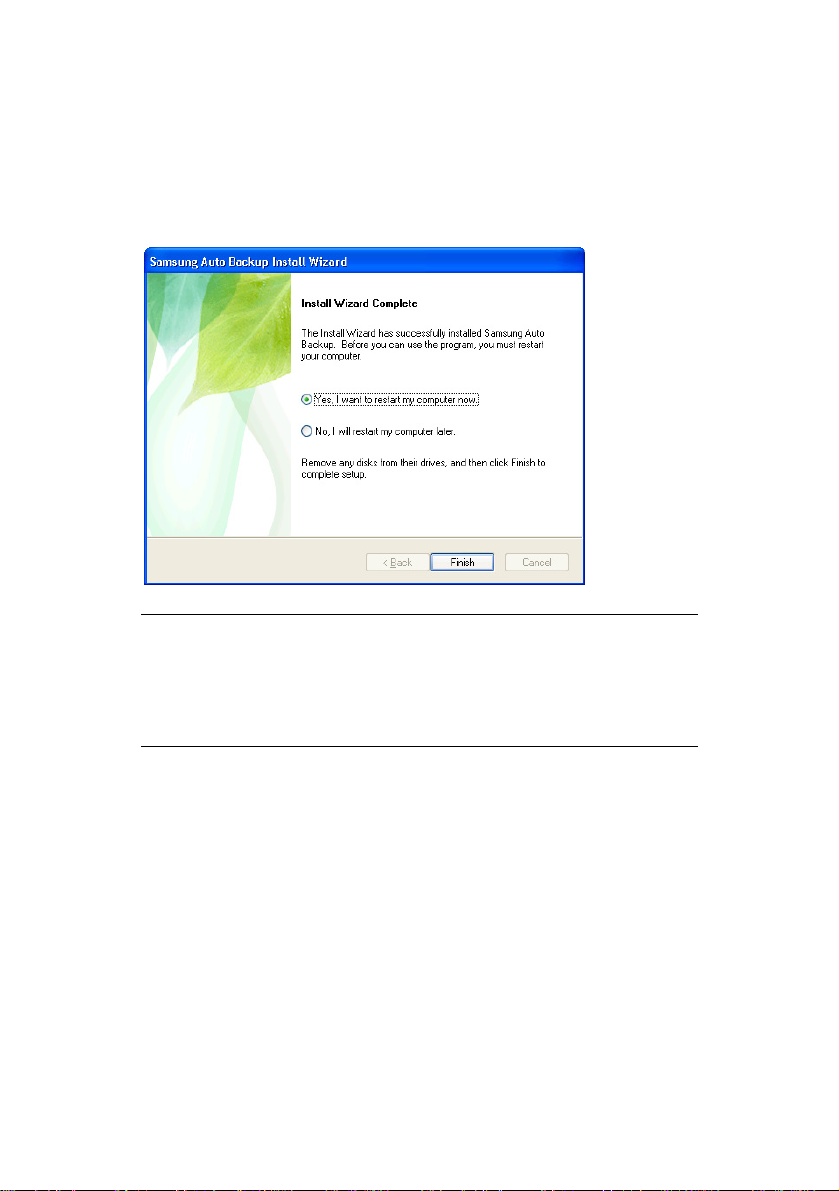
When the installation is complete, you may choose to
reboot the system now or later.
After making a selection, click Finish to complete the
8.
installation.
NOTE: IT IS HIGHLY RECOMMENDED THAT YOU
CHOOSE TO REBOOT YOUR COMPUTER SO THE
PROGRAM CAN COMPLETE THE INSTALLATION,
PLACING ICONS ON THE DESKTOP AND IN THE
TASK BAR.
You have successfully installed the software for your
Samsung External Hard Disk Drive.
The next step is to configure the software to your
exacting specifications.
Samsung Auto Backup User Manual Ver 2.0
22
Page 23

Chapter 5 Setting up the Auto
Backup
Samsung Auto Backup User Manual Ver 2.0
23
Page 24
Setting up the Auto Backup
Getting Started
Examples are used in this section to better explore
the many options available.
The program starts by setting up what is backed up,
when it is backed up, and to what folder it is backed
up.
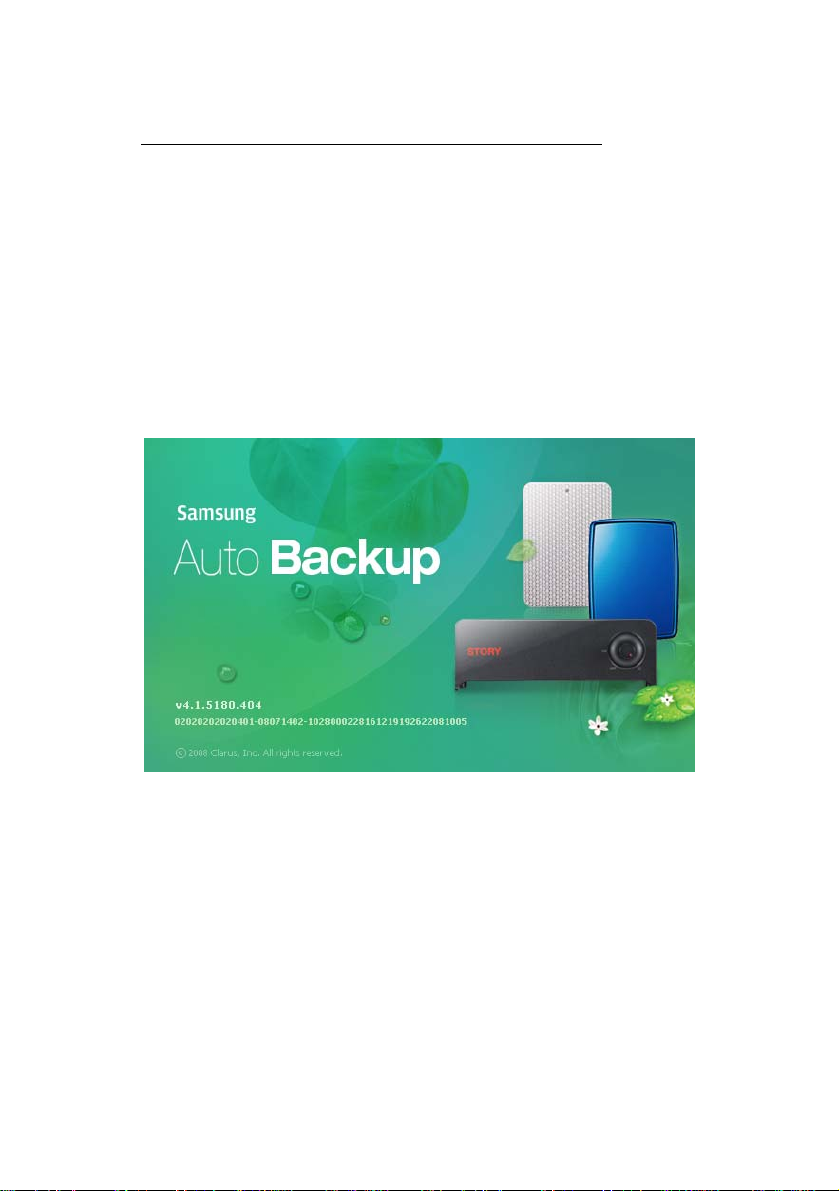
The first screen displays the version, serial number,
and the program.
Figure 5-1 Samsung’s Auto Backup Splash Screen
If the software does not automatically start, you may
launch the program by clicking:
Start -> Programs-> Samsung -> Samsung Auto
1.
Backup -> Samsung Auto Backup
Samsung Auto Backup User Manual Ver 2.0
24
Page 25
Setting up the Auto Backup
Setting up your Preferences
This is a one-time setup so you will get the most out
of your Samsung External Hard Disk Drive. The
Backup Settings Wizard will step through the options
and preferences; such as what files to backup, when
to back them up, and into what drive and folder you
would like them backed up.
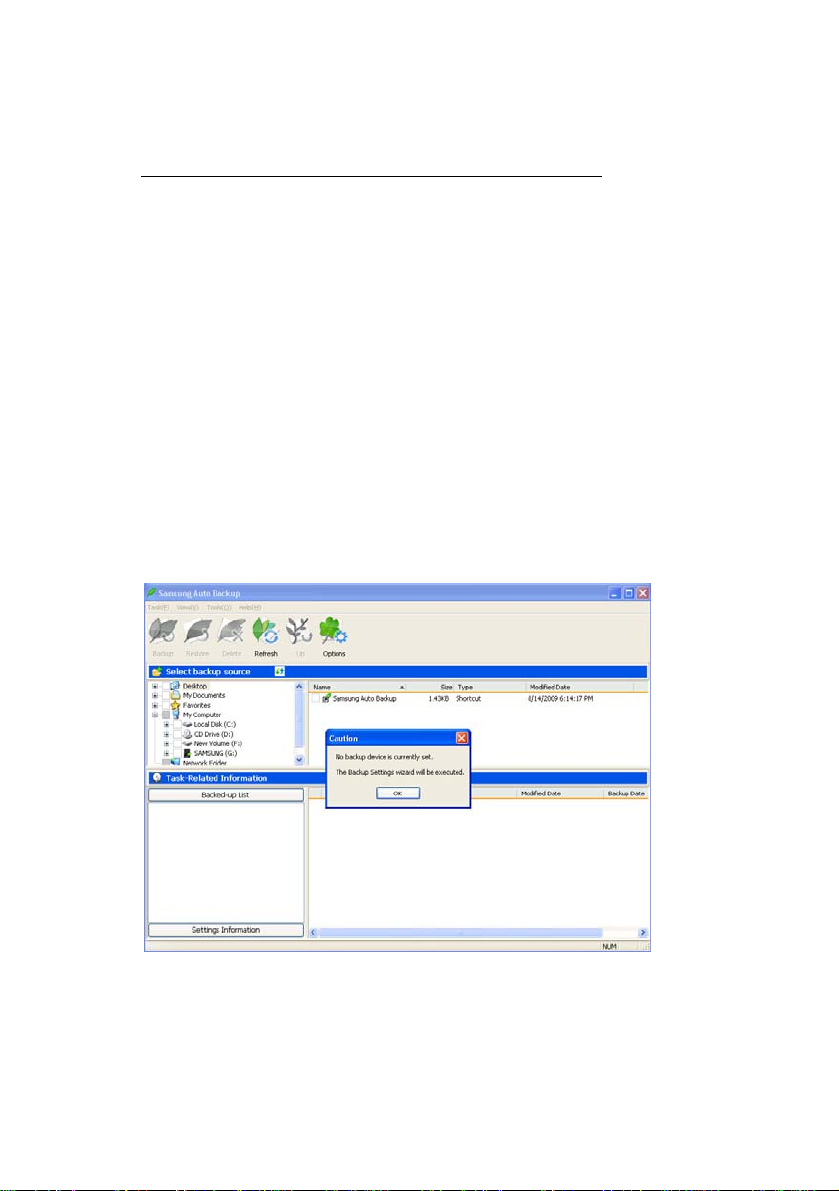
The first input screen looks as though there is a
problem however, this ‘Caution’ box is only t o let you
know that nothing has been set up yet.
From the Backup Wizard screen:
Click OK
2.
Figure 5-2 Auto Backup Screen with Caution box.
The first parameter to setup is to identify where your
backed up data will go. On the backup destination
Samsung Auto Backup User Manual Ver 2.0
25
Page 26
Setting up the Auto Backup
screen, you can choose the Samsung External Hard
Disk Drive that is connected. If the Samsung External
Hard Disk Drive is not connected, you cannot choose
the backup destination.
Creating a Folder
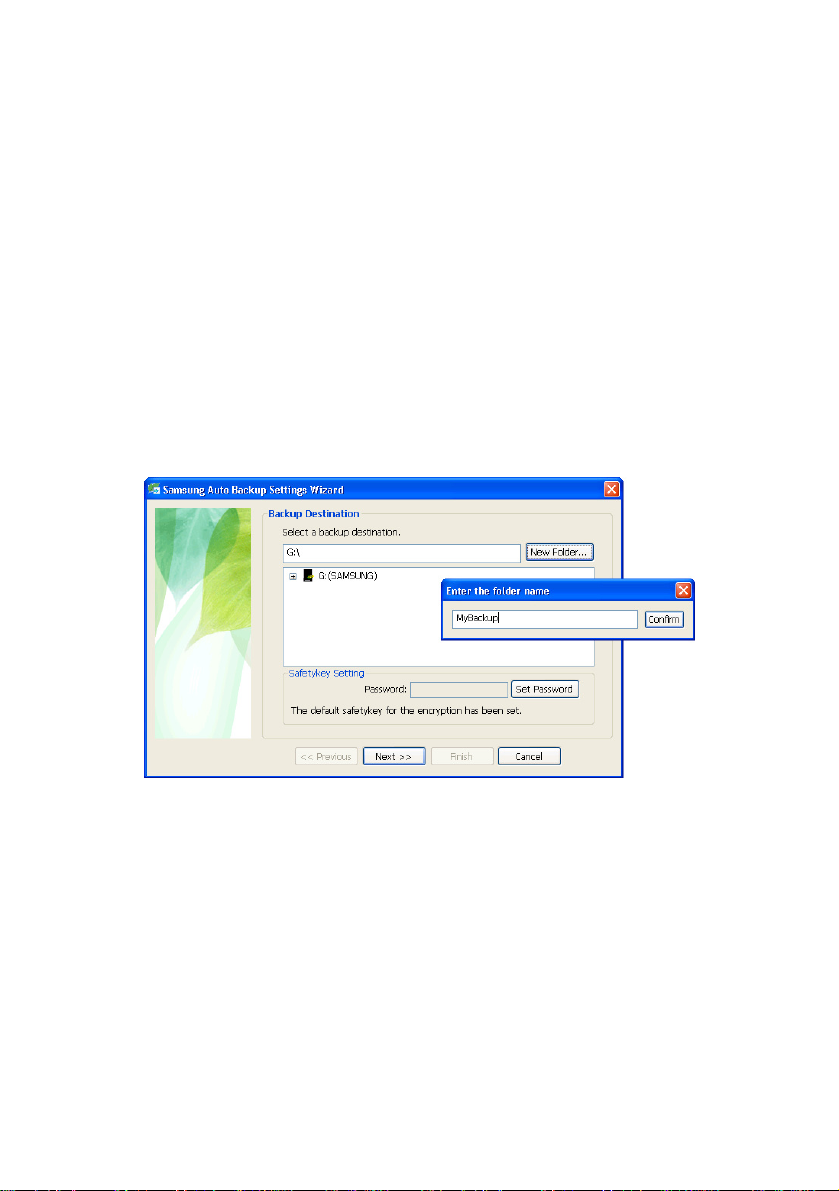
Create our own folder and use the SafetyKey to
protect it.
3.
Click New Folder...
4.
Type MyBackup
Click Confirm
5.
Figure 5-3 Create your Folder
Samsung Auto Backup User Manual Ver 2.0
26
Page 27

Setting up the Auto Backup
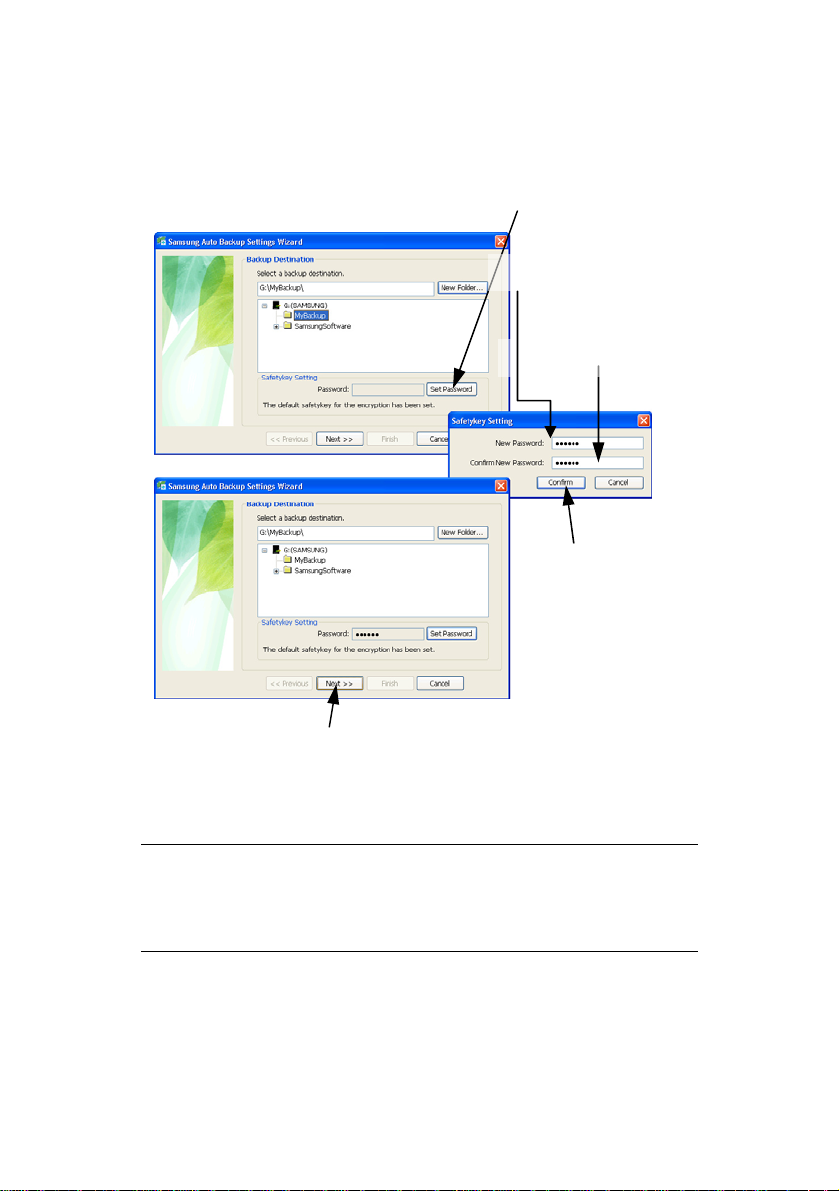
Creating a Password
Setting up your own, personal SafetyKey will ensure
that you do not have to use the default password.
From the Samsung Auto Backup Settings Wizard
window:
Click Set Password
6.
7.
Enter a SafetyKey in the New Password: field
8.
Retype the same SafetyKey in the Confirm New
Password: field
Click Confirm ->Next>>
9.
Samsung Auto Backup User Manual Ver 2.0
27
Page 28
Setting up the Auto Backup
Figure 5-4 Create your Password
6.Click Set Password
7.Enter a Password
8.Re-Enter Password
9.Click Confirm
Click Next
NOTE: SINCE YOU CAN SET THE COMPRESSION
SAFETYKEY ONLY ONCE DURING THE INITIAL
SETUP STAGE, MAKE SURE NOT TO LOSE YOUR
SAFETYKEY.
Samsung Auto Backup User Manual Ver 2.0
28
Page 29

Setting up the Auto Backup
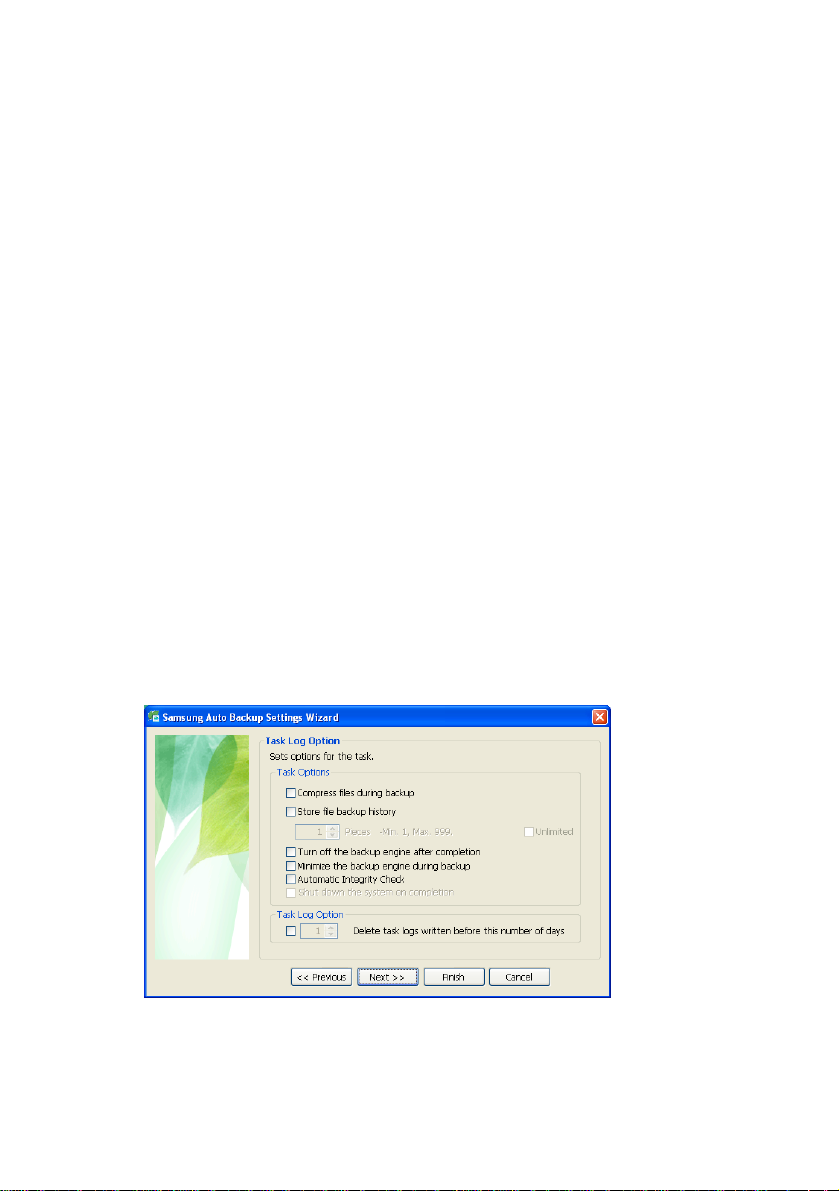
Setting the Task Log Options
From this window you can specify various backup
options; such as whether to compress the files,
whether to store a backup history, and whether to
close the backup window after finishing the backup
process. Following is a description of each option.
• Compress files during backup
This option allows you to compress the files as you back them
up. The overall backup speed is decreased but this allows you to
protect the backed up data and use its storage space more
efficiently.
NOTE: THE COMPRESSED BACKUP DATA CANNOT
BE READ OR EXECUTED, IF NOT BE OPENED WITH
AUTO BAKCUP PROGRAM. IF YOU MOVE THE
COMPRESSED BACKUP FILE FROM THE BACKUP
DESTINATION TO ANOTHER LOCATION, IT MAY
CAUSE FAILURE OF RESTORATION.
• Store file backup history
For repeated backups, several versions of a file can exist. This
stores information on different file versions, including the file
information and backup time with the file.
NOTE: ON THE FILE BACKUP HISTORY SETTING,
SELECTING THE ‘UNLIMITED’ MAY CAUSE LACK
OF
CAPACITY ON ACCOUNT OF THE INCREASE OF
FILE BACKUP HISTORY.
Samsung Auto Backup User Manual Ver 2.0
29
Page 30
Setting up the Auto Backup
• Turn off the backup engine after completion
Turns off the backup engine automatically after completion.
• Minimize the backup engine during backup
Minimizes the backup engine to the task bar/system tray.
• Automatic Integrity Check
Automatically check whether the backup information is same as
the backup data stored on the backup device.
• Shut down the system after completion
Shuts down the computer automatically after completion.
• Task Log Option
After finishing a backup, restoration, or deletion of your data, a
log is generated. This log is maintained for the duration
specified in this window.
10.
Select your preferred options and click Next>>
Figure 5-5 Setting the Task Log Options
Samsung Auto Backup User Manual Ver 2.0
30
Page 31

Setting up the Auto Backup
File Filter
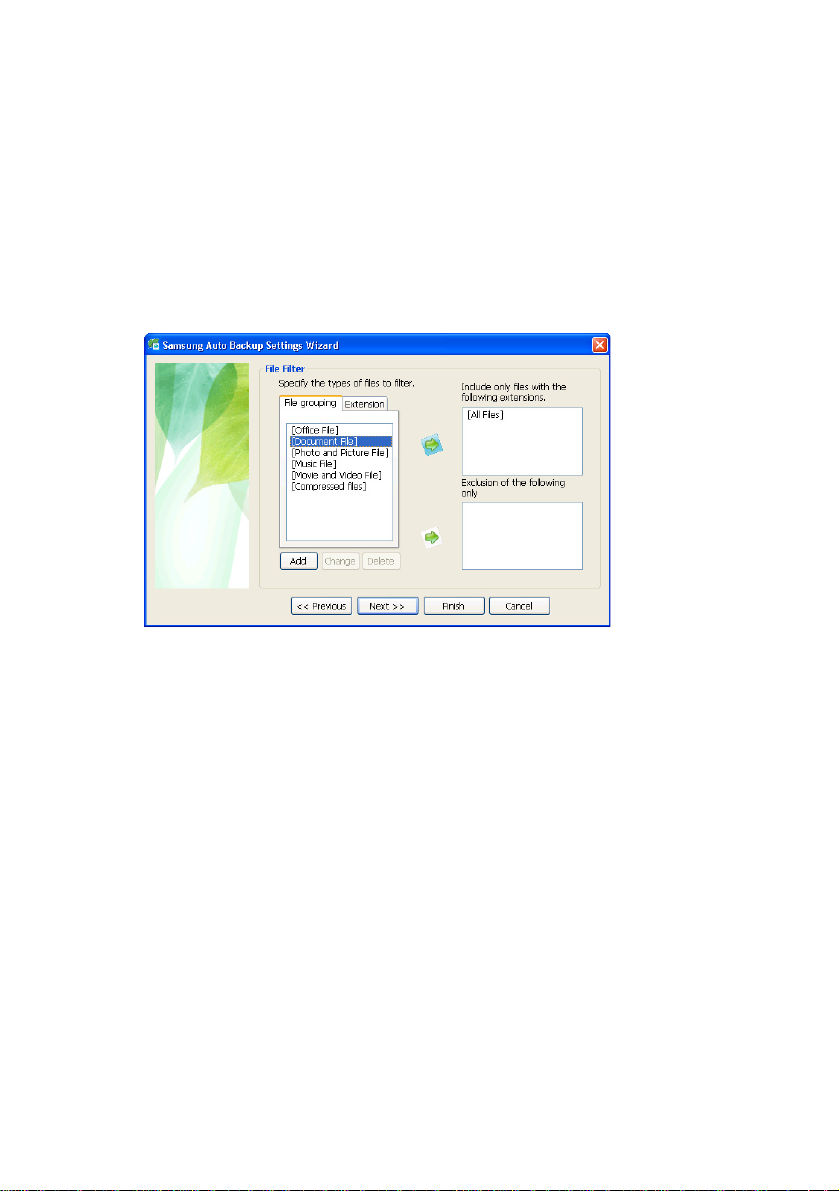
The File Filter screen defines the file types to back up
or exclude from the backup. File types are categorized
in six groups:
• Office File
Files created using Microsoft Office.
• Document File
Any document file that was created using a word processing
software product like Microsoft Word.
• Photo and Picture File
Files that are either photos or pictures. Photos can be from a
camera and Pictures can be a graphic like an icon or any generic
graphic that is supplied with a program.
• Movie, Music, and Video Files
Any files that are movie or video formats. Many companies send
out video files with their product to help the buy er learn how to
use their product.
• Compressed Files
Any files that may have been compressed for easier portability.
Often these files have an extension of .zip.
Samsung Auto Backup User Manual Ver 2.0
31
Page 32
Setting up the Auto Backup
Backup Groups of Files
For the purposes of this manual, choose Document
Files.
Choose Document Files and click the green Right
11.
Arrow
Figure 5-6 Choose the Type of file group or choose All
Samsung Auto Backup User Manual Ver 2.0
32
Page 33
Setting up the Auto Backup
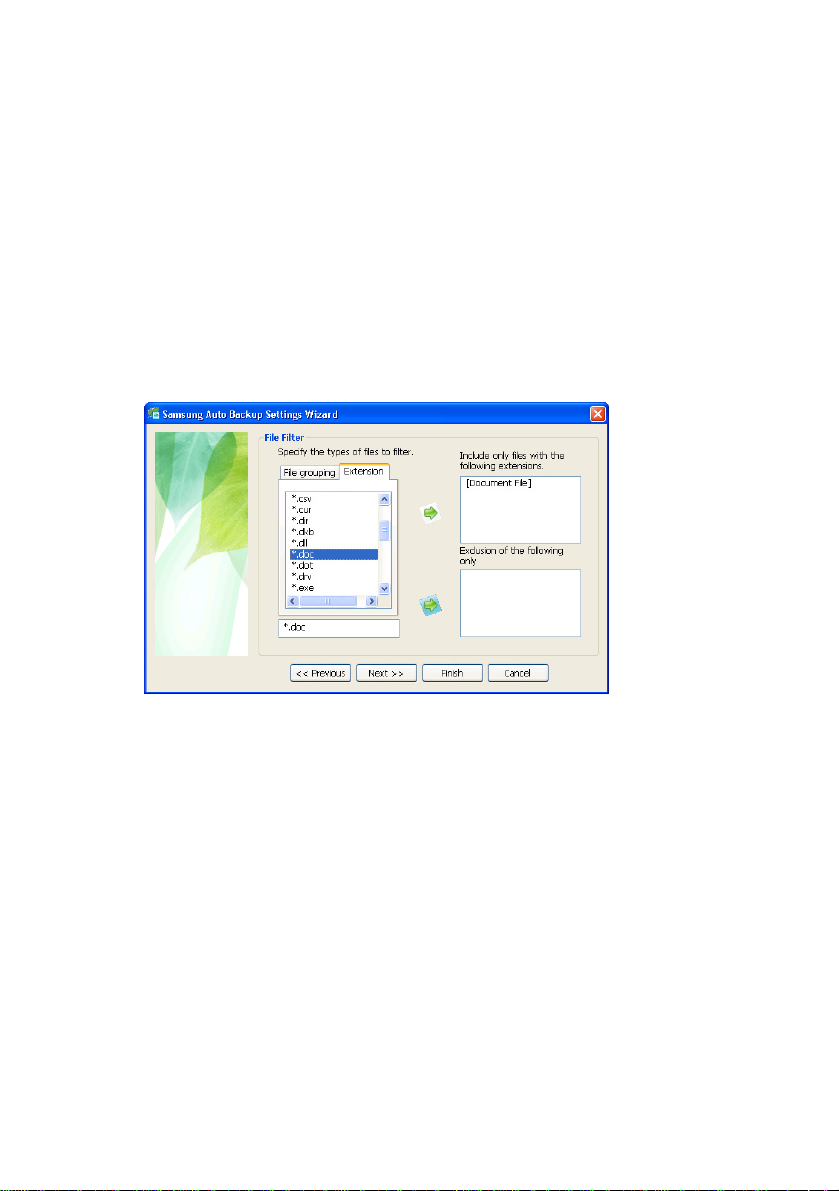
Backup Types of Files by Extension
To backup certain types of files, with the
extension .DOC for instance:
Click the Extension tab
12.
Click *.DOC
13.
Click the bottom Green Right Arrow
14.
Click Next>>
15.
Figure 5-7 Choose the file extension to backup
If you click Next without making any change to the
settings, all files the will be backed up from your
backup source.
Samsung Auto Backup User Manual Ver 2.0
33
Page 34

Setting up the Auto Backup
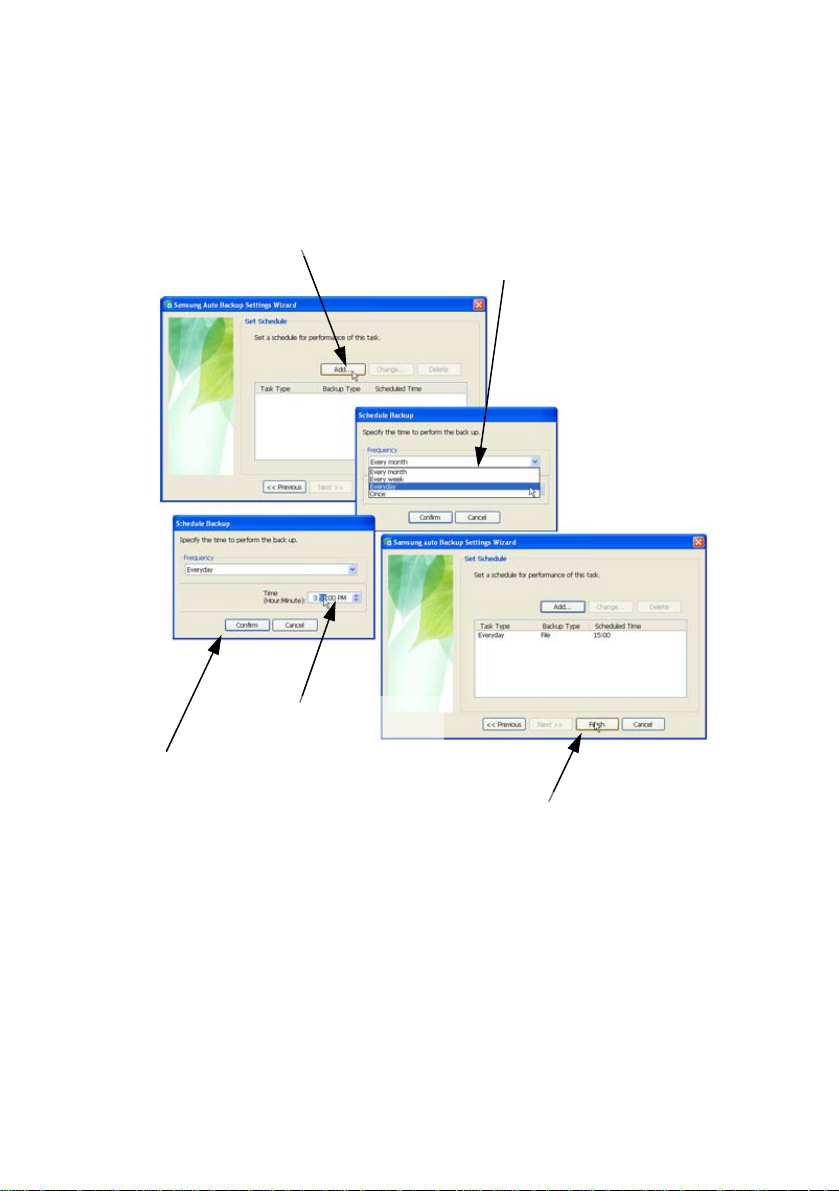
Setting the Backup Schedule
This allows you to set a date and time to start the
backup. From the Set Schedule screen:
Click Add
16.
17.
Click the Frequency pull-down menu and choose a
frequency
NOTE: FREQUENCY SHOULD BE SET ACCORDING
TO THE DATA AND HOW OFTEN YOU MAKE
CHANGES. IF YOU MAKE MANY CHANGES IN A
DAY, YOU WOULD CHOOSE EVERYDAY, ETC.
Now the day is set you should set a time to start your
backup. It is recommended to set a time when the
computer is not normally being used. Backing up your
data while you are working on your computer may
slow your computer down.
From the Schedule Backup screen:
Click the Hour and choose the hour
18.
19.
Click the Minute and choose the minute
Click Confirm -> Finish
20.
Samsung Auto Backup User Manual Ver 2.0
34
Page 35
Setting up the Auto Backup
Figure 5-8 Set the Day and Time
16.Click Add..
17.Choose the Frequency
18.Choose
the time
20.Click Confirm
20.Click Finish
Samsung Auto Backup User Manual Ver 2.0
35
Page 36

Chapter 6 Managing Data
Samsung Auto Backup User Manual Ver 2.0
36
Page 37
Managing Data
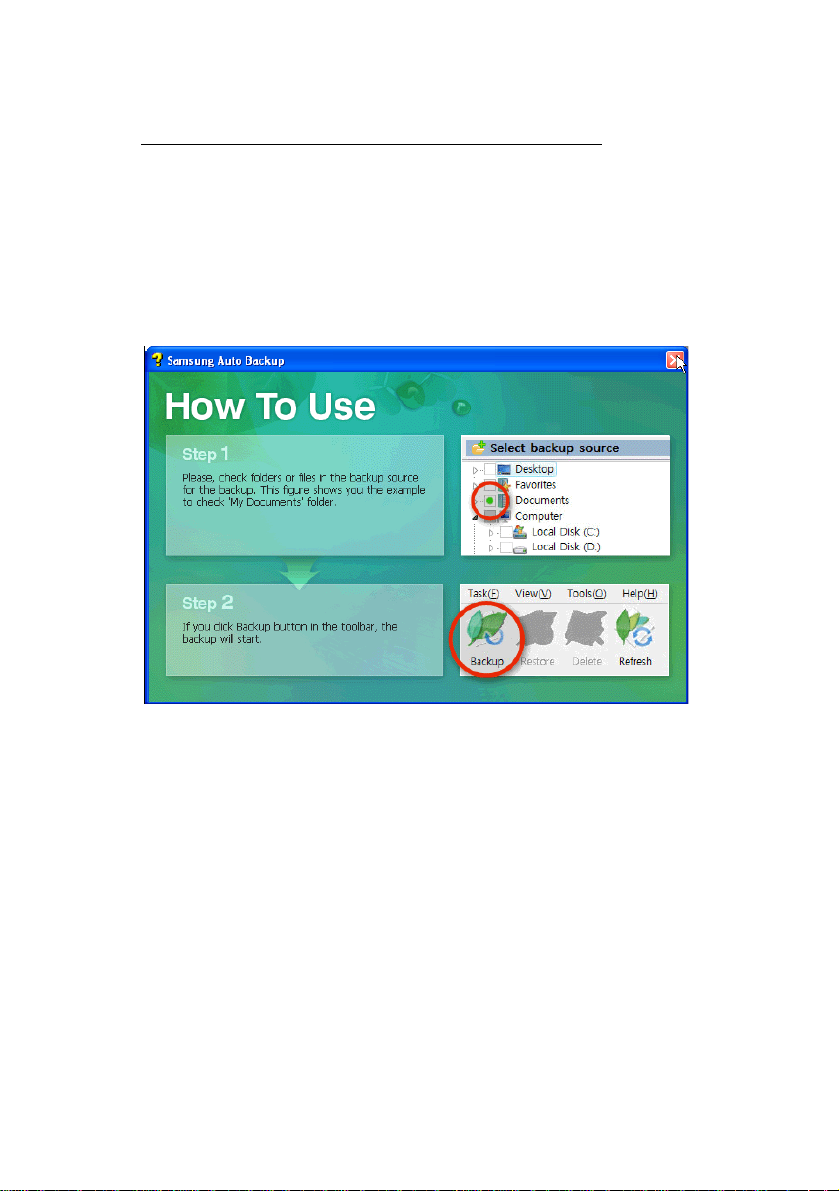
Starting Data Management
After you have finished with the setup, the How To
Use splash screen appears. Close this as you would
with any Windows program by clicking the
upper right-hand corner of the screen.
Figure 6-1 “How To Use” Splash Screen
X in the
Samsung Auto Backup User Manual Ver 2.0
37
Page 38
Managing Data
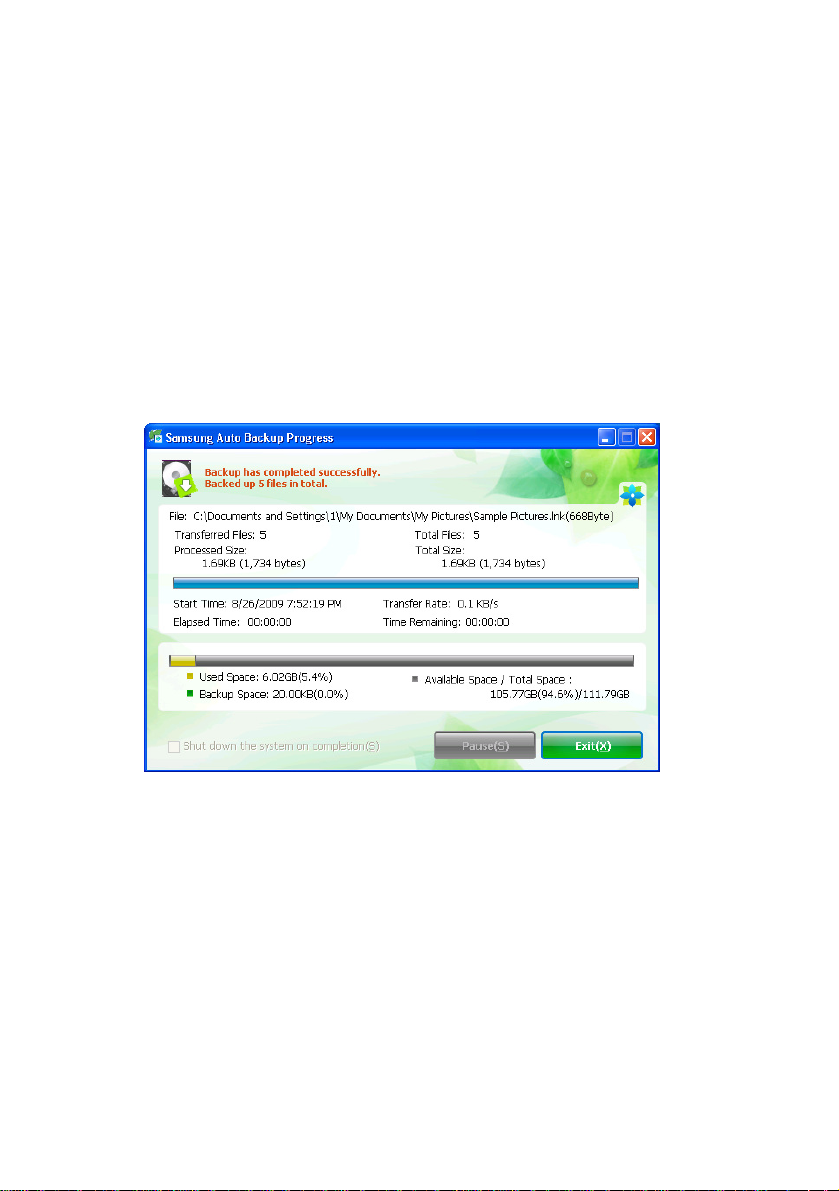
First Backup
After you close the splash screen, the Auto Backup
Progress screen appear. The program is backing up your
data as you specified and setting up your options.
By default, the Auto Backup program will backup
everything in the ‘My Documents’ folder. This can be
changed at any time.
Click Exit
1.
Figure 6-2 First backup after setup
Clicking Exit takes you back to the Samsung Auto Backup
Main screen.
Samsung Auto Backup User Manual Ver 2.0
38
Page 39
Managing Data
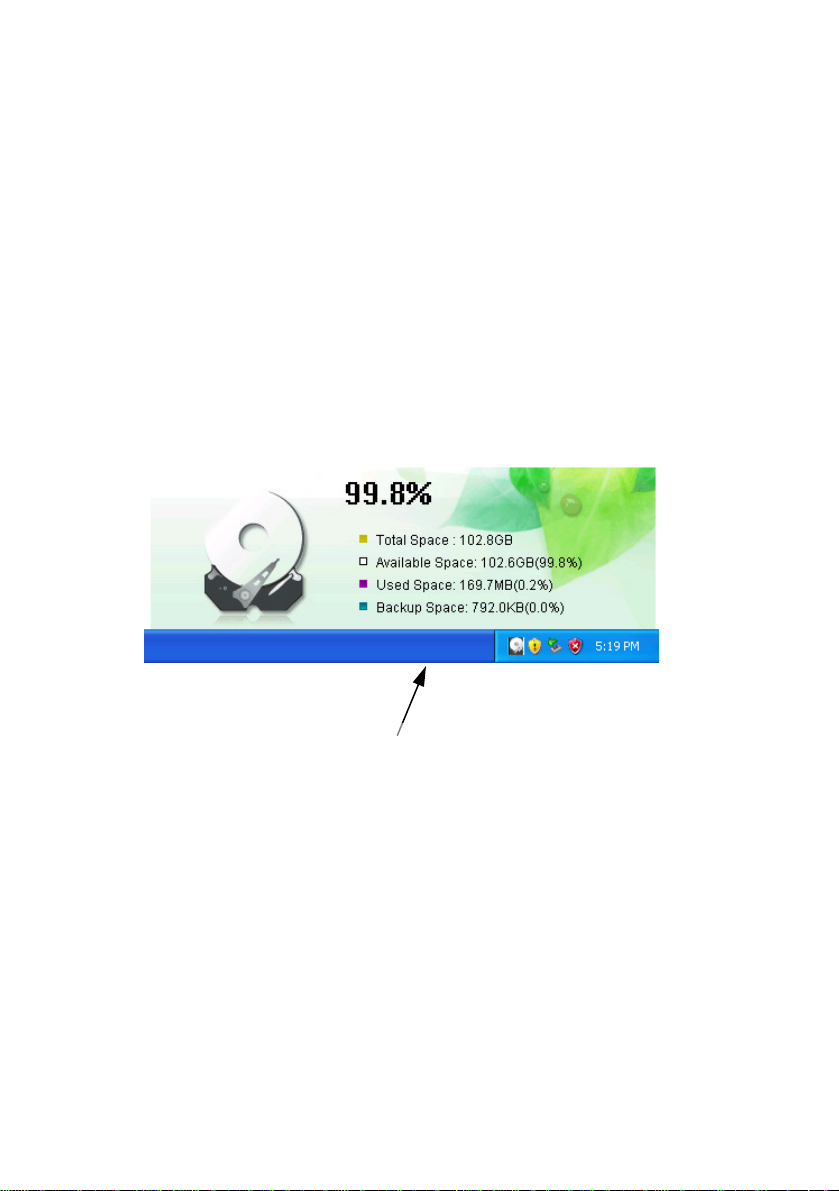
Disk Space Information
While the Samsung Auto Backup is running, an Auto
Backup icon, placed in the task bar, keeps track of
information about the backup device, including used
space and backup space.
Double-clicking this icon will display th e Total Space,
Available Space, Used Space, and Backup Space on
your Samsung External Hard Disk Drive.
To minimize the Disk Information window, click
anywhere on the display.
Figure 6-3 Icon in Windows Tray
Click this icon to show
The disk drive’s space information
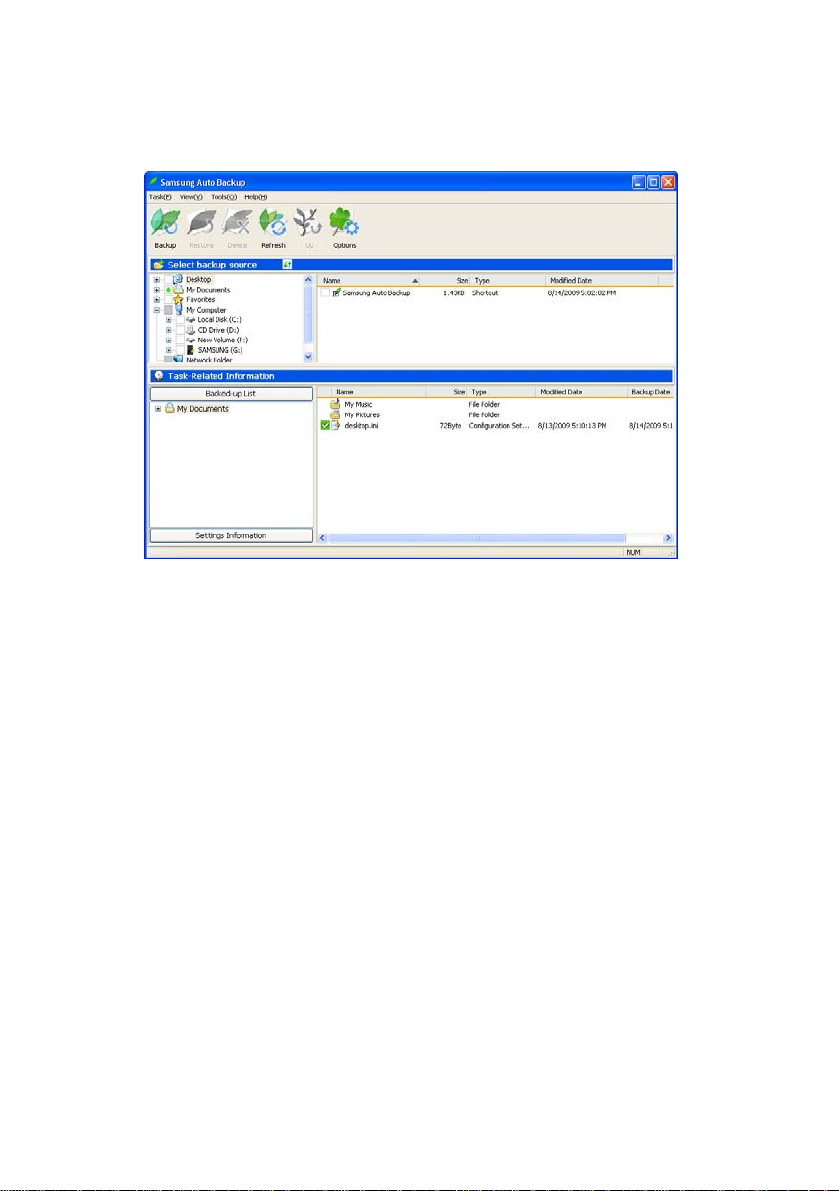
Samsung Auto Backup Main Screen
The main screen is where you make any changes or
modifications with your backup configuration.
Samsung Auto Backup User Manual Ver 2.0
39
Page 40
Managing Data
Figure 6-4 Samsung Main Backup Screen
Menu Bar
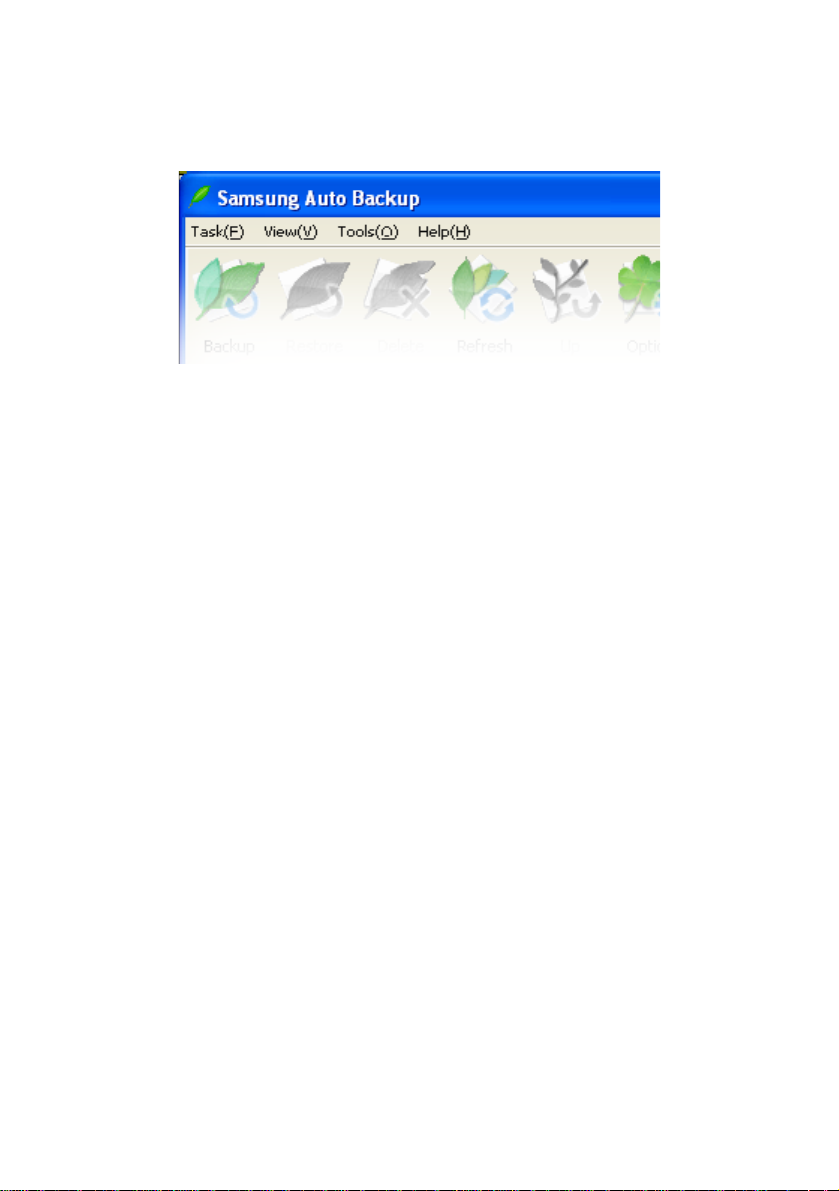
The menu bar is located at the top of the main screen.
It contains several menus such as Task, View, Tools,
and Help.
• Task
Used to perform backup, restoration, deletion, etc.
• View
Used to control the look of the program windows.
• Tools
Used to set various options such as backup options, backup
device, network connection, update, integrity check, and
migration.
• Help
Display help.
Samsung Auto Backup User Manual Ver 2.0
40
Page 41
Managing Data
Figure 6-5 Menu Bar
Task Menu
• Backup
Starts a manual backup of the source you selected.
• Restore
Restores the backup data you selected.
• Delete
Deletes the item (backup file, backup folder, task history, and
task schedule) you selected.
• Exit
Quits Samsung Auto Backup.
View Menu
• Show tool bar
Shows or hides the tool bar.
• Show status bar
Shows or hides the status bar.
• Refresh
Refreshes the selected program pane’s contents.
• Up
Samsung Auto Backup User Manual Ver 2.0
41
Page 42

Managing Data
Navigates to the top folder of the selected folder or file.
Tools Menu
• Options
Sets various backup options.
• Backup device - sub-menu as follows:
Change backup device (C
Changes the backup device
Replicate backup device (R
Replicates the backup information or the backup device .
Restore backup information (I
Changes the replicated backup information into the current
backup information.
)...
)...
)...
• Connect to network folder
Connects to a network folder to be used as a backup source.
• Disconnecting the network folder
Disconnects a network drive or folder.
• Migration
Runs a tool that replicates the files and folder structure to
another storage device.
• Integrity check
Runs a tool which checks whether data stored on the actual
backup device matches the backup information of Samsung
Auto Backup.
• Compress backup info
Compresses the backup information.
Tools Menu Help
Help
•
Samsung Auto Backup User Manual Ver 2.0
42
Page 43
Managing Data
Shows help items.
• About Samsung Auto Backup
Shows version information about Sam s ung Auto Backup.
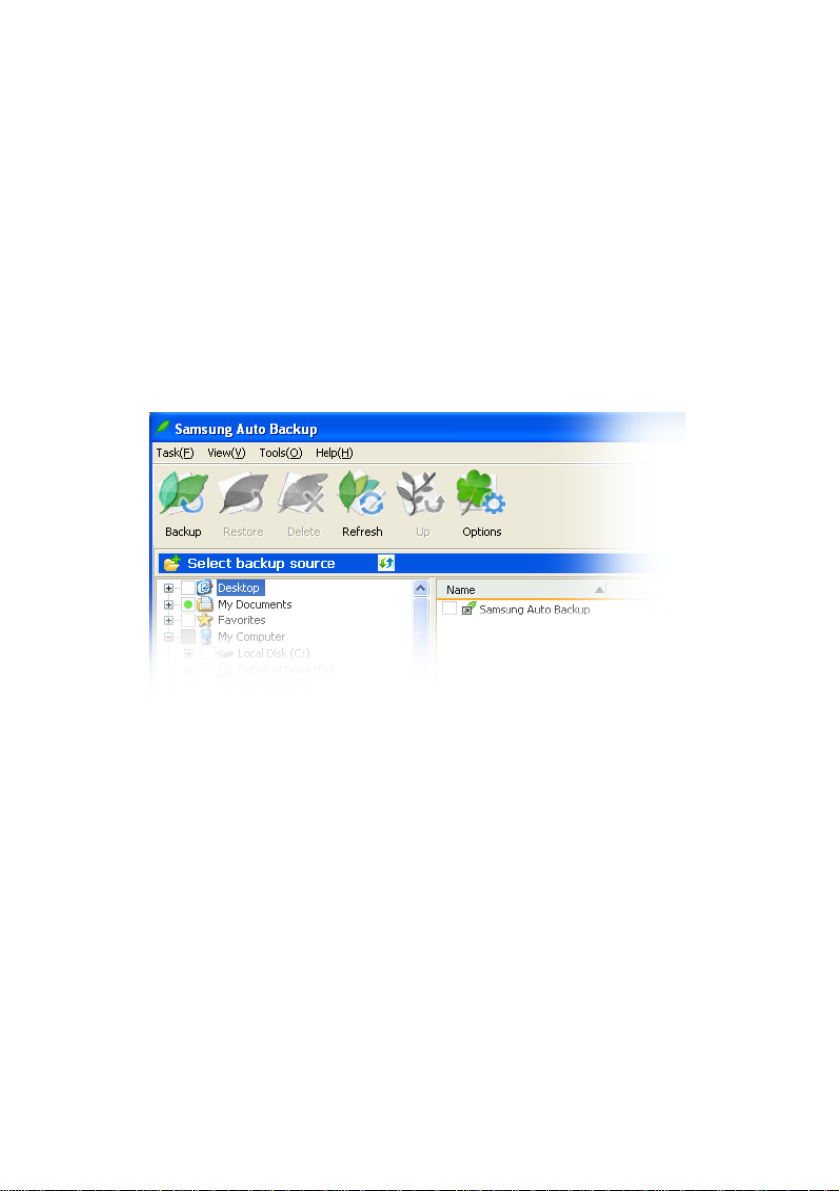
Icon Bar
The icon bar is located just below the Menu Task bar
at the top of the main screen. The icons launch the
most frequently used functions for your convenience.
Figure 6-6 Icon Bar
• Backup
You can perform a manual backup by clicking Backup.
• Restore
By choosing a folder on your Samsung External Hard Disk
Drive, you can click Restore to copy the folder or file.
• Delete
You can choose a folder or file on your Samsung External Hard
Disk Drive drive and click Delete to delete the folder or file.
• Refresh
Samsung Auto Backup User Manual Ver 2.0
43
Page 44
Managing Data
If the directories in either the source or destination window has
changed, click Refresh to view the changes in either window.
• Up
If you are currently looking at a sub-folder (a folder under
another folder), click Up to take you back to the previous folder.
• Options
Allows you to change the options setup when the program was
first installed.
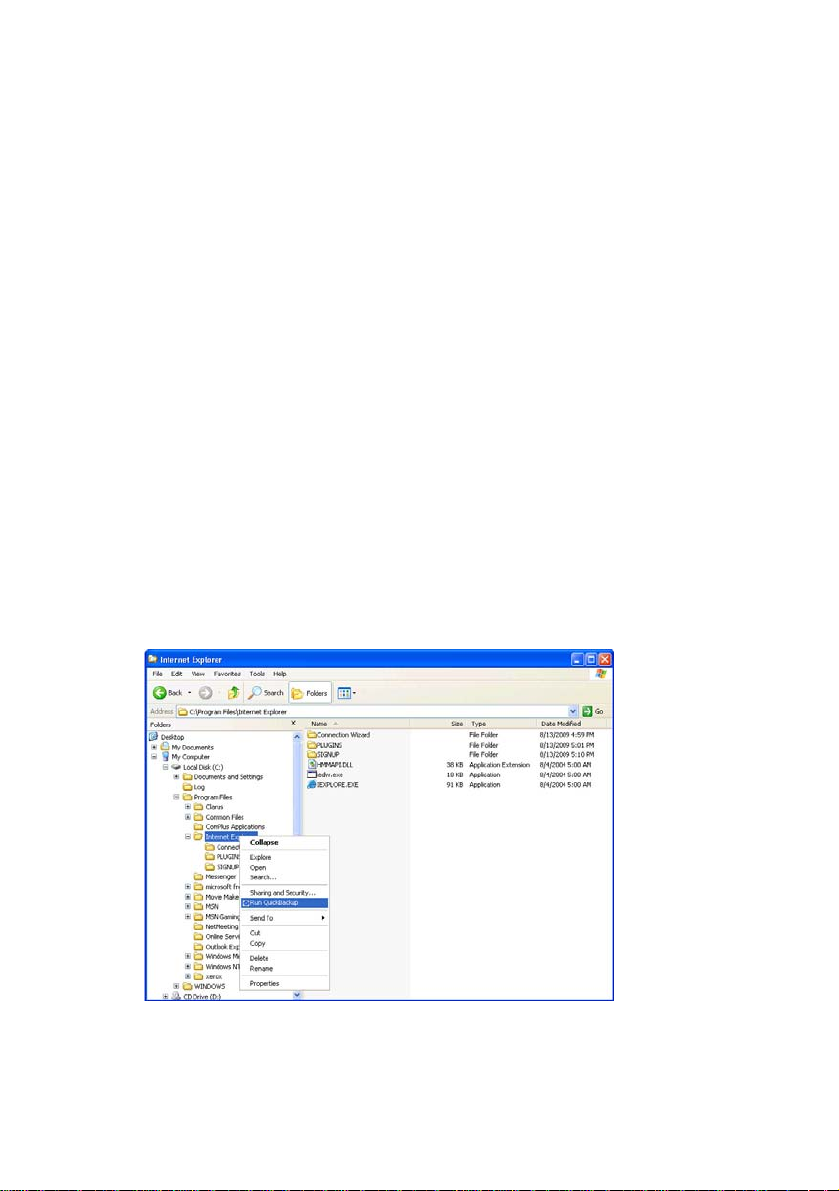
Quick Backup
The QuickBackup function allows users to use the
backup system from Windows Explorer.
From your Windows Explorer:
Right-click on the folder or file to have backed up
1.
Choose Run QuickBackup
2.
Figure 6-7 Selecting QuickBackup Source
Samsung Auto Backup User Manual Ver 2.0
44
Page 45
Managing Data
Files and folders are automatically saved as a backup
source that you defined during setup.
When the backup has finished, click Exit
3.
Viewing Backup Results
You can see the results of the backup process after
performing manual or scheduled backups.
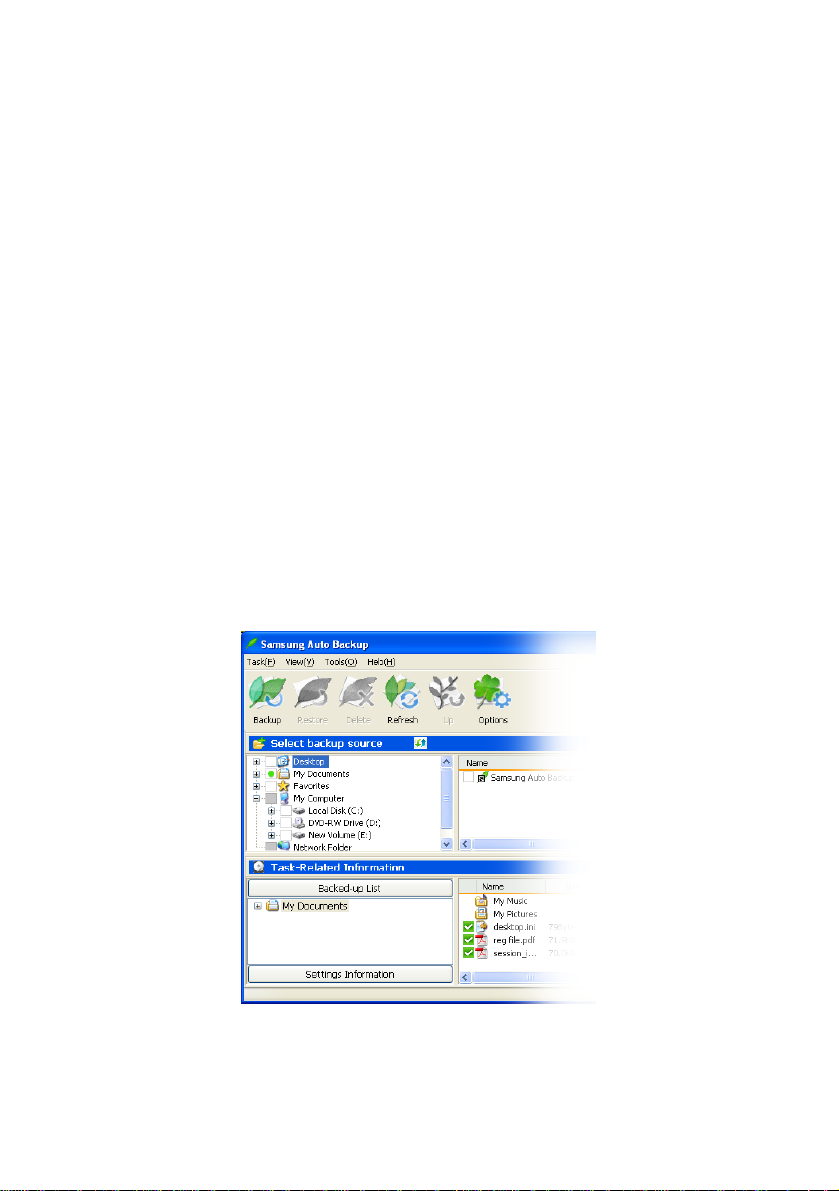
To view detailed backup results, from the Task Related
Information window:
Click the Backed-up List bar under the Task Related
1.
Information window
Click on a folder in the Backed up List
2.
You can also check the detailed backup results from
the Settings Information Windows by clicking:
Settings Information bar -> Task Log icon
3.
Figure 6-8 Settings Information Window
Samsung Auto Backup User Manual Ver 2.0
45
Page 46
Managing Data
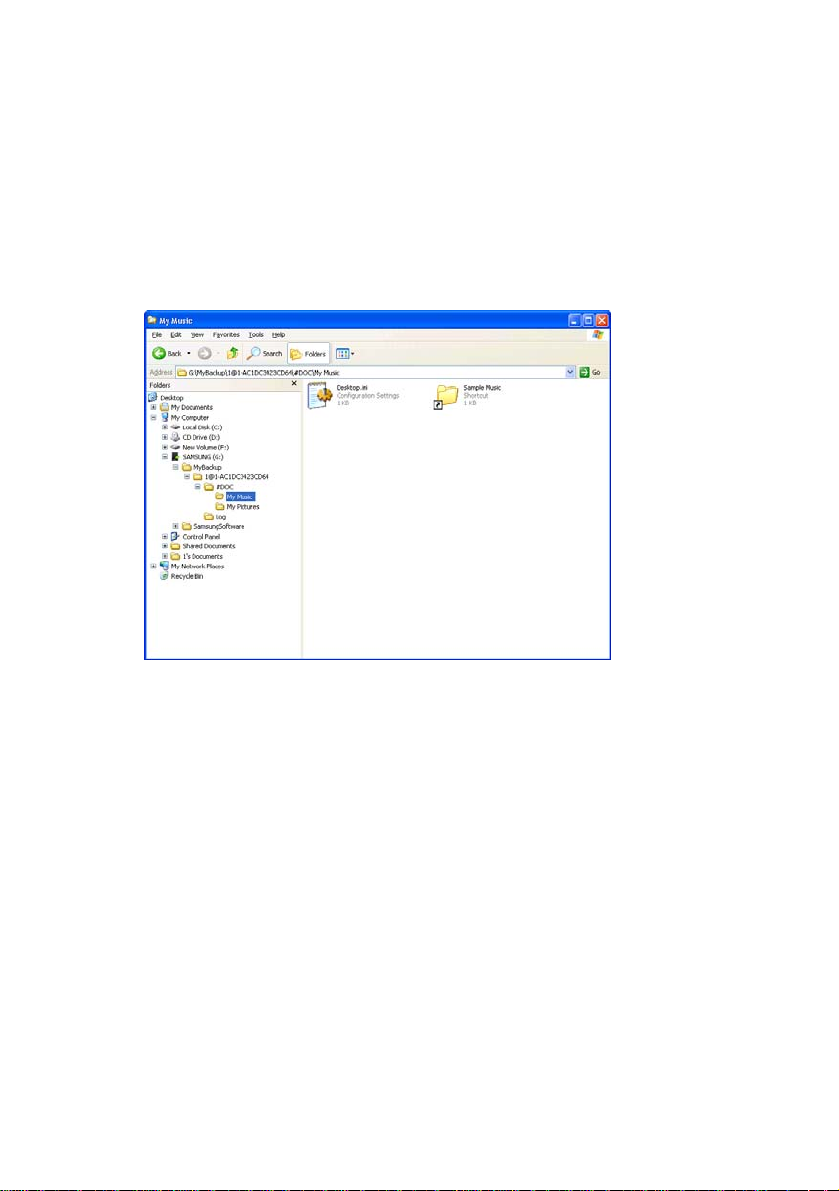
Check the Backup from Windows Explorer
If you open the folder set in the Backup Settings Wizard in
Windows Explorer, you can see the following folder
and confirm that the backup process is complete.
Figure 6-9 Check Files in Windows Explorer Screen
Samsung Auto Backup User Manual Ver 2.0
46
Page 47

Chapter 7 Advanced
Samsung Auto Backup User Manual Ver 2.0
47
Page 48

Advanced
Changing Options
To change the initial backup options (backup file t ypes,
backup schedule, etc.), from the tool bar:
Click Tools ->Options
1.
2.
Change any options
Click Confirm
3.
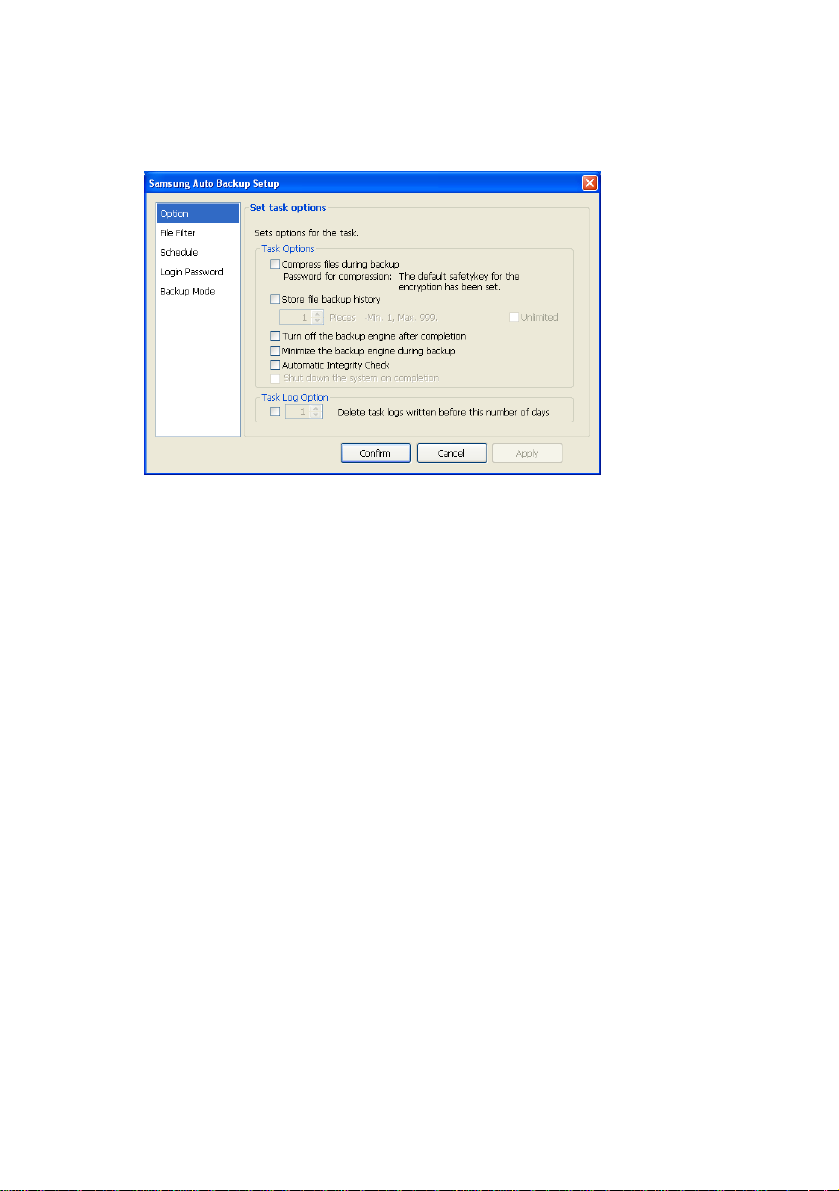
Set Task Options
From this window you can specify various
backup options; such as whether to compress
the files, whether to store a backup history, and
whether to close the backup window after
finishing the backup process. Following is a
description of each option.
For more information on the Task Options, please
See Chapter 5 in section “Setting the Task Log
Options”
Samsung Auto Backup User Manual Ver 2.0
48
Page 49
Advanced
Figure 7-1 Task Options Screen
Samsung Auto Backup User Manual Ver 2.0
49
Page 50
Advanced
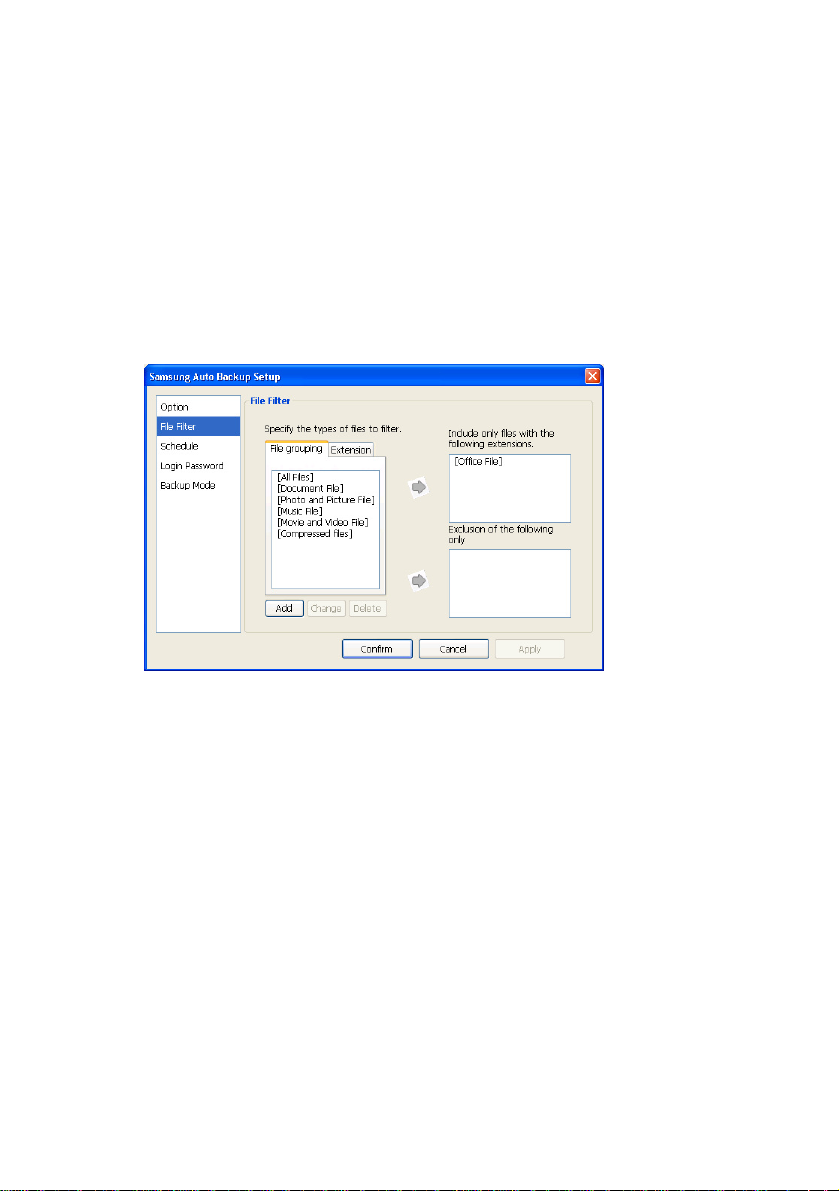
File Filter
The File Filter screen defines the file types to
back up or exclude from the backup. File types
are categorized in six groups:
For more information on the File Filter options, please
see Chapter 5 in the section "File Filter"
Figure 7-2 File Filter
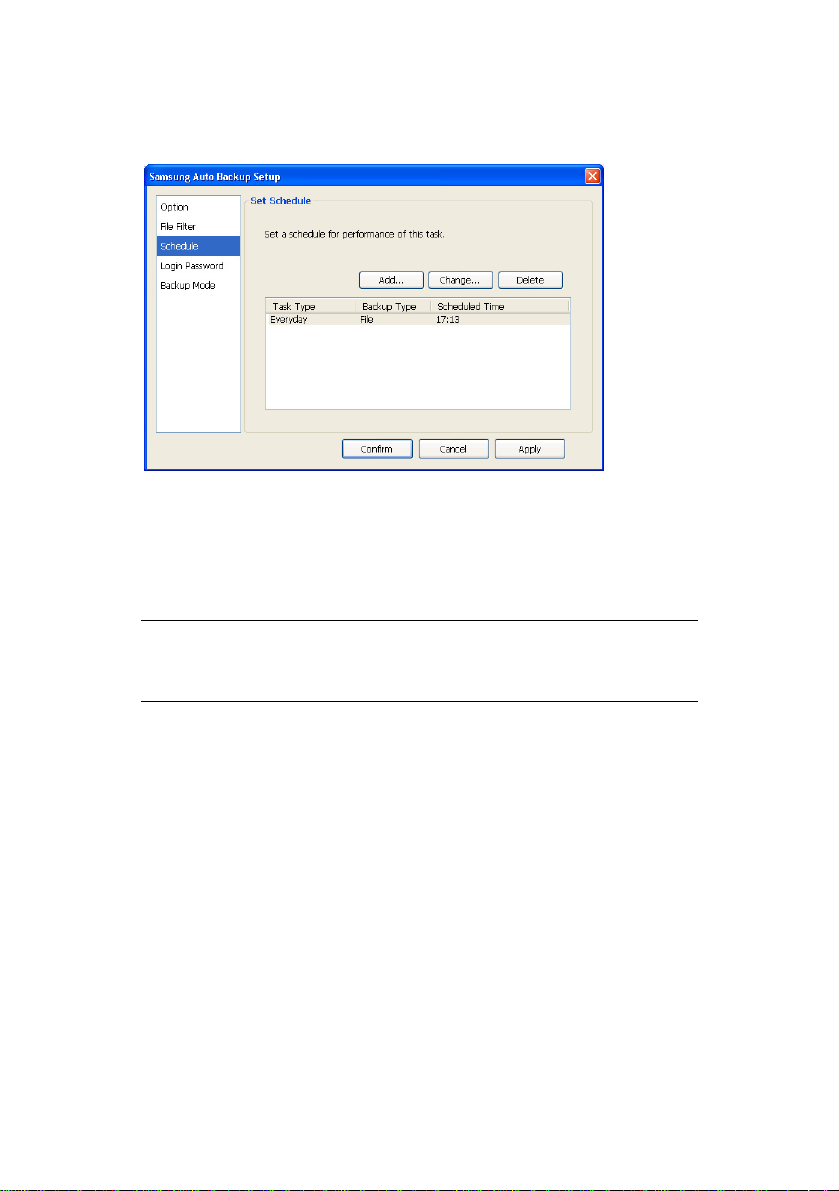
Schedule
Adding, changing, or deleting a schedule is
performed from this screen. By clicking Add...,
Change..., or Delete you can create as many
backup schedules for as many file groups or
types as you desire.
For more information on creating a schedule, please
see Chapter 5 in the section "Setting the Backup
Schedule”
Samsung Auto Backup User Manual Ver 2.0
50
Page 51
Advanced
Figure 7-3 Schedule
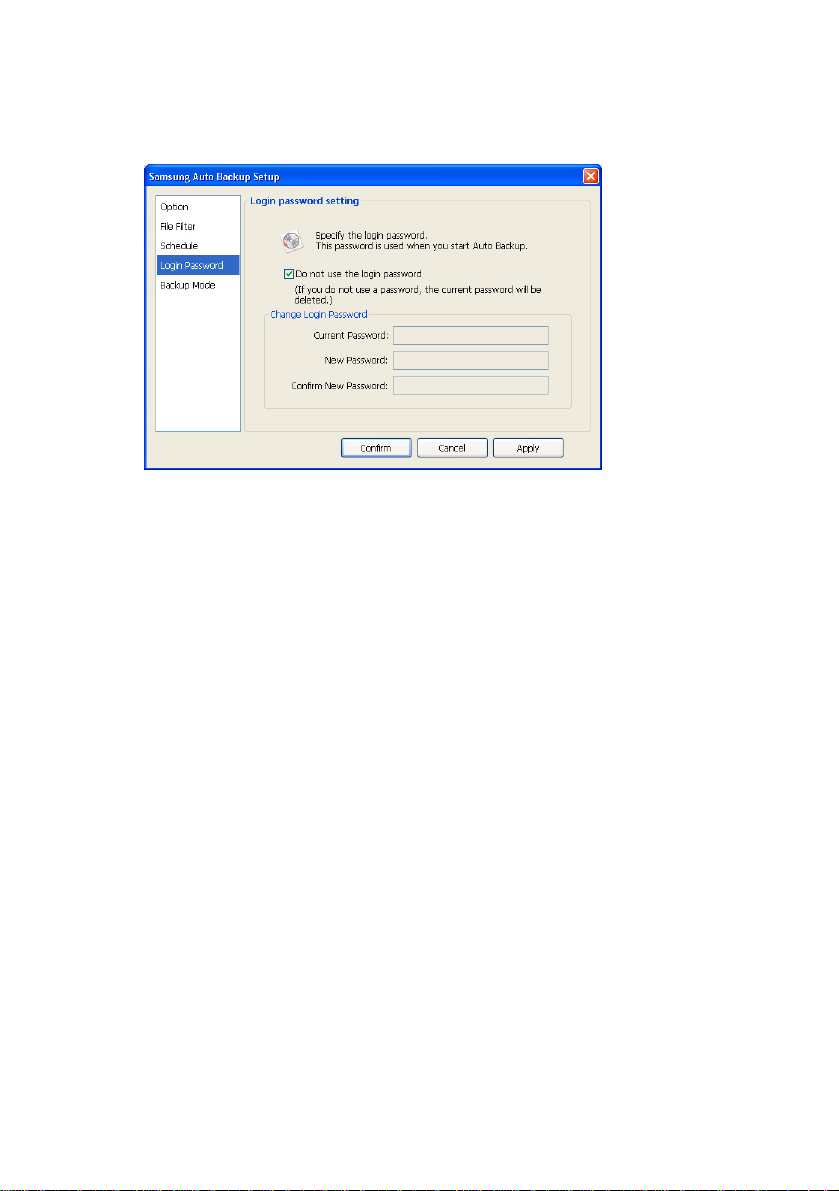
Login Password
From this window, you can set a password for
the backup program. This will prevent
unauthorized persons from accessing your data.
NOTE: YOU MUST REMEMBER YOUR PASSWORD.
IT IS REQUIRED WHEN YOU START THE
PROGRAM
It is always good to change the password on a
regular schedule. From this screen, you can
change the password by performing the
following:
1. Click in the Current Password: box
2. Enter the current password
3. Click in the New Password box
4. Enter a new password
5. Click in the Confirm New Password: box
6. Reenter the password
7. Click Apply -> Confirm
Samsung Auto Backup User Manual Ver 2.0
51
Page 52
Advanced
Figure 7-4 Login Password
Backup Mode
From the Set Backup Mode a Normal/Scheduled
Mode or Real-Time Auto Run Mode is set.
• Normal/Scheduled Mode
Will analyze the current backup source (the data to be backed up)
and decide whether to perform a full backup (all files) or if an
incremental backup (only files that have been modified since the
last backup) is sufficient.
An incremental backup will only backup those files which have
been changed or created since the last backup.
• Real-Time Auto Run Mode
Choosing this will initiate an immediate, real-time backup.
A real-time backup will only backup those files which have been
changed or created since the last backup through the real-time
monitoring without analyzing backup sources. But, at the first
time, after a full backup is completed successfully, a real-time
monitoring will start.
Samsung Auto Backup User Manual Ver 2.0
52
Page 53
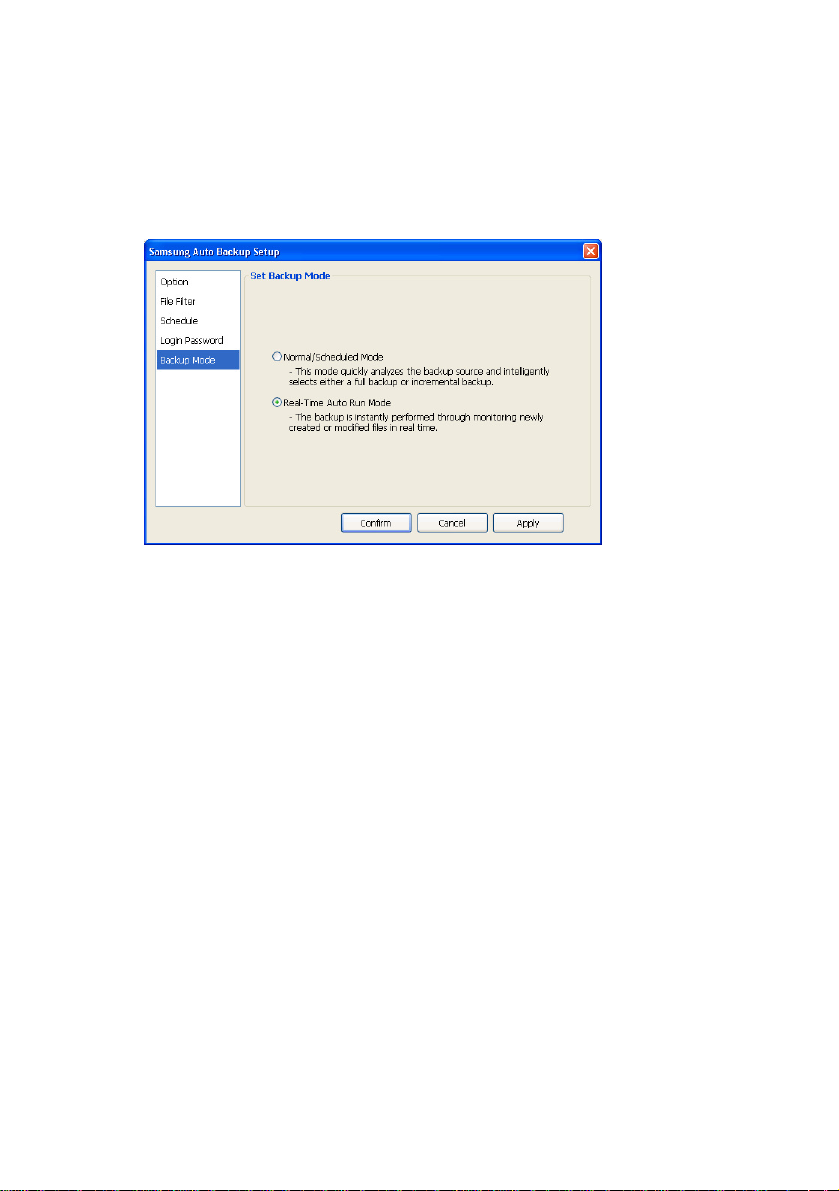
1. Choose the Backup Mode
2. Click Apply -> Confirm
Figure 7-5 Backup Mode
Advanced
Samsung Auto Backup User Manual Ver 2.0
53
Page 54
Advanced
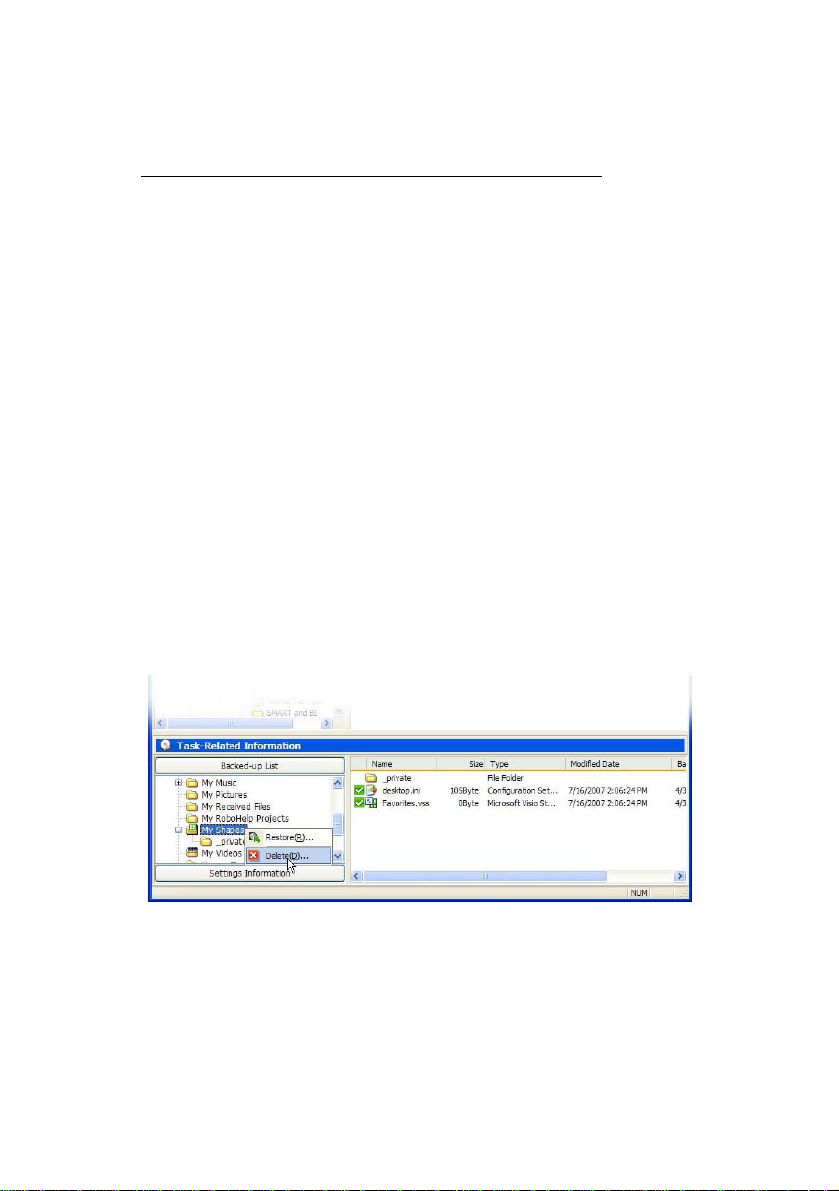
Deleting Backed up Data
For data that should no longer be stored on the
Samsung External Hard Disk Drive, there are four
ways to run the Delete Wizard. After selecting the
folder or file to delete:
Option 1
Option 2
Right-click the selected item and select
Delete from the shortcut menu
From the Menu bar, select Task -> Delete
Option 3
Option 4
From the Tool bar click Delete
Press Del on your keyboard
From the Samsung Auto Backup main window:
Click the Delete icon
1.
2.
Choose the folder or file to delete
Click Delete
3.
Figure 7-6 Deleting Files
From the Auto Backup File Deletion Wizard screen,
there are four different choices:
• Delete All Files
Deletes all the files and folders that have been selected.
Samsung Auto Backup User Manual Ver 2.0
54
Page 55
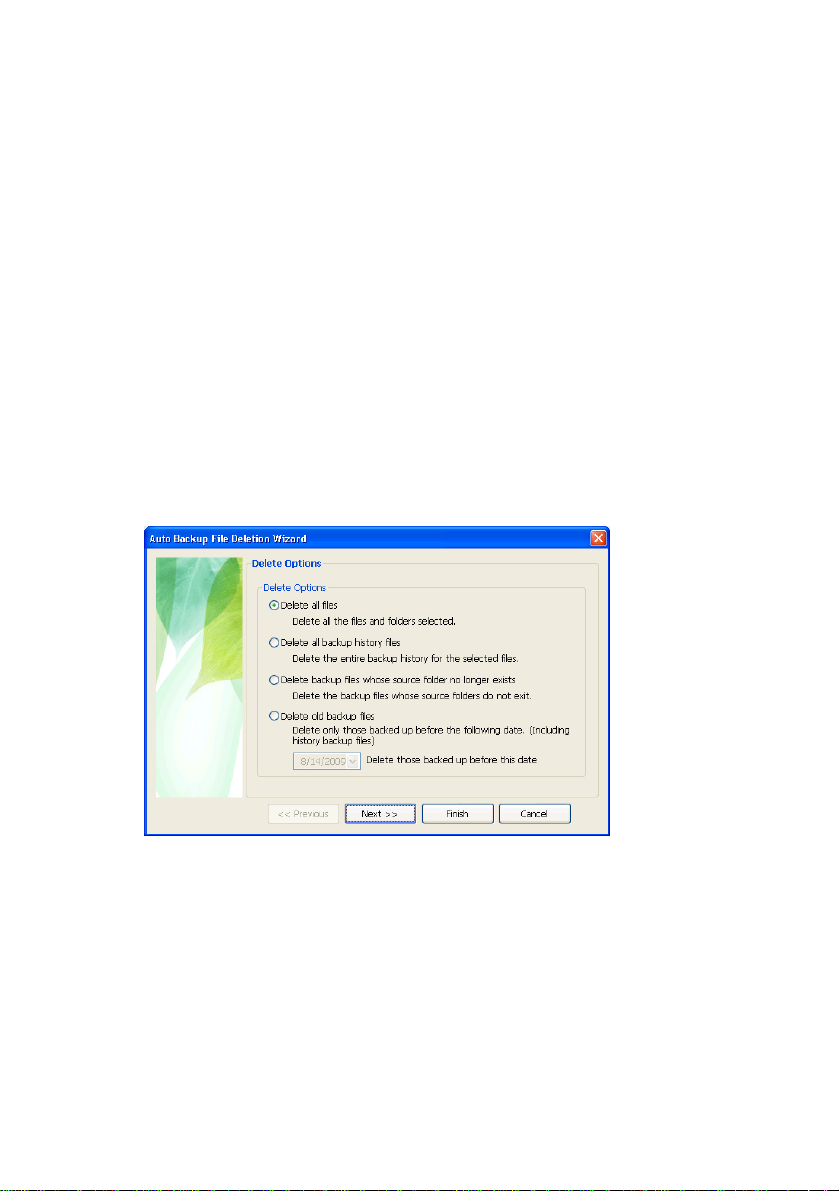
Advanced
• Delete all backup history files
Deletes the entire backup history for the selected files.
• Delete backup files whose source folder no longer exists.
Deletes the backup files that no longer have source files.
• Delete old backup files
Deletes only those files and histories of files backed up before a
designated date.
For the purpose of this manual, choose:
4. Delete all files
5. Click Next >>
Figure 7-7 Delete Options
You are prompted to identify the files to delete.
Choose the File Group or File Extension to delete
6.
Click Next>>
7.
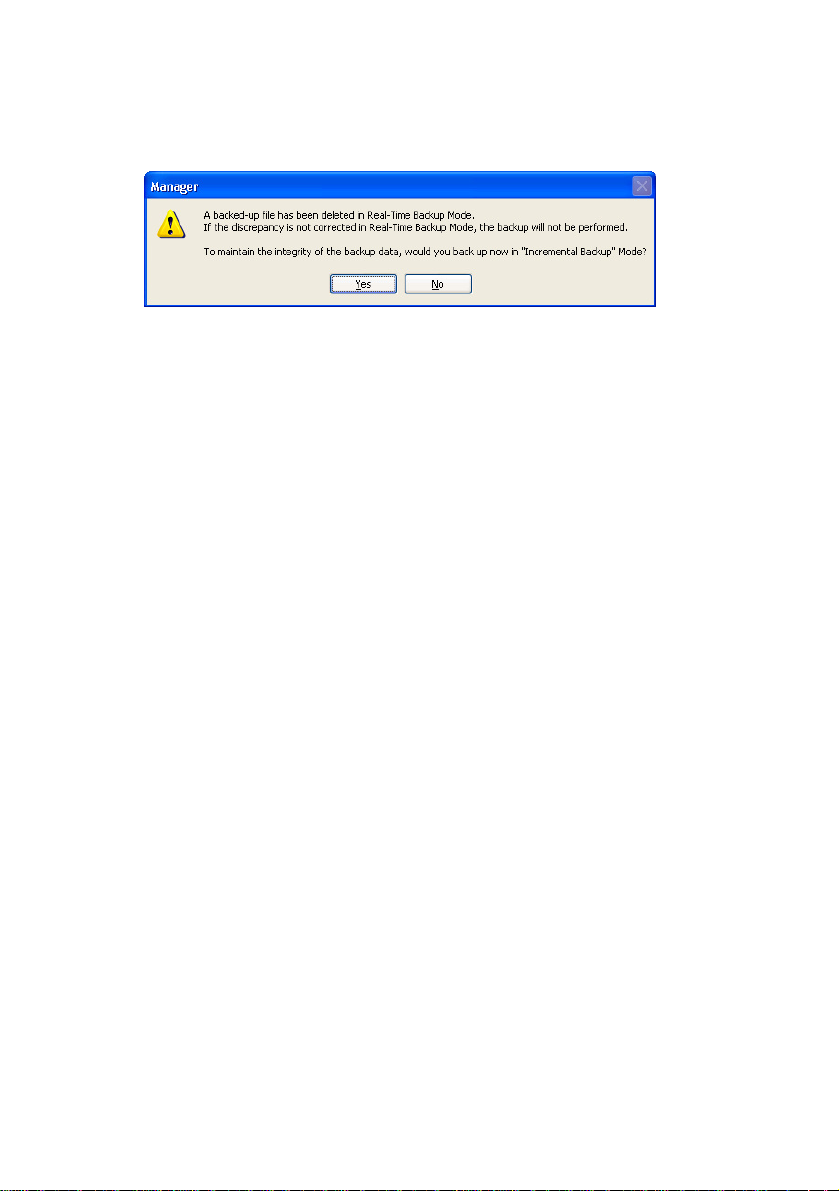
A prompt displays asking if you would like to initiate a
backup in ‘Intelligent’ mode.
Click No
8.
Samsung Auto Backup User Manual Ver 2.0
55
Page 56
Advanced
Figure 7-8 Backup in Intelligent Mode
After the analysis has completed:
9.
Click Exit
Samsung Auto Backup User Manual Ver 2.0
56
Page 57
Advanced
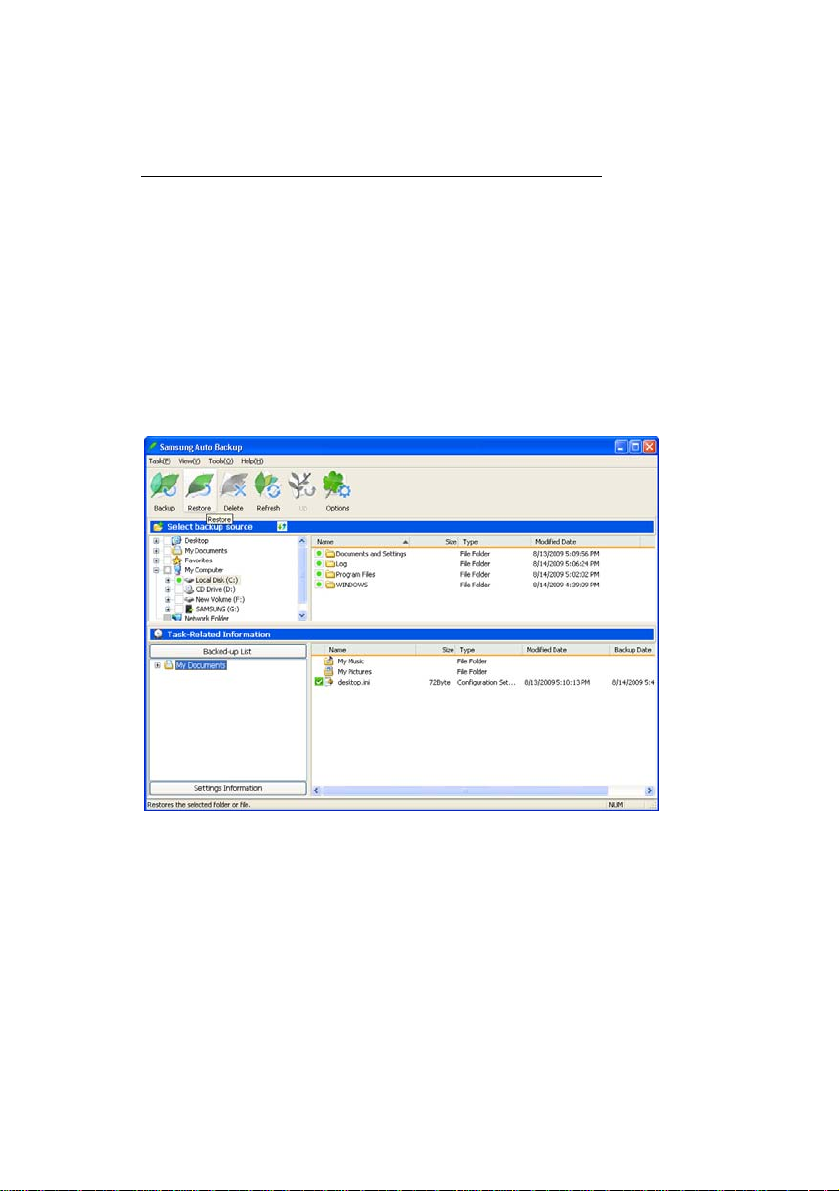
Restoring Data
The process of restoring data is very similar to
deleting data using the icons along the top of the
screen.
From the Icons along the top of the screen:
Click Restore
1.
Figure 7-9 From the icons along the top, click Restore
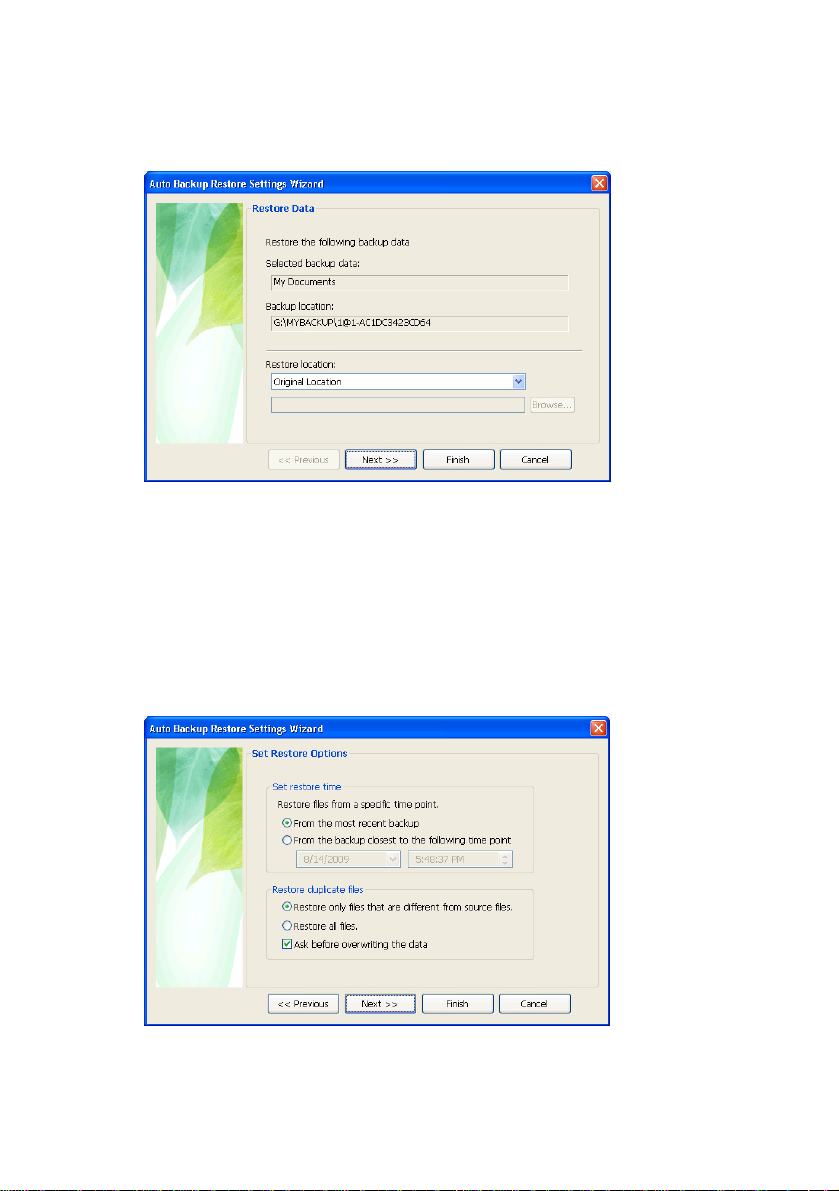
The default restore location is the original location
from where the files were deleted.
From the Restore Data screen, choose the Restore
Location.
Click Next>>
2.
Samsung Auto Backup User Manual Ver 2.0
57
Page 58
Advanced
Figure 7-10 Restoring data
From the Set Restore Options screen:
If you have a particular time that you would like
3.
restored, choose From the most recent backup
There is an option to restore duplicate files as well
however, for the purpose of this manual, we will
restore from the most recent backup.
Click Next>>
4.
Figure 7-11 Set Restore Options
Samsung Auto Backup User Manual Ver 2.0
58
Page 59
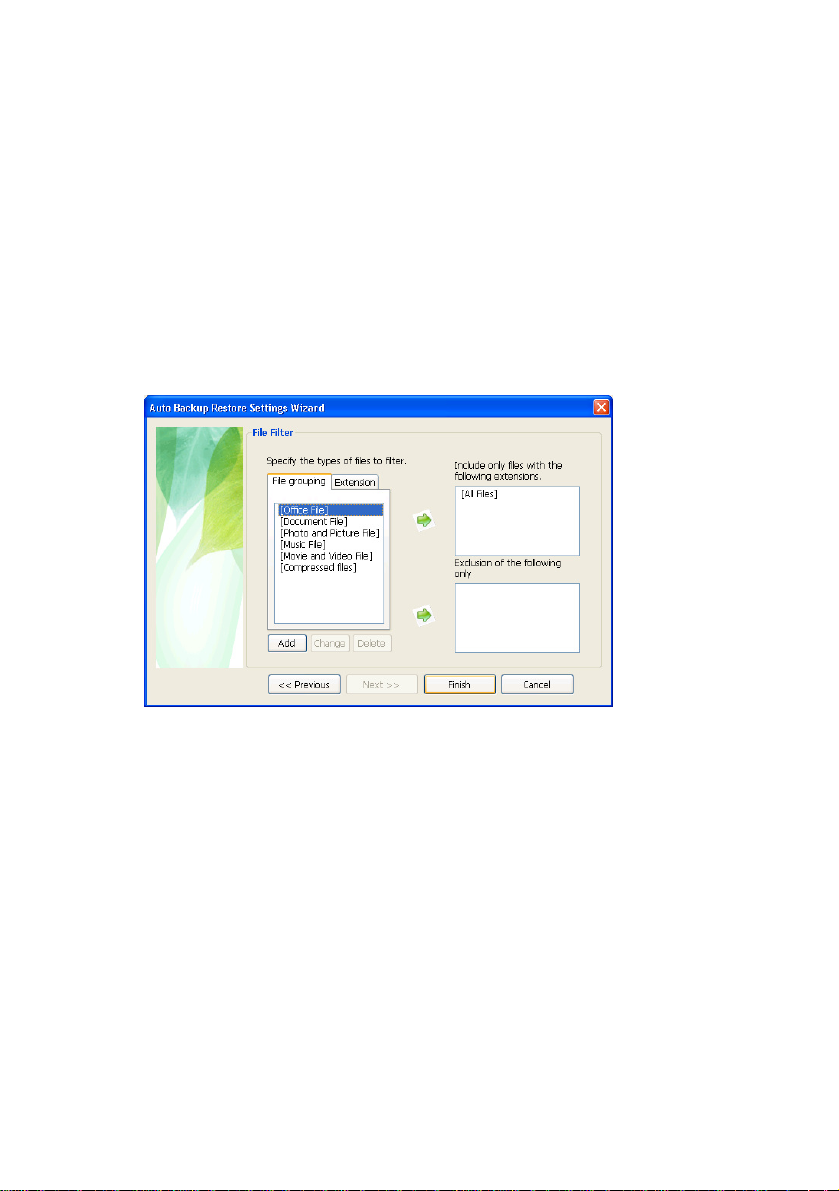
Advanced
If you only want certain groups or types of files
restores, identify them in the File Filter screen. For
the purposes of this manual, choose [All Files].
Click [All Files]
5.
Click Green Right Arrow
6.
Click Finish
7.
Click Exit at the Samsung Auto Backup Progress screen
8.
Figure 7-12 Choose the type of files to restore
Settings Information
The backup list window shows varied information
about the backup, backup device, backup schedule,
task log and a backed-up files list.
• Backup Information show s information about the current task
options, backup mode, and file filter.
• Device Information Shows general information about the backup
device, including total space, used space and free space on the
backup device.
Backup Schedule shows information about the
scheduled backup time.
Samsung Auto Backup User Manual Ver 2.0
59
Page 60
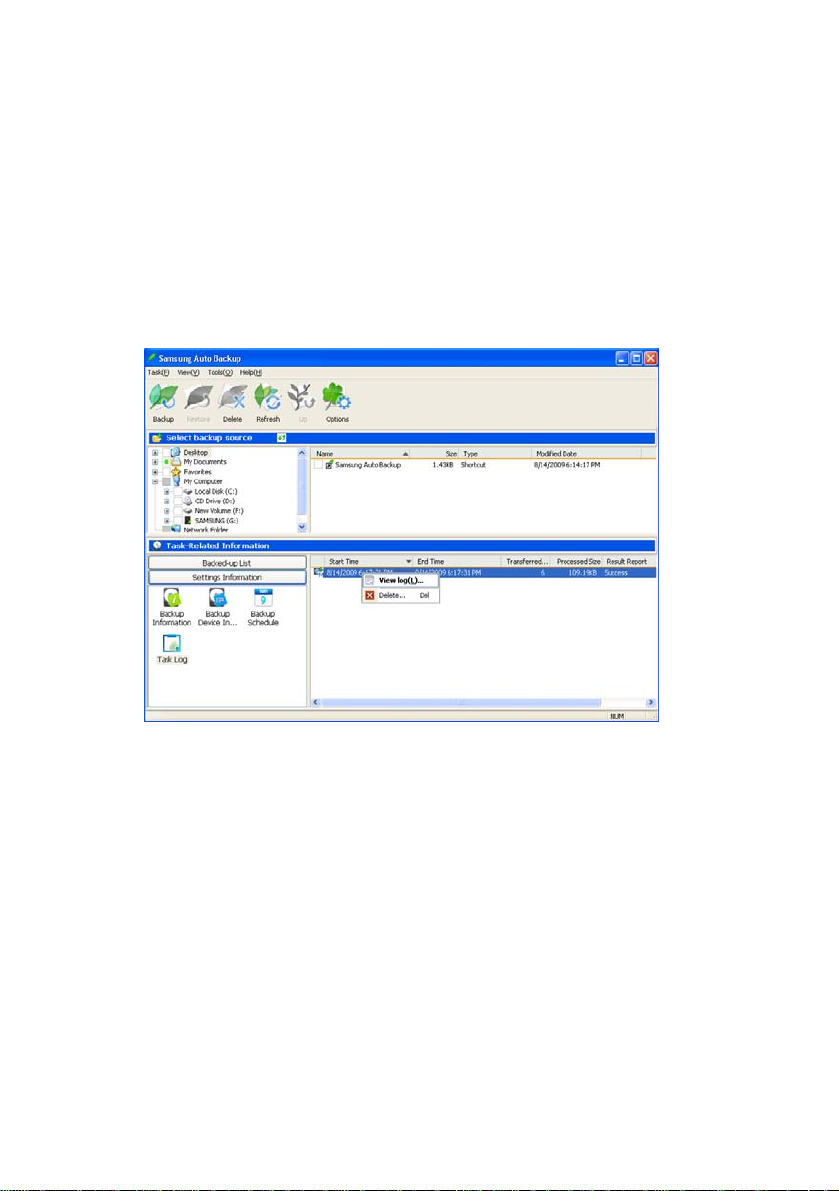
Advanced
Task Log
Shows a log list on the performed tasks. Doubleclicking it will display a more detailed task log.
Right clicking on a newly backed up file will launch
1.
the View Task Log Manual Backup screen
Figure 7-13 Task Log List Screen
Samsung Auto Backup User Manual Ver 2.0
60
Page 61
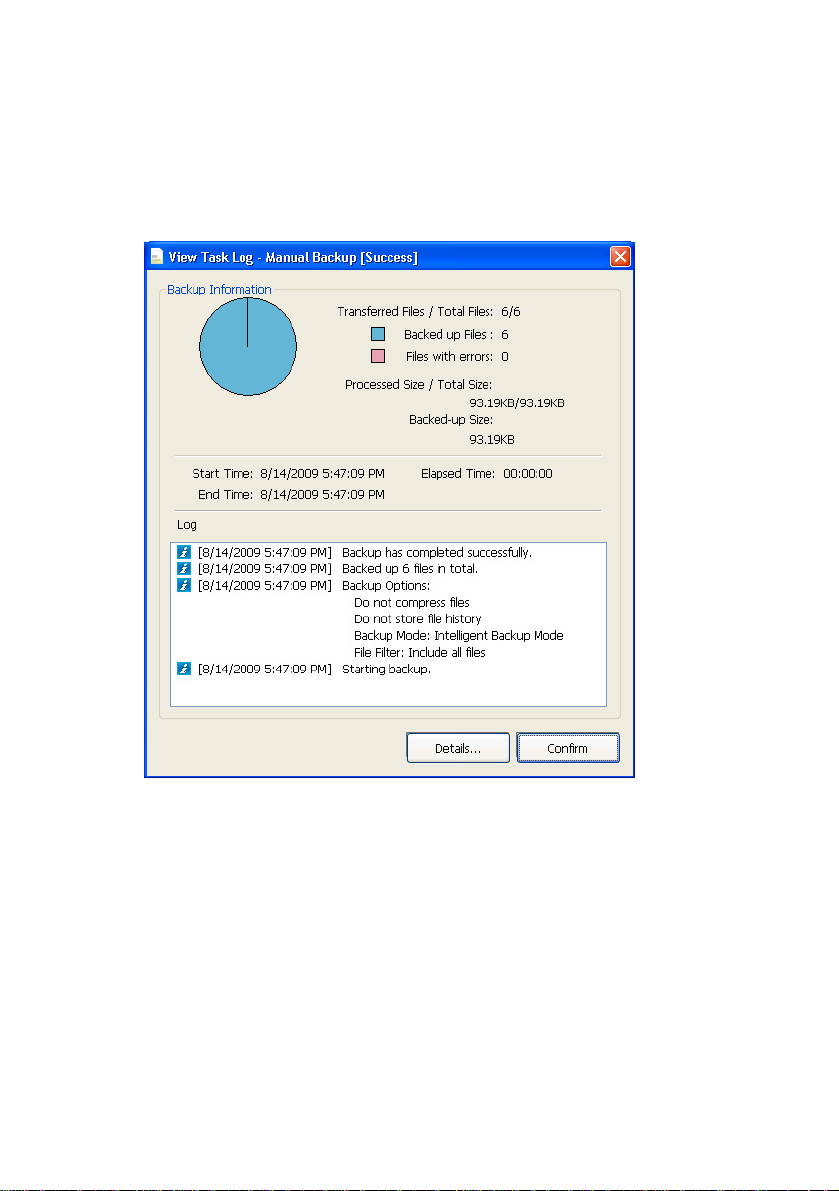
Advanced
2.
Choosing Details... from the View Task Log Manual
Backup screen will launch the View Details screen
Figure 7-14 Viewing the Task Log
Samsung Auto Backup User Manual Ver 2.0
61
Page 62
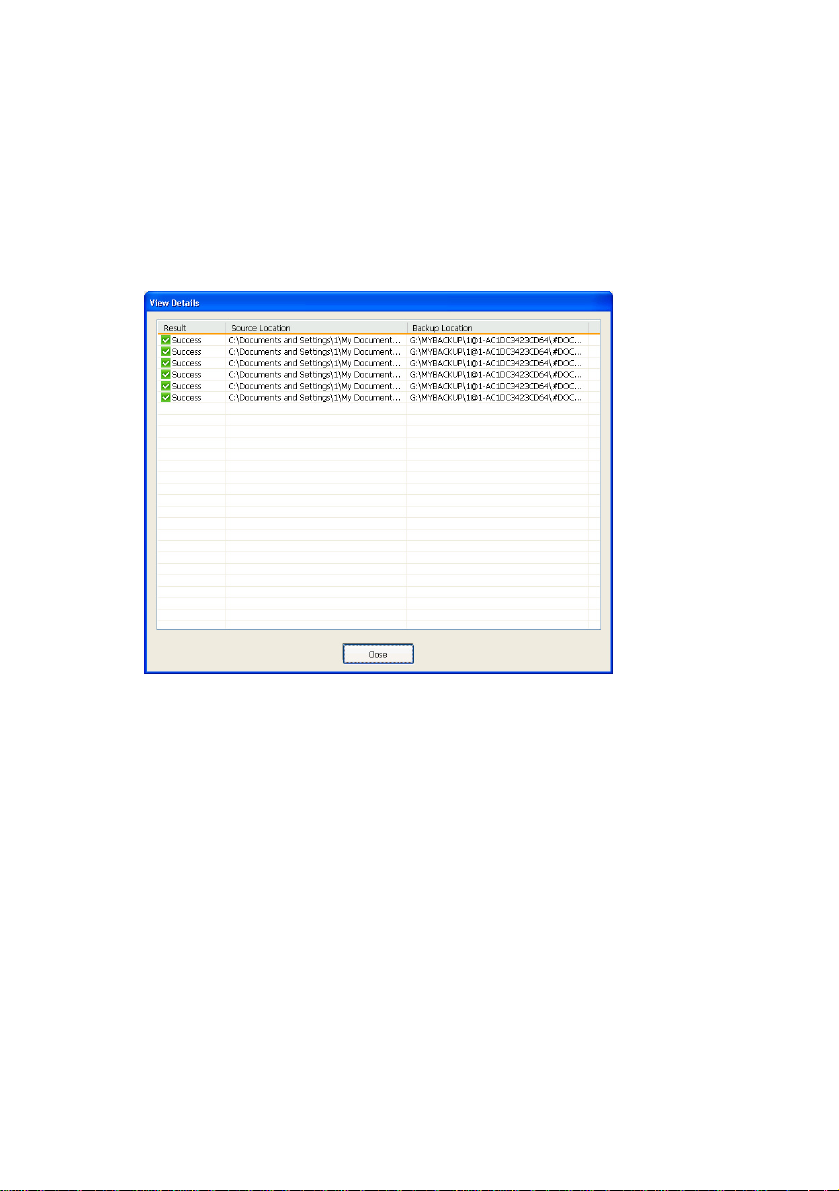
Advanced
3.
Click Close to return to the View Task Log - Manual
Backup screen
4.
Click Confirm from the View Task Log screen to
return you to the Main Screen
Figure 7-15 View Details
Samsung Auto Backup User Manual Ver 2.0
62
Page 63
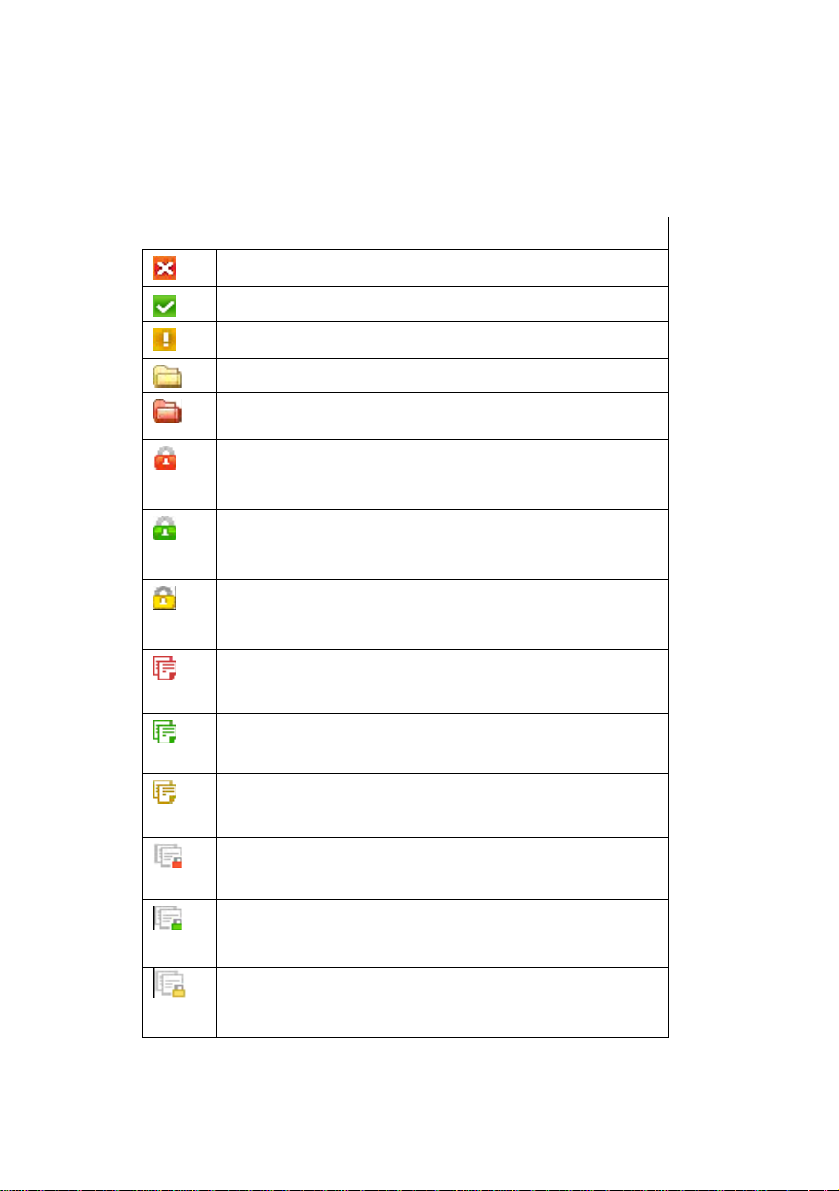
Advanced
The backed up list uses icons to show the location of
the files and their status. The following table shows
the meaning of each icon.
Table 7.1: Backup file status Icons
The backup file exists, but the source file does not.
The backup file is the same as the source file.
The backup file is different from the source file.
The backup folder is the same as the source folder.
The backup folder exists, but the source folder
doesn’t.
The file has been backed up using
compression/password, and the source file doesn’t
exist.
The file has been backed up using
compression/password, and it is the same as the
source file.
The file has been backed up using
compression/password, and it is different from the
source file.
The file has been backed up with backup history, and
the source file doesn’t exist.
The file has been backed up with backup history, and
it is the same as the source file.
The file has been backed up with backup history, and
it is different from the source file.
The file has been compressed and backed up with
backup history, and the source file doesn’t exist.
The file has been compressed and backed up with
backup history, and it is the same as the source file.
The file has been compressed and backed up with
backup history, and it is different from the source
file.
Samsung Auto Backup User Manual Ver 2.0
63
Page 64
Advanced
Tools Menu
The following is an in-depth exploration of the options
under the Tools Menu.
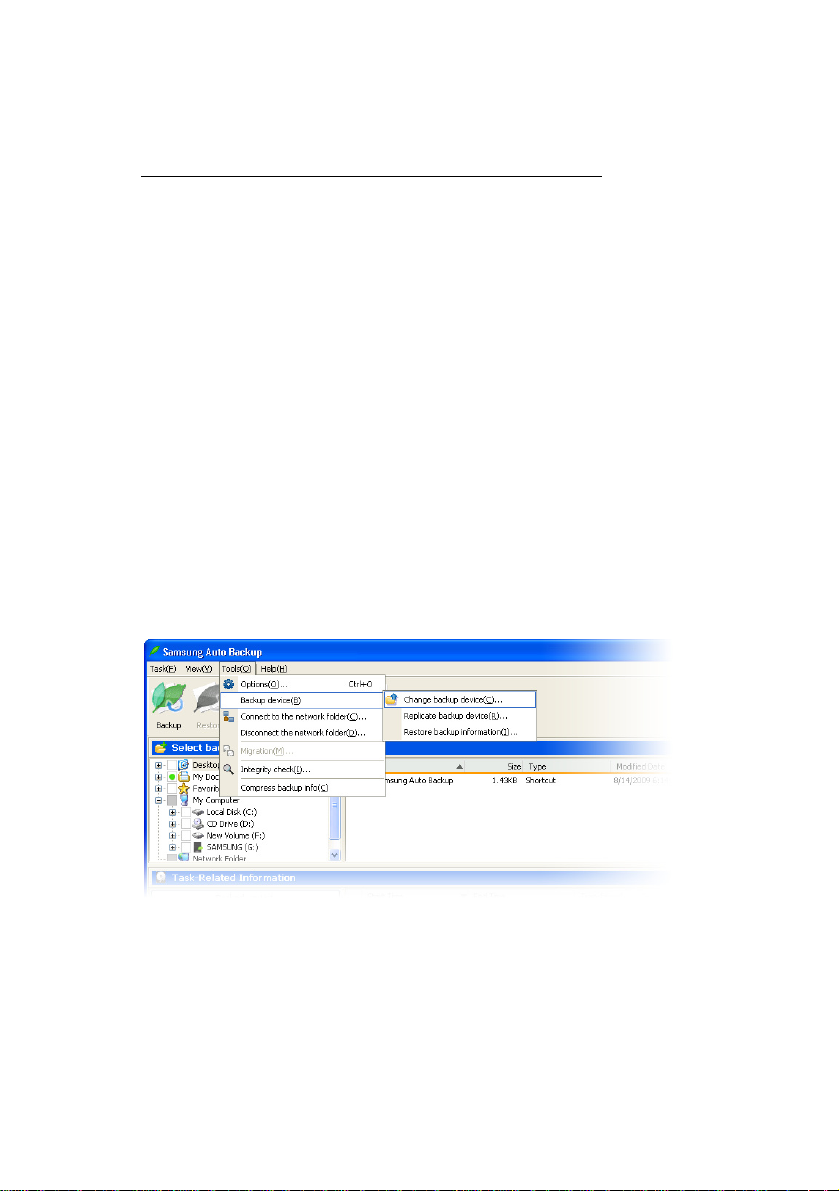
Setting the Backup Device
Backup Device Settings is comprised of:
• Change Backup Device
• Replicate Backup Device
• Restore Backup Information.
From the main menu:
Click Tools
1.
2.
Choose Backup Device
Figure 7-16 Backup Device options
Samsung Auto Backup User Manual Ver 2.0
64
Page 65

Advanced
Changing the Backup Device
You may need to change the backup device for
various reasons. For example, if you want to use a
different Samsung External Hard Disk Drive.
On the backup destination screen, you can only
choose the Samsung External Hard Disk Drive that is
connected. If the Samsung external hard disk is not
connected, you cannot choose the backup destination.
If you select the Change backup device option, the
Backup Settings Wizard that appeared when you ran
the program for the first time is displayed again. In
the Backup Settings Wizard, you can change the
backup device and other options.
NOTE: IF THE NEW BACKUP DEVICE WAS USED
AS A BACKUP DEVICE BEFORE AND CONTAINS
PREVIOUS BACKUP DATA, A LIST OF THE USERS
WHO USED IT IS DISPLAYED. YOU CAN CONTINUE
TO USE THE PREVIOUS BACKUP DATA BY
SELECTING AN ENTRY FROM THIS LIST. OR YOU
CAN CONFIGURE A NEW BACKUP ENVIRONMENT.
NOTE: ON THE BACKUP DESTINATION SETTING,
SELECTING THE ‘NEW CONFIGURATION’ CAUSE
THE WHOLE PREVIOUS BACKUP DATA LOSS.
If unauthorized persons used the previous backup
data, the backup information in the data may have
been revealed to them. Set a SafetyKey and Login
Password to prevent further unauthorized access if
several people are using the same backup device.
Samsung Auto Backup User Manual Ver 2.0
65
Page 66
Advanced
Replicating the Backup Device
You can replicate the current backup device to a
different backup location.
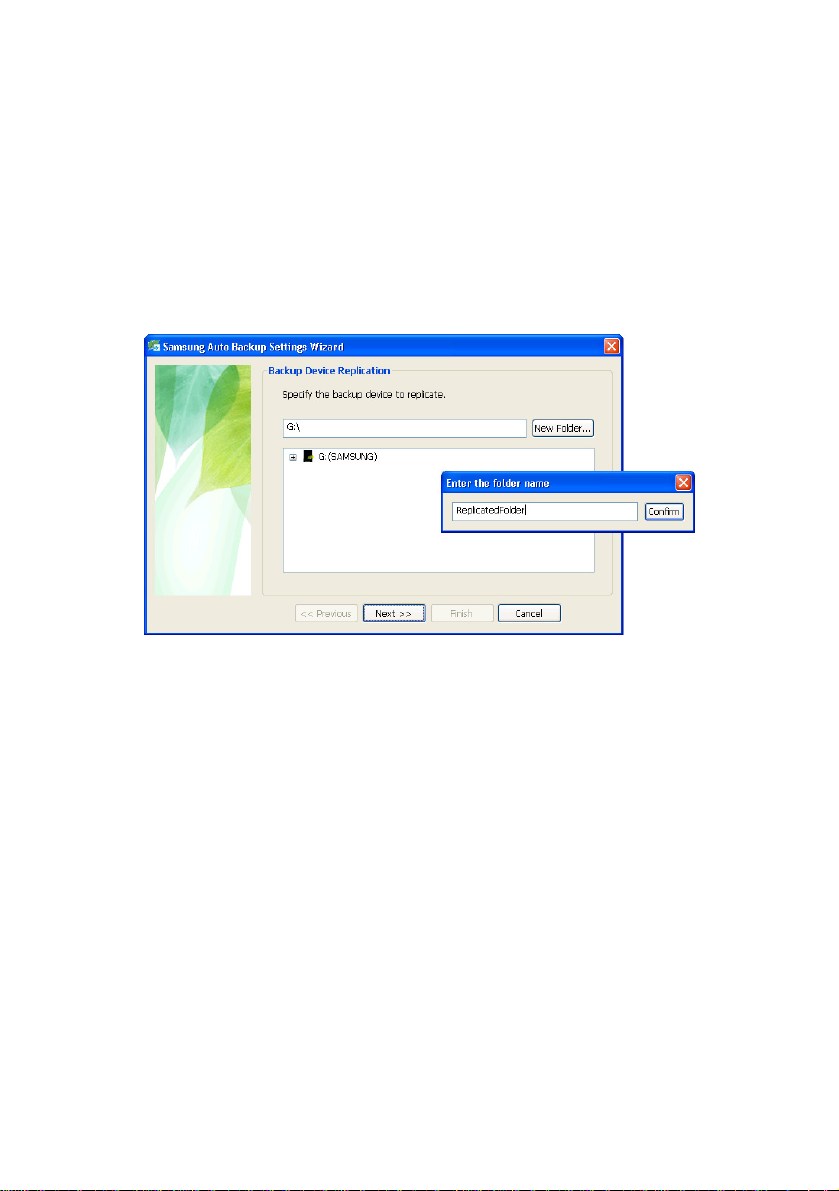
If you select the Replicate backup device option, the
following Wizard appears.
Figure 7-17 Replicating the Backup Device
From the Replicate Backup Device screen, you can only
choose the Samsung External Hard Disk Drive that is
connected. If the Samsung External Hard Disk Drive is
not connected, you cannot choose the backup
destination.
From the Replicate Backup Device screen, select the location
of the backup device onto which the backup data will
be replicated
Click Next to navigate to the Options for Backup Device
1.
Replication screen
There are two types of backup device replication.
Option 1
One is Replicate backup information which
replicates only the current backup
information and options.
Samsung Auto Backup User Manual Ver 2.0
66
Page 67
Advanced
Option 2 The other is Replicate backup device which
replicates the current backup information,
options and backup files.
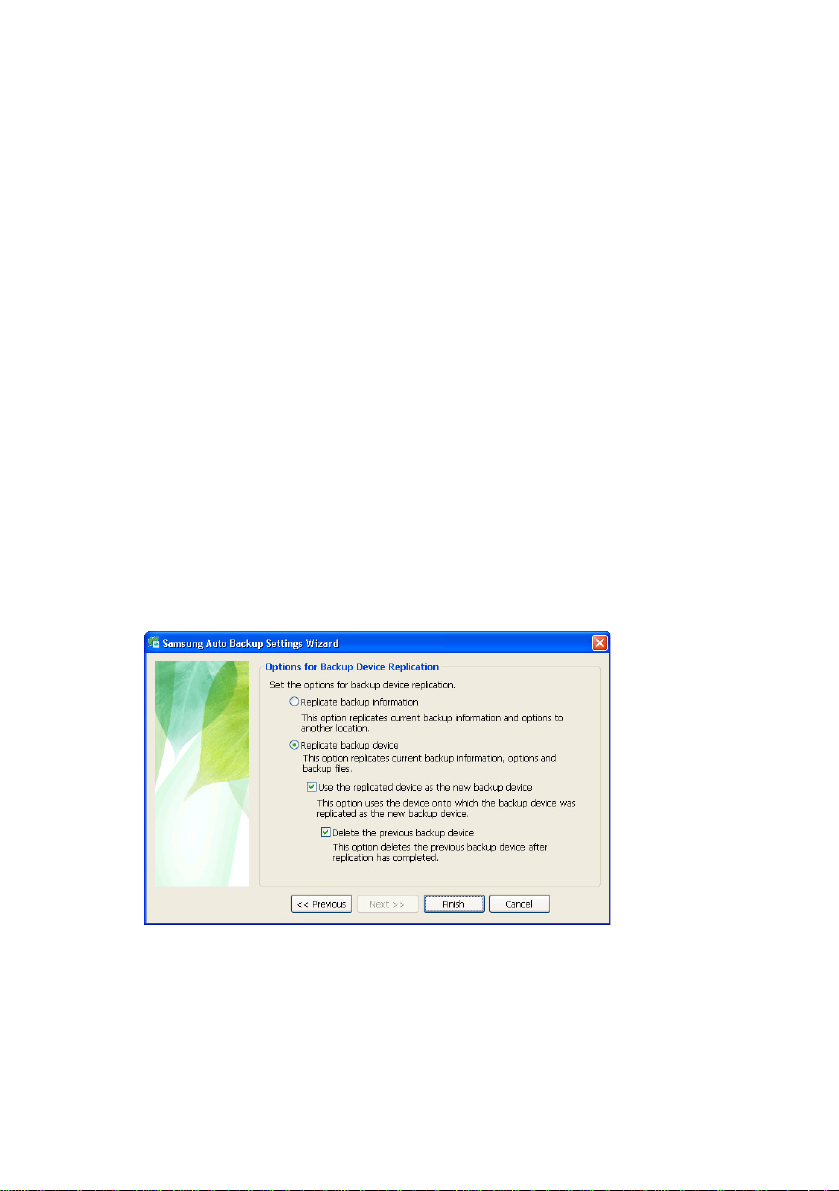
When you choose Replicate Backup Device, you can
select the following options.
Option 1
Option 2
2.
3.
Figure 7-18 Options for Backup Device Replication
Use the replicated device as the new backup
device. This option uses the device onto
which the backup device is being replicated
as the new default backup device.
Delete the previous backup device. This
option deletes the previous backup device
after replication is complete. This option is
activated only when you select the Use the
replicated device as the new backup device
option.
Choose the options for your specific requirements
Click Finish
Samsung Auto Backup User Manual Ver 2.0
67
Page 68

Advanced
Restoring the Backup Information
This process restores backup information that was
stored in another location. The backup information is
reverted to the time when the backup information was
stored. Existing backup information is then deleted.
After the restoration of backed up information, it is
highly recommended to run an Integrity Check to
match the backup information with the files stored on
the backup device.
Using Migration
Migration is different from backup as it precisely
copies the folder structure and files from the source
drive to another drive.
Samsung Auto Backup creates a new folder with the
user account name and the computer name and
stores the files in this new folder. But migration
maintains the same folder structure. Therefore, you
can use this function when you want to replicate the
folder structure of one computer in another computer.
To use the migration function:
Samsung Auto Backup User Manual Ver 2.0
68
Page 69
Advanced
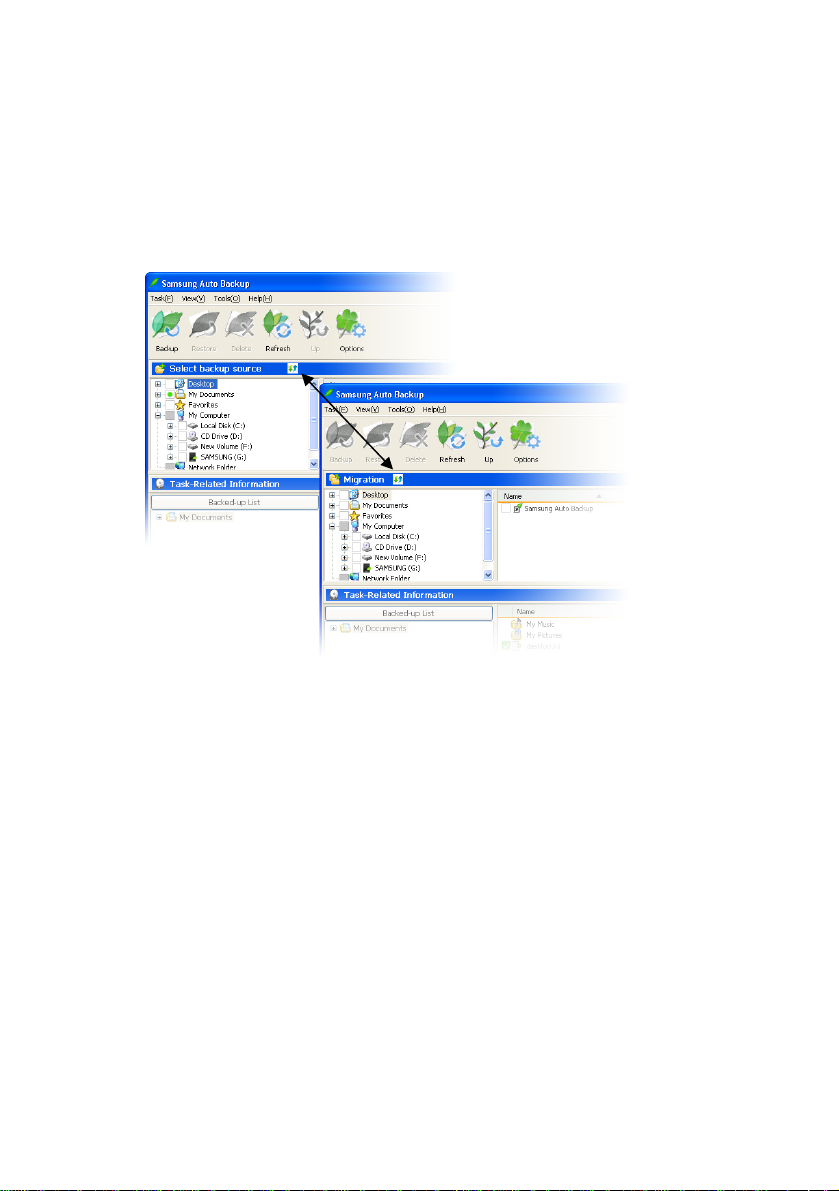
1.
Click the toggle button beside the title of the Backup
Source window to switch to migration mode
Figure 7-19 Switching to the Migration Mode
Samsung Auto Backup User Manual Ver 2.0
69
Page 70
Advanced
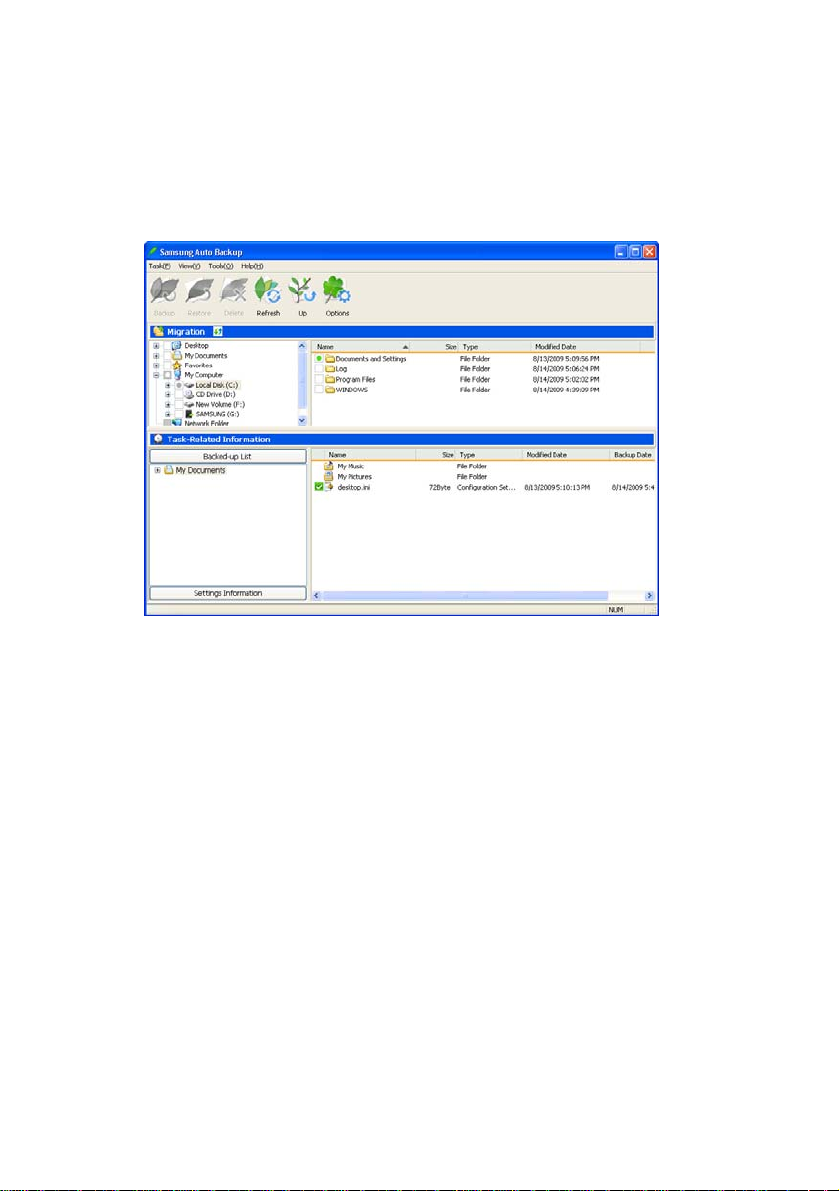
2.
Select the folder(s) or file(s) to migrate in the
Migration (top) selection window
Figure 7-20 Selecting the Migration Source
Samsung Auto Backup User Manual Ver 2.0
70
Page 71
Advanced
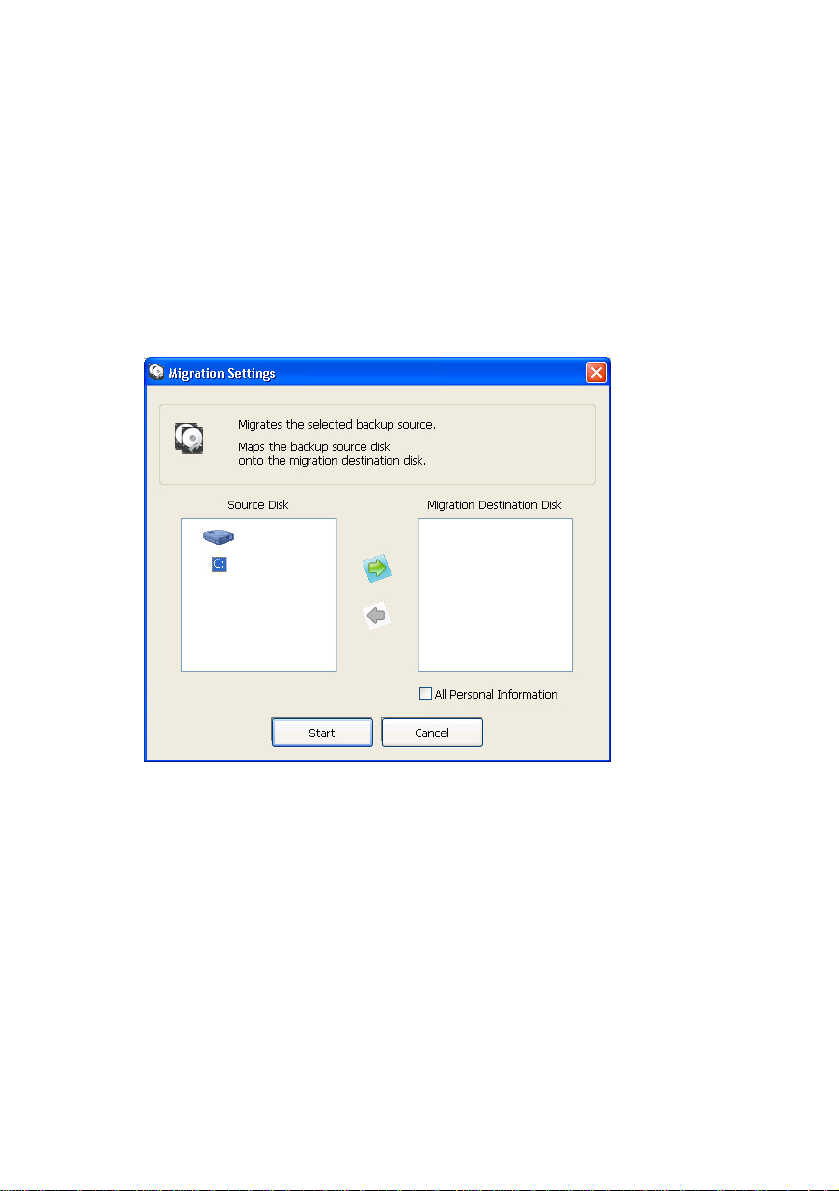
From the Menu bar:
Click Tools -> Migration
3.
4.
Choose the Source from the left window
5.
Click the green Right Arrow
Click Start
6.
The migration path has been ‘mapped’.
Figure 7-21 Choosing the Source and Migration Destination
Samsung Auto Backup User Manual Ver 2.0
71
Page 72
Advanced
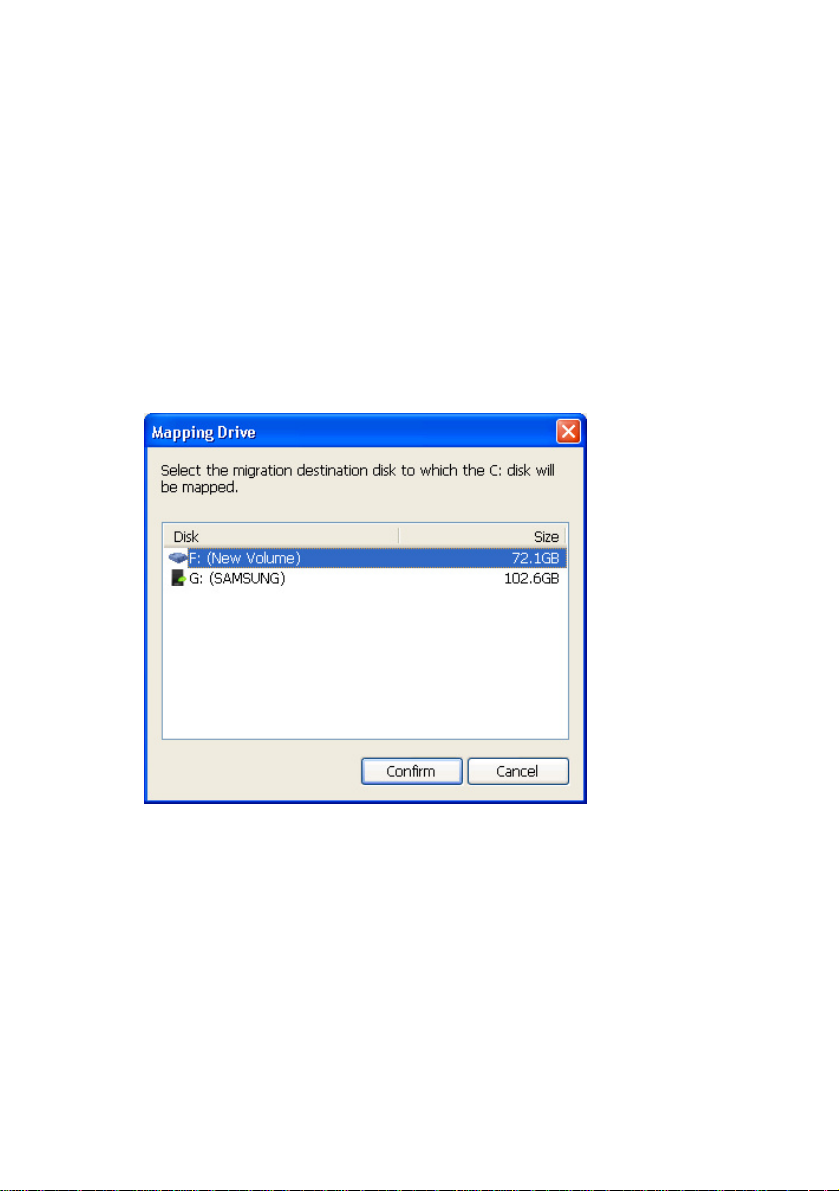
Next, identify the destination disk for the files. For
example, if you just got another computer, you may
choose to migrate the backed up information from
your Samsung External Hard Disk Drive to your new
computer.
Choose a destination
7.
Click Confirm
8.
From the pull-down menu, you may choose the
Default Destination or use New User Destination.
Figure 7-22 Choose the destination
Choose the destination
9. Click Confirm
Click Start to begin the migration
10.
The migration engine shows the progress of the
migration process.
After completion of the migration, you can see a list of
the migrated files in the View Details window.
Click Close to close the details screen
11.
Samsung Auto Backup User Manual Ver 2.0
72
Page 73

Advanced
12.
Click Exit(X) to go back to the Main screen
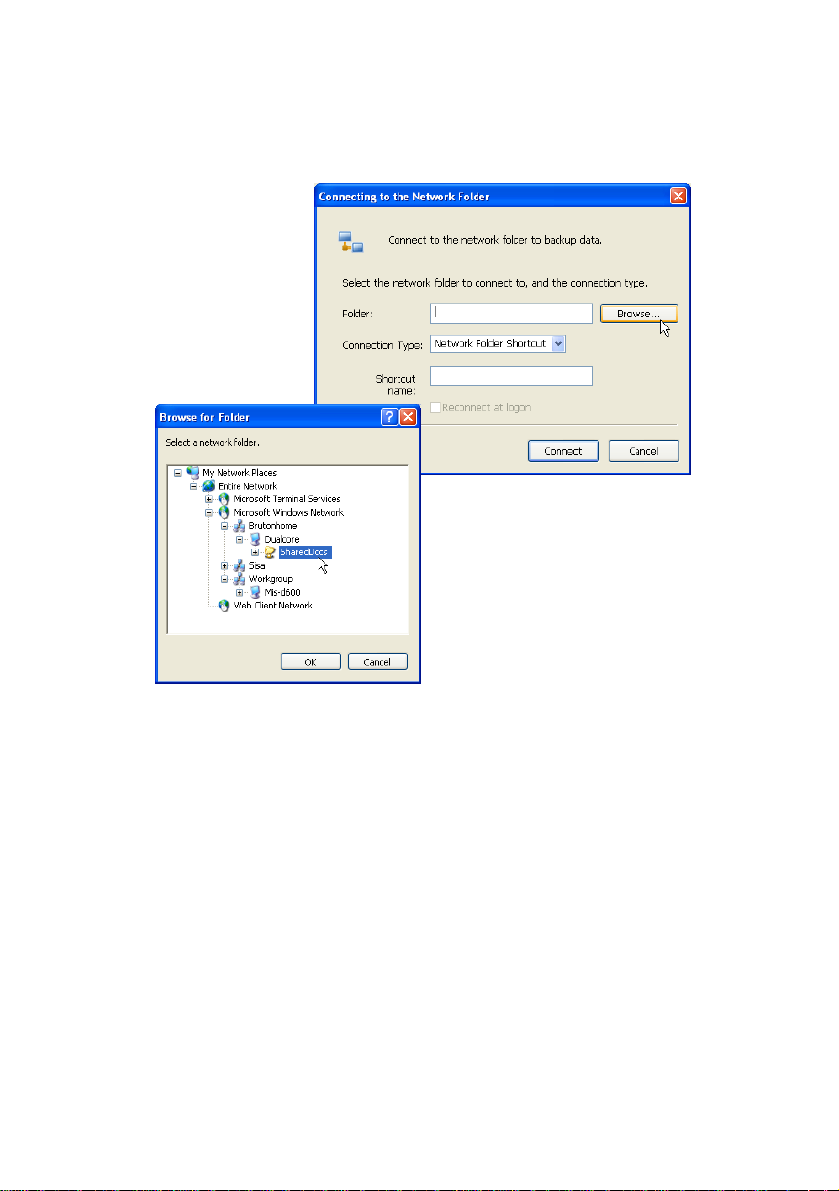
Connecting to a Network Folder
When the backup source is another computer on a
network, from the Tools menu choose the Connect to
the network folder function to add the source to the
Source Selection window.
There are two options:
Option 1
Option 2
1.
2.
3.
4.
5.
You can select either Network Folder
Shortcut
Network Drive as the Connection Type
Click Browse...
Choose a network folder
Click OK
Enter a Shortcut name
Click Connect
Samsung Auto Backup User Manual Ver 2.0
73
Page 74
Advanced
Figure 7-23 Connecting to the Network Folder
Network Drive assigns a drive letter to the network
folder to connect the corresponding folder to the
computer. Network Folder Shortcut creates a network
folder in My Network Neighborhood instead of
assigning a drive letter.
When the network folder is connected it appears in
the backup source tree.
Samsung Auto Backup User Manual Ver 2.0
74
Page 75
Advanced
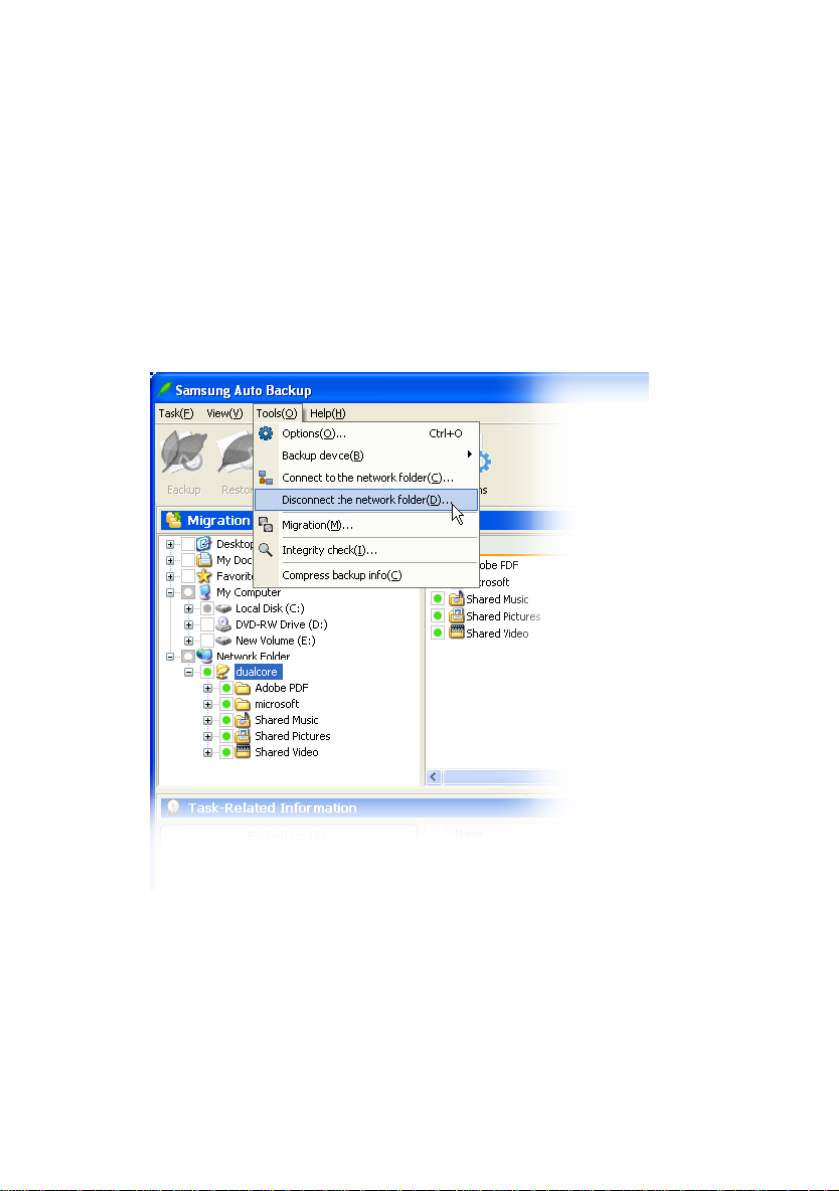
Disconnecting a Network Drive
At some point, you may not want your network drive
connected. To disconnect a network drive:
Click the network drive to disconnect
1.
Click Tools -> Disconnect Network Drive -> Confirm
2.
Figure 7-24 Disconnecting a Network Drive
Samsung Auto Backup User Manual Ver 2.0
75
Page 76

Advanced
Checking the Integrity of Backed up Data
As the basic backup units of Samsung Auto Backup
are the file and folder, you can use Windows Explorer
to access the files and folders within the backup data.
Therefore, it is possible that you may accidentally
change or delete files and folders on the backup
device using Windows Explorer.
If you change the folders or files in the backup device
manually, there can be discrepancies between
Samsung Auto Backups information and the backup
files stored on the device. As a result, the backed up
data will become unreliable, and Samsung Auto
Backup won’t be able to restore it.
The Backup Data Integrity Check tool solves this
problem. This tool checks whether the backup
information of Samsung Auto Backup is the same as
the backup data stored on the backup device, and
corrects any discrepancy to match the backup files
with the backup information.
This will keep your backup information synchronized
with the actual backed up data.
The best way to maintain synchronization is not to
change the backup files stored on the backup device
in the first place.
One of the most important factors to Integrity Checks,
is the time information of the computer. If the time
zone of the computer changes after a backup was last
performed, the Integrity Check tool may recognize the
files as being changed.
NOTE: BE SURE TO CHECK THAT THE TIME ZONE
IS CORRECT BEFORE USING THE TOOL.
Samsung Auto Backup User Manual Ver 2.0
76
Page 77

Advanced
1.
Select Tools -> Integrity Check
Click Check(s) to start the integrity check
2.
The progress of the integrity check is displayed in a
window. The result shows both deleted files and
changed files. Deleted files are the files that exist in
the backup information of Samsung Auto Backup but
do not exist in the actual backed up data. Changed
files are files that exist in the actual backed up data
but do not match the backup information, as they
were subsequently changed.
Messages will display showing changed and deleted
files. If you want to correct the discrepancies, click
the Correct Error button in the bottom righ t corner of
the panel.
When the tool corrects an error caused by a deleted
file, it deletes the information about th at file from the
backup information of Samsung Auto Backup. That is,
it deletes the backed up data from the backup list.
For a changed file, it changes the backup information
of Samsung Auto Backup according to the information
of the corresponding file on the backup device.
Samsung Auto Backup User Manual Ver 2.0
77
Page 78
Advanced
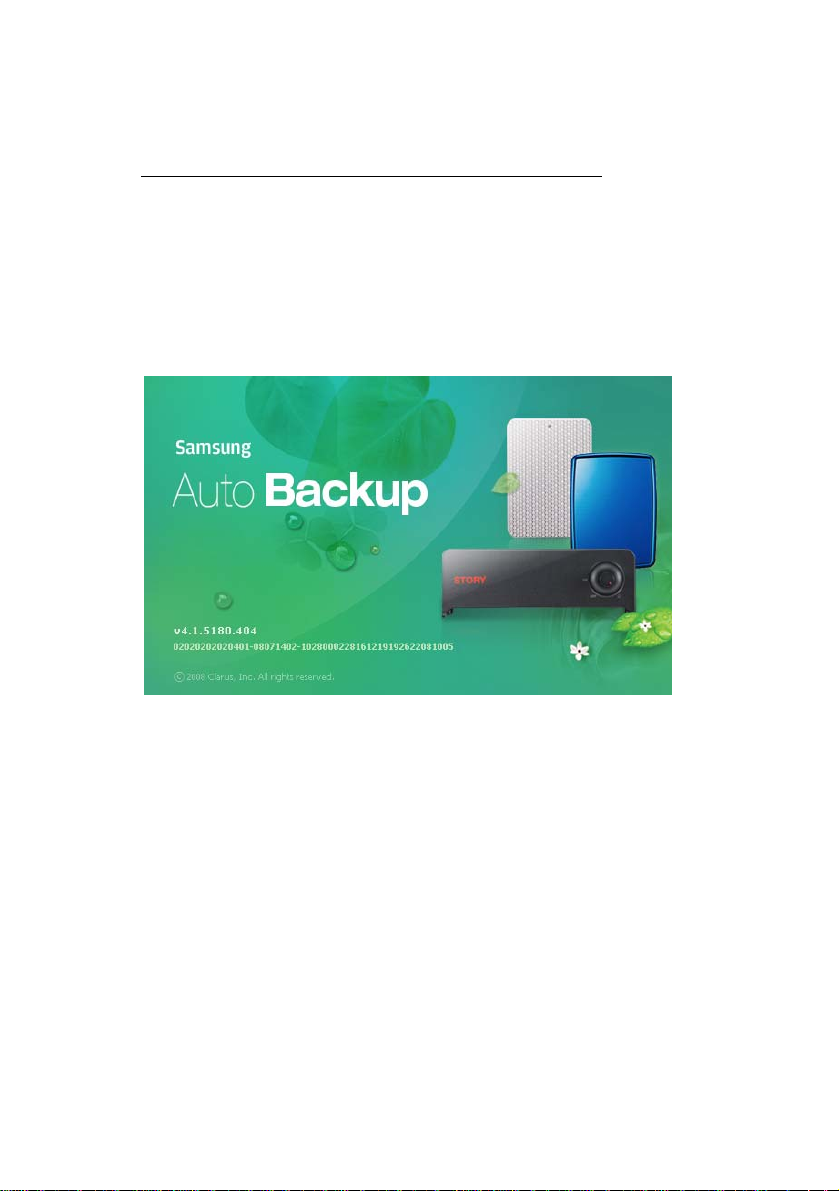
About Samsung Auto Backup
This menu allows you to check the product
information on Samsung Auto Backup.
Click Help -> About Auto Backup
1.
Figure 7-25 About Auto Backup
Samsung Auto Backup User Manual Ver 2.0
78
Page 79

Index
67
backup engine .......................... 29
backup history .......................... 29
Backup Information
Information, Backup10, 59, 64,
68
Backup Log
Log, Backup ........................ 10
Backup Results
Results ................................. 45
Backup Source
Source, Backup ............... 9, 69
Backup, Task Bar
Task Bar 1, 2, 5, 6, 8, 9, 10, 13,
14, 16, 18, 20, 23, 24, 25,
27, 32, 33, 34, 38, 39, 40,
41, 42, 43, 45, 46, 48, 53,
55, 58, 59, 63, 64, 65, 66,
67, 68, 69, 76, 77, 78
C
Compress ........................... 29, 42
Compressed Files ..................... 31
Connecting ................... 15, 73, 74
D
Date and Time
Time and Date ..................... 34
Defrag ...................................... 10
Delete, Task Bar
Task Bar ...... 41, 43, 53, 54, 67
Disk Space ............................... 39
Document File .......................... 30
E B
Exit, Task Bar Backup Device
Task Bar 38, 41, 45, 55, 58, 72 Device, Backup .. 9, 64, 65, 66,
F
File Deletion Wizard ................ 53
File Filter............................ 30, 58
Folder
Creating ............. 21, 26, 73, 74
Full Backup
Backup, Full .......................... 9
G
Groups ...................................... 32
H
Help, Menu Bar
Menu Bar ........... 40, 42, 43, 78
I
Incremental Backup
Backup, Incremental ............. 9
L
Language .................................. 17
License ..................................... 19
M
Manual Backup
Backup, Manual .. 9, 60, 61, 62
Migration ................................. 68
Minimize .................................. 29
Movie File ................................ 30
Music File ................................ 30
P
Password ...................... 27, 28, 65
Photo File ................................. 30
Samsung Auto Backup User Manual Ver 2.0
79
Page 80

Picture File ............................... 30
Preferences ............................... 25
Q
QuickBackup
Backup, Quick ..................... 44
R
Real-Time Backup
Backup, Real Time .............. 10
Refresh ............................... 41, 44
Replicate .................................. 66
Restore ............. 13, 56, 57, 59, 76
Restore, Task Bar
Task Bar 41, 42, 43, 56, 57, 58,
64
S
Safely Remove Hardware .......... 7
Scheduled Backup
Scheduled, Backup ................ 9
Show tool bar
Menu ................................... 41
System Specifications .............. 14
T
Task Log ... 29, 30, 45, 48, 60, 61,
62
Task, Menu Bar
Menu Bar29, 30, 40, 41, 43, 45,
48, 53, 60, 61, 62
Tools, Menu Bar
Menu Bar40, 42, 48, 64, 71, 73,
75, 77
U
USB
Cable, USB ...................... 7, 15
V
Video File ................................ 30
View, Menu Bar
Menu Bar40, 41, 60, 61, 62, 72
W
Windows Explorer ....... 44, 46, 76
Samsung Auto Backup User Manual Ver 2.0
80
 Loading...