

Samsung Au Galaxy S10 SCV41, Au Galaxy S10+ SCV42 Online Manual
Online Manual (in Japanese only)
1
1
123
12345
1
2
3
4
678
9
5
1
1
1
2
SCV41
Setting Guide
Thank you for purchasing the Galaxy S10
(referred to as the "product" in this manual).
In this guide, settings for using the
product are described.
You can use the "Online Manual" (in Japanese
only) which describes explanation of various
functions by the following operation.
On the home screen, ick up or ick
down → [Galaxy] → [取扱説明書 (Online
Manual)]
This manual is described with the content of
Android 9.
For the latest information, please refer to
the "設定ガイド (Setting Guide)" (Japanese)
available on the au homepage.
(https://www.au.com/support/service/
mobile/guide/manual/ (in Japanese only))
Company names and product names referred
to in this manual are trademarks or registered
trademarks of respective companies.
Sold by: KDDI CORPORATION, OKINAWA CELLULAR
TELEPHONE COMPANY
Imported by: SAMSUNG ELECTRONICS JAPAN Co., Ltd.
Manufactured by: Samsung Electronics Co., Ltd.
June 2019, 1st Edition
■ Using on this product
On the home screen,
ick up or ick down
[Galaxy] [取扱説明書
■ Using on the PC, etc.
Refer to au homepage.
https://www.au.com/online-manual/scv41/ (in Japanese only)
(Online Manual)]
You can use the
Online Manual.
* If the conrmation screen of
how to use is displayed, follow
the on-screen instructions.
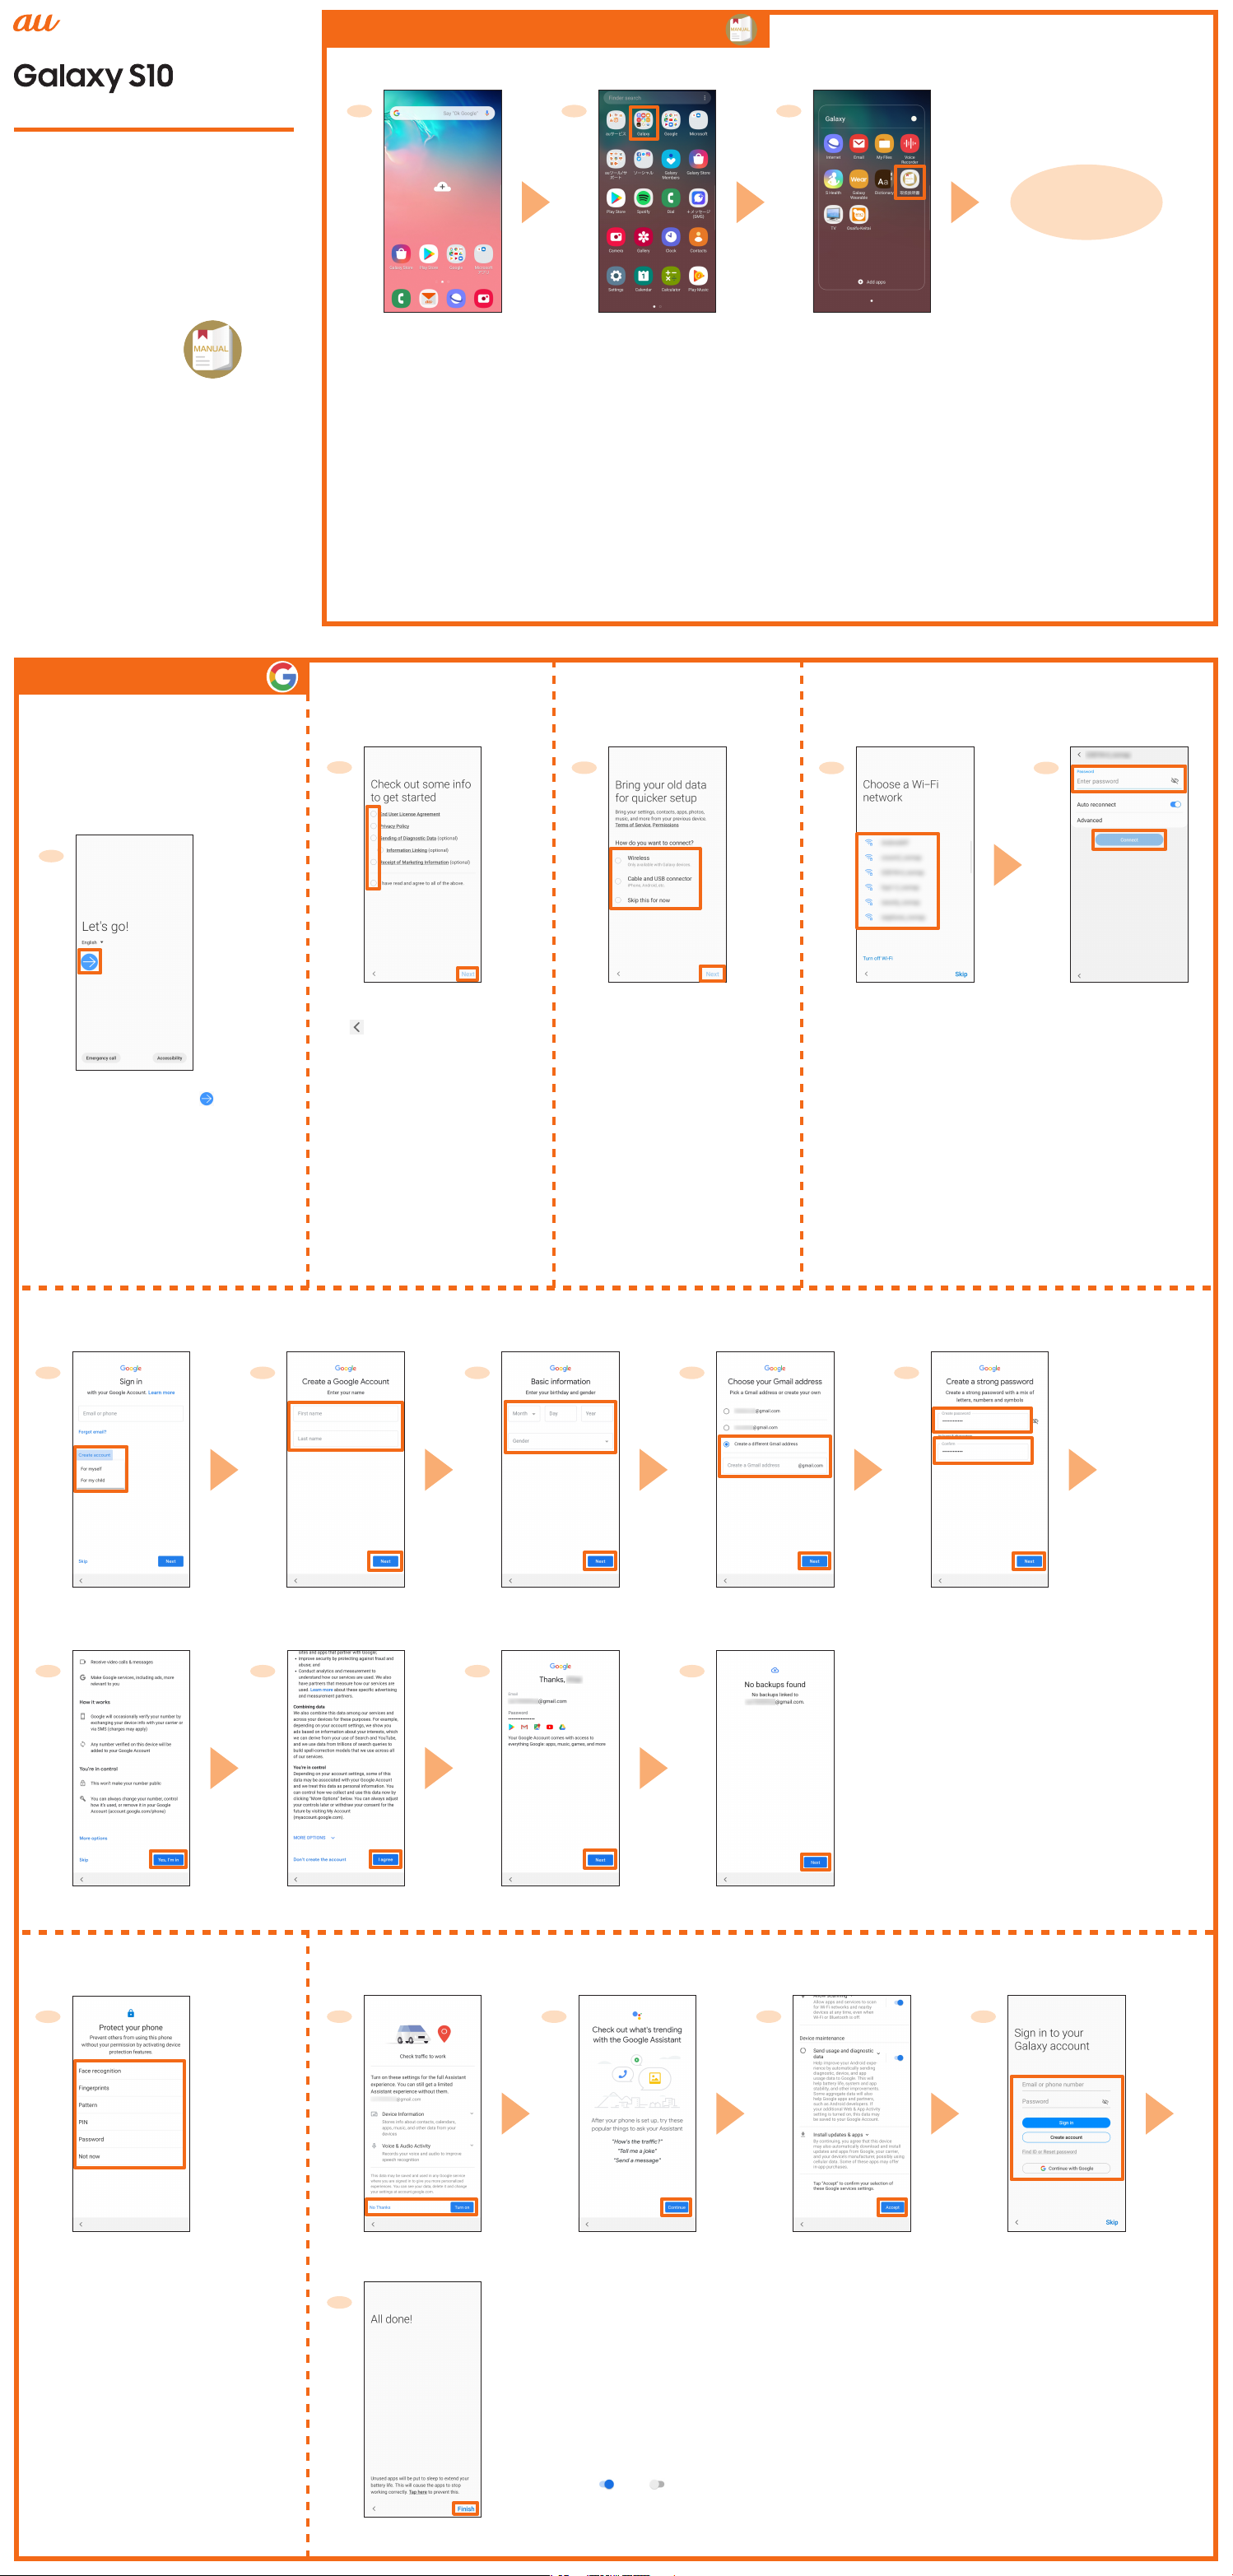
Initial settings
When turns ON the product for the
rst time, the initial setting screen
appears automatically. Follow the
guidance to make the settings.
* Depending on the settings, setting
contents and displays may dier.
■ STEP START
[日本語 (Japanese)] →
[English] → [OK] → [
●To change the language after it has
been initially set, on the home screen,
ick up or ick down → [設定 (Settings)]
→ [一般管理 (General management)]
→ [言語とキーボード (Language and
input)] → [言語 (Language)] → [言語を追
加 (Add language)] → select language
you want to use → [標準に設定 (Set as
default)].
]
■ STEP 1: Checking the
terms and conditions
Tap each agreement →
confirm the contents →
[
] → after confirming
all the contents, check the
agreements you agree →
[Next]
■ STEP 2: Data
recovery setting
Select the method to
recover data → [Next]
* In this manual, select "Skip
this for now" → [Next]. To
recover data, follow the onscreen instructions.
■ STEP 3: Wireless LAN (Wi-Fi®) function
setting
Tap Wi-Fi® network to
connect
* Tap "Skip" to set later.
●Password (security key) is set on access point. Check
the password in advance.
Enter a password
(security key) →
[Connect] → [Next]
■ STEP 4: Google Account setting
[Create account] → [For
myself]/[For my child]
*1
Enter your "First name"
and "Last name" → [Next]
Enter your birthday and
select gender → [Next]
Select "Create a dierent
Gmail address"*2 → enter an
address → [Next]
Enter your password →
reenter the password
→[Next]
●Set up Google account to use Google
applications such as "Gmail", and "Google
Play". Gmail address "(User name)@gmail.
com" is automatically created by user
name set in Google account.
●If you already have a Google account, tap
the "Email or phone" eld in step 1.
Conrm the contents →
[Yes, I'm in]
■ STEP 5: Protect setting
Set whether to protect the
product
●When protecting the product,
select "Face recognition",
"Fingerprints", "Pattern", "PIN" or
"Password".
●When not protecting the product,
[Not now] → [Skip anyway].
Conrm the contents →
[I agree]
■ STEP 6: Functions/Service setting
Set whether to enable
the Google Assistant
[Next] [Next]
Confirm the
contents, [Continue]
contents, [Accept]
Confirm the
*1 In this manual, select "For myself". To create
account for child, follow the on-screen
instructions.
*2 You can also select the address displayed on
the screen.
*1
Set Galaxy account
as required
*2
[Finish]
※3
*1 Tap " " to " " to disable the functions.
*2 If you do not set the Galaxy account, [Skip] → [Skip].
*3 After "Initial settings" is completed, "au Initial Setting" needs to set. For details, please read the back
page.
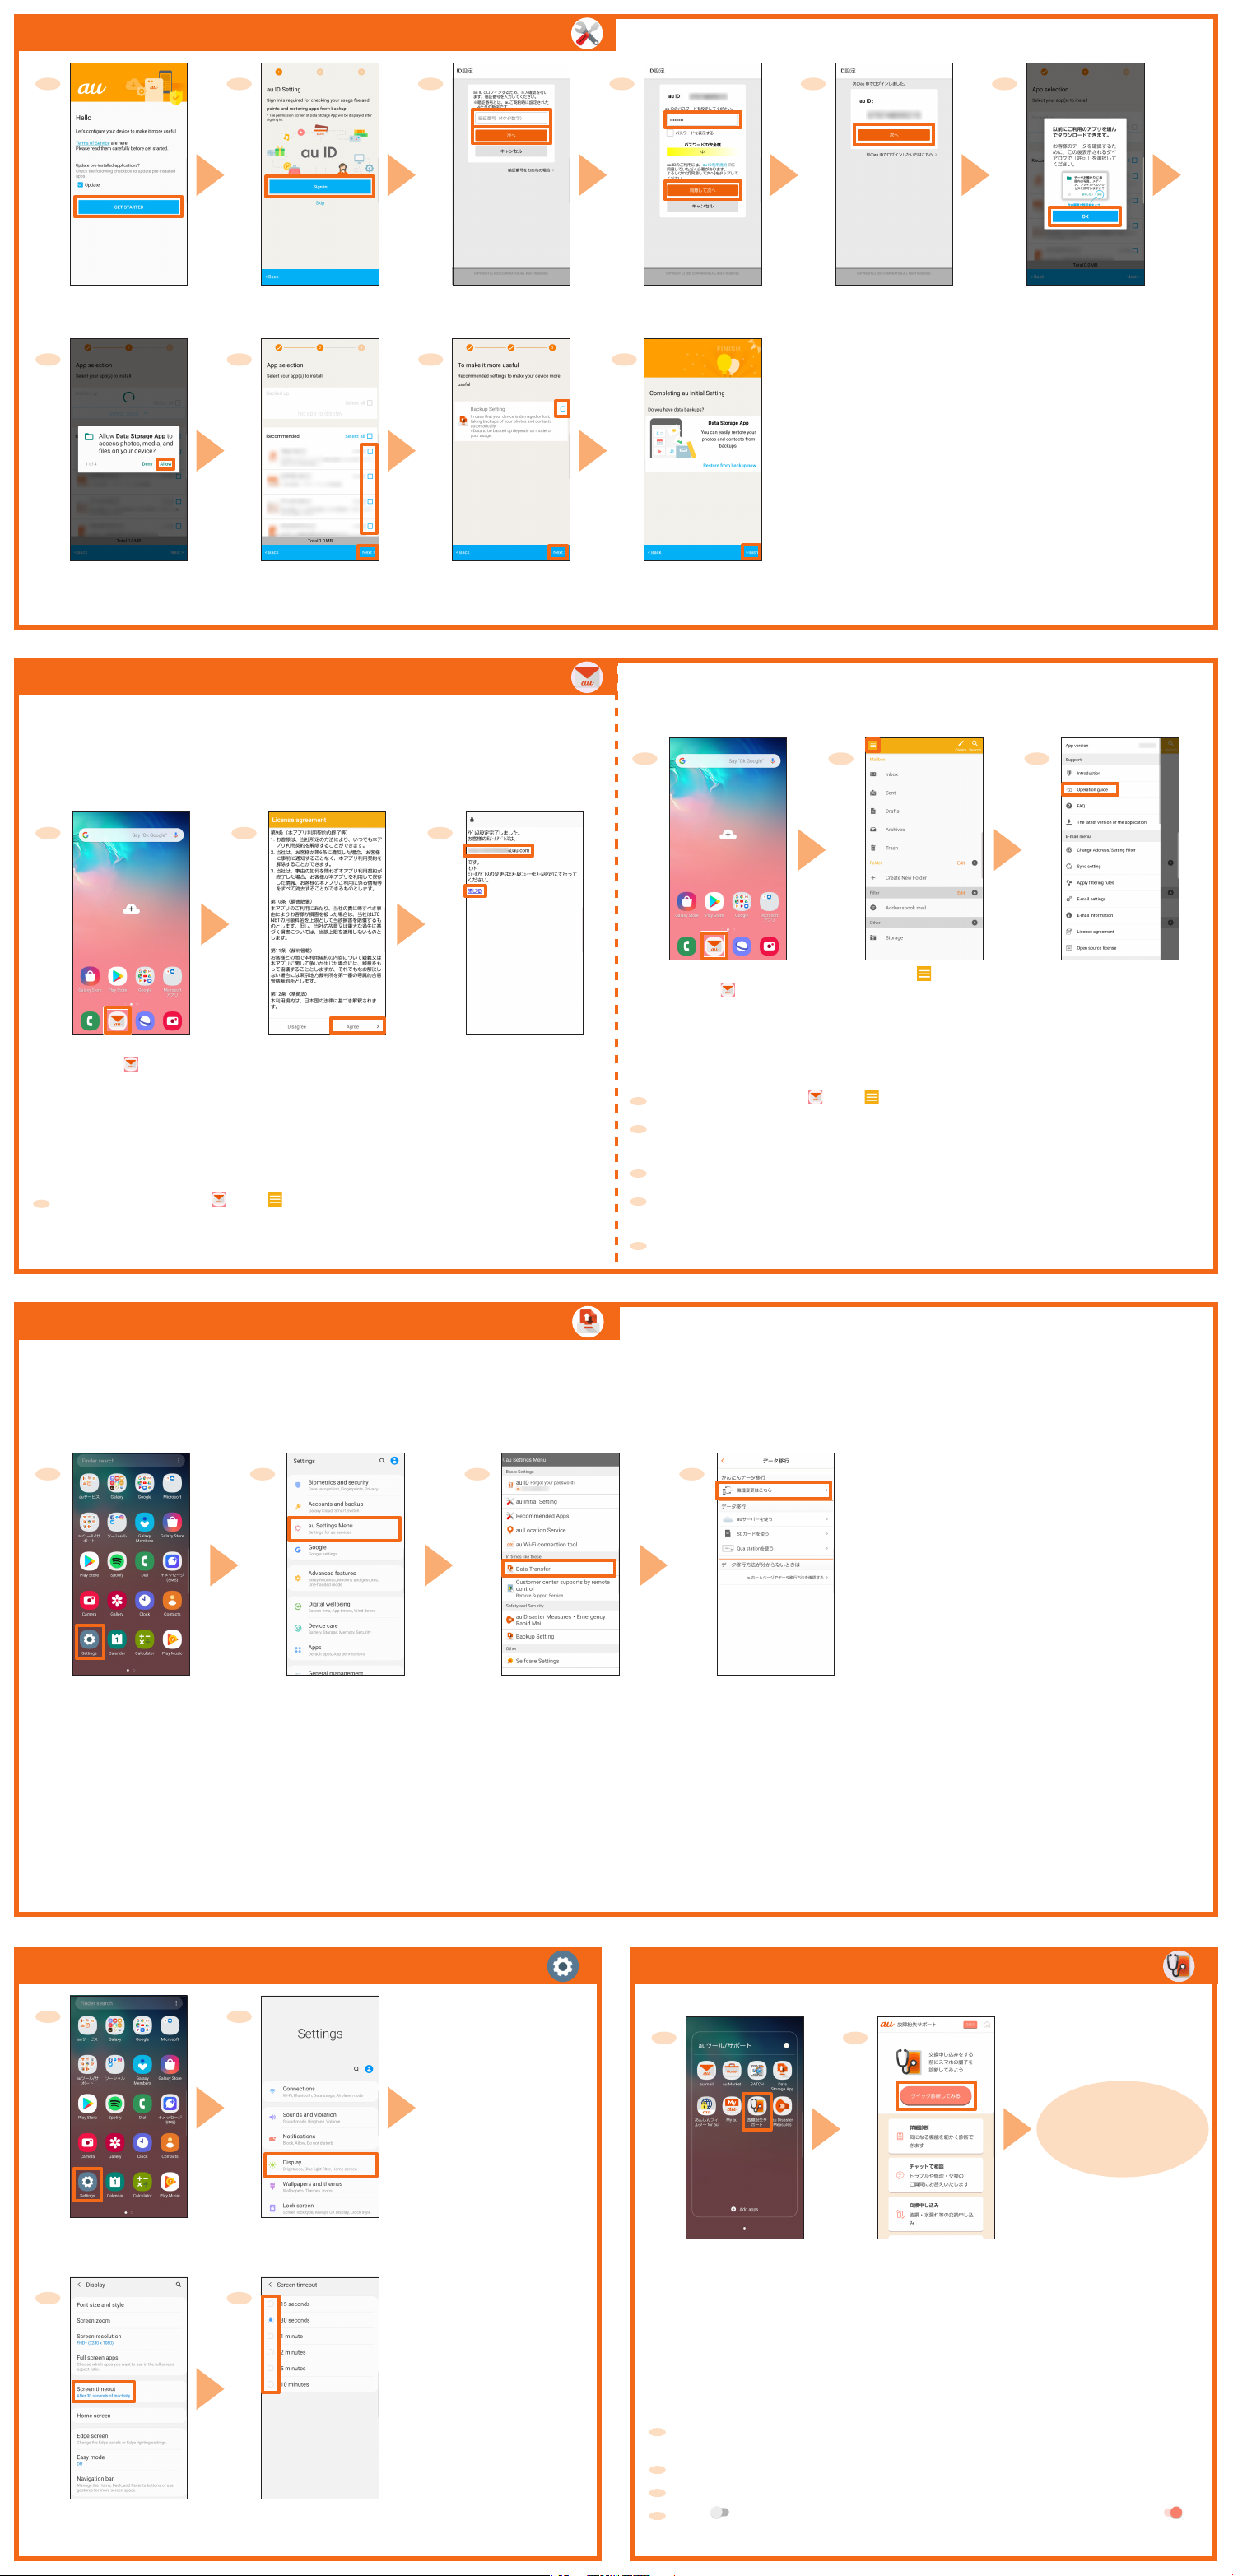
au Initial Setting
123
456
789
10
123
1
1
2
3
1
2
3
4
5
123
4
1
2
1
2
3
4
1
2
3
4
[GET STARTED]
[Allow]
*4
*1
Check the apps to install*5
[Sign in]
→ [Next]
*2
Enter a security number*3
→ [次へ (Next)]
Check the content
to set → [Next]
au-mail settings
■ Initial Setup
The au-mail address will be determined automatically after initial setup.
●Initial setup cannot be available with Wi-Fi® connecting.
●To use au-mail, subscription to LTE NET is required.
●Operation and screen may be changed without notice.
Enter a password → [同意し
て次へ (Agree and next)]
[Finish]
*6
●On au initial setting, you can make settings for updating preinstalled applications, setting au ID, downloading applications
previously used or using this product more conveniently.
●When you have set an au ID, you can use various au services
including "au Simple Payment Service" which oers you a
simple way to purchase applications from au Smart Pass and
Google Play.
*1 Check "Update", if you want to update pre-installed applications.
*2 If you have registered an au ID previously, step 3 and 4 are not
*3 The security number is the four-digit security code you wrote on
*4 A conrmation screen is displayed for application permission
*5 If "Select apps" is displayed in the "Backed up" eld, you can
*6 If you have backup data in "Data Storage App" application, the
[次へ (Next)] [OK]
displayed. Proceed to step 5.
the application form.
several times. Continue by following the on-screen instructions.
conrm the application by tapping.
data can be returned by tapping "Restore from backup now".
■ Checking how to use au-mail application
On the home screen,
[
]
* If the confirmation screen is displayed, follow the on-screen instructions.
Confirm the contents
→ [Agree]
■ Checking au-mail address
On the home screen, [ ] → [ ] → [E-mail information]
Your au-mail address appears in the E-mail address eld.
Checking the
au-mail address →
[閉じる (Close)]
On the home screen,
[
]
[ ]
■ Changing your au-mail address
The au-mail address can be changed which automatically decided by initial setup.
On the home screen, [ ] → [ ] → [Change Address/Setting Filter]
[ メールアドレスの変更へ (To change mail address)] → enter the security code
→ [送信 (Send)]
Conrm the contents → [承諾する (Accept)]
Select " ご希望のメールアドレスに変更する (Change to your desired e-mail
address)" → enter au-mail address → [送信 (Send)]
[OK] → [閉じる (Close)]
[Operation guide]
* Tap the item which you
want to check.
How to transfer data from the au Settings Menu
You can restore/store data from your previous au phone to this product using a microSD memory card or au server.
●If you restore data using au server, store the data using your previous au phone to au server in advance. You need to set up an au ID to use the au server.
(If your previous au phone does not have the au Settings Menu, use the au Cloud app.)
●If you restore data using a microSD memory card, save the data using your previous au phone to a microSD memory card in advance.
(If your previous au phone does not have the au Settings Menu, use the au backup app.)
On the home screen, flick up
or flick down → [Settings]
If you want to store your pictures, address book (contacts), etc. automatically to the au server using "Data Storage App" application, you can set up by following
procedure.
●On the home screen, flick up or flick down → [Settings] → [au Settings Menu] → [Backup Setting] → select the type of data to automatically store
[au Settings Menu] [Data Transfer]
*
If the conrmation screen is
displayed, follow the on-screen
instructions.
[機種変更はこちら (Model
changing is here)] and
perform data transfer according
to the screen guidance
Setting screen timeout Diagnosis regularly
It is recommended that you diagnose your smartphone in order to use it comfortably.
Continue by
following the on-
screen instructions.
On the home screen, flick up
or flick down → [Settings]
[Screen timeout] Tap the time until screen
[Display]
turns o
On the home screen, flick up
or flick down → [auツール/
サポート (au tool/support)]
→ [故障紛失サポート (Repair
and Delivery Support)]
*
If the conrmation screen is displayed, conrm the
contents and follow the on-screen instructions.
[クイック診断してみる (Try
quick diagnosis)]
■ Setting notication of regular cleaning
Set the "定期クリーニング通知 (Notification of regular cleaning)" to notify you to
diagnosis regularly.
On the home screen, flick up or flick down → [auツール/サポート (au tool/
support)] → [故障紛失サポート (Repair and Delivery Support)]
[便利な機能 (Convenient function)]
[各種設定 (Various settings)]
Tap " " of "定期クリーニング通知 (Notification of regular cleaning)" to " "
* Please diagnose with "クイック診断してみる (Try quick diagnosis)", when you receive the
notication.
 Loading...