

Page 1

ENGLISH
Page 2
Contents
PREPARATION
Safety Precautions ......................................................................................................... 3
Name of Each Part ......................................................................................................... 8
Remote Control – Buttons and Display ............................................................... 10
Inserting the Remote Control Batteries ............................................................... 11
Getting Started ............................................................................................................... 12
OPERATION
Selecting Auto Mode ................................................................................................... 13
Selecting Cool Mode .................................................................................................... 14
Selecting Heat Mode ................................................................................................... 15
Selecting Dry Mode ...................................................................................................... 16
Selecting Fan Mode ...................................................................................................... 17
Selecting Mode ................................................................................... 18
Selecting the Turbo Function ................................................................................... 20
Adjusting the Airflow Direction Vertically ........................................................... 21
Adjusting the Airflow Direction Horizontally ..................................................... 21
Setting the On Timer .................................................................................................... 22
Setting the Off Timer ................................................................................................... 23
Operating Your Air Conditioner Without the Remote Control .................. 24
RECOMMENDATIONS FOR USE
Cleaning Your Air Conditioner ................................................................................ 25
Cleaning Deodorizing and Bio filter(Option) .................................................... 25
Temperature and Humidity Ranges ...................................................................... 26
Operating Recommendations ................................................................................. 26
Solving Common Problems ...................................................................................... 27
E-2
Correct Disposal of This Product
(Waste Electrical & Electronic Equipment)
(Applicable in the European Union and other European countries with separate collection systems)
This marking on the product, accessories or literature indicates that the product and its electronic accessories (e.g. charger,
headset, USB cable) should not be disposed of with other household waste at the end of their working life. To prevent pos
sible harm to the environment or human health from uncontrolled waste disposal, please separate these items from other
types of waste and recycle them responsibly to promote the sustainable reuse of material resources.
Household users should contact either the retailer where they purchased this product, or their local government office, for
details of where and how they can take these items for environmentally safe recycling.
Business users should contact their supplier and check the terms and conditions of the purchase contract. This product and
its electronic accessories should not be mixed with other commercial wastes for disposal.
-
Page 3
Register your product at www.samsung.com/global/register
Safety Precautions
The following safety precautions are provided to protect the users’ safety and prevent property damage.
Make sure to read the followings and use the air conditioner properly.
Keep this user’s manual together with the installation manual in a handy place so that you can find it whenever
you need to see it after reading this manual thoroughly.
ENGLISH
WARNING
CAUTION
This indicates the possibility of serious injury or death.
This indicates the possibility of serious injury or damage to environments when
operated incorrectly.
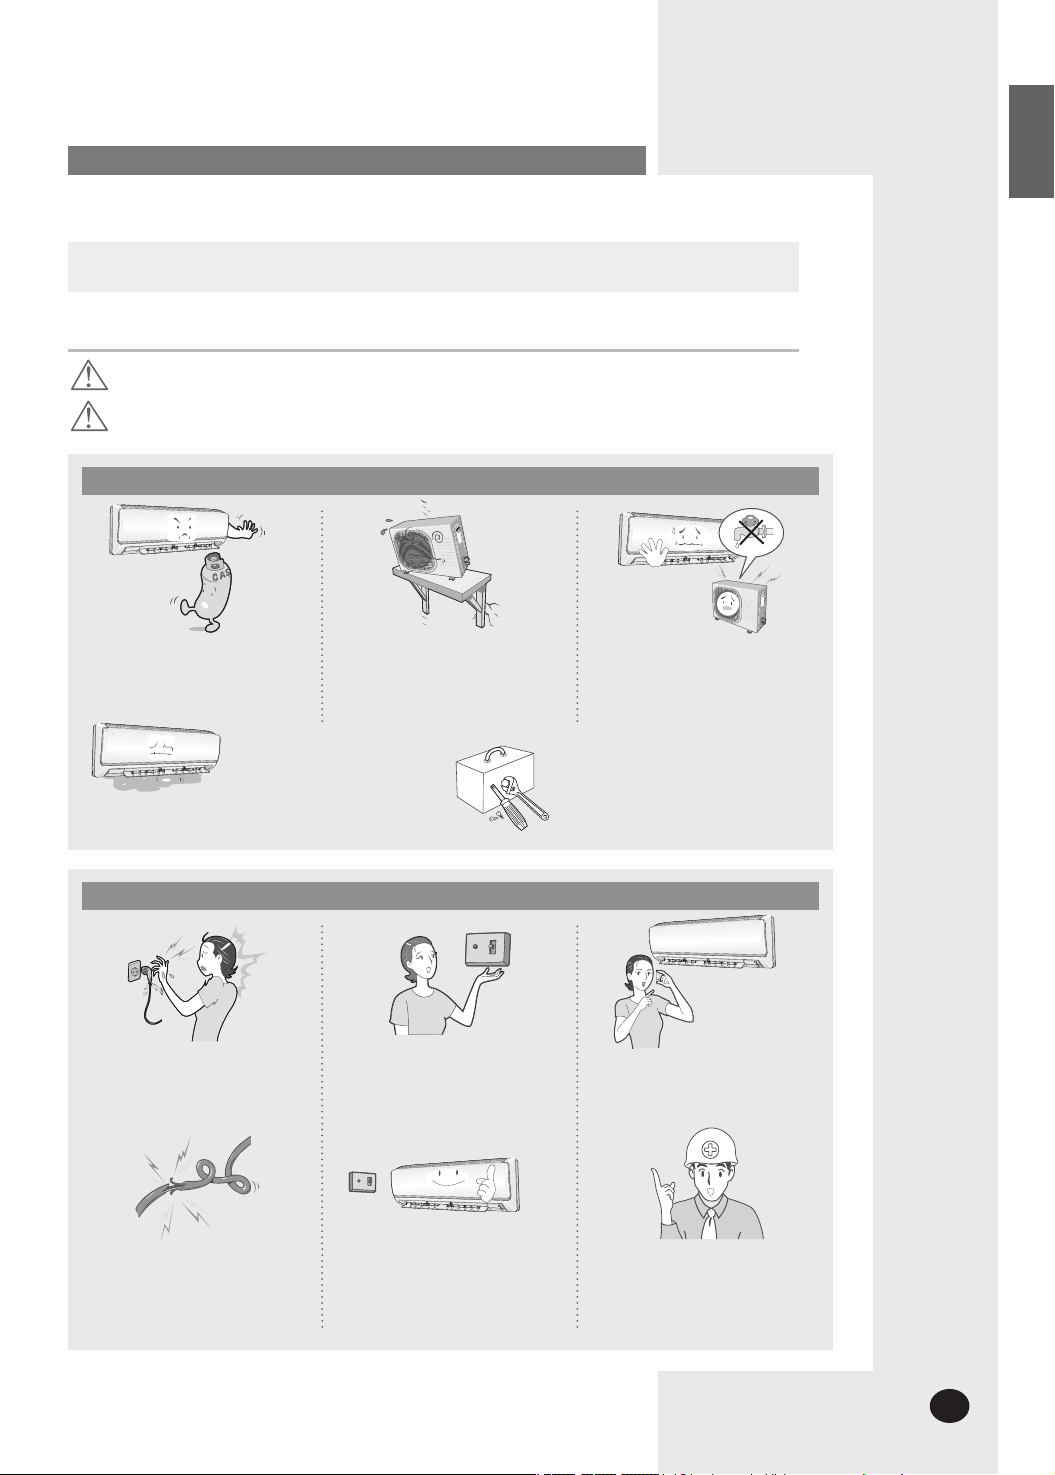
WHEN INSTALLING
Do not install the unit in a
place where it is exposed to
inflammable gas leakage.
Contact the service center
if the air conditioner is
under water.
REGARDING POWER SOURCE
Do not install the outdoor
unit where there’s the risk of
dropping such as on high
outer wall or outside of the
terrace.
Do not connect the ground
to a gas pipe, water pipe,
lightning rod or telephone
earth.
The installation must be carried out
by a licensed installer or qualified
personnel when installing the unit
for the first time or reinstalling it.
Do not pull the electric wire
or touch the power plug with
the wet hands.
Do not bend the electric wire
by force or weigh down the
air conditioner not to be out
of order.
Install the switch and circuit
breaker only for
air conditioner.
Use the power source with
separate wiring only for air
conditioner.
Use the rated current fuse.
If the power plug is
damaged, replace it by the
manufacturer or qualified
personnel to avoid the risk.
E-3
Page 4

WARNING
DURING OPERATION
Do not attempt to repair,
move, modify or reinstall
the unit on your own. Make
sure that these installations
are carried out by qualified
personnel to avoid electric
shock or fire.
Do not place any obstacles in
front of the unit.
Make sure that the unit is
correctly ventilated at all
times: Do not place clothing
or other materials over it.
Do not insert anything
between the air outlet
blades because the inner fan
may be damaged and could
cause injury. Keep children
away from the unit.
When using a wireless
remote control, the distance
should not be more than
7 meters from the air
conditioner. (If applicable)
The manufacturer declines
any liability for damage
resulting from modifications
or errors in the electrical or
hydraulic connections.
Failure to observe the
installation instruction, or use
of the unit under conditions
other than those indicated in
the table 'Operating limit' of
the unit installation manual,
will immediately invalidate
the unit warranty.
Never spill any kind of liquid
into the unit. Should this
happen, unplug or main
switch off the unit and
contact an authorized
service center.
If the wireless remote
control is not used for
a long time, remove the
batteries. (If applicable)
Do not connect the electric
heater to the air conditioner
or repair it with your
discretion.
Do not place any materials
so that children cannot step
on it.
E-4
Page 5
WARNING
DISPOSING THE UNIT
Before throwing out the
device, it is necessary to pull
back the battery cells and get
rid of them safely for recycling
reasons.
When you need to dispose of
the unit, consult your dealer.
If pipes are removed
incorrectly, refrigerant may
blow out and come into
contact with your skin, causing
injury. Releasing refrigerant
into the atmosphere also
damages the environments.
Please recycle or dispose
of the packaging material for
this product in an
environmentally responsible
manner.
ENGLISH
CAUTION
WHEN INSTALLING
Install the air conditioner
avoiding direct sunlight or
heater, especially water.
Install the outdoor unit so as
to let the discharged air out
properly. Avoid a place that
may disturb your neighbor by
noise.
Install the drain hose to let
the water run safely and
correctly.
E-5
Page 6

CAUTION
REGARDING POWER SOURCE
Disconnect the circuit breaker
when you don’t use the
air conditioner for a long time
to save energy.
DURING OPERATION
Contact the service center or
manufacturer if you want to
repair the air conditioner.
Contact the service center
after turning off the air
conditioner if strange noise
is heard, burning smell or
smoke blow.
E-6
Do not open the front grille
during operation.
Do not use the air conditioner
for a long time in a closed room
or in a place where there’s a
baby or an old person.
Avoid cold and hot air
reaching to person, pet or a
plant directly for a long time.
Do not step on the air
conditioner or put heavy
object on it.
Avoid the water from
getting into the
air conditioner.
Do not drink the water from
the air conditioner.
Page 7
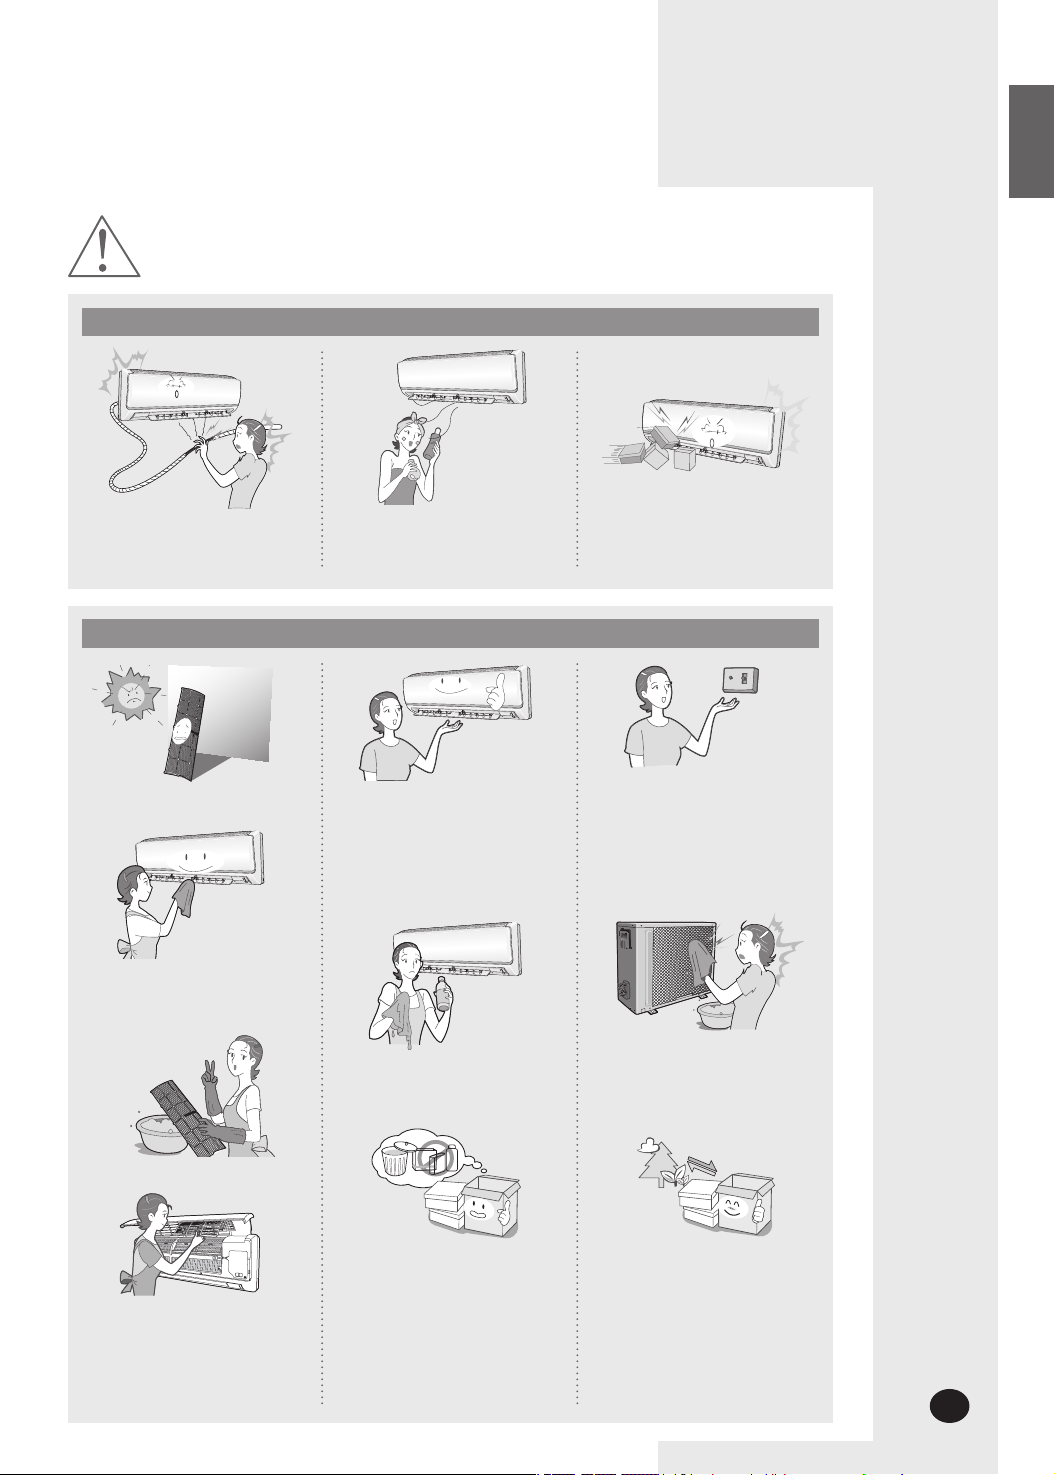
CAUTION
DURING OPERATION
Do not touch the pipes
connected to the air
conditioner.
OTHERS
Do not use the air conditioner
to maintain the machine, food,
pet, plant or cosmetics.
Do not give excessive shock
to the air conditioner.
ENGLISH
Be sure that the air filter not to
be exposed to direct sunlight.
Turn off the air conditioner
and if the fan stops to operate,
clean the air conditioner.
Clean the air filter every 2 weeks.
Be sure to insert the air filter.
When opening or closing the
front panel, use a stable stool
and watch your steps carefully.
The appliance is not intended
for use by young children or
infirm persons without
supervision: Young children
should be supervised to
ensure that they do not play
with the appliance.
Do not clean the air
conditioner by spraying water
directly or with benzene,
thinner or alcohol.
Dispose of the packaging
material in accordance with
the local requirements.
The maximum input power &
current is measured
according to the IEC standard
and the input power & current
is measured according to the
ISO standard.
The surface of the heat
exchanger is sharp, so be
careful of it when cleaning.
All of the manufacturing and
packaging materials used for your
new appliance are compatible
with the environment and can be
recycled.
E-7
Page 8

Name of Each Part
The design and shape can be changed according to the model.
Indoor Unit
Air Inlet
Temperature sensor
Power(On/Off) button
Air filter
(under the grille)
Operation indicator
Timer indicator
Turbo indicator
Power(On/Off) button
Air flow blades
(outlet)
(GREEN)
(GREEN)
(RED)
E-8
AQ N
Series
AQ F Series AQ09S Series
Page 9
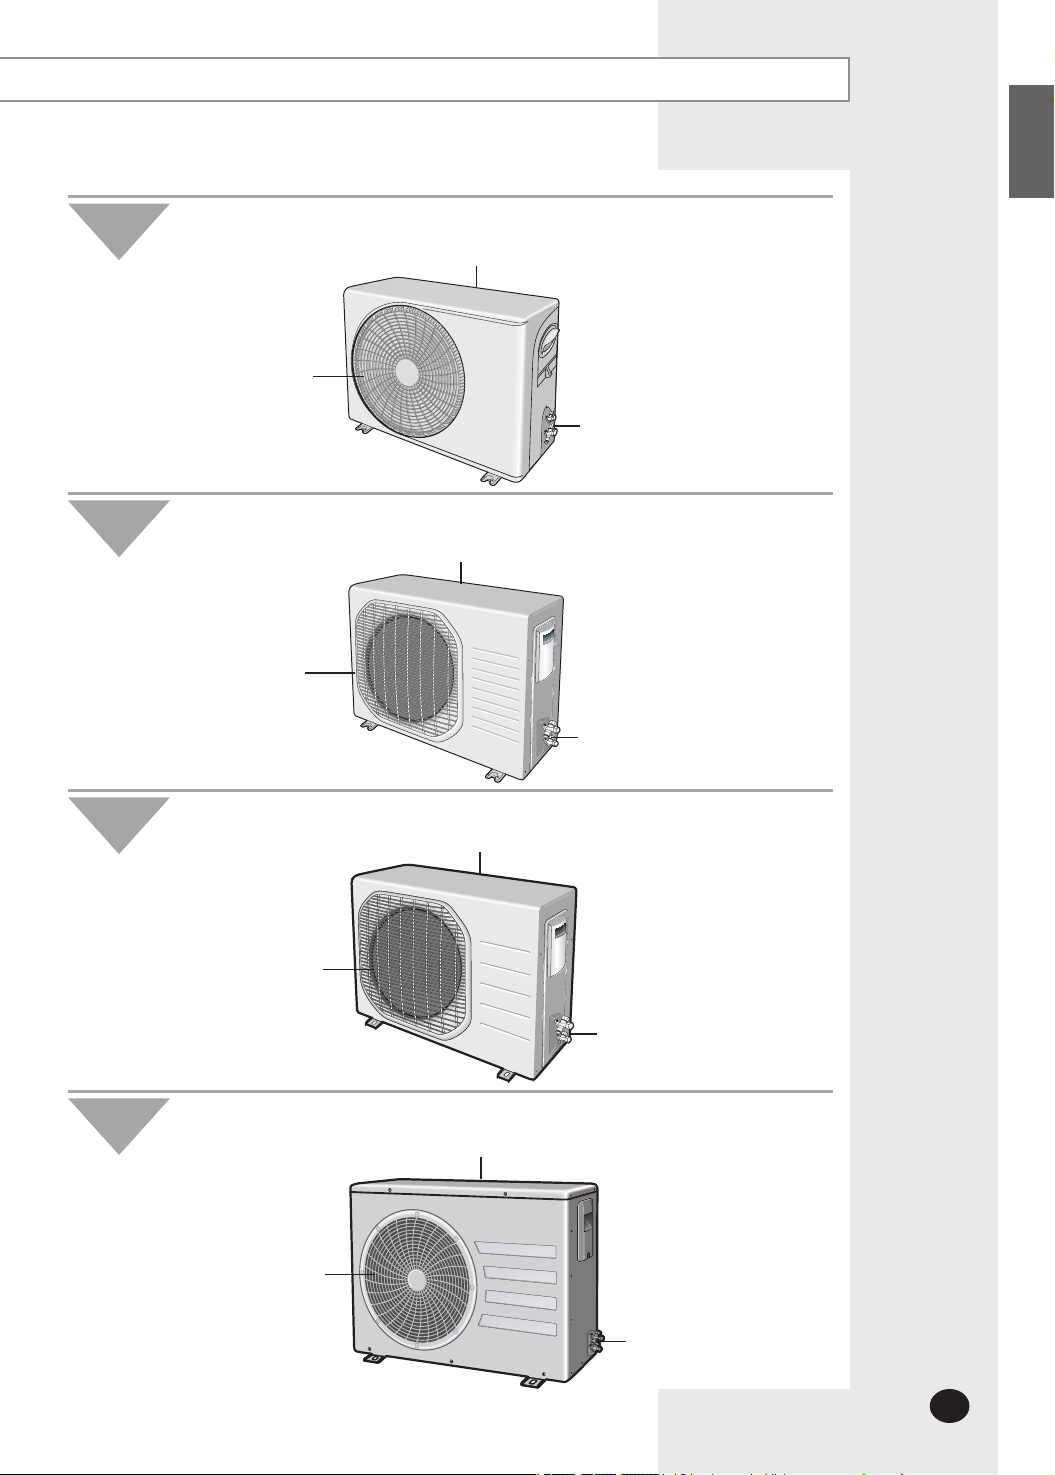
ENGLISH
Outdoor Unit
Outdoor Unit
Air Outlet
Air Outlet
AQ09
AQ12
Series
Air Inlet (Rear)
Connection Valve
(Inside)
Series
Air Inlet (Rear)
Connection Valve
(Inside)
Outdoor Unit
Outdoor Unit
AQ18
Air Outlet
AQ24
Air Outlet
Series
Air Inlet (Rear)
Connection Valve
(Inside)
Series
Air Inlet (Rear)
Connection Valve
(Inside)
E-9
Page 10

Remote Control-Buttons and Display
Remote control
transmission indicator
Operating mode indicator
AUTO, COOL, DRY
(
Turbo function indicator
FAN, HEAT
Temperature setting
mode indicator
Fan speed
Air flow direction
,
)
indicator
Mode selection button
(AUTO, COOL, DRY,
FAN, HEAT)
Temperature adjustment
buttons
Turbo button
Fan speed adjustment
button
Swing button
On Timer indicator
Off Timer indicator
Battery discharge indicator
button
On Timer button
Off Timer button
On/Off &
Timer Set/Cancel button
E-10
Page 11

Inserting the Remote Control Batteries
You must insert or replace the remote control batteries when:
Note
1
2
You purchase the air conditioner
The remote control does not work correctly
Use two AAA, LR03 1.5V batteries.
Do not use old and new batteries or different kinds of batteries
together.
Insert two batteries correctly as indicated by the + and – symbols.
Remove the battery cover in the rear of the remote control by pushing
it with your thumb.
Insert two batteries, respecting the polarities as indicated by
the + and - symbols.
ENGLISH
Close the cover by sliding it back in place.
3
Correct disposal of batteries in this product
(Applicable in the European Union and other European countries with separate battery return systems.)
This marking on the battery, manual or packaging indicates that the batteries in this product
should not be disposed of with other household waste at the end of their working life. Where
marked, the chemical symbols Hg, Cd or Pb indicate that the battery contains mercury,cadmium
or lead above the reference levels in EC Directive 2006/66. If batteries are not properly disposed of,
these substances can cause harm to human health or the environment.
To protect natural resources and to promote material reuse, please separate batteries from other
types of waste and recycle them through your local, free battery return system.
E-11
Page 12

G
etting Started
The User’s Manual provides you with valuable information about your air conditioner.
In order to take full advantage of the air conditioner’s features, please read this manual
carefully before using.
You have already seen the basic description of the unit on pages from 8 to 10.
Starting with the next page, you will find a series of stepfor each function available.
The illustrations in the step-by-step procedures use three different symbol
PRESS PUSH HOLD DOWN
by-step procedures
s:
E-12
Page 13

Selecting Auto Mode
ENGLISH
You can select Auto mode if you want to cool or heat your room automatically.
You can adjust the temperature in this mode.
1
Press the
Result
The indoor unit beeps.
2
Press the button on the remote control until is displayed.
Result
The air conditioner changes from Cool or Heat mode
Note You can change modes at any time.
3
Press the button to adjust the temperature until the required
temperature is displayed.
You can set the temperature between 16°C and 30°C.
Result
n/Off) button.
(O
: The operation indicator on the indoor unit lights up.
The air conditioner starts up in the mode you selected last.
: The indoor unit beeps each time you press the button.
The air conditioner runs in Auto mode.
Auto mode cools or heats the room depending on the set
temperature.
automatically, depending on the current temperature.
: Each time you press the
- The temperature adjusts by 1°C
- The indoor unit beeps
button:
E-13
Page 14

Selecting Cool Mode
You can select Cool mode if you want to cool your room.
You can adjust the temperature and the fan speed when cooling.
1
2
Press the (On/Off) button.
Result
: The operation indicator on the indoor unit lights up.
The air conditioner starts up in the mode you selected last.
The indoor unit beeps.
Press the button on the remote control until is displayed.
Result
: The indoor unit beeps each time you press the button.
The air conditioner runs in Cool mode.
Note You can change modes at any time.
3
Press the button to adjust the temperature until the required
temperature is displayed.
You can set the temperature between 16°C and 30°C.
Result:
Each time you press the button:
- The temperature adjusts by 1°C
- The indoor unit beeps
If the room temperature is higher than the selected
temperature, the air conditioner starts cooling.
If the room temperature reaches the set temperature, the air
conditioner stops cooling, but the fan continues to operate.
Press the button to select the fan speed until the required setting is
4
displayed.
Automatic (rotated :
Low
Medium
High
Maximum
: Each time you press the button, the indoor unit beeps.
Result
To control the airflow direction, refer to page 21.
5
)
E-14
Page 15

Selecting Heat Mode
You can select Heat mode if you want to heat your room.
You can adjust the temperature and the fan speed when heating.
1
Press the (On/Off) button.
Result
: The operation indicator on the indoor unit lights up.
The indoor unit beeps.
2
Press the button on the remote control until is displayed.
Result
Note You can change modes at any time.
The air conditioner starts up in the mode you selected last.
: The indoor unit beeps each time you press the button.
The air conditioner runs in Heat mode.
ENGLISH
3
Press the button to adjust the temperature until the required
temperature is displayed.
You can set the temperature between 16°C and 30°C.
Result:
Each time you press the button:
- The temperature adjusts by 1°C
- The indoor unit beeps
If the room temperature reaches 5°C higher than the set
temperature, the air conditioner stops heating, but the fan
continues to operate.
If the room temperature reaches 3°C lower than the set
temperature, the air conditioner starts heating again.
Press the button to select the fan speed until the required setting is
4
displayed.
Automatic (rotated :
Low
Medium
High
Maximum
Result
: Each time you press the button, the indoor unit beeps.
For the first 3~5 minutes, the fan may not operate to prevent
cool air from flowing out of the indoor unit.
)
This helps to warm the air in your room sufficiently.
To control the airflow direction, refer to page 21.
5
E-15
Page 16

Selecting Dry Mode
Select Dry mode if you want to dehumidify your room.
You can adjust the temperature in this mode.
1
2
Press the (On/Off) button.
Result
: The operation indicator on the indoor unit lights up.
The indoor unit beeps.
Press the button on the remote control until is displayed.
Result
Note You can change modes at any time.
The air conditioner starts up in the mode you selected last.
: The indoor unit beeps each time you press the button.
The air conditioner runs in the Dry mode.
3
Press the button to adjust the temperature until the required
temperature is displayed.
You can set the temperature between 16°C and 30°C.
Result
: Each time you press the button:
- The temperature adjusts by 1°C
- The indoor unit beeps
To control the airflow direction, refer to page 21.
4
The air conditioner starts dehumidifying and the fan speed
adjusts automatically.
E-16
Page 17

Selecting Fan Mode
Select Fan mode if you want to ventilate your room. It helps to refresh
the air in your room. You can adjust the fan speed in this mode.
1
Press the (On/Off) button.
Result
: The operation indicator on the indoor unit lights up.
The indoor unit beeps.
2
Press the button on the remote control until is displayed.
Result
Note You can change modes at any time.
The air conditioner starts up in the mode you selected last.
: The indoor unit beeps each time you press the button.
The air conditioner runs in Fan mode.
The temperature is set automatically.
ENGLISH
Press the button to select the fan speed until the required setting is
3
displayed.
Result
To control the airflow direction, refer to page 21.
4
Low
Medium
High
: Each time you press the button, the indoor unit beeps.
E-17
Page 18

Selecting Mode
mode helps users to fall asleep well after going to bed whether
being too hot to sleep or being awakened by coldness. The
be selected only when the air conditioner is switched on in cool/heat mode.
1
Press the (On/Off) button.
Result
: The operation indicator on the indoor unit lights up.
The indoor unit beeps.
mode can
The air conditioner starts up in the mode you selected last.
2
Press the
Result
3
Press the
- The remote control display shows you that this mode automatically stops
after 8-hour operation.
- In the case of adjusting time
to 12 hours.
Result
should press the
the
automatically stop in 8-hour operation.
4
Press the
temperature is displayed.
You can set the temperature between 16°C and 30°C.
Result
button to select
: The indoor unit beeps each time you press the
The air conditioner runs in cool or heat mode.
button.
Press the button to adjust desired operation time from 30 minutes
mode will automatically stop after the set time.
Press the button.
: In the case of adjusting the extra time for mode,you
button within 10 seconds.
button to adjust the temperature until the desired
: Each time you press the
- The temperature adjusts by 1°C
- The indoor unit beeps
or mode.
button within 10 seconds.If you do not press
mode will
button;
button.
E-18
Page 19

Selecting the Energy Saving Function
Temperature changes in mode
To prevent excessive cooling/heating during sleep, the mode automatically modifies
the temperature setting in accordance with the time setting. Temperature and air current change
according to the three stages; Falling asleep, Sound sleep, and Waking up from mode,
and then the air conditioner will automatically turn off when the set time has elapsed.
ENGLISH
Three stage
prevents you from having difficulty sleeping on extremely hot/cold nights.
Falling asleep : Eases you into sleep by dropping the temperature.
Sound sleep : Relaxes your body and raises your temperature slightly.
Waking up from mode :
Allows you to wake up to comfortable crisp air making you feel refreshed and energized.
• Set the Off timer in mode for more than 5 hours. Sleep may be disturbed if the
mode is set for too short or too long a time because the temperature changes are
set to an 8-hour cycle.
• If the mode is set for less than 4 hours, the operation will stop at the set time.
If the mode is set for over 5 hours, the last hour will run in Waking Up stage before
shutting off.
• Recommended set temperature is between 25˚C~27˚C for cooling and 21˚C~23˚C for
heating.
Cool mode
Set temperature
Temp.
When the 8-hour cycle
completes, this section
.
repeats
Time(hr.)
Heat mode
Set temperature
Temp.
When the 8-hour cycle
completes, this section
repeats
.
Time(hr.)
E-19
Page 20

Selecting the Turbo Function
You can select the Turbo Function if you want to cool or heat your room as quickly
as possible. The Turbo function operates for 30 minutes with the maximum settings
before returning automatically to the mode and temperature previously selected.
1
Press the (On/Off) button.
Result
: The operation indicator on the indoor unit lights up.
The indoor unit beeps.
Press the button.
2
Result:
After 30 minutes, the air conditioner is reset automatically to
The air conditioner starts up in the mode you selected last.
The temperature and fan settings are adjusted automatically.
The air conditioner cools or heats the room as quickly as
possible
.
the previous setting.
You can select the Turbo function in Auto, Cool and Heat mode.
If you select this function in Dry or Fan mode, the mode
changes to Auto mode.
Press the button again to stop the Turbo Function before the end of the
3
30-minute period.
Result: The air conditioner is reset automatically to the previous setting.
To control the airflow direction, refer to page 21.
4
E-20
Page 21

Adjusting the Airflow Direction Vertically
ENGLISH
You can adjust the airflow direction vertically. The outer airflow blade moves up
and down to increase the efficiency of the cooling or heating operation.
Press the button until the required direction is set.
1
Result: The outer blade is adjusted vertically.
Press the button again to move the blade up and down automatically
2
during operation.
Press the button again to stop the blade moving up and down.
3
Note If you turn the air conditioner... Then the blade...
Off is closed completely.
On set to the default position.
Adjusting the Airflow Direction Horizontally
You can adjust airflow direction horizontally manually.
The inner blades with small fins move the air in the desired direction.
Adjust the inner blades by moving them left or right.
1
Make sure do not touch the inner blades during operation.
It may cause injury on your fingers.
E-21
Page 22

Setting the On Timer
You can set the On Timer to turn on the air conditioner automatically at
the appointed time within a range of 30 minutes to 24 hours.
Press the button until the desired time is displayed to set the On Timer.
1
You can set the time between 0.5 hour and 24 hours.
2
Press the button to complete the setting.
Result
: The remaining time is displayed.
The timer indicator stops blinking.
The selected mode and the temperature on the display
disappear after 10 seconds.
The air conditioner turns on automatically at the appointed
time and the On Timer setting disappears.
Press the button until the desired mode is displayed at the top of
3
the remote control to select the mode in advance.
Result
: The air conditioner operates in the selected mode when it is
turned on.
To Cancel the On Timer
If you no longer wish to use the On Timer that you have set, you can
cancel it at any time.
To cancel the On Timer, press the button one or more times until the
1
timer setting disappears.
2
Press the button.
Note If you want to turn on the air conditioner before the timer
reaches the setting time, press the
button.
E-22
Page 23

Setting the Off Timer
You can set the Off Timer to turn off the air conditioner automatically at
the appointed time within a range of 30 minutes to 24 hours.
Press the button until the desired time is displayed to set
1
the Off Timer. You can set the time between 0.5 hour and 24 hours.
3
Press the button to complete the setting.
: The remaining time is displayed.
Result
Example If you would like to turn the air conditioner on after 2 hours
Note
Caution Make sure that the air conditioner will not continue to run
The timer indicator stops blinking.
The air conditioner turns off automatically at the appointed
time and the Off Timer setting disappears.
and to operate it for 2 hours during non-operation:
1. Press the button until ‘2.0 Hr’is displayed.
2. Press the button.
3. Press the button until ‘4.0 Hr’is displayed.
4. Press the button.
If you would like to turn on the air conditioner and then to turn
off it automatically at the appointed time by using On/Off Timer
during operation, you should set the On Timer longer than the
Off Timer.
after On Timer setting is confirmed.
ENGLISH
Note
You can check or change the mode and/or the temperature
by pressing the
the Off Timer.
If you would like to turn off the air conditioner and then to
button or the button after setting
turn on it again automatically at the appointed time by using
On/Off Timer during non-operation, you should set the
Off Timer longer than the On Timer.
To Cancel the Off Timer
If you no longer wish to use the Off Timer that you have set, you can
cancel it at any time.
To cancel the Off Timer, press the button one or more times until the
1
timer setting disappears.
2
Press the button.
Note
If you want to turn off the air conditioner before the timer
reaches the setting time, press the
button.
E-23
Page 24

Operating Your Air Conditioner Without the Remote Control
Your air conditioner can be operated directly from the indoor unit if
the remote control is lost or broken.
To switch the air conditioner on, press the ON/OFF switch on the right
1
side of the indoor unit.
Result:
To switch the air conditioner off, press the ON/OFF switch again.
2
Note Even if the air conditioner has been switched on via the
The OPERATION indicator on the indoor unit comes on.
The indoor unit beeps.
The air conditioner starts up in the most suitable mode for
the room temperature. The mode may change from cooling into
heating, from heating into cooling depending on the current
temperature during operation:
Room Temperature Operating Mode
Less than 24°C Heat
24°C or above Cool
ON/OFF switch, operations can still be controlled using the
remote control as usual.
E-24
Page 25

Cleaning Your Air Conditioner
To get the best possible use out of your air conditioner, you must
clean it regularly to remove the dust that accumulates on the air filter.
IMPORTANT
Open the upper front grille by pulling the lower right and left tabs
1
of the grille.
Pull air filters out of each tab of the grille.
2
Before cleaning your air conditioner, ensure that you
have switched off the breaker used for the unit.
ENGLISH
Remove all dust on the air filters with a vacuum cleaner or brush.
3
When you finished, insert air filters by fixing it to each tab of the grille.
4
To close the front grille, fix it to hooks and push down the lower
5
right and left tabs of the grille.
Clean the front grille with a damp cloth and mild detergent
6
(do NOT use benzene, solvents or other chemicals).
Note If you have not used the air conditioner for a long period of time,
set the fan going for three to four hours to dry the inside of
the air conditioner thoroughly.
Cleaning Deodorizing and Bio filter (Option)
To remove minute dust particles and odors, deodorizing and Bio filter
are installed in the air conditioner. You should clean the filters every 3 months.
Open the upper front grille by pulling the lower right and left tabs of
1
the grille.
Pull out the deodorizing and Bio filter.
2
Front grille
Air filter
Body groove
Body
Front grille
Hook
Body
Deodorizing Filter
Wash the filters with clean water, then dry them in the shade.
3
Insert the filters into the original position.
4
Note You can change the position of filters with each other.
Close the front grille.
5
Bio Filter
E-25
Page 26

Temperature and Humidity Ranges
The table below indicates the temperature and humidity ranges the air conditioner can be operated within. Refer to
the table for efficient use
MODE OPERATING CONDITIONS IF OUT OF CONDITIONS
COOL
HEAT
DRY
POWER SUPPLY
Any damage occurs out of condition specified cannot be covered by product warranty.
If the system works continuosly outside of conditions, its performace and reliability will be compromised.
.
Indoor temp: 16°C~32°C
Indoor humidity: below 80%
Outdoor temp:
21°C~43°C
Indoor temp: below 27°C
Outdoor temp:
0°C~24°C
Indoor temp: 16°C~32°C
Indoor humidity: below 80%
Outdoor temp:
18°C~43°C
Single phase rated voltage
minimum and maximum limit
- A safety device will stop continuously the
system functioning;
- Condensation may occur on the indoor unit
with risk to have either water blow off or drops
on the floor;
- A safety device will stop continuously the
system functioning;
- A safety device will stop continuously the
system functioning;
- Condensation may occur on the indoor unit
with risk to have either water blow off or drops
on the floor;
220V-240V~50Hz
198V min.-264V max.
Operating Recommendations
When you use your air conditioner, it is recommended that you read the following:
Topic Recommendation
Heating capacity
Warm air circulation The air conditioner circulates warm air to heat your room. It will take some time to warm
Frost
High indoor and
outdoor temperatures
The heat pump inside the air conditioner absorbs heat from outside air and brings itindoors.
If the temperature of the outside air drops, the air conditioner heats less. If the room is not warm
enough, use an additional heating appliance.
the air in your room entirely after the air conditioner turns on.
Therefore, turn the air conditioner on in advance.
When you select the Heat mode, frost may form in the outdoor unit due to low temperature
and high humidity.
If this happens:
The heating operation is stopped.
The air conditioner defrosts automatically for about 7 minutes. After about 7 minutes,
the air conditioner starts operating again normally.
If both the indoor and outdoor temperatures are high when you select the Heat mode,
the fan and the compressor of the outdoor unit may stop periodically.
This is normal; wait until the air conditioner turns on again.
E-26
Power failure If a power failure occurs when the air conditioner is operating, the air conditioner will turn off.
Protection mechanism When the air conditioner is started immediately after being plugged in or stopped,
When the power returns, the air conditioner will start up again automatically.
the normal operation starts up after 3 minutes for the reason of protection.
Page 27

Solving Common Problems
Before contacting the after-sales service, perform the following simple checks.
They may save you the time and expense of an unnecessary call.
Problem Explanation/Solution
ENGLISH
The air conditioner does not
operate at all.
The temperature is not adjusted.
The air conditioner does not operate
in the HEAT mode.
The cool(warm) air does not come
out from the air conditioner.
The fan speed is not adjusted.
The remote control does
not operate.
The Timer is not set.
Check if power is on and operate the air conditioner again.
Check if the circuit breaker is switched off.
Check if Off Timer is set.
Check if you selected the Fan mode.
Check if the air conditioner is cooling only model.
Check if the remote control is for cooling only model.
Check if set temperature higher(lower) than current temperature.
Check if you selected the Fan mode. Select the Cool, Heat, Auto or Dry
mode.
Check if the air filter is blocked by dirt. Clean the air filter regularly.
Check if the there is cover on the outdoor unit or any obstacle.
Remove the cover or obstacle.
Check if you installed the air conditioner under direct sunlight.
The window or door may be opened.
Check if you turn on the air conditioner just now.
It takes about 3 minutes to cool or heat the room.
Check if the drain pipe is too long.
In Dry mode, the fan speed is selected automatically.
Check if the battery is discharged. Replace the battery.
Check if the remote control sensor is blocked.
Check if the air conditioner is placed near strong light.
Check if you pressed the button after selecting time.
Odor is permeated in the
room during operation.
The indoor unit indicator
flashes.
Strange sound is heard from
the air conditioner.
Water drops from the outdoor
unit connection part.
Check if you use the air conditioner in smoky area or there is a smell.
Ventilate the room or select the Fan mode for 1~2 hours.
Press the button to turn on the air conditioner again.
Switch the circuit breaker off and switch on it again.
The sound is heard when the refrigerant gas flow is changed depending
on the use of the air conditioner.
When you press the button, noise may be heard that the
air conditioner sense the airflow blade.
Water may form due to the difference of the temperature.
AUTO- DIAGNOSTIC FUNCTION
This air conditioner has an auto-diagnostic function in case a failure will happen.
When error occurs, the Lamp will blink.
Before contacting customer call center green number, please ask to installer to
make a double check of installation unless there’s a full evidence of SAMSUNG
product problem.
E-27
Page 28

Contact SAMSUNG WORLD WIDE
If you have any comments or questions regarding a Samsung product, contact the SAMSUNG customer care center.
Country Customer Care Center Web Site
BELGIUM 0032 (0)2 201 24 18
CZECH REPUBLIC 800-726-786 (800 - SAMSUNG) www.samsung.com/cz
DENMARK 8 - SAMSUNG(7267864) www.samsung.com/dk
FINLAND 30 - 6227 515 www.samsung.com/fi
FRANCE
GERMANY 01805 - SAMSUNG(726-7864 € 0,14/Min) www.samsung.com/de
HUNGARY 06-80-SAMSUNG(726-7864) www.samsung.com/hu
ITALIA 800-SAMSUNG(726-7864) www.samsung.com/it
LUXEMBURG
NETHERLANDS 0900-SAMSUNG (0900-7267864) (€ 0,10/Min) www.samsung.com/nl
NORWAY 3 - SAMSUNG(7267864) www.samsung.com/no
POLAND
PORTUGAL 80820-SAMSUNG(726-7864) www.samsung.com/pt
SLOVAKIA 0800-SAMSUNG(726-7864) www.samsung.com/sk
SPAIN 902 - 1 - SAMSUNG (902 172 678) www.samsung.com/es
SWEDEN 075 - SAMSUNG(726 78 64) www.samsung.com/se
U.K 0845 SAMSUNG (7267864) www.samsung.com/uk
EIRE 0818 717 100 www.samsung.com/ie
AUSTRIA 0810 - SAMSUNG(7267864, € 0.07/min) www.samsung.com/at
Switzerland 0848 - SAMSUNG(7267864, CHF 0.08/min) www.samsung.com/ch
C
Samsung Electronics Co., Ltd. All Rights Reserved.
01 4863 0000 www.samsung.com/fr
0035 (0)2 261 03 710 www.samsung.com/lu
0 801 1SAMSUNG(172678)
022-607-93-33
www.samsung.com/be (Dutch)
www.samsung.com/be_fr (French)
www.samsung.com/pl
Page 29

USER’S MANUAL
AQ09F
AQ12F
AQ18
F
AQ24F
AQ09N
AQ12N
AQ18
N
AQ24N
AQ09S
Series
Series
Series
Series
Series
Series
Series
Series
Series
ENGLISH
ESPAÑOLFRANÇAISITALIANOPORTUGUÊSDEUTSCHEΛΛHNIKAБЪЛГАРСКИROMÂNĂHRVATSKI
SE F I P D G
Bu Ro Cr
Split - type Air Conditioner
(Cooling and Heating)
DB98-30665A(1)
 Loading...