

AIR CONDITIONER
( Cool )
EADB68-01386A(3)
OWNER’S
INSTRUCTIONS
Indoor Unit Outdoor Unit
APC3200B AXC3200B
APC2840B UPC2840B
E-
2
Safety Precautions
The following safety precautions must be taken when using your air conditioner.
1 Make sure that the indoor unit is correctly ventilated at all times; do NOT place clothing or other materials
over it.
2 NEVER spill liquid of any kind into the indoor unit. Should this happen, switch off the breaker used for your
air conditioner and contact your installation specialist.
3 Do NOT insert anything between the air flow blades, as the inner fan may become damaged and you may be
hurt. Keep children away from the indoor unit.
4 Do NOT place any obstacles in front of the outdoor unit.
5 If the remote control will not be used for a long time, remove the batteries.
6 Users of this product are cautioned not to attempt repair of this product at their own discretion.
Instead, they are requested to directly contact a designated service center or the outlet at which the
product was purchased.
7 If the supply cord is damaged, it must be replaced by a special cord or assembly available from the
manufacturer or its service centre.
8 This device must be installed according to the national electrical rules.
9 Before disposing of the remote control it is necessary to remove batteries.
10 The appliance is not intended for use by young children or infirm person without supervision;
young children should be supervised to ensure that they do not play with the appliance.
The manufacturer does not take any responsibility for any accidents that occur because
the air conditioner is not fixed firmly or installed securely, during installing or using the
product. In case you experience difficulty in installation, you must use an installation
specialist. An accident will occur if the installation is not done as recommends in the
installation guide.
CCCCAAAAUUUUTTTTIIIIOOOONN
NN

E-
3
Contents
◆
P
REPARING YOUR AIR CONDITIONER
■ Safety Precautions . . . . . . . . . . . . . . . . . . . . . . . . . . . . . . . . . . . . . . . . 2
■ View of the Unit . . . . . . . . . . . . . . . . . . . . . . . . . . . . . . . . . . . . . . . . . . . 4
■ Remote Control-Buttons and Display . . . . . . . . . . . . . . . . . . . . . . . . . . 6
■ Getting Started . . . . . . . . . . . . . . . . . . . . . . . . . . . . . . . . . . . . . . . . . . . 7
■ Inserting the Remote Control Batteries . . . . . . . . . . . . . . . . . . . . . . . . . 8
■ Using the control Panel on the Indoor Unit . . . . . . . . . . . . . . . . . . . . . . 8
■ Using the Remote Control . . . . . . . . . . . . . . . . . . . . . . . . . . . . . . . . . . 8
◆
O
PERATING YOUR AIR CONDITIONER
■ Selecting the Automatic Operating Mode . . . . . . . . . . . . . . . . . . . . . . . 9
■ Cooling Your Room . . . . . . . . . . . . . . . . . . . . . . . . . . . . . . . . . . . . . . . .10
■ Removing Excess Humidity . . . . . . . . . . . . . . . . . . . . . . . . . . . . . . . . .11
■ Changing the Room Temperature Quickly . . . . . . . . . . . . . . . . . . . . . .12
■ Selecting the Long Function . . . . . . . . . . . . . . . . . . . . . . . . . . . . . . . . .13
■ Airing Your Room . . . . . . . . . . . . . . . . . . . . . . . . . . . . . . . . . . . . . . . . .14
■ Adjusting the Air Flow Direction Vertically . . . . . . . . . . . . . . . . . . . . . .15
■ Adjusting the Air Flow Direction Horizontally . . . . . . . . . . . . . . . . . . . .15
◆
P
ROGRAMMING YOUR AIR CONDITIONER
■ Setting the On Timer . . . . . . . . . . . . . . . . . . . . . . . . . . . . . . . . . . . . . . .16
■ Setting the Off Timer . . . . . . . . . . . . . . . . . . . . . . . . . . . . . . . . . . . . . . .17
■ Setting the Sleep Timer . . . . . . . . . . . . . . . . . . . . . . . . . . . . . . . . . . . .18
◆
R
ECOMMENDATIONS FOR USE
■ Operating Recommendations . . . . . . . . . . . . . . . . . . . . . . . . . . . . . . . .19
■ Temperature and Humidity Ranges . . . . . . . . . . . . . . . . . . . . . . . . . . .20
■ Cleaning Your Air Conditioner . . . . . . . . . . . . . . . . . . . . . . . . . . . . . . . .21
■ Solving Common Problems . . . . . . . . . . . . . . . . . . . . . . . . . . . . . . . . .22
◆
T
ECHNICAL SPECIFICATIONS
E-
4
View of the Unit
Indoor Unit
Outer Air Flow Blades
Inner Air Flow Blades
Control Panel (refer to page 5)
Air Filter (Inside)
Air Inlet
How to open the front panel
◆ Hold the upper part of the front panel,
then pull it slightly forward.
E-
5
Outdoor Unit
Air Outlet
Connection Valve
Control Panel
Air Inlet(Rear)
Temperature setting
Remote control sensor
Fan speed indicators
Operating indicators
Fan speed selection
button
On/Off button
Turbo button
Temperature
adjustment buttons
Power indicator
Operating indicators
Timer indicator
Swing indicator
Operating mode selection
button (AUTO, COOL,
DRY, FAN)
Operating mode
indicators
E-
6
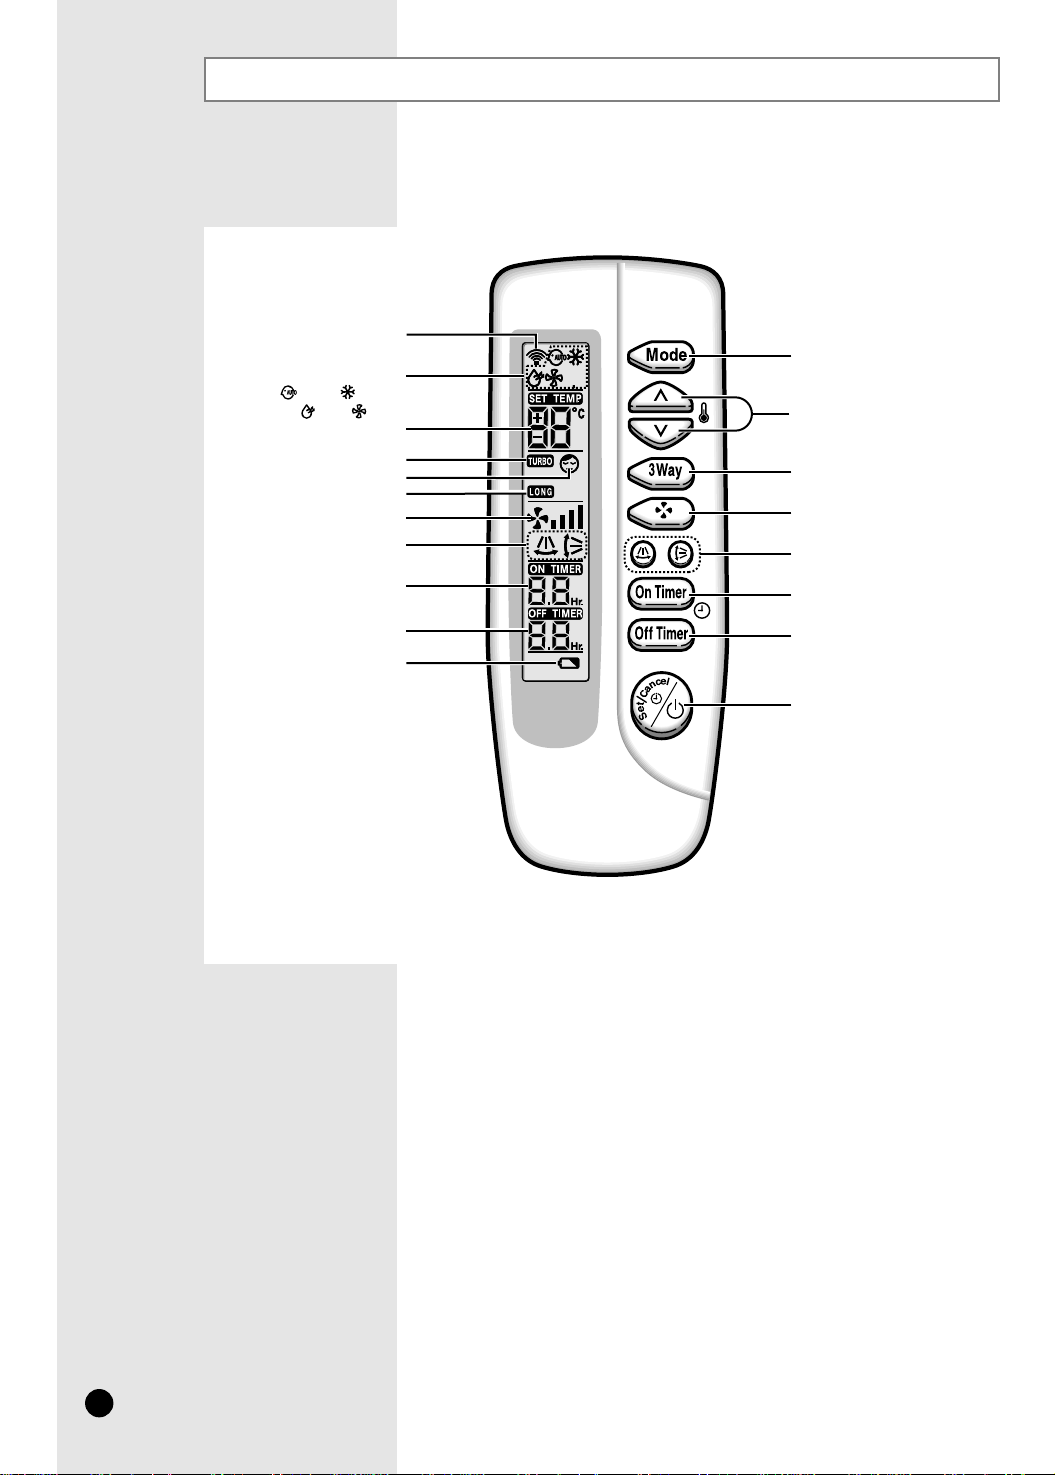
Remote Control - Buttons and Display
Operating mode
( AUTO, COOL,
DRY, FAN)
Remote control
transmission indicator
Mode selection button
(AUTO, COOL, DRY, FAN)
Turbo/Sleep/Long mode
selection button
Swing buttons
On Timer button
Off Timer button
On/Off &
Timer Set/Cancel button
Fan speed adjustment
button
Temperature adjustment
buttons
Temperature setting
Turbo mode
Sleep mode
Fan speed
Long mode
Air flow directions
On Timer setting
Off Timer setting
Battery discharge indicator
E-
7
G
etting Started
You have just purchased a packaged air conditioner and it has been
installed by your installation specialist.
Your Owner’s Instructions contains valuable information on using your
air conditioner. Please take the time to read it as it will help you take full
advantage of the unit’s features.
The booklet is organized as follows.
◆ The following figures are shown on pages from 4 to 6 :
- View of the unit
- Remote control(buttons and display)
They will help you find the buttons and understand the symbols displayed.
◆ In the main part of the installation book, you will find a series of
step-by-step procedures for each function available.
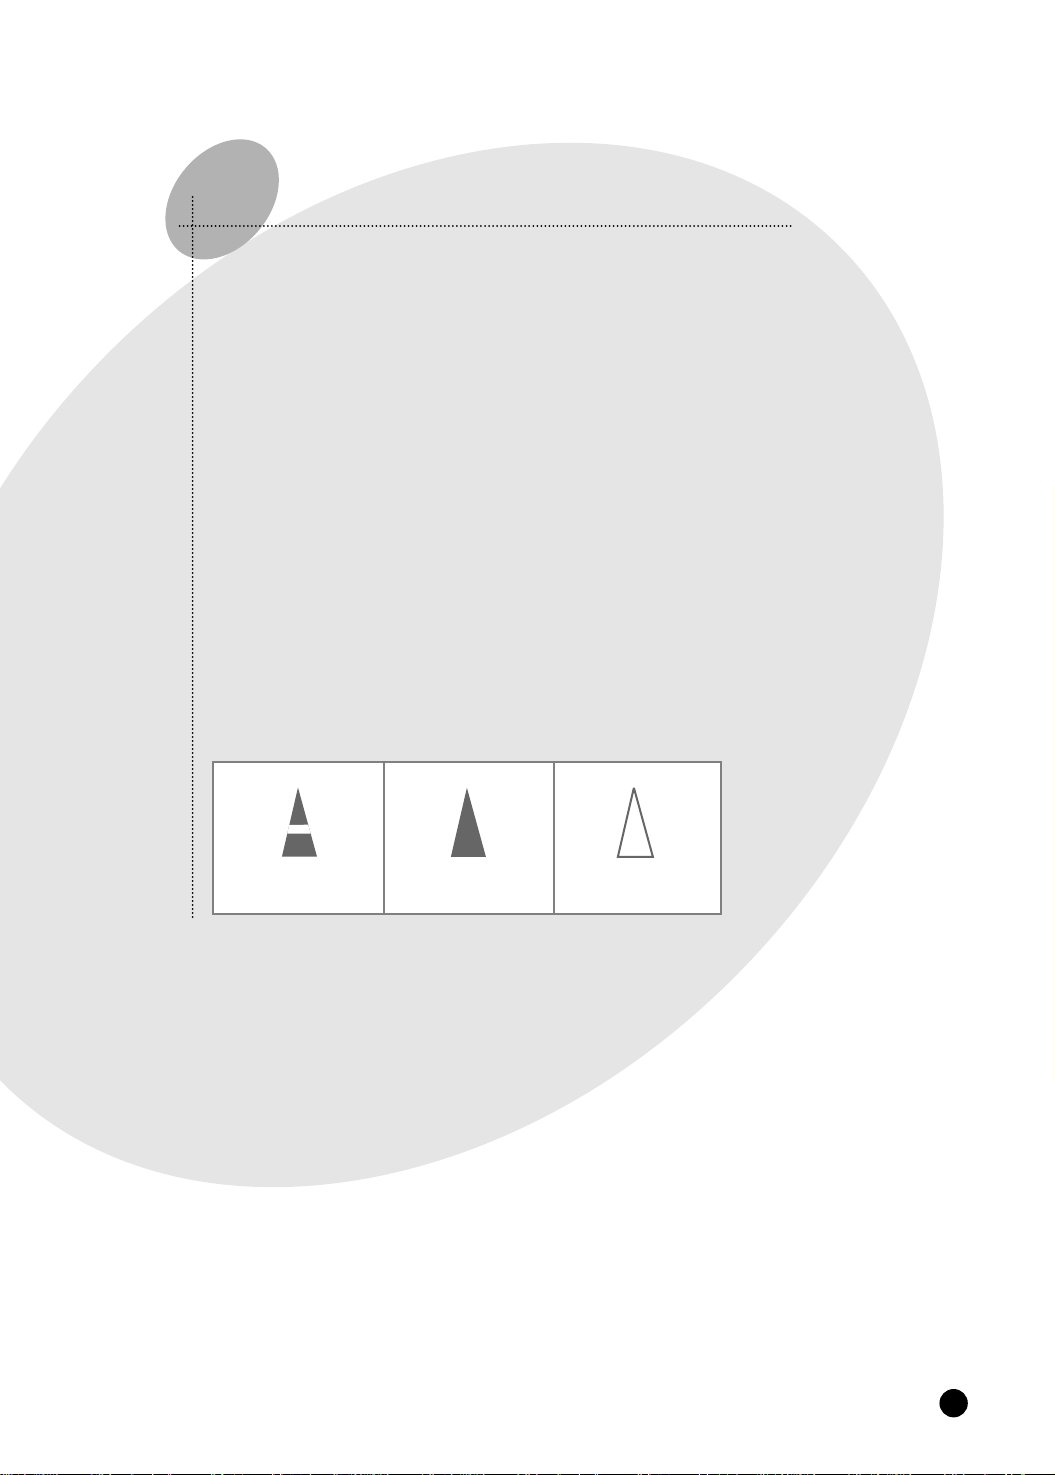
The illustrations in the step-by-step procedures use three different symbols:
PRESS PUSH HOLD DOWN
E-
8
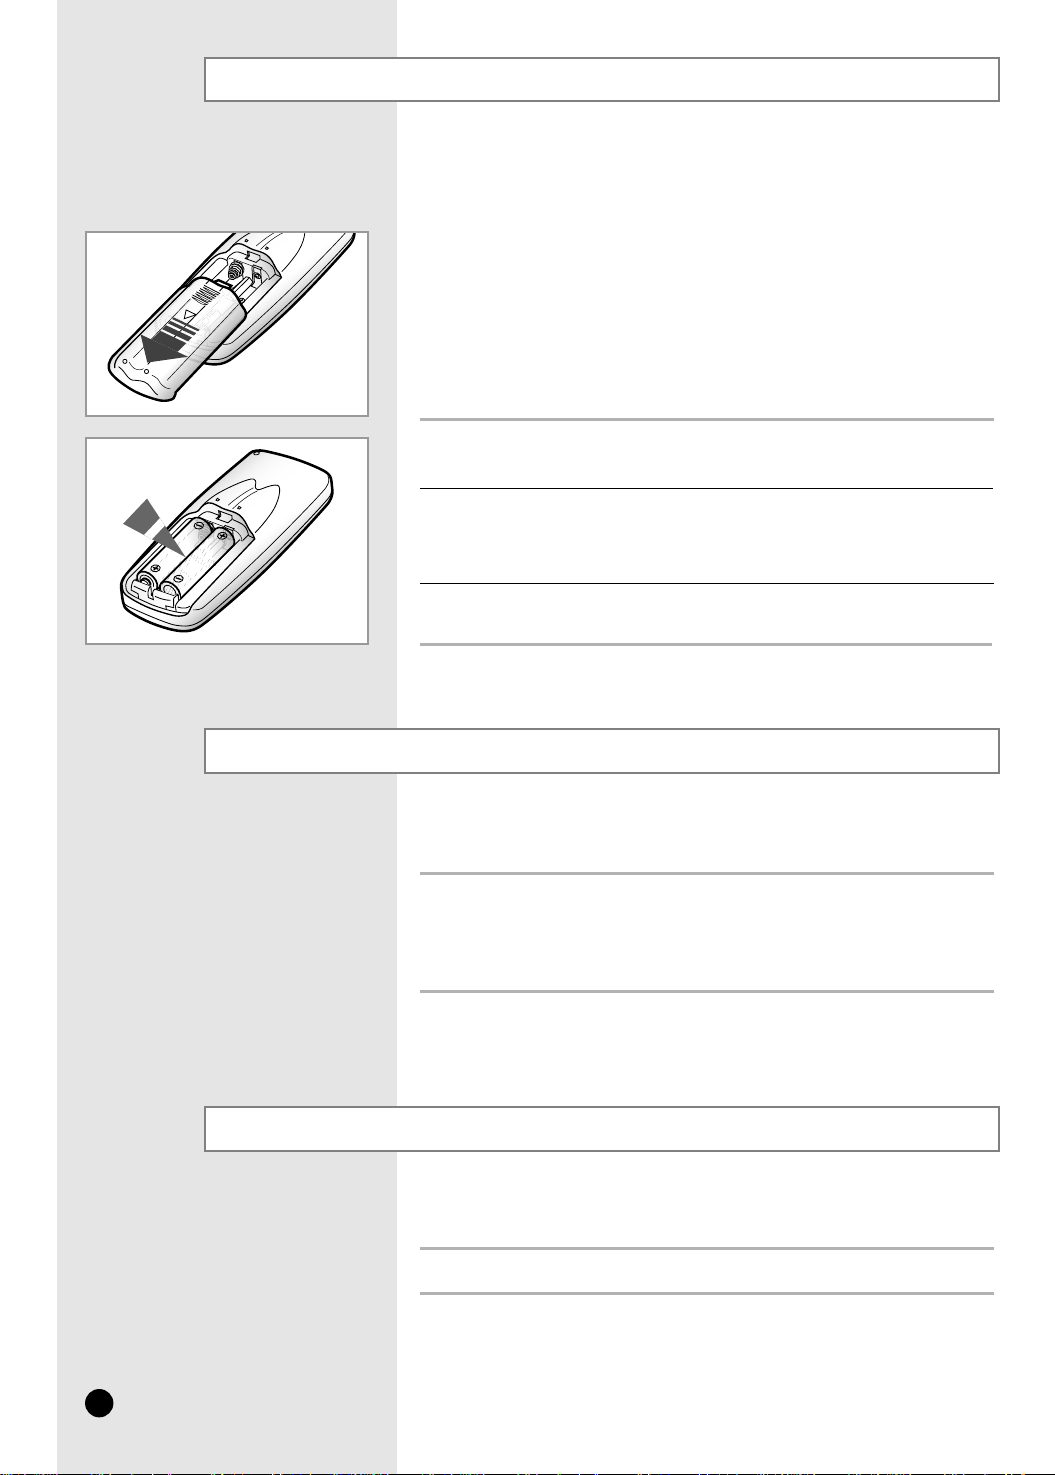
Inserting the Remote Control Batteries
Push the battery cover on the rear of the remote control with your thumb
in the direction of the arrow and remove it.
Insert the two batteries, taking care to respect the polarities :
◆ + on the battery with + on the remote control.
◆ - on the battery with - on the remote control.
1
2
Close the cover by sliding it back until it clicks into place.
3
◆ Use two AAA, LR03 1.5V batteries.
◆ Do not use old batteries or different kinds of batteries together.
◆ Batteries may be completely discharged after 12 months, even
◆ if they have not actually been used.
You must insert or replace the remote control batteries when :
◆ You purchase the air conditioner
◆ The remote control does not work correctly
NNNNoooottttee
ee
Using the Control Panel on the Indoor Unit
You can operate with indoor unit when you do not wish to or cannot
operate the air conditioner with the remote control.
You can use the AUTO, COOL, DRY and FAN functions depending on your
specific requirement. For further details on the functions, refer to page 9~14.
Using the Remote Control
All features of the air conditioner can be controlled with the remote
control.
Press any buttons depending on your specific requirements.

E-
9
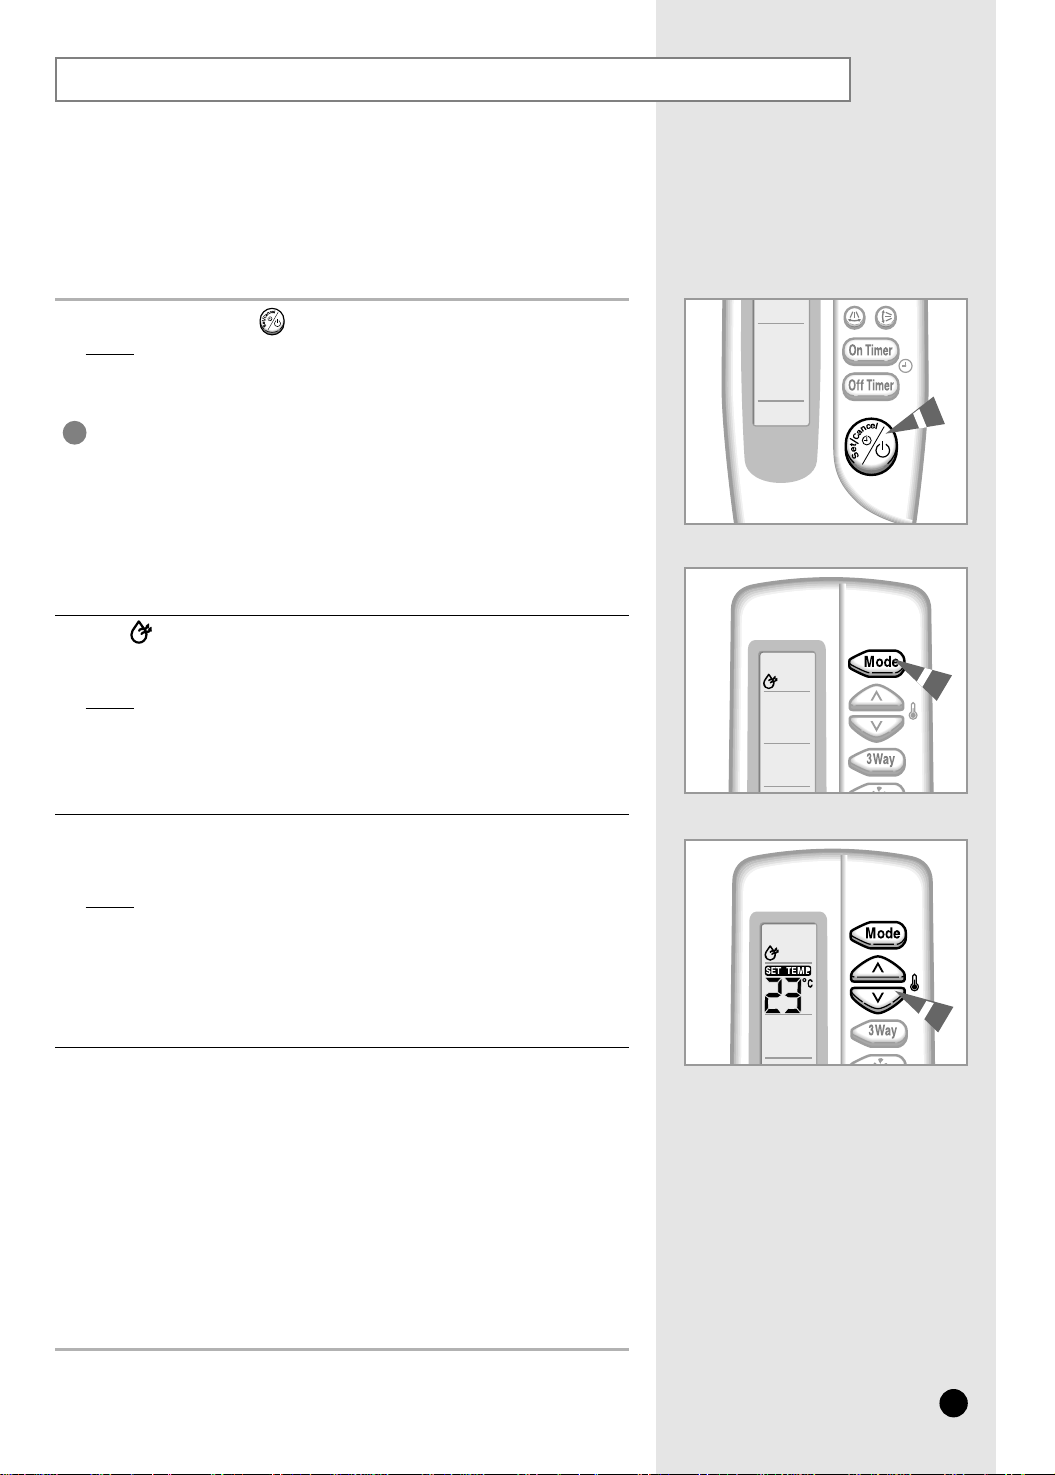
Selecting the Automatic Operating Mode
You can start the air conditioner in Automatic mode from your remote
control. In the Automatic mode, the standard temperature and the
optimum fan speed is selected automatically. You can adjust the
standard temperature but not the fan speed.
1
If the is not displayed at the top of the remote control,
press the MODE button on the remote control one or more times until it
appears.
Result
: ◆ The indoor unit beeps each time you press the MODE button.
◆ The air conditioner runs in AUTO mode.
2
You can change modes at any time.
If necessary, press the (On/Off) button.
Result: ◆ The POWER indicator on the indoor unit lights up.
◆ The air conditioner starts up in the mode selected
when the unit was last used.
◆ The indoor unit beeps.
The air conditioner is fitted with a protection mechanism to
prevent the unit from being damaged when it is started
immediately after being:
◆ Plugged in
◆ Stopped
lt will start up normally after three minutes.
IMPORTANT
NNNNoooottttee
ee
To adjust the standard temperature (The air conditioner automatically
set the standard temperature by the current room temperature.),
press the TEMPERATURE buttons one or more times.
3
SET TEMP. SET TEMP. - SET TEMP. SET TEMP.
-2°C -1°C Standard temperature +1°C +2°C
< When you feel hot > < When you feel chilly >

E-
10
Cooling Your Room
1
If necessary, press the (On/Off) button.
Result:
◆
The POWER indicator on the indoor unit lights up.
◆ The air conditioner starts up in the mode selected
when the unit was last used.
◆ The indoor unit beeps.
The air conditioner is fitted with a protection mechanism to
prevent the unit from being damaged when it is started
immediately after being:
◆ Plugged in
◆ Stopped
lt will start up normally after three minutes.
IMPORTANT
If the is not displayed at the top of the remote control,
press the MODE button on the remote control one or more times until it
appears.
Result:
◆
The indoor unit beeps each time you press the MODE button.
◆
The air conditioner runs in COOL mode.
2
You can change modes at any time.
NNNNoooottttee
ee
To adjust the temperature, press the TEMPERATURE buttons one or
more times until the required temperature is displayed.
Possible temperatures are between 18°C and 30°C inclusive.
Result: ◆
Each time you press the TEMPERATURE buttons:
- The temperature is adjusted by 1°C
- The indoor unit beeps
◆ The air conditioner starts cooling, provided that the room
temperature is higher than the selected temperature;
the fan will, however, operate.
3
Select the fan speed by pressing the FAN button one or more times
until the required setting is displayed:
Automatic (rotated : )
Low
Medium
High
Result
: Each time you press the FAN button, the indoor unit beeps.
4
To control the direction of the air flow, refer to page 15.
5
You must select the Cool mode if you wish to adjust the:
◆ Cooling temperature
◆ Fan speed when cooling
E-
11
Removing Excess Humidity
You can change modes at any time.
NNNNoooottttee
ee
If the atmosphere in your room is very humid or damp, you can
remove excess humidity without lowering the room temperature too
much.
1 If necessary, press the (On/Off) button.
Result
: ◆
The POWER indicator on the indoor unit lights up.
◆ The air conditioner starts up in the mode selected when
the unit was last used.
◆ The indoor unit beeps.
The air conditioner is fitted with a protection mechanism
to prevent the unit from being damaged when it is started
immediately after being:
◆ Plugged in
◆ Stopped
It will start up normally after three minutes.
2 If the is not displayed at the top of the remote control,
press the MODE button on the remote control one or more times until it
appears.
Result
: ◆
The indoor unit beeps each time you press the MODE button.
◆
The air conditioner runs in DRY mode.
3 To adjust the temperature, press the TEMPERATURE buttons one or
more times until the required temperature is displayed.
Possible temperatures are between 18°C and 30°C inclusive.
Result
: ◆ Each time you press the TEMPERATURE buttons:
- The temperature is adjusted by 1°C
- The indoor unit beeps
◆ The air conditioner starts removing the excess humidity;
the quantity of air is adjusted automatically.
4 To control the direction of the air flow, refer to page 15.
IMPORTANT

E-
12
Changing the Room Temperature Quickly
The Turbo cooling function is used to cool your room as quickly as possible.
EEEExxxxaaaammmmpppplllleeee
: You have just come home and find that the room is very
hot. You wish to cool it down as quickly as possible.
The Turbo function operates for 30 minutes with the maximum settings before
returning automatically to the mode and temperature previously selected.
1
If necessary, press the (On/Off) button.
Result
: ◆ The POWER indicator on the indoor unit lights up.
◆ The air conditioner starts up in the mode selected when the unit
was last used.
◆ The indoor unit beeps.
2
Press the button until is displayed on the remote control.
Result: ◆ The temperature and fan settings are adjusted automatically.
◆ The air conditioner cools the room as quickly as possible.
◆ After 30 minutes, the air conditioner is reset automatically to the
previous mode, temperature and fan settings.
But, if you press the button in DRY or FAN mode,
it will change to AUTO mode automatically.
3
If you wish to stop the Turbo function before the end of the 30-minute period,
press the button one or more times until , or disappears.
Result
: The air conditioner is reset automatically to the previous mode,
temperature and fan settings.
4
To control the direction of the air flow, refer to page
15.

E-
13
Selecting the Long Function
You can use the Long cooling function when you wish to make the cool
air run to every corner in your room, especially when you are away from
the air conditioner.
1
If necessary, press the (On/Off) button.
Result
: ◆ The POWER indicator on the indoor unit lights up.
◆ The air conditioner starts up in the mode selected when the unit
was last used.
◆ The indoor unit beeps.
2
Press the button until is displayed on the remote control.
Result
: ◆ The temperature and fan settings are adjusted automatically.
◆ The air conditioner cools the room as far as possible.
3
If you wish to stop the Long function before the end of the 30-minute period,
press the button one or more times until , or disappears.
Result
: The air conditioner is reset automatically to the previous mode,
temperature and fan settings.
But, if you press the button in DRY or FAN mode that is
changed with AUTO mode automatically.
4
To control the direction of the air flow, refer to page
15.
You cannot adjust the outer air flow blades when the Long
function is selected.
NNNNoooottttee
ee

E-
14
Airing Your Room
If the atmosphere in your room is stale, you can air the room using
the Fan feature.
3 Select the fan speed by pressing the FAN button one or more times
until the required setting is displayed:
Low
Medium
High
Result
: Each time you press the FAN button, the indoor unit beeps.
4 To control the direction of the air flow, refer to page 15.
2 If the is not displayed at the top of the remote control,
press the MODE button on the remote control one or more times until it
appears.
Result
: ◆
The indoor unit beeps each time you press the MODE button.
◆
The air conditioner runs in FAN mode.
◆
The temperature is set automatically.
NNNNoooottttee
ee You can change modes at any time.
1 If necessary, press the (On/Off) button.
Result
: ◆
The POWER indicator on the indoor unit lights up.
◆ The air conditioner starts up in the mode selected when
the unit was last used.
◆ The indoor unit beeps.
E-
15
Adjusting the Air Flow Direction Vertically
Adjusting the Air Flow Direction Horizontally
You can adjust the position of the outer air flow blade on the upper part of
the unit, thus increasing the efficiency of the air conditioner.
1 Press the button one or more times as required.
Result
: The outer blade is adjusted vertically.
RECOMMENDATION
When... Adjust the blade to face...
Cooling Upwards.
3
To stop the blade moving up and down, press the button again.
2 If you want the blade to move up and down automatically when the air
conditioner is operating, press the button.
Result
: The blades move up and down, around the base position set.
Just as the outer air flow blade can be adjusted vertically, the inner
blades can be adjusted horizontally.
1 Press the button one or more times as required.
Result
: ◆
The inner blade is adjusted horizontally.
2 If you want blade to move left and right automatically when the air
conditioner is operating, press the button.
Result
: ◆
The blades move left and right, around the base position set.
3 To stop the blade moving left and right, press the button again.

E-
16
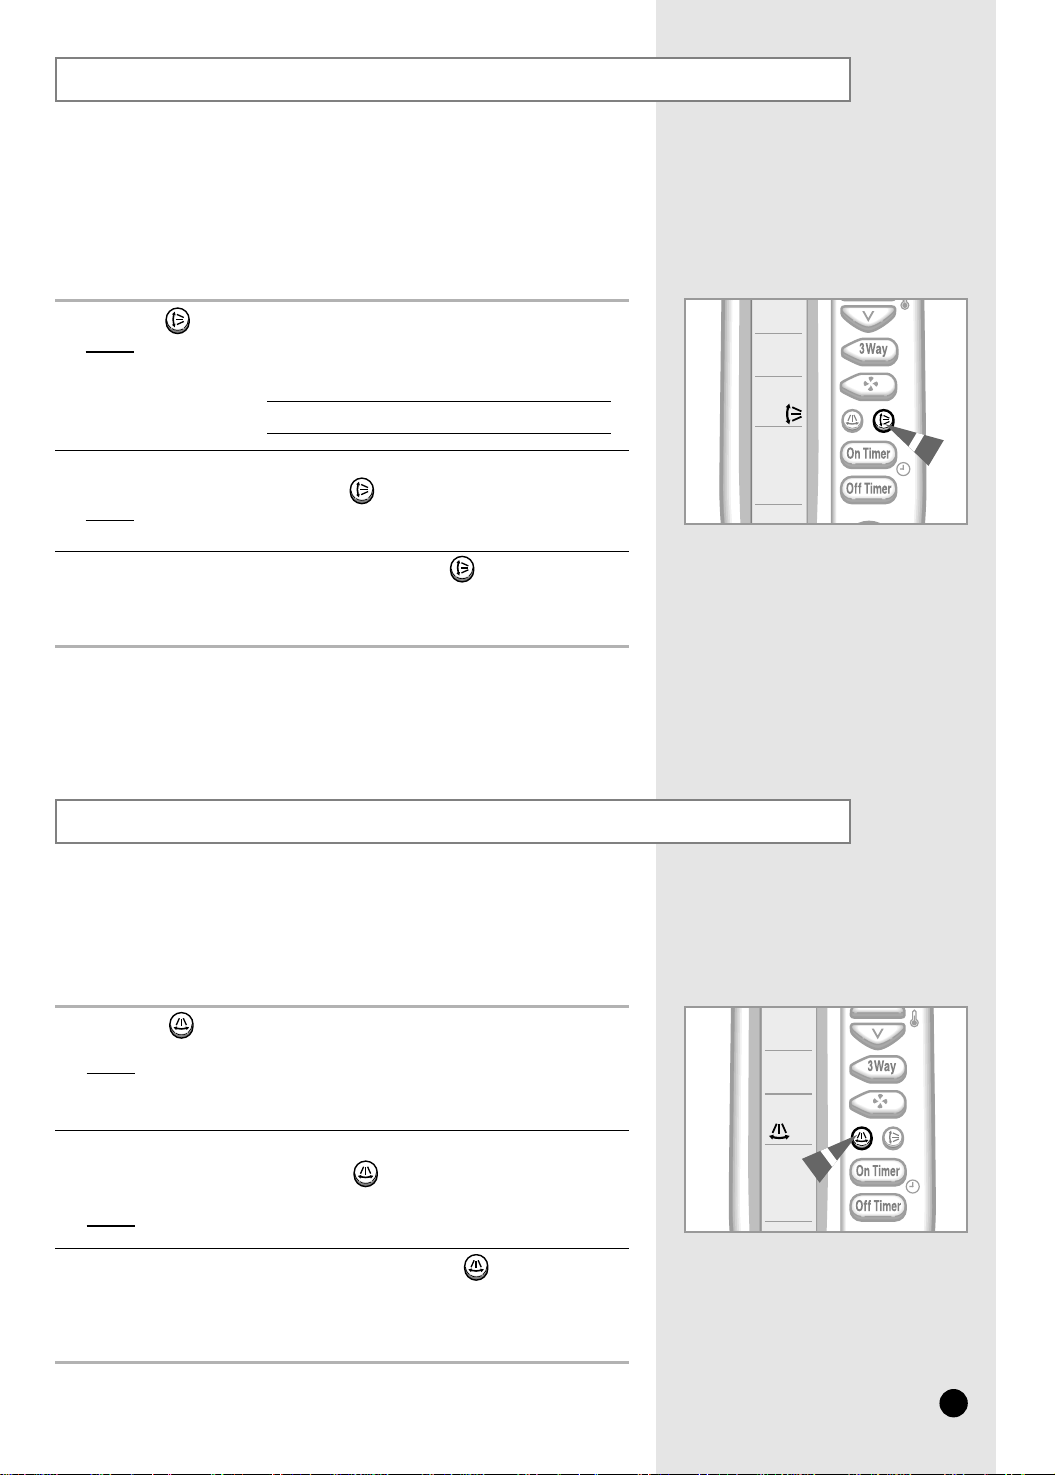
Setting the On Timer
If you want to turn on the air conditioner before the timer reaches
the setting time, press the (On/Off) button.
NNNNoooottttee
ee
The On Timer enables you to switch on the air conditioner automatically
after a given period of time. You can set the period of time from
30 minutes to 24 hours.
To set the operating time, press the ON TIMER button one or more times
until the required time is displayed. Possible time is between 0.5 hour and
24 hour inclusive.
1
Press the (Set/Cancel) button to complete the setting.
Result:
◆ The remaining time is displayed.
◆ Blinking of the timer indicator stops.
◆ The selected mode and the temperature on the display
disappear after 10 seconds.
◆ The air conditioner will switch on automatically when the
counter displayed on the remote control reaches the set time
and disappears the On timer setting.
2
To cancel the On Timer, press the ON TIMER button one or more times
until the timer setting disappears.
1
Press the (Set/Cancel) button.
2
To Cancel the On Timer
To select an operating mode in advance, press the button until the
desired mode is displayed at the top of the remote control.
Result:
◆ The air conditioner will run in the selected mode when it is
turned on.
3

E-
17
Setting the Off Timer
The Off Timer enables you to switch off the air conditioner automatically
after a given period of time. You can set the period of time from
30 minutes to 24 hours.
To set the operating time, press the OFF TIMER button one or more times
until the required time is displayed. Possible time is between 0.5 hour and
24 hour inclusive.
1
You can see or change the setting mode and/or the temperature
by pressing the MODE button or the TEMPERATURE buttons
after setting the Off timer.
NNNNoooottttee
ee
Press the (Set/Cancel) button to complete the setting.
Result:
◆ The remaining time is displayed.
◆ Blinking of the timer indicator stops.
◆ The air conditioner will switch off automatically when the
counter displayed on the remote control reaches the set time
and disappears the Off timer setting.
2
If you would like to turn the air conditioner on after 2 hours
and to operate it for 2 hours:
1. Press the ON TIMER button until ‘2.0 Hr’ is displayed.
2. Press the (Set/Cancel) button.
3. Press the OFF TIMER button until ‘4.0 Hr’ is displayed.
4. Press the (Set/Cancel) button.
EEEExxxxaaaammmmppppllllee
ee
If you want to turn off the air conditioner before the timer reaches
the setting time, press the (On/Off) button.
NNNNoooottttee
ee
To cancel the Off Timer, press the OFF TIMER button one or more times
until the timer setting disappears.
1
Press the (Set/Cancel) button.
2
To Cancel the Off Timer

E-
18
Setting the Sleep Timer
The Sleep Timer can be used when you are cooling your room to
switch the air conditioner off automatically after a period of six
hours.
NNNNoooottttee
ee If you wish to switch the unit off at a specific time,
refer to page 17.
2 Press the button one or more times until appears on the
remote control.
Result
: ◆ The indoor unit beeps.
◆ The air conditioner will be controlled as indicated in the
illustrations below.
Cooling The desired temperature is
increased by 1°C every hour.
When it has been increased
by 2°C (after two hours), the
temperature is maintained for
four hours.
To Cancel the Sleep Timer
If you no longer wish to use the Sleep Timer that you have set, you
can cancel it at any time.
Press the button.
Result
: ◆ The indoor unit beeps.
◆ The is no longer displayed.
◆ The air conditioner operates normally.
If the is not displayed at the top of the remote control,
press the MODE button on the remote control one or more times until it
appears.
1

E-
19
Operating Recommendations
Here is a recommendation that you should follow when using your
air conditioner.
Power failure If a power failure occurs when the air
conditioner is operating, the unit is switched off.
When the power returns, you must press the
(On/Off) button to restart it.
Topic Recommendation

E-
20
Temperature and Humidity Ranges
The following table indicates the temperature and humidity ranges
within which the air conditioner can be used.
If the air conditioner is used at... Then...
High temperatures The automatic protection feature may
be triggered and the air conditioner
stopped.
Low temperatures A water leak or some other malfunction
may occur if the heat exchanger
freezes.
High humidity levels Water may condense on and drip
from the surface of the indoor unit if it
is used for long periods.
Mode Outdoor Temperature Indoor Temperature Indoor Humidity
Cooling 21°C to 43°C approx. 18°C to 32°C approx. 80% or less
Drying 18°C to 43°C approx. 18°C to 32°C approx. -
❇ If the cooling operation is used at over 33
°C(indoor temperature)
then, it does not cool as its full capacity.
Cooling capacity
Power Supply
Cooling input
Running current
APC3200B
ISO SASO
30,000BTU/h 27,000BTU/h
3,100W 3,900W
14.5A 18.0A
APC2840B
ISO SASO
28,000BTU/h 24,000BTU/h
2,600W 3,300W
12.0A 15.5A
1∅ 220V~, 60Hz
Indoor air
temperature
Outdoor air
temperature
DB
WB
DB
WB
ISO
27°C(80.6°F)
19°C(66.2°F)
35°C(95.0°F)
24°C(75.2°F)
SASO
29°C(84.2°F)
19°C(66.2°F)
46°C(114.8°F)
24°C(75.2°F)
◆
The data are measured at following conditions.
NNNNoooottttee
ee
MODEL

E-
21
Cleaning Your Air Conditioner
NNNNoooottttee
ee ◆ If you have not used the air conditioner for a long period
of time, set the fan going for three to four hours to dry the
inside of the air conditioner thoroughly.
1 Hold the upper part of the front panel, then pull it slightly forward.
2
Hold the edge of the air filter under the front panel and pull to release them.
3 Remove all dust on the air filters with a vacuum cleaner or brush.
4 Clean the front panel with a damp cloth and mild detergent
(do NOT use benzene, solvents or other chemicals).
5 Reassemble the air filters and the front panel.
To get the best possible use out of your air conditioner, you must
clean it regularly by two weeks to remove the dust that accumulates
on the air filter.
Before cleaning your air conditioner, ensure that you
have switched off the breaker used for the unit.
IMPORTANT

E-
22
Solving Common Problems
Explanation/Solution
◆ Check that the breaker used for the air conditioner is switched on.
◆ Check that the POWER indicator on the indoor unit is on;
if necessary press the (On/Off) button on the remote control.
◆ Check whether the TIMER indicator on the indoor unit is switched on.
If so:
- Wait until the switch-on time is reached and the air conditioner starts
up automatically
- Cancel the timer (see pages 16 and 17 for further details)
◆ Check that there are no obstacles between you and the indoor unit.
◆ Check the remote control batteries.
◆ Check that you are close enough to the indoor unit (seven metres/
yards or less).
◆ Check that you are pointing the remote control at the remote control
sensor on the control panel of the indoor unit.
◆ Replace the remote control batteries if necessary.
◆ Check that the correct operating mode has been selected (AUTO,
COOL).
◆ The room temperature may be too low.
◆ Dust may be blocking the air filter guard; refer to page 21 for cleaning
instructions.
◆ Check that there is no obstacle in front of the outdoor unit.
◆ Check that the operating mode is set to COOL or FAN ; in the
AUTO mode, the fan speed changes automatically and in the
DRY mode, it is set to AUTO.
◆ Check that the air conditioner has been switched on; if necessary,
press the (On/Off) button on the remote control.
◆ Check that the timer has been programmed correctly;
see pages 16 and 17.
◆ Air the room.
Problem
The air conditioner does not
operate at all
The air conditioner does not
operate with the remote control
No beep is heard when you press
the (On/Off) on the remote
control
The air conditioner does not cool
The fan speed does not change
when you press the FAN button
The air flow direction does not
change when you press the
or button
The timer is not correctly triggered
Odours are permeated in the room
during air conditioning
Before contacting the after-sales service, perform the following simple checks.
They may save you the time and expense of an unnecessary call.

E-
23
Technical Specifications
❈ Design and specifications are subject to change without notice.
Model
APC3200B
APC2840B
220V~, 60Hz
Power Supply

Printed in Korea
ELECTRONICS
THIS AIR CONDITIONER IS MANUFACTURED BY :
 Loading...