

Page 1
This product is not manufactured for Iran. SVC Warraty will not be
applicable and the user will be responsible for service
expenses when the product is used in Iran.
QUESTIONS OR COMMENTS?
COUNTRY CALL OR VISIT US ONLINE AT
NIGERIA 0800-726-7864 www.samsung.com/africa_en/support
GHANA
COTE D’ IVOIRE 8000 0077 www.samsung.com/africa_fr/support
SENEGAL 800-00-0077 www.samsung.com/africa_fr/support
CAMEROON 7095-0077 www.samsung.com/africa_fr/support
KENYA 0800 545 545 www.samsung.com/support
UGANDA 0800 300 300 www.samsung.com/support
TANZANIA 0685 88 99 00 www.samsung.com/support
RWANDA 9999 www.samsung.com/support
BURUNDI 200 www.samsung.com/support
DRC 499999 www.samsung.com/support
SUDAN 1969 www.samsung.com/support
SOUTH AFRICA 0860 SAMSUNG (726 7864) www.samsung.com/support
BOTSWANA 8007260000 www.samsung.com/support
NAMIBIA 08 197 267864 www.samsung.com/support
ZAMBIA 0211350370 www.samsung.com/support
MOZAMBIQUE 847267864 / 827267864 www.samsung.com/support
U.A.E 800-SAMSUNG (726-7864)
OMAN 800-SAMSUNG(726-7864)
KUWAIT 183-2255 (183-CALL)
BAHRAIN 8000-4726
QATAR 800-2255 (800-CALL)
EGYPT
ALGERIA 021 36 11 00 www.samsung.com/n_africa/support
PAKISTAN 0800-Samsung (72678) www.samsung.com/pk/support
TUNISIA 80-1000-12 www.samsung.com/n_africa/support
JORDAN
SYRIA 18252273 www.samsung.com/Levant/support (English)
MOROCCO 080 100 2255 www.samsung.com/n_africa/support
SAUDI ARABIA 920021230
TURKEY 444 77 11 www.samsung.com/tr/support
INDIA
This product is RoHS compliant
0800-10077
0302-200077
08000-726786
16580
0800-22273
06 5777444
1800 3000 8282 - Toll Free
1800 266 8282 - Toll Free
30308282 - Non Toll Free
www.samsung.com/africa_en/support
www.samsung.com/ae/support (English)
www.samsung.com/ae_ar/support (Arabic)
www.samsung.com/ae/support (English)
www.samsung.com/ae_ar/support (Arabic)
www.samsung.com/ae/support (English)
www.samsung.com/ae_ar/support (Arabic)
www.samsung.com/ae/support (English)
www.samsung.com/ae_ar/support (Arabic)
www.samsung.com/ae/support (English)
www.samsung.com/ae_ar/support (Arabic)
www.samsung.com/eg/support
www.samsung.com/Levant/support (English)
www.samsung.com/sa/support
www.samsung.com/sa_en/support (English)
www.samsung.com/in/support
사우디,인도,나이지리아향 FAC MEMORY 냉방_IBIM_EN_03794A(7).indd 54 2014-03-12 오전 10:30:03
Page 2
AF28FVSDA Series
AF28FVZDA Series
Air Conditioner
user & installation manual
imagine the possibilities
Thank you for purchasing this Samsung product.
EN FR
사우디,인도,나이지리아향 FAC MEMORY 냉방_IBIM_EN_03794A(7).indd 55 2014-03-12 오전 10:30:04
DB68-03794A(7)
PT AR
Page 3
Features of your new air conditioner
Samsung Air Solution! Cool, Clean and refreshing feeling at once
Cool Air : Your air conditioner uses air flow direction control which provide direct air flow in hot days and indirect air flow
when you are cooled down.
Refreshing Air : Auto mode will provide refreshing air by selecting the operation mode automatically from Cool, Dry, Purity
depending on the indoor air environment.
4 seasons of effective cleaning
Purity mode
Purity mode can be selected solely to save energy.
When the air conditioner operates, Zero filter and the Virus Doctor eliminates harmful contaminants to provide us with
the cleanest air.
Smart sensor
Camera on the top of the indoor unit will detect the movement within the indoor and when there is no movement for a
certain time, air conditioner will adjust the indoor temperature or turn off power automatically to save the energy
Applicable to AFFVSD only
Correct Disposal of This Product
(Waste Electrical & Electronic Equipment)
(Applicable in countries with separate collection systems)
This marking on the product, accessories or literature indicates that the product and its electronic accessories (e.g.
charger, headset, USB cable) should not be disposed of with other household waste at the end of their working life.
To prevent possible harm to the environment or human health from uncontrolled waste disposal, please separate
these items from other types of waste and recycle them responsibly to promote the sustainable reuse of material
resources.
Household users should contact either the retailer where they purchased this product, or their local government
office, for details of where and how they can take these items for environmentally safe recycling.
Business users should contact their supplier and check the terms and conditions of the purchase contract. This
product and its electronic accessories should not be mixed with other commercial wastes for disposal.
(For India only)
For more information on safe disposal and recycling visit our website
www.samsung.com/in/support or contact our Helpline numbers - 1800 3000 8282, 1800 266 8282, 30308282
2
사우디,인도,나이지리아향 FAC MEMORY 냉방_IBIM_EN_03794A(7).indd 2 2014-03-12 오전 10:29:43
Page 4
Contents
USING PARTS
Safety precautions . . .. . . .. . .. . . .. . .. . . .. . .. . . .. . .. . . .. . .. . . .. . .. . . .. . .. . . .. . .. . . .. . .. . . .. . .. . . .. . .. . . .. . .. . . .. . .. . . .. . .. . 4
Checking before use . . .. .. .. .. .. .. . .. . . .. . .. . . .. . .. . . .. . .. . . .. . .. . . .. . .. . . .. . .. . . .. . .. . . .. . .. . . .. . .. . . .. . .. . . .. . .. . . .. . . 11
Checking the name of the parts . .. .. .. .. .. .. .. .. . .. . . .. . .. . . .. . .. . . .. . .. . . .. . .. . . .. . .. . . .. . .. . . .. . .. . . .. . .. . . .. . .. . . .. . 13
Checking the remote controller . . . .. . . . .. . . . .. . . .. . .. . . .. . .. . . .. . .. . . .. . .. . . .. . .. . . .. . .. . . .. . .. . . .. . .. . . .. . .. . . .. . .. . . .. 16
Basic operation . . . . .. . . . .. . . .. . .. . . .. . .. . . .. . .. . . .. . .. . . .. . .. . . .. . .. . . .. . .. . . .. . .. . . .. . .. . . .. . .. . . .. . .. . . .. . .. . . .. . .. . . . 18
Turbo operation . .. .. .. . .. . . .. . .. . . .. . .. . . .. . .. . . .. . .. . . .. . .. . . .. . .. . . .. . .. . . .. . .. . . .. . .. . . .. . .. . . .. . .. . . .. . .. . . .. . .. . . . 20
Air flow direction . . .. . . .. . .. . . .. . .. . . .. . .. . . .. . .. . . .. . .. . . .. . .. . . .. . .. . . .. . .. . . .. . .. . . .. . .. . . .. . .. . . .. . .. . . .. . .. . . .. . .. . 20
good'sleep operation . . . . . . . . . . . . . . . . . . . . . . . . . . . . . . . . . . . . . . . . . . . . . . . . . . . . . . . . . . . . . . . . . . . . . . . . . . . . . . . . . . . . . . . . . . . . . . . . . . . 21
Setting the On/Off timer . . . . . . . . . . . . . . . . . . . . . . . . . . . . . . . . . . . . . . . . . . . . . . . . . . . . . . . . . . . . . . . . . . . . . . . . . . . . . . . . . . . . . . . . . . . . . . . . 23
Smart sensor operation . . . .. .. .. .. . .. . . .. . .. . . .. . .. . . .. . .. . . .. . .. . . .. . .. . . .. . .. . . .. . .. . . .. . .. . . .. . .. . . .. . .. . . .. . .. . . .. . . 25
Lighting function . . . .. .. .. .. .. .. .. . .. . . .. . .. . . .. . .. . . .. . .. . . .. . .. . . .. . .. . . .. . .. . . .. . .. . . .. . .. . . .. . .. . . .. . .. . . .. . .. . . .. . . 25
Quiet operation . .. . . .. . .. . . .. . .. . . .. . .. . . .. . .. . . .. . .. . . .. . .. . . .. . .. . . .. . .. . . .. . .. . . .. . .. . . .. . .. . . .. . .. . . .. . .. . . .. . .. . . .. 26
Auto clean operation . .. . . . .. . . .. . .. . . .. . .. . . .. . .. . . .. . .. . . .. . .. . . .. . .. . . .. . .. . . .. . .. . . .. . .. . . .. . .. . . .. . .. . . .. . .. . . .. . .. 26
Cleaning the air conditioner .. .. . .. . . .. . .. . . .. . .. . . .. . .. . . .. . .. . . .. . .. . . .. . .. . . .. . .. . . .. . .. . . .. . .. . . .. . .. . . .. . .. . . .. . .. . . 27
Troubleshooting . . .. .. .. .. .. .. .. . .. . . .. . .. . . .. . .. . . .. . .. . . .. . .. . . .. . .. . . .. . .. . . .. . .. . . .. . .. . . .. . .. . . .. . .. . . .. . .. . . .. . .. . 30
Open Source Announcement . . . .. .. . .. . . .. . .. . . .. . .. . . .. . .. . . .. . .. . . .. . .. . . .. . .. . . .. . .. . . .. . .. . . .. . .. . . .. . .. . . .. . .. . . .. 33
INSTALLATION PARTS
Safety precautions . . .. . . .. . .. . . .. . .. . . .. . .. . . .. . .. . . .. . .. . . .. . .. . . .. . .. . . .. . .. . . .. . .. . . .. . .. . . .. . .. . . .. . .. . . .. . .. . . .. . .. 34
Required tools . . . . . . . . . . . . . . . . . . . . . . . . . . . . . . . . . . . . . . . . . . . . . . . . . . . . . . . . . . . . . . . . . . . . . . . . . . . . . . . . . . . . . . . . . . . . . . . . . . . . . . . . . . 36
Choosing the installation location . .. . .. . . .. . .. . . .. . .. . . .. . .. . . .. . .. . . .. . .. . . .. . .. . . .. . .. . . .. . .. . . .. . .. . . .. . .. . . .. . .. . . .. 37
Indoor/outdoor unit installation diagram . .. .. .. .. .. .. .. .. . .. . . .. . .. . . .. . .. . . .. . .. . . .. . .. . . .. . .. . . .. . .. . . .. . .. . . .. . .. . . . 38
Accessories . . . .. . . .. . .. . . .. . .. . . .. . .. . . .. . .. . . .. . .. . . .. . .. . . .. . .. . . .. . .. . . .. . .. . . .. . .. . . .. . .. . . .. . .. . . .. . .. . . .. . .. . . .. . . 40
Drilling a hole and fixing the indoor unit .. . . .. . .. . . .. . .. . . .. . .. . . .. . .. . . .. . .. . . .. . .. . . .. . .. . . .. . .. . . .. . .. . . .. . .. . . .. . .. . 41
Connecting pipes . . .. .. .. . .. . . .. . .. . . .. . .. . . .. . .. . . .. . .. . . .. . .. . . .. . .. . . .. . .. . . .. . .. . . .. . .. . . .. . .. . . .. . .. . . .. . .. . . .. . .. . 41
Connecting drain hose . .. .. .. .. .. .. .. . .. . . .. . .. . . .. . .. . . .. . .. . . .. . .. . . .. . .. . . .. . .. . . .. . .. . . .. . .. . . .. . .. . . .. . .. . . .. . .. . . . 44
Electrical work . . . .. .. .. .. . .. . . .. . .. . . .. . .. . . .. . .. . . .. . .. . . .. . .. . . .. . .. . . .. . .. . . .. . .. . . .. . .. . . .. . .. . . .. . .. . . .. . .. . . .. . .. . 45
Vacuum pump . . . .. .. .. .. . .. . . .. . .. . . .. . .. . . .. . .. . . .. . .. . . .. . .. . . .. . .. . . .. . .. . . .. . .. . . .. . .. . . .. . .. . . .. . .. . . .. . .. . . .. . .. . 49
Performing leak test .. .. .. .. .. . .. . . .. . .. . . .. . .. . . .. . .. . . .. . .. . . .. . .. . . .. . .. . . .. . .. . . .. . .. . . .. . .. . . .. . .. . . .. . .. . . .. . .. . . . 50
Installing the earth wire . .. .. .. . .. . . .. . .. . . .. . .. . . .. . .. . . .. . .. . . .. . .. . . .. . .. . . .. . .. . . .. . .. . . .. . .. . . .. . .. . . .. . .. . . .. . .. . . . 51
Charging refrigerant . . . .. . . . .. . . . .. . . .. . .. . . .. . .. . . .. . .. . . .. . .. . . .. . .. . . .. . .. . . .. . .. . . .. . .. . . .. . .. . . .. . .. . . .. . .. . . .. . .. . 51
Check and test operation . .. .. .. .. .. .. .. . .. . . .. . .. . . .. . .. . . .. . .. . . .. . .. . . .. . .. . . .. . .. . . .. . .. . . .. . .. . . .. . .. . . .. . .. . . .. . .. 52
Pump down procedure (When removing the product) .. . .. . . .. . .. . . .. . .. . . .. . .. . . .. . .. . . .. . .. . . .. . .. . . .. . .. . . .. . .. . . .. . 52
ENGLISH
3
사우디,인도,나이지리아향 FAC MEMORY 냉방_IBIM_EN_03794A(7).indd 3 2014-03-12 오전 10:29:43
Page 5
USING PARTS
Safety precautions
Before using your new air conditioner, please read this manual thoroughly to ensure that
you know how to safely and efficiently operate the extensive features and functions of
your new appliance.
If you have any questions, call your nearest contact center or find help and information
online at www.samsung.com.
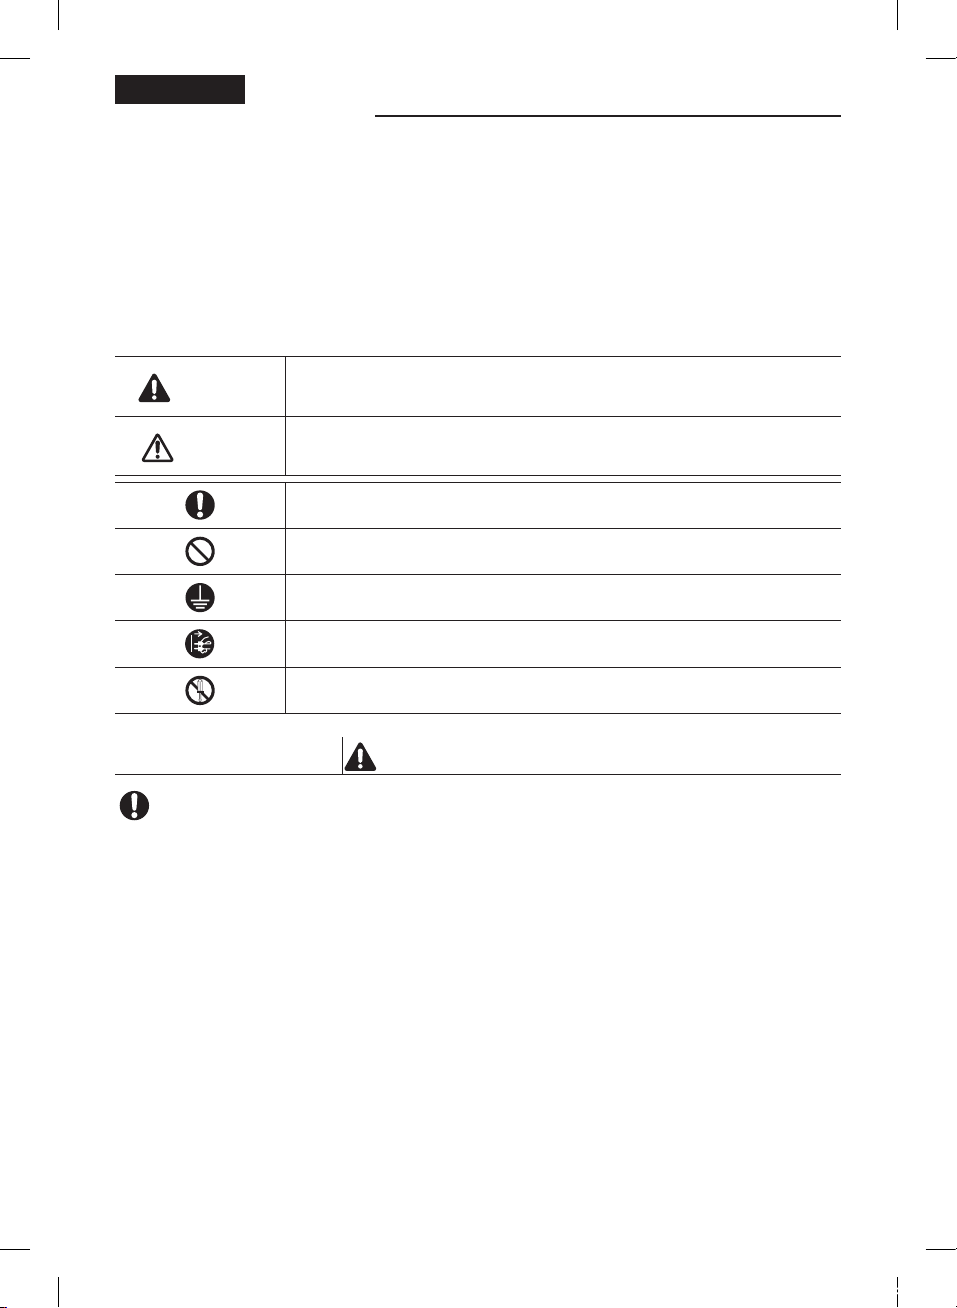
Important safety symbols and precautions:
WARNING
CAUTION
FOR INSTALLATION
Use the power line with the power specifications of the product or higher and use
the power line for this appliance only. In addition, do not use an extension line.
Extending the power line may result in electric shock or fire.
Do not use an electric transformer. It may result in electric shock or fire.
If the voltage/frequency/rated current condition is different, it may cause fire.
The installation of this appliance must be performed by a qualified technician or
service company.
Failing to do so may result in electric shock, fire, explosion, problems with the
product, or injury.
Install a switch and circuit breaker dedicated to the air conditioner.
Failing to do so may result in electric shock or fire.
Hazards or unsafe practices that may result in severe personal
injury or death.
Hazards or unsafe practices that may result in minor personal
injury or property damage.
Follow directions.
Do NOT attempt.
Make sure the machine is grounded to prevent electric shock.
Cut the power at the circuit breaker.
Do NOT disassemble.
WARNING
4
사우디,인도,나이지리아향 FAC MEMORY 냉방_IBIM_EN_03794A(7).indd 4 2014-03-12 오전 10:29:43
Page 6
Fix the outdoor unit firmly so that the electric part of the outdoor unit is not
exposed.
Failing to do so may result in electric shock or fire.
Do not install this appliance near a heater, inflammable material. Do not install
this appliance in a humid, oily or dusty location, in a location exposed to direct
sunlight and water (rain drops). Do not install this appliance in a location where
gas may leak.
This may result in electric shock or fire.
Never install the outdoor unit in a location such as on a high external wall where
it could fall.
If the outdoor unit falls, it may result in injury, death or property damage.
This appliance must be properly grounded. Do not ground the appliance to a gas
pipe, plastic water pipe, or telephone line.
Failure to do so may result in electric shock, fire, an explosion, or other problems at
the product.
Make sure to use a socket-outlet with ground.
ENGLISH
FOR INSTALLATION
CAUTION
Install your appliance on a level and hard floor that can support its weight.
Failing to do so may result in abnormal vibrations, noise, or problems with the
product.
Confirm that the indoor unit fixing device has been installed by confirming this
with an installation engineer.
If the indoor unit fixing device is not installed, the indoor unit may vibrate and fall
and this may result in injury.
Install the draining hose properly so that water is drained correctly.
Failing to do so may result in water overflowing and property damage.
5
사우디,인도,나이지리아향 FAC MEMORY 냉방_IBIM_EN_03794A(7).indd 5 2014-03-12 오전 10:29:44
Page 7
Safety precautions
FOR POWER SUPPLY
When the circuit breaker is damaged, contact your nearest service center.
Do not pull or excessively bend the power line. Do not twist or tie the power
line. Do not hook the power line over a metal object, place a heavy object on the
power line, insert the power line between objects, or push the power line into the
space behind the appliance.
This may result in electric shock or fire.
FOR POWER SUPPLY
When not using the air conditioner for a long period of time or during a thunder/
lightning storm, cut the power at the circuit breaker.
Failing to do so may result in electric shock or fire.
WARNING
CAUTION
6
사우디,인도,나이지리아향 FAC MEMORY 냉방_IBIM_EN_03794A(7).indd 6 2014-03-12 오전 10:29:44
Page 8
FOR USING
WARNING
If the appliance is flooded, please contact your nearest service center.
Failing to do so may result in electric shock or fire.
If the appliance generates a strange noise, a burning smell or smoke, cut-off the
power supply immediately and contact the nearest service center.
Failing to do so may result in electric shock or fire.
In the event of a gas leak (such as propane gas, LP gas, etc.), ventilate
immediately without touching the power line. Do not touch the appliance or
power line.
Do not use a ventilating fan.
A spark may result in an explosion or fire.
To reinstall the air conditioner, please contact your nearest service center.
Failing to do so may result in problems with the product, water leakage, electric
shock, or fire.
A delivery service for the product is not provided. If you reinstall the product in
another location, additional construction expenses and an installation fee will be
charged.
Especially, when you wish to install the product in an unusual location such as
in an industrial area or near the seaside where it is exposed to the salt in the air,
please contact your nearest service center.
ENGLISH
Do not operate the appliance with wet hands.
This may result in electric shock.
Do not strike or pull the air conditioner with excessive force.
This may result in fire, injury, or problems with the product.
Importantly, if the support bracket is excessively impacted, it may become
damaged.
Do not place an object near the outdoor unit that allows children to climb onto
the machine.
This may result in children seriously injuring themselves.
Do not turn the air conditioner off with the circuit breaker while it is operating.
Turning the air conditioner off and then on again with the circuit breaker may
cause a spark and result in electric shock or fire.
After unpacking the air conditioner, keep all packaging materials well out of the
reach of children, as packaging materials can be dangerous to children.
If a child places a bag over its head, it may result in suffocation.
Do not insert your fingers or foreign substances into the outlet when the air
conditioner is operating or the front panel is closing.
Take special care that children do not injure themselves by inserting their fingers
into the product.
7
사우디,인도,나이지리아향 FAC MEMORY 냉방_IBIM_EN_03794A(7).indd 7 2014-03-12 오전 10:29:44
Page 9
Safety precautions
FOR USING
Do not insert your fingers or foreign substances into the air inlet/outlet of the air
conditioner.
Take special care that children do not injure themselves by inserting their fingers
into the product.
Do not use this air conditioner for long periods of time in badly ventilated
locations or near infirm people.
Since this may be dangerous due to a lack of oxygen, open a window at least once
an hour.
If any foreign substance such as water has entered the appliance, cut-off the
power supply and contact the nearest service center.
Failing to do so may result in electric shock or fire.
Do not attempt to repair, disassemble, or modify the appliance yourself.
Do not use any fuse (such as copper, steel wire, etc.) other than the standard fuse.
Failing to do so may result in electric shock, fire, problems with the product, or
injury.
FOR USING
Do not place objects or devices under the indoor unit.
Water dripping from the indoor unit may result in fire or property damage.
Check that the installation frame of the outdoor unit is not broken at least once a
year.
Failing to do so may result in injury, death or property damage.
WARNING
CAUTION
Do not stand on top of the appliance or place objects (such as laundry, lighted
candles, lighted cigarettes, dishes, chemicals, metal objects, etc.) on the
appliance.
This may result in electric shock, fire, problems with the product, or injury.
Do not operate the appliance with wet hands.
This may result in electric shock.
Do not forcefully open the front panel while air conditioner is operating.
This may cause damage to the product.
Do not spray volatile material such as insecticide onto the surface of the
appliance.
8
사우디,인도,나이지리아향 FAC MEMORY 냉방_IBIM_EN_03794A(7).indd 8 2014-03-12 오전 10:29:44
Page 10
As well as being harmful to humans, it may also result in electric shock, fire or
problems with the product.
Do not drink the water from the air conditioner.
The water may be harmful to humans.
Do not apply a strong impact to the remote controller and do not disassemble
the remote controller.
Do not touch the pipes connected with the product.
This may result in burns or injury.
Do not use this air conditioner to preserve precision equipment, food, animals,
plants or cosmetics, or for any other unusual purposes.
This may result in property damage.
Avoid directly exposing humans, animals or plants from the air flow from the air
conditioner for long periods of time.
This may result in harm to humans, animals or plants.
This appliance is not intended for use by persons (including children) with
reduced physical, sensory or mental capabilities, or lack of experience and
knowledge, unless they have been given supervision or instruction concerning
use of the appliance by a person responsible for their safety. Children should be
supervised to ensure that they do not play with the appliance.
Max current is measured according to IEC standard for safety and current is
measured according to ISO standard for energy efficiency.
ENGLISH
FOR CLEANING
WARNING
Do not clean the appliance by spraying water directly onto it. Do not use
benzene, thinner, alcohol or acetone to clean the appliance.
This may result in discoloration, deformation, damage, electric shock or fire.
Before cleaning or performing maintenance, cut-off the power supply and wait
until the fan stops.
Failing to do so may result in electric shock or fire.
9
사우디,인도,나이지리아향 FAC MEMORY 냉방_IBIM_EN_03794A(7).indd 9 2014-03-12 오전 10:29:44
Page 11
Safety precautions
FOR CLEANING
Take care when cleaning the surface of the heat exchanger of the outdoor unit
since it has sharp edges.
To avoid cutting your fingers, wear thick cotton gloves when cleaning it.
Do not clean the inside of the air conditioner by yourself.
For cleaning inside the appliance, contact your nearest service center.
When cleaning the internal filter, refer to the descriptions in the ‘Cleaning the air
conditioner’ section. Failing to do so may result in damage, electric shock or fire.
CAUTION
10
사우디,인도,나이지리아향 FAC MEMORY 냉방_IBIM_EN_03794A(7).indd 10 2014-03-12 오전 10:29:44
Page 12
Checking before use
Using indoor unit
Make sure that curtain does not block the air inlet.
It may decrease cooling performance by blocking air circulation.
In Cool mode, set the appropriate desired temperature.
If the desired temperature is too low, it may be harmful for human body and power
consumption will also increase. Set the desired temperature about 5°C lower than the
outdoor temperature.
When cooling the room, use air conditioner and fan together to save energy.
When the air conditioner is used with fan, cooling will be more effective and energy can
be saved.
When the air conditioner is operating, close the doors and windows.
When the air conditioner is used with open doors and windows, cooling effect will
decrease.
If you use the air conditioner for over an hour, open the window to ventilate the air
about once every hour.
Install the product away from sunlight or heating devices.
Close the curtain when the sun shines.
Do not use any heating devices during cooling operation. Cooling effect will decrease.
ENGLISH
Storing indoor unit
Dry the air conditioner thoroughly by operating Purity mode for 3 to 4 hours.
Stop the operation and disconnect the power or turn off the auxiliary power switch.
• Do not move the product on your own. Pipe may get loose or pipe can get
CAUTION
damaged.
Using outdoor unit
Take away covers or barriers.
It may cause product failure, and poor performance in cooling by blocking air flow.
Installing outdoor unit
Install the outdoor unit in well ventilated area with no sunlight. If sunlight is unavoidable, install a sunshade.
11
사우디,인도,나이지리아향 FAC MEMORY 냉방_IBIM_EN_03794A(7).indd 11 2014-03-12 오전 10:29:44
Page 13
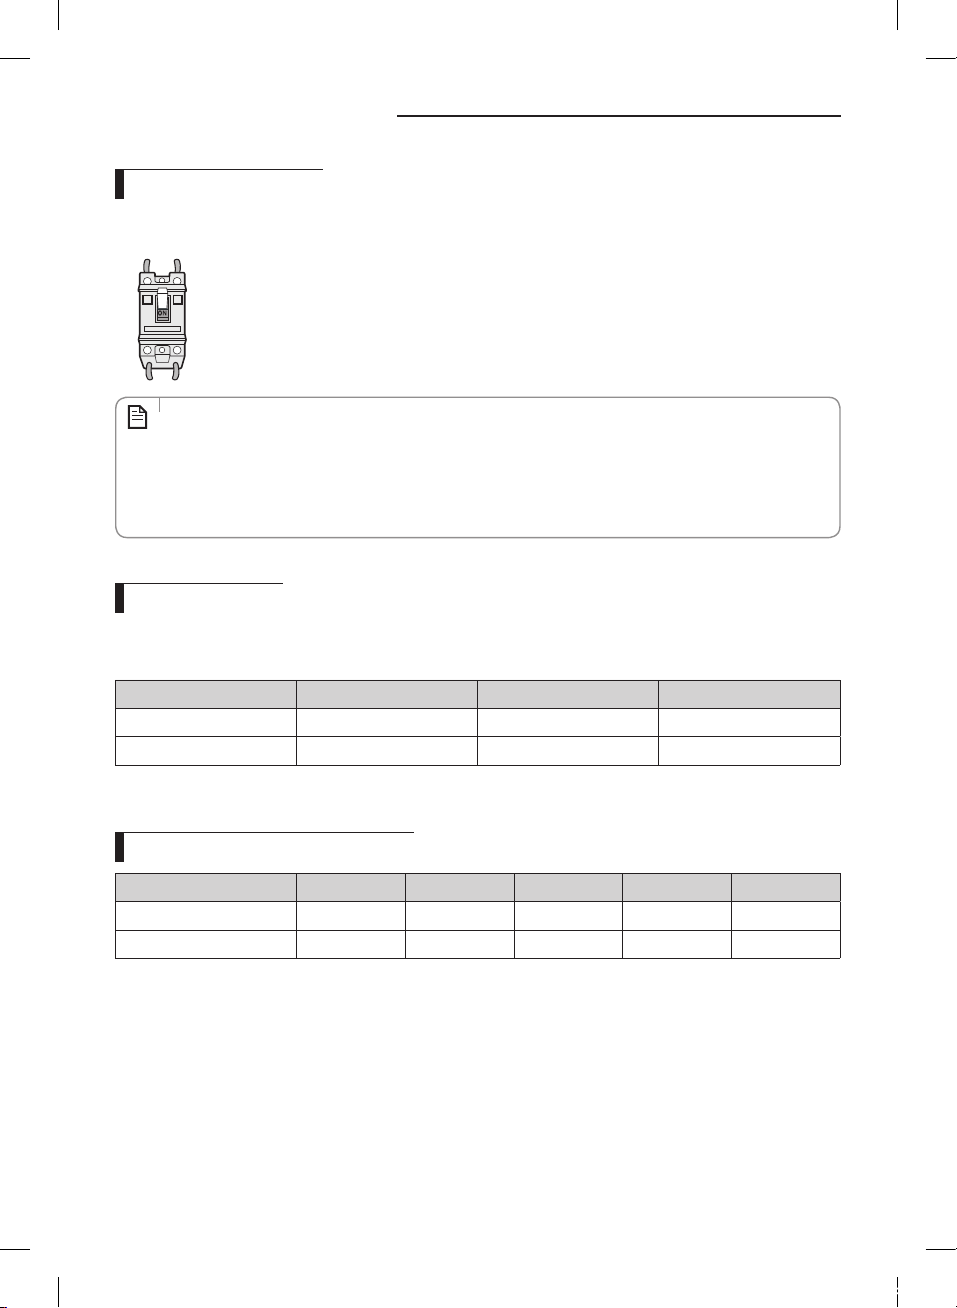
Checking before use
Auxiliary power switch
Turn on the auxiliary power switch which is installed separately. (Only applicable for outdoor unit with separate power
supply)
Auxiliary power switch (NFB, ELB, etc.)
• Auxiliary power switch is not included in the package. Purchase and install it separately.
NOTE
• Auxiliary power switch is a device for preventing over-current or short circuit. Install it separately near the indoor
unit and turn it off when cleaning or when you don’t use it for long time.
• If NFB or ELB has already installed in the switch box of the building, you don’t need to install auxiliary power
switch.
Operation ranges
When the air conditioner operates outside of temperature and humidity range indicated
below, protective device may activate and stop the operation.
Mode Indoor temperature Outdoor temperature Indoor humidity
Cool 21°C ~ 32°C 21°C ~ 52°C Relative humidity 80% or less
Dry 21°C ~ 30°C 21°C ~ 52°C -
If the air conditioner operates in cooling mode for long period of time in high humidity area, dew may be formed.
Functions available for each model
Model Name Smart Sensor ZERO Filter Virus Doctor Full HD Filter Lighting
AF28FVSDA
AF28FVZDA
The use of some function buttons on the remote controller may differ depending on the model. When pressing the
function buttons on the remote controller which are for a different model from the one purchased, the icon of the
selected function will be displayed, but cannot be used with your air conditioner.
N
N
-
12
사우디,인도,나이지리아향 FAC MEMORY 냉방_IBIM_EN_03794A(7).indd 12 2014-03-12 오전 10:29:44
Page 14
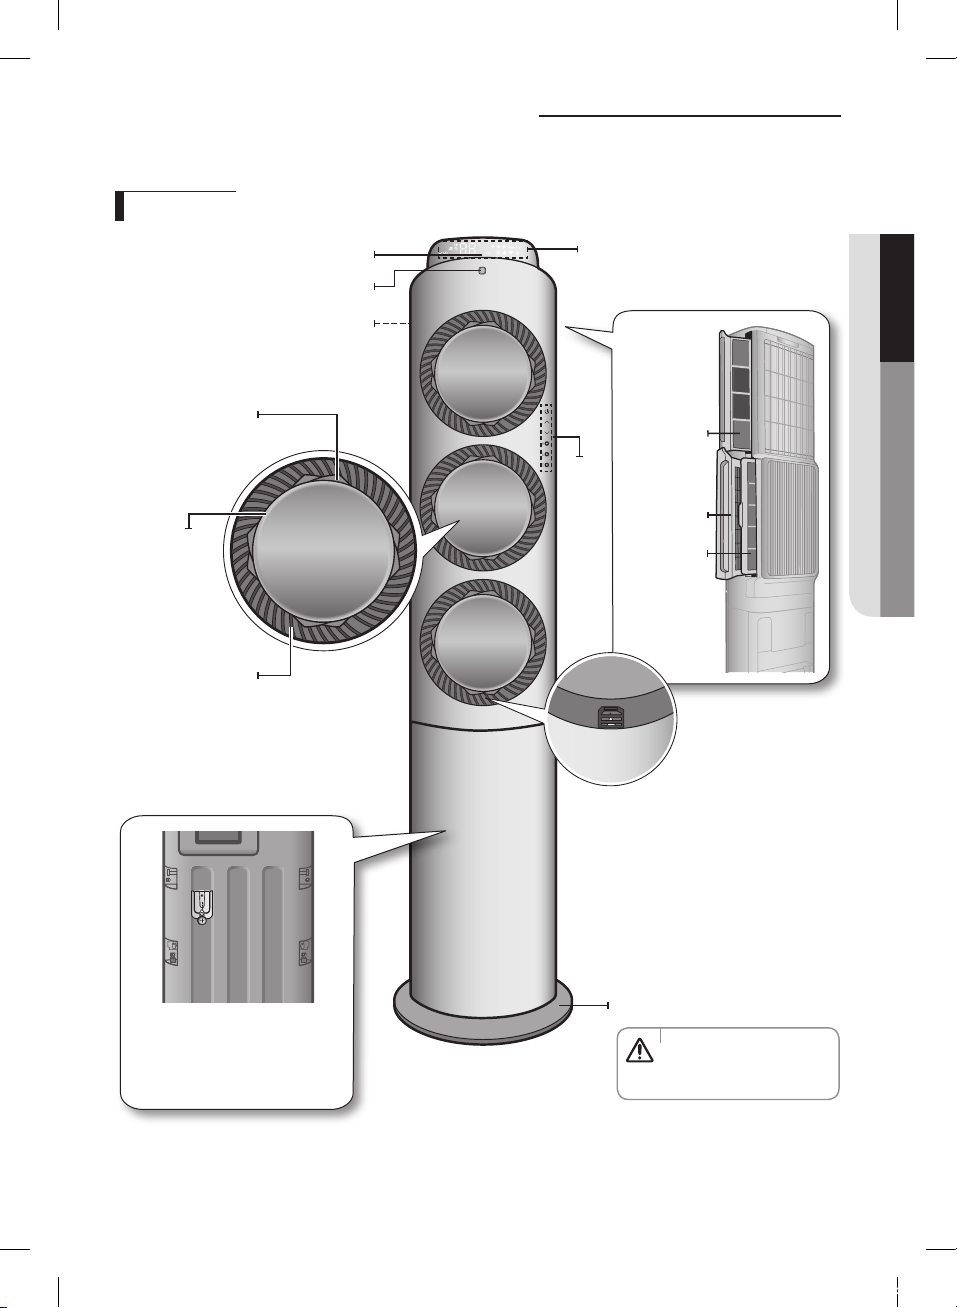
Checking the name of the parts
Your air conditioner may slightly look different from illustration depending on the model.
Indoor unit
Smart sensor(Camera)
Remote controller receiver
Air inlet
Intake outdoor air
Display
Arise automatically when turning on the air
conditioner
ENGLISH
Air control panel
Move with selected
air direction
Lighting
Lighting is
turned on or off
Air outlet
Discharge cool air
Full HD filter
Control
panel
Zero filter
Full HD filter
Virus doctor
Support bracket
Front remote controller holder
Fix the remote controller holder
on the front side of an indoor unit
with screws.
• If the support bracket is
excessively impacted, it
CAUTION
may become damaged.
13
사우디,인도,나이지리아향 FAC MEMORY 냉방_IBIM_EN_03794A(7).indd 13 2014-03-12 오전 10:29:45
Page 15
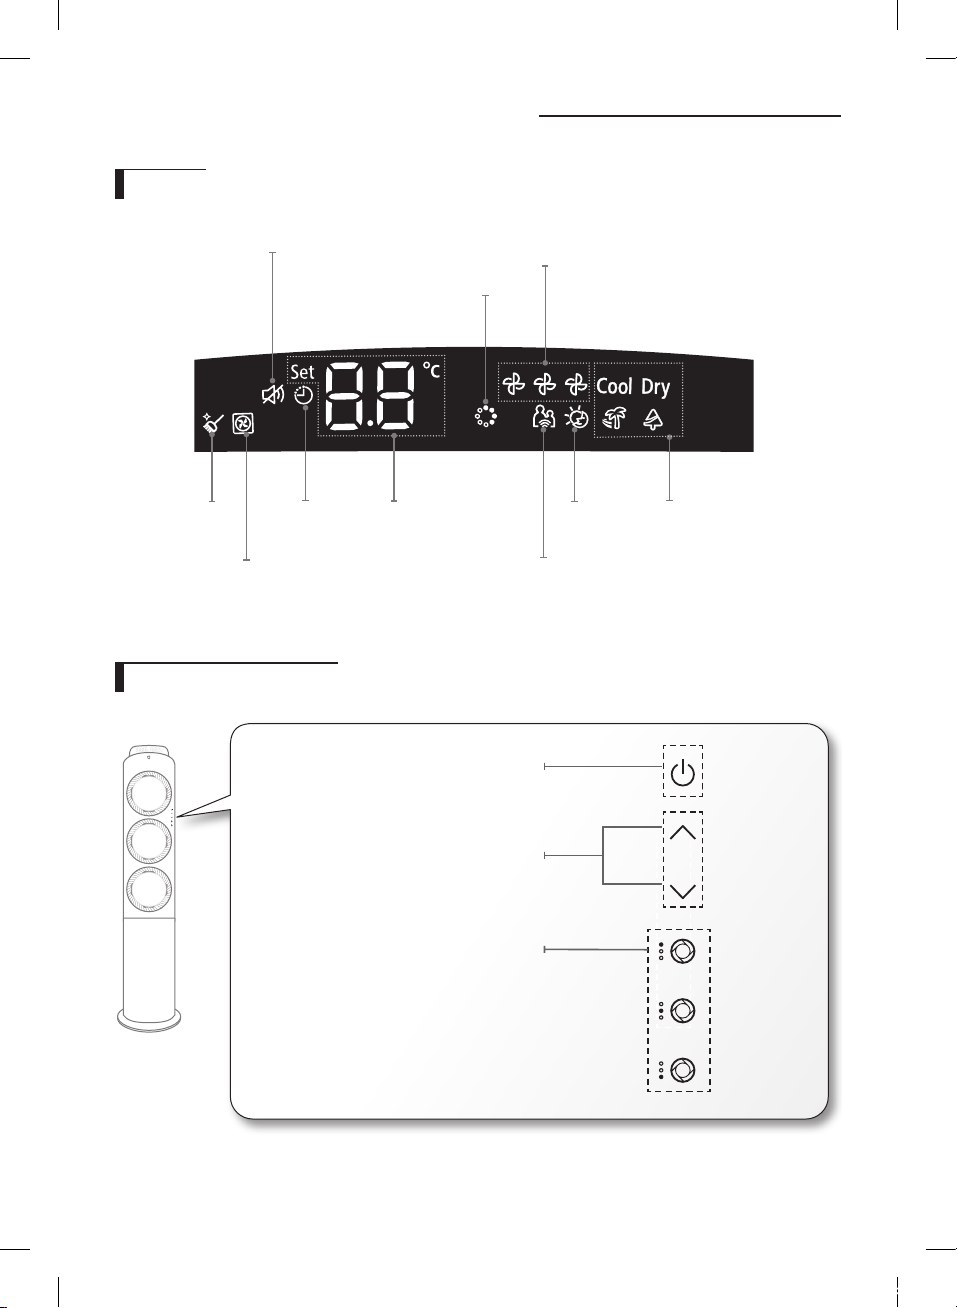
Checking the name of the parts
Display
Mute
Cleaning
Outdoor unit
operation
Timer
Buttons on control panel
Temperature
Virus
doctor
operation
On/Off button
Fan
speed
good'sleep
mode
Smart
sensor
Air conditioner
operation mode
Current operation
mode is displayed.
Temperature control button
Increase or decrease the
temperature by 1˚C
Individual control button
The number of air outlets is different depending on the models.
14
사우디,인도,나이지리아향 FAC MEMORY 냉방_IBIM_EN_03794A(7).indd 14 2014-03-12 오전 10:29:46
Page 16
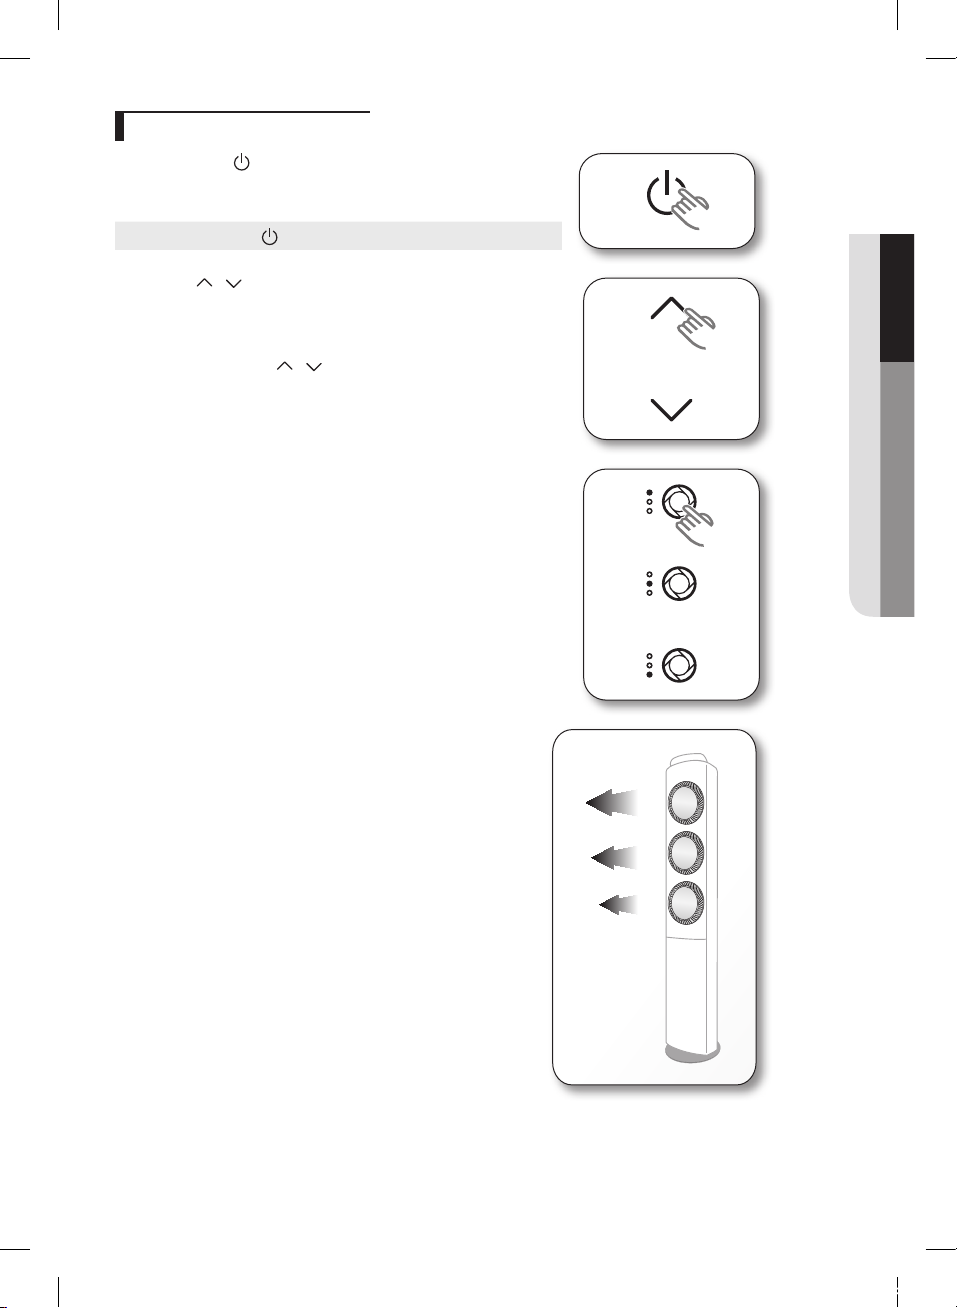
Operation with control panel
1. Press the Power button to operate the air conditioner.
The air outlets will open in order with melody sound and the air
conditioner will operate with auto mode.
Stop
Press the Power
2. Press the [ ], [ ] buttons to adjust the desired temperature.
When pressing the button first, the mode of air conditioner will change
to cool mode.
You can adjust the desired temperature by 1˚C within the range of 18˚C
~ 30˚C by pressing the [
3. Adjust fan height with the three individual air outlet control buttons.
You can adjust the fan height by controlling the air outlet individually.
Individual control will be canceled when turning the air conditioner off
and on.
button one more time.
], [ ] buttons.
ENGLISH
The fan speed of each air outlet will differ.
15
사우디,인도,나이지리아향 FAC MEMORY 냉방_IBIM_EN_03794A(7).indd 15 2014-03-12 오전 10:29:46
Page 17
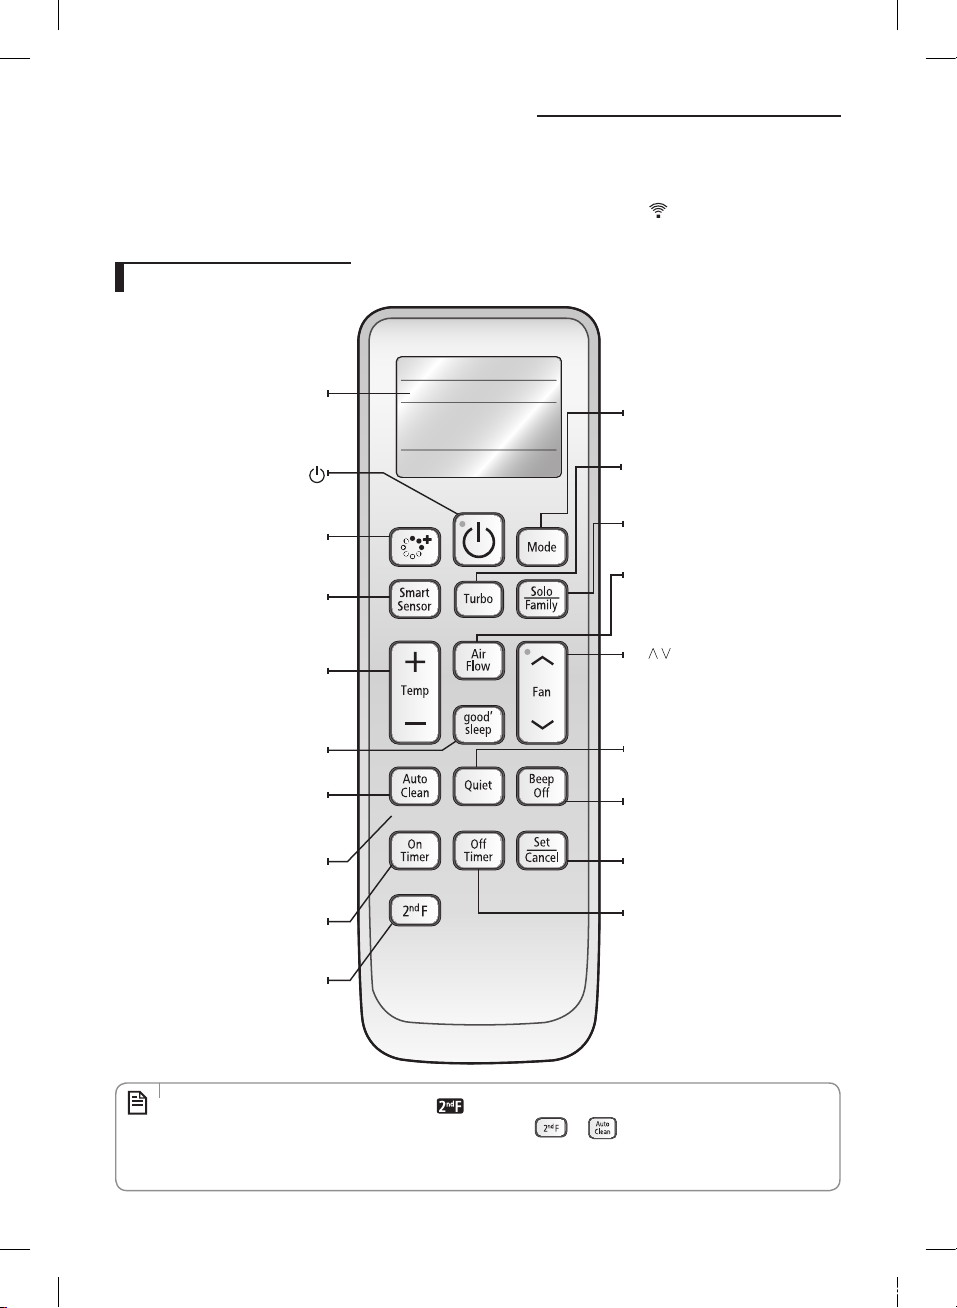
Checking the remote controller
Function may be different depending on the model.
Point the remote controller towards the remote control receiver of the unit.
When the button is pressed, you will hear ringing or beep sound and Transmit indicator (
controller display.
Remote controller buttons
) will appear on the remote
Remote controller display
Turn on/off the air conditioner
Select Zero filter and Virus doctor
Select Smart sensor mode
Increase/Decrease the temperature
Set the good'sleep mode on
Activate auto clean function to dry inside
of the indoor unit (to get rid of odor)
Set lighting of indoor unit
Power
Purity
Smart Sensor
Temp + –
by 1˚C
good'sleep
Auto Clean
Lighting
On Timer
Set the On timer on
Lighting
WPS Wi-Fi
Mode
Select one of the 5 operation modes
Turbo
Operate in maximum fan speed to cool
quickly
Solo/Family
Select Solo/Family mode
Air Flow
Set the air flow to cool effectively
according to the surrounding
Fan
Adjust how much air flows through the
air conditioner with the 4 different fan
speeds
Quiet
Reduced noise is generated during
operation
Beep Off
To silence the beep sound when pressing
the button
Set/Cancel
Set/Cancel the timer/good'sleep mode
Off Timer
Set the Off timer on
nd
[2
Select the function underneath a button
F] button
• 2ndF button: When pressing the 2ndF button, will appear on the remote controller display and you
NOTE
can select the below function of a button.(e.g. When pressing
function.) If you press the 2ndF, Power, Purity and the Set/Cancel button or don't press any buttons for 10
, you can select the Lighting
Lighting
seconds, the display will disappear and you can select the function of the button.
16
사우디,인도,나이지리아향 FAC MEMORY 냉방_IBIM_EN_03794A(7).indd 16 2014-03-12 오전 10:29:47
Page 18
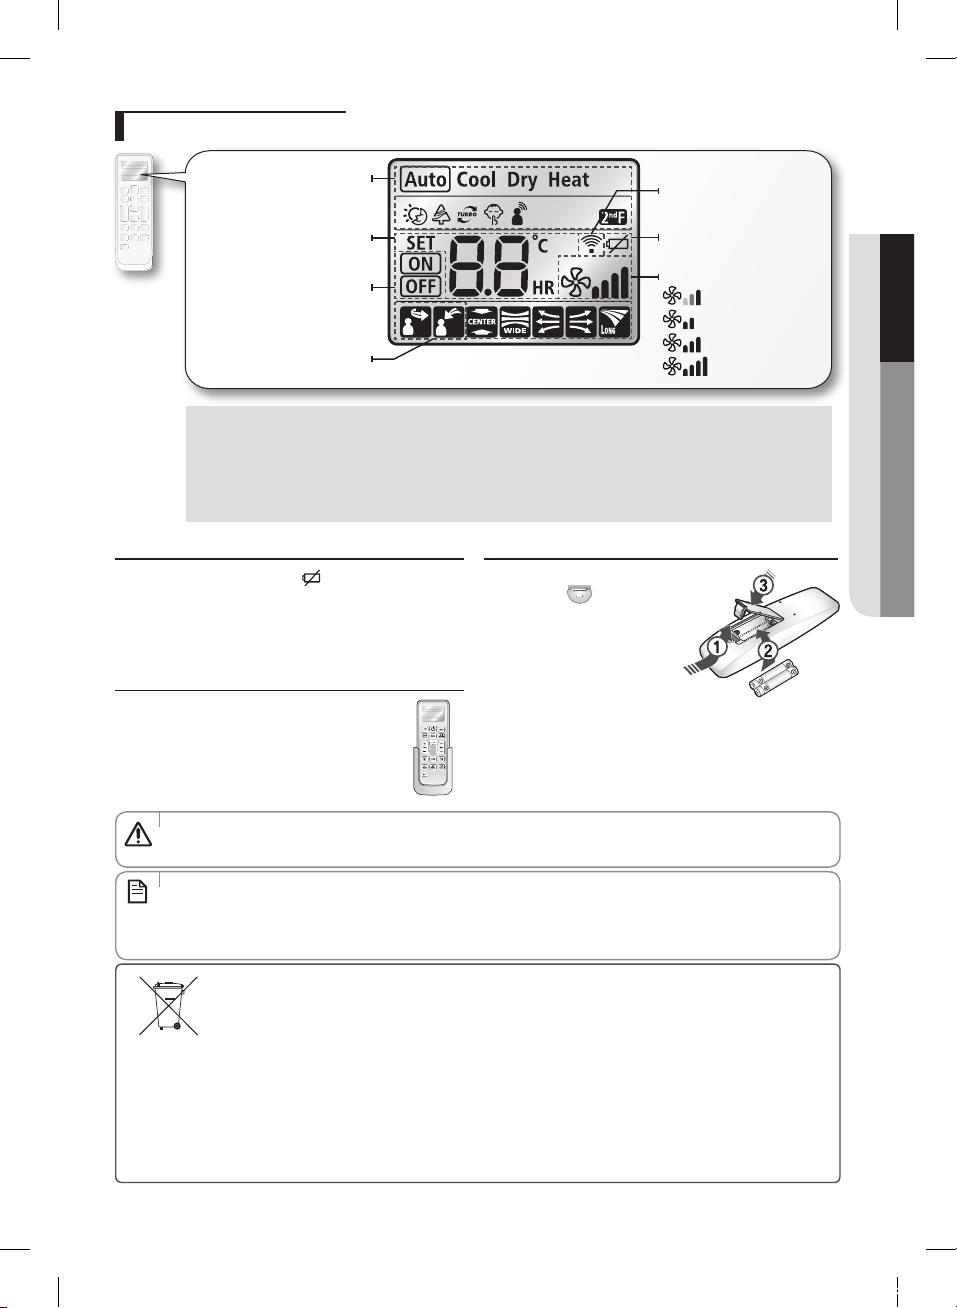
Remote controller display
Lighting
WPS Wi-Fi
Operation mode
indicator
Transmit indicator
Set temperature/Time
On/Off Time indicator
Heat mode will be displayed on the remote controller and reception sound will be ringing but the air conditioner
will not operate the heat mode. When you select heat mode with a remote controller and you turn the air
conditioner off and on, the air conditioner will operate with auto mode and heat mode will be displayed on the
remote controller. Change the operation mode of a remote controller.
Left fan and right fan will be displayed as not supported function and reception sound will be ringing. However,
the left and right fans will not operate.
indicator
Air flow direction
indicator
Battery changing time
When the battery is exhausted,( )will be displayed in the
remote controller display. When the icon appears, change
the batteries. The remote controller requires two 1.5V AAA
type batteries.
Storing the remote controller
When you do not use the remote controller for a
long time, remove the batteries from the remote
controller and store it.
Inserting the batteries
1. Open the battery cover.
Push the (
direction of the arrow and lift
up the cover.
2. Insert the batteries.
Check and match the (+),
(-) signs and insert them in
correct position.
3. Close the battery cover.
Match the cover and bottom
part of the remote controller
and press it until you hear
click sound.
) part in the
Low battery indicator
Fan speed indicator
Auto
Low
Medium
High
ENGLISH
• Make sure that water is not allowed to enter the remote controller.
CAUTION
• There is a possibility that the air conditioner will not operate by remote controller near strong light such as a
fluorescent lamp or neon sign. In this case, use the remote controller in front of the remote controller receiver
NOTE
of the indoor unit.
• If other electrical products are operated by the remote controller, call your nearest service center.
Correct disposal of batteries in this product
(Applicable in countries with separate collection systems)
This marking on the battery, manual or packaging indicates that the batteries in this product should not be disposed
of with other household waste at the end of their working life. Where marked, the chemical symbols Hg, Cd or Pb
indicate that the battery contains mercury, cadmium or lead above the reference levels in EC Directive 2006/66. If
batteries are not properly disposed of, these substances can cause harm to human health or the environment.
To protect natural resources and to promote material reuse, please separate batteries from other types of waste and
recycle them through your local, free battery return system.
17
사우디,인도,나이지리아향 FAC MEMORY 냉방_IBIM_EN_03794A(7).indd 17 2014-03-12 오전 10:29:48
Page 19
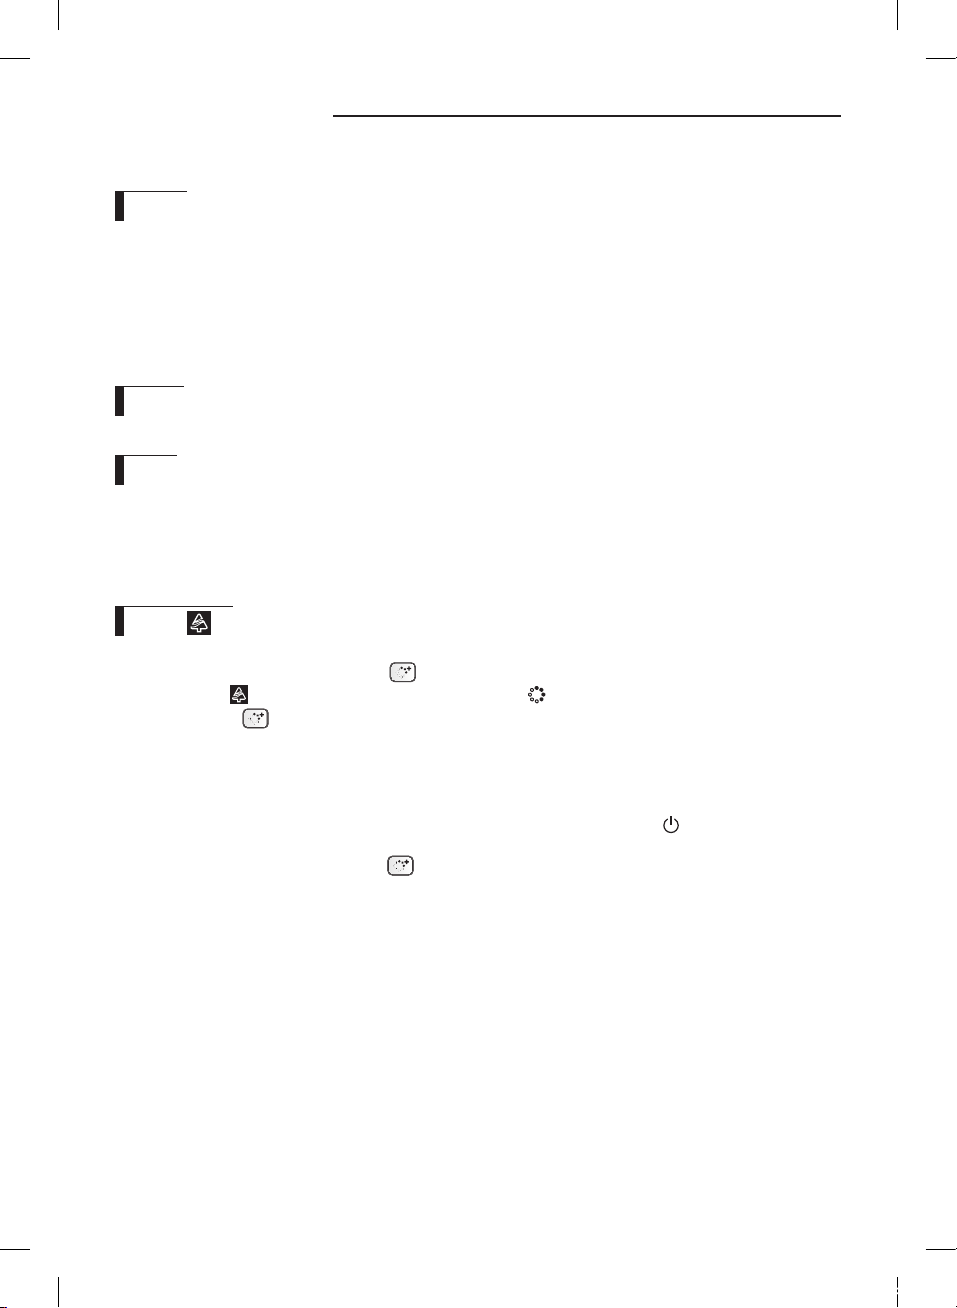
Basic operation
Basic operation is an operation mode that can be selected by pressing the Mode button.
Auto
In Auto mode, the air conditioner will automatically set the operation mode in Cool/Dry/Fan mode to provide refreshing air
throughout your indoor area.
In Auto mode, the air conditioner will automatically set the operation mode depending on the indoor surrounding.
- Display on the indoor unit will display Auto (Cool), Auto (Dry) and Auto (Purity)
In Auto mode, Smart sensor will detect the surrounding area with the camera on the indoor unit. Therefore, air flow
direction and the fan speed may different depending on the surrounding condition.
When selecting the individual operation of an indoor unit in auto mode, the indoor unit will change to cool mode.
Cool
Cool mode is frequently used and you can freely control the temperature, fan speed, and air flow direction in cool mode.
Dry
The air conditioner in Dry mode acts like a dehumidifier by removing moisture from the indoor air. Outdoor unit will
repeatedly and automatically turn on/off for maximum dehumidification according to the temperature difference of the
current and desired temperature. When the outdoor unit operates, cool air may come out from the indoor unit.
As you lower the set temperature of a remote controller, the amount of dehumidification will increase.
As you lower the set temperature of a remote controller, indoor temperature may decrease.
Purity ( )
This operation eliminates harmful contaminants within the air to provide a healthy and clean environment.
You can select Purity mode by pressing the
In purity mode,
You can press the
If you select Purity function in Auto mode, operation mode will change to Cooling (Purity) mode.
Front panel will be closed slightly when Purity mode is selected solely while the air conditioner is operating.
When the Purity mode is selected during air conditioner operation, changes in power consumption or operation noise
will be very subtle.
When the air conditioner and Purity mode is on at the same time, you can press the Power
operation.
When Purity mode is on, you can press the
will appear on the display of an indoor unit and will appear in 1 minute.
button during Cool/Dry mode and adjust the desired temperature.
button while the air conditioner is on or off.
button to stop the
button to stop the Purity operation.
18
사우디,인도,나이지리아향 FAC MEMORY 냉방_IBIM_EN_03794A(7).indd 18 2014-03-12 오전 10:29:48
Page 20
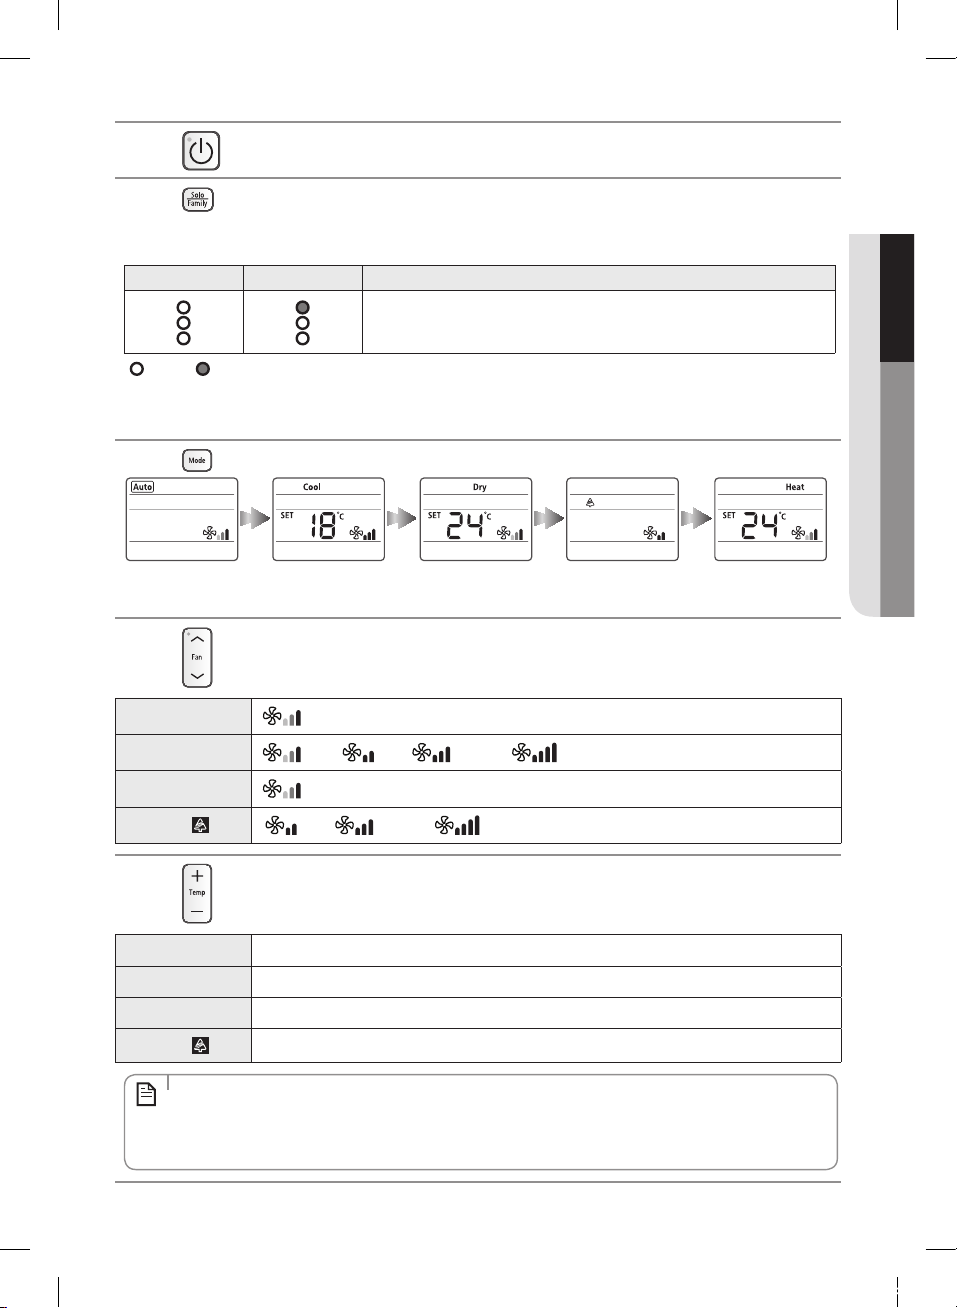
Press the button to turn on the air conditioner.
Press the
button to set Solo/Family mode.
• Solo : Select this function if you are alone in the room and save electricity bill.
• Family : Select this function if there are lots of people in the room or require powerful cooling.
Family mode Solo mode Remarks
The middle air outlet will be closed when the air conditioner reaches the
desired temperature in solo mode. When selecting the solo mode in purity
mode, the upper and middle air outlets are closed.
: Open : Close
• Family mode is set as default setting in all operation mode except Auto mode.
• During Auto mode, Solo/Family mode cannot be changed with remote controller.
Press the
button to set the operation mode.
Heat mode will be displayed on the remote controller and reception sound will be ringing but the heat mode
will not operate.
Press the
button to set the desired fan speed.
Auto
Cool
Dry
(Auto) [ Operation mode will change to Cool mode when the Fan speed is adjusted.]
(Auto), (Low), (Medium), (High)
(Auto)
ENGLISH
Purity (
)
(Low), (Medium), (High)
Press the button to adjust the desired temperature.
Auto
Cool You can adjust the desired temperature by 1°C within the range of 18°C~30°C.
Dry You can adjust the desired temperature by 1°C within the range of 18°C~30°C.
Purity (
Operation mode will change to Cool mode when desired temperature is adjusted.
Temperature adjustment is not possible.
)
• If you select Purity function additionally while operating in other mode, you can adjust the temperature
(except in Auto mode).
NOTE
• If you press the Temp + or - button on the indoor unit control panel while operating in Purity mode,
operation mode will change to Cool mode.
19
사우디,인도,나이지리아향 FAC MEMORY 냉방_IBIM_EN_03794A(7).indd 19 2014-03-12 오전 10:29:49
Page 21
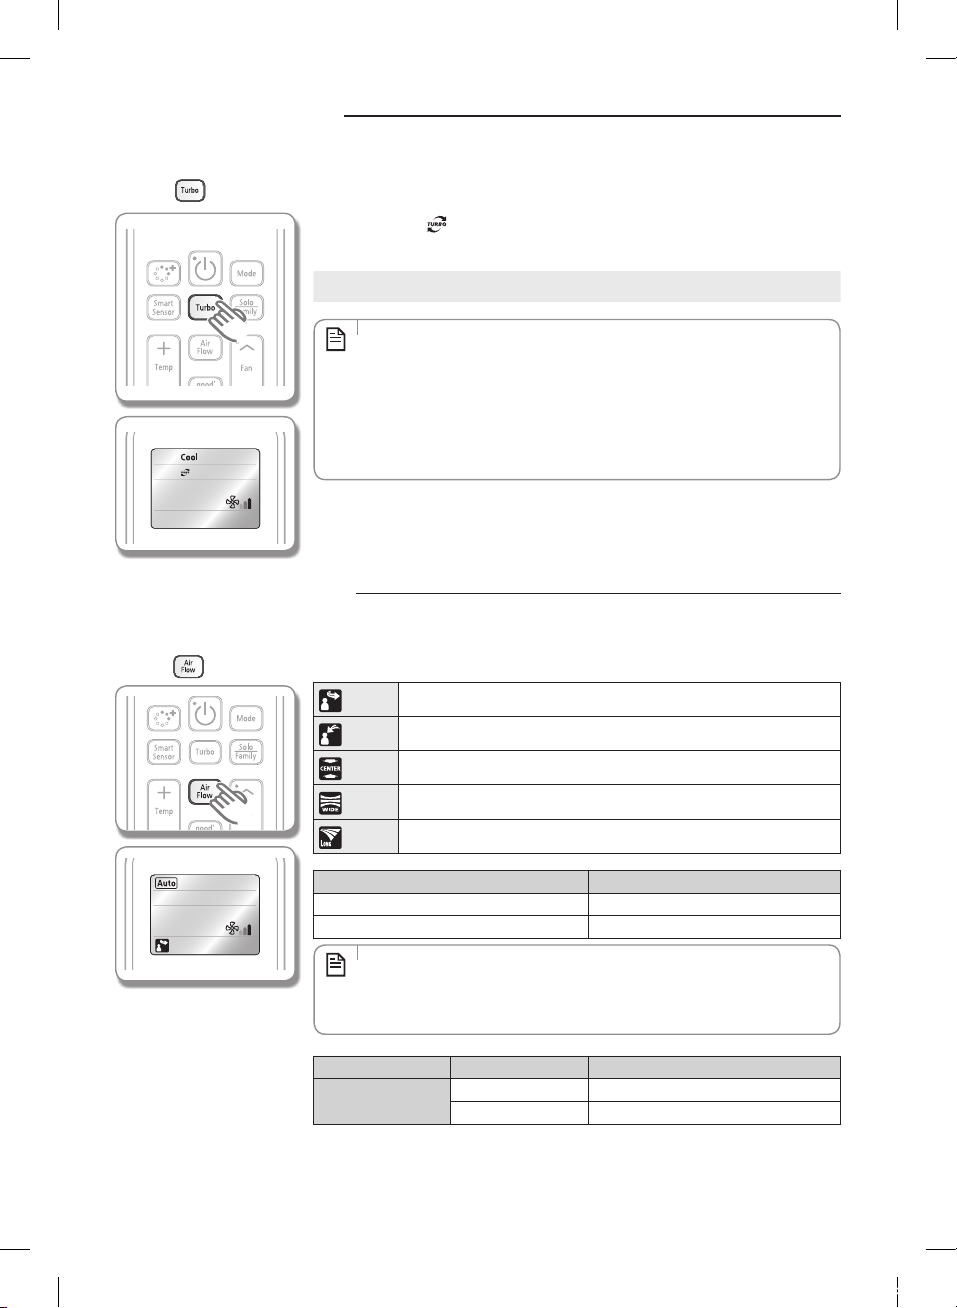
Turbo operation
Turbo function will be helpful to cool your room quickly and effectively.
Press the
button on the remote controller in the Cool mode.
Turbo indicator appears on the remote controller display and the air conditioner
will operate in Turbo function for 30 minutes.
Cancel Press the Turbo, Mode, Quiet, Smart Sensor or good`sleep button.
WPS Wi-Fi
• Turbo function is only available in the Cool mode.
• If you select the Turbo function during the Quiet/Smart sensor/good`sleep
NOTE
operation, the Quiet/Smart sensor/good`sleep operation will be canceled.
• You can adjust the air flow direction.
• You cannot adjust the desired temperature and fan speed.
• When selecting the individual operation of an indoor unit in turbo operation,
the indoor unit will change to cool mode.
Air flow direction
You can adjust the air flow direction according to the surrounding environment.
Press the
button to select desired air flow direction.
Indirect
Direct
WPS
Wi-Fi
Center
Wide
Long
Air will not flow to the person directly but provide coolness rather indirectly.
Cool air will flow directly to the person.
Cool air will come out intensively from the center.
Air flow blades will move left/right to provide the cool air to wide range of
area.
It is efficient to cool the area further away.
Operation mode Supported air flow
Cool/Dry/Purity Center, Wide, Long
• Air flow cannot be selected during good'sleep mode.
• When the Long air flow direction is selected, you may change the fan speed
NOTE
from the remote controller and the beep may sound but the air conditioner is
not actually operating in selected setting.
Auto Indirect, Direct
MODE Model Name Air flow direction
AUTO
AF28FVSDA
AF28FVZDA
N
N
You cannot adjust the direction of air flow.
Indirect, Direct
20
사우디,인도,나이지리아향 FAC MEMORY 냉방_IBIM_EN_03794A(7).indd 20 2014-03-12 오전 10:29:50
Page 22
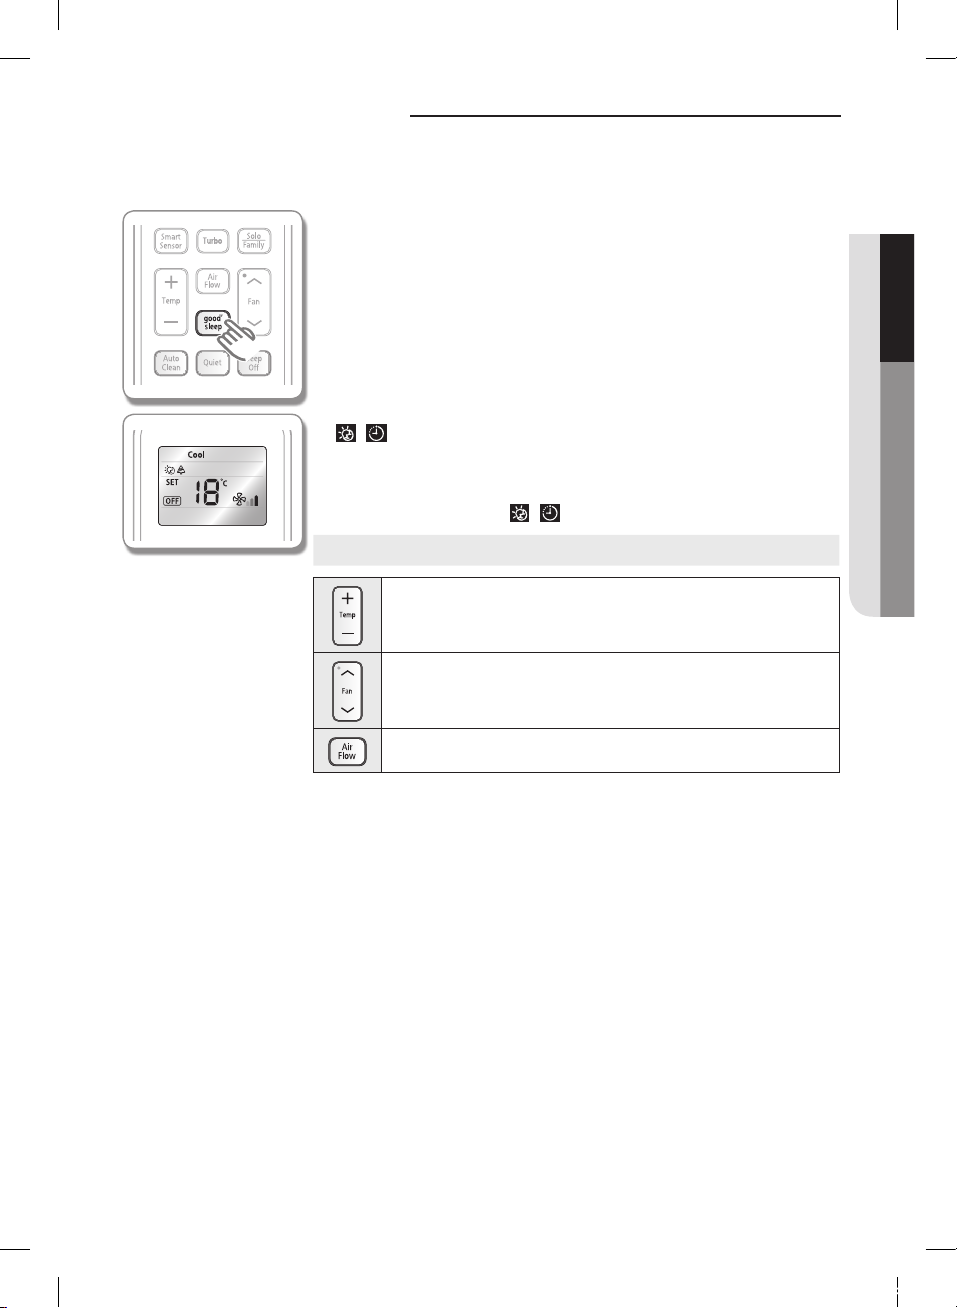
good'sleep operation
For a comfortable sleep, the air conditioner will operate in Fall asleep Sound sleep Wake up from good’ sleep mode.
When the air conditioner is on and in cool mode.
1. Press the good'sleep button on the remote controller to select the good'sleep mode.
good'sleep indicator appears and Off timer indicator starts blinking on the remote
controller display.
2. Press the good'sleep button to set the time.
You can set the time in half hourly units from 30 minute ~ 3 hours and hourly units
from 3 hour ~ 12 hours.
The operation hour can be set to minimum 30 minutes and maximum 12 hours.
Default operation hour is set to 8 hours.
3. Press the Set/Cancel button to activate it.
Off timer indicator stops blinking and set time will be displayed.
/ icon appears in the display of the indoor unit and good'sleep mode starts
operating.
If you don't press the Set/Cancel button to start the good'sleep mode within 10
seconds, the operation is canceled so you should check the Off indicator on the
remote controller display and
Cancel Press the Set/Cancel button once again.
You can set the desired temperature by 1˚C within the range of 18˚C~30˚C.
Fan speed will be adjusted automatically according to the good'sleep mode.
/ icon on the indoor unit display.
Lighting
WPS
Wi-Fi
ENGLISH
Air flow direction will be adjusted automatically according to the good'sleep
mode.
21
사우디,인도,나이지리아향 FAC MEMORY 냉방_IBIM_EN_03794A(7).indd 21 2014-03-12 오전 10:29:51
Page 23
good'sleep operation
Temperature and fan speed changes in good'sleep mode
1. Fall asleep mode : Provides you with comfortable environment for a good sleep by rapid cooling and hypnagogue
expedition breeze.
2. Sound sleep mode : The sound sleep mode adjust temperature and air flow in waves to maintain healthy skin
temperature while it aids deep sleep. According to the change of good’ sleep operation hours, the sound sleep hour can
be longer or shorter.
3. Wake up from good'sleep mode : Provides you with the air flow that adjusts your body temperature to wake you up in a
fresh status.
• In first 30 minutes of good'sleep mode, air conditioner will operate in Purity (Cool) mode.
• The recommended set temperature is 25°C~27°C and 26°C is the most ideal temperature. If the set temperature
NOTE
is too low, you may feel cold or dry and catch a cold.
• You may not have such a restful sleep if the good'sleep is set too short or long because the default is set to
8-hour-operation.
• If the good’ sleep mode is set less than 4 hours, the operation will stop after the set hours. If the good'sleep
mode is set over 5 hours, it will run as Wake up stage from the last one hour before it stops automatically.
• If you press the Solo/Family, Smart Sensor, Turbo, Mode or Quiet button during the good’ sleep operation, the
operation is canceled and the selected operation starts.
• Only the latest setting timer will be applied between the On Timer/Off Timer and good'sleep functions.
• You can set the Purity function during the good’ sleep operation.
• When operating the good'sleep mode, the air outlet will be automatically turned off and on depending on the
difference between the current temperature and desired temperature.
22
사우디,인도,나이지리아향 FAC MEMORY 냉방_IBIM_EN_03794A(7).indd 22 2014-03-12 오전 10:29:51
Page 24
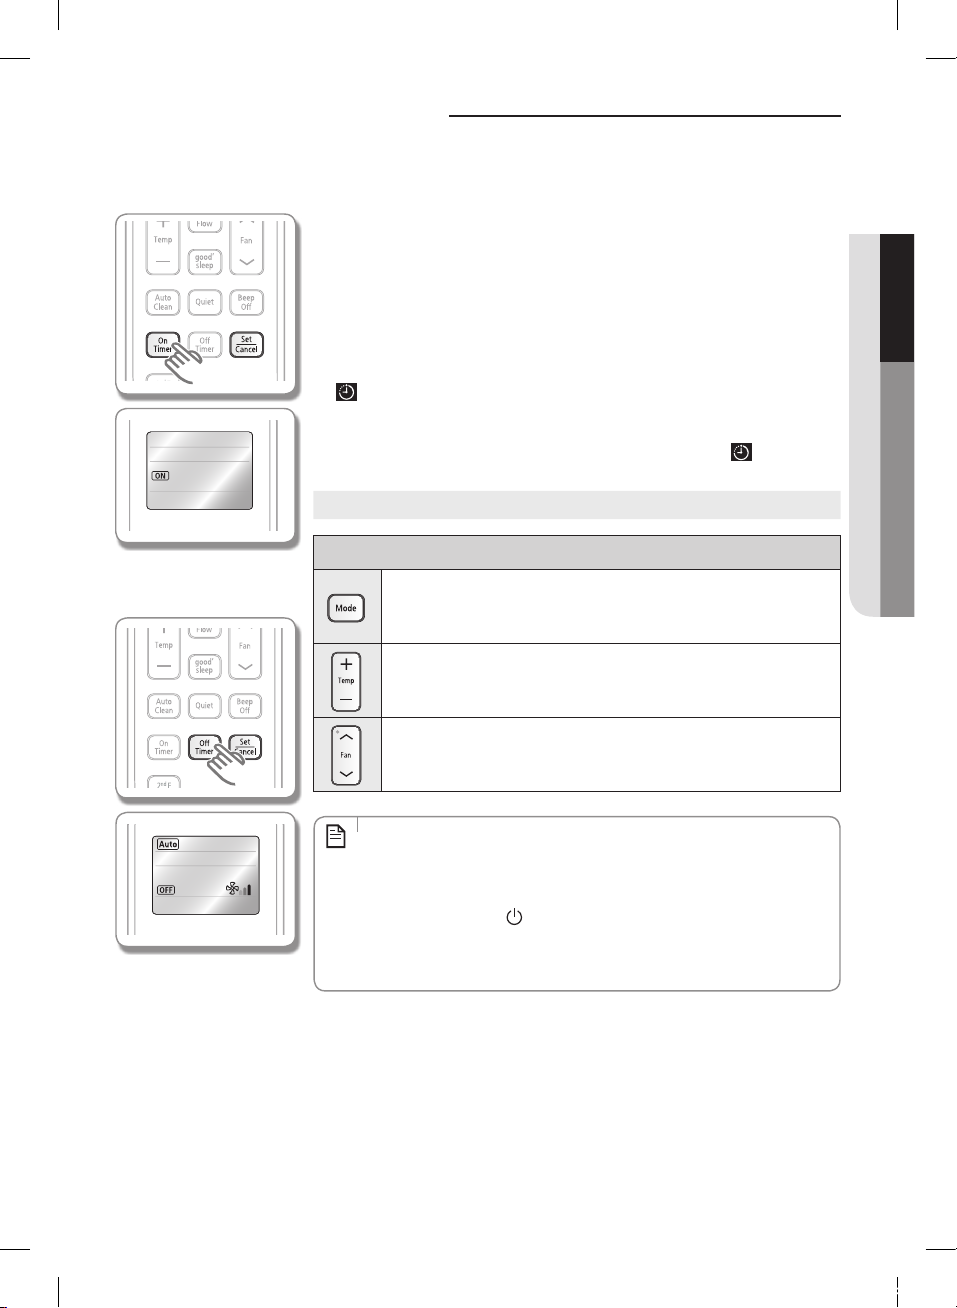
Setting the On/Off timer
You can set the air conditioner to turn on/off automatically at desired time.
Setting On timer while the air conditioner is off / Off timer while the air conditioner is on.
1. Press the On timer or Off timer button.
On/Off timer indicator will blink on the remote controller display.
2. Press the On timer or Off timer button repeatedly to set the time.
You can set the time in half hourly units from 30 minute ~ 3 hours and hourly units
Lighting
from 3 hour ~ 24 hours.
The set hour is set to minimum 30 minutes and maximum 24 hours.
3. Press the Set/Cancel button to activate it.
On/Off timer indicator will stop blinking and the set time will be displayed.
icon appears in the display of the indoor unit and timer setting will be completed.
If you don't press the Set/Cancel button within 10 seconds after selecting the On/
Off timer function, the air conditioner will return to the previous status, so you should
check the On/Off timer indicator on the remote controller display or
indoor unit display.
Cancel
Press the Set/Cancel button once again.
ENGLISH
icon on the
<Setting On timer>
Lighting
<Setting Off timer>
Additional options available in On timer mode
You can select from Auto Cool Dry Purity Heat.
When setting the on timer with Heat mode, the air conditioner will operate with
Auto mode.
You can adjust the temperature in Auto/Dry mode. Operation mode will change
to Cool mode if you press the Temp + or - button in Auto mode, and you cannot
adjust the temperature during Purity mode.
You cannot adjust the fan speed.
• Only the latest setting timer will be applied between the On Timer/Off Timer
and good'sleep functions.
NOTE
• About 10 seconds after setting the On timer, only the On timer indicator will
appear on the remote controller display.
• If you press the Power
button on the indoor unit after setting the On timer
function with the remote controller, Timer indicator on the indoor unit display
will disappear and the function will be canceled. However, Timer indicator on
the remote controller will remain on but the function will not work.
23
사우디,인도,나이지리아향 FAC MEMORY 냉방_IBIM_EN_03794A(7).indd 23 2014-03-12 오전 10:29:51
Page 25
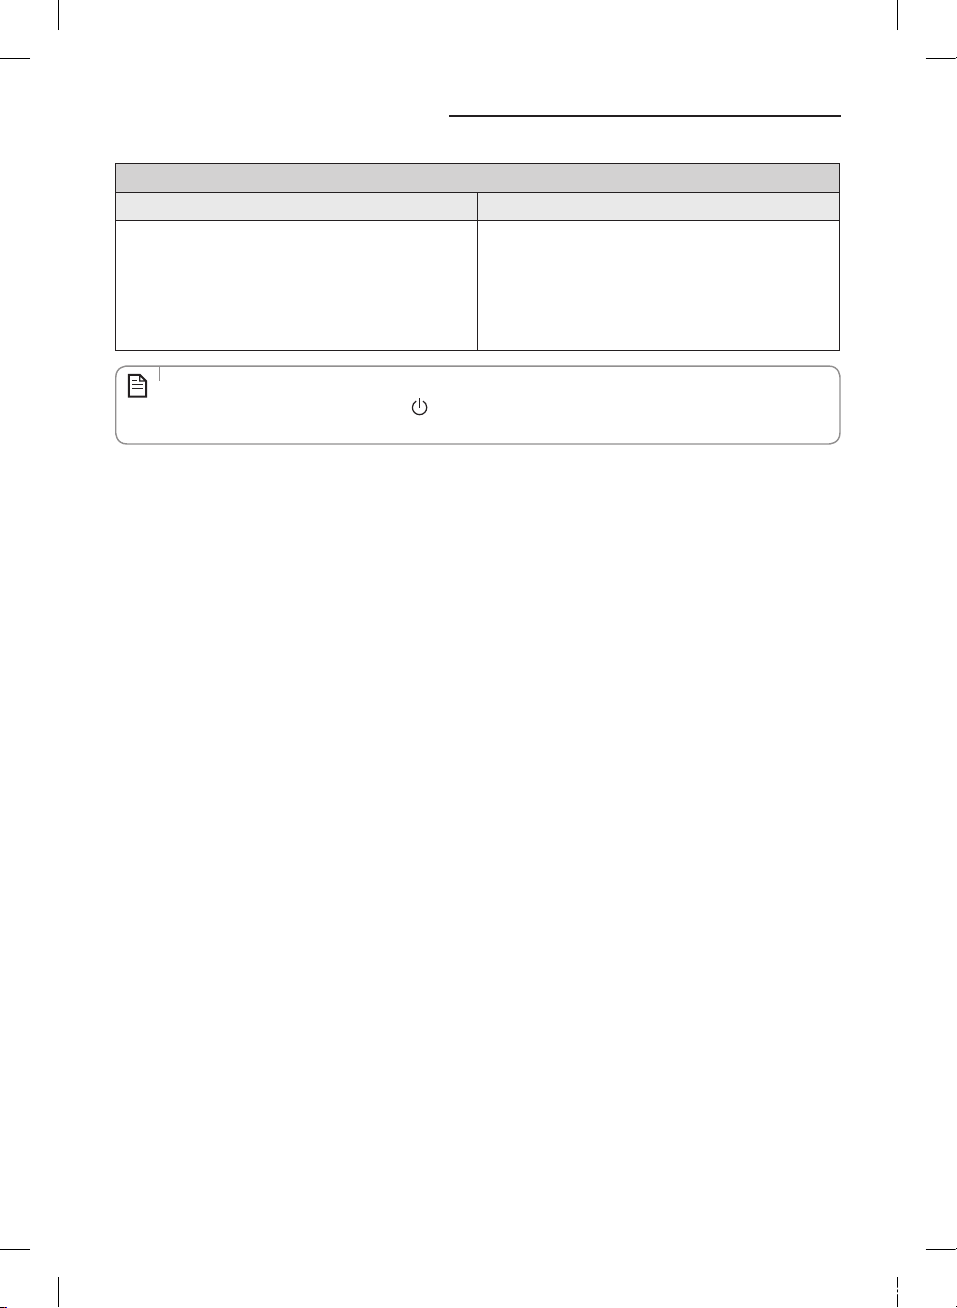
Setting the On/Off timer
Combining On Timer and Off Timer
If the air conditioner is Off If the air conditioner is On
Preset time on On timer is shorter than Off timer
Ex) On timer : 3 hours, Off timer : 5 hours
- The air conditioner will turn on after 3 hours
from the moment you have set the timer. Your air
conditioner will remain on for 2 hours and then turn
off automatically.
• On timer and Off timer setting time should be different from each other.
NOTE
• If you press Set/Cancel button or Power
the functions of both On timer and Off timer are canceled at the same time.
button while the both On timer and Off timer are set simultaneously,
Preset time on On timer is longer than Off timer
Ex) On timer : 3 hours, Off timer : 1 hour
- The air conditioner will be turned off after 1 hour from
the moment you have set the timer. After 2 hours,
your air conditioner will turn on.
24
사우디,인도,나이지리아향 FAC MEMORY 냉방_IBIM_EN_03794A(7).indd 24 2014-03-12 오전 10:29:51
Page 26
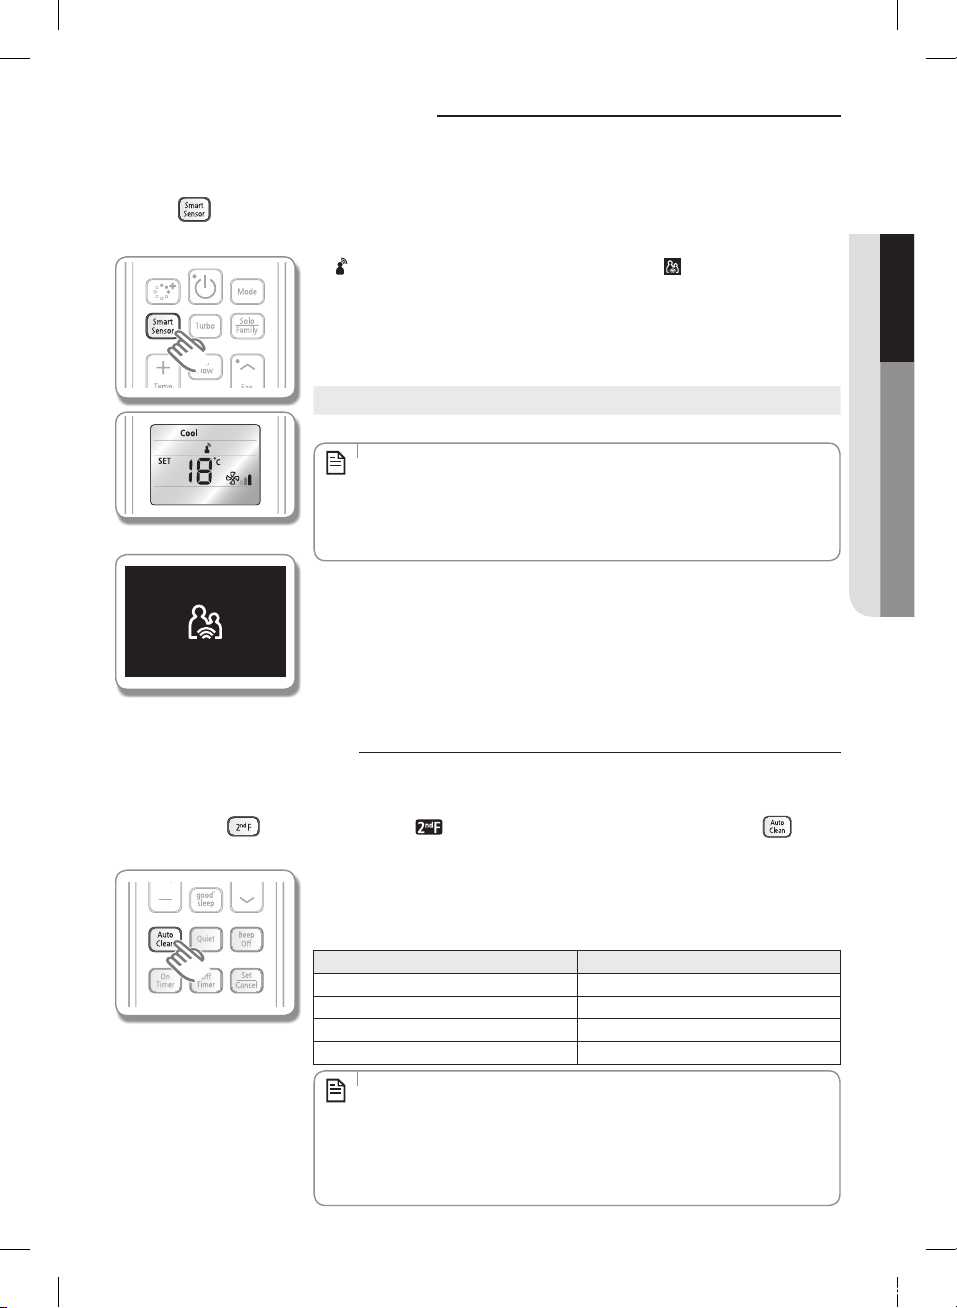
Smart sensor operation
In Cool mode, camera on the top of the indoor unit will detect the movement within the indoor and when there is no
movement for certain time, air conditioner will adjust the indoor temperature or turn off power automatically.
Press the
Applicable to AFFVSD only
<Remote controller display>
button during Cool mode.
WPS
Wi-Fi
<Indoor unit display>
icon appears on the remote controller display and the icon appears on the
indoor unit display.
When the movement is not detected for 1 hour, temperature will be adjusted
automatically.
When the movement is not detected for 2 hours, air conditioner will turn off
automatically.
Cancel Press the Smart Sensor button once again.
• Smart sensor will detect about 25° on the left and right side of the product.
• In dark places, camera cannot detect the movement and Smart sensor function
NOTE
may not work properly.
• Smart sensor mode may get disturbed by change of light or movement
change caused by devices such as TV, fan...etc.
ENGLISH
Lighting function
You can create fresh mood of indoor room with soft light by turning the light on.
After pressing the
to adjust the lighting level of an indoor unit.
Lighting
<Remote controller display>
사우디,인도,나이지리아향 FAC MEMORY 냉방_IBIM_EN_03794A(7).indd 25 2014-03-12 오전 10:29:52
button and checking the indicator on the remote controller display, press the
Each time you press the Lighting button during air conditioner operation, the lighting
level will be adjusted. (The lighting function will work only with opened air outlet.)
When changing the lighting level, press the 2
nd
F button first and then press the
Lighting button repeatedly to adjust the desired level.
Press times Brightness
1 Level 1 (Low)
2 O
3 Level 3 (High)
4 Level 2 (Medium)
• The lighting figure may change depending on the status of air conditioner
operation.
NOTE
• The lighting figure will differ depending on the models.
• The use of lighting function will be different depending on the model.
• When the air conditioner is turned off, the reception sound will be ringing from
the air conditioner but the lighting function will not operate.
Lighting
button
25
Page 27
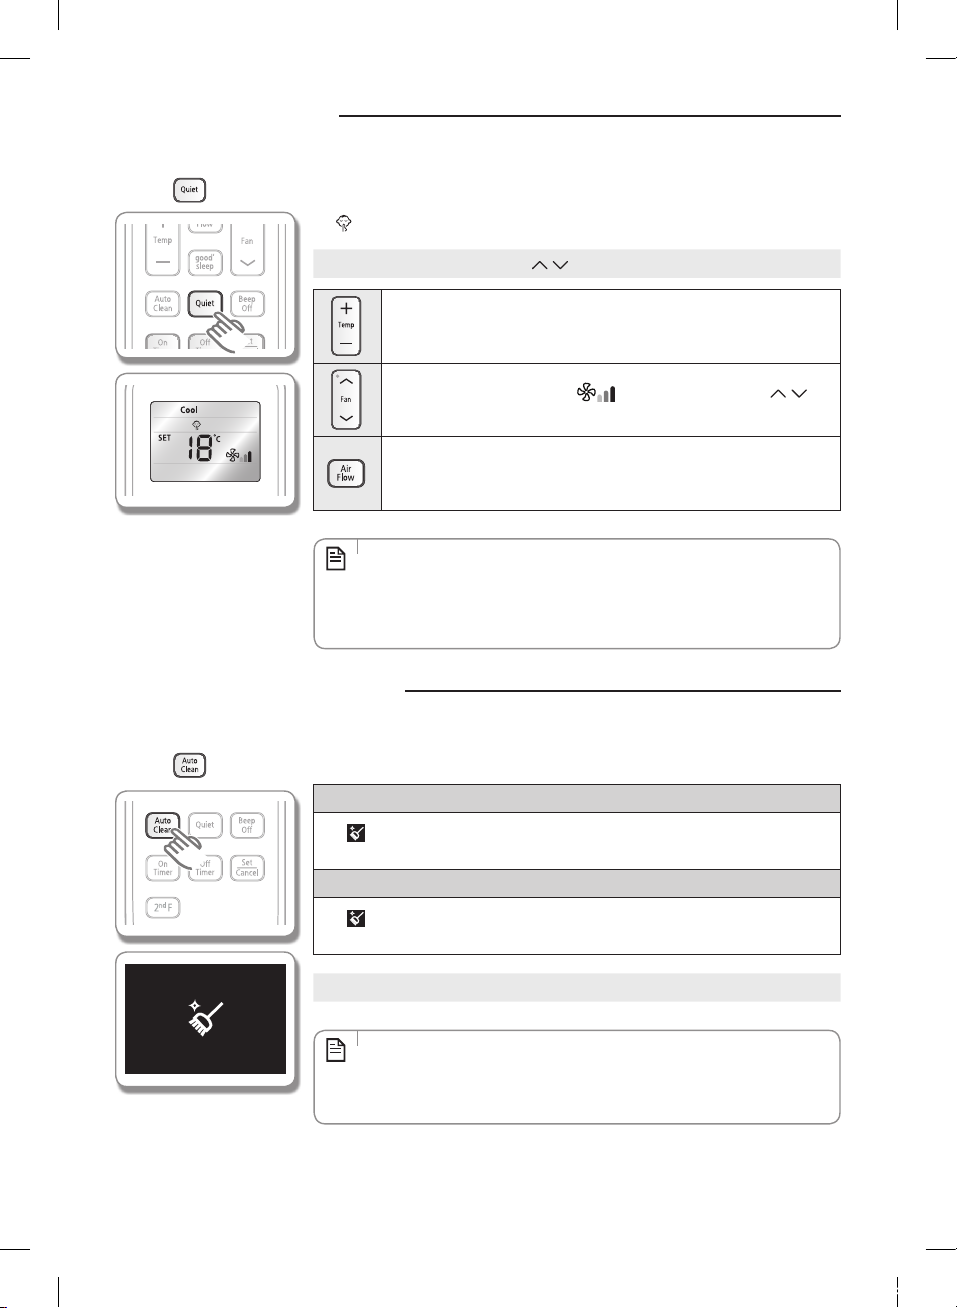
Quiet operation
This function can reduce the noise generated during air conditioner operation.
Press the
button to select Quiet function.
icon will appear on the remote controller display.
Cancel Press the Quiet, Mode or Fan , button once again.
Lighting
NOTE
You can adjust the desired temperature by 1°C within the range of
18°C~30°C.
Since the fan speed is fixed as (Auto), pressing the Fan ,
button will cancel the Quiet operation.
You can set the air flow direction.
• You can select the Quiet operation while the air conditioner is in cool mode.
If you select the Quiet operation during the Smart sensor/Turbo/good'sleep
operation, corresponding operation will be canceled.
• When selecting the individual operation of an indoor unit in quiet operation,
the indoor unit will change to cool mode.
Auto clean operation
Auto clean function will prevent mold from growing by eliminating the moisture inside of the indoor unit.
Press the
Lighting
button.
When the air conditioner is turned on,
icon appears in the display of the indoor unit and the Auto cleaning function will
run for 3 minutes after air conditioner stops operating.
When the air conditioner is turned off,
icon appears in the display of the indoor unit and the Auto cleaning function will
run for 3 minutes.
Cancel Press the Auto Clean button once again.
• The Auto clean indicator appears only on the indoor unit display.
• If you select another mode during auto clean operation, the selected mode will
NOTE
start its operation. When the selecte mode finishes, the auto clean function will
be initialized and run again for 3 minutes.
26
사우디,인도,나이지리아향 FAC MEMORY 냉방_IBIM_EN_03794A(7).indd 26 2014-03-12 오전 10:29:53
Page 28
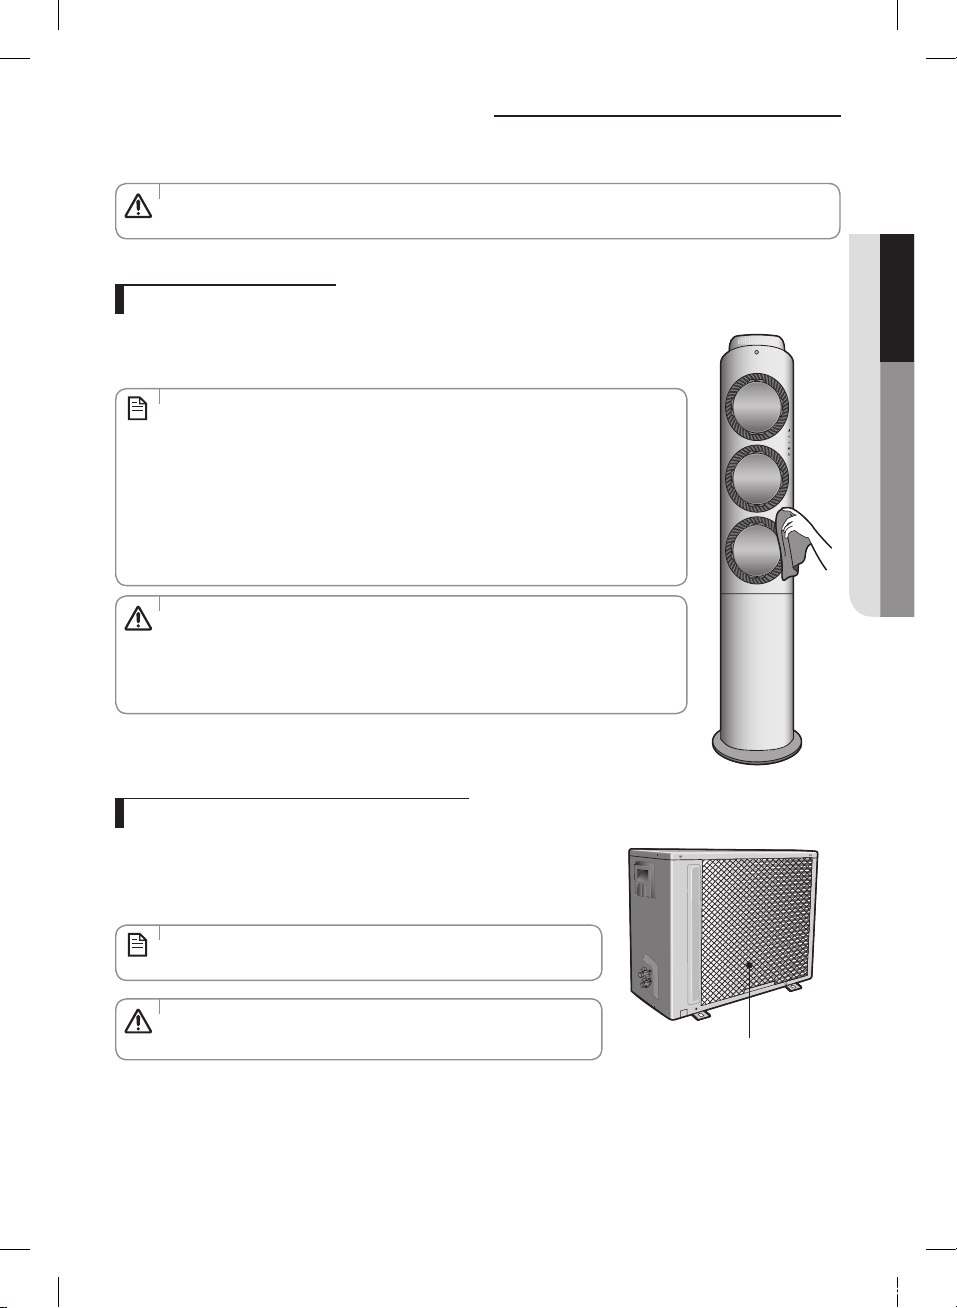
Cleaning the air conditioner
• Make sure to turn off the circuit breaker when cleaning the air conditioner.
CAUTION
Cleaning the indoor unit
Wipe the surface of the unit with a slightly wet or dry cloth when needed.
Brush away the dust on the narrow gap of air conditioner.
• Since the panel of the product can be scratched easily, use the exclusive cleaning
cloth (micro fiber) for cleaning. Wet the exclusive cleaning cloth (micro fiber) with
NOTE
little bit of water, and make sure to remove any foreign object on the cloth since the
product can be scratched easily.
• When cleaning the indoor unit, use soft and slightly wet cloth(micro fiber) because
the indoor unit panel is easily scratched. Dust off the cloth before cleaning to prevent
indoor unit from being scratched by the foreign material on the cloth.
• If it is difficult to clean the indoor unit heat exchanger on your own, contact service
center.
• Do not clean the display using alkaline detergent.
CAUTION
• Do not clean the surface with sulfuric acid, hydrochloric acid or
organic solvents (thinner, kerosene, acetone) or attach stickers.
It may damage the surface of the unit.
ENGLISH
Cleaning the outdoor unit heat exchanger
When dust accumulates on the heat exchanger, it may decrease cooling
performance. Therefore, clean it regularly.
Spray water to clean the dust.
• If it is difficult to clean the outdoor unit heat exchanger on your own,
contact service center.
NOTE
• Be careful with the sharp edges on the outdoor unit
CAUTION
heat exchanger.
사우디,인도,나이지리아향 FAC MEMORY 냉방_IBIM_EN_03794A(7).indd 27 2014-03-12 오전 10:29:54
Heat exchanger
27
Page 29
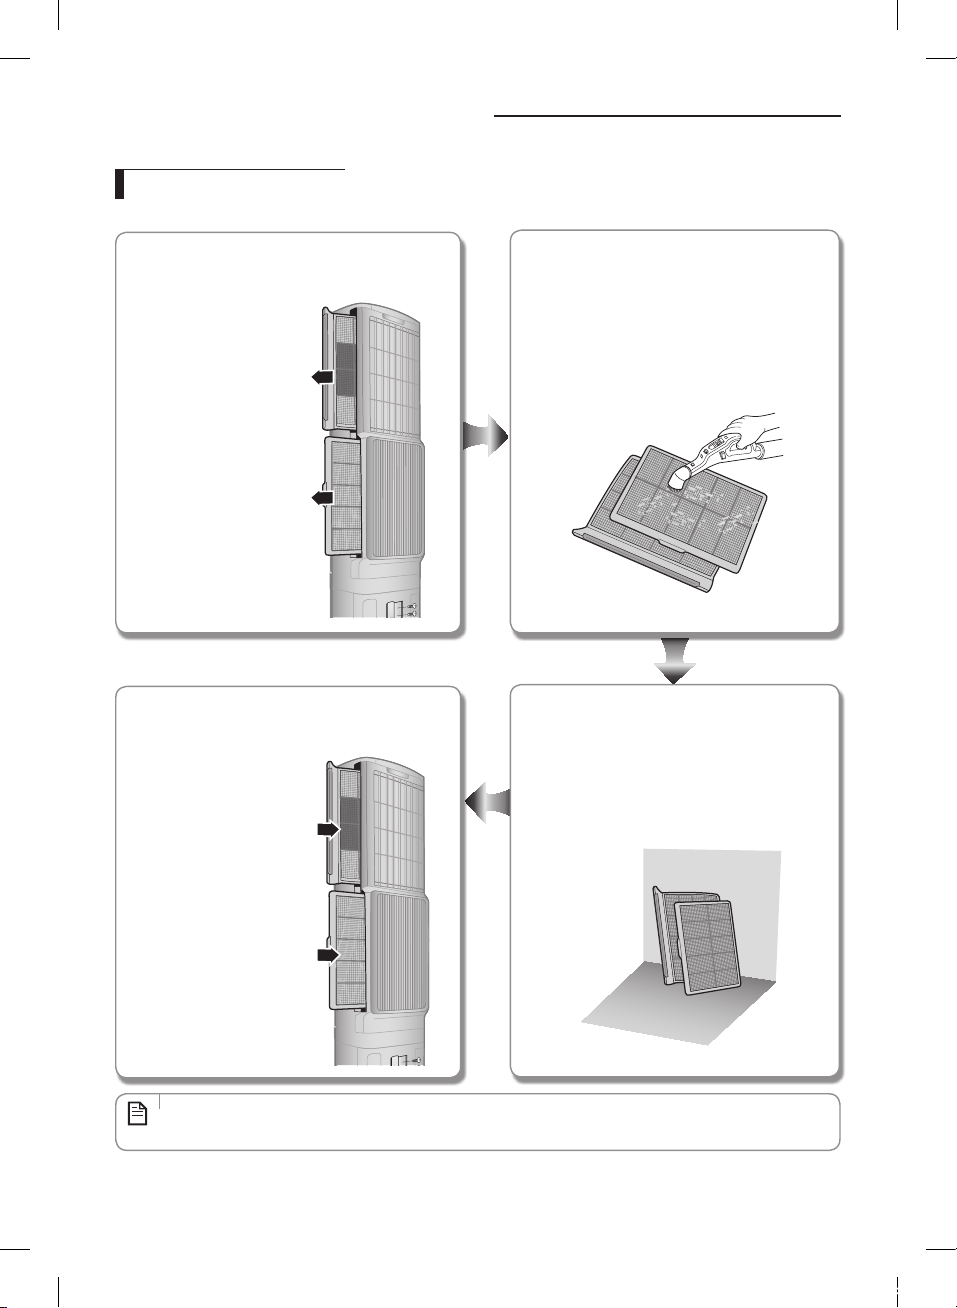
Cleaning the air conditioner
Cleaning the Full HD filter
Full HD filter filters the big dust of incoming air.
Pull out the Full HD filter in the arrow direction.
Before pulling out the lower Full HD filter, take out
the Zero filter first.
Push the Full HD filter to the end in the arrow
direction so that it can be completely fixed.
After pushing the lower
Full HD filter, push the
Zero filter.
Remove dust with a vacuum cleaner or running
water.
When the dust is serious, clean the filter with
warm water which contains a neutral detergent.
However, when rubbing out the filter with a
brush, the Full HD filter may be damaged.
Dry the filter completely in the shade.
When drying the Full HD filter, make sure the
filter is not exposed to direct sunlight.
• Clean the Full HD filter every 2 weeks. Cleaning term may differ depending on the usage and environmental
conditions.
NOTE
28
사우디,인도,나이지리아향 FAC MEMORY 냉방_IBIM_EN_03794A(7).indd 28 2014-03-12 오전 10:29:54
Page 30
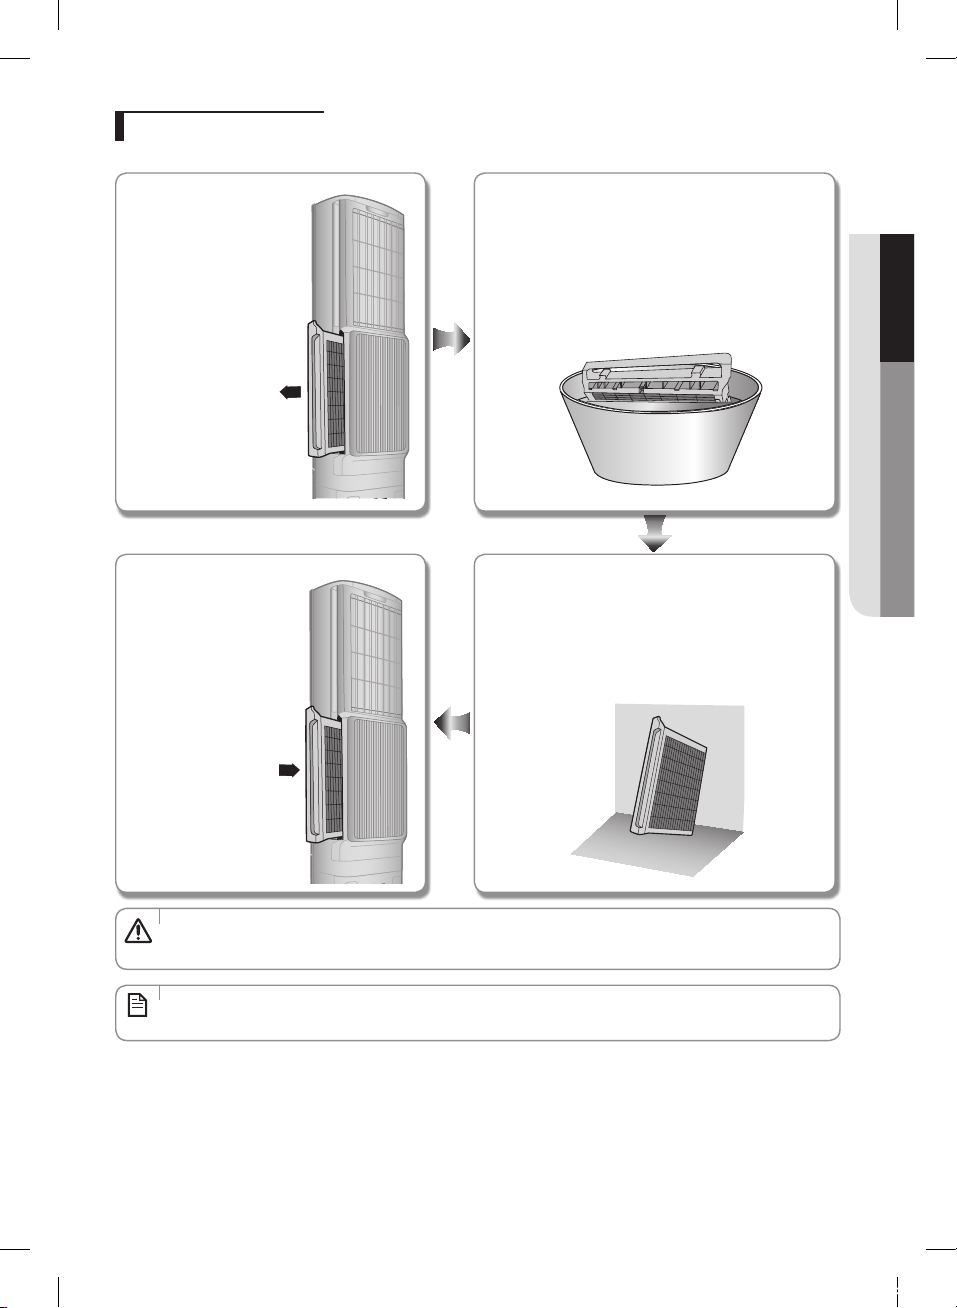
Cleaning the Zero filter
Zero filter traps small dust particles within the air. It is washable and it can be used semi-permanently.
Remove the lower Full HD
filter. Grasp the handle on
the Zero filter and remove it
by pulling it in the direction
of the arrow shown in the
figure.
Push the Zero filter in the
direction of the arrow
and make sure it is fixed
in correct position. Put
the lower Full HD filter
back.
Soak the filter in the water and shake it up and down for
few times.
Do not disassemble the Zero filter when cleaning it.
If the accumulated dust is heavy, soak the filter in water
mixed with detergent and shake it in water for 30
minutes until it is cleaned.
Dry the filter in a ventilated area.
Put the filters vertically for 12~24 hours when drying
(Drying time can be shorter depending on the
condition)
Do not dry the Zero filter in direct sunlight. It may get
deformed.
ENGLISH
• Be careful with the sharp rear surface of the Zero filter. You may cut in your hands.
CAUTION
• Clean the Zero filter every 3 months. (Based on 8 hours of use per day.) Cleaning term may differ depending on
the usage and environmental conditions.
NOTE
29
사우디,인도,나이지리아향 FAC MEMORY 냉방_IBIM_EN_03794A(7).indd 29 2014-03-12 오전 10:29:55
Page 31
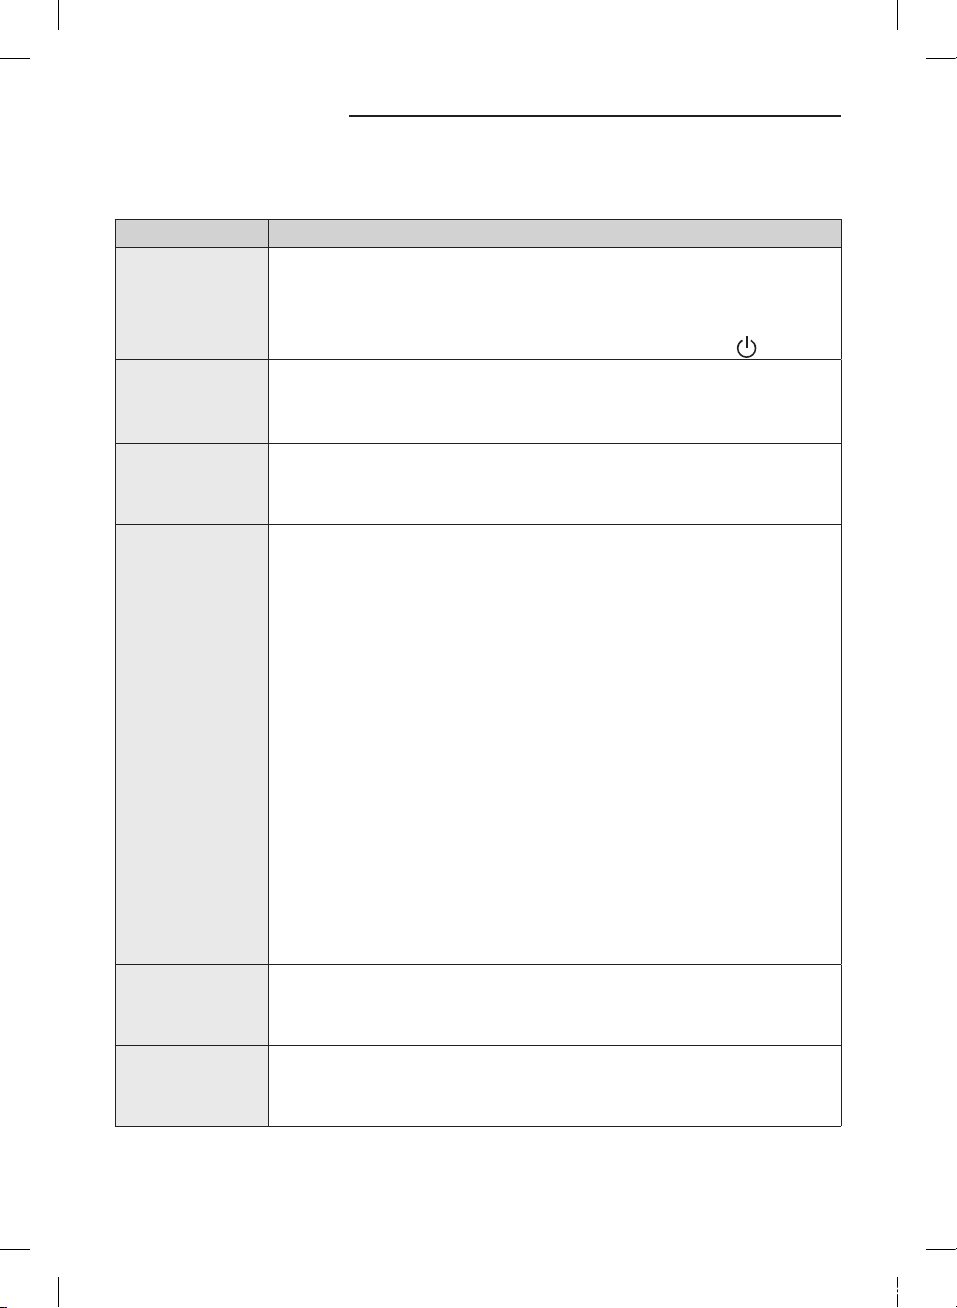
Troubleshooting
Refer to the following chart if the air conditioner operates abnormally. This may save time
and unnecessary expenses.
PROBLEM SOLUTION
The air
conditioner
does not work
at all.
Front panel
remains open.
The temperature
adjustment is
not working.
Cool air does not
come out of the
air conditioner.
Air flow
adjustment is
not working.
Fan speed
adjustment is
not working.
• Check power status and then operate the air conditioner again.
• Switch on the circuit breaker and then operate the air conditioner again.
• Check if the air conditioner is turned off by Off timer or Smart sensor.
Operate the air conditioner again by pressing the Power button.
• Check if there is a power failure.
• Check if there is any object blocking the front panel from closing.
Remove the object and then operate again.
• Check if you have selected Turbo/Purity mode. In these modes,
temperature adjustment is not available.
• Check if the set temperature is higher than the current temperature.
• Check if the Full HD filter is blocked by dirt. If there is a lot of dust on
the Full HD filter, cooling performance may decrease. Clean them
frequently.
• Check if the outdoor unit is covered or installed near the obstacle.
Take the cover off and take the obstacle away.
• If you want to operate the air conditioner in the sunlight, cover the
outdoor unit using curtains or etc.
• If the doors or windows are open, it may cause poor cooling
performance. Close the doors and windows.
• If you have selected Purity mode without selecting other mode, cool
air does not come out of the air conditioner. Press the Mode button
to select other mode.
• Check if the pipe length is too long. When the pipe length exceeds
maximum allowable pipe length, cooling performance may
decrease.
• Check if you have selected good'sleep mode. In this mode, you
cannot adjust the air flow direction since it is set to Auto.
• Check if you have selected Dry/Turbo/good'sleep mode. In these
modes, fan speed is set to Auto and you cannot adjust the fan speed.
30
사우디,인도,나이지리아향 FAC MEMORY 냉방_IBIM_EN_03794A(7).indd 30 2014-03-12 오전 10:29:55
Page 32
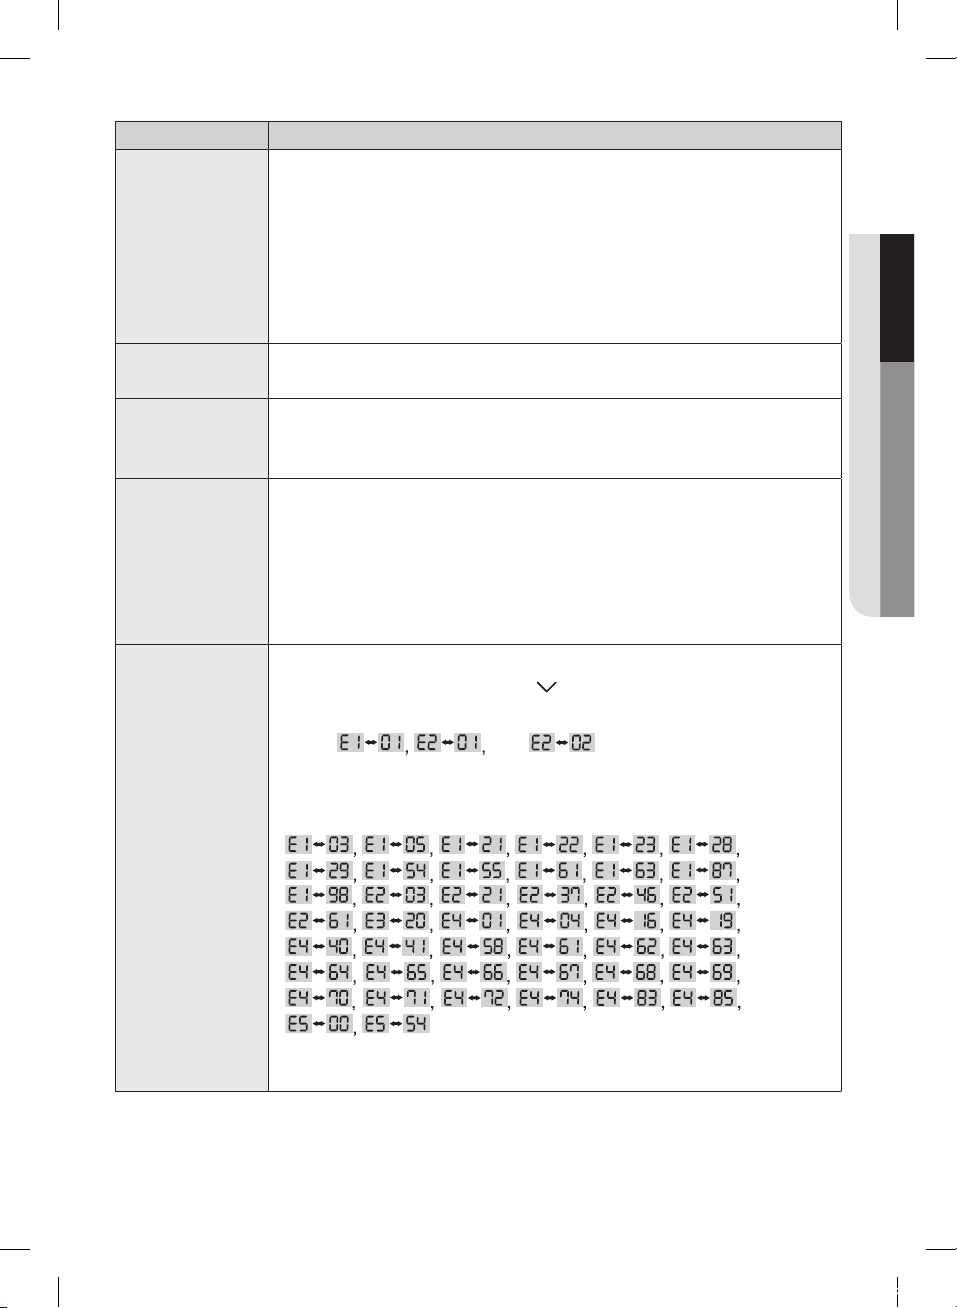
PROBLEM SOLUTION
• Check if your batteries are depleted.
• Make sure nothing is blocking your remote controller sensor.
Remote
controller is not
working.
• Check whether there are strong lighting apparatus near the air
conditioner. Strong light which comes from fluorescent bulbs or
neon signs may interrupt the electric waves.
• Stand towards the center of the product, point the remote controller
towards the remote control receiver and press the button.
Timer function
does not work.
The air
conditioner is
not turned off.
• Check if you have pressed the Set/Cancel button on the remote
controller after setting the time.
• Check the air conditioner is in auto cleaning mode. When turning the
air conditioner off after using the auto cleaning function, it will take
3 minutes to turn the air conditioner off.
• Odor may permeate depending on the surrounding environment or
Odors permeate
in the room
during
operation.
operating condition. Ventilate the indoor air.
• Check if the appliance is running in a smoky area. Ventilate the room
or operate the air conditioner in Purity mode for 1~2 hours. (We do
not use smelly components in the air conditioner.)
• Clean the Zero filter and Full HD filter if they are dirty.
• When error indications appear on the indoor unit display, press
the Set/Cancel button and Fan
indications appear again, contact a service center.
• When
and appear on the indoor unit
display, check the power cable of outdoor unit is connected. If the
connection is ok, turn the indoor unit off and on again.
• When
ENGLISH
button for 3 minutes. If error
Error is indicated
are blinking, the air conditioner has a problem. In this case, contact a
service center.
31
사우디,인도,나이지리아향 FAC MEMORY 냉방_IBIM_EN_03794A(7).indd 31 2014-03-12 오전 10:29:55
Page 33
Troubleshooting
PROBLEM SOLUTION
• Depending on the status of the air conditioner usage, noise can be
Noise is
generated
Water is
dropping from
the outdoor
unit piping
connection
heard when refrigerant flow movement changes. It is normal.
• Crackling sound may occur during the operation of the air
conditioner, push the Zero filter to the end.
• Water may be generated because of the temperature difference. It is
normal.
• When the humidity difference of air outlet is big, water drop may
be formed and dripping. Therefore, do not worry about this with
product malfunction.
32
사우디,인도,나이지리아향 FAC MEMORY 냉방_IBIM_EN_03794A(7).indd 32 2014-03-12 오전 10:29:55
Page 34
Open Source Announcement
The software included in this product contains open source software. You may obtain the complete corresponding source
code for a period of three years after the last shipment of this product by sending an email to
mailto:[email protected].
It is also possible to obtain the complete corresponding source code in a physical medium such as a CD-ROM; a minimal
charge will be required.
The following URL http://opensource.samsung.com/opensource/Memory/seq/0 leads to the download page of the source
code made available and open source license information as related to this product. This offer is valid to anyone in receipt of
this information.
ENGLISH
33
사우디,인도,나이지리아향 FAC MEMORY 냉방_IBIM_EN_03794A(7).indd 33 2014-03-12 오전 10:29:55
Page 35
Installation parts
Safety precautions
Carefully read the content of this manual before installing the air conditioner and store the manual in a safe place in order to
be able to use it as reference after installation.
WARNING
CAUTION
Hazards or unsafe practices that may result in severe personal injury or death.
Hazards or unsafe practices that may result in minor personal injury or property damage.
WARNING
Installation must be carried out by a qualified installer.
- Do not attempt to repair, move, modify or reinstall the unit on your own since such act may cause fire, electric shock or
water leakage.
Install the unit in a place where it is strong enough to hold the product weight.
- When installed in place where it is not strong enough to withhold the product weight, the unit could fall and cause
injury.
The unit should be installed in accordance with the National Electrical regulations by a qualified installer and leased
circuit must be used.
- Lack of capacity on leased circuit or improper installation may cause electric shock or fire.
Use the specified wires to connect the indoor and outdoor units securely and attach the wires firmly to the terminal block
connecting sections so that the pressure is not applied to the sections.
- Inappropriate connection and fixing could cause fire.
Attach the electrical cover to the indoor and outdoor unit securely without any gaps.
- If there are any gaps, there is potential risk of fire or electric shock due to dust or water.
Make sure to use the part provided or specified parts for the installation work.
- The use of defective parts could cause an injury or leakage of water due to a fire, an electric shock, the unit falling, etc.
Make sure that the refrigerant gas does not leak after completing the installation.
- If the refrigerant gas comes into contact with the heating apparatus, harmful gas will be generate.
- If the refrigerant gas of the indoor unit leaks and comes into contact with the fan heater, space heater or stove, harmful
gas will be generated.
Ensure that a proper ground wire is in place.
- Do not connect the ground wire to a gas pipe, water pipe, lightning rod or telephone grounding. Defective grounding
could cause electric shock.
Do not install the unit in a place where it is exposed to inflammable gas leakage.
- When leaked gas accumulates around the product, it may cause fire.
Perform the installation securely referring to the installation manual.
- Incomplete installation could cause water leakage, electric shock or fire.
Check first the following situations before starting the operation during the installation.
- The pipe must be properly connected and make sure there is no leakage.
- Service valves must be open. If compressor is operated with the service valve closed, excessive pressure may damage
parts of the compressor. If leakage occurs on any of the connections, air inflow may also cause excessive pressure that
could lead to explosion.
34
사우디,인도,나이지리아향 FAC MEMORY 냉방_IBIM_EN_03794A(7).indd 34 2014-03-12 오전 10:29:55
Page 36
WARNING
Do not assemble the power cord on your own, use two cables together to extend the cable length or tangle the cable.
- Bad connection, isolation and over voltage may cause fire or electric shock.
Make sure to turn off the main power when setting up the indoor unit electrical circuit or power cords.
- There is a risk of electric shock.
Install a ground leakage breaker depending on the installation place.
- If not, it may cause electric shock.
Never use the components and pipes for R-22 refrigerant on the models using R-410A refrigerant.
- If the oil used for R-410A gets mixed with the mineral oil for R-22, it will get hydrolyzed and cause product damage.
CAUTION
Check if the product is in good shape before the installation.
- Do not install the product with the damage which occurred during shipment.
Read the installation manual thoroughly before installing the air conditioner.
Before installing the air conditioner, make sure to discuss the location selection and the precautions on the installation
manual with the user.
Perform the drainage/piping work securely according to the installation manual.
- If not, water could drip from the unit and household goods could get wet and damaged.
Fasten a flare nut with a torque wrench as specified in this installation manual.
- When fastened too tightly, a flare nut may break after a long period of time and cause refrigerant leakage.
Wear thick gloves during the installation process.
- If not, personal injury may occur due to the air conditioner parts.
Be careful not to touch the outdoor unit inlet or aluminium pins.
- You may get personal injury.
Do not install the outdoor unit in a place where animals could live.
- If an animal comes into contact with the electric parts, damage or fire may occur. In addition ask the customer to
maintain a clean installation place around it.
After completing the installation, run the trial operation. If no error occurs, explain to the customer how to use and clean
the air conditioner according to the user’s manual. In addition give the installation manual and the user’s manual to the
customer.
Do not open the front panel of the indoor unit during operation.
- It may cause damage to the product.
Check the product before installing it.
- Check the unit for damage that may have taken place during transportation and do not install or use damaged
equipment.
All of the manufacturing and packaging material used for your new appliance are compatible with the environment and
can be recycled.
This product is an air conditioning system and contains a refrigerant that must be recovered and disposed of in an
appropriate way by qualified personnel.
- At the end of the life cycle, take it to a proper recycling or disposal center or return it to the dealer so that it can be
disposed correctly.
When customer claim is caused by not following above safety precaution, installer is responsible for the claim.
(Installer is responsible for the service charges.)
ENGLISH
35
사우디,인도,나이지리아향 FAC MEMORY 냉방_IBIM_EN_03794A(7).indd 35 2014-03-12 오전 10:29:56
Page 37
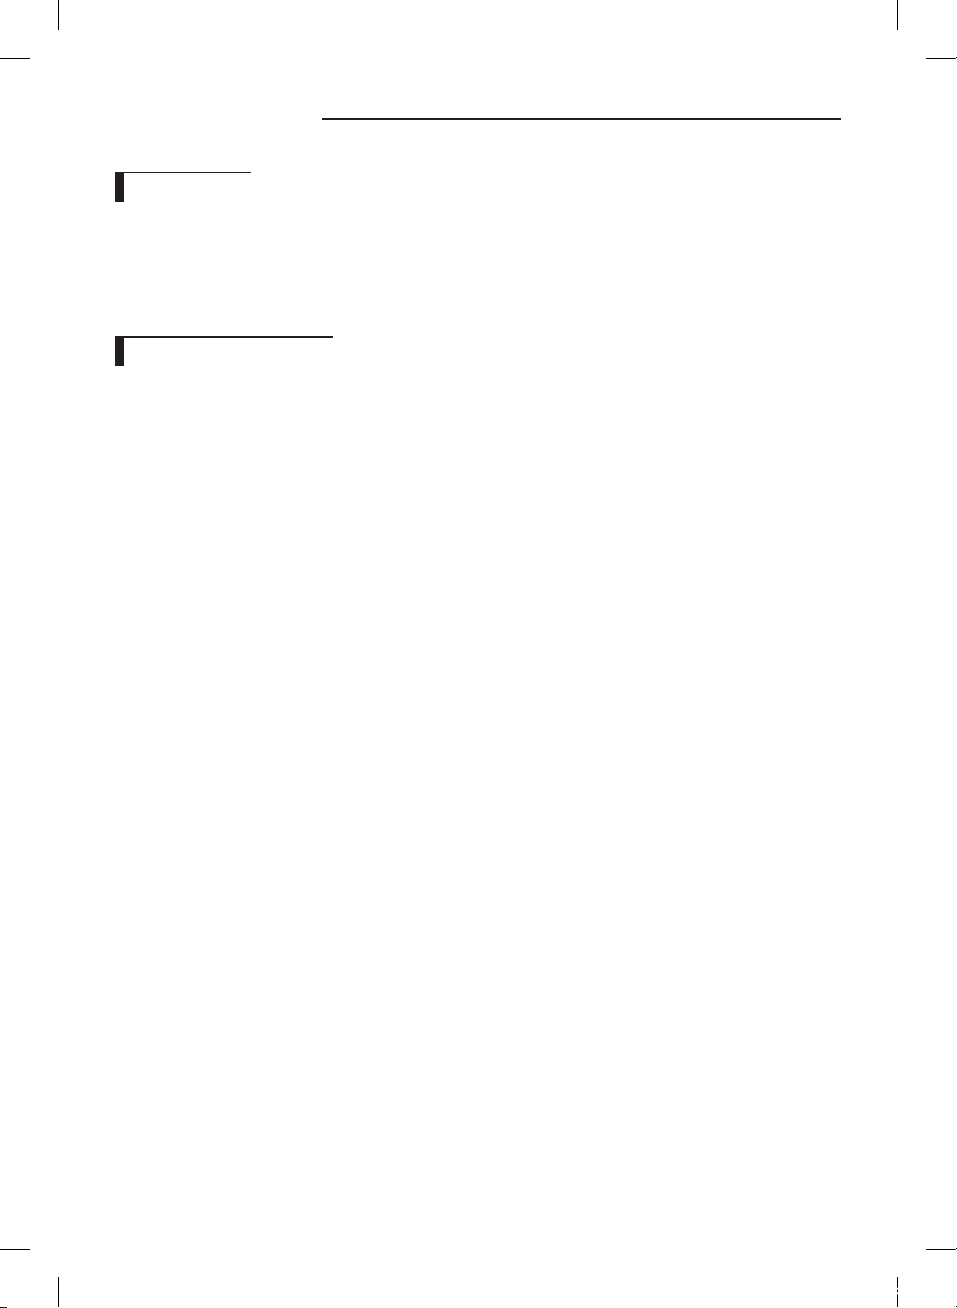
Required tools
General tools
① Vacuum pump ② Torque wrench ③ Pipe cutter
④ Reamer ⑤ Pipe bender ⑥ Spirit level
⑦ Screw driver ⑧ Spanner ⑨ Drill
⑩ L wrench ⑪ Measuring tape
Tools for test operations
① Thermometer ② Resistance meter ③ Electroscope
36
사우디,인도,나이지리아향 FAC MEMORY 냉방_IBIM_EN_03794A(7).indd 36 2014-03-12 오전 10:29:56
Page 38
Choosing the installation location
Indoor unit
Install the unit at a place close to the wall facing the outside as it is necessary to perform piing connection with the
outdoor unit.
- It is effective to install the unit at the place where air flow is not blocked and the cool air can be distributed throughout
the room.
Install the unit at a place where there is no obstacle against the wind around the air intake and air outlet.
Avoid a place near the door which is frequently used by people.
Avoid a place exposed to direct sunlight. (If it is unavoidable, install a sunshade).
- Surface of the product may get discolored.
Install it on even ground.
• Make sure there is no abnormal operation or noise generation.
• If installed on uneven ground, water may overflow.
Outdoor unit
Avoid a place exposed to direct sunlight. (If it is unavoidable, install a sunshade).
A place free from the risk of combustible gas leakage.
A place which can bear the weight of the unit.
A place which can bear the fixing strength of the outdoor unit.
Avoid a place exposed to oil (including machine oil)
Avoid a saline place.
Avoid a place exposed to sulfide gas (hot spring zone).
- When installing the unit at such special environmental conditions, it may cause trouble to the product. When it is
unavoidable, special maintenance is required.
A place where discharged air and noise of the outdoor unit does not disturb the neighborhood.
- Take extra care not to cause any inconvenience to your neighbors when installing the unit on the borderline with your
neighborhood.
A place where strong wind does not head against the air outlet of the outdoor unit.
- If a strong wind heads directly against the air outlet at the time of cool operation, a safety device can be operated.
Do not install the outdoor unit on a unstable places (such as rooftop). If installation is unavoidable, make sure that you
fixed the unit firmly. Avoid places where strong wind or storm can possibly knock down the product (such as seashore or
place with frequent storm)
ENGLISH
37
사우디,인도,나이지리아향 FAC MEMORY 냉방_IBIM_EN_03794A(7).indd 37 2014-03-12 오전 10:29:56
Page 39
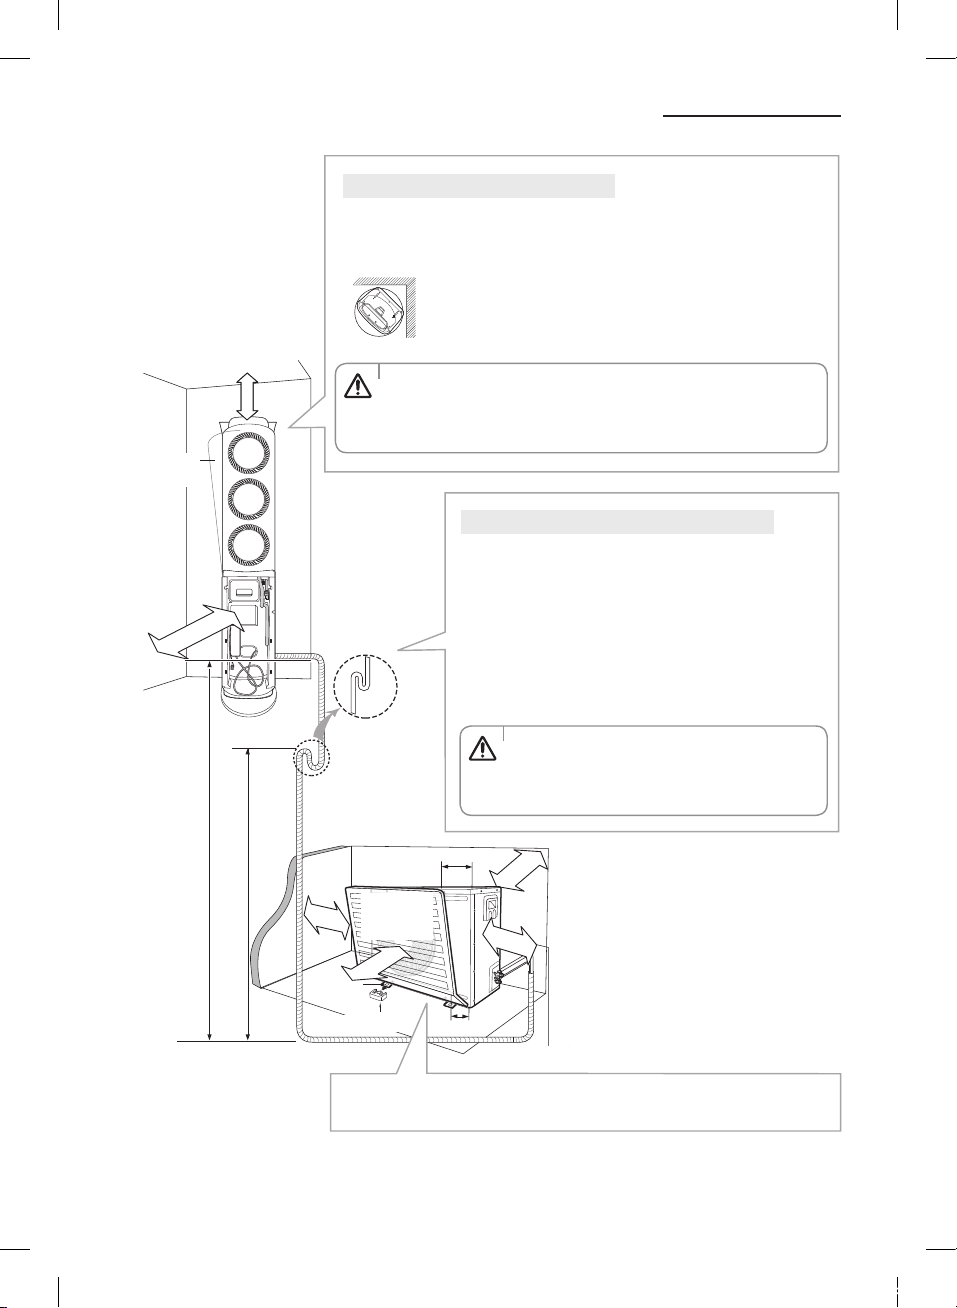
Indoor/outdoor unit installation diagram
Maximum
allowable piping
elevation 10m
or less
6m or
less
Install S-trap for
every 6m
Maximum allowable
piping length 20m
or less
Outdoor unit
50cm
ormore
30cm or
more
50cm or
more
Air guide
(Not provided by
manufacturer )
30cm or more
20cm or more
No obstacle
1m or more
60cm or more
30cm or
more
Protection
vinyl
Outdoor
unit leg
Rubber leg
Spare space for piping
Installation space for floor type indoor unit
To minimize the waste of space due to installation, install the indoor unit as
shown in below figure.
- Top view
CAUTION
After completing the installation, remove the protection vinyl.
(Be careful of static electricity).
After completing the installation, remove the protective
filament film on the product.
• Make sure that there are no obstacles (such as curtains etc.) blocking air
inlets of the indoor unit.
• Clear space on the right side of the indoor unit for possible filter
maintenance in the future.
Piping length for indoor/outdoor unit installation
Refer to illustration on the left for maximum allowable
piping length and elevation.
Since product performance and lifespan may decrease as
piping length becomes longer, try to minimize the piping
length but make sure it is over 5m.
Select the installation location where you can keep the
piping bending to maximum 10 spots.
Stated cooling performance is based on product with 5m
piping.
• One S-trap must be installed on the low pressure
pipe up to 6m of piping elevation. For piping
CAUTION
elevation that exceeds 6m, install S-trap every
6m.
When air guide needs to be installed to prevent the warm discharge air from
disturbing the pedestrian, refer to the illustration on the right side for installation.
38
사우디,인도,나이지리아향 FAC MEMORY 냉방_IBIM_EN_03794A(7).indd 38 2014-03-12 오전 10:29:56
Page 40
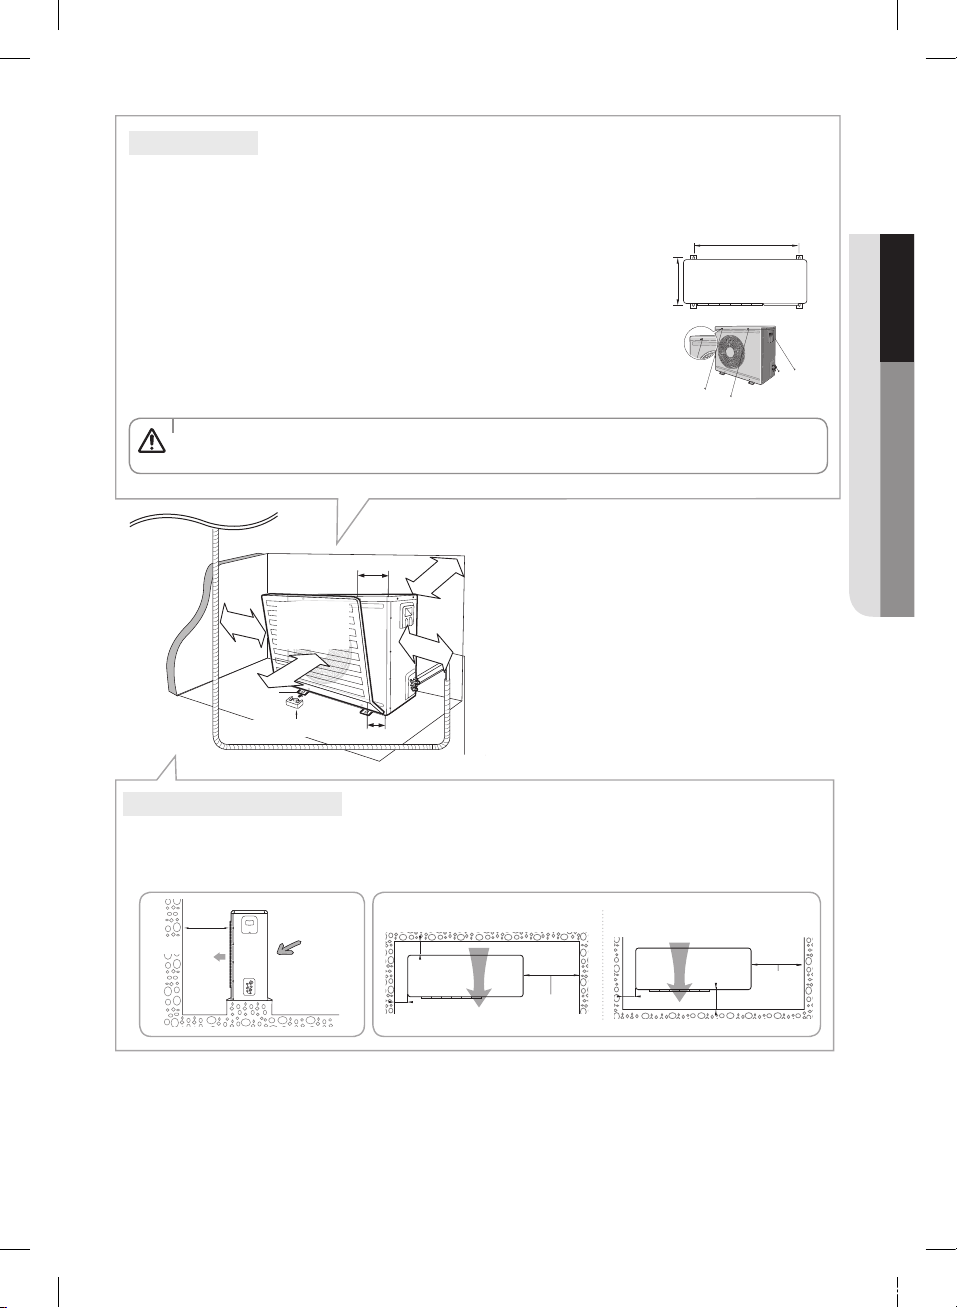
Outdoor unit
30cm or
more
50cm or
more
Air guide
(Not provided by
manufacturer )
30cm or more
20cm or more
60cm or more
30cm
ormore
Outdoor
unit leg
Rubber leg
Spare space for piping
Fixing outdoor unit
Follow below method to firmly fix the outdoor unit.
Using rubber leg
- Put the rubber leg to the outdoor unit leg. (Refer to illustration on the right.)
Using anchor bolt
- On a flat, rigid ground, use 4 anchor bolt (M10) to fix the unit. (Anchor bolt should be
purchased separately.)
- Select the anchor bolt that is long enough to securely fix the outdoor unit.
If you need to ensure the outdoor unit from falling, use wires to fix it firmly.
• Loosen the 4 screws from the top cover of the outdoor unit.
• Put the wire around the screws and fasten the screws.
• Fix the wire on the ground.
• When the outdoor unit is not firmly fixed, it may fall and cause personal injury or property damage.
• When the outdoor unit is installed in water-proofed rooftop, fix the wire on the wall.
CAUTION
Anchor bolt fixing dimension
660mm
338mm
ENGLISH
Installation space for outdoor unit
Refer to following examples for wind protection.
When installing in the street with lots of buildings, install the product parallel to the street.
In the places with strong wind, install the product with air outlet facing the wall.
60cm or
Wall
more
Air
outlet
Strong wind
Rooftop
The air intake faces towards the wall
30cm or more
30cm or more
50cm or
more
Spare space
for piping
The air outlet faces towards the all
30cm or more
50cm or
Spare space
for piping
60cm or more
more
39
사우디,인도,나이지리아향 FAC MEMORY 냉방_IBIM_EN_03794A(7).indd 39 2014-03-12 오전 10:29:57
Page 41
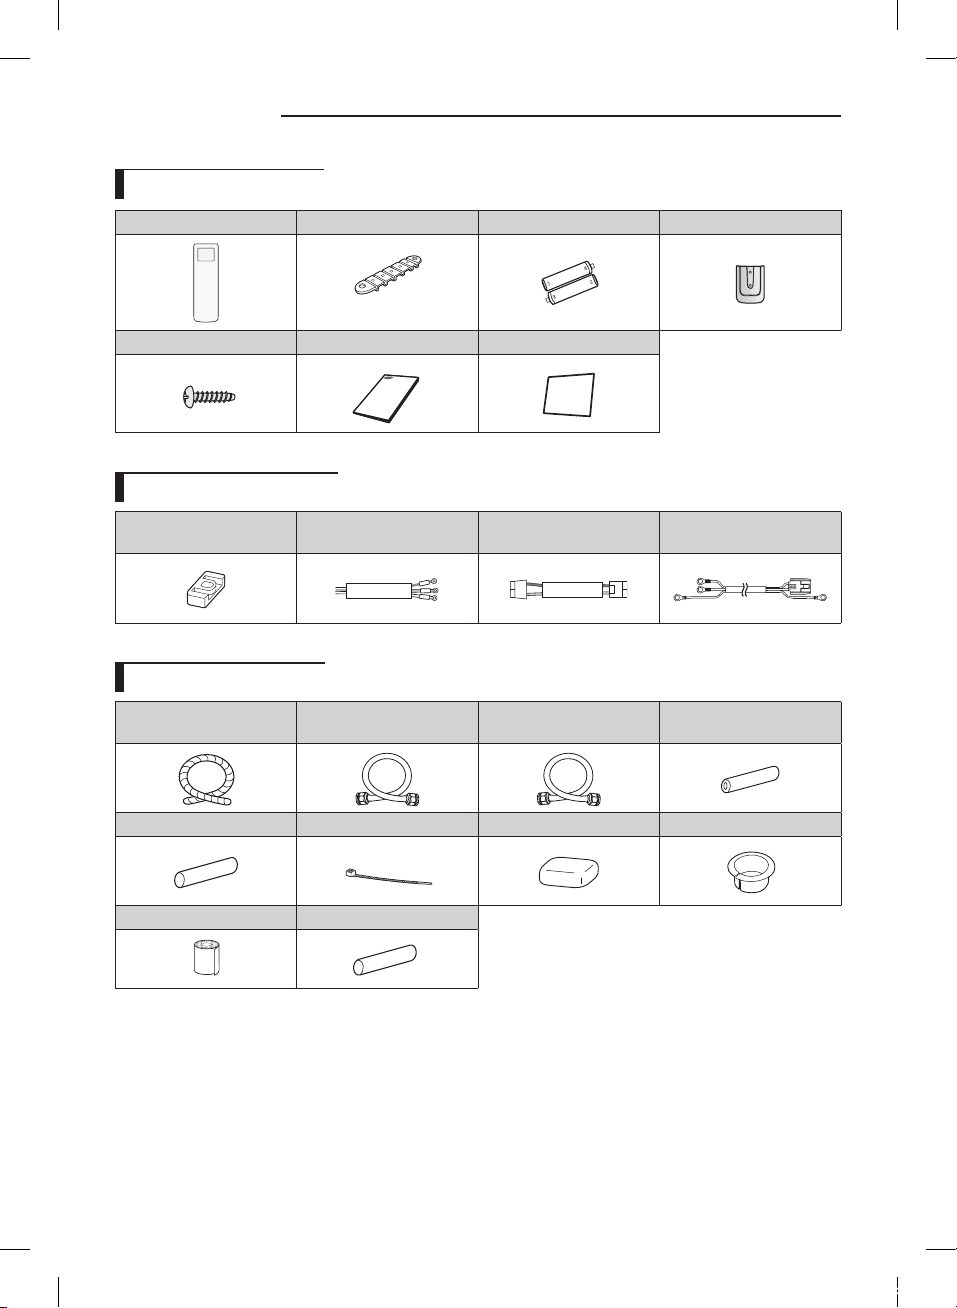
Accessories
Indoor unit accessories
Remote controller Fixing bracket for indoor unit Batteries Remote controller holder
M4X16 screws User & installation manual Cleaning cloth (micro fiber)
Outdoor unit accessories
Rubber leg Main power cable
Installation accessories
Drain connection hose
Connection pipe & Insulation
(Φ6.35mm)
Indoor/outdoor unit
communication cable
Connection pipe & Insulation
(Φ15.88mm)
Indoor/Outdoor unit power
cable
Sleeve
Service tube Cable tie Putty Bushing
Finishing tape Drain insulation tube
Installation accessories may differ depending on the model.
40
사우디,인도,나이지리아향 FAC MEMORY 냉방_IBIM_EN_03794A(7).indd 40 2014-03-12 오전 10:29:59
Page 42
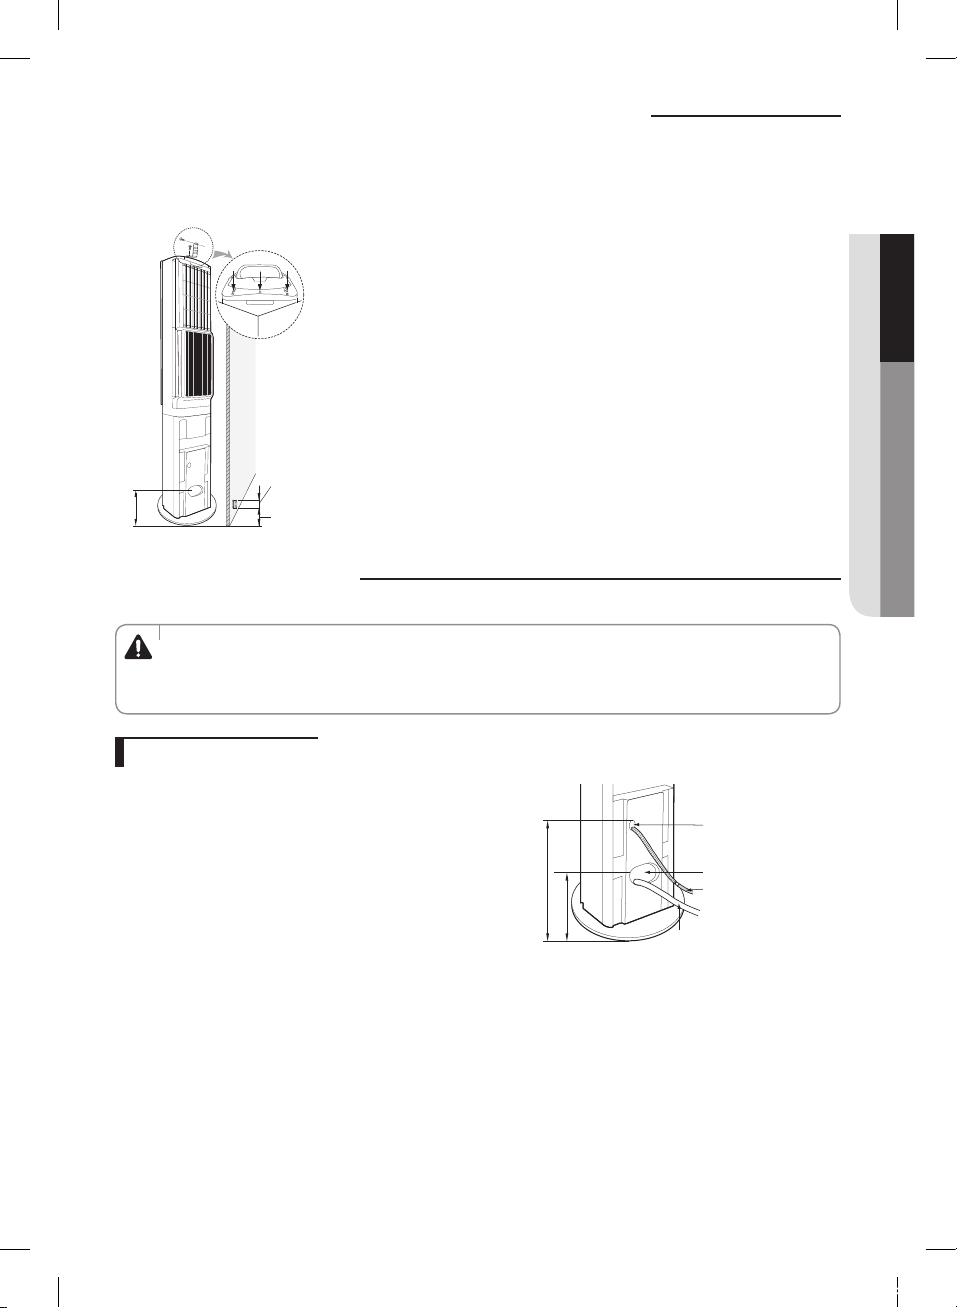
Drilling a hole and fixing the indoor unit
Drill a hole with diameter of 60~65mm towards the outside.
If the indoor unit is installed on unstable ground, it may shake by external force or by children and get knocked down. To
prevent these accidents, you must fix the top or back of the indoor unit tightly with fixing brackets.
ø60~65mm
200mm
150mm or less
Connecting pipes
• When installing, make sure there is no leakage. When recovering the refrigerant, stop the compressor first
before removing the connection pipe. If the refrigerant pipe is not properly connected and the compressor
WARNING
works with the service valve open, the pipe inhales the air and it makes the pressure inside of the refrigerant
cycle abnormally high. It may cause explosion and injury.
ENGLISH
Installation procedure
1. Slightly hit the hole, for piping connection, with your hands or
hammer.
410mm
200mm
Piping
Upper hole for
drain hose
Hole for piping
connection
Drain hose
41
사우디,인도,나이지리아향 FAC MEMORY 냉방_IBIM_EN_03794A(7).indd 41 2014-03-12 오전 10:29:59
Page 43
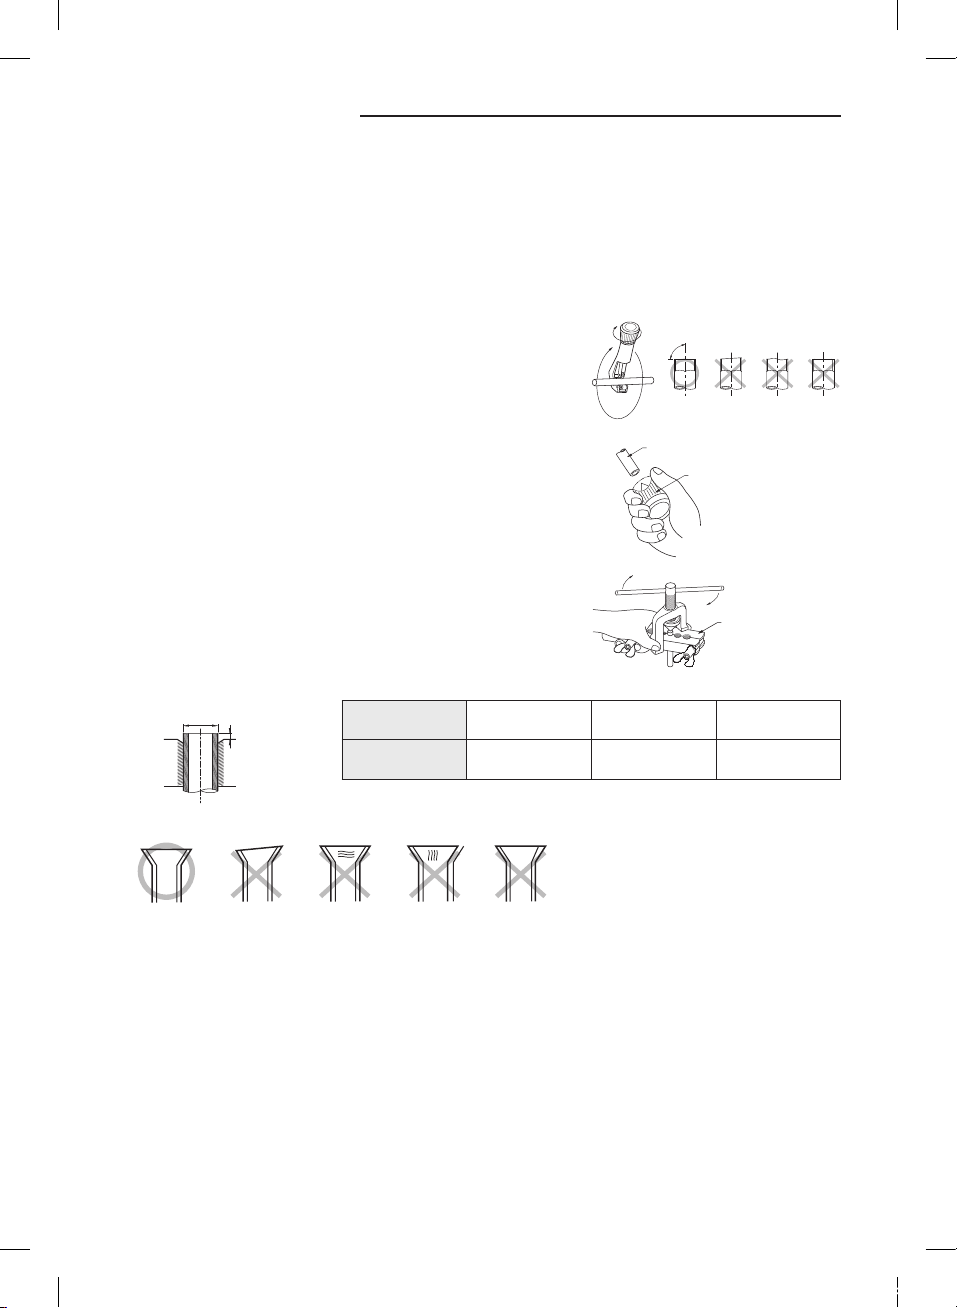
Connecting pipes
2. Bend the connection pipe to an appropriate length using a bender depending upon the installation place.
3. Perform pipe bending process.
- Perform bending of the pipe using the pipe bender which has a specified bending radius.
- Be sure to take full care to perform bending of the pipe successfully at one time. Bending and unbending the pipe more
than twice makes the bending work increasingly difficult.
4. Connect the high pressure pipe (ø6.35mm) and low pressure pipe (ø15.88mm) to the high/low pressure pipe of the
outdoor unit and tightening by applying appropriate torque.
Flare process
1) Cut the pipe using the pipe cutter.
90°
2) Remove burr on the edge of the pipe.
• If burr is not removed after cutting the pipe, there is a risk of refrigerant
gas leakage.
• If foreign substance such as burr goes into the pipe, there is a risk of
product breakdown. Therefore, face the pipe downward when doing
the work.
3) Insert the flare nut into the pipe, and then perform the flare process.
Flare length
D(mm)
H(mm)
Outer Diameter (D) ø6.35 ø9.52 ø15.88
Height (H) 1.3mm 1.8mm 2.2mm
Incorrectly flared pipes
Oblique Damaged
surface
Cracked Uneven
thickness
Pipe
Oblique Rough
Reamer
Flaring tool
Burr
42
사우디,인도,나이지리아향 FAC MEMORY 냉방_IBIM_EN_03794A(7).indd 42 2014-03-12 오전 10:30:00
Page 44
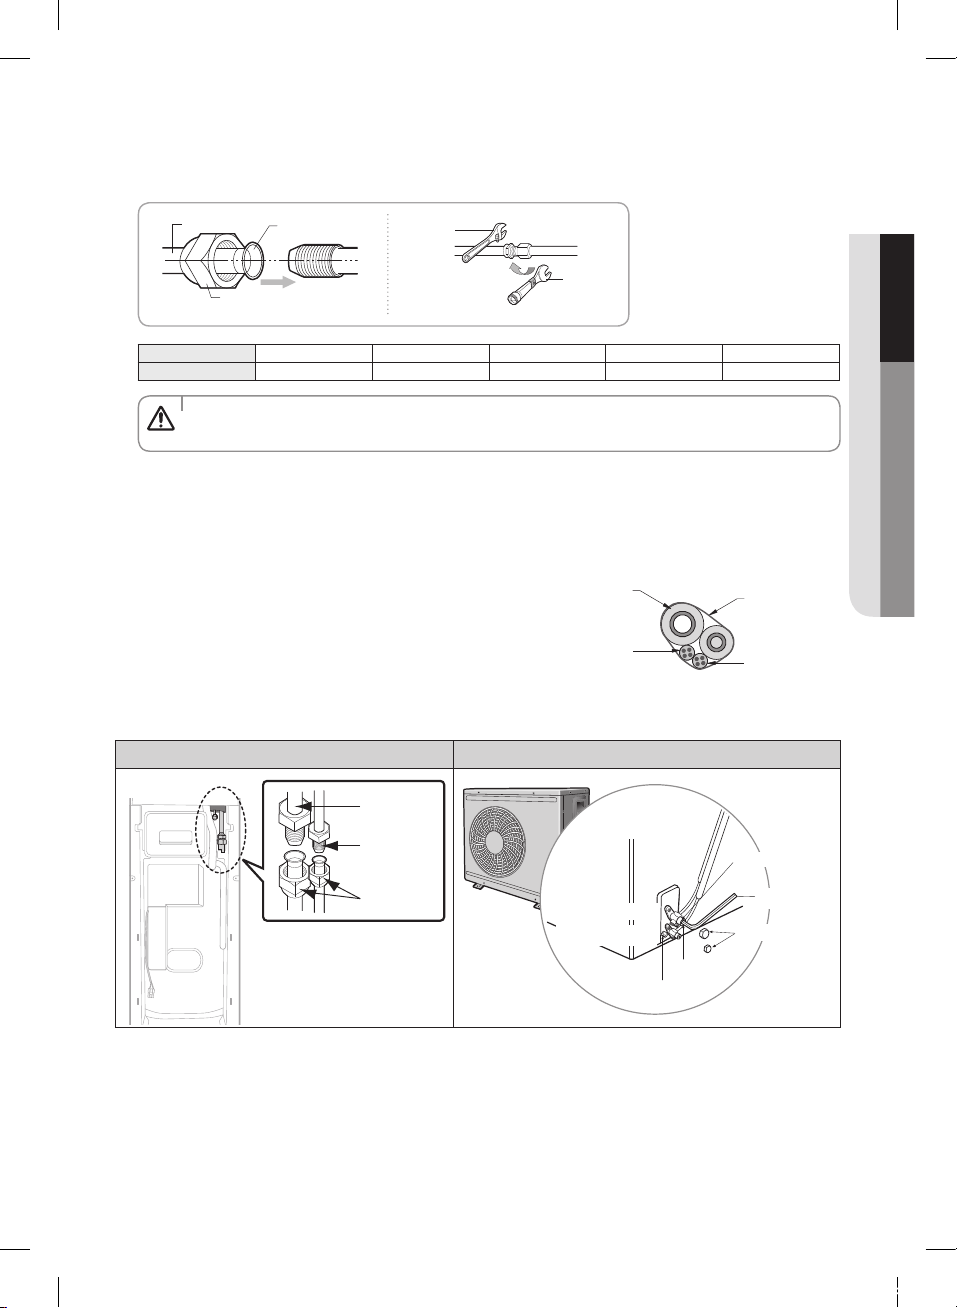
Tightening of connection parts
Alight the pipes to be connected and tighten the flare nuts with your hands first and then with a torque wrench, tighten
it in a direction shown in below illustration.
- You can avoid of gas leakage by applying refrigerant oil on the flare connection part.
Pipe
Flare nut
Flare connection part
Monkey
spanner
Torque
wrench
Diameter(D) ø6.35mm ø9.52mm ø12.70mm ø15.88mm ø19.05mm
Torque (kgf•cm)
• Apply the torque depending on the diameter and tighten it securely to make sure there is no leakage.
CAUTION
140~170 250~280 380~420 440~480 990~1210
5. Eliminate the uncondensed gas with vacuum pump and open the service valve to put the refrigerant.
- Make sure to perform leak test. (Refer to 'Performing leak test' on page 50.)
6. Insulate the drain hose after connecting it.
- Insulate it correctly to avoid dew formation.
Pipe insulation
1) Insulate the refrigerant pipes heavily with the finishing tape.
Pipe insulation
If the insulation is poor, dew may form and leak through the
indoor.
2) Use finishing tape wind up the refrigerant pipe.
3) When you bend the pipe and secure a minimum bending
Indoor/outdoor unit
communication cable
radius of 100mm to prevent any distortion of the pipe.
7. Wind a finish tape when connecting refrigerant pipe, and communication cable is completed.
Indoor unit Outdoor unit
Finishing tape
Indoor/outdoor unit
power cable
ENGLISH
Low pressure
pipe
High pressure
pipe
Flare nut
Low pressure side
High pressure side
Stop valve
Service port
Valve core
L wrench
Service port cap
43
사우디,인도,나이지리아향 FAC MEMORY 냉방_IBIM_EN_03794A(7).indd 43 2014-03-12 오전 10:30:00
Page 45
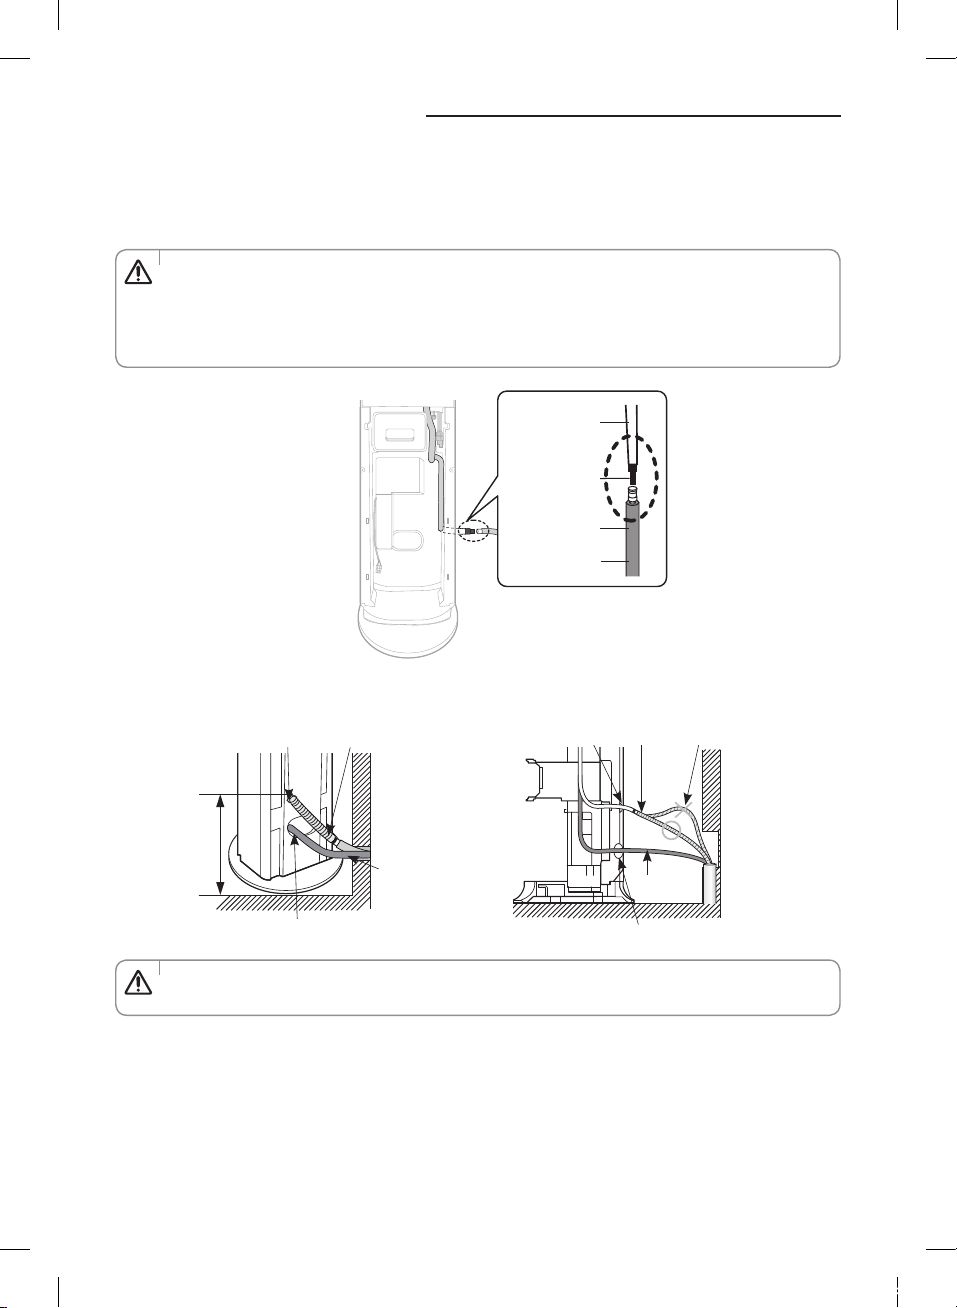
Connecting drain hose
1. Slightly hit the hole, for drain hose, with your hands or hammer.
2. Insulate the drain hose with drain insulation tube and fix it with tape.
3. Make the drain hose to direct downward to establish natural draining.
- Make sure to check for proper drainage after connection
• Fix the drain hose tightly to prevent any water leakage.
• Do not use the extended drain hose.
CAUTION
- Since water may leak from the connection part, make sure that you do not extend the drain hose. However, if
extension is unavoidable due to its short length, use silicone sealant to securely seal the connection to prevent
leakage. (Do not use the insulation tape.)
[Polypropylene(PP)]
Insulation (foamed
Drain hose
Duct drainage
polyethylene)
Connection
drain hose
• Connect the drain hose through the upper hole
for drain hose.
Upper hole for a drain hose
410 mm
Hole for piping connection
• Make sure the U-TRAP does not occur. Water may overflow and cause property damage.
CAUTION
Drain hose
Piping
• Connection with wire-concealed piping
Upper hole for
a drain hose
44
Incorrect installation
Drain hose
Hole for piping connection
(U-TRAP)
Piping
사우디,인도,나이지리아향 FAC MEMORY 냉방_IBIM_EN_03794A(7).indd 44 2014-03-12 오전 10:30:01
Page 46
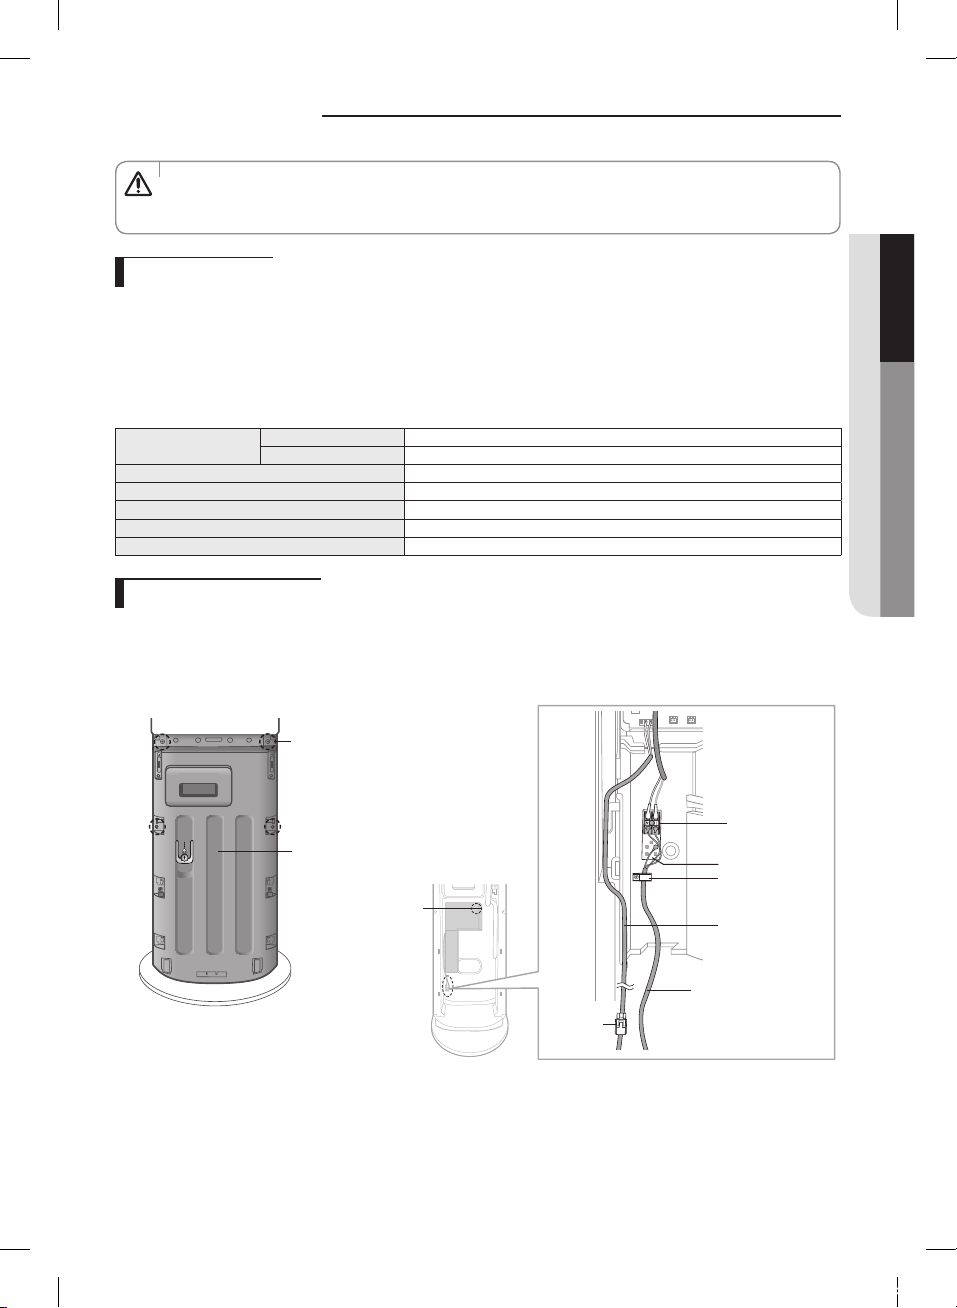
Electrical work
• The electrical work should be performed by a specialist qualified for the work.
• Avoid using multi-concent but use rate power supply for air conditioner. (Use separate power cable for outdoor
CAUTION
unit.)
Wiring standard
Always make sure that the power supply is compliant with current safety standards. Always install the air conditioner in
compliance with current local safety standards.
Make sure to install exclusive power supply(purchase separately).
- If you use multiple connecting, there is a risk of electric shock or fire.
If the outdoor power supply has been selected, install circuit breaker (ELCB). (Purchased separately)
Make sure to connect earth wire.
Type
Circuit breaker 20A
Indoor/outdoor unit power cable 1.0mm
Outdoor unit power cable 2.5mm
Indoor/outdoor unit communication cable 0.75mm
Connecting procedure
1. After loosening the 4 screws(①) of support-inlet, disassemble the support-inlet.
2. Connect the housings of communication cable(②) for an indoor unit and outdoor unit.
3. Fix the power connection cable and communication cable with a cable clamp.
4. After assembling the SUPPORT-INLET and fix it with the screws(①).
Indoor unit Indoor power (Indoor/outdoor unit power cable)
Outdoor unit Outdoor power (Earth leakage circuit breaker)
Power 1Ph, 220~240V, 50Hz/60Hz
2
or more
2
or more
2
or more
Screw ①
ENGLISH
Power terminal
SUPPORTINLET
COVER-PCB
Housing ②
Earth plate
Cable clamp
Communication
cable
Power connection
cable
45
사우디,인도,나이지리아향 FAC MEMORY 냉방_IBIM_EN_03794A(7).indd 45 2014-03-12 오전 10:30:01
Page 47
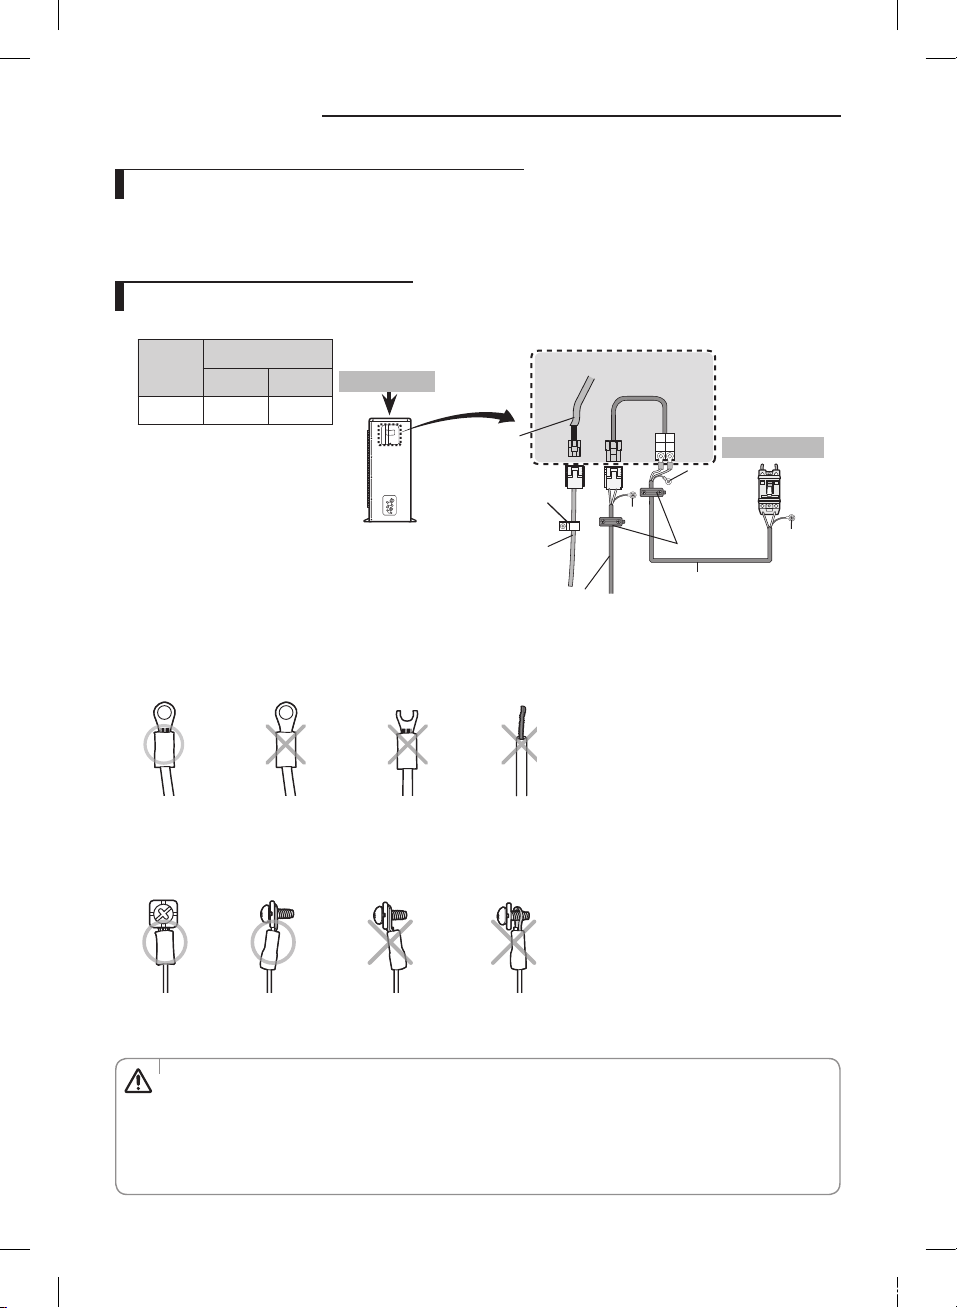
Electrical work
Safety information on outdoor unit power supply
Power cable must be hard chloroprene synthetic rubber or better, which is certified with safety certification (60245 KS IEC 66).
- Rated voltage: 450/750V, H07RN-F (60245 KS IEC 66)
- Use cable over 2.5mm
Type of outdoor unit power supply
Comply with tightening torque to make sure that the screws do not get loose.
Screw
Before connecting, compressed part of the terminal should face upward.
kgf•cm N•m
M4 25~40 2.5~4.0
2
(Distance : 15m or less)
Torque
Outdoor unit
Communication
cable
Cable clamp
Indoor/outdoor unit
communication cable
Indoor/outdoor unit
power cable
Electrical parts
(Power part)
L
N
Earth
Earth
Cable clamp
Power cable
• The figure of an outdoor
unit may be different
depending on models.
Cabinet panel
OFF
Earth
Installed back to
front.
Compressed part
is cut.
Ring terminal is
detached.
After tightening, there should be no gap between a terminal and a screw.
- If there is a gap, fire may occur due to the heat of electronic connection part.
Terminal is tightened
back to front.
A screw is not tightened firmly
or there is a gap between a
screw and ring terminal.
• When connecting the cables to the outdoor unit, reversing the connection of power and communication cable
or connecting the earth wire incorrectly, electric leakage or product malfunction may occur.
CAUTION
• Do not cut or modify the supplied cable and install it.
• There is no front and back for the communication cable, so it can be switched.
• Use solderless ring terminal to connect the power cable to the power terminal block. If you connect stranded or
solid wires without solderless ring terminal, heat may generate from the connected part and cause fire.
46
사우디,인도,나이지리아향 FAC MEMORY 냉방_IBIM_EN_03794A(7).indd 46 2014-03-12 오전 10:30:02
Page 48
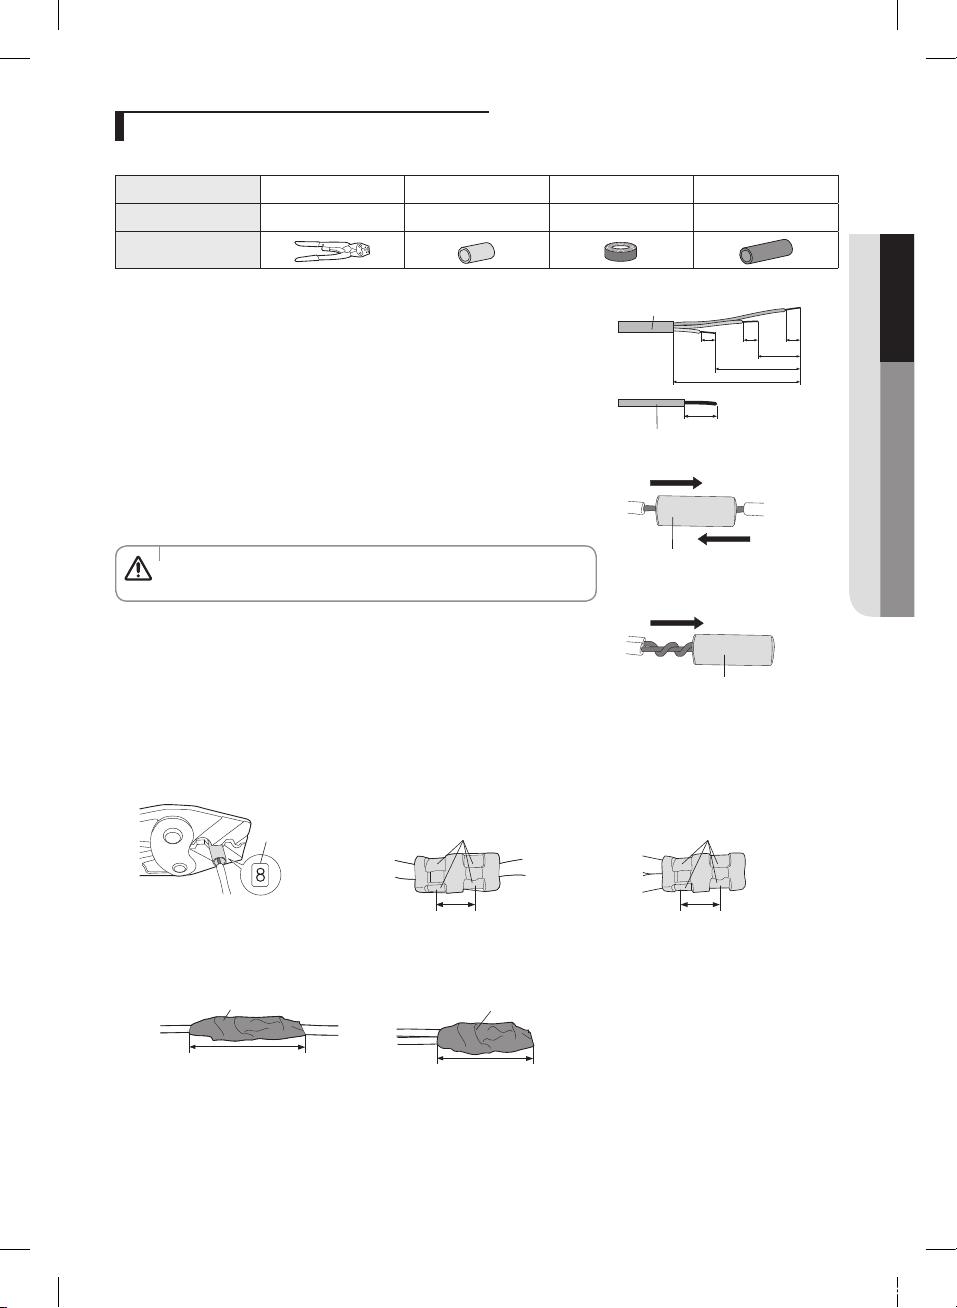
How to connect your extended power cables
Items to prepare
Tools Crimping plier Connection sleeve (mm) Insulation tape Contraction tube (mm)
Spec MH-14 20xØ6.5(HxOD) Width 19mm 70xØ8.0(LxOD)
Shape
ENGLISH
1. As shown in the figure, peel off the shields from the rubber/wire of the power
cable.
- Peel off 20mm of the wire shields of the tube installed already.
Power cable(provided by us)
Power cable (provided by us)
20
(Unit: mm)
202020
60
120
180
2. Insert both sides of core wire of the power cable into the connection sleeve.
Method 1
Push the core wire in to the sleeve from both sides.
• After peeling off the tube wire, you must insert a contraction tube.
CAUTION
Connection sleeve
Method 2
Twist the wire cores together and push it in to the sleeve.
Connection sleeve
3. Using a compressor, compress the two points and flip it over and compress another two points in the same location.
- The compression dimension should be 8.0.
- After compressing it, pull both sides of the wire to make sure it is firmly pressed.
Comp. dim.
Method 1
Compress it 4 times
Method 2
Compress it 4 times
5mm
5mm
4. Wrap it with the insulation tape twice and position your contraction tube in the middle of the insulation tape.
Method 1
Insulation tape
40mm
Method 2
Insulation tape
35mm
47
사우디,인도,나이지리아향 FAC MEMORY 냉방_IBIM_EN_03794A(7).indd 47 2014-03-12 오전 10:30:02
Page 49
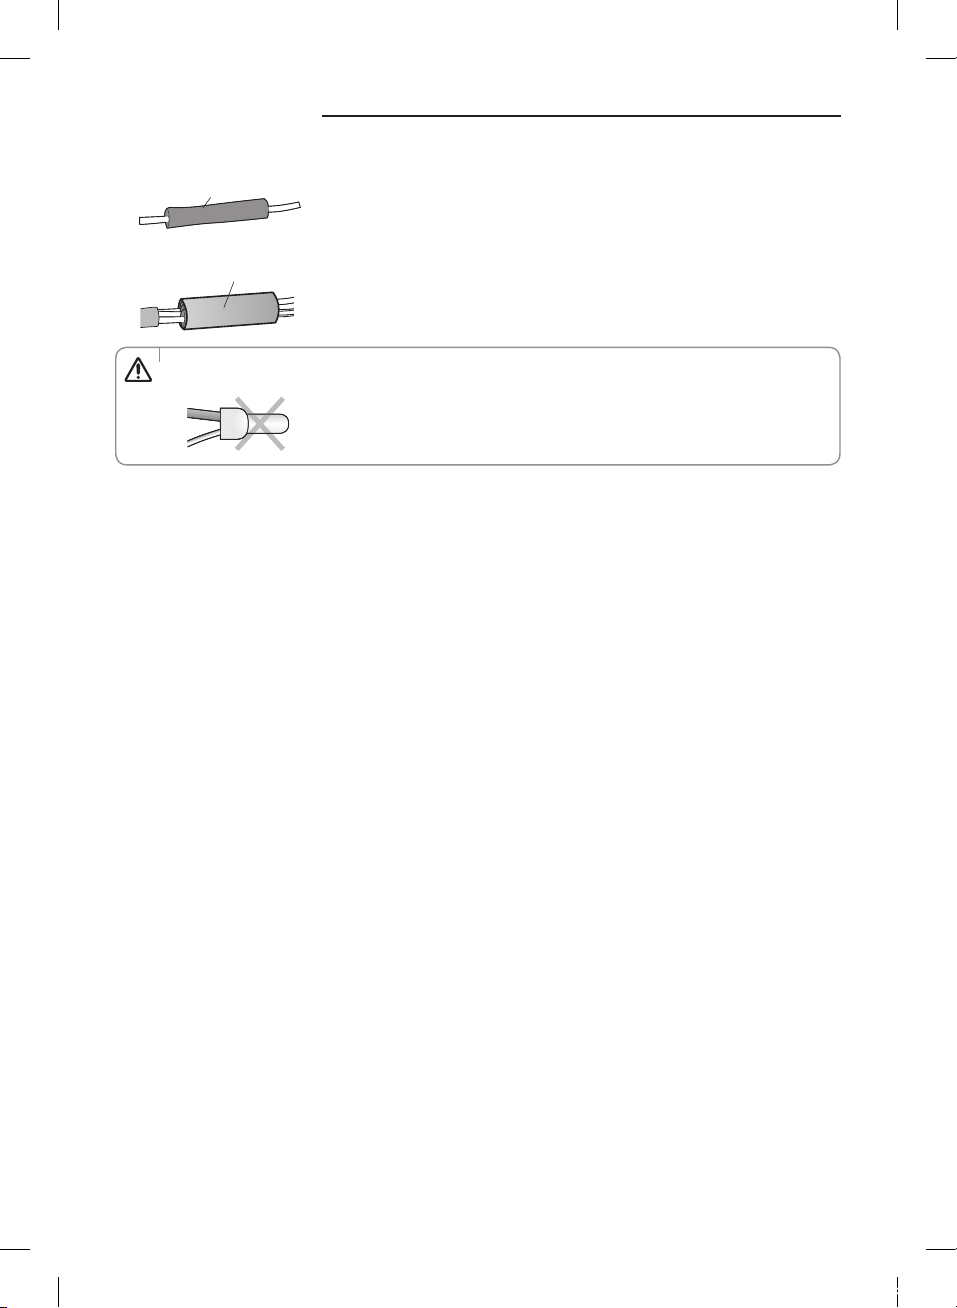
Electrical work
5. Apply heat to the contraction tube to contract it.
Contraction tube
6. After tube contraction work is completed, wrap it with the insulation tape to finish.
Insulation tape
• In case of extending the electric wire, please DO NOT use a round-shaped pressing socket.
CAUTION
- Incomplete wire connections can cause electric shock or a fire.
48
사우디,인도,나이지리아향 FAC MEMORY 냉방_IBIM_EN_03794A(7).indd 48 2014-03-12 오전 10:30:02
Page 50
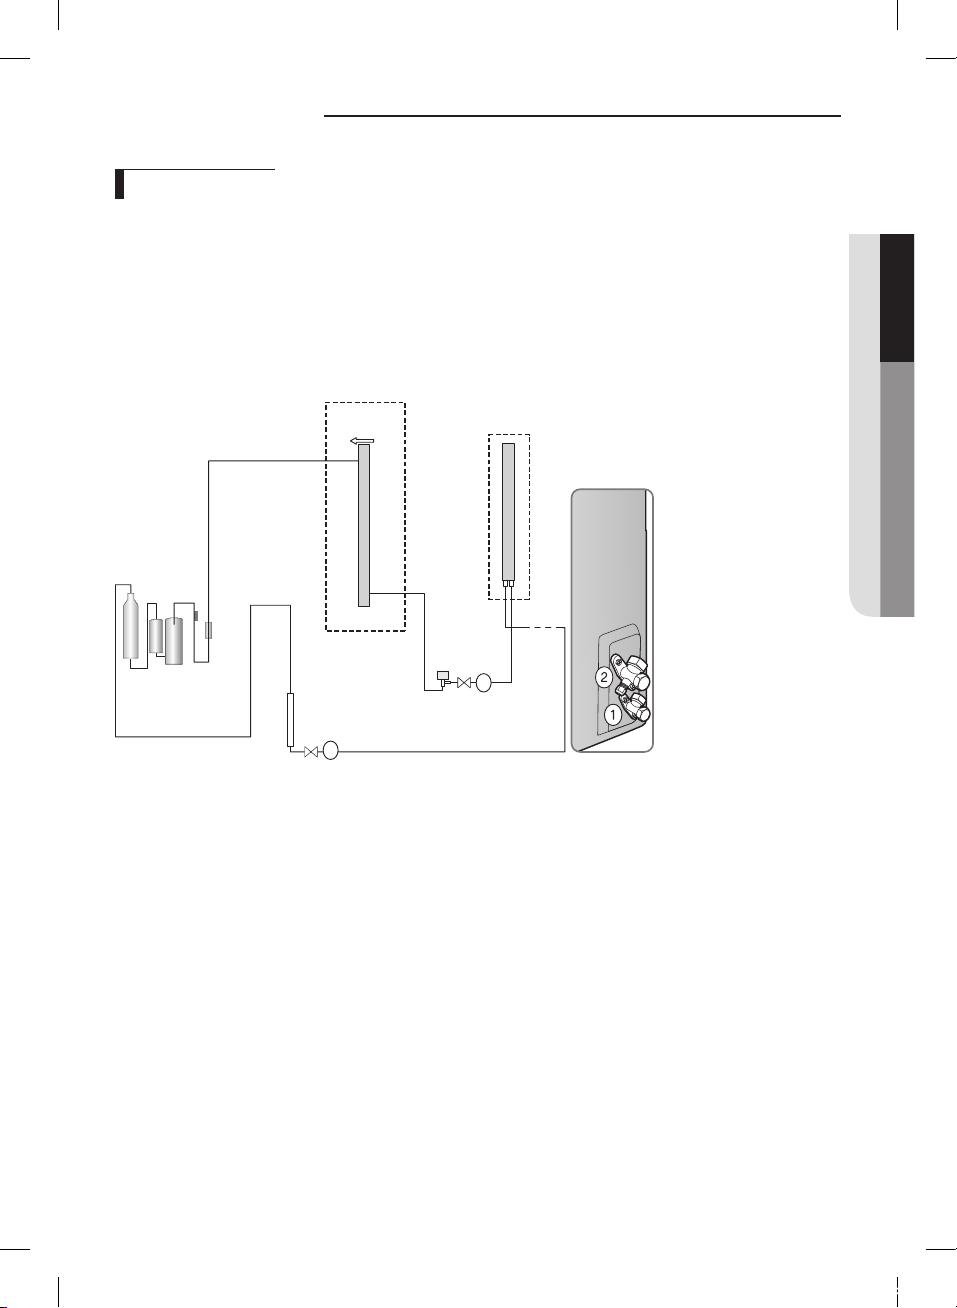
Vacuum pump
Vacuuming pipe
1. Completely connect the indoor/outdoor unit pipes.
2. Connect the manifold gauge to the service valve port of the low pressure side on the outdoor unit.
3. Execute vacuum pump for over 30 minutes.
- If the pipe extension is larger, time of the vacuum pump should also get longer.
4. After degree of vacuum has been established, open the service valve ~ as shown in the illustration.
- Use soapsuds to check for refrigerant leakage on the connection part of the pipes
Outdoor unit
F&T Condenser
Air flow
Sensor
Compressor
Indoor unit heat
EEV
Service Valve
exchanger
1
ENGLISH
2
Service Valve
Vacuuming air conditioner
- Execute vacuum pump on the manifold gauge connected to low pressure side , to purge the air from the pipes and indoor unit.
49
사우디,인도,나이지리아향 FAC MEMORY 냉방_IBIM_EN_03794A(7).indd 49 2014-03-12 오전 10:30:02
Page 51
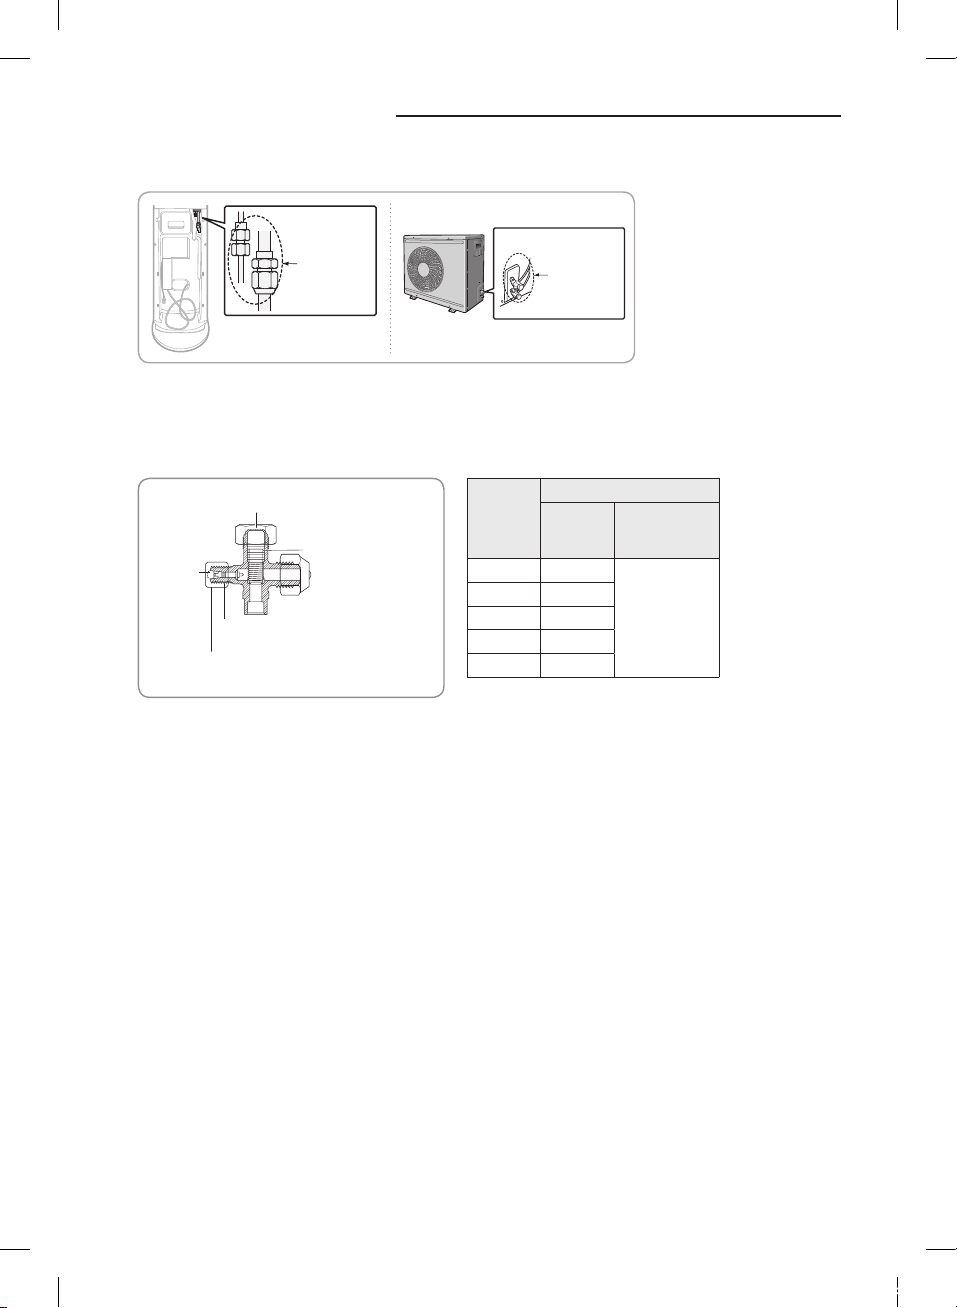
Performing leak test
Use leak tester or soapsuds on the pipe connection part after performing vacuum pump.
Check for
leakage
Check for
leakage
Test part for indoor unit Test part for outdoor unit
Before inspecting the leakage, use a torque wrench to close the cap for the service valve.(Comply with a tightening
torque for each size of the diameter, and tighten the cap firmly to prevent any leakage.)
To check for any possible leakage, insert inert gas into the pipes connected to indoor/outdoor units and check the
connection part of the indoor/outdoor units with soap lather or liquid for leakage test.
Tightening torque for body cap
(Refer to the table)
Spindle
Charging
core
R-22: Diameter of the screw - 7/16-20UNF
R-410A: Diameter of the screw - 1/2-20UNF
Tightening torque for charging port cap
(Refer to the table)
Outer
Diameter
(mm)
Ø6.35 20 ~ 25
Ø9.52 20 ~ 25
Ø12.7 25 ~ 30
Ø15.88 30 ~ 35
Ø19.05 35 ~ 40
1 N•m = 10 kgf•cm
Tightening torque
Body cap
(N•m)
Charging port
cap (N•m)
10 ~ 12
50
사우디,인도,나이지리아향 FAC MEMORY 냉방_IBIM_EN_03794A(7).indd 50 2014-03-12 오전 10:30:03
Page 52
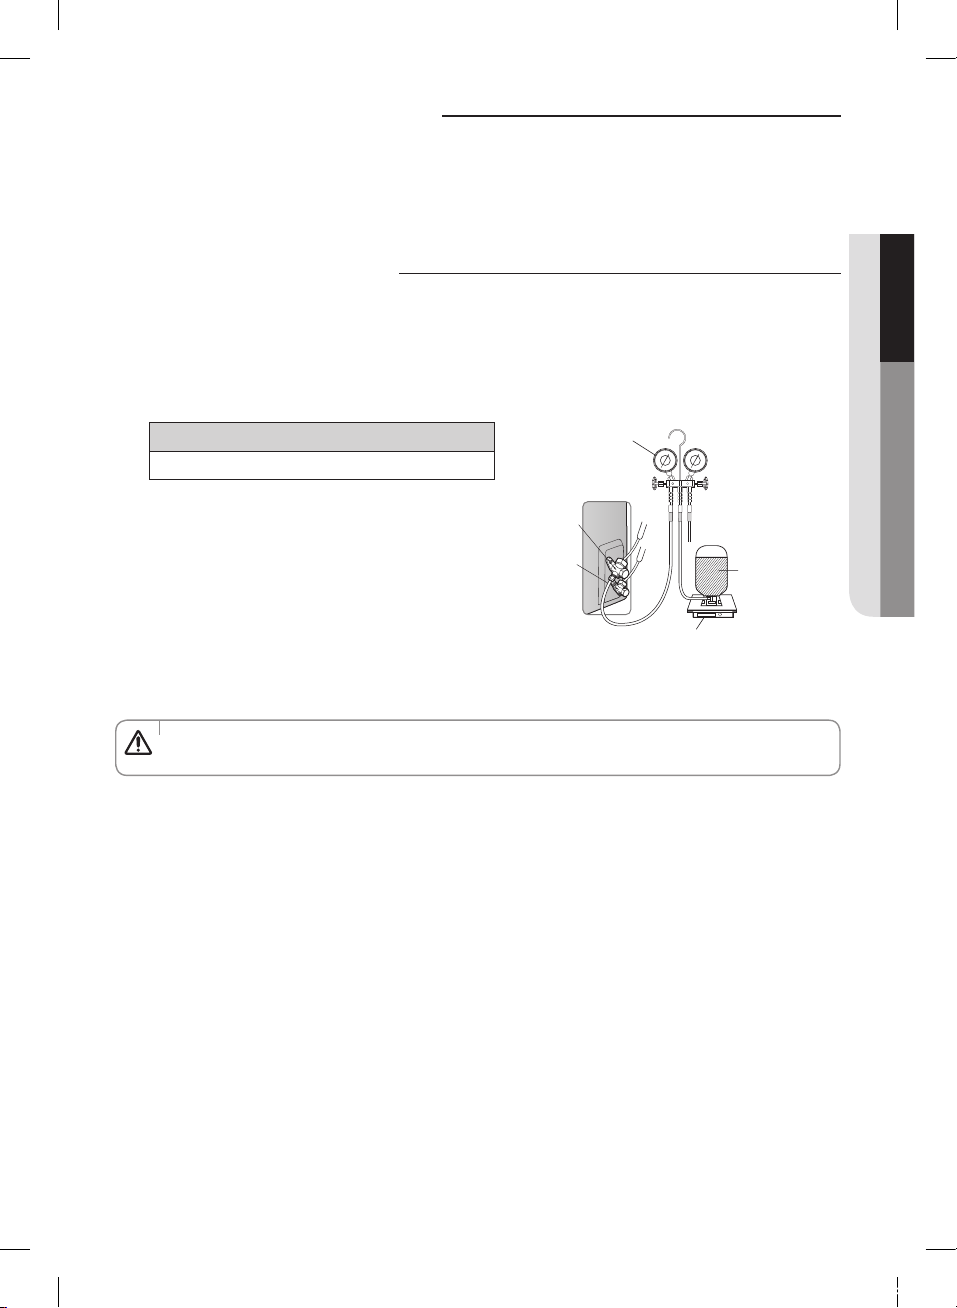
Installing the earth wire
Earthing must be done by the installation specialist for your safety.
Connect grounding electrode and the air conditioner.
- Perform the earthing work 3 on the outdoor unit earthing terminal.
Charging refrigerant
1. Connect the manifold gauge in the low pressure side (gas) and press Set/Cancel, Mode, Temp + button simultaneously
for 5 seconds to enter the refrigerant charging mode. When the outdoor unit operates, charge the refrigerant.
2. Charge the refrigerant depending on the pipe length.
- If the installed pipe length exceeds standard length (5m), you must add 30g of refrigerant (R-410A) for every 1m.
- You do not need to charge the additional refrigerant when pipe length is less than 5m.
Supplied pipe length
5m
Manifold gauge
Gas side
ENGLISH
Liquid side
Electronic scale
3. After charging the refrigerant, disconnect the manifold gauge from the service port and close the service cap.
4. Deactivate the refrigerant charging mode by pressing Set/Cancel, Mode, Temp + button simultaneously for 5 seconds.
• Make sure to charge refrigerant with accurate amount by using the electronic scale.
CAUTION
Refrigerant
51
사우디,인도,나이지리아향 FAC MEMORY 냉방_IBIM_EN_03794A(7).indd 51 2014-03-12 오전 10:30:03
Page 53
Check and test operation
1. Supply power to the air conditioner.
2. Turn on the air conditioner.
3. While pressing and holding the Set/Cancel button on the remote controller, press the Power
display the temperature of indoor heat exchanger.
- Write down the displayed temperature.
4. Press the Turbo button on the remote controller to operate in turbo mode for 10 minutes.
5. Check if the indoor unit is operating normally.
- Standard condition to judge normal operation. (Indoor/outdoor unit over 21°C, operate in Cool mode for over 10
minute)
6. While pressing and holding the Set/Cancel button on the remote controller, press the Power
display the temperature of indoor heat exchanger.
- If the displayed temperature differs over 10°C from the temperature written down previously, it is operating normally.
7. When checking above step 1~6 is done, tell the user how to use the air conditioner.
button for 3 seconds to
button for 3 seconds to
Pump down procedure (When removing the product)
1. Press the Power button on the indoor unit control panel for 5 seconds to enter the Pump down mode and operate
the compressor for over 5 minutes. Or, Press the Set/Cancel, Mode and Temp - button on the remote controller
simultaneously to enter the Pump down mode and operate the compressor for over 5 minutes.
2. Remove the High/Low pressure side valve cap.
3. Use the L wrench to completely close the valve on the high pressure side.
4. After 2 minutes, completely close the valve on the low pressure side.
5. Press the Power
the Set/Cancel, Mode and Temp - button on the remote controller simultaneously to deactivate the Pump down mode.
6. Disconnect the pipe.
button on the indoor unit control panel for 5 seconds to deactivate the Pump down mode. Or, Press
52
사우디,인도,나이지리아향 FAC MEMORY 냉방_IBIM_EN_03794A(7).indd 52 2014-03-12 오전 10:30:03
Page 54
Memo
ENGLISH
53
사우디,인도,나이지리아향 FAC MEMORY 냉방_IBIM_EN_03794A(7).indd 53 2014-03-12 오전 10:30:03
 Loading...