

Samsung 530 User Manual

Contact SAMSUNG WORLDWIDE
If you have any questions or comments relating to Samsung products, please contact the SAMSUNG customer care center.
Comment contacter Samsung dans le monde
Si vous avez des suggestions ou des questions concernant les produits Samsung, veuillez contacter le Service Consommateurs
Samsung.
Country
CANADA 1-800-SAMSUNG (726-7864) www.samsung.com Samsung Electronics Canada Inc., Customer Service
U.S.A 1-800-SAMSUNG (726-7864) www.samsung.com Samsung Electronics America, Inc. 85 Challenger
Customer Care Center
Web Site Address
55 Standish Court Mississauga, Ontario L5R 4B2
Canada
Road Ridgeeld Park, NJ 07660
Plasma TV
user manual
© 2011 Samsung Electronics Co., Ltd. All rights reserved.
imagine the possibilities
Thank you for purchasing this Samsung product.
To receive more complete service, please register
your product at
www.samsung.com/register
Model _____________ Serial No. _____________
BN68-03689B-01

Figures and illustrations in this User Manual are provided for reference only and may differ from actual product appearance.
Product design and specifications may be changed without notice.
Important Warranty Information Regarding Television Format Viewing
See the warranty card for more information on warranty terms.
✎
Wide screen format PDP Displays (16:9, the aspect ratio of the screen width to height) are primarily designed to view wide screen format full-motion video.
The images displayed on them should primarily be in the wide screen 16:9 ratio format, or expanded to fill the screen if your model offers this feature and
the images are constantly moving. Displaying stationary graphics and images on screen, such as the dark sidebars on no expanded standard format
television video and programming, should be limited to no more than 5% of the total television viewing per week.
Additionally, viewing other stationary images and text such as stock market reports, video game displays, station logos, web sites or computer graphics
and patterns, should be limited as described above for all televisions. Displaying stationary images that exceed the above guidelines can cause uneven
aging of PDP Displays that leave subtle, but permanent burned-in ghost images in the PDP picture. To avoid this, vary the programming and images, and
primarily display full screen moving images, not stationary patterns or dark bars.
On PDP models that offer picture sizing features, use these controls to view different formats as a full screen picture.
Be careful in the selection and duration of television formats used for viewing. Uneven PDP aging as a result of format selection and use, as well as
burned-in images, are not covered by your Samsung limited warranty.
• SAMSUNG ELECTRONICS NORTH AMERICAN LIMITED WARRANTY STATEMENT
Subject to the requirements, conditions, exclusions and limitations of the original Limited Warranty supplied with Samsung Electronics (SAMSUNG)
products, and the requirements, conditions, exclusions and limitations contained herein, SAMSUNG will additionally provide Warranty Repair Service
in the United States on SAMSUNG products purchased in Canada, and in Canada on SAMSUNG products purchased in the United States, for the
warranty period originally specified, and to the Original Purchaser only.
The above described warranty repairs must be performed by a SAMSUNG Authorized Service Center. Along with this Statement, the Original Limited
Warranty Statement and a dated Bill of Sale as Proof of Purchase must be presented to the Service Center. Transportation to and from the Service
Center is the responsibility of the purchaser. Conditions covered are limited only to manufacturing defects in material or workmanship, and only those
encountered in normal use of the product.
Excluded, but not limited to, are any originally specified provisions for, in-home or on-site services, minimum or maximum repair times, exchanges or
replacements, accessories, options, upgrades, or consumables.
For the location of a SAMSUNG Authorized Service Center, please call toll-free:
– In the United States : 1-800-SAMSUNG (1-800-726-7864)
– In Canada : 1-800-SAMSUNG
User Instructions
• Screen Image retention
Do not display a still image (such as on a video game) on the plasma display panel for more than several minutes as it can cause screen image
retention. This image retention is also known as ‘screen burn’. To avoid such image retention, refer to page 14 of this manual to reduce the degree of
brightness and contrast of the screen when displaying a still image.
• Heat on the top of the Plasma TV
The top side of the product may be hot after long periods of use as heat dissipates from the panel through the vent hole in the upper part of the
product.
This is normal and does not indicate any defect or operation failure of the product.
However, children should be prevented from touching the upper part of the product.
• The product is making a ‘cracking’ noise.
A ‘cracking’ noise may occur when the product contracts or expands due to a change in the surrounding environment such as temperature or
humidity. This is normal and not a defect of the unit.
• Cell Defects
The PDP uses a panel consisting of 2,360,000(HD-level) to 6,221,000(FHD-level) pixels which require sophisticated technology to produce. However,
there may be a few bright or dark pixels on the screen. These pixels will have no impact on the performance of the product.
• Avoid operating the TV at temperatures below 41°F (5°C)
• A still image displayed too long may cause permanent damage to the PDP Panel.
Watching the Plasma TV in 4:3 format for a long period of time may leave traces of borders displayed on the left, right and center of
the screen caused by the difference of light emission on the screen. Playing a DVD or a game console may cause similar effects to
the screen.
Damages caused by the above effect are not covered by the Warranty.
• After-images on the Screen.
Displaying still images from Video games and PC for longer than a certain period of time may produce partial after-images.
To prevent this effect, reduce the ‘brightness’ and ‘contrast’ when displaying still images for a long time.
• Warranty
Warranty does not cover any damage caused by image retention.
Burn-in is not covered by the warranty.
• Caution
The glass screen of your PDP TV can break if the TV is accidentally dropped and hits the ground. Care should be taken.
Ensure two or more persons help when moving the product as a safety precaution. Do not lay the product flat on one side when
moving.
(Your) Samsung Plasma TV is a high quality television that has been carefully packaged to protect the integrity of its glass panel and component parts
from damage during transport. It is nonetheless a fragile piece of electronics that requires care in handling. Refrain from putting undue stress on any
part of the packaging unpacking, shipment, installation whether on a pedestal or mounted on the wall. Avoid placement of the TV that would expose
its screen to any form of impact. Breakage of the panel due to impact strike is not covered under the manufacturer’s warranty.
English
2

Contents
Getting Started
y List of Features .........................................................4
y Accessories ..............................................................4
y Install the Stand ........................................................ 5
y Viewing the Control Panel .........................................7
y Viewing the Remote Control ..................................... 8
y Connecting to an Antenna ........................................ 9
y Plug & Play (Initial Setup) ........................................... 9
Connections
y Connecting to an AV Device .................................... 10
y Connecting to an Audio Device ............................... 11
y Connecting to a PC ................................................ 11
y Changing the Input Source ..................................... 12
Basic Features
y How to Navigate Menus ..........................................13
y Channel Menu ........................................................ 13
Seeing Channels 13
Using Favorite Channels 14
Memorizing Channels 14
Editing Channels 14
Other Features 14
y Picture Menu .......................................................... 15
Changing the Preset Picture Mode 15
Adjusting Picture Settings 15
Changing the Picture Options 16
y Sound Menu ........................................................... 17
Changing the Preset Sound Mode 17
Adjusting Sound Settings 18
Sound Settings 18
y Setup Menu ............................................................ 18
Setting the Time 18
Using the Sleep Timer 19
Setting the On/Off Timer 19
Locking Programs 19
Other Features 21
Economical Solutions 22
y Support Menu .........................................................22
Advanced Features
y Media Play .............................................................. 23
Connecting a USB Device 23
Using the Media Play Menu 23
Other Information
y Installing the Wall Mount ......................................... 27
y Anti-Theft Kensington Lock ..................................... 27
y Securing the Installation Space ............................... 28
y Securing the TV to the Wall ..................................... 29
y Troubleshooting ......................................................30
Storage and Maintenance 32
y License ................................................................... 33
y Specifications ......................................................... 33
y Dimensions ............................................................. 34
y Index ...................................................................... 35
ENGLISH
t
This function can be used by pressing the
TOOLS button on the remote control.
Check the Symbol!
Note
Indicates additional information.
Step by Step Guide
Check here for instructions on how to open
the relevant submenu within the OSD (on
screen display).
English
3

Getting Started
List of Features
y Excellent Digital Interface & Networking: With a built-in HD digital tuner, nonsubscription HD broadcasts can be viewed
without a cable box / STB (Set-Top-Box) satellite receiver.
y Media Play: Allows you to play music files, pictures saved on a USB device (p. 23).
y Self Diagnosis: You can check to make sure picture and sound operate normally (p. 22).
Accessories
✎
Please make sure the following items are included with your PDP TV. If any items are missing, contact your dealer.
✎
The items’ colors and shapes may vary depending on the models.
✎
Check that there are no accessories hidden behind or under packing materials when you open the box.
y Remote Control (BN59-01006A) & Batteries (AAA x 2)
y Owner’s Instructions
y Warranty Card / Safety Guide / Quick Setup Guide
Ferrite Core (1EA)
(3301-002049)
✎
Ferrite Core for Power Cord: The ferrite cores are used to shield the cables from interference.
When connecting the ferrite core to a cable, open the ferrite core and clip it around the cable
near the plug as shown in the figure.
A Maximum distance between the ferrite core and the end of the cord inserted in the TV:
x
6~8 inches
y Cleaning Cloth (BN63-01798B)
y Power Cord
A
Input Cables (Sold Separately)
To purchase the below cable, contact www.SamsungParts.com
HDMI HDMI-DVI Component
Composite (AV) Coaxial (RF)
English
4
Power Cord

Install the Stand
See the separate stand installation guide for more detailed instructions.
51 inches model only (PN51D530)
A
1 EA
B
1 EA
01 Getting Started
C
x4 (M4 X L12)
Stand Guide Stand Screws
1 3
2
A
4
C
(M4 X L12)
B
Side View
x4
Front
Rear
Top View
ATTENTION
DO NOT USE
DO NOT USE
CHEMICALS
GREASE
(Correct assembly)
DO NOT USE
OIL
D
✎
Place a soft cloth over the table to protect the TV,
x4 (M4 X L8)
and then place the TV on the cloth screen side
down.
✎
Insert the Stand Guide into the slot of TV bottom
side.
(Incorrect assembly)
5
D
x4
(M4 X L8)
English
5

Getting Started
59 inches model only (PN59D530)
B
A
Stand (depending on the model)
1
2
(M4 X L12)
A
x4
B
Front
Rear
C
DO NOT USE
CHEMICALS
Top View
ATTENTION
DO NOT USE
GREASE
DO NOT USE
OIL
Guide Stand Screws
3
✎
Place a soft cloth over the table to protect the TV,
and then place the TV on the cloth screen side down.
✎
Insert the Stand Guide into the slot of TV bottom
C
D
x4 (M4 X L12)
x4 (M4 X L8)
side.
(Incorret assembly)(Correct assembly)
4
Side View
D
x4
5
✎
NOTE
Make sure to distinguish between the front and back of the Stand and Guide Stand when assembling them.
x
Make sure that at least two people lift and move the TV.
x
Stand the product up when you fasten the screws. If you fasten the screws with the TV lying down, it may lean to one
x
(M4 X L8)
side when you stand it up.
Do not insert your fingers into the stand base slot of the TV when installing the stand base.
[
English
6

Viewing the Control Panel
✎
The product color and shape may vary depending on the model.
Control Panel
Power Indicator Blinks and turns off when the power is on and lights up in standby mode.
P
(Power)
SOURCE
MENU Displays an on-screen menu, the OSD (on screen display) of your TV’s features.
y
z
E
Turns the TV on or off.
Toggles between all the available input sources. In the on-screen menu, use this
button as you would use the ENTER
Adjusts the volume. In the OSD, use the
◄ and ► buttons on the remote control.
Changes the channels. In the OSD, use the
▼ and ▲ buttons on the remote control.
E
button on the remote control.
y
buttons as you would use the
z
buttons as you would use the
01 Getting Started
Standby mode
Do not leave your TV in standby mode for long periods of time (when you are away on a holiday, for example). A small amount
of electric power is still consumed even when the power button is turned off. It is best to unplug the power cord.
English
7
Getting Started
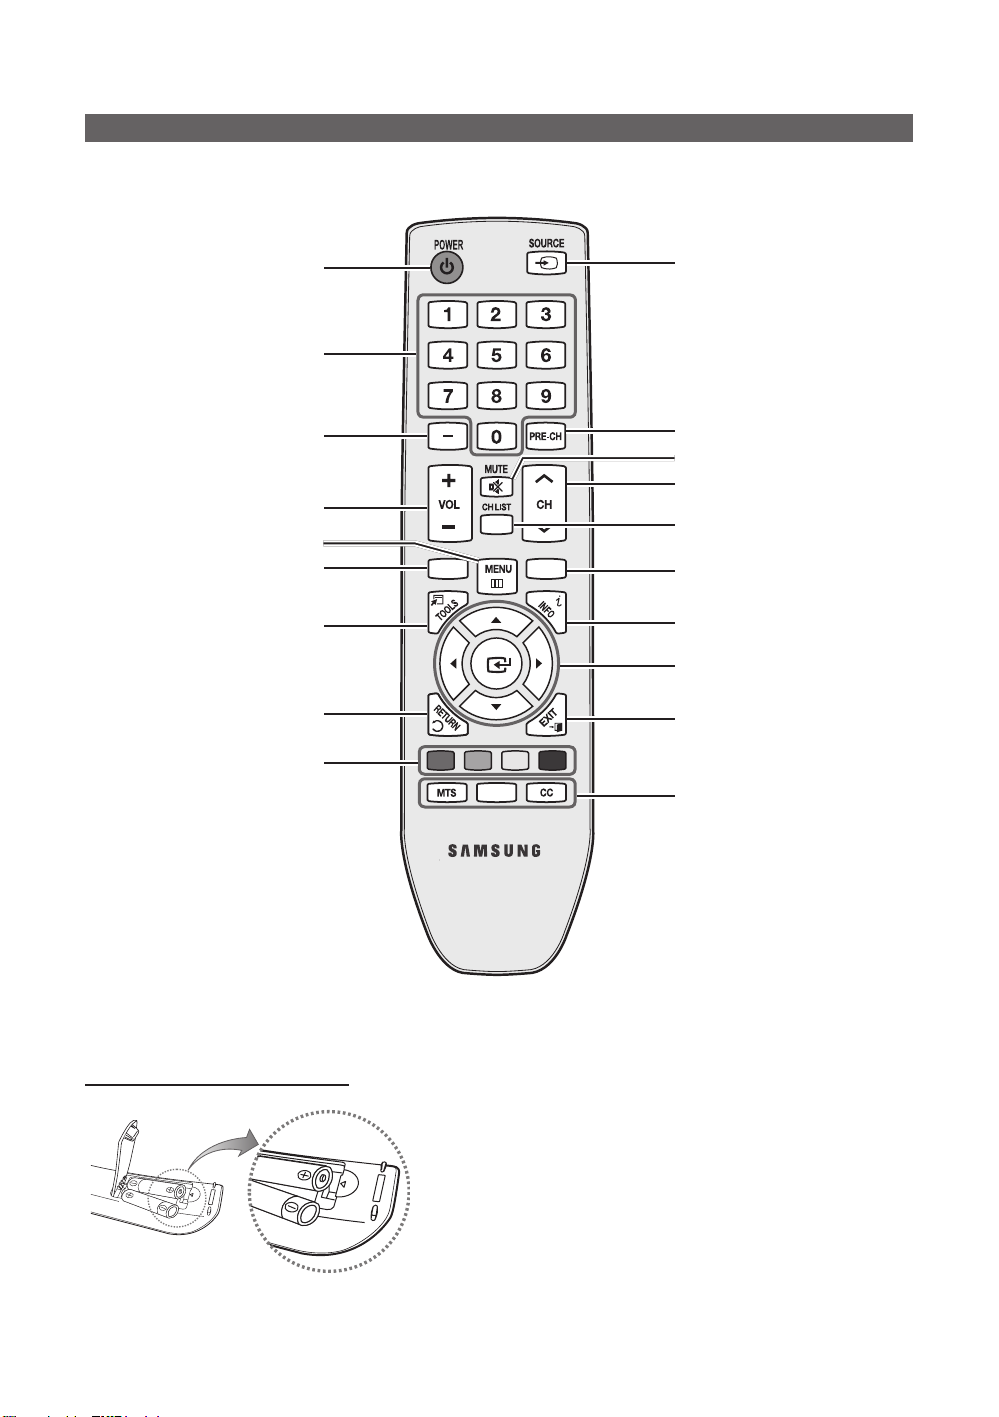
Viewing the Remote Control
Turns the TV on and off.
Press to directly access channels.
Press to select additional digital channels
(digital) being broadcasted by the same
station. For example, to select channel
“54-3”, press “54”, then press “–” and
“3”.
Adjusts the volume.
Brings up the OSD.
Displays Media Play (USB) (p. 23).
Quickly select frequently used functions.
Returns to the previous menu.
Use these buttons in a specific feature.
For details, refer to e-Manual.
MEDIA.P
A B C D
FAV.CH
P.SIZE
Displays and selects the available video
sources (p. 12).
Returns to the previous channel.
Cuts off the sound temporarily.
Changes channels.
Displays the channel list on the screen
(p. 13).
FAV.CH: Displays Favorite Channel Lists
on the screen (p.14).
Displays information on the TV screen.
Selects the on-screen menu items and
changes the values seen on the menu.
Exits the menu.
MTS: Press to choose stereo, mono,
or Separate Audio Program (SAP
broadcast) (p. 18).
P.SIZE: Lets you choose the picture size
(p. 16).
CC: Controls the caption decoder (p.
21).
Installing batteries (Battery size: AAA)
English
8
✎
NOTE
Use the remote control within 23 feet from the TV.
x
Bright light may affect the performance of the remote
x
control. Avoid use when nearby fluorescent lights or neon
signs.
The color and shape may vary depending on the model.
x

Connecting to an Antenna
POWER
Connecting the Power cord and an antenna or cable connection
✎
The PDP device may interfere with an amateur radio or AM radio.
✎
Using two-way radio mobile and portable units or amateur radio or AM radio near your TV may cause the TV to
malfunction.
VHF/UHF Antenna
01 Getting Started
Antenna Cable (Not Supplied)
or
Power Input
Plug & Play (Initial Setup)
When the TV is initially powered on, a sequence of on-screen prompts will assist in configuring basic settings. Press the
P
POWER
1
2
button. Plug & Play is available only when the Input source is set to TV.
✎
To return to the previous step, press the Red button.
Selecting a language
Selecting Store Demo
or Home Use
Selecting an antenna
Press the ▲ or ▼ button, then press the ENTER
desired OSD (On Screen Display) language.
Press the ◄ or ► button, then press the ENTER
y Select the Home Use mode. Store Demo mode is for retail
environments.
y To return the unit’s settings from Store Demo to Home Use
(standard): Press the volume button on the TV. When you see the
volume OSD, press and hold MENU for 5 sec.
Press the ▲ or ▼ button, then press the ENTER
E
button. Select the
E
button.
E
button. Select Air, Cable or Auto.
Cable
ANT OUT
P
3
Selecting a channel
4
Setting the Clock
5
Mode
View the HD
6
Connection Guide.
Enjoy your TV.
Press the ▲ or ▼ button, then press the ENTER
to memorize. When setting the antenna source to Cable, a step appears allowing you to
assign numerical values (channel frequencies) to the channels. For more information, refer to
Channel → Auto Program (p. 14).
✎
Press the ENTERE button at any time to interrupt the memorization process.
Set the Clock Mode automatically or manually.
y Auto: Allows you to select DST (Daylight Saving Time) mode and time zone.
y Manual: Allows you to manually set the current date and time (p. 19).
The connection method for the best HD screen quality is displayed.
Press the ENTERE button.
E
button. Select the channel source
7
If You Want to Rerun Plug & Play...
O
MENUm → Setup → Plug & Play → ENTER
✎
NOTE
y To change the TV’s setting from Store Demo to Home Use when not in Plug & Play, press the volume button on the TV.
When you see the volume bar on the screen, press and hold the MENU button on the TV for 5 sec.
E
English
9
Connections
(DVI)
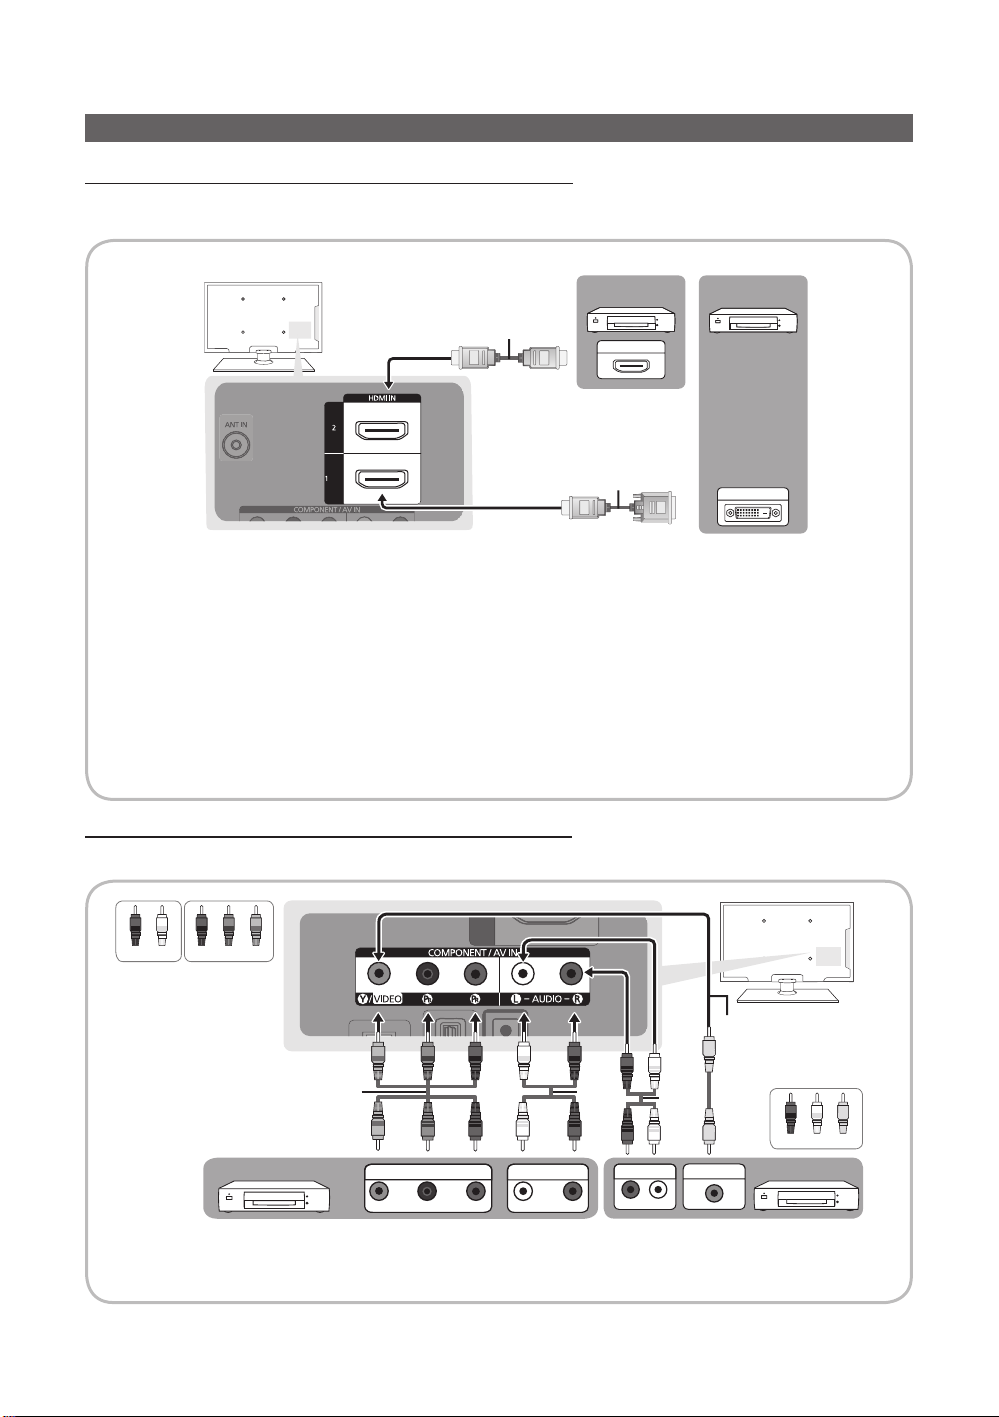
Connecting to an AV Device
Using an HDMI or an HDMI to DVI cable: HD connection (up to 1080p)
We recommend using the HDMI connection for the best quality HD picture.
Available devices: DVD, Blu-ray player, HD cable box, HD STB (Set-Top-Box) satellite receiver
Device Device
HDMI Cable (Not Supplied)
HDMI to DVI Cable (Not Supplied)
✎
HDMI IN 1(DVI), 2
When using an HDMI/HDMI cable connection, the picture may not display normally (if at all) or the audio
x
may not work if an external device that uses an older version of HDMI mode is connected to the TV. If such
a problem occurs, ask the manufacturer of the external device about the HDMI version and, if out of date,
request an upgrade.
Be sure to purchase a certified HDMI cable. Otherwise, the picture may not display or a connection error may
x
occur.
When using an HDMI/DVI cable connection, you must use the HDMI IN 1(DVI) jack for video. A DVD, Blu-ray
x
player, HD cable box, HD STB satellite receiver may require a DVI-HDMI (DVI to HDMI) cable or DVI-HDMI (DVI
to HDMI) adapter.
If an HDMI to DVI cable is connected to the HDMI IN 1(DVI) port, the audio does not work.
x
Using a Component (up to 1080p) or an Audio/Video (480i only) Cable
Available devices: DVD, Blu-ray player, cable box, STB satellite receiver, VCR
HDMI OUT
DVI OUT
W
R
Red White Red Blue Green
✎
When connecting to AV IN, the color of the AV IN [Y/VIDEO] jack (green) will not match the video cable (yellow).
✎
For better picture quality, the Component connection is recommended over the A/V connection.
English
10
R GB
Audio Cable
(Not Supplied)
WWR
Y
Y
VIDEO OUT
G
B
Component Cable
(Not Supplied)
G
B
Device Device
COMPONENT OUT
W
R
R
PRPBY
W
AUDIO OUT
R-AUDIO-L
R
Audio Cable
(Not Supplied)
R
R
AUDIO OUT
R-AUDIO-L
Video Cable
(Not Supplied)
R W
Red White Yellow
Y
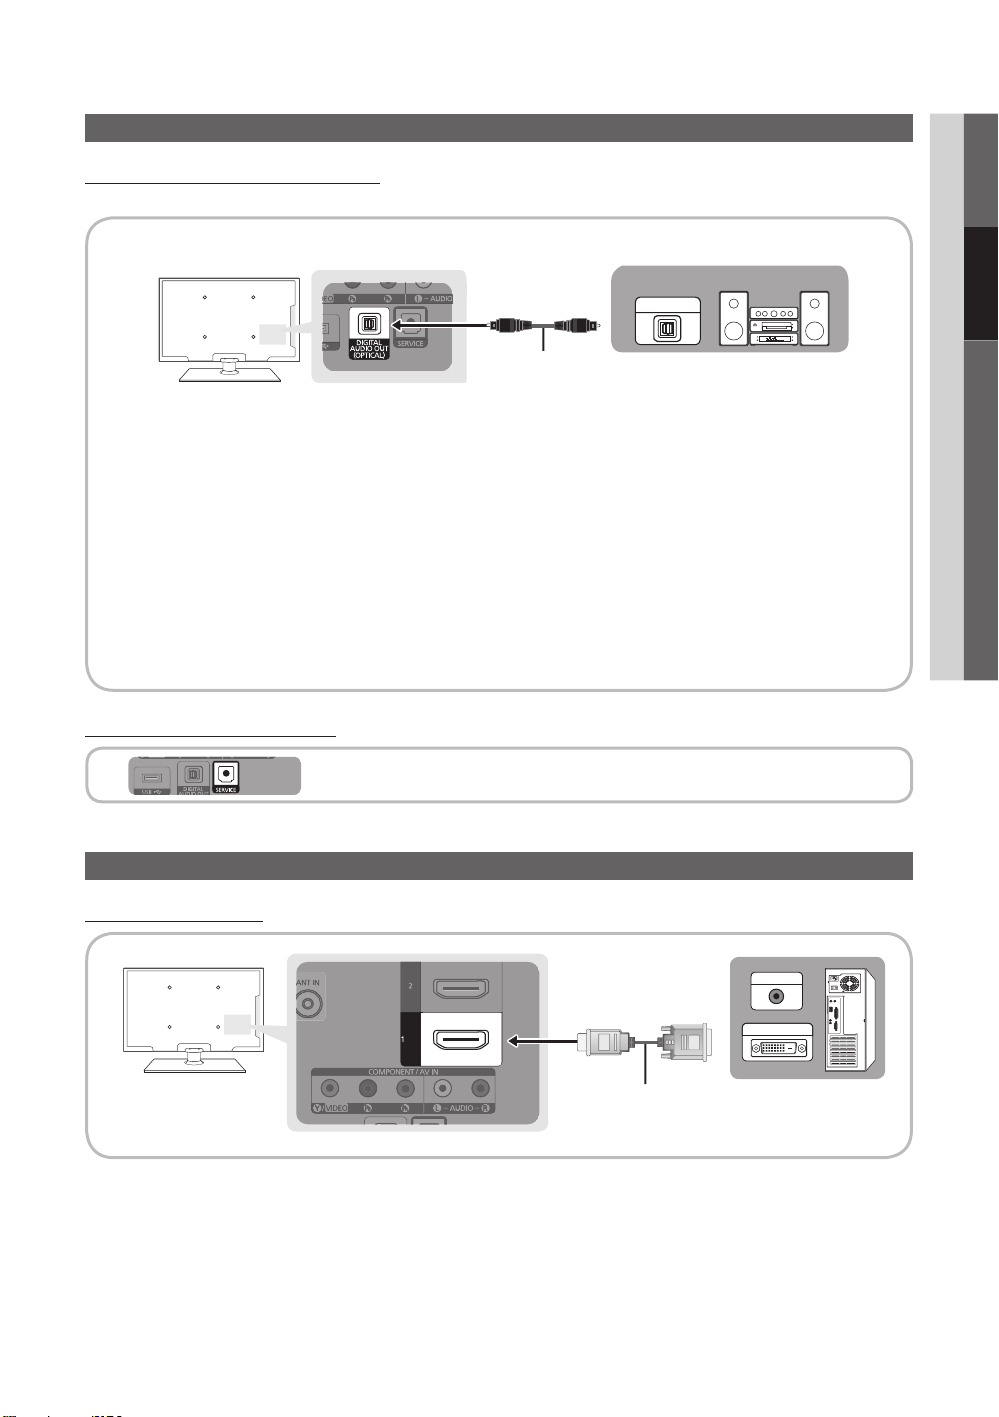
Connecting to an Audio Device
(DVI)
Using a Optical (Digital) Cable Connection
Available devices: Digital Audio System, Amplifier, DVD home theater
Optical Cable (Not Supplied)
✎
DIGITAL AUDIO OUT (OPTICAL)
When a Digital Audio System is connected to the DIGITAL AUDIO OUT (OPTICAL) jack, decrease the volume
x
of both the TV and the system.
5.1 CH (channel) audio is available when the TV is connected to an external device supporting 5.1 CH.
x
When the receiver (home theater) is set to on, you can hear sound output from the TV’s optical jack. When the
x
TV is receiving a DTV signal, the TV will send 5.1 CH sound to the amplifier or DVD home theater. When the
source is a digital component such as a DVD / Blu-ray player / cable box / STB (Set-Top-Box) satellite receiver
and is connected to the TV via HDMI, only 2 CH audio will be heard from the amplifier or DVD home theater. If
you want to hear 5.1 CH audio, connect the digital audio out jack from your DVD / Blu-ray player / cable box /
STB satellite receiver directly to an amplifier or home theater.
02 Connections
Digital Audio System
OPTICAL
Using a SERVICE Cable Connection
SERVICE: Connector for service only.
Connecting to a PC
Using an HDMI/DVI cable
✎
When connecting a HDMI to DVI cable, the Audio cable could not connect.
AUDIO OUT
DVI OUT
HDMI to DVI Cable (Not Supplied)
English
11
 Loading...