


1700FP-E.book Page 1 Monday, November 2, 1998 4:51 PM
®
Dell® 1700 Flat Panel Monitor User’s Guide
www.dell.com

1700FP-E.book Page 2 Monday, November 2, 1998 4:51 PM
Warnings, Cautions, and Notes
Throughout this document, there may be blocks of text printed in bold type or in italic type. These blocks are warnings, cautions, and notes, and they are used as follows:
WARNING: A WARNING indicates the potential for bodily harm and tells you how to avoid the problem.
CAUTION: A CAUTION indicates either potential damage to hardware or loss of data and tells you how
to avoid the problem.
NOTE: A NOTE indicates important information that helps you make better use of your computer system.
____________________
Information in this document is subject to change without notice.
© 1994–1998 Dell Computer Corporation. All rights reserved.
Reproduction in any manner whatsoever without the written permission of Dell Computer Corporation is strictly forbidden.
Trademarks used in this text: Dell and the DELL logo are registered trademarks of Dell Computer Corporation; Microsoft, Windows,
and Windows NT are registered trademarks of Microsoft Corporation; VESA is a registered trademark of Video Electronics Standards
Association; IBM is a registered trademark of International Business Machines Corporation; The E
registered trademarks of the U.S. Environmental Protection Agency (EPA). As an E
has determined that this product meets the E
Other trademarks and trade names may be used in this document to refer to either the entities claiming the marks and names or
their products. Dell Computer Corporation disclaims any proprietary interest in trademarks and trade names other than its own.
December 1998 P/N: 8164D and 9164D
NERGY STAR guidelines for energy efficiency.
NERGY STAR Partner, Dell Computer Corporation
NERGY STAR name and logo are

1700FP-E.book Page ix Monday, November 2, 1998 4:51 PM
Safety Instructions
Please read and follow these instructions when connecting and using your computer
monitor:
• To help avoid damaging your computer, be sure the voltage selection switch on the
power supply is set to match the alternating current (AC) power available at your
location:
— 115 volts (V)/60 hertz (Hz) in most of North and South America and some Far
Eastern countries such as Japan, South Korea, and Taiwan
— 230 V/50 Hz in most of Europe, the Middle East, and the Far East
Also be sure your monitor is electrically rated to operate with the AC power available in
your location.
• Never insert anything metallic into the monitor openings. Doing so may create the
danger of electric shock.
• To avoid electric shock, never touch the inside of the monitor. Only a qualified technician should open the monitor’s case.
• Never use your monitor if the power cord has been damaged. Do not allow anything to
rest on the power cord, and keep the cord away from where people could trip over it.
• Be sure to hold the plug, not the cord, when disconnecting the monitor from an electric socket.
• Openings in the monitor cabinet are provided for ventilation. To prevent overheating,
these openings should not be blocked or covered. Also, avoid using the monitor on a
bed, sofa, rug, or other soft surface. Doing so may block the ventilation openings in
the bottom of the cabinet. If you put the monitor in a bookcase or some other
enclosed space, be sure to provide adequate ventilation.
• Put your monitor in a location with low humidity and a minimum of dust. Avoid places
like damp basements or dusty hallways.
• Do not expose the monitor to rain or use it near water (in kitchens, next to swimming
pools, etc.). If the monitor accidentally gets wet, unplug it and contact an authorized
dealer immediately. You can clean the monitor with a damp cloth when necessary, but
be sure to unplug the monitor first.
• Place the monitor on a solid surface and treat it carefully. The screen can be damaged
if dropped, sharply hit or touched with a sharp or abrasive implement.
• Locate your monitor near an easily accessible AC outlet.
• If your monitor does not operate normally – in particular, if there are any unusual
sounds or smells coming from it – unplug it immediately and contact an authorized
dealer or service center.
1-ix

1700FP-E.book Page x Monday, November 2, 1998 4:51 PM
• High temperatures can cause problems. Don’t use your monitor in direct sunlight, and
keep it away from heaters, stoves, fireplaces, and other sources of heat.
• Unplug the monitor when it is going to be left unused for an extended period of time.
• Unplug your monitor from the AC outlet before any service.
1-x

1700FP-E.book Page v Monday, November 2, 1998 4:51 PM
Contents
Overview of Your Monitor. . . . . . . . . . . . . . . . . . . . . . . . . . . . . . . . . . . . . . . . . . . . . . . 1-1
Installation . . . . . . . . . . . . . . . . . . . . . . . . . . . . . . . . . . . . . . . . . . . . . . . . . . . . . . . . . . . 1-3
Getting Help . . . . . . . . . . . . . . . . . . . . . . . . . . . . . . . . . . . . . . . . . . . . . . . . . . . . . . . 1-5
Plug and Play . . . . . . . . . . . . . . . . . . . . . . . . . . . . . . . . . . . . . . . . . . . . . . . . . . . . . . . 1-5
Auto Adjustment . . . . . . . . . . . . . . . . . . . . . . . . . . . . . . . . . . . . . . . . . . . . . . . . . . . . 1-5
Maintenance of Your Flat Panel Display . . . . . . . . . . . . . . . . . . . . . . . . . . . . . . . . . . 1-6
Monitor Self Test. . . . . . . . . . . . . . . . . . . . . . . . . . . . . . . . . . . . . . . . . . . . . . . . . . . . 1-6
Adjusting Your Monitor . . . . . . . . . . . . . . . . . . . . . . . . . . . . . . . . . . . . . . . . . . . . . . . . . 1-7
Automatic Save . . . . . . . . . . . . . . . . . . . . . . . . . . . . . . . . . . . . . . . . . . . . . . . . . . . . . 1-8
Direct-Access Features. . . . . . . . . . . . . . . . . . . . . . . . . . . . . . . . . . . . . . . . . . . . . . . . . . 1-8
Contrast. . . . . . . . . . . . . . . . . . . . . . . . . . . . . . . . . . . . . . . . . . . . . . . . . . . . . . . . . . . 1-8
Brightness . . . . . . . . . . . . . . . . . . . . . . . . . . . . . . . . . . . . . . . . . . . . . . . . . . . . . . . . . 1-8
Auto Adjustment . . . . . . . . . . . . . . . . . . . . . . . . . . . . . . . . . . . . . . . . . . . . . . . . . . . . 1-8
OSM Lock/Unlock . . . . . . . . . . . . . . . . . . . . . . . . . . . . . . . . . . . . . . . . . . . . . . . . . . . 1-9
Menu System . . . . . . . . . . . . . . . . . . . . . . . . . . . . . . . . . . . . . . . . . . . . . . . . . . . . . . . . . 1-9
Accessing the Menu System . . . . . . . . . . . . . . . . . . . . . . . . . . . . . . . . . . . . . . . . . . 1-9
Image Lock: . . . . . . . . . . . . . . . . . . . . . . . . . . . . . . . . . . . . . . . . . . . . . . . . . . . 1-10
Position: . . . . . . . . . . . . . . . . . . . . . . . . . . . . . . . . . . . . . . . . . . . . . . . . . . . . . 1-10
Color Control: . . . . . . . . . . . . . . . . . . . . . . . . . . . . . . . . . . . . . . . . . . . . . . . . . 1-10
Reset: . . . . . . . . . . . . . . . . . . . . . . . . . . . . . . . . . . . . . . . . . . . . . . . . . . . . . . . 1-10
Language: . . . . . . . . . . . . . . . . . . . . . . . . . . . . . . . . . . . . . . . . . . . . . . . . . . . . 1-10
Menu Display Time: . . . . . . . . . . . . . . . . . . . . . . . . . . . . . . . . . . . . . . . . . . . . 1-11
Menu Position: . . . . . . . . . . . . . . . . . . . . . . . . . . . . . . . . . . . . . . . . . . . . . . . . 1-11
Image Size: . . . . . . . . . . . . . . . . . . . . . . . . . . . . . . . . . . . . . . . . . . . . . . . . . . . 1-11
Display Mode: . . . . . . . . . . . . . . . . . . . . . . . . . . . . . . . . . . . . . . . . . . . . . . . . . 1-11
Image Effect: . . . . . . . . . . . . . . . . . . . . . . . . . . . . . . . . . . . . . . . . . . . . . . . . . . 1-11
PowerSaver. . . . . . . . . . . . . . . . . . . . . . . . . . . . . . . . . . . . . . . . . . . . . . . . . . . . . . . . . . 1-12
Troubleshooting . . . . . . . . . . . . . . . . . . . . . . . . . . . . . . . . . . . . . . . . . . . . . . . . . . . . . .1-13
Specifications . . . . . . . . . . . . . . . . . . . . . . . . . . . . . . . . . . . . . . . . . . . . . . . . . . . . . . . . 1-14
Display Resolution. . . . . . . . . . . . . . . . . . . . . . . . . . . . . . . . . . . . . . . . . . . . . . . . . . 1-16
Dell® 1700 Flat Panel Monitor User’s Guide 1-v

1700FP-E.book Page vi Monday, November 2, 1998 4:51 PM
Figures 0
Figure 1-1. Front panel . . . . . . . . . . . . . . . . . . . . . . . . . . . . . . . . . . . . . . . . . . . . . . . . .1-1
Figure 1-2. Back panel connectors . . . . . . . . . . . . . . . . . . . . . . . . . . . . . . . . . . . . . . . .1-2
Figure 1-3. Connecting your monitor to a PC . . . . . . . . . . . . . . . . . . . . . . . . . . . . . . . .1-3
Figure 1-4. Connecting Your Monitor to a Workstation . . . . . . . . . . . . . . . . . . . . . . . .1-4
Figure 1-5. Monitor self test screen . . . . . . . . . . . . . . . . . . . . . . . . . . . . . . . . . . . . . . .1-6
Figure 1-6. User controls . . . . . . . . . . . . . . . . . . . . . . . . . . . . . . . . . . . . . . . . . . . . . . .1-7
Figure 1-7. On-Screen Menu (OSM) . . . . . . . . . . . . . . . . . . . . . . . . . . . . . . . . . . . . . . .1-9
Tables 0
Table 1-1. Menu adjustments . . . . . . . . . . . . . . . . . . . . . . . . . . . . . . . . . . . . . . . . . . .1-9
Table 1-2. Power-saving modes . . . . . . . . . . . . . . . . . . . . . . . . . . . . . . . . . . . . . . . .1-11
Table 1-3. Troubleshooting problems . . . . . . . . . . . . . . . . . . . . . . . . . . . . . . . . . . . .1-12
Table 1-4. Specifications . . . . . . . . . . . . . . . . . . . . . . . . . . . . . . . . . . . . . . . . . . . . . .1-13
Table 1-5. D-Sub Connector Pin Assignments . . . . . . . . . . . . . . . . . . . . . . . . . . . . .1-14
Table 1-6. 13W3 Connector Pin Assignments . . . . . . . . . . . . . . . . . . . . . . . . . . . . . .1-14
Table 1-7. Preset timing modes . . . . . . . . . . . . . . . . . . . . . . . . . . . . . . . . . . . . . . . .1-15
Appendicies 0
Index 0
1-vi Dell® 1700 Flat Panel Monitor User’s Guide

•
‚
ƒ
1700FP-E.book Page 1 Monday, November 2, 1998 4:51 PM
Dell® 1700 Flat Panel Monitor
User’s Guide
Overview of Your Monitor
Figure 1-1. Front panel
1. User controls
Use these buttons to adjust the image to your liking.
2. Video input selector and indicator lights
Your 1700FP flat panel monitor allows you to connect both a computer system and a
workstation to it at the same time. Use this button to select which system your monitor should display.
3. Power button and indicator light
Use this button to turn the monitor on and off. The power indicator light glows green
during normal operation.
Dell® 1700 Flat Panel Monitor User’s Guide 1-1
1700FP-E.book Page 2 Monday, November 2, 1998 4:51 PM
➀
„
➁
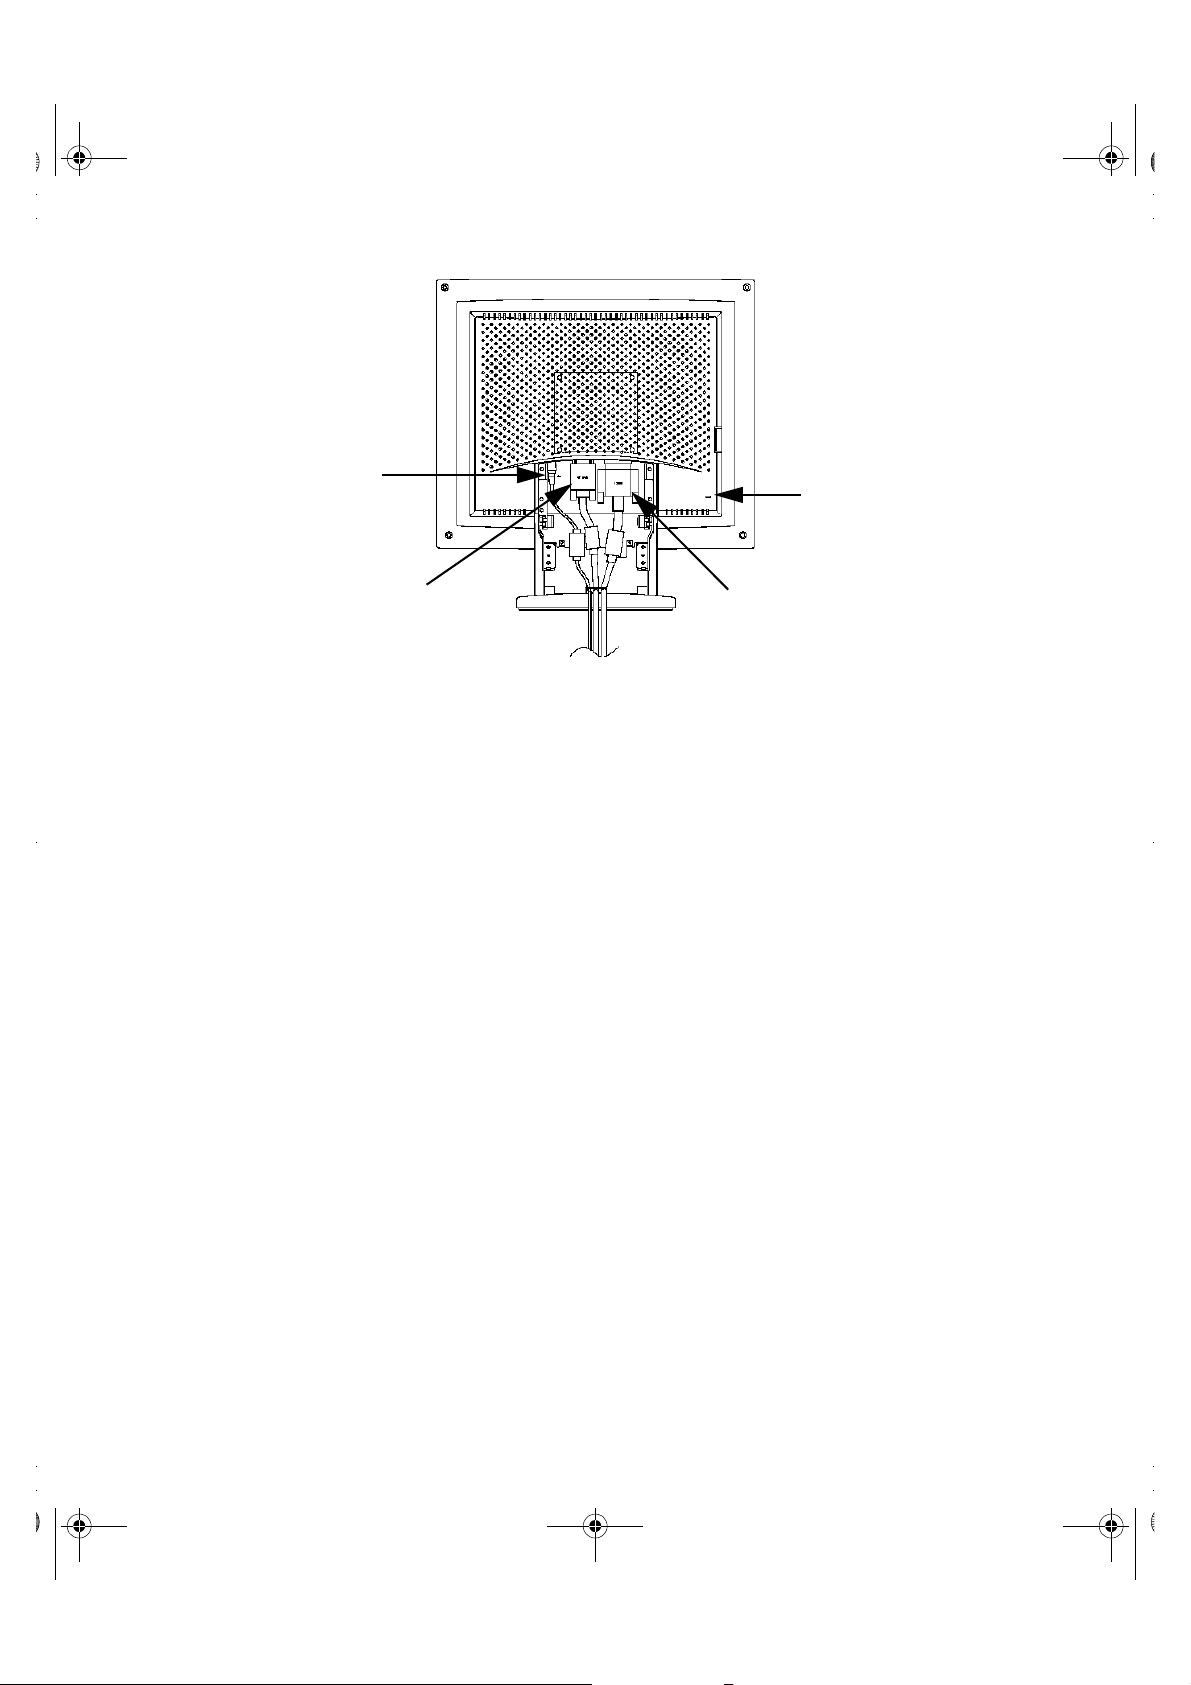
Figure 1-2. Back panel connectors
1. Power adapter connector
Connect the power adapter here.
2. 15-pin mini D-sub signal cable connector
Connect a mini D-sub cable from the video connector on your local (at your desk) computer to this connector. When the system connected to this cable is the active
system, the video 1 indicator will glow green.
3. 13W3 signal cable connector
Connect a 13W3 cable from the video connector on your workstation to this connector. When the workstation is the active system using the flat panel display, the video 2
indicator will glow green.
4. Kensington security slot
This monitor offers you the opportunity to attach a Kensington-type security device .
Kensington lock not included. Refer to your locking device documentation for installation instructions.
➂
1-2 Dell® 1700 Flat Panel Monitor User’s Guide

1700FP-E.book Page 3 Monday, November 2, 1998 4:51 PM
Installation
This monitor offers a method for connection to both a PC and a workstation. One or both
types of signal cables can be connected to the monitor simultaneously. Determine which
connection method(s) you need and refer to the instructions below..
Figure 1-3. Connecting your monitor to a PC
1. Turn off your computer and unplug its power cord.
2. Attach the blue signal cable connector to the video port on the back of your
computer.
3. Connect the power cord for your monitor to the power port on the power
adapter.
4. Plug the power cords of your computer and your monitor into a nearby
outlet.
5. Turn on your computer and monitor. If your monitor displays an image,
installation is complete.
6. Perform the auto adjustment procedure as described in “Auto Adjustment”
on page5.
Dell® 1700 Flat Panel Monitor User’s Guide 1-3
1700FP-E.book Page 4 Monday, November 2, 1998 4:51 PM
b
a
➀
Figure 1-4. Connecting Your Monitor to a Workstation
1. Turn off your computer and unplug its power cord.
2. Pull the cable covers off the back of your monitor. Grasp the top of the
stand cover (a) and pull the cover out then up to remove it. Using both
hands, release the tab on each side of the hinge cover (b) then pull the
cover out and off the monitor.
3. Connect the signal cable to the 13W3 connector (1) on the back of your
monitor. Connect the other end of the cable to the video port on the back of
your workstation.
4. Connect the power cord for your monitor to the power port on the power
adapter.
5. Secure the power adapter cord and the signal cable(s) under the metal
prong.
6. Make sure all connections are secure and replace the stand and hinge covers. Carefully insert the three tabs along the top of the hinge cover (b) into
the slots on the back of the monitor. Push the hinge cover onto the monitor
and make sure that the two side tabs connect with the back of the monitor.
Insert the two tabs along the bottom of the stand cover (a) into the slots in
the stand base while making sure that the power adapter cord and the signal cable(s) emerge through the cutout at the bottom of the stand cover.
Push the stand cover onto the back of the monitor and make sure that the
tabs along both sides of the stand cover snap into place.
7. Plug the power cords of your computer and your monitor into a nearby
outlet.
1-4 Dell® 1700 Flat Panel Monitor User’s Guide

1700FP-E.book Page 5 Monday, November 2, 1998 4:51 PM
8. Turn on your computer and monitor. If your monitor displays an image,
installation is complete.
9. Perform the auto adjustment procedure as described in “Auto Adjustment,”
below.
Getting Help
If your monitor does not display an image, check your cable connections and refer to “Troubleshooting” on page13. If you experience difficulties with the quality of the displayed
image, run auto adjustment again and refer to “Adjusting Your Monitor” on page7 or “Troubleshooting” on page13.
Plug and Play
Our adoption of the new VESA® Plug and Play solution eliminates complicated and time
consuming setup. It allows you to install your monitor in a Plug and Play compatible system
without the usual hassles and confusion. Your PC system can easily identify and configure
itself for use with your display. This monitor automatically tells the PC system its Extended
Display Identification (EDID) data using Display Data Channel (DDC) protocols so the PC
system can automatically configure itself to use the flat panel display.
Auto Adjustment
Even though your computer system can recognize your new flat panel display system, the
auto adjustment function will optimize the display settings for use with your computer.
Auto Adjustment can be accessed through the On-Screen Menu, See “Image Lock:” on
page 10 or use the direct access instructions below:
1. Turn on your computer and monitor.
2. Push the EXIT button to open the Auto Adjustment OSM.
3. Push the + button to activate the Auto Adjustment function. The screen will
dim and you may notice small changes to the screen image.
To abort the Auto Adjustment function, press the EXIT button again.
4. When finished, the screen will stop changing. Press the EXIT button to leave
the OSM or allow the OSM to timeout and disappear automatically.
Dell® 1700 Flat Panel Monitor User’s Guide 1-5
1700FP-E.book Page 6 Monday, November 2, 1998 4:51 PM
Maintenance of Your Flat Panel Display
WARNING: To avoid risk of electric shock, do not disassemble the monitor cabinet (except for gaining access to the cable connectors as described on page3).
The unit is not user-serviceable. User maintenance is restricted to cleaning as
explained below:
Unplug the monitor from the power outlet before cleaning.
• To clean your flat panel display screen, lightly dampen a soft, clean cloth with water or
mild detergent. If possible, use a special screen cleaning tissue or solution suitable for
the antistatic coating.
• To clean the monitor cabinet, use a cloth lightly dampened with a mild detergent.
• Never use flammable cleaning material to clean your flat panel display or any other
electrical apparatus.
Monitor Self Test
Your monitor provides a self test feature which allows you to check if your monitor is functioning properly. If your monitor and computer are properly connected but the monitor
screen remains dark and the power indicator is blinking, use the following steps to perform
the monitor self test:
1. Turn off both your computer and the monitor.
2. Unplug the video cable from the computer or video card.
3. Turn on the monitor.
If the monitor is functioning properly, you will see a white box with a red border and
black text inside stating:
No Connection
Check Signal Cable
Figure 1-5. Monitor self test screen
The three boxes inside the border are red, green and blue. Failure of any of the boxes
to appear indicates a problem with your monitor. This box will also appear during normal operation of your system if the video cable becomes disconnected or damaged.
4. Turn off your monitor and reconnect the video cable; then turn on both your
computer and monitor.
If your monitor screen remains blank after using the above procedure, check your
video controller and computer system; your monitor is functioning properly.
1-6 Dell® 1700 Flat Panel Monitor User’s Guide

1700FP-E.book Page 7 Monday, November 2, 1998 4:51 PM
Adjusting Your Monitor
Your flat panel display allows you to easily adjust the characteristics of the image being displayed. All of these adjustments are made using the control buttons on the front of the
monitor. While you use these buttons to adjust the controls, an on-screen menu shows
you their numeric values as they change.
• ‚
ƒ
„
…
Figure 1-6. User controls
1. EXIT button
The EXIT button opens the Auto Adjustment on-screen menu (OSM), exits from
menus and sub-menus, and exits the OSM.
2. The – / + () buttons
These buttons allow you to select items on the on-screen menu. When adjusting an
item using the OSM, the (–) button lowers the value of the selected function. The
(+) button raises the value of the selected function. These buttons are also direct
access buttons for theContrast feature control. (See the section on “Direct-Access
Features” on page8.)
3. The u/5 () buttons
When used with the OSM system, these buttons allow you to select sub-menu items
and to move the selector between menus on the OSM. These buttons are also direct
access buttons for the Brightness feature control. (See the section on “Direct-Access
Features” on page8.)
4. MENU ( ) button
This button opens the OSM system and activates the highlighted function.
5. VIDEO button and indicators
The VIDEO button allows you to select between two different computer systems
which may be connected to your monitor. Video 1 is for use with a local (at your desk)
computer system, while Video 2 is for use with a workstation. An indicator light glows
green next to the number (1 or 2) indicating which system is active on the flat panel
display screen.
†
‡
6. Power indicator
The power indicator light glows green during normal operation.
7. Power button
Use this button to turn the monitor on and off.
Dell® 1700 Flat Panel Monitor User’s Guide 1-7

: Exit
: Exit
: Exit
1700FP-E.book Page 8 Monday, November 2, 1998 4:51 PM
Automatic Save
Whenever you open the on-screen menu and allow an adjustment window to remain
on-screen for about three seconds without pressing another button, this monitor automatically saves any adjustments you have made. These changes are saved into a user area in
the monitor. User areas are reserved according to the signal frequency from your computer. This monitor can save adjustments for up to five user modes. It has ten factory
preset or preload modes, one for each signal frequency as listed in the “Preset timing
modes” on page16.
If you have made no adjustments, the on-screen menu disappears and the monitor does
not save anything.
Direct-Access Features
The features described on this page can be accessed quickly, at the touch of one button.
Once you are finished making adjustments to a feature, push the EXIT button to turn off
the menu.
Contrast
Contrast
16
–
➝
+
Follow these instructions to adjust the contrast between darkness and lightness on the monitor’s display.
1. With the menu off, push the “–” or “+” button. The
contrast display will appear.
2. Push the “+” button to increase the contrast; push
the “−−” button to decrease the contrast.
Brightness
Follow these instructions to adjust the brightness of the monitor’s display.
44
1. With the menu off, push the “ “6” ” or “ “5” ” button. The
brightness display will appear.
2. Push the “ “5” ” button to increase the brightness;
push the ““6” ” button to decrease the brightness.
6
➝
Brightness
5
Auto Adjustment
Auto Adjustment
No
–
➝
1-8 Dell® 1700 Flat Panel Monitor User’s Guide
Yes
+
Follow these instructions to enable or disable the automatic
screen adjustments for your monitor.
1. With the menu off, push the EXIT button. The automatic adjustment display will appear.
2. Follow the directions previously given on page5.

1700FP-E.book Page 9 Monday, November 2, 1998 4:51 PM
OSM Lock/Unlock
This function allows you to secure the current settings, while allowing you to adjust the
Brightness and Contrast, so that they cannot be inadvertently changed. You can unlock the
OSM controls at any time by using the same procedure.
1. Push and hold the MENU button for 5 seconds to Lock or Unlock the controls. When locked, a “LOCKED” message will be displayed.
Menu System
Auto Adjustment
Fine
i
Image Lock
29
Coarse
1349
: Access Function
Figure 1-7. On-Screen Menu (OSM)
Accessing the Menu System
1. With the menu off, push the MENU button to open the menu system and display the main function menu.
2. Push the + button to move to the next icon or push the − − button to move
back to the previous icon. As you move from one icon to another, the function name changes to reflect the function or group of functions represented
by that icon. See the table below to view a complete list of all the functions
offered by this monitor.
3. Push the MENU button once to select the adjustment function, then use the
+ and −− buttons to make your changes.
4. Push the EXIT button once to return to the main menu to select another
function or push the EXIT button 2 or 3 times to exit from the OSM.
Dell® 1700 Flat Panel Monitor User’s Guide 1-9

1700FP-E.book Page 10 Monday, November 2, 1998 4:51 PM
Table 1-1. Menu adjustments
Icon Settings and
Sub-menus
Image Lock:
• Auto
Adjustment
• Fine
• Coarse
Position:
• Horizontal
• Vertical
Description
Select this icon to adjust for and limit the amount of
noise in the video signal which causes horizontal lines
or areas on the screen where the image appears to be
unstable and jitters or shimmers.
Auto Adjustment allows the monitor to self-adjust to
the incoming video signal. After using Auto Adjustment
you can further tune your monitor to your liking using
the Fine and Coarse adjustments.
The Fine and Coarse adjustments allow you to more
closely adjust your monitor to your preference.
Use the “–” and “+” buttons to adjust away
interference.
If satisfactory results are not obtained using the Fine
adjustment, use the Coarse adjustment and then use
Fine again.
This function may change the width of the display
image. Use the Horizontal function on the Position
menu to center the display image on the screen.
Select this icon to move the viewing area on the
monitor screen.
Use the “–” and “+” buttons to move the viewing area
to the left or right when Horizontal is selected and up
and down when Vertical is selected.
Color Control:
• R(ed)
• G(reen)
• B(lue)
Reset:
• Geometry
• Color
Language:
• English
• Deutsch
• Español
• Français
• Italiano
1-10 Dell® 1700 Flat Panel Monitor User’s Guide
Select this icon to adjust the color hue and saturation.
The color hue is most noticeable in areas of white. Use
the “–” button to decrease the amount of the selected
color. Use the “+” button to increase the amount of the
selected color.
Select this icon to return to the factory preset values for
the selected group of functions. Resetting the
Geometry settings changes the Position settings, Image
Lock settings and changes the Image Size to Expand 2.
Resetting the Color settings changes the colors back to
their original factory settings.
Select one of the five languages to use for the OSM.
The language chosen affects only the language of the
OSM. It has no effect on any software running on the
computer.

1700FP-E.book Page 11 Monday, November 2, 1998 4:51 PM
Table 1-1. Menu adjustments (continued)
Icon Settings and
Sub-menus
Menu Display
Time:
• 5
• 10
• 20
• 200
Menu Position:
• Horizontal
• Vertical
Image Size:
• Normal
• Expand 1
• Expand 2
Display Mode: Select this icon to view the current user mode. This
i
Description
The OSM stays active for as long as it is in use. The
Menu Display Time sets the length of time the OSM
will remain active after the last time you pushed a
button.
Select this icon to change the position of the OSM on
the screen. The “–” and “+” buttons move the OSM.
Select the Horizontal function to move the OSM to the
left or right; select the Vertical function to move the
OSM up or down.
If you computer or video board supplies a signal rate
and addressability lower than 1280 x 1024, this FPD
monitor provides a scaling processor that can expand
the addressability up to 1280 x 1024. Select the Normal
setting to use the normal size viewing area for the
current signal. Select Expand 1 to expand the viewing
area to the full width of the monitor screen. Select
Expand 2 to extend the viewing area both horizontally
and vertically to the full size of the monitor screen.
screen only displays information; you cannot select a
new setting.
Image Effect:
• Scaling
• Filtering
Select this icon to optimize the display for the type of
software you are using.
Scaling smooths an image which may help the eye to
see more detail. Filtering sharpens text by adding a fine,
contrasting line around each character so that it is easier
to recognize.
Dell® 1700 Flat Panel Monitor User’s Guide 1-11

1700FP-E.book Page 12 Monday, November 2, 1998 4:51 PM
PowerSaver
This monitor has a built-in power management system called PowerSaver. This system
saves energy by switching your monitor into a low-power mode when it has not been used
for a certain amount of time. The available modes are “On”, “Standby”, “Sleep”, and “Deep
Sleep”.
This system operates with a VESA DPMS compliant video card installed in your computer.
You use a software utility installed on your computer to set up this feature. See Table 1-2
below for details.
Table 1-2. Power-saving modes
Power-Saving Function Mode (EPA/NUTEK)
Deep Sleep
State
Horizontal Sync
Vertical Sync
Video
Power
Indicator
Power
Consumption
Normal
Operation
Active
Active
Active
Green Amber Green/Amber
50W (max.)
45W (nominal)
Standby
Mode
Inactive
Active
Blanked
Less than
5W
Sleep Mode
Position A1
Active
Inactive
Blanked
Blinking
(0.5 sec interval)
Less than
5W
Mode
Position A2
Inactive
Inactive
Blanked
Amber
Blinking
(1 sec interval)
Less than
5W
NOTE: This monitor automatically returns to normal operation when horizontal
and vertical sync return. This occurs when you move the computer’s mouse or
press a key on the keyboard.
This monitor is EPA E
NERGY STAR
compliant and NUTEK compliant when used with a com-
puter equipped with VESA DPMS functionality.
For energy conservation, turn your monitor OFF when it is not needed, or when leaving it
unattended for long periods.
1-12 Dell® 1700 Flat Panel Monitor User’s Guide

1700FP-E.book Page 13 Monday, November 2, 1998 4:51 PM
Troubleshooting
Before calling for service, check the information in this section to see if you can remedy
any problems yourself.
Table 1-3. Troubleshooting problems
Symptom Corrective Actions
No Picture • Check to see that both the monitor and the computer
are plugged in and turned on.
“No Connection
Check Signal Cable”
appears
Picture is scrambled • Check the signal cable connection between the
Picture bounces or has
wavy oscillations.
Picture appears to be
ghosting
Color is not uniform • Adjust the color settings using the OSM COLOR
White does not look
white
The colors are distorted
with dark or shadowed
areas
Screen image is not
centered or sized
properly
The power indicator is
blinking green/amber or
amber
• Check the signal cable connection between the
computer and the monitor
• Use the monitor self test described on page 5.
computer and monitor
• Check the signal cable connection between the
computer and monitor
• Check the signal cable connection between the
computer and monitor.
menu.
• Adjust the color settings using the OSM COLOR
menu.
• Adjust the color settings using the OSM COLOR
menu.
• Adjust the Horizontal and Vertical position settings, or
the Image Size setting using the OSM.
• The monitor is using its power management system.
Check the power management utility on your
computer.
The image is too light or
too dark
Cannot adjust monitor
with the buttons on the
front panel
White lines show red or
blue shades at the edges
Picture is fuzzy • Perform monitor reset.
• Adjust the Brightness and Contrast settings.
• Please contact Dell customer service.
• Check surroundings for magnetic fields.
• Perform monitor reset.
• Eliminate accessories (i.e., Video extension cables).
Dell® 1700 Flat Panel Monitor User’s Guide 1-13

1700FP-E.book Page 14 Monday, November 2, 1998 4:51 PM
Specifications
Table 1-4. Specifications
Picture Tube . . . . . . . . . . . . . . . . . . . . . . 43 cm (17") flat panel display
Synchronization . . . . . . . . . . . . . . . . . . . . Horizontal: 31 kHz to 80 kHz (automatic)
Maximum Resolution . . . . . . . . . . . . . . . Horizontal: 1280 dots @ 80 kHz
Active Display . . . . . . . . . . . . . . . . . . . . . Horizontal: 338 ± 3 mm (13.3" ± 0.12")
Input Signal, Terminated . . . . . . . . . . . . . Analog video 0.714 Vpp positive at 75
Maximum Pixel Clock . . . . . . . . . . . . . . . 135 MHz
Power Adapter . . . . . . . . . . . . . . . . . . . . AC 90-264 Volt ± 10%, 60 Hz/50 Hz ± 3 Hz
Power Consumption . . . . . . . . . . . . . . . . 50 W (maximum), 45 W (nominal)
BTUs . . . . . . . . . . . . . . . . . . . . . . . . . . . . Heat Release per Hour : 153.55 BTU/Hr
Dimensions/Weight. . . . . . . . . . . . . . . . . Unit: 440 x 220 x 458.5 mm; 8kg
0.264mm Pixel pitch
Vertical: 56 Hz to 76 Hz (automatic)
Vertical: 1024 lines @ 85 Hz
Vertical: 270 ± 3 mm (10.6" ± 0.12")
(Active display size is dependent upon signal
timing)
Ω
Separate & composite sync: TTL level, positive
or negative
17.3 x 8.7 x18.1 in (W x D x H);
17.6 lb
Carton: 553 x 560.6 x 305 mm; 10 kg
21.8 x 22.1 x 12.0 in (W x D x H);
22 lb
(All measurements approximate.)
Environmental Considerations . . . . . . . . Operating Temperature: 50
NOTE: Design and specifications are subject to change without prior notice.
1-14 Dell® 1700 Flat Panel Monitor User’s Guide
(10
Humidity: 20% to 80%
Storage Temperature: -4
Humidity: 5% to 95%
°C to 35°C)
(-20
°C to 60°C)
°F to 95°F
°F to 140°F

1700FP-E.book Page 15 Monday, November 2, 1998 4:51 PM
Table 1-5. D-Sub Connector Pin Assignments
Pin No. 15-Pin Side of the Signal Cable
1
2
3
4
5
6
7
8
9
10
11
12
13
14
15
Red
Green
Blue
GND
DDC Return
GND-R
GND-G
GND-B
Reserved
GND-Sync/Self Test
GND
DDC Data
H-Sync
V-Sync
DDC Clock
Table 1-6. 13W3 Connector Pin Assignments
Pin No. 13W3 Side of the Signal Cable
A1
A2
A3
1
2
3
4
5
6
7
8
9
10
Red
Green
Blue
DDC Clock
NC
Reserved
Serial Data Return
Composite H/V Sync
DDC Data
V-Sync
NC
Reserved
Sync Return
Dell® 1700 Flat Panel Monitor User’s Guide 1-15

1700FP-E.book Page 16 Monday, November 2, 1998 4:51 PM
Display Resolution
For optimal monitor performance while using Microsoft Windows 95 or Windows NT®,
set the display resolution to 1280 x 1024 as follows :
1. Click the Start button, point to Settings, and click Control Panel.
2. Double-click the Display icon in the Control Panel window, and then click the
Settings tab.
3. In the Desktop area, move the slidebar to 1280 by 1024 pixels, then click
OK.
Table 1-7. Preset timing modes
Display Mode
IBM®, VGA2, 720 x 400
®
IBM
, VGA3, 640 x 480
®
VESA
, 640 x 480
®
VESA
, 640 x 480
®
VESA
, 800 x 600
®
VESA
, 800 x 600
®
VESA
, 1024 x 768
®
VESA
, 1024 x 768
®
VESA
, 1024 x 768
®
VESA
, 1280 x 1024
Horizontal
Frequency
(kHz)
®
31.469
®
31.469
®
37.500
®
43.269
®
46.875
53.674
48.363
®
60.023
68.677
79.976
Vertical
Frequency
(Hz)
®
70.087
®
59.940
®
75.000
®
85.080
®
75.000
85.061
®
60.004
®
75.029
84.997
75.025
Pixel Clock
(MHz)
®
28.322
®
25.175
®
31.500
®
36.000
®
49.500
®
56.250
®
65.000
78.750
94.500
135.000
Sync Polarity
(H/V)
®
–/+
®
–/–
®
–/–
®
–/–
®
+/+
®
+/+
®
–/–
+/+
®
+/+
+/+
1-16 Dell® 1700 Flat Panel Monitor User’s Guide

1700FP-E.book Page 1 Monday, November 2, 1998 4:51 PM
Index
Symbols
– / + buttons , 1-7
6 / 5 , 1-7
A
Auto adjustment , 1-5, 1-8, 1-10
Automatic save
, 1-8
B
Blue , 1-10
Brightness
, 1-8
C
Coarse , 1-10
Color
, 1-10
Color control
B
, 1-10
G
, 1-10
R
, 1-10
Connecting your monitor
Contrast
, 1-10
, 1-3
, 1-8
Display resolution
E
English , 1-10
Español
EXIT button
Expand 1
Expand 2
, 1-10
, 1-7
, 1-11
, 1-11
F
Filtering , 1-11
Fine
, 1-10
Français
, 1-10
G
Geometry , 1-10
Getting help
Green
, 1-5
, 1-10
H
, 1-16
D
Deutsch , 1-10
Direct-access features
Display mode
, 1-11
, 1-8
Horizontal , 1-10
I
Image effect , 1-11
Filtering
Dell® 1700 Flat Panel Monitor User’s Guide Index-1
, 1-11

1700FP-E.book Page 2 Monday, November 2, 1998 4:51 PM
Scaling , 1-11
Image lock
Auto adjustment
Coarse
Fine
Image size
Expand 1
Expand 2
Normal
Italiano
, 1-10
, 1-10
, 1-10
, 1-11
, 1-11
, 1-11
, 1-11
, 1-10
L
Language , 1-10
Deutsch
English
Español
Français
Italiano
, 1-10
, 1-10
, 1-10
, 1-10
, 1-10
M
, 1-10
O
OSM lock/unlock , 1-9
P
Plug and play , 1-5
Position
Power button
Power indicator
PowerSaver
, 1-10
Horizontal
Vertical
, 1-10
, 1-10
, 1-7
, 1-7
, 1-12
R
Red , 1-10
Reset
, 1-10
Color
, 1-10
Geometry
, 1-10
Maintenance , 1-6
MENU button
Menu display time
Menu position
Horizontal
Vertical
Menu system
Accessing
Monitor self test
, 1-7
, 1-11
, 1-11
, 1-11
, 1-11
, 1-9
, 1-9
, 1-6
N
No Connection, Check Signal Cable , 1-6, 1-
13
Normal
, 1-11
Index-2 Dell® 1700 Flat Panel Monitor User’s Guide
S
safety instructions
general
, 1-ix
Scaling
, 1-11
T
Troubleshooting , 1-13
V
Vertical , 1-10
VIDEO button and indicators
, 1-7
 Loading...