

Page 1
&4/:8"&KIKVCN"4GEQTFGT
14-1196
%106'065
FCC Declaration of Conformity ........................... 1
A Quick Look at the Recorder ............................. 1
Features .............................................................. 1
Preparation .......................................................... 2
Installing Batteries ............................................ 2
Setting the Clock .............................................. 2
Connecting Earphones ..................................... 2
Listening Safely ................................................ 2
Traffic Safety ................................................ 2
Attaching the Wrist Strap ................................. 2
Using the Microphone Stand ............................ 2
Operation ............................................................. 2
Locking the Recorder’s Controls ...................... 2
Selecting a Folder ............................................ 3
Recording ......................................................... 3
Setting Microphone Sensitivity ..................... 3
Recording Messages in Folder [A] or [B] ..... 3
Recording Messages in Folder [S] ............... 3
Checking the Number of Files
Recorded in the Folder ................................ 3
Playing Back Messages ................................... 3
Using Fast Playback .................................... 3
Using Schedule Playback ............................ 3
Fast-Forw a r d i n g /R e winding .......... .. ............. .... 4
Using Forward Skip/Reverse Skip ............... 4
Erasing Messages ............................................ 4
Erasing a Single Message ........................... 4
Erasing All Messages in Folder [A] or [B] .... 4
Erasing Messages in Folder [S] ................... 4
Moving a Message Between
Folders [A] and [B] ........................................... 4
Setting the Options ........................................... 4
Voice Activation ........................................... 4
Message Alarm Playback ............................ 5
Schedule Alarm Playback ............................ 5
Turning the Key Tone On/Off ....................... 5
Setting the Time ........................................... 5
Using the Recorder with a PC ............................. 5
Operating Environment .................................... 6
Installing Digital Wave Player ........................... 6
Uninstalling Digital Wave Player 6
Running Digital Wave Player ............................ 6
Transferring Recorded Files to the PC ............. 6
Transferring All Folders ................................ 6
Transferring a Selected Folder .................... 6
Direct Recording .............................................. 6
Playing Files on the PC .................................... 7
Special Digital Wave Player Functions ............. 7
Intro Scan ..................................................... 7
Creating Subfolders ..................................... 7
Setting the Time/Date Using the PC ............ 7
Troubleshooting ................................................... 7
Care ..................................................................... 7
Resetting the Recorder .................................... 7
Specifications ...................................................... 7
OWNER’S MANUAL — Please read before using this equipment.
(%%"&'%.#4#6+10"1("
%10(14/+6;
This device compli es wi th Part 15 of the
Rules
. Operation is subject to the following
two conditions: (1) this devic e may no t cause
harmful interference, and (2) thi s device must
accept any interference received, including
interference that may cause undesired
operation.
Product: Digital Recorder
Model: 14-1196
Responsible
Party:
Phone: 817-415-3200
RadioShack
100 Throckmorton
Fort Worth, TX 76102
FCC
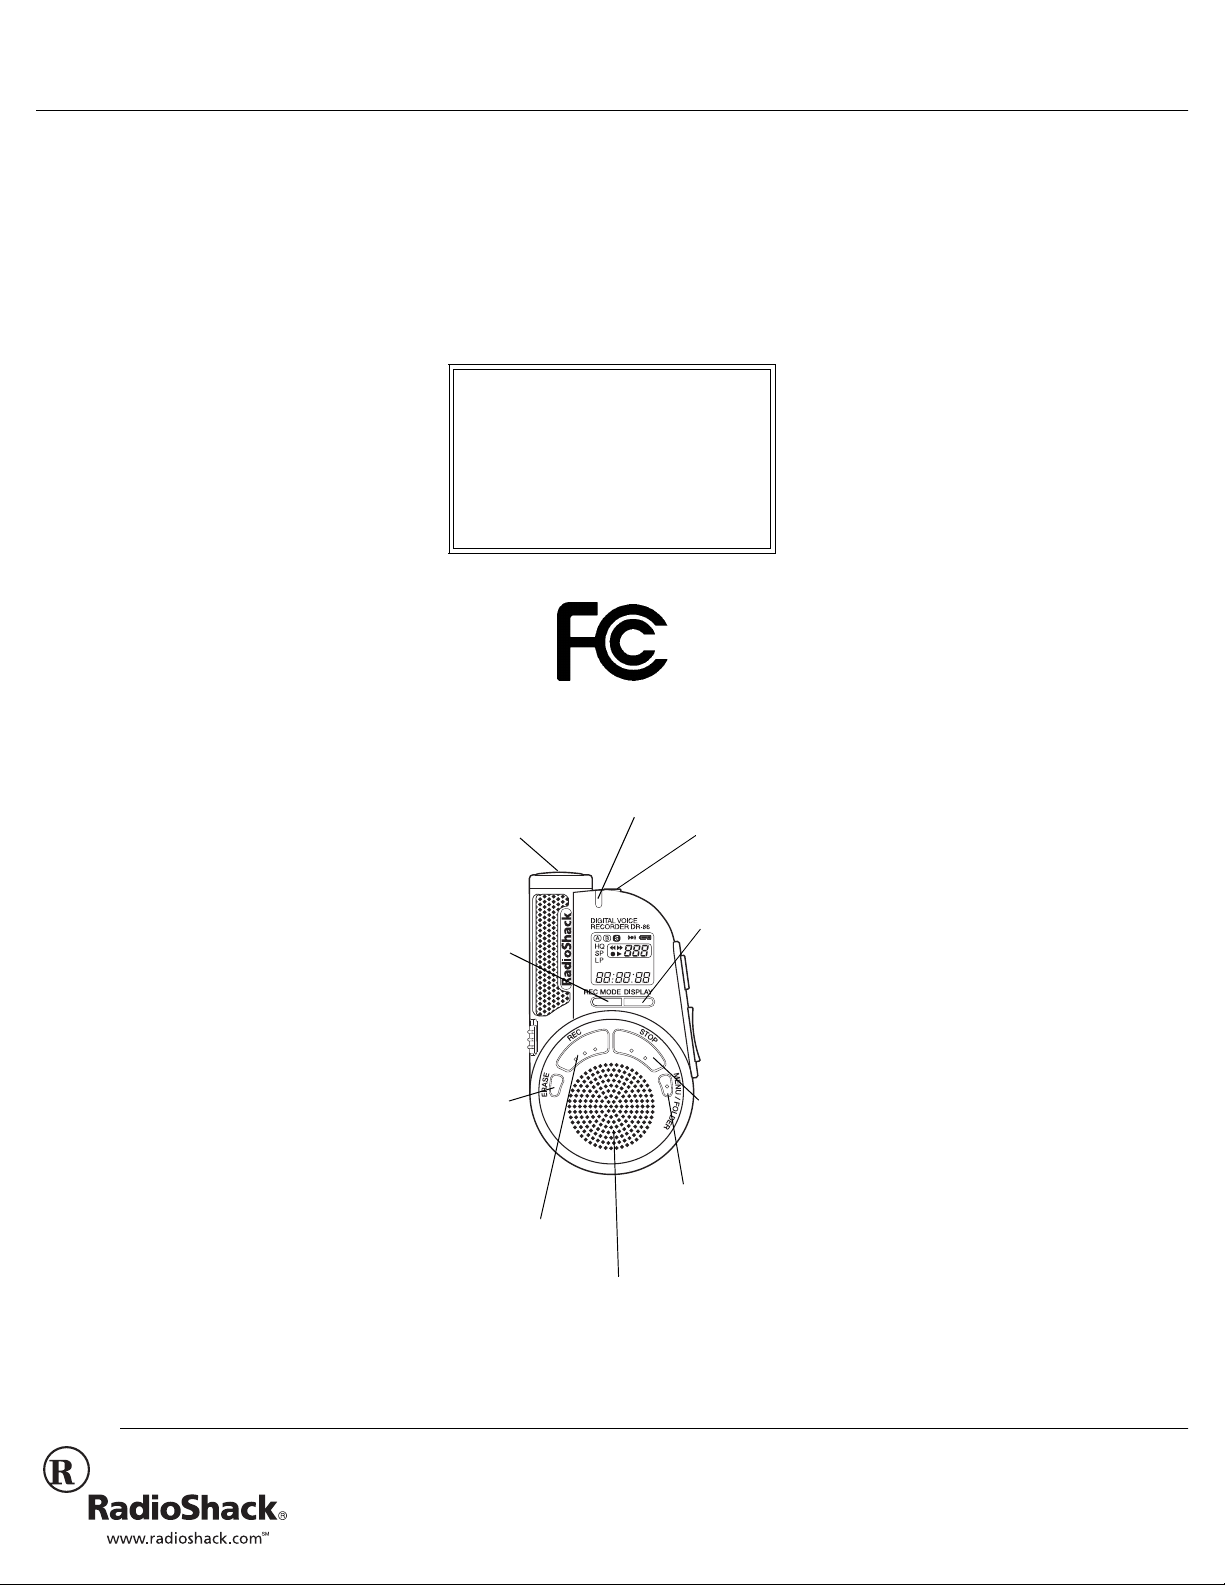
#"37+%-".11-"#6"6*'"
4'%14&'4
Microphone —
Provides superior
REC
MODE —
Press to
select
recordin
g speed:
HQ, SP,
ERASE—
Press to
erase
selected
REC — Press to
begin
Built-In Speaker — Lets you
listen to notes you recorded.
Record
Indicator
MENU/FOLDER
— Press to
select a menu
EAR —
Use an
optional
earphone
to listen to
DISPLA
Y —
Press to
view
current
time,
current
STOP —
Press to
stop
recordin
g or play
('#674'5
Your RadioShack DR-86 Digital Re co rder is
ideal for quick note takin g. Its light weight and
small size make it easy to slip into a pocket,
briefcase, or purse. You can use it at school,
at a business conference, for dictation, or on
the go. You can start recording manually or
set the recorder so sound activates
recording. The reco rder provides an hour and
a half of recording time.
Three Message Folders
— let you save up
to 100 messages in each folder to organize
your messages more effectively.
Flash Memory
— digital recording means no
tapes to load or break.
PC Data Transfer Kit
— allows you to record
voice files directly to a PC.
Message Alarm Playback
— the recorder
sounds an alarm at a set time and date and
plays back a selected message.
Schedule Playback
— the recorder sounds
an alarm at a set time and plays back
schedule messages for a set date.
24'2#4#6+10
+056#..+0)"$#66'4+'5
Your recorder requires two AAA batteries
(not supplied) for power. For the best
performance and lon gest life , we recom mend
RadioShack alkaline batteries.
Cautions:
• Use only fresh batteries of the required
size and recommended type.
• Do not mix old and new batteries,
different types of batteries (standard,
alkaline, or rechargeable), or
rechargeable batteries of different
capacities.
1. Slide the battery compartment cover in
the direction of the arrow to open it.
2. Place the batteries in the compartment
as indicated by the polarity symbols (+
and –) marked beside the compartment.
3. Snap the cover back in place.
Note:
batteries, the hour indicator flashes. See
2002 RadioShack Corporation.
©
RadioShack and RadioShack.com are trademarks
All Rights Reserved.
used by RadioShack Corporation.
When you install or repl ace the
Page 2

“Setting the Clock” on Page 2 for instructions
on setting the time and date.
When the recorder stops operating properly,
replace the batteries. We recommend you
HOLD
slide
before replacing batteries to maintain the
current settings (date/time, etc.). For your
convenience, the recorder also saves the
current settings in its nonvolatile memory at
hourly intervals.
Warning:
and properly. Do not burn or bury them.
Caution:
recorder for an extended period, remove the
batteries. Batteries can leak chemicals that
can destroy electronic parts.
When the batteries are depleted,
automatically shuts off. Replace batteries as
soon as possible.
in the direction of the arrow
Dispose of old batteries promptly
If you do not plan to use the
appears and the recorder
5'66+0)"6*'"%.1%-
1. Repeatedly press or hold down –/
+/
to set the hour, then press
-
store the setting.
2. Repeat Step 1 to set the minutes, year,
month, and day. After you set the date,
;D:
;D:
flashes, and the set tim e appears on
;D:;D:
the display.
Notes:
• If you do not press any button for about
three minutes, the recorder
automatically exits the time-setting
mode without saving your setting. Or,
STOP
press
setting mode sooner.
• To switch the time display between 12the 24-hour formats, press
while you are se ttin g the hour or minute.
7C
7C
or
7C7C
12-hour format, and disappears if in 24hour format.
• To change the order of the date display,
press
year, month, or day. The default is
::»OO
::»OO
::»OO::»OO
• You can set the time and date on the
recorder by connecting the recorder to
your PC. See “Special Digital Wave
Player Functions” on Page 6.
at any time to exit the time-
DISPLAY
FCý
FCý
appears if the ti me s etti ng is in
FCýFCý
DISPLAY
.
while you are setting the
)
PLAY
CC$ý
CC$ý
CC$ýCC$ý
or
to
%100'%6+0)"'#42*10'5
You can use an optiona l mono earphon e with
1
a
/8 inch (3.5 mm) mini-plug to listen to your
recordings in private. Your local RadioShack
store carries a wide selection of earphones.
Insert the earpho ne' s pl ug in to the recorder's
EAR
jack. The built-in speaker automatically
disconnects.
.+56'0+0)"5#('.;
To protect your hearing, follow these
guidelines when you use earphones.
• Set the volume to the lowest setting
before you begin listening. After you
begin listening, adjust the volume to a
comfortable level.
• Do not listen at extremely high volume
levels. Extended high-v olume listening
can lead to permanent hearing loss.
• Once you set the volume, do not
increase it. Over time, your ears adapt to
the volume level, so a volume level that
does not cause discomfort might still
damage your hearing.
64#((+%"5#('6;
Do not wear an earphone while operating a
motor vehicle or riding a bicycle. This can
create a traffic hazard and could be illegal in
some areas.
Even though some earphones let you hear
some outside sounds when listening at
normal volume lev els, they s till can p res ent a
traffic hazard.
#66#%*+0)"6*'"94+56"564#2
Thread the strap’s small loop through the
holes on the bottom of the recorder. Slip the
larger end of the strap through the smaller
loop. Pull the larger loop to tighten it.
75+0)"6*'"/+%412*10'"56#0&"
Place the recorder on a desk or other surface
during recording. Attach the microphone
PLAY
stand to the hole next t o the
of recorder) to reduce unwanted vibration in
the recorder.
button (top
12'4#6+10
.1%-+0)"6*'"4'%14&'4N5"
%10641.5
You can lock the recorder’s controls so you
cannot accidentally change any settings
(except
VOLUME
slide
flashes twice.
To conserve battery power, the display
disappears when you lock the recorder’s
controls while the recorder is stopped.
To unlock the recorder’s con trols, slid e
in the opposite direction from the arrow.
Notes:
SUPER DIRECTIONAL/NORMAL
). To lock the recorder’s controls,
HOLD
in the direction of the arrow.
• If you set the recorder to
playing, the display disappears when
HOLD
and
>EB:
>EB:
>EB:>EB:
HOLD
while it is
playback of the current file has
completed.
STOP
HOLD
.
• If you set the reco rder to
recording, the display disappears when
the recorder runs out of free memo ry. To
stop recording sooner, you must slide
HOLD
in the opposite direction to unlock
setting s, then press
• The alarm sounds at the scheduled time
even if the recorder is set to
recorder then begins to play the file
associated with the alarm once you
press any button.
5'.'%6+0)"#"(1.&'4
Repeatedly press
desired folder (
folder can store up to 100 messages.
Folders [A] and [B] are designed for
recording ordinary messages. Folder [S] is
designed for schedule management. You
can store up to 15 messages for a selected
date in the [S] folder, then use the schedule
playback feature to play back your messages
for that date. See “Using Schedule Pla yback”
on Page 3.
When you store 100 messages in a folder or
15 messages for a specific date in folder [S],
<KBB
<KBB
and the message number flash. You
<KBB<KBB
cannot record more messages until you
erase some messages.
MENU/FOLDER
Q7S
Q7S, Q8S
Q8S
, or
Q7SQ7S
Q8SQ8S
QIS
QIS
) appears. Each
QISQIS
4'%14&+0)
Your recorder has three recording modes:
HQ (High Quality) mode, SP (Standard
Playback) mode, and LP (Long Playback)
mode.
HQ
— high quality mode has about 22
minutes of recording time.
SP
— standard playback mod e has a bout 33
minutes of recording time.
LP
— long playback mode has about 90
minutes of recording time.
Note:
Use the remaining time and recorded
time only as references. The recording time
might be shorter than the specified value if a
large number of short recordings are made.
To change the recording mode, repeatedly
REC MODE
press
stopped.
5'66+0)"/+%412*10'"5'05+6+8+6;
You can set the microphone sensitivity to
meet your recording needs. Slide
DIRECTIONAL/NORMAL
DIRECTIONAL
unidirectional. Slid e the control t o
make the microphone omni-directional.
while the recorder is
SUPER
to
to make the microphone
while it is
HOLD
. The
until the
SUPER
NORMAL
to
2
Page 3

Notes:
not
•Do
• Be sure to keep the microphone toward
• To ensure successful recording, make a
touch the microphone g rill while
recording. Doing so may cause noise
and degrade the microphone’s
performance.
the speaker during recording.
test recording to choose the appropriate
microphone sensitivity before recording.
4'%14&+0)"/'55#)'5"+0"(1.&'4"
=#?"
14"=$?
1. Repeatedly press
ýQ8S
ýQ8S
or
appears.
ýQ8SýQ8S
2. Press
3. To temporarily stop recording, pres s
4. Press
Notes:
• Recording stops if y ou press
• When the remaining recording time falls
• When the remaining recording time falls
• You cannot record additional messages
REC
indicator lights and recording begins.
The display shows the current folder
name, the current message number, the
recording mode (
elapsed recording time.
REC
F7KI;ý
F7KI;ý
.
F7KI;ýF7KI;ý
flash. To resume recording, press
again.
STOP
recording.
the recorder is paused or leave the
recorder set to pause for 10 minutes.
below five minutes, the remaining
recording time appears.
below one minute, the record indicator
flashes.
<KBB
<KBB
appears when you press
if
<KBB<KBB
continue recording, erase unneeded
messages. See “Erasing Messages” on
Page 3.
MENU/FOLDER
to start recording. T he rec ord
>G
>G, IF
IF
, or
>G>G
IFIF
and the record indicator
when you are finished
until
BF
BF
), and the
BFBF
STOP
REC
REC
while
. To
4'%14&+0)"/'55#)'5"+0"(1.&'4"
=5?
1. Repeatedly press
and the current month and day appear.
2. Repeatedly press or hol d down –/
to select the desired date.
-
3. Press
4. Press
REC
and recording begins.
STOP
MENU/FOLDER
. The record indicator lights
to stop recording.
until
)
or
%*'%-+0)"6*'"07/$'4"1("(+.'5"
4
'%14&'&"+0"6*'"(1.&'4
Repeatedly press
desired folder appears.
MENU/FOLDER
until the
STOP
Hold down
stopped. The total numb er of files recorded in
the folder appears for as long as you hold
STOP
down
while the recorder is
.
2.#;+0)"$#%-"/'55#)'5
1. Repeatedly press
select the folder which contains the
message you want to hear.
2. Repeatedly press or hold down –/
until the number of the message you
-
want to hear appears.
3. Press
Q7Sý
Q7Sý
Q7SýQ7Sý
4. Adjust the volume to the desired
5. To temporarily stop playback, press
6. The recorder automatically stops at the
Note:
the recorder is paused or leave the recorder
set to pause for 10 minutes.
PLAY
listening level.
PLAY
F7KI;
F7KI;
.
F7KI;F7KI;
playback, press
end of each message. To stop playback
sooner , pres s
Playback stops if y ou press
75+0)"(#56"2.#;$#%-"
1. To start fast playback (30% faster than
normal speed), hold down
than one second while the recorder is
stopped, paused, or in playback.
briefly appears.
2. Press
3. If you press
PLAY
the normal speed.
the recorder reaches the end of a
message, the recorder stops.
75+0)"5%*'&7.'"2.#;$#%-
1. Repeatedly press
QIS
PLAY
STOP
QIS
QISQIS
QIS
QIS
QISQIS
select the
2. To select the date for the schedule you
want to check, repeatedly press or hold
down –/) or
stopped.
+/
To find the date where the next message
is recorded, hold down –/
the recorder is stopped. The recorder
starts searching by date, stops at the
next recorded message, and beeps
twice. If there are no further messages,
the recorder scrolls through the calendar
year by month.
3. Press
messages in succes sion for the sel ected
date.
4. Press
MENU/FOLDER
to start playback.
flashes. To resume
PLAY
again.
STOP
.
again to resume playb ack at
STOP
during fast playback or
MENU/FOLDER
folder.
+/-
while the recorder is
. The recorder plays back all
to stop playback.
PLAY
)
STOP
or
+/
to
or +/
)
while
for more
<#FB7Oý
<#FB7Oý
<#FB7Oý<#FB7Oý
to
while
-
(#56/(149#4&+0)14'9+0&+0)
To fast-forward through a message, hold
+
/
down
the recorder is paused or in playback.
To rewind through a message, hold down –/
for more than one second while the
)
recorder is paused or in playback.
The recorder continues fast-forwarding or
rewinding as long as you hold down either
button.
When the recorder reaches the end of (while
fast-forwarding) or the beginning of (while
rewinding) a message, the recorder pauses
(for about half a second). Then the recorder
starts fast-forwardin g or rewind ing the n ext or
previous message. When the recorder
reaches the first or last message, it
automatically stops.
for more than one second while
-
75+0)"(149#4&"5-+214'8'45'"
5
-+2
To skip backward to a message while the
recorder is stopped, paused, in playback or
fast playback, repeat edly pres s (or hold down
while the recorder is stopped) –/
desired message number appears.
To skip forward to a message while the
recorder is stopped, paused, in playback or
fast playback, repeat edly pres s (or hold down
while the recorder is stopped)
desired message number appears. Release
the button to stop skipping. When the
recorder reaches the first or last message, it
automatically stops.
Note:
You cannot skip forward or backward
in folder [S] while the recorder is stopped.
You can skip forward or backward only while
the recorder is paused or in playback.
)
+/
-
until the
until the
ý
'4#5+0)"/'55#)'5
Note:
If you do not p res s a k ey f or m ore th an
eight seconds, the recorder returns to
standby and does not erase the message.
'4#5+0)"#"5+0).'"/'55#)'
1. Repeatedly press
select the desired folder.
2. Repeatedly press –/) or
recorder is stopped, in payback, or
paused to select the message number
you want to erase.
3. Press
4. Press
ERASE
;H7I;
number,
alternately.
to delete the message. O therwis e, pr ess
any other key.
;H7I;
;H7I;;H7I;
ERASE
MENU/FOLDER
. The selected message
O;I
O;I
, and
again within eight s econds
O;IO;I
appear
+
/-
to
while the
3
Page 4

'4#5+0)"#.."/'55#)'5"+0"(1.&'4"
=#?"
14"=$?
1. Repeatedly press
Q7S
Q7S
Q8S
Q8S
or
Q7SQ7S
2. While the recorder is stopped, hol d
down
7BB
7BB
7BB7BB
alternately appear.
3. Press
to delete all messages in a folder.
flashes. Otherwise, press any other key.
appears.
Q8SQ8S
ERASE
flashes, and
ERASE
MENU/FOLDER
for more than two seconds.
;H7I;
;H7I;
and
;H7I;;H7I;
again within eight seconds
O;I
O;I
O;IO;I
tuntil
;H7I;
;H7I;
;H7I;;H7I;
'4#5+0)"/'55#)'5"+0"(1.&'4"=5?
To erase a message for a single date:
1. Repeatedly press
QISý
QISý
appears.
QISýQISý
2. Press –/) or
date, then press
3. Press –/) or
message you want to erase during
playback.
4. Press
5. Press
6. Press
To erase all messages for a selected date:
1. Repeatedly press
2. Press –/) or
3. Hold down
4. Press
To erase all messages in Folder [S]:
1. Repeatedly press
2. Hold down
3. Press
STOP
ERASE
;H7I;
number,
alternately.
to delete the selected message.
flashes. Otherwise, pre ss any other key.
The message numbers are
automatically reassigned.
QIS
QIS
QISQIS
date.
seconds.
O;I
O;I
O;IO;I
to delete all messages in a selected
date.
any other key.
QIS
QIS
QISQIS
seconds.
and
to erase all messages in folder [S].
Otherwise, press any other key.
;H7I;
;H7I;;H7I;
ERASE
appears.
7BB
7BB
7BB7BB
alternately appear.
ERASE
;H7I;
;H7I;
;H7I;;H7I;
appears.
QISý
QISý
QISýQISý
O;I
O;I
alternately flash.
O;IO;I
ERASE
MENU/FOLDER
+
/
to select the desired
-
PLAY
.
+
/-
to select the
.
. The selected message
O;I
O;I
, and
again within eight seconds
+
/
-
ERASE
flashes, and the date and
again within eight seconds
flashes. Otherwise, press
ERASE
and
again within eight se conds
appear
O;IO;I
MENU/FOLDER
to select the desired
for more than two
MENU/FOLDER
for more than four
7BB
7BB
flash, and
7BB7BB
until
;H7I;
;H7I;
;H7I;;H7I;
until
until
;H7I;ý
;H7I;ý
;H7I;ý;H7I;ý
/18+0)"#"/'55#)'"$'69''0"
(1.&'45"=#?"#0&"=$?
While playing back (or pausing) a message
in folder [A] or [B], hold down
for more than one second. This moves the
current message to the last position in the
other folder ([A] to [B], or [B] to [A]).
appears.
You cannot move messages from folder [S]
to another folder, or move messages from
folders [A] or [B] to [S].
MENU/FOLDER
5'66+0)"6*'"126+105
Note:
If you do not press any button for
about three minutes while in options mode,
the recorder automatically exits the mode.
81+%'"#%6+8#6+10
When you use this feature, recording begins
when the recorder picks up sound and stops
when the sound stops.
1. Hold down
one second while the recorder is
stopped, then repeatedly press –/
+
/
-
2. Press
setting mode. Either
3. Press –/) or
on voice activatio n (or
off the voice activation).
4. Press
5. Press
flashes.
Note:
feature is activated.
MENU/FOLDER
L9L7
L9L7
until
PLAY
PLAY
STOP
L9L7ý
L9L7ý
L9L7ýL9L7ý
flashes.
L9L7L9L7
to enter the voice activation-
+
/-
to complete the setting.
to exit options mode.
appears on the display if this
/'55#)'"#.#4/"2.#;$#%-
You can set the recorder so it sounds an
alarm at a specified time and plays back a
message set for that time. You can set up to
20 alarm messages.
1. Select a message you want to play.
2. Hold down
one second while the recorder is
stopped, then repeatedly press or hold
down –/) or
3. Press
mode. The month digit(s) flash.
4. Repeatedly press or hold down –/) or
+
/
-
5. Repeat Step 4 to set the desired date
and time for alarm playback.
6. When you have finished alarm setting,
press
alarm is activated.
MENU/FOLDER
+
/-
until
PLAY
to enter the alarm setting
to set the month and press
STOP
. appears, indicating an
for more than
E<<
E<<
or
E<<E<<
Ed
Ed
so
flashes to turn
EdEd
E<<ý
E<<ý
flashes to turn
E<<ýE<<ý
for more than
7B7HC
7B7HC
7B7HC7B7HC
Edý
Edý
EdýEdý
CEL;ý
CEL;ý
CEL;ýCEL;ý
)
flashes.
;D:
;D:
;D:;D:
flashes.
PLAY
or
At the set time and on the set date, the
recorder sounds short beep tones and
the record indicator flashes. Press any
button (except
The recorder plays back the selected
message. When playback finishes, the
recorder clears the alarm setting for that
message.
7. To cancel a set alarm message, select
the desired folder, then select the set
alarm message number. Repeat Steps
2–5, then press
appears, press –/) or
OFF
. Then press
Notes:
• You cannot set alarm messages if you
have already set 20 messages or if you
select message number 000.
• The beep tones stop automatically if no
button is pressed for five minutes after
the beeping starts. The message is not
played back.
• Message alarm playback operates even
if the recorder is locked.
REC MODE
PLAY
. When
STOP
.
+
/
-
DISPLAY
or
ED%E<<ý
ED%E<<ý
ED%E<<ýED%E<<ý
to select
).
5%*'&7.'"#.#4/"2.#;$#%-
You can set the recorder so it sounds an
alarm at the specified time and plays back
the day’s messages every day.
1. Hold down
one second while the recorder is
stopped, then repeatedly press or hold
.
down –/) or
flashes.
2. Press
mode. Either
3. Press –/) or
4. Press
5. Repeatedly press –/) or
hour and press
6. Repeat Step 5 to set the minutes.
7. To complete the folder schedule alarm
setting, press
8. At the set alarm time each day, the
recorder beeps. Press any button
(except
back all of the messages recorded for
the current date.
Note:
Schedule alarm playback operates
even if the recorder is locked.
MENU/FOLDER
+
/
until
-
PLAY
to enter the alarm setting
E<<
E<<
or
E<<E<<
+
/
to select
-
PLAY
. The hour digits flash.
PLAY
STOP
REC MODE
EDý
EDý
EDýEDý
.
;D:ý
;D:ý
.
;D:ý;D:ý
DISPLAY
or
QISý7B7HC
QISý7B7HC
QISý7B7HCQISý7B7HC
flashes.
for more than
ED
ED
.
EDED
+
/
to set the
-
appears.
) to play
6740+0)"6*'"-';"610'"1011((
1. Hold down
one second while the recorder is
stopped, then repeatedly press or hold
down –/) or
MENU/FOLDER
X;;F
until
X;;F
X;;FX;;F
+
/
-
for more than
flashes.
4
Page 5

PLAY
ED
ED
E<<ý
2. Press
3. Press –/) or
off the key tone or
E<<ý
.
or
EDED
+
flashes.
E<<ýE<<ý
E<<
E<<
/
so
flashes to turn
E<<E<<
-
ED
ED
flashes to turn on
EDED
the key tone.
4. Press
STOP
to finish the setting and exit
the options mode.
5'66+0)"6*'"6+/'
1. Hold down
one second while the recorder is
stopped, then repeatedly press or hold
down –/) or
2. Press
3. See “Setting the Clock” on Page 2 for
instructions on setting the time.
MENU/FOLDER
+
/
PLAY
.
-
until
for more than
J?C;ý
J?C;ý
flashes.
J?C;ýJ?C;ý
75+0)"6*'"4'%14&'4"
9+6*"#"2%"
You can use the sup plied Radi oShack Digita l
Wave Player software to:
• download the files in your recorder to
your computer
• store and manage voice recordings
made with the recorder
• play back files
• record voice files directly on a PC using
the recorder with a USB terminal
connector
Before transferring recorde d files or recordin g
directly to the PC, be sure:
• the recorder is connected to the PC
properly
• 25 MB or more of the hard-disk space
are available (to assure stable
performance of the PC)
• the PC’s free memory is sufficient for
recording a .wav file. This table shows
the file size and transfer time of a 5minute .wav file:
/QFG 5K\G"QH"HKNG 6TCPUHGT"6KOG
HQ About 3.2 MB About 1 minute
SP About 1.6 MB About 30 seconds
LP About 1.2 MB About 15 seconds
Notes:
• The RadioShack Digital Wave Player
software is for use exclusively with the
DR-86. It is not to be used with other
recorders.
• You cannot send files from the PC to the
recorder or overwrite files in the re corder
with RadioShack Digital Wave Player.
• RadioShack Digital Wave Player does
not support speech- rec ogn iti on s oftw a re.
• RadioShack Digital Wave Player does
not support Apple Macintosh computers.
• These instructions as sum e users are
familiar with Microsoft Windows
software. For details on PC operation or
your operating system, refer to the
operating instructions for your PC.
• If you are installing the software on
Windows 2000 or Windows XP
Professional, you must log in as the
administrator.
12'4#6+0)"'08+410/'06
Operating system : M ic ros oft Windows 98/Me/
2000 Professional/XP.
PC
CPU
RAM 32 MB or more
Hard-Disk Space
Sound Card
Display
CD-ROM Drive
USB port
Audio Output
Jacks
Note:
USB support is not available if
IBM PC/AT-compatible
machine
Intel Pentium 166 MHz or
more
25 MB (additional space
required to store voice
files)
Creative Labs Sound
Blaster 16 or any 100%
compatible sound card
×
800
600 pixels min.,
256 colors min.
2X or faster
At least one free port
Earphone (or speaker)
outputs
Windows 98/Me/2000/XP is upg rade d from
Windows 95, even if the PC is equipped with
a USB port.
+056#..+0)"&+)+6#."9#8'"
2.#;'4
Notes:
not
•Do
• Close any open applications before you
1. Place the RadioShack Digital Wave
2. Install RadioShack Digital Wave Player
3. After completion of setup, remove the
connect the recorder and the PC
before installing RadioShack Digital
Wave Player.
start installation of RadioShack Digital
Wave Player.
Player CD-ROM in the CD-ROM
drive.
The installation program automatically
starts. If it does not, double-click the
ROM
icon in the Explorer window, then
double-click the
Setup.exe
icon.
CD-
by following the instructions that appear
on the screen.
CD-ROM from the CD-ROM drive.
70+056#..+0)"&+)+6#."9#8'"
2
.#;'4
1. Click
Start/Programs/RadioShack Digital
Wave Player/Uninstall Digital Wave Player
2. Follow the on-screen instructions to
uninstall the RadioShack Digital Wave
Player.
4700+0)"&+)+6#."9#8'"2.#;'4
Note:
Before making any connections, make
sure that the recorder is stopped.
Connect the recorder to your PC by plugging
one end of the supplied USB cable into the
PC I/F
port on your recorder and the oth er end
of the cable to the back of your PC (refer to
your PC’s owner’s manual for the location).
The RadioShack Digital Wave Player starts,
and the main window automatically appears.
To use RadioShack Digital Wave Player
without connecting the re co rder to the PC, or
if RadioShack Digital Wave Player does not
start automatically when you connect the
recorder to the PC, click
RadioShack Digital Wave Player/Digital Wave
Player
.
Start/Programs/
To exit RadioS hack Digita l Wave Play er, click
Exit
on the
the window , or click
Player
button in the upper right corner of
File/Exit Digital Wave
.
Notes:
• It may take a few minutes to start the
RadioShack Digital Wave Player for the
first time.
• You cannot operate the buttons and
controls on the recorder, except for
microphone-sensitivity switch, while the
recorder is connected to the PC.
• Do not use any USB cable other than the
one supplied.
• Disconnect the USB cable after file
transfer or recording is completed.
64#05('44+0)"4'%14&'&"(+.'5"
61"6*'"2%
64#05('44+0)"#.."(1.&'45
Click the
icon from the left on the tool bar). All files in
the recorder are transferred to the
corresponding PC’s folders. For example, all
files in Folder [A] on your recorder are
transferred to Folder A on your PC.
64#05('44+0)"#"5'.'%6'&"(1.&'4
Click the
Folder B
on the tool bar. All files in the selected folder
in the recorder are transferred to the
corresponding PC’s folder.
Transfer All Folders
Transfer Folder A
icon, or
Transfer Schedule Folder
icon (the first
Transfer
icon,
icon
.
5
Page 6

Note:
Folders [A], [B], and [S] have been
prepared on the PC in advance. The date
subfolders and their recorded files are
created on the PC wh en you tran sfer the fil es
in the date subfolders.
When you transfer files, the filenames are
automatically changed on the PC and will
differ from the original file name on the
recorder.
Notes:
• You cannot transfer one file at a time.
• Transfer time varies depending on the
recording mode of a file and your PC’s
performance.
• You cannot upload files from the PC to
the recorder.
• You cannot transfer a file that has the
same recording date and time as a file
already in the corresponding folder on
the PC.
&+4'%6"4'%14&+0)
You can record files di rectly to a PC using the
recorder’s microphone. The files are not
stored on the recorder.
1. Click the
Direct Recording on PC
icon on
the toolbar in the main window to d ispla y
Recording Window
the
dialog box.
2. Select the audio quality: HQ, SP, or LP.
Record
3. Click
SUPER DIRECTION/NORMAL
use
to start recording. You can
on the
recorder to adjust the micrphone’s
sensitivity.
Pause
4. To pause recording, click
5. Click
STOP
to stop recording. If you click
Quit
, the recording window changes to
.
the main window. The recorded files are
stored in the recording folder in the PC’s
folder window.
2.#;+0)"(+.'5"10"6*'"2%
Any file transferred from the recorder or
recorded directly to the PC can be played
back on the PC. You cannot play back a file
that has not been transferred to the PC.
1. Choose the desired folder in the PC’s
Audio Folder window.
2. Click on the desired file in the list.
PLAY
3. Click
You can also perform other operations, such
as fast-forwarding, rewinding, etc., with the
buttons and controls on the playback control
panel. Hold down fast-forward or rewind to
forward or reverse through the entire file.
to play back the file.
Click the fast-forward or rewind icons to fastforward or reverse through the file
incrementally.
52'%+#."&+)+6#."9#8'"2.#;'4"
(70%6+105
+0641"5%#0
1. Click on the desired file on the file list.
2. Click the
Intro Scan
icon on the tool bar.
The first 5 seconds of each file in the
selected folder are played back in turn.
STOP
3. To stop the playback, click
.
%4'#6+0)"57$(1.&'45
You can create subfolders to sort files under
folders [A] and [B].
Note:
You cannot create subfolders under
folder [S] or the date subfolders.
1. Click on the desired folder under which
to create subfolders.
2. Click
New Folder
Edit/Create New Folder
dialog box appears.
. The
Create
3. Enter a name for the new subfo lder , th en
OK
click
the
. Your new subfolder appears in
Audio Folder
window.
4. You can move files by dragging and
dropping files from a file list to other
folder in the PC’s or recorder’s folder
window .
5'66+0)"6*'"6+/'1'"75+0)"6*'"
2%
1. Connect the recorder to the PC, then
Transfer/Transfer Date/Time
click
OK
2. Click
. The time and date on the PC
are transferred to the recorder.
.
6417$.'5*116+0)
2TQDNGO 5WIIGUVKQP
Make sure HOLD is set
Nothing happens
after pressing a
button.
There is no sound.
The playback
speed is too fast.
in the opposite direction
from the arrow.
Make sure that fresh
batteries are correctly
installed.
Make sure th e volume is
turned up and that an
earphone is not
connected to the
recorder.
Make sure the unit is not
set to fast playback.
2TQDNGO 5WIIGUVKQP
Make sure the number of
recorded messages in
the selected folder has
not reached 100.
The recorder will
not record.
appears when
there should be
ample space.
Operation is not
normal.
<KBB
<KBB
<KBB<KBB
Make sure there is
enough remaining
recording time.
Make sure the number of
messages of the same
date in folder [S] has not
reached 15.
Reset the unit. (See
“Resetting the Recorder”
on Page 6.)
%#4'
Keep the recorder dry; if it gets wet, wipe it
dry immediately. Use and store the recorder
only in normal temperature environments.
Handle the recorder carefully; do not drop it.
Keep the recorder away from dust and dirt,
and wipe it with a damp cloth occasionally to
keep it looking new.
Modifying or tampering with the recorder’s
internal components c an cause a malfunc tion
and might invalidate its warranty and void
your FCC authorization to operate it. If your
recorder is not perfo rming a s it s hould, take it
to your local RadioShack store for
assistance.
4'5'66+0)"6*'"4'%14&'4
If the recorder stops operating properly,
follow these steps to reset it.
Important:
information, including the date and time, as
well as other settings. Reset the recorder
only when you are sure the recorder is not
working properly.
Note:
eight seconds, the recorder returns to
standby and does not reset itself.
1. Hold down
2. Release both buttons.
3. Press
Resetting the recorder clears all
If you do not pres s a ke y f or m ore th an
STOP
than two seconds.
, then
9B;7Hý
9B;7Hý
9B;7Hý9B;7Hý
ERASE
appears.
9B;7H
9B;7H
9B;7H9B;7H
for more
O;I
O;I
and
O;IO;I
alternately appear.
ERASE
again within eight se conds
to reset the recorder and erase all saved
information. Otherwise, press any other
9>A
9>A
key.
appears when all information is
9>A9>A
erased.
RadioShack Corporation
Fort Worth, Texas 76102
14-1196
E1-22801-04
02A02
Printed in Hong Kong
Page 7

52'%+(+%#6+105
Recording Medium................ Built-in flash memory
Recording Time ............. HQ mode: About 22 min.
SP mode: About 33 min.
LP mode: About 90 min.
Speaker................................. Built-in 28 mm round
dynamic speaker
Maximum Power ...................................... 120 mW
Earphone Jack........................... 3.5 mm diameter,
impedance 8
Power Supply........................... Two AAA batteries
Continuous Battery Use Time:
Playback ....................................... About 11 hours
Recording...................................... About 19 hours
7
3
16
Dimensions ................... 3
/
(81 × 47.5 × 22.5 mm)
Weight..............................................2.29 oz (65 g)
Your recorder is for your personal use or pleasure
only. It is prohibited to record copyrighted material
without permission of the copyright holders
according to copyright law.
Specifications are typical; individual units might
vary. Specifications a subject to change and
improvement without notice.
57
×
×
/8
/64 inches
1
including batteries
Limited Ninety-Day Warranty
This product is warran ted by RadioShack against m anu fact uring defects in material and w orkm an ship unde r no rmal
use for ninety (90) days from the date of purchase from R adioShack company-o wned stores and au thorized RadioShack franchisees and dealers. EXCEPT AS PROVIDED HEREIN, RadioShack MAKES NO EXPRESS WARRANTIES AND ANY IMPLIED WARRANTIES, INCLUDING THOSE OF MERCHANTABILITY AND FITNESS FOR
A PAR TICULAR PURPOSE, ARE LIMITED IN DURATION TO THE DURATION OF THE WRITTEN LIMITED WARRANTIES CONTAINED HEREIN. EXCEPT AS PROVIDED HEREIN, RadioShack SHALL HAVE NO LIABILITY OR
RESPONSIBILITY TO CUSTOMER OR ANY OTHER PERSON OR ENTITY WITH RESPECT TO ANY LIABILITY,
LOSS OR DAMAGE CAUSED DIRECTLY OR INDIRECTLY BY USE OR PERFORMANCE OF THE PRODUCT OR
ARISING OUT OF ANY BREACH OF THIS WARRANTY, INCLUDING, BUT NOT LIMITED TO, ANY DAMAGES
RESULTING FROM INCONVENIENCE, LOSS OF TIME, DATA, PROPERTY, REVENUE, OR PROFIT OR ANY INDIRECT, SPECIAL, INCIDENTAL, OR CONSEQUENTIAL DAMAGES, EVEN IF RadioShack HAS BEEN ADVISED
Ω
OF THE POSSIBILITY OF SUCH DAMAGES.
Some states do not allow limitations on how long an implied warranty lasts or the exclusion or limitation of incidental
or consequential damages, so the above limitations or exclusions may not apply to you.
In the event of a prod uct defect during the warranty p eriod, take the p roduct and the RadioShac k sales receipt as
proof of purchase date to any RadioShack store. RadioShack will, at its option, unless o therwise provided by law:
(a) correct the defe ct by product repai r without char ge for parts and la bor; (b) replace th e product with o ne of the
same or similar design; or (c) refund the purchase price. All replaced parts and products, and products on which a
refund is made, become the property of RadioShack. New or reconditioned parts and products may be used in the
performance of warr anty service. Re paired or replaced parts and products a re warranted for t he remainder of th e
original warranty period. You will be charged for repair or replacement of the product made after the expiration of the
warranty period.
This warranty d oes no t cover : (a) dam age o r failur e caus ed by or attrib utable to act s o f God, abuse , accide nt, misuse, improper or abnormal usage, failure to follow instructions, improper installation or maintenance, alteration, lightning or other incidence of excess voltage or current; (b) any re pairs other than those provi ded by a RadioShack
Authorized Service Facility; (c) consumables such as fuses or batteries; (d) co smetic damage; (e) transportation,
shipping or insurance costs; or (f) costs of product removal, installation, set-up service adjustment or reinstallation.
This warranty gives you specific legal rights, and you may also have other rights which vary from state to state.
RadioShack Customer Relations, 200 Taylor Street, 6th Floor, Fort Worth, TX 76102
12/99
RadioShack Corporation
Fort Worth, Texas 76102
14-1196
E1-22801-04
02A02
Printed in Hong Kong
 Loading...