

Samson Stage 266: Dual Handheld Wireless System, Stage 266 Owner's Manual

Owner’s Manual

Copyright 2012 - V2
Important Safety Information
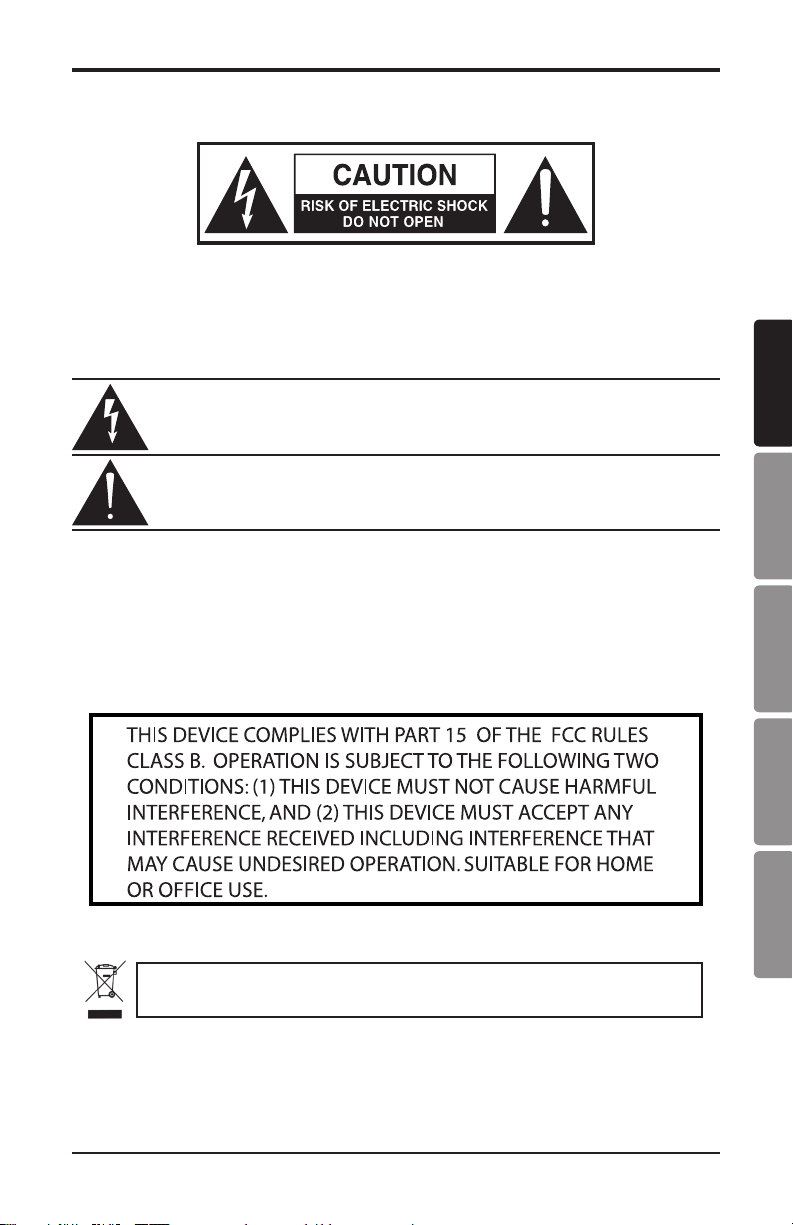
ATTENTION
RISQUE D’ÉLECTROCUTION !
NE PAS OUVRIR !
CAUTION: TO REDUCE THE RISK OF ELECTRIC SHOCK, DO NOT
REMOVE COVER (OR BACK). NO USER-SERVICEABLE PARTS
INSIDE. REFER SERVICING TO QUALIFIED SERVICE PERSONNEL.
This lightning ash with arrowhead symbol within an equilateral triangle is
intended to alert the user to the presence of non-insulated “dangerous voltage” within the product’s enclosure that may be of sucient magnitude to
constitute a risk of electric shock.
The exclamation point within an equilateral triangle is intended to alert the
user to the presence of important operating and maintenance instructions
in the literature accompanying the appliance.
ENGLISH
TO PREVENT FIRE OR SHOCK HAZARD. DO NOT USE THIS PLUG WITH AN EXTENSION CORD, RE-
WARNING
CEPTACLE OR OTHER OUTLET UNLESS THE BLADES CAN BE FULLY INSERTED TO PREVENT BLADE
EXPOSURE. TO PREVENT FIRE OR SHOCK HAZARD. DO NOT EXPOSE THIS APPLIANCE TO RAIN
OR MOISTURE. TO PREVENT ELECTRICAL SHOCK, MATCH WIDE BLADE PLUG TO WIDE SLOT AND
FULLY INSERT.
If you want to dispose this product, do not mix it with general household waste. There is a
separate collection system for used electronic products in accordance with legislation that
requires proper treatment, recovery and recycling.
Private household in the 25 member states of the EU, in Switzerland and Norway may return their used
electronic products free of charge to designated collection facilities or to a retailer (if you purchase a similar
new one).
For Countries not mentioned above, please contact your local authorities for a correct method of disposal.
By doing so you will ensure that your disposed product undergoes the necessary treatment, recovery and
recycling and thus prevent potential negative effects on the environment and human health.
Stage 266: Dual Handheld Wireless System
FRANÇAISDEUTSCHEESPAÑOLITALIANO
3

Important Safety Information
1. Read these instructions.
2. Keep these instructions.
3. Heed all warnings.
4. Follow all instructions.
5. Do not use this apparatus near water.
6. Clean only with dry cloth.
7. Do not block any ventilation openings. Install in accordance with the
manufacturer’s instructions.
8. Do not install near any heat sources
such as radiators, heat registers,
stoves, or other apparatus (including
ampliers) that produce heat.
9. Do not defeat the safety purpose
of the polarized or grounding type
plug. A polarized plug has two
blades with one wider than the
other. A grounding type plug has
two blades and a third grounding
prong. The wide blade or the third
prong are provided for your safety.
If the provided plug does not t into
your outlet, consult an electrician for
replacement of the obsolete outlet.
10. Protect the power cord from being
walked on or pinched particularly at
the plugs, convenience receptacles,
and at the point where they exit from
the apparatus.
11. Only use attachments/accessories
specied by the manufacturer.
12. Use only with the cart, stand, tripod,
bracket, or table specied by the
manufacturer, or sold with the apparatus. When a cart
is used, use caution
when moving the cart/
apparatus combination to avoid injury
from tip-over.
13. Unplug the apparatus during lightening storms, or when unused for
long periods of time.
14. Refer all servicing to qualied
personnel. Service is required when
the apparatus has been damaged in
any way, such as power supply cord
or plug is damaged, liquid has been
spilled or objects have fallen into
the apparatus has been exposed to
rain or moisture, does not operate
normally, or has been dropped.
15. This appliance shall not be exposed
to dripping or splashing water and
that no object lled with liquid such
as vases shall be placed on the apparatus.
16. Caution-to prevent electrical shock,
match wide blade plug wide slot
fully insert.
17. Please keep a good ventilation environment around the entire unit.
18. The direct plug-in adapter is used as
disconnect device, the disconnect
device shall remain readily operable.
19. Batteries (battery pack or batteries
installed) shall not be exposed to
excessive heat such as sunshine, re
or the like.
4

Table of Contents
Introduction. . . . . . . . . . . . . . . . . . . . . . . . . . . . . . . . . . . . . . . . . . . . . . . . 6
Receiver Controls and Features. . . . . . . . . . . . . . . . . . . . . . . . . . . . . . . . . . . .7
Transmitter Controls and Features. . . . . . . . . . . . . . . . . . . . . . . . . . . . . . . . . . 8
Quick Start Guide . . . . . . . . . . . . . . . . . . . . . . . . . . . . . . . . . . . . . . . . . . . . 9
Specifications. . . . . . . . . . . . . . . . . . . . . . . . . . . . . . . . . . . . . . . . . . . . . . 12
Troubleshooting . . . . . . . . . . . . . . . . . . . . . . . . . . . . . . . . . . . . . . . . . . . . 13
ENGLISH
FRANÇAISDEUTSCHEESPAÑOLITALIANO
Stage 266: Dual Handheld Wireless System
5

Introduction
Congratulations on purchasing the Samson Stage 266 Dual Microphone Wireless System! The
Stage 266 system is the perfect solution for any application requiring two high quality, wireless
microphones in an easy to use, compact package. The system features the SR266 dual channel
receiver with individual and mixed outputs. Also included are two HT6 handheld microphone
transmitters.
With the Stage 266 system, you’ll have great sound quality with clear reception, and the ability
to walk freely around your venue. For any live sound application (karaoke, schools, conferences,
houses of worship, etc.) the Stage 266 is the ideal tool for your dual-channel wireless microphone
needs. The Stage 266 always provides outstanding performance and reliability.
Although this product is designed for intuitive operation, we suggest you take some time to
go through these pages to learn how we’ve implemented a number of unique features, and
to get step-by-step instructions for setting up your system. If your Stage 266 was purchased in
the United States, you’ll also nd a warranty card enclosed—please don’t forget to ll it out and
mail it in so that you can receive online technical support, and so that we can send you updated
information about this and other Samson products. Also, be sure to check out our website
(www.samsontech.com) for complete information about our full product line.
We recommend that you record your serial number in the space provided below, for future reference.
Serial number:_______________________________
Date of purchase:____________________________
Should your unit ever require servicing, a Return Authorization (RA) number must be obtained
before shipping your unit to Samson. Without this number, the unit will not be accepted. Please
call Samson at 1-800-3SAMSON (1-800-372-6766) for an RA number prior to shipping your unit.
Please retain the original packing materials and, if possible, return the unit in the original carton.
If you purchased your Samson product outside the United States, please contact your local distributor for warranty information and service.
Features
• Professional, dual-handheld wireless system.
• Easy setup and operation.
• Crystal-controlled, Superheterodyne circuitry for clear and reliable reception.
• Individual or mixed ¼” outputs
• Up to 250’ of line-of-sight operating range.
• Two professional HT6 handheld transmitters with mute switches
• Each HT6 transmitter provides nine hours of battery life, using standard 9-volt batteries.
6
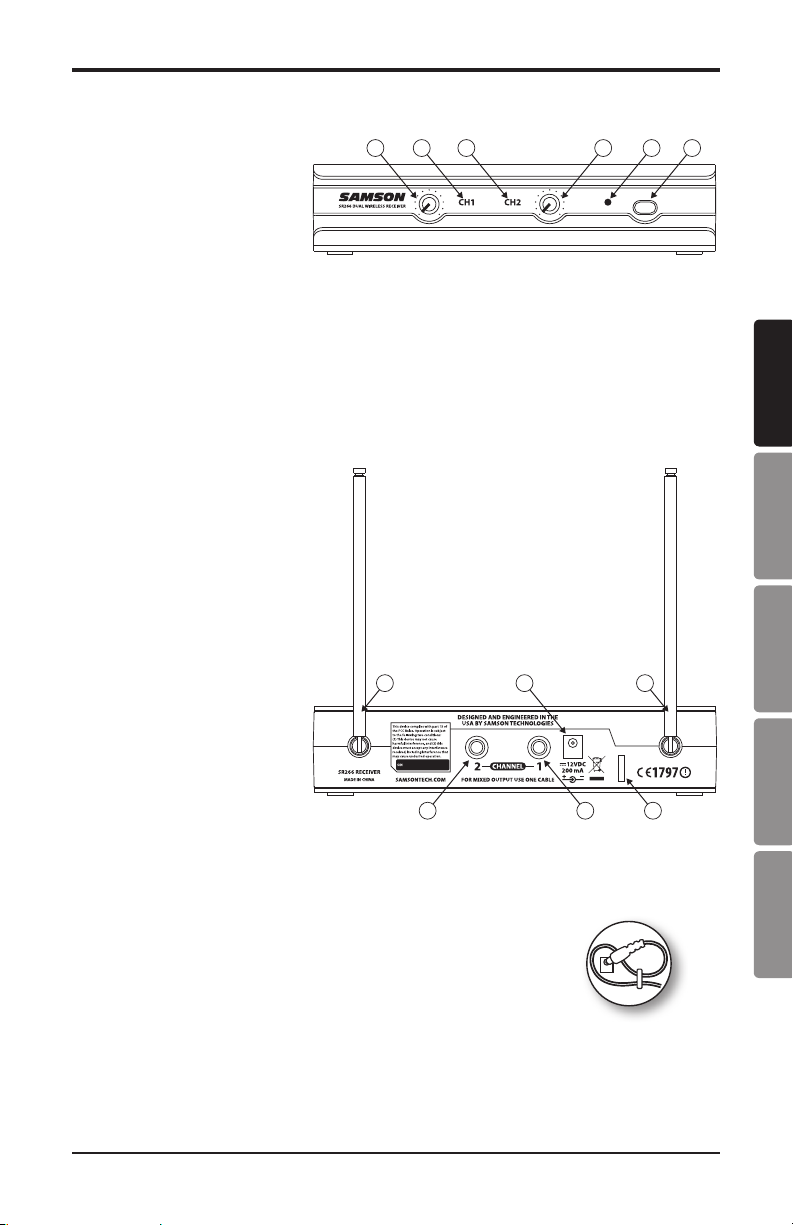
9 8 10
7 1111
SR266 Receiver Controls and Features
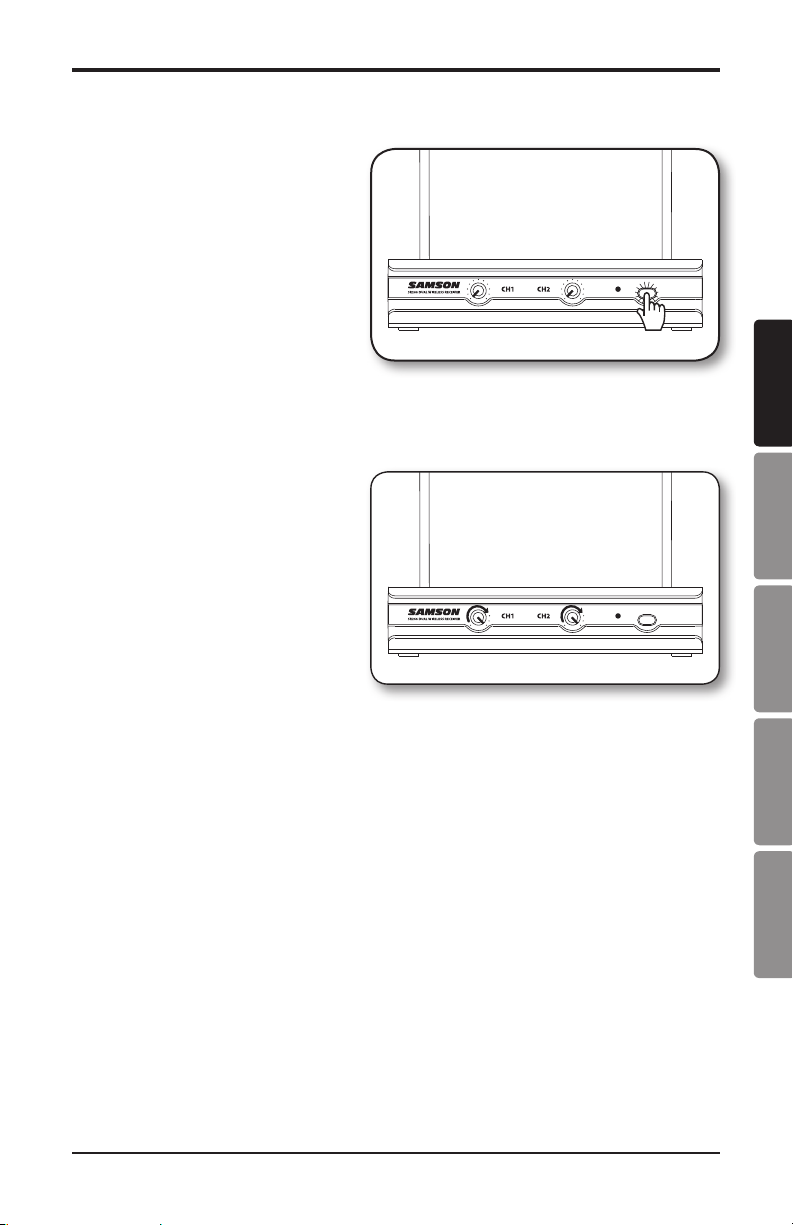
1. Power Switch - Press to turn
the receiver on or o.
2. Power Indicator - Lights red
when the receiver is powered
on.
3. Volume Control (Channel 1) - Rotate to adjust the level of the audio signal output from the
Channel 1 receiver.
4. Channel 1 RF Indicator - Lights green when the corresponding Channel 1 HT6 transmitter is
powered on, and there is an RF signal present and detected by the receiver.
5. Volume Control (Channel 2) - Rotate to adjust the level of the audio signal output from the
Channel 2 receiver.
6. Channel 2 RF Indicator - Lights green when the corresponding Channel 2 HT6 transmitter is
powered on, and there is an RF signal present and detected by the receiver.
7. DC Input - Connect the sup-
plied 12-volt, 200 mA power
adapter here.
WARNING: The substitution
of any other kind of power
adapter can cause severe damage to the SR266 and will void
your warranty.
8. Channel 1 Output - Use this
unbalanced, ¼” jack to connect
the SR266 Channel 1 receiver
to the line level input of a
mixer, amplifier, or other audio
equipment. For a mixed signal
of both receivers, only plug
into one output on the SR266.
Otherwise, Channel 1 and
Channel 2 will output separate
signals.
9. Channel 2 Output - Use this unbalanced, ¼” jack to connect the SR266 Channel 2 receiver to
the line level input of a mixer, amplifier, or other audio equipment. For a mixed signal of both
receivers, only plug into one output on the SR266. Otherwise, Channel 1 and Channel 2 will
output separate signals.
10. Adaptor Strain Relief - Loop the included adaptor’s cord through the
strain relief to prevent the plug from accidentally detaching from the
receiver.
11. Antenna - The antenna mountings allow full rotation for optimum
placement. In normal operation, both antennas should be placed in a vertical position. The
antennas can be folded inward for convenience when transporting the SR266.
9 8 10
7 1111
1253 4 6
ENGLISH
FRANÇAISDEUTSCHEESPAÑOLITALIANO
Stage 266: Dual Handheld Wireless System
7
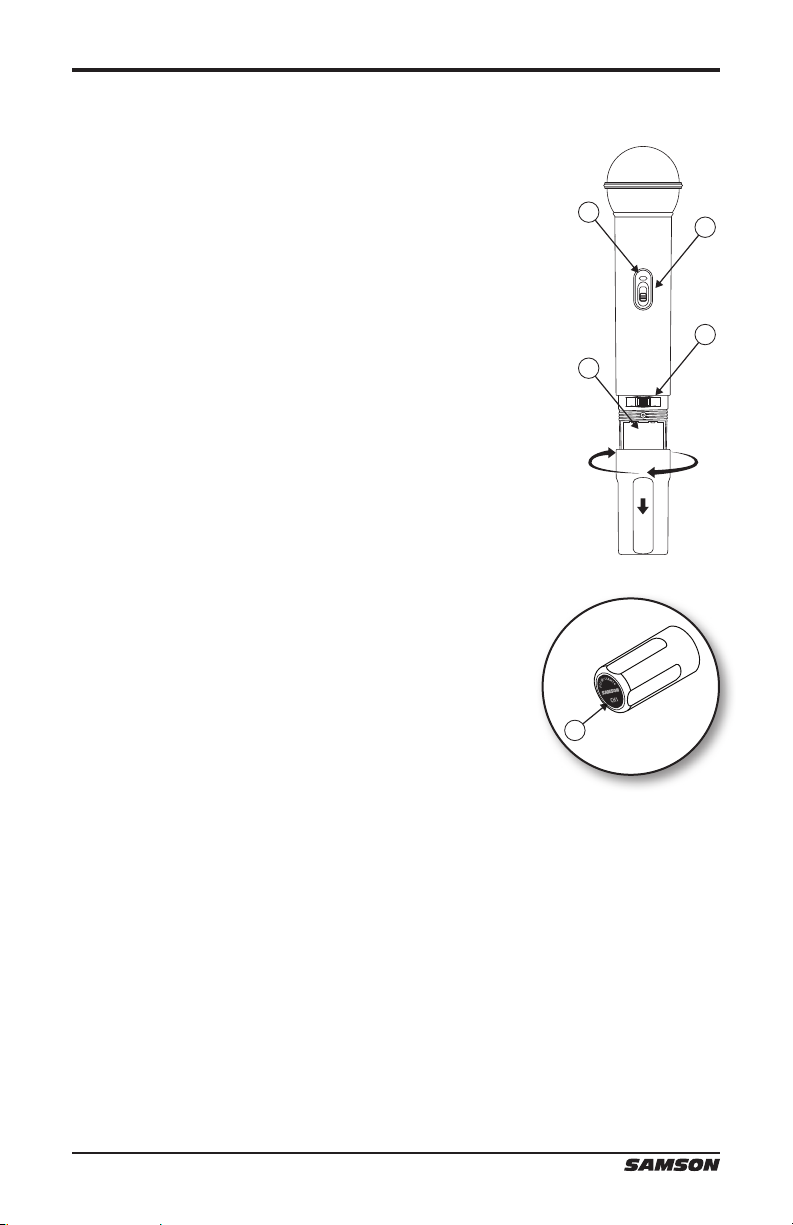
HT6 Transmitter Controls and Features
5
1. Audio ON/OFF Switch - When set to the ON position, audio signal
is transmitted. When set to the OFF position, the audio signal is
muted. Note that moving this switch to the OFF position does not
turn o the transmitter power—it is simply a way to temporarily
mute the transmission of audio signal. When not in use for extended
periods, the transmitter power should be turned o by using the
power ON/OFF switch.
2. Power ON/OFF Switch - Use this switch to turn the HT6 on or o (to
conserve battery power, be sure to leave it o when not in use).
Be sure to mute the audio signal at your external mixer or amplifier
before turning transmitter power on or off, or an audible pop may
result.
3. Power Indicator - LED lights green when the transmitter is powered
on.
4. Battery Compartment - Insert a standard 9-volt alkaline battery
here. Be sure to observe the plus and minus polarity markings when
installing the battery. We recommend the Duracell MN 1604 type
battery for use with this device. Although rechargeable Ni-Cad
batteries can be used, they do not supply adequate current for more
than four hours.
WARNING: Do not insert the battery backwards; doing so can cause
severe damage to the HT6 and will void your warranty.
5. Channel Marking - Printed number corresponding to the appro-
priate channel on the SR266 receiver.
3
1
2
4
5
8
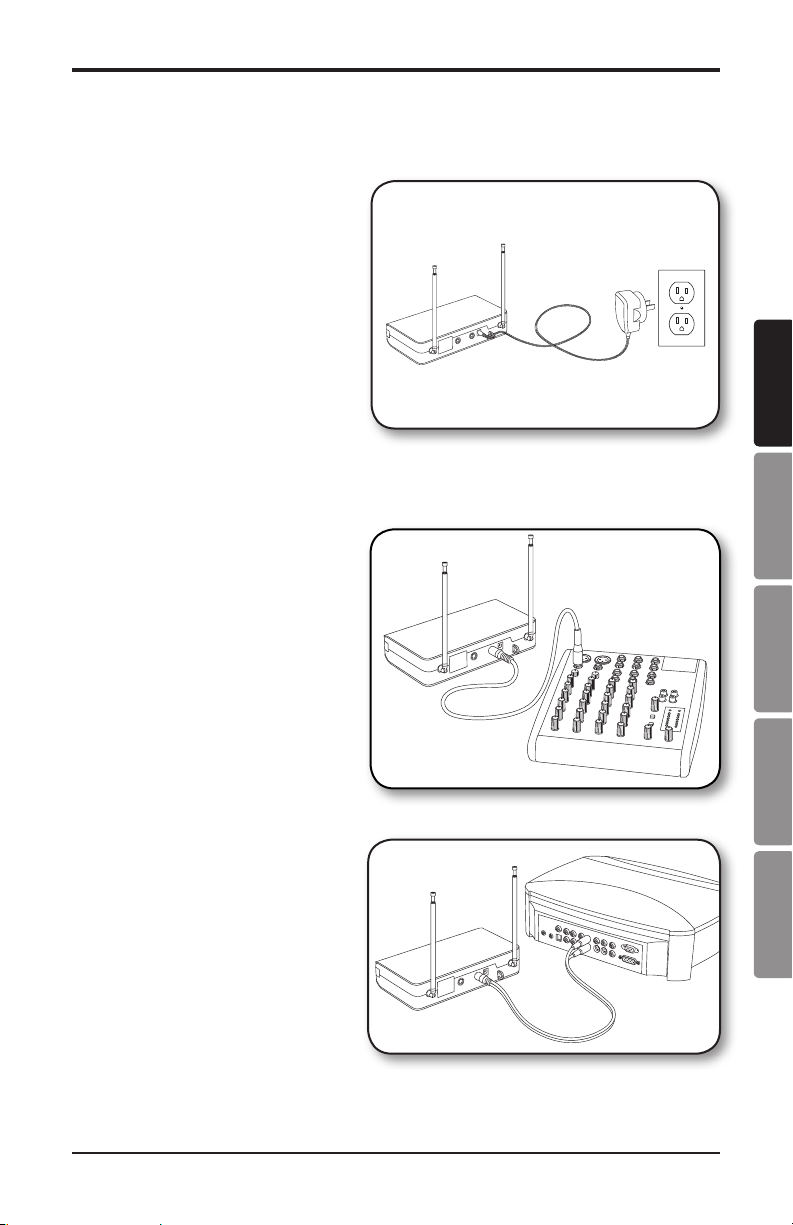
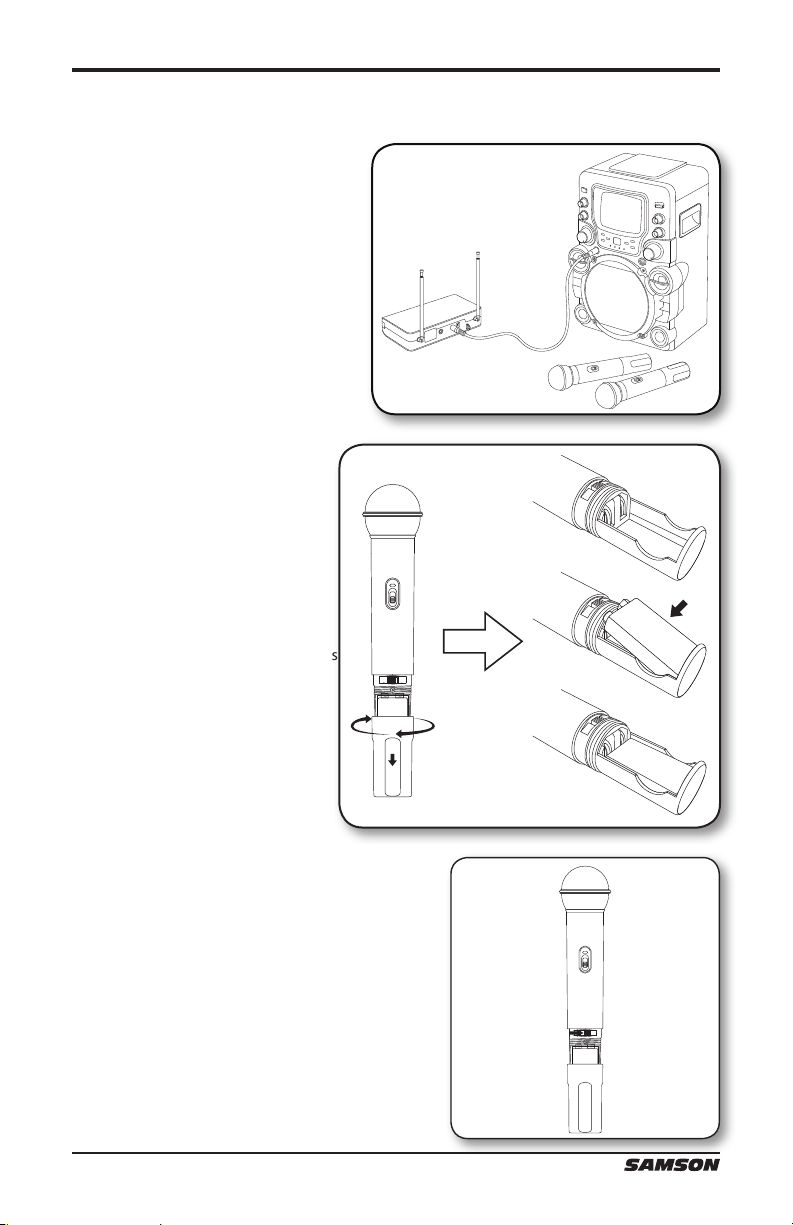
Quick Start Guide
Follow these basic procedures for setting up and using your Stage 266 Series Wireless System.
1. Connect the SR266 receiver power
adaptor to the rear panel DC input, and
then to an electrical outlet.
2. Connect the receiver’s appropriate ¼” output to the input of a mixer, stereo, karaoke machine,
or any other line level input (see below).
Use the included ¼” to ¼” cable to connect
the SR266 receiver to a mixer.
Use the included ¼” to dual RCA cable to
connect the SR266 recevier to a stereo or
other HI-FI device.
ENGLISH
FRANÇAISDEUTSCHEESPAÑOLITALIANO
Stage 266: Dual Handheld Wireless System
9
Quick Start Guide
3. Plugging the receiver into a stereo using the 1/4" - RCA cable.
Use the included ¼” to ¼” cable to connect
the SR266 receiver to a karaoke machine.
3. While holding the upper section
of the HT6 transmitter, rotate the
bottom section and slide down to
expose the battery compartment.
Insert a standard 9-volt alkaline
battery, being sure to follow the plus
and minus polarity markings.
4. Turn on the HT6 transmitter by sliding the POWER
switch to the right, and replace the bottom section.
10
Quick Start Guide
5. Place the SR266 receiver where it will
be used (the general rule of thumb is
to maintain “line of sight” between the
receiver and transmitters so that the
person(s) using the transmitter can see
the receiver). Turn on the power of the
SR266 receiver.
6. Turn on the connected amplifier and/
or mixer, but keep its volume all the
way down. Next, make sure that your
transmitter is un-muted by setting
its Audio switch to ON. Then, set the
Volume Control knob on the SR266
fully clockwise; this is unity gain.
Speak or sing into the mic at a normal
performance level while slowly raising
the volume of your amplifier/mixer until
the desired level is reached.
ENGLISH
FRANÇAISDEUTSCHEESPAÑOLITALIANO
Stage 266: Dual Handheld Wireless System
11

Specications
OVERALL SYSTEM SPECIFICATIONS
Operating Frequency VHF 173.80 MHz to 213.20 MHz
Number of Channels Fixed channel
Frequency Stability ±0.005%
Modulation Mode FM
Maximum Deviation ±15 kHz
Operating Range 250’ (line of sight)
Operating Temperature Range 40° F (4° C) to 110° F (43° C)
Frequency Response 80 Hz to 15 kHz
SR266 RECEIVER SPECIFICATIONS
Image Rejection 30 dB
Dynamic range 95.5 dB
Maximum Output 900mV
Sensitivity 10 dBµV for 48 dB S/N
Output Connectors Two - 1/4” TS (“mono”) phone jack
Audio Output Levels -10dB unbalanced (1/4” phone connector)
Power Supply 100-240V AC (50/60 Hz) to 12V DC 0.2A
Dimensions 7.9” x 5.3” x 1.7”
200 mm x 134 mm x 43 mm
Net Weight 0.84 lbs
0.38 kg
HT6 HANDHELD TRANSMITTER SPECIFICATIONS
RF Power Output 10 mW
Microphone Element H6 Dynamic unidirectional
Typical Battery Life (9-volt alkaline battery) 9-hours
Current Consumption 30 mA typical
Dimensions Ø2.1” x 9.3”
Ø52.6 mm x 235.5 mm
Net Weight 0.4 lbs
0.18 kg
12

Troubleshooting
Issue Solutions
Turn on the HT6 transmitter using the Power ON/OFF switch.
Ensure the HT6 transmitter’s batteries are installed correctly.
Check that the HT6 Audio ON/OFF switch is in the ON position.
Conrm that the SR266 adaptor is correctly connected and
plugged into an electrical outlet.
No Audio
Distorted Audio
Audio Dropout
Transmitters and Receiver
on Dierent Channels
Turn on the SR266 receiver.
Make sure the SR266 output and audio input connections are
securely connected.
Ensure that the SR266 receiver and HT6 transmitters are in line of
sight with one another.
Check the receiver and audio input device level controls.
Check the receiver output level and audio input device level.
Check the HT6’s batteries and replace if low.
Another transmitter may be broadcasting on the same channel.
Turn o transmitter that may be causing interference.
The transmitter may be too far away from the receiver. Move
closer to the receiver, or reposition the antennas.
Remove any sources that may cause RF interference, such as cell
phones, cordless phones, lighting equipment, computers, etc.
Contact your Samson reseller or distributor for assistance.
ENGLISH
FRANÇAISDEUTSCHEESPAÑOLITALIANO
Stage 266: Dual Handheld Wireless System
13
FCC Rules and Regulations
Samson wireless receivers are certified under FCC Rules part
15 and transmitters are certified under FCC Rules part 74.
Licensing of Samson equipment is the user’s responsibility
and licensability depends on the user’s classification, appli-
cation and frequency selected.
NOTE: This equipment has been tested and found to comply with the
limits for a Class B digital device, pursuant to Part 15 of the FCC Rules.
These limits are designed to provide reasonable protection against
harmful interference in a residential installation. This equipment generates, uses and can radiate radio frequency energy and, if not installed
and used in accordance with the instructions, may cause harmful interference to radio communications. However, there is no guarantee that
interference will not occur in a particular installation. If this equipment
does cause harmful interference to radio or television reception, which
can be determined by turning the equipment off and on, the user is
encouraged to try to correct the interference by one or more of the following measures:
• Reorientorrelocatethereceivingantenna.
• Increasetheseparationbetweentheequipmentandreceiver.
• Connecttheequipmentintoanoutletonacircuitdifferentfromthat
to which the receiver is connected.
• ConsultthedealeroranexperiencedRadio/TVtechnicianforhelp.
WARNING:Changesormodificationsnotexpresslyapprovedbythe
party responsible for compliance could void the user’s authority to
operate the equipment.
This device complies with RSS-210 of
Industry & Science Canada.
Operation is subject to the following two conditions:
(1) this device may not cause harmful interference and (2)
this device must accept any interference received, includ-
ing interference that may cause
undesired operation.

Consignes de sécurité importantes
ATTENTION
RISQUE D’ÉLECTROCUTION !
NE PAS OUVRIR !
ATTENTION : POUR ÉVITER TOUT RISQUE D’ÉLECTROCUTION,
NE RETIREZ PAS LES VIS. TOUTE RÉPARATION DOIT ÊTRE
CONFIÉE À UN PERSONNEL QUALIFIÉ.
Le symbole de l’éclair prévient l’utilisateur de la présence de tensions “dangereuses” et non isolées dans l’appareil, d’une amplitude susante pour
présenter un risque d’électrocution.
Le symbole du point d’exclamation prévient l’utilisateur de la présence
d’instructions importantes sur le fonctionnement et la maintenance de ce
produit dans le mode d’emploi fourni.
ENGLISH
FRANÇAISDEUTSCHEESPAÑOLITALIANO
Ce produit ne doit pas être jeté avec les ordures ménagères. Il existe un service de
collecte séparé pour les produits électroniques usés. Ce service respecte les législations
sur le traitement approprié, la récupération et le recyclage.
Les consommateurs des 27 pays membres de l’Union européenne, de la Suisse et de la Norvège peuvent
se départir gratuitement de leurs produits électroniques usagés dans des points de collecte désignés, ou auprès
d’un revendeur (lorsqu’un nouveau produit est acheté).
Pour les autres pays, veuillez contacter votre administration locale pour connaître la méthode de mise au rebut
appropriée.
En procédant ainsi, vous êtes assuré que votre produit sera correctement traité, récupéré et recyclé
afin de prévenir les effets négatifs possibles sur l’environnement et la santé.
Stage 266 : Double micro main sans fil
15

Important Safety Information
1. Veuillez lire toutes les instructions.
2. Conservez ces instructions.
3. Respectez les mises en garde.
4. Suivez les instructions.
5. N’utilisez pas cet appareil près d’une
source liquide.
6. Nettoyez avec un tissu sec.
7. Veillez à ne pas obstruer les fentes de
ventilation. Installez l’appareil selon
les instructions du fabricant.
8. N’installez pas près d’une source de
chaleur (radiateurs, etc.), ou de tout
équipement générant de la chaleur
(amplicateurs de puissance, etc.).
9. Ne retirez pas la terre du cordon secteur ou de la prise murale. Les ches
canadiennes avec polarisation (avec
une lame plus large) ne doivent pas
être modiées. Si votre prise murale
ne correspond pas au modèle fourni,
consultez votre électricien.
10. Protégez le cordon secteur contre
tous les dommages possibles (pincement, tension, torsion, etc.). Veillez à
ce que le cordon secteur soit libre, en
particulier à sa sortie du boîtier.
11. Utilisez uniquement les xations et
accessoires spéciés par le fabricant.
12. Utilisez uniquement le support,
le pied, ou la table spéciés par le
fabricant, ou vendus avec l’appareil.
Lorsque vous utilisez un chariot,
procédez avec vigilance lorsque vous
vous déplacez pour éviter toute blessure aux personnes
et tout dommage aux
équipements.
13. Déconnectez l’appareil du secteur en
présence d’orage ou
lors de périodes de non-utilisation
prolongées
14. Consultez un service de réparation
qualié pour tout dysfonctionnement (dommage sur le cordon
secteur, baisse de performances,
exposition à la pluie, projection
liquide dans l’appareil, introduction
d’un objet dans le boîtier, etc.).
15. N’exposez pas cet appareil aux projections liquides. Veillez à ne placer
aucun objet contenant un liquide
(vase, verre, etc.) sur l’appareil.
16. Vériez que la broche de terre soit
présente sur le che secteur .
17. Vériez la bonne ventilation autour
de l’appareil.
18. La che secteur permet la déconnexion instantanée de l’appareil.
Veillez à ce que cette che soit facilement atteignable.
19. N’exposez pas les piles ou accumulateurs à une chaleur excessive (exposition directe au soleil, feu, etc.).
16

Table des Matières
Introduction. . . . . . . . . . . . . . . . . . . . . . . . . . . . . . . . . . . . . . . . . . . . . . . 18
Récepteur SR266 — Fonctions et réglages . . . . . . . . . . . . . . . . . . . . . . . . . . . 19
Émetteur HT6 — Fonctions et réglages . . . . . . . . . . . . . . . . . . . . . . . . . . . . . 20
Guide de prise en main. . . . . . . . . . . . . . . . . . . . . . . . . . . . . . . . . . . . . . . . 21
Caractéristiques techniques. . . . . . . . . . . . . . . . . . . . . . . . . . . . . . . . . . . . . 24
Assistance technique . . . . . . . . . . . . . . . . . . . . . . . . . . . . . . . . . . . . . . . . . 25
ENGLISH
FRANÇAISDEUTSCHEESPAÑOLITALIANO
Stage 266 : Double micro main sans fil
17

Introduction
Merci d’avoir choisi le double micro main sans l Samson Stage 266 ! Le Stage 266 vous ore la
solution parfaite aux applications nécessitant l’utilisation de deux micros sans l de haute qualité,
le tout dans un système compact et complet. Ce système sans l utilise le double récepteur SR266
avec sorties individuelles et mélangées. Il comprend également deux micros main HT6 haute
qualité.
Avec le système sans l Stage 266, vous bénéciez d’une très haute qualité sonore avec une
réception claire, et la possibilité de parler en vous déplaçant totalement librement. Pour toutes
les applications de sonorisation (karaoké, écoles, conférences, lieux de culte, etc.), le Stage 266 est
l’outil idéal. Le Stage 266 vous ore toujours une qualité et une abilité exceptionnelles.
Bien que ce produit ait été conçu pour que son utilisation soit intuitive, prenez le temps de lire
ces quelques pages pour en savoir plus sur les fonctions de ce système sans fil. Si vous avez
acheté ce systèmes sans fil Stage 266 aux USA, vous trouverez une carte de garantie — prenez
le temps de nous la retourner pour bénécier de l’assistance technique et pour recevoir des
documentations sur les nouveaux produits Samson. N’oubliez pas de consulter notre site Internet
à l’adresse suivante www.samsontech.com.
Prenez le temps de noter le numéro de série et la date d’achat ci-dessous pour toute référence
ultérieure.
Numéro de série :_______________________________
Date d’achat :____________________________
Si vous devez faire réparer cet appareil, vous devez tout d’abord obtenir un numéro de retour
auprès de nos services. Sans ce numéro, l’appareil ne sera pas accepté. Appelez Samson au :
1-800-3SAMSON (1-800-372-6766) pour obtenir ce numéro. Utilisez les emballages d’origine
pour le retour. Si vous avez acheté ce produit hors des USA, contactez votre revendeur ou votre
distributeur, pour en savoir plus sur les termes de la garantie.
Généralités :
• Double micro main sans l professionnel.
• Mise en œuvre et utilisation simples.
• Circuit superhétérodyne géré par quartz orant une réception claire et able.
• Sorties en Jacks 6,35 mm individuelles ou mélangées
• Portée de 75 mètres (en ligne directe dégagée).
• Deux micros main émetteur professionnels HT6 avec touches de coupure
• Chaque émetteur HT6 ore une autonomie de neuf heures, avec une pile de 9 Volts stan-
dard.
18
9 8 10
7 1111
Récepteur SR266 — Fonctions et réglages
1. Interrupteur - Appuyez pour
placer le récepteur sous/hors
tension.
2. Témoin - S’allume en rouge
avec la mise sous tension.
3. Volume (canal 1) - Tournez le bouton pour régler le niveau de sortie du signal du canal 1.
4. Témoin HF du canal 1 - S’allume en vert lorsque le micro main émetteur HT6 couplé au
canal 1 est sous tension, et lorsque le signal HF est présent et détecté par le récepteur.
5. Volume (canal 2) - Tournez le bouton pour régler le niveau de sortie du signal du canal 2.
6. Témoin HF du canal 2 - S’allume en vert lorsque le micro main émetteur HT6 couplé au
canal 2 est sous tension, et lorsque le signal HF est présent et détecté par le récepteur.
7. Embase DC - Reliez l’adaptateur secteur 12 Volts (200 mA) fourni à cette embase.
ATTENTION : L’utilisation d’un autre adaptateur secteur peut causer des dommages sévères
au SR266, et annule la garantie.
8. Sortie du canal 1 - Utilisez
ce Jack asymétrique 6,35 mm
pour connecter le canal 1 du
récepteur SR266 à l’entrée
ligne d’une console de mixage,
d’un amplificateur, ou tout
autre équipement audio. Pour
disposer du signal mélangé
des deux récepteurs, utilisez
une seule des deux sorties du
SR266. Dans le cas contraire les
sorties des canaux 1 et 2 sont
séparées et non mélangées.
9. Sortie du canal 2 - Utilisez
ce Jack asymétrique 6,35 mm
pour connecter le canal 2 du
récepteur SR266 à l’entrée ligne
d’une console de mixage, d’un amplificateur, ou tout autre équipement audio. Pour disposer
du signal mélangé des deux récepteurs, utilisez une seule des deux sorties du SR266. Dans le
cas contraire les sorties des canaux 1 et 2 sont séparées et non mélangées.
10. Passe-câble - Enroulez le cordon de l’adaptateur secteur dans le passe-câble pour éviter que
la che d’alimentation soit accidentellement déconnectée.
11. Antenne - Les embases d’antennes permettent leur rotation pour une
position optimum. En utilisation normale, les deux antennes doivent
être verticales. Les antennes peuvent être pliées vers l’avant, ce qui
facilite le transport du récepteur SR266.
9 8 10
7 1111
1253 4 6
ENGLISH
FRANÇAISDEUTSCHEESPAÑOLITALIANO
Stage 266 : Double micro main sans fil
19

Émetteur HT6 — Fonctions et réglages
5
1. Interrupteur Audio ON/OFF - En position ON, le signal audio est
transmis. En position OFF, le signal audio est coupé. Notez que
lorsque vous placez l’interrupteur en position OFF, vous ne placez
pas le micro hors tension — vous ne faites que couper la transmission HF du signal audio. Lorsque vous ne l’utilisez plus, placez
l’émetteur hors tension avec l’interrupteur ON/OFF (2).
2. Interrupteur ON/OFF - Utilisez cet interrupteur pour placer l’interrupteur HT6 sous/hors tension (pour économiser la pile, laisser le
micro hors tension lorsque vous ne l’utilisez pas).
Veillez à couper le signal audio sur la console de mixage ou l’amplicateur externe avant de placer l’émetteur sous/hors tension pour
éviter tout bruit de pop violent.
3. Témoin Led - Ce témoin s’allume en vert lorsque vous placez l’émetteur sous tension.
4. Compartiment de la pile - Insérez une pile de 9 Volts alcaline
standard dans ce compartiment. Respectez les polarités (+ et -) de
la pile. Nous conseillons la pile Duracell MN 1604 avec cet émetteur.
Bien que vous puissiez utiliser des accumulateurs rechargeables au
Ni-Cad, ceux-ci ne fonctionnent que pendant 4 heures.
ATTENTION : Veillez à ne pas insérer la pile à l’envers ; ceci endommagerait sérieusement le HT6 et annulerait la garantie.
5. Numéro de canal - Le numéro sérigraphié correspond au numéro
de canal sur le récepteur SR266.
3
1
2
4
20
5
 Loading...