


PERSONAL MONITOR MIXER/HEADPHONE AMP
S Class Signal Processors

Table Of Contents
Features 3
Front and Rear Panel Layout 4
Operating the S monitor 5-7
Specifications 8
Wiring Guide 8
Copyright 2003, Samson Technologies Corp.
Printed January 2003
Samson Technologies Corp.
575 Underhill Blvd.
P. O. Box 9031
Syosset, NY 11791-9031
Phone: 1-800-3-SAMSON (1-800-372-6766)
Fax: 516-364-3888
www.samsontech.com

S monitor Introduction and Features
Introduction
Thank you for purchasing the S monitor personal monitor system from Samson Audio!
S monitor provides an elegant solution for personal monitoring, either on stage or in the
studio. The S monitor is a specially designed headphone amplifier that allows you to mix
the balance between the signals from your microphone together with a stereo source. The
S monitor also includes a Mic Thru output on an XLR connector for passing your microphone signal into the main PA or recording console. When designing a monitor system for
multiple users, you can daisy-chain several S monitors together thanks to the convenient
1/4-inch MIX THRU connector. Individual controls for the Mic and the Mix Volume enable
you to use the S monitor to set the balance between mic and mix that’s just right for you.
Tw o powerful headphone outputs (on 1/4-inch connectors) are included so you can share
your personal mix with someone else. And just because this unit is miniature, don’t be surprised with its great sound and reliability thanks to high quality components and solid build
construction.
S monitor Features
•Personal monitor mixer/headphone amplifier
• Balanced XLR microphone input
• Balanced XLR microphone through output to send mic signal to main mixer
• 1/4-inch Stereo Input for feeding a stereo monitor signal from the main mixer
• 1/4-inch Stereo Thru for daisy-chaining, and sending the stereo monitor signal to
additional units
• Microphone Volume control allows the user to set their individual mic monitor
level
• Mix Volume controls the level of the Stereo Input monitor signal
•Two headphone outputs on standard 1/4-inch phone connectors
• Rugged aluminum extrusion chassis
• Large rubber bumper feet
• 18 Volt AC adapter included
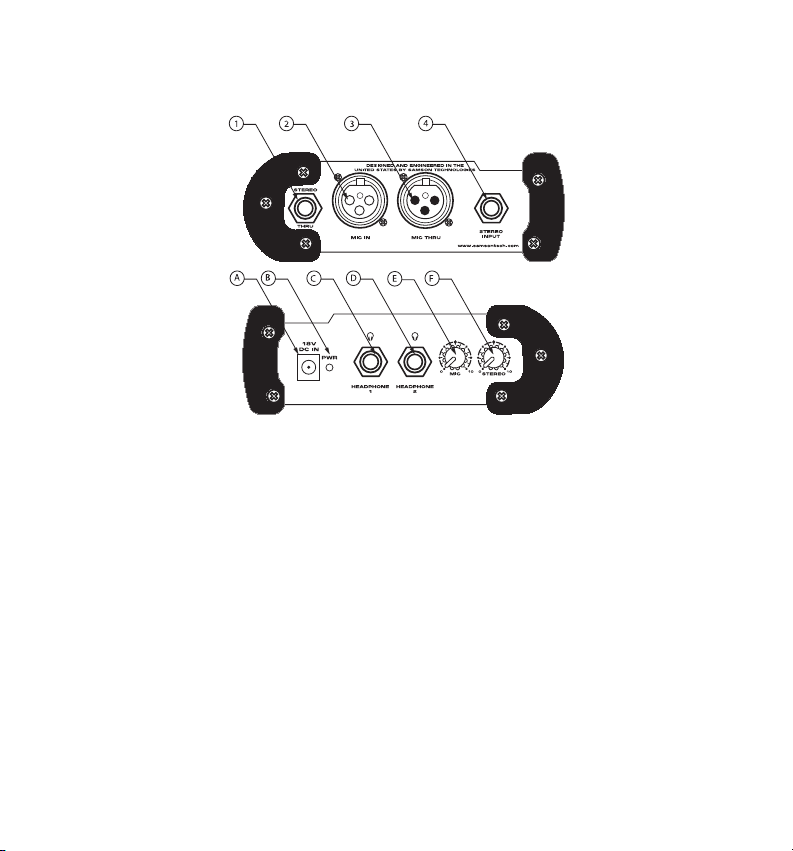
S monitor Front and Rear Panel Layout
ADCPOWER INPUT - Connect the sup-
plied power adapter here.
BPOWER LED - Red LED will illuminate
when power is on indicating the S monitor is ready for operation.
C PHONE 1 - 1/4” output for connecting
headphones.
D PHONE 2 - 1/4” output for connecting
headphones.
E MIC VOLUME - Control knob used to
adjust the level of the MIC input signal.
FMIX VOLUME - Control knob used to
adjust the level of the Stereo input signal.
1 STEREO THRU - 1/4-inch TRS (TIP/
RING/SLEEVE) connector to output
main stereo signal.
2 MIC INPUT - Connect any dynamic
or battery powered condenser
microphone here.
3 MIC THRU - Parallel output for pass-
ing microphone signal to main
mixer.
4 STEREO INPUT - 1/4-inch TRS (TIP/
RING/SLEEVE) connector to input
main stereo signal.(Tip = Left; Ring
= Right)
4

A
5
Operating the S monitor
Setting Up the S monitor
The basic procedure for setting up and using your S monitor is simple and takes only a
few minutes. Remove all packing materials (save them in case of need for future service)
and check to make sure that you remove the supplied AC power adapter.
Set the S monitors control knobs to the following
default positions: all off.
Powering the S monitor
Connect the supplied AC/DC adapter to the 18V
DC Power Input on the rear panel of the S monitor then plug the adapter into any standard AC
outlet.
Connecting a Microphone to the S monitor
Follow the steps below to connect your microphone to the S monitor and then to your main
mixer.
Connect your microphone to the S monitor’s MIC input using a standard balanced XLR
microphone cable.
Using a second standard microphone cable, connect the S monitor’s MIC THRU output to
the input on your main mixer.
M
S
O
N
R
2
1

6
Operating the S monitor
Connecting a Stereo Monitor Signal
Now you’re ready to connect the stereo monitor feed from your main mixer. You can use
the headphone output from your mixer, one or two of your mixers AUX/MONITOR sends,
or any stereo line level source to feed the STEREO monitor input.
Use a standard 1/4-inch TRS
(Tip/Ring/Sleeve)(Tip=L; Ring=R) cable to connect the STEREO input.
If you are using additional S monitors, use a
standard 1/4-inch TRS cable to daisy-chain one
unit to the next, and distribute the stereo monitor mix from unit to unit.
Connecting Headphones
IMPORTANT NOTE: Before you install the headgear,be sure to double check that the MIC and
STEREO level controls are turned to the all the way down (fully counter clockwise position). The S
monitor is small, but powerful. It can generate loud signal levels into the connected headphone. We
recommend that you exercise extreme caution and care for your ears. They’re your most important
tool, and instrument.Always start with the level controls all the way off and slowly raise the signal to
a comfortable listening level.
Now, connect your headphones to one of the S
monitor’s PHONE outputs.
While speaking or singing into your mic, slowly
raise the MIC level control until you reach a
comfortable level. Then lower it just a bit.
Now, bring up your STEREO monitor send while singing or speaking into your mic. Try to
speak and sing at the level that you expect to be at when performing and try to tuck the
monitor mix just behind the MIC signal.
Use both the MIC and STEREO level controls to make fine adjustments to the balance of
the MIC and STEREO inputs, dialing up the mix that’s just right for you.

7
Creating a Mix
Now that you have connected your mic and monitor mix to the S monitor’s inputs, you can
begin to create your mix. The best way to do this is to adjust one channel at a time.
Slowly raise the level control for the MIC input until you have reached the desired level.
Now, repeat the same for STEREO input. You may want to go back and slightly raise or
lower an individual channel until you have set the balance between all the connected
inputs. Then, you have your perfect mix!
Typical Set-up
The diagram below shows a typical set-up for a small band using three S monitor
mixer/headphone amplifiers for a sophisticated personal headphone monitoring system.
The vocalist’s microphone is connected to the MIC input and then passed through to the
main mixer using the MIC THRU output. A stereo monitor feed is sent from the main mixer
and connected to the S monitor’s STEREO input. Using the S monitor’s STEREO THRU
output the monitor send can be passed from one S monitor to the next.
Operating the S monitor
Mix THRU
to additional
S monitors
Typical hook-up for personal monitoring
with independent level control
for mic and stereo monitor mix
SIGNAL FLOW
Rear View
SIGNAL FLOW
SIGNAL FLOW
Mic THRU
to Mixer
S
A
M
S
O
N
R
2
1
Stereo monitor mix
SIGNAL FLOW
from Mixer

Samson Technologies Corp.
575 Underhill Blvd.
P. O. Box 9031
Syosset, NY 11791-9031
Phone: 1-800-3-SAMSON (1-800-372-6766)
Fax: 516-364-3888
www.samsontech.com
S monitor Specifications
Frequency Response 10 Hz to 93 kHz
Noise Level -100 dBu
THD+N <0.004 %
Input Impedance >10 kOhm
Output Impedance 100 Ohm
Stereo Input 1/4” jack unbalanaced
Mix Thru 1/4” jack unbalanaced
S monitor Specifications - continued
Mic Thru XLR balanced out
Maximum Input Level +20 dBu
Power Supply 18 V DC
Dimensions 5.65” L x 4.13” W x 2” H (144mm
L x 105mm W x 51mm H)
Weight 16.5 oz., 419 gm.
S monitor Wiring Guide
 Loading...