

Page 1

2-Channel Phantom Power Supply
S C l a s s S i g n a l P r o c e s s o r s
Page 2

Copyright 2004 - 2007, Samson Technologies Corp.
Printed July 2007, v2.0
Samson Technologies Corp.
45 Gilpin Avenue
Hauppauge, New York 11788-8816
Phone: 1-800-3-SAMSON (1-800-372-6766)
Fax: 631-784-2201
www.samsontech.com
ENGLISH
S phantom Introduction and Features . . . . . . . . . . . .3
S phantom Front and Rear Panel Layout . . . . . . . . . . .
4
Operating the S Phantom . . . . . . . . . . . . . . . . . . . .
5
Typical Set-up . . . . . . . . . . . . . . . . . . . . . . . . . . . .6
Wiring Guide. . . . . . . . . . . . . . . . . . . . . . . . . . . . .7
S phantom Specifications . . . . . . . . . . . . . . . . . . .28
FRANÇAIS
S phantom - Introduction et caractéristiques . . . . . . . .8
S phantom - Présentation des faces avant et arrière
. . . .9
Utilisation du S phantom
. . . . . . . . . . . . . . . . . . . .10
Configuration type. . . . . . . . . . . . . . . . . . . . . . . .11
Guide de câblage. . . . . . . . . . . . . . . . . . . . . . . . .12
S phantom - Caractéristiques techniques . . . . . . . . .28
DEUTSCHE
S phantom Einleitung und Features . . . . . . . . . . . . . 13
S phantom Layout der Vorder- und Rückseite
. . . . . . .14
S Phantom bedienen . . . . . . . . . . . . . . . . . . . . . .
15
Typisches Setup. . . . . . . . . . . . . . . . . . . . . . . . . . 16
Verdrahtungsanleitung . . . . . . . . . . . . . . . . . . . . .17
S phantom Technische Daten . . . . . . . . . . . . . . . . .29
Table of Contents
ESPAÑOL
Introducción y características del S phantom . . . . . . .18
Distribución del panel frontal y trasero del S phantom
19
Manejo del S Phantom . . . . . . . . . . . . . . . . . . . . .
20
Configuración típica . . . . . . . . . . . . . . . . . . . . . . .21
Guía de cableado . . . . . . . . . . . . . . . . . . . . . . . . .22
Especificaciones técnicas del S phantom . . . . . . . . . .29
ITALIANO
S phantom - Introduzione e Caratteristiche . . . . . . . .23
S phantom - I Pannelli Frontale e Posteriore
. . . . . . . .24
La Configurazione dell'S Phantom . . . . . . . . . . . . . .
25
Configurazione Tipica . . . . . . . . . . . . . . . . . . . . . .26
Guida al Cablaggio . . . . . . . . . . . . . . . . . . . . . . . .27
S phantom - Specifiche . . . . . . . . . . . . . . . . . . . . . 30
Page 3

3
S phantom Introduction and Features
Introduction
Congratulations on your purchase of the S phantom by Samson Audio! The S phantom is a twochannel, 48-volt phantom power supply capable of powering most any condenser microphones,
two at a time. The S phantom is a perfect solution for applications where the use of condenser
microphones is desired and the mixer, recorder, PA, or amplifier to be used does not provide
phantom power on the microphone inputs. Whatever your exact situation, the S phantom
will provide high quality and reliable performance thanks to its solid build construction based
around the extruded aluminum chassis and oversized rubber bumper feet.
In this manual, you’ll find a more detailed description of the features of the S phantom, as well as
a guided tour through the front and rear panels, step-by-step instructions for using the S phantom, and full specifications. You’ll also find a warranty card enclosed—please don’t forget to fill it
out and mail it so that you can receive online technical support and so we can send you updated
information about other Samson products in the future. Also, be sure to check out our website
(www.samsontech.com) for complete information about our full product line.
S Phantom Features
• Two channel, 48 volt phantom power supply for powering most condenser microphones.
• Two balanced XLR microphone inputs.
• Two balanced XLR microphone outputs.
• Convenient 1/4-inch phone jack output for Mic 1, for easy hook-up to many personal record
-
ers without XLR inputs.
• Large rubber bumper feet.
• 18 Volt DC adapter included.
• Three year extended warranty.
3
Page 4
4
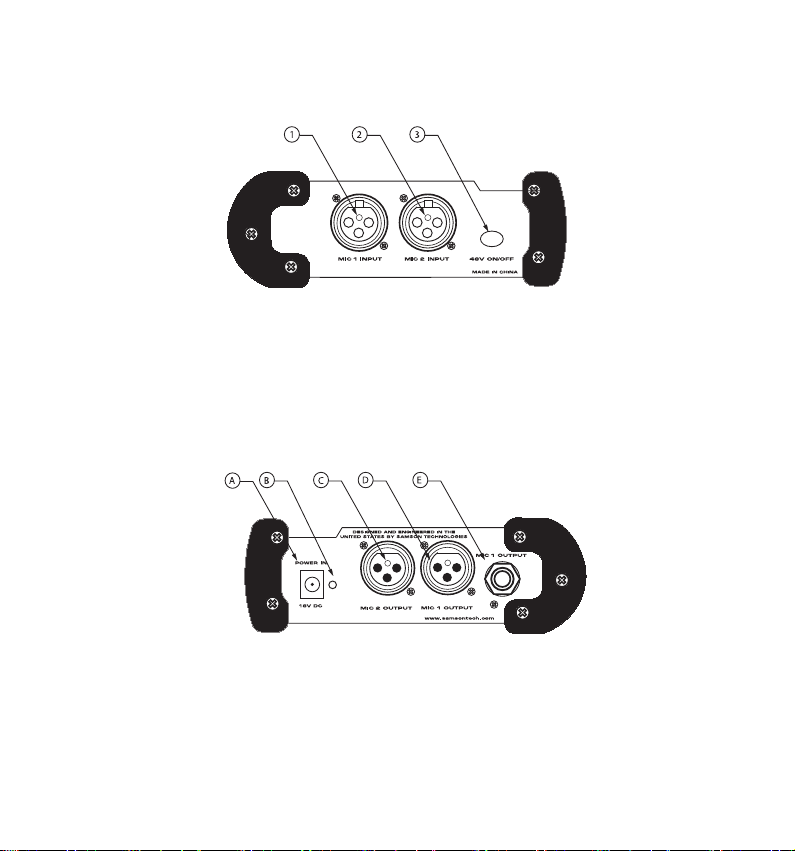
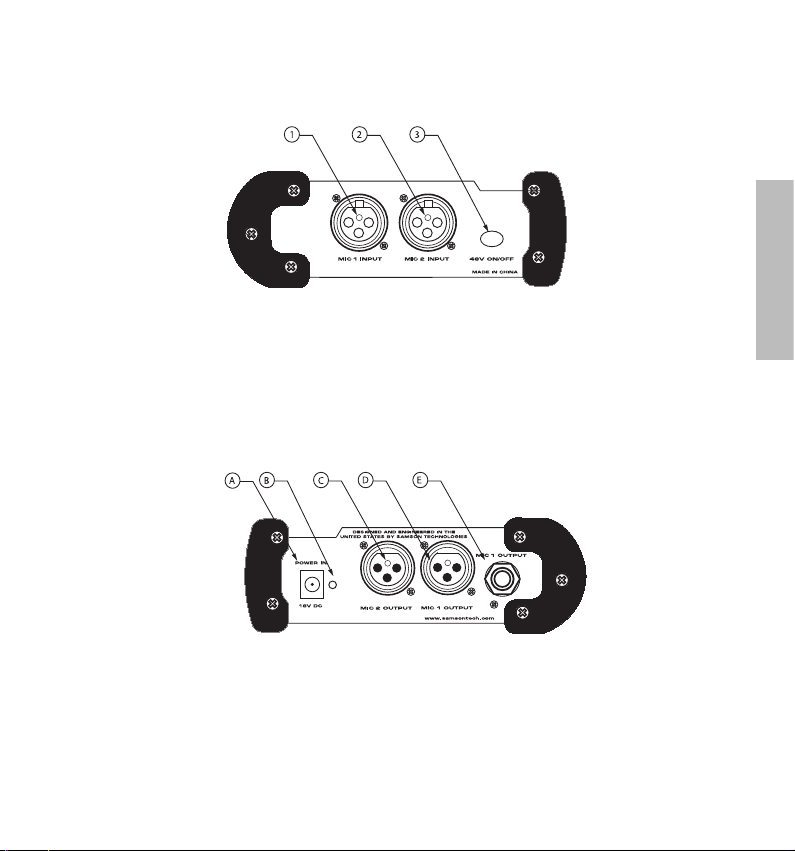
S phantom Front and Rear Panel Layout
A DC POWER INPUT - Connect the sup-
plied power adapter here.
B POWER ON LED - The red LED illumi-
nates when the unit is powered on.
C MIC 2 OUTPUT
- XLR balanced micro-
phone output.
1 MIC 1 INPUT- XLR balanced input for
connecting condenser microphone.
4
2 MIC 2 INPUT- XLR balanced input
for connecting condenser microphone.
3 48V ON/OFF
switch - When
pressed in, the LED illuminates
indicating the phantom power is
on.
D MIC 1 OUTPUT - XLR balanced
microphone output.
E MIC 1 OUTPUT - 1/4-inch balanced
connector for Mic 1 Output.
Front Panel Layout
Rear Panel Layout
Page 5

5
5
Operating the S Phantom
Setting Up the S phantom
The basic procedure for setting up and using your S phantom is simple and takes only a few
minutes. Remove all packing materials (save them in case of need for future service) and check
to make sure that you remove the supplied DC power adapter.
Warning: Be sure to turn down the channel and master volumes of your mixer, PA or recorder
BEFORE connecting or disconnecting your microphone cables. All phantom power supplies, including
the S phantom, will make a loud pop when a microphone is connecting or disconnected during operation. Depending on the level of your system, the pop can damage your speakers or if you’re wearing
headphones, the pop may EVEN DAMAGE YOUR EARS! So be careful and be sure to turn down the volume of your mic channel, other inputs and master volumes before plugging or unplugging any mic
cables while the S phantom is powered on.
• Using a standard XLR microphone cable, connect the output of your condenser microphone to the S phantom’s CHANNEL 1 INPUT.
• Using a second mic cable, connect the CHANNEL 1 OUTPUT of the S phantom to the micro
phone input of the mixer, recorder, PA or amplifier you wish to connect your condenser
microphone to. If your recorder or mixer does not have an XLR input you can use the 1/4inch MIC 1 Output.
Note: There are several different input connectors that may be on your mixer or recorder, but they
will more than likely be either XLR or 1/4-inch phone. For a detailed wiring diagram see page 7 of this
manual.
• Repeat the steps above for the second microphone using the CHANNEL 2 INPUTS and
OUTPUTS.
• Plug the included DC adapter into the power outlet. Be sure to pay attention and confirm
the adapter is the correct voltage for your country. See specificationsprinted on the AC adapter.
• Press the 48V switch in to activate the phantom power.
Page 6

6
Typical Set-up
The diagram on the right shows a
typical set-up for a project recording studio using the S phantom
to connect two condenser microphones to a personal hard disk
recorder that does not provide
phantom power.
Note: You can use either the XLR
or 1/4-inch phone jack output for
Mic 1 as depicted in the illustration by the dotted line.
For additional functionality, the
S phantom can be used as a oneto-two mic splitter using the MIc1
XLR and 1/4-inch Outputs.
Operating the S Phantom
Disconnecting the S phantom
Follow the steps below for disconnecting your system.
• Lower the level controls, to the off position, for the input channels that have the S phantom connected.
• Lower your master volume level control.
• Now, power-down the S phantom supply by removing the AC adapter.
Page 7
7
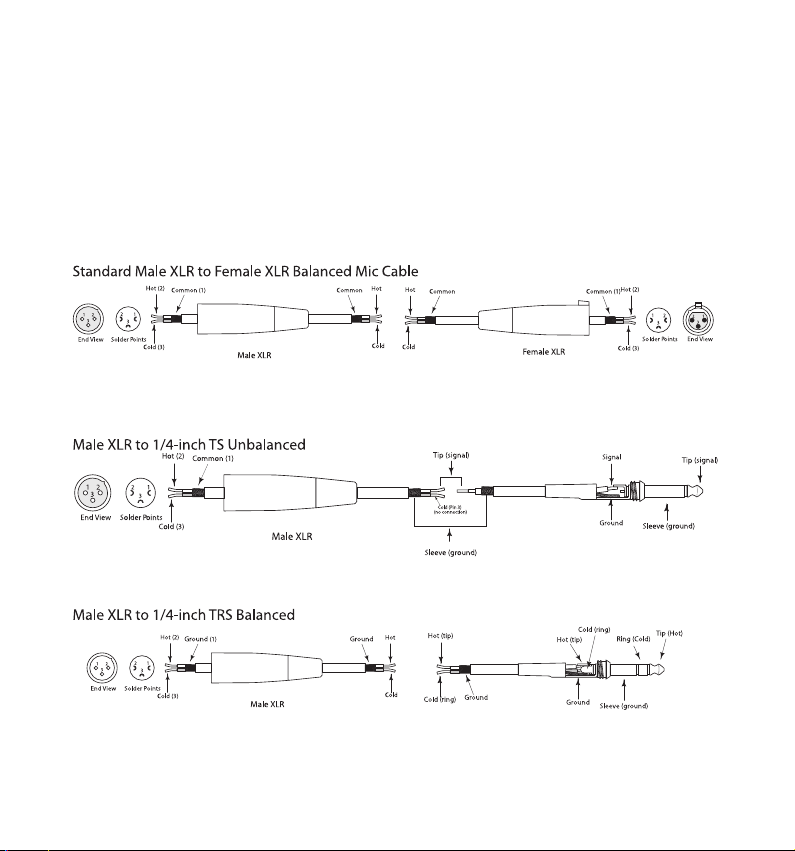
S phantom Wiring Guide
Wiring Guide
There are several ways to interface the S phantom, depending on your exact set-up. Follow the
cable diagrams below for connecting your gear.
Page 8

FRANÇAIS
8
S phantom - Introduction et caractéristiques
Introduction
Merci d'avoir choisi un S phantom de Samson Audio ! Le S phantom est un module d'alimentation fantôme 48 V à deux canaux pouvant alimenter la plupart des micros à condensateur (deux
à la fois). Le S phantom représente la solution par excellence pour les applications nécessitant
l'utilisation d'un micro à condensateur (lorsque les entrées micro de la console, l'enregistreur,
le système de sonorisation ou l'amplificateur ne sont pas munies d'une alimentation fantôme).
Quelle que soit votre situation, le S phantom vous garantit une fiabilité à toute épreuve et des
performances sonores de haute qualité grâce à son boîtier ultra robuste disposant d'un châssis
en aluminium extrudé et de pieds amortisseurs surdimensionnés en caoutchouc.
Dans ces pages, vous trouverez une description détaillée de toutes les fonctions du S phantom,
une description des faces avant et arrière, les instructions pour l’utilisation et les caractéristiques
techniques complètes. Vous trouverez également une carte de garantie : n’oubliez pas de la
remplir et de nous l’envoyer afin que vous puissiez bénéficier de l’assistance technique en ligne
et recevoir les informations sur les produits Samson. Pensez à consulter notre site Internet (www.
samsontech.com) pour obtenir une information complète sur toute notre gamme de produits.
Contactez votre revendeur pour de plus amples informations sur la garantie.
S phantom - Caractéristiques
• Module d'alimentation fantôme 48 V à deux canaux permettant d'alimenter la plupart des
micros à condensateur.
• Deux entrées micro XLR symétriques.
• Deux sorties micro XLR symétriques.
• Sortie Jack 6,35 mm pratique (pour l'entrée micro 1) facilitant la connexion à la plupart des
enregistreurs personnels ne disposant pas d'entrées XLR.
•
Pieds amortisseurs surdimensionnés en caoutchouc.
• Adaptateur secteur 18 Vcc fourni.
• Garantie étendue de trois ans.
Page 9
FRANÇAIS
9
S phantom - Présentation des faces avant et arrière
A Embase secteur - Connectez l'adaptateur
secteur fourni à cette embase.
B LED d'alimentation - Cette LED s'allume en
rouge lorsque le module est sous tension.
C
Sortie MIC 2 OUTPUT - Sortie micro XLR
symétrique.
1 Entrée MIC 1 INPUT - Entrée XLR symé-
trique permettant de connecter un micro
à condensateur.
2 Entrée MIC 2 INPUT - Entrée XLR
symétrique permettant de connecter un micro à condensateur.
3 Touche 48 V ON/OFF - Placez
cette touche en position basse
pour activer l'alimentation fantôme
(la LED s'allume alors).
D Sortie MIC 1 OUTPUT - Sortie micro
XLR symétrique.
E Sortie MIC 1 OUTPUT - Sortie Jack
6,35 mm symétrique reprenant le
signal de la sortie Mic 1 Output.
Face avant
Face arrière
Page 10

FRANÇAIS
10
Utilisation du S phantom
Configuration du S phantom
La configuration du S phantom est très simple et elle ne prend que quelques minutes. Sortez le
S phantom et l'adaptateur secteur de l'emballage (conservez-le pour tout retour en atelier).
Mise en garde : Placez les réglages de volume de sortie et d'entrée de la console, du système de
sonorisation ou de l'enregistreur au minimum AVANT de connecter ou déconnecter les câbles de vos
micros. Tous les modules d'alimentation fantôme, incluant le S phantom, produisent un bruit désagréable lorsque vous connectez ou déconnectez un micro pendant qu'ils sont sous tension. Selon le
volume du système de sonorisation, ce bruit peut endommager vos enceintes ou même entraîner des
DOMMAGES AUDITIFS si vous portez un casque ! Nous vous recommandons d'être vigilant et de régler
le niveau de l'entrée micro, des autres entrées et de la sortie principale au minimum avant de connecter ou déconnecter un câble lorsque le S phantom est sous tension.
• Utilisez un câble micro XLR standard pour relier la sortie de votre micro à condensateur à
l'entrée CHANNEL 1 INPUT du S phantom.
• Utilisez un deuxième câble micro pour relier la sortie CHANNEL 1 OUTPUT du S phantom à
l'entrée micro de la console, de l'enregistreur, du système de sonorisation ou de l'amplificateur auquel vous souhaitez connecter votre micro à condensateur. Si votre enregistreur ou
console ne dispose pas d'une entrée XLR, utilisez la sortie Jack 6,35 mm MIC 1 Output.
Remarque :
Bien qu'il existe de nombreux types de connecteurs d'entrée, les consoles et les enregistreurs sont normalement équipés de connecteurs XLR ou de Jacks 6,35 mm. Pour plus de détails,
consultez le guide de câblage en page12.
• Répétez les étapes ci-dessus pour le deuxième micro, en utilisant l'entrée CHANNEL 2
INPUT et la sortie CHANNEL 2 OUTPUT.
• Connectez l'adaptateur secteur à l'embase. Assurez-vous que l'adaptateur secteur soit com-
patible avec la tension utilisée dans votre pays. Consultez les caractéristiques techniques en
page 28.
• Placez la touche 48 V en position basse pour activer l'alimentation fantôme.
Page 11

FRANÇAIS
11
Configuration type
Cette illustration présente une
configuration type pour un Home
Studio. Le S phantom est utilisé
pour relier deux micros à condensateur à un enregistreur sur disque dur qui ne dispose pas d'une
alimentation fantôme.
Remarque : Vous pouvez utiliser la
sortie XLR ou Jack 6,35 mm pour
le micro 1, tel qu'indiqué par la
ligne pointillée.
Le S phantom offre encore plus de
possibilités en permettant d'acheminer le signal de l'entrée micro 1
aux sorties XLR et Jack 6,35 mm.
Utilisation du S phantom
Déconnexion du S phantom
Suivez cette procédure pour déconnecter votre S phantom :
• Réglez le niveau des entrées servant à connecter le S phantom au minimum.
• Placez le réglage de volume général au minimum.
• Mettez le S phantom hors tension en déconnectant l'adaptateur secteur.
Page 12

FRANÇAIS
12
S phantom - Guide de câblage
Guide de câblage
Il existe plusieurs façons de configurer le S phantom en fonction de votre application spécifique.
Consultez ces schémas avant de connecter vos équipements.
Page 13

DEUTSCHE
13
S phantom Einleitung und Features
Einleitung
Herzlichen Glückwunsch zum Kauf der S phantom von Samson Audio! Diese 2-Kanal, 48-Volt
Phantomspannungsquelle kann fast alle Kondensatormikrofone im Doppelpack mit Spannung
versorgen. Die S phantom ist die perfekte Lösung für Anwendungen, bei denen der Einsatz
von Kondensatormikrofonen erwünscht ist, aber die verwendeten Mischer, Recorder, PAs oder
Verstärker keine Phantomspannung an den Mikrofoneingängen bereitstellen. Dank seiner
soliden, auf einem Pressaluminium-Chassis und überdimensionierten, stoßabsorbierenden
Gummifüßen basierenden Bauweise bietet die S phantom in jeder Situation exzellente und
zuverlässige Leistungen.
In diesem Handbuch finden Sie eine detaillierte Beschreibung der Funktionen der S phantom
sowie eine Führung durch die vorder- und rückseitigen Bedienfelder, schrittweise Anleitungen
für die Anwendung der S phantom und umfassende Spezifikationen. Bitte vergessen Sie nicht,
die beiliegende Garantiekarte ausgefüllt an uns zurückzusenden, damit Sie online technischen
Support erhalten und wir Ihnen zukünftig aktualisierte Informationen über andere SamsonProdukte zukommen lassen können. Besuchen Sie auch unsere Webseite (www.samsontech.
com), auf der Sie alle Informationen über unsere komplette Produktlinie finden. Bei Kauf außerhalb der USA setzen Sie sich bezüglich Garantie-Informationen bitte mit Ihrem lokalen Vertrieb
in Verbindung.
S Phantom Features
• 2-Kanal, 48 Volt Phantomspannungsquelle zum Betreiben der meisten Kondensatormikrofone
• Zwei symmetrische XLR-Mikrofoneingänge
• Zwei symmetrische XLR-Mikrofonausgänge
• Praktische 1/4" Klinkenausgangsbuchse für Mic 1 ermöglicht die einfache Verkabelung mit
Personal Recordern ohne XLR-Eingänge
• Große, stoßabsorbierende Gummifüße
• 18 Volt DC Adapter inklusive
• 3 Jahre erweiterte Garantie
Page 14

DEUTSCHE
14
S phantom Layout der Vorder- und Rückseite
A DC POWER INPUT - Schließen Sie hier
den mitgelieferten Netzadapter an.
B POWER ON LED - Bei eingeschaltetem
Gerät leuchtet die rote LED.
C MIC 2 OUTPUT - Symmetrischer XLR-
Mikrofonausgang.
1 MIC 1 INPUT - Symmetrischer XLR-Ein-
gang zum Anschließen von Kondensatormikrofonen.
2 MIC 2 INPUT - Symmetrischer
XLR-Eingang zum Anschließen von
Kondensatormikrofonen.
3 48V ON/OFF-S
chalter - Bei
gedrückter Taste leuchtet die LED
und die Phantomspeisung ist
eingeschaltet.
D MIC 1 OUTPUT - Symmetrischer
XLR-Mikrofonausgang.
E MIC 1 OUTPUT - Symmetrischer 1/4"
Ausgang für Mic 1.
Layout der Vorderseite
Layout der Rückseite
Page 15

DEUTSCHE
15
S Phantom bedienen
S phantom einrichten
Die S phantom lässt sich einfach und in wenigen Minuten einrichten. Entfernen Sie das gesamte
Verpackungsmaterial (heben Sie es für eine spätere Verwendung gut auf ) und trennen Sie den
mitgelieferten DC Netzadapter von der S phantom.
Vorsicht: Sie sollten unbedingt die Kanal- und Master-Pegelregler von Mischer, PA oder Recorder
zurückdrehen, BEVOR Sie die Mikrofonkabel anschließen oder trennen. Alle Phantomspannungsquellen, auch die S phantom, erzeugen ein lautes Pop-Geräusch, wenn während des Betriebs eine
Mikrofonverbindung hergestellt oder unterbrochen wird. Abhängig von der Lautstärke Ihres Systems
kann das Pop-Geräusch Ihre Boxen beschädigen oder, wenn Sie Kopfhörer tragen, SOGAR IHR
GEHÖR BESCHÄDIGEN! Gehen Sie also vorsichtig vor und drehen Sie den Pegel des Mikrofonkanals,
der anderen Eingänge und des Master-Reglers zurück, bevor Sie bei eingeschalteter S phantom
Mikrofonkabel anschließen oder entfernen.
• Verbinden Sie den Ausgang Ihres Kondensatormikrofons über ein standard XLRMikrofonkabel mit dem CHANNEL 1 INPUT der S phantom.
• Verbinden Sie den CHANNEL 1 OUTPUT der S phantom über ein zweites Mikrofonkabel
mit dem Mikrofoneingang des Mischers, Recorders, PA-Systems oder Verstärkers, an den
Sie das Kondensatormikrofon anschließen möchten. Wenn Ihr Recorder oder Mischer nicht
über einen XLR-Eingang verfügt, können Sie den 1/4" MIC 1 Output benutzen.
Hinweis: Ihr Mischer oder Recorder besitzt wahrscheinlich mehrere verschiedene Eingänge, aber
diese werden höchstwahrscheinlich als XLR- oder 1/4" Klinkenbuchsen ausgelegt sein. Ein detailliertes
Verdrahtungsdiagramm finden Sie auf Seite 17
• Wiederholen Sie die obigen Schritte für das zweite Mikrofon mit den CHANNEL 2 INPUTS
und OUTPUTS.
• Schließen Sie den mitgelieferten DC-Adapter an eine Netzsteckdose an. Stellen Sie sicher,
dass der Adapter auf die in Ihrem Land übliche Spannung ausgelegt ist. Siehe Technische Daten
auf Seite 29.
• Drücken Sie die 48V-Taste, um die Phantomspannung zu aktivieren.
Page 16

DEUTSCHE
16
Typisches Setup
Das folgende Diagramm zeigt
ein typisches Setup für ein
Projektaufnahmestudio, wobei
zwei Kondensatormikrofone
mittels S phantom an einen
Personal Harddisk-Recorder
angeschlossen sind, der keine
Phantomspannung bereitstellt.
Hinweis: Man kann entweder den
XLR- oder 1/4"-Klinkenausgang
für Mic 1 verwenden, was in der
Abbildung durch eine gepunktete
Linie dargestellt wird.
Die S phantom ist zusätzlich als
1-auf-2 Mikrofonsplitter einsetzbar, indem man die XLR- und
1/4"-Ausgänge von Mic1 gleichzeitig benutzt.
S Phantom bedienen
S phantom-Verbindung trennen
Gehen Sie schrittweise wie folgt vor, um die Kabelverbindungen des Systems zu trennen.
• Drehen Sie die Pegelregler bei den Eingangskanälen, an die die S phantom angeschlossen
ist, ganz zurück.
• Drehen Sie den Master-Pegelregler zurück.
• Schalten Sie dann die S phantom aus, indem Sie den AC-Adapter entfernen.
Page 17

DEUTSCHE
17
S phantom Verdrahtungsanleitung
Verdrahtungsanleitung
Abhängig von Ihrem speziellen Setup gibt es mehrere Möglichkeiten, die S phantom in Ihr
System zu integrieren. Gehen Sie beim Anschließen Ihrer Geräte nach den folgenden Kabeldiagrammen vor.
Page 18

ESPAÑOL
18
Introducción y características del S phantom
Introducción
¡Felicidades y gracias por su compra del S phantom de Samson Audio! El S phantom es una
fuente de alimentación fantasma de 48 voltios de dos canales, capaz de pasar voltaje a la
mayoría de micrófonos condensadores, con un máximo de dos a la vez. El S phantom es la
solución perfecta para cualquier aplicación en la que necesite usar micrófonos condensadores
y su mezclador, grabadora, sistema PA o amplificador no disponga de alimentación fantasma
en sus entradas de micrófono. Cualquiera que sea su situación, el S phantom le ofrecerá un
rendimiento fiable y de alta calidad gracias a su robusta construcción con un chasis de aluminio
extrudido y unas grandes patas de goma.
En este manual encontrará una descripción más detallada de las distintas funciones del S
phantom, así como un recorrido guiado por su panel frontal y trasero, instrucciones paso-apaso para el manejo de esta unidad y una completa tabla de especificaciones técnicas. También
encontrará una tarjeta de garantía—no se olvide de cumplimentarla y devolvérnosla por
correo para que pueda recibir soporte técnico online y para que podamos enviarle información
actualizada acerca de este y otros productos Samson en el futuro. Además, no deje de visitar la
página web (www.samsontech.com) donde encontrará más información acerca de este y otro
productos de nuestra amplia gama. Si compró este aparato en otro país, póngase en contacto
con su distribuidor local para que le informen sobre los términos de la garantía.
Características del S Phantom
• Fuente de alimentación fantasma de 48 voltios y dos canales para pasar voltaje a la mayoría
de micrófonos condensadores.
• Dos entradas de micrófono en XLR balanceado.
• Dos salidas de micrófono en XLR balanceado.
• Util conector de salida en 6,3 mm para Mic 1, que permite un sencillo cableado con la mayoría
de grabadoras personales que no ofrecen entradas XLR.
• Grandes patas de goma.
• Incluye adaptador de corriente de 18 voltios DC.
• Garantía ampliada de 3 años.
Page 19

ESPAÑOL
19
Distribución del panel frontal y trasero del S phantom
A DC POWER INPUT - Conecte aquí el
adaptador de corriente incluido.
B LED POWER ON - Este piloto rojo se
ilumina cuando la unidad está activa.
C MIC 2 OUTPUT - Salida de micrófono en
XLR balanceado.
1 MIC 1 INPUT- Entrada en XLR balanceado
para la conexión de un micrófono
condensador.
2 MIC 2 INPUT- Entrada en XLR
balanceado para la conexión de un
micrófono condensador.
3
Interruptor 48V ON/OFF -
Cuando esté pulsado, el LED se
encenderá para indicar que la
alimentación fantasma está activa.
D MIC 1 OUTPUT - Salida de
micrófono en XLR balanceado.
E MIC 1 OUTPUT - Conector de 6,3
mm balanceado para la salida Mic 1.
Panel frontal
Panel trasero
Page 20

ESPAÑOL
20
Manejo del S Phantom
Configuración del S phantom
El proceso básico para la configuración y manejo de su S phantom es muy simple y solo le
ocupará unos minutos. Separe todo el embalaje y protecciones (pero consérvelos por si necesita
usarlos de nuevo en el futuro) y asegúrese de extraer el adaptador de corriente incluido.
Precaución: Asegúrese de reducir al mínimo los controles de volumen de canal y master de su mesa
de mezclas, equipo PA o grabadora ANTES de conectar o desconectar los cables de sus micrófonos.
Todas las fuentes de alimentación fantasma, incluyendo el S phantom, producen un fuerte petardeo
cuando un micrófono es conectado o desconectado con la unidad en marcha. Dependiendo del nivel
de su sistema, ese petardeo puede llegar a dañar los altavoces o, si está usando unos auriculares,
producirle un GRAVE DAÑO AUDITIVO! Por este motivo tenga cuidado y asegúrese de dejar al mínimo
el volumen del canal de su micro, el del resto de entradas y el volumen master antes de conectar o
desconectar cualquier cable de micro con el S phantom encendido.
• Por medio de un cable de micrófono XLR standard, conecte la salida de su micrófono
condensador a la entrada CHANNEL 1 INPUT del S phantom.
• Por medio de un segundo cable de micro, conecte la salida CHANNEL 1 OUTPUT del S
phantom a la entrada de micrófono de la mesa de mezclas, grabadora, PA o amplificador
a la que quiera conectar su micro condensador. Si su grabadora o mesa de mezclas no
dispone de una entrada XLR, también puede usar la salida MIC 1 de 6,3 mm.
Nota: Su mesa de mezclas o grabadora puede disponer de tipos muy diferentes de conectores de
entrada, pero lo más probable es que sean XLR o de 6,3 mm. Si quiere tener más detalles sobre los
diagrama de cableado, vea la página 22 de este manual.
• Repita los pasos anteriores para el segundo micrófono, usando las tomas CHANNEL 2
INPUTS y OUTPUTS.
• Conecte el adaptador DC incluido a una salida de corriente.
Asegúrese de que el adaptador
sea del voltaje correcto para su país. Vea las especificaciones técnicas en la página 29.
• Pulse el interruptor 48V para activar la alimentación fantasma.
Page 21

ESPAÑOL
21
Configuración típica
El diagrama siguiente le muestra
una configuración típica para
un estudio de grabación de
proyectos en el que se usa el S
phantom para la conexión de
dos micros condensadores a una
grabadora personal de disco duro
que no disponga de salida de
alimentación fantasma.
Nota: Puede usar tanto el
conector de salida XLR como el
de 6,3 mm para la toma Mic 1,
tal como le muestra la ilustración
con la línea de puntos.
Para una mayor funcionalidad,
puede usar el S phantom como
un divisor de un micro a dos por
medio de las salidas MIc1 XLR y
de 6,3 mm.
Manejo del S Phantom
Desconexión del S phantom
Realice estos pasos para la desconexión de su sistema.
• Baje los controles de nivel, hasta la posición off, de los canales de entrada a los que esté
conectado el S phantom.
• Baje el control de nivel de volumen master.
• Ahora, apague el S phantom simplemente desconectando su adaptador de corriente.
Page 22

ESPAÑOL
22
Guía de cableado del S phantom
Guía de cableado
Existen varias formas de interconectar el S phantom, dependiendo de su configuración concreta.
Consulte los diagrama de cables siguientes a la hora de conectar su equipo.
Page 23

ITALIANO
23
S phantom - Introduzione e Caratteristiche
Introduzione
Ci congratuliamo per l'acquisto dell'S phantom della Samson Audio! L'S phantom è un generatore
di alimentazione fantasma a 48 volt, a due canali, capace di alimentare praticamente qualsiasi
microfono a condensatore, due alla volta. L'S phantom è la soluzione perfetta per le applicazioni
dove si desidera usare microfoni a condensatore e il mixer, il registratore, l'amplificatore o il sistema PA da usare non dispongono agli ingressi microfonici di alimentazione fantasma. Qualunque
sia l'esatta situazione d'uso, l'S phantom è in grado di fornire prestazioni affidabili e di alta qualità,
grazie alla solida realizzazione della sua costruzione, basata su di uno chassis in alluminio a estrusione con piedini in gomma di dimensioni generose.
In questo manuale, troverete la descrizione dettagliata delle caratteristiche dell'S phantom, una
ricognizione completa sui suoi pannelli frontale e posteriore, istruzioni passo a passo per l'uso e
le specifiche complete. Troverete inclusa la cartolina di garanzia: non dimenticate di compilarla e
spedircela per posta, per poter ricevere supporto tecnico in linea e permetterci di inviarvi, in futuro, informazioni su altri prodotti Samson. Inoltre, ricordati di visitare il sito www.samsontech.com,
per conoscere l’intera gamma dei nostri prodotti. Se acquistato al di fuori degli Stati Uniti, contatta
direttamente il distributore della tua area per informazioni riguardanti la garanzia.
S Phantom - Caratteristiche
• Generatore di alimentazione fantasma a 48 volt, a due canali, per alimentare la maggior parte
dei microfoni a condensatore.
• Due ingressi microfonici XLR bilanciati.
• Due uscite microfoniche XLR bilanciate.
• Comoda uscita su jack phono da 1/4” per il Microfono 1, per semplificare il collegamento con i
tanti registratori personali che non dispongono di ingressi XLR..
•
Ampi piedini in gomma.
• Alimentatore a 18 Volt in CC in dotazione.
•
Garanzia estesa a tre anni (valida per il mercato Statunitense).
Page 24

ITALIANO
24
S phantom - I Pannelli Frontale e Posteriore
A INGRESSO DI ALIMENTAZIONE - è qui
che va collegato l'alimentatore in dotazione.
B LED DI ACCENSIONE - è il LED rosso
che si illumina quando l'apparecchio è
acceso.
1 INGRESSO MIC 1 - ingresso XLR bi-
lanciato per il collegamento di microfoni a condensatore.
2 INGRESSO MIC 2 - ingresso XLR bilan-
ciato per il collegamento di microfoni a
condensatore.
3 INTERRUTTORE 48V ON/OFF - quando
lo si preme, se ne illumina il LED, ad
indicare che l'alimentazione fantasma è
attiva.
C USCITA MIC 2 - uscita microfonica su
XLR bilanciato.
D USCITA MIC 1
- uscita microfonica su
XLR bilanciato.
E USCITA MIC 1 - connettore da 1/4” per
l'uscita Mic 1.
Pannello Frontale
Pannello Posteriore
Page 25

ITALIANO
25
La Configurazione dell'S Phantom
La Configurazione dell'S phantom
La procedura di base per la configurazione e l'uso dell'S phantom è semplice e richiede solo pochi
minuti. Eliminate tutti i materiali di imballo (conservateli nel caso vi servano in futuro per evenuali
spedizioni in assistenza) ed assicuratevi di aver preso fuori l'alimentatore in CC in dotazione.
Attenzione: controllate di aver chiuso i volumi di canale e generali del mixer, del sistema di amplifi-
cazione PA o del registratore PRIMA di collegare o scollegare i cavi microfonici. Quando si connette o si
stacca un microfono in condizioni d'uso, tutti gli alimentatori fantasma, compreso l'S phantom, generano un forte schiocco. A secondo del livello al quale è regolato il sistema, lo schiocco può danneggiare
le casse acustiche o, se siete in cuffia, puo PERFINO DANNEGGIARVI L'UDITO! Quando l'S phantom è
acceso, fate dunque attenzione ad abbassare il volume del canale del microfono, degli altri ingressi ed
i volumi generali prima di attaccare o staccare qualsiasi cavo microfonico.
• Usando un cavo XLR microfonico standard, collegate l'uscita del microfono a condensatore
all'INGRESSO DEL CANALE 1 dell'S phantom.
• Usando un secondo cavo microfonico, collegate l'USCITA DEL CANALE 1 dell'S phantom
all'ingresso microfonico del mixer, del registratore, dell'amplificatore o del sistema di amplificazione PA al quale volete che il microfono a condensatore sia collegato. Se il mixer o il
registratore non dispongono di un ingresso XLR, potete usare l'Uscita MIC 1 da 1/4”.
Nota: sul mixer o sul registratore potrebbero esserci connettori di ingresso di molti tipi, ma molto
probabilmente troverete o XLR o jack phono da 1/4”. Trovate i diagrammi di cablaggio dettagliati a
pagina 27 di questo manuale.
• Ripetete le istruzioni sopra per il collegamento del secondo microfono all'INGRESSO e alla
USCITA DEL CANALE 2.
• Collegate l'alimentatore in CC in dotazione ad una presa di corrente. Controllate con attenzio-
ne che l'adattatore sia del voltaggio corretto per la nazione in cui lo usate. Fate riferimento alle
Specifiche riportate sull'adattatore.
• Premete l'interruttore “48V” per attivare l'alimentazione fantasma.
Page 26

ITALIANO
26
Configurazione Tipica
Il diagramma a fianco mostra
una configurazione tipica per
uno studio di registrazione di
progetto, con l'uso dell'S phantom per collegare due microfoni
a condensatore a un registratore compatto, su disco rigido, che
non dispone di alimentazione
fantasma.
Nota: per il Mic 1 potete usare
sia l'uscita XLR che l'uscita jack
phono da 1/4”, come indicato
nell'illustrazione dalla linea tratteggiata.
Come caratteristica aggiuntiva, potete usare le uscite MIC
1 XLR e da 1/4” per trasformare l'S Phantom in un partitore
(“splitter”) microfonico “da uno
a due”.
L'Uso dell'S Phantom
Come Staccare l'S phantom
Ecco le istruzioni per scollegare il sistema.
• Abbassate, fino a chiuderli, i controlli di livello dei canali di ingresso ai quali avete collegato
l'S phantom.
• Abbassate il controllo generale di livello del volume.
• A questo punto spegnete l'alimentatore S phantom staccandone l'adattatore in CA.
Page 27

ITALIANO
27
S phantom - Guida al Cablaggio
Guida al Cablaggio
È possibile interfacciare l'S phantom in molti modi differenti, a seconda dell'esatta configurazione d'uso. Ecco di seguito i diagrammi per il collegamento delle vostre apparecchiature.
Page 28

28
S phantom Specifications
Phantom Power Voltage 48 Volt
Connectors
Mic One Input XLR Balanced (PIN 1 GND, PIN 2 HOT, PIN 3 COLD)
Mic Two Input XLR Balanced (PIN 1 GND, PIN 2 HOT, PIN 3 COLD)
Mic One Output XLR Balanced (PIN 1 GND, PIN 2 HOT, PIN 3 COLD)
Mic One Output 1/4-inch Phone Balanced
Mic Two Output XLR Balanced (PIN 1 GND, PIN 2 HOT, PIN 3 COLD)
Control Switches
48 Volt ON / OFF
Indicators
Power On Red Light Emitting Diode
Phantom On Red Light Emitting Diode in 48 Volt switch
Power 18 VDC adapter (included)
Dimensions 5.65” L x 4.13” W x 2” H (144mm L x 105mm W x 51mm H)
Weight 16.5 oz., 419 gm.
Specifications are subject to change without notice.
S phantom - Caractéristiques techniques
Tension d'alimentation fantôme 48 V
Connecteurs
Entrée Mic 1 XLR symétrique (Broche 1 : Masse, Broche 2 : Plus, Broche 3 :
Moins)
Entrée Mic 2 XLR symétrique (Broche 1 : Masse, Broche 2 : Plus, Broche 3 :
Moins)
Sortie Mic 1 XLR symétrique (Broche 1 : Masse, Broche 2 : Plus, Broche 3 :
Moins)
Sortie Mic 1 Jack 6,35 mm symétrique
Sortie Mic 2 XLR symétrique (Broche 1 : Masse, Broche 2 : Plus, Broche 3 :
Moins)
Touche
48 Volt ON/OFF
Témoins
Mise sous tension Led rouge
Activation de l'alimentation fantôme Led rouge (touche 48 Volt)
Alimentation Adaptateur secteur 18 Vcc (fourni)
Dimensions 144 mm (L) x 105 mm (P) x 51 mm (H)
Poids 419 g
Les caractéristiques peuvent être modifiées à tout moment sans préavis.
Page 29

29
S phantom Technische Daten
Phantomspannung 48 Volt
Anschlüsse
Mic One-Eingang XLR symmetrisch
(POL 1 ERDE, POL 2 HEISS, POL 3 KALT)
Mic Two-Eingang XLR symmetrisch
(POL 1 ERDE, POL 2 HEISS, POL 3 KALT)
Mic One-Ausgang XLR symmetrisch
(POL 1 ERDE, POL 2 HEISS, POL 3 KALT)
Mic One-Ausgang 1/4" Klinke symmetrisch
Mic Two-Ausgang XLR symmetrisch
(POL 1 ERDE, POL 2 HEISS, POL 3 KALT)
Kontrollschalter
48 Volt ON / OFF
Anzeigen
Power On Rote LED
Phantom On Rote LED im 48 Volt-Schalter
Spannungsversorgung 18 VDC Adapter (inklusive)
Abmessungen 144mm L x 105mm B x 51mm H (5.65” L x 4.13” B x 2” H)
Gewicht 419 g, 16.5 Unzen
Technische Daten können unangekündigt geändert werden.
Especificaciones técnicas del S phantom
Voltaje de alimentación fantasma 48 voltios
Conectores
Entrada Mic 1 XLR balanceado (punta 1 masa, punta 2 activo, punta 3
pasivo)
Entrada Mic 2 XLR balanceado (punta 1 masa, punta 2 activo, punta 3
pasivo)
Salida Mic 1 XLR balanceado (punta 1 masa, punta 2 activo, punta 3
pasivo)
Salida Mic 1 6,3 mm balanceado
Salida Mic 2 XLR balanceado (punta 1 masa, punta 2 activo, punta 3
pasivo)
Interruptores de control
48 Volt ON / OFF
Indicadores
Power On ED de color rojo
Phantom On LED de color rojo en interruptor 48 Volt
Alimentación Adaptador de 18 V DC (incluido)
Dimensiones 144 L x 105 P x 51 A mm (5.65” L x 4.13” P x 2” A)
Peso 419 gr. (16.5 oz.)
Estas especificaciones están sujetas a cambios sin previo aviso.
Page 30

S phantom - Specifiche
Alimentazione Fantasma 48 Volt
Connettori
Ingresso Mic Uno XLR Bilanciato (PIN 1 Massa, PIN 2 Caldo, PIN 3 Freddo)
Ingresso Mic Due XLR Bilanciato (PIN 1 Massa, PIN 2 Caldo, PIN 3 Freddo)
Uscita Mic Uno XLR Bilanciato (PIN 1 Massa, PIN 2 Caldo, PIN 3 Freddo)
Uscita Mic Uno 1/4” Phono Bilanciato
Uscita Mic Due XLR Bilanciato (PIN 1 Massa, PIN 2 Caldo, PIN 3 Freddo)
Interruttori di Controllo
48 Volt ON / OFF
Indicatori
Accensione Diodo a Emissione Luminosa Rosso
Alimentazione Fantasma Diodo a Emissione Luminosa Rosso nell'interruttore a 48 Volt
Alimentazione Alimentatore a 18 VCC in dotazione
Dimensioni
144 (L) x 105 (P) x 51 (A) mm - 5,65” (L) x 4,13” (P) x 2” (A)
Peso 470 g, 16,5 oz.
Specifiche soggette a variazioni senza preavviso.
Page 31

Page 32

Samson Technologies Corp.
45 Gilpin Avenue
Hauppauge, New York 11788-8816
Tel.: 1-800-3-SAMSON (1-800-372-6766)
Fax: 631-784-2201
www.samsontech.com
 Loading...