

Page 1

Tub & Shower Wall Installation Instructions
Thank you for purchasing Transolid® Tub & Shower Walls. Please read the instructions
carefully prior to installing the wall system. This manual will give you basic instructions for
the installation of tub and shower walls in a step-by-step sequence that will work in most
types of installations. If you have an installation that is not covered in this manual, please
contact your Transolid dealer or contact Transolid directly for additional information
to cover your application.
Warning - Please inspect all items for breakage and report any damage to the store of purchase. Store panels in
a at area to avoid warpage until the time of installation. Do not store the panels out of the original packaging
in a vertical position. Allow panels to acclimate to room temperature before installing.
Tools and Supplies Needed for Installation
• Circular Saw with Carbide Tip Blade (24-40 tooth) • Level
• Random Orbital Sander • Square
• Belt Sander with 80 Grit Belt • Jig Saw with Wood Finish Blade
• 150-320 Grit Sandpaper & Scotch Brite Pad • Compass or Scribe Tool
• Installation Kit or Hot Melt Gun & Glue Sticks • Denatured Alcohol
• Drill, Hole Saw, 1/2” Diameter Bit (Sharp) • Clean Shop Rags
• Caulk Gun & Silicone • 1 x 4 x 8’ Wood for Bracing (4 pcs.)
• Paintable Latex Caulk
Preparing the Installation Site
• Prepare the area with moisture resistant dry wall, marine grade plywood, or tile backer board.
Never install Transolid directly on any wall construction that is, or may become, damp.
• When installing over ceramic tile, check for loose tiles. If you nd any, correct the problem. Make sure that
the area to be covered is uniform in support. If not, build up the areas without tile. Remove the bottom row
of tile and cut a ventilation gap in the substrate.
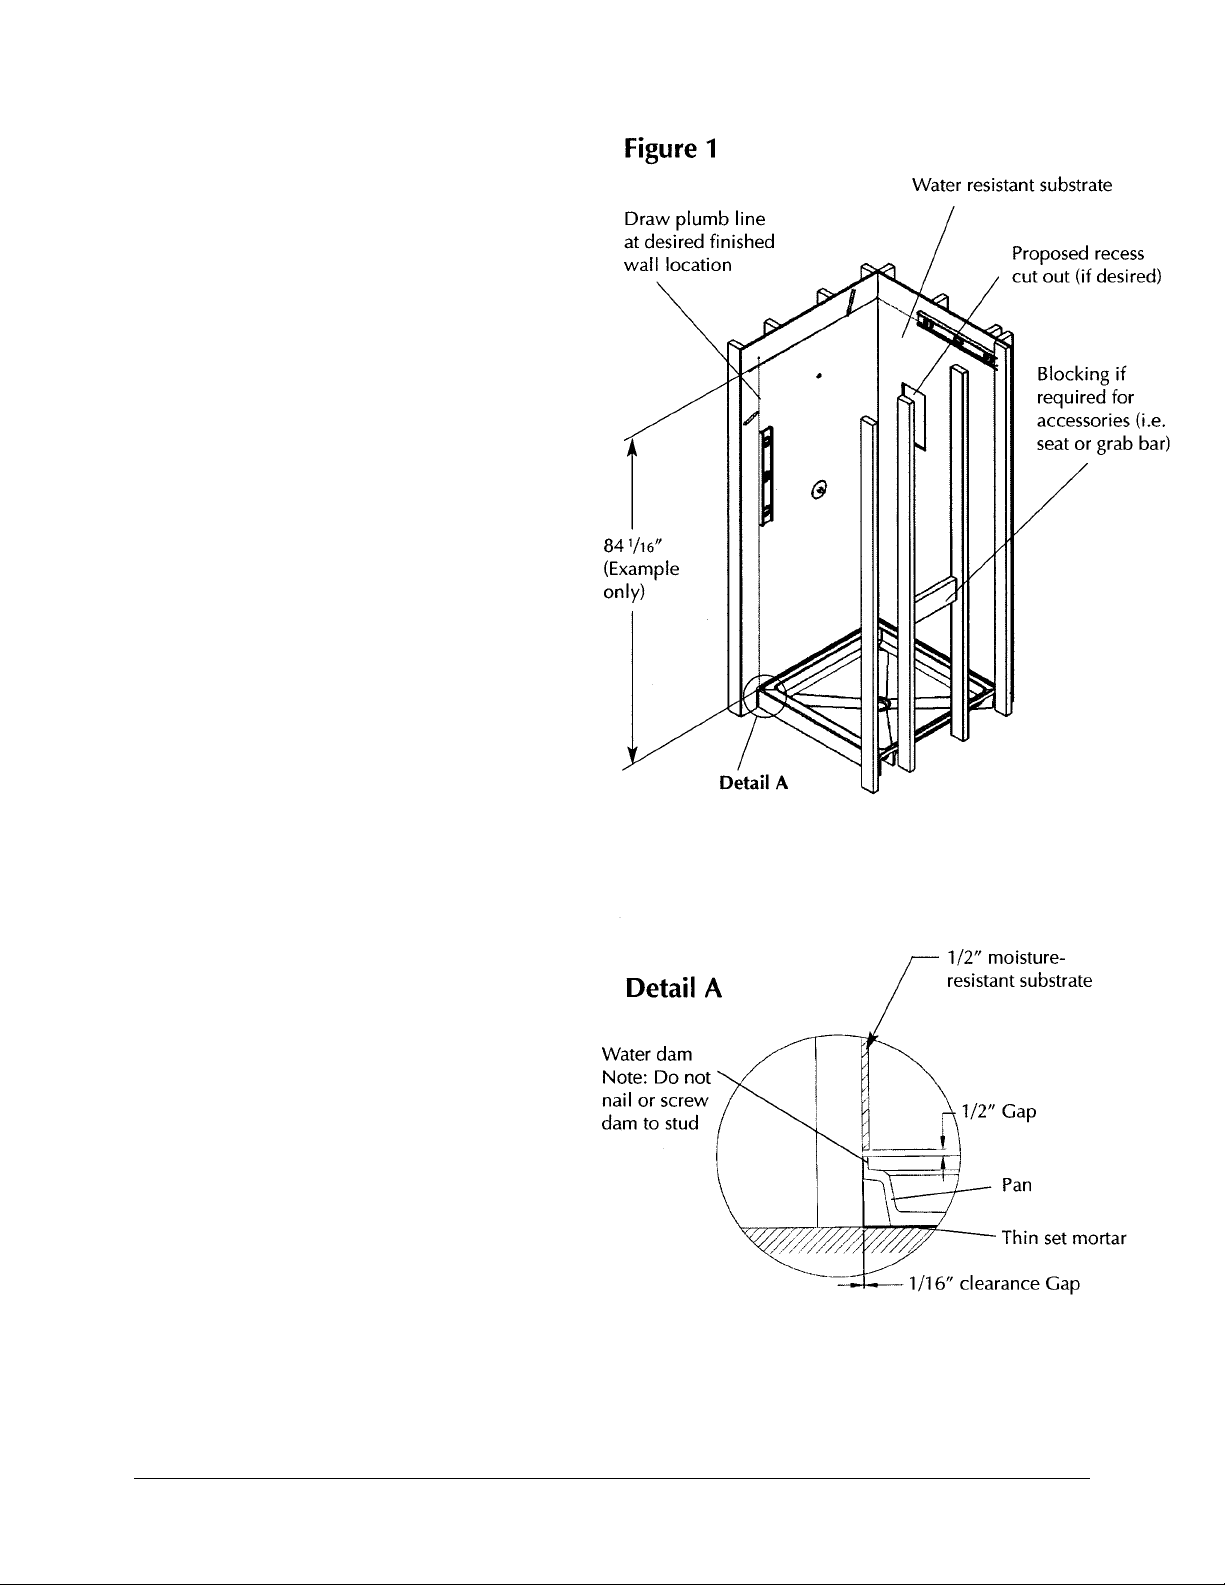
• On every installation, make sure that there is a 1/2” clearance between the top of the shower pan or tub deck
and the bottom of the substrate. This will allow for ventilation and keep water leaks from wicking up the
substrate. (Figure 1)
Preparation for Accessories
Recessed Accessories:
Make sure the accessories will t near, but not in, a stud and closer to the center of the sheet. Make sure no
electrical wiring or plumbing is present before cutting out for the accessories. Make the cutout in the substrate
to receive the accessory.
Surface Mounted Accessories:
If a surface mounted accessory, such as a grab bar, is going to be installed, make sure 2” x 6” wood blocking is
installed behind the substrate where the surface mounted accessory will be located. This will insure that there is
solid backing for any screws that need to be used in the installation.
Transolid, Div. • 400 Dietz Road • Warren, OH 44483 • (800) 766-2452 • www.transolid.com
Page 2
Measuring for Installation
Leave the protective lm on the panels until the walls
are installed.
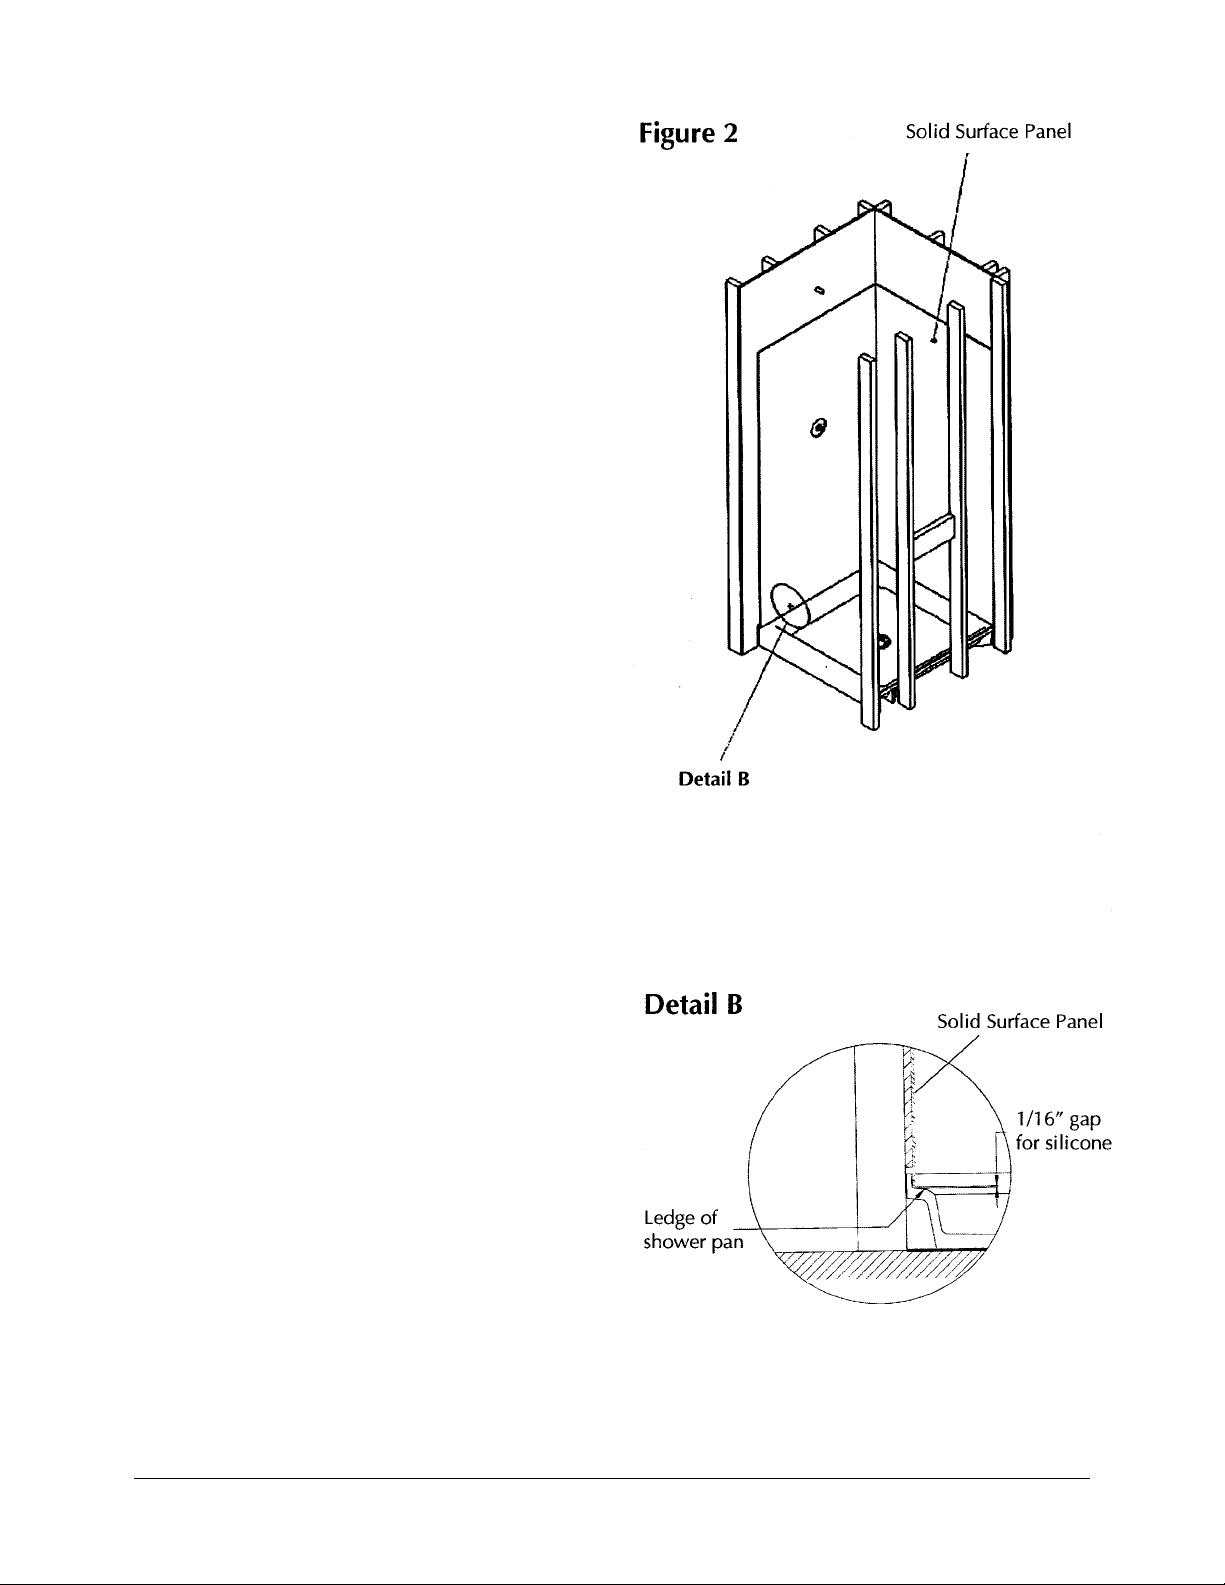
1. Determine your desired wall panel height. Allow
for a 1/16” gap between the panel and shower/tub
base for a better silicone seal.
2. Panels should be installed in the following order:
Ceiling, Back wall, Side wall without plumbing and
the plumbing wall.
3. You may need to draw level and plumb lines on
the wall to determine whether your shower pan or
walls are out of square. Using the reference line
and measuring from the lowest point on tub or
widest point on the wall, determine how your
panels will need to be cut. Transfer this data to the
panels. (Figure 1)
4. Check your measurements and cut the panels with
a circular saw or jig saw. You may make nal
adjustments to your cuts with a belt sander.
Measuring and Making Cutouts
1. All inside corners of cutouts should have a mini mum 1/4” radius. To avoid possible breakage,
do not cut sharp inside corners.
2. Locate the location of the plumbing holes. Transfer
the data to the panels. Cut the holes a minimum
1/4” larger than the pipe diameters. The cover
plates for the plumbing xtures may allow for
more variance. Consult the plumbing xture
installation instructions for templates and recom mended hole cut out sizes. Check your measure ments and using a jig saw or standard bi-metal
hole saw, cut out the plumbing holes.
3. Once the panels are cut to size, locate the caddie
cutouts, marking the cut out locations. Cut the
caddies out after the panels have been installed.
Transolid, Div. • 400 Dietz Road • Warren, OH 44483 • (800) 766-2452 • www.transolid.com
Page 3
Measuring the Panels (Figure 2)
1. Shim: Place shims (1/16” thick) at the base of
where the sheets will rest. This allows for better
ow of the silicone. Laminate chips make great
shims. (Shims may not be necessary if the slope
of the pan creates a natural adhesion gap.)
2. Trial Fit & Scribe the Panels As Needed: Place
the panel on the shims where it will be installed
and check the t. If necessary, scribe the panel for
a better t. Trim the scribe with a belt sander.
3. Clean the Sheets and Installation Area: With
denatured alcohol and a clean rag, clean the back
of the sheets and the substrate, along with any
other area that will be in contact with the silicone.
4. If using an installation kit, prior to applying the
silicone adhesive, apply the butyl tape abut 2”
from the edge, around the perimeter of the panel.
5. Apply the silicone adhesive, about 1” from the
edge, around the perimeter of the panel. Place
quarter sized dots of silicone adhesive every 8-10
inches apart over the surface of the panel.
If Accessories are being used, on the wall, place a
bead of silicone around the cut out location.
6. Place the panel on the 1/16” shims, line up any
holes, and rmly press the panel in place.
7. If using a hot melt glue gun, apply the silicone as
stated in steps 4 & 5, apply hot melt along the
back edge of the panel of Transolid where it will
be attached to the substrate and press the panel
rmly into place. The hot melt will hold the panel
until the silicone sets up.
8. For Ceilings: Use a T-brace to hold the ceiling
panel in place for a minimum of 12 hours.
Transolid, Div. • 400 Dietz Road • Warren, OH 44483 • (800) 766-2452 • www.transolid.com
Page 4
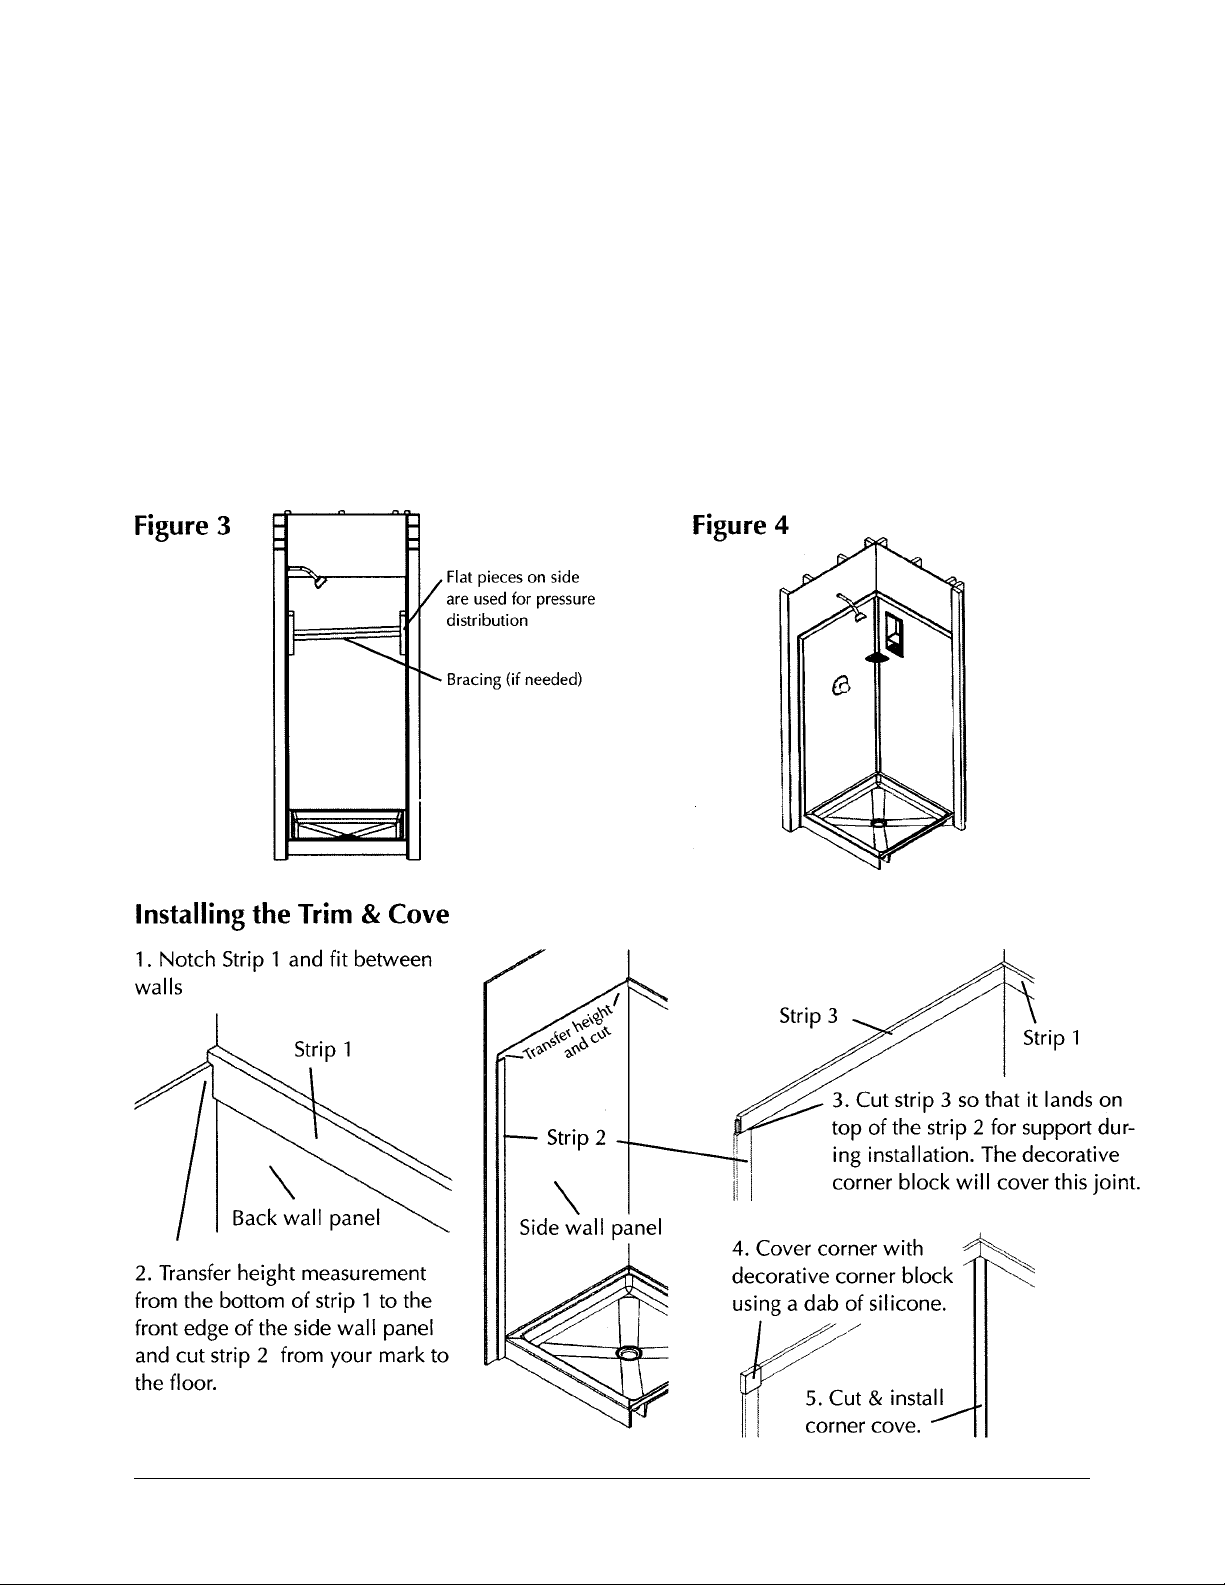
9. If you nd the panel pulling from the wall, bracing may be necessary. Use 1 x 4 boards, or other
dimensional lumber, and brace the panels where needed as illustrated. (Figure 3)
10. Allow the silicone to cure. Make all remaining cut outs. Silicone between the panel and the
substrate along the cut out edge and install the accessory.
11. Once the silicone is set up and the panel is secure, pull away the protective plastic an install the
trim and cove.
12. Install any surface mounted items, such as grab bars, shower seats, etc., make sure that the screw
hole drilled into the Transolid panel is 1/16” larger than the screw so that the accessory is held in
place by the wood blocking and not the Transolid panel. If the accessory is to be ADA compliant,
please refer to the ADA manual for the proper heights and locations.
Transolid, Div. • 400 Dietz Road • Warren, OH 44483 • (800) 766-2452 • www.transolid.com
Page 5

• Clean all joints to be siliconed well with denatured alcohol
• Trim & Cove should be installed using silicone adhesive. Hot melt glue should be used to tack the trim in
place while silicone cures.
• Caulk all inside joints with the color matched silicone.
• Caulk outside joints with paintable caulk where wall surfaces are painted, or silicone if wall surfaces
are unpainted.
• Clean up silicone with denatured alcohol while silicone is still wet.
Cove moldings and trim pieces not only enhance the looks of a wet wall installation, but also provide extra
protection against water. Cove moldings and trim pieces can also be used to better t panels when walls are
not standard sizes. You can install the cove moldings and trim pieces using stretched out butyl tape or hot melt,
along with the color matched silicone. If adding cove moldings and a trim kit, start with the trim pieces and
nish with the corner cove moldings. (Figure 4)
1. Dry t the trim pieces along the top of the wall panels, marking the measurements on each trim piece.
Outer corners should be mitered together, at 45 degree angles, while inner corners should rest ush against
the next trim piece. Make all necessary cuts. Decorative corner blocks can be used for nishing off the trim.
2. Adhere each trim piece to the outer wall and the Transolid wall panel, using spots of butyl tape or hot melt.
3. Dry t the cove strips into each corner, measuring the length from the pan ledge to the location where the
cove strip reaches the bottom of the top trim piece (or the top wall panel if a trim kit is not in use). The cove
strip should rest ush against the bottom of the trim pieces. Cut the cove piece to size.
4. Adhere the cove strip to the corner using pressure spots of butyl tape or hot melt.
5. Use the color matched silicone or caulk to seal all joint areas.
Sealing the Walls & Trim
1. Clean all joints to be siliconed well with denatured alcohol.
2. Using the color coordinated silicone in the installation kit, or silicone of your color choice, silicone all
internal joints with a uniform consistent bead. Use denatured alcohol for cleanup while silicone is still wet.
3. Using a paintable latex caulk (not supplied) caulk the outside perimeter of the shower wall and paint with
the exterior wall color. If a non-paintable surface butts up to the shower walls (i.e. tile or stone), silicone
can be used.
Transolid, Div. • 400 Dietz Road • Warren, OH 44483 • (800) 766-2452 • www.transolid.com
 Loading...