

Page 1

OWNER’S MANUAL
Page 2

Page 3

Copyright 2013, Samson Technologies Corp.
v2
Samson Technologies Corp.
45 Gilpin Avenue
Hauppauge, New York 11788-8816
Phone: 1-800-3-SAMSON (1-800-372-6766)
Fax: 631-784-2201
www.samsontech.com
Page 4
Important Safety Information
RISQUE DE CHOC ÉLECTRONIQUE -
CAUTION: TO REDUCE THE RISK OF ELECTRIC SHOCK, DO NOT REMOVE COVER (OR BACK). NO
USER-SERVICEABLE PARTS INSIDE. REFER SERVICING TO QUALIFIED SERVICE PERSONNEL.
This lightning flash with arrowhead symbol within an equilateral triangle is intended to alert
the user to the presence of non-insulated “dangerous voltage” within the product’s enclosure
that may be of sufficient magnitude to constitute a risk of electric shock.
The exclamation point within an equilateral triangle is intended to alert the user to the presence of important operating and maintenance instructions in the literature accompanying
the appliance.
AVIS
NE PAS OUVRIR
If you want to dispose this product, do not mix it with general household waste. There is a
separate collection system for used electronic products in accordance with legislation that
requires proper treatment, recovery and recycling.
Private household in the 27 member states of the EU, in Switzerland and Norway may return their used
electronic products free of charge to designated collection facilities or to a retailer (if you purchase a similar
new one).
For Countries not mentioned above, please contact your local authorities for a correct method of disposal.
By doing so you will ensure that your disposed product undergoes the necessary treatment, recovery and
recycling and thus prevent potential negative effects on the environment and human health.
Page 5

Important Safety Information
1. Read these instructions.
2. Keep these instructions.
3. Heed all warnings.
4. Follow all instructions.
5. This apparatus shall not be exposed
to dripping or splashing liquid and no
object filled with liquid, such as a vase,
should be placed on the apparatus.
6. Clean only with a dry cloth.
7. Do not block any of the ventilation
openings. Install in accordance with the
manufacturer's instructions.
8. Do not install near any heat sources such
as radiators, heat registers, stoves, or
other apparatuses (including amplifiers)
that produce heat.
9. Only use attachments/accessories specified by the manufacturer.
10. Unplug this apparatus during lightning
storms or when not in use for long periods of time.
11. Do not override the intended purpose of
the polarized or grounding-type plug. A
polarized plug has two blades, with one
wider than the other. A grounding-type
plug has two blades and a third grounding prong. The wide blade, or third prong,
is provided for your safety. If the provided
plug does not fit your outlet, consult an
electrician to replace the obsolete outlet.
12. Protect the power cord from being walked
on or pinched, particularly at the prongs,
convenience receptacles, the point where
they exit from the apparatus.
13. Use only with the cart stand, tripod
bracket, or table specified by the
manufacture, or sold with the apparatus.
When a cart is used, utilize caution when
moving the cart/apparatus combination to
avoid injury from tip-over.
14. Refer all servicing to qualified service
personnel. Servicing is required if the
apparatus has been damaged in any way,
such as power-supply cord or plug break-
age, damage due to liquid
or objects falling onto the
apparatus, exposure to
rain or moisture, or if the
apparatus does not operate normally, or has been
dropped.
15. POWER ON/OFF SWITCH: For products
with a power switch, the power switch
DOES NOT break the connection from
the mains.
16. MAINS DISCONNECT: The plug should
remain readily operable. For rack-mount
or installation where plug is not accessible, an all-pole mains switch with a
contact separation of at least 3 mm in
each pole shall be incorporated into
the electrical installation of the rack or
building.
17. FOR UNITS EQUIPPED WITH EXTERNALLY ACCESSIBLE FUSE RECEPTACLE: Replace fuse with same type and
rating only.
18. MULTIPLE-INPUT VOLTAGE: This equipment may require the use of a different
line cord, attachment plug, or both,
depending on the available power source
at installation. Connect this equipment
only to the power source indicated on the
equipment rear panel. To reduce the risk
of fire or electric shock, refer servicing to
qualified service personnel or equivalent.
Page 6

Table of Contents
Introduction . . . . . . . . . . . . . . . . . . . . . . . . . . . . 7
Features . . . . . . . . . . . . . . . . . . . . . . . . . . . . . . 8
Front Panel Layout . . . . . . . . . . . . . . . . . . . . . . . . . 9
Rear Panel Layout . . . . . . . . . . . . . . . . . . . . . . . . 10
Connecting the Resolv Monitors . . . . . . . . . . . . . . . . . . 11
Positioning your Studio Monitors . . . . . . . . . . . . . . . . . 12
Connecting an Active Subwoofer . . . . . . . . . . . . . . . . . 14
Specifications . . . . . . . . . . . . . . . . . . . . . . . . . . 15
Resolv SE Series Connections . . . . . . . . . . . . . . . . . . . 17
6
Page 7

Introduction
Thank you for purchasing a Resolv SE series studio reference monitor from Samson
Technologies! The Resolv studio monitors are active speakers that incorporate internal
biamplied power and electronic crossovers for optimal tonal balance and precise performance. Each speaker features a 1.25” neodymium, soft-dome tweeter with ferrofluid cooling, mounted in a waveguide in the center of the front baffle. This combination of components provides a precise high frequency response, and a wide listening
area. To deliver an accurate mid-range and tight low end, our engineers have carefully
voiced each model utilizing glass-fiber low-frequency drivers with butyl surrounds.
This ensures even stereo imaging without hyped frequency response. The cabinets are
constructed out of medium density fiberboard (MDF) with internal bracing to create a
rigid enclosure which reduces vibration and increases performance. The edges of the
cabinets are rounded to reduce cabinet-edge diffraction.
The Resolv SE monitors have been designed as near-field monitors ideal for use in
studios, video post-production suites, fixed installations, or as playback speakers.
They are also well-suited to be part of a multi-channel audio system.
In these pages, you’ll find a detailed description of the features of the Resolv SE5,
SE6, and SE8 models, as well as a guided tour through the control panel, and instructions for setup and use. You’ll also find a warranty card enclosed—please don’t forget
to fill it out and mail it in so that you can receive online technical support, and so that
we can send you updated information about these and other Samson products, in the
future.
We recommend you record your serial number in the space provided below for future
reference.
Serial number:_____________________________________
Date of purchase: ___________________________________
ENGLISH
FRANÇAISDEUTSCHEESPAÑOLITALIANO
With proper care and maintenance, your Resolv studio monitor will operate troublefree for many years. Should your speaker ever require servicing, a Return Authorization (RA) number must be obtained before shipping your unit to Samson. Without
this number, the unit will not be accepted. Please call Samson at 1-800-3SAMSON
(1-800-372-6766) for an RA number prior to shipping your unit. Please retain the
original packing materials and, if possible, return the unit in its original carton. If
your Resolv monitor was purchased outside of the United States, contact your local
distributor for warranty details and service information. Also, be sure to check out our
website (www.samsontech.com) for information about our full product line.
Resolv SE Studio Monitors
7
Page 8
Features
The Samson Resolv SE series reference monitors provide smooth, accurate response
for any mixing or critical listening situation. Here are some of their main features:
• Two-way, bass-reflex, active studio monitor providing extremely accurate monitoring for recording studio, post-production or multi-media applications
• 1.25” soft-dome tweeter provides extended, accurate high frequency response
with minimal distortion
• Tweeter waveguide designed to provide accurate, even dispersion of high-frequency content for flat on- and off-axis listening areas
• Powered by an internal amplifier specifically designed for optimal performance
and maximum SPL. The SE5 has 70 watts of total power, while the SE6 and
SE8 have 100 watts of total power
• Four-position High Frequency Level control allows the listener to contour the
response curve to custom tailor the response that works best in their mixing
environment
• Active electronic crossover utilizing a multi-pole design for linear frequency
response unaffected by signal level
• Tight and controlled low frequency response produced by magnetically shielded,
woven carbon fiber woofers with butyl surround and heavy-duty motor structures
with large voice coils
• Extremely rigid, MDF (Medium Density Fiberboard) construction, delivering
maximum SPL
8
Page 9

Front Panel Layout
ENGLISH
FRANÇAISDEUTSCHEESPAÑOLITALIANO
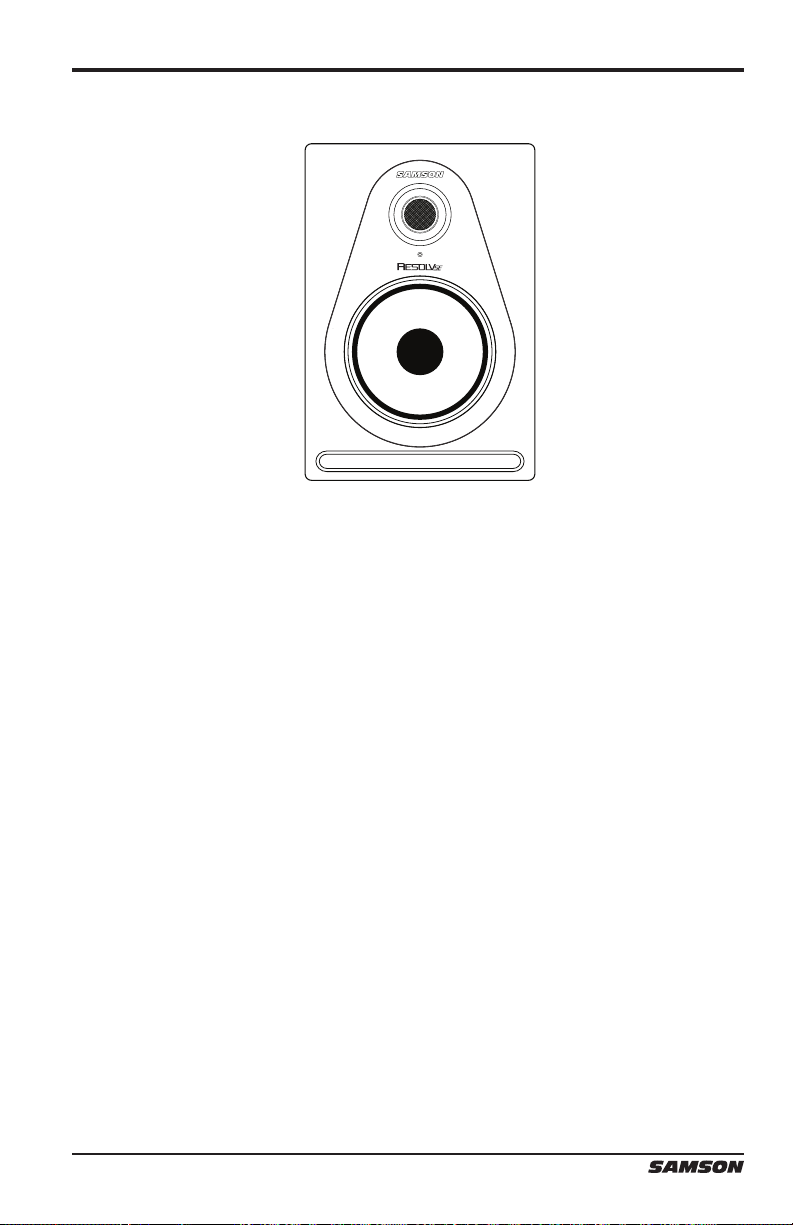
1. Tweeter – 1.25” silk-dome tweeter with ferrofluid-cooled neodymium magnet
provides a natural reproduction of high frequencies while minimizing distortion
resulting in a clear, precise and sweet top end
2. Woofer – Woven carbon fiber, copolymer butyl surround woofers provide each
monitor with tight and controlled mid- and low-frequency response
3. Power Indicator – White LED illuminates indicating the unit is powered on and
ready for operation
4. Enclosure – Solid MDF construction and internal damping maximizes acoustic
efficiency
5. Bass Reflex Port – Front-firing port provides minimal port turbulence and
enhances the linear extended low frequency response
Resolv SE Studio Monitors
9
Page 10

Rear Panel Layout
1. HF LEVEL – Four-position rotary switch used to adjust the high frequency
response. Setting the switch to 0dB (factory setting) produces a flat response.
The -2dB, +2dB and +4dB adjusts a high frequency shelf above 4kHz. Your
room acoustics or listening material will determine the appropriate setting for
your application.
2. VOLUME – Controls the amount of overall output level.
3. XLR Input (SE6 and SE8 only) – Connect a balanced, +4dBu, line level signal here
via standard XLR (microphone) cable.
4. ¼” Input – Connect a balanced, +4dBu, line level signal here via a TRS (Tip,
Ring, Sleeve), or unbalanced TS (Tip, Sleeve) ¼”cable.
5. RCA Input – Used to connect signals from unbalanced, –10dBV devices.
6. POWER Switch – Use this switch to turn the speakers on and off. When powered
on, the front panel LED will light.
7. Voltage Switch – Used to select the operating voltage.
NOTE: Be sure to check that the voltage setting and fuse rating are correct for your country.
8. AC Inlet – Connect the supplied IEC power cable here.
9. Fuse Holder – Holds the mains fuse. To replace the fuse, remove the power cable
and pry the fuse holder open using a flat head screwdriver.
NOTE: Never remove the fuse while the speakers are plugged in.
10
Page 11
Connecting the Resolv Monitors
Control Room Outputs
The Resolv SE series monitors are the perfect addition to any project studio. When
connecting your monitors to a mixer, you should utilize the control room outputs of
your mixer so that you can independently control the level to the speakers without
affecting the main mix output. Follow the simple steps and diagram in this section
to quickly connect your monitors using a standard recording console’s control room
outputs.
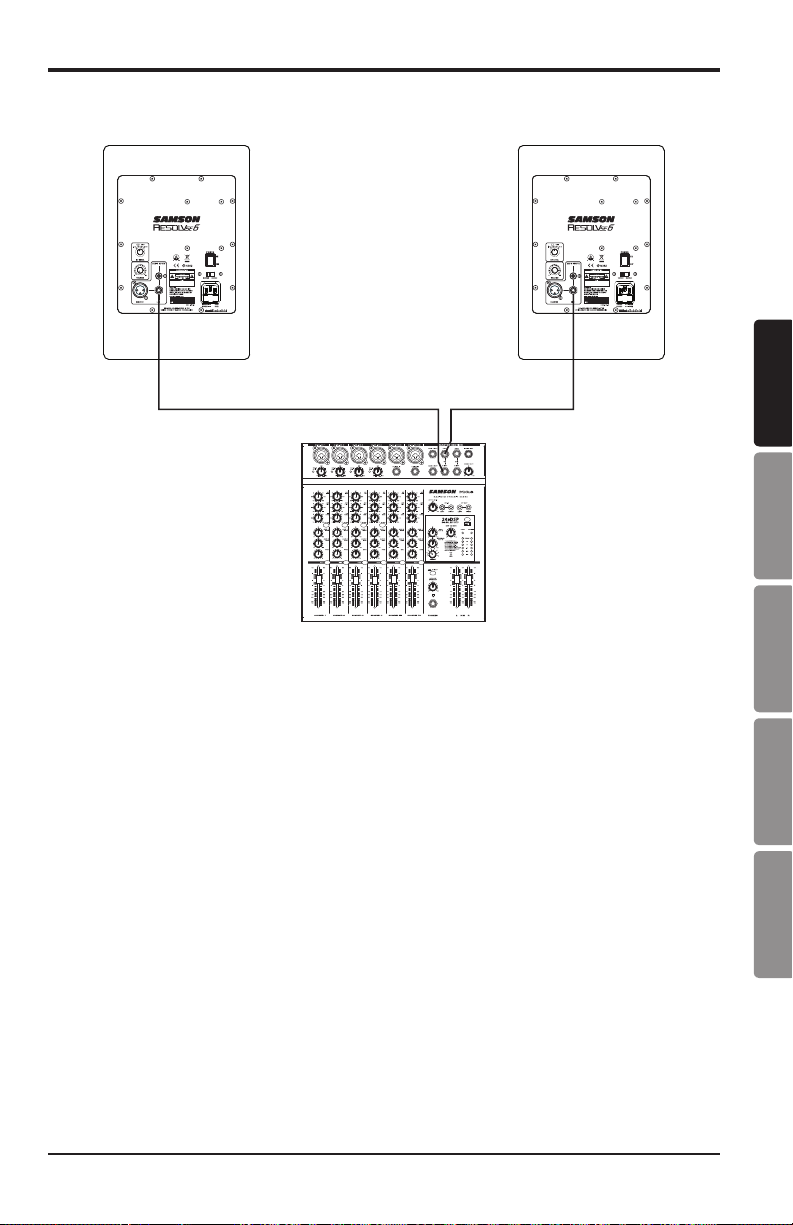
1. Lower your mixer’s master outputs until they are completely off.
2. Connect the mixer’s Left Control Room output to the left-side Resolv SE Series
LINE INPUT and the mixer’s Right Control Room output to the right-side Resolv
SE Series LINE INPUT. The Resolv SE series connections can be made via one
of the three rear panel Audio Inputs. You can use RCA inputs for unbalanced,
-10dBV level signals, or either the ¼” or XLR (SE6 & SE8 only) inputs for balanced, +4dBu level signals.
Note: Before plugging in and powering on the untis, remember the “last on, first off” rule of
power amplifiers (and powered monitors). When powering up your system, be sure that all the
wires are connected, turn your mixer and any other outboard gear on, and then finally turn your
Resolv SE Series on.
3. Set the Resolv SE Series input Volume control to the 12-o’clock (center detent)
position.
4. Run an audio signal (such as music from a CD) through your mixer and raise the
Control Room level to a comfortable listening volume.
ENGLISH
FRANÇAISDEUTSCHEESPAÑOLITALIANO
Resolv SE Studio Monitors
11
Page 12
Positioning your Studio Monitors
Positioning the Resolv SE Series
Near field (close to the listener) monitoring has become the choice of many engineers because of the cost and complexities associated with mounting monitors onto
the walls. Positioning your studio monitors correctly is very important. Correct placement not only creates the proper stereo image, but also minimizes the effects of your
room’s reflections. This is especially important in today’s project studios since the
budget for room acoustics is often close to nothing. By taking some time and using
your ears when setting up your monitors, you can create an optimal listening environment.
The most important consideration when evaluating room acoustics is the presence of
reflective surfaces near the monitoring area. These can include flat tabletops, glass
mirrors or framed pictures, large open walls and even the surface of your mixing console. Most reflecting sound will eventually reach the listening position, but since it
is slightly delayed from the direct source, the result is random cancellation of some
frequencies, or comb filtering. If possible, remove any and all reflective surfaces. You
may also want to hang some acoustic foam on walls near the monitors.
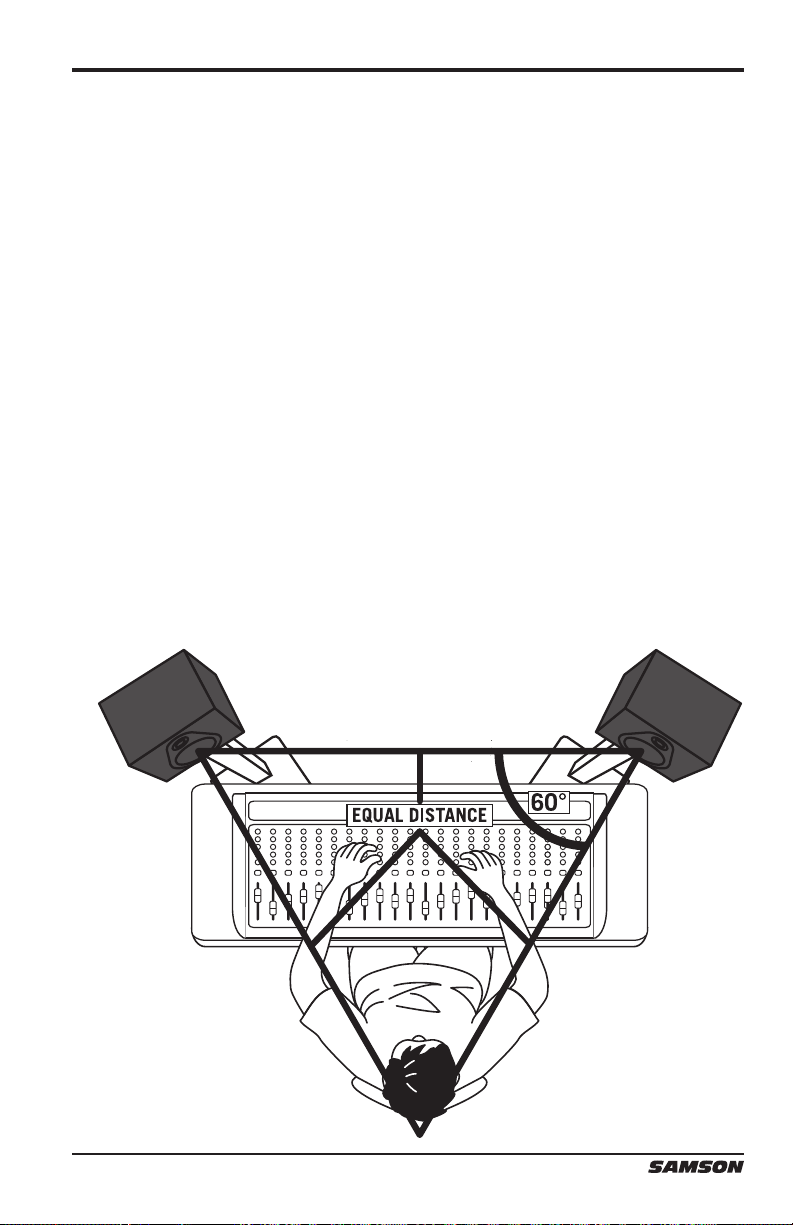
When positioning the monitors, you’ll want to set up what is commonly referred to
as the “mix triangle” (shown below). In this ideal configuration, the space between
the left and right monitor is equal to the distance from the listener to each monitor,
forming an equilateral triangle.
12
Page 13

Positioning your Studio Monitors
Speaker Orientation
A major objective when setting
up your studio monitors is to
obtain the best possible stereo
image. The Resolv SE monitors
are designed to be used in a vertical position, with the tweeter
and woofer symmetrically in line.
Placing the speaker on its side
will cause an offset in sound
between the woofer and the tweeter, limiting your ability to find optimal listening
positions.
A Moment of Reflection
When setting the height of your monitor system, be careful to avoid reflections off
the surface of the mixing console. These reflections arrive at the listening position slightly delayed from the original sound, resulting in cancellations and overall
unpredictable response (Figure 1). Visualize straight lines representing the beams of
sound radiating from the monitors and choose a height that reduces the occurrence
of reflections that will end up in the prime listening spot. In most cases, the ideal
position is slightly behind and above the mixing console’s meter bridge (Figure 2).
Always use your ears to find the best positioning for your room. Using monitor stands
will assist in placing the speakers in the appropriate position.
ENGLISH
FRANÇAISDEUTSCHEESPAÑOLITALIANO
Figure 1 Figure 2
Resolv SE Studio Monitors
13
Page 14

Connecting an Active Subwoofer
The Resolv SE monitors are designed to be full-range speakers, but occasionally you
may need to hear the extreme low end. Adding an active subwoofer to extend the
low frequency response of your monitor system can be beneficial when mixing your
music, for example. Typically, it is best to set the subwoofer level to be equal to that
of the Resolv SE main speakers.
Because deep-bass frequencies are non-directional, it is difficult for our ears to locate the sound source, and the precise placement of the subwoofer is not as critical
as the main speakers. The ideal location is between the two main speakers. If you notice there are frequencies that sound quieter than others, move the subwoofer slightly
to the left or right. If the subwoofer has a polarity switch, try setting the switch to the
opposite phase setting to see if this provides an improved low frequency response.
To incorporate a subwoofer into your monitor system, connect Left and Right Control
Room outputs of your mixer to the active subwoofer’s line inputs. Then connect the
subwoofer’s line outputs to the Resolv SE series left and right speakers. Run an audio
signal (such as music from a CD) through your mixer and raise the level to a comfortable listening volume. Finally, adjust the crossover frequency control (if applicable)
of the subwoofer to the desired frequency.
14
Page 15
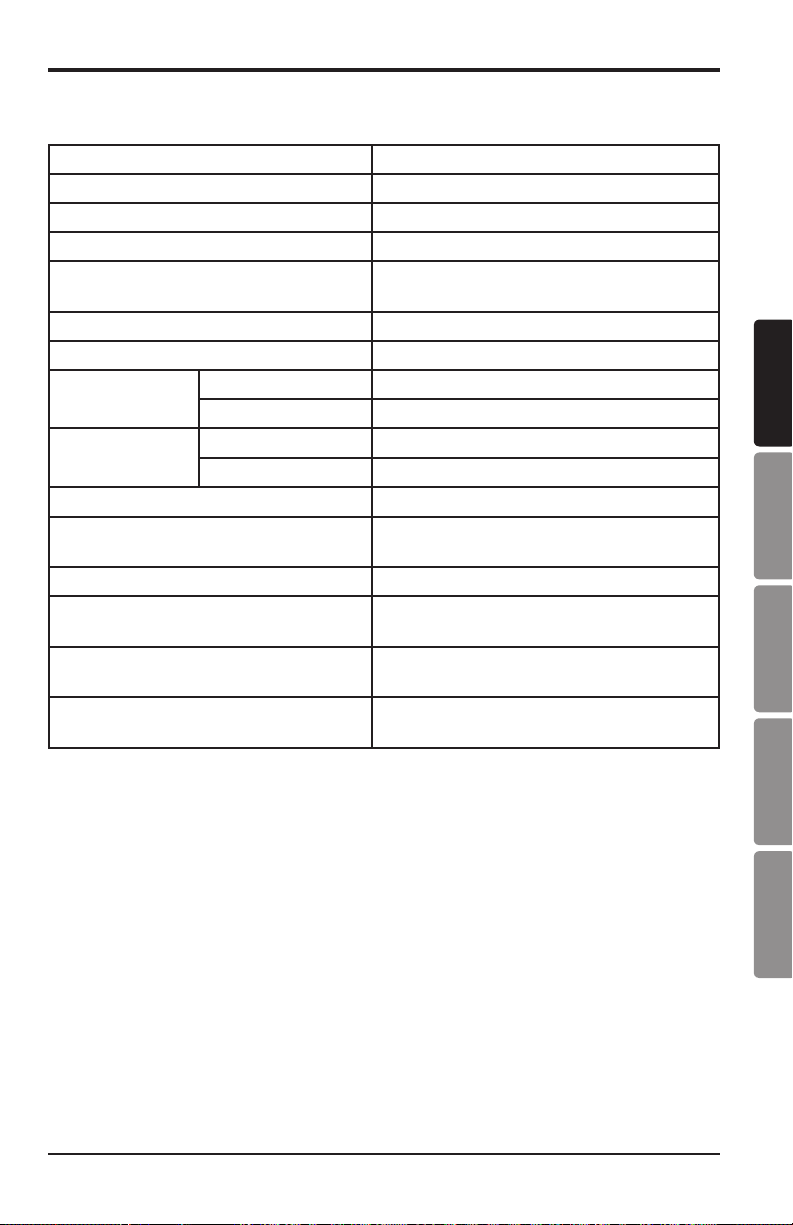
Specifications
Model SE5
Woofer 5” woven carbon fiber
Tweeter 1.25” Silk Dome
Enclosure Type 2-way Bass Reflex System
Enclosure Vinyl wrapped 3/4” (18mm) MDF cabinet
with painted front baffle
Frequency Response 45Hz - 27kHz +/-3dB
Crossover Frequency 3.19kHz 24dB/oct Linkwitz-Riley
Output Power HF 20 Watts RMS
LF 50 Watts RMS
Input Connectors Unbalanced RCA
Balanced ¼” TRS Phone
Input Impedance 10k ohm
Controls VOLUME Control
HF LEVEL (-2dB, 0dB, +2dB, +4dB)
Power Consumption 125W
Fuse 100V - 120V T1.6AL (slow blow)
220V - 240V T800mAL (slow blow)
Dimensions (L x W x H) 8” x 8.6” x 12.3”
204mm x 218mm x 312mm
Weight 15.25lbs
6.9kg
ENGLISH
FRANÇAISDEUTSCHEESPAÑOLITALIANO
Resolv SE Studio Monitors
15
Page 16

Specifications
SE6 SE8
6.5” woven carbon fiber 8” woven carbon fiber
1.25” Silk Dome 1.25” Silk Dome
2-way Bass Reflex System 2-way Bass Reflex System
Vinyl wrapped 3/4” (18mm) MDF cabi-
net with painted front baffle
40Hz - 27kHz +/-3dB 30Hz - 27kHz +/-3dB
3.19kHz 24dB/oct Linkwitz-Riley 3.19kHz 24dB/oct Linkwitz-Riley
25 Watts RMS 25 Watts RMS
75 Watts RMS 75 Watts RMS
RCA RCA
XLR, ¼” TRS Phone XLR, ¼” TRS Phone
10k ohm 10k ohm
VOLUME Control
HF LEVEL (-2dB, 0dB, +2dB, +4dB)
175W 175W
100V - 120V T2.0AL (slow blow)
220V - 240V T1.0AL (slow blow)
9.3” x 9.9” x 13.6”
236mm x 251mm x 346mm
18lbs
8.2kg
Vinyl wrapped 3/4” (18mm) MDF cabinet with painted front baffle
VOLUME Control
HF LEVEL (-2dB, 0dB, +2dB, +4dB)
100V - 120V T2.0AL (slow blow)
220V - 240V T1.0AL (slow blow)
11.2” x 12” x 16.25”
285mm x 304mm x 413mm
25lbs
11.4kg
16
Page 17
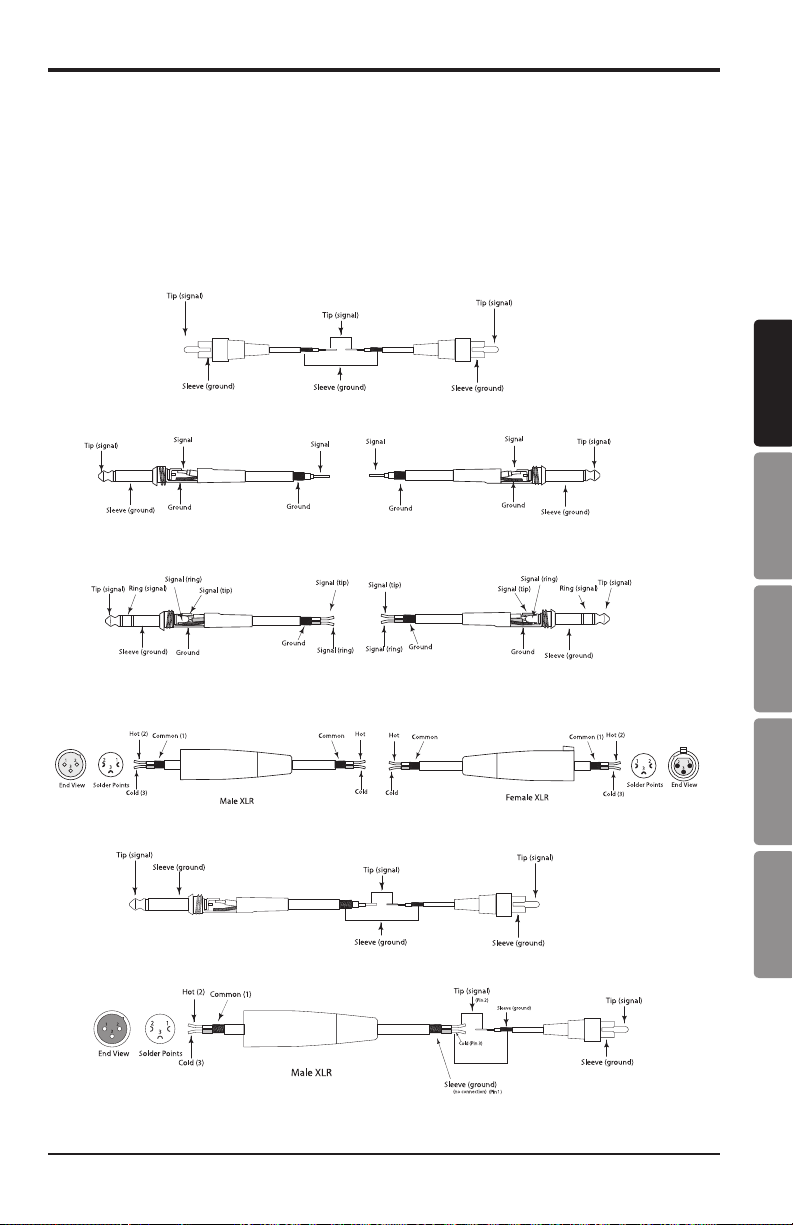
Resolv SE Series Connections
Resolv SE Series Wiring Guide
There are several ways to interface the Resolv SE Series, depending on your exact
monitoring set-up. Follow the cable diagrams below for connecting your monitor system.
RCA to RCA Cable
Unbalanced ¼” to ¼” Cable
Balanced ¼” to ¼” Cable
XLR to XLR Cable
Unbalanced ¼” to RCA
XLR to RCA
ENGLISH
FRANÇAISDEUTSCHEESPAÑOLITALIANO
Resolv SE Studio Monitors
17
Page 18
Informations de sécurité importantes
Si vous voulez mettre cet appareil au rebut, ne le mélangez pas aux ordures ménagères. Il existe un
système de collecte séparé pour les appareils électroniques usagés, conformément à la législation en
vigueur qui impose que le traitement, la récupération et le recyclage soient faits dans les règles de l’art.
Les ménages résidant dans les 27 Etats membres de l’U.E., en Suisse et en Norvège peuvent retourner gratuitement
leurs appareils électroniques usagés aux déchetteries agréées ou à un commerçant (en cas d’achat d’un appareil
neuf similaire).
Pour les pays non cités précédemment, n’hésitez pas à contacter votre collectivité locale pour vous renseigner sur
la bonne méthode de mise au rebut.
En agissant ainsi, vous serez assuré que votre appareil sera traité, récupéré et recyclé dans les règles, prévenant
ainsi les effets néfastes potentiels sur l’environnement et la santé humaine.
RISQUE DE CHOC ÉLECTRONIQUE -
AVIS
NE PAS OUVRIR
ATTENTION ! POUR DIMINUER LE RISQUE D’ELECTROCUTION, NE PAS RETIRER LE CACHE (OU A
L’ARRIERE). CE MATERIEL NE COMPORTE PAS DE PIECES SUSCEPTIBLES D’ETRE REPAREES PAR
L’UTILISATEUR. CONFIER L’ENTRETIEN A UN TECHNICIEN QUALIFIE.
Le triangle équilatéral renfermant un éclair terminé par une flèche a pour but d’alerter
l’utilisateur sur la présence d’une “tension dangereuse” non isolée” à l’intérieur du boîtier
de l’appareil qui peut être d’une valeur suffisante pour présenter un risque d’électrocution.
Le triangle équilatéral renfermant un point d’exclamation a pour but d’alerter l’utilisateur sur
la présence de consignes d’utilisation et de maintenance importantes dans la documentation
jointe à l’appareil.
Page 19

Informations de sécurité importantes
1. Lire ces consignes.
2. Les conserver.
3. Tenir compte de toutes les mises en
garde.
4. Suivre toutes les consignes.
5. Ne pas exposer l’appareil aux gouttes
ni aux éclaboussures ; ne poser sur
l’appareil aucun objet rempli de liquide
(par ex. un vase).
6. Ne nettoyer qu’avec un chiffon sec.
7. Ne boucher aucun des orifices
de ventilation. Installer l’appareil
conformément aux consignes du
fabricant.
8. Ne pas installer à proximité de sources
de chaleur comme des radiateurs, des
bouches de chauffage, cuisinières ou
autres appareils (amplificateurs compris)
qui dégagent de la chaleur.
9. N’employer que les fixations/accessoires
indiqués par le fabricant.
10. Débrancher cet appareil lors des orages
ou lorsqu’il reste inemployé pour une
longue durée.
11. Ne pas outrepasser la fonction prévue de
la prise polarisée ou à prise de terre. Une
fiche polarisée présente deux lames dont
une plus large que l’autre. Une fiche à
prise de terre présente deux lames et
une troisième broche de mise à la terre
(aux Etats-Unis). La lame large ou la
troisième broche est prévue pour votre
sécurité. S’il est impossible d’introduire
la fiche fournie dans la prise de secteur,
faire intervenir un électricien pour
faire remplacer la prise de secteur non
conforme.
12. Protéger le câble électrique pour éviter
de marcher dessus ou de le pincer, en
particulier sur les broches, les prises de
secteur et à l’endroit où le câble sort de
l’appareil.
13. Ne l’utiliser qu’avec le chariot, support,
trépied, console ou plateau indiqué(e)
par le fabricant ou vendu(e) avec
l’appareil. Si l’on se sert d’un chariot,
faire attention en déplaçant l’ensemble
chariot/appareil pour éviter les accidents
dus au renversement du chariot.
14. Toutes les interventions d’entretien
doivent être confiées à des techniciens
d’entretien qualifiés. L’intervention est
obligatoire si l’appareil a été endommagé
d’une manière ou d’une autre, par
exemple en cas de casse du câble
d’alimentation ou de la fiche mâle, de
détérioration due à la chute de liquide ou
d’objets sur l’appareil,
d’exposition à la pluie
ou à l’humidité ou si
l’appareil ne fonctionne
pas normalement, ou
s’il a subi une chute.
15. INTERRUPTEUR
MARCHE/ARRET : Pour les appareils
munis d’un interrupteur Marche/Arrêt,
cet interrupteur NE COUPE PAS la
liaison avec la prise de secteur.
16. SECTIONNEUR SECTEUR : la fiche
mâle devra rester facilement accessible.
Pour une installation encastrable ou
une installation où la fiche mâle n’est
pas accessible, un interrupteur secteur
omnipolaire à écart entre contacts d’au
moins 3 mm sur chaque pôle devra être
intégré à l’installation électrique du bâti
ou de l’immeuble.
17. POUR LES APPAREILS EQUIPES D’UNE
PRISE-FUSIBLE ACCESSIBLE DE
L’EXTERIEUR : ne remplacer le fusible
que par un fusiblie de même type et de
même valeur nominale.
18. TENSION SUR ENTREES MULTIPLES
: Ces équipements peuvent nécessiter
l’utilisation d’un câble d’alimentation,
d’une prise de branchement, d’une fiche
d’attirance différent, ou les deux, en
fonction de l’installation. Ne brancher cet
équipement que sur la source d’énergie
figurant sur la façade arrière des
équipements. Pour diminuer le risque
d’incendie ou d’électrocution, confiez
l’entretien à un technicien d’entretien
qualifié ou à son équivalent.
Page 20

Sommaire
Introduction . . . . . . . . . . . . . . . . . . . . . . . . . . . 21
Caractéristiques techniques. . . . . . . . . . . . . . . . . . . . 22
Schéma du panneau frontal. . . . . . . . . . . . . . . . . . . . 23
Schéma du panneau arrière . . . . . . . . . . . . . . . . . . . . 24
Pour raccorder les enceintes de monitoring Resolv . . . . . . . . . 25
Pour positionner vos enceintes de monitoring de studio. . . . . . . 26
Raccordement d’un subwoofer actif . . . . . . . . . . . . . . . . 28
Caractéristiques techniques. . . . . . . . . . . . . . . . . . . . 29
Les raccords sur la gamme Resolv SE . . . . . . . . . . . . . . . 31
20
Page 21

Introduction
Merci d’avoir acquis votre enceinte de référence pour studio de la gamme Resolv
SE auprès de Samson Technologies ! Les enceintes de studio Resolv sont des
haut-parleurs actifs qui intègrent la puissance bi-amplifiée interne et des liaisons
électroniques pour une balance tonale optimale et des performances précises. Tous
les haut-parleurs présentent une sortie d’aigus à pavillon souple en néodyme de
1.25” refroidi par ferrofluide installée au centre de la baffle avant. La réunion de
plusieurs composants permet d’obtenir une réponse hautes fréquences précise et
une plage d’écoute étendue. Pour obtenir une moyenne gamme précise et un bas
de gamme bien délimité, nos ingénieurs ont décliné avec soin chaque modèle,
en utilisant des diffuseurs basses fréquences en fibre de verre à entourages en
butyle. Ceci garantit une imagerie stéréo homogène sans battage sur la réponse en
fréquence. Les armoires sont réalisées en panneaux de fibres à densité moyenne
(MDF) à renfort interne pour créer un boîtier rigide qui atténue les vibrations et
augmente les performances. Les bords des armoires sont arrondis pour réduire la
diffraction aux bordures des armoires.
Les enceintes Resolv SE ont été conçues comme des enceintes de proximité idéales
pour les studios, les suites de post-production vidéo, les installations fixes ou comme
des haut-parleurs de reproduction. Elles conviennent également à merveille pour
s’intégrer à une chaîne multi-voies.
Dans ces pages, vous trouverez une présentation détaillée des fonctionnalités
des modèles Resolv SE5, SE6, et SE8 ainsi qu’une visite guidée du tableau de
commande et les consignes d’installation et d’utilisation. Vous trouverez également
une fiche de garantie jointe en annexe. N’oubliez pas de la remplir et de nous
l’adresser par courrier pour vous permettre d’obtenir une assistance technique
en ligne, et pour que nous puissions vous envoyer des informations actualisées
concernant ces produits et les autres produits Samson.
Nous vous conseillons de bien noter le numéro de série de votre appareil dans
l’espace prévu ci-dessous pour ne pas l’oublier.
ENGLISH
FRANÇAISDEUTSCHEESPAÑOLITALIANO
N° de série : _____________________________________
Date d’achat : ___________________________________
En bénéficiant d’une maintenance soignée, votre enceinte de studio Resolv vous
offrira de nombreuses années de fonctionnement sans problèmes. Si votre appareil
nécessite l’intervention du S.A.V., un numéro d’Autorisation de Renvoi (RA) doit
impérativement être obtenu avant de renvoyer votre appareil chez Samson. Sans
ce numéro, l’appareil ne sera pas accepté. N’hésitez pas à téléphoner à Samson
au 1-800-3SAMSON (1-800-372-6766) pour demander un numéro RA avant
d’expédier votre appareil. Veuillez conserver les matériaux d’emballage d’origine et,
si possible, renvoyer l’appareil dans son carton d’origine. Si vous avez acheté votre
enceinte Resolv en-dehors des Etats-Unis, contactez le distributeur le plus proche
pour tous renseignements sur la garantie et sur le S.A.V. En outre, consultez notre
site web (www.samsontech.com) pour tous renseignements complets sur toute notre
gamme d’appareils.
Enceintes de studio Resolv SE
21
Page 22

Caractéristiques techniques
Les enceintes de référence de la série Samson Resolv SE fournissent une réponse
précise et en douceur à n’importe quelle situation critique au mixage ou à l’écoute.
Voici quelques-unes de leurs caractéristiques principales :
• Enceinte de monitoring de studio active deux voies, bass-reflex assurant un
monitoring extrêmement précis à des applications d’enregistrement en studio,
de post-production ou multimédia, la sortie d’aigus à pavillon souple 1,25”
fournit une réponse haute fréquence étendue et précise avec une distorsion
minimale,
• Guide d’ondes du haut-parleur d’aigus conçu pour offrir une dispersion
homogène précise du contenu à hautes fréquences pour des zones d’écoute
uniformes dans l’axe et hors de l’axe du faisceau principal,
• Alimentée par un amplificateur interne spécialement conçu pour des
performances optimales et un niveau de pression acoustique maximal. La SE5
présente 70 W de puissance totale, alors que la SE6 et la SE8 ont 100 W de
puissance totale
• La commande de niveau hautes fréquences à quatre positions permet à
l’auditeur de lisser la courbe de réponse pour obtenir la réponse qui fonctionne
le mieux dans son environnement de mixage,
• Répartiteur électronique actif adoptant une conception multipolaire pour une
réponse en fréquence linéaire non affectée par le niveau du signal,
• Réponse en basse fréquence serrée et maîtrisée obtenue par des woofers
en fibre de carbone tissée à écran magnétique avec entourage en butyle et
structures de moteur robustes à grandes bobines acoustiques
• Une réalisation extrêmement rigide, en panneaux de fibres à densité moyenne
MDF, fournissant un niveau de pression acoustique maximum
22
Page 23
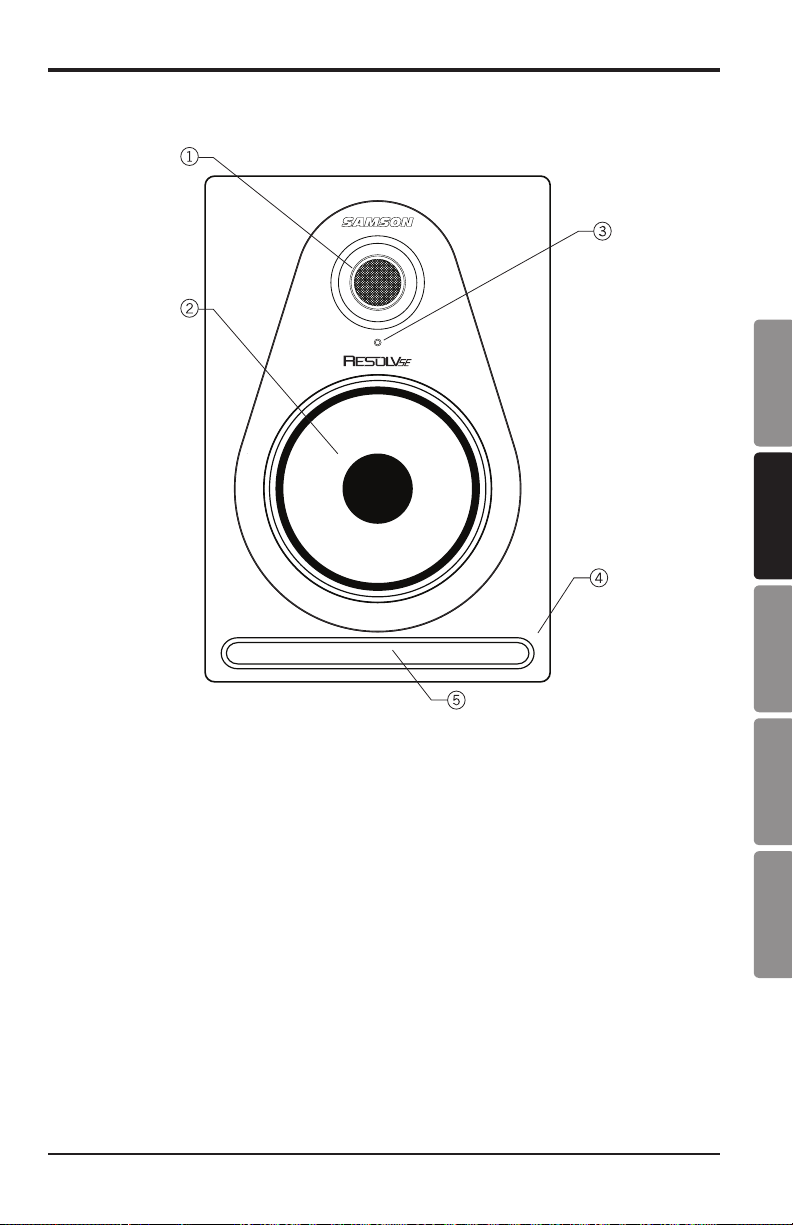
Schéma du panneau frontal
ENGLISH
FRANÇAISDEUTSCHEESPAÑOLITALIANO
1. Tweeter – Ce haut-parleur d’aigus à dôme en soie de 1,25” et aimant en
néodyme refroidi par ferrofluide assure une reproduction naturelle des hautes
fréquences tout en minimisant la distorsion pour aboutir à une gamme
supérieure nette, précise et agréable.
2. Woofer – ces haut-parleurs de graves en fibre de carbone tissée à entourage en
copolymère butyle font bénéficier chaque enceinte de monitoring d’une réponse
en moyenne et basse fréquence serrée et maîtrisée.
3. Indicateur de puissance – Le témoin LED blanc s’allume pour signaler que
l’appareil est sous tension et prêt à fonctionner.
4. Boîtier – la structure en carton-fibre dur de densité moyenne (MDF) et
l’atténuation interne maximisent le rendement acoustique
5. Port Bass-Reflex – ce port d’avant-garde offre des turbulences au port minimes
et améliore la réponse à basses fréquences linéaire étendue
Enceintes de studio Resolv SE
23
Page 24

Schéma du panneau arrière
MARCHE/ARRET
NIVEAU HF
ENTREES AUDIO
PUISSANCE NOMINALE
CAUTION
RISQUE D’ELECTROCUTION
VOLUME
BALANCE EN EQUILIBRE
LIGNE
NE PAS OUVRIR
AVERTISSEMENT :
LES ENCEINTES RESOLV PEUVENT
PARVENIR A DES NIVEAUX DE PRESSION
ACOUSTIQUE EXTREMEMENT ELEVES.
FAITES BIEN ATTENTION ! SINON, CELA
RISQUE DE PROVOQUER UNE DIMINUTION
DE L’ACUITE AUDITIVE.
FABRIQUE EN CHINE
MODEL NO. RESOLV SE8
CONCEPTION ET ETUDES REALISEES AUX
ETAT-UNIS PAR SAMSON TECHNOLOGIES
1. HF LEVEL (Niveau HF) – Bouton rotatif à quatre positions servant à régler la réponse
à hautes fréquences. Le fait de régler le bouton sur 0 dB (réglage d’origine) permet
d’obtenir une réponse uniforme. Le -2 dB, +2 dB et le +4 dB permettent de régler un
dégradé à hautes fréquences au-dessus de 4 kHz. L’acoustique de votre pièce ou le
matériel d’écoute détermineront le réglage approprié correspondant à votre application.
2. VOLUME – Règle la valeur du niveau de sortie global.
3. Entrée XLR (sur SE6 et SE8 uniquement) – Brancher ici un signal de niveau de ligne
symétrique à +4 dBu via un câble XLR (microphone) standard.
4. Entrée ¼” – Brancher ici un signal de niveau de ligne symétrique à +4 dBu par
l’intermédiaire d’un câble ¼” TRS (Tip, Ring, Sleeve, c’.-à-d. Pointe, Anneau, Corps), ou
TS dissymétrique (Tip, Sleeve / Pointe, Corps).
5. Entrée RCA – Sert à relier des signaux provenant de dispositifs dissymétriques à –10 dBV.
6. Bouton POWER – Mettre les haut-parleurs en marche et à l’arrêt à l’aide de ce bouton.
Lorsqu’ils sont en marche, le témoin LED du panneau avant s’allumera.
7. Sélecteur Voltage (Tension) – Sert à sélectionner la tension de fonctionnement.
REMARQUE : Vérifiez bien que le réglage de tension et la valeur nominale des fusibles correspondent à ceux
en vigueur dans votre pays.
8. Entrée AC (courant de secteur) – Brancher ici le câble de secteur CEI joint à la livraison.
9. Porte-fusible – Renferme le fusible de secteur. Pour remplacer le fusible, retirer le câble
d’alimentation et faire levier pour ouvrir le porte-fusible à l’aide d’un tournevis à pointe
plate.
REMARQUE : ne jamais retirer le fusible pendant que les haut-parleurs sont encore branchés.
MARCHE
ARRET
AVERTISSEMENT : LORSQU’ON CHANGE DE
TENSION ELECTRIQUE, IL FAUT AUSSI CHANGER
24
Page 25

Pour raccorder les enceintes de monitoring Resolv
NIVEAU HF
VOLUME
BALANCE EN EQUILIBRE
ENTREES
AUDIO
LIGNE
MODEL NO. RESOLV SE8
CONCEPTION ET ETUDES REALISEES AUX
ETAT-UNIS PAR SAMSON TECHNOLOGIES
PUISSANCE NOMINALE
CAUTION
RISQUE D’ELECTROCUTION
NE PAS OUVRIR
AVERTISSEMENT :
LES ENCEINTES RESOLV PEUVENT
PARVENIR A DES NIVEAUX DE
PRESSION ACOUSTIQUE EXTREMEMENT
ELEVES. FAITES BIEN ATTENTION !
SINON, CELA RISQUE DE PROVOQUER
UNE DIMINUTION DE L’ACUITE AUDITIVE.
MARCHE/ARRET
MARCHE
ARRET
FABRIQUE EN CHINE
AVERTISSEMENT : LORSQU’ON CHANGE DE TENSION
ELECTRIQUE, IL FAUT AUSSI CHANGER DE FUSIBLE.
NIVEAU HF
VOLUME
BALANCE EN EQUILIBRE
ENTREES
AUDIO
LIGNE
CONCEPTION ET ETUDES REALISEES AUX
ETAT-UNIS PAR SAMSON TECHNOLOGIES
PUISSANCE NOMINALE
RISQUE D’ELECTROCUTION
AVERTISSEMENT :
LES ENCEINTES RESOLV PEUVENT
PARVENIR A DES NIVEAUX DE
PRESSION ACOUSTIQUE EXTREMEMENT
ELEVES. FAITES BIEN ATTENTION !
SINON, CELA RISQUE DE PROVOQUER
UNE DIMINUTION DE L’ACUITE AUDITIVE.
MODEL NO. RESOLV SE8
MARCHE/ARRET
MARCHE
ARRET
CAUTION
NE PAS OUVRIR
FABRIQUE EN CHINE
AVERTISSEMENT : LORSQU’ON CHANGE DE TENSION
ELECTRIQUE, IL FAUT AUSSI CHANGER DE FUSIBLE.
Sorties de la salle de commande
MIC/LIGNE 4 MIC/LIGNE 5/6 MIC/LIGNE 7/8
MIC/LIGNE 1
MIC/LIGNE 3
MIC/LIGNE 2
GAIN
GAIN
GAIN
GAIN
CLIP
CLIP
CLIP
CLIP
Hte Fréq.
Hte Fréq.
Hte Fréq.
12K
12K
12K
Fréq. Moy.
Fréq. Moy.
Fréq. Moy.
2.5K
2.5K
2.5K
Basses
Basses
Basses
Fréq.
Fréq.
Fréq.
80Hz
80Hz
80Hz
PASSE-
PASSE-
PASSE-
HAUT
HAUT
HAUT
MON
MON
MON
AUX 1
AUX 1
AUX 1
DSP
DSP
DSP
AUX 2
AUX 2
AUX 2
ENREGISTREMENT ENREGISTREMENTENREGISTREMENT
SECTION PRINCIPALE
SORTIE AUX 1
GAUCHE GAUCHE
SORTIE MONO
VALIDATION MIX
SORTIE MONO
DROITE DROITE
SORTIE AUX 2
SORTIE DE LIGNE DROITEENTRÉE DE LIGNE DROITE
Hte Fréq.
Hte Fréq.
Hte Fréq.
12K
12K
12K
GAMME DYNAMIQUE MAXI
2T SUR MIX
Fréq. Moy.
Fréq. Moy.
Fréq. Moy.
SORTIE 2T
ENTRÉE 2T
2.5K
2.5K
2.5K
GAUCHE DROITE GAUCHE DROITE
Basses
Basses
Basses
Fréq.
Fréq.
Fréq.
80Hz
80Hz
80Hz
PASSE-
HAUT
MON
MON
AUX 1
AUX 1
DSP
DSP
AUX 2
AUX 2
ENREGISTREMENTENREGISTREMENTENREGISTREMENT
MODE
EFFETS NUMERIQUES
DISQUE
DUR
TRAITT DU SIGNAL
NUMERIQUE VERS MON
MARCHE/
AUX
MON
ARRET
RETOUR 1
AUX 1
PIC
AUX/DSP
DSP
RET 2
1 GRANDE SALLE DE CONCERTS
AUX 2
2 MOYENNE SALLE DE
CONCERTS
3 GRANDE CHAMBRE
4 RM. VOCALE
5 RM. VOCALE 2
6 CHORUS + REVERBERATION
7 CHORUS + RETARD
8 CAGE D’ESCALIER
PIC
SELECTIONNER
MIX/2T
C/CHAMBRE
+TELEPHONES
G MELANGE D
TELEPHONES
VOIE 7/8VOIE 5/6VOIE 4VOIE 3VOIE 2VOIE 1
Les enceintes de monitoring de la série Resolv SE conviennent à merveille pour équiper
n’importe quel studio professionnel. Au moment de relier vos enceintes de monitoring à un
mélangeur, il faudra utiliser les sorties cabine d’écoute de votre mélangeur pour vous permettre
de régler indépendamment le niveau des haut-parleurs sans que cela ait un impact sur la sortie
de mixage principale. Suivez les étapes simples et le schéma exposés dans ce paragraphe pour
relier rapidement vos enceintes de monitoring en passant par les sorties cabine d’écoute de
votre console d’enregistrement standard.
1. Réduisez les sorties principales du mélangeur jusqu’à ce qu’elles soient entièrement
coupées.
2. Raccorder la sortie Cabine d’écoute gauche du mélangeur sur l’ENTREE DE LIGNE gauche
de la Série Resolv SE et la sortie Cabine d’écoute droite du mélangeur sur l’ENTREE DE
LIGNE droite de la Série Resolv SE. Les raccordements de la série Resolv SE peuvent
être réalisés par l’une des trois Entrées Audio du panneau arrière. Vous pouvez utiliser les
entrées RCA pour les signaux dissymétriques de niveau -10 dBV, ou soit les entrées ¼”,
soit les entrées XLR (SE6 & SE8 seulement) pour les signaux symétriques de niveau +4
dBu.
Remarque : Avant de brancher et de mettre en marche les appareils, n’oubliez pas la règle de mise sous/
hors tension des amplificateurs de puissance “dernier allumé-premier éteint” (et enceintes alimentées). En
mettant votre chaîne en marche, vérifiez bien que tous les fils sont branchés, allumez votre mélangeur et
tout autre appareil extérieur, puis terminez en allumant vos enceintes de la série Resolv SE.
3. Positionnez le réglage de volume d’entrée de la Série Resolv SE à 12 heures (cran central).
4. Faites passer un signal audio (par exemple de la musique provenant d’un CD) à travers
votre mélangeur, puis montez le niveau de la Cabine d’Ecoute jusqu’à un volume d’écoute
confortable.
ENGLISH
FRANÇAISDEUTSCHEESPAÑOLITALIANO
Enceintes de studio Resolv SE
25
Page 26

Pour positionner vos enceintes de monitoring de studio
Positionnement des enceintes de la série Resolv SE
L’écoute de proximité (près de l’auditeur) est privilégiée par de nombreux ingénieurs du son
en raison du coût et des complexités liées à la fixation des enceintes de monitoring aux murs.
Il est très important de bien positionner vos enceintes de studio. Un bon placement non
seulement génère une bonne image stéréophonique, mais encore réduit au minimum les effets
des réverbérations provoquées par votre local. Ceci revêt une importance toute particulière
dans les studios professionnels d’aujourd’hui étant donné que le budget affecté à l’acoustique
de la pièce est souvent proche de zéro. En consacrant un peu de temps et en vous servant
de vos oreilles pour installer vos enceintes de monitoring, vous créerez un cadre optimal pour
l’écoute.
L’élément le plus important à envisager lorsqu’on évalue l’acoustique d’une pièce est la
présence de surfaces réverbérantes près de l’espace de monitoring. Ces surfaces peuvent
englober les dessus de table plats, les miroirs en verre ou les photos encadrées, les grandes
cloisons ouvertes et même la surface de votre console de mixage. L’essentiel du son, en se
réverbérant, rejoindra finalement le poste d’écoute, mais puisqu’il présente un léger retard
par rapport à la source directe, le résultat est l’annulation aléatoire de certaines fréquences
ou filtrage en peigne. Si possible, supprimez toutes les surfaces réverbératrices. Vous pouvez
également, si vous le souhaitez, accrocher de la mousse acoustique aux parois situées au
voisinage des enceintes de monitoring.
En positionnant les enceintes, vous voudrez sans doute configurer ce qu’il est convenu
d’appeler le “triangle de mélange” (représenté ci-dessous). Dans cette configuration idéale,
l’espace entre l’enceinte gauche et l’enceinte droite est égal à la distance qui sépare l’auditeur
de chaque enceinte, formant un triangle équilatéral.
26
DISTANCE EGALE
Page 27

Pour positionner vos enceintes de monitoring de studio
Orientation des haut-parleurs
L’un des principaux objectifs de
l’installation de vos enceintes de
studio est d’obtenir la meilleure
image stéréophonique possible. Les
enceintes Resolv SE sont conçues
pour être utilisées à la verticale, le
tweeter (haut-parleur d’aigus) et le
woofer (haut-parleur de graves) étant
alignés symétriquement. Le fait de
disposer le haut-parleur sur le côté
provoquera un décalage du son entre le haut-parleur de graves et le haut-parleur d’aigus, ce qui
limite la possibilité pour vous de trouver une position d’écoute optimale.
Réverbération
Au moment de régler la hauteur de votre jeu d’enceintes, veillez à éviter les réverbérations à
la surface de la console de mixage. Ces réverbérations se produisent à une position d’écoute
légèrement en décalage par rapport au son d’origine, ce qui aboutit à des annulations et à
une réponse globale imprévisible (Figure 1). Visualisez les lignes droites représentant les
faisceaux de son émis par les enceintes et choisissez une hauteur qui réduise la survenance
de réverbérations termineront leur course au point d’écoute principal. Dans la plupart des
cas, la position idéale se situe légèrement derrière et au-dessus de la rangée de VU-mètres de
la console de mixage (Figure 2). Servez-vous toujours de vos oreilles pour trouver le meilleur
positionnement correspondant à votre local. L’utilisation de supports d’enceintes facilitera le
bon positionnement des haut-parleurs.
ENGLISH
FRANÇAISDEUTSCHEESPAÑOLITALIANO
Figure 1 Figure 2
Enceintes de studio Resolv SE
27
Page 28

Raccordement d’un subwoofer actif
Les enceintes de monitoring Resolv SE sont conçues pour être des haut-parleurs à gamme
étendue, mais il peut arriver que vous cherchiez à mieux entendre la partie extrême grave du
son. Ajouter un caisson d’extrêmes-graves actif pour élargir la réponse en basses fréquences
de votre jeu d’enceintes peut être bénéfique, par exemple, au moment de mixer votre musique.
Normalement, il vaut mieux régler le caisson d’extrêmes-graves au même niveau que les
principaux haut-parleurs Resolv SE.
Etant donné que les fréquences extrêmes-graves sont non directionnelles, il sera difficile
pour nos oreilles de localiser la source du son ; aussi le positionnement précis du caisson
d’extrêmes-graves est-il moins essentiel que celui des haut-parleurs principaux. L’emplacement
idéal se situe entre les deux haut-parleurs principaux. Si vous remarquez que certaines
fréquences sonnent moins fort que d’autres, déplacez le caisson d’extrême-graves légèrement
vers la gauche ou vers la droite. Si le caisson d’extrêmes-graves est muni d’un sélecteur de
polarité, essayez de régler le sélecteur sur la phase opposée pour voir si ce dernier engendre
une réponse en basses fréquences améliorée.
Pour intégrer un caisson d’extrêmes-graves à votre jeu d’enceintes de monitoring, raccordez
les sorties Salle d’Ecoute Gauche et Droite de votre mélangeur aux entrées de ligne du caisson
d’extrêmes-graves actif. Ensuite, raccordez les sorties de ligne du caisson d’extrêmes-graves aux
haut-parleurs gauche et droit de la série Resolv SE. Faites passer un signal audio (par exemple
de la musique provenant d’un CD) à travers votre mélangeur, puis montez le niveau jusqu’à
un volume d’écoute confortable. Enfin, réglez la fréquence du répartiteur (le cas échéant) du
subwoofer (caisson d’extrêmes-graves) à la fréquence désirée.
28
Page 29

Caractéristiques techniques
Modèle SE5
Woofer (Haut-parleur de graves) 5” en fibre de carbone tissée
Tweeter (Haut-parleur d’aigus) Dôme en soie de 1,25”
Type d’enceinte Système Bass Reflex à 2 voies
Enceinte Boîtier en carton-fibre de densité moy-
enne MDF de ¾” (18 mm) à enveloppe
vinyle et baffle avant peinte
Réponse en fréquence 45 Hz à 27 kHz +/- 3 dB
Fréquence du répartiteur 3,19 kHz 24 dB/oct Linkwitz-Riley
Puissance de
sortie
Connecteurs
d’entrée
Impédance d’entrée 10 k-ohms
Réglages Réglage de VOLUME
Puissance absorbée 125 W
Fusible 100 V – 120 V T1,6AL (à action retardée)
Dimensions (l x p x h) 8” x 8,6” x 12,3”
Poids 15,25 livres
Hautes Fréquences 20 Watts RMS
Basses Fréquences 50 Watts RMS
Dissymétriques RCA
Symétriques ¼” TRS Téléphone
NIVEAU Hautes Fréquences (-2 dB, 0dB,
+2 dB, +4 dB)
220 V – 240 V T800 mAL (à action
retardée)
204 mm x 218 mm x 312 mm
6,9 kg
ENGLISH
FRANÇAISDEUTSCHEESPAÑOLITALIANO
Enceintes de studio Resolv SE
29
Page 30

Caractéristiques techniques
SE6 SE8
6,5” en fibre de carbone tissée 8” en fibre de carbone tissée
Dôme en soie de 1,25” Dôme en soie de 1,25”
Système Bass Reflex à 2 voies Système Bass Reflex à 2 voies
Boîtier en carton-fibre de densité moy-
enne MDF de ¾” (18mm) à enveloppe
vinyle et baffle avant peinte
40 Hz à 27 kHz +/- 3 dB 30 Hz à 27 kHz +/- 3 dB
3,19 kHz 24 dB/oct Linkwitz-Riley 3,19 kHz 24 dB/oct Linkwitz-Riley
25 Watts RMS 25 Watts RMS
75 Watts RMS 75 Watts RMS
RCA RCA
XLR, ¼” TRS Téléphone XLR, ¼” TRS Téléphone
10 k-ohms 10 k-ohms
Réglage du VOLUME
NIVEAU Hautes Fréquences (-2 dB,
0dB, +2 dB, +4 dB)
175W 175W
100 V – 120 V T2,0AL (à action retar-
dée)
220 V – 240 V T1,0AL (à action retardée)
9.3” x 9.9” x 13.6”
236 mm x 251 mm x 346 mm
18 livres
8,2 kg
Boîtier en carton-fibre de densité moyenne MDF de ¾” (18mm) à enveloppe
vinyle et baffle avant peinte
Réglage du VOLUME
NIVEAU Hautes Fréquences (-2 dB,
0dB, +2 dB, +4 dB)
100 V – 120 V T2,0AL (à action retardée)
220 V – 240 V T1,0AL (à action retardée)
11.2” x 12” x 16.25”
285 mm x 304 mm x 413 mm
25 livres
11,4 kg
30
Page 31

Les raccords sur la gamme Resolv SE
Froid (broche 3)
Pointe (signal)
Manchon (terre)
Pointe (signal)
Manchon (terre)
Manchon (terre)
Pointe (signal)
Aperçu final
Points de brasage
Chaud (2)
Froid (3)
Courant (1)
XLR male
Pointe (signal)
(broche 2)
Manchon (terre)
(pas de branchement) (broche 1)
Manchon (terre)
Pointe (signal)
Manchon (terre)
Pointe (signal)
Pointe (signal)
Pointe (signal)
Manchon (terre)
Manchon (terre)
Manchon (terre)
Signal
Aperçu final
Points de brasage
Chaud(2)
Freddo (3)
XLR male
Courant (1)
Courant
Chaud
Chaud
Courant
FroidFroid
XLR femelle
Courant (1) Chaud (2)
Froid (3)
Aperçu final
Points de brasage
Anneau (signal)
Signal (anneau)
Signal (pointe)
Signal (pointe)
Signal (pointe)
Signal (anneau)
Anneau (signal)
Pointe (signal)
Manchon (terre)
Terre
Terre
Signal (anneau)Signal (anneau)
Terre
Terre
Manchon (terre)
Pointe (signal)
Signal
Manchon (terre)
Terre
Terre
Signal
Signal Pointe (signal)
Manchon (terre)
Terre
Terre
Signal (pointe)
Notice de câblage de la Série Resolv SE
Il y a plusieurs méthodes pour raccorder la Série Resolv SE, en fonction de la configuration exacte de vos enceintes. Suivez les schémas de câblage ci-dessous pour
brancher votre jeu d’enceintes de monitoring.
Câble RCA vers RCA
Câble ¼” - ¼” dissymétrique
ENGLISH
Câble ¼” - ¼” symétrique
Câble XLR - XLR
¼” - RCA dissymétrique
XLR to RCA
FRANÇAISDEUTSCHEESPAÑOLITALIANO
Enceintes de studio Resolv SE
31
Page 32

Wenn Sie dieses Produkt entsorgen wollen, werfen Sie es nicht in den normalen Hausmüll. Es gibt ein
getrenntes Sammelsystem für gebrauchte elektronische Geräte gemäß den Gesetzen für
ordnungsgemäße Behandlung, Rückgewinnung und Wiederverwertung.
Private Haushalte in den 27 Mitgliedsstaaten der EU, in der Schweiz und in Norwegen können ihre gebrauchten
elektronischen Geräte kostenlos an speziellen Sammelstellen oder bei einem Fachhändler zurückgeben (wenn sie
dort ein vergleichbares Neugerät kaufen).
In anderen als den oben erwähnten Ländern kontaktieren Sie hinsichtlich einer ordnungsgemäßen Entsorgung bitte
Ihren örtlichen Behörden.
Damit stellen Sie sicher, dass das zu entsorgende Produkt der notwendigen Behandlung, Rückgewinnung und
Wiederverwertung zugeführt und so eine mögliche negative Auswirkung auf die Umwelt und die menschliche
Gesundheit vermieden wird.
Wichtige Sicherheitsinformationen
WARNHINWEIS
STROMSCHLAGRISIKO -
NICHT ÖFFNEN
ACHTUNG: UM DAS RISIKO EINES STROMSCHLAGS ZU VERRINGERN, ÖFFNEN SIE NICHT DIE ABDECKUNG
(ODER RÜCKWAND). BEINHALTET KEINE DURCH DEN BENUTZER ZU WARTENDEN TEILE. LASSEN SIE
WARTUNGSARBEITEN DURCH QUALIFIZIERTES FACHPERSONAL DURCHFÜHREN.
Dieses Symbol eines Blitzes mit Pfeilspitze in einem gleichseitigen Dreieck soll den
Benutzer auf das Vorhandensein nicht isolierter „gefährlicher Spannung“ innerhalb des
Produktgehäuses aufmerksam machen, die stark genug ist, um ein Stromschlagrisiko
darzustellen.
Das Ausrufezeichen in einem gleichseitigen Dreieck soll den Benutzer auf das Vorhandensein
wichtiger Betriebs-und Wartungsanleitungen in der dem Gerät beiliegenden Literatur
hinweisen.
Page 33

Wichtige Sicherheitsinformationen
1. Lesen Sie diese Anweisungen.
2. Bewahren Sie diese Anweisungen auf.
3. Beachten Sie alle Warnungen.
4. Befolgen Sie alle Anweisungen.
5. Das Gerät darf keinen tropfenden oder
spritzenden Flüssigkeiten ausgesetzt
werden, und es sollte kein mit Flüssigkeit
gefülltes Objekt, wie beispielsweise eine
Vase, auf das Gerät gestellt werden.
6. Nur mit einem trockenen Tuch reinigen.
7. Blockieren Sie keine der
Lüftungsöffnungen. Installieren Sie
das Gerät gemäß der Anweisungen des
Herstellers.
8. Nicht in der Nähe von Wärmequellen wie
Heizkörpern, Wärmespeichern, Öfen oder
anderen Wärme erzeugenden Geräten
(einschließlich Verstärkern) installieren.
9. Verwenden Sie nur vom Hersteller
angegebene Zusatzgeräte/Zubehör.
10. Nehmen Sie das Gerät während eines
Gewitters, oder wenn es für längere Zeit
nicht benutzt wird, vom Stromnetz.
11. Umgehen Sie nicht die zweckmäßige
Bestimmung des verpolungssicheren
oder geerdeten Steckers. Ein
verpolungssicherer Stecker hat zwei
Kontaktstifte, von denen einer breiter
ist als der andere. Ein geerdeter Stecker
hat zwei Kontaktstifte und einen dritten
Erdungsstift. Der breite Kontaktstift oder
der dritte Stift dient zu Ihrer Sicherheit.
Wenn der mitgelieferte Stecker nicht in
Ihre Steckdose passt, wenden Sie sich
an einen Elektriker, um die veraltete
Steckdose auszutauschen.
12. Schützen Sie das Netzkabel gegen
Drauftreten und Abknicken, vor allem
an den Kontaktstiften, Steckdosen und
seiner Austrittsstelle aus dem Gerät.
13. Verwenden Sie das Gerät nur mit dem
vom Hersteller angegeben oder mit dem
Gerät verkauften Wagen, Stativ oder
Tisch. Wenn ein Wagen benutzt wird,
bewegen Sie ihn und das Gerät mit
Vorsicht, um Beschädigungen durch
Umkippen zu vermeiden.
14. Lassen sie jegliche Wartungsarbeiten
durch qualifiziertes Fachpersonal
ausführen. Eine Wartung ist erforderlich,
wenn das Gerät in irgendeiner Weise
beschädigt wurde, z.B. durch Bruch
eines Stromkabels oder Steckers,
Beschädigung durch Flüssigkeiten
oder auf das Gerät herabgefallene
Gegenstände, wenn
das Gerät Regen oder
Feuchtigkeit ausgesetzt
wurde oder wenn es
nicht ordnungsgemäß
funktioniert oder fallen
gelassen wurde.
15. EIN/AUS-NETZSCHALTER: Bei
Produkten mit einem Netzschalter wird
die Verbindung zum Stromnetz durch
diesen Schalter NICHT unterbrochen.
16. TRENNUNG VOM STROMNETZ: Der
Stecker sollte immer leicht erreichbar
sein. Wenn der Stecker als Folge der
Installation des Geräts in einem Gestell
oder Rahmen nicht erreichbar ist,
muss ein allpoliger Schalter mit einem
Kontaktabstand von mindestens 3 mm in
jedem Pol in die elektrische Anlage des
Gestells oder Rahmens integriert werden.
17. FÜR GERÄTE MIT VON
AUSSEN ZUGÄNGLICHER
SICHERUNGSSTECKDOSE: Ersetzen
Sie die Sicherung nur mit Sicherungen
gleichen Typs und Nennwerts.
18. MEHRERE EINGANGSSPANNUNGEN:
Je nach verfügbarer Stromquelle kann
bei diesem Gerät die Verwendung
verschiedener Netzkabel, Stecker oder
beider notwendig werden. Schließen Sie
das Gerät nur an die auf der Rückseite
angegebene Stromquelle an. Um
Brandgefahr sowie das Risiko eines
Stromschlags zu vermeiden, lassen Sie
Wartungsarbeiten nur von qualifiziertem
Fachpersonal ausführen.
Page 34

Inhaltsverzeichnis
Einleitung . . . . . . . . . . . . . . . . . . . . . . . . . . . . 35
Produktmerkmale . . . . . . . . . . . . . . . . . . . . . . . . 36
Anordnung auf der Frontplatte . . . . . . . . . . . . . . . . . . 37
Anordnung auf der Rückwand . . . . . . . . . . . . . . . . . . . 38
Anschluss der Resolv-Monitorlautsprecher . . . . . . . . . . . . . 39
Positionierung der Studiomonitore . . . . . . . . . . . . . . . . 40
Anschluss eines Aktivsubwoofers . . . . . . . . . . . . . . . . . 42
Technische Daten . . . . . . . . . . . . . . . . . . . . . . . . 43
Anschlüsse der Resolv SE Serie . . . . . . . . . . . . . . . . . . 45
34
Page 35

Einleitung
Vielen Dank für den Kauf eines Studio-Referenz-Monitors aus der Resolv SE Serie von
Samson Technologies! Die Resolv Studio-Monitorboxen sind Aktivlautsprecher, die intern
doppelt verstärkte Power mit elektronischen Crossovers kombiniert und so optimale
klangliche Ausgewogenheit und präzise Leistung ermöglichen. Jeder Lautsprecher verfügt
über einen 1,25” Soft-Dome-Hochtöner aus Neodym mit Ferrofluid-Kühlung, der in
einen Waveguide in der Mitte der vorderen Schallwand montiert ist. Diese Kombination
von Komponenten bietet einen präzise hohen Frequenzgang und eine breite Hörzone.
Um Mitten und Tiefen genau darzustellen, haben unsere Ingenieure sorgfältig jedes
Modell unter Verwendung von Niederfrequenztreibern aus Glasfasern mit Butyl-Sicken
abgestimmt. Dies sorgt für eine ausgeglichene Stereoabbildung ohne übertriebenen
Frequenzgang. Die Gehäuse sind aus mitteldichten Faserplatten (MDF) mit internen
Verstrebungen hergestellt, um ein starres Äußeres zu gewährleisten, das Vibrationen
reduziert und die Leistung erhöht. Die Kanten der Gehäuse sind abgerundet, um
Kantenbeugung zu minimieren.
Die Resolv SE Monitore sind als Nahfeld-Monitore konzipiert und ideal für den
Einsatz in Studios, bei der Video-Postproduktion, in festen Installationen oder als
Wiedergabelautsprecher. Auch sind sie gut als Teil eines Mehrkanal-Audio- Systems
geeignet.
Auf den folgenden Seiten erhalten Sie eine detaillierte Beschreibung der
Produktmerkmale der Modelle Resolv SE5, SE6 und SE8 sowie eine Anleitung für
das Bedienfeld und Anweisungen für Einrichtung und Gebrauch. Zudem liegt eine
Garantiekarte bei – bitte vergessen Sie nicht, diese auszufüllen und abzuschicken,
damit Sie technischen Online-Support erhalten und wir Ihnen zukünftig aktualisierte
Informationen über diese und andere Samson-Produkte zukommen lassen können.
Zum späteren Nachschlagen empfehlen wir Ihnen, in dem unten bereitgestellten Feld Ihre
Seriennummer zu notieren.
Seriennummer:_____________________________________
Kaufdatum: ___________________________________
ENGLISH
FRANÇAISDEUTSCHEESPAÑOLITALIANO
Mit der richtigen Pflege und Wartung wird Ihr Resolv Studio-Monitor viele Jahre lang
störungsfrei funktionieren. Sollte Ihr Lautsprecher jemals gewartet werden müssen,
holen Sie sich bitte eine Warenrücksendenummer, bevor sie ihn an Samson schicken.
Ohne diese Nummer kann das Gerät nicht angenommen werden. Bitte rufen Sie Samson
unter 1-800-SAMSON (1-800-372-6766) an, um vor dem Versand Ihres Geräts eine
Warenrücksendenummer zu erhalten. Bitte bewahren Sie die Originalverpackung auf
und nutzen Sie diese wenn möglich zum Versenden des Geräts. Wenn Sie Ihren Resolv
Monitor außerhalb der USA erworben haben, wenden Sie sich bei Garantie- und ServiceAnfragen bitte an Ihren örtlichen Händler. Weitere Informationen über unser gesamte
Produktpalette erhalten Sie auf unserer Website (www.samsontech.com).
Resolv SE Studio-Monitore
35
Page 36

Produktmerkmale
Die Samson Resolv SE Referenzmonitore sorgen für einen reibungslosen und präzisen
Klang bei jeder Abmisch- oder kritischen Höranwendung. Dies sind einige ihrer
wichtigsten Merkmale:
• Aktiver zwei-Wege Bassreflex-Studiomonitor mit äußerst präzisem Monitoring für
Tonstudio, Postproduktion oder Multimedia-Anwendungen
• Der 1,25” Soft-Dome-Hochtöner bietet einen erweiterten und genauen
Hochfrequenzgang mit minimaler Verzerrung.
• Hochtöner mit Waveguide für genaue und gleichmäßige Dispersion hoher Frequenzen
in flachen Hörbereichen auf und außerhalb der Hörachse
• Angetrieben von einem internen Verstärker, der speziell für optimale Leistung und
maximalen Schalldruck (SPL) entwickelt wurde. Der SE5 hat eine Gesamtleistung
von 70 Watt, während die Modelle SE6 und SE8 über 100 Watt Gesamtleistung
verfügen.
• Der vierstufige Hochfrequenzregler ermöglicht es dem Hörer, die Frequenzgangkurve
so einzustellen, dass die Wiedergabe optimal an die Abmischumgebung angepasst
wird.
• Die aktive elektronische Frequenzweiche (Crossover) mit mehrpoligem Design
gewährleistet einen nicht vom Signalpegel beeinflussten linearen Frequenzgang.
• Stramme und kontrollierte Basswiedergabe durch magnetisch abgeschirmte Tieftöner
aus gewebten Kohlefasern mit Butyl-Sicken und hochbelastbaren Motorstrukturen
mit großen Schwingspulen
• Extrem steife Konstruktion aus mitteldichten Faserplatten (MDF) für maximalen
Schalldruck (SPL)
36
Page 37

Anordnung auf der Frontplatte
ENGLISH
FRANÇAISDEUTSCHEESPAÑOLITALIANO
1. Hochtöner – Der 1,25” Silk-Dome-Hochtöner mit Ferrofluid-gekühltem
Neodymium-Magneten sorgt für eine natürliche Wiedergabe hoher Frequenzen
bei minimaler Verzerrung und bietet so klare, präzise und feine Höhen.
2. Tieftöner – Die Copolymer-Tieftöner aus gewebten Kohlefasern mit Butyl-Sicken
verschaffen jedem Monitor einen strammen und kontrollierten Frequenzgang bei
Mitten und Tiefen.
3. Betriebsanzeige – Die weiße LED zeigt an, wenn das Gerät eingeschaltet und
betriebsbereit ist.
4. Gehäuse – Stabile MDF-Konstruktion und innere Dämpfung maximieren die
akustische Wirksamkeit.
5. Bassreflexkanal – Der nach vorne ausgerichtete Bassreflexkanal verringert
Turbulenzgeräusche und verbessert die linear erweiterte Basswiedergabe.
Resolv SE Studio-Monitore
37
Page 38

Anordnung auf der Rückwand
POWER
HOCHFREQUENZPEGEL
SYMMETRISCH
LAUTSTÄRKE
AUDIOEINGÄNGE
LINE
ENTWORFEN UND ENTWICKELT IN DEN USA
BELASTBARKEIT
CAUTION
STROMSCHLAGRISIKO
NICHT ÖFFNEN
WARNUNG:
RESOLV-MONITORLAUTSPRECHER
KÖNNEN EXTREM HOHE SCHALLDRUCKPEGEL ERREICHEN. SEIEN SIE
VORSICHTIG, UM HÖRSCHÄDEN ZU
VERMEIDEN.
HERGESTELLT IN CHINA
MODEL NO. RESOLV SE8
VON SAMSON TECHNOLOGIES.
1. Hochfrequenzpegel (HF LEVEL) – Die Hochfrequenzwiedergabe wird mittels vier
Drehschaltern geregelt. Das Einstellen des Reglers auf 0dB (Werkseinstellung)
bewirkt eine flache Wiedergabe. Die Einstellungen -2dB, +2dB und +4dB regeln den
Hochfrequenzbereich über 4kHz. Ihre Raumakustik oder das zu hörende Material
bestimmen, welche Einstellung für Ihre jeweilige Anwendung angemessen ist.
2. LAUTSTÄRKE (VOLUME) – Regelt die Gesamtlautstärke.
3. XLR-Eingang (nur beim SE6 und SE8) – Schließen Sie hier mittels eines Standard-XLR-
Kabels (Mikrofonkabel) ein symmetrisches +4dBu Line-Level-Signal an.
4. ¼” Eingang – Schließen Sie hier ein symmetrisches +4dBu Line-Level-Signal über einen
Klinkenstecker (TRS) oder ein asymmetrisches ¼”-TS-Kabel an.
5. Cinch-Eingang (RCA) – Wird zum Anschluss von Signalen asymmetrischer -10dBV-Geräten
verwendet.
6. EIN/AUS-Schalter – Mit diesem Schalter können Sie die Lautsprecher ein- und ausschalten.
Im eingeschalteten Zustand leuchtet die frontseitige LED.
7. Spannungsumschalter (Voltage Switch) – Hiermit wählen Sie die Betriebsspannung. HINWEIS:
Achten Sie darauf, dass Spannungseinstellung und Sicherungsnennwert für Ihr Land korrekt sind.
8. Stromanschlussbuchse – Schließen Sie hier das mitgelieferte IEC-Netzkabel an.
9. Sicherungshalter – Hält die Netzsicherung. Zum Ersetzen der Sicherung ziehen Sie das
Netzkabel und hebeln Sie den Sicherungshalter mit einem flachen Schraubendreher
auf. HINWEIS: Entfernen Sie niemals die Sicherung, während die Lautsprecher noch an das Stromnetz
angeschlossen sind.
38
EIN
AUS
WARNUNG: WENN DIE SPANNUNG UMGESCHALTET
WIRD, MUSS AUCH DIE SICHERUNG
ENTSPRECHEND AUSGETAUSCHT WERDEN.
Page 39

Anschluss der Resolv-Monitorlautsprecher
POWER
BELASTBARKEIT
WARNUNG:
RESOLV-MONITORLAUTSPRECHER
KÖNNEN EXTREM HOHE
SCHALLDRUCKPEGEL ERREICHEN.
SEIEN SIE VORSICHTIG, UM
HÖRSCHÄDEN ZU VERMEIDEN.
MODEL NO. RESOLV SE8
ENTWORFEN UND ENTWICKELT IN DEN
USA VON SAMSON TECHNOLOGIES.
EIN
AUS
CAUTION
STROMSCHLAGRISIKO
NICHT ÖFFNEN
HERGESTELLT IN CHINA
WARNUNG: WENN DIE SPANNUNG UMGESCHALTET
WIRD, MUSS AUCH DIE SICHERUNG ENTSPRECHEND
AUSGETAUSCHT WERDEN.
HOCHFREQUENZPEGEL
LAUTSTÄRKE
SYMMETRISCH
HOCHFREQUENZPEGEL
AUDIOEINGÄNGE
LAUTSTÄRKE
SYMMETRISCH
LINE
AUDIOEINGÄNGE
LINE
BELASTBARKEIT
STROMSCHLAGRISIKO
WARNUNG:
RESOLV-MONITORLAUTSPRECHER
KÖNNEN EXTREM HOHE
SCHALLDRUCKPEGEL ERREICHEN.
SEIEN SIE VORSICHTIG, UM
HÖRSCHÄDEN ZU VERMEIDEN.
MODEL NO. RESOLV SE8
ENTWORFEN UND ENTWICKELT IN DEN
USA VON SAMSON TECHNOLOGIES.
POWER
EIN
AUS
CAUTION
NICHT ÖFFNEN
HERGESTELLT IN CHINA
WARNUNG: WENN DIE SPANNUNG UMGESCHALTET
WIRD, MUSS AUCH DIE SICHERUNG ENTSPRECHEND
AUSGETAUSCHT WERDEN.
Kontrollraum-Ausgänge
MIC/ANSCHLUSS 2 MIC/ANSCHLUSS 3
MIC/ANSCHLUSS 1
MIC/ANSCHLUSS 4 MIC/ANSCHLUSS 5/6 MIC/ANSCHLUSS 7/8
VERSTÄRKUNG
VERSTÄRKUNG VERSTÄRKUNG
VERSTÄRKUNG
CLIP
CLIP
CLIP
CLIP
AUX 1
AUX 1
AUX 1
MON
MON
MON
AUX 2
AUX 2
AUX 2
DSP
DSP
DSP
AUFNAHME
AUFNAHMEAUFNAHME
HAUPTSEKTION
AUX 1 AUSGANG
LINKS LINKS
MONO AUSGANG
CR MIX
MONO AUSGANG
RECHTS RECHTS
AUX 2 AUSGANG
R LINE INR LINE IN
MAXIMALER DYNAMISCHER BEREICH
2T AUF MIX
2T AUSGANG
2T EINGANG
LINKS RECHTS LINKS RECHTS
MODE
DIGITALE EFFEKTE
DSP AUF MON
EIN
AUX
AUX 1
AUX 1
AUX 1
RET 1
MON
MON
MON
AUX 2
AUX 2
DSP
DSP
SPITZE
AUX/DSP
AUX 2
1 GROSSER SAAL
RET 2
DSP
2 MITTLERER SAAL
3 GROSSER RAUM
4 VOCAL RM.
5 VOCAL RM. 2
6 CHOR+HALL
7 CHOR+VERZÖGERUNG
8 TREPPENHAUS
SPITZE
AUSWAHL
AUFNAHMEAUFNAHMEAUFNAHME
MIX/2T
KONTROLLRAUM+
KOPFHÖRER
L MIX R
KOPFHÖRER
KANAL 7/8KANAL 5/6KANAL 4KANAL 3KANAL 2KANAL 1
Die Monitore der Serie Resolv SE sind die perfekte Ergänzung für jedes Projektstudio. Beim
Anschluss der Monitore an ein Mischpult sollten Sie Kontrollraum-Ausgänge (Control Room
Outputs) Ihres Mischpults verwenden, so dass Sie die Lautsprecher unabhängig ansteuern
können, ohne die Hauptausgänge des Mischpults zu beeinflussen. Folgen Sie den einfachen
Schritten und dem Diagramm in diesem Abschnitt, um ihre Monitore im Handumdrehen über
die Kontrollraum-Ausgänge eines jeden Standard-Mischpults anzuschließen.
1. Senken Sie die Master-Ausgänge Ihres Mischpults, bis sie vollständig ausgeschaltet sind.
2. Schließen Sie den linken Kontrollraum-Ausgang Ihres Mischpults an den linken LINE
INPUT des Resolv SE an sowie den rechten Kontrollraum-Ausgang an die rechte Seite des
LINE INPUT Ihres Resolv SE. Die Verbindungen können über eine der drei Audio-Eingänge
auf der Rückseite des Resolv SE vorgenommen werden. Sie können Cinch-Eingänge für
unsymmetrische -10dBV-Signale oder die ¼” oder XLR-Eingänge (nur beim SE6 und SE8)
für symmetrische Signale mit +4 dBu Pegel verwenden. Hinweis: Beachten Sie bitte vor dem An-
schließen und Einschalten der Geräte das „Last on, first off“-Prinzip für Endstufen (und Aktivboxen). Stellen
Sie vor dem Einschalten des Systems sicher, dass alle Kabel angeschlossen sind, schalten Sie Ihr Mischpult
und andere externe Geräte ein und zuletzt ihren Resolv SE.
3. Stellen Sie den Eingangslautstärkeregler des Resolv SE auf die 12-Uhr-Position ein (in der
Mitte einrasten).
4. Führen Sie ein Audio-Signal (z.B. Musik von einer CD ) durch Ihr Mischpult und erhöhen
Sie den Kontrollraum-Pegel auf eine angenehme Hörlautstärke.
ENGLISH
FRANÇAISDEUTSCHEESPAÑOLITALIANO
Resolv SE Studio-Monitore
39
Page 40

Positionierung der Studiomonitore
Positionierung der Resolv SE Monitor-Lautsprecher
Viele Toningenieure bevorzugen mittlerweile das Nahfeld-Monitoring (nahe am Hörer)
wegen der mit einer Wandmontage der Monitore verbundenen Kosten und Komplexität.
Die Positionierung Ihrer Studio-Monitore ist dabei sehr wichtig. Eine richtige Platzierung
verhilft Ihnen nicht nur zu einem einwandfreien Stereobild, sondern minimiert auch
die Auswirkungen von Raumreflexionen. Dies ist besonders in heutigen Projektstudios
von Bedeutung, da die Budgets für Raumakustik oft verschwindend gering ausfallen.
Mit etwas Zeit und dem richtigen Hinhören bei der Monitoreinrichtung können Sie eine
optimale Hörumgebung schaffen.
Der wichtigste Gesichtspunkt beim Beurteilen der Raumakustik ist das Vorhandensein
reflektierender Flächen in der Nähe der Monitor-Lautsprecher. Dazu gehören flache
Tischplatten, Spiegel aus Glas oder gerahmte Bilder, große offene Wände und sogar die
Oberfläche Ihres Mischpults. Die meisten Schallreflexionen werden letztendlich die
Hörposition erreichen, aber da sie leicht verzögert ankommen, ist das Ergebnis eine
zufällige Aufhebung einiger Frequenzen oder Kammfilterung. Entfernen Sie deshalb
wenn möglich alle reflektierenden Oberflächen. Auch sollten Sie bestenfalls etwas
Akustikschaum an den Wänden in der Nähe der Monitore anbringen.
Bei der Positionierung Ihrer Monitore sollten Sie möglichst eine gemeinhin als
„Stereodreieck“ bezeichnete Anordnung erreichen (siehe unten). In dieser idealen
Konfiguration ist die Strecke zwischen dem linken und rechten Monitor gleich dem
Abstand des Hörers zu jedem Monitor, wodurch ein gleichseitiges Dreieck gebildet wird.
40
GLEICHER ABSTAND
Page 41

Positionierung der Studiomonitore
Lautsprecherausrichtung
Ein wesentliches Ziel bei der
Einrichtung Ihrer Studio-Monitore
besteht darin, das bestmögliche
Stereobild zu erhalten. Die Resolv SE
Monitore wurden für die Verwendung
in vertikaler Position konzipiert, wobei
Hochtöner und Tieftöner symmetrisch
auf einer Linie ausgerichtet sind.
Wenn Sie die Lautsprecher auf die
Seite legen, führt dies zu einer
unerwünschten Klangverschiebung zwischen Tieftöner und Hochtöner, welche das Finden der
optimalen Hörpositionen erschwert.
Ein Moment der Reflexion
Achten Sie bei der Höheneinstellung des Monitorsystems darauf, Reflexionen von der
Oberfläche des Mischpults zu vermeiden. Diese Reflexionen kommen leicht verzögert
an der Hörposition an, was Aufhebungen und insgesamt unvorhersehbare Wiedergaben
hervorruft (Abbildung 1). Stellen Sie sich die Schallbahnen in geraden, von den Monitoren
ausgehenden Linien vor und wählen Sie eine Höhe, die das Auftreten von Reflexionen an der
hauptsächlichen Hörposition reduziert. In den meisten Fällen ist die ideale Position etwas
hinter und oberhalb der Meterbridge des Mischpults (Abbildung 2). Benutzen Sie immer Ihr
Gehör, um die beste Positionierung für Ihren Raum zu finden. Mit Monitorständern können die
Lautsprecher noch besser in die gewünschte Position gebracht werden.
ENGLISH
FRANÇAISDEUTSCHEESPAÑOLITALIANO
Abbildung 1 Abbildung 2
Resolv SE Studio-Monitore
41
Page 42

Anschluss eines Aktivsubwoofers
Die Resolv SE Monitore sind als Komplettlautsprecher konzipiert worden, aber gelegentlich
müssen Sie eventuell extrem niedrige Frequenzen hören. Es kann beispielsweise beim
Abmischen Ihrer Musik von Vorteil sein, das Monitorsystem zur Basswiedergabe um einen
aktiven Subwoofer zu erweitern. Normalerweise ist es am besten, wenn der Subwoofer-Pegel
dem der Resolv SE Hauptlautsprecher entspricht.
Da tiefe Bässe ungerichtet sind, können unsere Ohren die Schallquelle schwerer lokalisieren, so
dass die genaue Platzierung des Subwoofers nicht so wichtig ist wie die der Hauptlautsprecher.
Die ideale Position befindet sich zwischen den beiden Hauptlautsprechern. Sollten Sie
feststellen, dass einige Frequenzen leiser klingen als andere, versetzen Sie den Subwoofer
leicht nach links oder rechts. Wenn der Subwoofer über einen Polaritätsschalter verfügt, können
Sie zur Verbesserung der Basswiedergabe versuchen, ihn auf die entgegengesetzte Phase
einzustellen.
Verbinden Sie die linken und rechten Kontrollraum-Ausgänge des Mischpults mit den LineEingängen des aktiven Subwoofers, um diesen in Ihr Monitorsystem zu integrieren. Dann
verbinden Sie die Line-Ausgänge des Subwoofers mit den linken und rechten Resolv SE
Lautsprechern. Führen Sie ein Audio-Signal (z.B. Musik von einer CD) durch Ihr Mischpult und
erhöhen Sie den Pegel auf eine angenehme Hörlautstärke. Passen Sie schließlich die CrossoverSteuerung des Subwoofers (falls vorhanden) an die gewünschte Frequenz an.
42
Page 43

Technische Daten
Modell SE5
Tieftöner 5” gewebte Kohlefaser
Hochtöner 1,25” Silk Dome
Gehäusetyp 2-Wege Bassreflex-System
Gehäuse In Vinyl gehülltes 3/4” (18mm) MDF-
Gehäuse mit lackierter Frontverkleidung
Frequenzgang 45Hz - 27kHz +/-3dB
Crossover-Frequenz 3,19kHz 24dB/oct Linkwitz-Riley
Ausgangsleis-
tung
Eingangsanschlüsse
Eingangswiderstand 10k Ohm
Bedienelemente Lautstärkeregler
Leistungsaufnahme 125W
Sicherung 100V - 120V T1,6AL (träge)
Abmessungen (L x B x H) 8” x 8,6” x 12,3”
Gewicht 15,25lbs
HF (Hochfrequenz) 20 Watt effektiv
LF (Niedrigfre-
quenz)
Asymmetrisch Cinch (RCA)
Symmetrisch ¼” Klinkenstecker (TRS)
50 Watt effektiv
HOCHFREQUENZPEGEL (-2dB, 0dB, +2
dB, +4 dB)
220V - 240V T800mAL (träge)
204mm x 218mm x 312mm
6,9kg
ENGLISH
FRANÇAISDEUTSCHEESPAÑOLITALIANO
Resolv SE Studio-Monitore
43
Page 44

Technische Daten
SE6 SE8
6,5” gewebte Kohlefaser 8” gewebte Kohlefaser
1,25” Silk Dome 1,25” Silk Dome
2-Wege Bassreflex-System 2-Wege Bassreflex-System
In Vinyl gehülltes 3/4” (18mm) MDF-
Gehäuse mit lackierter Frontverkleidung
40Hz - 27kHz +/-3dB 30Hz - 27kHz +/-3dB
3,19kHz 24dB/oct Linkwitz-Riley 3,19kHz 24dB/oct Linkwitz-Riley
25 Watt effektiv 25 Watt effektiv
75 Watt effektiv 75 Watt effektiv
Cinch (RCA) Cinch (RCA)
XLR, ¼” Klinkenstecker (TRS) XLR, ¼” Klinkenstecker (TRS)
10k Ohm 10k Ohm
Lautstärkeregler
HOCHFREQUENZPEGEL (-2dB, 0dB,
+2 dB, +4 dB)
175W 175W
100V - 120V T2,0AL (träge)
220V - 240V T1,0AL (träge)
9,3” x 9,9” x 13,6”
236mm x 251mm x 346mm
18lbs
8,2kg
In Vinyl gehülltes 3/4” (18mm) MDFGehäuse mit lackierter Frontverkleidung
Lautstärkeregler
HOCHFREQUENZPEGEL (-2dB, 0dB,
+2 dB, +4 dB)
100V - 120V T2,0AL (träge)
220V - 240V T1,0AL (träge)
11,2” x 12” x 16,25”
285mm x 304mm x 413mm
25lbs
11,4kg
44
Page 45

Anschlüsse der Resolv SE Serie
kalt (Pin 3)
Spitze (Signal)
Schaft (Masse)
Spitze (Signal)
Schaft (Masse)
Schaft (Masse)
Spitze (Signal)
Ansicht Kontaktseite
Lötpunkte
heiß (2)
kalt (3)
Schirmung/Masse (1)
männlicher XLR-Stecker
Spitze (Signal)
(Pin 2)
Schaft (Masse)
(keine Verbindung) (Pin 1)
Schaft (Masse)
Spitze (Signal)
Schaft (Masse)
Spitze (Signal)
Spitze (Signal)
Spitze (Signal)
Schaft (Masse)
Schaft (Masse)
Schaft (Masse)
Signal
Ansicht Kontaktseite
Lötpunkte
heiß(2)
kalt (3)
männlicher XLR-Stecker
Schirmung/Masse (1)
Schirmung/Masse
heiß
heiß
Schirmung/Masse
kaltkalt
weiblicher XLR-Stecker
Schirmung/Masse (1) heiß (2)
kalt (3)
Ansicht Kontaktseite
Lötpunkte
Ring (Signal)
Signal (ring)
Signal (Spitze)
Signal (Spitze)
Signal (Spitze)
Signal (ring)
Ring (Signal)
Spitze (Signal)
Schaft (Masse)
Masse
Masse
Signal (ring)Signal (ring)
Masse
Masse
Schaft (Masse)
Spitze (Signal)
Signal
Schaft (Masse)
Masse
Masse
Signal
Signal Spitze (Signal)
Schaft (Masse)
Masse
Masse
Spitze (Signal)
Signal (Spitze)
Verkabelungsanleitung für die Resolv SE Serie
In Abhängigkeit Ihrer jeweiligen Monitor-Einrichtung gibt es verschiedene
Möglichkeiten, die Geräte der Resolv SE Serie anzuschließen. Nehmen Sie den
Anschluss Ihres Monitorsystems gemäß der Kabelpläne vor.
Cinch-auf-Cinch-Kabel
asymmetrisches ¼’’ auf ¼’’ Kabel
symmetrisches ¼’’ auf ¼’’ Kabel
XLR-auf-XLR-Kabel
asymmetrisches ¼’’ auf Cinch-Kabel
XLR-auf-Cinch
ENGLISH
FRANÇAISDEUTSCHEESPAÑOLITALIANO
Resolv SE Studio-Monitore
45
Page 46

A la hora de deshacerse de este producto al final de su vida de servicio, no lo mezcle con la basura
doméstica normal. Existe un sistema de recogida específico para los productos electrónicos usados
conforme a la legislación, que requiere el tratamiento, la recuperación y el reciclaje apropiados.
Los usuarios no profesionales residentes en uno de los 27 estados miembro de la UE, en Suiza y en Noruega
pueden devolver sus aparatos electrónicos usados, sin coste alguno, al comercio en el que fueron adquiridos (si se
adquiere allí otro aparato similar) o a determinados centros designados para la recogida de residuos eléctricos y
electrónicos.
En el caso de los países no indicados arriba, póngase en contacto con las autoridades locales para determinar el
método de eliminación correcto.
Mediante la eliminación correcta de su aparato usado se asegurará de que éste se someta al tratamiento, la
recuperación y el reciclaje apropiados, evitándose así los efectos adversos sobre el medio ambiente y la salud
humana.
Información de Seguridad Importante
RISQUE DE CHOC ÉLECTRONIQUE -
AVIS
NE PAS OUVRIR
PRECAUCIÓN: CON EL FIN DE REDUCIR EL PELIGRO DE SACUDIDA ELÉCTRICA, NO RETIRE LA TAPA (O LA PARTE
POSTERIOR). NO HAY PIEZAS CUYA REPARACIÓN PUEDA SER EFECTUADA POR EL USUARIO EN EL INTERIOR DEL
APARATO. ENCARGUE LAS REPARACIONES A PERSONAL TÉCNICO DEBIDAMENTE CUALIFICADO.
Este símbolo de un relámpago con cabeza de flecha situado en el interior de un triángulo
equilátero tiene como objeto alertar al usuario de la presencia de “tensión peligrosa” no
aislada en el interior del alojamiento del producto que podría tener la magnitud suficiente
para presentar un riesgo de sacudida eléctrica.
Este símbolo de un signo de exclamación situado en el interior de un triángulo equilátero
tiene como objeto alertar al usuario de la presencia de instrucciones de operación y mantenimiento importantes en la documentación que acompaña al aparato.
Page 47

Información de Seguridad Importante
1. Lea cuidadosamente estas instrucciones.
2. Conserve estas instrucciones para
cualquier consulta en el futuro.
3. Siga cuidadosamente todas las
advertencias.
4. Observe y siga todas las instrucciones del
fabricante.
5. Este aparato no debe exponerse al goteo
o a las salpicaduras de líquidos. Tampoco
deben colocarse sobre él objetos llenos
de líquidos, como por ejemplo jarrones.
6. Limpie el aparato solo con un trapo seco.
7. No bloquee las aperturas de ventilación.
Instale el aparato de acuerdo con las
instrucciones del fabricante.
8. No instale el aparato cerca de fuentes
de calor como, por ejemplo, rejillas de
calefacción, estufas u otros aparatos
(incluyendo amplificadores) que
produzcan calor.
9. Utilice solo las conexiones/accesorios
especificados por el fabricante.
10. Desenchufe este aparato durante las
tormentas eléctricas o cuando no vaya a
utilizarlo durante un período de tiempo
prolongado.
11. No anule el sistema de seguridad del
enchufe de tipo polarizado o con toma
de tierra. Un enchufe polarizado tiene
dos bornes, uno más ancho que el otro.
Uno con toma de tierra tiene dos bornes
normales y un tercero para la conexión a
tierra. El borne ancho o el tercer borne
se incluyen como medida de seguridad.
Cuando el enchufe no encaje en su salida
de corriente, llame a un electricista para
que le cambie su salida anticuada.
12. Evite que el cable de corriente quede
en una posición en la que pueda ser
pisado o aplastado, especialmente en los
enchufes, receptáculos y en el punto en
el que sale de la unidad.
13. Utilice solo el soporte de carro, el soporte
de trípode o la mesa especificados por
el fabricante o vendidos junto con el
aparato. Si utiliza un carro, es necesario
que proceda con precaución a la hora de
mover el conjunto del carro/aparato con
el fin de evitar que vuelque y las lesiones
personales que ello podría acarrearle.
14. Dirija cualquier posible reparación
solo a personal técnico debidamente
cualificado. Deberá hacer que su aparato
sea reparado cuando esté dañado de
alguna forma, como por ejemplo si el
cable de corriente o el enchufe están
dañados, o si se han derramado líquidos
o se ha introducido
algún objeto dentro de
la unidad, si ésta ha
quedado expuesta a la
lluvia o la humedad,
si no funciona
normalmente o si ha
caído al suelo.
15. INTERRUPTOR DE ENCENDIDO/
APAGADO DE LA ALIMENTACIÓN: En el
caso de los productos equipados con un
interruptor de alimentación, el interruptor
de alimentación NO interrumpe la
conexión desde la red eléctrica.
16. DESCONEXIÓN DE RED: El enchufe
debe poder operarse fácilmente en todo
momento. En el caso de montaje en rack
o de instalación en los que el enchufe no
resulte accesible, es necesario incorporar
un interruptor de red omnipolar con una
separación de los contactos de al menos
3 mm en cada polo a la instalación del
rack o el edificio.
17. PARA LAS UNIDADES EQUIPADAS
CON FUSIBLE ACCESIBLE DESDE EL
EXTERIOR: Reemplace el fusible solo
por otro fusible del mismo tipo y valor
nominal.
18. TENSIÓN DE ENTRADA MÚLTIPLE: Para
este equipo podrá ser necesario el uso de
un cable de alimentación o un enchufe
diferente o ambos, dependiendo de la
fuente de alimentación disponible en la
instalación. Conecte este equipo solo a
la fuente de alimentación indicada en el
panel posterior del equipo. Para reducir
el riesgo de incendio o de sacudida
eléctrica, dirija cualquier reparación
a personal técnico debidamente
cualificado.
Page 48

Índice
Introducción . . . . . . . . . . . . . . . . . . . . . . . . . . . 49
Características . . . . . . . . . . . . . . . . . . . . . . . . . . 50
Front Panel Layout . . . . . . . . . . . . . . . . . . . . . . . . 51
Vista del Panel Trasero . . . . . . . . . . . . . . . . . . . . . . 52
Conexión de los Monitores Resolv . . . . . . . . . . . . . . . . . 53
Colocación de sus Monitores de Estudio . . . . . . . . . . . . . . 54
Conexión de un Subwoofer Activo . . . . . . . . . . . . . . . . . 56
Especificaciones . . . . . . . . . . . . . . . . . . . . . . . . . 57
Conexiones del Resolv Serie SE . . . . . . . . . . . . . . . . . . 59
48
Page 49

Introducción
Le agradecemos que haya decidido adquirir un monitor de referencia para
estudio Resolv Serie SE. Los monitores de estudio Resolv son altavoces activos
que incorporan potencia biamplificada interna y crossovers electrónicos para un
balance tonal óptimo y un rendimiento preciso. Cada altavoz incluye un tweeter
de cúpula blanda de neodimio de 1,25” refrigerado por fluido férrico, montado en
una guía de ondas en el centro del bafle frontal. Esta combinación de componentes
proporciona una respuesta de alta frecuencia precisa y un área de escucha amplia.
Para proporcionar un rango medio preciso y un extremo bajo compacto, nuestros
ingenieros han diseñado cuidadosamente cada modelo utilizando drivers de baja
frecuencia de fibra de vidrio con recubrimiento de butilo. Así se mejora la imagen
estéreo sin exageración en la respuesta de frecuencia. Los armarios están construidos
en fibra de densidad media (MDF) con refuerzos internos para crear un recinto rígido
que reduce las vibraciones e incrementa la actuación. Los bordes de los armarios son
redondos con el fin de reducir la difracción en los bordes.
Los monitores Resolv SE se han diseñado como monitores de campo próximo ideales
para el uso en estudios, salas de post-producción de vídeo, instalaciones fijas o como
altavoces de reproducción. También son muy adecuados para formar parte de un
sistema de audio multicanal.
En estas páginas podrá encontrar una descripción detallada de las características
de los modelos SE5, SE6 y SE8 del monitor Resolv, así como un recorrido guiado
a través de su panel de control, instrucciones paso a paso para su configuración
y manejo. También encontrará una tarjeta de garantía – no olvide rellenarla y
enviárnosla por correo para que pueda recibir soporte técnico online y para que le
podamos ofrecer información actualizada sobre éste y otros productos de Samson en
el futuro.
Le recomendamos que en las líneas siguientes anote su número de serie para
cualquier consulta en el futuro.
Número de serie:_____________________________________
Fecha de compra: ___________________________________
Con unos cuidados y mantenimiento adecuados, su monitor de estudio Resolv
funcionará sin ningún problema durante muchos años. En el caso improbable de que
en algún momento tuviera que reparar este aparato, deberá solicitarnos un número
de autorización de devolución (RA) para poder enviar su unidad a Samson. Sin este
número no se acepta ninguna unidad en fábrica. Póngase en contacto con Samson
en el 1-800- 3SAMSON (1-800-372-6766) para que le facilitemos este número de
autorización de devolución antes de enviarnos la unidad. Si es posible, conserve el
embalaje original y los materiales de protección para devolvernos la unidad dentro de
ellos. Si compró su monitor Resolv fuera de los Estados Unidos, póngase en contacto
con su distribuidor en lo relativo a los detalles de la garantía y la información de
servicio. No olvide visitar nuestra página web (www.samsontech.com) en la que podrá
encontrar información sobre nuestra línea de productos completa.
ENGLISH
FRANÇAISDEUTSCHEESPAÑOLITALIANO
Resolv SE Studio Monitors
49
Page 50

Características
Los monitores de referencia Samson Resolv Serie SE le ofrecen una respuesta suave
y precisa para cualquier situación de mezcla o de escucha crítica. Éstas son algunas
de sus características principales:
• Un monitor para estudio activo reflector de bajos de dos vías que proporciona
una monitorización extremadamente precisa para estudios de grabación, salas
de post-producción y entornos multimedia.
• Su tweeter de cúpula blanda de 1,25” proporciona una respuesta de alta
frecuencia ampliada y precisa con la mínima distorsión.
• Guía de ondas del tweeter diseñada para ofrecer una dispersión precisa y
uniforme del contenido de alta frecuencia para unas áreas de escucha plana
dentro y fuera del eje.
• Alimentado mediante un amplificador interno diseñado específicamente para
ofrecer al usuario un rendimiento óptimo y el máximo nivel SPL. El SE5 tiene
70 vatios de potencia total, mientras que el SE6 y el SE8 tienen 100 vatios de
potencia total.
• El control de Nivel de Alta Frecuencia de cuatro posiciones permite al usuario
modelar el contorno de la curva de respuesta con el fin de personalizar la
respuesta que mejor se adapte a su entorno de mezcla.
• Crossover electrónico activo utilizando un diseño multipolar para una respuesta
de frecuencia lineal no afectada por el nivel de la señal.
• Respuesta de baja frecuencia compacta y controlada producida mediante
woofers de fibra de carbono tejida blindados magnéticamente con recubrimiento
de butilo y estructuras de motor con bobinas de voz de gran tamaño.
• Fabricación extremadamente sólida en MDF (fibra de densidad media) para
ofrecer el máximo nivel SPL con una total rigidez.
50
Page 51

Front Panel Layout
ENGLISH
FRANÇAISDEUTSCHEESPAÑOLITALIANO
1. Tweeter – 1.25” silk-dome tweeter with ferrofluid-cooled neodymium magnet
provides a natural reproduction of high frequencies while minimizing distortion
resulting in a clear, precise and sweet top end
2. Woofer – Woven carbon fiber, copolymer butyl surround woofers provide each
monitor with tight and controlled mid- and low-frequency response
3. Power Indicator – White LED illuminates indicating the unit is powered on and
ready for operation
4. Enclosure – Solid MDF construction and internal damping maximizes acoustic
efficiency
5. Bass Reflex Port – Front-firing port provides minimal port turbulence and
enhances the linear extended low frequency response
Resolv SE Studio Monitors
51
Page 52

Vista del Panel Trasero
ALIMENTACIÓN
NIVEL DE HF
ENTRADAS
DE AUDIO
RÉGIMEN DE POTENCIA
CAUTION
PELIGRO DE SACUDIDA
VOLUMEN
BALANCEADA
LÍNEA
ELÉCTRICA
NO ABRIR
ADVERTENCIA:
LOS MONITORES RESOLV PUEDEN
ALCANZAR NIVELES DE PRESIÓN
ACÚSTICA EXTREMADAMENTE ELEVADOS.
ES NECESARIO TENER CUIDADO PARA
EVITAR PÉRDIDAS DE AUDICIÓN
FABRICADO EN CHINA
MODEL NO. RESOLV SE8
DISEÑADO EN ESTADOS UNIDOS POR
SAMSON TECHNOLOGIES
1. Nivel de HF – Interruptor giratorio de cuatro posiciones para ajustar la respuesta de alta
frecuencia. El ajuste del interruptor en 0dB (ajuste de fábrica) produce una respuesta
plana. Con los valores -2dB, +2dB y +4dB se ajusta un shelf de alta frecuencia por
encima de 4kHz. La acústica de su sala o el material de escucha determinarán el ajuste
apropiado para su aplicación.
2. VOLUMEN – Controla la magnitud del nivel de la salida global.
3. Entrada XLR (solo SE6 y SE8) – Conecte aquí una señal de nivel de línea +4dBu balanceada
mediante un cable XLR estándar (micrófono).
4. Entrada ¼” – Conecte aquí una señal de nivel de línea +4dBu balanceada mediante un
cable de ¼” TRS (Punta, Anillo, Lateral) o TS no balanceado.
5. Entrada RCA – Esta entrada se utiliza para conectar señales de unidades a -10dBv no
balanceadas.
6. Interruptor de ALIMENTACIÓN – Utilice este interruptor para encender y apagar los
altavoces. Cuando estén encendidos, el LED del panel frontal de iluminará.
7. Interruptor de Tensión – Utilice este interruptor para la seleccionar la tensión de
funcionamiento.
NOTA: Asegúrese de comprobar que el ajuste de la tensión y el valor nominal del fusible sean
los correctos para su país.
8. Entrada de CA – Conecte aquí el cable de alimentación IEC que se incluye.
9. Portafusible – Contiene el fusible de red. Para reemplazar el fusible, retire el cable de
alimentación y abra el portafusibles utilizando un destornillador de punta plana.
NOTA: No retire nunca el fusible mientras los altavoces estén enchufados.
52
ON
OFF
ADVERTENCIA: SI SE MODIFICA LA TENSIÓN ES
NECESARIO CAMBIAR EL FUSIBLE
Page 53

Conexión de los Monitores Resolv
ALIMENTACIÓN
AUDIO
LÍNEA
RÉGIMEN DE POTENCIA
PELIGRO DE SACUDIDA
ADVERTENCIA:
LOS MONITORES RESOLV PUEDEN
ALCANZAR NIVELES DE PRESIÓN
ACÚSTICA EXTREMADAMENTE ELEVADOS.
ES NECESARIO TENER CUIDADO PARA
EVITAR PÉRDIDAS DE AUDICIÓN
MODEL NO. RESOLV SE8
DISEÑADO EN ESTADOS UNIDOS
POR SAMSON TECHNOLOGIES
ON
OFF
CAUTION
ELÉCTRICA
NO ABRIR
FABRICADO EN CHINA
ADVERTENCIA: SI SE MODIFICA LA TENSIÓN ES
NECESARIO CAMBIAR EL FUSIBLE
NIVEL DE HF
VOLUMEN
BALANCEADA
NIVEL DE HF
ENTRADAS DE
VOLUMEN
BALANCEADA
ENTRADAS DE
AUDIO
LÍNEA
RÉGIMEN DE POTENCIA
PELIGRO DE SACUDIDA
ADVERTENCIA:
LOS MONITORES RESOLV PUEDEN
ALCANZAR NIVELES DE PRESIÓN
ACÚSTICA EXTREMADAMENTE ELEVADOS.
ES NECESARIO TENER CUIDADO PARA
EVITAR PÉRDIDAS DE AUDICIÓN
MODEL NO. RESOLV SE8
DISEÑADO EN ESTADOS UNIDOS POR
SAMSON TECHNOLOGIES
ALIMENTACIÓN
ON
OFF
CAUTION
ELÉCTRICA
NO ABRIR
FABRICADO EN CHINA
ADVERTENCIA: SI SE MODIFICA LA TENSIÓN ES
NECESARIO CAMBIAR EL FUSIBLE
Salidas de Sala de Control
MIC/LINEA 4 MIC/LINEA 5/6 MIC/LINEA 7/8
MIC/LINEA 1
MIC/LINEA 3
MIC/LINEA 2
GANANCIA
GANANCIA
GANANCIA
GANANCIA
CLIP
CLIP
CLIP
CLIP
AUX 1
AUX 1
AUX 1
MON
MON
MON
AUX 2
AUX 2
AUX 2
DSP
DSP
DSP
SECCIÓN MAESTRA
SALIDA AUX 1
IZQUIERDA IZQUIERDA
SALIDA MONO
CR MIX
SALIDA MONO
DERECHA DERECHA
AUX 2 OUT
SALIDA LÍNEA RENTRADA LÍNEA R
RANGO DINÁMICO MÁXIMO
2T A MIX
SALIDA 2T
ENTRADA 2T
IZQUIERDA DERECHA IZQUIERDA DERECHA
MODO
EFECTOS DIGITALES
DISCO
DURO
DSP A MON
POTENCIA
AUX
AUX 1
AUX 1
AUX 1
RET 1
MON
MON
MON
AUX 2
AUX 2
DSP
DSP
PICO
AUX/DSP
AUX 2
1 SALA GRANDE
RET 2
DSP
2 SALA MEDIANA
3 HABITACIÓN GRANDE
4 SALA VOCALES
5 SALA VOCALES 2
6 CORO+REVERBERACIÓN
7 CORO+RETARDO
8 ESCALERA
PICO
SELECCIONAR
MIX/2T
SALA DE CONTROL
+AURICULARES
L MIX R
AURICULARES
CANAL 7/8CANAL 5/6CANAL 4CANAL 3CANAL 2CANAL 1
Los monitores Resolv Serie SE son la adición perfecta para cualquier estudio de
proyectos. A la hora de conectar los monitores a una mesa de mezclas, debe utilizar
las salidas de sala de control de su mesa de mezclas de manera que pueda controlar
independientemente el nivel a los altavoces sin que la salida de mezcla principal se
vea afectada. Siga los sencillos pasos y el diagrama de esta sección para conectar
rápidamente sus monitores utilizando las salidas de sala de control de una mesa de
mezclas estándar.
1. Coloque abajo del todo los controles de salidas master de la mesa de mezclas.
2. Conecte la salida Izquierda de Sala de Control de la mesa de mezclas a la toma LINE
INPUT izquierda del RESOLV Serie SE y la salida Derecha de Sala de Control de la
mesa de mezclas a la LINE INPUT del Resolv Serie SE de la derecha. Las conexiones
en serie del Resolv Serie SE pueden efectuarse mediante una de las tres Entradas de
Audio del panel trasero. Puede utilizar entradas RCA para señales de nivel -10dBV no
balanceadas o las entradas ¼” o XLR (solo los modelos SE6 y SE8) para señales de
nivel +4dBu balanceadas.
Nota: Antes de conectar las unidades y de encenderlas, recuerde la regla “el último en encender,
primero en apagar” de los amplificadores de potencia (y de los monitores autoamplificados). Cuando
encienda su sistema, asegúrese de que todos los cables estén conectados, encienda la mesa y el
resto de unidades exteriores y finalmente encienda el Resolv Serie SE.
3. Ajuste el control de Volumen de entrada del Resolv Serie SE en la posición de las 12
en punto del reloj.
4. Dé paso a una señal audio (música desde un CD, por ejemplo) a través de su
mezclador y suba el nivel de la Sala de Control hasta un volumen de escucha
cómodo.
Resolv SE Studio Monitors
53
ENGLISH
FRANÇAISDEUTSCHEESPAÑOLITALIANO
Page 54

Colocación de sus Monitores de Estudio
Colocación del Resolv Serie SE
La monitorización de campo cercano (cerca del oyente) se ha convertido en la elección
de muchos técnicos debido al coste y las complejidades asociados al montaje de los
monitores en las paredes. El posicionamiento correcto de los monitores de estudio es
un aspecto muy importante. La colocación correcta no solo crea la imagen de estéreo
correcta, sino que también minimiza los efectos de las reflexiones que se producen en
la sala. Esto es especialmente importante en los estudios de proyectos de hoy en día, ya
que el presupuesto con el que se suele contar para trabajar en la acústica de la sala es en
muchos casos prácticamente inexistente. Si dedica algún tiempo a la colocación de los
monitores, guiándose por su oído, podrá crear un entorno de escucha óptimo.
El aspecto más importante a la hora de evaluar la acústica de la sala es la presencia
de superficies reflexivas cerca del área de monitorización. Estas superficies pueden ser
mesas, espejos o cuadros, grandes paredes planas e incluso la propia superficie de la
mesa de mezclas. La mayor parte del sonido reflejado llegará finalmente a la posición de
escucha, pero dado que estará ligeramente retardado con respecto a la fuente directa, el
resultado será una cancelación aleatoria de algunas frecuencias, también denominado
filtro de peine. Si fuera posible, elimine todas estas superficies reflexivas. También puede
serle de ayuda colocar algún aislamiento acústico en las paredes más cercanas a los
monitores.
A la hora de colocar los monitores, le interesará colocarlos de la forma denominada
habitualmente “triángulo de mezcla” (vea la siguiente ilustración). En esta configuración
ideal, el espacio entre los dos monitores debe ser igual a la distancia desde cada uno de
ellos al oyente, formando un triángulo equilátero.
54
DISTANCIA IGUAL
Page 55

Colocación de sus Monitores de Estudio
Orientación de los Altavoces
Uno de los objetivos principales
a la hora de colocar los monitores
de estudio consiste en obtener la
mejor imagen de estéreo posible.
Los monitores Resolv Serie SE
están diseñados para utilizarse en
posición vertical, con el tweeter y el
woofer alineados simétricamente.
La colocación del altavoz tumbado
sobre uno de los laterales provocará una descompensación del sonido entre el tweeter y el
woofer, lo que limitará las posibilidades de encontrar posiciones de escucha óptimas.
Un Momento de Reflexión
Cuando esté escogiendo la altura para su sistema de monitores, tenga cuidado con el fin
de evitar las reflexiones de la superficie de su mesa de mezclas. Estas reflexiones llegan a
la posición de escucha con un ligero retardo con respecto al sonido original, produciendo
cancelaciones y una respuesta global impredecible (Figura 1). Visualice los rayos de la
radiación del sonido como líneas rectas que salen desde los monitores y escoja una altura
que le permita reducir la aparición de estas reflexiones que terminarán en el punto de
escucha. En la mayoría de los casos, la posición ideal estará ligeramente por detrás y
encima del panel de medidores de la mesa de mezclas (Figura 2). Utilice siempre su oído
para encontrar el mejor posicionamiento en su sala. El uso de soportes para el monitor le
ayudará a colocar los altavoces en la posición apropiada.
ENGLISH
FRANÇAISDEUTSCHEESPAÑOLITALIANO
Figure 1 Figure 2
Resolv SE Studio Monitors
55
Page 56
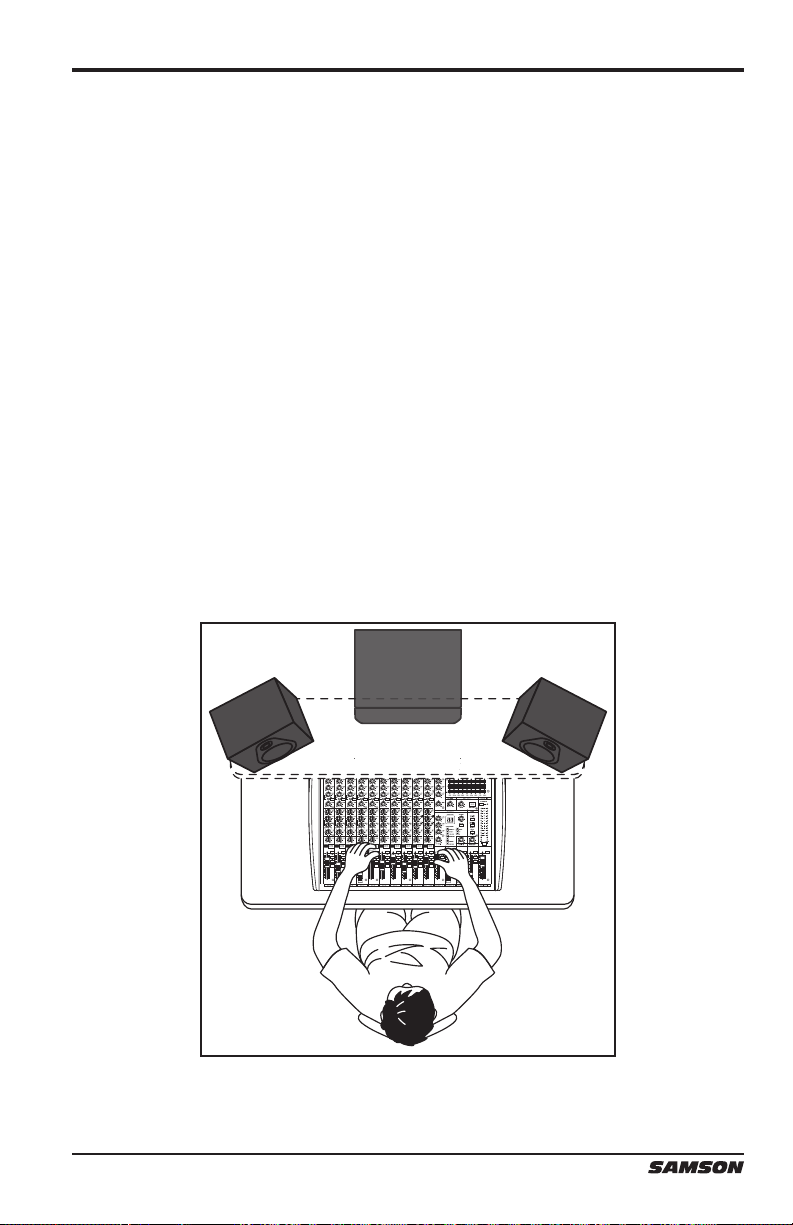
Conexión de un Subwoofer Activo
Los monitores Resolv SE está diseñados como altavoces de rango completo, pero en
algunas ocasiones podría ser necesario escuchar los graves más extremos. La adición
de un subwoofer activo para ampliar la respuesta de baja frecuencia de su sistema
de monitor puede resultarle muy útil a la hora de mezclar su música, por ejemplo.
Normalmente es mejor ajustar el nivel del subwoofer de manera que sea el mismo que
el de los altavoces principales del Resolv Serie SE.Puesto que las frecuencias de bajos
profundos son no direccionales, a nuestro oído le resulta difícil localizar la fuente del
sonido y, por lo tanto, la colocación del subwoofer no es un aspecto tan crítico como en el
caso de los altavoces principales. La posición ideal es entre los dos altavoces principales.
Si observa que hay frecuencias que suenan con menos intensidad que otras, desplace
ligeramente el subwoofer hacia la izquierda o hacia la derecha. Si el subwoofer tiene un
interruptor de polaridad, ajuste el interruptor en el ajuste de la fase opuesta para ver si así
mejora la respuesta de baja frecuencia.
Para incorporar un subwoofer a su sistema de monitor, conecte las salidas de Sala de
Control Izquierda y Derecha de su mesa de mezclas a las entradas de línea del subwoofer
activo. A continuación, conecte las salidas de línea del subwoofer a los altavoces
izquierdo y derecho del Resolv Serie SE. Haga pasar una señal audio (como la de un CD
de música) a través de la mesa y aumente el nivel hasta llegar a un volumen de escucha
que le resulte cómodo. Por último, ajuste el control de la frecuencia de crossover (si fuera
aplicable) del subwoofer en la frecuencia que desee.
56
Page 57

Especificaciones
Modelo SE5
Woofer Fibra de Carbono Tejida de 5”
Tweeter Cúpula de Seda de 1,25”
Tipo de Recinto Sistema Reflector de Bajos de Dos Vías
Recinto Armario fabricado en MDF de 18 mm
(3/4”) recubierto de vinilo con bafle
frontal pintado
Respuesta de Frecuencia 45Hz - 27kHz +/-3dB
Frecuencia de Crossover 3,19kHz 24dB/oct Linkwitz-Riley
Potencia de
Salida
Conectores de
Entrada
Impedancia de Entrada 10k ohmios
Controles Control de VOLUMEN
Consumo de Energía 125W
Fusible 100V – 120V T1,6AL (fusible lento)
Dimensiones (largo x ancho x alto) 204 mm x 218 mm x 312 mm
Peso 6,9 kg
Graves 20 vatios RMS
Agudos 50 vatios RMS
No Balanceada RCA
Balanceada ¼” TRS Phone
NIVEL HF (-2dB, 0dB, +2dB, +4dB)
220V – 240V T800mAL (fusible lento)
(8” x 8,6” x 12,3”)
(15,25 libras)
ENGLISH
FRANÇAISDEUTSCHEESPAÑOLITALIANO
Resolv SE Studio Monitors
57
Page 58

Especificaciones
SE6 SE8
Fibra de Carbono Tejida de 6,5” Fibra de Carbono Tejida de 8”
Cúpula de Seda de 1,25” Cúpula de Seda de 1,25”
Sistema Reflector de Bajos de Dos Vías Sistema Reflector de Bajos de Dos Vías
Armario fabricado en MDF de 18 mm
(3/4”) recubierto de vinilo con bafle
frontal pintado
40Hz - 27kHz +/-3dB 30Hz - 27kHz +/-3dB
3,19kHz 24dB/oct Linkwitz-Riley 3,19kHz 24dB/oct Linkwitz-Riley
25 vatios RMS 25 vatios RMS
75 vatios RMS 75 vatios RMS
RCA RCA
XLR, ¼” TRS Phone XLR, ¼” TRS Phone
10k ohmios 10k ohmios
Control de VOLUMEN
NIVEL HF (-2dB, 0dB, +2dB, +4dB)
175W 175W
100V – 120V T2,0AL (fusible lento)
220V – 240V T1,0AL (fusible lento)
236 mm x 251 mm x 346 mm
(9,3” x 9,9” x 13,6”)
8,2 kg
(18 libras)
Armario fabricado en MDF de 18 mm
(3/4”) recubierto de vinilo con bafle
frontal pintado
Control de VOLUMEN
NIVEL HF (-2dB, 0dB, +2dB, +4dB)
100V – 120V T2,0AL (fusible lento)
220V – 240V T1,0AL (fusible lento)
285 mm x 304 mm x 413 mm)
(11,2” x 12” x 16,25”)
11,4 kg
(25 libras)
58
Page 59

Conexiones del Resolv Serie SE
Negativo (Pin 3)
Punta (señal)
Manguito (tierra)
Punta (señal)
Manguito (tierra)
Manguito (tierra)
Punta (señal)
Vista Terminal
Puntos de Soldadura
Positivo (2)
Negativo (3)
Común (1)
XLR Macho
Punta (señal)
(Pin 2)
Manguito (tierra)
Manguito (tierra)
Punta (señal)
Manguito (tierra)
Punta (señal)
Punta (señal)
Punta (señal)
Manguito (tierra)
Manguito (tierra)
Manguito (tierra)
Señal
Vista Terminal
Puntos de Soldadura
Positivo (2)
Negativo (3)
XLR Macho
Común (1)
Común
Positivo
Positivo
Común
Negativo Negativo
XLR Hembra
Común (1) Positivo (2)
Negativo (3)
Vista Terminal
Puntos de Soldadura
Anillo (señal)
Señal (anillo)
Señal (punta)
Señal (punta)
Señal (punta)
Señal (anillo)
Anillo (señal)
Punta (señal)
Manguito (tierra)
Tierra
Tierra
Señal (anillo)Señal (anillo)
Tierra
Tierra
Manguito (tierra)
Punta (señal)
Señal
Manguito (tierra)
Tierra
Tierra
Señal
Señal Punta (señal)
Manguito (tierra)
Tierra
Tierra
Punta (señal)
Señal (punta)
Guía de cableado del RESOLV 50a
Hay varias formas de interconectar el Resolv Serie SE, dependiendo de su montaje
de monitorización concreto. Para la conexión de su sistema de monitorización vea
los siguientes diagramas de cables.
Cable RCA a RCA
Cable ¼” no balanceado a ¼”
Cable ¼” balanceado a ¼”
Cable XLR a XRL
Cable ¼” no balanceado a RCA
XLR a RCA
ENGLISH
FRANÇAISDEUTSCHEESPAÑOLITALIANO
Resolv SE Studio Monitors
59
Page 60

Se si desidera smaltire il prodotto non gettarlo con i rifiuti domestici generici. Esiste un sistema di
raccolta separato per i prodotti elettronici usati in ottemperanza con la normativa che prevede un
trattamento, un recupero e un riciclaggio corretti.
Utenze private dei 27 stati membri dell’UE, oltre che di Svizzera e Norvegia, possono effettuare gratuitamente la
consegna dei loro prodotti elettronici usati presso gli impianti di raccolta a ciò preposti o un rivenditore (se si
acquista un oggetto nuovo simile).
Per i Paesi non citati sopra, contattare le autorità locali per conoscere i metodi di smaltimento corretti.
Facendo ciò ci si assicurerà che il prodotto smaltito sia sottoposto ai necessari processi di trattamento, recupero e
riciclaggio e che vengano così evitati effetti potenzialmente negativi per l’ambiente e la salute umana.
Informazioni importanti sulla sicurezza
ATTENZIONE
RISCHIO DI FOLGORAZIONE -
NON APRIRE
AVVERTIMENTO: PER RIDURRE IL RISCHIO DI FOLGORAZIONI, NON ASPORTARE IL COPERCHIO (O LA PARTE
POSTERIORE). ALL’INTERNO DELL’APPARECCHIO NON CI SONO COMPONENTI RIPARABILI DALL’UTENTE. PER LE
RIPARAZIONI RIVOLGERSI A PERSONALE DI ASSISTENZA QUALIFICATO.
Il simbolo del fulmine con la punta a forma di freccia all’interno di un triangolo equilatero
ha lo scopo di avvisare l’utente della presenza di “tensioni pericolose” non isolate all’interno
della cassa, di ampiezza sufficiente a costituire un rischio di folgorazione.
Il punto esclamativo all’interno di un triangolo equilatero ha lo scopo di avvisare l’utente
della presenza di importanti istruzioni di funzionamento e manutenzione nella documentazione a corollario dell’apparecchio.
Page 61

Informazioni importanti sulla sicurezza
1. Leggere le presenti istruzioni.
2. Conservare le presenti istruzioni.
3. Prestare attenzione a tutte le avvertenze.
4. Seguire tutte le istruzioni.
5. L’apparecchio non deve essere esposto
a sgocciolamento o schizzi di liquido e
su di esso non deve essere posato alcun
oggetto contenente liquido, come per
esempio un vaso.
6. Pulire unicamente con un panno
asciutto.
7. Non bloccare alcuna delle aperture di
ventilazione. Eseguire l’installazione
conformemente alle istruzioni della
società produttrice.
8. Non installare nei pressi di sorgenti
di calore come termosifoni, registri di
calore, stufe o altri apparecchi (compresi
gli amplificatori) che producono calore.
9. Usare soltanto dispositivi/accessori
specificati dalla società produttrice.
10. Staccare la spina dell’apparecchio dalla
presa di corrente durante i temporali
o quando non è utilizzato per lunghi
periodi di tempo.
11. Non ignorare il fine previsto della spina
polarizzata o con messa a terra. Una
spina polarizzata ha due lame, una più
ampia dell’altra. Una spina con messa a
terra ha due lame e un terzo connettore
di messa a terra. La lama larga, o il
terzo polo, è inserita/o per la sicurezza
dell’utente. Se la spina in dotazione non
è adatta per la propria presa, consultare
un elettricista per sostituire la presa
obsoleta.
12. Proteggere il cavo di alimentazione
in modo che non venga calpestato o
schiacciato, soprattutto in corrispondenza
delle spine, dei connettori, del punto in
cui essi escono dall’apparecchio.
13. Usare unicamente con il carrello,
treppiede o tavolo di supporto specificati
dalla società produttrice, o venduti
con l’apparecchio. Quando si utilizza
un carrello, fare attenzione nello
spostamento dell’insieme carrello/
apparecchio per evitare lesioni da
ribaltamento.
14. Per qualsiasi riparazione rivolgersi a
personale di assistenza qualificato.
Eventuali riparazioni sono necessarie
se l’apparecchio è stato danneggiato in
qualche modo, come nel caso di guasti al
cavo di alimentazione o alla spina, danni
provocati dal rovesciamento di liquido o
dalla caduta di oggetti
sull’apparecchio,
esposizione alla
pioggia o all’umidità,
o se l’apparecchio
non funziona in modo
normale o è stato fatto
cadere.
15. INTERRUTTORE DI ACCENSIONE/
SPEGNIMENTO: per prodotti dotati
di interruttore, l’interruttore NON
interrompe il collegamento con la rete
elettrica.
16. DISTACCO DALLA RETE ELETTRICA:
la spina deve rimanere prontamente
inseribile. Per montaggi su rack o
installazioni in cui la spina non sia
accessibile, un interruttore di rete
multipolare con separazione dei contatti
di almeno 3 mm su ciascun polo sarà
inserito nell’impianto elettrico del rack o
dell’edificio.
17. PER UNITÀ DOTATE DI PORTAFUSIBILI
ACCESSIBILE DALL’ESTERNO: sostituire
i fusibili unicamente con altri dello
stesso tipo e potenza.
18. TENSIONE IN INGRESSO MULTIPLA:
questo apparecchio potrebbe richiedere
l’uso di un cavo di alimentazione
differente o di una spina di collegamento
diversa, o di entrambi, a seconda della
fonte di alimentazione disponibile
all’installazione. Collegare l’apparecchio
solo alla fonte di alimentazione indicata
sul suo pannello posteriore. Per ridurre
il rischio di incendi o folgorazioni,
affidare le riparazioni solo a personale
di assistenza qualificato o a tecnici in
possesso di preparazione equivalente.
Page 62

Indice
Introduzione . . . . . . . . . . . . . . . . . . . . . . . . . . . 63
Caratteristiche . . . . . . . . . . . . . . . . . . . . . . . . . . 64
Layout del pannello frontale . . . . . . . . . . . . . . . . . . . 65
Layout del pannello posteriore . . . . . . . . . . . . . . . . . . 66
Collegamento dei monitor Resolv . . . . . . . . . . . . . . . . . 67
Posizionamento dei monitor da studio . . . . . . . . . . . . . . . 68
Collegamento di un subwoofer attivo. . . . . . . . . . . . . . . . 70
Specifiche . . . . . . . . . . . . . . . . . . . . . . . . . . . . 71
Collegamenti degli apparecchi Resolv serie SE . . . . . . . . . . . 73
62
Page 63

Introduzione
Vi ringraziamo per aver acquistato un monitor di riferimento da studio Resolv
della serie SE di Samson Technologies! I monitor da studio Resolv sono diffusori
attivi che incorporano potenza di biamplificazione interna e crossover elettronici
per un equilibrio tonale ottimale e prestazioni precise. Ciascun diffusore è dotato
di un tweeter a cupola morbida da 1,25” (3,18 cm) con magnete al neodimio e
raffreddamento con ferrofluido, montato in una guida d’onda al centro del pannello
frontale. Questa combinazione di componenti fornisce una risposta in alta frequenza
precisa e una vasta area di ascolto. Per fornire una gamma delle medie frequenze
precisa e una risposta solida a quelle basse, i nostri tecnici hanno sonorizzato
attentamente ciascun modello utilizzando driver a bassa frequenza in fibra di vetro
con sospensioni in butile. Ciò garantisce una riproduzione acustica uniforme senza
risposta in frequenza martellante. I cabinet sono realizzati in pannelli di fibra a
media densità (MDF) con rinforzo interno in modo da creare una cassa rigida che
riduce le vibrazioni e aumenta le prestazioni. I bordi dei cabinet sono arrotondati per
ridurre la diffrazione ai bordi.
I monitor Resolv SE sono stati progettati per applicazioni di campo vicino, ideali per
uso in studio, con suite di post-produzione video, installazioni fisse o altoparlanti per
la riproduzione. Sono inoltre molto adatti come componenti di un impianto audio
multicanale.
Nelle pagine seguenti troverete una descrizione dettagliata delle caratteristiche
dei modelli Resolv SE5, SE6 e SE8, oltre ad una presentazione delle funzioni del
pannello di controllo e alle istruzioni per la configurazione e l’uso dell’apparecchio.
Troverete anche un certificato di garanzia — vi preghiamo di compilarlo e spedirlo
in modo da poter ricevere assistenza tecnica on-line e da permetterci di inviarvi
informazioni aggiornate su questi e altri prodotti Samson in futuro.
Vi raccomandiamo di annotare il numero di serie del vostro apparecchio nello spazio
sottostante per farvi riferimento in futuro.
Numero di serie:_____________________________________
Data di acquisto: ___________________________________
ENGLISH
FRANÇAISDEUTSCHEESPAÑOLITALIANO
Con le dovute cure e manutenzione, un monitor da studio Resolv funzionerà senza
problemi per molti anni. Se il diffusore dovesse necessitare riparazioni, bisognerà
ottenere un numero di autorizzazione al reso (RA) prima di spedire l’unità a Samson.
Senza questo numero, l’unità non sarà accettata. Vi preghiamo di contattare Samson
allo 1-800-3SAMSON (1-800-372-6766) per ottenere un numero RA prima di
spedire la vostra unità. Conservare la confezione originale e, se possibile, effettuare
il reso dell’unità nel suo imballaggio originale. Se il monitor Resolv è stato acquistato
fuori dal territorio degli Stati Uniti, contattare il distributore locale per dettagli sulla
garanzia e informazioni sull’assistenza. Inoltre, accertarsi di consultare il nostro
sito web (www.samsontech.com) per informazioni sulla nostra gamma completa di
prodotti.
63Monitor da studio Resolv SE
Page 64

Caratteristiche
I monitor di riferimento Resolv della serie SE offrono una risposta semplice e precisa
a qualsiasi situazione di missaggio o di ascolto critico. Di seguito vengono elencate
alcune delle loro caratteristiche principali:
• Monitor da studio attivo a due vie, bass-reflex, in grado di fornire un
monitoraggio estremamente preciso per applicazioni di registrazione in studio,
post-produzione o multimediali
• Un tweeter a cupola morbida da 1,25” (3,18 cm) assicura una risposta in alta
frequenza estesa e precisa, con una distorsione minima
• Guida d’onda del tweeter ideata per fornire una dispersione accurata e uniforme
dei contenuti in alta frequenza per zone di ascolto piatte in asse e fuori asse
• Potenziati da un amplificatore interno specificamente ideato per ottenere
prestazioni ottimali e il massimo livello di pressione sonora. Il modello SE5 ha
una potenza totale di 70 Watt, mentre i modelli SE6 e SE8 hanno una potenza
totale di 100 Watt
• Un sistema di controllo del livello delle alte frequenze su quattro posizioni
consente all’ascoltatore di costruire la curva di risposta per personalizzare la
risposta che si attaglia al meglio al proprio ambiente di missaggio
• Crossover elettronici attivi con progettazione multipolare per una risposta in
frequenza lineare non influenzata dal livello del segnale
• Una risposta solida e controllata alle basse frequenze prodotta da woofer in fibra
di carbonio intrecciata schermati magneticamente con sospensione in butile e
da resistenti motori con ampi voice coil
• Struttura estremamente rigida in MDF (pannelli di fibra a media densità) che
assicura il massimo livello di pressione sonora
64
Page 65

Layout del pannello frontale
ENGLISH
FRANÇAISDEUTSCHEESPAÑOLITALIANO
1. Tweeter – il tweeter a cupola di seta da 1,25” (3,18 cm) con magnete al
neodimio raffreddato con ferrofluido offre una riproduzione naturale delle alte
frequenze minimizzando al contempo la distorsione con il risultato di una
gamma di alte frequenze chiara, distinta e melodiosa
2. Woofer – i woofer in fibra di carbonio con sospensione in copolimero butilico
forniscono a ciascun monitor una risposta in media e bassa frequenza solida e
controllata
3. Indicatore di accensione – un LED di colore bianco si illumina indicando che
l’unità è accesa e pronta per l’uso
4. Cassa – una solida struttura in MDF e lo smorzamento interno massimizzano
l’efficienza acustica
5. Porta bass reflex – una porta front-firing garantisce un rumore di turbolenza
ridotto al minimo in corrispondenza della porta ed esalta linearità ed estensione
della risposta in bassa frequenza
65Monitor da studio Resolv SE
Page 66

Layout del pannello posteriore
ALIMENTAZIONE
LIVELLO HF
INGRESSI AUDIO
POTENZA
CAUTION
RISCHIO DI FOLGORAZIONE
VOLUME
BILANCIATO
LINEA
NON APRIRE
AVVERTIMENTO:
I MONITOR RESOLV POSSONO
RAGGIUNGERE LIVELLI DI PRESSIONE
SONORA ESTREMAMENTE ELEVATI, FARE
ATTENZIONE O POTREBBERO PRODURSI
DANNI ALL’UDITO
FABBRICATO IN CINA
MODEL NO. RESOLV SE8
PROGETTATO NEGLI STATI UNITI DA SAMSON
TECHNOLOGIES
1. LIVELLO HF – Interruttore girevole a quattro posizioni utilizzato per regolare la risposta
in alta frequenza. L’impostazione dell’interruttore su 0 dB (impostazione predefinita
di fabbrica) produce una risposta piatta. I valori -2 dB, +2 dB e +4 dB regolano un
equalizzatore parametrico sulle alte frequenze sopra i 4 kHz. L’acustica della stanza o il
materiale di ascolto determineranno l’impostazione adatta all’applicazione.
2. VOLUME – Controlla la quantità del livello di uscita complessivo.
3. Ingresso XLR (solo per i modelli SE6 e SE8) – Collegare a questo ingresso un segnale con
livello di linea bilanciata pari a +4 dBu, con un cavo XLR standard (microfono).
4. Ingresso da ¼” – Collegare a questo ingresso un segnale con livello di linea bilanciata pari
a +4 dBu, attraverso un cavo da ¼” con connettore TRS (Tip, Ring, Sleeve), o TS (Tip,
Sleeve) sbilanciato.
5. Ingresso RCA – Utilizzato per collegare segnali da dispositivi da –10 dBV sbilanciati.
6. Interruttore di ACCENSIONE – Usare questo interruttore per accendere e spegnere gli
altoparlanti. Quando l’apparecchio è acceso il LED situato sul pannello frontale si
illuminerà.
7. Interruttore di tensione – Usato per selezionare la tensione di funzionamento.
NOTA: accertarsi di controllare che l’impostazione della tensione e la potenza del fusibile siano corrette per
il proprio paese.
8. Ingresso c.a. – Collegare a questo ingresso il cavo di alimentazione con connettore IEC in
dotazione.
9. Portafusibile – Contiene il fusibile per il collegamento alla rete elettrica. Per sostituire
il fusibile, togliere il cavo di alimentazione e aprire il portafusibile facendo leva con un
cacciavite a testa piatta.
NOTA: non rimuovere mai il fusibile mentre gli altoparlanti sono collegati alla presa.
ON
OFF
AVVERTIMENTO: QUANDO SI CAMBIA
TENSIONE BISOGNA CAMBIARE FUSIBILE
66
Page 67

Collegamento dei monitor Resolv
ALIMENTAZIONE
INGRESSI
AUDIO
LINEA
MODEL NO. RESOLV SE8
STATI UNITI DA SAMSON TECHNOLOGIES
POTENZA
CAUTION
RISCHIO DI FOLGORAZIONE
NON APRIRE
AVVERTIMENTO: I MONITOR
RESOLV POSSONO RAGGIUNGERE
LIVELLI DI PRESSIONE SONORA
ESTREMAMENTE ELEVATI, FARE
ATTENZIONE O POTREBBERO
PRODURSI DANNI ALL’UDITO
FABBRICATO IN CINA
PROGETTATO NEGLI
AVVERTIMENTO: QUANDO SI CAMBIA
TENSIONE BISOGNA CAMBIARE FUSIBILE
ON
OFF
LIVELLO HF
VOLUME
BILANCIATO
LIVELLO HF
VOLUME
BILANCIATO
INGRESSI
AUDIO
LINEA
AVVERTIMENTO: I MONITOR
RESOLV POSSONO RAGGIUNGERE
LIVELLI DI PRESSIONE SONORA
ESTREMAMENTE ELEVATI, FARE
ATTENZIONE O POTREBBERO
PRODURSI DANNI ALL’UDITO
MODEL NO. RESOLV SE8
PROGETTATO NEGLI STATI UNITI DA
SAMSON TECHNOLOGIES
ALIMENTAZIONE
ON
OFF
POTENZA
CAUTION
RISCHIO DI FOLGORAZIONE
NON APRIRE
FABBRICATO IN CINA
AVVERTIMENTO: QUANDO SI CAMBIA
TENSIONE BISOGNA CAMBIARE FUSIBILE
Uscite sala di controllo
MIC/LINEA 4 MIC/LINEA 5/6 MIC/LINEA 7/8
MIC/LINEA 1
MIC/LINEA 3
MIC/LINEA 2
GUADAGNO
GUADAGNO
GUADAGNO
GUADAGNO
CLIP
CLIP
CLIP
CLIP
MON
MON
MON
AUX 1
AUX 1
AUX 1
DSP
DSP
DSP
AUX 2
AUX 2
AUX 2
MASTER SECTION
USCITA AUX 1
SINISTRA SINISTRA
USCITA MONO
CR MIX
USCITA MONO
DESTRA DESTRA
USCITA AUX 2
USCITA LINEA DINGRESSO LINEA D
GAMMA DINAMICA MASSIMA
DA 2T A MIX
USCITA 2T
INGRESSO 2T
SINISTRA DESTRA SINISTRA DESTRA
MODALITÀ
EFFETTI DIGITALI
DA DPS A MON
ALIMENTAZIONE
AUX
MON
MON
MON
RET 1
AUX 1
AUX 1
AUX 1
DSP
DSP
AUX 2
AUX 2
PICCO
AUX/DSP
DSP
1 AUDITORIO GRANDE
RET 2
AUX 2
2 AUDITORIO MEDIO
3 SALA GRANDE
4 VOCAL ROOM
5 VOCAL ROOM 2
6 CORO + RIVERBERO
7 CORO + RITARDO
8 TROMBA DELLE SCALE
PICCO
SELECT
MIX/2T
SALA CONTR.
+ CUFFIE
S MIX D
CUFFIE
CANALE 7/8CANALE 5/6CANALE 4CANALE 3CANALE 2CANALE 1
I monitor Resolv della serie SE sono il complemento perfetto per qualsiasi project studio.
Per il collegamento dei monitor a un mixer si dovranno utilizzare le uscite della sala
di controllo del mixer in modo da poter controllare indipendentemente il livello degli
altoparlanti senza effetti sull’uscita principale della console di missaggio. Eseguire le
semplici operazioni e consultare il diagramma illustrati in questo paragrafo per collegare
velocemente i monitor facendo ricorso alle uscite della sala di controllo di una console di
registrazione standard.
1. Abbassare il volume delle uscite principali del mixer fino a che non sono completa-
mente silenziate.
2. Collegare l’uscita sinistra della sala di controllo del mixer all’INGRESSO DI LINEA
posizionato sul lato sinistro dell’apparecchio Resolv serie SE e l’uscita destra della
sala di controllo del mixer all’INGRESSO DI LINEA posizionato sul lato destro
dell’apparecchio Resolv serie SE. I collegamenti agli apparecchi Resolv serie SE
possono essere effettuati attraverso uno dei tre ingressi audio presenti sul pannello
posteriore. Si possono utilizzare gli ingressi RCA per i segnali con livello pari a -10
dBV sbilanciati, oppure l’ingresso da ¼” o l’ingresso XLR (solo per i modelli SE6 e
SE8) per i segnali con livello pari a +4 dBu bilanciati.
Nota: prima di inserire le spine e accendere le unità, ricordare che per gli amplificatori di potenza
(e per i diffusori potenziati) vale la regola “l’ultimo acceso è il primo spento”. Quando si accende
l’impianto, accertarsi che tutti i cavi siano collegati, accendere il mixer e qualsiasi altro outboard e
solo alla fine accendere l’apparecchio Resolv serie SE.
3. Impostare il controllo del volume di ingresso dell’apparecchio Resolv serie SE sulla
posizione ore 12 (bloccato al centro).
4. Inviare un segnale audio (come della musica da un CD) attraverso il mixer e alzare il
livello della sala di controllo a un volume di ascolto piacevole.
67Monitor da studio Resolv SE
ENGLISH
FRANÇAISDEUTSCHEESPAÑOLITALIANO
Page 68

Posizionamento dei monitor da studio
Posizionamento degli apparecchi Resolv serie SE
Il monitoraggio in campo vicino (accanto all’ascoltatore) è divenuto la scelta privilegiata di
molti tecnici per via dei costi e delle complessità associati con il montaggio dei monitor a
parete. Il posizionamento corretto dei monitor da studio è un elemento molto importante.
Un corretto posizionamento non solo crea la giusta riproduzione stereo, ma riduce anche
al minimo gli effetti creati dalle riflessioni dell’ambiente. Ciò è importante soprattutto
negli odierni project studio dal momento che il budget per realizzare l’acustica della sala
spesso è irrisorio. Con un po’ di tempo e di ascolto durante il montaggio dei monitor è
possibile creare un ambiente di ascolto ottimale.
La considerazione più importante nella valutazione dell’acustica di una stanza è la presenza di superfici riflettenti accanto all’area di monitoraggio. Dette superfici possono comprendere piani di tavoli piatti, specchi in vetro o foto incorniciate, pareti aperte di vaste
dimensioni o persino la superficie della console di missaggio. Anche il suono più riflesso
alla fine raggiungerà la posizione di ascolto, ma, dal momento che è leggermente ritardato
dalla sorgente diretta, il risultato sarà una cancellazione casuale di alcune frequenze o
l’effetto di un filtro comb. Se possibile rimuovere tutte le superfici riflettenti. Potrebbe
essere anche desiderabile appendere dei pannelli in schiuma acustica sulle pareti accanto
ai monitor.
Nel posizionamento dei monitor, si desidererà configurare ciò a cui si fa comunemente
riferimento con il termine di “triangolo di missaggio” (illustrato di seguito). In questa configurazione ideale, lo spazio tra il monitor destro e quello sinistro è pari alla distanza tra
l’ascoltatore e ciascun monitor, che forma un triangolo equilatero.
68
PARI DISTANZA
Page 69

Posizionamento dei monitor da studio
Orientamento dell’altoparlante
Un obiettivo importante durante il
montaggio dei monitor da studio
è ottenere la riproduzione stereo
migliore possibile. I monitor Resolv
SE sono progettati per l’uso in
posizione verticale, con il tweeter e
il woofer allineati simmetricamente.
Posizionare l’altoparlante sul fianco
provocherà una compensazione di
suono tra il woofer e il tweeter, limitando la capacità dell’utente di trovare delle posizioni
di ascolto ottimali.
Un attimo di riflessione
Definendo l’altezza del sistema di diffusione, fare attenzione a evitare riflessioni dalla
superficie della console di missaggio. Queste riflessioni giungono alla posizione di
ascolto con un leggero ritardo rispetto al suono originale, dando luogo a cancellazioni
e a una risposta imprevedibile a livello generale (Figura 1). Visualizzare le linee diritte
che rappresentano i raggi sonori irradiati dai monitor e scegliere un’altezza che riduca
il prodursi di riflessioni che termineranno nel punto di ascolto principale. Nella maggior
parte dei casi la posizione ideale è lievemente dietro e sopra il ponte di misura della
console di missaggio (Figura 2). Fare sempre ricorso al proprio udito per individuare il
posizionamento migliore nella stanza. L’utilizzo di supporti per i monitor sarà di ausilio
nel collocare gli altoparlanti nella posizione idonea.
ENGLISH
FRANÇAISDEUTSCHEESPAÑOLITALIANO
Figura 1 Figura 2
69Monitor da studio Resolv SE
Page 70

Collegamento di un subwoofer attivo
I monitor Resolv SE sono progettati per essere altoparlanti a gamma completa,
occasionalmente però è possibile avere la necessità di ascoltare la gamma bassa
estrema. L’aggiunta di un subwoofer attivo per estendere la risposta in bassa
frequenza dell’impianto di diffusione può rivelarsi utile nel missaggio di musica per
esempio. Di norma, la soluzione migliore è impostare il livello del subwoofer pari a
quello degli altoparlanti principali Resolv SE.
Dal momento che le frequenze dei bassi profondi non sono direzionali, è difficile per
l’orecchio umano individuare la sorgente sonora, sicché il posizionamento preciso
del subwoofer non è un elemento di importanza così cruciale come quello degli
altoparlanti principali. La posizione ideale è tra i due altoparlanti principali. Se si
rileva che alcune frequenze risultano più attenuate di altre, spostare leggermente
il subwoofer a sinistra o a destra. Se il subwoofer ha un commutatore di polarità,
cercare di impostarlo sulla fase opposta per vedere se ciò migliora la risposta in
bassa frequenza.
Per incorporare un subwoofer nel proprio impianto di diffusione, collegare le uscite
della sala di controllo destra e sinistra del mixer agli ingressi di linea del subwoofer
attivo. Poi collegare le uscite di linea del subwoofer agli altoparlanti destro e sinistro
Resolv serie SE. Inviare un segnale audio (come della musica da un CD) attraverso
il mixer e alzare il livello a un volume di ascolto piacevole. In ultimo, regolare il
controllo della frequenza di crossover (se applicabile) del subwoofer sulla frequenza
desiderata.
70
Page 71

Specifiche
Modello SE5
Woofer fibra di carbonio intrecciata da 5” (12,7
cm)
Tweeter cupola in seta da 1,25” (3,18 cm)
Tipo di cassa sistema bass reflex a due vie
Cassa cabinet in MDF con rivestimento in vinile
da 3/4” (18 mm) con pannello frontale
verniciato con pannello frontale verniciato
Risposta in frequenza 45 Hz – 27 kHz +/-3 dB
Frequenza di crossover 3,19 kHz 24 dB/ott Linkwitz-Riley
Potenza di
uscita
Connettori di
ingresso
Impedenza di ingresso 10k ohm
Controlli Controllo del VOLUME
Potenza assorbita 125 W
Fusibile 100 V – 120 V T 1,6 AL (ritardato)
Dimensioni (Lungh. x Largh. x H) 8” x 8,6” x 12,3”
Peso 15,25 lb
HF 20 Watts RMS
LF 50 Watts RMS
sbilanciato RCA
bilanciato TRS telefonico da ¼”
LIVELLO HF (-2 dB, 0 dB, +2 dB, +4dB)
220 V – 240 V T 800 mAL (ritardato)
204 mm x 218 mm x 312 mm
6,9 kg
ENGLISH
FRANÇAISDEUTSCHEESPAÑOLITALIANO
71Monitor da studio Resolv SE
Page 72

Specifiche
SE6 SE8
fibra di carbonio intrecciata da 6,5”
(16,51 cm)
cupola in seta da 1,25” (3,18 cm) cupola in seta da 1,25” (3,18 cm)
sistema bass reflex a due vie sistema bass reflex a due vie
cabinet in MDF con rivestimento in
vinile da 3/4” (18 mm) con pannello
frontale verniciato
40 Hz – 27 kHz +/-3 dB 30 Hz – 27 kHz +/-3 dB
3,19 kHz 24 dB/ott Linkwitz-Riley 3,19 kHz 24 dB/ott Linkwitz-Riley
25 Watts RMS 25 Watts RMS
75 Watts RMS 75 Watts RMS
RCA RCA
XLR, TRS telefonico da ¼” XLR, TRS telefonico da ¼”
10k ohm 10k ohm
Controllo del VOLUME
LIVELLO HF (-2 dB, 0 dB, +2 dB,
+4dB)
175W 175W
100 V – 120 V T 1,6 AL (ritardato)
220 V – 240 V T 800 mAL (ritardato)
9,3” x 9,9” x 13,6”
236 mm x 251mm x 346 mm
18 lb
8,2 kg
fibra di carbonio intrecciata da 8”
(20,32 cm)
cabinet in MDF con rivestimento in
vinile da 3/4” (18 mm) con pannello
frontale verniciato
Controllo del VOLUME
LIVELLO HF (-2 dB, 0 dB, +2 dB,
+4dB)
100 V – 120 V T 1,6 AL (ritardato)
220 V – 240 V T 800 mAL (ritardato)
11,2” x 12” x 16,25”
285 mm x 304 mm x 413 mm
25 lb
11,4 kg
72
Page 73

Collegamenti degli apparecchi Resolv serie SE
Freddo (contatto 3)
Punta (segnale)
Manica (messa a terra)
Punta (segnale)
Manica (messa a terra)
Manica (messa a terra)
Punta (segnale)
Vista estremità
Punti di
saldatura
Caldo (2)
Freddo (3)
Comune (1)
XLR maschio
Punta (segnale)
(Contatto 2)
Manica (messa a terra)
(nessuna connessione) (contatto 1)
Manica (messa a terra)
Punta (segnale)
Manica (messa a terra)
Punta (segnale)
Punta (segnale)
Punta (segnale)
Manica (messa a terra)
Manica (messa a terra)
Manica (messa a terra)
Segnale
Vista estremità
Punti di
saldatura
Caldo (2)
Freddo (3)
XLR maschio
Comune (1)
Comune
Caldo
Caldo
Comune
FreddoFreddo
XLR femmina
Comune (1) Caldo (2)
Freddo (3)
Vista estremità
Punti di
saldatura
Segnale (anello)
Segnale (anello)
Segnale (punta)
Segnale (punta)
Segnale (punta)
Segnale (anello)
Anello (segnale)
Punta (segnale)
Manica (messa a terra)
Messa a terra
Messa a terra
Segnale (anello)Segnale (anello)
Messa a terra
Messa a terra
Manica (messa a terra)
Punta (segnale)
Segnale
Manica (messa a terra)
Messa a terra
Messa a terra
Segnale
Segnale Punta (segnale)
Manica (messa a terra)
Messa a terra
Messa a terra
Punta (segnale)
Segnale (punta)
Guida al cablaggio degli apparecchi Resolv serie SE
Molti sono i modi per interfacciare gli apparecchi Resolv serie SE, a seconda
dell’esatta configurazione dell’impianto di diffusione. Seguire quanto riportato dai
diagrammi di cablaggio sottostanti per eseguire il collegamento al proprio impianto
di diffusione.
Da RCA a cavo RCA
Da ¼” sbilanciato a cavo da ¼”
Da ¼” bilanciato a cavo da ¼”
Da XLR a cavo XLR
Da ¼” sbilanciato a RCA
Da XLR a RCA
ENGLISH
FRANÇAISDEUTSCHEESPAÑOLITALIANO
73Monitor da studio Resolv SE
Page 74

NOTES
Page 75

Page 76

Samson Technologies Corp.
45 Gilpin Avenue
Hauppauge, New York 11788-8816
Phone: 1-800-3-SAMSON (1-800-372-6766)
Fax: 631-784-2201
www.samsontech.com
 Loading...