

Page 1
SAMSON SPLICING INSTRUCTIONS
Smooth ICE/Flavored ICE Cover Installation
MARKING AND KNOTTING
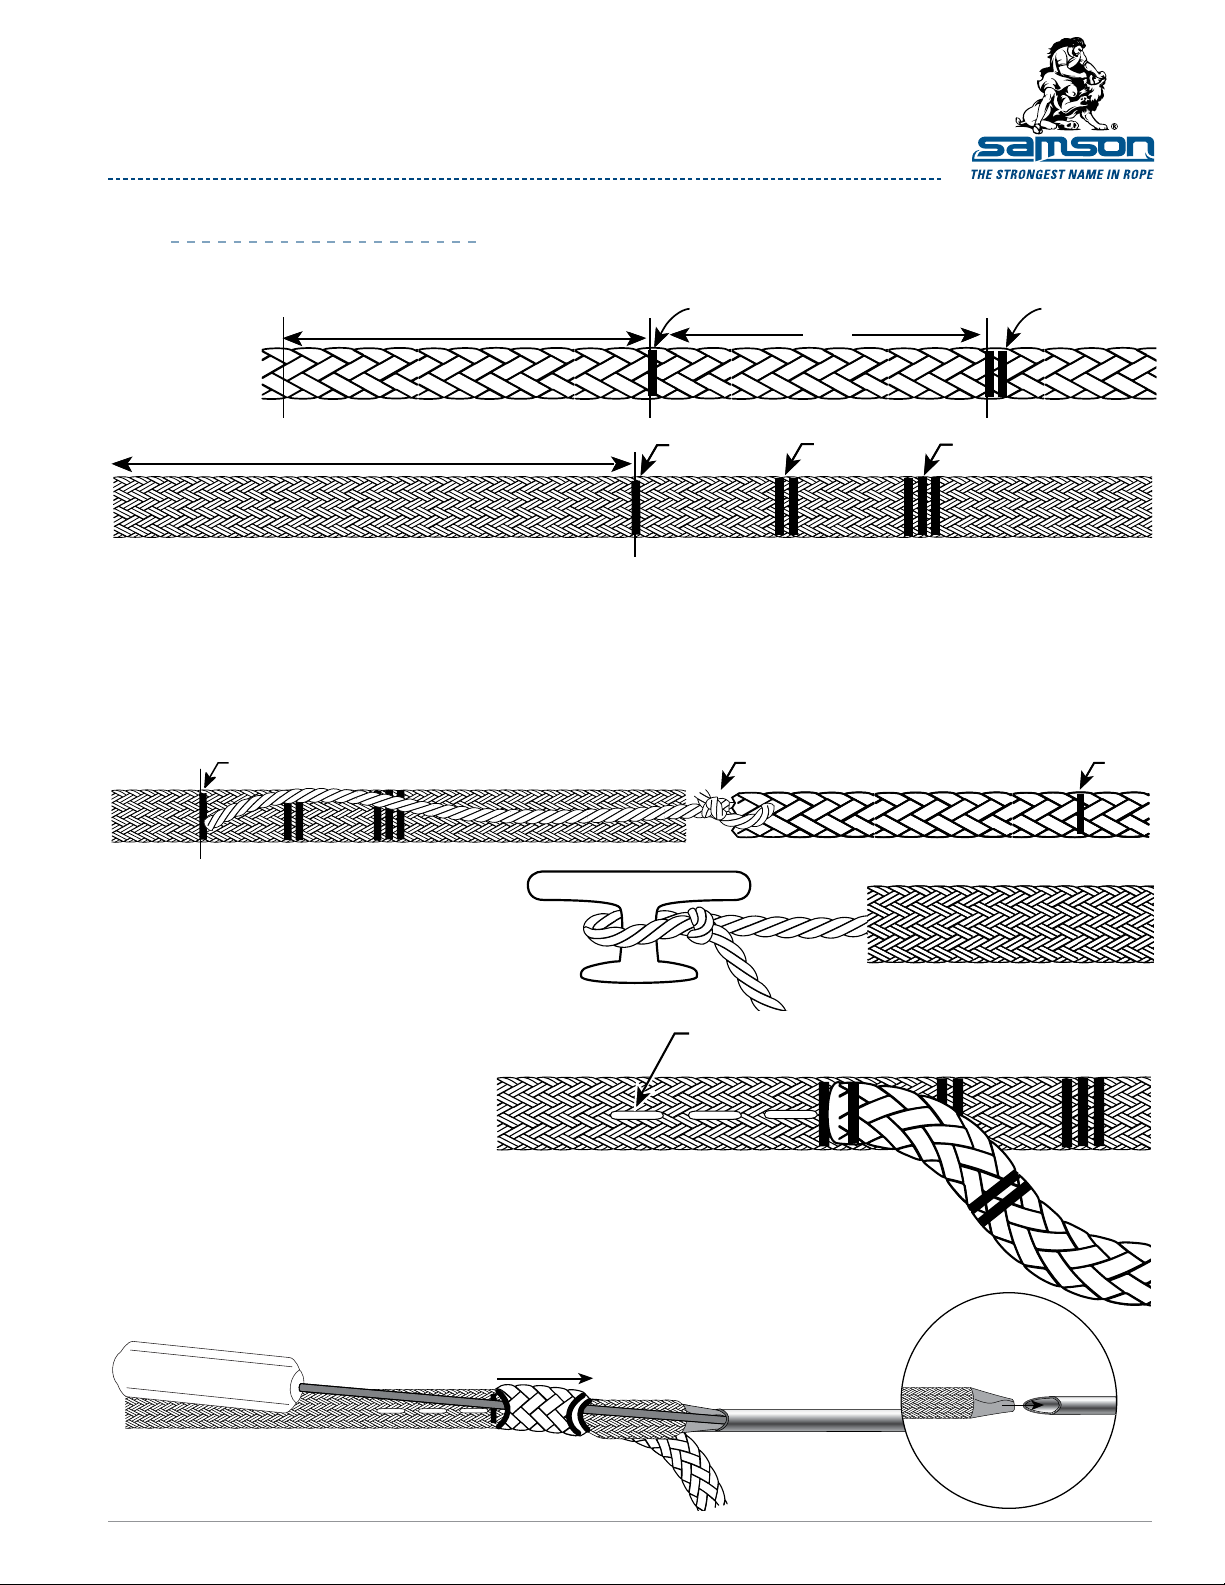
Lay out rope to be covered and from the end to be covered, measure off distance to be covered and make
Mark 1 on the rope. From Mark 1, measure off a distance of 15 inches and make Mark 2 on the rope.
step
1
Section of rope to be covered
Mark 1 Mark 2
15"
step
2
step
3
step
4
Ice cover plus 15% extra length
Lay out Ice cover below rope to be covered and allow 15% more cover length than rope to be covered from Mark
1 to the end of the rope. Then make Mark 1 on the cover using Mark 1 on the rope as a guide. Next make Mark 2
and Mark 3 on the cover by measuring off 6 inches for each mark.
Tape and cut the Ice cover at Mark 3. Then extract the internal feed line from the cover at Mark 1. Attach feed line
to rope end to be covered by passing the feed line through the rope braid and forming a loop knot. Be careful not
to pull the feed line into the cover on the other end.
Extract feed line at Mark 1 on cover
Attach feed line from other end of cover
to a xed point for assistance in burying
the rope into the cover.
Tie off 1 end of feeder core
Mark 1
Attached feed line to rope with loop
knot. Tape for smooth transition
between feed line and rope
Mark 2
Mark 3
Mark 1
Lock stitch cover to rope
Feed rope into cover and milk cover
over rope until Mark 1 of cover and
step
5
step
6
SamsonRope.com | Email CustServ@SamsonRope.com | Tel +1.360.384.4669
Mark 1 of rope are matched. Then
lock stitch the cover to the rope from
Mark 1 back for 3 complete passes.
Insert a splicing d, d should be sized to rope diameter, with the cover into the rope as
close to the lock-stitch as possible. Continue pushing the d through the center of the
rope and extract the d and cover at Mark 2 on the rope.
pusher
Insert fid at Mark 1 on rope and exit at Mark 2
Cover, insert in fid.
PAGE 1 OF 3
Page 2
SAMSON SPLICING INSTRUCTIONS
Smooth ICE/Flavored ICE Cover Installation
step
7
step
8
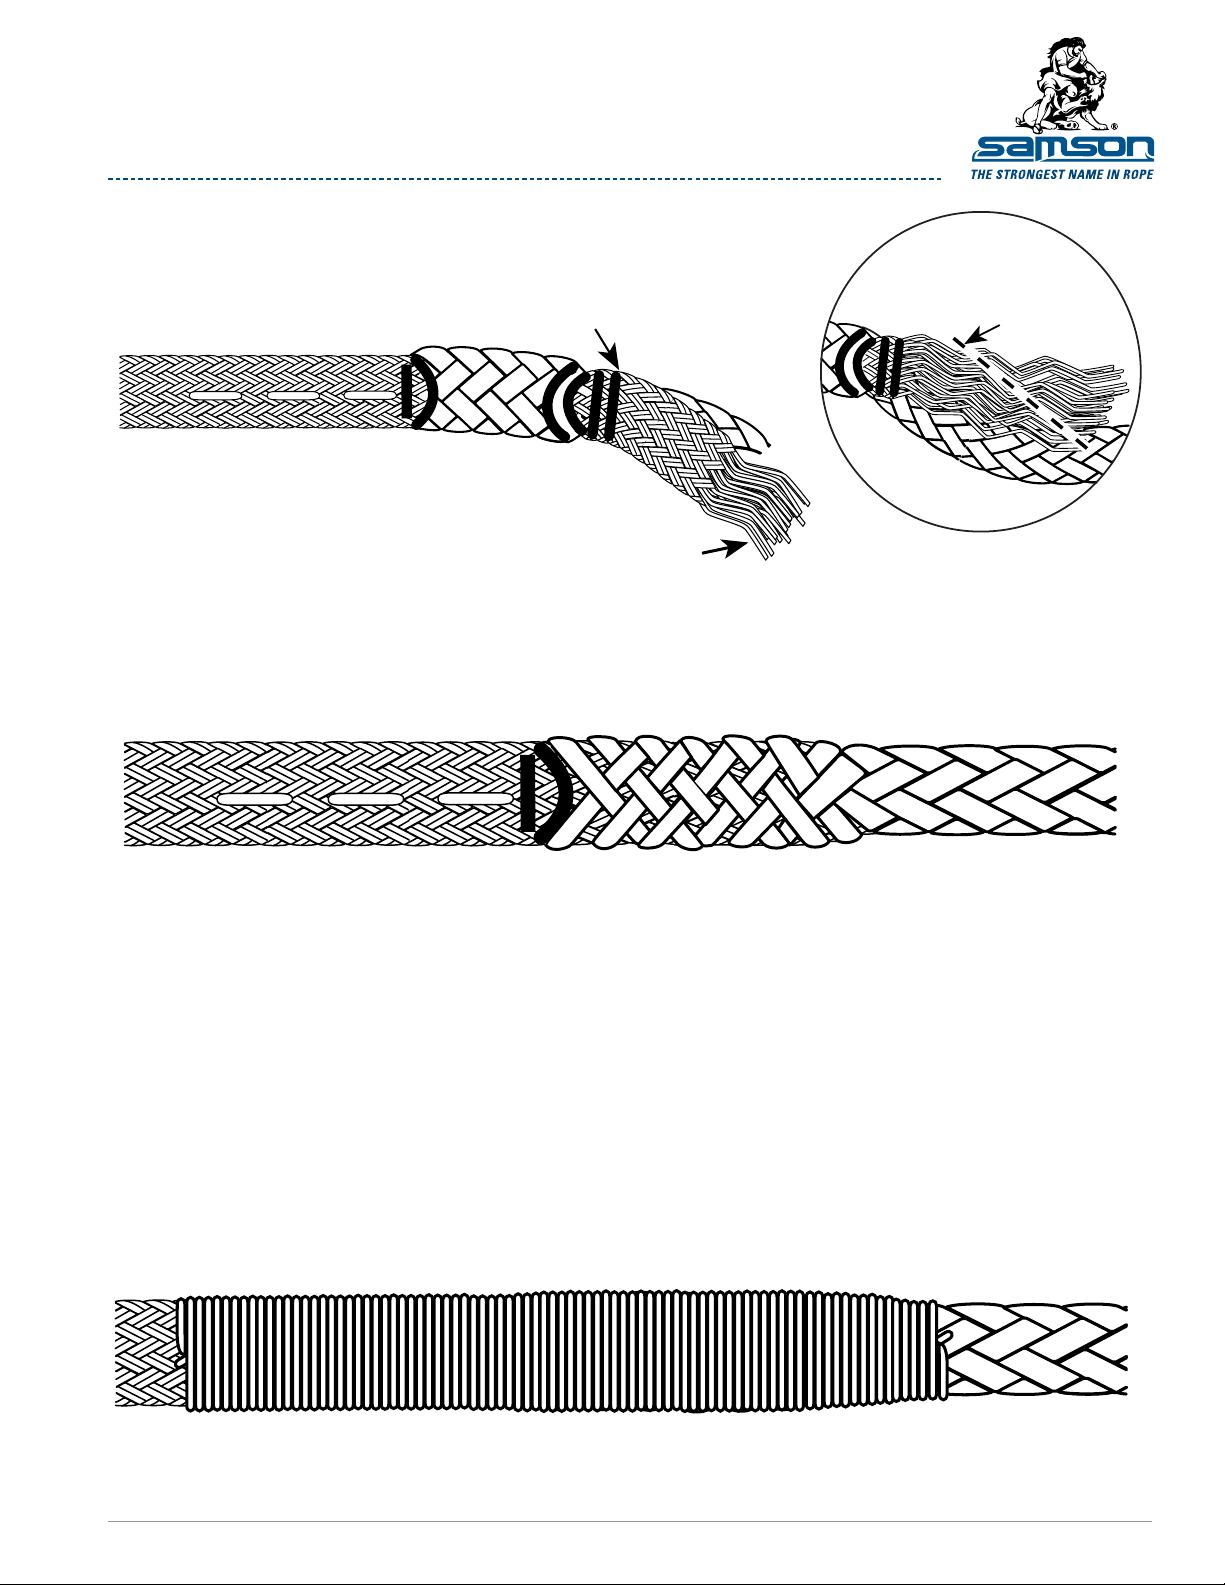
Pull the Ice cover out of the rope until Mark 2 on the cover is exposed. Unbraid the cover
from the end back to Mark 2. Angle cut the strands from Mark 2 to the end of the cover
to perform a taper.
Pull cover out of rope until Mark 2 on
cover is exposed
Unbraid cover from end
back to Mark 2
At the point the cover is inserted in the rope, milk the rope down
toward the end of the tapered cover strands. This will cause the
cover strands to become buried into the rope and disappear.
Cut unbraided strands at
an angle to taper
step
9
step
10
11
step
Whip from the area where the cover is inserted into the rope to
just beyond the lock stitching to nish that portion of the splice.
Opposite end: remove feed line and secure the rope to a xed
point. Milk the cover toward the rope end/bitter end to eliminate
any slack between the cover and the rope.
Lock stitch and whip the cover to the rope.
(See page 3 for tips on lock stitching and whipping.)
SamsonRope.com | Email CustServ@SamsonRope.com | Tel +1.360.384.4669
PAGE 2 OF 3
Page 3

SAMSON SPLICING INSTRUCTIONS
Lock Stitching Procedure Whipping Method I
STEP 1
Pass stitching twine through
spliced area near throat of
eye as shown.
STEP 2
Reinsert twine through the
rope. The twine should
cover 2 strands from the
exit point. Pull the twine
snug, but not tight.
STEP 3
Continue to reinsert as
shown until you have at
least 3 complete stitches
on each side of the rope.
Each stitch should cross
over 2 strands in the rope.
B
A
B
A
1
B
23
A
STEP 4
After completing Step 3, rotate spliced part of rope 90° and reinsert
end A into spliced area in the same fashion as in Steps 1, 2 and 3.
The splice will now be stitched on 2 planes perpendicular to each
other. Make sure you do not pull the stitching too tight.
STEP 5
After stitching at least 3 complete stitches as in Step 3, extract both
ends of the twine together through the same opening in the braid.
Tie them together with a square knot and reinsert back into braid.
For double braids, re-insert the knot between the cover and core.
123
A
B
Whipping Finished Splice Method I
Choosing twines for whipping:
In general, braided nylon twine is preferred for whipping. Polyester twines, or twisted twines in either
polyester or nylon, can also be used.
For double braids the twine used should be approximately twice the diameter of the strands in the cover.
Whip or seize the end of the spliced area with whipping twine for extra security and a professional touch.
Keeping tension on rope while wrapping results in tighter whipping.
STEP 1
Form loop along the rope with whipping
twine and wrap end around the back.
STEP 2
Continue wrapping at least 1 rope diameter in length.
STEP 3
Cut both ends close to whipping.
DOCUMENT ICE_Cover Install_AUG2012.pdf
SamsonRope.com | Email CustServ@SamsonRope.com | Tel +1.360.384.4669
© 2012 Samson Rope Technologies, Inc. All rights reserved. S/WD #108294 7/2012
Pull to bury
Finish with end through loop then pull
opposite end to bury loop under whipping
PAGE 3 OF 3
 Loading...