

Page 1
C03U
D"D"
P R O F E S S I O N A L M I C R O P H O N E S
MULTI-PATTERN USB CONDENSER MICROPHONE
Page 2

Table of Contents
ENGLISH
Introduction. . . . . . . . . . . . . . . . . . . . . . . . . 1
C03U Features . . . . . . . . . . . . . . . . . . . . . . . 1
Installing the C03U . . . . . . . . . . . . . . . . . . . . 2
Getting Started with MAC OS X . . . . . . . . . . . . 3
Getting Started with Windows XP . . . . . . . . . . . 4
Using the Softpre Software Applet . . . . . . . . . . 5
Setting a Good Level . . . . . . . . . . . . . . . . . . . 5
Using the Softpre Software Applet . . . . . . . . . . 6
Powering the C03U . . . . . . . . . . . . . . . . . . . . 6
Operating the C03U. . . . . . . . . . . . . . . . . . . . 7
Microphone Placement . . . . . . . . . . . . . . . . . 9
Setting Up the Signal Level . . . . . . . . . . . . . . . 9
P-Popping . . . . . . . . . . . . . . . . . . . . . . . . . . 9
Stand Mounting the C03U. . . . . . . . . . . . . . . . 9
Using the Optional SP01 Shock-Mount . . . . . . 10
Specifications . . . . . . . . . . . . . . . . . . . . . . . 52
FRANÇAIS
Introduction. . . . . . . . . . . . . . . . . . . . . . . . 11
C03U — Caractéristiques . . . . . . . . . . . . . . . 11
Installation du C03U . . . . . . . . . . . . . . . . . . 12
Mise en oeuvre sous MAC OS X . . . . . . . . . . . 13
Mise en oeuvre avec Windows XP . . . . . . . . . . 14
Utilisation du logiciel Softpre . . . . . . . . . . . . . 15
Obtention d’un niveau optimal . . . . . . . . . . . 15
Utilisation du logiciel Softpre . . . . . . . . . . . . . 16
Alimentation du C03U . . . . . . . . . . . . . . . . . 16
Utilisation du C03U . . . . . . . . . . . . . . . . . . . 17
Positionnement du micro . . . . . . . . . . . . . . . 19
Réglage du niveau du signal . . . . . . . . . . . . . 19
Bruits de pop . . . . . . . . . . . . . . . . . . . . . . . 19
Installation du C03U sur un pied. . . . . . . . . . . 19
Suspension anti-choc SP01 optionnelle . . . . . . 20
Caractéristiques techniques . . . . . . . . . . . . . 52
DEUTSCHE
Einleitung . . . . . . . . . . . . . . . . . . . . . . . . . 21
C03U Features . . . . . . . . . . . . . . . . . . . . . . 21
C03U installieren. . . . . . . . . . . . . . . . . . . . . 22
Erste Schritte mit MAC OS X. . . . . . . . . . . . . . 23
Erste Schritte mit Windows XP . . . . . . . . . . . . 24
Softpre Software Applet verwenden . . . . . . . . 25
C03U betreiben . . . . . . . . . . . . . . . . . . . . . 27
Mikrofon-Platzierung . . . . . . . . . . . . . . . . . . 29
Signalpegel einstellen . . . . . . . . . . . . . . . . . 29
P-Popping . . . . . . . . . . . . . . . . . . . . . . . . . 29
Ständermontage des C03U . . . . . . . . . . . . . . 29
Optionale SP01 Stoßschutz-Halterung montieren 30
Technische Daten . . . . . . . . . . . . . . . . . . . . 52
ESPAÑOL
Introducción . . . . . . . . . . . . . . . . . . . . . . . 31
Características del C03U . . . . . . . . . . . . . . . . 31
Instalación del C03U . . . . . . . . . . . . . . . . . . 32
Puesta en marcha con MAC OS X . . . . . . . . . . 33
Puesta en marcha con Windows XP . . . . . . . . . 34
Uso del programa Softpre Software Applet. . . . 35
Ajuste de un buen nivel . . . . . . . . . . . . . . . . 35
Uso del programa Softpre Software Applet. . . . 36
Encendido del C03U . . . . . . . . . . . . . . . . . . 36
Manejo del C03U. . . . . . . . . . . . . . . . . . . . . 37
Manejo del C03U. . . . . . . . . . . . . . . . . . . . . 38
Colocación del micrófono . . . . . . . . . . . . . . . 39
Ajuste del nivel de señal . . . . . . . . . . . . . . . . 39
Petardeos o "P-Popping". . . . . . . . . . . . . . . . 39
Montaje del C03U sobre un soporte . . . . . . . . 39
Uso de la protección opcional SP01. . . . . . . . . 40
Especificaciones técnicas . . . . . . . . . . . . . . . 53
ITALIANO
Iintroduzione . . . . . . . . . . . . . . . . . . . . . . . 41
C03U - Caratteristiche . . . . . . . . . . . . . . . . . 41
L'Installazione del C03U . . . . . . . . . . . . . . . . 42
Come Iniziare con MAC OS X . . . . . . . . . . . . . 43
Come Iniziare con Windows XP . . . . . . . . . . . 44
L'Uso del Software Applet Softpre . . . . . . . . . . 45
Come Ottenere un Buon Livello . . . . . . . . . . . 45
L'Uso del Software Applet Softpre . . . . . . . . . . 46
L'Alimentazione del C03U . . . . . . . . . . . . . . . 46
L'Uso del C03U . . . . . . . . . . . . . . . . . . . . . . 47
L'Uso del C03U . . . . . . . . . . . . . . . . . . . . . . 48
L'Uso del C03U . . . . . . . . . . . . . . . . . . . . . . 49
Il Posizionamento del Microfono. . . . . . . . . . . 49
La Regolazione del Livello del Segnale. . . . . . . 49
P-Popping . . . . . . . . . . . . . . . . . . . . . . . . . 49
Il Montaggio su Asta del C03U . . . . . . . . . . . . 49
L'Uso dell'Anti-Shock Opzionale SP01. . . . . . . . 50
C03U Specifications . . . . . . . . . . . . . . . . . . . 51
Specifiche . . . . . . . . . . . . . . . . . . . . . . . . . 53
Copyright 2005 - 2007, Samson Technologies Corp.
Printed November, 2007 v2.0
Samson Technologies Corp.
45 Gilpin Avenue
Hauppauge, New York 11788-8816
Phone: 1-800-3-SAMSON (1-800-372-6766)
Fax: 631-784-2201
www.samsontech.com
Page 3
Introduction
D"D"
Congratulations on your purchase of the Samson C03U studio condenser. The C03U
features a large, 19mm ultra thin diaphragm capsule with an onboard high quality
Analog-to-Digital converter and USB output. The C03U is perfect for recording your
music, or any acoustic audio source on your favorite DAW (Digital Audio Workstation).
Just plug in the supplied USB cable, launch your DAW and start recording. For
expanded control, install the Samson C03U driver software and you'll have additional
features like programmable GAIN, Low Cut Filter, Input Metering and Phase switch.
The C03U faithfully reproduces a variety of sound sources including vocals, acoustic
instruments and overhead cymbals, to name a few. The extended frequency and fast
transient response insures an accurate reproduction with linear characteristics from
bottom to top.
In these pages, you’ll find a detailed description of the features of the C03U Studio
Condenser Microphone, as well as step-by-step instructions for its setup and use, and
full specifications. You’ll also find a warranty card enclosed—please don’t forget to fill
it out and mail it in so that you can receive online technical support and so we can
send you updated information about these and other Samson products in the future.
With proper care and adequate air circulation, your C03U will operate trouble free
for many years. We recommend you record your serial number in the space provided
below for future reference.
Serial number: __________________________
Date of purchase: ________________________
Should your unit ever require servicing, a Return Authorization number (RA) must be
obtained before shipping your unit to Samson. Without this number, the unit will not
be accepted. Please call Samson at 1-800-3SAMSON (1-800-372-6766) for a Return
Authorization number prior to shipping your unit. Please retain the original packing
materials and if possible, return the unit in the original carton and packing materials.
ENGLISH
C03U Features
• Large Diaphragm, 19mm, Multi-pattern, Studio
Condenser with USB Digital Output.
• Compatible with any computer based Digital Audio
Workstation.
• Hyper Cardioid, Omni and BiDirectional pick-up patterns.
• The extremely detailed sound reproduction makes it
ideal for recording vocals, acoustic instruments and
just about any other sound source.
• High Quality AD convertor with 16 Bit, 48K sampling
• Software drivers for MAC and PC provide addi-
• Dual 19mm Capsules with 3-micron Diaphragm.
• Solid Die Cast construction.
• Swivel Stand Mount and 10 foot USB cable included.
rate.
tional features like Programmable Gain, LED Input
Metering, Low Cut Filter, and Phase.
1
Page 4

Installing the C03U
Installing the C03U is a simple procedure that takes just a few minutes. Since the
C03U is USB compliant, you can use either a MAC or PC, connect the included USB
cable and plug and play. You will be able to control your C03U using the standard
audio interface controls in the MAC or Windows operating system. You will find
detailed instructions on setting up with MAC OS and Windows in the following sec-
ENGLISH
tions of this manual.
For expanded control, you can install the Samson Softpre applet which will give you
programmable Gain and a digital Input Meter so you can adjust the internal, digitally
controlled microphone pre-amplifier to the correct level. You can also use the Low Cut
Filter to remove unwanted low frequency rumble. There's even a Phase switch so you
can invert the signal polarity when using multiple microphones.
Since it is possible to adjust the level of the signal from the operating system preferences, and in your recording software, it's a good idea to be familiar with these controls in the MAC or Windows operating system. Therefore, we recommend that you
follow the section Getting Started with Windows XP (and 98) or Getting Started with
MAX OS X before installing the C03U software driver.
IMPORTANT NOTE:
program, so we recommend that you install the microphone on your computer without
the Softpre first. Then, please check our website for a list of programs that work with the
Softpre applet.
The Softpre applet is not compatible with every recording software
2
Page 5
SAMSON C03U
Getting Started with MAC OS X
The following example is for setting up the
C03U in MAC OS X .
1. Plug in microphone. The LED will light
to indicate it is receiving USB power. The
MAC will recognize the USB audio device
and automatically install a universal driver.
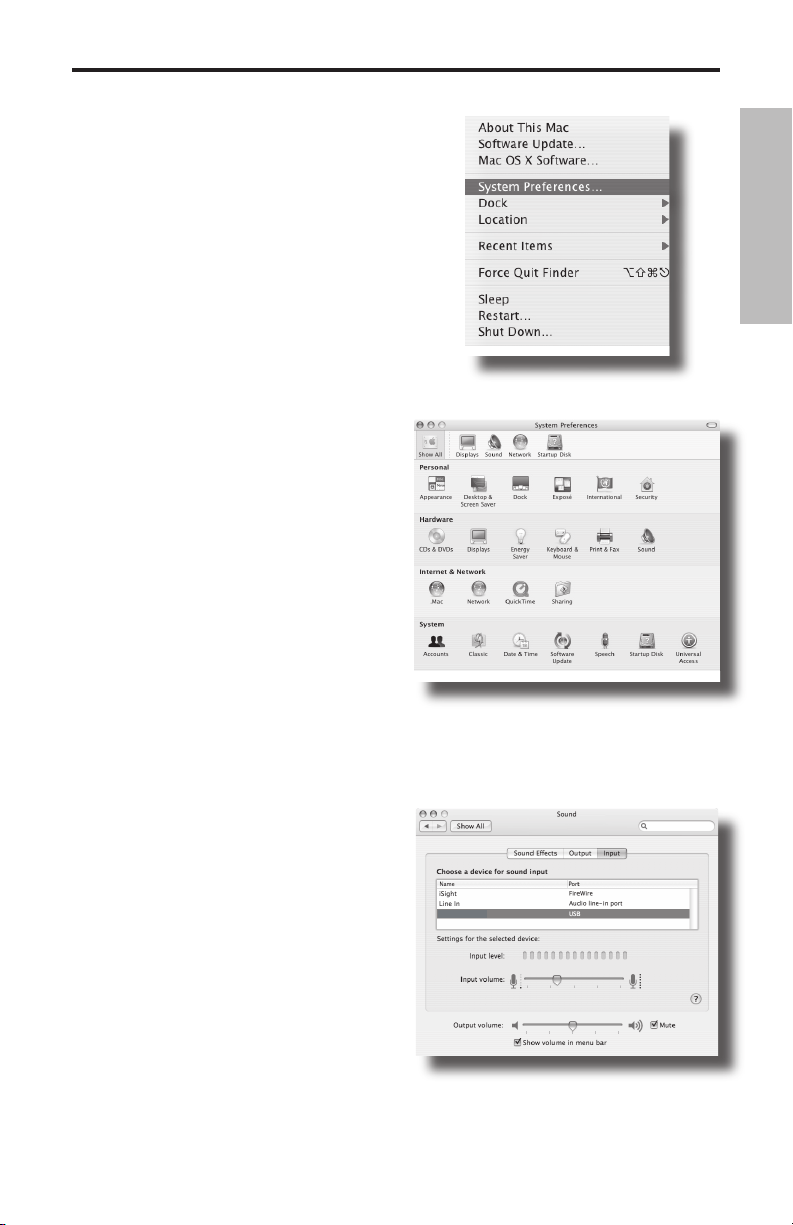
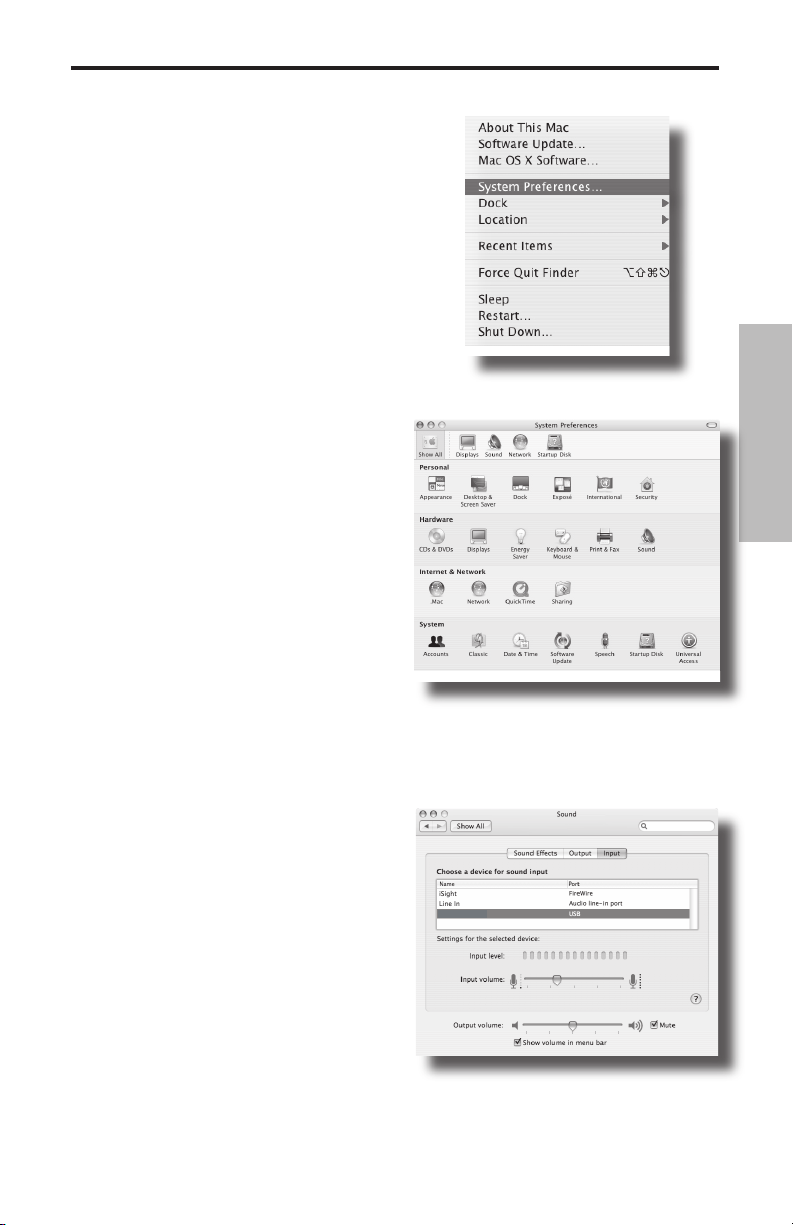
2.To select the C03U as the computers
audio input, open the System Preferences
from the dock or the main Apple Menu
(figure 1).
3. Next open the Sound preference (figure
2).
4. Now, click in the Input tab and select
C03U (figure 3).
ENGLISH
Figure 1
Figure 2
Figure 3
3
Page 6
SAMSON C03U
#5
Getting Started with Windows XP
The following example is for setting up the
C03U in Windows XP with Service Pack 2.
Other versions may vary slightly.
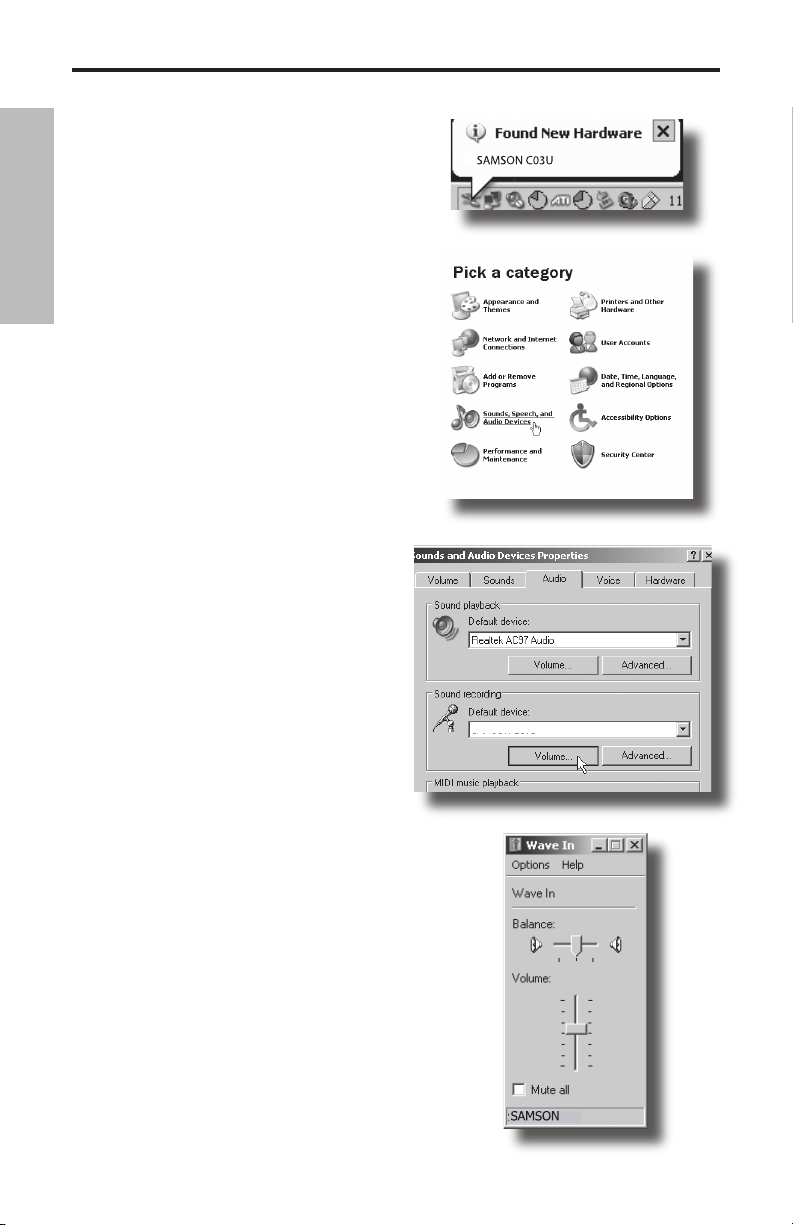
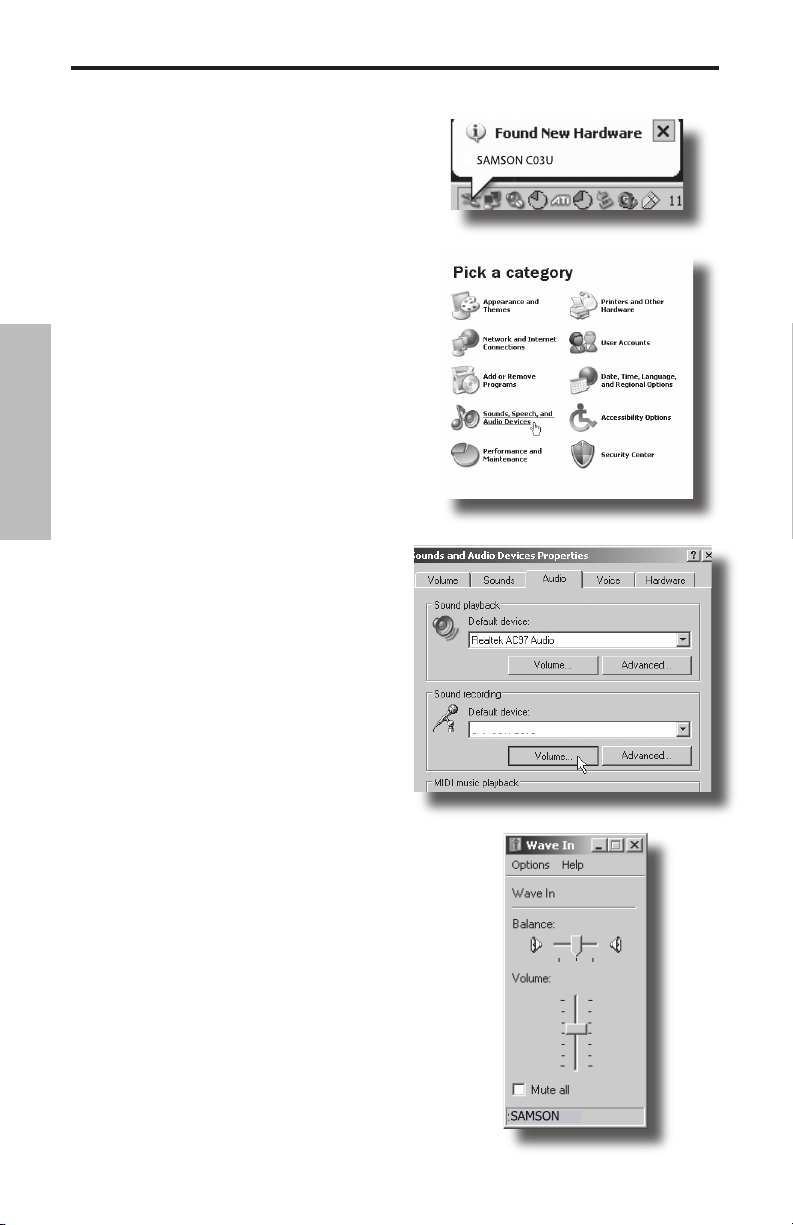
1. Plug in microphone. The LED will light to
indicate it is receiving USB power. Win-
ENGLISH
dows will recognize the USB audio device
and automatically install the universal
drivers (figure 1). (These balloons will not
appear next time you plug it in, as the microphone drivers are already installed.)
The C03U is now recognized as a Windows
audio device under the name Samson
C03U. Each additional C03U will have a
number added, such as Samson C03U (2),
and so on. To set it as the default device
and change computer-controlled gain, access control panel.
2. Access Sounds and Audio Devices
through Control Panel (figure 2).
3. Select Samson C03U as Sound recording
Default device under the Audio tab. The
default device is used in simple programs
like those for teleconferencing or Sound
Recorder. In most pro audio programs
you can select which device (or multiple
devices) to use within the program itself.
To set computer-controlled gain, click the
Volume button (figure 3).
Figure 1
Figure 2
Figure 3
4. The Wave In window sets the computercontrolled gain or mutes the microphone.
The gain is from –62 dB to +48 dB (figure
4).
4
Figure 4
Page 7

Using the Softpre Software Applet
Installing the Softpre Software
The C03U can work with most audio software by
simply connecting the microphone to your computer
using the supplied USB cable. However, to take advantage of the advance features you should install the
Samson C03U software. Getting the software is easy.
Just type samsontech.com into your favorite internet
browser, look for the C03U driver link and follow the
on screen instructions to download the driver. After
you download the driver software, run the installation
program and start to use the C03U software.
Once you have the C03U software installed you can
operate your C03U by following the simple instructions outlined in the following sections of this manual.
Setting a Good Level
One of the most important fundamentals of good
audio engineering is setting proper levels. Even on a
small typical mixer, or basic multi-track recorder, there
are several controls that affect the level of a signal as it
makes it’s way from your sound source to your speakers and then, ultimately, the level of your headphone
or monitor system. These include pre-amp gain, EQ,
aux sends and returns, channel fader level, bus or group levels, and finally, the master
fader. That’s not to mention the level of the 5:15 train on its way to Pennsylvania
Station who’s thunderous crossing horn can be picked up from 5 miles away while
miking a nylon string guitar, despite the use of double moving blankets over the windows of your project studio. But that’s another story with another set of disciplines.
Start off by being aware that anytime you change any control in the audio path, you
are probably affecting gain somewhere. Then, be sure to carefully monitor the levels
on your input and output meters to avoid a clipped signal with too many peaks.
Also, remember your ear is the most sophisticated and calibrated piece of test gear
you have. So, setting a good level should be approached from a technical point of
view, and then confirmed, by a creative point of view.
ENGLISH
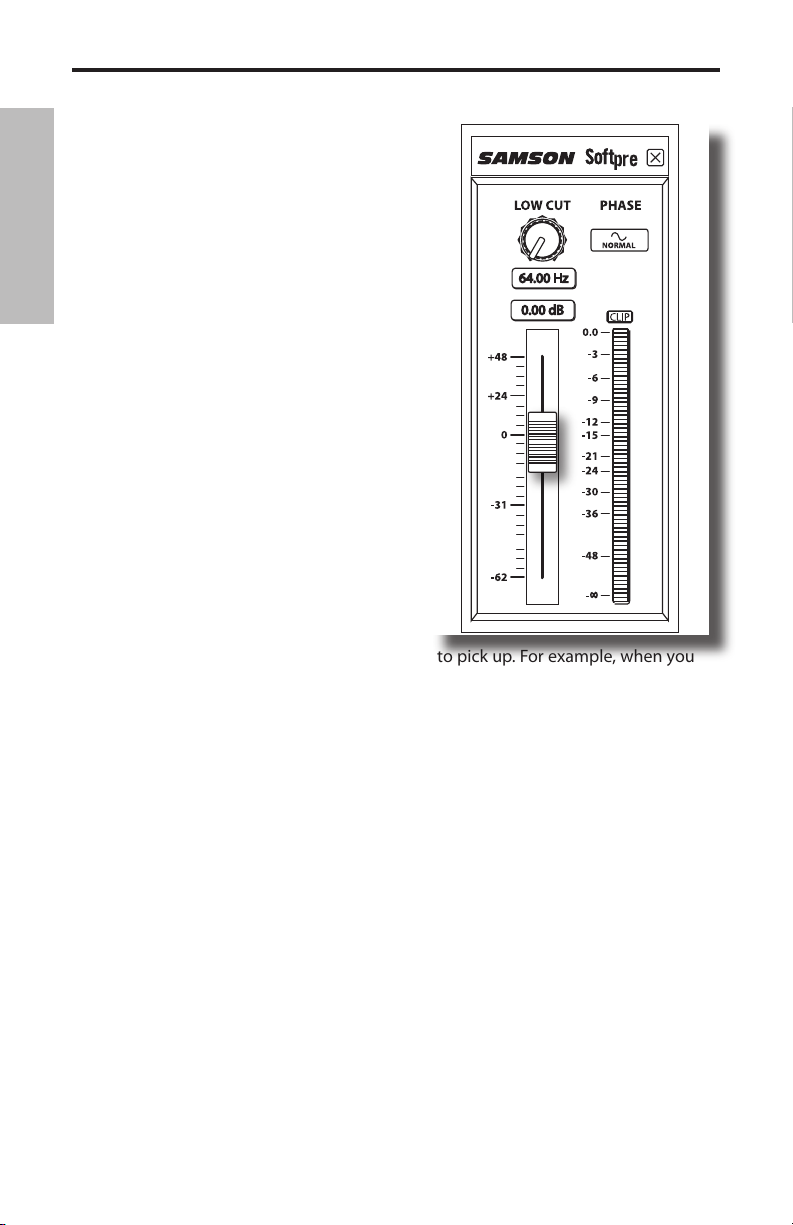
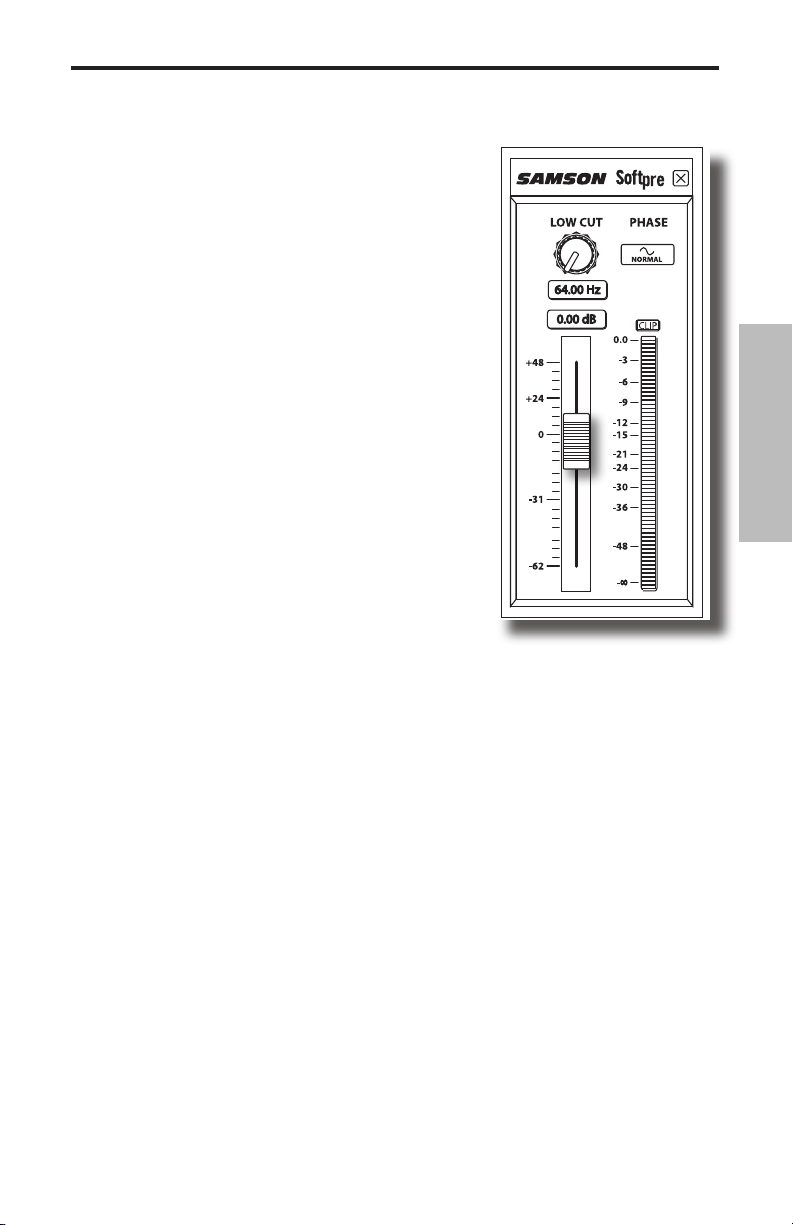
INPUT GAIN – Fader
The C03U has an onboard, digitally controlled analog INPUT GAIN stage which is
controlled by the C03U software fader. The fader control provides a range of gain
from -62 to +48 dB. The C03U can accept levels from most any sound source by using
the INPUT GAIN fader. You can use the INPUT GAIN control to adjust the level of your
input signal. It is a good idea to start with the level low and raise it up as you need.
Be sure to monitor the input digital VU METER and try to set the INPUT GAIN control
so that the meter reads just below the CLIP indicator. If you see the CLIP indicator
light you are “Over–Loading” and the sound may become distorted. If this happens,
simply back down on the INPUT GAIN Fader. The CLIP indicator will stay red until you
clear it by clicking on the CLIP icon.
5
Page 8
Using the Softpre Software Applet
DIGITAL VU METER - Input Level
To monitor the signal being sent from the
C03U, there is an digital VU METER with a scale
from infinity to Digtal Mximum or CLIP. The
level displayed on the meter will be affected by
the Input Gain Fader so be sure that you have
that set to the correct position for your sound
ENGLISH
source. The digital VU METER features “VU”
ballistics, which means it reacts to the signal
based on an average level. Use the VU METER
when you are setting your input level using
the GAIN control. Try to set the level so that
the meter reads about just below CLIP but so
that it never goes to CLIP. If you see the CLIP
indicator light you are “Over–Loading” and the
sound may become distorted. If this happens,
simply back down on the INPUT GAIN Fader.
The CLIP indicator will stay red until you clear
it by clicking on the CLIP icon.
Using the Low Cut Filter
Like any good mic pre, the C03U software
features a Low Cut, (or High Pass), filter for
attenuating the bottom-end frequencies. The
Low Cut filter allows you to remove the lower
frequencies that you sometimes just don’t want to pick up. For example, when you
are miking a high-hat you only want to capture the frequencies that the hi-hat is producing. Therefore, by using the Low Cut filter, you can reduce the amount of pick-up
from the low toms and bass drum that may leak into the hi-hat mic. You can use the
same technique on other instruments like acoustic guitar, violin, piano and even on
vocals. In live sound applications, the Low Cut filter is especially useful for removing stage rumble. The Softpre software provides a variable Low Cut filter that allows
you to adjust the exact frequency at which the low frequencies begin to roll-off, or
attenuate.
PHASE – Switch
For a variety of miking and mixing techniques, it may be necessary to invert the signal phase from the source you have plugged into your C03U and Softpre software.
When the PHASE switch is pressed in, the yellow LED will light showing that the
input signal is now out-of-phase.
Powering the C03U
The C03U is a condenser microphone, and like all condenser microphones, it has
internal electronics that require an active power supply. Traditional studio condensers are almost always powered by a Phantom Power supply which is usually derived
from the mixing console. The C03U receives its power from the USB bus. Simply
connect the microphone to the computers USB port and the microphone is ready to
operate. The C03U features a power on LED, which will illuminate when USB power is
present.
6
Page 9
Operating the C03U
1
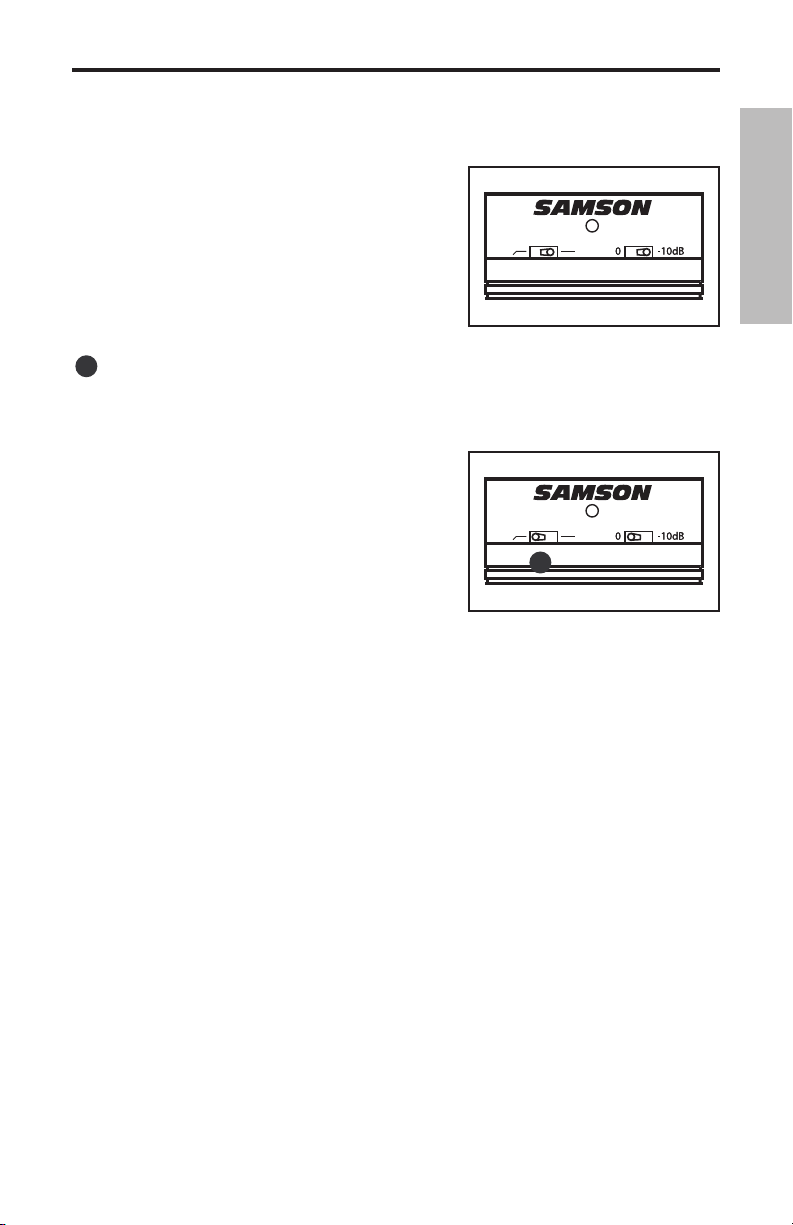
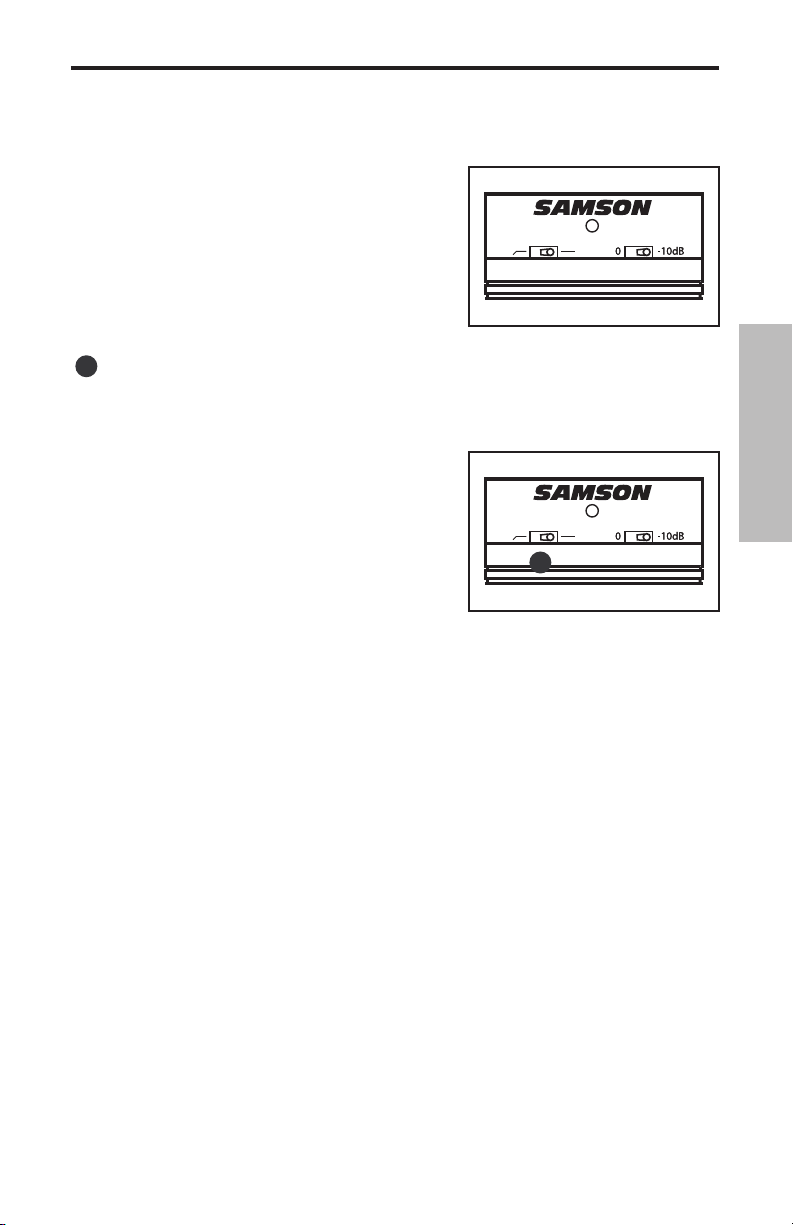
Using the PAD Switch
The C03U includes a PAD switch, which you can
use to lower the input sensitivity of the microphone. When the PAD switch is set at the 0dB position the PAD is bypassed and there is no effect on
the signal. When the PAD switch is set to the –10dB
position, the microphone’s input sensitivity will be
lowered by 10dB. You can use the PAD when you
are miking loud sound sources with a high SPL
(Sound Pressure Level).
2
Using the Hi-Pass Filter
The C03U offers a user selectable hi-pass, or low-cut filter, which you can use to eliminate any unwanted low frequency reproduction. When the Hi-pass Filter is is set to
the “flat” (indicated by the straight line) position,
there is no effect on the signal. When the Hi-pass
switch is set to the “roll-off” position (indicated
with the angled line), a 12dB per octave low-cut
at 100Hz is applied to the signal. This can be
extremely useful for removing low frequency stage
rumble, wind noise during outdoor use, and filtering out lows from drums when used as overhead
cymbal microphone on a drum kit.
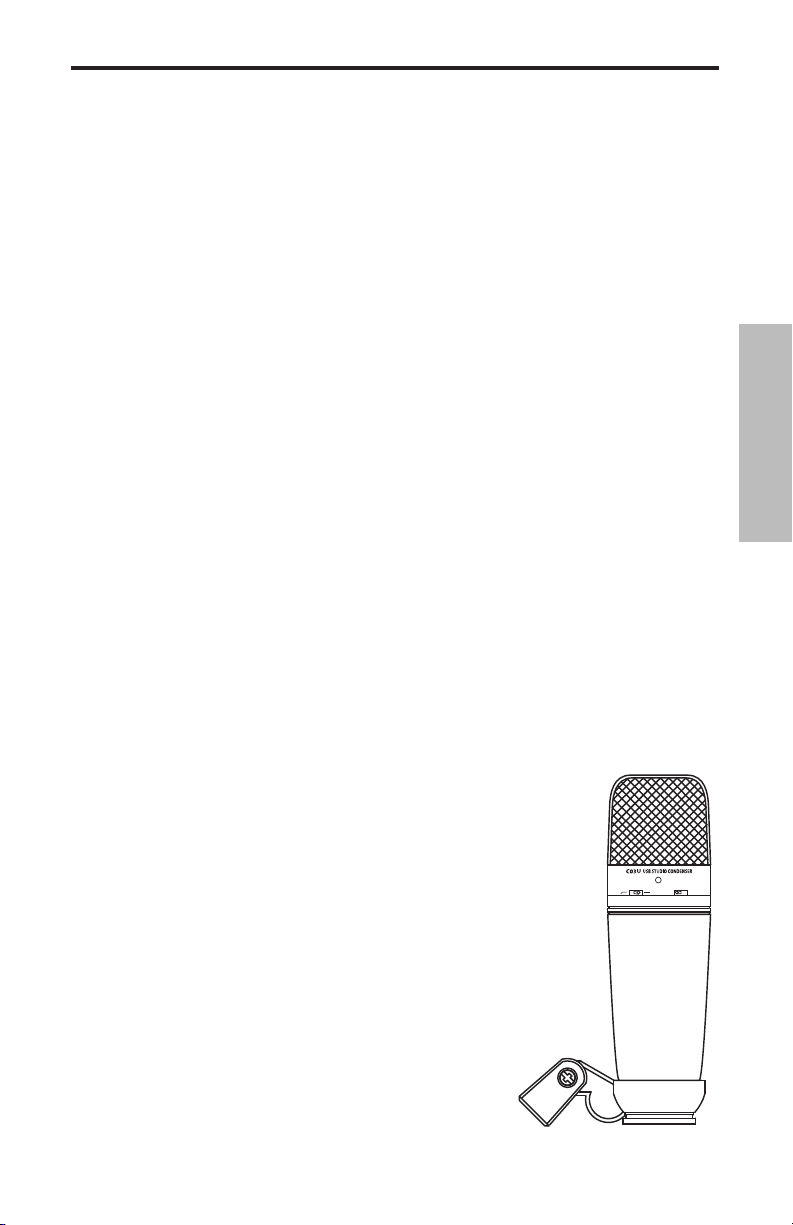
Polar Patterns
The most important characteristic of any microphone is its directionality or “pickup
pattern”. The C03U’s versatile dual capsule design is capable of producing three useful
pick up patterns; Cardioid, Omni, and Figure 8. It is easy for you to select the pickup
pattern using the C03U’s pattern selection switch located on the rear of the microphone. When choosing a pattern, you should be aware of the phenomenon known as
the “proximity effect”.
2
1
ENGLISH
Simply put, proximity effect is the change in frequency response as the microphone
position is changed relative to the sound source. Any microphone exhibits its best
frequency response when pointed directly at the sound source (on-axis). Depending
on the pickup pattern, the low frequency response will increase, sometimes
greatly, when positioned less than 12 inches away from the sound source (off-axis).
Understanding and knowing how to use the proximity effect can be a tremendous
help in getting just sound you looking for. The following sections details the three
available pickup patterns.
7
Page 10

Operating the C03U
3
Super Cardioid
While Omni and Bi-directional microphones are very useful for a variety of specialty
applications, the majority of miking situations in recording and live sound require
uni-directional or Cardioid microphones. The C03U condenser’s pickup pattern is
Super-cardioid, which offers even more side-to-side rejection. The uni-directional
nature allows for better separation of instruments in the studio and more control over
feedback in live sound reinforcement. To select the
ENGLISH
Super Cardioid pickup pattern, set the pattern selection switch to the center, Super Cardioid position
indicated by the “heart shaped” icon. When positioned correctly, the Super-cardioid pickup pattern
allows you to pick up more of the sound you want
and less of the sound you don’t want.
4
Omni
Omni, or omni-directional, microphones pick up sound from all directions. To select
the Omni pickup pattern, set the C03U’s pattern selection switch to the right, “O” position. You can use the omni pickup pattern if you want to capture the ambient sound
and natural reverb in a room where an instrument or voice is being recorded. The
Omni mode is also great for recording ensemble
performances from groups of vocals, brass, woodwind and other instruments with the artists facing
each other in a circle around the microphone. As an
added benefit, the omni pattern is the least susceptible to the proximity effect. This can be extremely
useful when recording artists who have a tendency to move their instrument, including their voice, around the microphone while performing. In these situations, using
a cardioid pattern can result in the frequency response changing tremendously with
just a few inches of movement resulting in a recorded track with the lows moving up
and down in volume. Using the omni pick up pattern can help control these tricky
miking situations allowing you to capture the best performance without inhibiting
the talent by forcing them to try to stay in a fixed position.
5
Figure 8
Figure 8, or bi-directional, mics pick up the sound
directly in front and back of the microphone while
rejecting the sound on the left and right sides. To
select the Figure-8 pickup pattern set the C03U’s
pattern selection switch to the left, “8” position.
In this mode it’s almost like having two identical
microphones facing back-to-back to each other. This can be an ideal setting for capturing two artists singing a duet or laying down a background vocal track. Having the
two artists face each other while performing can help capture the emotions that may
other wise be missed if two microphones are used. You can also create some interesting slap back echo effects by positioning the C03U in Figure-8 pattern between a
recorded instrument and a particular wall in the studio. The rear capsule will pick up
the reflection of the sound off the wall, and by changing the distance of the microphone from the wall you can actually change the delay time of the echo.
8
3
4
5
Page 11

Operating the C03U
Microphone Placement
In order to maximize the sound quality, you must pay careful attention to the placement of your C03U and how it is positioned for the instrument or vocalist that you are
miking. All microphones, especially uni-directional or cardioid microphones, exhibit a
phenomenon known as “proximity effect.” Very simply put, proximity effect is a resulting change in the frequency response of a microphone based on the position of the
mic capsule relative to the sound source. Specifically, when you point a cardioid mic
directly at the sound source (on axis) you will get the best frequency response, however when you start pointing the microphone slightly away (off axis) you will notice
the low frequency response dropping off and the microphone will start to sound
thinner.
For most vocal applications you’ll want to position the microphone directly in front
of the artist. The same may be true for miking instruments, however, you can make
some pretty amazing equalization adjustments by slightly changing the angle of
the capsule to the sound source. This can be a very useful technique in capturing
the optimum sound of drum set, acoustic guitar, piano or other instruments in a live
room or sound stage. Experimentation and experience are the best teachers in getting good sounds, so plug in!
Setting Up the Signal Level
You can adjust the C03U's internal digitally controlled analog Input Gain stage by
using the Softpre applet, or you can control the input gain by using the software
control in your computer's operating system and/or digital audio workstation. Either
way, the purpose of the mic trim control is to optimize the amount of good signal to
any associated noise. A good mic pre, like the C03U software control panel, will also
have LEVEL or CLIP indicators. To set a good level on the mic, set the C03U up in front
of the desired sound source and slowly raise the input trim control until you see the
CLIP or Peak indicator light up. Then, turn the input trim control down until the indicator does not light any more. For more information on setting the Input Gain with the
Softpre applet, see the section "INPUT GAIN - Fader" on page 7 in this manual.
ENGLISH
P-Popping
P-Popping is that annoying pop that you can get when the microphone diaphragm
gets a blast of air from a vocalist pronouncing words with the letter “P” included.
There are a few ways to deal with the problem including using an external pop filter.
Some famous engineers have relied on an old nylon stocking over a bent clothes
hanger, which actually works very well. You can also try placing the microphone
slightly off axis (on a slight angle) from the vocalist. This can often solve the problem
without using an external pop filter. However, for a more reliable solution, try an
external pop filter like the Samson PS-01.
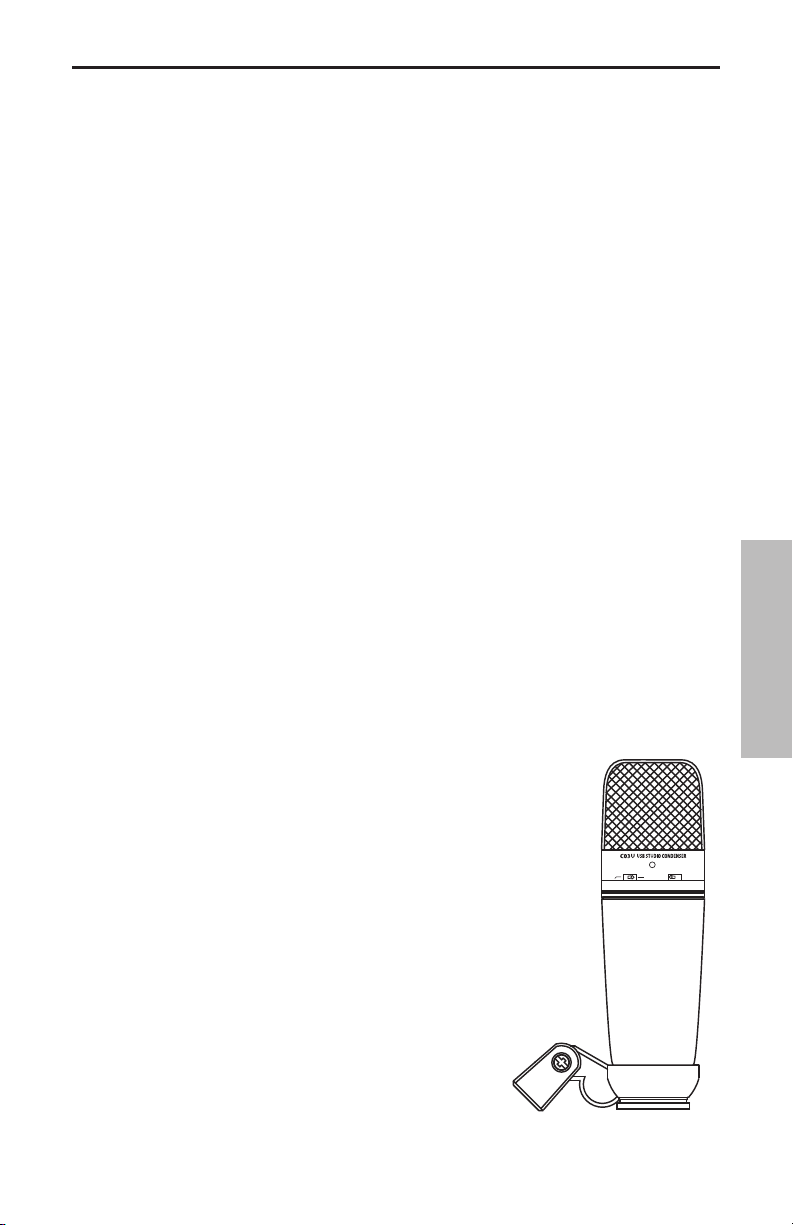
Stand Mounting the C03U
The C03U can be mounted to a standard microphone stand using the included swivel
mount adapter. If you are using a U.S. 5/8” mic stand, you will need to remove, by
unscrewing, the Euro stand adapter. Simply screw the swivel adapter on to your mic
stand or boom arm. Now, loosen the thumbscrew and adjust the microphone to the
desired angle. Once set, tighten the thumbscrew to secure the microphone in place.
9
Page 12

Using the Optional SP01 Shock-Mount
Using the Optional SP01 “Spider” Shock-Mount
For additional isolation the C03U can be
fitted on the optional SP01 “Spider” shock
mount. Follow the steps below the to install
the SP01.
ENGLISH
• First, screw the SP01 shock mount onto
your mic stand or boom arm. If you’re
using a US 5/8” mic stand or boom,
remove the Euro adapter.
• Remove the C03U swivel mount by
rotating the threaded collar counterclockwise as shown in figure 1.
• Install the C03U into the SP01 by fitting
the microphone into the center of the
web, positioning the C03U onto the bottom mounting plate.
• Secure the SP01 by reinstalling the
threaded collar, rotating clockwise until
tight. (Figure 2)
• Now, loosen the thumb screw to adjust
the angle of the microphone and position the C03U to the desired location.
Once set, tighten the thumbscrew to
secure the microphone in place.
1
2
Note: Be careful not to cross thread
or over tighten the threaded collar or
thumb screw.
10
Page 13
Introduction
D"D"
Merci d’avoir choisi le micro à condensateur de studio Samson C03U. Le C03U
est équipé d’une capsule ultra fine de 19 mm, d’un convertisseur Analogique/
Numérique intégré de haute qualité et d’une sortie USB. Le C03U est parfait pour l’enregistrement de la musique ou de toute source audio acoustique avec votre application d’enregistrement sur ordinateur. Il vous suffit de connecter le cordon USB fourni
et de lancer l’application pour commencer à enregistrer. Pour disposer de réglages
supplémentaires, installez le logiciel de Driver du Samson C03U : Vous bénéficiez
alors d’un réglage de gain programmable, d’un filtre passe-haut, d’un afficheur de
niveau et d’un sélecteur de phase. Le C03U reproduit avec fidélité de nombreuses
sources comme les chants, les instruments acoustiques, les Overheads de cymbales,
etc. Sa réponse en fréquences très étendue et sa réponse ultra rapide aux transitoires
vous garantissent une reproduction précise et linéaire sur la totalité du spectre.
Dans ces pages, vous trouverez une description détaillée des fonctions du micro à
condensateur de studio C03U, des instructions de configuration et d’utilisation pas-àpas et les caractéristiques techniques. Vous trouverez également une carte de garantie — prenez le temps de la remplir et de nous la renvoyer pour bénéficier de notre
assistance technique. Nous vous ferons également parvenir des informations sur les
nouveaux produits Samson.
Avec un entretien adapté, le C03U vous donnera satisfaction pendant de très nombreuses années. Prenez le temps de noter le numéro de série et la date d’achat ci-dessous pour toute référence ultérieure.
Numéro de série : __________________________
Date d’achat : ________________________
Si vous devez faire réparer cet appareil, vous devez tout d’abord obtenir un numéro
de retour auprès de nos services. Sans ce numéro, l’appareil ne sera pas accepté.
Appelez Samson au : 1-800-3SAMSON (1-800-372-6766) pour obtenir ce numéro.
Utilisez les emballages d’origine pour le retour.
C03U — Caractéristiques
• Micro à condensateur multi-directivité de qualité studio
avec diaphragme de 19 mm et sortie numérique USB.
• Compatible avec les systèmes d’enregistrement sur ordinateur.
• Diagrammes polaires hyper cardioïde, omni-directionnel et bi-directionnel.
• Une reproduction extrêmement fidèle, faisant du C03U
le micro idéal pour l’enregistrement des chants, des instruments acoustiques ou de toute autre source.
• Convertisseur A/N haute qualité en 16 Bits, à 48 kHz.
• Logiciels pour MAC et PC offrant des réglages de gain,
• Double capsule de 19 mm à diaphragme de 3 microns.
• Construction moulée ultra fiable.
• Support articulé et câble USB de 3 m fournis.
un afficheur de niveau, un filtre passe-haut et un inverseur de phase.
11
FRANÇAIS
Page 14

Installation du C03U
L’installation du C03U est très simple et ne prend que quelques minutes. Le C03U est
compatible USB et vous pouvez l’utiliser directement sur un MAC ou sur un PC, en
connectant simplement le câble USB fourni. Vous pouvez contrôler le C03U avec les
réglages audio de vos systèmes d’exploitation MAC ou Windows. Vous trouverez des
instructions détaillées sur la configuration avec MAC OS et Windows dans les sections
suivantes de ce mode d’emploi.
Vous pouvez installer le logiciel du Samson C03U pour obtenir des réglages supplémentaires. Vous disposez alors d’un réglage de gain programmable et d’un afficheur
de niveau vous permettant d’adapter le préamplificateur interne du micro aux
signaux enregistrés. Vous pouvez également utiliser le filtre passe-haut pour atténuer
les bruits basse fréquence indésirables. De plus, l’inverseur de phase peut s'avérer très
pratique lorsque vous utilisez plusieurs micros.
Étant donné qu’il est possible de régler le niveau du signal depuis les préférences de
votre système d’exploitation informatique, ainsi que depuis votre logiciel d’enregistre-
FRANÇAIS
ment, vous devez vous familiariser avec ces réglages dans votre environnement MAC
ou Windows. Par conséquent, lisez les sections Mise en oeuvre sous Windows XP (et
98) ou Mise en oeuvre sous MAC OS X, avant d’installer le Driver du C03U.
REMARQUE : Comme le logiciel Softpre n’est pas compatible avec tous les logiciels d’enre-
gistrement, nous vous conseillons d’installer le micro sur votre ordinateur avant d'installer
Softpre. Vous pouvez obtenir la liste des programmes compatibles avec le logiciel Softpre
sur notre site Internet.
12
Page 15
SAMSON C03U
Mise en oeuvre sous MAC OS X
Cet exemple vous indique comment installer le C03U avec MAC OS X.
1. Connectez le micro. La Led doit s’allumer
pour indiquer qu’il reçoit l’alimentation
USB. Le MAC reconnaît le périphérique
audio USB et installe automatiquement un
pilote universel.
2. Pour sélectionner le C03U comme source
audio de l’ordinateur, ouvrez les préférences système dans le Dock ou dans le menu
Pomme principal (Figure 1).
3. Ouvrez ensuite les préférences Son
(Figure 2).
4. Cliquez maintenant sur l’onglet d’Entrée
et sélectionnez le C03U (Figure 3).
Figure 1
FRANÇAIS
Figure 2
Figure 3
13
Page 16
SAMSON C03U
#5
Mise en oeuvre avec Windows XP
Cet exemple vous indique comment installer le C03U avec Windows XP et le Service
Pack 2. Les autres versions peuvent varier.
1. Connectez le micro. La Led doit s’allumer
pour indiquer qu’il reçoit l’alimentation
USB. Windows reconnaît le périphérique
audio USB et installe automatiquement le
Driver (Figure 1). (Les bulles d’aide contextuelle ne s’affichent que lors de la première
installation).
Le C03U est reconnu comme un périphérique audio Windows dont le nom est
Samson C03U. Pour chaque C03U supplémentaire installé, un chiffre est ajouté (par
exemple, Samson C03U (2), etc.). Pour le sé-
FRANÇAIS
lectionner comme périphérique par défaut
et modifier le gain réglé par l’ordinateur,
affichez le panneau de configuration.
2. Affichez les périphériques de Son et
Audio depuis le panneau de configuration
(Figure 2).
3. Sélectionnez le Samson C03U comme
périphérique d’enregistrement par défaut
dans l’onglet Audio. Le périphérique par
défaut est utilisé par les programmes
simples, comme ceux de téléconférence,
ou par l’enregistreur de Windows. Dans la
plupart des applications audio pro, vous
pouvez sélectionner le(s) périphérique(s) à
utiliser directement depuis le programme.
Pour régler le gain depuis l’ordinateur,
cliquez sur le bouton Volume (Figure 3).
Figure 1
Figure 2
Figure 3
4. La fenêtre Wave In détermine le gain
et permet de couper le micro. Le gain est
réglable de –62 dB à +48 dB (Figure 4).
14
Figure 4
Page 17
Utilisation du logiciel Softpre
Installation du logiciel Softpre
Vous pouvez utiliser le C03U avec la plupart des logiciels audio en connectant simplement le micro au
port USB de l’ordinateur. Ceci dit, pour tirer avantage
des fonctions avancées, installez le logiciel du Samson
C03U. Il est facile de télécharger ce logiciel : saisissez
l’adresse samsontech.com dans votre navigateur
Internet, recherchez le lien vers le Driver du C03U et
suivez les instructions à l’écran pour le télécharger.
Après avoir téléchargé le programme, lancez l’installation et utilisez le logiciel du C03U.
Une fois le logiciel installé, vous pouvez utiliser le
C03U en suivant les conseils donnés dans les sections
suivantes.
Obtention d’un niveau optimal
L’un des principes de base de l’audio réside dans
l’obtention d’un niveau de travail convenable. Même
les petits mélangeurs ou les enregistreurs multipistes
de base sont équipés de réglages qui affectent le
niveau du signal dans son trajet entre la source et les
enceintes, ainsi que le niveau de votre casque ou de
votre système d’écoute. Ces réglages sont : Gain de
préamplification, égalisation, départs et retours Aux, Faders de voies, réglages de
niveau de bus ou de groupe, et enfin, le Fader général. N’oublions pas le train de 5:15,
dont la trompe est tellement bruyante que vous pouvez l’entendre 10 km à la ronde
pendant que vous essayez de faire une prise de guitare classique, malgré le fait que
vous ayez utilisé toutes les couvertures de la maison pour essayer d’isoler les fenêtres
de votre studio. Mais c’est une autre histoire. Vous devez savoir qu’à chaque fois que
vous modifiez un réglage dans le trajet du signal, vous modifiez probablement le
gain quelque part en aval du trajet. Veillez à contrôler les afficheurs de niveau d’entrée et de sortie pour éviter de saturer le signal. Souvenez-vous que votre oreille reste
le meilleur outil d’appréciation. L’obtention d’un bon niveau doit être approchée de
façon technique et contrôlée à l’écoute.
FRANÇAIS
Fader de GAIN D’ENTRÉE
Le C03U est équipé d’un étage interne de réglage du niveau d’entrée analogique
contrôlé de façon numérique par le Fader du logiciel du C03U. La plage du Fader est
réglable de -62 à +48 dB. Le C03U peut accepter tous les types de niveaux à l’aide du
Fader de GAIN D’ENTRÉE, qui détermine le niveau du signal d’entrée. Il est conseillé
de commencer avec un niveau faible et de monter progressivement le réglage.
Contrôlez le niveau d’entrée sur l’afficheur et essayez de régler le gain d’entrée de
sorte que l’afficheur de niveau reste juste en dessous du niveau d’écrêtage CLIP. Le
témoin CLIP s’allume lorsque vous surchargez les circuits, ce qui crée de la distorsion.
Lorsque cela se produit, baissez le Fader de gain d’entrée. Le témoin CLIP demeure
allumé en rouge jusqu’à ce que vous cliquiez dessus.
15
Page 18

Utilisation du logiciel Softpre
AFFICHEUR DE NIVEAU - Niveau d’entrée
Pour visualiser le niveau du signal transmis
par le C03U, vous disposez d’un afficheur de
niveau avec une plage allant de l’infini à l’écrêtage (CLIP). Le niveau affiché est affecté par le
Fader de gain — réglez le gain avec précision
en fonction de la source enregistrée. L’afficheur
de niveau indique le niveau moyen du signal.
Utilisez-le lorsque vous déterminez le niveau
d’entrée avec le Fader de gain. Réglez le niveau
de sorte que l’affichage reste juste en dessous
du témoin d’écrêtage CLIP, sans qu'il ne s'allume. Le témoin CLIP s’allume lorsque vous surchargez les circuits, ce qui crée de la distorsion.
Lorsque cela se produit, baissez le Fader de
gain d’entrée. Le témoin CLIP demeure allumé
en rouge jusqu’à ce que vous cliquiez dessus.
FRANÇAIS
Utilisation du filtre passe-haut
Comme tout préamplificateur micro de haute
qualité, le logiciel du C03U permet de contrôler
un filtre passe-haut Low Cut (ou coupe-bas)
servant à atténuer les basses fréquences. Ce filtre passe-haut permet d’atténuer les fréquences de votre choix. Par exemple, lorsque vous
faites une prise de charleston, vous pouvez utiliser le filtre passe-haut pour atténuer
les fréquences générées par les toms et la grosse caisse. Vous pouvez utiliser la même
technique sur d’autres instruments, comme les guitares acoustiques, le violon, le
piano et même sur les chants. En sonorisation, le filtre passe-haut est très utile pour
atténuer les bruits de scène. Le logiciel Softpre est donc équipé d’un filtre passe-haut
à fréquence de coupure variable.
Touche PHASE
Pour de nombreuses applications de prise de son et de mixage, il est nécessaire
d’inverser la phase du signal de la source reprise par le C03U et le logiciel Softpre.
Lorsque la touche PHASE est allumée en jaune, le signal d’entrée est déphasé de
180°.
Alimentation du C03U
Le C03U est un micro à condensateur, et comme tous les micros à condensateur, il
est équipé de circuits internes qui nécessitent une alimentation active. Les micros à
condensateur traditionnels sont en général alimentés par l’alimentation fantôme de
la console de mixage. Le C03U est alimenté par le bus USB. Connectez simplement le
micro au port USB de votre ordinateur pour l’utiliser. Le C03U est équipé d’une Led
de mise sous tension qui s’allume lorsque le micro est alimenté par le bus USB.
16
Page 19
Utilisation du C03U
1
Utilisation du sélecteur PAD
Le C03U est pourvu d’un sélecteur PAD permettant d’atténuer la sensibilité en entrée du micro.
Lorsque ce sélecteur est placé sur la position 0 dB,
le circuit d’atténuation est désactivé et le niveau
du signal n’est pas affecté. Lorsqu’il est placé sur
la position -10 dB, la sensibilité en entrée est atté
nuée de 10 dB. Placez-le sur cette position lorsque
vous utilisez le micro avec des sources produisant
des niveaux sonores extrêmement élevés.
2
Utilisation du filtre passe-haut
Le C03U est muni d’un filtre passe-haut permettant de supprimer les basses fréquences indésirables. Lorsque le sélecteur du filtre est réglé sur la position indiquée par
une ligne droite, le signal n’est pas affecté. Lorsque
le sélecteur est réglé sur la position indiquée par
une ligne inclinée, le signal est affecté par le filtre
passe-haut de 12 dB/octave à 100 Hz. Ce filtre
extrêmement utile permet de supprimer les bruits
de scène et de vent (pour les applications à l’extérieur), ainsi que d’atténuer les basses fréquences
produites par la batterie lorsque le micro est utilisé
pour les cymbales.
Directivité
La directivité est la caractéristique la plus importante des micros. La double capsule
polyvalente du C03U offre trois diagrammes polaires : cardioïde, omni-directionnel et
Figure 8 (bi-directionnel). Le sélecteur à l’arrière du C03U permet de sélectionner le
type de directivité très facilement. Tenez compte de “l’effet de proximité” lorsque vous
effectuez la sélection.
-
2
1
FRANÇAIS
En termes simples, l’effet de proximité se caractérise par une variation de la réponse
en fréquence du micro en fonction de la position de la capsule par rapport à la source
sonore. Dans les faits, lorsque vous pointez un micro en direction de la source sonore
(dans l’axe), la réponse en fréquence s’améliore. Selon la structure polaire du micro,
les basses fréquences seront accentuées (quelques fois de façon importante) si vous
le placez à moins de 30 cm de la source (hors-axe). Vous devez comprendre la façon
dont l'effet de proximité affecte les fréquences afin de l'utiliser pour optimiser le son
des sources reprises. Les sections suivantes donnent une description détaillée des
trois structures polaires.
17
Page 20

Utilisation du C03U
3
Micro hyper-cardioïde
Les micros omni-directionnels et bi-directionnels s’avèrent très pratiques pour bon
nombre d’applications. Les situations de prises de son les plus courantes (scène et
enregistrement) nécessitent néanmoins l’utilisation d’un micro uni-directionnel (ou
cardioïde). Le micro à condensateur C03U est de type hyper-cardioïde, afin d'offrir
une réjection maximale des sons latéraux. L’utilisation d’un micro uni-directionnel
permet d’isoler le son des instruments en studio
et de réduire les risques de Larsen sur scène. Pour
utiliser le mode hyper-cardioïde, placez le sélecteur
de directivité au centre (sur le repère en forme de
coeur). Lorsqu’il est bien positionné, le micro hypercardioïde vous permet de faire ressortir ce que vous
souhaitez entendre et d’atténuer encore plus efficacement ce que vous ne souhaitez pas entendre.
4
Micro omni-directionnel
Les micro omni-directionnels captent les signaux provenant de toutes les directions.
FRANÇAIS
Pour utiliser le mode omni-directionnel, placez le sélecteur de directivité sur le repère
“O” (à droite). Réglez-le ainsi lorsque vous souhaitez capter le son ambiant et la réverbération naturelle de la pièce dans laquelle l'instrument ou le chant est enregistré. Le mode Omni
donne également d’excellents résultats lorsque vous
devez enregistrer les performances d’ensembles
de chants, de cuivres et d’instruments à vent en
bois, ou lorsque les musiciens sont placés en cercle autour du micro. De plus, les micros omni-directionnels sont moins susceptibles
d’être affectés par l’effet de proximité, ce qui peut être très utile si l’artiste se déplace
devant le micro pendant l’enregistrement. En effet, lorsque vous utilisez un micro
cardioïde, les déplacements de seulement quelques centimètres affectent la réponse
en fréquence et le niveau des basses fréquences de la piste enregistrée de façon
importante. L’utilisation d’un micro omni-directionnel permet d’éviter ce genre de
problèmes et d’enregistrer une performance optimale même si l’artiste ne tient pas
en place.
5
Micro Figure 8
Les micros bi-directionnels (ou de type Figure 8)
captent les sons provenant de l’avant et de l’arrière
et atténuent les sons latéraux (gauche, droite). Pour
utiliser le mode bi-directionnel, placez le sélecteur
de directivité sur le repère “8” (à gauche). Ce mode permet d'obtenir pratiquement
le même résultat que si vous utilisiez deux micros pointant vers l’avant et l’arrière.
Il offre donc une reproduction très satisfaisante lorsque vous devez enregistrer les
chants ou les choeurs interprétés par deux artistes. Comme les deux artistes sont
face à face, la performance est bien plus convaincante que si vous aviez utilisé deux
micros. Vous pouvez également créer des effets d’écho Slap Back très intéressants
en plaçant le C03U en mode Figure 8 entre l’instrument qui est enregistré et l’un des
murs du studio. La capsule arrière capte alors les réflexions du son sur le mur. Vous
pouvez déterminer le temps de retard en approchant/éloignant le micro du mur.
18
3
4
5
Page 21

Utilisation du C03U
Positionnement du micro
Le positionnement du C03U par rapport à l’instrument ou au chanteur que vous enregistrez influence directement la qualité sonore finale. Tous les micros, et en particulier
les micros uni-directionnels ou cardioïdes, sont très sensibles à un phénomène connu
sous le nom “d’effet de proximité”. En termes simples, l’effet de proximité se caractérise par une variation de la réponse en fréquence du micro en fonction de la position
de la capsule par rapport à la source sonore. Dans les faits, lorsque vous pointez un
micro cardioïde en direction de la source sonore (dans l’axe), la réponse en fréquence
s’améliore ; à l’inverse, lorsque vous désaxez le micro par rapport à la source, les graves sont plus particulièrement atténués et le son devient plus aigu.
Pour la plupart des applications de chant, on cherchera à placer le micro juste devant
l’artiste. La même règle peut s’appliquer pour la reprise d’instruments. Cependant,
de surprenantes nuances d’égalisation peuvent être obtenues en désaxant très légèrement la capsule par rapport à la source sonore. N’hésitez pas à faire appel à cette
technique pour une prise optimale des sons de batterie, de guitare acoustique, de
piano ou d’autres instruments, sur scène ou en studio. Rien ne saurait remplacer l’expérience dans le domaine de la prise de son, alors passez à la pratique !
Réglage du niveau du signal
Vous pouvez contrôler le gain analogique du C03U à l’aide du logiciel Softpre, ou
déterminer le gain d’entrée avec les réglages du système d’exploitation de votre ordinateur et/ou de votre logiciel d’enregistrement audionumérique. Dans un cas comme
dans l’autre, le réglage de gain du micro vous permet d’optimiser le niveau du signal
micro par rapport au bruit de fond induit. Un bon préamplificateur micro, comme
celui offert par le panneau de configuration du logiciel du C03U, est en outre équipé
de témoins d’écrêtage (PEAK ou CLIP). Pour obtenir un niveau micro idéal, placez le
C03U en face de la source à enregistrer et augmentez progressivement le gain jusqu’à
ce que le témoin CLIP ou PEAK s’allume. Baissez ensuite très légèrement le gain de
telle sorte que le témoin reste éteint. Pour de plus amples informations sur le réglage du
gain d’entrée avec le logiciel Softpre, consultez la section "Fader de GAIN D'ENTRÉE" à la
page 7.
Bruits de pop
Les “pops” sont des bruits désagréables produits par le micro lorsque le diaphragme
reçoit le souffle d’un chanteur prononçant un “P”. Il existe différentes solutions permettant de pallier ce problème, dont le recours à un filtre anti-pop externe. Certains
ingénieurs du son parmi les plus prestigieux emploient pour cela un bon vieux bas
nylon enfilé sur un porte-manteau et obtiennent d’excellents résultats. Vous pouvez
également désaxer légèrement le micro par rapport au chanteur ; cette technique,
efficace dans bien des cas, offre l’avantage de rendre inutile le recours à un filtre antipop externe. Pour de meilleurs résultats, utilisez un filtre externe, tel le Samson PS-01.
FRANÇAIS
Installation du C03U sur un pied
Le C03U peut être installé sur un pied standard au moyen de l’adaptateur fourni. Si
vous utilisez un pied à la norme américaine 5/8”, dévissez l’adaptateur pour la norme
européenne. Vissez simplement la base filetée du micro sur votre pied ou votre perche. Dévissez la vis “rapide” de la rotule pour donner au micro l’axe souhaité. Une fois
l’angle correct obtenu, serrez la vis pour maintenir le micro en place.
19
Page 22

SUSPENSION
ANTI-CHOC SP01
BAGUE
FILETÉE
VIS
RAPIDE
BAGUE
FILETÉE
Suspension anti-choc SP01 optionnelle
Utilisation de la suspension anti-choc SP01 “Spider” optionnelle
Afin de garantir une isolation optimale du
micro, le C03U peut être installé sur la suspension anti-choc SP01 “Spider” optionnelle.
Cette procédure vous indique comment installer le micro sur sa suspension SP01 :
• Tout d’abord, vissez la suspension SP01
sur le pied ou sur la perche micro. Si
vous utilisez un pied à la norme américaine 5/8”, retirez l’adaptateur à la norme
européenne.
• Retirez la pince de fixation sur pied du
FRANÇAIS
C03U en tournant la bague filetée dans
le sens inverse des aiguilles d’une montre (voir fig. 1).
• Installez le C03U sur la suspension SP01
en plaçant le micro au centre de la toile
et en veillant à le positionner correctement sur la base.
• Assurez la fixation à la suspension SP01
en remontant la bague filetée. Tournezla dans le sens des aiguilles d’une montre (fig. 2).
1
2
• Desserrez la vis rapide de la rotule pour
régler l’angle du micro. Une fois l’angle
correct obtenu, serrez la vis pour maintenir le micro en place.
Remarque : Évitez d'abîmer le filetage
ou de trop serrer la bague ou la vis
rapide.
20
Page 23
Einleitung
D"D"
Herzlichen Glückwunsch zum Kauf des Samson C03U Studio-Kondensatormikrofons. Das
C03U zeichnet sich aus durch eine große, 19 mm, ultra-dünne Membrankapsel mit integriertem, hochwertigem Analog/Digital-Konverter und USB-Ausgang. Das C03U eignet
sich perfekt zum Aufnehmen von Musik oder jeder anderen akustischen Audioquelle
mit Ihrer Lieblings-DAW (Digital Audio Workstation). Einfach das mitgelieferte USB-Kabel
einstecken, die DAW starten und mit der Aufnahme beginnen. Zur Erweiterung der
Steuerungsmöglichkeiten können Sie die Samson C03U Treibersoftware installieren und
zusätzliche Funktionen, wie programmierbares GAIN, Low Cut-Filter, Input-Anzeige und
Phasen-Schalter nutzen. Das C03U reproduziert mit hoher Klangtreue die verschiedensten Klangquellen, inklusive Gesang, Akustikinstrumente, Overhead-Becken u. v. m. Der
erweiterte Frequenzgang und die schnelle Transientenansprache garantieren eine präzise
Reproduktion mit linearer Klangcharakteristik über das gesamte Frequenzspektrum.
Auf diesen Seiten finden Sie eine detaillierte Erläuterung der Funktionen des C03U
Studio-Kondensatormikrofons sowie schrittweise Anleitungen für die Einrichtung und
Anwendung plus umfassende Spezifikationen. Bitte vergessen Sie nicht, die beiliegende
Garantiekarte ausgefüllt an uns zurückzusenden, damit Sie online technischen Support
erhalten und wir Ihnen zukünftig aktuelle Informationen über dieses und andere SamsonProdukte zukommen lassen können.
Bei sorgsamer Behandlung und korrekter Belüftung wird Ihr C03U viele Jahre störungsfrei
funktionieren. Die Seriennummer sollten Sie in der Zeile unten eintragen.
Seriennummer: _____________________
Kaufdatum: ________________________
Sollte Ihr Gerät einmal gewartet werden müssen, besorgen Sie sich vor der Rücksendung
an Samson bitte eine Return Authorization Number (RA) (Rückgabeberechtigungsnummer).
Ohne diese Nummer wird das Gerät nicht angenommen. Bitte rufen Sie Samson unter der
Nummer 1-800-3SAMSON (1-800-372-6766) an, um eine RA-Nummer vor der Rücksendung
zu erhalten. Heben Sie bitte das Original-Verpackungsmaterial auf und schicken Sie das
Gerät möglichst im Originalkarton und mit dem Originalverpackungsmaterial zurück.
C03U Features
• Große Membran, 19 mm, Studio-Kondensatormikrofon
mit Multi-Richtcharakteristik und USB-Digitalausgang.
• Kompatibel mit jeder computerbasierten Digital Audio
Workstation.
• Hyperniere-, Omni- und bidirektionale Charakteristik.
• Durch die extrem detaillierte Klangreproduktion
ist das C03U ideal für das Aufnehmen von Gesang,
Akustikinstrumenten und praktisch jeder anderen
Klangquelle geeignet.
• Hochwertiger AD-Wandler mit einer Samplingrate von
• Software-Treiber für MAC und PC bieten zusätzliche
• Doppelte 19 mm Kapsel mit 3 Mikron dicker Membran.
• Solide Spritzguss-Konstruktion.
• Inklusive schwenkbarer Ständerhalterung und 3 m USB-
16 Bit, 48 kHz.
Funktionen, wie programmierbares Gain, LED InputAnzeige, Low Cut-Filter und Phase.
21
DEUTSCHE
Page 24

C03U installieren
Das C03U lässt sich in wenigen Minuten problemlos installieren. Da das C03U dem USBStandard entspricht, können Sie es über das mitgelieferte USB-Kabel an einen MAC oder
PC anschließen und – wie bei Plug&Play üblich – sofort anfangen. Sie können Ihr C03U mit
den standard Audio Interface-Reglern des MAC- oder Windows-Betriebssystems steuern.
Detaillierte Anleitungen zum Einrichten des Geräts mit MAC OS und Windows finden Sie in
den folgenden Abschnitten dieses Handbuchs.
Für eine erweiterte Kontrolle lässt sich das Samson Softpre Applet installieren, das programmierbares Gain und eine digitale Eingangsanzeige bereitstellt, damit Sie den internen,
digital gesteuerten Mikrofon-Vorverstärker auf den korrekten Pegel einstellen können. Mit
dem Low Cut-Filter kann man außerdem unerwünschte, tieffrequente Rumpelgeräusche
entfernen. Es ist sogar ein Phasen-Schalter verfügbar, mit dem sich beim Einsatz mehrerer
Mikrofone die Signalpolarität umkehren lässt.
Da Sie den Signalpegel mit der Systemsteuerung und der Aufnahme-Software regeln können, sollten Sie sich mit diesen Reglern im MAC- oder Windows-Betriebssystem vertraut
machen. Lesen Sie daher am besten zunächst den Abschnitt „Erste Schritte mit Windows
XP (und 98)“ oder „Erste Schritte mit MAC OS X“, bevor Sie den C03U Softwaretreiber installieren.
WICHTIGER HINWEIS: Da das Softpre Applet nicht mit jeder Aufnahme-Software kompatibel
ist, sollten Sie das Mikrofon zuerst ohne das Softpre in Ihrem Computer installieren. Auf unserer
Webseite finden Sie dann eine Liste der Programme, mit denen das Softpre Applet funktioniert.
DEUTSCHE
22
Page 25

SAMSON C03U
Erste Schritte mit MAC OS X
Das folgende Beispiel beschreibt das Einrichten des C03U in MAC OS X .
1. Schließen Sie das Mikrofon an. Die LED
leuchtet und das Mikrofon empfängt USBSpannung. Der MAC erkennt das USB Audiogerät und installiert automatisch einen Universaltreiber.
2. Um das C03U als Audio-Eingang des Computers zu wählen, öffnen Sie die System
steuerung (System Preferences) aus dem
Dock oder dem Apple-Hauptmenü (Abb. 1).
3. Öffnen Sie dann die Sound-Einstellungen
(Abb. 2).
4. Klicken Sie dann auf das Input-Register und
wählen Sie C03U (Abb. 3).
-
Abb. 1
DEUTSCHE
Abb. 2
Abb. 3
23
Page 26

SAMSON C03U
#5
Erste Schritte mit Windows XP
Das folgende Beispiel beschreibt das Einrichten des C03U in Windows XP mit Service Pack
2. Andere Versionen können geringfügig
variieren.
1. Schließen Sie das Mikrofon an. Die LED
leuchtet und das Mikrofon empfängt USBSpannung. Windows erkennt das USB
Audiogerät und installiert automatisch die
Universaltreiber (Abb. 1). (Diese Sprechblasen werden beim nächsten Anschließen des
Mikrofons nicht mehr erscheinen, da die
Mikrofontreiber bereits installiert sind.)
Das C03U wurde jetzt als Windows-Audiogerät unter dem Namen „Samson C03U“
erkannt. Jedem weiteren C03U wird eine
Nummer hinzugefügt, z. B. Samson C03U (2)
usw. Um es als Standardgerät zu wählen und
das computergesteuerte Gain zu ändern,
rufen Sie die Systemsteuerung auf.
2. Greifen Sie via Systemsteuerung auf
„Sounds und Audiogeräte“ zu (Abb. 2).
3. Wählen Sie im Audio-Register das Samson
C03U als „Standardgerät“ für die „Sound-Aufnahme“. Das Standardgerät wird in einfachen
DEUTSCHE
Programmen benutzt, z. B. Teleconferencing
oder Sound Recorder. Bei den meisten professionellen Audio-Programmen können Sie im
Programm selbst wählen, welches Gerät (oder
mehrere Geräte) benutzt werden soll(en). Um
das computergesteuerte Gain einzustellen,
klicken Sie auf den Volume-Button (Abb. 3).
Abb. 1
Abb. 2
Abb. 3
4. Das Wave In-Fenster bestimmt das computergesteuerte Gain oder schaltet das Mikrofon stumm. Der Gain-Bereich beträgt –62 dB
bis +48 dB (Abb. 4).
24
Abb. 4
Page 27

Softpre Software Applet verwenden
Softpre Software installieren
Das C03U arbeitet mit den meisten Audio-Programmen
zusammen, nachdem Sie das Mikrofon einfach über das
mitgelieferte USB-Kabel an Ihren Computer angeschlossen haben. Um allerdings die komplexeren Funktionen
zu nutzen, müssen Sie die Samson C03U Software installieren. Diese ist sehr einfach erhältlich. Geben Sie „www.
samsontech.com“ in Ihren bevorzugten Internet Browser
ein, suchen Sie nach dem C03U Treiber-Link und befolgen
Sie die angezeigten Anleitungen zum Herunterladen des
Treibers. Nachdem Sie die Treibersoftware heruntergeladen und installiert haben, können Sie die C03U Software
verwenden.
Nach der Installation der C03U Software können Sie das
C03U betreiben, indem Sie nach den einfachen Anleitungen der folgenden Abschnitte vorgehen.
Korrekten Pegel einstellen
Zu den wichtigsten Grundlagen guter Tontechnik zählt
das Einstellen von korrekten Pegeln. Sogar bei einem
kleinen standard Mischer oder einfachen MehrspurRecorder gibt es mehrere Regler, die den Pegel eines
Signals beeinflussen, während es von der Klangquelle
zu den Boxen bzw. den Kopfhörern oder dem
Monitorsystem geleitet wird. Zu diesen Reglern zählen Preamp Gain, EQ, Aux Sends und
Returns, Kanalfader, Bus- oder Subgruppen und schließlich Master Fader. Ganz zu schweigen vom Pegel des 5:15-Uhr-Zugs auf seinem Weg zum Mannheimer Hauptbahnhof
und dem markerschütternden Signalhorn, das beim Aufnehmen einer klassischen Gitarre
auch noch in 5 km Entfernung wahrnehmbar ist, trotz doppelter Dämmmatten an den
Fenstern des Projekt-Studios. Aber das ist eine andere Geschichte mit wiederum anderen
Regeln. Zunächst sollten Sie sich bewusst sein, dass Sie mit jeder Änderung eines in den
Signalweg geschalteten Reglers auch irgendwo die Verstärkung ändern. Dann müssen Sie
sorgfältig die Pegel auf Ihren Eingangs- und Ausgangsanzeigen überwachen, um übersteuerte Signale mit zu vielen Pegelspitzen zu vermeiden. Und vergessen Sie nicht, dass
Ihr Gehör das komplexeste und am besten kalibrierte Testgerät ist, das Sie besitzen. Sie
sollten das Einstellen eines korrekten Pegels also von einem technischen Standpunkt aus
angehen und das Ergebnis dann von einem kreativen Standpunkt aus bestätigen.
DEUTSCHE
INPUT GAIN–Fader
Das C03U verfügt über eine interne, digital gesteuerte, analoge INPUT GAIN-Stufe, die mit
dem C03U Software-Fader geregelt wird. Die Fadersteuerung bietet einen Gain-Bereich
von -62 bis +48 dB. Durch Nachregeln des INPUT GAIN-Faders kann das C03U die Pegel
der meisten Klangquellen verarbeiten. Mit dem INPUT GAIN-Regler lässt sich der Pegel
des Eingangssignals einstellen. Beginnen Sie mit einem niedrigen Pegel und erhöhen Sie
ihn bei Bedarf. Überwachen Sie die digitale VU-ANZEIGE des Eingangs und stellen Sie den
INPUT GAIN-Regler möglichst so ein, dass die Werte knapp unter der CLIP-Anzeige liegen.
Wenn die CLIP-Anzeige leuchtet, kommt es zur „Überlastung“ und der Klang wird eventuell
verzerrt. Regeln Sie in diesem Fall den INPUT GAIN Fader einfach etwas zurück. Die CLIPAnzeige leuchtet weiterhin rot, bis Sie sie durch Anklicken des CLIP Icons zurücksetzen.
25
Page 28

Softpre Software Applet verwenden
DIGITALE VU-ANZEIGE - Eingangspegel
Zum Überwachen des vom C03U übertragenen
Signals gibt es eine digitale VU-ANZEIGE mit einer
Skala von „unendlich“ bis „Digtal Mximum“ oder
CLIP. Der auf der Anzeige dargestellte Pegel wird
vom Input Gain Fader beeinflusst, daher sollte dieser auf die für die Klangquelle geeignete Position
eingestellt sein. Die digitale VU-ANZEIGE simuliert
eine “VU” Ballistik und reagiert auf durchschnittliche Signalpegel. Die VU-ANZEIGE hilft Ihnen
beim Einstellen des Eingangspegels mit dem
GAIN-Regler. Der Pegel sollte sich auf der Anzeige
etwas unter der CLIP-Marke bewegen, aber diese
nie erreichen. Wenn die CLIP-Anzeige leuchtet,
tritt eine „Überlastung“ ein und der Klang könnte
verzerrt werden. Regeln Sie in diesem Fall einfach
den INPUT GAIN Fader zurück. Die CLIP-Anzeige
leuchtet rot, bis Sie sie durch Anklicken des CLIP
Icons zurücksetzen.
Low Cut-Filter einsetzen
Wie jeder gute Mikrofon-Preamp verfügt auch
die C03U Software über ein Low Cut (oder
High Pass) Filter zum Bedämpfen des tiefen
Bassbereichs. Mit dem Low Cut-Filter können
Sie die tiefen Frequenzen entfernen, die Sie
manchmal einfach nicht aufnehmen möchten. Bei der Mikrofon-Abnahme eines HiHats
möchte man beispielsweise nur die Frequenzen aufzeichnen, die das HiHat erzeugt. Mittels
Low Cut-Filter lassen sich die Einstreuungen der tiefen Toms und Bassdrum ins HiHat-
DEUTSCHE
Mikrofon verringern. Die gleiche Technik können Sie auch bei anderen Instrumenten, z.
B. Akustikgitarre, Violine, Piano und sogar Gesang, verwenden. Bei Live-Beschallungen
dient das Low Cut-Filter besonders zum Entfernen von Rumpelgeräuschen, die häufig auf
Bühnen entstehen. Die Softpre Software bietet ein variables Low Cut-Filter, mit dem sich
die exakte Frequenz einstellen lässt, ab der die Bässe entfernt oder bedämpft werden.
PHASE – Schalter
Bei vielen Mikrofonabnahme- und Mischtechniken müssen Sie vielleicht die Phase der
Signalquelle umkehren, die ins C03U und die Softpre Software eingespeist wird. Bei
gedrücktem PHASE-Schalter leuchtet die gelbe LED und die Phase des Eingangssignals ist
gedreht.
C03U mit Spannung versorgen
Das C03U besitzt wie alle anderen Kondensatormikrofone eine interne Elektronik, die eine
aktive Spannungsversorgung benötigt. Herkömmliche Studio-Kondensatormikrofone
werden fast immer über eine Phantomspeisung versorgt, die normalerweise vom
Mischpult bezogen wird. Das C03U empfängt seine Spannung über den USB-Bus.
Schließen Sie das Mikrofon einfach an den USB-Port des Computers an und schon ist das
Mikrofon betriebsbereit. Die Einschalt-LED des C03U leuchtet, sobald USB-Spannung anliegt.
26
Page 29

C03U betreiben
1
PAD-Schalter einsetzen
Das C03U verfügt über einen PAD-Schalter, mit dem
sich die Eingangsempfindlichkeit des Mikrofons verringern lässt. In der 0 dB-Stellung des PAD-Schalters
wird die Bedämpfung (PAD) umgangen und das
Signal bleibt unbeeinflusst. In der –10dB-Stellung
des PAD-Schalters wird die Eingangsempfindlichkeit
des Mikrofons um 10 dB verringert. Setzen Sie das
PAD ein, wenn Sie laute Klangquellen mit hohem
Schalldruckpegel (SPL) via Mikrofon aufnehmen.
2
Hi-Pass-Filter einsetzen
Das C03U verfügt auch über ein zuschaltbares Hi-Pass- oder Low-Cut-Filter, mit dem
Sie unerwünschte tiefe Frequenzen beseitigen
können. Wenn das Hi-Pass-Filter linear eingestellt
ist (gerade Linie), bleibt das Signal unbeeinflusst.
Wenn das Hi-Pass-Filter auf “Roll-Off” eingestellt
ist (geknickte Linie), wird bei 100 Hz ein Filter mit
12dB/Oktave auf das Signal angewandt. Dies kann
ein nützliches Mittel sein zum Entfernen von tieffrequentem Bühnenrumpeln, Windgeräuschen bei
Außenaufnahmen oder tiefen Trommelfrequenzen,
wenn das C03U als Overhead-Beckenmikrofon eines
Drumkits eingesetzt wird.
2
Richtcharakteristiken
Die wichtigste Eigenschaft jedes Mikrofons ist seine Richtcharakteristik. Die vielseitige
Doppelkapseltechnik des C03U ermöglicht drei nützliche Richtcharakteristiken: Niere-,
Omni- und Achter-Charakteristik. Mit dem Pattern-Wahlschalter auf der Mikrofon-Rückseite
lässt sich die Richtcharakteristik problemlos wählen. Bei der Wahl der Charakteristik sollten
Sie ein Phänomen namens "Nahbesprechungseffekt" nicht vergessen.
1
DEUTSCHE
Einfach ausgedrückt, bewirkt der Nahbesprechungseffekt eine Änderung des Frequenzgangs, sobald die Mikrofonposition relativ zur Klangquelle geändert wird. Jedes Mikrofon
erzeugt seinen besten Frequenzgang, wenn es direkt auf die Klangquelle (axial) gerichtet
wird. Je nach Richtcharakteristik wird der tiefe Frequenzgang (manchmal stark) verstärkt,
wenn das Mikrofon weniger als 30 cm (außer-axial) von der Klangquelle entfernt ist.
Wenn Sie den Nahbesprechungseffekt verstehen und seine Einsatzmöglichkeiten kennen,
werden Sie den gewünschten Sound wesentlich einfacher einstellen können. In den folgenden Abschnitten werden die drei verfügbaren Richtcharakteristiken beschrieben.
27
Page 30

C03U betreiben
3
Superniere
Während Mikrofone mit Omni- und bidirektionaler Charakteristik für die verschiedensten
Spezialanwendungen sehr nützlich sind, erfordert die Mehrzahl von Mikrofonabnahmen
bei Aufnahmen und Live-Beschallungen entweder unidirektionale oder Nieren-Mikrofone.
Die Supernieren-Charakteristik des C03U Kondensatormikrofons bietet eine stärkere Unterdrückung von seitlich auftreffendem Schall. Die unidirektionale Eigenschaft ermöglicht
eine bessere Trennung von Instrumenten im Studio und eine bessere Feedback-Kontrolle
bei der Live-Beschallung. Um die Supernieren-Richtcharakteristik zu wählen, stellen
Sie den Pattern-Wahlschalter in die mittlere Super
Cardioid-Position, die durch ein "herzförmiges" Icon
angezeigt wird. Bei korrekter Positionierung des
Mikrofons können Sie mit der Supernieren-Charakteristik größere Anteile des gewünschten Klangs und geringere Anteile des unerwünschten Klangs aufnehmen.
4
Omni
Omni- oder omnidirektionale Mikrofone nehmen Klänge aus allen Richtungen auf. Um die
Omni-Richtcharakteristik zu wählen, stellen Sie den Pattern-Wahlschalter des C03U auf die
rechte “O” Position ein. Setzen Sie die Omni-Charakteristik ein, um den Raumklang und
natürlichen Nachhall eines Raums einzufangen, in dem ein Instrument oder eine Stimme
aufgenommen wird. Der Omni-Modus ist auch großartig zum Aufnehmen von EnsembleDarbietungen von Gesangs-, Blechbläser-, Holzbläserund anderen Instrumentengruppen geeignet, bei
denen sich die Künstler in einem Kreis um das Mikrofon gegenüberstehen. Die Omni-Charakteristik ist
zudem am wenigsten anfällig für den Nahbesprechungseffekt. Dies ist beim Aufnehmen von Künstlern
extrem nützlich, die während ihrer Darbietung gern ihr Instrument, inklusive ihrer Stimme,
vor dem Mikrofon umherbewegen. Der Einsatz einer Nieren-Charakteristik kann in diesen
DEUTSCHE
Situationen dazu führen, dass sich der Frequenzgang bereits bei wenigen Zentimetern an
Bewegung ungeheuer stark ändert und bei der aufgenommenen Spur der Pegel der tiefen
Frequenzen ansteigt und abfällt. Mittels Omni-Charakteristik kann man diese schwierige
Mikrofonabnahme-Situation besser kontrollieren und die bestmögliche Performance ein
fangen, ohne den Künstler zu behindern, indem man ihn zwingt, an einer festen Position
stehen zu bleiben.
5
Achter-Charakteristik
Mikrofone mit bidirektionaler oder Achter-Richtcharakteristik nehmen die direkt von vorne und hinten
kommenden Klänge auf, während die von der linken
und rechten Seite kommenden Klänge unterdrückt
werden. Um die Achter-Charakteristik zu wählen, stellen Sie den Pattern-Wahlschalter des C03U nach links auf Position “8” ein. In diesem Modus
arbeiten Sie beinahe wie mit zwei identischen Mikrofonen, die Rücken an Rücken zueinander aufgestellt sind. Damit können Sie optimal zwei Künstler erfassen, die ein Duett
singen, oder Chorstimmen aufnehmen. Wenn sich die beiden Sänger bei ihrer Darbietung
gegenüber stehen, lassen sich die Emotionen viel besser als beim Einsatz von zwei gleich
ausgerichteten Mikrofonen einfangen. Man kann auch interessante Slap Back Echo-Effekte
erzeugen, indem man das C03U mit Achter-Charakteristik zwischen einem aufzunehmenden Instrument und einer speziellen Wand des Studios aufstellt. Da die hintere Kapsel die
von der Wand zurückgeworfene Reflexion des Klangs aufnimmt, kann man die Delay-Zeit
des Echos ändern, indem man die Entfernung des Mikrofons von der Wand variiert
28
3
4
5
-
.
Page 31

C03U betreiben
Mikrofon-Platzierung
Um die Klangqualität zu maximieren, müssen Sie genau darauf achten, wie Ihr C03U
platziert und bezüglich des abzunehmenden Instruments oder Sängers aufgestellt ist. Alle
Mikrofone und besonders unidirektionale oder Nierenmikrofone zeichnen sich durch ein
Phänomen namens „Nahbesprechungseffekt“ aus. Dieser entsteht durch die Änderung des
Frequenzgangs eines Mikrofons, der wiederum auf der Entfernung (und Position) zwischen
Mikrofonkapsel und Klangquelle basiert. Wenn Sie ein Nierenmikrofon direkt (axial) auf
die Klangquelle richten, erhalten Sie den besten Frequenzgang. Wenn Sie das Mikrofon
jedoch etwas neben die Klangquelle richten (außer-axial), werden Sie feststellen, dass die
Bassansprache nachlässt und das Mikrofon zunehmend dünner klingt.
Bei den meisten Gesangsanwendungen werden Sie das Mikrofon direkt vor dem Künstler
aufstellen. Das gleiche gilt für die Mikrofonabnahme von Instrumenten, aber man kann
ziemlich erstaunliche EQ-Einstellungen vornehmen, indem man den Winkel zwischen Kapsel und Klangquelle nur leicht ändert. Dies ist eine nützliche Technik, um den optimalen
Sound von Drumsets, Akustikgitarren, Pianos oder anderen Instrumenten in einem akustisch lebendigen Raum oder auf einer Bühne einzufangen. Experiment und Erfahrung sind
die besten Lehrmeister beim Erstellen guter Sounds – also schließen Sie Ihr Mikrofon an!
Signalpegel einstellen
Sie können die interne, digital gesteuerte, analoge Input Gain-Stufe des C03U mit dem
Softpre Applet einstellen oder Sie können das Eingangs-Gain mit dem Software-Regler des
Betriebssystems Ihres Computers und/oder Ihrer digitalen Audio Workstation steuern. In
beiden Fällen besteht der Zweck des Mic Trim-Reglers darin, den Anteil an gutem Signal
relativ zu begleitenden Störgeräuschen zu optimieren. Ein guter Mikrofon-Vorverstärker,
wie das C03U Software-Bedienfeld, besitzt auch LEVEL- oder CLIP-Anzeigen. Um einen
guten Pegel am Mikrofon einzustellen, bauen Sie das C03U vor der gewünschten
Klangquelle auf und drehen den Input Trim-Regler langsam auf, bis die CLIP- oder PeakAnzeige aufleuchtet. Drehen Sie dann den Input Trim-Regler etwas zurück, bis die Anzeige
nicht mehr leuchtet. Weitere Infos über das Einstellen von Input Gain mit dem Softpre Applet
finden Sie in Abschnitt "INPUT GAIN - Fader" auf Seite 7 dieses Handbuchs.
DEUTSCHE
P-Popping
Dieses störende Pop-Geräusch entsteht, wenn die Mikrofon-Membran von Luftstößen
getroffen wird, die beim Aussprechen von Wörtern mit dem Vokal "P" (und anderen
Explosivlauten) durch den Sänger entstehen. Dieses Problem kann man auf verschiedene
Weise, z. B. mit einem externen Pop-Filter, lösen. Manche berühmten Tontechniker verlassen sich auf einen alten Nylonstrumpf, den sie über einen zurechtgebogenen DrahtKleiderbügel gezogen haben – was tatsächlich sehr gut funktioniert. Sie können das Mikrofon auch probeweise leicht außer-axig (mit einem kleinen Winkel) auf den Sänger richten.
Dies löst häufig das Problem auch ohne externen Pop-Filter. Zuverlässigere Lösungen
bieten allerdings externe Pop-Filter, wie der Samson PS-01.
Ständermontage des C03U
Das C03U lässt sich mit dem mitgelieferten, schwenkbaren Montage-Adapter an standard
Mikrofonständern montieren. Bei einem amerikanischen 5/8” Mikrofonständer müssen
Sie vorher den Euro-Ständeradapter abschrauben. Schrauben Sie den Schwenk-Adapter
dann einfach auf den Mikrofonständer oder Galgenständerarm. Lösen Sie dann die
Rändelschraube, um das Mikrofon auf den gewünschten Winkel einzustellen. Ziehen Sie
anschließend die Rändelschraube zur Sicherung der Mikrofonposition wieder fest.
29
Page 32

SP01
STOSS-SCHUTZ
GEWINDERING
RÄNDELSCHRAUBE
GEWINDERING
Optionale SP01 Stoßschutz-Halterung montieren
Optionale SP01 “Spider” Stoßschutz-Halterung verwenden
Zur zusätzlichen Isolation kann das C03U
auf die optionale SP01 “Spider” StoßschutzHalterung montiert werden. Gehen Sie wie
folgt vor, um die SP01 zu installieren.
• Schrauben Sie die SP01 Stoßschutz-
Halterung zuerst auf Ihren Mikrofonständer oder Galgenständerarm. Bei
einem amerikanischen 5/8” Mikrofonoder Galgenständer müssen Sie den
Euro-Adapter entfernen.
• Entfernen Sie die C03U Schwenkhalter-
ung, indem Sie den Gewindering wie in
Abb. 1 nach links drehen.
• Installieren Sie das C03U in der SP01,
indem Sie das Mikrofon in die Mitte des
Netzes einpassen und das C03U auf der
unteren Montageplatte positionieren.
Sichern Sie die SP01, indem Sie den
•
Gewindering wieder installieren und
DEUTSCHE
nach rechts drehen, bis er fest sitzt (Abb.
2).
• Lockern Sie jetzt die Rändelschraube,
um den Mikrofonwinkel einzustellen, und bringen Sie das C03U in die
gewünschte Position. Drehen Sie dann
die Rändelschraube wieder fest, um das
Mikrofon an seinem Platz zu sichern.
1
2
Hinweis: Achten Sie darauf, das
Gewinde nicht zu verkanten und den
Gewindering und die Rändelschraube
nicht zu überdrehen.
30
Page 33

Introducción
D"D"
Felicidades y gracias por su compra del micro condensador de estudio Samson C03U.
El C03U dispone de un gran y super fino diafragma de 19 mm con un convertidor
analógico-digital de alta calidad y una salida USB exteriores. Este micrófono es
perfecto para la grabación de su música, o de cualquier fuente audio acústico a
su DAW (workstation audio digital) preferido. Simplemente conecte el cable USB
incluido, arranque su DAW e inicie la grabación. Para un mayor control, instale el
software controlador Samson C03U con el que dispondrá de funciones adicionales
como la ganancia programable, filtro de corte de graves, medición de entrada y
conmutador de fase. El C03U reproduce con absoluta fidelidad una amplia gama
de fuentes de sonido incluyendo voces, instrumentos acústicos y platillos, por citar
unos pocos. La rápida respuesta a transitorios y de frecuencia le aseguran una
reproducción precisa con una características lineales en todo el rango.
En estas páginas encontrará una descripción detallada de todas las características del
micrófono condensador de estudio C03U, instrucciones paso-a-paso para su montaje
y uso y una completa tabla con las especificaciones. También encontrará una tarjeta
de garantía—no se olvide de rellenarla y enviárnosla por correo para que pueda
recibir soporte técnico online y para que podamos enviarle información actualizada
sobre este y otros productos Samson en el futuro.
Con unos cuidados mínimos, su C03U funcionará sin problemas durante muchos
años. Le recomendamos que apunte aquí abajo el número de serie de este aparato
para cualquier consulta en el futuro.
Número de serie: __________________________
Fecha de compra: ________________________
En el improbable caso de que su unidad tenga que ser reparada en algún momento,
necesitará conseguir un número de Autorización de devolución (RA) para poder
enviar su unidad a Samson. Sin este número, ninguna unidad es aceptada en fábrica.
Póngase en contacto con Samson en el teléfono 1-800-3SAMSON (1-800-372-6766)
para que le facilitemos este número de autorización de devolución antes de enviarnos
la unidad. Le recomendamos que guarde el embalaje original de este aparato y, si es
posible, utilice este embalaje para devolvernos la unidad en caso de reparación.
Características del C03U
• Micrófono condensador de estudio multipatrón con
un gran diafragma de 19 mm y salida digital USB.
• Compatible con cualquier workstation audio digital
con base en ordenador.
• Patrones hipercardioide, omni y bidireccional.
Una reproducción del sonido extremadamente
•
detallada hace que sea perfecto para la grabación de
voces, instrumentos acústicos y casi cualquier otra
fuente de sonido.
• Convertidor AD de alta calidad con 16 bits y
• Drivers para MAC y PC que le ofrecen funciones
• Doble cápsula de 19 mm con diafragma de 3 micras.
•
• Incluye pinza móvil y cable USB de 3 metros.
frecuencia de muestreo de 48K.
adicionales como ganancia programable, medidor
de entrada, filtro de corte de graves y fase.
Construcción sólida y robusta.
31
ESPAÑOL
Page 34

Instalación del C03U
La instalación del C03U es un proceso muy sencillo que solo requerirá unos minutos.
Dado que el C03U es un dispositivo USB, puede usarlo tanto en un MAC como en un
PC, a los que tras conectarles el cable USB cable ya podrá funcionar. Podrá controlar
su C03U usando los controles del interface audio standard del sistema operativo
MAC o Windows. En las siguientes secciones de este manual encontrará instrucciones
concretas acerca de cómo configurar este aparato con MAC OS y Windows.
Para un mayor control, puede instalar el programa controlador Softpre applet que
hará que disponga de ganancia programable y de un medidor de entrada digital para
que pueda ajustar el preamplificador digital interno del micrófono al nivel correcto.
También podrá usar el filtro de corte de graves para eliminar murmullos no deseados
de bajas frecuencias. Incluso hay un interruptor de fase que le permite invertir la
polaridad de la señal cuando use varios micrófonos.
Dado que es posible ajustar el nivel de la señal en las preferencias del sistema
operativo y en su programa de grabación, es una buena idea que se familiarice con
esos controles en el sistema operativo MAC o Windows. Por ello, le recomendamos
que lea la sección Puesta en marcha con Windows XP (y 98) o Puesta en marcha con
MAX OS X antes de instalar el controlador de software C03U.
NOTA IMPORTANTE: El programa Softpre applet no es compatible con todos los
programas de grabación, por lo que le recomendamos que instale primero el micro en
su ordenador sin el Softpre. Acceda después a nuestra página web y localice la lista de
programas que funcionan sin problemas con el Softpre applet.
ESPAÑOL
32
Page 35

SAMSON C03U
Puesta en marcha con MAC OS X
A continuación le mostraremos un ejemplo
de la configuración del C03U en MAC OS X .
1. Conecte el micrófono. El piloto
se iluminará para indicarle que está
recibiendo corriente a través de la
conexión USB. El MAC reconocerá el
dispositivo audio USB e instalará de forma
automática un controlador universal.
2. Para elegir el C03U como la entrada
audio del ordenador, abra las preferencias
del sistema en el dock o en el menú Apple
principal (figura 1).
3. Después abra las preferencias de sonido
(figura 2).
4. Ahora, haga clic en la pestaña de entrada
y elija el C03U (figura 3).
Figura 1
Figura 2
ESPAÑOL
Figura 3
33
Page 36

SAMSON C03U
#5
Puesta en marcha con Windows XP
En el ejemplo siguiente puede ver la
configuración del C03U en Windows
XP con el Service Pack 2. En el caso de
otras versiones, el proceso puede variar
ligeramente.
1. Conecte el micrófono. El piloto se
iluminará para indicarle que el micro
está recibiendo corriente a través de
la conexión USB. Windows reconocerá
el dispositivo de audio USB e instalará
de forma automática los controladores
universales (figura 1). (Estos globos
informativos no aparecerán la siguiente
vez que conecte el micro, dado que los
controladores ya estarán instalados).
El C03U será reconocido a partir de ahora
como un dispositivo audio Windows con
el nombre Samson C03U. A cada C03U
adicional que añada se le asignará un
número, del tipo Samson C03U (2), etc.
Para configurarlo como el dispositivo por
defecto y cambiar la ganancia controlada
por ordenador, vaya al panel de control.
Figura 1
Figura 2
2. Vaya después a Dispositivos de sonido y
audio en el panel de control (figura 2).
3. Elija el Samson C03U como dispositivo
de grabación audio por defecto dentro de
la pestaña Audio. El dispositivo por defecto
se usa en programa sencillos como los de
teleconferencia o grabación de sonido.
En la mayoría de los programas audio
podrá elegir qué dispositivos (o cuales si
ESPAÑOL
puede elegir varios) usar con ese programa
concreto. Para ajustar la ganancia
controlada por ordenador, haga clic en el
botón Volumen (figura 3).
4. La ventana Wave In ajusta la ganancia
controlada por el ordenador y permite
la anulación del micrófono. El rango de
ganancia va de –62 a +48 dB (figura 4).
34
Figura 3
Figura 4
Page 37
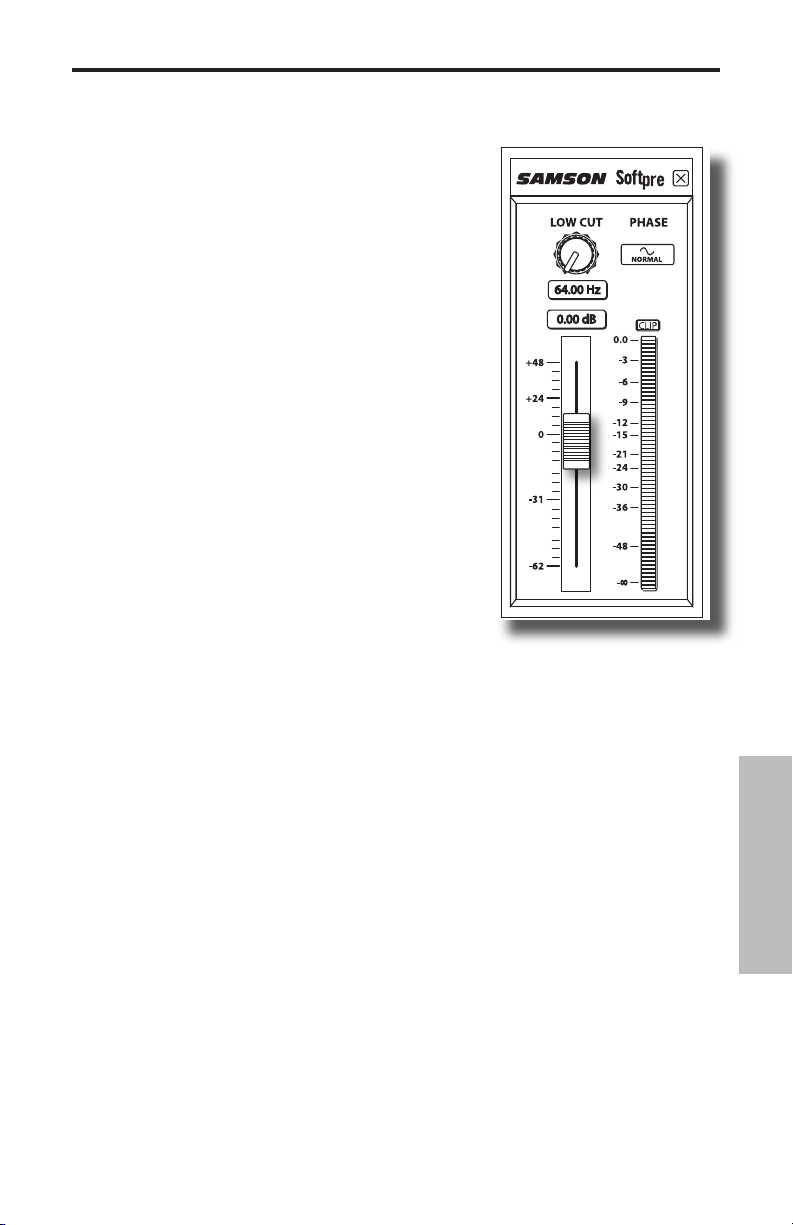
Uso del programa Softpre Software Applet
Instalación del programa Softpre
El C03U puede funcionar con la mayoría de programas
audio, simplemente conectando el micrófono a
su ordenador por medio del cable USB incluido.
No obstante, para sacar el máximo partido de las
funciones avanzadas debería instalar el programa
Samson C03U. El conseguir este programa es muy
sencillo. Simplemente teclee samsontech.com en su
navegador preferido de internet, busque el enlace
del driver C03U y siga las instrucciones de pantalla
para descargar ese controlador. Una vez que haya
descargado el software, ejecute el programa de
instalación y comience a usar el software C03U.
Una vez que tenga instalado el programa C03U podrá
usar su C03U a través de las sencillas instrucciones
que le describimos a continuación.
Ajuste de un buen nivel
Uno de los puntos más importantes para un buen
técnico de sonido es ajustar los niveles de forma
adecuada. Incluso en una pequeña mesa de mezclas
o en una grabadora multipistas básica, hay varios
controles que afectan al nivel de la señal desde la
fuente de sonido a sus altavoces o al nivel de sus
auriculares o sistema de monitorización. Entre estos
controles se incluye la ganancia de pre-amplificador, EQ, envíos y retornos auxiliares,
nivel del fader de canal, niveles de grupo o bus, y finalmente el fader master... y eso
sin mencionar el tren que pasa justo al lado de su casa y hace sonar la bocina en
el momento de captar con su micro el sonido de una cuerda de nylon de guitarra,
y que se oye a pesar de haber cubierto con cortinas las ventanas de su estudio
casero... pero eso es otra historia y requiere a otro tipo de disciplinas. Comencemos
teniendo en cuenta que cada vez que cambie cualquier control en la ruta de señal,
probablemente estará afectando a la ganancia en algún punto. Por tanto, asegúrese
de monitorizar cuidadosamente los niveles en sus medidores de entrada y salida
para evitar una señal saturada con demasiados picos. Además, recuerde que sus
oídos son el tester más calibrado y preciso que tendrá jamás. Por ello, el ajuste de un
buen nivel debería ser ajustado partiendo de un punto de vista técnico, pero debería
confirmarlo después usando su criterio personal.
ESPAÑOL
INPUT GAIN – Fader
El C03U tiene una fase de GANANCIA DE ENTRADA analógica interna y controlada
digitalmente que es controlada por el fader del programa C03U. El control de este
fader le ofrece un rango de ganancia de -62 a +48 dB. El C03U puede aceptar niveles
de la mayoría de micrófonos por medio del fader INPUT GAIN. Puede usar el control
INPUT GAIN para ajustar el nivel de su señal de entrada. Es una buena idea empezar
con un nivel bajo y después ir subiendo hasta donde necesite. Asegúrse de controlar
el MEDIDOR de entrada VU digital y tratar de ajustar el control INPUT GAIN de forma
que el medidor le ofrezca lecturas por debajo del indicador CLIP. Si observa que el
piloto CLIP se ilumina eso será que la señal está "sobrecargada" y que el sonido puede
que distorsione. Si ocurre eso, simplemente baje el fader INPUT GAIN. El indicador
CLIP seguirá iluminado en rojo hasta que lo reinicie pulsando sobre el icono CLIP.
35
Page 38
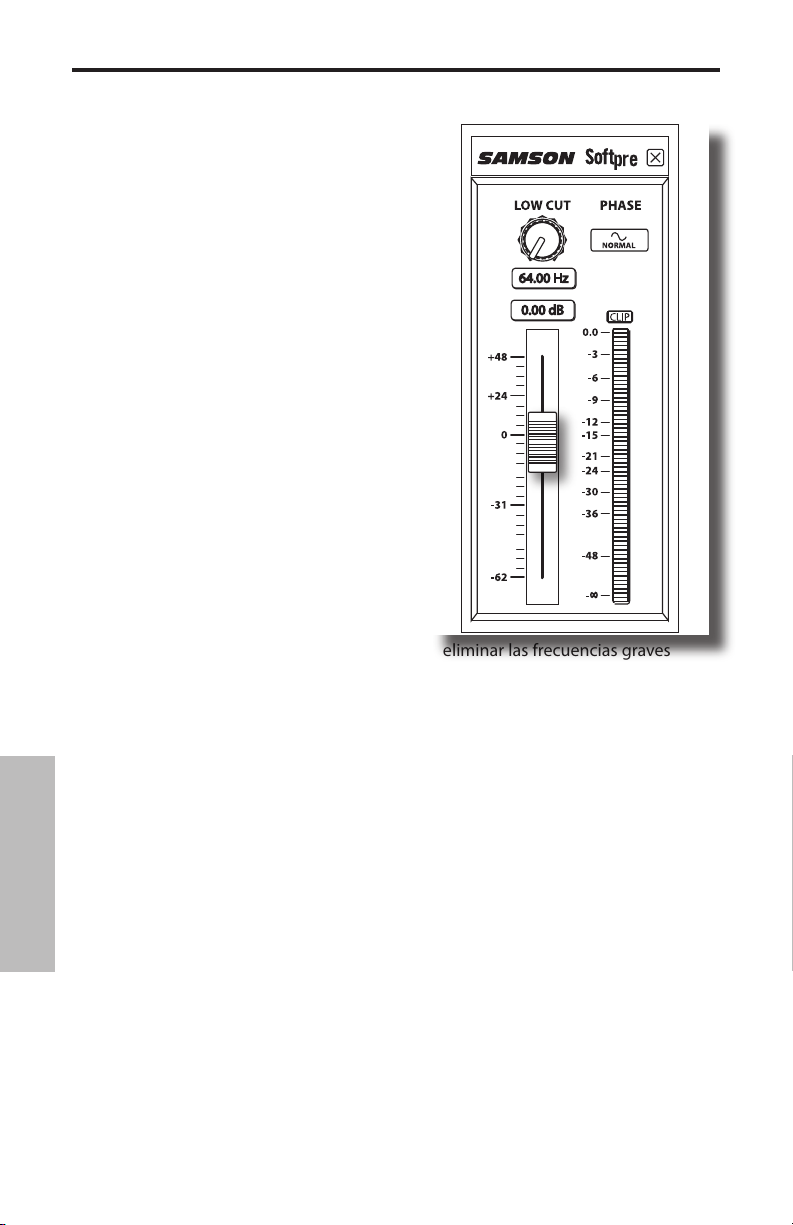
Uso del programa Softpre Software Applet
MEDIDOR DIGITAL VU - Nivel de entrada
Para monitorizar la señal enviada desde el
C03U, dispone de un MEDIDOR digital VU con
una escala que va desde infinito al máximo
digital o CLIP. El nivel que aparezca en el
medidor se verá afectado por el fader de
ganancia de entrada, por lo que asegúrese
de ajustar la posición correcta para su fuente
de sonido. El MEDIDOR digital VU ofrece una
balística “VU”, lo que implica que reacciona
a la señal en base a u nivel medio. Use el
MEDIDOR VU cuando esté ajustando su nivel
de entrada usando el control GAIN. Trate de
ajustar el nivel de forma que el medidor de
ofrezca lecturas cercanas al CLIP pero sin
hacer que se ilumine ese piloto. Si se ilumina
el piloto CLIP estará "sobrecargando" la señal
y el sonido distorsionará. Si esto ocurre,
baje el fader INPUT GAIN. El indicador CLIP
seguirá iluminado en rojo hasta que lo reinicie
pulsando sobre el icono CLIP.
Uso del filtro de corte de graves
Al igual que cualquier buen previo de micro,
el programa C03U dispone de un filtro de
corte de graves (o pasa-altos) para atenuar
las frecuencias supergraves. Este filtro le permite eliminar las frecuencias graves
que a veces no querrá captar. Por ejemplo, cuando esté capturando el sonido de
un hi-hat solo querrá captar las frecuencias que producen esos platillos. Por tanto,
usando este filtro podrá reducir la cantidad de captura de sonido de los timbales y
bombo que puedan desviarse al micro del hi-hat. Puede usar esta misma técnica en
otros instrumentos como guitarras acústicas, violines, piano o incluso en voces. En
aplicaciones de sonido directo, el filtro de corte de graves es especialmente útil para
eliminar los murmullos de escenario. El programa Softpre software le ofrece un filtro
de corte de graves variable que le permite ajustar la frecuencia exacta en la que las
bajas frecuencias empezarán a ser reducidas o atenuadas.
PHASE – Interruptor
Para una amplia gama de técnicas de mezcla y microfonía, puede que necesite
invertir la fase de las señal de la fuente que haya conectado a su programa C03U
ESPAÑOL
y Softpre. Cuando pulse el interruptor PHASE, el piloto amarillo se encenderá para
indicarle que la señal de entrada está ahora fuera de fase.
Encendido del C03U
El C03U es un micro condensador y, al igual que todos los micros condensadores,
dispone de unos circuitos electrónicos internos que requieren una fuente de
alimentación activa. Los micrófonos condensadores tradicionales de estudio casi
siempre reciben el voltaje a través de una fuente de alimentación fantasma, derivada
habitualmente de la mesa de mezclas. El C03U receibe su corriente del bus USB.
Simplemente conecte el micrófono al puerto USB de su ordenador y ya estará listo
para funcionar. El C03U dispone de un piloto de encendido que se iluminará en
cuanto el micro reciba corriente a través de la conexión USB.
36
Page 39

Manejo del C03U
1
Uso del interruptor PAD
El C03U incluye un interruptor PAD que puede
usar para reducir la sensibilidad de entrada del
micro. Cuando ajuste este interruptor a la posición
0dB quedará anulado y no habrá efecto sobre la
señal. Cuando lo ajuste a -10dB, la sensibilidad
de entrada del micrófono será reducida en 10
dB. Puede usar este interruptor PAD cuando esté
captando fuentes de señal potentes con un SPL
(nivel de presión sonora) alto.
2
Uso del filtro pasa-altos
El C03U también le ofrece un filtro de corte de graves, pasa-altos seleccionable
por el usuario, que puede usar para eliminar la reproducción de frecuencias graves
no deseadas. Cuando ajuste este filtro a la
posición "plana" (indicada por la línea recta), no
habrá ningún efecto sobre la señal. Cuando lo
coloque en la posición de “supresión” (indicada
por una línea en ángulo), será aplicado un corte
de graves de 12 dB por octava a 100 Hz a la
señal. Esto puede resultar muy útil para eliminar
murmullos de graves, ruidos de viento cuando
lo use en exteriores y filtras sonidos graves de
tambores cuando lo utilice como micro de platillos
suspendido en una jirafa sobre un kit de batería.
Patrones polares
La característica de mayor importancia de cualquier micro es su direccionalidad o
"patrón de captura". El versátil diseño de doble cápsula del C03U es capaz de producir
hasta tres útiles patrones de captura; cardioide, omni y en forma de 8. Es muy fácil
elegir el patrón de captura usando el interruptor de selección de patrón del C03U que
está situado en la parte de atrás del micro. A la hora de elegir un patrón, deberá tener
en cuenta el fenómeno conocido como "efecto de proximidad".
2
1
ESPAÑOL
De forma resumida, el efecto de proximidad es el cambio en la respuesta de
frecuencia que se produce por el cambio en la posición de un micro en relación a la
fuente de sonido. Cualquier micro produce su mejor respuesta de frecuencia cuando
es apuntado directamente a la fuente de sonido (sobre el eje). Dependiendo de su
patrón de captura, la respuesta de frecuencias graves aumentará, a veces en gran
medida, cuando lo coloque a menos de 12 pulgadas (30 cm) de la fuente de sonido
(fuera del eje). El conocer y comprender cómo usar este efecto de proximidad en su
propio beneficio le ayudará a la hora de conseguir el sonido que esté buscando. En
las secciones siguientes le detallamos los tres patrones de captura disponibles.
37
Page 40

Manejo del C03U
3
Supercardioide
Mientras que los micros omni y bidireccionales son muy útiles para una amplia
gama de aplicaciones concretas, la mayor parte de las situaciones de microfonía
en estudios y directo requieren micros cardioides o unidireccionales. Uno de los
patrones de captura del C03U es supercardioide, lo que le ofrece incluso un rechazo
a los lados aun mayor. La naturaleza unidireccional ofrece la mejor separación de
instrumentos en el estudio y un mayor control de la
realimentación en refuerzo de sonido directo. Para
elegir este patrón de captura, coloque el interruptor
de selección de patrón en la posición central,
indicada por el icono de "corazón". Cuando lo haya
colocado correctamente, este patrón le permitirá
captar el máximo del sonido que quiera y el mínimo
de los que no quiera.
4
Omni
Los micros omni, u omnidireccionales, captan el sonido de todas las direcciones.
Para elegir este patrón de captura, coloque el interruptor de patrón del C03U en la
posición de la derecha, icono “O”. Puede usar este atrón si quiere capturar el snoido
de ambiente y la reverb natural de una sala en la que esté grabando una voz o
instrumento. Este modo también resulta perfecto
para la grabación de actuaciones de grupos de
voces, metales, vientos y otros instrumentos en
los que los músicos están en círculo alrededor del
micro. Como ventaja añadida, este patrón omni es
el menos susceptible al efecto de proximidad, lo
que puede ser muy útil a la hora de grabar músicos con tendencia a moverse con su
instrumento mientras actúan. En estos casos, el uso de un patrón cardioide podría
dar una respuesta de frecuencia muy variable en cuanto se moviese solo un poco, lo
que produciría pistas grabadas con una fuerte variación en los graves. El uso de este
tipo de patrón de captura puede ayudarle a controlar esas situaciones de microfonía
complicadas, permitiéndole captar la mejor ejecución sin limitar el talento del músico
obligándole a quedarse fijo en una única posición sin moverse.
5
En forma de 8
Los micros con patrón bidireccional o con forma de
8 captan el sonido procedente directamente tanto
de delante como de detrás del micro, rechazando
ESPAÑOL
el de los laterales. Para elegir este patrón, coloque
el selector de patrón del C03U en la posición de
la izquierda, icono “8”. En este modo es como si
tuviese dos micros uno de espaldas al otro, lo que puede resultar ideal para captar
la actuación de dos artistas que canten un dueto o para una pista de voz del coro.
El hacer que los dos cantantes queden cara a cara le ayudará a captar emociones
que sería imposible si usase dos micros. También puede crear algunos efectos de
eco slapback interesantes, colocando el C03U con este patrón entre un instrumento
grabado y una pared del estudio. La cápsula trasera captará la reflexión del sonido
en la pared, y modificando la distancia del micro a la pared podrá incluso llegar a
cambiar el tiempo de retardo del eco.
38
3
4
5
Page 41

Manejo del C03U
Colocación del micrófono
De cara a maximizar la calidad del sonido debe poner una especial atención en la
ubicación de su C03U y en su colocación con respecto al instrumento o cantante que
quiera captar. Todos los micrófonos, especialmente los unidireccionales o cardioides,
sufren un fenómeno conocido como "efecto de proximidad" que, de forma resumida,
se puede definir como el cambio en la respuesta de frecuencia de un micro en
base a la posición de la cápsula del mismo en relación a la fuente de sonido. En
especial, cuando coloque un micro cardioide apuntando directamente a la fuente de
sonido (en el eje) obtendrá la mejor respuesta de frecuencia, mientras que si separa
ligeramente el micro hacia otro lado (fuera del eje) observará que la respuesta en
graves comienza a caer y que el sonido empieza a ser más fino y dulce.
Para la mayoría de las aplicaciones vocales querrá colocar el micro directamente
delante del cantante. Esto mismo se cumplirá para la microfonía de instrumentos, si
bien, puede producir algunos ajustes de ecualización interesantes modificando el
ángulo de la cápsula con respecto a la fuente de sonido. Esto puede ser una técnica
de captura muy útil para optimizar el sonido de un kit de batería, guitarra acústica,
piano u otro instrumento en una sala o escenario. La experimentación es la mejor
escuela para conseguir un buen sonido, así que ¡pruebe!
Ajuste del nivel de señal
Puede ajustar la fase de ganancia de entrada analógica con control digital del C03U
usando el programa Softpre applet, o también puede controlar la ganancia de
entrada usando el control de software del sistema operativo de su ordenador y/o
DAW. Sea cual sea la forma que elija, el propósito de este retoque es optimizar la
cantidad de señal útil en relación al ruido asociado. Un buen previo de micro, como
el panel de control de software C03U, también deberá tener indicadores LEVEL o
CLIP. Para ajustar un buen nivel en el micro, coloque el C03U delante de la fuente
de sonido elegida y suba lentamente el control de retoque (trim) de entrada hasta
que observe que el indicador CLIP o Peak se ilumina. Después, baje ligeramente ese
control hasta que el indicador ya no se encienda. Para más información acerca del
ajuste de la ganancia de entrada con el programa Softpre applet, vea la sección "INPUT
GAIN - Fader" en la página 7 de este manual.
Petardeos o "P-Popping"
El "P-Popping" es ese molesto petardeo que aparece cuando el diafragma del micro
recibe el golpe de aire de un cantante que pronuncia palabras que incluyen la "P".
Existen algunas formas de solucionar este problema, incluyendo el uso de un filtro
externo. Algunos técnicos famosos usan una media puesta en un colgador, con unos
resultados bastante buenos. También puede probar a colocar el micro ligeramente
fuera del eje (algo angulado) con respecto al cantante. Esto hay veces que puede
llegar a solucionar el problema sin que tenga que usar un filtro. No obstante, para
una solución más fiable, pruebe un filtro exterior como el Samson PS-01.
ESPAÑOL
Montaje del C03U sobre un soporte
Puede montar el C03U en un soporte de micro standard por medio de la pinza de
micro incluida. Si está usando un soporte de micro americano con rosca de 5/8”,
deberá quitar primero el adaptador para soportes europeos (desenrroscándolo).
Simplemente enrrosque el adaptador en el soporte de micro o jirafa que vaya a usar.
Después, afloje el tornillo de giro y ajuste el micrófono al ángulo al que quiera usarlo.
Una vez elegido el ángulo, fije el tornillo para asegurar la posición.
39
Page 42

PROTECTOR
ANTIGOLPES
SP01
ANILLO DE
TUERCA
TORNILLO
DE GIRO
ANILLO DE
TUERCA
Uso de la protección opcional SP01
Uso de la protección opcional "en araña" SP01
Para un mayor aislamiento, puede colocar el
C03U en la protección opcional "en araña"
SP01. Realice los pasos siguientes para
instalar el SP01.
• Primero, atornille la protección SP01
en el soporte de micro o jirafa. Si está
usando un soporte o jirafa US de 5/8”,
retire el adaptador Euro.
• Quite la pinza de sujeción del C03U
girando hacia la izquierda el anillo de
tuerca, tal como le mostramos en la
figura 1.
• Coloque el C03U dentro del SP01
insertando el micrófono en el centro de
la red y fijándolo en la placa de montaje
inferior.
• Fije el SP01 volviendo a instalar el anillo
de tuerca y girándolo hacia la derecha
hasta asegurarlo. (figura 2)
• Ahora, afloje el tornillo de fijación
para ajustar el ángulo del micrófono y
coloque el C03U en su ubicación final.
Una vez fijado, asegure de nuevo el
tornillo para fijar el micro en su posición.
1
2
Nota: No apriete demasiado el anillo de
tuerca para que no se pase de rosca.
ESPAÑOL
40
Page 43

Introduzione
D"D"
Ci congratuliamo con voi per l'acquisto del condensatore da studio C03U Samson. Il
C03U dispone di una ampia capsula a diaframma ultra sottile da 19mm con a bordo
un convertitore Analogico - Digitale di qualità elevata ed uscita USB. Il C03U è perfetto per la registrazione della vostra musica o di qualsiasi sorgente audio acustica
sulla vostra DAW (Digital Audio Workstation) preferita. Vi basta collegare il cavo USB in
dotazione, lanciare la DAW ed iniziare a registrare. Per espandere le capacità di controllo, installate il driver software del C03U Samson e disporrete di funzioni addizionali
come il Guadagno (Gain) programmabile, il Filtro Passa-Alto, la Misura di Ingresso ed
il Commutatore di Fase. Il C03U riproduce fedelmente svariate sorgenti sonore tra cui
voci, strumenti acustici e piatti in ambiente, per citarne alcune. La risposta veloce ai
transienti ed estesa in frequenza assicura una riproduzione accurata con caratteristiche
lineari dai bassi agli acuti.
In queste pagine troverete una descrizione dettagliata delle caratteristiche del Microfono a Condensatore da Studio C03U, istruzioni passo a passo per la sua configurazioni
di collegamento e d'uso e le specifiche complete. Troverete anche inclusa la garanzia
che vi preghiamo di compilare e inviare per posta, per permettervi di ricevere supporto
tecnico in linea e informazioni aggiornate su questo e su altri futuri prodotti Samson.
Se lo trattate con cura permettendo una corretta circolazione dell'aria, il vostro C03U
sarà in grado di funzionare senza problemi per molti anni. Vi raccomandiamo di registrarne il numero di serie nell'apposito spazio che segue, a memoria futura.
Numero di Serie: __________________________
Data d'acquisto: __________________________
Dovesse mai accadere che il vostro microfono necessiti di assistenza, contattate il distributore Samson Italiano m. casale bauer via mail all'indirizzo info@casalebauer.com
oppure telefonicamente allo 051 - 766.648. Vi preghiamo di conservare i materiali di
imballo originali e di usarli in caso di spedizione.
C03U - Caratteristiche
• Condensatore da Studio a Diaframma Ampio da 19mm
con Uscita Digitale USB.
• Compatibile con qualsiasi Workstation Audio Digitale
basata su computer.
• Risposta polare commutabile Ipercardioide, Omni e
Bi-direzionale.
• La riproduzione sonora estremamente dettagliata lo
rende ideale per la registrazione di voci, strumenti acustici e praticamente di qualsiasi altra sorgente sonora.
• Convertitore AD di qualità elevata a 16 Bit, con frequen-
• I Software di controllo per MAC e PC forniscono funzioni
• Doppia Capsula da 19mm con Diaframma da 3-micron.
• Solida realizzazione in pressofusione.
• Snodo per il montaggio su Asta e cavo USB da 3 metri
za di campionamento a 48K.
addizionali come Guadagno Programmabile, Misura di
Ingresso a LED, Filtro Passa-alto e Commutatore di Fase.
in dotazione.
41
ITALIANO
Page 44

L'Installazione del C03U
L'installazione del C03U è una procedura semplice che richiede solo pochi minuti. Dato
che il C03U rispetta le specifiche USB, potete usare sia un MAC che un PC e collegare il
cavo USB in dotazione: si tratta di una operazione “plug and play” (collegalo e usalo).
Potrete controllare il vostro C03U dall'interfaccia audio standard dei sistemi operativi
MAC OS e Windows. Troverete istruzioni dettagliate sulla configurazione con MAC OS e
Windows nei successivi capitoli di questo manuale.
Per estendere le capacità di controllo potete installare il software applet Softpre
Samson che fornisce Guadagno programmabile e la Misura digitale dell'Ingresso, per
permettervi di regolare al livello corretto il preamplificatore microfonico interno a controllo digitale. Potete anche usare il Filtro Passa-alto per eliminare dal segnale rumori
indesiderati di bassa frequenza. È perfino disponibile un Commutatore di Fase con cui
invertire la polarità del segnale quando si usano più microfoni.
Dato che è possibile regolare il livello del segnale sia dalle preferenze di sistema del
sistema operativo che dal software di registrazione, è una buona idea prendere confidenza con i rispettivi controlli dei sistemi operativi MAC o Windows. Per questo, prima
di installare il software di controllo del C03U, vi raccomandiamo di seguire le apposite
istruzioni su Come Iniziare con Windows XP (e 98) o su Come Iniziare con MAC OS X.
NOTA IMPORTANTE: l'applet Softpre non è compatibile con tutti i software di registra-
zione per computer, per cui vi raccomandiamo prima di tutto di installare il microfono sul
vostro computer senza il Softpre. Effettuata l'installazione, vi preghiamo poi di controllare
sul nostro sito web l'elenco dei programmi in grado di operare con l'applet Softpre.
ITALIANO
42
Page 45

SAMSON C03U
Come Iniziare con MAC OS X
L'esempio che segue spiega la regolazione
del C03U in MAC OS X .
1. Collegate il microfono. Vedrete il suo
LED illuminarsi, ad indicare che riceve
l'alimentazione USB. Il MAC riconoscerà l'apparecchio audio USB ed installerà
automaticamente il software di controllo
(“driver”) universale.
2. Per scegliere il C03U come ingresso audio
del computer, aprite le Preferenze di Sistema dal dock o dal Menu Apple principale (figura 1).
3. Aprite le preferenze del Suono (figura 2).
4. Cliccate sulla etichetta “Ingresso” e scegliete il C03U (figura 3).
Figura 1
Figura 2
ITALIANO
Figura 3
43
Page 46

Come Iniziare con Windows XP
SAMSON C03U
L'esempio che segue spiega la regolazione
del C03U in Windows XP con Service Pack 2.
Altre versioni possono presentare leggere
variazioni.
1. Collegate il microfono. Vedrete il suo LED
illuminarsi, ad indicare che riceve l'alimentazione USB. Windows riconoscerà
la periferica audio USB ed installerà automaticamente il software di controllo
(“driver”) universale (figura 1; notate che,
la prossima volta che collegherete il microfono, il “fumetto” non comparirà più,
dato che il driver sarà stato installato).
Il C03U a questo punto viene riconosciuto
come periferica audio Windows con il nome
di Samson C03U. Ad ogni C03U addizionale verrà aggiunto un numero, a partire da
Samson C03U (2). Per sceglierlo come periferica predefinita e poter cambiare il guadagno controllato dal computer, andate nel
pannello di controllo.
2. Dal pannello di controllo scegliete “Suoni, voce e periferiche audio” (figura 2).
Figura 1
Figura 2
3. A partire dall'etichetta Audio, scegliete
Samson C03U come periferica predefinita per la registrazione suoni. La periferica
predefinita viene usata nei programmi
elementari come quelli per la teleconferenza o la Registrazione dei Suoni. Nella
maggior parte dei programmi audio professionali, potete scegliere quale periferica (anche più di una) usare all'interno del
programma stesso. Per regolare il guadagno controllato dal computer, cliccate sul
tasto del Volume (figura 3).
4. La finestra di Wave In regola il guadagno
controllato dal computer oppure disattiva il microfono. Il guadagno può variare
ITALIANO
da –62 dB a +48 dB (figura 4).
44
Figura 3
Figura 4
Page 47

L'Uso del Software Applet Softpre
Come Installare il Software Softpre
Il C03U è subito in grado di lavorare con la maggior
parte del software audio, basta semplicemente collegarlo al computer tramite il cavo USB in dotazione. Però,
per poter trarre vantaggio dalle sue funzioni avanzate, è
necessario installare il software C03U Samson. Ottenere
il software è facile. Per scaricarlo vi basta digitare
samsontech.com nel vostro programma di navigazione
internet preferito, cercare il collegamento al driver del
C03U e seguire le istruzioni sullo schermo. Dopo averlo
scaricato, lanciate il programma di installazione e potrete
usare subito il software C03U Samson.
Installato il software C03U, potrete usare il vostro C03U
tramite le semplici istruzioni che trovate nei paragrafi che
seguono di questo manuale.
Come Ottenere un Buon Livello
Uno dei fondamenti più importanti dell'ingegneria del
suono è la corretta regolazione dei livelli. Anche in un
tipico mixer di dimensioni contenute, o in un registratore
multitraccia elementare, ci sono diversi controlli che
intervengono sul livello del segnale nel suo percorso
dalla sorgente sonora alle casse acustiche; in ultimo,
va regolato poi il livello della cuffia o del sistema di
monitorizzazione. Tra i controlli ci sono il guadagno del
preamplificatore, l'EQ, le mandate ed i ritorni ausiliari, i
livelli dei fader di canale, di bus e di gruppo e, infine, il volume generale. Per non parlare
del volume del treno delle 5 e 15 la cui tromba che tuona al passaggio a livello a 8 km di
distanza può essere ripresa dalla registrazione che state tentando di fare con una chitarra
con le corde in nylon, a dispetto del doppio strato di coperte che avete messo sulla finestra del vostro studio personale. Ma questa è un'altra storia che coinvolge un altro gruppo di discipline. Come punto di partenza, tenete a mente che ogni volta che modificate
un qualsiasi controllo nel percorso audio, probabilmente state modificando un guadagno
da qualche altra parte. Per cui, fate in modo di controllare con attenzione le misure dei
livelli in ingresso ed in uscita, per evitare di mandare in distorsione il segnale con picchi
troppo elevati. Ricordate inoltre che le vostre orecchie sono l'apparecchio di misura più
sofisticato e meglio calibrato di cui disponete. Perciò, la regolazione ottimale del livello va
prima affrontata dal punto di vista tecnico e poi confermata dal punto di vista creativo.
GUADAGNO IN INGRESSO – Il Fader
Il C03U dispone a bordo di uno stadio analogico di GUADAGNO IN INGRESSO controllato
digitalmente dal Fader del suo software. Il fader di controllo fornisce un intervallo di
guadagno da -62 a +48 dB. Tramite l'uso del fader di GUADAGNO IN INGRESSO, il C03U è
in grado di accettare praticamente qualsiasi livello di sorgente sonora. Potete usarlo per
regolare il livello del segnale in ingresso. È una buona idea iniziare con un livello contenuto, da alzare poi a seconda delle necessità. Controllate il VU METER dell'ingresso digitale e
cercate di regolare il controllo di GUADAGNO IN INGRESSO in modo che la misura letta sia
appena sotto l'indicatore di DISTORSIONE (CLIP). Se l'indicatore di CLIP si accende, siete
in “Sovraccarico” ed il suono potrebbe essere distorto. Se questo accade, semplicemente
abbassate il fader del GUADAGNO IN INGRESSO. L'indicatore di CLIP rimarrà acceso fino a
quando non lo spegnerete cliccando sull'icona CLIP.
45
ITALIANO
Page 48

L'Uso del Software Applet Softpre
VU METER DIGITALE - Il Livello in Ingresso
Per monitorare il segnale inviato dal C03U è presente
un VU METER digitale con una scala che va da meno
infinito al Massimo Livello Digitale, ovvero al CLIP.
Sul livello riportato in misura interviene il Fader di
Guadagno in Ingresso, per cui fate in modo di averlo
regolato correttamente rispetto alla sorgente sonora. Il VU METER digitale dispone di lettura balistica,
il che significa che reagisce in base al livello medio
del segnale. Usate il VU METER per controllare il
livello in ingresso che regolate tramite il controllo di
GUADAGNO. Cercate di regolare il livello in modo
che la misura letta sia appena sotto il CLIP, senza mai
raggiungerlo. Se l'indicatore di CLIP si accende siete
in “Sovraccarico” ed il suono può andare in distorsione. Se questo accade, semplicemente abbassate il
Fader di GUADAGNO IN INGRESSO. L'indicatore di
CLIP rimarrà acceso fino a quando non lo spegnerete
cliccando sull'icona di CLIP.
L'Uso del Filtro Passa-alto (Low Cut)
Come qualsiasi buon preampli microfonico, il software del C03U dispone di un filtro Passa-alto che
permette di attenuare il segmento inferiore della
risposta in frequenza, per eliminare quelle basse frequenze che a volte non volete riprendere. Per esempio, se riprendete un charleston,
volete catturare esclusivamente le frequenze prodotte dai suoi piatti. In questo caso,
usando il filtro Passa-alto, potete ridurre la quantità di suono dai tom e dalla cassa
ripreso dal microfono dell'hi-hat. Potete usare questa stessa tecnica su altri strumenti
come la chitarra acustica, il violino, il pianoforte e perfino sulle voci. Nelle applicazioni
dal vivo, il filtro Passa-alto è particolarmente utile per eliminare il rumore del palco. Il
software Softpre dispone di un filtro Passa-alto regolabile che vi permette di scegliere
la frequenza esatta a partire dalla quale le basse frequenze vengono attenuate.
FASE – Commutatore
Per un gran numero di applicazioni di ripresa microfonica e di missaggio, può essere
necessaria l'inversione della fase del segnale in sorgente ripreso dal C03U e dal software Softpre. Quando il commutatore di FASE è attivato, se ne illumina il LED giallo, ad
indicare che il segnale è “fuori fase”.
L'Alimentazione del C03U
Il C03U è un microfono a condensatore e come tutti i microfoni a condensatore dispone
al suo interno di una elettronica che richiede una alimentazione attiva. I condensatori
ITALIANO
da studio tradizionali sono quasi sempre alimentati da una Alimentazione Fantasma
che di solito viene fornita dal mixer. Il C03U riceve la sua alimentazione dal bus USB.
Basta semplicemente collegarlo alla porta USB del computer ed il microfono è pronto
per funzionare. Il C03U dispone di un LED di alimentazione che si illumina quando è
presente l'alimentazione USB.
46
Page 49

L'Uso del C03U
1
L'Uso dell'Interruttore PAD
Il C03U dispone di un interruttore PAD che permette di abbassarne la sensibilità in ingresso. Quando
l'interruttore PAD è regolato nella posizione a 0dB,
il circuito di attenuazione è escluso e non c'è nessun
intervento sul segnale. Quando l'interruttore PAD
è regolato nella posizione a -10dB la sensibilità in
ingresso del microfono viene abbassata di 10 dB.
Il PAD va usato per la ripresa di sorgenti sonore
ad alto volume con elevato SPL (Sound Pressure
Level).
2
L'Uso del Filtro Passa-Alto
Il C03U dispone di un filtro passa-alto, ovvero
taglia-basso, selezionabile che permette di eliminare dalla ripresa segnali indesiderati in bassa frequenza. Quando il Filtro Passa-alto è in posizione
lineare (“flat” - indicata dalla linea diritta), non viene
effettuato nessun intervento sul segnale. Quando il
Passa-alto è in posizione di taglio (“roll-off” - indicata dalla linea angolata), viene applicato al segnale
un filtro di esclusione dei bassi di 12dB per ottava
a 100 Hz. È un filtro che può essere estremamente utile per eliminare rumori in bassa
frequenza dalla struttura del palco, rumore di vento nell'uso all'aperto e per filtrare
le basse dalla batteria quando il microfono viene usato per la ripresa in ambiente dei
piatti della batteria.
2
1
La Risposta Polare
La caratteristica più importante di qualsiasi microfono è la direzionalità, ovvero la
“risposta polare”. La versatile realizzazione a doppia capsula del C03U gli permette tre
diverse risposte polari: Cardioide, Omni e A Figura di 8. Scegliere la risposta polare del
C03U è facile, basta usare l'interruttore di selezione della risposta polare che si trova sul
retro del microfono. Nello scegliere la risposta polare, siate consapevoli del fenomeno
conosciuto come “effetto di prossimità”.
In parole semplici, l'effetto di prossimità è il cambiamento di risposta in frequenza che
risulta dal microfono in base alla posizione della capsula rispetto alla sorgente sonora.
Qualunque microfono esibisce la miglior risposta in frequenza quando lo si punta direttamente verso la sorgente sonora (in asse). A seconda della risposta polare, la risposta
alle basse frequenze può aumentare, a volte anche notevolmente, quando si posiziona
il microfono a meno di 30 cm. dalla sorgente sonora (fuori asse). Comprendere l'effetto
di prossimità e saperlo sfruttare può essere di notevole aiuto quando si vuole ottenere
un determinato risultato sonoro. I paragrafi che seguono spiegano in dettagli i tre tipi
di risposta polare disponibili.
47
ITALIANO
Page 50

L'Uso del C03U
3
Super Cardioide
Mentre i microfoni Omni e Bi-direzionali sono molto utili per un gran numero di differenti applicazioni, per la maggior parte delle situazioni di ripresa in registrazione e dal
vivo sono necessari microfoni Uni-direzionali o Cardioidi. La risposta polare del C03U
è Super Cardioide, ovvero Uni-direzionale, e questo permette una maggiore reiezione
dai lati del microfono. La natura Uni-direzionale di questi microfoni permette una
miglior separazione tra gli strumenti in studio ed
un maggiore controllo rispetto al feedback nella
ripresa dal vivo. Per scegliere la risposta polare
Super Cardioide regolate l'interruttore di selezione della risposta del C03U nella posizione Super
Cardioide centrale indicata dall'icona a forma di
“cuore”. Quando li si posizionano correttamente, i microfoni con risposta polare Super
Cardioide permettono di riprendere una maggior quantità di suono dalla sorgente che
si vuole riprendere ed una minor quantità di suono indesiderato.
4
Omni
I microfoni Omni, ovvero omnidirezionali, riprendono il suono da tutte le direzioni.
Per scegliere la risposta polare Omni regolate l'interruttore di selezione della risposta
del C03U nella posizione “O” a destra. Potete usare la risposta Omni per catturare il
suono dell'ambiente ed il reverbero naturale della
stanza dove registrate una voce o uno strumento.
Il modo Omni è inoltre perfetto per la registrazione
di esecuzioni in gruppo di voci, fiati, legni ed altri
strumenti, con gli artisti che si fronteggiano l'un l'altro in cerchio intorno al microfono. Come ulteriore
vantaggio, la risposta Omni è meno suscettibile all'effetto di prossimità e questo può
essere estremamente utile quando si registrano artisti che durante l'esecuzione hanno
la tendenza a muovere il proprio strumento, voce compresa, intorno al microfono. In
queste situazioni, l'uso di una risposta Cardioide può dare per risultato tremende variazioni della risposta in frequenza nella registrazione, a causa di movimenti anche solo
di pochi centimetri, con i bassi che aumentano e diminuiscono di volume. L'uso della
risposta Omni può permettere di controllare più facilmente questo tipo di situazioni
complicate di ripresa, consentendovi di catturare le esecuzioni migliori senza inibire il
talento degli artisti costringendoli a rimanere in una posizione fissa.
3
4
5
A Figura di 8
I microfoni a Figura di 8, ovvero Bi-direzionali,
riprendono il suono direttamente di fronte e dietro ed ignorano il suono dai lati. Per scegliere la
risposta polare a Figura di 8 regolate l'interruttore
di selezione della risposta del C03U nella posizione
“8” a sinistra. In questo modo è come se si disponesse di due microfoni identici che
si fronteggiano uno di schiena all'altro. Questa può essere una regolazione ideale
ITALIANO
per catturare due artisti che cantano in duetto o per stendere tracce di coro. Avere i
due artisti uno di fronte all'altro durante l'esecuzione può essere di aiuto nel catturare
emozioni che altrimenti potrebbero andar perdute con l'uso di due microfoni. Potete
anche creare alcuni interessanti effetti di eco ribattuto regolando il C03U sulla risposta
a Figura di 8 e posizionandolo tra lo strumento da registrare ed un particolare muro
dello studio. Il retro della capsula riprenderà il suono riflesso dal muro e di fatto potrete
modificare il tempo di ritardo dell'eco variando la distanza del microfono dal muro.
48
5
Page 51

L'Uso del C03U
Il Posizionamento del Microfono
Per ottenere la massima qualità sonora dovete riporre la massima attenzione nel posizionamento del C03U rispetto allo strumento o alla voce da riprendere. Tutti i microfoni,
specialmente i microfoni unidirezionali o cardioidi, esibiscono un fenomeno conosciuto
come “effetto di prossimità”. In parole semplici, l'effetto di prossimità è il cambiamento di
risposta in frequenza che risulta dal microfono in base alla posizione della capsula rispetto
alla sorgente sonora. In specifico, quando si punta un microfono cardioide direttamente
verso la sorgente sonora (in asse) si ottiene la miglior risposta in frequenza, ma se si comincia a spostarlo in una direzione leggermente diversa (fuori asse) si nota che diminuisce la
risposta alle frequenze basse e che il suono del microfono comincia ad essere più “sottile”.
Per la maggior parte delle riprese vocali vi sarà preferibile posizionare il microfono direttamente di fronte all'artista. Lo stesso vale per la ripresa degli strumenti, anche se potete
ottenere regolazioni dell'equalizzazione piuttosto sorprendenti variando leggermente
l'angolazione della capsula rispetto alla sorgente sonora. Questa può essere una tecnica
davvero utile per catturare il suono ottimale di un set di batteria, di una chitarra acustica,
di un pianoforte o di altri strumenti in un ambiente dal vivo o su un palco. Le sperimentazioni e l'esperienza sono i migliori maestri nell'arte di ottenere un buon suono, per cui
datevi da fare!
La Regolazione del Livello del Segnale
Potete regolare lo stadio di Guadagno in Ingresso del C03U, uno stadio analogico a controllo digitale, tramite l'uso dell'applet Softpre, oppure potete controllare il guadagno in
ingresso tramite il software di controllo del sistema operativo del vostro computer e/o della
workstation audio digitale. In un modo o nell'altro, lo scopo del trimmer di controllo del
microfono è di ottimizzare la quantità di segnale utile rispetto a qualsiasi rumore associato.
Un buon preampli microfonico, come il pannello di controllo software del C03U, dispone
anche di indicatori di LIVELLO o di CLIP. Per ottenere una buona regolazione di livello per il
microfono, posizionate il C03U di fronte alla sorgente sonora voluta ed alzate lentamente il
trimmer di controllo in ingresso fino a vedere accendersi l'indicatore di Picco o di CLIP. Poi,
abbassate il trimmer di controllo dell'ingresso fino a che l'indicatore non si accende più.
Per ulteriori informazioni sulla regolazione del Guadagno in Ingresso con l'applet software, fate
riferimento al paragrafo “GUADAGNO IN INGRESSO - il Fader“ a pagina 5 di questo manuale.
P-Popping
Il “P-Popping” è quel suono noioso che si ottiene quando il diaframma del microfono
riceve una raffica d'aria dal cantante che pronuncia parole che comprendono la lettera
“P”. Esistono alcuni modi per ovviare a questo problema e tra questi l'uso di filtri anti-pop
esterni. Alcuni famosi ingegneri si sono affidati ad un vecchio calzino in nylon montato su
di una gruccia di fil di ferro ripiegato, un sistema che di fatto funziona molto bene. Potete
provare a posizionare il microfono leggermente fuori asse (di un angolo minimo) rispetto
al cantante. In questo modo spesso si risolve il problema senza l'uso di un filtro anti-pop
esterno. Ad ogni buon conto, se volete una soluzione davvero affidabile, provate un filtro
anti-pop esterno come il PS01 Samson.
Il Montaggio su Asta del C03U
Il C03U può essere montato su di un'asta microfonica standard tramite la clip in dotazione.
Se usate un'asta di tipo americano da 5/8” dovrete togliere, svitandolo, l'adattatore per asta
Europea. Vi basta poi semplicemente avvitare la clip sull'asta, sia che sia diritta o di tipo a
braccio. Allentate poi la vite di regolazione e sistemate il microfono all'angolo desiderato.
Effettuata la regolazione, stringete nuovamente la vite per assicurare il microfono nella
posizione corretta.
49
ITALIANO
Page 52

ANTI-SHOCK
SP01
GHIERA
FILETTATA
VITE DI
REGOLAZIONE
GHIERA
FILETTATA
L'Uso dell'Anti-Shock Opzionale SP01
L'Uso dell'Anti-Shock Opzionale “a Ragnatela” SP01
Per un ulteriore isolamento, il C03U può essere
installato nell'anti-shock opzionale “a ragnatela” SP01. Ecco di seguito le istruzioni per
l'installazione dell'SP01.
• Prima di tutto, avvitate l'anti-shock SP01
su un'asta diritta o a braccio. Se usate
un'asta di tipo americano da 5/8”, togliete
l'adattatore Europeo.
• Togliete dal C03U la clip di installazione
ruotando la ghiera filettata in senso antiorario, come mostrato in figura 1.
• Installate il C03U nell'SP01 posizionandolo nel centro della ragnatela ed allineandolo nella piastra inferiore di montaggio.
• Bloccate l'SP01 montando nuovamente
la ghiera filettata e ruotandola fino in
fondo in senso orario (figura 2).
• A questo punto, allentate la vite di regolazione e regolate l'angolazione del
microfono fino a sistemare il C03U nella
posizione voluta. Fatto questo, stringete
la vite di regolazione per assicurare il
microfono in posizione.
1
2
Nota: fate attenzione a non avvitare
male e a non stringere troppo né la ghiera filettata né la vite di regolazione.
ITALIANO
50
Page 53
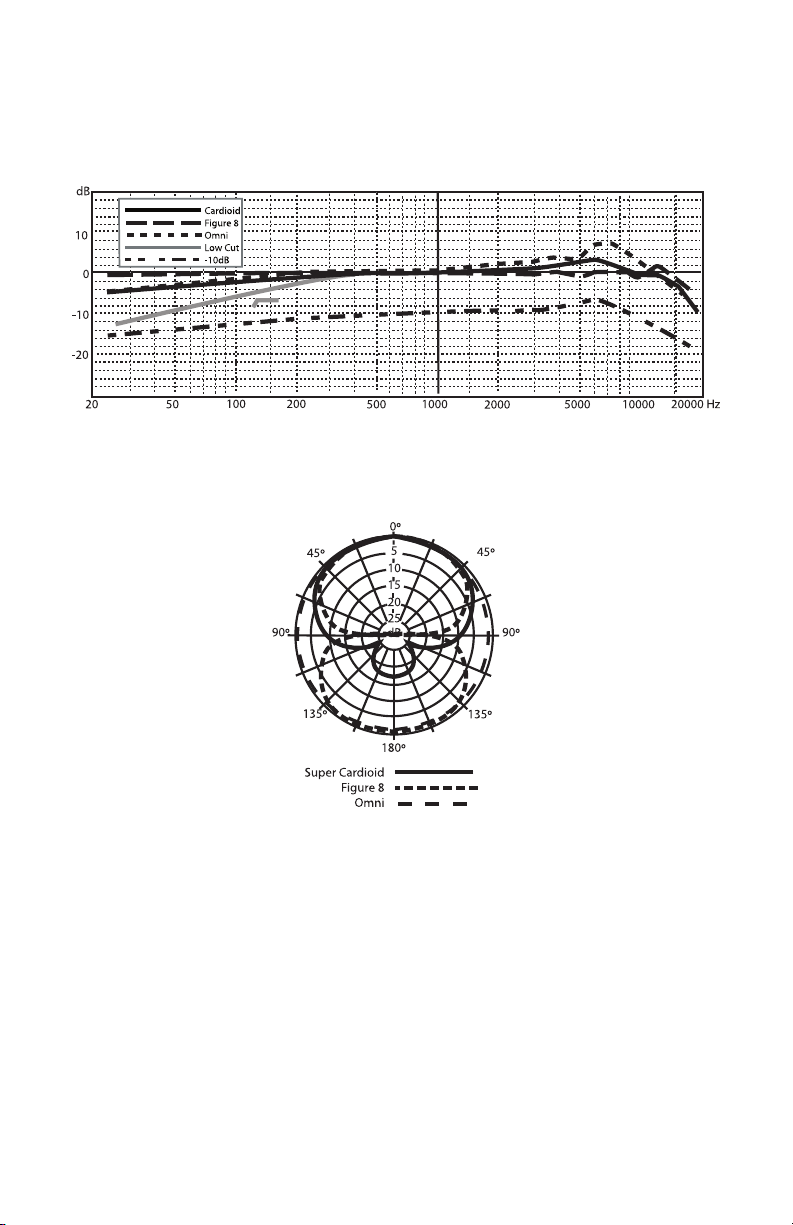
C03U Specifications
51
Page 54

Specifications / Caractéristiques techniques / Technische Daten
C03U Specifications
Frequency Response 20~18000 HZ
Polar pattern Super Cardioid, Omni, Bi-directional
Element type Back condenser type
Diaphragm thickness 3 microns
Sensitivity -33 dB/Pa
SPL 136 dB
Weight 1.06 lbs. (.48 kg)
Dimensions Height: 7" (180 mm)
Width: 2.125" (54 mm)
Depth: 2.125" (54 mm)
Shipping Weight 2.5 lbs.(1.15 Kg)
Specifications subject to change without notice.
C03U - Caractéristiques techniques
Réponse en fréquence 20~18000 Hz
Diagrammes polaires Hyper cardioïde, omni-directionnel,
bi-directionnel
Type d’élément Condensateur arrière
Épaisseur du diaphragme 3 microns
Sensibilité -33 dB/Pa
Niveau SPL 136 dB
Poids 0,48 kg
Dimensions Hauteur : 180 mm
Largeur : 54 mm
Profondeur : 54 mm
Poids à l’expédition 1,15 kg
Ces caractéristiques techniques peuvent être modifiées à tout moment sans préavis.
C03U Technische Daten
Frequenzgang 20~18000 Hz
Richtcharakteristik Superniere, Omni, bidirektional
Element-Typ Back-Kondensatormikrofon
Membrandicke 3 Mikron
Empfindlichkeit -33 dB/Pa
Schalldruckpegel 136 dB
Gewicht 0.48 kg (1.06 lbs.)
Abmessungen Höhe: 180 mm (7")
Breite: 54 mm (2.125")
Tiefe: 54 mm (2.125")
Transportgewicht 1.15 kg (2.5 lbs.)
Technische Daten können unangekündigt geändert werden.
52
Page 55

Especificaciones técnicas /Specifiche
C03U - Specifiche
Risposta in Frequenza da 20 a 18000 HZ
Risposta Polare Super Cardioide, Omni, Bi-direzionale
Tipo di Elemento Condensatore a piastra posteriore
Spessore del Diaframma 3 micron
Sensibilità -33 dB/Pa
SPL 136 dB
Peso 0,48 kg. (1,06 lbs. )
Dimensioni Altezza: 7" (180 mm)
Larghezza: 2,125" (54 mm)
Profondità: 2,125" (54 mm)
Peso con Imballo 1,15 Kg. (2,5 lbs.)
Specifiche soggette a variazione senza preavviso.
Especificaciones técnicas del C03U
Respuesta de frecuencia 20~18000 Hz
Patrón polar Supercardioide, Omni, Bidireccional
Tipo de elemento Condensador trasero
Grosor del diafragma 3 micras
Sensibilidad -33 dB/Pa
SPL 136 dB
Peso neto (1.06 libras) 0.48 kg
Dimensiones Altura: (7") 180 mm
Anchura: (2.125") 54 mm
Profundidad: (2.125") 54 mm
Peso con embalaje (2.5 libras) 1.15 Kg
Estas especificaciones están sujetas a cambios sin previo aviso.
53
Page 56

Samson Technologies Corp.
45 Gilpin Avenue
Hauppauge, New York 11788-8816
Phone: 1-800-3-SAMSON (1-800-372-6766)
Fax: 631-784-2201
www.samsontech.com
 Loading...