

Page 1
INSTRUCCIONES - USERS MANUAL - GEBRAUCHSANWEISUNG MODE D’EMPLOI - INSTRUZIONI PER L’USO - MANUAL DE INSTRUÇÕES
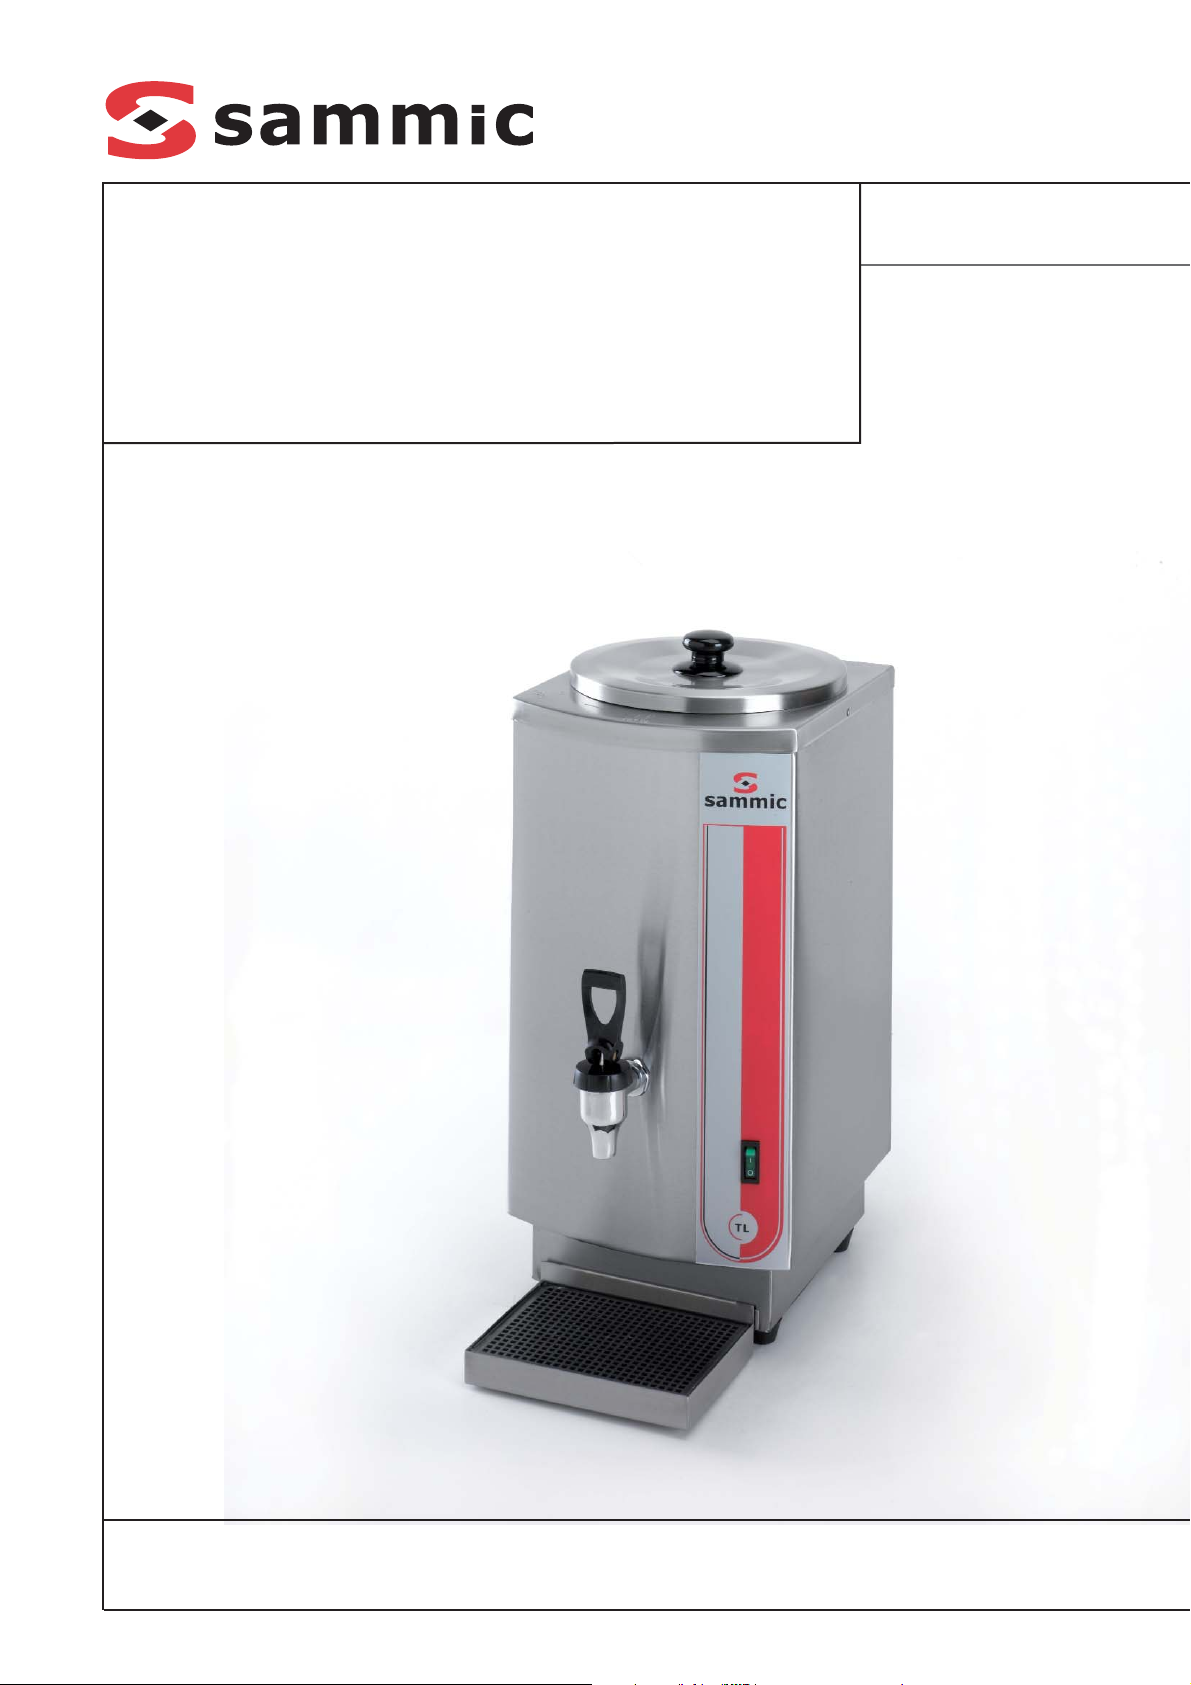
TL-6 / TL-11
Calentadores de leche
Milk heaters
Milcherhitzer
Laitières
Riscaldalatte
Aquecedores de leite
Page 2
2
ESPAÑOL
GUÍA DE FUNCIONAMIENTO
1. Coloque el cierre de forma que el panel
muestre “open” (abierto) y retire el depósito de leche. Limpie los depósitos de
agua y de leche usando el dispositivo de
limpieza.
2. Llene con agua el depósito de agua.
3. Vuelva a colocar el depósito de leche en
el depósito interno de agua, y gírelo
hasta que se muestre “close” (cerrado)
en el panel.
Durante estas operaciones, en el depósito de leche entrará un poco de agua del
depósito interno de agua. Retire todo
este agua usando el grifo de leche antes
de llenar el depósito de leche con leche.
Gracias a que el depósito de leche dispone de una junta tórica alrededor del
conector para prevenir fugas, en el depósito de leche no entrará más agua procedente del depósito interno de agua una
vez retirada este agua.
Coloque el depósito de leche en su sitio
y bloquéelo rápidamente para evitar que
entre más agua en el depósito.
4. Llene el depósito de leche con leche y
coloque la tapa.
5. Encienda la máquina. Coloque el interruptor en "1". El indicador se iluminará
y la máquina comenzará a funcionar.
Cuando la temperatura alcance 60-65ºC,
la alimentación se desactivará automáticamente. Si la temperatura desciende
hasta 50-55ºC, la alimentación se activará automáticamente. La máquina está
controlada por un termostato para mantener la leche a una temperatura de
entre 55 y 65ºC.
6. Coloque la taza sobre la bandeja de
recogida y extraiga la leche por medio
de la válvula de leche.
7. Asegúrese de que el interruptor esté
colocado en “0” y desconecte la máquina
si no la va a utilizar durante un largo
periodo de tiempo.
ADVERTENCIAS
1. Consulte estas instrucciones antes de
usar la máquina. Esta máquina debe
conectarse a una fuente de alimentación
adecuada y debe estar conectada a tierra.
2. Coloque la máquina sobre una superficie
plana y estable en una zona bien ventilada. Evite colocar la máquina cerca de
productos inflamables y explosivos.
3. Precaución: el depósito interno debe llenarse con agua antes de poner en marcha la máquina. El nivel de agua debe
estar 5 cm por encima del calentador. Si
la máquina se utiliza durante un periodo
de tiempo prolongado, deberá añadirse
agua.
4. El depósito de leche debe colocarse y
bloquearse conforme a los símbolos
mostrados en el panel. En caso contrario, el depósito no quedará bien ajustado y entrará agua en el depósito de
leche.
5. Asegúrese de que se ha retirado toda la
leche del depósito antes de limpiar y
mover el depósito. En caso contrario, la
leche residual entrará en el depósito de
agua durante la retirada del depósito de
leche.
6. Para proteger la unidad y evitar lesiones,
asegúrese de no mojar en exceso el
depósito durante su limpieza. Puede limpiarlo con un paño de algodón humedecido en agua con detergente, y secarlo
con un paño limpio.
7. Para evitar lesiones, el cable de alimentación dañado debe ser sustituido por el
fabricante o por un técnico de mantenimiento autorizado.
8. Son pocos los accesorios que pueden
ser directamente sustituidos por el usuario. Si hay algún problema con ellos,
póngase en contacto con el fabricante
y/o con un técnico de mantenimiento
autorizado.
9. Este aparato ha sido diseñado para uso
comercial y debe ser utilizado únicamente en interiores.
10. El aparato es termopositivo durante el
funcionamiento, especialmente la carcasa metálica. Mantenga alejados del
aparato a los niños y ancianos y tenga
cuidado de no tocar la carcasa cuando
el aparato esté en funcionamiento.
11. Coloque el interruptor nuevamente en
“0”, corte el suministro eléctrico, asegúrese de que no queda leche y limpie
el depósito y la bandeja de descongelación. Realice estas operaciones después de cada uso de la máquina.
CAPACIDAD (litros)
ALIMENTACIÓN
POTENCIA
DIMENSIONES
- Ancho
- Fondo
- Alto
PESO NETO
5
1000 W
350 mm
240 mm
510 mm
8.5 Kg
TL-6
CARACTERÍSTICAS
10
2400 W
310 mm
340 mm
510 mm
12 Kg
TL-11
230 V / 50Hz / 1~
Page 3
OPERATION GUIDE
1. Turn-on the lock catch to “open” shown
on the panel, and remove the milk tank.
Clean the milk and water tanks before
using the appliance.
2. Fill the water tank with water.
3. Put the milk tank back into the internal
water tank, and turn it to “close” shown
on the panel.
During these operations, a little water in
the internal water tank will leak into the
milk tank. Let all this water out using the
milk tap before filling the milk tank with
milk. Since there is an “O”-ring around
the connector of the milk tank for preventing leakage, no more water will flow
into the milk tank from the internal
water tank after this water is out.
Put the milk tank back and lock it
quickly in order not to let more water
leak into the tank.
4. Fill the milk tank with milk and fix the
lid.
5. Turn on the machine. Start the switch on
“1”. The indicator lights up and the
machine starts working. When the temperature reaches 60-65ºC the power
automatically cut off. When the temperature drops to 50-55ºC, the power will
automatically turn on. The machine is
thermostatically controlled to keep the
milk temperature between 55-65ºC.
6. Put the cup on the splash tray and get
the milk using the milk valve.
7. Make sure the switch is at “0” and
unplug the machine if it will not be used
for a long time.
WARNINGS
1. Refer to these instructions before using
this machine. This machine must be connected with the suitable power supply
and the earth wire.
2. Place the machine on a flat, stable surface in a well ventilated area. Avoid placing
your machine near inflammable products and explosives.
3. Caution: the internal tank must be filled
with water before turning the machine
on. The water level must be 5cm above
the heater. If the machine is used for a
long time, water must be added.
4. The milk tank must be settled and locked as the symbols show on the panel.
Otherwise, the tank will not be well fitted
and the water will leak into the milk
tank.
5. Make sure all the milk in the tank has flowed out before cleaning and moving the
tank. Otherwise, the residual milk will
leak into the water tank as the milk tank
is removed.
6. To protect the unit and prevent injuries,
be careful not to soak the barrel. You
may clean it using a cotton cloth soaked
in detergent and water, and wipe it over
with a clean cloth.
7. To prevent injuries, the damaged power
cord should be replaced by the manufactured or by an authorized service engineer.
8. A few accessories can be replaced
directly by the user. If there is something
wrong with them, please contact the
manufacturer and/or an authorized service engineer.
9. This appliance is designed for commercial use and is for indoor-use only.
10. The appliance will be thermopositive
then working, specially the metal shell.
Keep children and elder back, and be
careful not to touch the shell when working.
11. Set the switch back at “0”, cut the
power off, make sure no more milk
remains, and clean the tank and the
defrosting tray. Do these after using
the machine every time.
3
ENGLISH
CAPACITY (litres)
ELECTRICAL SUPPLY
LOADING
DIMENSIONS
- Width
- Depth
- Height
NET WEIGHT
5
1000 W
350 mm
240 mm
510 mm
8.5 Kg
TL-6
SPECIFICATIONS
10
2400 W
310 mm
340 mm
510 mm
12 Kg
TL-11
230 V / 50Hz / 1~
Page 4

4
DEUTSCH
BETRIEBSANLEITUNG
1. Die Verriegelung auf die Position "open"
(siehe Symbol auf dem Paneel) stellen
und den Milchtank entfernen. Milch- und
Wassertank vor der Verwendung des
Gerätes reinigen.
2. Wassertank mit Wasser füllen.
3. Milchtank wieder in den internen
Wassertank einführen und auf die
Position “close“ (siehe Symbol auf dem
Paneel) stellen.
Bei der Ausführung dieser Schritte tritt
eine kleine Wassermenge aus dem internen Wassertank in den Milchtank. Vor der
Befüllung des Milchtanks mit Milch ist
dieses Wasser vollständig über den
Milchhahn abzulassen. Nach dem
Entfernen des Wassers kann kein weiteres
Wasser aus dem internen Wassertank in
den Milchtank fließen, da ein O-Ring am
Anschluss des Milchtanks die Leckage
verhindert.
Den Milchtank wieder einführen und
schnell verschließen, um zu verhindern,
dass weiteres Wasser in den Tank entweicht.
4. Den Milchtank mit Milch füllen und den
Deckel schließen.
5. Die Maschine einschalten. Den Schalter
auf “1” stellen. Die Betriebsanzeige
leuchtet und die Maschine beginnt den
Betrieb. Sobald die Temperatur 60-65°C
erreicht wird die Stormversorgung automatisch unterbrochen. Sobald die
Temperatur unter 50-55°C fällt schaltet
sich die Stromversorgung automatisch
an. Die Maschine ist thermostatgeregelt,
um die Milch auf einer Temperatur von
55-65°C zu halten.
6. Die Tasse auf die Abtropffläche stellen
und die Milch aus dem Milchventil zufüh-
ren.
7. Wenn die Maschine über einen längeren
Zeitraum nicht benutzt wird, den
Schalter auf “0” stellen und das
Netzanschlusskabel der Maschine entfernen.
SICHERHEITSHINWEISE
1. Vor der Verwendung der Maschine die
vorliegenden Anweisungen beachten.
Diese Maschine muss an eine geeignete
Stromversorgung und ein Erdungskabel
angeschlossen sein.
2. Die Maschine auf einer ebenen, stabilen
Oberfläche in einem gut belüfteten
Bereich aufstellen. Die Maschine nicht in
der Nähe entzündbarer oder explosiver
Produkte aufstellen.
3. Achtung: der interne Tank muss vor dem
Einschalten der Maschine mit Wasser
gefüllt sein. Der Wasserstand muss 5 cm
oberhalb des Erhitzers liegen. Wird die
Maschine über einen langen Zeitraum
benutzt, muss Wasser hinzugefügt werden.
4. Der Milchtank ist entsprechend der auf
dem Paneel angezeigten Symbole einzuführen und zu verriegeln. Andernfalls ist
die Einbaulage des Tanks nicht korrekt,
was dazu führt, dass Wasser in den
Milchtank entweicht.
5. Vor dem Reinigen und Bewegen des
Milchtanks sicherstellen, dass die Milch
vollständig entleert wurde. Andernfalls
fließt die verbleibende Milch beim
Entfernen des Milchtanks in den
Wassertank.
6. Um Schäden an der Einheit und
Verletzungen zu vermeiden, darauf achten, den Milchtank nicht in Flüssigkeit
einzutauchen. Mit einem in
Reinigungsmittel und Wasser getränkten
Baumwolltuch reinigen und mit einem
sauberen Tuch trocken wischen.
7. Um Verletzungen zu vermeiden, beschädigte Stromkabel vom Hersteller oder
von einem autorisierten
Wartungsingenieur austauschen lassen.
8. Bestimmte Zubehörteile können direkt
vom Nutzer ausgetauscht werden. Falls
diese fehlerhaft sein sollten, bitte den
Hersteller bzw. einen autorisierten
Wartungsingenieur kontaktieren.
9. Dieses Gerät ist ausschließlich für den
gewerblichen Gebrauch und die
Verwendung im Innenbereich bestimmt.
10. Das Gerät, insbesondere das
Metallgehäuse, erhitzt sich im eingeschalteten Zustand. Kinder und ältere
Menschen fernhalten und das Gehäuse
im eingeschalteten Zustand nicht
berühren.
11. Den Schalter zurück auf “0” stellen, die
Stromversorgung unterbrechen,
sicherstellen, dass die Milch vollständig
entfernt wurde und den Tank sowie die
Abtauschale reinigen. Diese Schritte
nach jeder Verwendung der Maschine
vornehmen.
FASSUNGSVERMÖGEN (liter)
ELEKTROANSCHLUß
ANSCHLUßWERT
AUßENABMESSUGEN
- Breite
- Tiefe
- Höhe
NETTOGEWICHT
5
1000 W
350 mm
240 mm
510 mm
8.5 Kg
TL-6
EIGENSCHAFTEN
10
2400 W
310 mm
340 mm
510 mm
12 Kg
TL-11
230 V / 50Hz / 1~
Page 5

5
FRANÇAISE
MANUEL D’UTILISATION
1. Mettez le verrouillage en position “open”
(ouvert) indiquée sur le panneau et retirez le tank à lait. Nettoyez le tank à eau
et le tank à lait avant d’utiliser l’appareil.
2. Remplissez le tank à eau avec de l’eau.
3. Remettez le tank à lait dans le tank interne à eau, et mettez-le en position "close"
(fermé) indiqué sur le panneau.
Pendant ces opérations, une petite quantité d’eau s’échappe du tank interne à
eau et entre dans le tank à lait. Évacuez
toute cette eau en utilisant le robinet à
lait avant de remplir le tank à lait avec du
lait. Étant donné qu’il y a un joint torique
autour du connecteur du tank à lait qui
sert à prévenir les fuites, il n’y aura plus
d’écoulement d’eau dans le tank à lait
provenant du tank à eau une fois que
cette eau est évacuée.
Remettez le tank à lait à sa place et
verrouillez-le rapidement pour éviter les
fuites d'eau à dans le tank.
4. Remplissez le tank à lait avec du lait et
fixez le couvercle.
5. Allumez la machine. Mettez l’interrupteur en position “1”. L’indicateur s’allume et la machine se met en marche.
Lorsque la température atteigne 60-65ºC
le courant se coupe automatiquement.
Lorsque la température tombe à 5055ºC, le courant s’active automatiquement. La machine est thermostatiquement contrôlée pour garder la température du lait entre 55-65ºC.
6. Mettez la tasse sur le plateau anti-éclaboussures et obtenez du lait en utilisant
la vanne à lait.
7. Assurez-vous que l’interrupteur est en
position “ 0 ” et débranchez la machine
si elle ne va pas être utilisée pendant
une longue période.
AVERTISSEMENT
1. Reportez-vous à ces instructions avant
d’utiliser la machine. Cette machine doit
être connectée à une alimentation électrique convenable avec un câble à terre.
2. Placez la machine sur une superficie
plate et stable dans un endroit bien aéré.
Évitez de placer votre machine tout près
des produits inflammables et explosifs.
3. Précaution: Le tank interne doit être
rempli avec de l’eau avant de mettre en
marche la machine. Le niveau de l’eau
doit être 5cm au-dessus de l'appareil de
chauffage. Il faut ajouter de l’eau si l'appareil est utilisé pendant une longue
période.
4. Le tank à lait doit être réglé et verrouillé
comme l’indique les symboles sur le
panneau. Autrement, le tank ne sera pas
ajusté et il y aura des fuites d’eau dans
le tank à lait.
5. Assurez-vous que tout le lait est évacué
avant de nettoyer et de retirer le tank.
Autrement, le lait résiduel fuira dans le
tank à eau pendant le retrait du tank à
lait.
6. Pour protéger l’unité et prévenir des
blessures, faites attention à ne pas tremper le tank. Vous devez le nettoyer en
utilisant un chiffon en coton trempé
dans du détergent et dans de l’eau, et
essuyez-le avec un chiffon propre.
7. Pour prévenir des blessures, le cordon
d’alimentation endommagé doit être
remplacé par le fabricant ou par un ingénieur de soutien technique spécialisé.
8. Quelques accessoires peuvent être rem-
placés par l’usager. S’ils présentent des
disfonctionnements, veuillez contacter
le fabricant et/ou un ingénieur de soutien technique spécialisé.
9. Cet appareil est conçu uniquement pour
une utilisation commerciale et pour une
utilisation à l’intérieur.
10. L’appareil est thermopositif lors du
fonctionnement, tout particulièrement
la carcasse métallique. Gardez loin de
la portée des enfants et des personnes
âgées, et faites attentions à ne pas toucher la carcasse lors du fonctionnement.
11. Remettez l’interrupteur à “0”, coupez
le courant, assurez-vous qu'il ne reste
plus de lait, et nettoyez le tank et le
plateau de dégivrage. Faites cela après
chaque utilisation de la machine.
CAPACITÉ (litres)
ALIMENTATION ÉLECTRIQUE
PUISSANCE
DIMENSIONS EXTÉRIEURES
- Largeur
- Profondeur
- Hateur
POIDS NET
5
1000 W
350 mm
240 mm
510 mm
8.5 Kg
TL-6
CARACTÉRISTIQUES
10
2400 W
310 mm
340 mm
510 mm
12 Kg
TL-11
230 V / 50Hz / 1~
Page 6

6
ITALIANO
GUIDA ALLE OPERAZIONI
1. Sbloccare il lucchetto che appare sul display portandolo su “open” (aperto) e
rimuovere il serbatoio del latte. Pulire i
serbatoi del latte e dell’acqua prima di
utilizzare l’apparato.
2. Riempire il serbatoio d’acqua.
3. Riposizionare il serbatoio del latte nel
serbatoio d’acqua interno e portarlo su
“close” (chiuso) (sul display).
Durante queste operazioni si registrerà
una lieve perdita d’acqua dal serbatoio
d’acqua interno al serbatoio del latte. Far
uscire tutta quest’acqua usando il rubinetto del latte prima di riempire di latte il
serbatoio corrispondente. Grazie all’Oring posto attorno al connettore del serbatoio del latte per prevenire le perdite,
una volta uscita, l’acqua non fluirà più
dal serbatoio d’acqua interno al serbatoio del latte.
Ricollocare il serbatoio del latte e chiuderlo velocemente al fine di arrestare
l’ingresso dell’acqua nel serbatoio.
4. Riempire di latte il serbatoio corrispondente e fissare il coperchio.
5. Accendere la macchina. Portare l’interruttore su “1”. L’indicatore si accende e
la macchina inizia a funzionare. Quando
la temperatura raggiunge 60-65ºC, la
tensione si interrompe automaticamente. Quando la temperatura scende a 5055ºC, la tensione riprende automaticamente. La macchina è controllata termostaticamente per mantenere la temperatura tra 55 e 65ºC.
6. Mettere la coppa sul vassoio raccoglischizzi e far uscire il latte usando l’apposita valvola.
7. Controllare che l’interruttore sia su “0” e
scollegare la macchina se non si prevede
di usarla per molto tempo.
ATTENZIONE
1. Leggere le istruzioni prima di usare la
macchina. Questa macchina deve essere
collegata a un’alimentazione di potenza
adatta e deve essere messa a terra.
2. Posizionare la macchina su una superficie piana e stabile in un ambiente ben
ventilato. Evitare di collocarla in prossimità di prodotti infiammabili ed esplosivi.
3. Precauzione: il serbatoio interno deve
essere riempito d’acqua prima di accendere la macchina. Il livello dell’acqua
deve superare di 5 cm quello del riscaldatore. Se la macchina viene usata per
un periodo di tempo prolungato, è
necessario aggiungere acqua.
4. Il serbatoio del latte deve essere posizionato e bloccato come illustrano i simboli che appaiono sul display. Altrimenti
il serbatoio non sarà posizionato correttamente e l’acqua continuerà a perdere
nel serbatoio del latte.
5. Verificare che tutto il latte sia fuoriuscito
prima di pulire e spostare il serbatoio.
Altrimenti il latte residuo entrerà nel serbatoio dell’acqua con la rimozione del
serbatoio del latte.
6. Per proteggere l’unità ed evitare lesioni,
fare attenzione a non sommergere il serbatoio. Pulirlo usando un panno di cotone imbevuto di detergente e acqua e
asciugarlo con un panno pulito.
7. Per evitare lesioni, il cavo elettrico danneggiato deve essere sostituito dal fabbricante o dal servizio tecnico autorizzato.
8. Alcuni accessori devono essere sostituiti
direttamente dall’utente. Se non funzionano, contattare il fabbricante e/o il servizio tecnico autorizzato.
9. Questo apparato è stato disegnato per
uso commerciale e solo per uso interno.
10. L’apparato è positivo al calore durante
il funzionamento, soprattutto la carcassa metallica. Tenere lontano bambini e
anziani e fare attenzione a non toccare
la carcassa durante il funzionamento.
11. Reimpostare l’interruttore sullo “0”,
interrompere l’alimentazione, eliminare tutti i resti di latte, pulire il serbatoio
e il vassoio di sbrinamento. Ripetere
queste operazioni dopo ogni utilizzo
della macchina.
CAPACITÀ
(litri)
ALIMENTAZIONE ÉLETTRICA
POTENZA
DIMENSIONI ESTERNE
- Larghezza
- Profonditá
- Altezza
PESO NETTO
5
1000 W
350 mm
240 mm
510 mm
8.5 Kg
TL-6
CARATTERISTICHE
10
2400 W
310 mm
340 mm
510 mm
12 Kg
TL-11
230 V / 50Hz / 1~
Page 7

7
PORTUGUES
GUIA DE FUNCIONAMENTO
1. Rode o fecho para “open” (abrir) como
mostrado no painel e retire o depósito
do leite. Limpe os depósitos do leite e da
água antes de utilizar o aparelho.
2. Encha o depósito da água com água.
3. Volte a colocar o depósito do leite no
depósito interno da água e rode-o para
“close” (fechar) como mostrado no painel.
Durante estas operações, haverá uma
pequena fuga de água do depósito interno de água para o depósito do leite.
Deixe toda esta água sair utilizando a
torneira do leite antes de encher o depósito de leite. Como existe uma junta tórica à volta do conector do depósito de
leite para evitar fugas, não haverá mais
fugas de água para o depósito do leite a
partir do depósito interno da água depois
da saída desta água.
Volte a colocar o depósito de leite e
feche-o rapidamente para não permitir a
entrada de mais água no depósito.
4. Encha o depósito de leite e encaixe a
tampa.
5. Ligue a máquina. Coloque o selector na
posição “1”. O indicador acende-se e a
máquina começa a funcionar. Quando a
temperatura atingir 60-65ºC, a corrente
eléctrica é automaticamente desligada.
Quando a temperatura desce para 5055ºC, a corrente eléctrica é ligada automaticamente. A máquina é controlada
por um termóstato de forma a manter a
temperatura do leite entre 55 e 65ºC.
6. Coloque o copo no tabuleiro anti-salpicos e retire o leite utilizando a válvula do
leite.
7. Certifique-se de que o selector está na
posição “0” e desligue a máquina da rede
eléctrica se não a for utilizar durante um
período prolongado.
AVISOS
1. Consulte estas instruções antes de utilizar a máquina. Esta máquina tem de ser
ligada com a alimentação eléctrica adequada e com um fio de terra.
2. Coloque a máquina numa superfície
plana e estável, numa área bem ventilada. Evite colocar a máquina perto de produtos inflamáveis e explosivos.
3. Cuidado: o depósito interno deve ser
enchido com água antes de ligar a
máquina. O nível da água deve estar 5
cm acima do aquecedor. Se a máquina
for utilizada durante períodos prolongados, é necessário adicionar água.
4. O depósito de leite deve ser colocado e
bloqueado como mostra o símbolo do
painel. Caso contrário, o depósito não
ficará bem encaixado, podendo ocorrer
fugas de água para o depósito do leite.
5. Certifique-se de que todo o leite do
depósito foi escoado antes de limpar ou
deslocar o depósito. Caso contrário,
pode ocorrer uma fuga dos resíduos de
leite para o depósito da água quando
retirar o depósito do leite.
6. Para proteger o aparelho e evitar ferimentos, tenha cuidado para não ensopar
o depósito. Pode limpá-lo utilizando um
pano de algodão embebido em detergente e água e limpá-lo com um pano
limpo.
7. Para evitar ferimentos, se o cabo de alimentação se danificar, tem de ser substituído pelo fabricante ou por um técnico
de assistência autorizado.
8. Alguns acessórios podem ser substituídos directamente pelo utilizador. Se tiverem algum problema, contacte o fabricante e/ou um técnico de assistência
autorizado.
9. Este aparelho destina-se apenas a uso
comercial e a utilização em interiores.
10. O aparelho será termopositivo quando
estiver em funcionamento, especialmente a cobertura de metal. Mantenha
as crianças e os idosos afastados do
aparelho e certifique-se de que não
tocam na cobertura quando estiver em
funcionamento.
11. Coloque o selector na posição “0”, des-
ligue a corrente eléctrica, certifique-se
de que não existem resíduos de leite e
limpe o depósito e o tabuleiro de descongelamento. Efectue estas operações
sempre depois de cada utilização da
máquina.
CAPACIDADE
(litros)
ALIMENTAÇÃO ELÉCTRICA
POTÊNCIA
DIMENSÕES EXTERIORES
- Largura
- Profundidade
- Altura
PESO LÍQUIDO
5
1000 W
350 mm
240 mm
510 mm
8.5 Kg
TL-6
CARACTERÍSTICAS
10
2400 W
310 mm
340 mm
510 mm
12 Kg
TL-11
230 V / 50Hz / 1~
Page 8

ER-437/1/96
UNE-EN ISO 9001
SAMMIC, S.L. (Sociedad Unipersonal) Basarte, 1 - 20720 AZKOITIA - www.sammic.com
12-09/00
 Loading...