

Salus SAU1AT1 User Manual
Use & Care Guide
Kenmore™
Smart Thermostat
Model: 105.20001410
P/N XXXXXXXXX
Sears Brands Management Corporation,
Hoffman Estates, IL 60179
www.kenmore.com
www.sears.com
www.kmart.com

CONTENT
ASSURELINK INFORMATION - WARRANTY P 1
IMPORTANT SAFETY INSTRUCTIONS P 2
FEATURES / OPERATIONS P 3
CLEANING / MAINTENANCE INSTRUCTIONS P 8
SPECIFICATIONS / FCC INFORMATION P 9
TROUBLESHOOTING P 10
FAQ P 11
ASSURELINK INFORMATION
Refer to the Quick Start / Installation Guide that came with your Kenmore Smart Thermostat for detailed
installation instructions. Also refer to it for information on creating an Assurelink Connected account,
setting up your gateway, and setting up your thermostat for connected operation from your phone or web
browser. This Use & Care Guide contains more detailed information, and instructions for operating the
Thermostat from the front panel controls.
WARRANTY
KENMORE LIMITED WARRANTY
FOR ONE YEAR from the date of sale this product is warranted against defects in material or workmanship when it is correctly
connected, operated and maintained according to all supplied instructions.
WITH PROOF OF SALE, return a defective product to the retailer from which it was purchased for free replacement.
This warranty is void if this product is ever used for other than private household purposes.
This warranty covers ONLY defects in material and workmanship, and will NOT pay for:
1.
Damage to or failure of this product if it is not correctly connected, operated or maintained according to all supplied instructions.
2.
Damage to or failure of this product resulting from accident, alteration, abuse, misuse or use for other than its intended purpose.
3.
Damage to or failure of parts or systems resulting from unauthorized modifications made to this product.
Disclaimer of implied warranties; limitation of remedies
Customer’s sole and exclusive remedy under this limited warranty is product replacement as provided herein. Implied warranties,
including warranties of merchantability or fitness for a particular purpose, are limited to one year or the shortest period allowed by
law. Seller shall not be liable for incidental or consequential damages. Some states and provinces do not allow the exclusion or
limitation of incidental or consequential damages, or limitation on the duration of implied warranties of merchantability or fitness, so
these exclusions or limitations may not apply to you.
This warranty gives you specific legal rights, and you may also have other rights which vary from
state to state.
Sears Brands Management Corporation, Hoffman Estates, IL 60179
P 1

IMPORTANT SAFETY INSTRUCTIONS
When using your equipment, basic safety precautions should always be followed to reduce risk of
fire, electric shock, and injury to persons, including the following:
Read all of the instructions listed here and/or in the user manual before you operate the device. Give
1.
particular attention to all safety precautions. Retain the instructions for future reference.
This device must be installed and used in strict accordance with the installation manual and/or use and
2.
care guide.
Comply with all warning and caution statements in the instructions.
3.
The thermostat can be powered by two AA batteries or by a connection to a 24VAC power source
4.
(C-wire). Always install the 2 AA batteries so that they will run the Smart Thermostat in case of a power
failure.
Never connect any terminal of the thermostat to 120/220V AC; this may cause serious damage to the
5.
thermostat and even your HVAC system.
Do not install this thermostat at an altitude of over 6500 feet (2000 meters).
6.
This standalone mounted electronic thermostat serves as a temperature control system only in dry, closed
7.
living or office spaces. Do not place it in a bathroom or area of excessive moisture. Do not allow it to get
wet.
This device should not be used in an environment that is below 32°F (0°C) and above 104°F (50°C),
8.
humidity above 80%.
Do not expose the thermostat to voltage fluctuations of more than+/-10%.
9.
Clean the thermostat with a dry, soft cloth. Do not use solvents or aggressive cleaning agents. NEVER use
10.
detergents, gasoline, glass cleaner, furniture polish, paint thinner, or other household solvents to clean
any part of the thermostat.
Never place anything over the air vents of the thermostat.
11.
Never drop any liquid or chemical inside of the thermostat through the air vents.
12.
DO NOT use outdoors.
13.
DO NOT attempt to repair or adjust any electronic or mechanical functions on this thermostat. Doing so
14.
will void your warranty. The inside of the unit contains no user serviceable parts.
NOTE: DO NOT block air vents of the thermostat.
NOTE: Incorrect connection of HVAC wires to thermostat terminals may cause unrecoverable damage to
your HVAC system. Incorrect wiring connection voids all thermostat warranty coverage. Nor is thermostat
seller or manufacturer responsible for any HVAC system damage due to incorrect wiring connection.
P 2
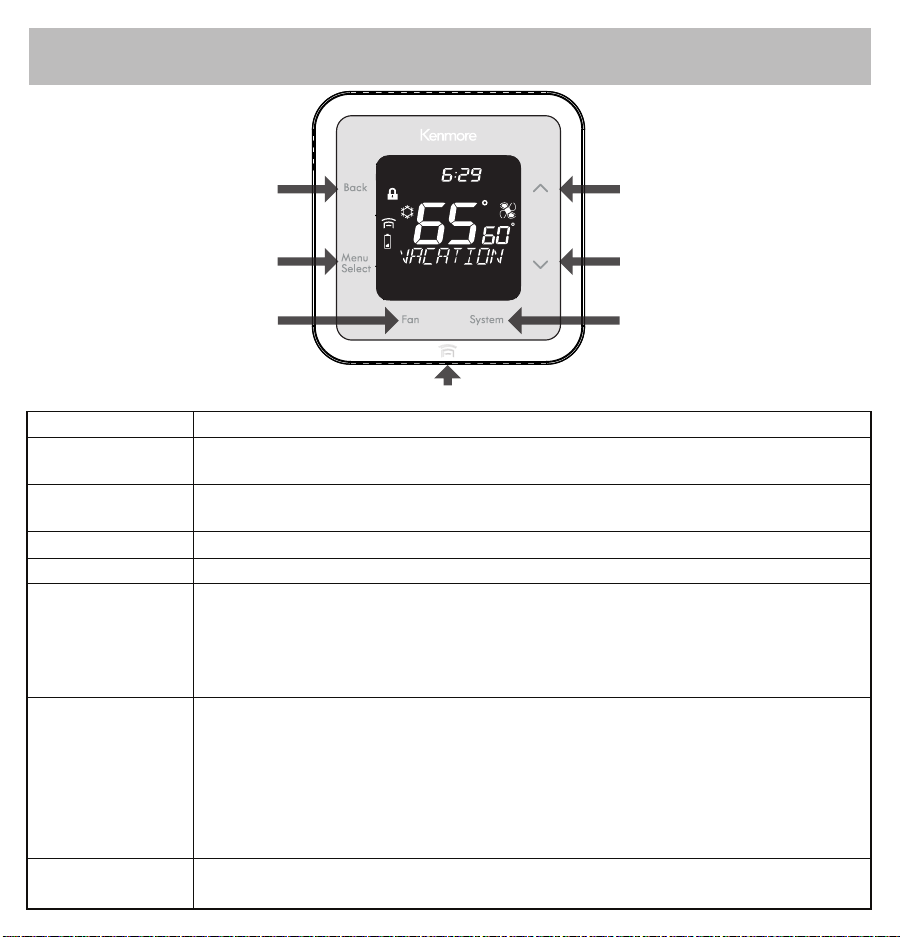
FEATURES / OPERATION
Back
Menu or
Select
Fan
Reset Button (located at the bottom part of the Kenmore Smart Thermostat)
KEY/TOUCH ACTION
Up Key
FUNCTION
Increase set temperature for TEMP HOLD or PERM HOLD. Also used with Down key to
activate "Key Lock"
Down Key
Decrease set temperature for TEMP HOLD or PERM HOLD. Also used with Up key to activate
"Key Lock"
System Key
Fan Key Switching fan mode: ON or AUTO
Menu / Select Key
Back Key
Switching operating mode: AUTO, HEAT, COOL, OFF, & EMERGENCY HEAT
Press Menu / Select once and use Up/Down Key to navigate the following functions:
When the thermostat shows the function you want to set up, press Menu/Select once again
•
to enter that function.
•
For modifying parameters, use Up/Down to change and Menu/Select to confirm the setup value.
At any time during Setup, pressing Back once will navigate backward one level and cancel
•
• Vacation • Clock • Program • Settings • Filter
any setting change you have made.
Pressing and holding Back for 2 seconds while in a Menu screen will return the unit to the
•
Home Screen.
Pressing and holding Back for 2 seconds while on the Home Screen will cancel Temp Hold,
Perm Hold, Vacation mode, and Away mode. (Away mode is only available via the
Assurelink remote APP.)
Reset Button
Reset the thermostat. Can also used for installation setup and to remove the
thermostat from customer's Assurelink account. See Assurelink APP for details.
P 3
/
Auto Cool
Fan Auto
F
PM
F
F
Up Key
Down Key
System
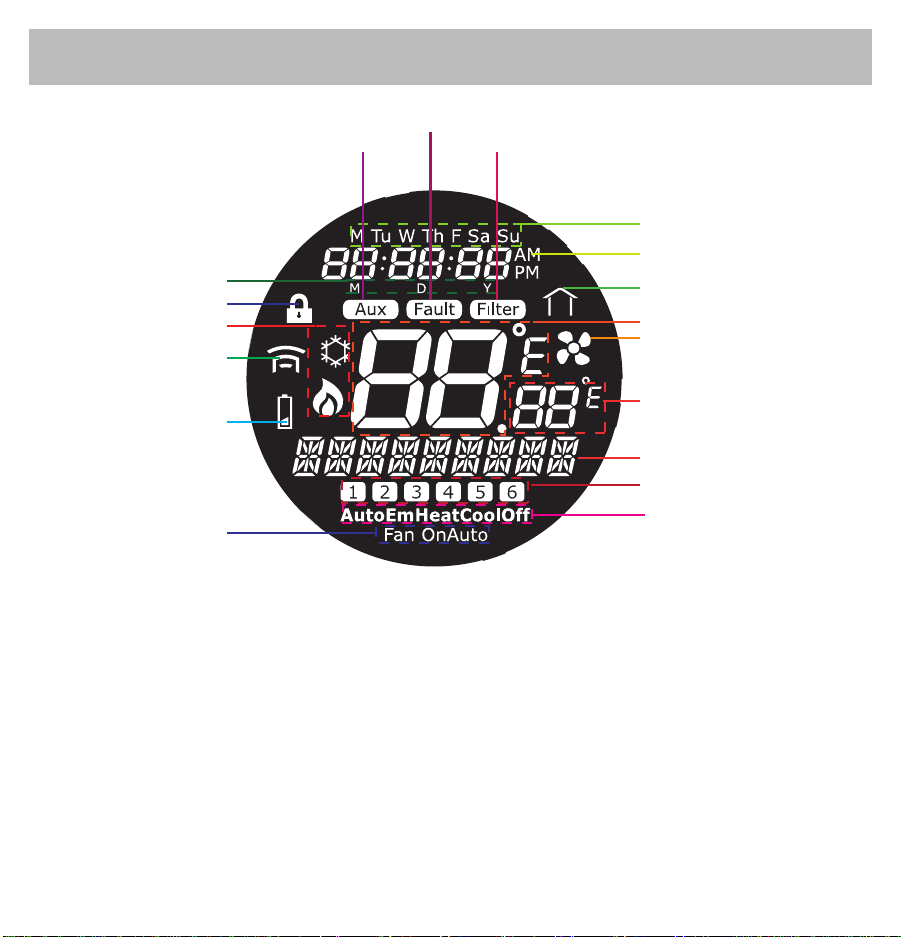
FEATURES / OPERATION
Home Screen
Auxiliary Icon Filter Icon
Month; Date; Year
Key Lock Icon
Heat & Cool Output Icon
Assurelink
Connected Icon
Battery Icon
Fan Mode
Resersed LCD with Blue LED back lit.
The Home Screen is the default display screen. It is normally dark. Press any key once to turn on
the display. It will remain on for 20 seconds. If no further keys are pressed, it will become dark
again. If you are within any of the setup menus, the display will stay on for one minute, and turn
dark if no further keys are pressed. The display will remain on while pressing keys to make
settings changes within the menus. The unit will return to the Main Screen if no keys are pressed
in a minute, and turn off.
Fault Icon
Day
Time
Energy Saving Icon
Room Temperature
Fan Icon
Set Point Temperature
Current Operating Status
Program Number
System Mode
The large temperature reading on the Home Screen is the current air temperature. The small
temperature reading is the current set point temperature.
P 4
 Loading...