

Page 1
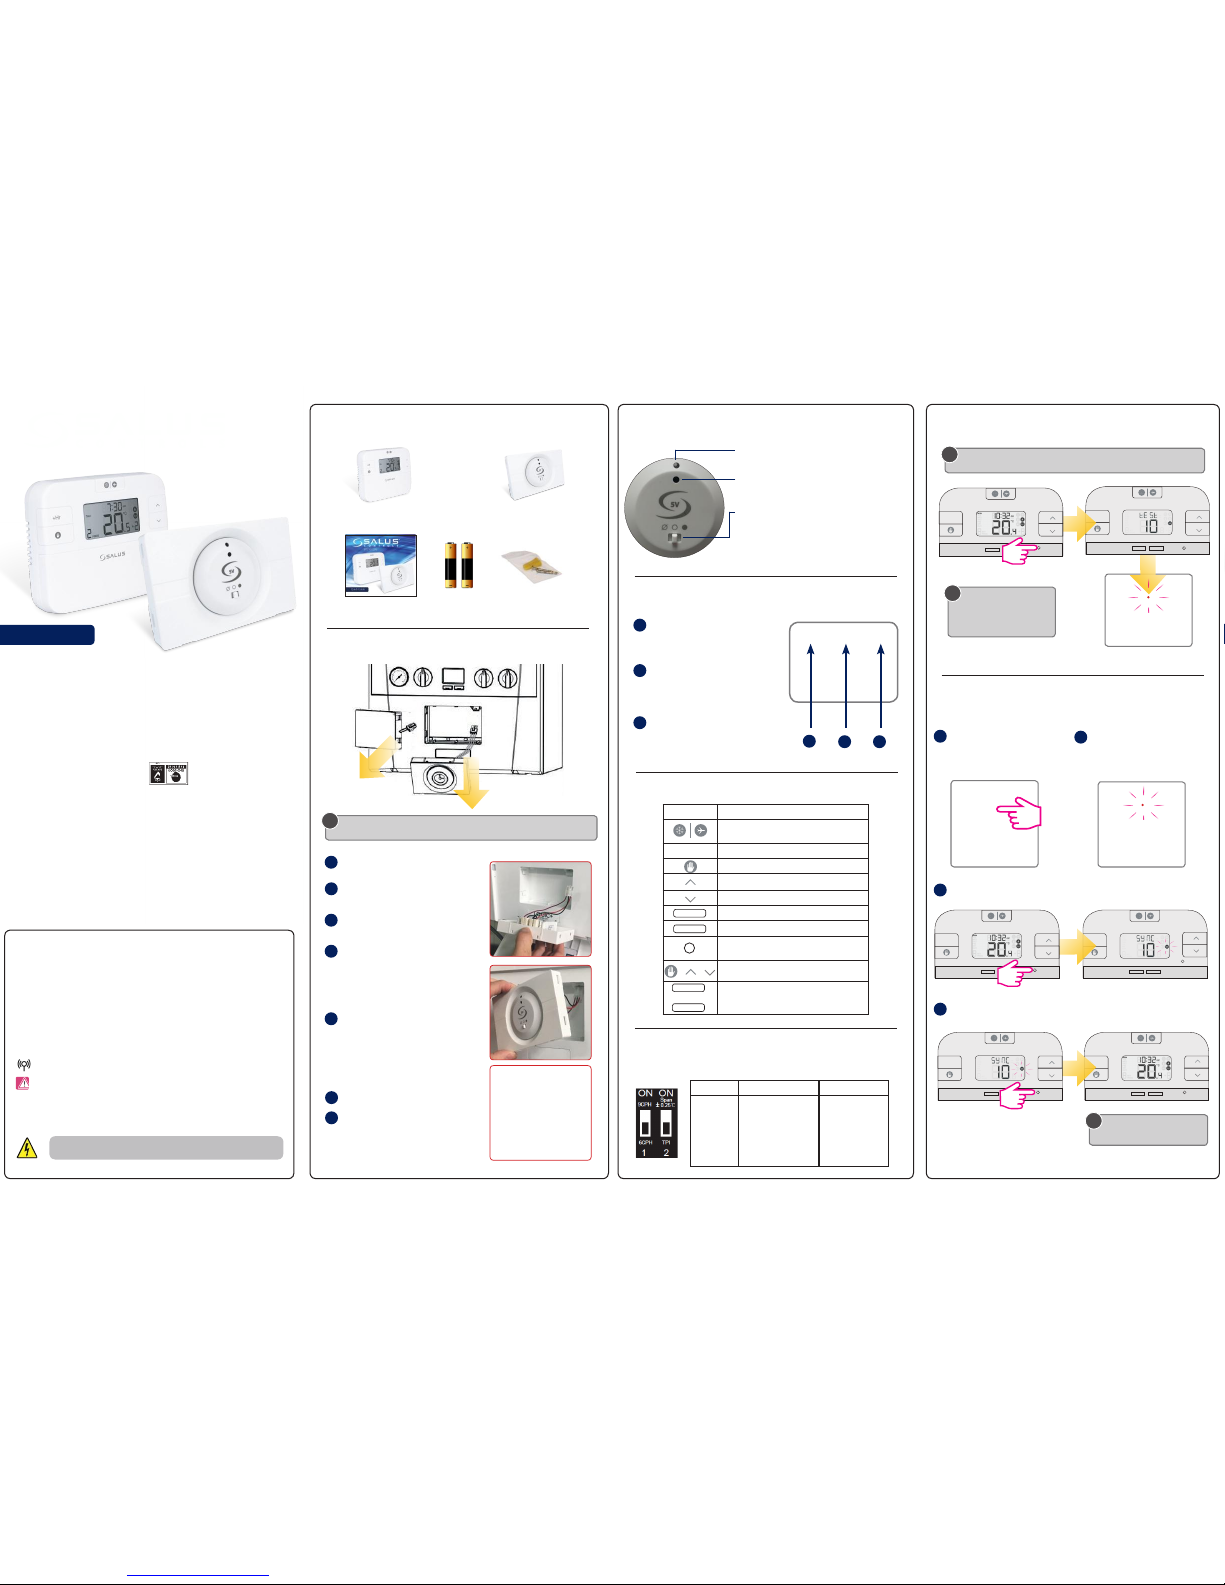
TEST / PAIRING
SELECT
+Hr
SET
i
Once paired please close the
boiler control panel.
The LED will start flashing red.
i
When enter test pairing
mode, after a 10 minute
countdown the thermostat
will time out.
+Hr
Quick Guide
RT510LG5V
Always isolate the AC Mains supply before installing or working on any components
that require 230 VAC 50Hz supply.
RT510TX Button Functions
TEST / PAIRING
SELECT
+Hr
SET
TEST / PAIRING
SELECT
+Hr
SET
3 Sec
TEST / PAIRING
+Hr
SELECT SET
TEST / PAIRING
SELECT SET
LG+5V Installation
Introduction
The RT510TX thermostat will switch your heating system on or o, as needed, in accordance
with the time and temperature set by you. It can be used with the LG+5V integral plug-in
RF boiler module. The LG+5V boiler module 868MHz is a receiver with 5V DC to control ON/OFF of
Boiler or other heat system via the RF signal transmitted from the thermostat.
868.0-868.6MHz; <13dBm
Safety Information
Use in accordance with the regulations. Indoor use only. Keep your device completely dry. Disconnect
your device before cleaning it with a dry cloth. This accessory must be tted by a competent person, and
installation must comply with the guidance, standards and regulations applicable to the city, country or
state where the product is installed. Failure to comply with the relevant standards could lead to prosecution.
Product Compliance
This product complies with the essential requirements and other relevant provisions of the following EU Directives: EMC
2014/30/EU, LVD 2014/35/EU, RED 2014/53/EU and RoHS 2011/65/EU. Full text of the EU Declaration of Conformity is
available on www.saluslegal.com
3
4
+Hr
SELECT
SELECT
SET
SET
+++
Key Function
1. Press once to activate Frost Mode
2. Press for 3 seconds in order to activate Holiday Mode
Press once to activate/deactivate Boost function
Press once to enter/exit Permanent Override function
Increase button
Decrease button
Select the clock or programme settings
Press to conrm your settings
1. Press once to enter/exit in Test Mode
2. Press for 3 seconds to enter/exit Pairing Mode
Press the buttons for 3 seconds to enter Installer Mode
Press the buttons for 3 seconds to enter Clock Settings
Test the Pairing Process
LG+5V Switch Position
Box content
Pairing Process
Once the LED stops flashing, press the
TEST / PAIRING button for 3 sec.
The boiler receiver is OFF. When in this
mode, the boiler will not receive a signal
from the RF thermostat.
AUTO. RX will automatically receive the RF
signal from your compatible SALUS device
and control the module output so that it
switches the boiler accordingly.
MANUAL mode - Manual Override. When in
this mode, the boiler will be always turned
on and the LED indicator will also be lit
constantly.
1
1
1
4
1
2
2
2
5
2
3
3
3
6
7
Press the SYNC button for 3
seconds until LED starts ashing.
3 Sec
The LG+5V is ready to be paired
with your thermostat.
Connect the electrical plug.
The LG+5V is ready to be paired with your
thermostat.
Push t boiler control into housing.
Reverse the procedure to install the
LG+5V.
Pull down control panel cover.
Remove existing mechanical timer /
blanking plate and unscrew from plate.
Ensure boiler is isolated and switched o.
Mechanical
Timer
Blanking
Plate
LG+5V User Controls
LED - It will be on when the thermostat is demanding
heat.
Mode Switch
ON – Boiler will be on continuous
AUTO – will follow time and temperature program in
the transmitter
OFF – Boiler is off
SYNC Button - This is used only for pairing the RF
communications.
Quick Guide
2 x AA Alkaline
Batteries
2 x Fixing Screws
RT510TX LG+5V
Desk Stand
Begin the pairing process
End the pairing process
i
i
When removing blanking plate, also remove visible thermostat link plug, do not remove
any internal link.
During test pairing, boiler control should ash conrming pair. If not, please follow
Pairing Process.
RT510TX Dip Switch Settings
The DIP Switches can be found on the rear of your thermostat.
Control feature TPI Span
Operation When TPI is selected on DIP
switch № 2, the DIP switch
№ 1 is functional. You can
choose the Cycles Per Hour
between a lower comfort
level (6CPH) and a higher
comfort level (9CPH).
When Span is selected
on DIP switch № 2,
the DIP switch № 1 is
not functional. The
temperature accuracy of
your thermostat is set to
± 0.25 °C.
TEST / PAIRING
SELECT
+Hr
SET
3 Sec
SALUS Controls is a member of the Computime Group.
Maintaining a policy of continuous product development SALUS Controls plc reserve the right to
change specification, design and materials of products listed in this brochure without prior notice.
Issue Date: February 2018
V014
SALUS Controls plc
SALUS House
Dodworth Business Park South,
Whinby Road, Dodworth,
Barnsley S75 3SP, UK.
T: +44 (0) 1226 323961
www.salus-tech.com
Page 2
+Hr
SELECT SET
TEST / PAIRING
+Hr
SELECT SET
Setpoint (desired) temperature
TEST / PAIRING
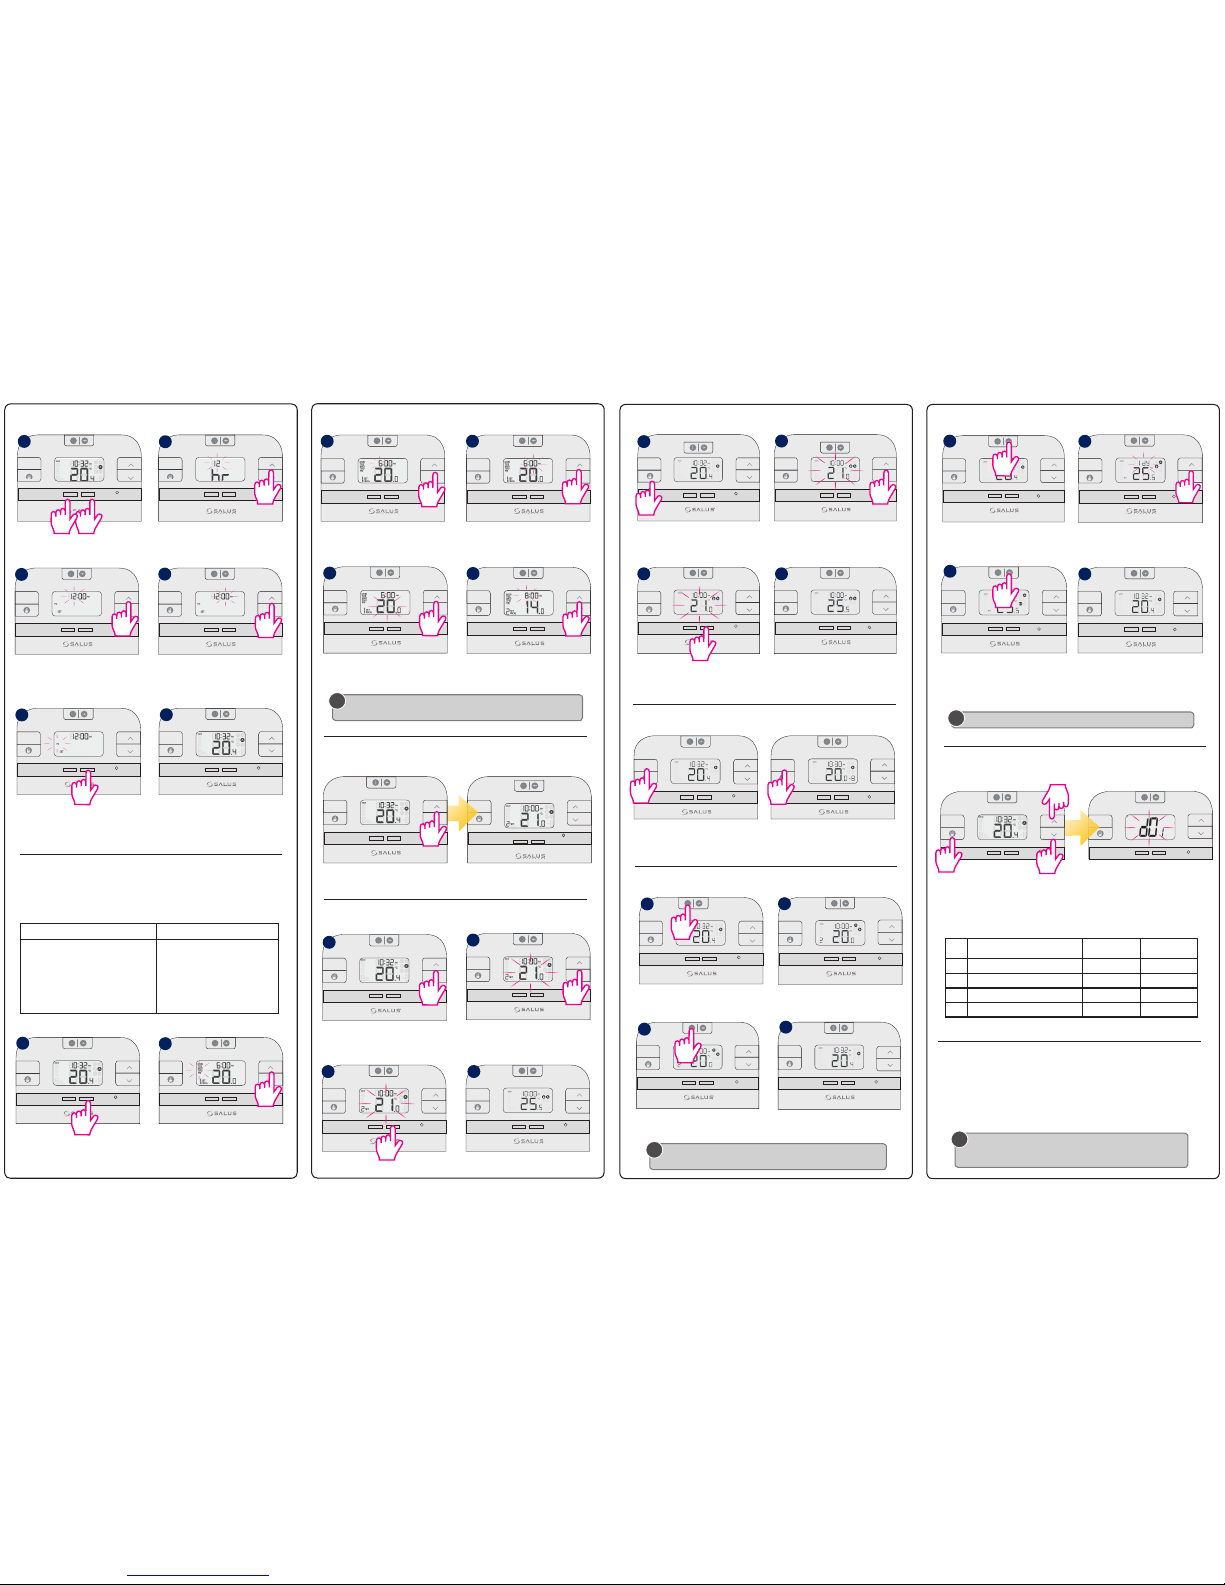
Setting Time and Date
Programming
Press SET to return to the Main Screen.
+Hr
+Hr
+Hr
+Hr
+Hr
SELECT
SELECT
SELECT
SELECT
SELECT
SET
SET
SET
SET
SET
+Hr
SELECT SET
You can create personalized programmes for your controller. You have the option to choose
between a 5-2 days programme or a daily one by using the parameter d04 from Installer mode.
Press UP or DOWN to select Weekday/Weekend/
Day and press SELECT.
Press SET to change your programmes.
+Hr
SELECT SET
Press UP or DOWN to set the minutes and
press SELECT to conrm your option.
Press UP or DOWN to set the temperature and
press SELECT to conrm your option.
Follow the same procedure for the next
set of time.
Review the Setpoint (desired) temperature
Press UP or DOWN to review the setpoint
temperature.
Press UP or DOWN to set the temperature.
Actual room temperature
Boost function
Frost protection
Frost Mode ON.
+Hr
SELECT SET
Press OVERRIDE in order to activate the
mode.
Press UP or DOWN to set the temperature.
+Hr
+Hr
SELECT SET
SELECT SET
Press SET to conrm the changes.
Press +Hr to activate the
Boost function.
Press the FROST button once to activate the
function.
The Override sign will appear on the Main
screen.
Press +Hr to set boost hours and then press
UP or DOWN to set the boost temperature
for your boost period.
+Hr
SELECT SET
Frost Mode OFF.
+Hr
SELECT SET
Holiday Mode
Press the HOLIDAY button for 3 sec. Press the UP or DOWN button to set the
Holiday period.
+Hr
SELECT SET
+Hr
SELECT SET
Press the HOLIDAY button for 3 sec to exit
Holiday Mode.
Reset function RT510TX
Remove the batteries without pressing any button. Wait 2 minutes and insert the batteries
again. Your device will be restarted.
+Hr
SELECT SET
+Hr
SELECT SET
+Hr
SELECT SET
+Hr
SELECT SET
+Hr
+Hr
SELECT SET
SELECT SET
+Hr
SELECT SET
Press UP or DOWN to set the hour and press
SELECT to conrm your option.
+Hr
SELECT SET
+Hr
SELECT SET
+Hr
SELECT SET
+Hr
SELECT SET
Permanent Override
1
1
5
3
1
3
1
3
5-2 Days Programme 24h Programme
Weekdays
6 sets of time/channel
Weekends
6 sets of time/channel
Total: 12 settings/week
24h
6 sets of time/channel
Total: 42 settings/week
TEST / PAIRING
TEST / PAIRING
TEST / PAIRING
TEST / PAIRING
TEST / PAIRING
TEST / PAIRING
TEST / PAIRING
TEST / PAIRING
TEST / PAIRING
TEST / PAIRING
TEST / PAIRING
TEST / PAIRING TEST / PAIRING
TEST / PAIRING
TEST / PAIRING
TEST / PAIRING
TEST / PAIRING
TEST / PAIRING
TEST / PAIRING
TEST / PAIRING
TEST / PAIRING
TEST / PAIRING
TEST / PAIRING
TEST / PAIRING
TEST / PAIRING
Continue with the same steps for setting
the Day.
Press the FROST button once to deactivate
the function.
Temporary Override
6
1
2
4
5
6
3
2
+Hr
SELECT SET
Press SET to conrm the changes.
+Hr
SELECT SET
3
TEST / PAIRING
TEST / PAIRING
4
2
4
2
4
2
4
3sec
3sec
Press the buttons together for 3 sec.
Press UP or DOWN to select the hour format
and then press SELECT to conrm your
option.
Press UP or DOWN to select the hour
and then press SELECT to conrm your
option.
Press UP or DOWN to select the minutes
and then press SELECT to conrm your
option.
+Hr
SELECT SET
+Hr
SELECT SET
3 Sec3 Sec
+Hr
SELECT SET
+Hr
SELECT SET
1
3
TEST / PAIRING
TEST / PAIRING
TEST / PAIRING
TEST / PAIRING
2
4
i
i
i
i
After you have done all the changes, please press SET to conrm all your choices
and to return to the Main Screen.
The Frost protection temperature can be reviewed by pressing the UP button
once, but can only be changed in Installer Mode.
You can also exit Holiday Mode by setting the days to zero.
When you want to change the batteries your device will use the internal
memory to backup your settings. You have 30 seconds to change the
batteries before losing your settings.
Installer Mode
Press the three buttons together
simultaneously for 3 seconds.
+Hr
SELECT SET
3 Sec
3 Sec
TEST / PAIRING
3 Sec
dxx Function Parameter Default value
d01 Temperature display increments 0.1°C or 0.5°C 0.5°C
d02 Temperature oset +/- 3.0°C 0.0°C
d03 Frost Protection setpoint temperature 5.0°C - 17.0°C 5.0°C
d04 Programmer selection 5/2 or 24 hr (7d) 52d
 Loading...