

Page 1
Quick Guide Installation
Model: RT510 / RT510RF / RT510TX / RT510BC / RXRT510
Always isolate the AC Mains supply before installing or working
on any components that require 230 VAC 50Hz supply.
Introduction
The RT510 thermostat will switch your heating system on or o, as needed, in accordance with the temperature set
by you. The RT510 series includes the following products:
• RT510 for wired applications
• RT510RF (RT510TX + RXRT510) for wireless applications
• RT510TX for wireless application, using 5 x 5 receiver
• RXRT510 for wireless application using 5 x 5 transmitter
• RT510BC for wireless application
Product Compliance
EU Directives: 2014/53/EU and 2011/65/EU. Please check www.saluslegal.com for the full information.
Safety Information
Use in accordance with the EU and national regulations. For indoor use only.
Keep your device completely dry. This product must be installed by a competent person and in accordance with all
the EU and national regulations.
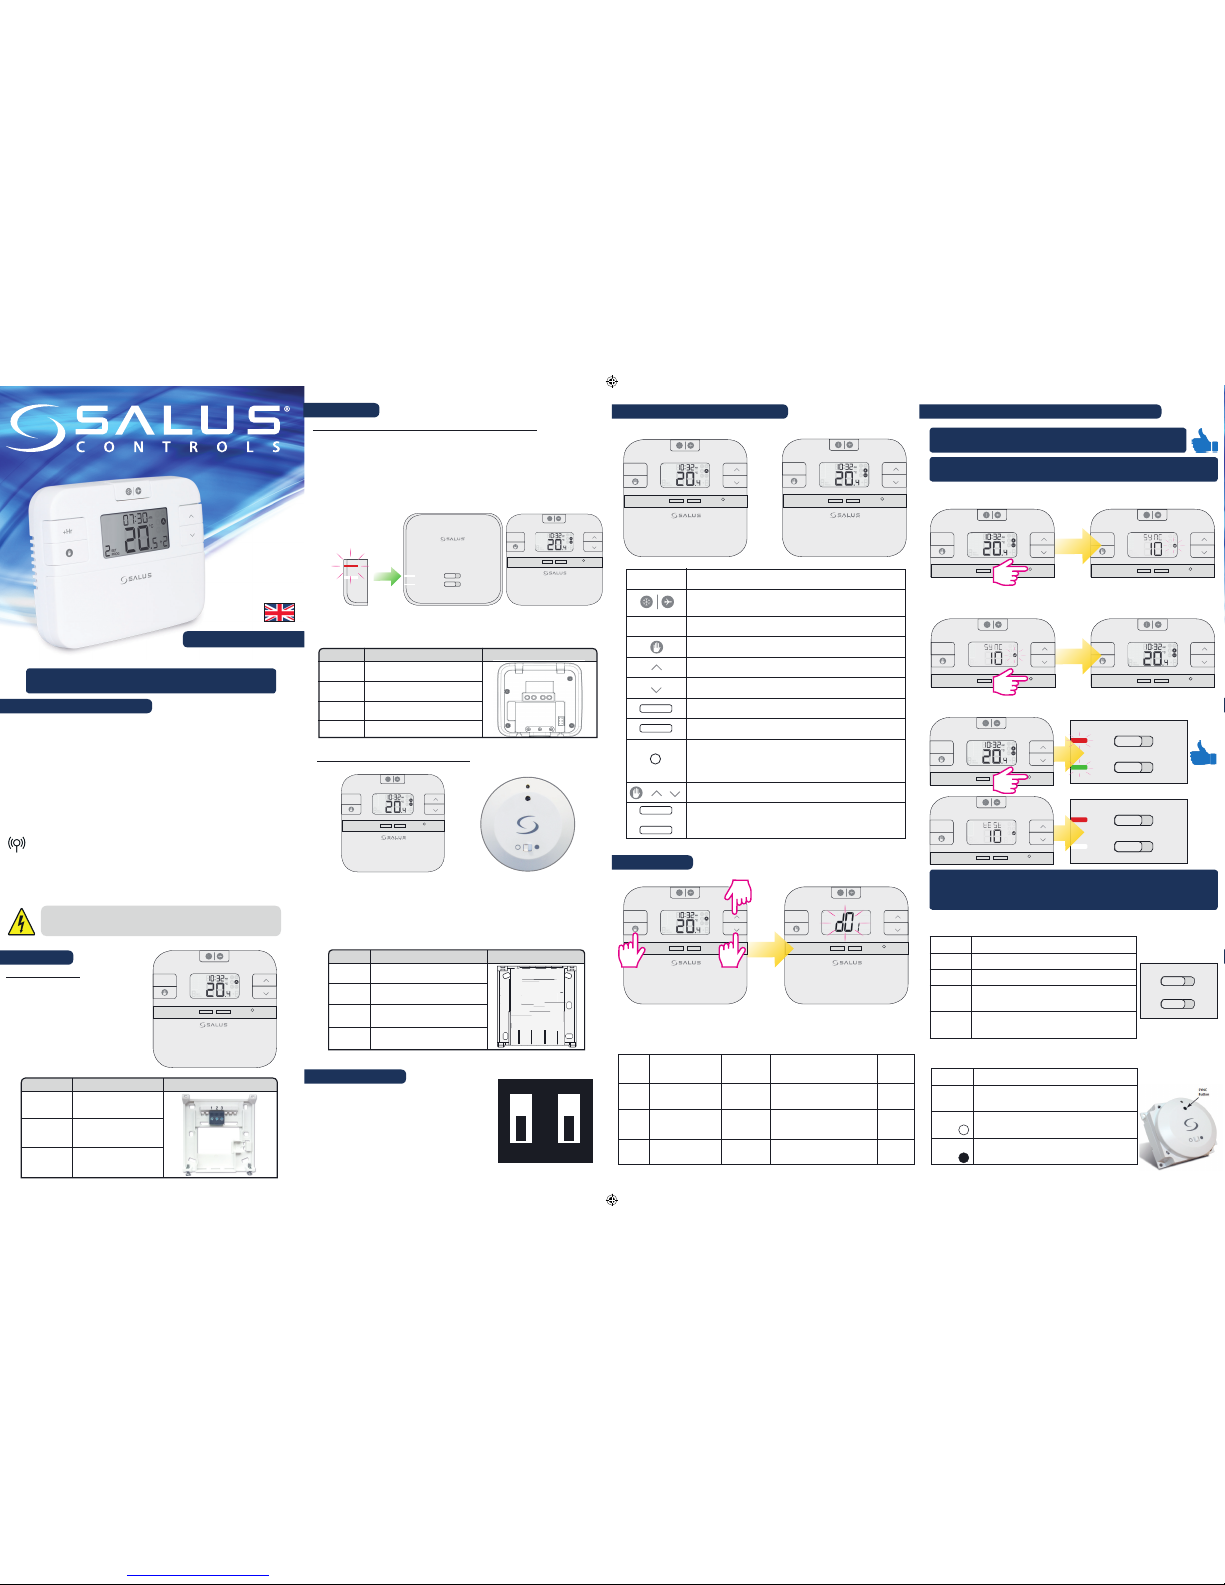
Button Functions RT510 and RT510TX Pairing the RT510TX with the Receiver/Boiler Controller
Installer Mode
Dip Switch Settings
RT510 & RT510RF Quick Guide
RESET
+Hr
SELECT SET
RESET
+Hr
SELECT SET
TEST / PAIRING
SELECT
+Hr
SET
TEST / PAIRING
SELECT
+Hr
SET
RT510 RT510TX
COMNO L N
Terminal Description Receiver Terminals
NO
COM
L
N
Switch Terminal
Common Switch Terminal
Mains Live (230VAC)
Mains Neutral
RT510BC (RT510TX+Boiler Controller)
Wire up the boiler controller and switch it ON. After that please insert the
batteries into the thermostat.
Leave the link wire in the boiler
Remove the link wire in the boiler
NL1234
NL1234 NL123456
NL1234 NL123456
NL1234 NL123456
NL1234 NL123456
NL1234 NL123456
NL1234 NL123456
NL1234 NL123456
NL1234 NL123456
NL1234 NL123456
NL1234 NL123456
NL1234 NL123456
NL1234 NL123456
NL1234 NL123456
NL1234 NL123456
NL1234 NL123456
NL1234 NL123456
NL1234 NL123456
NL1234 NL123456
NL1234 NL123456
NL1234 NL123456
NL1234 NL123456
NL1234 NL123456
NL1234 NL123456
NL1234 NL123456
NL1234 NL123456
NL1234 NL123456
NL1234 NL123456
NL1234 NL123456
1234
Terminal Description Plug in BC terminals
4 (NO)
3 (COM)
2 (L)
1 (N)
Switch Terminal
Common Switch Terminal
Mains Live
Mains Neutral
The DIP switches are found on the rear of
your thermostat and can be used to change
the span (temperature accuracy) of your
thermostat from the default +/-0.5°C to
+/-0.25°C and the programmes 5-2 or 24h.
Changing DIP Switch 2 may cause your boiler
to operate more frequently. The DIP switches
are located on the back of the thermostat.
24H
5-2
+/-0.25
+/-0.5
ON
1
2
Key Function
+Hr
SELECT
SELECT
SET
SET
+++
1. Press once to activate Frost Mode
2. Press for 3 seconds in order to activate Holiday Mode.
Press once to activate/deactivate Boost function
Press once to enter/exit Permanent Override function.
Increase button
Decrease button
Select the clock or programme settings
Press to conrm your settings
Press the buttons for 3 seconds to enter Installer Mode
Press the buttons for 3 seconds to enter Clock Settings
1. Press once to enter in Test Mode for RT510RF
2. Press for 3 seconds to enter/exit Pairing Mode for RT510RF
3. Press once to return to Factory Settings for the RT510
RESET
+Hr
SELECT SET
3 Sec 3 Sec
3 Sec
Press the three buttons
together for 3 seconds.
dxx Function Parameter Description Default
value
d01
Temperature display
increments
0.1 or 0.5°C
Select temperature display
increments
0.5°C
d02 Temperature oset +/-3.0°C
Calibrate your thermostat
temperature
0.0°C
d03 Frost setpoint 5.0-17.0°C Set the Frost Point temperature 5.0°C
If you are using the RT510RF or RT510BC pack, the pairing between
the thermostat and the receiver/boiler controller is already done.
If you bought an RT510TX and RXRT510 separately then pair as follows.
Please make sure that the Receiver/Boiler Controller is set on Auto.
Begin the pairing process
TEST / PAIRING
SELECT
+Hr
SET
TEST / PAIRING
SELECT
+Hr
SET
TEST / PAIRING
SELECT
+Hr
SET
3 Sec
ON
AUTO
OFF
MANUAL
TEST / PAIRING
SELECT
+Hr
SET
Wait 9 minutes for the timeout
process to be complete.
End the pairing process
3 Sec
ON
AUTO
OFF
MANUAL
TEST / PAIRING
+Hr
SELECT SET
TEST / PAIRING
+Hr
SELECT SET
Test the pairing process
Button Description for RXRT510 Receiver
Button Function
ON The receiver is enabled, ready for use.
OFF The receiver is disabled, will not function.
AUTO The receiver will switch on and o automatically,
as operated by the thermostat.
MANUAL Providing ON is selected,the receiver will switch
on continuously, overriding the thermostat.
Button Description for RXBC605 Boiler Controller
Button Function
SYNC The boiler controller will be syncronised with the
thermostat.
AUTO The receiver will switch on and o automatically,
as operated by the thermostat.
MANUAL Select in the event of thermostat failure to switch
boiler on continuously, overriding the thermostat.
ON
AUTO
OFF
MANUAL
Installation
RT510 Thermostat
Insert the batteries and
wire up the device.
Terminal Description Backplate
Common Terminal
1 (COM)
2 (NC)
Switched Live OFF
3 (NO)
Switched Live ON
Technical Support
T: 44 (0) 1226 323961
E: [email protected]
Installation
RT510RF (RT510TX+RXRT510)Thermostat and Receiver
1. Wire up the receiver and switch the power on
2. Once the receiver is switched on then insert the batteries into the
thermostat. If using RT510RF pack the devices are already paired.
Now follow Test pairing process to confirm connection between both the
thermostat and receiver. If purchased the devices separately please follow
pairing process.
TEST / PAIRING
SELECT
+Hr
SET
AUTO
ON OFF
MANUAL
868.0-868.6MHz; <13dBm
06/2017
+Hr
RESET
SELECT SET
1
1
1
1
1
1
1
1
1
After power up, the
receiver will be in
pairing mode and
the LED will flash red.
Page 2
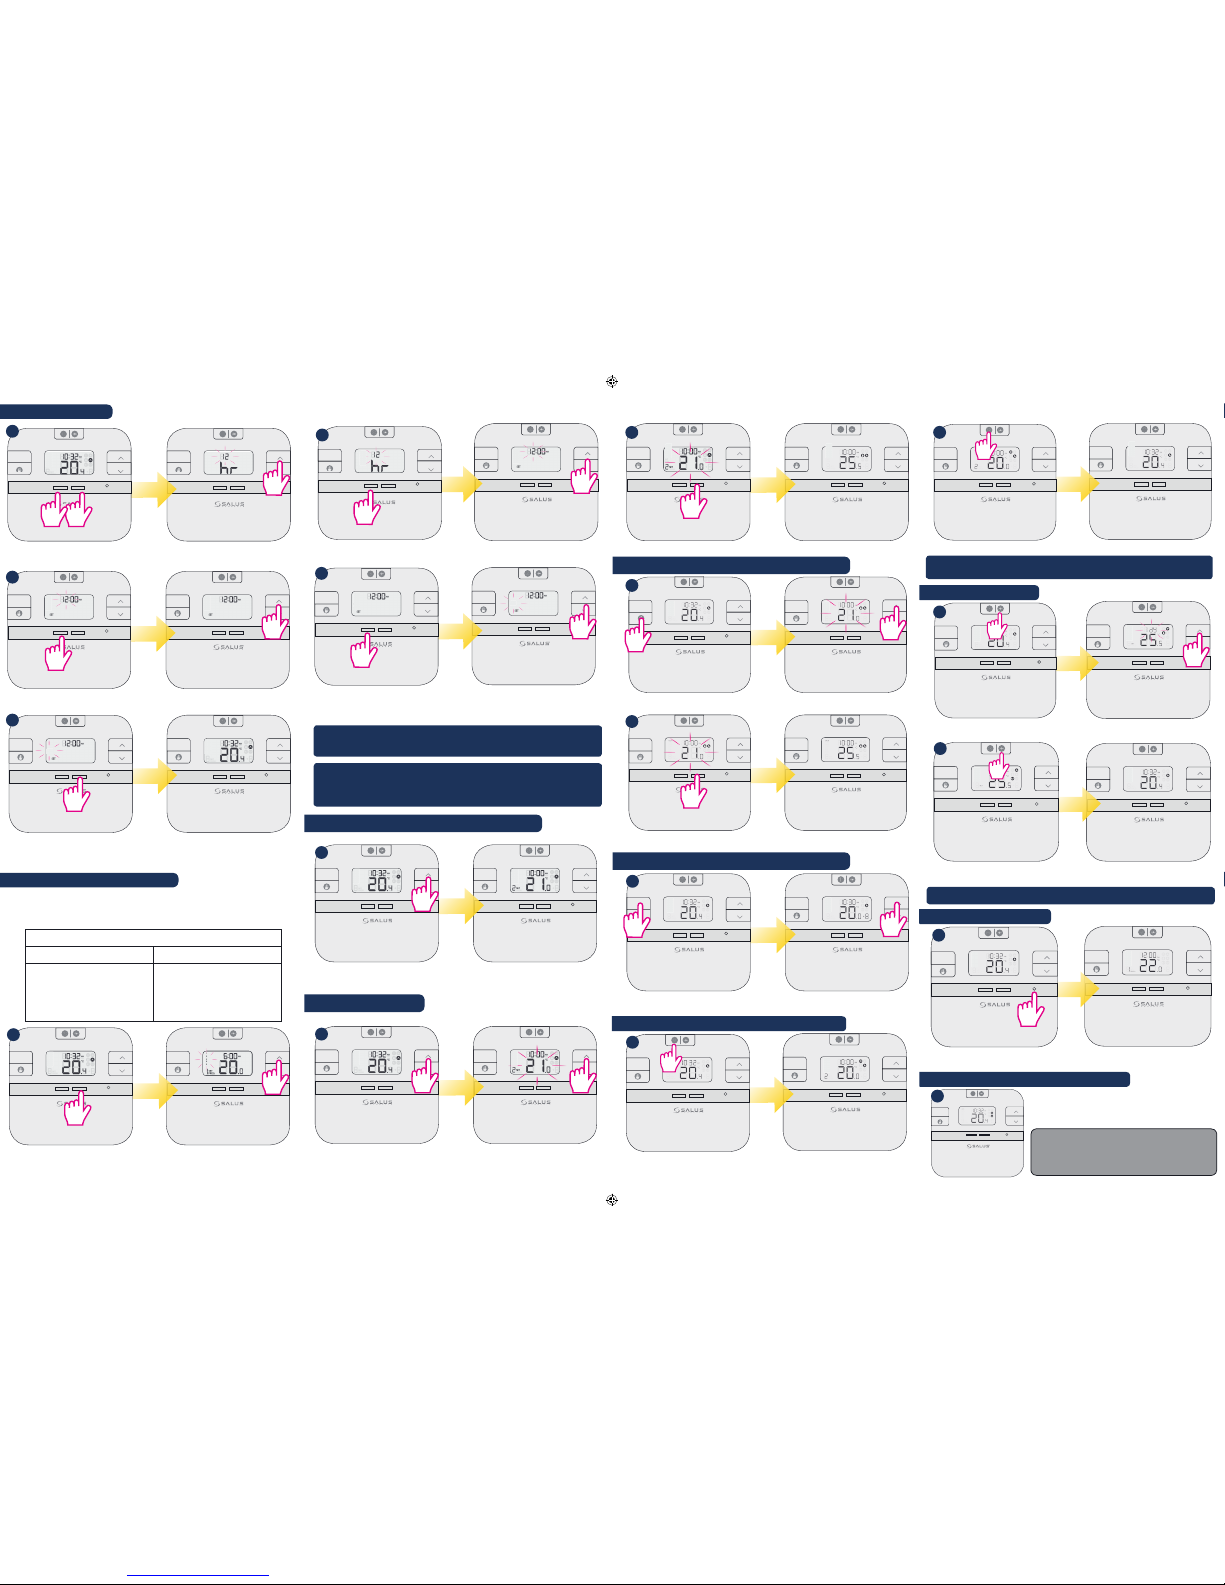
Setting Time and Date
Programming the RT510/RT510TX
Press the buttons
together for 3 sec.
Press Up or Down to
select the hour format.
Press Select to confirm
your option.
Press Select and after that Up
and Down to set the minutes.
Continue with the same steps
for setting the Day. Press Set
to return to the Main Screen.
You can create personalized programmes for your controller. You have the
option to choose between a 5-2 days programme or a daily one by using the
DIP Switches.
5-2 Days Programme
RT510/RT510TX
Weekdays
6 sets of time/channel
Weekends
6 sets of time/channel
Total: 12 settings/week
24h Programme
24h
6 sets of time/channel
Total: 42 settings/week
Press Up or Down to select Weekday/
Weekend or the Day for which you
want to create the program
Press Set to change your
programmes.
Press Up/Down
to set the hour.
Press Select to confirm
your option.
Press Up/Down to
set the day.
After you have done all the changes, please press SET to confirm all
your choices and to return to the Main Screen.
Note: Don’t forget to move the DIP Switch to 24h in order to have
the individual programme active. After that please follow the same
instructions as for the 5-2 days programme.
Review the Setpoint (desired) temperature
Temporary Override
Press Up/Down to review
the setpoint temperature.
Press Up/Down to
set the temperature.
Press Set to confirm the changes.
Actual room temperature
Setpoint (desired) temperature
Boost function
Frost protection
Frost Mode ON.
Press Override in order to
activate the mode.
Press Up or Down to set the
temperature.
Press Set to confirm
the changes.
Press +Hr to activate the
Boost function.
Press the Frost button to
activate the function.
The Override sign will appear
on the Main screen.
Press Up or Down to set
the Boost function.
The Frost protection temperature can be reviewed by pressing
the UP button once, but can only be changed in Installer Mode.
Frost Mode OFF.
Holiday Mode
Press the Holiday button
for 3 sec.
Press the Up or Down button
to set the Holiday period.
Press the Holiday button for 3
sec to exit Holiday Mode.
Note: You can also exit Holiday Mode by setting the days to zero.
Reset function RT510
Press the Reset button once.
You can use a paper clip.
Your device is now reset to
factory settings.
Reset function RT510TX
Remove the batteries without pressing any
button. Wait 2 minutes and insert the batteries
again. Your device will be restarted.
When you want to change the batteries your
device will use the internal memory to backup
your settings. You have 30 seconds to change
the batteries before losing your settings.
Press Select to confirm
your option.
Permanent Override
RESET
+Hr
SELECT SET
RESET
+Hr
SELECT SET
RESET
+Hr
SELECT SET
RESET
+Hr
SELECT SET
3 Sec3 Sec
RESET
+Hr
SELECT SET
RESET
+Hr
SELECT SET
1
5 5
5
1
2
3
5
RESET
+Hr
SELECT SET
RESET
+Hr
SELECT SET
5
4
1
2
3
4
5
RESET
+Hr
SELECT SET
RESET
+Hr
SELECT SET
RESET
+Hr
SELECT SET
RESET
+Hr
SELECT SET
RESET
+Hr
SELECT SET
RESET
+Hr
SELECT SET
RESET
+Hr
SELECT SET
5
RESET
+Hr
SELECT SET
5
7
6
8
1
5
5
1
1
1
1
+Hr
SELECT SET
RESET
+Hr
SELECT SET
10
+Hr
SELECT SET
RESET
RESET
+Hr
SELECT SET
11
+Hr
SELECT SET
RESET
+Hr
SELECT SET
12
+Hr
SELECT SET
RESET
RESET
+Hr
SELECT SET
13
RESET
+Hr
SELECT SET
RESET
+Hr
SELECT SET
9
1 1
1
1
1
1
1
+Hr
SELECT SET
+Hr
SELECT SET
RESET
14
+Hr
SELECT SET
+Hr
SELECT SET
3sec
RESET
15
RESET
+Hr
SELECT SET
+Hr
SELECT SET
3sec
RESET
16
RESET
+Hr
SELECT SET
RESET
+Hr
SELECT SET
17
TEST / PAIRING
+Hr
SELECT SET
18
1
1
1
1
1
1
1
 Loading...