

Salton DS1457 Instruction Manual
Instruction Booklet
Model DS1457

IMPORTANT SAFEGUARDS
When using electrical appliances, basic safety precautions should
always be followed including the following:
1. Read all instructions.
2. Always use this appliance on a dry, level surfaces.
3. To protect against electrical hazards, do not immerse cord, plugs,
or the appliance in water or other liquid. Do not place on a
wet surface.
4. Close supervision is necessary when any appliance is used by or
near children. Children should be supervised to ensure that they
do not play with the appliance.
5. This appliance is not intended for use by persons (including
children) with reduced physical, sensory or mental capabilities or
lack of experience and knowledge, unless they have been given
supervision or instruction concerning the use of the appliance by
a person responsible for their safety.
6. Unplug from outlet when not in use, before putting on or taking
off parts and before cleaning.
7. Do not operate any appliance with a damaged cord or plug or
after the appliance malfunctions, or is dropped or damaged in any
manner. Return appliance to Salton for examination, repair or
electrical or mechanical adjustment. See Warranty.
8. The use of accessories or attachments not recommended or sold
by Salton may cause fire, electric shock or injury.
9. Do not use outdoors.
10. Do not let cord hang over edge of table or counter, or touch
hot surfaces.
11. Extreme caution must be used when moving an appliance
containing hot liquids.
12. This appliance is for Household Use Only.
13. Do not use appliance for other than intended use.
14. Do not leave unit unattended while in use.
15. Always turn the appliance off and unplug from the outlet when
left unattended or finished using.
2

16. Check to be sure that the switch is in the OFF position after each
use. Ensure that the motor is stopped before disassembling
17. Avoid contacting moving parts. Make sure that the motor stops
completely before disassembling.
18. Always make sure the unit is fully assembled and the Chute or Feed
Tube/Cone Holder is locked securely in position before the motor is
turned on. Do not attempt to remove parts when it is in operation.
19. Do not either operate or plug and unplug the unit with wet hands.
20. Do not use the appliance continuously for more than 2 minutes.
21. Do not turn the appliance on for more than 2 minutes without
adding food. This may damage the auger.
22. Do not use this appliance if any of the parts are damaged.
23. Do not put your fingers or other objects into the Chute or Feed
Tube/Cone Holder while it is operating. Always use the food pusher
provided.
24. During operation feed the food slowly to avoid clogging. If the unit
gets clogged turn the appliance off immediately. Unplug the
appliance, disassemble and remove the stuck food.
25. Do not place on or near a hot gas or electric burner, or in a
heated oven.
26. Always attach plug to appliance first, then plug cord into the wall
outlet. To disconnect, turn control to ‘OFF’, then remove plug from
wall outlet.
27. Do not attempt to override the safety features
SAVE THESE INSTRUCTIONS
HOUSEHOLD USE ONLY
POLARIZED PLUG
This appliance has a polarized plug (one blade is wider than the
other). To reduce the risk of electric shock, this plug will fi t in a
polarized outlet only one way. If the plug does not fi t fully in the
outlet, reverse the plug. If it still does not fit, contact a qualified
electrician. Do not modify the plug in any way.
3
A
B
C
D
E
F
G
G2
G1
K
H
I
L
J
J1
J2
J3
J4
J5
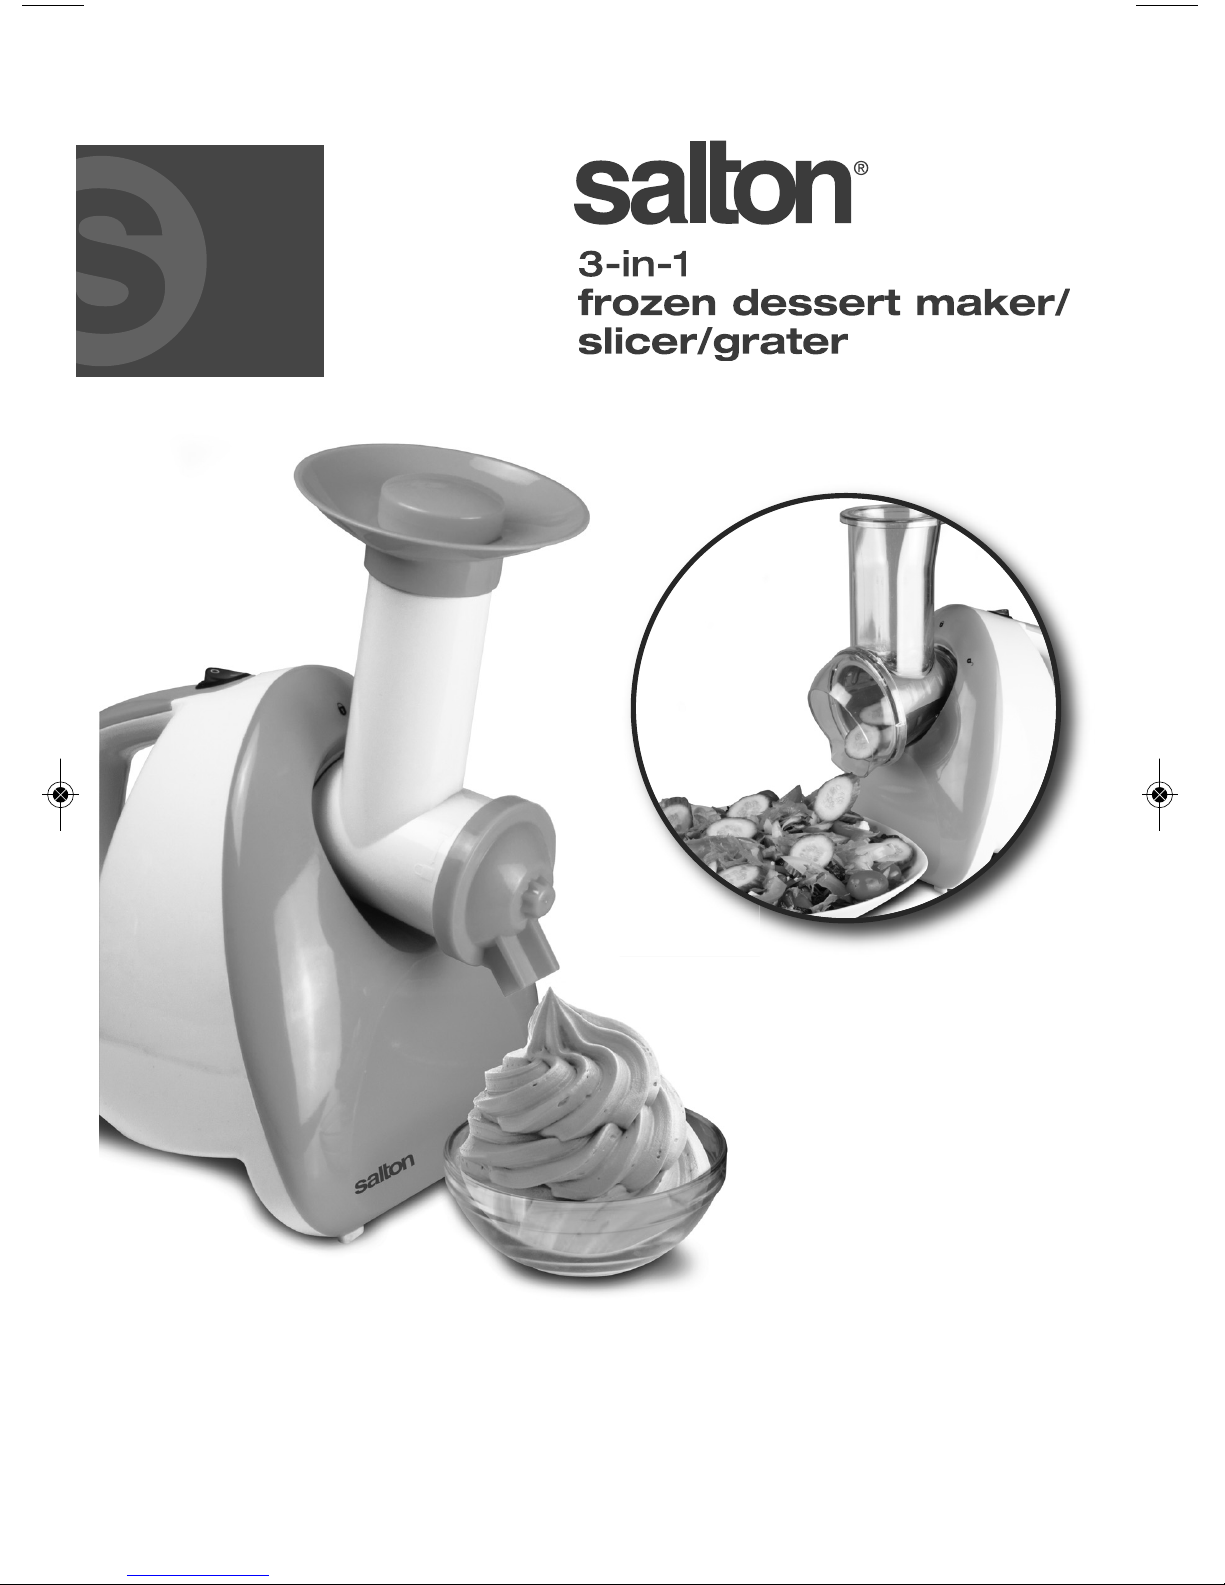
INTRODUCTION
Your 3-in-1 Frozen Dessert Maker/Slicer/Grater is a compact, easy to
use Multi-Function appliance. The Frozen Dessert Makers turns frozen
fruit into healthy soft serve in seconds. The Slicer/Grater function
slices, shreds, grates and grinds vegetables, cheese, fruit, nuts,
chocolate & bread for salads, soups, tacos, pizzas, pastas, desserts and
more. You can also make snow cones and ice slushies. Control your
intake of fats, salts and/or additives for a healthier diet.
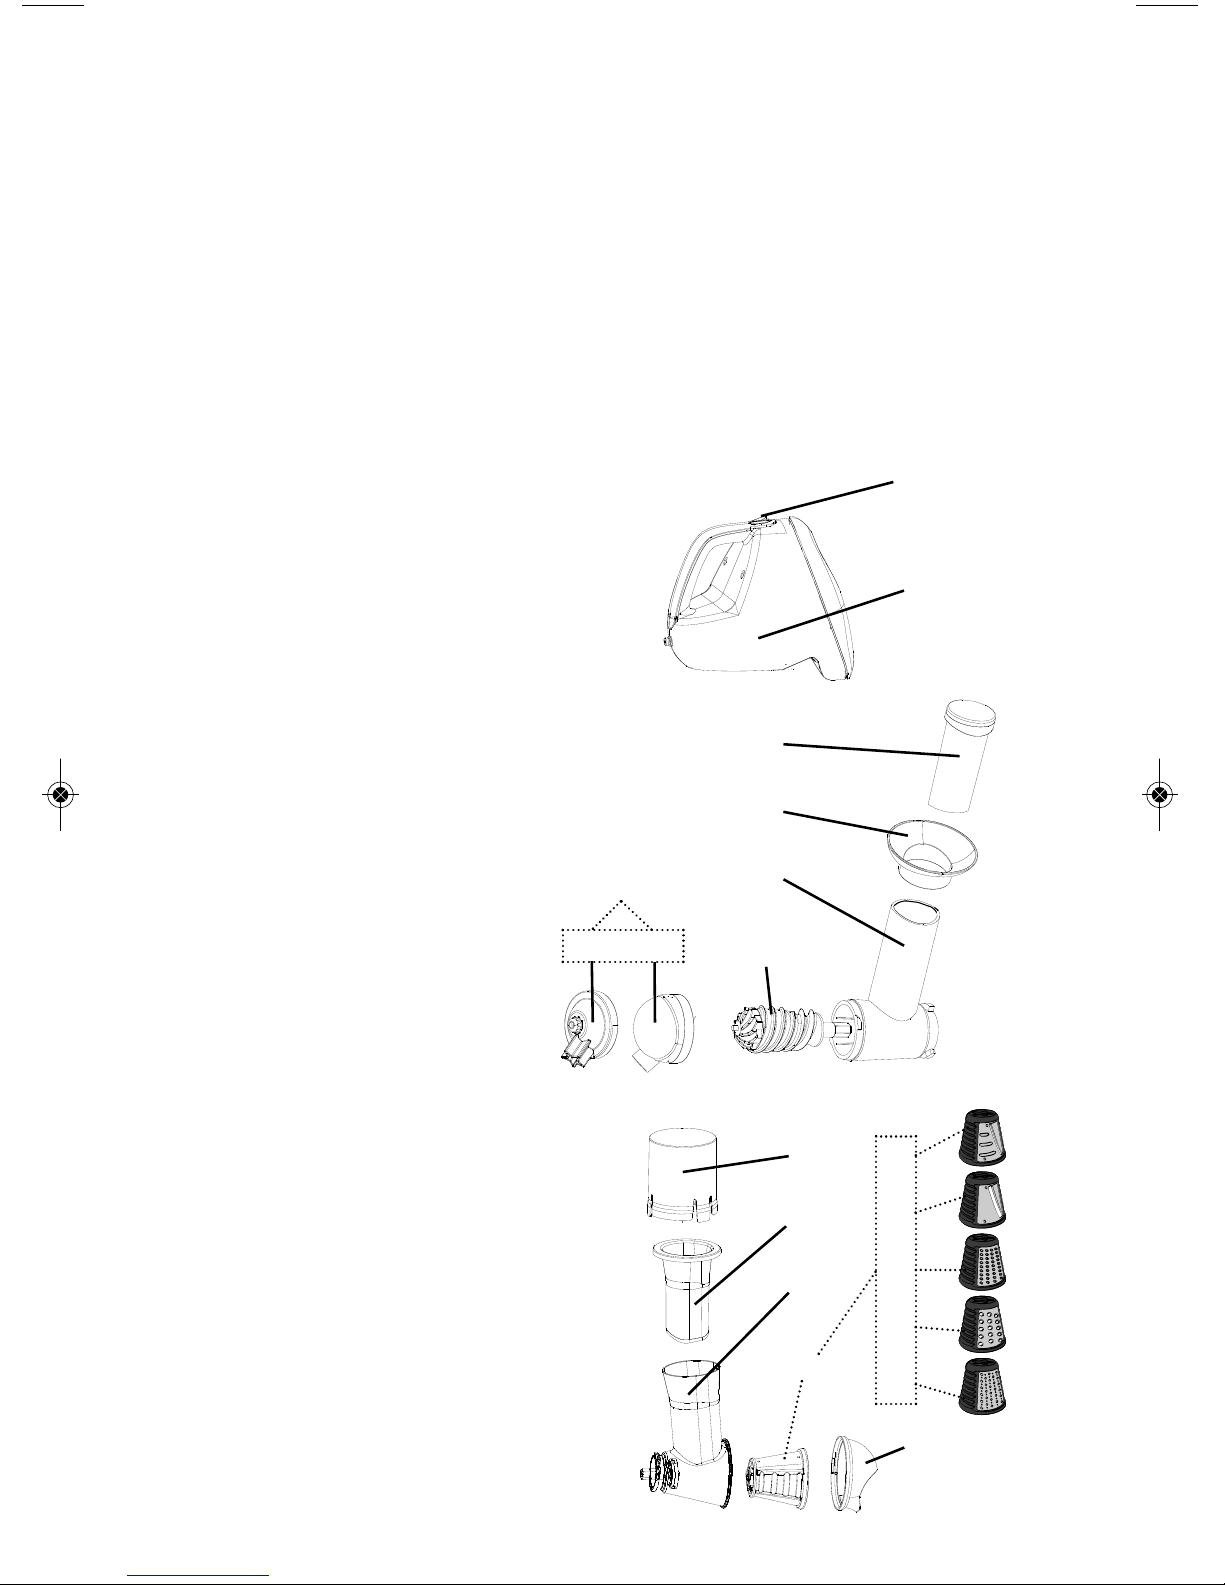
DESCRIPTION OF PARTS
A. Motor Base
B. ON/OFF Switch
FROZEN DESSERT MAKER PARTS
C. Food Pusher
D. Tray
E. Chute
F. Auger
G. Dispensers
G.1 Star Shaped
G.2 Swirl Shaped
SLICER/GRATER PARTS
H. Food Pusher
I. Feed Tube/Cone Holder
J. Cones
J.1 Thick Slicer (Dark Green)
J.2 Thin Slicer (Light Green)
J.3 Fine Grater (Yellow)
J.4 Coarse Grater (Red)
J.5 Extra Fine Grater (Orange)
K. Storage Accessory for Cones
L. Splash Guard
4

BEFORE FIRST USE
1. Unpack and remove all parts and packaging materials from
the carton.
2. DO NOT plug the power cord into any outlet before reading
the instructions.
3. Wash all Frozen Dessert Maker parts (Food Pusher, Tray, Chute,
Auger and Dispensers) and all Slicer/Grater parts (Food Pusher,
Feed Tube/Cone Holder, Cones, Storage Accessory for Cones and
Splash Guard) in warm soapy water. Rinse well and dry.
4. Wipe the Motor Base with a damp cloth.
NEVER IMMERSE THE MOTOR BASE IN WATER OR ANY OTHER
LIQUID.
DO NOT use harsh detergents or abrasive cleaners on any part of
the appliance.
IMPORTANT: Use extreme caution when handling the Cones.
The Cone blades are extremely sharp. Always hold the plastic parts.
HOW TO USE
ASSEMBLY - FROZEN DESSERT MAKER
1. Place Auger (F) in bottom of Chute (E).
2. Make sure the gasket is properly seated inside the Dispenser (G).
Place Dispenser (Star or Swirl Shape) on bottom of Chute aligning
tabs. Rotate counter-clockwise a quarter turn to the left until
dispenser is facing downward.
3. Place Chute (E) in Motor Base (A) aligning tabs. Rotate counter-
clockwise a quarter turn to the left until it is straight and into the
locked position.
4. Place Tray (D) on top of Chute (E).
5. Place Food Pusher (C) in Chute (E).
6. Plug in the appliance.
NOTE: Do not operate unit for more than 2 minutes continuously at
any one time.
5

HOW TO USE - FROZEN DESSERT MAKER
1. Freeze your desired fruit for 24 hours. Remove from freezer and
allow to thaw slightly (approximately 7-10 minutes depending on
the type of fruit).
2. Place a small bowl or serving dish directly below the Dispenser.
3. Remove the Food Pusher from the Chute and turn the unit ON.
4. Insert frozen fruit into the top of the Chute. DO NOT overfill the
Chute.
5. DO NOT place fruit with pits, honey or ice into the Frozen Dessert
Maker.
6. Apply steady pressure on the Food Pusher to slowly press the
contents down through the Chute. DO NOT apply too much force.
7. The creamy frozen fruit mixture will dispense into your bowl. If
using more than one type of fruit per serving, add the different
fruits alternately to allow them to mix properly.
8. Repeat the process until you have created the amount of frozen
fruit desired. If using spices, sugar or sugar substitute, you may
add with the fruit directly in the Food Pusher.
9. If the soft-serve fruit mixture stops dispensing, the Chute may be
clogged. Turn unit off IMMEDIATELY and unplug from electrical
outlet. Remove the Dispenser by turning clockwise and take out
the Auger. Wipe clean and reassemble the Frozen Dessert Maker.
10.NEVER try to force ingredients through the Chute if ingredients
are not dispensing.
11.Unplug unit from outlet when finished.
12.Follow the directions in the Cleaning & Maintenance section to
clean the machine.
ASSEMBLY - SLICER/GRATER
1. Place Feed Tube/Cone Holder (I) in Motor Base (A) aligning tabs.
Rotate counter-clockwise a quarter turn to the left until Feed
Tube/Cone Holder (I) is straight and into the locked position.
2. Install desired Cone (J) inside Cone Holder (I) and gently turn
clockwise until it stops turning.
3. Place Splash Guard (L) over end of Cone Holder (I) and rotate
counter-clockwise a quarter turn to the left until it is straight with
the lip facing downward.
4. Plug in the Motor Base.
NOTE: Do not operate unit for more than 2 minutes continuously at
any one time.
6

WARNING: Your appliance has an On/OFF Button. Before running the
appliance, always make sure that the cone is locked in position. To
ensure the cone is properly installed, Press the ON/OFF Switch (B) to
the ON position once or twice for 2 seconds and then press to OFF
position.
HOW TO USE - SLICER/GRATER
1. Place food in the Feed Tube and push down using the
Food Pusher as needed.
2. Place a bowl or serving dish directly below the Splash Guard.
3. Do not operate the appliance empty or with any of the cones
stored.
4. Do not chop, grate or slice raw or cooked meat.
5. Do not use your hands, always use the Food Pusher.
6. Do not remove the cones until the motor has completely
stopped.
7. To change Cones, unplug the Motor Base, remove the Splash
Guard and turn the Cone counter-clockwise until it releases from
the tabs and gently pull out.
IMPORTANT: Use firm ingredients to avoid accumulation in the Cone
Holder. It may be necessary to cut certain foods into smaller pieces to
fit through the Feed Tube.
7
 Loading...