


CKM25
OWNER’S MANUAL
Model No. CKM25

IMPORTANT SAFEGUARDS
WARNING: A risk of fire and electric shock exists in all
electrical appliances and may cause personal injury or
death. Please follow all safety instructions.
When using electrical appliances, basic safety precautions should
always be followed including the following:
1. Read all instructions before using appliance.
2. To protect against risk of electrical shock, do not immerse or
rinse Motor Body, cord or plug in water or any other liquid.
3. This appliance is not for use by children.
4. Close supervision is necessary when any appliance is used
near children.
5. Unplug from outlet when not in use, before putting on or taking
off parts and before cleaning. To disconnect, grasp plug and
pull from electrical outlet. Never pull cord.
6. Avoid contacting moving parts.
7. Do not operate any appliance with a frayed or damaged cord,
or plug or after the appliance malfunctions or has been
dropped or damaged in any manner. Contact Consumer
Service for return authorization, examination, repair or electrical
or mechanical adjustment.
8. Do not let cord hang over edge of table or counter, or touch
hot surfaces including the stove.
9. Do not use outdoors or while standing in a damp area.
10. Keep hands, hair, clothing, as well as utensils away from
moving parts and Discs while processing to prevent the risk
of severe injury to persons, or damage to the Cookie Press.
Handle Discs and Tips carefully when removing, inserting
or cleaning.
11. Be certain Tube and Tube Cover are securely locked in place
before operating appliance. Do not attempt to remove Tube or
Tube Cover while operating.
12. Do not place on or near a hot gas or electric burner, or in a
heated oven.
13. The use of accessory attachments not recommended or sold
by the manufacturer may cause fire, electric shock or injury.
14. Do not use appliance for other than intended use.
SAVE THESE INSTRUCTIONS
FOR HOUSEHOLD USE ONLY
1

Introduction
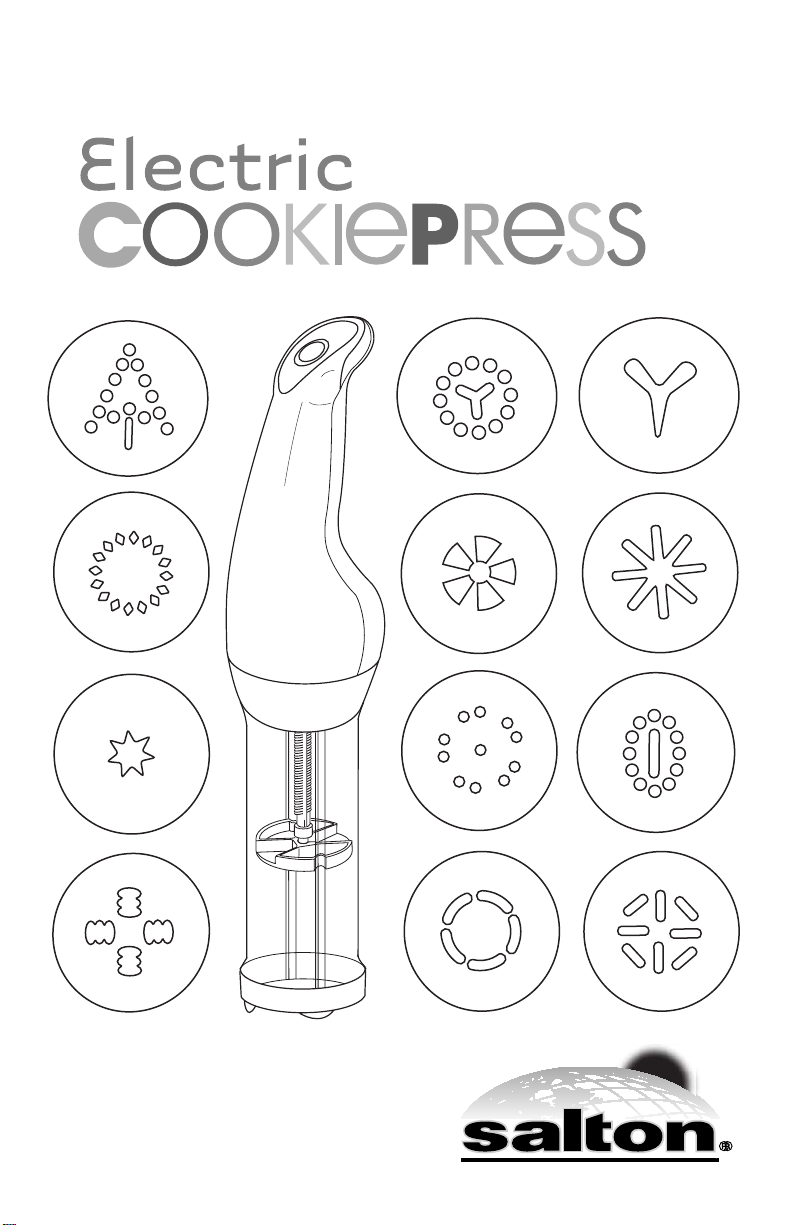
Congratulations on your purchase of the Salton® CKM25 Electric
Cookie Press. With the press of a button, this Cookie Press allows
you to make a delicious and appealing variety of cookies. Push
button operation means each and every cookie will be fashioned to
perfection — no guess work involved. Make bakery style cookies in
your own home. . . quickly change from a Cookie Disc to a Filler Tip
and you're ready to add the final flourishes to pastries, cakes and
candies. The Electric Cookie Press comes complete with a wide
selection of interchangeable Cookie Discs and Filler Tips. Get
creative and make today a special occasion to remember!
Before Using for the First Time
1. Carefully unpack the Cookie Press and all accessories.
2. After unpacking, wash Cookie Discs, Filler Tips, Filler Tip
Adapter, Tube Cover, Filler Tip Cover, Tube, Cam Disc, Press
Disc and Cam Shaft with warm, soapy water. Rinse and dry
thoroughly.
3. Make sure the unit is unplugged and then wipe all surfaces
with a slightly moistened, soft cloth and dry thoroughly. Never
immerse the Motor Body, plug or cord in water or any other
liquid. Do not use steel wool, scouring pads or abrasive
cleansers as they will damage the finish.
4. Thoroughly dry all parts so that no water enters the
Motor Body.
Polarized Plug
This appliance has a polarized plug (one blade is wider than the
other). As a safety feature to reduce the risk of electrical shock, this
plug is intended to fit in a polarized outlet only one way. If the plug
does not fit fully into the outlet, reverse the plug. If it still does not
fit, contact a qualified electrician. Do not attempt to defeat this
safety feature.
2
Getting To Know Your Salton
®
Electric Cookie Press
Before using your Electric Cookie Press for the first time, you must
become familiar with all of the parts. Read all instructions and
safeguards carefully.
PRODUCT MAY VARY SLIGHTLY FROM ILLUSTRATIONS
2.
5.
7.
4.
8.
1.
6.
9.
10.
3.
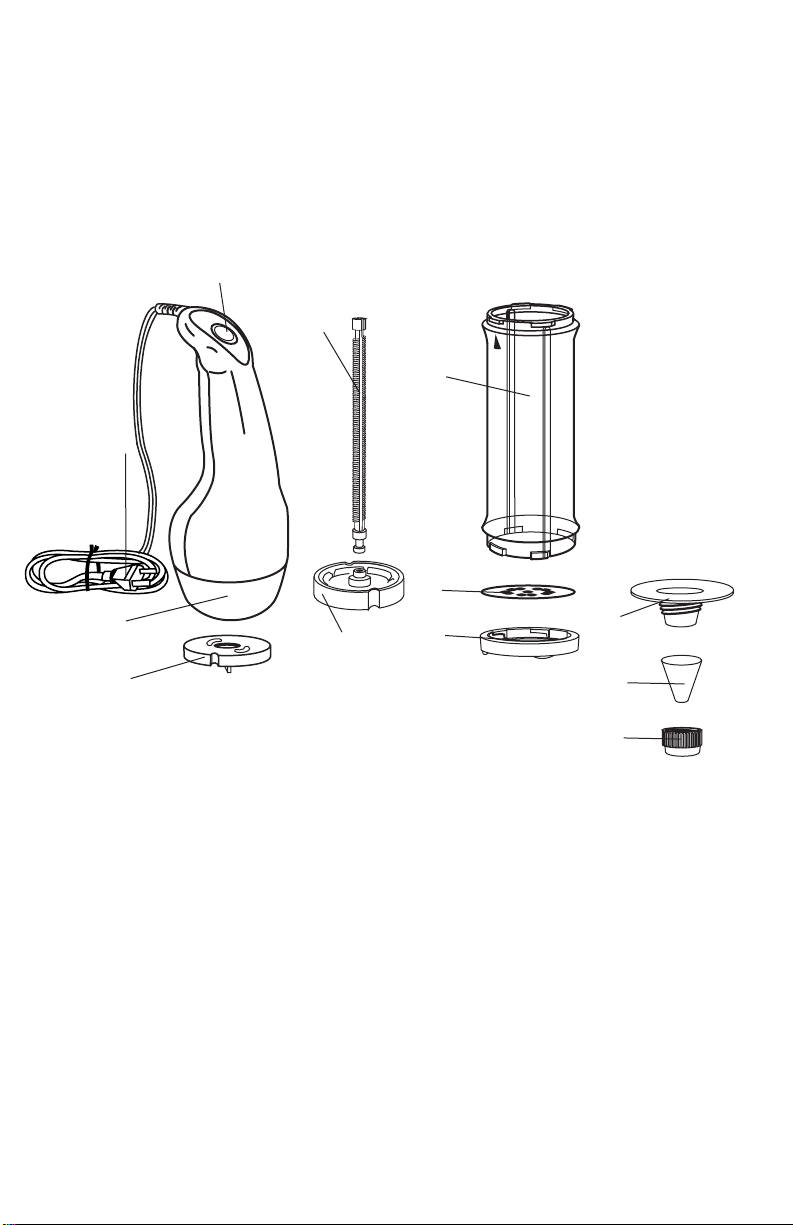
1. Motor Body
2. ON/OFF Button
3. Cam Disc (P/N 70701A)
4. Polarized Plug
5. Cam Shaft (P/N 70702A)
6. Press Disc (P/N 70703A)
7. Tube (P/N 70704)
8. Cookie Disc
9. Tube Cover (P/N 70706)
10. Filler Tip Adapter (P/N 70705)
11. Filler Tip
12. Filler Tip Cover (P/N 70707)
3
Cookie Disc
Assembly
11.
12.
Filler Tip Assembly
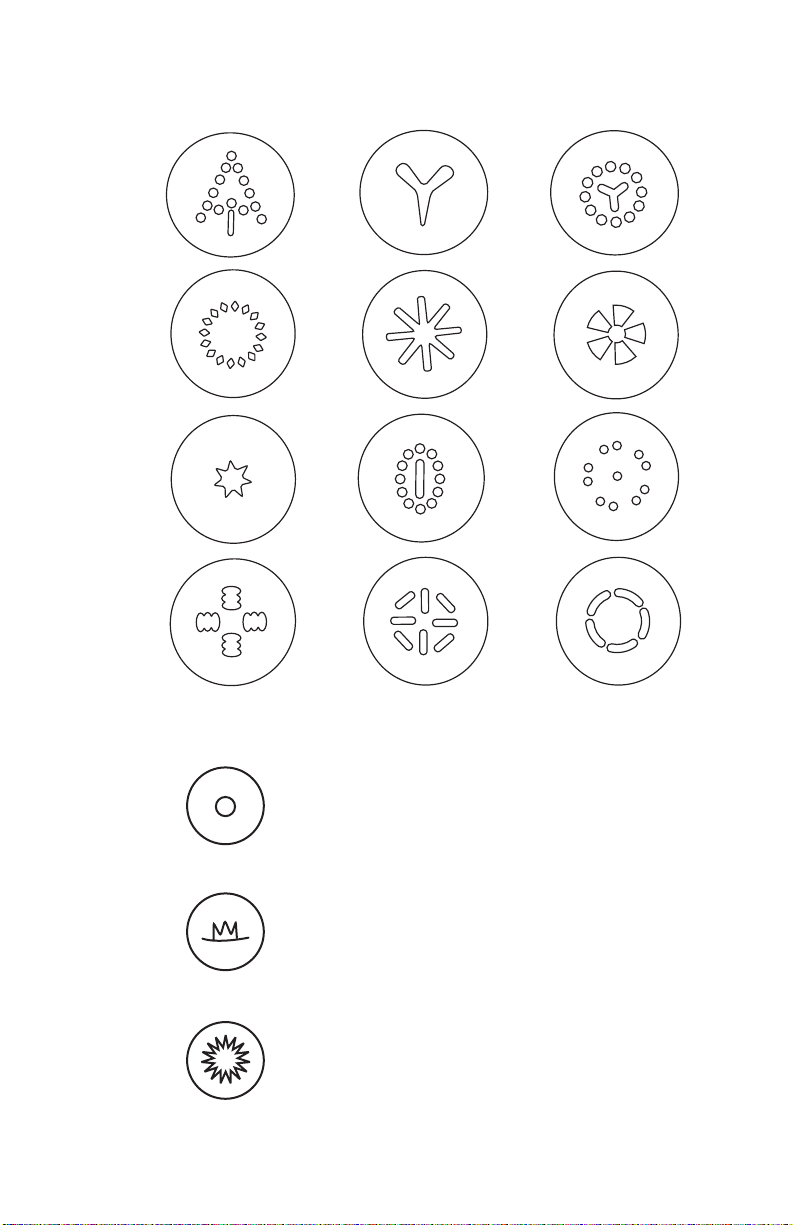
Electric Cookie Press Discs and Tips
1.
2.
3.
4.
5.
6.
7.
8.
9.
10.
11.
12.
1.
Cookie Discs Set
(P/N 70708-SET)
Individual Discs:
(P/N 70708-1, 70708-2, 70708-3,
70708-4, 70708-5, 70708-6,
5.
70708-7, 70708-8, 70708-9,
70708-10, 70708-11, 70708-12)
Filler Tips Set (P/N 70709-SET)
Individual Tips:
(P/N 70709-1, 70709-5, 70709-9)
9.
Assembly Instructions
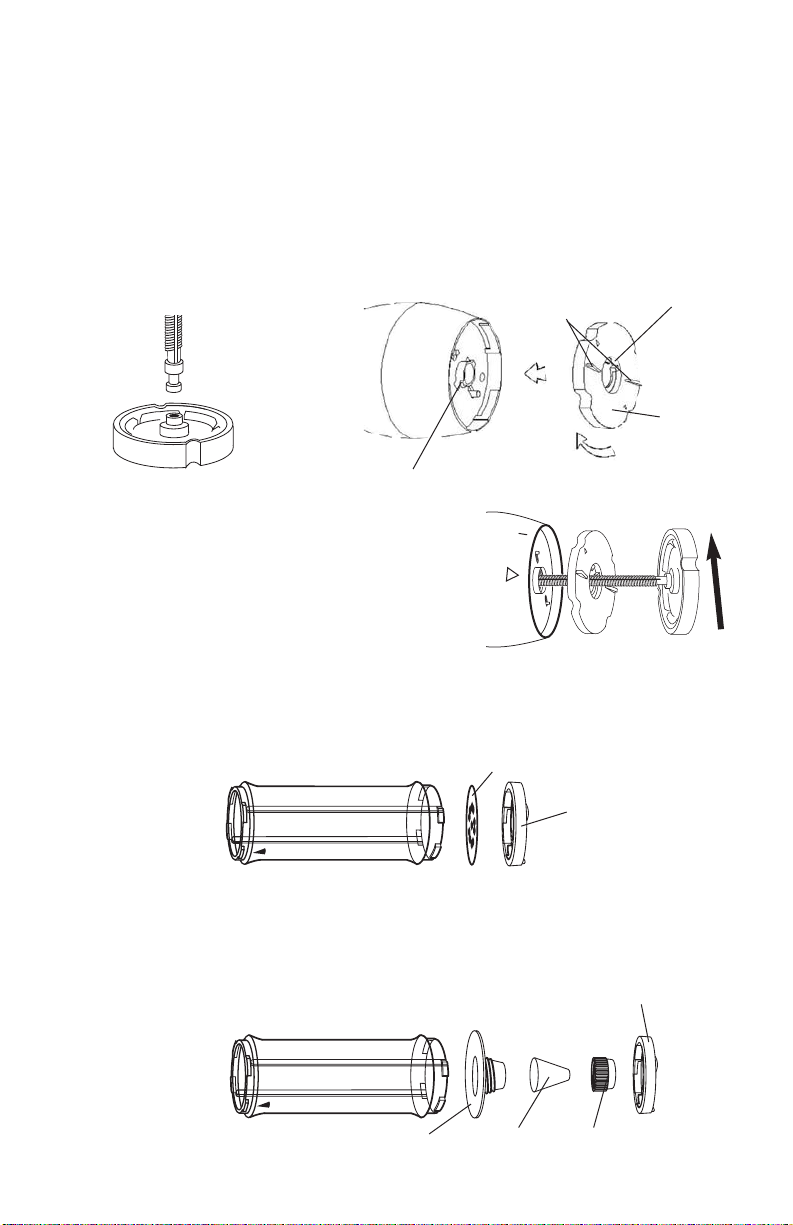
1. Attach Cam Shaft to the Press Disc by inserting stem of the Shaft
into the Press Disc’s center hole. Press firmly. You will hear a click
as the Shaft snaps in place. (See Figure 1.)
2. Line the Tabs on the Motor Body up with the slots on the Cam
Disc. Insert Cam Disc into the Motor Body. Using the two Grips
on the Cam Disc, turn slightly clockwise until the Disc clicks into
position. (See Figure 2.)
Grips
Tabs
Figure 1
3. Fit the Shaft all the way inside the
unit, the outside contours of the
K
C
O
L
Figure 2
2 Discs will line up. (See Figure 3.)
NOTE: Turn Cam Disc one click
counter-clockwise if Shaft is
difficult to insert into Motor Body.
Figure 3
4. Select a Disc and place it inside the Tube Cover. Then place the
Tube into the Tube Cover, turning clockwise until locked. (See
Figure 4.)
Tube with Disc Assembly
Cookie Disc
Slots
Cam Disc
Figure 4
Tube Cover
5. If a Filler Tip is to be used, refer to Figure 5 and fit the desired Tip
over the Filler Tip Adapter and secure it with the Filler Tip Cover.
Place the Filler Tip Assembly inside the Tube Cover. Then place
the Tube into the Tube Cover, turning clockwise until locked. (See
Figure 5.)
Figure 5
Tube with Tip Assembly
Tip Adapter
5
Filler
Tip
Tube Cover
Filler
Tip Cover
Assembly Instructions (Continued)
6. With a spoon or spatula, load freshly prepared cookie dough.
NOTE: To ensure proper operation, do not fill the Tube past
the MAX Fill Line. DO NOT OVERFILL!
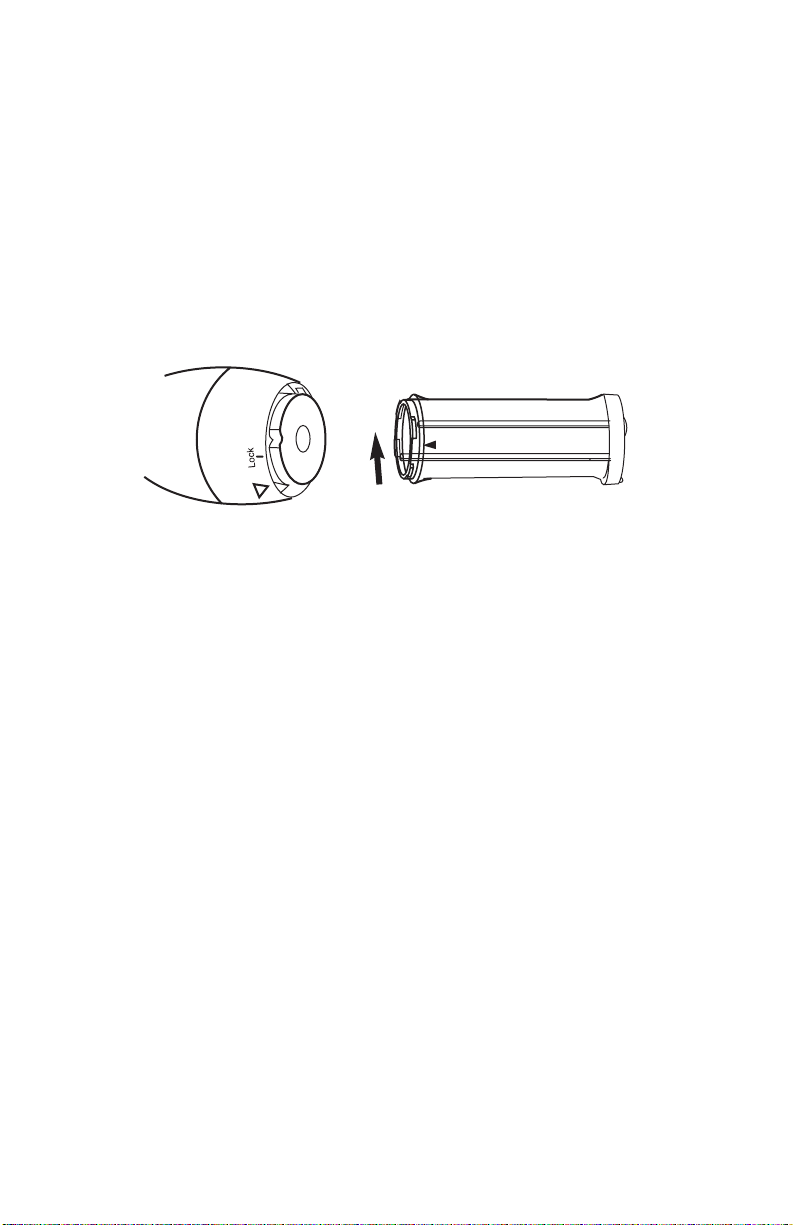
7. Look inside the Tube to see the ridges extending from top to
bottom. These ridges align with the outside contours of the 2
Discs. In the UNLOCK position, the arrow on the Tube lines up
with the arrow on the Handle. Grasp Tube firmly and turn
clockwise until the top arrow on the Tube lines up in the LOCK
position. (See Figure 6.)
8. Your Cookie Press is now fully assembled and ready for use.
6
Instructions for Making Cookies
The proper consistency of cookie dough is very important. If the
dough is too stiff, it won't release from the Cookie Press. If the
dough is too soft or sticky, chill in the refrigerator for 15 minutes.
For best results, use the recipes in this booklet until you get a feel
for the proper consistency of the dough. We do not recommend
using store-bought refrigerated cookie doughs.
1. Plug the fully assembled and filled Cookie Press into a standard
120V AC outlet.
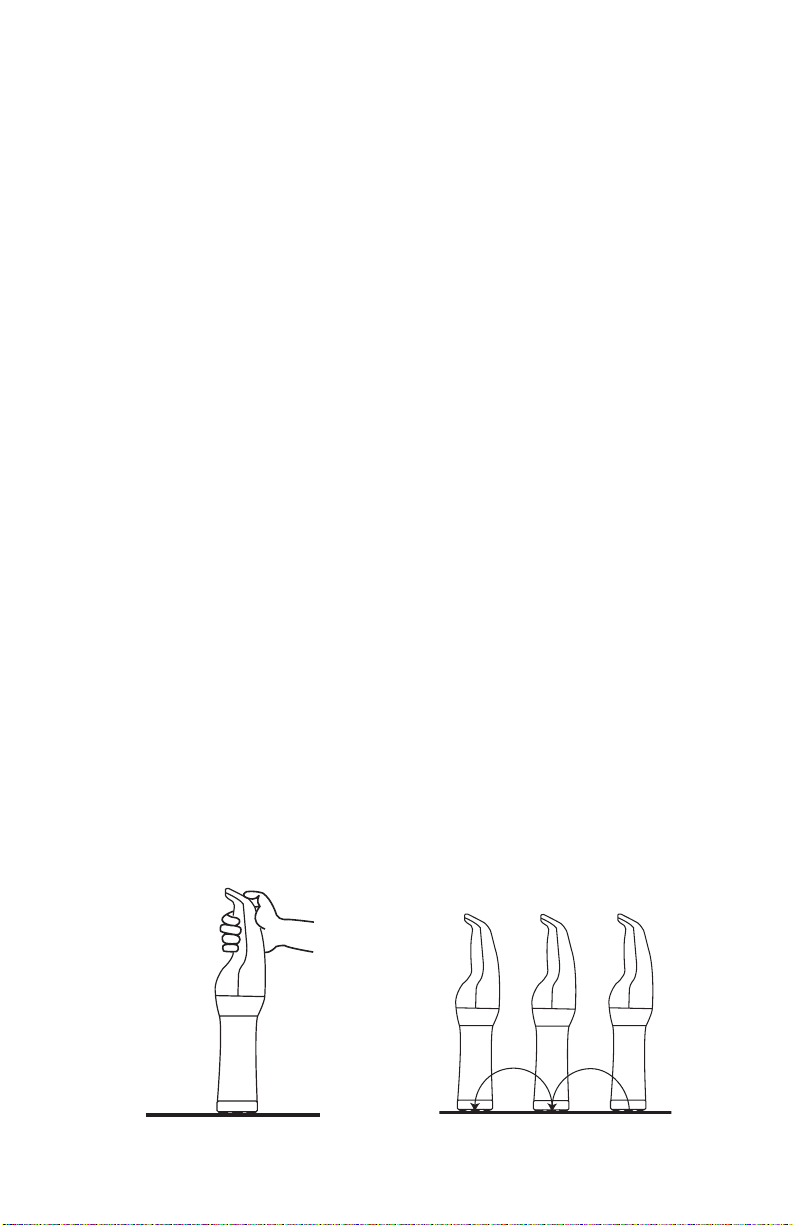
2. Stand the Cookie Press upright and press against the surface
of the cookie sheet. Refer to Figure 7. The Cookie Press has
been specially designed for thumb operation. Thumb operation
provides better balance for placing the cookie shapes on the
cookie sheets. (See Figure 8.)
3. When the Tube is filled with cookie dough and the ON/OFF
Button is pressed, the Press Disc pushes downward, forcing
the dough through the Disc or Tip to form an attractive cookie
or decoration.
4. Holding the Cookie Press in position against the cookie sheet,
press and hold the ON/OFF Button until the air pockets have
been removed and the dough starts to emerge from the
openings in the Cookie Disc.
5. Press a cookie for 2 seconds and note the result.
NOTE: The time to press each cookie will be based on the
desired thickness and shape of your cookie and the dough
you are using.
6. Release the ON/OFF Button and quickly step to the next
position on the cookie sheet. Refer to Figure 8.
NOTE: It may be necessary to experiment with varying times and
pressures until the desired cookie thickness is achieved.
Figure 7
Figure 8
7
 Loading...