

Salton DH-1171 Instruction Booklet
®
Food Dehydrator
Instruction Booklet
Model: DH-1171

IMPORTANT SAFEGUARDS
When using electrical appliances, basic safety precautions should always be
followed including the following:
1. Read all instructions.
2. DO NOT touch hot surfaces.
3. To protect against electrical hazards, do not immerse cord, plugs,
or the appliance in water or any other liquid.
4. Close supervision is necessary when any appliance is used by or near children.
5. Unplug from outlet when not in use and before cleaning. Allow to cool
before putting on or taking off parts.
6. DO NOT operate any appliance with a damaged cord or plug or after
the appliance malfunctions, or has been damaged in any manner.
Return appliance to Salton for examination, repair or adjustment.
See Warranty section.
7. The use of accessories or attachments not recommended by Salton
may cause hazards.
8. DO NOT use outdoors.
9. DO NOT let cord hang over edge of table or counter, or touch hot surfaces.
10. DO NOT place on or near a hot gas or electric burner, or in a heated oven.
11. DO NOT use for other than intended use.
12. To disconnect, turn the power switch to ‘OFF’, then unplug from
the wall outlet.
13. This appliance is for Household Use Only. DO NOT use appliance for other
than its intended use.
14. DO NOT pour liquids into the appliance.
15. DO NOToperate near combustible or pressurized spray cans.
16. DO NOT leave unit unattended while in use for longer than the times
indicated in this instruction booklet.
SAVE THESE INSTRUCTIONS
HOUSEHOLD USE ONLY
2
3
POLARIZED PLUG
This appliance has a polarized plug (one blade is wider than the other). To reduce
the risk of electric shock, this plug will fit in a polarized outlet only one way.
If the plug does not fit fully in the outlet, reverse the plug. If it still does not fit,
contact a qualified electrician. Do not modify the plug in any way.
INTRODUCTION
Your Salton Food Dehydrator provides a fast economic way to dehydrate food.
Dried food can be eaten as a snack or used in preparation of meals. Follow
the easy directions in this booklet to dehydrate fruits, vegetables, meats and
more. You will discover different tastes and textures by drying different types
of food. You can even use the Dehydrator to dry flowers for arrangements
or potpourri.
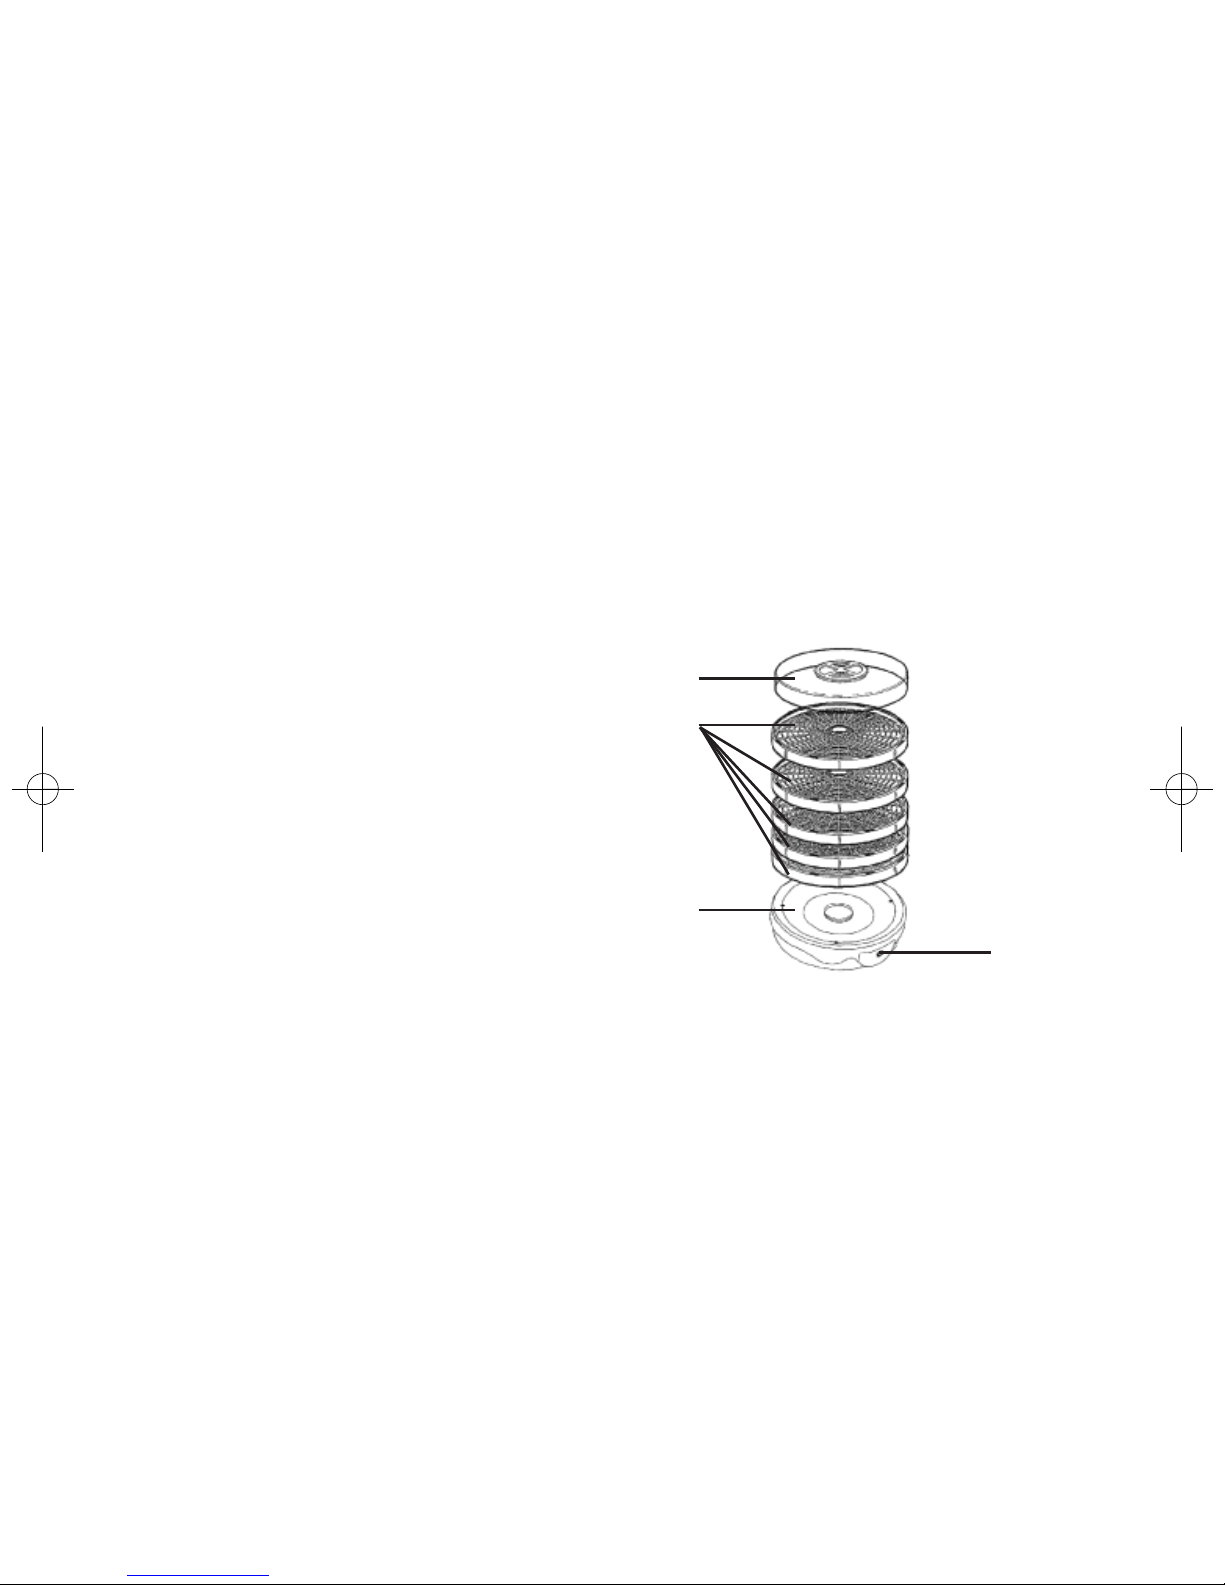
DESCRIPTION OF PARTS
1. Vented See-through Cover
2. 5 Stackable Dehydrator Trays
3. Base
4. On/Off Switch
BEFORE FIRST USE
1. Unpack and remove all parts and packaging materials from the carton.
2. DO NOT plug the power cord into any outlet before reading the instructions.
3. Wash the Dehydrator Trays and Cover in warm soapy water. Rinse well and dry.
4. Wipe the Base with a damp cloth. NEVER IMMERSE THE BASE IN WATER
OR ANY OTHER LIQUID.
1
2
3
4

HOW TO USE
1. Before using your Salton Food Dehydrator read this Instruction Booklet.
2. Prepare the food according to its type (See the sections in the following
pages for fruits, vegetables, etc.). Arrange food on Dehydrator Trays. Food
should be placed on the Dehydrator Trays so the slices are not overlapping.
Foods that take a longer period of time to dry (consult the Drying Tables)
should be placed near the bottom of the Dehydrator Tray stack.
3. Put the Dehydrator Trays aside.
4. Place the Base on a flat, smooth heatproof surface. Plug into wall outlet,
press the On/Off switch to ‘I’ (On) and preheat for 5 minutes.
5. Place full Dehydrator Trays on the Base. Place Cover on top of trays and
allow food to dry for the recommended drying times in the Drying Charts.
6. Begin to check on food before the dehydration time is complete.
7. When dehydration is completed remove individual pieces and store
in containers or food bags (See the Packing and Storage section).
If some pieces are not yet done, leave them on the dehydrator
and check frequently until all food dehydration is complete.
8. Press the On/Off Switch to the ‘O’ (Off) position and unplug from wall outlet.
9. Follow the instructions in the Care and Maintenance section.
SELECTING AND PREPARING FOODS FOR DEHYDRATION
All foods to be dried should be in good condition.
• Fruits:
Almost all fruits are suitable for drying but some require more drying time
than others. Check the guidelines in the Fruit Drying Chart . Select fruits
that are just ripe as they have the highest natural form of sugar and
are best for drying. Fruits that are not ripe may have a flat, bitter taste.
• Vegetables:
Choose vegetables that are fresh and tender without spoiled spots.
• Meat, poultry and fish:
Use fresh not frozen, with as little fat as possible.
4

Preparation and Pretreatment of Fruits
1. Wash all fresh fruit thoroughly. Dry.
2. Remove any blemishes or spoiled spots.
3. Pit fruits such as cherries, apricots, prunes, etc.
4. Smaller fruits such as grapes may be dried whole.
5. Fruits that have been waxed to prevent moisture loss should always
be peeled. Peeling is optional with other fruits.
6. Most fruits dry best when sliced between 6 mm (1/4") and 13 mm (1/2").
7. Many of the light coloured fruits such as apples, pears, peaches, etc.
tend to darken during drying and storage. If desired, you can prevent
discoloration by pretreating fruit. Slice fruit directly into one of the four
following solutions:
a) Pineapple or lemon juice. Slice fruit directly into juice. Remove fruit
after 2 minutes. Drain and remove excess moisture by placing on
paper towels. Pat dry then place on Dehydrating Trays.
b) 5 ml (1 tsp) Sodium Bisulfite in 1 litre/quart of water. Remove fruit
after 2 minutes. Drain and remove excess moisture by placing on
paper towels. Pat dry then place on Dehydrating Trays.
NOTE: Sodium Bisulfite must be food-safe (USP) grade only.
c) 15 ml (1 tbsp.) ascorbic acid or citric acid powder, (found in most
pharmacies) and 2 litres/quarts of water. Remove fruit after
2 minutes. Drain and remove excess moisture by placing on paper
towels. Pat dry then place on Dehydrating Tray.
d) Syrup blanching: To achieve a sweeter tasting candied fruit, use syrup
blanching to retain the colour of fruit. Mix 250ml (1 cup) sugar,
250ml (1 cup) white corn syrup and 500ml (2 cups) water in a large
heavy saucepan. Add .7 kgs (1–1/2 lbs.) of cut fruit. Bring to a boil.
Remove from heat and let stand (do not stir) about 35 minutes. Drain
and lightly rinse with water. Remove excess moisture by placing on
paper towels. Pat dry then place on Dehydrating Trays.
5

NOTE:
• Fruits with tough skins (grapes, prunes, cherries, etc.) may be water
blanched. Dip fruits in boiling water for a few seconds to crack the skins.
This will allow moisture inside to surface more readily during drying.
• Before drying pretreated or blanched food, remove any excess moisture
by placing the food on paper towels or clean cloths and pat dry.
Fruit Drying Chart
Exact dehydrating time varies greatly depending on several factors: Type, size,
quality of food, quantity placed on trays and personal preference. It will help
to keep notes on the type of food, weight before and after drying, total drying
time and final results.
FRUIT PREPARATION TEXTURE TIME
WHEN DRY (Hrs)
Apples Peel (if desired), core and slice. Pliable 4 – 15
Pretreat if desired.
Apricots Dry in halves or quarters. Pliable 10 – 36
Pretreat if desired.
Bananas Remove peel, cut into 3 mm Crisp 8 – 36
(1/8") slices.
Berries Leave berries whole or cut Leathery & crisp 8 – 24
strawberries in 10 mm (3/8")
slices. Pretreat if desired.
Blanch wax coated berries
in water bath for 1 – 2 minutes
Cherries Pitting is optional. Stem when Leathery & sticky 6 – 36
ready to use. Cut in half. Place
skin side down on tray.
Cranberries Blanch in boiling water Pliable 4 – 24
1 – 2 minutes. Cut in half
or chop.
Grapes Remove stems. Blanch in Pliable 6 – 36
(Raisins) boiling water for
1 – 2 minutes.
Kiwi Peel, remove seeds and Pliable 15 – 24
cut into 6 mm (1/4") slices.
6
 Loading...