

Salton CU-60 User Manual
COFFEE URN
Model: CU-60

IMPORTANT SAFEGUARDS
When using electrical appliances, basic safety precautions should
always be followed including the following:
1. Read all instructions.
2. Do not touch hot surfaces. Use handles or knobs.
3. To protect against electrical hazards, do not immerse cord, plugs,
or the appliance in water or other liquid.
4.
Close supervision is necessary when any appliance is used by or near children.
5. Unplug from outlet when not in use and before cleaning. Allow to cool
before putting on or taking off parts, and before cleaning the appliance.
6. Do not operate any appliance with a damaged cord or plug or after the
appliance malfunctions, or has been damaged in any manner. Return
appliance to Salton for examination, repair or adjustment. See Warranty.
7. The use of accessories or attachments not recommended by Salton
may cause hazards.
8. Do not use outdoors.
9. Do not let cord hang over edge of table or counter, or touch hot surfaces.
10. Do not place on or near a hot gas or electric burner, or in a heated oven.
11.
Extreme caution must be used when moving an appliance containing hot liquids.
12. Do not leave unit unattended while in use.
13. Ensure that the Cover is securely in place before brewing and when serving
coffee.When placing the Cover on the Body of the Coffee Urn, make sure
that one Locking Tab is facing the front and the other is facing the back
of the Coffee Urn. Grasp the Glass Knob carefully and turn the Cover
clockwise until the Locking Tabs are fully engaged inside the handles
of the Coffee Urn.
14. Scalding may occur if the Cover is removed during the brewing cycle.
When removing the Cover from the Body, grasp the Glass Knob carefully
and turn the Cover counterclockwise to unlock the Cover. NOTE: During
and after brewing, the Glass Knob will be hot.Always use a pot holder or
oven mitt to remove or replace the Cover.
SAVE THESE INSTRUCTIONS
2
GROUNDED PLUG
To reduce the risk of electric shock this appliance has a grounded plug.
(2 blades and 1 pin) If the plug does not fit fully into the electrical outlet contact
a qualified electrician. Do not modify the plug in any way or use an adaptor.
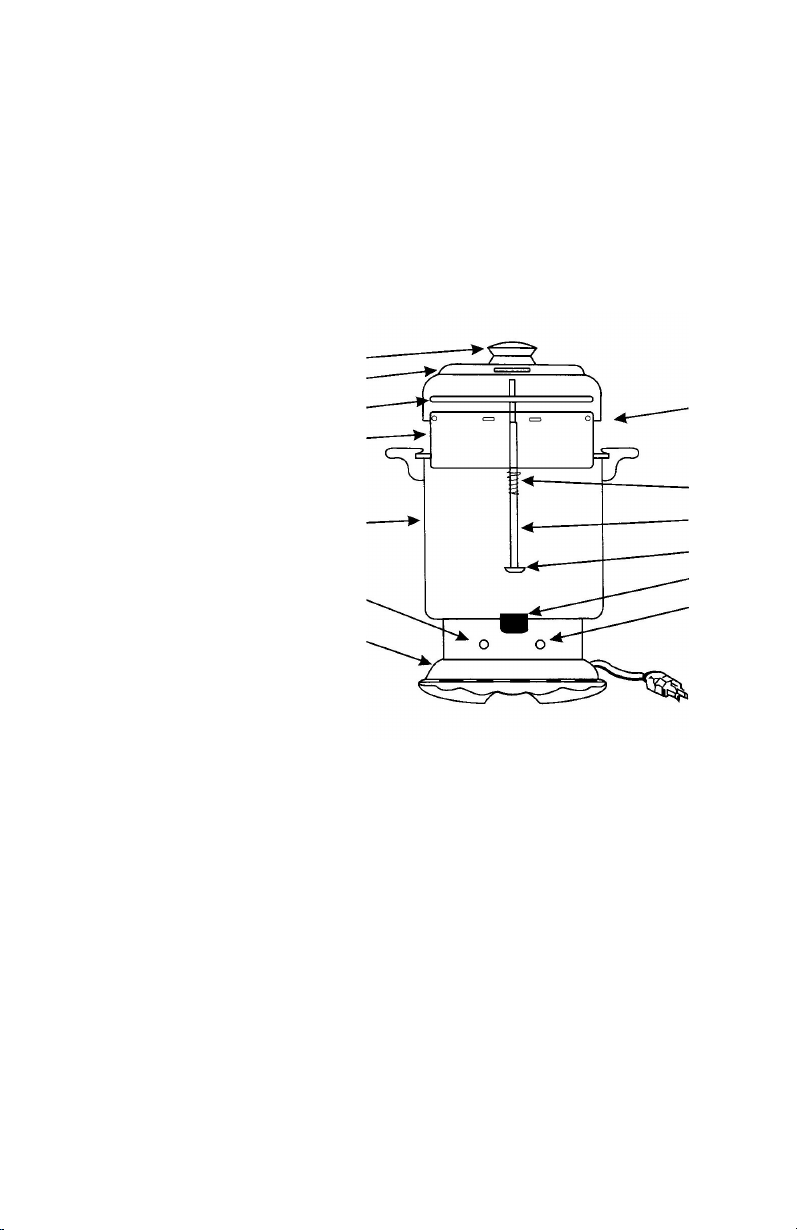
DESCRIPTION OF PARTS
1. Glass Knob
2. Cover
3. Spreader
4. Basket
5. Body
1
2
3
4
8
6. ‘On’ Indicator Light
7. Base
8. Locking Tab
9. Spring
10. Pump Tube
5
6
7
9
10
11
12
13
11. Washer
12. Heat Well
13. ‘Ready’ Indicator Light
BEFORE FIRST USE
Wash cover and all internal parts in warm soapy water or in the dishwasher
to remove any residue left over from the manufacturing process.Wash the
inside of the Body with warm soapy water, rinse and dry. NEVER IMMERSE
THE BODY IN WATER OR ANY OTHER LIQUID. Wipe outside surface with a
damp cloth and dry.
3
 Loading...