

Salton VS-30, COMBO II User Manual
Model: VS-30
COMBO
II
STEAMER

IMPORTANT SAFEGUARDS
When using electrical appliances, basic safety precautions should always be
followed including the following:
1. Read all instructions.
2. Do not touch hot surfaces. Use handles or knobs.
3. To protect against electrical hazards, do not immerse cord, plugs, or the
appliance in water or other liquid.
4.
Close supervision is necessary when any appliance is used by or near children.
5. Unplug from outlet when not in use and before cleaning. Allow to cool
before putting on or taking off parts, and before cleaning the appliance.
6. Do not operate any appliance with a damaged cord or plug or after the
appliance malfunctions, or has been damaged in any manner. Return
appliance to Salton for examination, repair or adjustment. See Warranty.
7. The use of accessories or attachments not recommended by Salton may
cause hazards.
8. Do not use outdoors.
9. Do not let cord hang over edge of table or counter, or touch hot surfaces.
10. Do not place on or near a hot gas or electric burner, or in a heated oven.
11. Extreme caution must be used when moving an appliance containing hot
liquids.
12. Prior to connecting or disconnecting plug from wall outlet, turn any
control to "off".
13. This appliance is for Household Use Only. Do not use appliance for other
than its intended use.
14. Do not leave unit unattended while in use.
15. CAUTION:This appliance generates heat and escaping steam during use.
Proper precautions must be taken to prevent the risk of burns, fires or
other damage to persons or property.
16. This appliance generates steam – do not operate uncovered.
17. Use oven mitts or potholders when removing Cover during operation.
18. Always open the Cover away from your face to avoid escaping steam.
2
SAVE THESE INSTRUCTIONS
HOUSEHOLD USE ONLY
POLARIZED PLUG
This appliance has a polarized plug (one blade is wider than the other).To
reduce the risk of electric shock, this plug will fit in a polarized outlet only
one way. If the plug does not fit fully in the outlet, reverse the plug. If it still
does not fit, contact a qualified electrician. Do not modify the plug in any way.
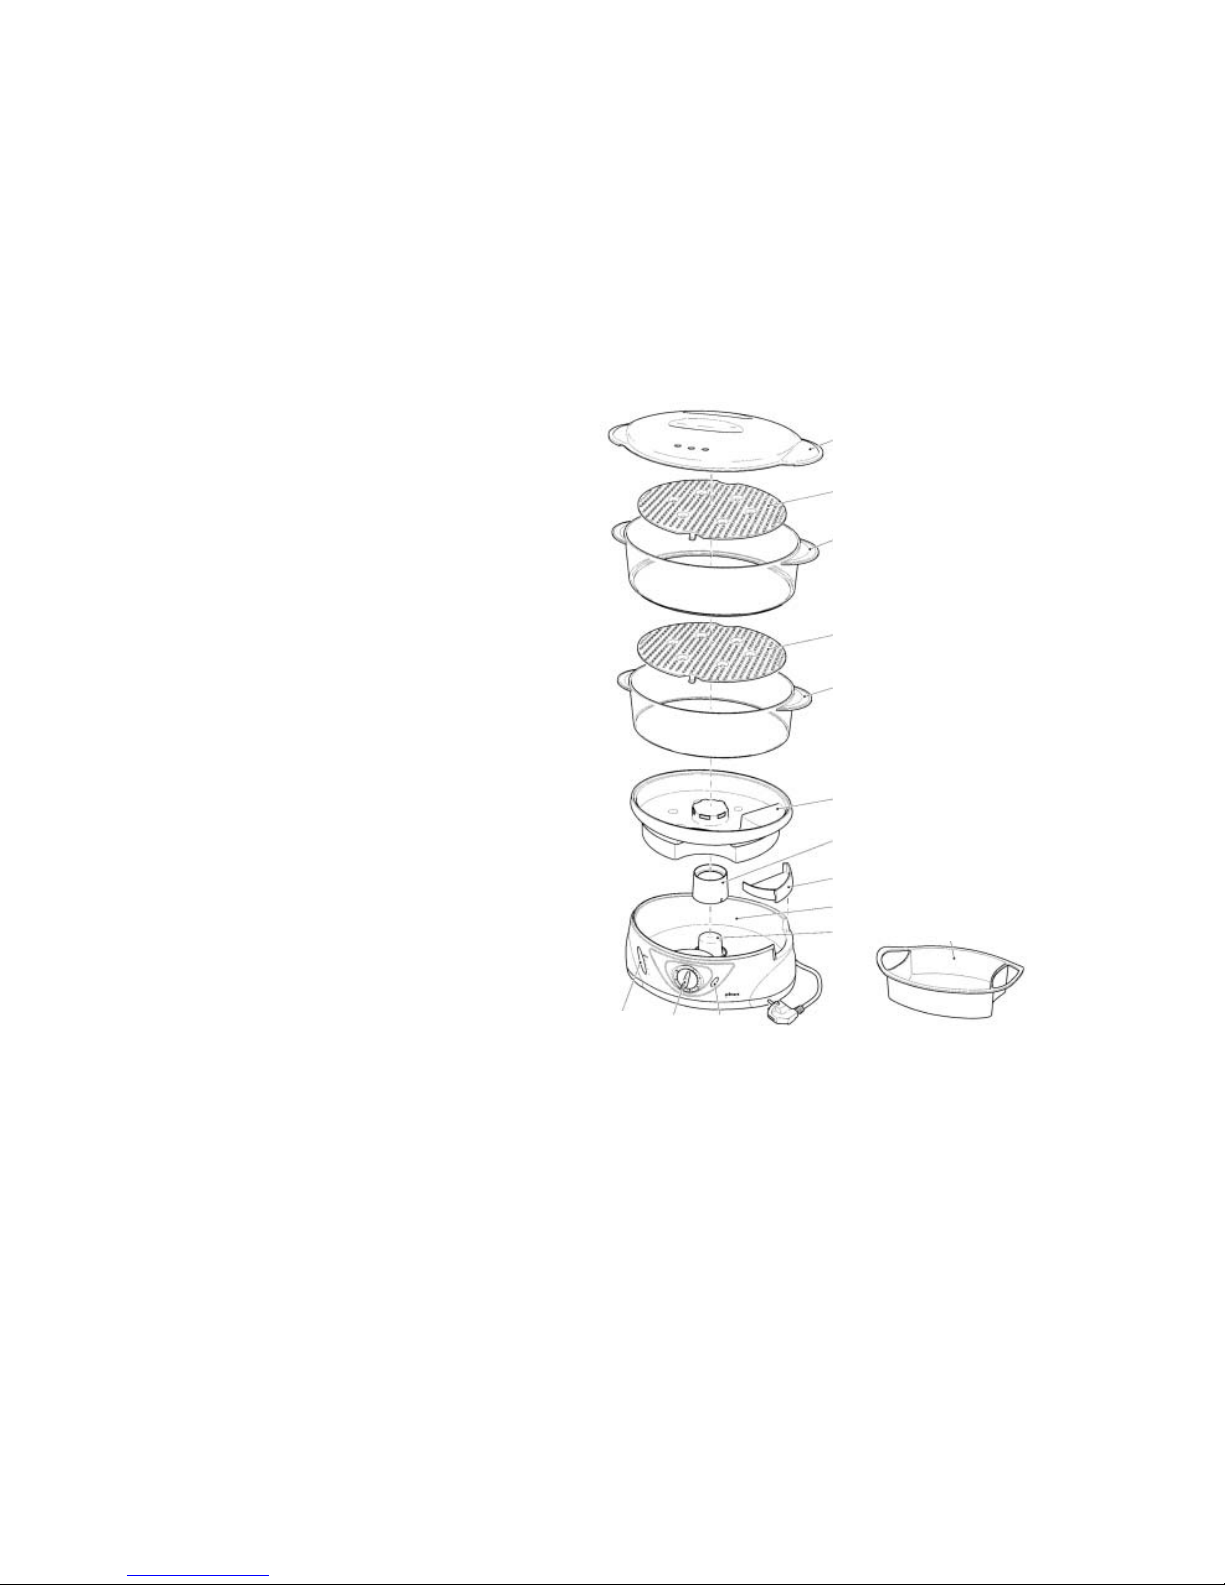
DESCRIPTION OF PARTS
1. Cover
2. Steaming Bowl Partitions (2)
3. Large Steaming Bowl
4. Small Steaming Bowl
5. Drip Tray
6. Instant Steam Ring
7. Water Refill Drawer
8. Base/Water Reservoir
9. Heating Element
10. Water Level Window
11. Timer
12. Indicator Light
13. Rice Bowl
BEFORE FIRST USE
Wash the Cover, Steaming Bowls, Rice Bowl, Partitions, Removable Ring and
Drip Tray in soapy water. Rinse and dry. Wipe the Base with a damp cloth.
Never immerse the Base in water or any other liquid.
3
10
11 12
9
8
7
6
5
13
4
2
3
2
1

HOW TO USE
1. Place Steamer on a level surface close to a 120 volt A.C. outlet. Do not place
under wall cabinets.
2. Fill the Water Reservoir with the maximum amount of cold water. Any excess
water can be emptied out at the end of the steaming cycle. If more than
60 minutes is required for steaming and water is not visible through the
Water Level Window you can add water by opening the Water Refill Drawer
during the steaming cycle and pour in enough water to reach up to the
maximum mark on the window.
NOTE: The maximum amount of water is 1.4 litres.This is enough water for
approximately, 75 – 80 minutes of steaming.
IMPORTANT: Do not add salt, pepper, seasonings, etc. or liquids other than
water to the Base.
3. Place the Instant Steam Ring over the Heating Element so that the notch
is at the bottom.
4. Place the Drip Tray on top of the Base.
5. Place the Steaming Bowl(s) on the Drip Tray.The Steaming Bowls can be
used in three different ways:
Single level (one bowl): Place food in either the Small or Large Steaming
Bowl. Place on the Drip Tray. Cover.
Single level (both bowls) If steaming larger items (eg. Corn on the cob),
place the Small Steaming Bowl on the Drip Tray. Remove the Partition from
the Large Steaming Bowl and place Bowl on top of the Small Steaming
Bowl. Place food in Bowl. Cover.
Multiple level: Place the items that need the longest steaming time in the
Small Steaming Bowl and place on the Drip Tray. Place the Large Steaming
Bowl on top of the smaller bowl. Place food in Large Steaming Bowl. Cover.
NOTE: To remove the Partition, place the Steaming Bowl upside down on a
flat surface. Push the side (right or left of the Partition tab) of the Steaming
Bowl out slightly and the Partition will fall out.
6. Plug unit into wall outlet.
4

7. Set Timer for recommended amount of time.
NOTE: (a) The Timer will work even if the unit is not plugged in. Ensure that
the Indicator Light is on once Timer is operating. (b) If the desired cooking
time is less than 10 minutes, turn the Timer past the 10 minute mark then
turn it back to the desired time.
8. When time has expired the Timer will ring once and the Steamer will shut
off automatically. To avoid overcooking, remove Steamer Bowl(s) immediately using a potholder or oven mitts.
9. Unplug unit and allow to cool completely before cleaning.
HELPFUL HINTS
1. Steam cooking times will vary depending on the size and amount of food
being cooked and the desired degree of doneness. Use the Steaming
Charts as a guide but experiment with this healthy method of cooking
by varying the cooking times. This will help you to obtain the best results
to suit your taste.
2. Smaller pieces of food steam cook faster than larger pieces; a single layer
steams faster than several layers and foods of uniform size will steam
more evenly.
3. Foods with longer steaming times should be placed on the lower level in
the small Steaming Basket. Once these foods are partially cooked, remove
the Cover and add the Large Steaming Bowl.
4.
Arrange food with spaces between pieces to allow for maximum steam flow.
5. When steaming large quantities of food, stir halfway through cooking.
6. Juices from meat or poultry should not drip onto other foods. Never place
meat or poultry in the upper Steaming Bowl above other foods.
7. Do not steam frozen meat, poultry or seafood.
5
 Loading...