

Salton CM1337 Instruction Booklet
Instruction Booklet
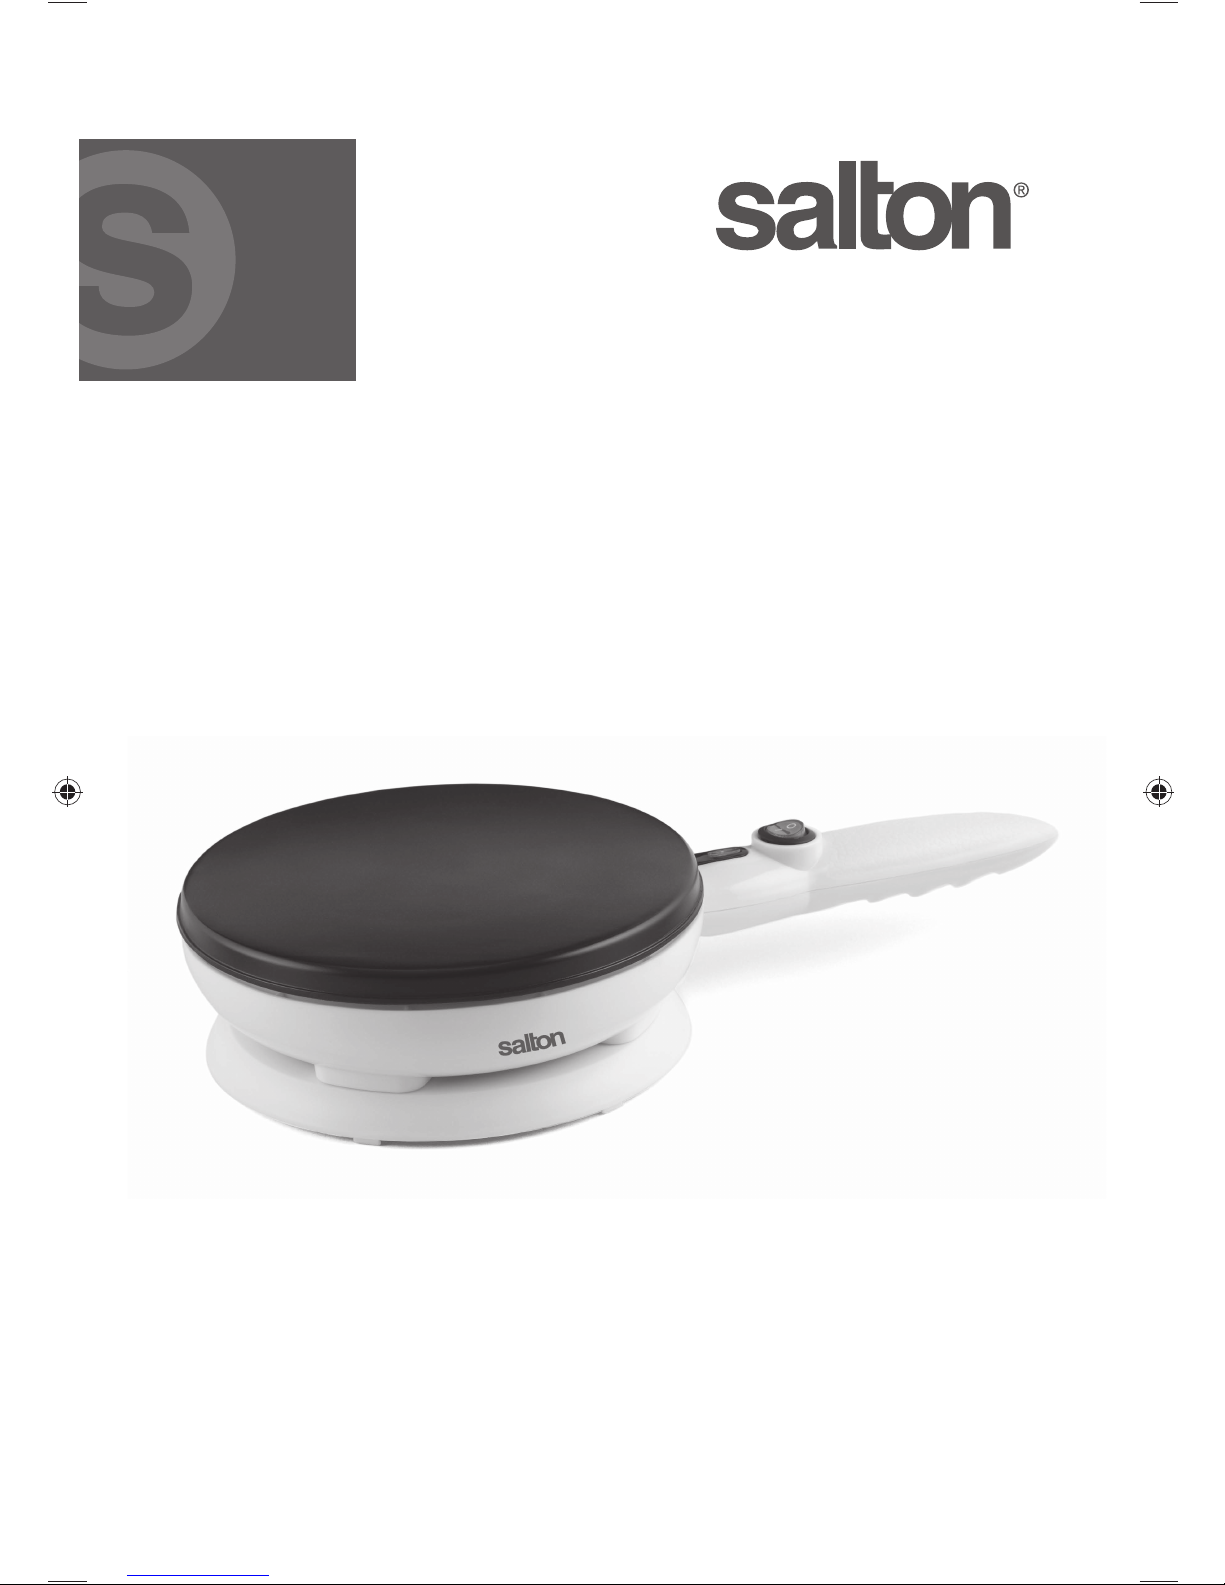
Model CM1337
crepe &
tortilla maker

3
IMPORTANT SAFEGUARDS
When using electrical appliances, basic safety precautions should always be
followed including the following:
1. Read all instructions.
2. Do not touch hot surfaces. Use handles or knobs.
3. To protect against electrical hazards, do not immerse cord, plugs or the
appliance in water or other liquid.
4. Use the appliance with the provided power base only.
5. Protect the appliance and power base from moisture. DO NOT allow water to
be poured or splashed on the appliance or the power base.
6. Close supervision is necessary when any appliance is used by or near children.
Children should be supervised to ensure that they do not play with the
appliance.
7. This appliance is not intended for use by persons, (including children),
with limited physical, sensory or mental abilities or who lack the necessary
experience and/or skills unless these persons act under the supervision of a
person responsible for their safety or they were instructed by such a person on
how to use the appliance.
8. Unplug from outlet when not in use and before cleaning. Allow to cool before
putting on or taking off parts, and before cleaning the appliance.
9. Do not operate any appliance with a damaged cord or plug or after the
appliance malfunctions, or has been damaged in any manner. Return appliance
to the nearest authorized service facility for examination, repair or adjustment.
All servicing, other than cleaning, should be performed by an authorized
service representative. See Warranty.
10. The use of accessories or attachments not recommended by the appliance
manufacturer may result in re, electric shock or injury to persons.
11. Do not use outdoors.
12. Do not let cord hang over edge of table or counter, or touch hot surfaces.
13. Do not place on or near a hot gas or electric burner, or in a heated oven.
14. Always attach plug to appliance rst, then plug cord into the wall outlet. To
disconnect, turn any control to ‘OFF’, then remove plug from wall outlet.
15. Do not use appliance for other than intended use.
16. Do not leave unit unattended while in use.
17. Extreme caution must be used when moving an appliance containing hot
liquids.
18. Unplug the unit from the wall outlet:
- if it malfunctions
- if it is not being used
- before cleaning
SAVE THESE INSTRUCTIONS
HOUSEHOLD USE ONLY

GROUNDED PLUG
To reduce the risk of electric shock this appliance has a grounded plug (2 blades
and 1 pin). If the plug does not t fully into the electrical outlet contact a quali ed
electrician. Do not modify the plug in any way or use an adaptor.
BEFORE FIRST USE
1. Read the instructions.
2. Remove all packing material and stickers. Do not remove the rating label.
3. Clean the baking surface by wiping with a damp cloth.
4. Season the baking surface by wiping with a paper towel moistened in a small
amount of vegetable oil. This needs to be done only the rst time that the crepe
maker is used.
5. Discard the rst crepe.
HOW TO USE
In all crepe batters, the proportions of our, eggs and liquid can be varied to produce
a thin, lacy crepe, a sturdier thicker crepe or an egg-y rich crepe. Adding butter
or margarine adds avour and makes removal from the pan easier. Oil may make
crepes stick slightly. Sugar adds crispness but may make crepes break in rolling.
Since dessert crepes have a sweetened lling and/or sauce, you can use a basic
batter without sugar for crepes you wish to fold or roll.
Making the rst few crepes takes a little practice. After the rst few you will
master the art of crepe making.
1. Place the power base on a dry level surface.
2. Place the Crepe Maker on the power base and plug into the wall outlet.
3. Switch to the ‘ON’ position.
Warning: Do not touch the baking plate. Appliance is getting hot!
4. After a few minutes, the indicator light will turn on. Now the Crepe Maker is
hot and you can start baking.
5. Pour the crepe batter into the batter dish.
6. Remove the Crepe Maker from the power base. Turn the Crepe Maker so that
the baking surface faces downward.
7. Hold the baking surface of the Crepe Maker into the batter dish for 3 seconds.
NOTE: Do not immerse the appliance too deep in the batter.
8. Move the Crepe Maker back and forth so that the complete baking surface is
covered by batter. NOTE: Do not hold the Crepe Maker in the batter for more
than 3 seconds. If the Crepe Maker is held too long in the tray, the crepe will
not stick to the baking surface.
9. Place the Crepe Maker back onto the power base.
10. The crepe is ready when the indicator light comes on or when the crepe has
reached the desired browning degree and steam is no longer visible.
11. Remove the Crepe Maker from the power base again and turn the Crepe
Maker over a plate so that the crepe falls off onto the plate. If it sticks, loosen
carefully at the edge with a plastic or wooden utensil. NOTE: It is not required
to brown the other side of the crepe.
12. For additional crepes follow the instructions above.
4

5
WARNING: DO NOT allow water to be splashed on the contact base or the
appliance. If water is splashed on the contact base or the appliance:
- Immediately unplug from the wall outlet
- Dry the power base with a dry kitchen towel
- Dry all surfaces of the appliance
- Allow time for the appliance or power base to dry completely
- Plug back into the wall outlet
If water enters the power base, return the appliance to the nearest authorized
service facility for examination, repair or adjustment.
SERVING
Starting with a pile of at crepes, you can use them in a number of ways,
depending on whether you want a simple sauced or a fancy lled crepe. They can
be served cold, warm or hot, baked, broiled or crisp-fried in oil. Here are some
ideas on handling crepes. See recipes for the ways to use various shapes.
• Crepes are folded in quarters...
when served plain (or spread with a thin lling) and served in sauce, or used
“hot off the baking plate” for dipping in an appetizer dip.
• Or rolled...
when lled with a few spoonfuls of an entree or dessert mixture and quickly
baked, broiled or lled with cold mouse, ice cream or whipped cream.
• Or folded into an envelope…
for small appetizers, ravioli-like entrees, crisp-fried treats of all kinds.
• Or stacked...
to make a cake (gateau) or in a casserole dish, with appropriate llings and
toppings, served hot or cold.
How to Flame Crepes
• Generally, dessert crepes that are served in a sauce, in a cha ng dish or skillet,
are those you want to ame, both for extra avour and dramatic effect. Any
high-proof brandy, cognac, rum or liqueur can be used. Most popular are
brandy, fruit- avoured liqueurs such as Kirsch, Cointreau or Grand Marnier.
• To ame properly, crepes and the liqueur must be warm. When the crepes are
ready, reduce heat to low, spoon on a few tablespoons of liqueur so it will oat
on top of the sauce. Do not boil or stir; let heat for a few minutes.
• Then with a long match (stand back) touch ame to edge of pan just above
food until it lights. Let ame subside before serving. Never add additional
liqueur if any ame is burning.
HELPFUL HINTS
• In all crepe batters, the proportions of our, eggs and liquid can be varied to
produce a thin, lacy crepe, a sturdier, thicker crepe or an egg-y rich crepe.
Adding butter or margarine adds avour and makes removal from the baking
plate easier. Oil may make crepes stick slightly. Sugar adds crispness but may
make crepes break in rolling. Since dessert crepes have a sweetened lling
and/or sauce, you can use a basic batter without sugar for crepes you wish to
fold or roll.
• Prepare one of the batter recipes an hour or more ahead of time and allow it to
rest for at least one hour.

6
• Any unused crepes can be stored for several days in the refrigerator or a month
in the freezer. Simply stack a batch on a sheet of foil or waxed paper and insert
into a large plastic food storage bag and twist and fasten opening, pressing out
as much air as possible. To use, allow crepes to warm up to room temperature.
They will peel apart with just a gentle pull. If you’re in a hurry, the stack can be
warmed by covering with foil on a at pan in a low oven.
• Stack crepes as you make them. No waxed paper is needed between them.
You can keep crepes moist as you make them by covering the stack with a
cloth, paper towel or foil. This is not necessary for crepes that will be lled and/
or sauced and heated.
• If your crepes are not as dry or crisp as you like them, allow to bake several
seconds longer.
• The rst crepe or two may be lacy or have holes, particularly if the batter is
frothy from blender-mixing or whipping.
• If crepes stick to Maker, check recipe - recipes using oil in place of butter or
margarine or recipes including sugar can stick slightly. You may need to wipe
surface of Crepe Maker with a bit of butter on a paper towel before the rst
crepe or between each dipping.
CARE AND CLEANING
1. Unplug from the wall outlet and allow the appliance to cool but still remain
warm.
2. Clean by wiping with a damp cloth. NEVER immerse the plug, appliance and
power base or place them under running water.
3. Clean the batter dish in warm soapy water.
4. Do not use any abrasive cleaning agents on any part of the appliance.
5. All servicing, other than cleaning, should be performed by an authorized service
representative. See Warranty.

7
TROUBLESHOOTING GUIDE
Problem Possible cause Solution
Crepe Maker is not
working or it is not
getting hot
Appliance is not plugged into
the wall outlet
Power switch at handle is not
switched on
Plug into the wall outlet
Press the switch to the ON
position
Crepes are not round
but serrated or
misshaped
There is not enough batter in
the batter dish and the Crepe
Maker is touching the bottom
of the batter dish
Pour more batter into the
batter dish
After dipping the
batter does not stick
to the baking surface
The Crepe Maker is not held in
the batter long enough.
Batter is too thick
The dipping process should
take about 3 seconds
Add some liquid.
The batter should have the
consistency of whipping
cream
The nished
crepe
sticks to the baking
surface
The gluten in the our has not
had time to rest
Batter with oil or sugar can
make crepes stick to the
baking surface
Let the batter rest for about
an hour before baking
Use less sugar and use
butter or margarine instead
of oil.
Crepes are fragile Sugar makes crepes fragile Use less sugar in the batter

8
RECIPES
We suggest you start with the batter recipes given here, they all dip,
cook and release well on your Crepe Maker. They fold or roll well and
keep for weeks in the freezer or days in the refrigerator.
IMPORTANT:
- Measure our and liquid carefully, the batter consistency is important. Batter
should resemble the consistency of thick heavy cream.
- If the crepe is sticking to the baking plate, allow the batter to rest for one hour
before using.
Basic Batter
1 cup (250 ml) all-purpose our
2 eggs
1/2 cup (125 ml) milk
1/2 cup (125 ml) water
1/4 tsp. (1.5 ml) salt
2 tbsp. (30 ml) butter or margarine, melted
Use a wire whisk or mixer and combine our, salt and eggs, add liquid gradually.
Beat until smooth then add other ingredients.
Makes about 16 crepes.
Richer More Egg-y Crepes
1 cup (250 ml) all-purpose our, presifted
3 eggs
3/4 cup (180 ml) milk
3/4 cup (180 ml) water
1/4 tsp. (1.5 ml) salt
2 tbsp. (30 ml) butter or margarine, melted
Use a wire whisk or mixer and combine our, salt and eggs, add liquid gradually.
Beat until smooth then add other ingredients.
Makes about 16 crepes.
Cornmeal Crepes
Delicious with any Mexican style or any main dish lling.
1/2 cup (125 ml) yellow cornmeal
1/2 cup (125 ml) boiling water
3 eggs
1/2 tsp. (3 ml) salt
1/2 cup (125 ml) all-purpose our, presifted
 Loading...