

Salton CF2137 Instruction Booklet

Instruction Booklet
Model CF2137
compact freezer
3.0 cu. ft (85 litre) capacity

IMPORTANT SAFEGUARDS
Before the appliance is used, it must be properly positioned and installed as per the
instruction in the Installation section. To reduce the risk of fire, electric shock or
injury, follow basic precautions including the following:
1. Read all instructions before using the appliance.
2. Plug into a grounded 3-prong outlet, do not remove grounding prong, do not
use an adapter, and do not use an extension cord.
3. Do not place any other household appliances on top of the unit.
4. It is recommended that a separate circuit, serving only your appliance be
provided. Use receptacles that cannot be turned off by a switch or pull chain.
5. Never clean appliance parts with flammable fluids. Do not store or use gasoline
or other flammable vapors and liquids in the vicinity of this or any other
appliance. The fumes can create a fire hazard or explosion.
6. Failure to unplug the appliance during cleaning or light bulb replacement could
result in electrical shock or personal injury.
7. Do not connect or disconnect the plug when your hands are wet.
8. Do not operate any appliance with a damaged cord or plug or after the
appliance malfunctions, or has been damaged in any manner. Do not repair or
replace any part of the freezer. Return appliance to SWG Canada for
examination, repair or adjustment. See Warranty.
9. To ensure proper ventilation for your appliance, follow the instructions in the
Installation section for proper clearances. Choose a well-ventilated area with
temperatures above 55°F (13°C) and below 90°F (32°C).
10. Do not use outdoors.
11. The appliance should not be located next to ovens, grills or other sources of
high heat.
12. It is important for the appliance to be leveled to work properly.
13. Never allow children to operate, play with or crawl inside the unit.
14. Do not use this appliance for other than its intended use.
DANGER - Risk of child entrapment
Before disposing of your appliance, ensure that the door (s) are removed. Shelves
should also be left in place to help avoid children climbing inside. Never allow a
child to operate, play with or climb inside the appliance.
SAVE THESE INSTRUCTIONS
HOUSEHOLD USE ONLY
2
GROUNDED PLUG
To reduce the risk of electric shock this appliance has a grounded plug. (2 blades
and 1 pin). If the plug does not fi t fully into the electrical outlet contact a
qualifi ed electrician. Do not modify the plug in any way or use an adaptor.
Use an exclusive wall outlet. Do not connect your freezer to extension cords or
together with any other appliance in the same wall outlet. If the power cord is
too short, have a qualifi ed electrician or service technician install an outlet near
the appliance.
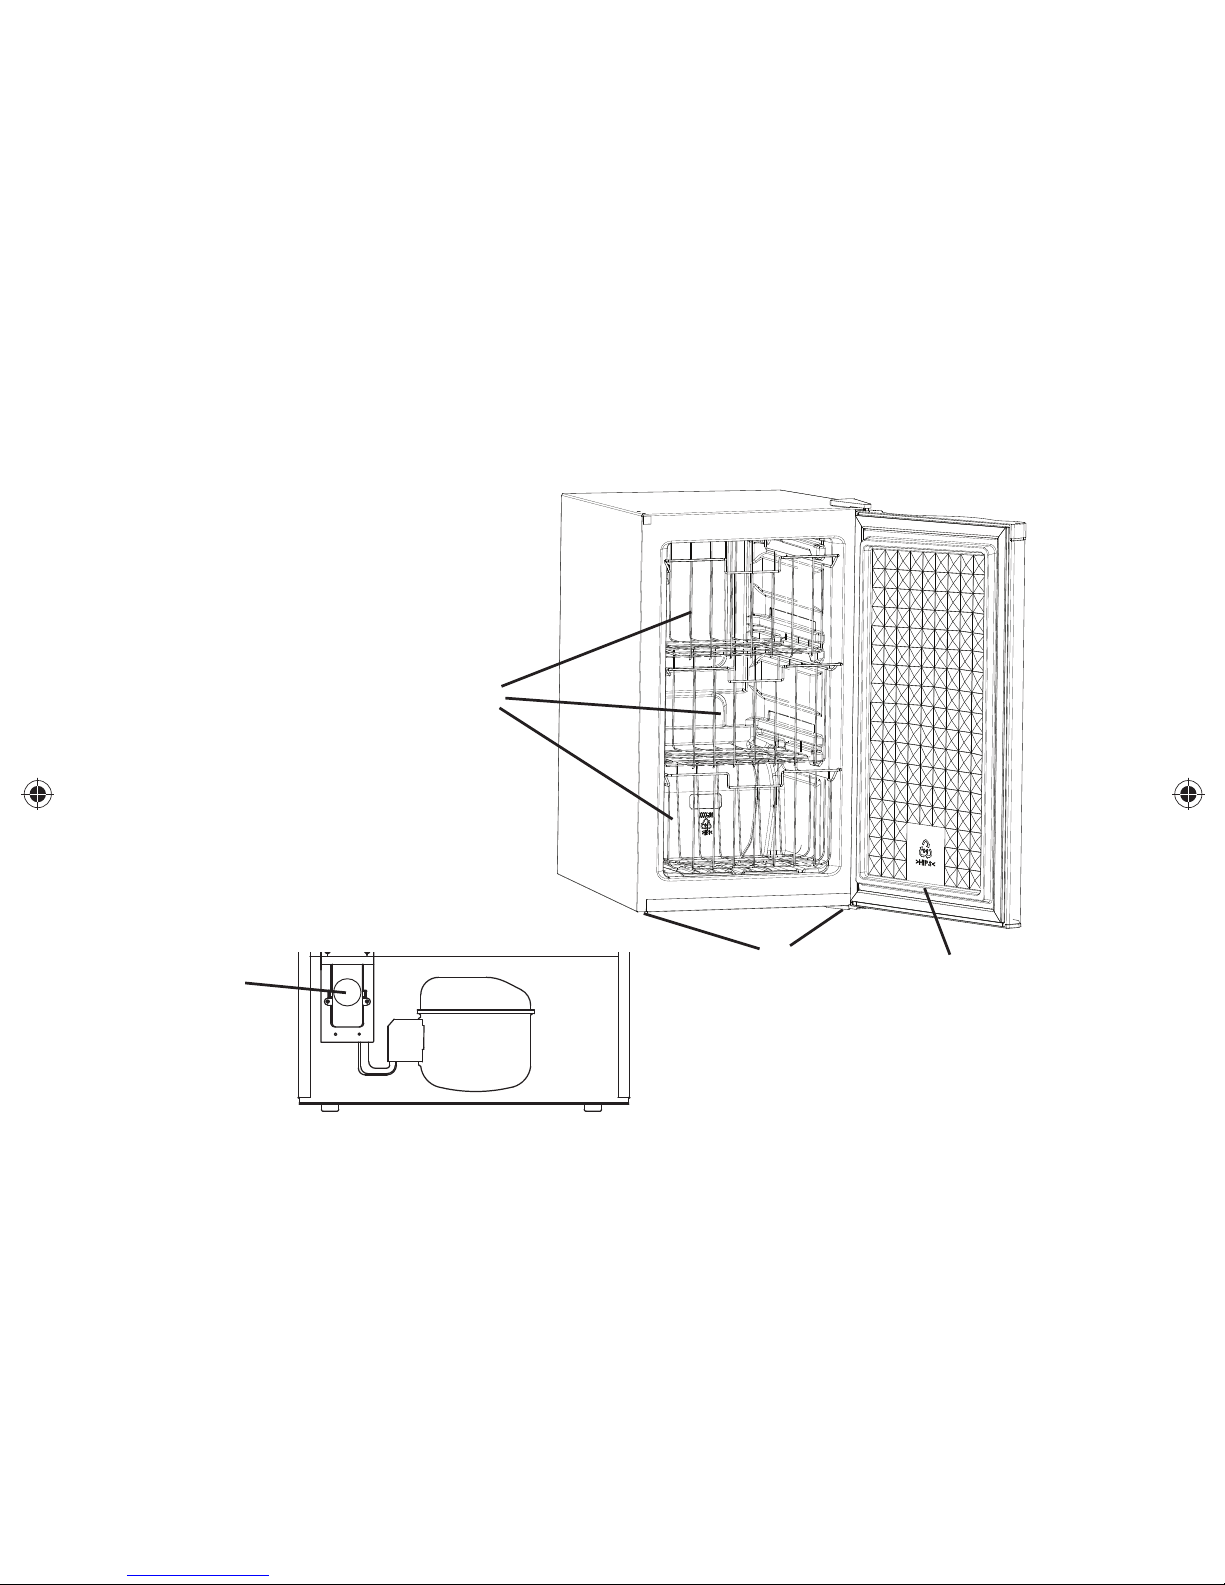
DESCRIPTION OF PARTS
1. Adjustable Temperature
Control
2. Slide-Out Drawers
3. Leveling Legs
4. Reversible Door
Back of Freezer
INSTALLATION
1. Remove all packaging, including the foam between the condenser and cabinet
on the outside of the unit. WARNING: Two or more people should move the
freezer. Failure to do so can result in back or other injuries.
2. Remove all packaging and labels. If there is any glue residue rub a small
amount of liquid dish soap with your fi ngers then wipe with warm water. Dry.
NOTE: Do not use any sharp instruments, rubbing alcohol, fl ammable fl uids
or abrasive cleaners to remove tape or glue.
1
3
4
2
3
3. IMPORTANT: Let the freezer stand upright for approximately 2 hours
before plugging into the power source. This will reduce the possibility of a
malfunction in the cooling system from handling during transportation.
4. This freezer is designed to be free standing. It was not designed for
recessed or enclosed area installation.
5. Place your freezer on a floor that is strong enough to support the
freezer when it is fully loaded.
6. Locate the freezer away from direct sunlight and sources of heat (stove,
heater, radiator, etc). Direct sunlight may affect the acrylic coating and
heat sources may decrease cooling efficiency.
7. Ensure there is a minimum 20 cm (8”) clearance on both sides,10 cm (4”)
at the back wall and 30 cm (12”) above the unit for proper air circulation.
NOTE: If you are installing your freezer next to a fixed wall, leave
sufficient space on the hinge side to allow for the door to swing open.
8. Level the freezer by adjusting the legs. Turn the Leg clockwise to raise
that side of the freezer or turn counterclockwise to lower that side. While
adjusting the Legs, have someone push against the top of the freezer to
take some weight off the front leveling legs.
NOTE: To help with door closure, position legs with a 1/8" (3 mm) tilt to
the back.
9. Do not use in any location not properly insulated or heated, e.g. garage
etc. Your freezer was not designed to operate in temperatures below
12.8°C (55 °F). In extreme cold ambient temperatures the freezer will not
perform properly. Avoid locating the freezer in damp or moist areas.
Excessive moisture may cause frost to form quickly on the evaporator. This
would require more frequent defrosting of the freezer.
10. Make sure all shelves and other parts listed in the Description of Parts are
in place.
11. Once the freezer has been plugged in (after 2 hours in the upright
position), allow the freezer’s interior to cool for 2-3 hours before putting
food into the compartments.
4
 Loading...