


Page 1

065 001 055 740
LCD-3735TN
LCD TV
INSTRUCTION MANUAL
065001055740 37" LCD OPL ING 30/5/06 11:27 Page 1
Page 2

2
DEAR USER . . . . . . . . . . . . . . . . . . . . . . . . . . . . . . . . . . . . . . . . . . . . . . . . . . . . . . . . . . . . . . . . . . . . . . . . . . . .3
WHAT TO DO FOR THE SAFETY OF YOUR TV SET . . . . . . . . . . . . . . . . . . . . . . . . . . . . . . . . . . . . . . . . . . . . .4
WHAT ARE THE FUNCTIONS OF YOUR TV SET . . . . . . . . . . . . . . . . . . . . . . . . . . . . . . . . . . . . . . . . . . . . . . .5
REMOTE CONTROL . . . . . . . . . . . . . . . . . . . . . . . . . . . . . . . . . . . . . . . . . . . . . . . . . . . . . . . . . . . . . . . . . . . . .6
ANTENNA CONNECTION . . . . . . . . . . . . . . . . . . . . . . . . . . . . . . . . . . . . . . . . . . . . . . . . . . . . . . . . . . . . . . . .8
VIDEO, COMPUTER AND DECODER CONNECTION . . . . . . . . . . . . . . . . . . . . . . . . . . . . . . . . . . . . . . . . . . .9
CONNECTION TO EXTERNAL DEVICES . . . . . . . . . . . . . . . . . . . . . . . . . . . . . . . . . . . . . . . . . . . . . . . . . . . . .10
CONNECTION TO EXTERNAL DEVICES (PC AND DVI) . . . . . . . . . . . . . . . . . . . . . . . . . . . . . . . . . . . . . . . . . .11
SWITCHING ON AND OFF . . . . . . . . . . . . . . . . . . . . . . . . . . . . . . . . . . . . . . . . . . . . . . . . . . . . . . . . . . . . . .12
TV FUNCTIONS . . . . . . . . . . . . . . . . . . . . . . . . . . . . . . . . . . . . . . . . . . . . . . . . . . . . . . . . . . . . . . . . . . . . . . .13
TV FUNCTIONS (MENUS) . . . . . . . . . . . . . . . . . . . . . . . . . . . . . . . . . . . . . . . . . . . . . . . . . . . . . . . . . . . . . . . .14
TELETEXT . . . . . . . . . . . . . . . . . . . . . . . . . . . . . . . . . . . . . . . . . . . . . . . . . . . . . . . . . . . . . . . . . . . . . . . . . . . .29
BEFORE CALLING SERVICE . . . . . . . . . . . . . . . . . . . . . . . . . . . . . . . . . . . . . . . . . . . . . . . . . . . . . . . . . . . . . . .31
TECHNICAL SPECIFICATIONS . . . . . . . . . . . . . . . . . . . . . . . . . . . . . . . . . . . . . . . . . . . . . . . . . . . . . . . . . . . . .32
CONTENTS
065001055740 37" LCD OPL ING 30/5/06 11:27 Page 2
Page 3

DEAR USER
3
CCoonnggrraattuullaattiioonnss
This is an excellent selection. Your new LCD TV will provide happiness to your home. But before using, or even
setting it, please read this guide carefully and keep for future reference.
FFuunnccttiioonnss ooff yyoouurr TTVV sseett
* LCD TV is a color set with a remote control
* You can adjust all commands related to video and audio, by means of the on screen menus (On Screen Display)
* You can set the menu language from the options
* You can save up to 100 channels in the VHF, UHF and S bands
* Allows cable TV receipts
* Thanks to the automatic channel search, you can find the required channel easily, save and name it (ATS)
* You can adjust your TV set with 90 minutes automatic switching off in 15 minutes intervals
* TV set automatically shifts to Stand-by after 5 minutes of broadcast ending (Auto Shut Off)
* You can use the LCD TV as a Computer Monitor.
065001055740 37" LCD OPL ING 30/5/06 11:27 Page 3
Page 4
WHAT TO DO FOR SAFETY OF YOUR TV SET
4
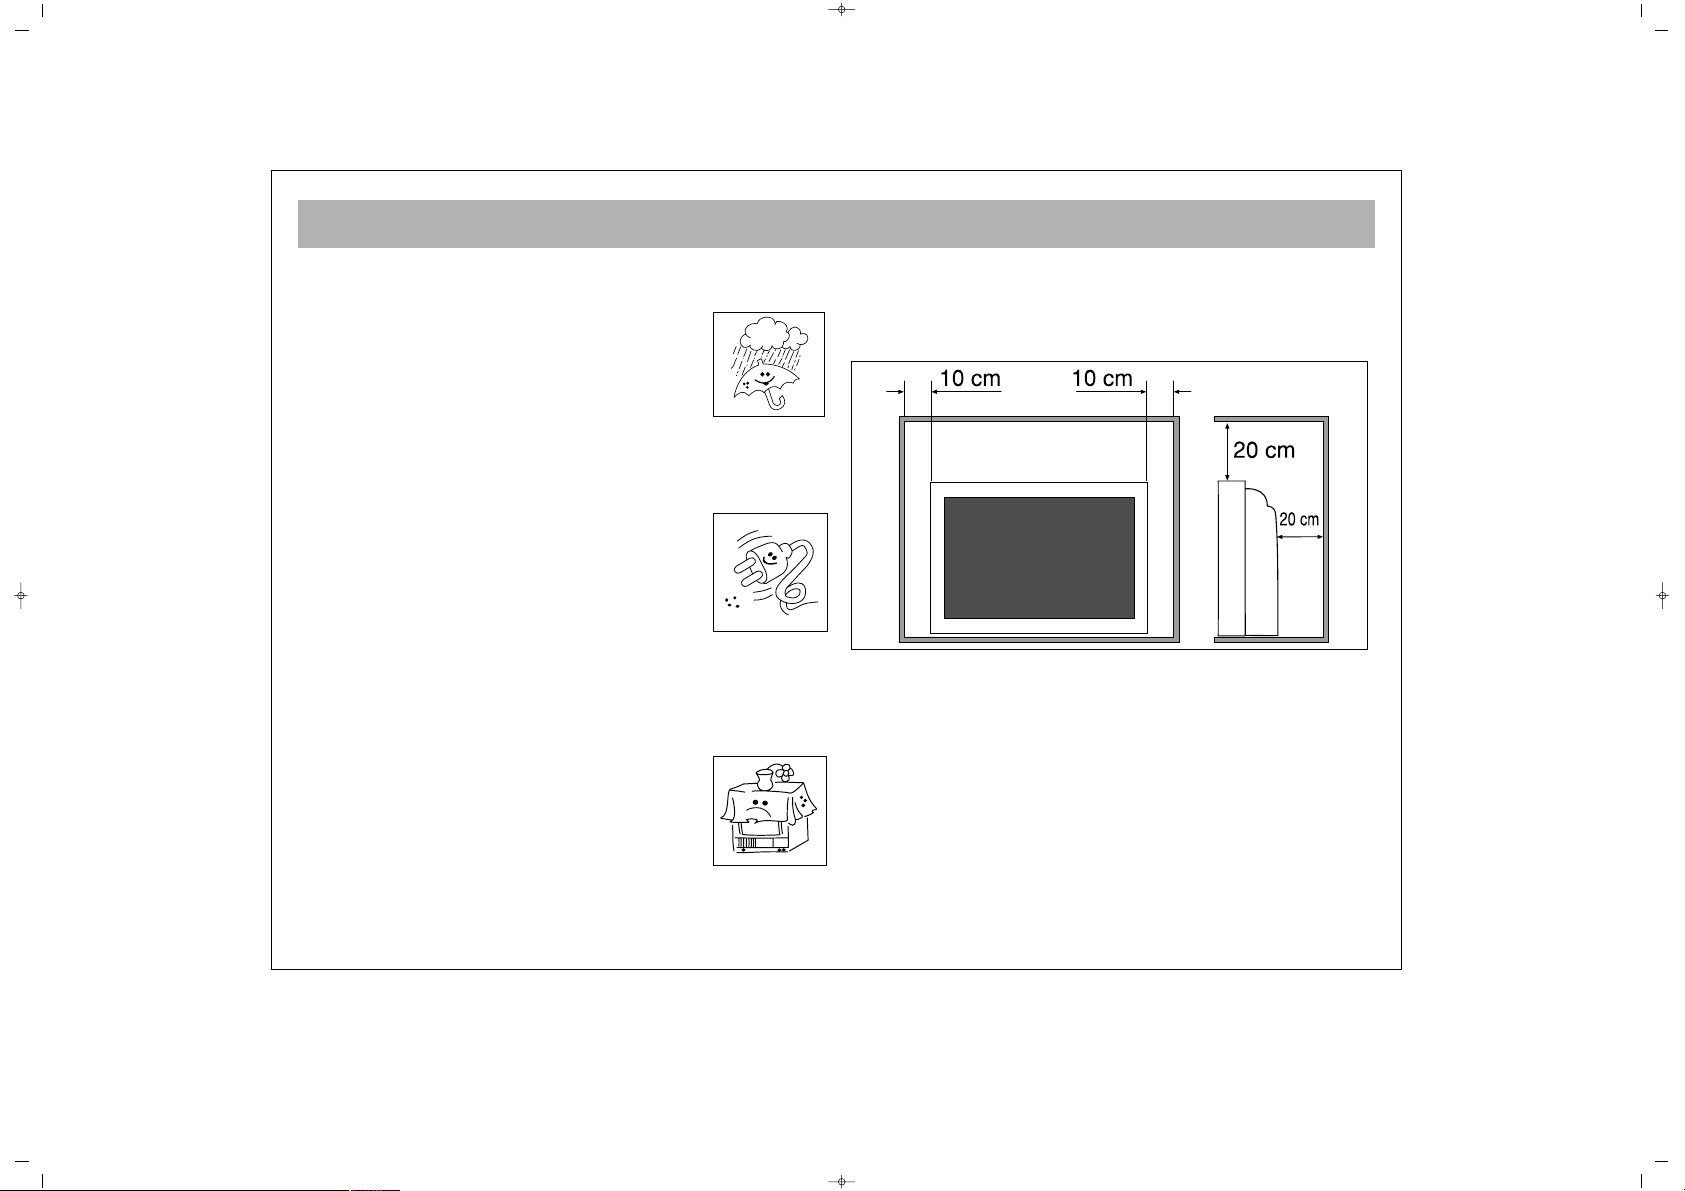
FFiirrsstt WWaarrnniinngg
To prevent short circuit or fire, protect your TV set from
rain or humidity.
* There is a high voltage in your TV set.
Do not open the rear cover
* Call authorized service where necessary
MMeeaassuurreess
* Operate your TV set at 220 V AC 50 Hz city network
voltage
* If any foreign object enters or a fluid flows
into your TV, switch off immediately,
remove the plug from the wall socket and
call service.
* Do not pull the power cord while
removing the plug. Hold the plug and pull.
PPllaacciinngg
* Do not place your TV set near a heat source, or at
locations directly subject to dusting,
mechanical vibration and direct sunlight
* To prevent internal heating, leave spaces
around the TV set as shown below. Do not
cover it.
* Do not place any water containing vase etc. on your
TV set
* There should be no fire source on or near your TV
CClleeaanniinngg
Clean your TV set using mildly wet cloth. Do not use
chemicals or mechanical cleaners which would impair
the external paint.
RReeppaacckkiinngg
Store the original cardboard box and packaging
materials to reuse where necessary.
065001055740 37" LCD OPL ING 30/5/06 11:27 Page 4
Page 5
WHAT ARE THE FUNCTIONS OF YOUR TV SET
5
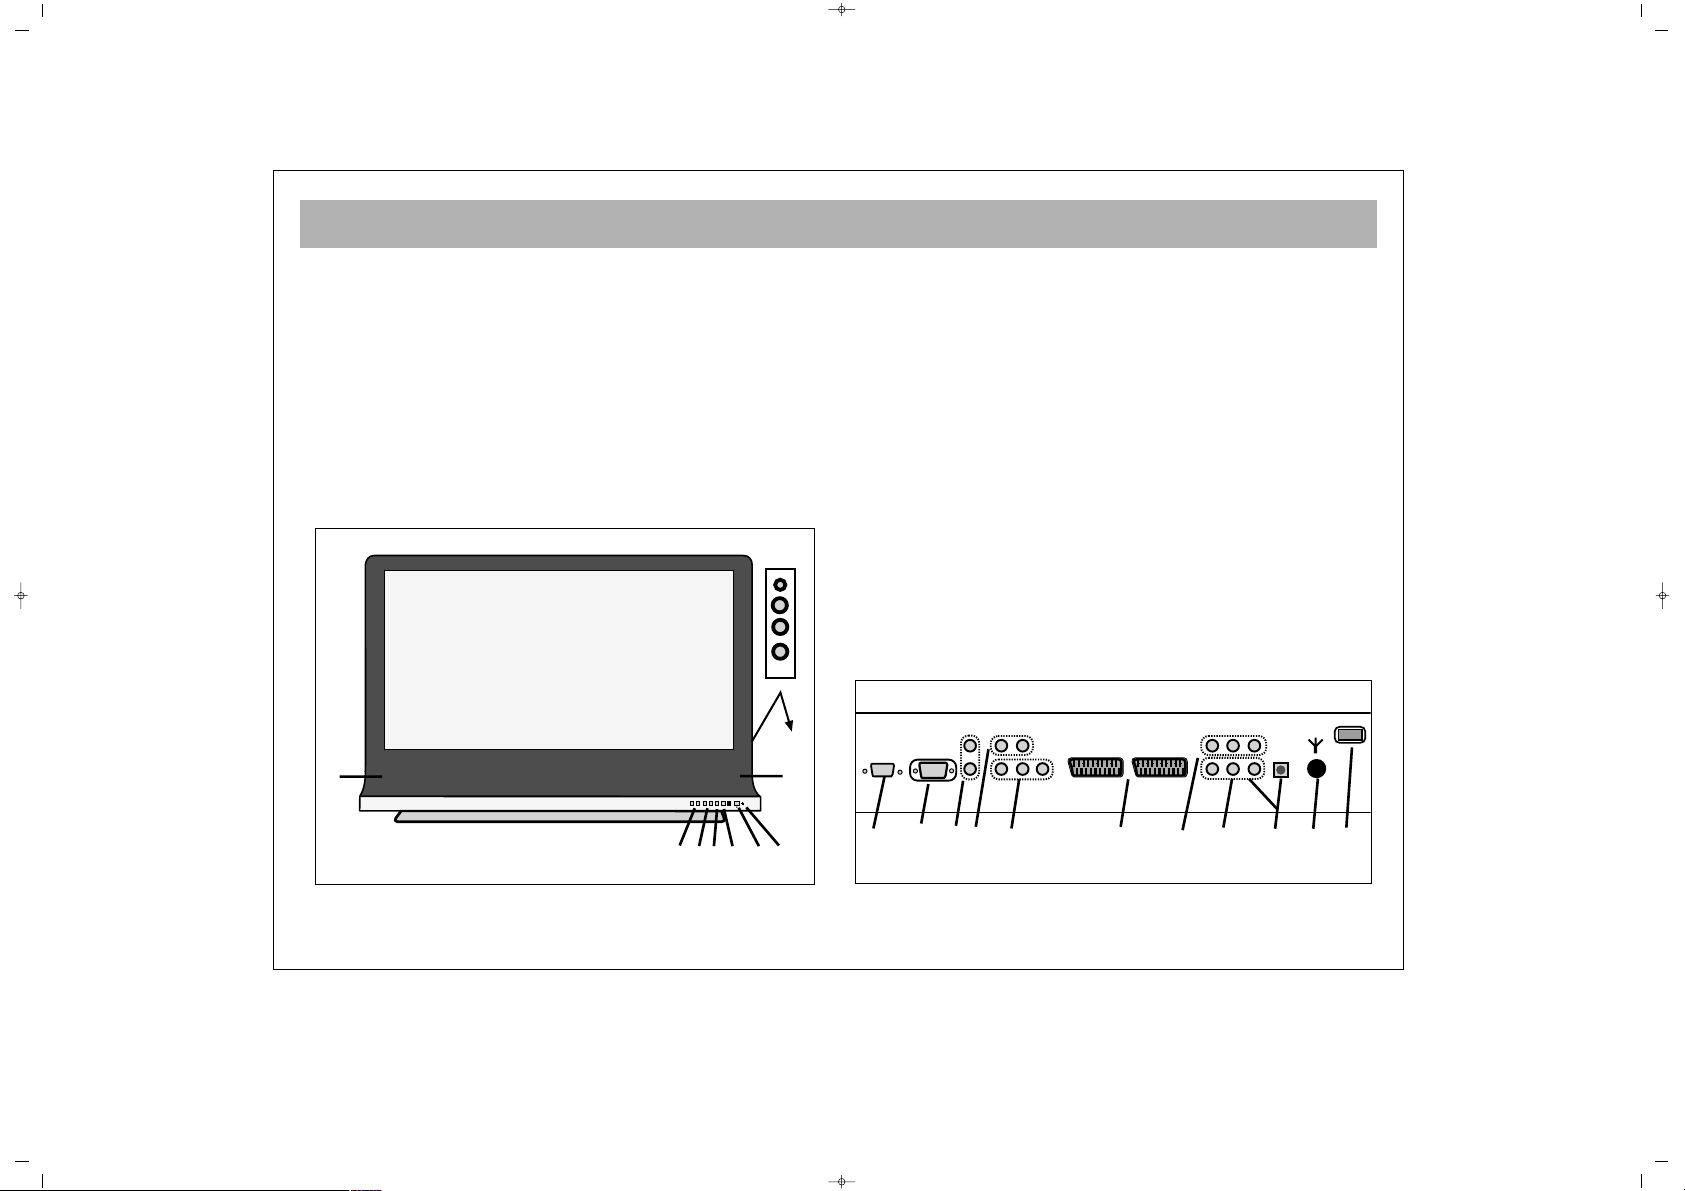
FFRROONNTT
11..
Switching ON/OFF button
22..
Remote control receiver and LED display
33..
Speaker
44..
P + – Program up or down buttons
55..
e + – Volume ± buttons
66..
Menu button
77..
Sel button (AV selection button)
88..
Standby button
99..
AV (Chinch) entries / Headphone in
BBAACCKK
1100..
Antenna in
1111..
“Scart in” (You can connect computer, decoder, video
set etc. to the TV set through this in)
1122..
S-VIDEO in
1133..
YPbPr in
1144..
YPbPr Audio in
1155..
PC in (Optional)
1166..
PC Audio in
1177..
HDMI in (Optional)
1188..
AV out
1199..
AV in
10
11
14121315 1617
18
19
1
V- V+ P- P+ MENU SEL
2
4
5
8
3
3
9
6
7
065001055740 37" LCD OPL ING 30/5/06 11:27 Page 5
Page 6

REMOTE CONTROL
6
1. Switching ON and OFF
2. Direct program selection buttons
3. Zoom button (no function)
4. Mute button
5. Menu selection button
6. Swap button
7. Program up & down button in TV position, and Page number up & down button in
Teletext position, or move in menus
8. Volume up & down and menu adjustment buttons
9. Channel shift in mosaic mode. Confirmation or cancellation button in the menus
10. PIP button (in some models)
11. User normalization button
12. Audio selection button DUAL A, DUAL B, Stereo, Mono
(DUAL A, DUAL B, ST/MONO)
13. AV button
14. Mosaic Screen button
((AAvvaaiillaabbllee aatt ssoommee mmooddeellss))
15. Red button (for zooming out or in the PIP picture in PIP models, for leaving DVI and
PC mode in the TV position)
16. Green button (moves the PIP picture on the corners of the screen in the models with
PIP. If this button is pressed in TV position, it is used for shifting to PC mode)
17. Yellow button (To shift to DVI mode in TV position)
18. Blue button (Picture Freezing Button)
19. Picture format selection
20. Provides information on the displayed channel
NNoottee::
In order to use the other button functions described in the menus, please refer to
the remote control figure shown in the TELETEXT section.
065001055740 37" LCD OPL ING 30/5/06 11:27 Page 6
Page 7

REMOTE CONTROL (RC)
7
Never drop the RC on the ground
Never try to disassemble the RC
Never press 2 buttons on the RC simultaneously
If you are not going to use the RC for a long time,
remove the batteries
NNoottee::
Your RC controls the TV set at a maximum
distance of 7 m and angle of 30°
BBaatttteerryy PPllaacceemmeenntt ((11..55VV AAAAAA xx 22))
* Open the battery cover in the direction of the arrow
* Place the batteries checking the polarity
* Close the cover
065001055740 37" LCD OPL ING 30/5/06 11:27 Page 7
Page 8
ANTENNA CONNECTION
8
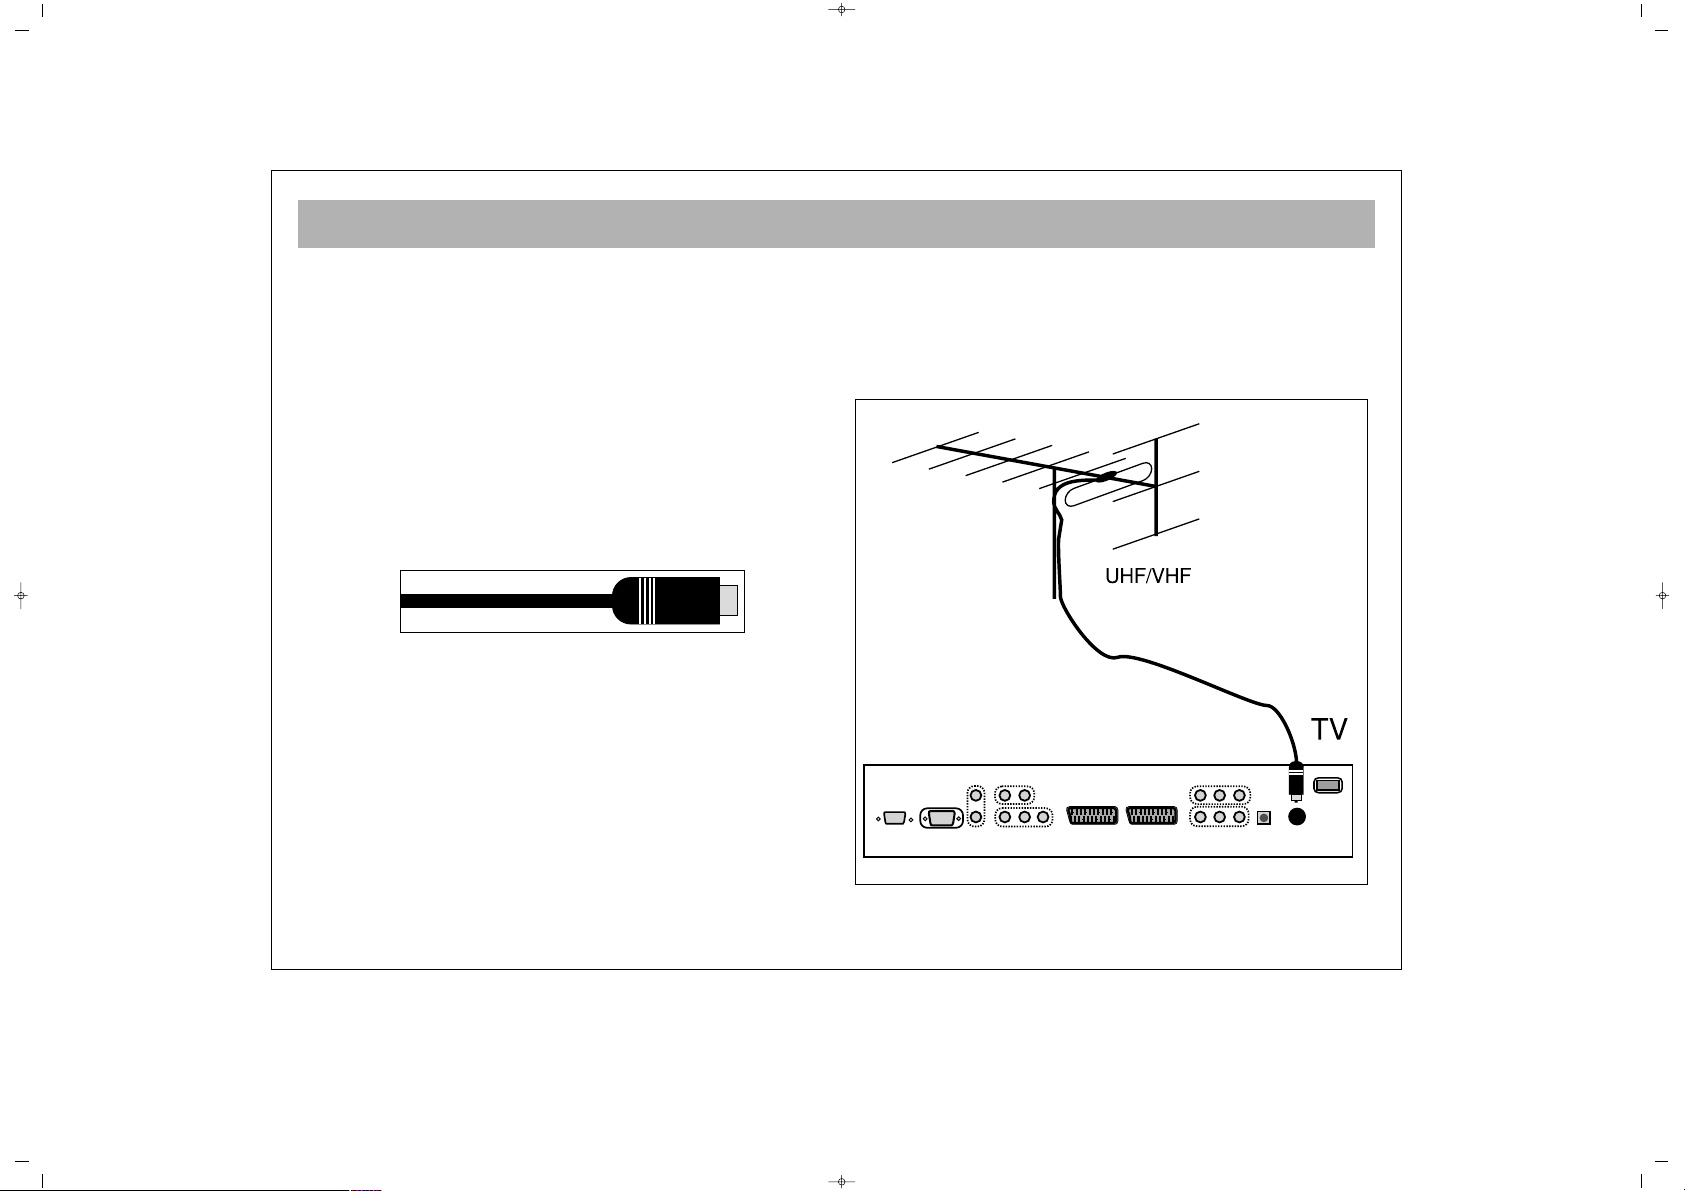
AAnntteennnnaa CCoonnnneeccttiioonn............
First select the antenna. The following antennas are
suitable for your TV set.
* VHF antenna
* VHF / UHF combined antenna
* UHF antenna
When connecting one of these antennas to your TV set,
you should use 75 Ohm round “coaxial” cable and
unplug your TV set
If the cable is 300 ohm (double wire flat cable), the
adapter converting 300 ohm to 75 ohm should be
inserted into the TV antenna inlet. To watch the cable
broadcasting of Turkish Telecom, you should connect
the broadcast installation outlet to the antenna inlet. As
motor vehicles emulate energy and the communication
lines emulate noise signals, please take care to install
your antenna far from these and metal surfaces, so that
it is not loose. Do not extend your antenna cable longer
than required or roll it. As the antenna cable may be
impaired by rain, wind, smoke or humidity in the long
term, check the antenna and equipment periodically
and carry out maintenance where necessary.
065001055740 37" LCD OPL ING 30/5/06 11:27 Page 8
Page 9
VIDEO, COMPUTER AND DECODER CONNECTION
9
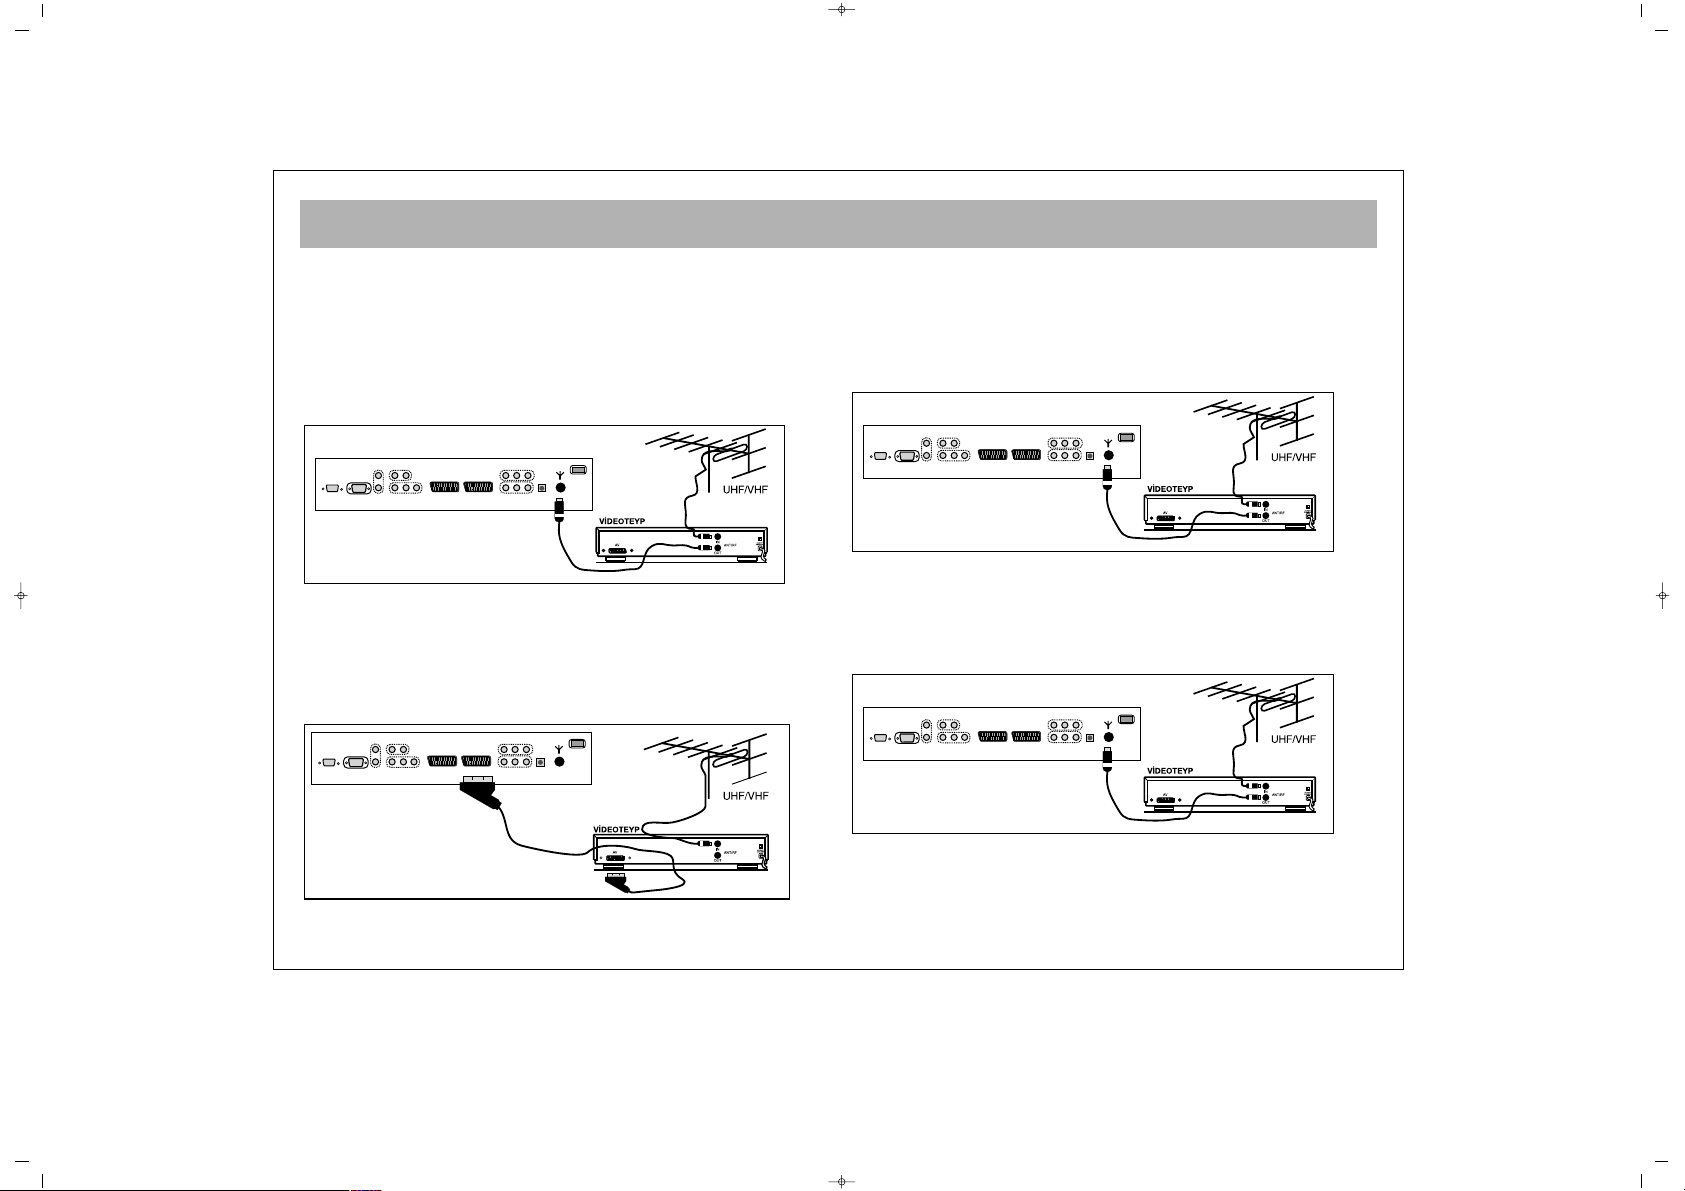
11.. VViiddeeoo ttaappee ccoonnnneeccttiioonn ((tthhrroouugghh ccooaaxxiiaall ccaabbllee))
* Connect the antenna cable plug into the antenna inlet
* Connect the antenna outlet of the video tape (RF outlet) to the
antenna inlet of your TV set through coaxial cable
* You can play the video tape by adjusting the TV channel for
the video output
NNoottee::
If the display or volume are impaired, take the video tape
away from the TV set
22.. VViiddeeoo ttaappee ccoonnnneeccttiioonn ((tthhrroouugghh ssccaarrtt ccaabbllee))
* Connect the antenna cable plug into the antenna inlet of the
video set
* Connect the SCART socket of the video tape and scart socket
of the TV set through EURO scart cable
* Press “AV” button
33.. DDeeccooddeerr CCoonnnneeccttiioonn
* Connect the antenna cable plug to the antenna inlet of the
decoder
* Connect the antenna outlet of the Decoder (RF outlet) to the
antenna inlet of the TV set through coaxial cable
* You can use the decoder by adjusting the TV set to the
Decoder’s output channel.
44.. DDeeccooddeerr CCoonnnneeccttiioonn ((tthhrroouugghh ssccaarrtt ccaabbllee))
* Connect the antenna plug to the antenna inlet of the TV set
* Connect the scart socket of the decoder to the scart socket of
the TV set through EURO scart cable
* When entering the program where cable TV is saved, you can
watch the broadcasting decoded.
EURO AV
065001055740 37" LCD OPL ING 30/5/06 11:27 Page 9
Page 10
CONNECTION TO EXTERNAL DEVICES
10
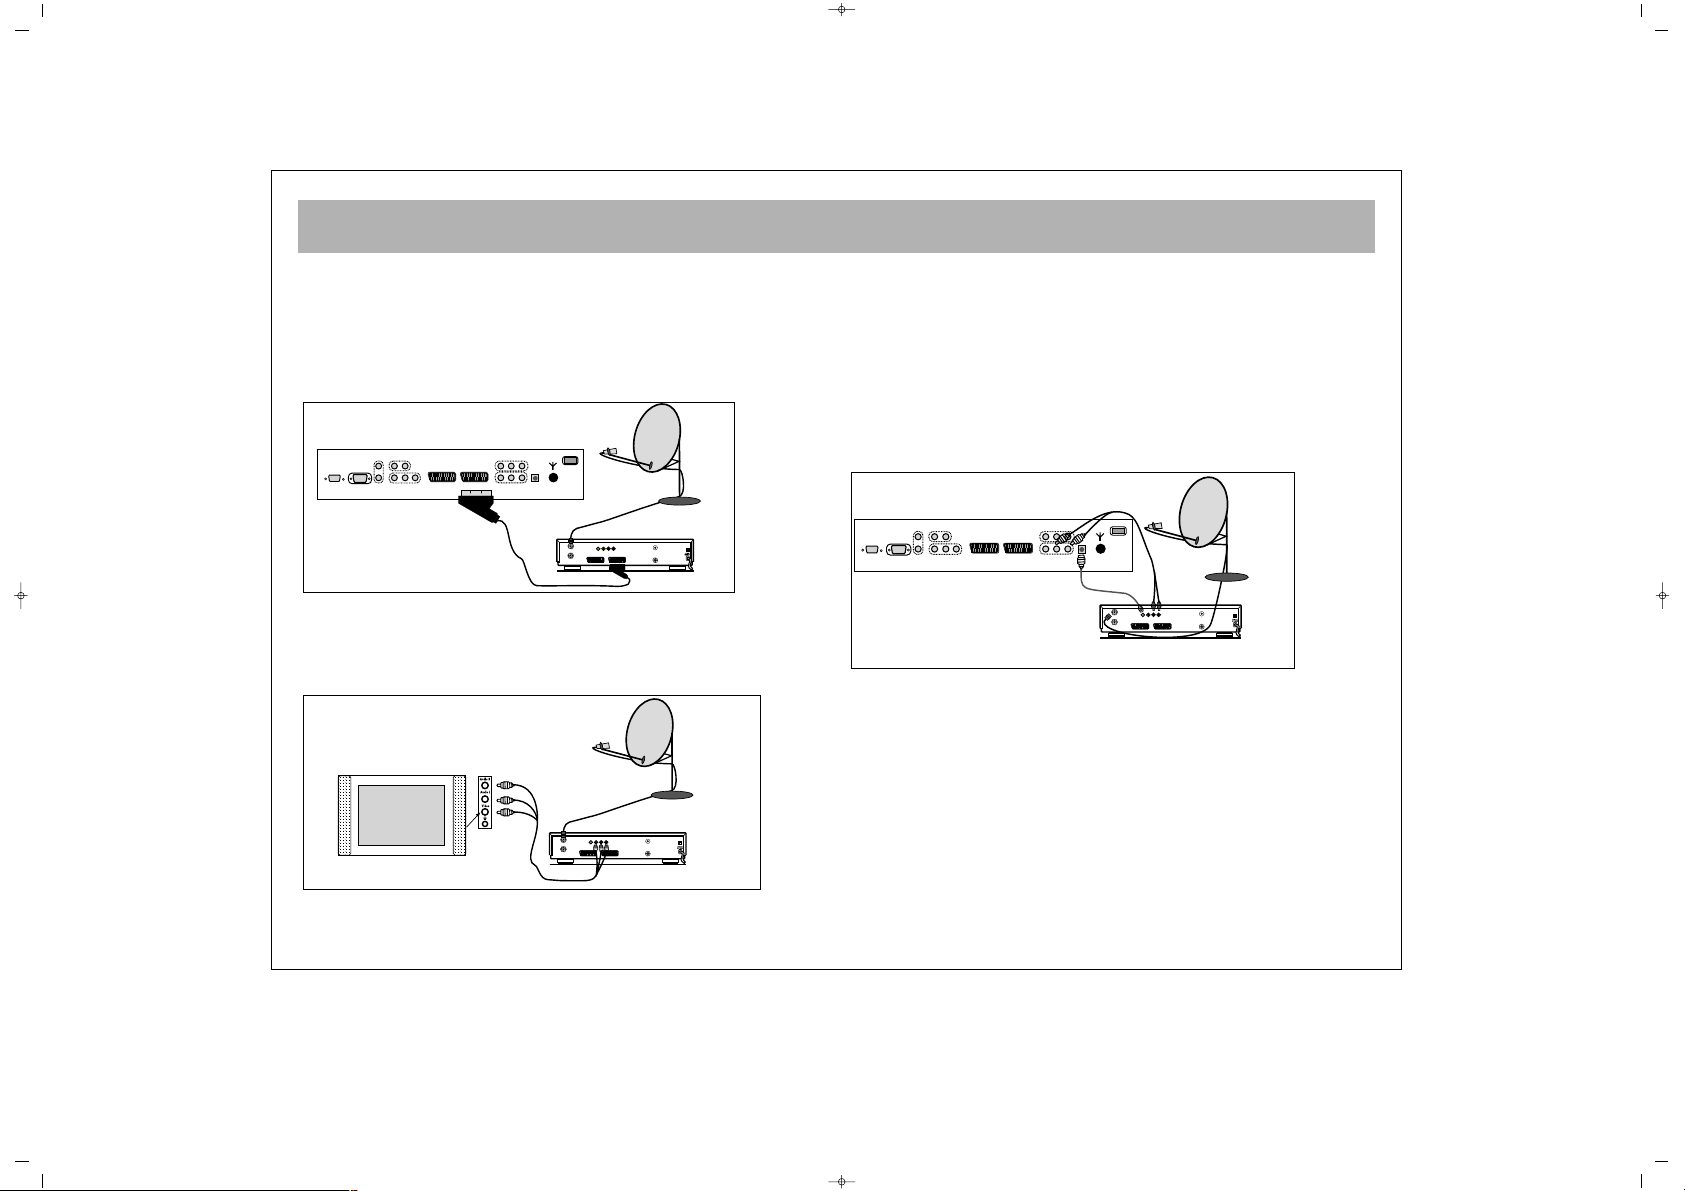
55.. RReecceeiivveerr ccoonnnneeccttiioonn ((SSaatteelllliittee RReecceeiivveerr))
Connect the cable from the satellite dish to the “LNB-IN” inlet of
the Satellite Receiver.
aa.. WWiitthh SSccaarrtt SSoocckkeett
* Connect the Satellite Receiver’s scart socket and your TV’s
scart socket using EURO scart cable.
* Press the “AV” button on the remote control of the TV set.
bb.. CCoonnnneeccttiinngg ffrroomm tthhee ssiiddee AAVV IInnlleettss ((OOppttiioonnaall))
* Connect the chinch sockets of the Receiver or Camera (Video,
Left Audio, Right Audio) to the sockets to the side of the TV
* Press the “AV” button on the RC and take it to the Side AV
position
cc.. WWiitthh SSVVHHSS SSoocckkeett
* Connect the SVHS socket of the Receiver and that of your TV
set, through the SVHS cable. This provides a display
transmission
* For the volume, connect the Receiver’s (L, R) Left and Right
chinch volume outlets to the (L,R) Left and Right inlets of the TV
using double sided chinch socket cable.
While the Receiver is open, press the AV button of the TV set
until the Receiver Display comes to the screen.
DECODER SCART TV SCART
OUT
SVSH V L R
TV
AERIAL
DISH
LNB
RECEIVER
DECODER SCART TV SCART
OUT
SVSH V L R
TV
AERIAL
DISH
LNB
RECEIVER
EURO AV
DECODER SCART TV SCART
OUT
SVSH V L R
TV
AERIAL
DISH
LNB
RECEIVER
065001055740 37" LCD OPL ING 30/5/06 11:27 Page 10
Page 11
CONNECTION TO EXTERNAL DEVICES (PCI AND DVI)
11
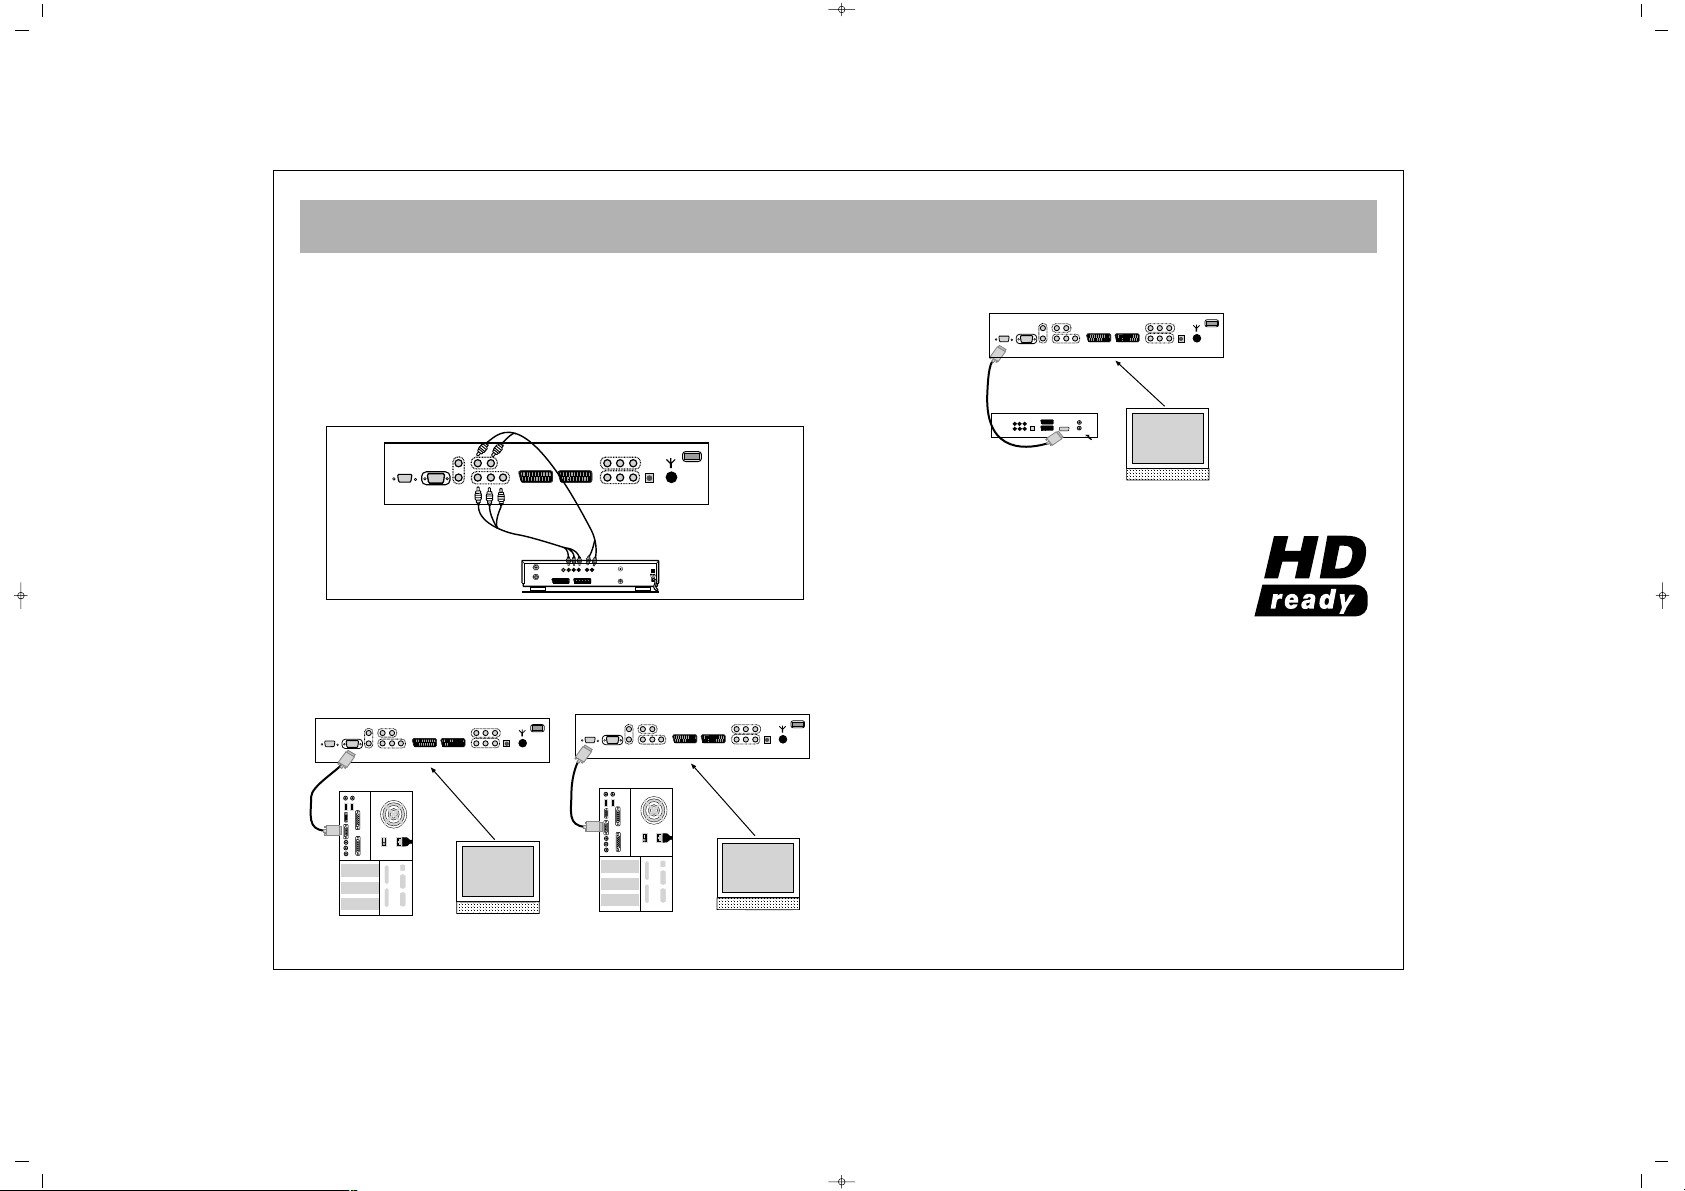
ee.. CCoommppoonneenntt YYPPbbPPrr IInn
* Connect the video YPbPr outlets of the DVD to the YPbPr inlet
sockets of the TV using 3 way chinch socket cable.
* For the volume, connect the Left and Right (L,R) chinch audio
outlets of the TV to the Left and Right (L,R) audio inlets of the TV
using double sided chinch socket cable.
While the DVD is ON, press the AV button on the RC and select
the YPbPr on the LCD TV. This provides video transmission.
ff.. CCoommppuutteerr CCoonnnneeccttiioonn ((OOppttiioonnaall))
You can use the LCD TV as a monitor, connecting the VGA
cable of the computer to the PC socket of the TV. Also, you can
connect it to the computer using the DVI socket.
gg.. DDVVDD CCoonnnneeccttiioonn ((OOppttiioonnaall))
Using the DVI socket, you can connect your DVD.
DDVVII//HHDDMMII SSuuppppoorrtteedd RReessoolluuttiioonnss
RRGGBB SSiiggnnaall RReessoolluuttiioonn FFrreeqquueennccyy
1080I 1920 * 1080 60
1080I 1920 * 1080 50
720P 1280 * 720 60
720P 1280 * 720 50
576P 720 * 576 50
480P 640 * 480 60
PPCC//DDVVII:: AAllll VVEESSAA SSttaannddaarrddss uupp ttoo 11228800xx11002244
640x480 50Hz/60Hz/70Hz/75Hz/85Hz/90Hz/100Hz
800x600 60Hz/70Hz/75Hz/85Hz/100Hz
1024x768 60Hz/70Hz/75Hz/85Hz
1152x864 60Hz/70Hz/75Hz/85Hz
1280x960 60Hz/70Hz/75Hz/85Hz
1280x1024 60Hz/70Hz/75Hz/85Hz
065001055740 37" LCD OPL ING 30/5/06 11:27 Page 11
AUDIO OUT
OUT
DISH
LNB
DECODER SCART TV SCART
SVSH V L R
TV
RL
AERIAL
PC
PC
DVD
DVI
Page 12
SWITCHING ON AND OFF
12
NNoottee:: RRCC iiss aann aabbbbrreevviiaattiioonn ffoorr tthhee RReemmoottee CCoonnttrrooll
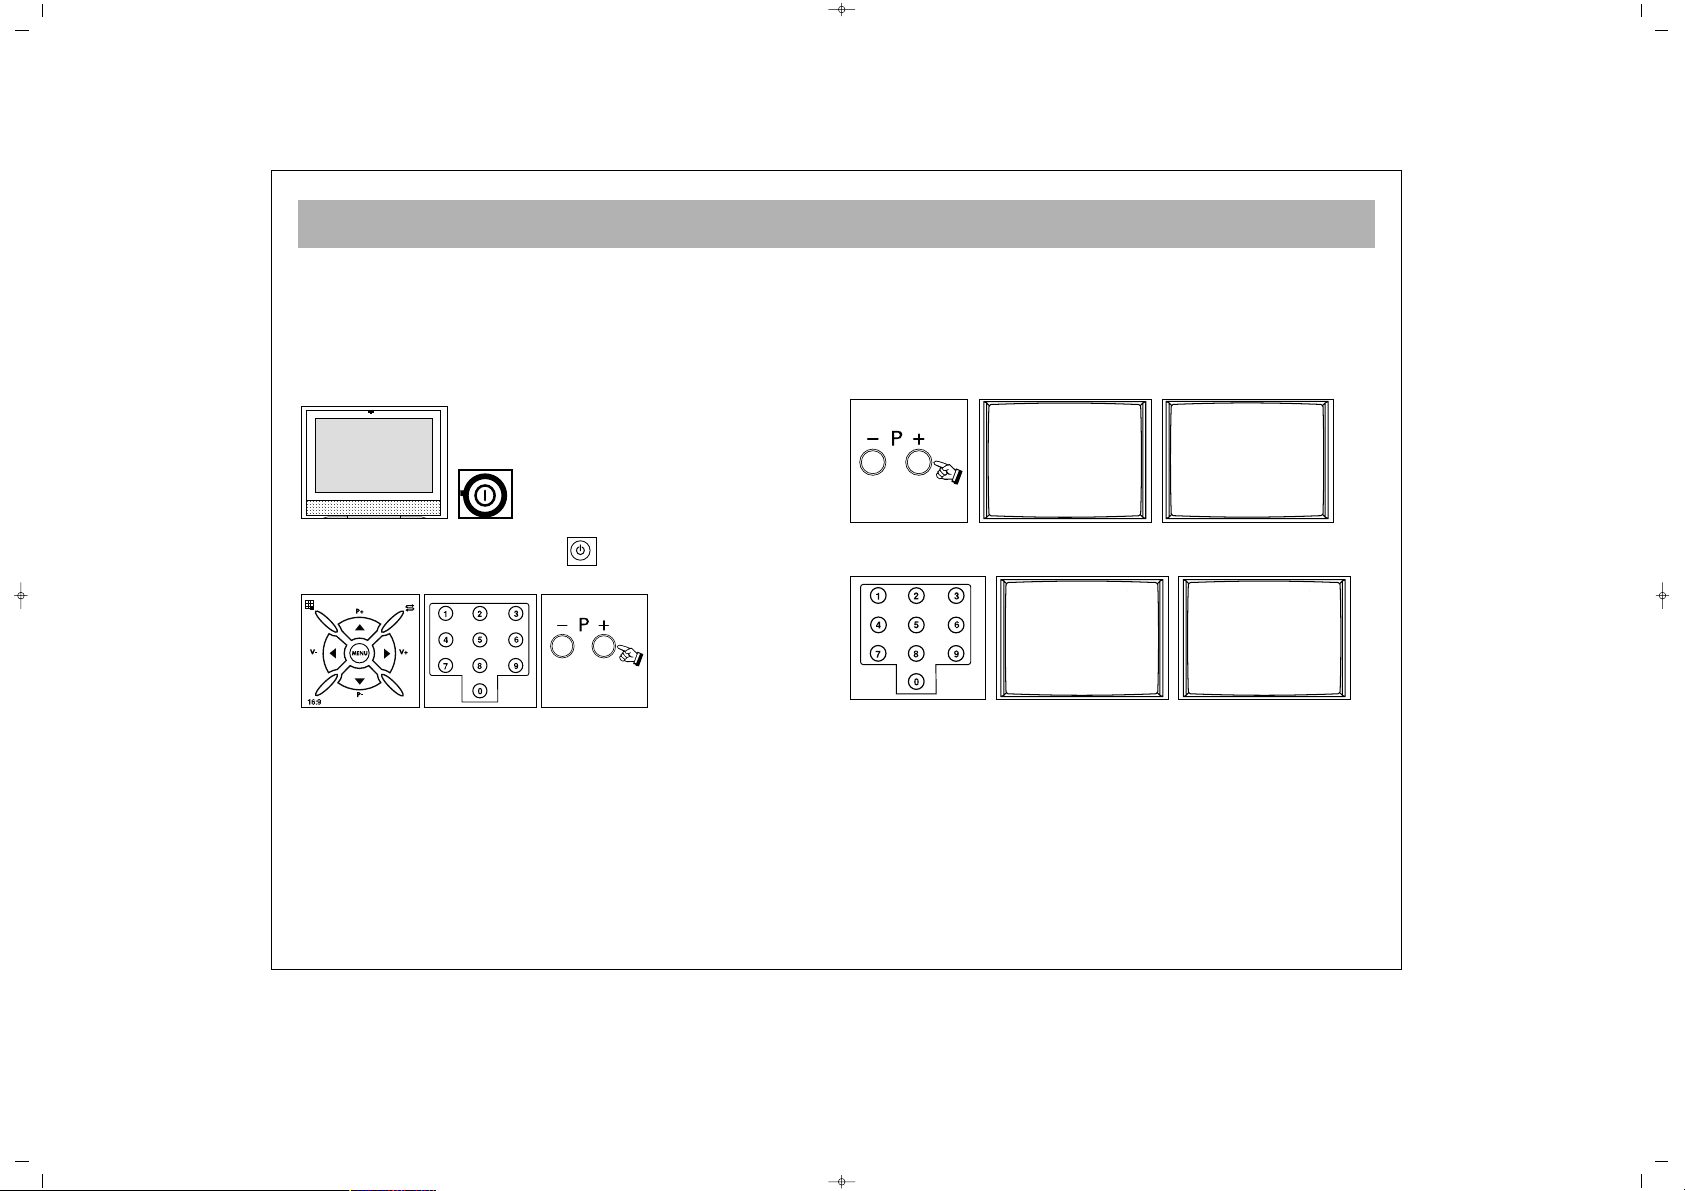
11.. OOppeerraattiinngg
aa.. SSwwiittcchhiinngg oonn tthhee TTVV
Press the on/ off button on the TV set. wait for its
switching on.
bb.. SSttaanndd bbyy mmooddee
While the TV is in standby, you can switch on with
the Power button or pressing P±.
22.. SSwwiittcchhiinngg ooffff
aa.. SSwwiittcchhiinngg ooffff tthhee TTVV
When you want to switch off the TV completely, press
on/off button.
bb.. SSttaanndd bbyy mmooddee
For switching off the TV for a short time, press the
Standby button on the RC or TV.
If you are not to use the TV for a long time, press the
on/off button on the TV set.
11.. PPrrooggrraamm NNuummbbeerr SSeelleeccttiioonn
* You can select the program you want by pressing P±
button on the TV control panel
* If you want to select a program from 1 to 9, press the
related button on the RC
* For selecting a program from 10 to 100, the number is
pressed on the RC swiftly.
EExxaammppllee::
To shift to the program No. 100, first press 1.
In that case, on the left corner “1” message appears.
Then, without waiting, press “0” button twice. TV set
shifts to the program No. 100.
2--
2--
001
1--
OK
5
6
1
8
065001055740 37" LCD OPL ING 30/5/06 11:27 Page 12
Page 13
TV FUNCTIONS
13
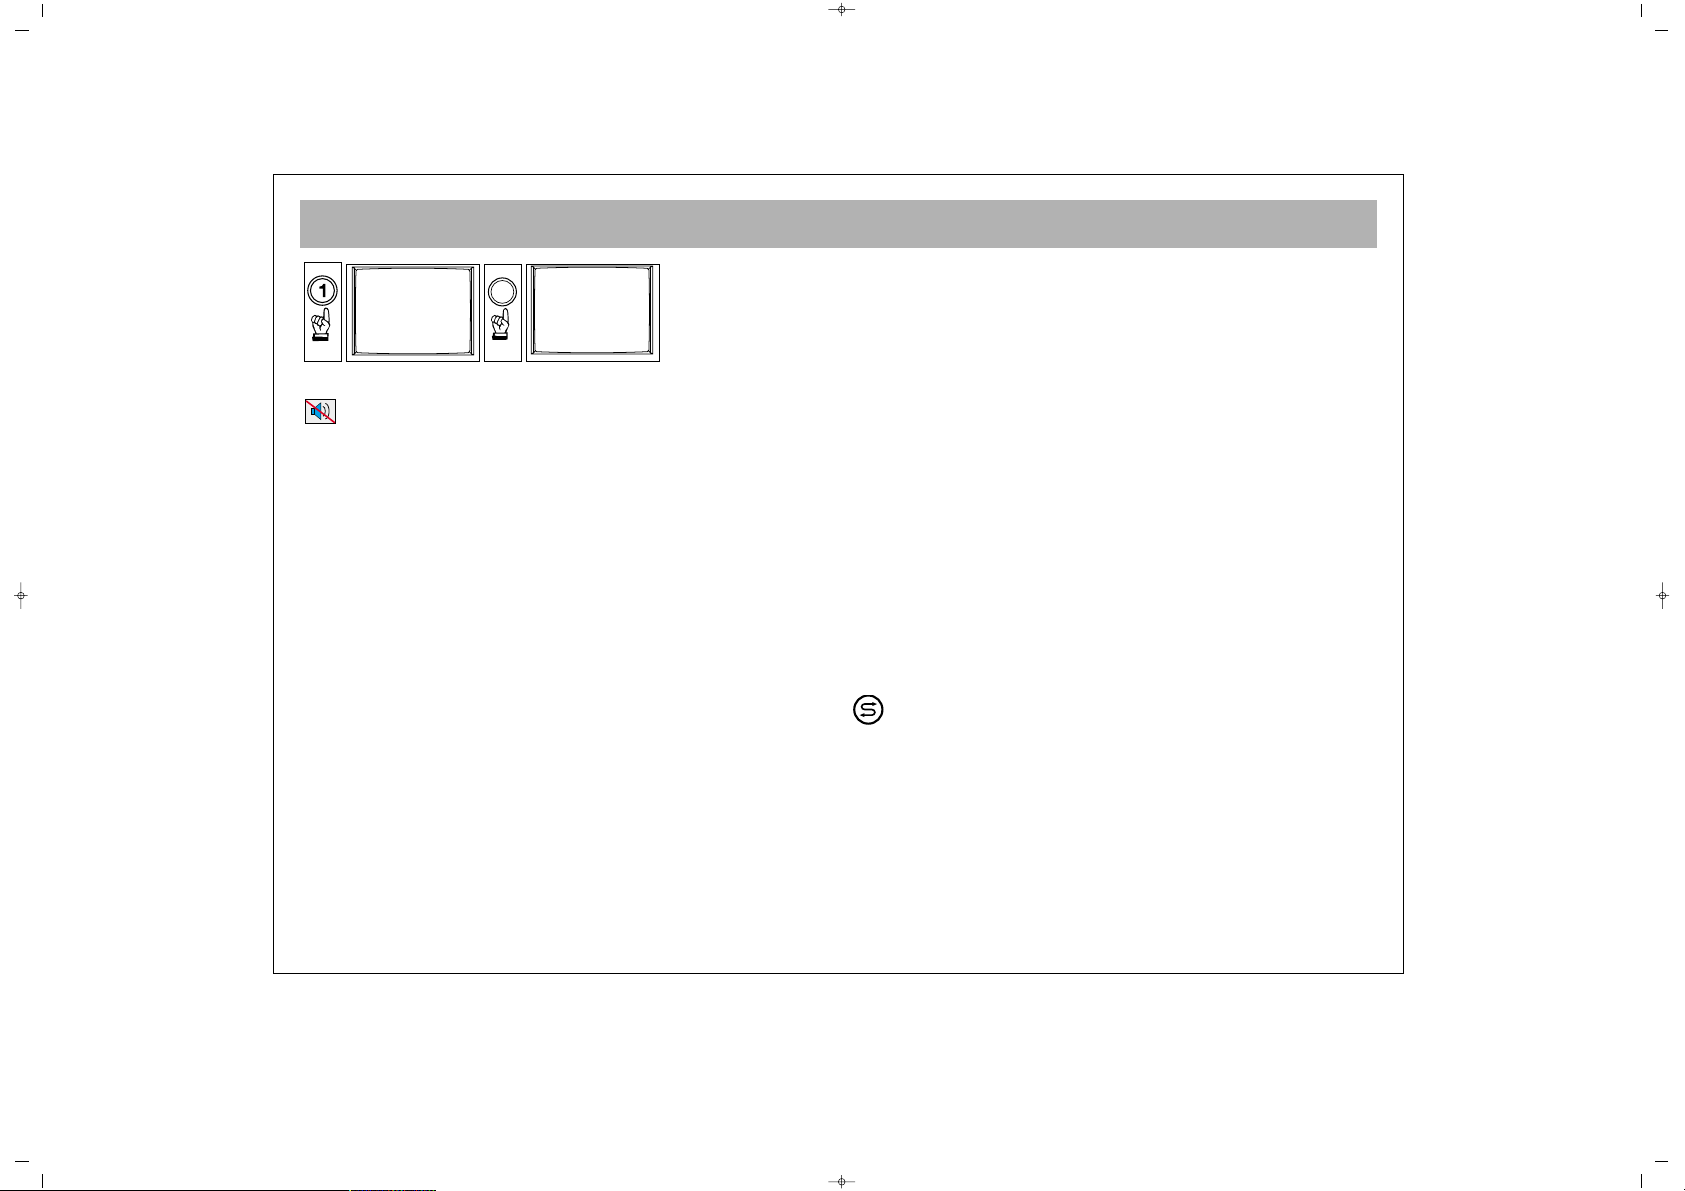
22.. MMuuttee
For muting the sound, press MUTE button on the
RC. Pressing this button again restores the sound.
33.. 1166::99 BBuuttttoonn::
This is for changing the picture
dimension.
44::33 CCiinneemmaa,, AAuuttoommaattiicc
and
1166::99
are
accessed through a single key press.
44.. PPPP::
Pressing this button loads the audio and video
values in the memory to the TV
If you keep PP button pressed for a time, the current TV
audio and picture values are saved as “User Values”
and the message
““UUsseerr VVaalluueess SSaavveedd””
appears on the
screen.
55.. SS//MM//DD bbuuttttoonn::
For stereo broadcasting, you can
change the volume as Mono, Stereo or DUAL A, DUAL
B. You can’t do this in case of mono broadcasting. You
can only see the bil screen of the broadcasting.
66.. AAVV::
To shift to AV mode, press AV (0) button on the
RC. The Info (information) menu appears on the
screen. In suitable AV Mode, leave pressing the button.
Each time you press the AV button, the inlet modes that
could be connected to your device appears and the
“TV” mode, that is the latest mode you started will
appear on the screen. Furthermore, you can shift to TV
mode pressing the “Red” button in any mode. As long
as the main menu is on the screen, you cannot take
your TV to AV position.
77:: AAuuttoommaattiicc SSwwiittcchhiinngg OOffff::
The TV automatically
switches off in 5 minutes after the broadcast ends.
Note: If you leave the TV at AV mode, the set does not
shift to Stand By mode after 5 minutes even the
broadcast ends.
88.. OOKK BBuuttttoonn::
In the mosaic mode, this is used to shift
to channel or for
CCoonnffiirrmmiinngg
or
CCaanncceelliinngg
the changes
in menus.
99.. IInnffoo BBuuttttoonn ((‹‹))::
The channel No., screen format,
channel name (if written), audio type etc. information
are given here.
SSwwaapp::
By pressing Swap button, you can return to
the former channel you watched
NNoottee::
If there is a menu on the screen, pressing Swap
will change nothing.
1
100
00
065001055740 37" LCD OPL ING 30/5/06 11:27 Page 13
Page 14
TV FUNCTIONS (MENUS)
14
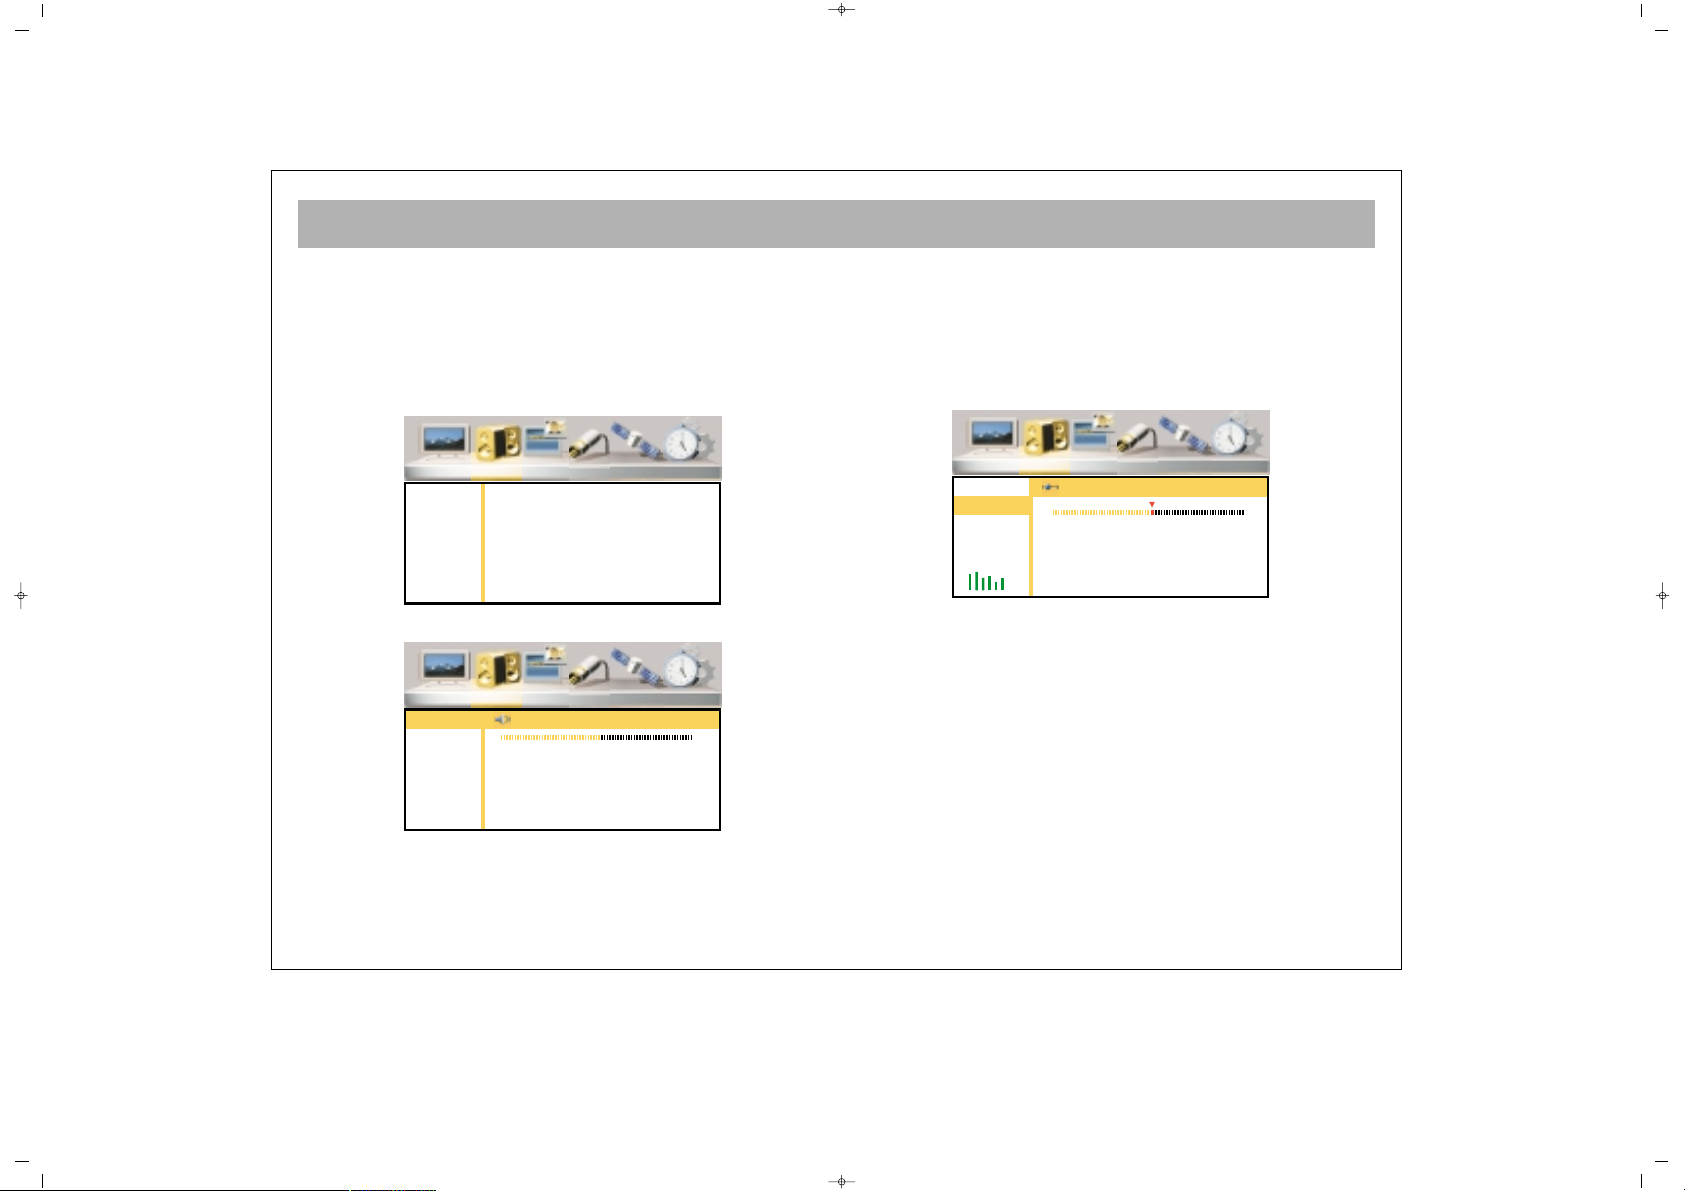
AAcccceessss iinn tthhee MMeennuuss
Pressing the Menu button, the Main Menu appears on
the screen, you can press V± to surf in the menus or
press OK or P- button to change any menu.
You can scroll on the menu lines pressing P± or press
OK or V+ button to change values. You can reduce or
increase the values pressing V±.
11.. IINNSSTTAALLLLAATTIIOONN ((AAuuttoommaattiicc SSeeaarrcchh,, FFiinnddiinngg oorr
RReeccoorrddiinngg))
The automatic programming for your device is told
below. In the following pages, you can find a more
comprehensive description on the settings and menus.
1. Connect the device as defined in the former pace
and take the TV into display mode
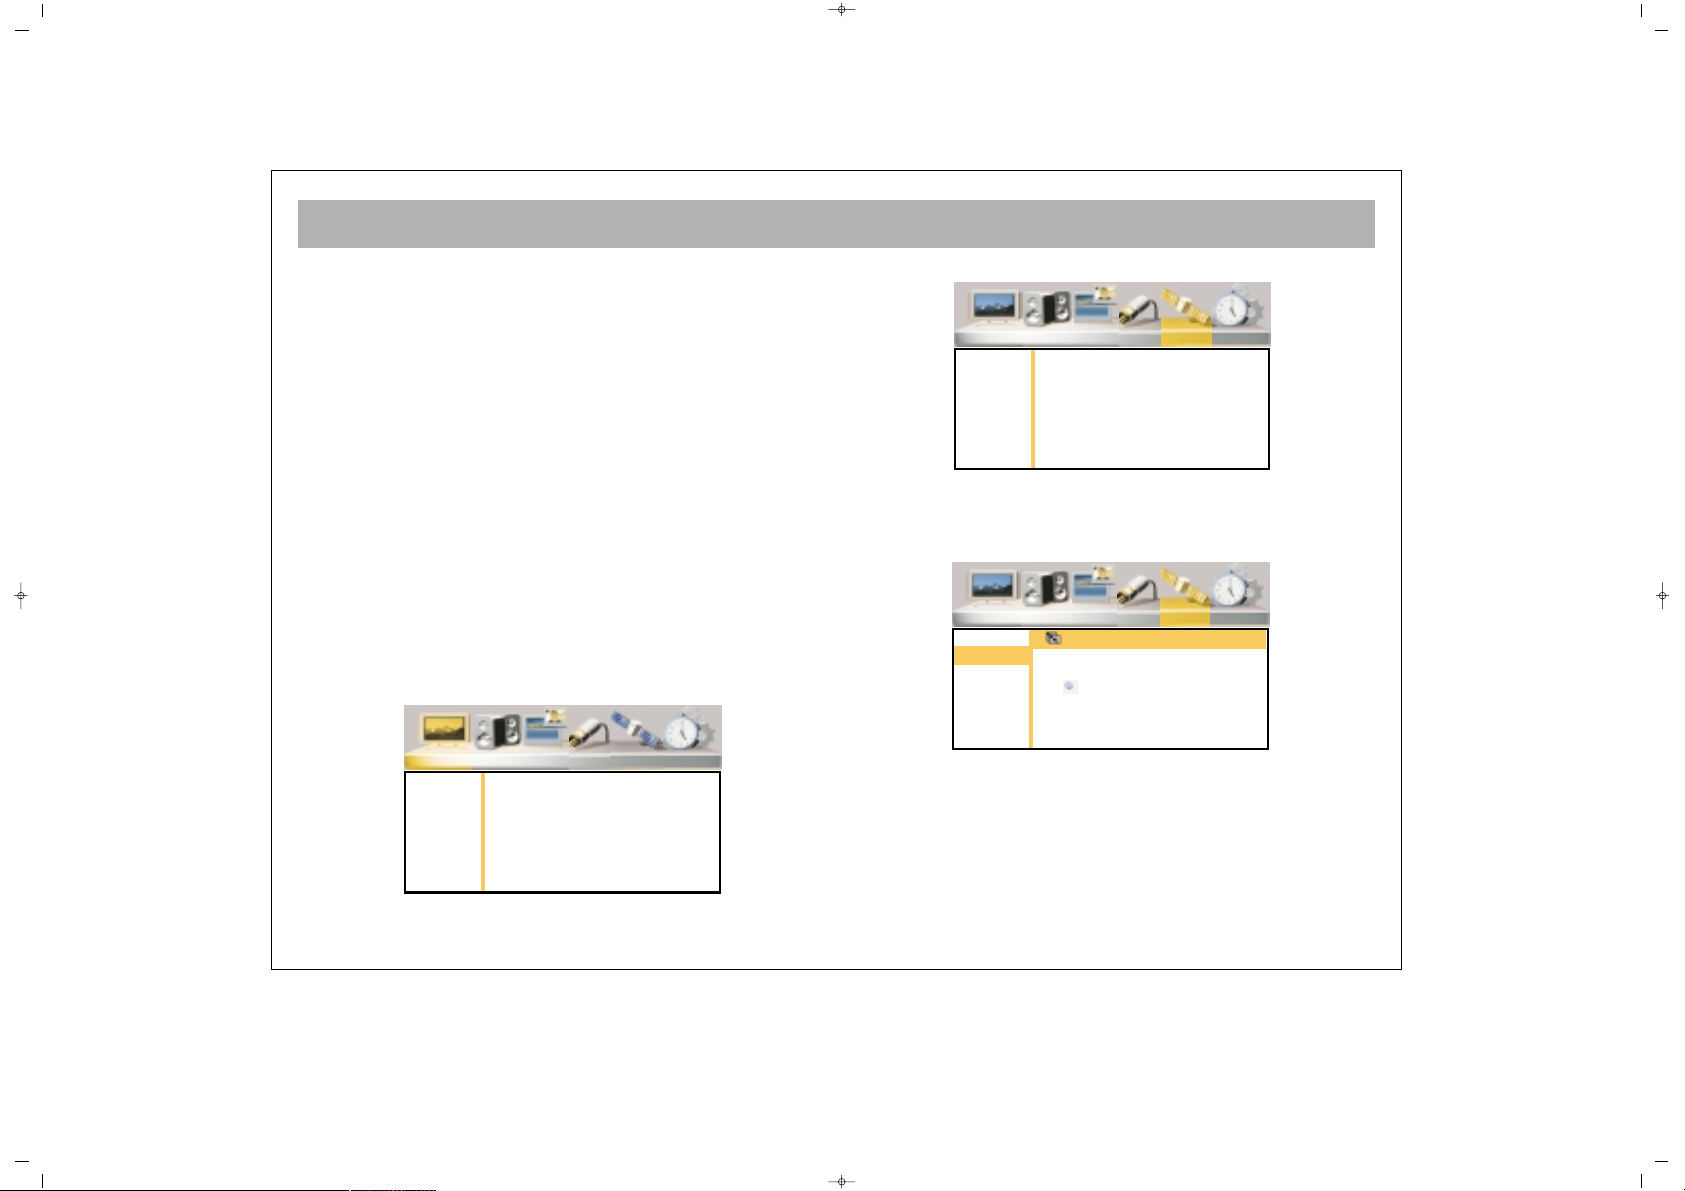
2. Press “Menu” button on the RC. The main menu will
appear on the screen.
3. Shift the “Installation” menu pressing V+ button
4. Enter into the menu pressing OK
5. Access to “Auto Scanning” option pressing P- or V+
button and confirm by pressing OK.
6. Select the country pressing V+ button, if your
country is not mentioned, then confirm “Others”.
7. Go to “Start” option pressing P-
065001055740 37" LCD OPL ING 30/5/06 11:27 Page 14
Picture Sound PIP Source Installation Setup
Brightness
Contrast
Colour
Hue
Sharpness
Noise Red.
Colour Temp
0
Picture Sound PIP Source Installation Setup
Stations
Auto Scan
Man. Search
Picture Sound PIP Source Installation Setup
Stations
Auto Scan
Man. Search
Auto Search
Country GB
Start
Page 15
TV FUNCTIONS (MENUS)
15
8. Start a search pressing “OK” button. On the lower
part of the screen, a bar will appear, showing that the
search has been started.
DDoo nnootthhiinngg uunnttiill tthhee sseeaarrcchh iiss oovveerr..
Your set will
automatically find and memorize the channels. When
the search is over, the bar at the bottom will disappear.
Naming, program deletion, moving and manual
channel search are defined in the following pages.
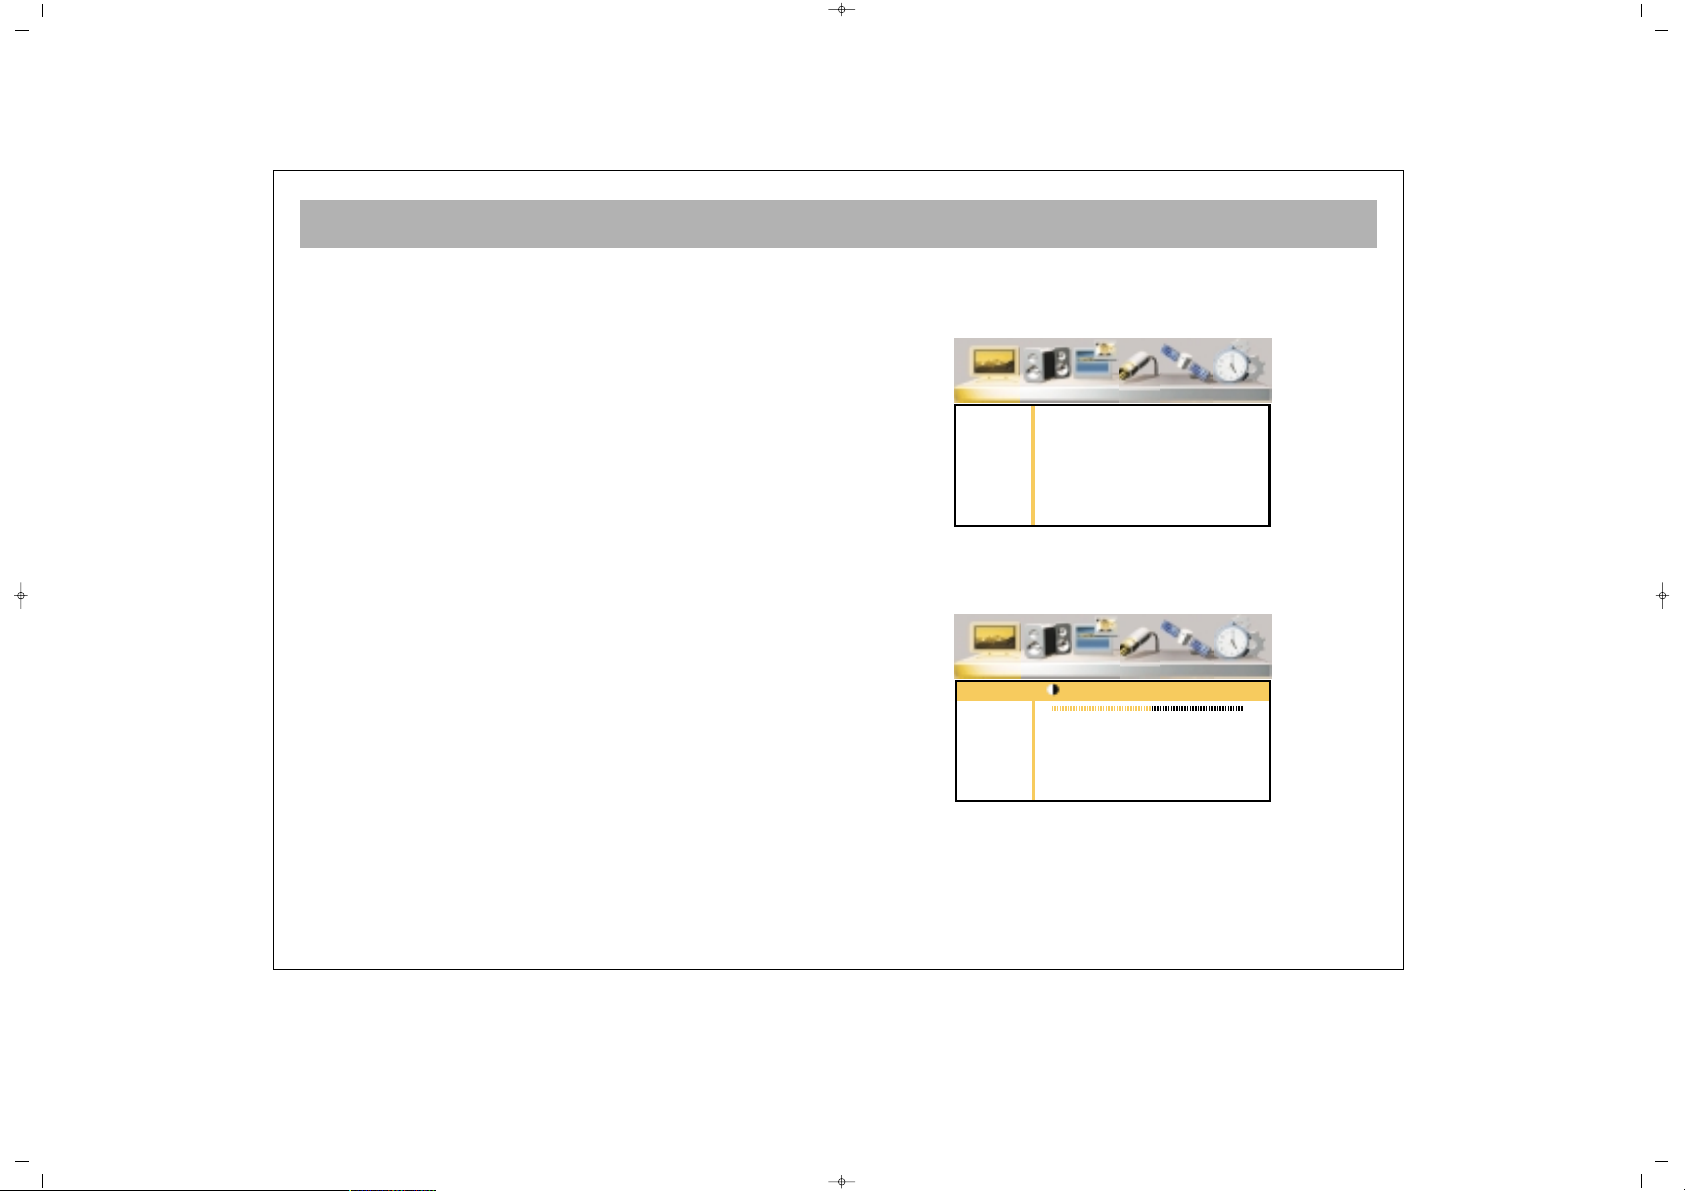
PPiiccttuurree mmeennuu::
You can adjust the picture values in this menu.
BBrriigghhttnneessss
You can adjust the “Brightness” as defined below:
1. Go to “Brightness” line pressing P±
2. Confirm pressing OK or V+
065001055740 37" LCD OPL ING 30/5/06 11:27 Page 15
Picture Sound PIP Source Installation Setup
Brightness
Contrast
Colour
Hue
Sharpness
Noise Red.
Colour Temp
Picture Sound PIP Source Installation Setup
Brightness
Contrast
Colour
Hue
Sharpness
Noise Red.
Colour Temp
Brightness
0
50
Page 16
TV FUNCTIONS (MENUS)
16
3. Adjust to a suitable value pressing V± buttons.
4.You can return to “Picture” menu by pressing MENU
button.
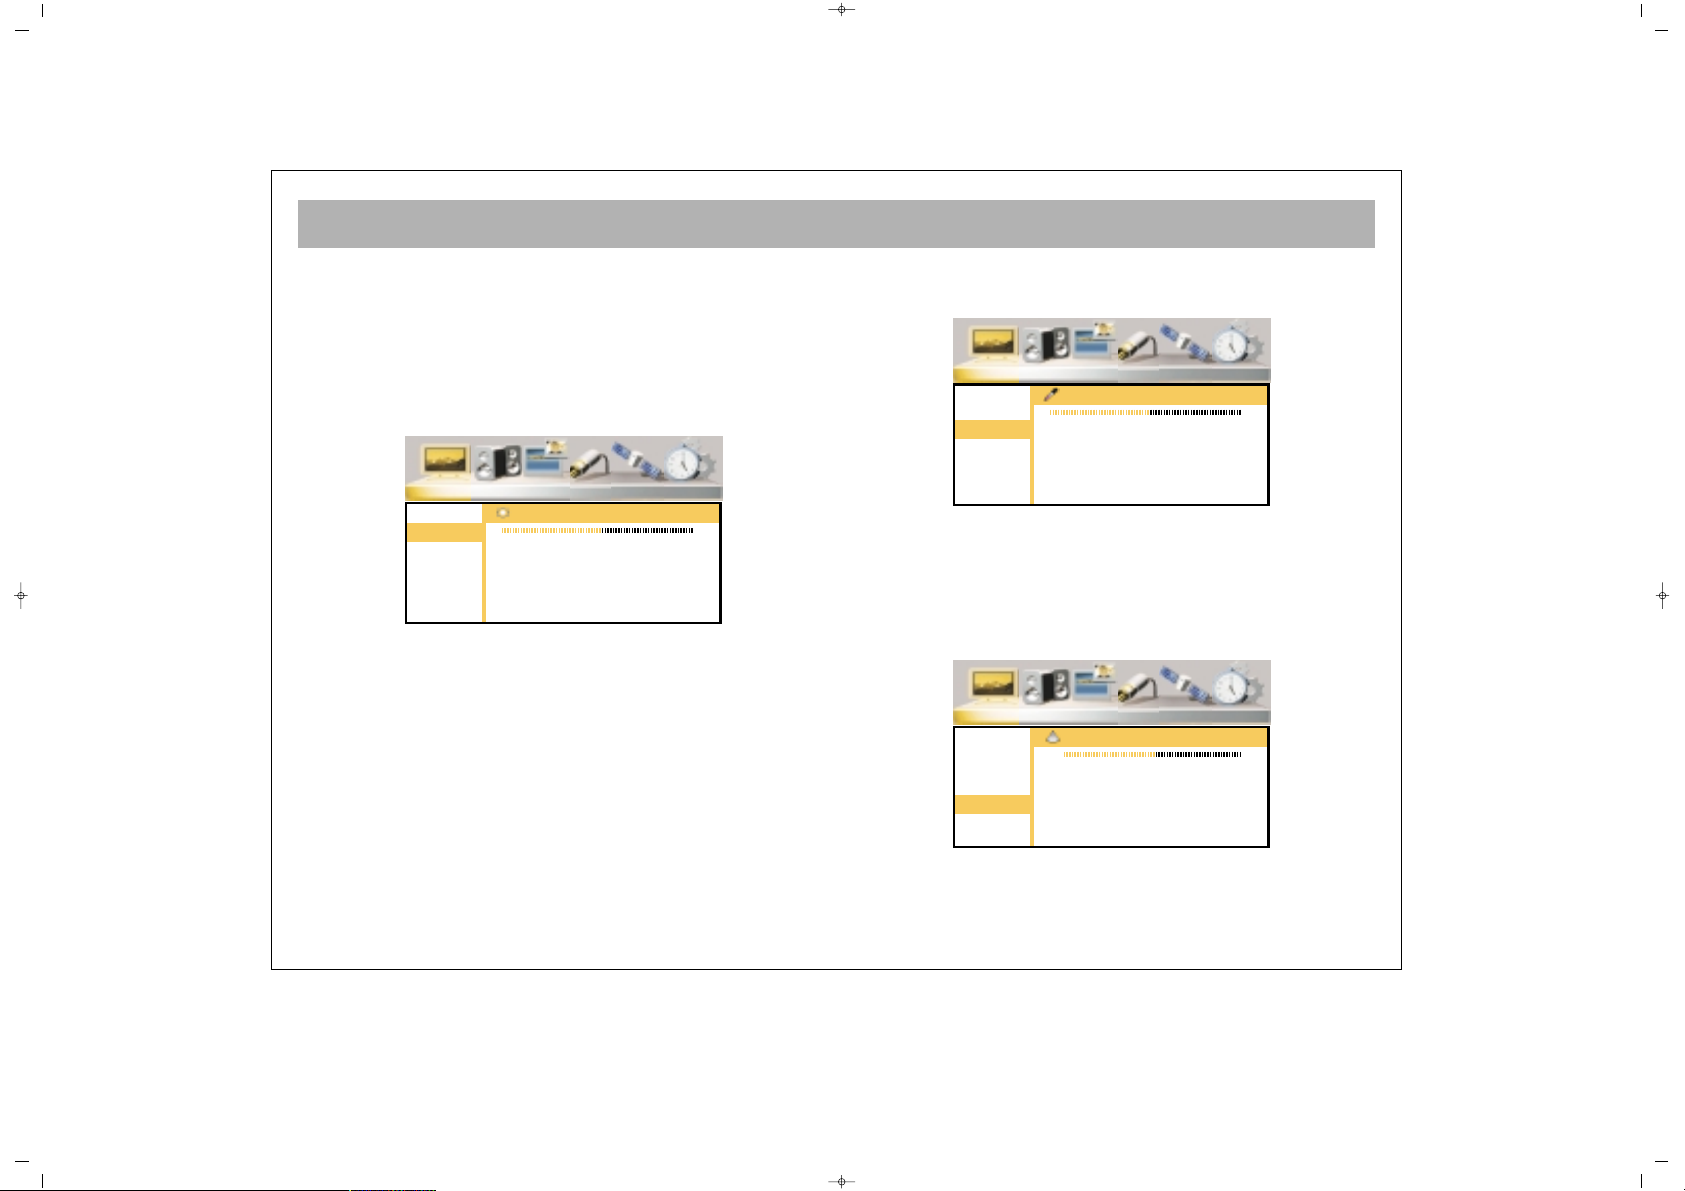
CCoonnttrraasstt
You can adjust a suitable Contrast value.
Go to the Contrast line pressing P± button. Repeat the
procedure given in 2, 3 and 4 of the “Brightness”
setting.
CCoolloorr
You can set the color.
Go to “Color” line pressing P± button. Repeat the
procedure given in 2, 3 and 4 of the “Brightness”
setting.
SShhaarrppnneessss
You can set the Sharpness.
065001055740 37" LCD OPL ING 30/5/06 11:27 Page 16
Picture Sound PIP Source Installation Setup
Brightness
Contrast
Colour
Hue
Sharpness
Noise Red.
Colour Temp
Contrast
50
Picture Sound PIP Source Installation Setup
Brightness
Contrast
Colour
Sharpness
ICC
Graphics
Colour Temp
Colour
50
Picture Sound PIP Source Installation Setup
Brightness
Contrast
Colour
Hue
Sharpness
Noise Red.
Colour Temp
Sharpness
10
Page 17
TV FUNCTIONS (MENUS)
17
Go to “Sharpness” line pressing P±. Repeat the
procedure given in 2, 3 and 4 of the “Brightness”
setting.
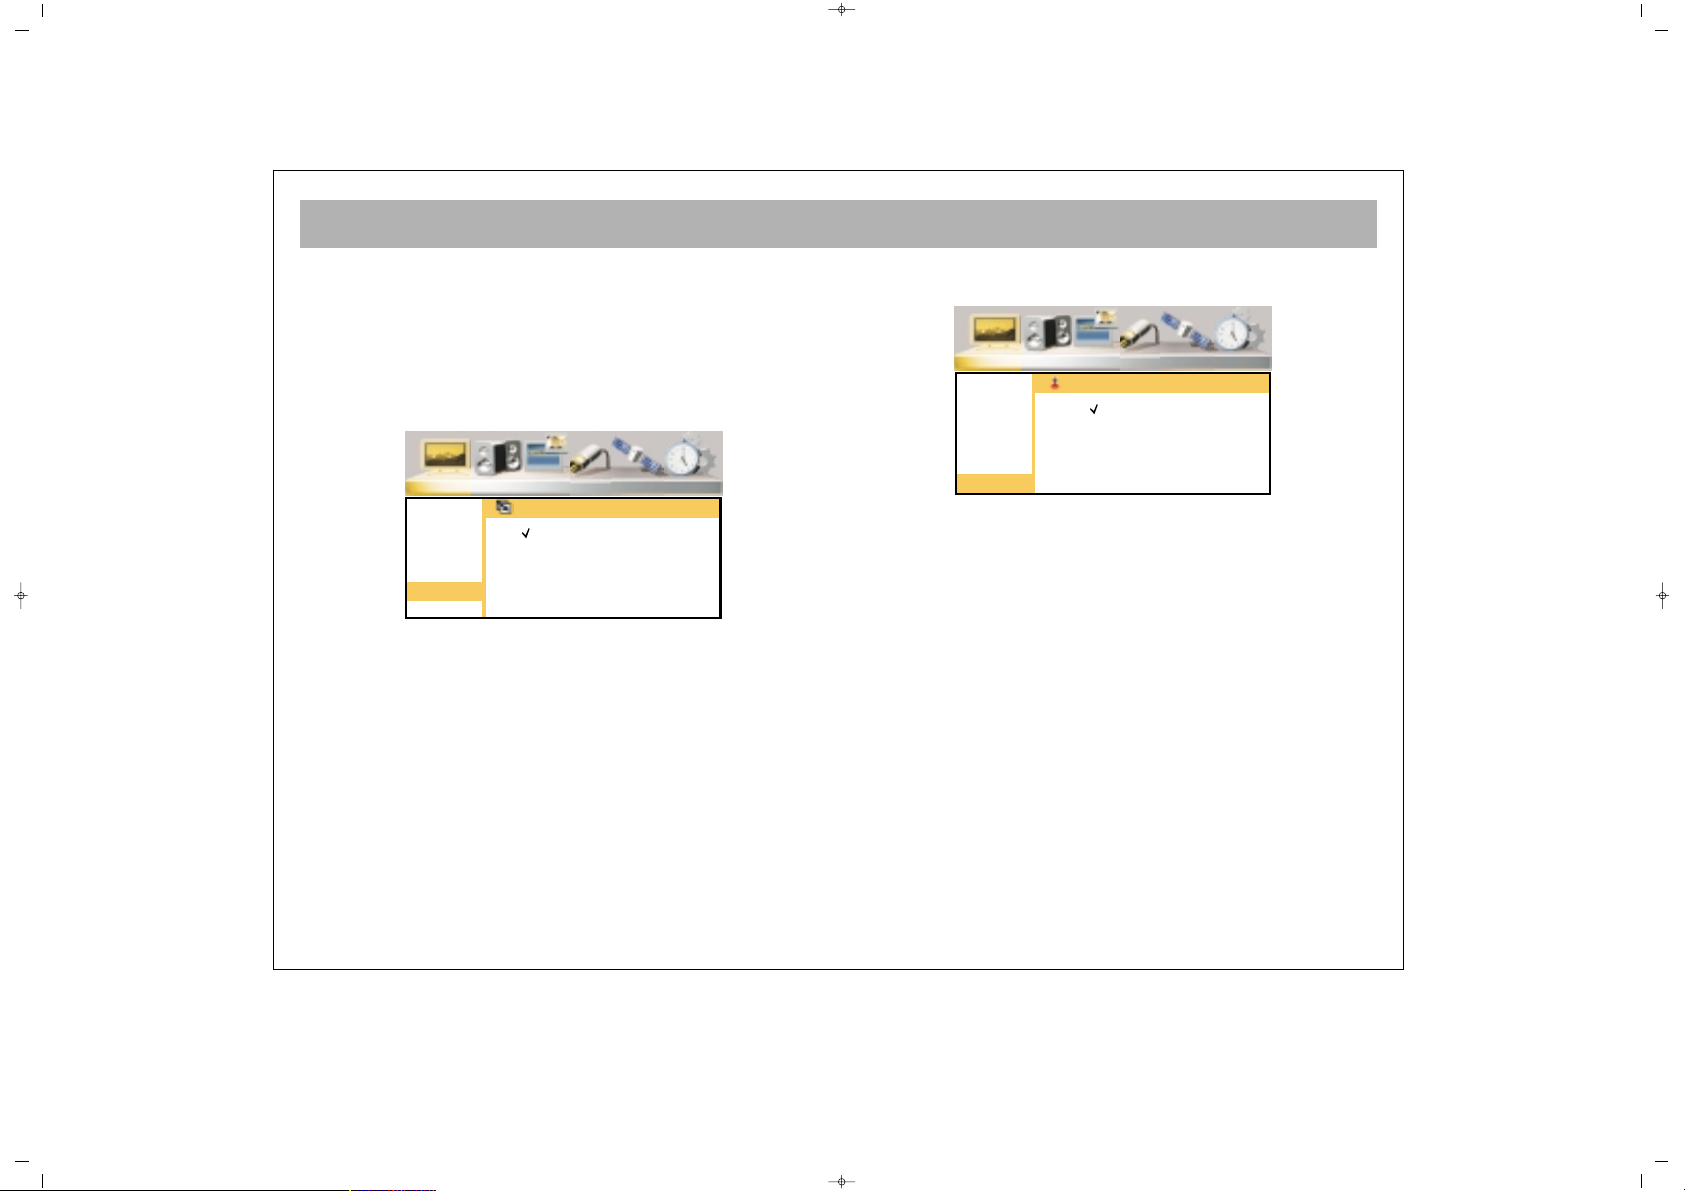
LLeessss NNooiissee
You can improve the bad picture display caused by bad
signal using “Noise Reduction” function.
1. Press P± button to go to “Less Noise” line
2. Confirm pressing OK or V+ button
3. Press P± to select “Open”
4. Press MENU button to return to “Picture” menu.
CCoolloorr TTeemmppeerraattuurree
You can select the factory set color values
1.Press P± to go to line “Color Temp.”
2. Confirm pressing OK or V+ buttons
3. Select the color option you want pressing P± buttons
4. You can return to Picture menu by pressing MENU
button
065001055740 37" LCD OPL ING 30/5/06 11:27 Page 17
Picture Sound PIP Source Installation Setup
Brightness
Contrast
Colour
Hue
Sharpness
Noise Red.
Colour Temp
Noise Reduction
Off
On
Picture Sound PIP Source Installation Setup
Brightness
Contrast
Colour
Hue
Sharpness
Noise Red.
Colour Temp
Colour Temperature
Warm
Cool
Normal
User
Page 18
TV FUNCTIONS (MENUS)
18
SSoouunndd MMeennuu
1. Enter to the Main Menu, pressing Menu button
2. Go to “Volume” menu by V+ button
3. Enter to Volume submenu by pressing OK or P-
You can adjust the volume settings as you want:
1. Go to the volume line pressing P± button.
2. Confirm pressing OK or V+ button
3. Adjust to suitable values pressing V± buttons
4. You can return to the Volume menu pressing MENU
button
BBaallaannccee
You can adjust balance (the volume intensity ratio
between the speakers)
Go to Balance line pressing P± buttons. Repeat the
“Volume” setting procedure No. 2, 3 and 4.
065001055740 37" LCD OPL ING 30/5/06 11:27 Page 18
Picture Sound PIP Source Installation Setup
Volume
Balance
Equalizer
Surround
BASS Enhance
Headphone
Picture Sound PIP Source Installation Setup
Volume
Balance
Equalizer
Surround
BASS Enhance
Headphone
Volume
Picture Sound PIP Source Installation Setup
Volume
Balance
Equalizer
Surround
BASS Enhance
Headphone
Balance
RL
15
Page 19
TV FUNCTIONS (MENUS)
19
EEqquuaalliizzeerr
4. Equalizer (Direct, Film, Music, Speech) mode
adjustments can be carried out
1. Press P± to go to the Equalizer line
2. Press OK or V+ button to confirm
3. Go to the Equalizer mode you want to set pressing
V± buttons
4. Go to the frequency line you want to adjust pressing
V± buttons
5. Set to the suitable value by V± buttons
6. Repeat the procedures 4 and 5 for the other
frequencies
7. When you press P- button after the lowest frequency
line, you access to the Equalizer modes line. If you
want to set the other modes, repeat the parts 2 and 6.
8. You can return to the “Volume” menu by pressing
MENU button
SSuurrrroouunndd
You can activate or deactivate the Surround sound
effect
1. Go to the Surround line pressing P± button
2. Confirm by pressing OK or V+ button
3. Select Open by P± buttons
4. You can return to the "Sound" menu by pressing
MENU button
BBaassss EEffffeecctt
You can activate or deactivate the Bass Effect function
065001055740 37" LCD OPL ING 30/5/06 11:27 Page 19
Picture Sound PIP Source Installation Setup
Volume
Balance
Equalizer
Surround
BASS Enhance
Headphone
Equalizer
Flat Movie Music Speech User
120Hz
500Hz
1.5KHz
5KHz
10KHz
Picture Sound PIP Source Installation Setup
Volume
Balance
Equalizer
Surround
BASS Enhance
Headphone
Surround
On
Off
Picture Sound PIP Source Installation Setup
Volume
Balance
Equalizer
Surround
BASS Enhance
Headphone
BASS Enhance
On
Off
Page 20

TV FUNCTIONS (MENUS)
20
1. Press P± button to go to the Bass Effect line.
2. Confirm by pressing OK or V+ button
3. Select "Open" option by pressing P± buttons
4. You can return to the Sound menu pressing MENU
button
HHeeaaddpphhoonnee
You can increase or reduce the speakerphone sound
1. Go to the Headphone line pressing P±
2. Confirm by pressing OK or V+
3. Set to the suitable value by pressing MENU button
4. You can return to the Sound menu pressing MENU
button
PPIIPP MMeennuu
1. Go to the Main Menu by pressing Menu button
2. Press V+ to access to PIP menu
3. Go to the PIP submenu by pressing OK or P-
PPIIPP ((PPiiccttuurree iinn PPiiccttuurree)) MMooddee
You can activate or deactivate the screen or mosaic
screen
065001055740 37" LCD OPL ING 30/5/06 11:27 Page 20
Picture Sound PIP Source Installation Setup
Volume
Balance
Equalizer
Surround
BASS Enhance
Headphone
Headphone Volume
15
Picture Sound PIP Source Installation Setup
PIP Modes
PIP Size
PIP Position
Page 21

TV FUNCTIONS (MENUS)
21
OOppeenniinngg aa PPIIPP SSccrreeeenn
1. Go to the PIP Mode line by pressing P±
2. Confirm by pressing OK or V+
3. Select the PIP option by pressing P± buttons
4. You can return to PIP menu by pressing MENU
button
PPIIPP DDiimmeennssiioonn
In this menu you can select the PIP size from among 3
different options
1. Press P± to go to the PIP line
2. Confirm by pressing OK or V+ button
3. Select the suitable PIP size by pressing P± buttons
4. You can return to PIP menu by pressing MENU
button
PPIIPP PPoossiittiioonn
You can adjust the PIP position on the TV
1. Press P± to the PIP Position line
2. Confirm by pressing OK or V+ buttons
3. Select the suitable PIP position by pressing P±
buttons
4. You can return to PIP menu by pressing MENU
button
065001055740 37" LCD OPL ING 30/5/06 11:27 Page 21
Picture Sound PIP Source Installation Setup
PIP Modes
PIP Size
PIP Position
PIP Modes
Off
PIP
Mosaic
Picture Sound PIP Source Installation Setup
PIP Modes
PIP Size
PIP Position
PIP Size
Small
Medium
Large
Picture Sound PIP Source Installation Setup
PIP Modes
PIP Size
PIP Position
PIP Position
Top Left
Top Right
Bottom Left
Bottom Right
Page 22

TV FUNCTIONS (MENUS)
22
SSoouurrccee MMeennuu
1. Go to the Main Menu by pressing Menu button
2. Go to the Source Menu pressing V+
3. Enter to the Source Submenu by pressing OK or PYou can select the external device (AV) modes in this
menu
MMaaiinn WWiinnddooww
You can select the AV modes for the main screen
1. Go to the Main Window line by pressing P±
2. Confirm by pressing OK or V+ button
3. Press P± to select the AV mode where the device you
want to display is connected
4. Press MENU button to return to Resource menu.
PPIIPP WWiinnddooww
You can select the AV modes for the PIP screen
1. Go to the PIP Window Line by pressing P±
2. Confirm by pressing OK or V+
3. Select the AV mode of the device you want to use,
pressing P±
4. You can return to the Resource menu by pressing
MENU button
065001055740 37" LCD OPL ING 30/5/06 11:27 Page 22
Picture Sound PIP Source Installation Setup
Main
PIP
Picture Sound PIP Source Installation Setup
Main
PIP
Main Source Select
TV
Side AV
AV-IN
S-Video
Y Pb Pr
HD-YPbPr
PC
HDMI
SCART1
SCART2
Picture Sound PIP Source Installation Setup
Main
PIP
PIP Source Select
TV
Side AV
AV-IN
S-Video
Y Pb Pr
HD-YPbPr
PC
HDMI
SCART1
SCART2
Page 23

TV FUNCTIONS (MENUS)
23
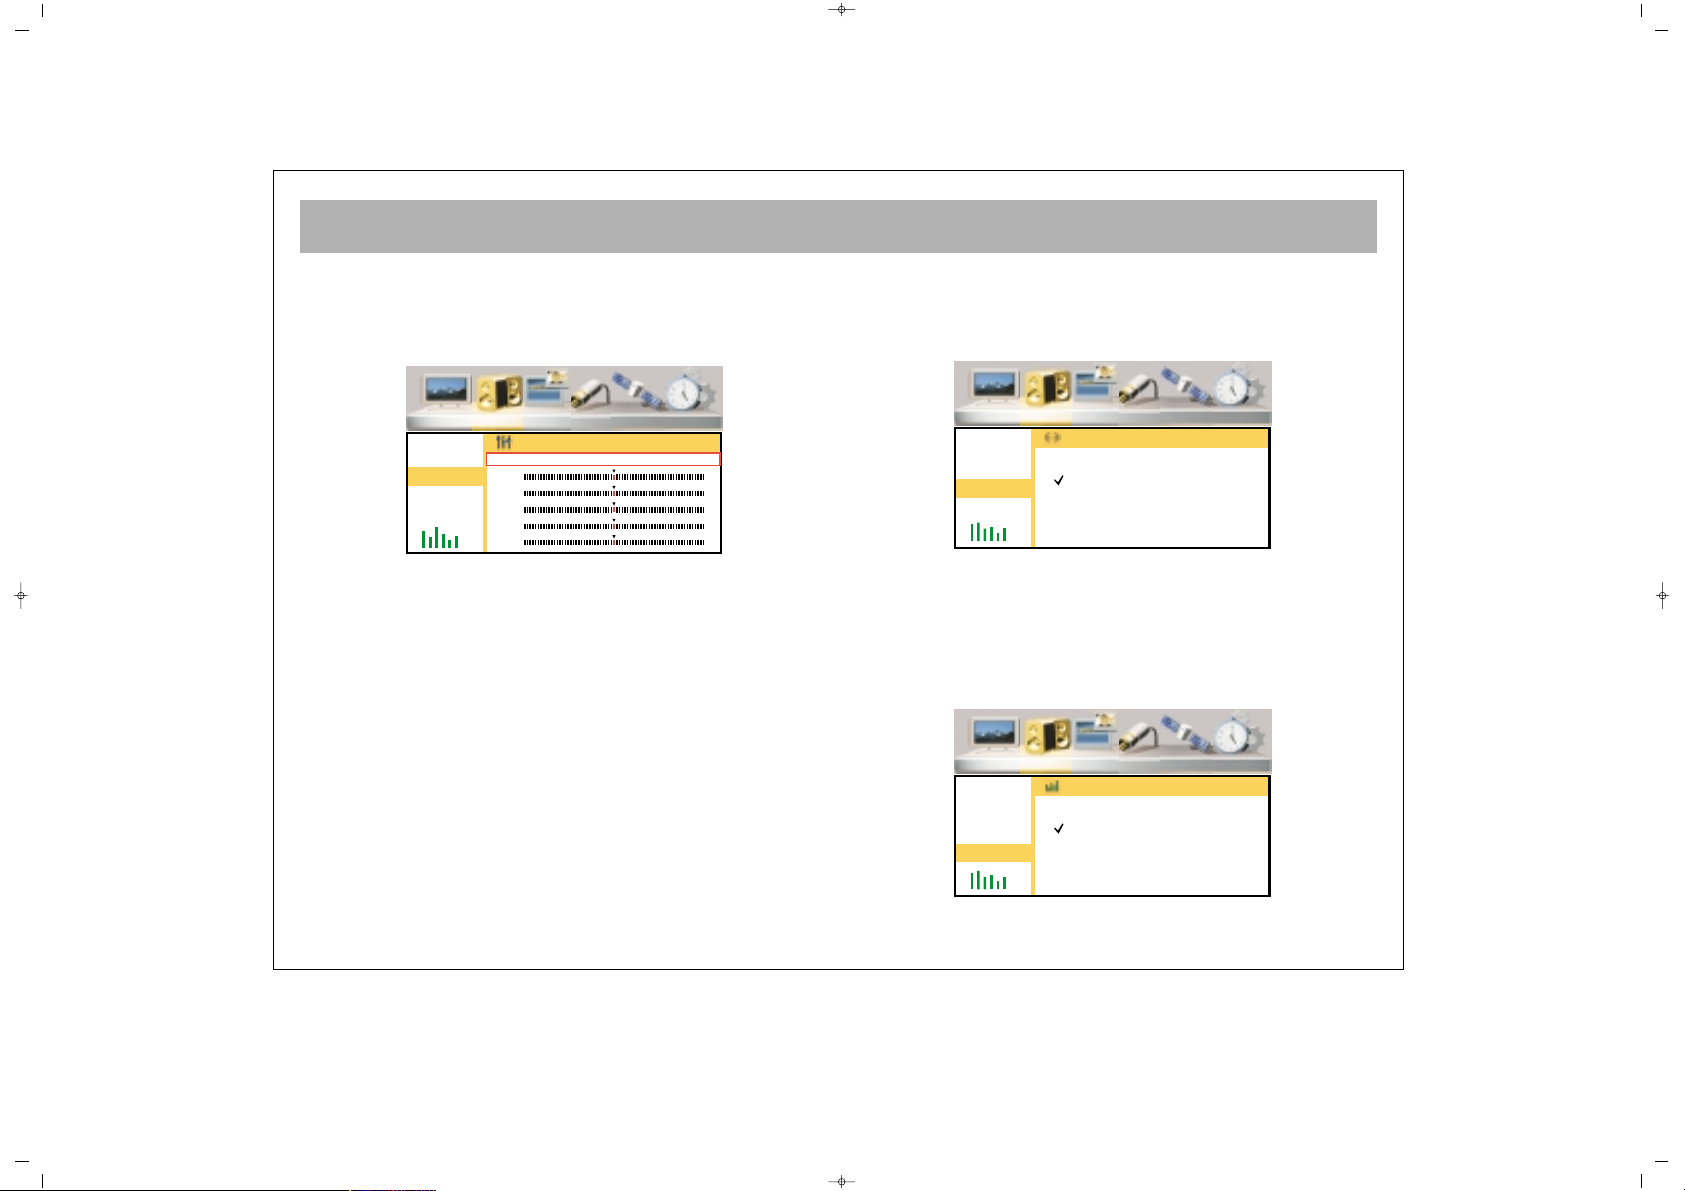
IInnssttaallllaattiioonn MMeennuu
1. Press Menu button to enter to the Main Menu
2. Go to the Installation Menu by pressing V+ button
3. Go to the Installation Submenu pressing OK or PCChhaannnneell TTaabbllee
In this menu, you can delete, scroll, name and lock
channels.
DDeelleettiinngg CChhaannnneellss
1. Press P± to go to the Channel Table Line
2. Confirm by pressing OK or V+ buttons
3. Highlight the channel to be deleted using P± buttons
4. Delete the channel pressing Red button
5. You can return to Channel Table menu by pressing
Menu button.
CChhaannnneell MMoovvee
1. Highlight the Channel Table line pressing P±
2. Confirm by pressing OK or V+
3. Highlight the channel to be moved by pressing P±
buttons
4. Press Green button
5. Highlight the line where the channel to be moved,
using P± buttons
6. End the move by pressing Green button
7. You can return to Channel Table menu by pressing
MENU button
065001055740 37" LCD OPL ING 30/5/06 11:27 Page 23
Picture Sound PIP Source Installation Setup
Stations
Auto Scan
Man. Search
Program Channel Frequency Lock
Delete Move Name Lock
TV Station
17
18
19
20
21
266,00
273,00
280,00
294,00
303,00
Program Channel Frequency Lock
Delete Move Name Lock
TV Station
17
18
19
20
21
266,00
273,00
280,00
294,00
303,00
Page 24

TV FUNCTIONS (MENUS)
24
CChhaannnneell nnaammiinngg
1. Go to the Channel Table line pressing P±
2. Confirm by pressing OK or V+ button
3. Highlight the channel to name by pressing P+
4. Press yellow button
5. Type the letter by pressing P±
6. Proceed to the following letter pressing V+ button
7. Carry out the parts 5 and 6 until the letter is typed
8. Complete the naming by pressing Yellow button
9. You can return to Channel Table menu by pressing
MENU button
CChhaannnneell LLoocckk
The channels locked in this menu are not visible when
P± is pressed. When you try to enter channel
number directly, you should enter the "password".
1. Go to the Channel Table line by pressing P± buttons
2. Confirm by pressing OK or V+ button
3. Highlight the channel by P±
4. Press blue button
5. Enter the password on the menu appearing on the
screen. The password is set as
"00000" in the factory. To cancel the locking function,
repeat parts 3, 4 and 5.
6. Press menu button to return to "Channel Table"
menu.
065001055740 37" LCD OPL ING 30/5/06 11:27 Page 24
Program Channel Frequency Lock
Delete Move Name Lock
TV Station
17
18
19
20
21
266,00
273,00
280,00
294,00
303,00
Program Channel Frequency Lock
Delete Move Name Lock
TV Station
17
18
19
20
21
266,00
273,00
280,00
294,00
303,00
Page 25

TV FUNCTIONS (MENUS)
25
AAuuttoommaattiicc SSeeaarrcchh
1. Press P- button to go to Automatic Search option and
confirm by pressing OK button
2. Press V+ to select the country, if there is no reference
for country, select Others.
3. Press P- button to access to "Start" option
4. Start Automatic Search by pressing OK. Below the
screen, the search bar will appear.
DDoo nnootthhiinngg uunnttiill tthhee sseeaarrcchh iiss oovveerr..
Your device will
automatically find and memorize the channels.
WWaarrnniinngg::
This will delete the channels memorized
before
MMaannuuaall SSeeaarrcchh
In this menu you can set channels and fine tuning
1. Access to Manual Search option by pressing P- and
confirm by OK.
2. Access to "Country" line by pressing P- button and
select the country by pressing V± (This option should
be set as Europe except for France)
3. Go to the "Program No." Line pressing P±
4. Specify the program number pressing V+ button
5.
a.1. Go to the "Frequency" option pressing Pa.2. Enter the frequency of the channel you want to
find from the numerical keyboard 0….9
OORR
b.1. Go to the SEARCH option by pressing P- button
b.2. Start SEARCH pressing V+ button and continue
until finding the required channel continue pressing
V+ button.
065001055740 37" LCD OPL ING 30/5/06 11:27 Page 25
Picture Sound PIP Source Installation Setup
Stations
Auto Scan
Man. Search
Auto Search
Country GB
Start
Picture Sound PIP Source Installation Setup
Stations
Auto Scan
Man. Search
Manual Search
Program Nr.0
Frequency 0 Mhz
Scan
Fine Tune
System Europe
Store
Page 26

TV FUNCTIONS (MENUS)
26
6. Go to the Fine Tuning Line pressing P± and if
necessary, fine tune using V±
7. Go to the Record line pressing P± and memorize the
action by pressing OK button
8. Press MENU button to return to Channel Table menu.
SSeettttiinnggss MMeennuu
1. Enter to the Main Menu pressing Menu button
2. Go to the Settings menu by V+ button
3. Go to the Settings submenu by pressing OK and P-
LLaanngguuaaggee
In this menu you can change the Menu language.
1. Go to the language line pressing P± button
2. Confirm by pressing OK or V+ button
065001055740 37" LCD OPL ING 30/5/06 11:27 Page 26
Picture Sound PIP Source Installation Setup
Languages
Sleep Timer
Child Lock
Graphics
AV Config.
Picture Sound PIP Source Installation Setup
Languages
Sleep Timer
Child Lock
Graphics
AV Config.
Languages
English OK
Page 27

TV FUNCTIONS (MENUS)
27
3. Select the language by P± and press V+ to access to
OK line.
4. Let the set memorize the entry by pressing OK
5. Press MENU button to return "Settings" menu, if you
want to.
SSlleeeepp TTiimmeerr
You can adjust your set for automatic switching off.
1. Go to "Sleep Timer" line by pressing P± button
2. Confirm by pressing OK or V+ buttons
3. Select the time section for closing by pressing P±
buttons
4. You may press MENU button to return to the
"Settings" menu.
CChhiilldd LLoocckk
You can activate the Child Lock
1. Go to "Child Lock" line pressing P± buttons
2. Confirm by pressing OK or V+ button
3. Go to "Change Password" line by P± buttons
4. Confirm by pressing OK and enter a password in the
password menu, which should be easy to remember
5. Re-enter the Password as instructed in the menu
6. Go to "Lock" line by P± buttons
7. Confirm by pressing OK and enter the Password in
the password menu. Child Lock is now deactivated.
Your set will ask for a password while opening and will
not start if the password is not entered correctly.
NNOOTTEE:: IIff yyoouu ffoorrggeett tthhee cchhiilldd lloocckk,, ttyyppee 11--99--22--33--00 oonn
tthhee RRCC.. WWhheenn yyoouu wwaanntt ttoo cchhaannggee tthhee ppaasssswwoorrdd,, tthhee
TTVV wwiillll aasskk aa ppaasssswwoorrdd,, yyoouu ccaann eessttaabblliisshh aa nneeww
ppaasssswwoorrdd bbyy rree--eenntteerriinngg tthhiiss nnuummbbeerr..
065001055740 37" LCD OPL ING 30/5/06 11:27 Page 27
Picture Sound PIP Source Installation Setup
Languages
Sleep Timer
Child Lock
Graphics
AV Config.
Sleep Timer
Off
90
60
45
30
15
Picture Sound PIP Source Installation Setup
Languages
Sleep Timer
Child Lock
Graphics
AV Config.
Child Lock
Lock
Change Password
Page 28

TV FUNCTIONS (MENUS)
28
8. By pressing MENU button you can return to
"Settings" menu
GGrraapphhiiccss
Your TV set can automatically set graphics for PCI
mode.
1. Go to the Graphic line pressing P±
2. Confirm by pressing OK or V+
3. Start Auto Setting by pressing OK
4. You can return to Settings menu by pressing MENU
SSCCAARRTT CCoonnffiigguurraattiioonn
You can configure the SCART inlets.
1. Go to the SCART Config. Line by pressing P±
2. Confirm by OK or V+ button
3. Select the SCART inlet to be set by P±
4. Select the configuration according to the your TV’s
external out with V+/V- button when you connect
Scart1 and Scart2.
5. You can return to "Settings" menu by pressing MENU
065001055740 37" LCD OPL ING 30/5/06 11:27 Page 28
Picture Sound PIP Source Installation Setup
Languages
Sleep Timer
Child Lock
Graphics
AV Config.
Graphics (PC Mode Only)
Auto Adjust
Picture Sound PIP Source Installation Setup
Languages
Sleep Timer
Child Lock
Graphics
AV Config.
AV Configuration
SCART1 CVBS/RGB
SCART2 S-Video
Page 29

TELETEXT
29
TTeelleetteexxtt MMooddee
If the channel has a teletext broadcasting, you can carry
out various actions by passing to teletext mode
11.. TTeelleetteexxtt
: This shifts to teletext broadcasting in
the channel. Pressing twice will transform into a double
teletext page. If you press SWAP button while in
this mode, the first page remain fixed, you can carry out
teletext actions in the 2nd page. Pressing 3rd time will
shift to the TV broadcasting.
22.. RReevveeaall // CCoonncceeaall::
: In teletext, this provides
revealing or concealing of some information in the text
broadcasting
33.. TTeelleetteexxtt ttiimmeerr::
:
((AAvvaaiillaabbllee aatt ssoommee mmooddeellss))
Displays the time taken from the teletext of the channel
while in TV mode on the upper right corner of the
screen.
44.. CCaanncceell ((uuppddaattiinngg))::
: While in teletext mode
pressing this button brings the TV broadcasting. But
teletext is still active and if a new page number is
entered, page search continues. When the required
page is accessed, a message showing the page number
appears on the screen. Pressing this button again brings
the teletext page.
55.. SSiizzee ((PPaaggee eexxppaannssiioonn))
: This button is used to
display the teletext page in 3 different formats. This
brings the display in normal sizes, upper part double
sized or lower part double sized
66.. MMiixx ((MMiixxeedd TTVV aanndd TTeelleetteexxtt BBrrooaaddccaassttiinngg))
: You
can display the TV and Teletext broadcasting side to side.
1.Teletext button
2. Reveal (Conceal) button
3. Teletext timer button
(Available at some models)
4. Cancel (Updating) button
5. Size (Page expansion)
button
6. Mix (Mixed Teletext and TV
button)
7.Hold (Subpage holding)
button
8. Index (Home Page button)
9. Color (Red, Green, Yellow,
Blue Button)
065001055740 37" LCD OPL ING 30/5/06 11:27 Page 29
Page 30

TELETEXT
30
77.. HHoolldd ((HHoollddiinngg aa ssuubbppaaggee))::
: If there are
subpages of a Teletext Page, these subpages are
displayed at certain time intervals. In this case, this
button is used to keep any page permanently on the
screen. When the page is kept by pressing HOLD
button, the Hold icon appears on the upper left corner
of the Teletext Page.
88.. IInnddeexx ((HHoommee PPaaggee))::
: This button provides a
direct access to the index page of Teletext.
99.. CCoolloorr BBuuttttoonnss ((RREEDD // GGRREEEENN // YYEELLLLOOWW // BBLLUUEE))
These four colored text buttons provide an easier scan
of the teletext information. When you press MENU
button while this mode is on, color options change and
you can access to the required option with the color
buttons.
EExxaammppllee
TTVV GGUUIIDDEE SSPPOORRTTSS NNEEWWSS WWEEAATTHHEERR
(The above information are for example purposes, such
information may change depending on the concerned
page)
Press RED
button to
receive TV
Guide
Press GREEN
button to
receive sports
information
Press YELLOW
button to
receive news
Press BLUE
button to
receive weather
information
065001055740 37" LCD OPL ING 30/5/06 11:27 Page 30
Page 31

BEFORE CALLING SERVICE
31
SSyymmppttoomm
No picture
There is no light on the screen
No sound
No or weak picture
There is no light on the screen
Normal sound
Picture is normal
No sound
There is no color on the color
broadcast or the colors are not normal
Picture is snowy or there are noises
There are dotted lines or lines
Double picture or shadows
There is no display on the DVI or PC
mode
RReeccoommmmeennddaattiioonn
• Plug your TV to an operating outlet
• Press ON/OFF button on the TV
• If the standby indicator lights, press program numbers on the RC or P± buttons on the TV
• Check the antenna
• Check the brightness, color or contrast
• Check the video inlet
• Check the VGA cable in case of monitor use
• If the Mute symbol appears on the screen, press Mute button on the RC once more
• Raise the sound level on the TV set or RC
• Check the color setting
• Fine tune for a more clear display
• Fine tune
• Check the antenna
• This might be caused by internal noises (For example motor vehicles, neons, hair dryers etc.)
Set the antenna direction to minimum noise
• Also the adjacent buildings may have some reflections. You can correct the display by raising the
antenna
Check if the set is in correct mode. Check the external DVI or VGA cable
If there is a problem in the picture and sound, compare with the below listed “symptoms” and remedy by following the
recommendations. If the problem persists, you should apply to an
aauutthhoorriizzeedd sseerrvviiccee
065001055740 37" LCD OPL ING 30/5/06 11:27 Page 31
Page 32

TECHNICAL SPECIFICATIONS
32
Screen Size
3377””
Standard Size 94 cm
Power Consumption 160 W
Operating Voltage 230 V (AC) 50 Hz
TV System MULTI SYSTEM / NTSC PLAYBACK
Band VHF I Kanal 2 - 4
VHF III Kanal 5 - 12
UHF Kanal 21 - 69
S Kanal S1 - S41
Aerial Input 75 ohm Standard Antenna Socket
Program Capacity 100 + AV
Picture Tube TFT LCD Panel 1366 x 768 resolution
Sound Output rms 2 x 8 W
065001055740 37" LCD OPL ING 30/5/06 11:27 Page 32
Page 33

065001055740 37" LCD OPL ING 30/5/06 11:27 Page 33
Page 34

LCD-3735TN
LCD TV
Manuel d’utilisation
065 001 056 040
065001056040 37" LCD AVISOL FRA 12/6/06 14:47 Page 1
Page 35

2
CONSIGNES DE SECURITE . . . . . . . . . . . . . . . . . . . . . . . . . . . . . . . . . . . . . . . . . . . . . . . . . . . . . . . . . . . . . . . .3
LES FONCTIONS DES COMPOSANTS DE VOTRE POSTE DE TELEVISION . . . . . . . . . . . . . . . . . . . . . . . . . . . .4
TELECOMMANDE . . . . . . . . . . . . . . . . . . . . . . . . . . . . . . . . . . . . . . . . . . . . . . . . . . . . . . . . . . . . . . . . . . . . . . .5
BRANCHEMENT DE L’ANTENNE . . . . . . . . . . . . . . . . . . . . . . . . . . . . . . . . . . . . . . . . . . . . . . . . . . . . . . . . . . . .7
BRANCHEMENT D'UN LECTEUR VIDEO, D'UN ORDINATEUR ET D'UN DECODEUR . . . . . . . . . . . . . . . . . .8
CONNEXION A DES APPAREILS EXTERNES . . . . . . . . . . . . . . . . . . . . . . . . . . . . . . . . . . . . . . . . . . . . . . . . . . . .9
CONNEXION A DES APPAREILS EXTERNES (PC ET HDMI) . . . . . . . . . . . . . . . . . . . . . . . . . . . . . . . . . . . . . . .10
MISE EN MARCHE ET ARRET . . . . . . . . . . . . . . . . . . . . . . . . . . . . . . . . . . . . . . . . . . . . . . . . . . . . . . . . . . . . . .11
FONCTIONS DU TELEVISEUR . . . . . . . . . . . . . . . . . . . . . . . . . . . . . . . . . . . . . . . . . . . . . . . . . . . . . . . . . . . . .12
FONCTIONS DU TELEVISEUR (MENUS) . . . . . . . . . . . . . . . . . . . . . . . . . . . . . . . . . . . . . . . . . . . . . . . . . . . . .14
TELETEXTE . . . . . . . . . . . . . . . . . . . . . . . . . . . . . . . . . . . . . . . . . . . . . . . . . . . . . . . . . . . . . . . . . . . . . . . . . . . .26
AVANT D'APPELER LE SERVICE APRES-VENTE . . . . . . . . . . . . . . . . . . . . . . . . . . . . . . . . . . . . . . . . . . . . . . . .28
CARACTERISTIQUES TECHNIQUES . . . . . . . . . . . . . . . . . . . . . . . . . . . . . . . . . . . . . . . . . . . . . . . . . . . . . . . . .29
TABLE DES MATIERES
065001056040 37" LCD AVISOL FRA 12/6/06 14:47 Page 2
Page 36

CONSIGNES DE SECURITE
3
PPrreemmiièèrree mmiissee eenn ggaarrddee
Pour prévenir tout risque d'incendie ou
d'électrocution, n'exposez pas le téléviseur
à la pluie ou à l'humidité.
• Votre poste de télévision contient une
haute tension, donc veuillez ne pas retirer
le cache arrière.
• Ce produit doit être réparé par un personnel qualifié
uniquement.
PPrrééccaauuttiioonnss
• Ce téléviseur est conçu pour fonctionner
sur une alimentation secteur 220-250 V
uniquement.
• Si un liquide ou un objet s’introduit dans
votre poste de télévision, éteignez-le
immédiatement, débranchez-le de
l'alimentation secteur et appelez le service agréé.
• Ne débranchez pas le téléviseur en tirant sur le câble
d’alimentation. Tenez toujours la prise.
IInnssttaallllaattiioonn
• N'installez pas le téléviseur dans des
endroits chauds, humides ou très
poussiéreux. N’installez pas le téléviseur
dans un lieu exposé à des vibrations
mécaniques.
• Il est fortement déconseillé de poser un
objet tel qu’un vase sur le poste de
télévision.
• Eloignez les flammes nues (par exemple les bougies)
et les objets inflammables du téléviseur.
• Pour éviter que l’appareil ne chauffe, assurez-vous
qu'il y ait assez d'espace autour du poste de télévision,
comme le montre l'illustration ci-dessous. Ne
recouvrez pas les fentes de ventilation de la TV.
EEnnttrreettiieenn
Débranchez toujours le téléviseur avant de le nettoyer.
Pour ce faire, utilisez un chiffon doux légèrement
humide. N'employez pas de produits chimiques ou
d'appareils de nettoyage : ils risqueraient
d'endommager la finition extérieure.
RRééeemmbbaallllaaggee
Conservez le carton et les matériaux d'emballage
d’origine pour une éventuelle réutilisation ultérieure.
065001056040 37" LCD AVISOL FRA 12/6/06 14:47 Page 3
Page 37

LES FONCTIONS DES COMPOSANTS DE VOTRE TELEVISEUR
4
FFaaccee aavvaanntt
2. Récepteur de la télécommande et voyant lumineux
3. Haut-parleur
4. Touches P+ / – : chaîne suivante/précédente
5. Touches +/- : réglage du volume
6. Touche Menu
7. Touche Sel.
8. Touche Veille
9. Entrée latérale AV (RCA) / Prise casque
FFaaccee aarrrriièèrree
1. Commutateur ON/OFF
10. Entrée antenne
11. Prises péritel (pour le branchement de lecteurs DVD,
magnétoscopes, boîtiers décodeurs ou appareils similaires).
12. Entrées S-VIDEO et S-AUDIO
13. Entrées YPbPr
14. Entrées audio YPbPr
15. Entrée PC (optionnel)
16. Entrée audio PC
17. Entrée HDMI (optionnel)
18. Sortie AV (pour transmission vidéo et audio)
10
11
14
12 13
15
16
17
18
1
V- V+ P- P+ MENU SEL
2
4
5
8
3
3
9
6
7
065001056040 37" LCD AVISOL FRA 12/6/06 14:47 Page 4
Page 38

TELECOMMANDE
5
1. Touche ON/OFF
2. Touches de sélection directe des chaînes (pavé numérique)
3. Touche zoom (en mode Cinéma)
4. Touche MUTE (sourdine)
5. Touche MENU
6. Touche de permutation
7. Sélection de la chaîne suivante/précédente en mode TV ou de la page suivante /
précédente en mode télétexte ; touche de navigation haut/bas dans les menus.
8. Touches de réglage du volume et de réglage dans les menus
9. Touche de validation ou d’annulation dans les menus
10. Touche PIP (sur certains modèles uniquement)
11. Touche des réglages utilisateur
12. Touche de sélection audio DUAL A, DUAL B, stéréo, mono
(DUAL A, DUAL B, ST/MONO)
13. Touche AV
14. Touche d’affichage de la mosaïque des chaînes (disponible sur certains modèles)
15. Touche rouge (déplace l’image incrustée PIP d'un coin à un autre de l'écran sur les
modèles compatibles ; permet de quitter les modes HDMI et PC en mode de réglage
du téléviseur)
16. Touche verte (agrandit ou réduit l’image incrustée en mode PIP; sert à passer du
mode TV au mode PC).
17. Touche jaune (permet d’accéder au mode HDMI lorsque vous êtes en mode TV).
18. Touche bleue (arrêt sur image)
19. Sélection du format d’affichage
20. Affiche le numéro de la chaîne actuellement à l’écran
Pour utiliser les autres fonctions décrites dans les menus, veuillez vous référer à l'image
de la télécommande dans la section TELETEXTE.
065001056040 37" LCD AVISOL FRA 12/6/06 14:47 Page 5
Page 39

TELECOMMANDE
6
Ne laissez jamais tomber votre télécommande.
Ne tentez pas d’ouvrir le boîtier de la télécommande vousmême.
N’appuyez jamais sur 2 touches de la télécommande à la fois.
Otez les piles de la télécommande si celle-ci n’est pas
utilisée pendant une période prolongée.
RReemmaarrqquuee ::
La télécommande peut faire fonctionner le
téléviseur à une distance de 7 mètres et dans un angle de 30
degrés maximum.
.
IINNSSTTAALLLLAATTIIOONN DDEESS PPIILLEESS ((11,,55 VV AAAAAA xx 22))
• Otez le couvercle du compartiment pour piles.
• Installez les piles en respectant la polarité.
• Refermez le compartiment pour piles.
065001056040 37" LCD AVISOL FRA 12/6/06 14:47 Page 6
Page 40

BRANCHEMENT DE L'ANTENNE
7
BBrraanncchheemmeenntt ddee ll''aanntteennnnee
Choisissez d’abord l’antenne. Les antennes suivantes
sont compatibles avec votre téléviseur.
* Antenne VHF
* Antenne double VHF / UHF
* Antenne UHF
Pour le branchement d'une de ces antennes à votre
téléviseur, utilisez un câble coaxial rond 75 Ohm et
débranchez votre téléviseur de l’alimentation secteur.
Branchez l’antenne externe dans l'entrée antenne
comme indiqué ci-contre. Il est déconseillé d’utiliser
une antenne intérieure. Etant donné que les véhicules
produisent de l’énergie et que les lignes de
communication sont sources d’interférences, veuillez
prendre soin d'installer votre antenne loin de ces
derniers et des surfaces métalliques. Ne tirez pas le fil
de votre antenne plus loin que nécessaire et ne
l’enroulez pas. L’antenne et le câble pouvant être
endommagés par une exposition prolongée à la pluie,
au vent et à la fumée, nous vous conseillons de les faire
vérifier régulièrement par un installateur d’antennes
professionnel. Une antenne ou un câble en mauvais
état entraînent bien souvent une image « neigeuse ».
065001056040 37" LCD AVISOL FRA 12/6/06 14:47 Page 7
Page 41

BRANCHEMENT D'UN MAGNETOSCOPE ET D'UN DECODEUR
8
11.. BBrraanncchheemmeenntt dd’’uunn mmaaggnnééttoossccooppee ((aavveecc ccââbbllee ccooaaxxiiaall))
* Branchez le connecteur du câble antenne dans l'entrée
antenne de votre magnétoscope (celle-ci est habituellement
nommée « RF in »).
* Branchez la sortie RF de votre magnétoscope à l'entrée
antenne de votre poste de télévision à l’aide d’un câble coaxial.
* Insérez une cassette vidéo et appuyez sur la touche PLAY.
* Choisissez le canal à utiliser pour visualiser le contenu de vos
appareils de lecture de cassettes vidéos.
Remarque : Si vous rencontrez des problèmes avec l'affichage
ou le volume, retirez la cassette vidéo du poste de télévision.
22.. BBrraanncchheemmeenntt dd’’uunn mmaaggnnééttoossccooppee ((aavveecc ccââbbllee ppéérriitteell))
* Branchez le connecteur du câble antenne dans l’entrée
antenne de votre magnétoscope.
* Raccordez la prise péritel du magnétoscope à la prise péritel
du poste de télévision au moyen d’un câble péritel.
* Appuyez sur la touche AV.
33.. CCoonnnneexxiioonn dd’’uunn ddééccooddeeuurr
* Branchez le connecteur du câble antenne dans l'entrée
antenne du décodeur.
* Raccordez la sortie antenne de votre décodeur (sortie RF) à
l’entrée antenne de votre poste de télévision au moyen d’un
câble coaxial.
* Assurez-vous que le décodeur est allumé.
44.. BBrraanncchheemmeenntt dduu ddééccooddeeuurr ((aavveecc uunn ccââbbllee ppéérriitteell))
* Branchez le connecteur du câble antenne dans l'entrée
antenne du poste de télévision.
* Raccordez la prise péritel du décodeur à la prise péritel du
poste de télévision au moyen d’un câble péritel.
* Appuyez sur la touche AV.
EURO AV
EURO AV
VVIIDDEEOO
VVIIDDEEOO
DDEECCOODDEERR
DDEECCOODDEERR
065001056040 37" LCD AVISOL FRA 12/6/06 14:47 Page 8
Page 42

CONNEXION D’APPAREILS EXTERNES
9
55.. BBrraanncchheemmeenntt dd’’uunn rréécceepptteeuurr ((rréécceepptteeuurr ssaatteelllliittee))
Raccordez le câble de la parabole à l’entrée « LNB-IN » de votre
récepteur satellite.
aa.. AAvveecc uunnee pprriissee PPéérriitteell
* Raccordez la prise péritel du récepteur satellite à la prise
péritel du poste de télévision au moyen d’un câble péritel.
* Appuyez sur la touche AV de la télécommande de votre poste
de télévision.
bb.. BBrraanncchheemmeenntt ssuurr lleess eennttrrééeess llaattéérraalleess AAVV ((ooppttiioonnnneell))
* Raccordez les sorties RCA du récepteur ou de la caméra
(vidéo, audio gauche, audio droit) aux entrées latérales du
téléviseur.
* Appuyez plusieurs fois sur la touche AV de la télécommande
jusqu’à ce que le mode AV soit sélectionné.
cc.. AAvveecc uunnee pprriissee SSVVHHSS
* Raccordez la prise SVHS du récepteur à celle de votre poste de
télévision au moyen d’un câble SVHS. Ceci permet une
transmission d’images.
* Pour le volume, raccordez les sorties RCA gauche et droite (L,
R) du récepteur aux entrées gauche et droite (L, R) du téléviseur
en utilisant un câble RCA à deux têtes.
Lorsque le récepteur est allumé, appuyez sur la touche AV du
poste de télévision jusqu’à ce que l’image transmise par le
récepteur apparaisse à l’écran.
dd.. SSoorrttiieess AAVV ((ddiissppoonniibblleess ssuurr cceerrttaaiinnss mmooddèèlleess sseeuulleemmeenntt))
* Utilisez les sorties AV du téléviseur (vidéo, audio gauche,
audio droit) pour transmettre des signaux vidéo et audio du
poste de télévision à un autre appareil.
R
L
DECODER SCART TV SCART
OUT
SVSH V L R
TV
AERIAL
DISH
LNB
RECEIVER
DECODER SCART TV SCART
OUT
SVSH V L R
TV
AERIAL
DISH
LNB
RECEIVER
EURO AV
DECODER SCART TV SCART
OUT
SVSH V L R
TV
AERIAL
DISH
LNB
RECEIVER
065001056040 37" LCD AVISOL FRA 12/6/06 14:47 Page 9
Page 43

CONNEXION D’APPAREILS EXTERNES (PCI ET HDMI)
10
ee)) EEnnttrrééee ccoommppoossaannttee YYPPbbPPrr
* Vidéo : Raccordez les prises YPbPr du lecteur DVD aux ports
YPbPr du téléviseur en utilisant un câble AV tri-directionnel.
* Audio : Raccordez les sorties audio gauche et droite (L, R) du
lecteur DVD aux entrées audio gauche et droite du téléviseur au
moyen de câbles AV.
Appuyez plusieurs fois sur la touche AV de la télécommande
jusqu’à ce que le signal du lecteur DVD soit sélectionné.
ff.. CCoonnnneexxiioonn dd’’uunn oorrddiinnaatteeuurr ((eenn ooppttiioonn))
Vous pouvez utiliser votre TV LCD comme moniteur. Pour ce faire,
connectez le câble VGA de votre ordinateur à la prise PC de votre
TV. Vous pouvez également connecter l’ordinateur à la prise HDMI.
gg.. CCoonnnneexxiioonn dd’’uunn lleecctteeuurr DDVVDD ((eenn ooppttiioonn))
Connectez votre lecteur DVD à la prise HDMI.
RRééssoolluuttiioonnss PPCC // HHDDMMII ccoommppaattiibblleess
VVGGAA 664400 XX 448800 6600 HHzz//7700 HHzz // 7755 HHzz
SSVVGGAA 880000 XX 660000 6600 HHzz//7700 HHzz // 7755 HHzz
XXGGAA 11002244 XX 776688 6600 HHzz//7700 HHzz // 7755 HHzz
SSXXGGAA 11228800 XX 11002244 6600 HHzz//7700 HHzz // 7755 HHzz
065001056040 37" LCD AVISOL FRA 12/6/06 14:47 Page 10
AUDIO OUT
OUT
DISH
LNB
SVSH V L R
DECODER SCART TV SCART
TV
RL
AERIAL
PC
DVD
DVI
PC
Page 44

MISE EN MARCHE ET ARRET
11
11.. MMiissee eenn mmaarrcchhee
aa.. MMiissee eenn mmaarrcchhee dduu ttéélléévviisseeuurr
Placez le commutateur d’alimentation situé à l’arrière
du téléviseur en position ON (faites-le basculer vers
l’avant du téléviseur.) Ceci met le téléviseur en veille.
bb.. MMOODDEE VVEEIILLLLEE
Allumez le téléviseur en appuyant sur la touche veille
de la télécommande ou du téléviseur ou sur les
touches P+/P- du téléviseur.
22.. AArrrrêêtt
a. Mise hors tension du téléviseur
Placez le commutateur d’alimentation sur OFF.
bb.. MMooddee vveeiillllee
Pour arrêter le poste de télévision pour une courte
période, appuyez sur la touche veille de la
télécommande ou du téléviseur.
En cas de non-utilisation prolongée, appuyez sur le
bouton ON/OFF du téléviseur.
11.. SSéélleeccttiioonn dduu nnuumméérroo dduu cchhaaîînnee
• Vous pouvez sélectionner n’importe quelle chaîne en
appuyant sur les touches P +/- du panneau de contrôle
du téléviseur ou de la télécommande.
• Si vous voulez sélectionner une chaîne comprise
entre 1 et 9, utilisez le pavé numérique de la
télécommande.
• Pour sélectionner une chaîne comprise entre 10 et
99, tapez les chiffres rapidement à l’aide du pavé
numérique de la télécommande.
2--
2--
001
1--
OK
5
6
1
8
065001056040 37" LCD AVISOL FRA 12/6/06 14:47 Page 11
Page 45

FONCTIONS DU TELEVISEUR
12
EExxeemmppllee ::
Pour aller à la chaîne 99, appuyez d’abord
sur la touche 9. L’indication « 9 » apparaît alors dans le
coin supérieur droit de l’écran. Appuyez à nouveau sur
la touche 9, le téléviseur bascule sur la chaîne 99.
22.. MMUUTTEE ((ssoouurrddiinnee))
Pour mettre le son en sourdine, appuyez sur la
touche MUTE de la télécommande. Si vous appuyez à
nouveau sur cette touche, le son sera rétabli à son
niveau précédent.
33.. TToouucchhee 1166::99 ::
Cette touche permet de modifier le
format d’affichage. Les options disponibles sont : Auto,
16:9, 14:9, Cinéma, Zoom et 4:3.
ZZoooomm mmaannuueell ::
En mode cinéma, appuyez sur la
touche Zoom ( ) de la télécommande pour activer le
zoom manuel. Appuyez sur les touches V+/V- pour
régler le zoom vertical.
44.. PPPP ::
Appuyez sur cette touche pour charger les
réglages audio et vidéo présents dans la mémoire.
Maintenez la touche PP enfoncée pendant environ
quelques secondes pour sauvegarder les réglages audio
et vidéo actuels du téléviseur en tant que « paramètres
utilisateur ». Un message s’affiche à l’écran pour
confirmer l’enregistrement des réglages.
55.. TToouucchhee SS//MM//DD ::
Pour une diffusion en stéréo, vous
pouvez régler le volume sur Mono, Stéréo ou DUAL A,
DUAL B.
66.. AAVV ::
Pour passer au mode AV, appuyez sur la touche
AV de la télécommande. Le menu AV apparaît à
l'écran. Vous pouvez sélectionner le mode AV qui vous
convient à l’aide des touches P+/P-, puis confirmez en
appuyant sur OK. En mode AV, vous pouvez basculer
vers le mode TV en utilisant le pavé numérique. Si
vous vous trouvez en mode HDMI ou PC, appuyez sur
la touche rouge pour passer en mode TV. Il n’est pas
possible de passer en mode AV si un menu est affiché à
l’écran. Le menu des chaînes n’est pas accessible en
mode AV.
77.. AArrrrêêtt aauuttoommaattiiqquuee ::
Votre téléviseur se met en veille
automatiquement 5 minutes après la fin des émissions.
RReemmaarrqquuee ::
Si vous laissez votre téléviseur en mode AV,
il ne passera pas en mode veille après 5 minutes même
si aucune émission n'est en cours.
9
99
00
065001056040 37" LCD AVISOL FRA 12/6/06 14:47 Page 12
Page 46

FONCTIONS DU TELEVISEUR
13
88.. TToouucchhee OOKK::
Elle permet de basculer du menu
principal vers le sous-menu et vice versa.
99.. TToouucchhee IInnffoo ((
‹‹))::
Appuyez sur cette touche pour
afficher le numéro de chaîne.
TToouucchhee ddee ppeerrmmuuttaattiioonn ::
En appuyant sur cette
touche, vous retournez à la chaîne que vous regardiez
précédemment.
RReemmaarrqquuee ::
Cette touche n’est pas fonctionnelle si un
menu est affiché à l’écran.
TToouucchhee MMoossaaiicc ::
Elle n’est pas fonctionnelle.
RReemmaarrqquuee ::
La fonction mosaïque est disponible sur
certains modèles seulement.
PPIIPP--ffuunnccttiiee PPIIPP ((iinnccrruussttaattiioonn dd''iimmaaggee)) ::
Certains
modèles sont équipés de la fonction d’incrustation
d'image (PIP).
Lorsque vous appuyez sur la touche PIP de la
télécommande, une petite fenêtre apparaît à
l’écran.Vous pouvez changer la chaîne affichée dans
cette image incrustée en appuyant sur la touche P+/P.Appuyez sur la touche rouge pour modifier la position
de l’image incrustée sur l’écran. Appuyez sur la touche
verte pour ajuster sa taille. Si vous voulez modifier
l’image sur l’écran principal, utilisez simplement le
pavé numérique. Si vous désirez permuter les chaînes
affichées dans l’image en plein écran et dans la fenêtre
PIP, appuyez sur la touche SWAP de la télécommande.
Appuyez une nouvelle fois sur PIP pour quitter le mode
PIP.
Pour passer du mode PIP au mode AV, appuyez sur la
touche AV. Vous pouvez utiliser la touche AV pour vous
rendre vers les autres modes AV.
065001056040 37" LCD AVISOL FRA 12/6/06 14:47 Page 13
Page 47

FONCTIONS DU TELEVISEUR (MENUS)
14
NNaavviiggaattiioonn ddaannss lleess mmeennuuss
Affichez le menu principal à l’écran à l’aide de la
touche Menu. Vous pouvez sélectionner les options du
menu en appuyant sur les touches V+/V- et accéder aux
sous-menus à l’aide de la touche OK pour y modifier
les paramètres.
Dans les sous-menus, vous pouvez sélectionner une
option à l’aide des touches P+/P-. Confirmez vos
sélections en appuyant sur OK. Vous pouvez accroître
ou diminuer les valeurs des paramètres à l’aide des
touches V+/V-.
11.. IInnssttaallllaattiioonn ((RReecchheerrcchhee eett mméémmoorriissaattiioonn
aauuttoommaattiiqquueess))
Vous trouverez ci-dessous des instructions concernant
la recherche automatique de chaînes. Les pages qui
suivent contiennent des explications plus détaillées sur
les réglages et les menus.
1. Branchez votre poste de télévision sur secteur et
allumez-le.
2. Appuyez sur la touche MENU de la télécommande.
Le premier menu OSD apparaît à l’écran.
3. Appuyez sur la touche V+ pour accéder au menu «
INSTALLATION ».
065001056040 37" LCD AVISOL FRA 12/6/06 14:47 Page 14
IMAGE
TEMP. COULEURS
PREREGLAGES IMAGE
LUMINOSITE
CONTRASTE
COULEUR
NETTETE
INSTALLATION
RECHERCHE AUTO
RECH. MANUELLE
EDITER CHANIE
Page 48

FONCTIONS DU TELEVISEUR (MENUS)
15
4. Appuyez 3 fois sur la touche V+ pour accéder au
menu INSTALLATION. Appuyez sur la touche OK pour
accéder au menu.
5. Appuyez sur les touches P+/P- pour accéder à
l’option RECHERCHE AUTO et confirmez en appuyant
sur OK.
6. Modifiez le paramètre SELECTION DU PAYS à votre
convenance en appuyant sur la touche V+ (si votre
pays n’est pas répertorié, choisissez AUTRES).
7. Appuyez sur la touche P- pour accéder à l’option
RECHERCHE.
8. Appuyez sur la touche V+ pour lancer une recherche
automatique. Un menu OSD apparaît à l’écran pour
confirmer le lancement effectif de la recherche.
APPUYEZ SUR MENU POUR ARRETER
Ne faites rien avant que la fin de la recherche. Votre
téléviseur va trouver et mémoriser les chaînes
automatiquement. Lorsque la recherche est terminée, le
menu EDITER CHAINES apparaît à l’écran.
065001056040 37" LCD AVISOL FRA 12/6/06 14:47 Page 15
INSTALLATION
RECHERCHE AUTO
RECH. MANUELLE
EDITER CHANIE
RECHERCHE AUTO
SELECTION DU PAYS
RECHERCHE
FRANCE
COMMENCER
RECHERCHE AUTO
SELECTION DU PAYS
RECHERCHE
FRANCE
COMMENCER
RECHERCHE AUTO
_ _ _ _ _
ARRETER AVEC MENU
CH. 3
10 %
Page 49

FONCTIONS DU TELEVISEUR (MENUS)
16
Vous pouvez nommer, effacer, transférer ou passer les
chaînes présentes dans le menu « EDITER CHAINE ».
Ces fonctions sont détaillées dans les pages suivantes.
RREECCHHEERRCCHHEE MMAANNUUEELLLLEE
Pour rechercher les chaînes manuellement, vous
pouvez utiliser le sous-menu « RECH. MANUELLE » du
menu « INSTALLATION ».
CChhaaîînnee ::
Saisissez le numéro de chaîne souhaité à l’aide
du pavé numérique de la télécommande.
SSyyssttèèmmee ::
Sélectionnez FRANCE pour la France, ou
EURO pour les autres pays européens.
NNoomm ::
Permet de donner un nom à la chaîne. Accédez
à la première case en appuyant sur la touche V+ et
sélectionnez la lettre de votre choix à l’aide des
touches P+/P-. Répétez la même opération jusqu’à la
fin du mot (5 caractères maximum).
RReecchheerrcchhee ::
Vous pouvez modifier la fréquence en
appuyant sur les touches V+/V- ou en la saisissant à
l’aide du pavé numérique.
065001056040 37" LCD AVISOL FRA 12/6/06 14:48 Page 16
EDITER CHAINE
1 -------
2 -------
3 -------
4 -------
5 -------
SUPPRIMER
SAUTER
6 -------
7 -------
8 -------
9 -------
10 -------
11 -------
12 -------
13 -------
14 -------
15 -------
DEPLACER
OK : SELECTIONNER
16 -------
17 -------
18 -------
19 -------
20 -------
INSTALLATION
RECHERCHE AUTO
RECH. MANUELLE
EDITER CHANIE
RECH. MANUELLE
INSTALLATION
SYSTEME
NOM
RECHERCHE
SYNTON. PRECISE
CONTROLE PARENTEL
1
EURO
000 MHz
DESACTIVE
MEMORISER : OK
0
Page 50

FONCTIONS DU TELEVISEUR (MENUS)
17
SSyynnttoonn.. pprréécciissee ::
Appuyez sur les touches V+/V- pour
procéder à la syntonisation précise de la chaîne
mémorisée.
VVeerrrroouuiillll.. cchhaaîînnee ::
Vous pouvez activer ou désactiver le
verrouillage d’une chaîne en appuyant sur la touche V+.
RReemmaarrqquuee ::
Vous pouvez également accéder aux chaînes
verrouillées au moyen de la télécommande. En
revanche, vous ne pourrez pas y avoir accès en appuyant
sur les touches P+/- du poste de télévision.
Vous pouvez enregistrer les réglages dans le sous-menu
de réglages des chaînes en appuyant sur OK.
EEDDIITTEERR CCHHAAIINNEE
EEffffaacceerr ((ttoouucchhee rroouuggee)) ::
Appuyez sur la touche rouge lorsque vous vous trouvez
sur la chaîne que vous voulez effacer.
065001056040 37" LCD AVISOL FRA 12/6/06 14:48 Page 17
RECH. MANUELLE
INSTALLATION
SYSTEME
NOM
RECHERCHE
SYNTON. PRECISE
CONTROLE PARENTEL
1
EURO
000 MHz
DESACTIVE
MEMORISER : OK
0
RECH. MANUELLE
INSTALLATION
SYSTEME
NOM
RECHERCHE
SYNTON. PRECISE
CONTROLE PARENTEL
1
EURO
000 MHz
DESACTIVE
MEMORISER : OK
0
INSTALLATION
RECHERCHE AUTO
RECH. MANUELLE
EDITER CHANIE
EDITER CHAINE
1 -------
2 -------
3 -------
4 -------
5 -------
SUPPRIMER
SAUTER
6 -------
7 -------
8 -------
9 -------
10 -------
11 -------
12 -------
13 -------
14 -------
15 -------
DEPLACER
OK : SELECTIONNER
16 -------
17 -------
18 -------
19 -------
20 -------
Page 51

FONCTIONS DU TELEVISEUR (MENUS)
18
DDééppllaacceerr ((ttoouucchhee vveerrttee)) ::
1. Sélectionnez la chaîne que vous souhaitez déplacer
en utilisant les touches V+/V- et P+/P-.
2. Appuyez sur la touche verte pour que la chaîne soit
en surbrillance.
3. Déplacez la chaîne sélectionnée vers la ligne désirée
en utilisant les touches V+/V- et P+/P-.
4. Appuyez une nouvelle fois sur la touche verte pour
terminer l’opération de déplacement.
SSaauutteerr ((ttoouucchhee bblleeuuee)) ::
Utilisez les touches P+/- pour sélectionner les chaînes
que vous ne voulez pas visionner lorsque vous zappez.
Appuyez sur la touche bleue quand la chaîne est
sélectionnée.
TToouucchhee OOKK::
Dans le menu « Editer Chaîne », sélectionnez une
chaîne en appuyant sur OK. Appuyez sur la touche OK
lorsque vous vous trouvez sur la chaîne que vous
voulez afficher en arrière-plan.
MMeennuu IIMMAAGGEE
Ce menu sert à régler les paramètres de l'image.
Température des couleurs : Vous pouvez modifier les
différents réglages à l’aide des touches V+/V-.
065001056040 37" LCD AVISOL FRA 12/6/06 14:48 Page 18
IMAGE
TEMP. COULEURS
PREREGLAGES IMAGE
LUMINOSITE
CONTRASTE
COULEUR
NETTETE
IMAGE
TEMP. COULEURS
PREREGLAGES IMAGE
LUMINOSITE
CONTRASTE
COULEUR
NETTETE
NORMAL
DOUX
65
70
40
70
Page 52

FONCTIONS DU TELEVISEUR (MENUS)
19
PPrréérrééggllaaggeess iimmaaggee ::
Vous pouvez sélectionner le
préréglage de l’image souhaité en appuyant sur les
touches V+/V-. Lorsque vous sélectionnez
“UTILISATEUR”, vous pouvez modifier les paramètres
ci-dessous à votre convenance.
LLuummiinnoossiittéé ::
Vous pouvez régler la luminosité à l’aide
des touches V+/V-.
CCoonnttrraassttee ::
Vous pouvez régler le contraste à l’aide des
touches V+/V-.
CCoouulleeuurr ::
Vous pouvez régler la couleur à l’aide des
touches V+/V-.
NNeetttteettéé ::
Vous pouvez régler la netteté à l’aide des
touches V+/V-.
MMEENNUU SSOONN
VVoolluummee ::
Vous pouvez régler le volume à l’aide des
touches V+/V-.
065001056040 37" LCD AVISOL FRA 12/6/06 14:48 Page 19
IMAGE
TEMP. COULEURS
PREREGLAGES IMAGE
LUMINOSITE
CONTRASTE
COULEUR
NETTETE
NORMAL
UTILISATEUR
60
90
50
75
SON
VOLUME
PREREGLAGES AUDIO
SURROUND
AVL
BALANCE
BASSES
AIGUS
SON
VOLUME
PREREGLAGES AUDIO
SURROUND
AVL
BALANCE
BASSES
AIGUS
NORMAL
DESACTIVE
DESACTIVE
10
0
50
55
Page 53

FONCTIONS DU TELEVISEUR (MENUS)
20
PPrréérrééggllaaggeess AAuuddiioo ::
Vous pouvez sélectionner un
préréglage audio à l’aide des touches V+/V-.
Sélectionnez UTILISATEUR pour effectuer vos propres
réglages (graves, aigus).
SSuurrrroouunndd ::
Vous pouvez activer ou désactiver l’effet
audio surround à l’aide des touches V+/V-.
AAVVLL::
Vous pouvez activer ou désactiver l’option AVL à
l’aide des touches V+/V-. L’AVL maintient le volume à
un niveau constant.
BBaallaannccee ::
Vous pouvez régler la balance gauche et
droite à l’aide des touches V+/V-.
GGrraavveess ::
Vous pouvez régler le niveau des graves à
laide des touches V+/V-.
AAiigguuss ::
Vous pouvez régler le niveau des aigus à l’aide
des touches V+/V-.
065001056040 37" LCD AVISOL FRA 12/6/06 14:48 Page 20
SON
VOLUME
PREREGLAGES AUDIO
SURROUND
AVL
BALANCE
BASSES
AIGUS
UTILISATEUR
DESACTIVE
DESACTIVE
10
0
25
60
Page 54

FONCTIONS DU TELEVISEUR (MENUS)
21
MMeennuu PPIIPP//PPAAPP ((DDiissppoonniibbllee ssuurr cceerrttaaiinnss mmooddèèlleess
sseeuulleemmeenntt))
AAccttiivvéé//DDééssaaccttiivvéé ::
Vous pouvez activer ou désactiver
les fonctions PIP (image incrustée), PAP1 et PAP2 à
l’aide des touches V+/V-.
SSoouurrccee::
Sélectionnez la source que vous souhaitez
afficher sur l’image incrustée ou l’écran PAP en utilisant
les touches V+/V-.
DDiimmeennssiioonnss PPIIPP ::
Vous pouvez régler la taille de la
fenêtre PIP à l’aide des touches V+/V-.
PPoossiittiioonn PPIIPP ::
Vous pouvez choisir la position de la
fenêtre PIP à l’aide des touches V+/V-.
065001056040 37" LCD AVISOL FRA 12/6/06 14:48 Page 21
PIP/PAP
AAN/UIT
BRON
BIB AFMETING
BIB POSITIE
PIP/PAP
AAN/UIT
BRON
BIB AFMETING
BIB POSITIE
UIT
YPBPR
BREED
PIP/PAP
AAN/UIT
BRON
BIB AFMETING
BIB POSITIE
BIB
HDMI
BREED
Page 55

FONCTIONS DU TELEVISEUR (MENUS)
22
MMEENNUU CCAARRAACCTTEERRIISSTTIIQQUUEESS
Vous pouvez utiliser ce menu pour régler certaines
caractéristiques ainsi que l’heure.
LLaanngguuee ::
Sélectionnez la langue du menu à l’aide des
touches V+/V-
TTrraannssppaarreennccee::
Vous pouvez régler la transparence du
menu à l’aide des touches V+/V-.
RRééiinniittiiaalliisseerr ::
Vous pouvez rétablir les réglages par
défaut à l’aide des touches V+/V-.
HHeeuurree ::
Dans ce menu, vous pouvez régler l’heure et la
chaîne à afficher en cas de mise en marche
automatique .
065001056040 37" LCD AVISOL FRA 12/6/06 14:48 Page 22
CARACTERISTIQUES
LANGUE
TRANSPARENCE
REINITIALISER
HEURE
CARACTERISTIQUES
LANGUE
TRANSPARENCE
REINITIALISER
HEURE
FRANCAIS
COMMENCER
0
CARACTERISTIQUES
LANGUE
TRANSPARENCE
REINITIALISER
HEURE
FRANCAIS
COMMENCER
0
Page 56

FONCTIONS DU TELEVISEUR (MENUS)
23
HHoorrllooggee ::
Vous pouvez régler l’heure en utilisant le
pavé numérique.
HHeeuurree aarrrrêêtt ::
Vous pouvez régler l’heure à laquelle vous
voulez que le téléviseur s’éteigne. Pour activer cette
fonction, entrez l’heure d’arrêt automatique et accédez
à « Heure arrêt » à l’aide de la touche V+. Choisissez sur
« ACTIVE » en appuyant sur la touche P-. Le poste de
télévision s’éteindra à l’heure choisie.
HHeeuurree mmaarrcchhee
DDaannss llee mmeennuu HHeeuurree
1. Appuyez sur la touche P- pour sélectionner « Heure
marche ».
2. Appuyez sur la touche V+ pour accéder à la section
Heures.
3. Tapez le chiffre des heures à l’aide du pavé
numérique.
4. Appuyez sur la touche V+ pour sélectionner la
section Minutes.
5. Entrez le chiffre des minutes à l’aide du pavé
numérique.
6. Appuyez sur la touche V+ et activez la fonction au
moyen de la touche P-.
7. Appuyez sur la touche V+ et entrez le numéro de la
chaîne qui devra s’afficher lors du démarrage
automatique.
8. Appuyez sur la touche V+ et entrez la valeur du
niveau sonore souhaité à l’aide du pavé numérique.
9. Vous pouvez retourner au menu Caractéristiques en
appuyant sur la touche OK.
065001056040 37" LCD AVISOL FRA 12/6/06 14:48 Page 23
HEURE
HORLOGE
HEURE ARRET
HEURE MARCHE
ARRET AUTOMATIQUE
00 : 00
00 : 00
00 : 00
CH.
VOL
DESACTIVE
OFF
OFF
1
10
TIME
CLOCK
OFF TIME
ON TIME
AUTO SHUT OFF
00 : 00
00 : 00
00 : 00
PR.
VOL
OFF
OFF
OFF
1
10
Page 57

FONCTIONS DU TELEVISEUR (MENUS)
24
Tous les menus apparaissent en mode PC et AV. Les
menus complémentaires en mode PC sont les suivants :
MMeennuu IImmaaggee eenn mmooddee PPCC
Dans ce menu, on trouve les options de couleur «
Rouge », « Vert » et « Bleu ». Vous pouvez régler les
valeurs des couleurs à l’aide des touches V+/V-.
065001056040 37" LCD AVISOL FRA 12/6/06 14:48 Page 24
IMAGE
TEMP. COULEURS
LUMINOSITE
CONTRASTE
ROUGE
VERT
BLEU
IMAGE
TEMP. COULEURS
LUMINOSITE
CONTRASTE
ROUGE
VERT
BLEU
NORMAL
66
50
50
50
Page 58

FONCTIONS DU TELEVISEUR (MENUS)
25
MMEENNUU IIMMAAGGEE
(Ce menu n’est disponible qu’en
présence d’un signal provenant d’un PC.)
CCoonnffiigg.. aauuttoo ::
Dans cette option, appuyez sur la touche
V+ pour que les réglages du moniteur soient effectués
automatiquement.
PPooss.. hhoorriizzoonnttaallee ::
Vous pouvez déplacer l’affichage du
PC vers la gauche ou vers la droite en utilisant les
touches V+/V-.
PPooss.. vveerrttiiccaallee ::
Vous pouvez déplacer l’affichage du PC
vers la gauche ou vers la droite en utilisant les touches
V+/V-.
HHoorrllooggee ::
Vous pouvez régler l’heure à l’aide des
touches V+/V-. La modification de cette valeur
entraînera un élargissement ou un rétrécissement de
l’image sur le côté droit.
PPhhaassee ::
Vous pouvez régler la phase à l’aide des
touches V+/V-.
065001056040 37" LCD AVISOL FRA 12/6/06 14:48 Page 25
ECRAN
CONFIG. AUTO
POS. HORIZONTALE
POS. VERTICALE
HORLOGE
PHASE
1024x768 75Hz
ECRAN
CONFIG. AUTO
POS. HORIZONTALE
POS. VERTICALE
HORLOGE
PHASE
1024x768 75Hz
COMMENCER
71
60
1369
70
Page 59

TELETEXTE
26
MMOODDEE TTEELLEETTEEXXTTEE
Si la chaîne sélectionnée émet des informations
télétexte, vous pouvez utiliser les diverses fonctions du
télétexte de la manière suivante.
11.. TTéélléétteexxttee ::
Appuyez sur la touche télétexte pour
afficher le télétexte. Appuyez de nouveau sur cette
touche pour revenir à l’affichage TV.
22.. RRéévvéélleerr // mmaassqquueerr ::
Appuyez sur cette touche
pour afficher les réponses aux quiz ou aux jeux. Appuyez
de nouveau sur cette touche pour cacher les réponses.
33.. AAffffiicchhaaggee ddee ll’’hhoorrllooggee dduu ttéélléétteexxttee ::
À la
première fois quand vous alimentez votre TV, il
enregistre le temps de TXT du premier canal qui
transmet l'information de TXT. Quand vous appuyez
sur
()
le bouton, l'information de temps apparaît sur
l'écran pour un short tandis que.
Si votre TV est au mode de TXT et aussi si votre écran
de système télétexte a une page secondaire, cette fois
vous pouvez voir l'information de temps du côté
inférieur de l'écran de TV. Vous pouvez accéder à ces
pages secondaires en appuyant sur les boutons verts et
rouges de fonction.
44.. AAnnnnuullaattiioonn ::
Si vous appuyez sur cette touche
en mode télétexte, la chaîne de télévision que vous
regardez actuellement sera affichée (sur certains
modèles de téléviseurs seulement).
Le télétexte est cependant toujours activé et la recherche
des pages continuera si un nouveau numéro de page est
entré. Lorsque la page recherchée est trouvée, un
message indiquant le numéro de page apparaît à l’écran.
Si vous appuyez à nouveau sur cette touche, vous
pourrez visionner la page télétexte mise à jour.
1. Touche télétexte
2. Touche révéler / masquer
(réponse)
3. Touche d’affichage de
l’horloge du télétexte
4. Touche d’annulation
(mise à jour)
5. Touche de sélection du format
(élargissement de la page)
6. Touche d’affichage mixte
(visualisation simultanée de la
télévision et du télétexte)
7. Touche pause (maintien à
l’écran d'une sous-page)
8. Touche index (page d'accueil)
9. Touches de couleur
(rouge, verte, jaune, bleue)
065001056040 37" LCD AVISOL FRA 12/6/06 14:48 Page 26
Page 60

TELETEXTE
27
55.. SSéélleeccttiioonn dduu ffoorrmmaatt ::
Appuyez une fois pour
afficher la moitié supérieure de la page à la hauteur de
deux fois la taille normale du texte. Appuyez une
nouvelle fois pour afficher la moitié inférieure de la
page. Appuyez de nouveau sur cette touche pour
afficher la page entière au format standard.
66.. AAffffiicchhaaggee mmiixxttee ((vviissuuaalliissaattiioonn ssiimmuullttaannééee ddee llaa
ttéélléévviissiioonn eett dduu ttéélléétteexxttee)) ::
Appuyez pour afficher le
télétexte par-dessus l’émission de télévision. Appuyez de
nouveau sur cette touche pour afficher la page télétexte
seule.
77.. PPaauussee ::
Si une page de télétexte contient des
sous-pages, ces dernières sont affichées de manière
successive. Dans ce cas, appuyez sur cette touche pour
maintenir une certaine page à l’écran. Tant que la page
reste ainsi figée à l’écran, l’icône Hold est affichée dans
le coin supérieur gauche de la page télétexte. Appuyez
de nouveau sur cette touche pour réactiver le
changement automatique de sous-pages.
88.. IInnddeexx ((ppaaggee dd''aaccccuueeiill)) ::
Cette touche donne un
accès direct à la page d’accueil du télétexte.
99.. TToouucchheess ddee ccoouulleeuurr ((RROOUUGGEE,, VVEERRTTEE,, JJAAUUNNEE,, BBLLEEUUEE))
Vous pouvez facilement parcourir les données du
télétexte en utilisant ces quatre touches de couleur.
Lorsque ce mode est activé, appuyez sur la touche
MENU pour modifier les options de couleur. Vous
pouvez accéder plus rapidement à n’importe quelle
option avec les touches de couleur.
EEXXEEMMPPLLEE ::
GGUUIIDDEE TTVV SSPPOORRTTSS AACCTTUUAALLIITTEESS MMEETTEEOO
(Les informations ci-dessus sont fournies à titre
d’exemple et dépendent de la page sélectionnée)
FFaasstteexxtt
Ce téléviseur est compatible avec le système Fastext.
Lorsque l’on affiche une page, le système stocke
automatiquement les pages adjacentes et vous pouvez
y accéder plus facilement. Utilisez la touche P+ pour
passer à la page télétexte suivante et P- pour passer à la
page télétexte précédente.
Touches de couleur Fastext (rouge, verte, jaune, bleue).
Les pages liées à la page actuelle sont également
sauvegardées dans la mémoire et peuvent être
rapidement sollicitées en appuyant sur la touche de
couleur appropriée.
Appuyez sur la
touche ROUGE
pour afficher
les programmes
TV.
Appuyez sur la
touche VERTE
pour afficher
des
informations
sportives.
Appuyez sur la
touche JAUNE
pour afficher
les actualités.
Appuyez sur la
touche BLEUE
pour afficher
les prévisions
météorologiques.
065001056040 37" LCD AVISOL FRA 12/6/06 14:48 Page 27
Page 61

AVANT D'APPELER LE SERVICE APRES-VENTE
28
Si vous rencontrez un problème avec votre téléviseur, veuillez lire ce qui suit. Si le problème persiste, vous devrez contacter un service de
réparation agréé.
AAtttteennttiioonn ::
SSii llee ttéélléévviisseeuurr ffoonnccttiioonnnnee àà uunnee tteemmppéérraattuurree aammbbiiaannttee ddee 55°° CCeellssiiuuss oouu mmooiinnss,, iill ssee pprroodduuiirraa uunn ddiissffoonnccttiioonnnneemmeenntt ddee llaa nn