


Page 1

LCD-2636TN-BL
LCD TV
Instruction Manual
065 001 061 070
065001061070 26" LCD AVISOL ING 8/11/06 17:02 Page 1
Page 2

2
WHAT TO DO FOR SAFETY OF YOUR TV SET . . . . . . . . . . . . . . . . . . . . . . . . . . . . . . . . . . . . . . . . . . . . . . . . .3
WHAT ARE THE FUNCTIONS OF YOUR TV SET . . . . . . . . . . . . . . . . . . . . . . . . . . . . . . . . . . . . . . . . . . . . . . . .4
REMOTE CONTROL . . . . . . . . . . . . . . . . . . . . . . . . . . . . . . . . . . . . . . . . . . . . . . . . . . . . . . . . . . . . . . . . . . . . . .5
ANTENNA CONNECTION . . . . . . . . . . . . . . . . . . . . . . . . . . . . . . . . . . . . . . . . . . . . . . . . . . . . . . . . . . . . . . . .7
VIDEO, COMPUTER AND DECODER CONNECTION . . . . . . . . . . . . . . . . . . . . . . . . . . . . . . . . . . . . . . . . . . .8
CONNECTION TO EXTERNAL EQUIPMENT . . . . . . . . . . . . . . . . . . . . . . . . . . . . . . . . . . . . . . . . . . . . . . . . . . .9
CONNECTION TO EXTERNAL EQUIPMENT (PC AND HDMI) . . . . . . . . . . . . . . . . . . . . . . . . . . . . . . . . . . . .10
SWITCHING ON AND OFF . . . . . . . . . . . . . . . . . . . . . . . . . . . . . . . . . . . . . . . . . . . . . . . . . . . . . . . . . . . . . .11
TV FUNCTIONS . . . . . . . . . . . . . . . . . . . . . . . . . . . . . . . . . . . . . . . . . . . . . . . . . . . . . . . . . . . . . . . . . . . . . . .12
TV FUNCTIONS (MENUS) . . . . . . . . . . . . . . . . . . . . . . . . . . . . . . . . . . . . . . . . . . . . . . . . . . . . . . . . . . . . . . . .14
TELETEXT . . . . . . . . . . . . . . . . . . . . . . . . . . . . . . . . . . . . . . . . . . . . . . . . . . . . . . . . . . . . . . . . . . . . . . . . . . . .26
BEFORE CALLING THE SERVICE . . . . . . . . . . . . . . . . . . . . . . . . . . . . . . . . . . . . . . . . . . . . . . . . . . . . . . . . . . .28
TECHNICAL SPECIFICATIONS . . . . . . . . . . . . . . . . . . . . . . . . . . . . . . . . . . . . . . . . . . . . . . . . . . . . . . . . . . . . .29
CONTENTS
065001061070 26" LCD AVISOL ING 8/11/06 17:02 Page 2
Page 3
WHAT TO DO FOR SAFETY OF YOUR TV SET
3
FFiirrsstt WWaarrnniinngg
To prevent fire or shock hazard, do not
expose the TV to rain or moisture.
• There is a high voltage in your TV set, so,
please do not remove the rear cover
• This product must only be repaired by
qualified personnel.
CCaauuttiioonnss
• This TV is designed to operate on 220250 V AC supply only.
• If any liquids flows or objects falls into
your TV set, immediately turn it off, unplug
from the mains electrical supply and call
authorized service
• Do not unplug by pulling the mains cable. Always
hold the plug.
PPllaacciinngg
• Do not place the TV in hot, humid or
excessively dusty places. Do not install the
TV where it may be exposed to mechanical
vibrations.
• No vase etc. should be placed on the TV
set
•Keep inflammable objects or naked lights (for
example candles) away from the TV.
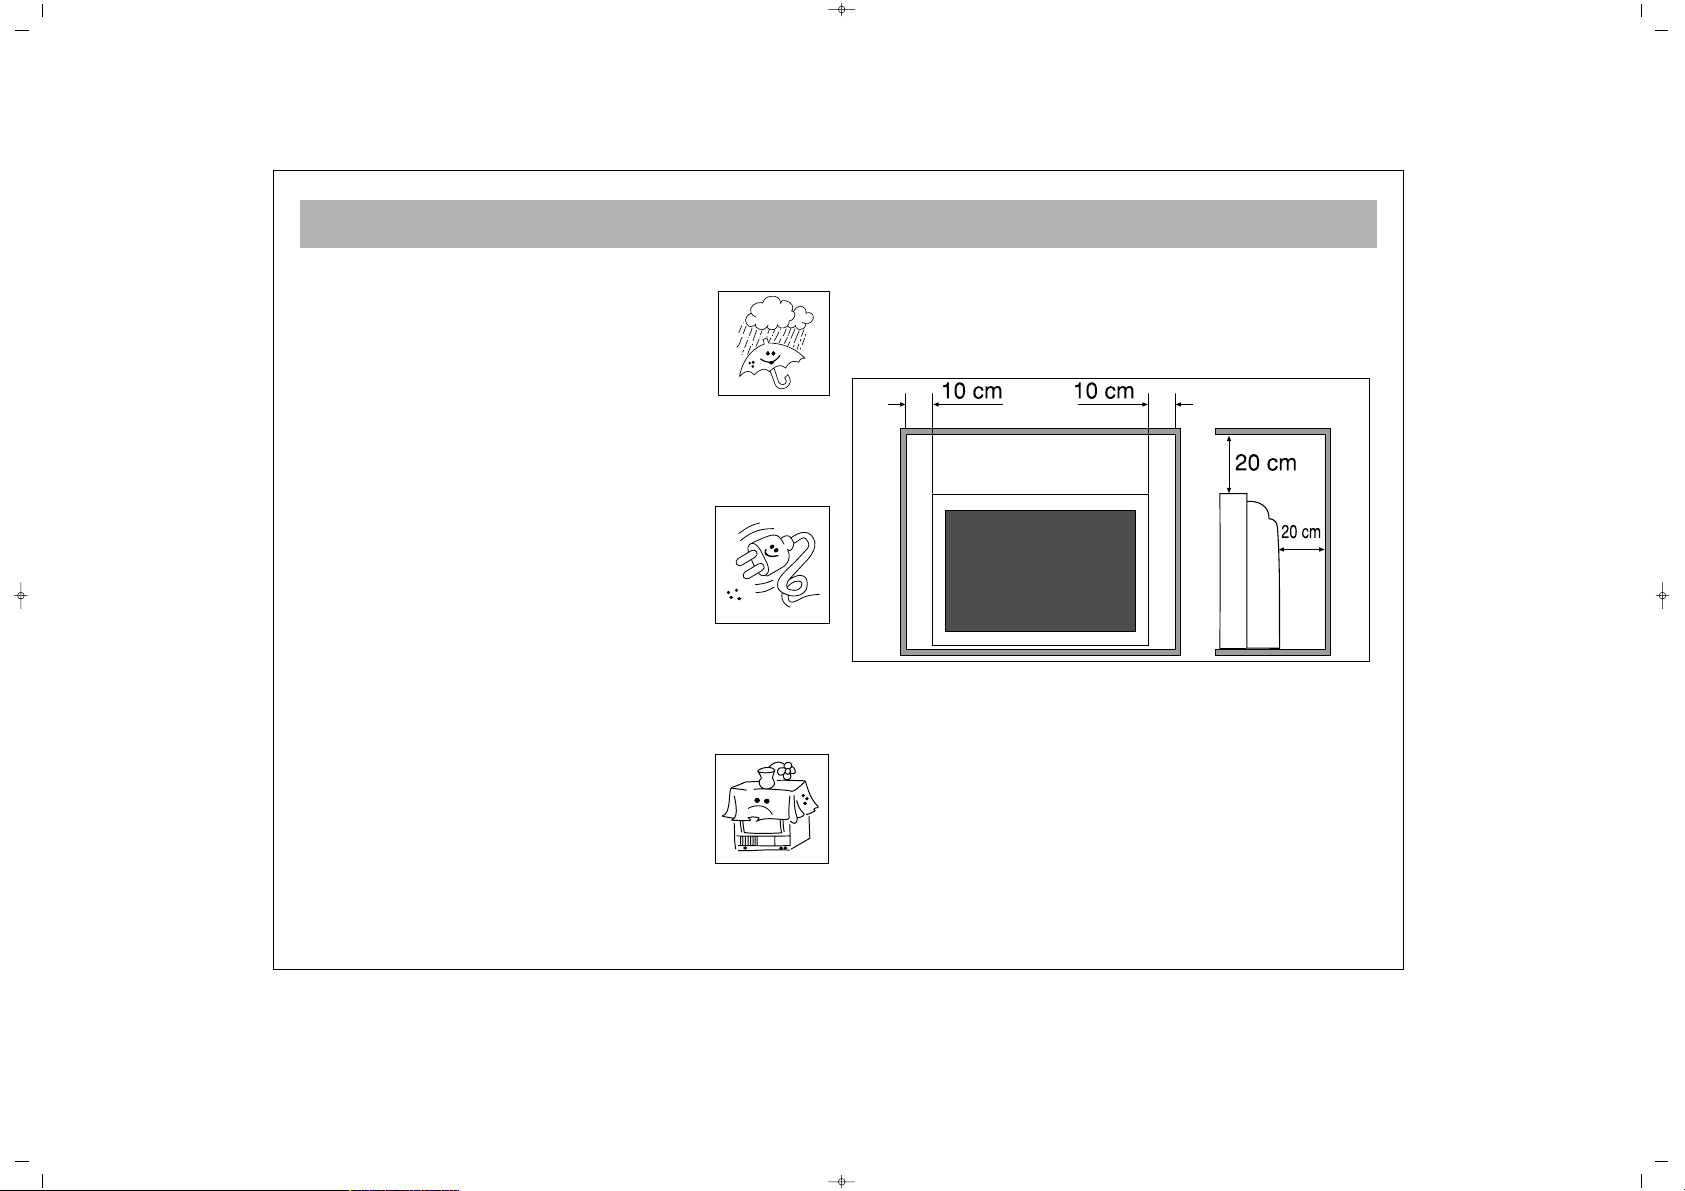
• To prevent internal heating, ensure that there is a
space around the TV set as shown below. Do not cover
the ventilation openings of the TV.
CClleeaanniinngg
Unplug the TV before cleaning it.Clean your TV set with
a mildly humidified soft,lightly dampened cloth. Do not
use chemicals or mechanical cleaners which may impair
the paint finish.
RReeppaacckkaaggiinngg
Keep the original carton box and packing materials to
use when necessary
065001061070 26" LCD AVISOL ING 8/11/06 17:02 Page 3
Page 4
WHAT ARE THE FUNCTIONS OF YOUR TV SET
4
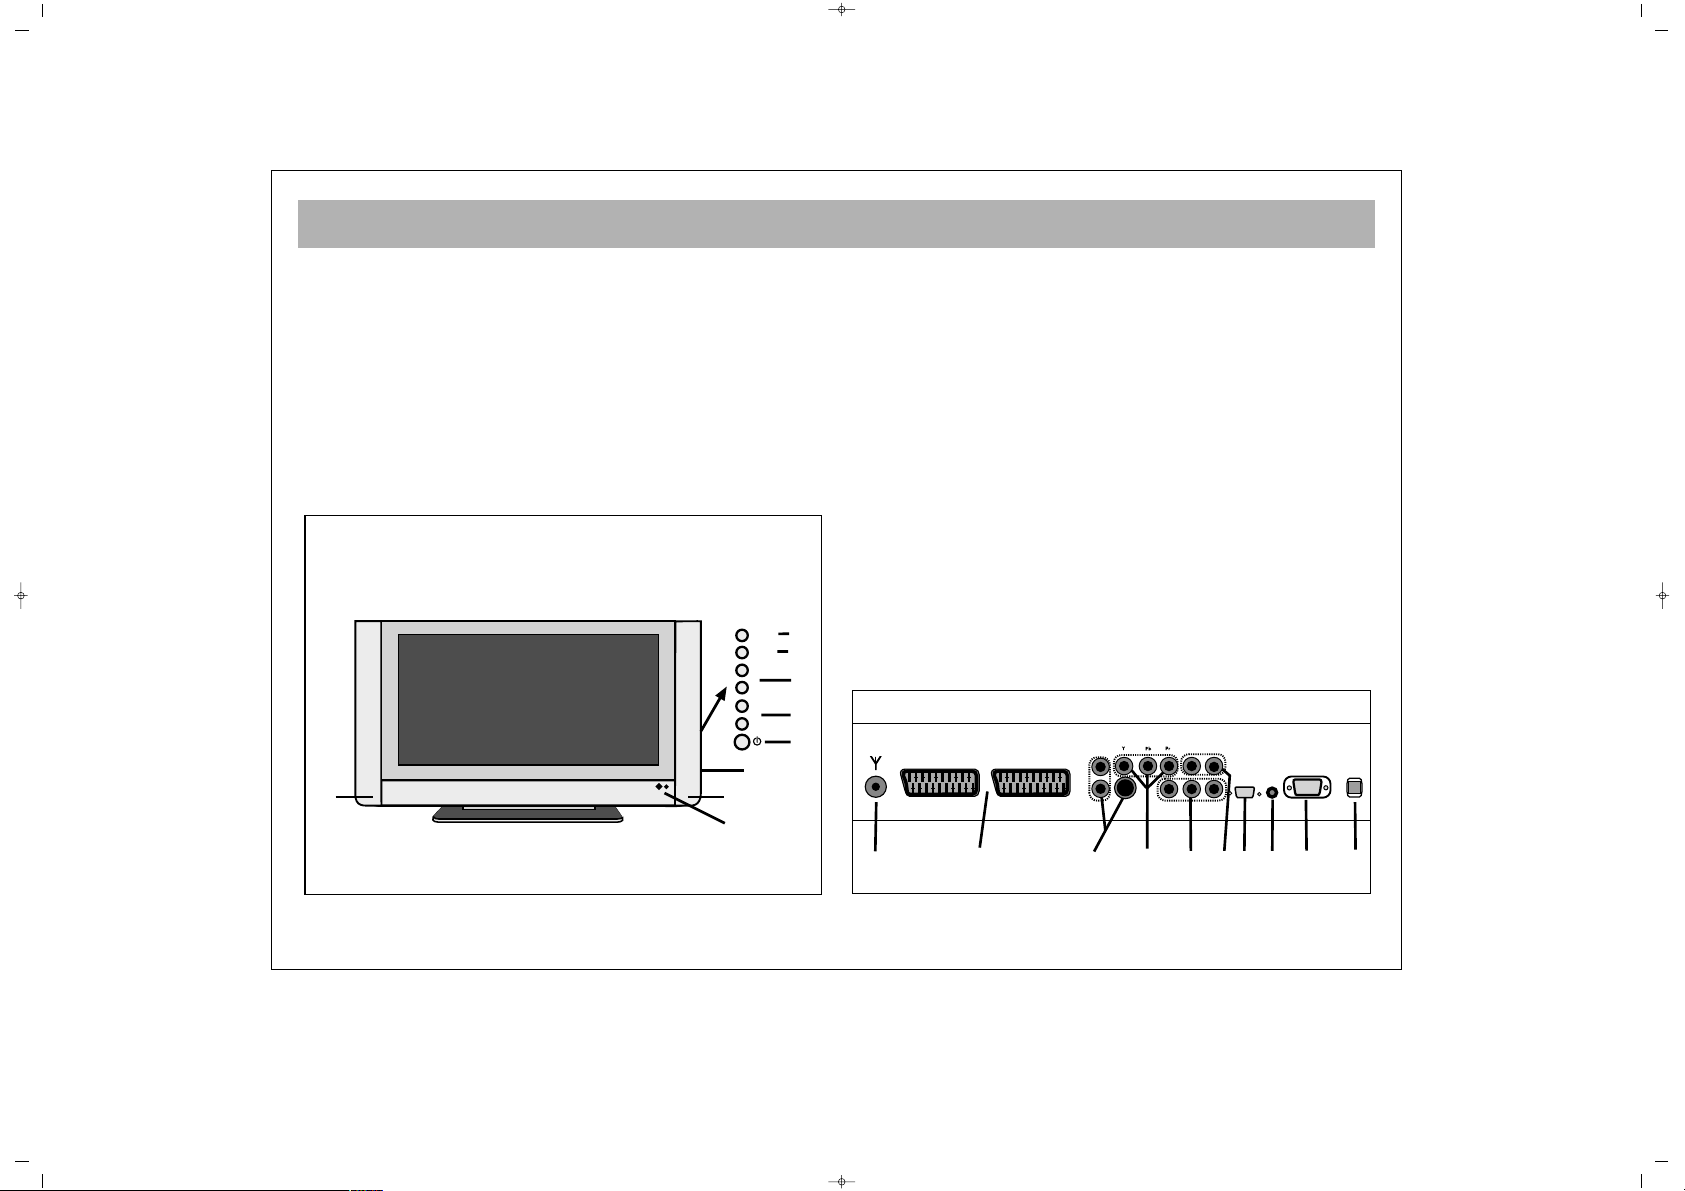
FFrroonntt
22..
Remote control receiver and diode indicator
33..
Speaker
44..
P + – Program up and down buttons
55..
e + – Audio up and down buttons
66..
Menu button
77..
Sel button
88..
Standby button
99..
Side AV (Chinch) in / Headphone in
RReeaarr
11..
ON/OFF switch
1100..
Aerial in
1111..
SCART connectors. (For connecting DVD, Video, Set
Top Boxes and similar equipment.)
1122..
S-VIDEO and S-AUDIO in
1133..
YPbPr in
1144..
YPbPr Audio in
1155..
PC in (Optional)
1166..
PC Audio in
1177..
HDMI in (Optional)
1188..
AV out (For Video and Audio transmission)
10
11
14
12 13
15
16
17
18
1
2
3
3
9
8
7
6
5
4
TV–
TV+
V+
V–
AV
MENU
065001061070 26" LCD AVISOL ING 8/11/06 17:02 Page 4
Page 5
REMOTE CONTROL
5
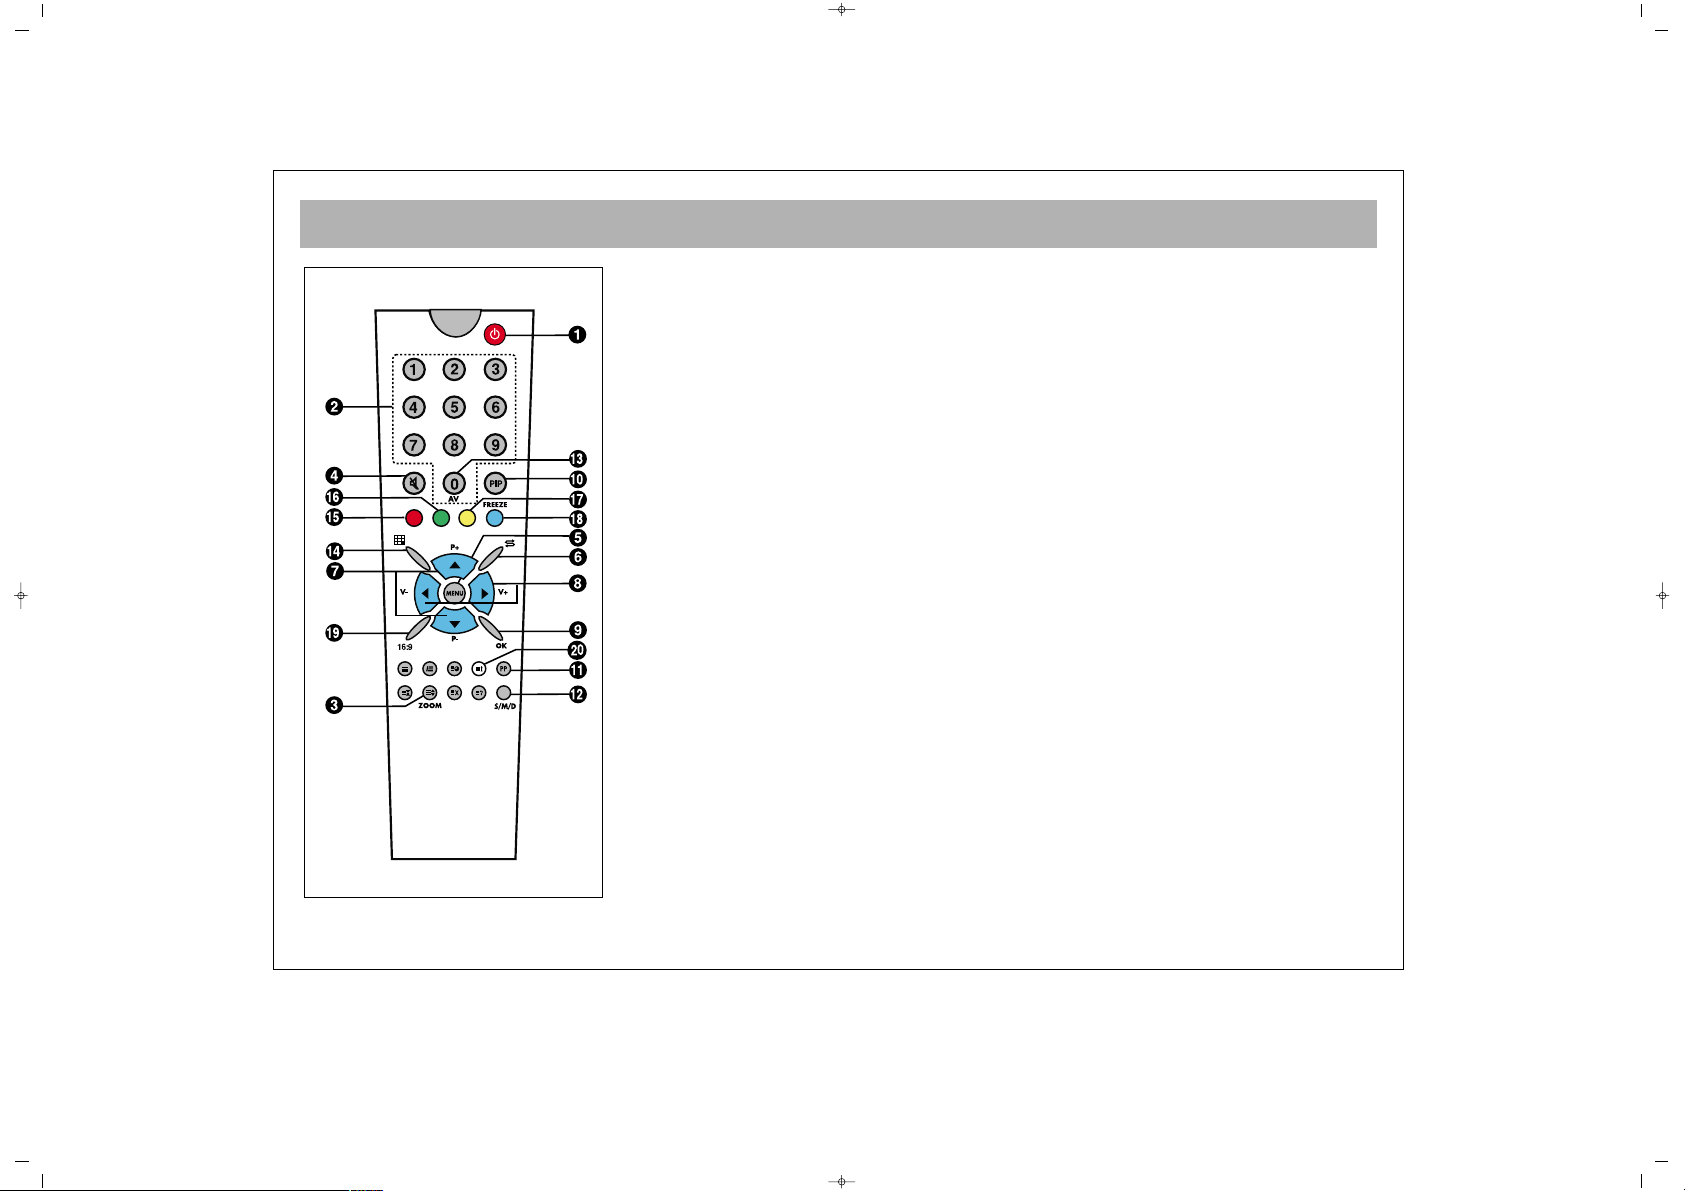
1. ON/OF (Stand-by) button
2. Direct program selection buttons
3. Zoom button (in the Cinema format)
4. Mute button
5. Menu selection button
6. Swap button
7. Increasing / decreasing program number in TV, or page number in teletext mode,
upward or downward scroll button in menus
8. Sound +/-, and menu setting buttons
9. Approval or cancellation button in menus
10. PIP button (in some models)
11. Permanent normalization button
12. Audio selection button DUAL A, DUAL B, Stereo, Mono
(DUAL A, DUAL B, ST/MONO)
13. AV button
14. Mosaic screen button ( available in some models)
15. Red button (to shift to HDMI mode in PC mode)
16. Green button (to shift to TV mode in PC mode)
17. Yellow button (to shift to HDMI mode in TV mode)
18. Blue button (Picture Freezing button)
19. Picture format selection
20. Provides information on the current channel
To use the other button functions described in the menus, please check the remote
controller picture described in the TELETEXT section
065001061070 26" LCD AVISOL ING 8/11/06 17:02 Page 5
Page 6
REMOTE CONTROL
6
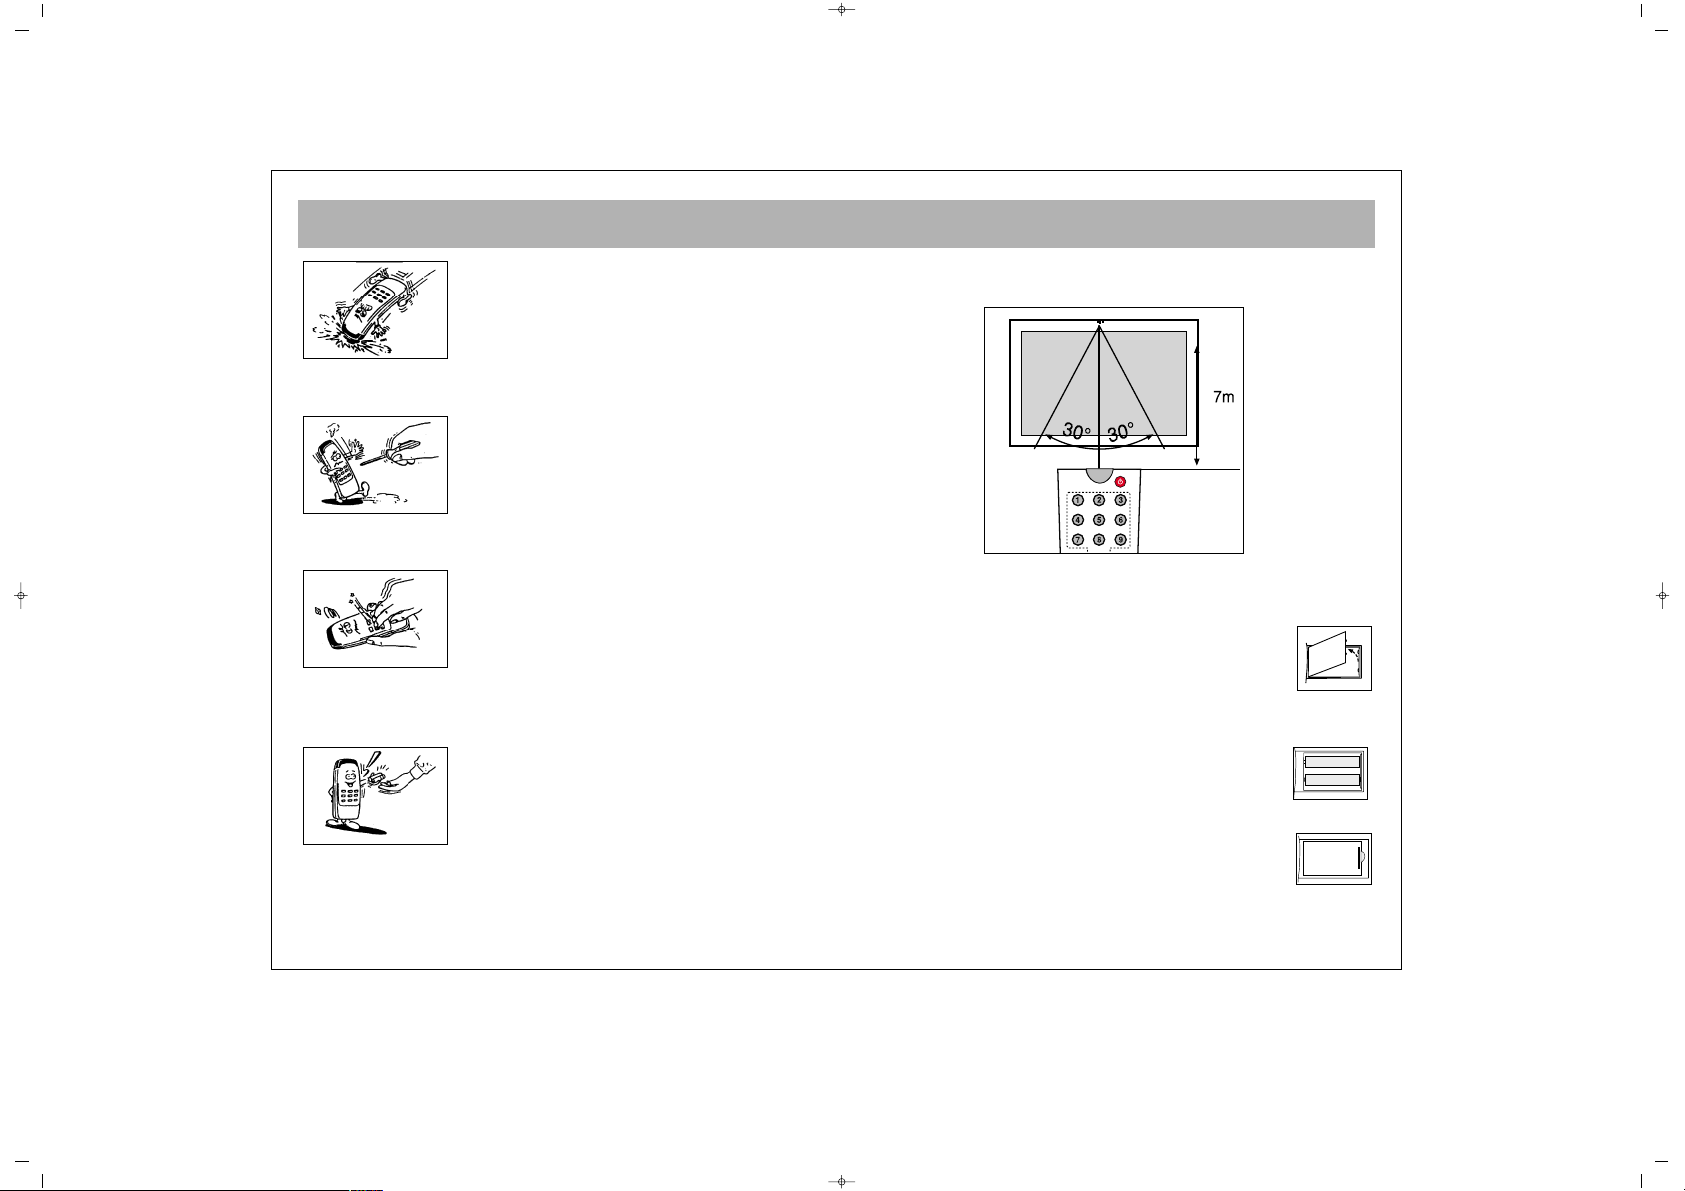
Never drop your Remote Control.
Do not attempt to open your Remote Control.
Do not press any 2 buttons on Remote Control
simultaneously.
If you do not plan to use your Remote Control. for a long
time, remove the batteries.
NNoottee ::
The Remote Control will operate the TV up to 7 metre
a way and at an angle of 30 degrees.
.
.
BBAATTTTEERRYY IINNSSEERRTTIIOONN ((11,,55VV AAAAAA xx 22 ppiieecceess))
• Remove battery cover
• Place the batteries ensuring that the polarity is correct.
• Close the cover.
065001061070 26" LCD AVISOL ING 8/11/06 17:02 Page 6
Page 7
AERIAL CONNECTION
7
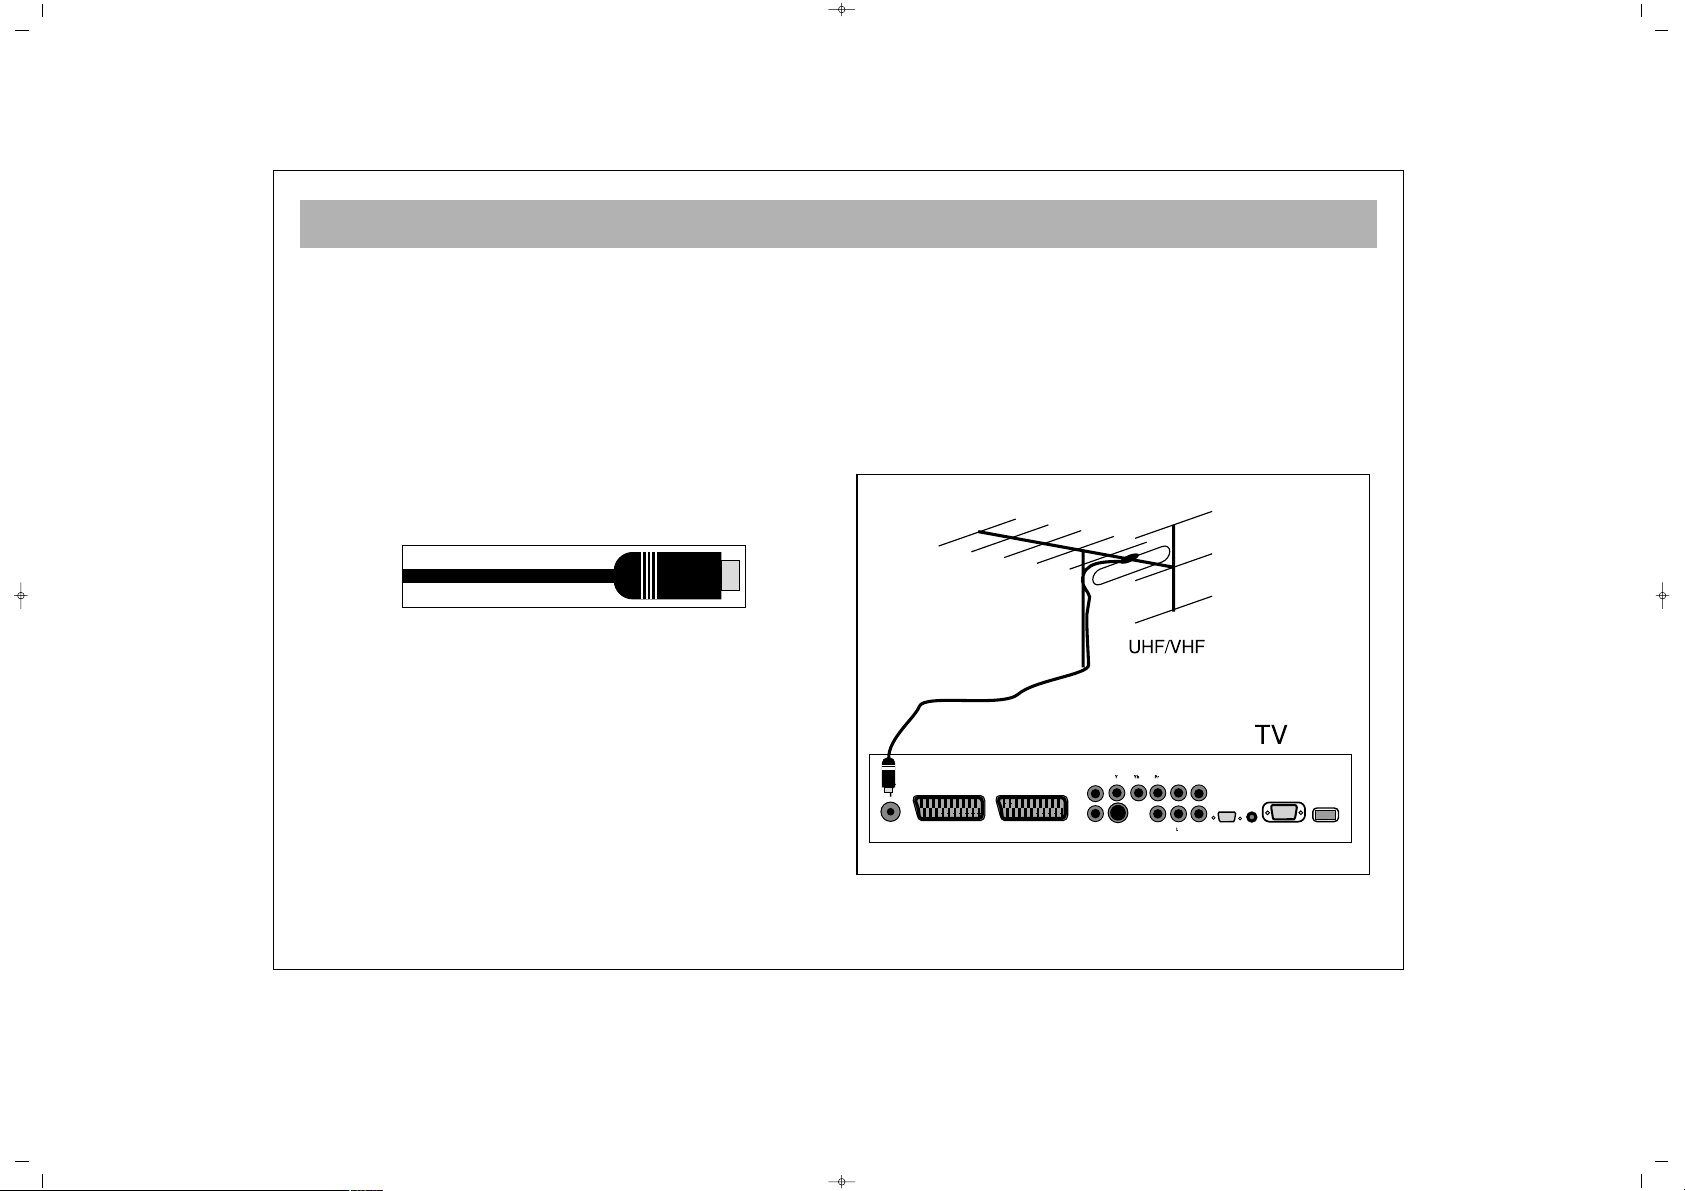
AAeerriiaall CCoonnnneeccttiioonn............
First select the antenna. The following antennas are
suitable for your TV set.
* VHF antenna
* VHF / UHF combined antenna
* UHF antenna
When connecting one of these aerial to your TV set,
you should use 75 Ohm round “coaxial” cable and
unplug your TV set
Plug the external aerial in the aerial socket as show
oposite. An indoor aerial is not recommended. As
motor vehicles emulate energy and communication
lines emulate noise signals, please take care to install
your antenna far from these and metal surfaces. Do not
extend your aerial cable longer than required or roll it.
As the aerial and cable may be impaired by prolonged
exposure to rain, wind and smoke, we recommend that
they are periodically checked by a professional aerial
fitter. A poor aerial or cable often results by a "snowy"
picture.
065001061070 26" LCD AVISOL ING 8/11/06 17:02 Page 7
Page 8
VIDEO AND DECODER CONNECTIONS
8
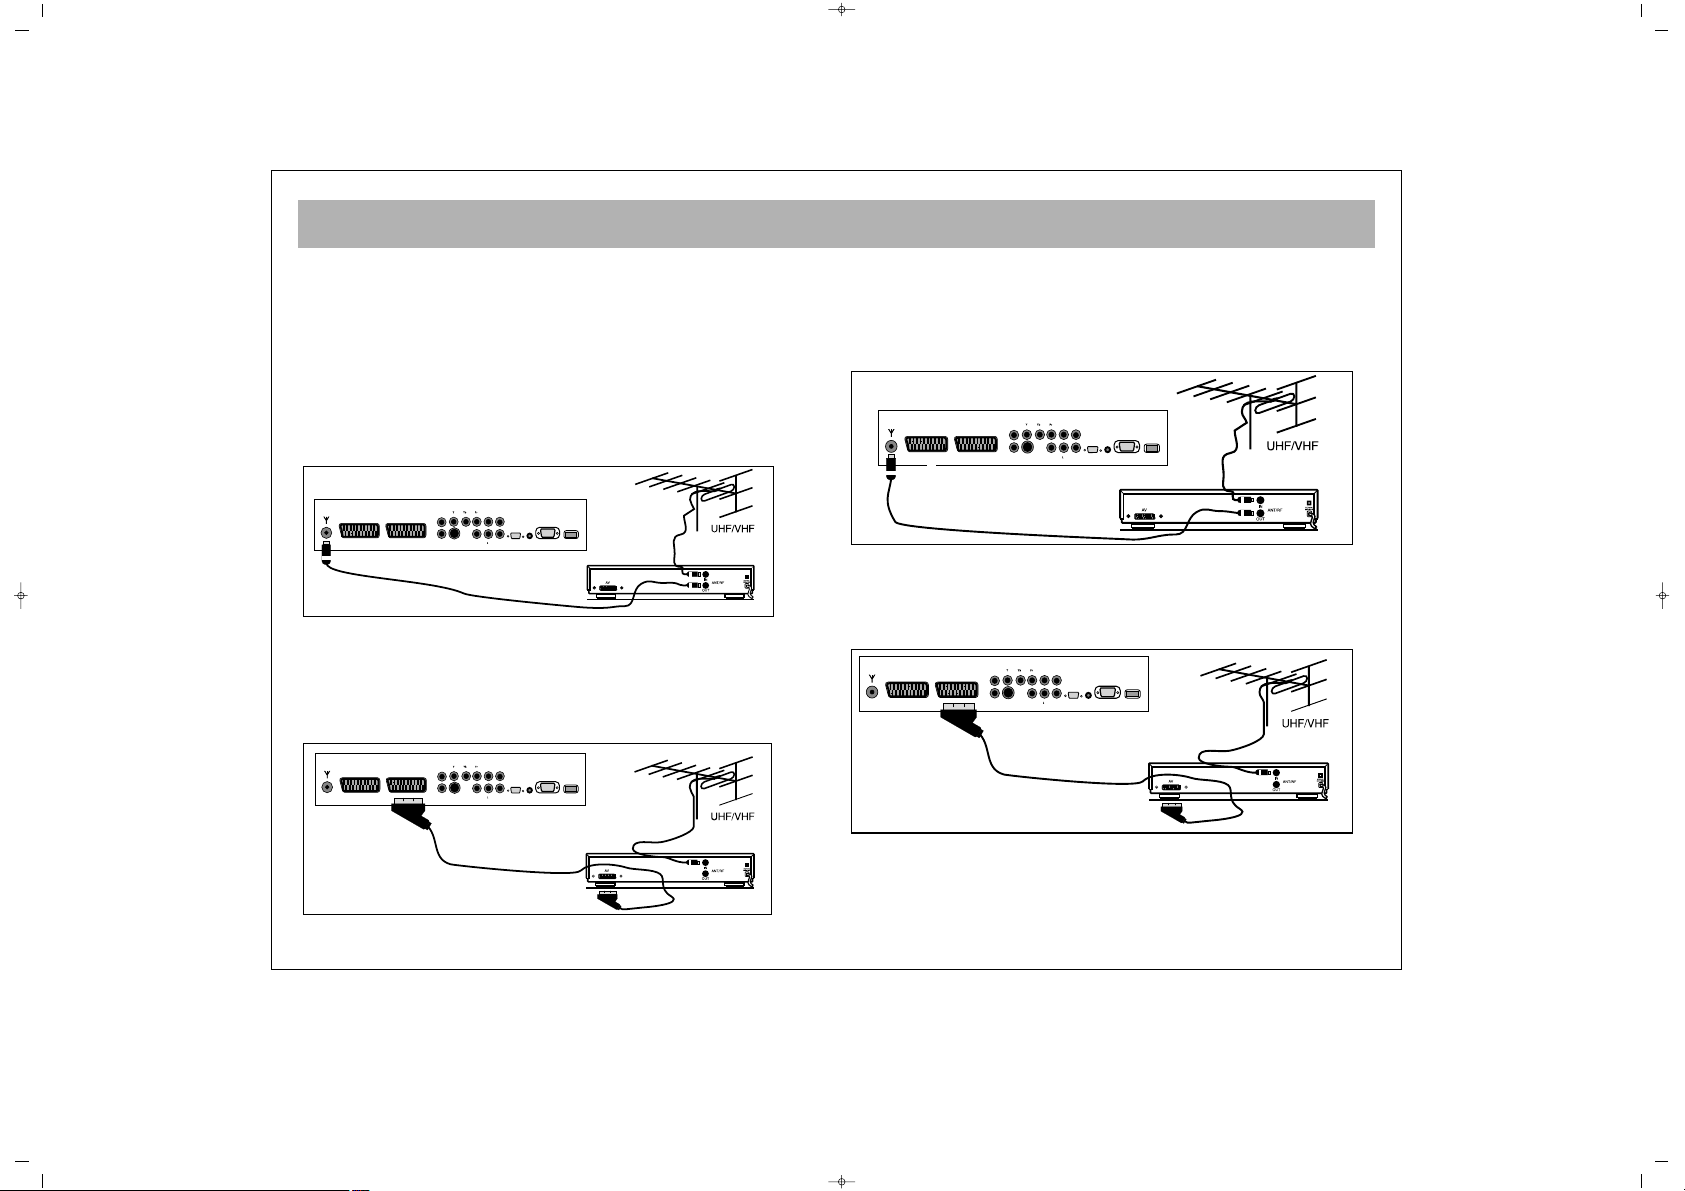
11.. VViiddeeoo ttaappee ccoonnnneeccttiioonn ((tthhrroouugghh ccooaaxxiiaall ccaabbllee))
* Connect antenna cable plug into the antenna input of your
video cassette equipment. (This is typically marked RF in)
* Connect the RF outpuut of your cassette equipment to the
antenna input of your TV set. You must use co-axial cable for
this.
* Insert a video cassette and press play.
* Choose the channel to be used to view your video cassette
equipments output.
NNoottee::
If the display or volume are impaired, take the video tape
away from the TV set
22.. VViiddeeoo ttaappee ccoonnnneeccttiioonn ((tthhrroouugghh ssccaarrtt ccaabbllee))
* Connect the antenna cable plug into the antenna inlet of the
video set
* Connect the SCART socket of the video tape and scart socket
of the TV set through EURO scart cable
* Press “AV” button
33.. DDeeccooddeerr CCoonnnneeccttiioonn
* Connect the antenna cable plug to the antenna inlet of the
decoder
* Connect the antenna outlet of the Decoder (RF outlet) to the
antenna inlet of the TV set through coaxial cable
* Ensure the decoder is switched on.
44.. DDeeccooddeerr CCoonnnneeccttiioonn ((tthhrroouugghh ssccaarrtt ccaabbllee))
* Connect the antenna plug to the antenna inlet of the TV set
* Connect the scart socket of the decoder to the scart socket of
the TV set through EURO scart cable
* Press “AV” button.
EURO AV
EURO AV
VVIIDDEEOO
VVIIDDEEOO
DDEECCOODDEERR
DDEECCOODDEERR
065001061070 26" LCD AVISOL ING 8/11/06 17:02 Page 8
Page 9
CONNECTION TO EXTERNAL DEVICES
9
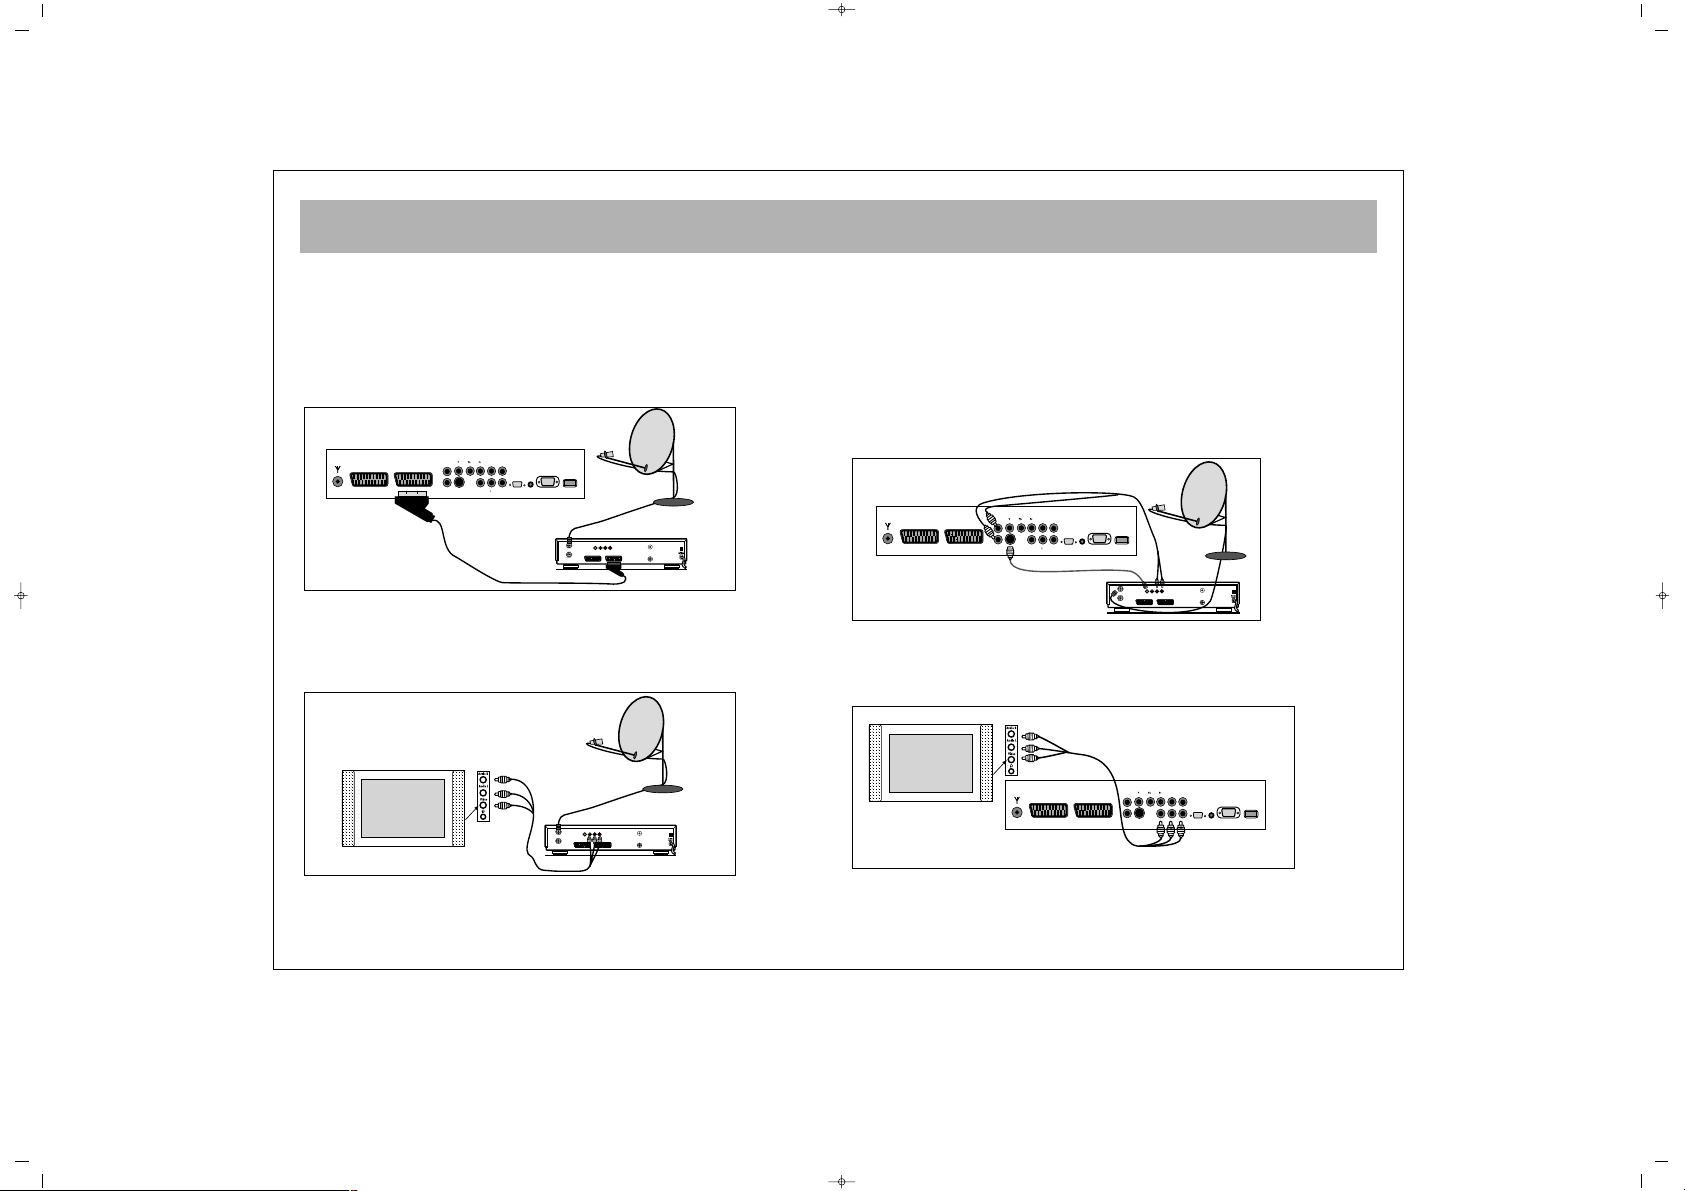
55.. RReecceeiivveerr ccoonnnneeccttiioonn ((SSaatteelllliittee RReecceeiivveerr))
Connect the cable from the satellite dish to the “LNB-IN” inlet of
the Satellite Receiver.
aa.. WWiitthh SSccaarrtt SSoocckkeett
* Connect the Satellite Receiver’s scart socket and your TV’s
scart socket using EURO scart cable.
* Press the “AV” button on the remote control of the TV set.
bb.. CCoonnnneeccttiinngg ffrroomm tthhee ssiiddee AAVV IInnlleettss ((OOppttiioonnaall))
* Connect the chinch sockets on the Receiver or Camera (Video,
Left Audio, Right Audio) to the sockets to the side of the TV
* Press the “AV” button on the RC until the Side AV position is
selected.
cc.. WWiitthh SSVVHHSS SSoocckkeett
* Connect the SVHS socket of the Receiver and that of your TV
set, through the SVHS cable. This provides a display
transmission
* For the volume, connect the Receiver’s (L, R) Left and Right
chinch volume outlets to the (L,R) Left and Right inlets of the TV
using double sided chinch socket cable.
While the Receiver is on, press the AV button of the TV set until
the Receiver Display comes to the screen.
dd)) AAVV OOuutt ((NNoott aavvaaiillaabbllee iinn ssoommee mmooddeellss))
• Use the AV outlets on theTV (Video, Left Audio, Right Audio)
to transmit the video and audio of the TV set to another
equipment.
R
L
DECODER SCART TV SCART
OUT
SVSH V L R
TV
AERIAL
DISH
LNB
RECEIVER
DECODER SCART TV SCART
OUT
SVSH V L R
TV
AERIAL
DISH
LNB
RECEIVER
EURO AV
DECODER SCART TV SCART
OUT
SVSH V L R
TV
AERIAL
DISH
LNB
RECEIVER
065001061070 26" LCD AVISOL ING 8/11/06 17:02 Page 9
Page 10

CONNECTION TO EXTERNAL DEVICES (PCI AND HDMI)
10
ee)) CCoommppoonneenntt YYPPbbPPrr IInn
*Video: Connect the DVD YPbPr sockets to the TV YPbPr
connectors using a 3 way AV cable.
* Sound: Connect the left and right (L,R) sound output
connectors on the DVD to the left and right sound input
connectors on the TV using AV cables.
Press the AV button on the TV RC until the signal from the DVD
is selected.
ff
))
CCoommppuutteerr CCoonnnneeccttiioonn ((OOppttiioonnaall))
To use the TV as a monitor connect the computer VGA (Monitor)
output to the TV PC socket. The HDMI socket can also be used.
gg
))
DDVVDD CCoonnnneeccttiioonn ((OOppttiioonnaall))
The HDMI socket can also be used to connect a DVD to the TV.
TThhee rreessoolluuttiioonnss wwhhiicchh ssuuppppoorrtt PPCC && HHDDMMII
VVGGAA 664400 XX 448800 6600 HHzz//7700 HHzz // 7755 HHzz
SSVVGGAA 880000 XX 660000 6600 HHzz//7700 HHzz // 7755 HHzz
XXGGAA 11002244 XX 776688 6600 HHzz//7700 HHzz // 7755 HHzz
SSXXGGAA 11228800 XX 11002244 6600 HHzz//7700 HHzz // 7755 HHzz
065001061070 26" LCD AVISOL ING 8/11/06 17:02 Page 10
AUDIO OUT
OUT
DISH
LNB
DECODER SCART TV SCART
SVSH V L R
TV
RL
AERIAL
PC
DVD
DVI
PC
Page 11

SWITCHING ON AND OFF
11
NNoottee:: RRCC iiss aann aabbbbrreevviiaattiioonn ffoorr tthhee RReemmoottee CCoonnttrrooll
11.. TTuurrnniinngg OOnn
aa.. TTuurrnniinngg oonn tthhee TTVV
Set the mains switch at the rear of the TV to ON. (Move
the switch so that it "rocks" to wards the front of the TV.)
This places the TV in standby.
bb.. SSTTAANNDD BBYY MMOODDEE
Turn on the TV by pressing the stand by button on
the RC, the stand by button on the front of the TV or the
P+/P- buttons on the TV.
22.. TTuurrnniinngg OOffff
aa.. TTuurrnniinngg ooffff tthhee TTVV
Set the mains switch to OFF.
bb.. SSttaannddbbyy MMooddee
To turn off the TV for a short time period, press the
Standby button on the RC or TV
If you are not going to use the set for a long time, press
the ON/OFF button on the TV set.
11.. SSeelleeccttiinngg PPrrooggrraamm NNuummbbeerr
• Using the P+- buttons on the TV control panel or RC,
you can select any program.
•When you want to select a program between 1 and 9,
press the number on the RC
•To select a number between 10 and 99, the program
number is pressed on the RC quickly on the RC.
2--
2--
001
1--
OK
5
6
1
8
065001061070 26" LCD AVISOL ING 8/11/06 17:02 Page 11
Page 12

TV FUNCTIONS
12
EExxaammppllee::
To shift to program No. 99, first press 9. In
that case a message "9" appears on the right corner of
the screen. Quickly press 9 again, the set changes to the
program no. 99
22.. MMUUTTEE
To mute the sound, press MUTE button on the RC.
Pressing this button again will restore the sound at its
former level.
33.. 1166::99 bbuuttttoonn::
This is used to change the picture size.
Auto, 16:9, 14:9, Cinema, Zoom and 4:3 picture
formats are available.
MMaannuuaall ZZoooomm::
Press the ( ) Zoom button on the RC
while in cinema mode to activate Manual Zoom.
Pressing V+/V- buttons will adjust vertical zoom.
44.. PPPP::
Pressing this button will load the audio and
picture values in the memory. Pressing PP button for
about 2 seconds will memorize current TV audio and
pictures values as "User Settings" an on-screen message
confirms the settings have been stored.
55.. SS//MM//DD bbuuttttoonn::
For stereo broadcasting, you can change
the volume as Mono, Stereo or DUAL A, DUAL B.
66.. AAVV ::
To shift to AV mode, press AV button on the RC.
The AV menu will appear on the screen. You can select
suitable AV modes using P+/P- buttons and confirm by
pressing OK. In the AV mode, you can pass to TV
mode using the numerical keyboard. If you are in
HDMI and PC mode, press red button to shift to TV
mode. As long as there is a menu on the screen, you
cannot shift your TV set to AV mode. Programs menu is
not available in the AV mode.
77.. AAuuttoommaattiicc sshhuuttttiinngg ddoowwnn::
The TV set will
automatically change to stand by mode 5 minutes after
the broadcasting is over.
NNoottee::
If you leave the TV in AV mode, it will not shift to
Standby mode after 5 minutes even there is no
broadcasting
88.. OOKK BBuuttttoonn::
This provides shift from the main menu
to submenu vice versa
99.. IInnffoo BBuuttttoonn ((
‹‹))::
Press this button to see the
information on the current channel
9
99
00
065001061070 26" LCD AVISOL ING 8/11/06 17:02 Page 12
Page 13

TV FUNCTIONS
13
SSwwaapp::
You can return to the previous channel by
pressing this.
NNoottee::
If there is a menu on the screen, you cannot use
it.
MMoossaaiicc::
This is not functional
NNoottee::
Mosaic function is available in some models.
065001061070 26" LCD AVISOL ING 8/11/06 17:02 Page 13
Page 14

TV FUNCTIONS (MENUS)
14
SSccrroolllliinngg iinn tthhee MMeennuuss
When you press Menu button, the Main (Display) menu
appears on the screen. You can scroll in the main menu
options pressing V+/V- buttons and access to submenus
pressing OK to make changes.
In the submenus, you can scroll up and down the
options pressing P+/P- and select values to change by
pressing OK. You can increase or decrease values
pressing V+/V- buttons.
11.. IInnssttaallllaattiioonn ((AAuuttoommaattiicc SSeeaarrcchh,, FFiinnddiinngg aanndd
MMeemmoorriizziinngg))
Below is the automatic programming procedure for
your set. A more detailed explanation on the settings
and menus are given in the following pages.
1. Connect your set and switch on
2. Press "Menu" button on the RC
The First (Display Menu) will appear on the screen.
3. Access to "INSTALLATION" menu pressing V+
button.
065001061070 26" LCD AVISOL ING 8/11/06 17:02 Page 14
PICTURE
COLOR TEMP.
PICTURE PRESET
BRIGHTNESS
CONTRAST
COLOUR
SHARPNESS
INSTALLATION
AUTO TUNING
MANUAL TUNING
PROGRAMME TABLE
Page 15

TV FUNCTIONS (MENUS)
15
4. Press V+ 3 times to move to the INSTALLATION
menu. Press OK to access in the menu.
5. Press P+/P- buttons to access AUTO TUNING option
and confirm pressing OK
6. Select suitable COUNTRY SELECTION pressing V+
button (if your country is not listed, press OTHERS)
7. Access the SEARCH option pressing P- button
8. Start an AUTO TUNING pressing “V+” button. An
OSD bar will appear on the screen to show that search
has been started.
Do not do anything until search is complete. Your TV
will find and memorize the channels automatically.
When the search is over, the PROGRAM TABLE menu
will appear on the screen.
065001061070 26" LCD AVISOL ING 8/11/06 17:02 Page 15
INSTALLATION
AUTO TUNING
MANUAL TUNING
PROGRAMME TABLE
AUTO TUNING
COUNTRY SELECTION
SEARCH
UK
TO START
AUTO TUNING
COUNTRY SELECTION
SEARCH
UK
TO START
AUTO TUNING
_ _ _ _ _
PRESS MENU TO STOP
PR. 3
10 %
Page 16

TV FUNCTIONS (MENUS)
16
Naming, program deletion, transfer and channel skip
in the “PROGRAM TABLE” are explained in the
following pages.
MMAANNUUAALL TTUUNNIINNGG
For a manual setting, you can use the MANUAL
TUNING submenu in the “INSTALLATION” menu
PPrrooggrraammmmee ::
You can enter the program number to set,
using the numerical keyboard on the RC.
SSyysstteemm::
You should select FRANCE for France, or
EURO for other European countries
NNaammee::
You can name the channel. Access to the first
digit pressing V+ button and find the letter you want to
find using P+/P- buttons. Repeat the same process until
writing fully (5 characters)
SSeeaarrcchh::
You can change the frequency pressing V+/Vbuttons to find your channel or directly enter the
channel number through numerical keyboard.
065001061070 26" LCD AVISOL ING 8/11/06 17:02 Page 16
1 -------
2 -------
3 -------
4 -------
5 -------
DELETE
SKIP
6 -------
7 -------
8 -------
9 -------
10 -------
11 -------
12 -------
13 -------
14 -------
15 -------
MOVE
OK : SELECT
16 -------
17 -------
18 -------
19 -------
20 -------
INSTALLATION
AUTO TUNING
MANUAL TUNING
PROGRAMME TABLE
MANUAL TUNING
PROGRAMMESYSTEM
SYSTEM
NAME
SEARCH
FINE TUNE
PROGRAMLOCK
1
EURO
000 MHz
OFF
STORE : OK
0
Page 17

TV FUNCTIONS (MENUS)
17
FFiinnee::
Press V+/V- buttons to fine to the channel you
have adjusted.
CChhiilldd LLoocckk::
You can turn on or off the channel for
which you set a program lock, pressing V+ button.
NNoottee::
You can also access to the locked channels
through the RC but you cannot access it using the P+buttons on the TV set.
You can memorize the settings in the "Channel Settings"
menu pressing OK.
PPRROOGGRRAAMMMMEE TTAABBLLEE
DDeelleettee ((RReedd BBuuttttoonn))::
While you are on the program which you want to
delete, press red button to delete.
065001061070 26" LCD AVISOL ING 8/11/06 17:02 Page 17
MANUAL TUNING
PROGRAMME
SYSTEM
NAME
SEARCH
FINE TUNE
PROGRAMLOCK
1
EURO
000 MHz
OFF
STORE : OK
0
MANUAL TUNING
PROGRAMME
SYSTEM
NAME
SEARCH
FINE TUNE
PROGRAMLOCK
1
EURO
000 MHz
OFF
STORE : OK
0
INSTALLATION
AUTO TUNING
MANUAL TUNING
PROGRAMME TABLE
PROGRAMME TABLE
1 -------
2 -------
3 -------
4 -------
5 -------
DELETE
SKIP
6 -------
7 -------
8 -------
9 -------
10 -------
11 -------
12 -------
13 -------
14 -------
15 -------
MOVE
OK : SELECT
16 -------
17 -------
18 -------
19 -------
20 -------
Page 18

TV FUNCTIONS (MENUS)
18
MMoovvee ((GGrreeeenn BBuuttttoonn))::
1. Select the Program you want to move, using the
V+/V -, P+/P- buttons
2. Press green button, the program is highlighted.
3. Move the highlighted program to the desired row
pressing V+/V -, P+/P- buttons.
4. Press the green button again, move process is over
SSkkiipp ((BBlluuee BBuuttttoonn))::
You can select the programs which you do not want to
be seen in the channel transitions which take place by
P+- button presses. While the cursor is on the related
program, it is sufficient to press the blue button.
OOKK BBuuttttoonn::
While in the Program Table, select the program by
pressing OK. Just press OK while you are on the
program which you want to be shown in the
background.
PPIICCTTUURREE MMeennuu
In this menu, you can adjust the picture related
parameters.
CCoolloorr TTeemmppeerraattuurree::
You can select the required color
value pressing V+/V- buttons.
065001061070 26" LCD AVISOL ING 8/11/06 17:02 Page 18
PICTURE
COLOR TEMP.
PICTURE PRESET
BRIGHTNESS
CONTRAST
COLOUR
SHARPNESS
COLOR TEMP.
PICTURE PRESET
BRIGHTNESS
CONTRAST
COLOUR
SHARPNESS
NORMAL
USER
60
90
50
75
Page 19

TV FUNCTIONS (MENUS)
19
PPiiccttuurree PPrreesseett::
You can select the required picture
setting pressing V+/V- buttons. When you select "User",
you can change the below defined settings according to
your requirement.
BBrriigghhttnneessss::
You can set suitable Brightness pressing
V+/V- buttons
CCoonnttrraasstt::
You can set suitable Contrast pressing V+/V-
buttons
CCoolloouurr::
You can adjust suitable Colour value pressing
V+/V-
SShhaarrppnneessss::
Adjust suitable value pressing V+/V-
SSOOUUNNDD MMEENNUU
VVoolluummee
Set suitable sound value pressing V+/V-
065001061070 26" LCD AVISOL ING 8/11/06 17:02 Page 19
COLOR TEMP.
PICTURE PRESET
BRIGHTNESS
CONTRAST
COLOUR
SHARPNESS
NORMAL
USER
60
90
50
75
SOUND
VOLUME
SOUND PRESET
SURROUND
AVL
BALANCE
BASS
TREBLE
SOUND
VOLUME
SOUND PRESET
SURROUND
AVL
BALANCE
BASS
TREBLE
FLAT
OFF
OFF
10
0
50
55
Page 20

TV FUNCTIONS (MENUS)
20
SSoouunndd PPrreesseett::
You can select predetermined sound
values pressing V+/V- buttons. Select PERSONAL to set
your own values (Bass, High Pitch)
SSuurrrroouunndd::
You can activate or de-activate the surround
sound effect pressing V+/V- buttons
AAVVLL::
You can activate or de-activate the AVL feature
pressing V+/V- buttons. AVL keeps the sound level at
the same level.
BBaallaannccee::
You can adjust the balance of sound between
the left and right speakers using the V+/V- buttons.
BBaassss::
Adjust "Bass" value pressing V+/V-
TTrreebbllee::
Adjust "Pitch" value pressing V+/V-
065001061070 26" LCD AVISOL ING 8/11/06 17:02 Page 20
SOUND
VOLUME
SOUND PRESET
SURROUND
AVL
BALANCE
BASS
TREBLE
FLAT
OFF
OFF
10
0
50
55
Page 21

TV FUNCTIONS (MENUS)
21
PPIIPP // PPAAPP MMeennuu ((NNoott aavvaaiillaabbllee iinn aallll mmooddeellss..))
OOnn // OOffff::
You can select or close the PIP (Picture in
Picture), PAP1, PAP2 functions pressing V+/V- buttons
SSoouurrccee::
You can select the mode you want to display
on the PIP and PAP screens using V+/V- buttons.
PPIIPP SSiizzee::
You can select the size of the PIP window
pressing V+/V- buttons.
PPIIPP PPoossiittiioonn::
You can select the position of the PIP
window pressing V+/V- buttons.
065001061070 26" LCD AVISOL ING 8/11/06 17:02 Page 21
PIP/PAP
ON/OFF
SOURCE
PIP SIZE
PIP POSITION
PIP/PAP
ON/OFF
SOURCE
PIP SIZE
PIP POSITION
OFF
HDMI
LARGE
PIP/PAP
PIP
HDMI
LARGE
ON/OFF
SOURCE
PIP SIZE
PIP POSITION
Page 22

TV FUNCTIONS (MENUS)
22
FFEEAATTUURREESS MMEENNUU
You can use this menu to Features menu and time.
LLaanngguuaaggee::
Select the menu language pressing V+/V-
buttons
TTrraannssppaarreennccyy::
You can set the menu transparency
pressing V+/V- buttons
RReesseett::
You can restore the settings to default values
pressing V+/V- buttons
TTiimmee::
You can set time and time set program change in
the menu.
065001061070 26" LCD AVISOL ING 8/11/06 17:02 Page 22
FEATURES
LANGUAGE
TRANSPARENCY
RESET
TIME
FEATURES
LANGUAGE
TRANSPARENCY
RESET
TIME
ENGLISH
TO START
FEATURES
LANGUAGE
TRANSPARENCY
RESET
TIME
0
ENGLISH
TO START
0
Page 23

TV FUNCTIONS (MENUS)
23
CClloocckk::
You can enter time data using numerical
keyboard
OOffff ttiimmee::
You can set the time when you want the TV
set to switch off. To activate the function, enter the
switching off time and access "Off Time" using V+
button and turn it to "OPEN" using P- button. The TV set
will switch of at the specified time.
OOnn ttiimmee
WWhhiillee iinn tthhee TTiimmee MMeennuu
1. Press P- button to select "On Time"
2. Press V+ button and access to time section
3. Enter the time for switching on using numerical
buttons
4. Press V+ button to select minute section
5. Enter minute using numerical keyboard
6. Press V+ button and select On Time to activate using
P- button
7. Press V+ button and enter the number of the channel
you want to be switched on
8. Press V+ button and enter sound level using
numerical keyboard
9. You can return to Features menu pressing OK button
065001061070 26" LCD AVISOL ING 8/11/06 17:02 Page 23
TIME
CLOCK
OFF TIME
ON TIME
AUTO SHUT OFF
00 : 00
00 : 00
00 : 00
PR.
VOL
OFF
OFF
OFF
1
10
TIME
CLOCK
OFF TIME
ON TIME
AUTO SHUT OFF
00 : 00
00 : 00
00 : 00
PR.
VOL
OFF
OFF
OFF
1
10
Page 24

TV FUNCTIONS (MENUS)
24
All menus appear in the PC and AV Modes. The
additional menus in PC monitor use are as follows:
PPCC MMoonniittoorr PPiiccttuurree MMeennuu
In this menu, there are "Red, Green and Blue" colour
options for PC Monitor. You can set the colour values
according to your request pressing V+/V- buttons.
065001061070 26" LCD AVISOL ING 8/11/06 17:02 Page 24
PICTURE
COLOR TEMP.
BRIGHTNESS
CONTRAST
RED
GREEN
BLUE
PICTURE
COLOR TEMP.
BRIGHTNESS
CONTRAST
RED
GREEN
BLUE
NORMAL
66
50
50
50
Page 25

TV FUNCTIONS (MENUS)
25
PPIICCTTUURREE MMEENNUU
(This menu is only available when a
PC signal is present.)
AAuuttoo CCoonnffiigguurraattiioonn::
On this option, pressing the V+
button will automatically carry out the PC monitor
settings.
HHoorriizzoonnttaall ppoossiittiioonn::
You can slide the PC display on the
screen to right or left horizontally, pressing V+/Vbuttons.
VVeerrttiiccaall ppoossiittiioonn::
You can slide the PC display on the
screen to up or down vertically, pressing V+/V- buttons.
CClloocckk::
You can set the time pressing V+/V-. Changing of
this value will provide enlarging or narrowing of the
picture on the right side.
PPhhaassee::
Set the phase pressing V+/V- buttons.
065001061070 26" LCD AVISOL ING 8/11/06 17:02 Page 25
SCREEN
AUTOCONFIGURATION
HORIZONTAL POS.
VERTICAL POS.
CLOCK
PHASE
1024x768 75Hz
SCREEN
AUTOCONFIGURATIONYATAY POZ‹SYON
HORIZONTAL POS.
VERTICAL POS.
CLOCK
PHASE
1024x768 75Hz
TO START
71
60
1369
70
Page 26

TELETEXT
26
TTEELLEETTEEXXTT MMOODDEE
If the current channel has a teletext broadcast, you can
change to teletext mode as described below.
11.. TTeelleetteexxtt ::
Press the teletext button to select
teletext. Press again to revert to TV.
22.. RReevveeaall // CCoonncceeaall::
Press the button to reveal
answers to quiz or games page. Press again to conceal
to answers.
33.. TTeelleetteexxtt ttiimmeerr::
At first time when you switch on
your TV, it records TXT time of the first channel which
transmits TXT info. When you press ( ) button, time
information appears on the screen for a short while. If
your TV is at TXT mode and also if your Teletext screen
has a sub page, this time you may see time information
on the bottom side of TV screen. You may access those
sub pages by pressing Green and Red function buttons.
44.. CCaanncceell::
Pressing this button in the Teletext
mode causes the current TV programme to be
displayed in some TV models.
But teletext is still active, and if a new page number is
entered, page search continues. When the requested
page is found, a message showing the page number
appears on the screen. Pressing this button again
displays the new teletext page.
55.. SSiizzee ::
Press once to display the upper half of
the page at double text height. Press again to display
the lower half of the page at double text height. Press
again to display the full page at normal height.
1. Teletext button
2. Reveal / Conceal (Reply)
button
3. Teletext timer button
4. Cancel (updating) button
5. Size (page enlargement)
button
6. Mix (Combined TV and
Teletext watching) button
7. Hold (Lower page holding)
button
8. Index (Main page) button
9. Color (Red, Green, Yellow,
Blue) buttons
065001061070 26" LCD AVISOL ING 8/11/06 17:02 Page 26
Page 27

TELETEXT
27
66.. MMiixx:: ((CCoommbbiinneedd TTVV aanndd TTeelleetteexxtt bbrrooaaddccaassttiinngg))::
Press to superimpose Teletext over the TV programme.
Press again to display the Teletext page alone.
77.. HHoolldd::
If a teletext page has subpages, such
pages are displayed at certain time intervals. In such a
case, press this button to keep a specific page
permanently on the screen. When the page is held
pressing "HOLD", the Hold icon appears on the upper
left corner of the teletext page. Pressing this button
again leaves from the hold setting.
88.. IInnddeexx ((MMaaiinn PPaaggee))::
This button provides direct
access to the index page of teletext.
99.. CCoolloouurr BBuuttttoonnss ((RREEDD // GGRREEEENN // YYEELLLLOOWW // BBLLUUEE))
You can easily scan the teletext data by pressing these
four coloured text buttons. While this mode is active,
pressing MENU button changes colour options and you
can access any option of your request easier using the
colour buttons
EEXXAAMMPPLLEE::
TTVV GGUUIIDDEE SSPPOORRTTSS NNEEWWSS WWEEAATTHHEERR
(The above information are for example purposes, such
information may change depending on the selected
page)
FFaasstteexxtt
This Tv supports the Fastext system. When a page is
requested the system automatically stores the adjacent
pages. These can be selected by using P+ to select the
next Teletext page and P- to select the previous Teletext
page.
Fastext Buttons (Red, Green, Yellow and Blue). Pages
related to the current page are also stored in memory
can be quickly reached by pressing the appropriate
coloured button.
Press RED
button to
receive TV
Guide
Press GREEN
button to
receive sports
information
Press YELLOW
button to
receive news
Press BLUE
button to
receive weather
information
065001061070 26" LCD AVISOL ING 8/11/06 17:02 Page 27
Page 28

BEFORE CALLING SERVICE
28
If you have a problem with your TV please check the Symptom and Recommendation. If this fails to cure the problem you will need to
contact an authorised service company. If the problem persists, please apply to an authorized service.
CCaauuttiioonn::
WWhheenn tthhee TTVV sseett iiss ooppeerraatteedd aatt aammbbiieenntt tteemmppeerraattuurreess ooff 55 ddeeggrreeee CCeellssiiuuss oorr lloowweerr,, tthheerree wwiillll bbee aa ffooccuuss ddiissoorrddeerr aanndd ccoolloo