

Page 1
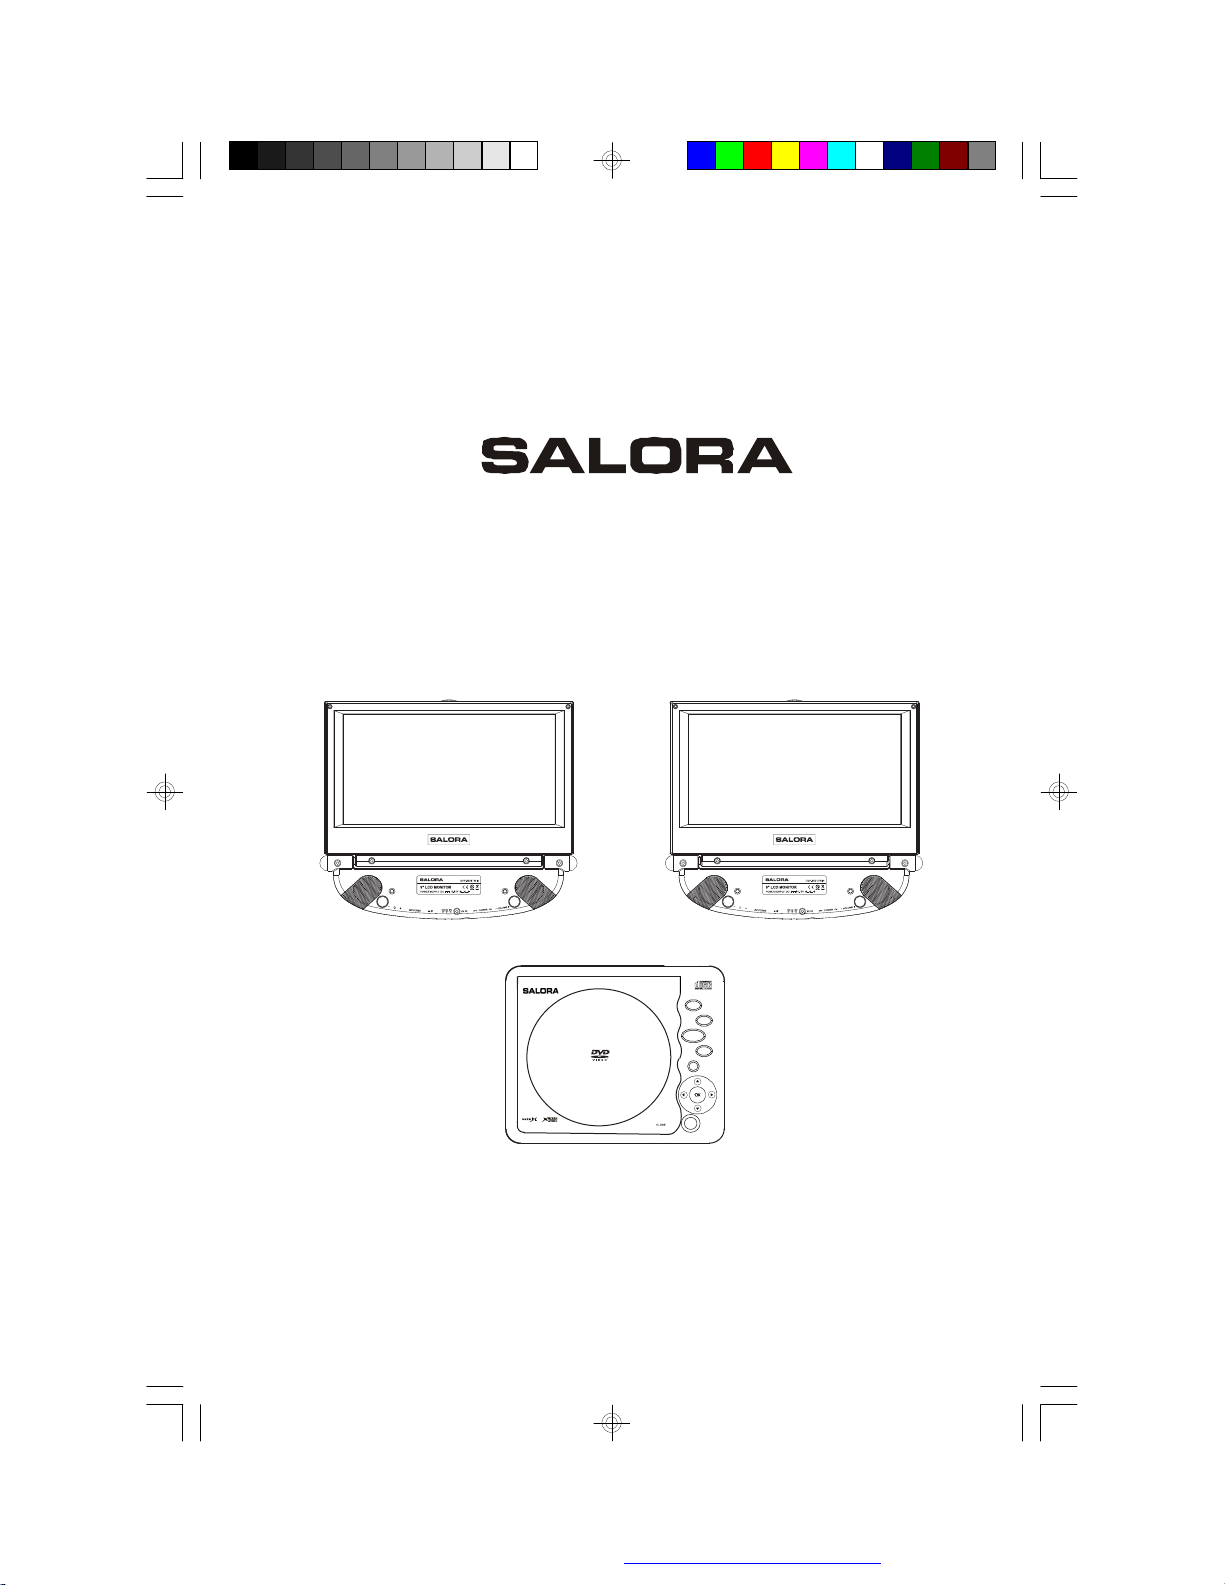
DVP-9021TWIN
Portable DVD player with two 9” LCD screen
MONITOR
MONITOR
PORT 1
PORT 2
SD/DVD
PREV
STOP
NEXT
ME NU
OPEN
Owner’s Manual
PDF created with FinePrint pdfFactory Pro trial version http://www.fineprint.com
Page 2

Notice:
This Product incorporates copyright protection technology that is protected by method claims of certain U.S. Patents and other intellectual
property rights owned by Macrovision Corporation and other rights owners. Use of this copyright protection technology must be authorized by
Macrovision Corporation, and is intended for home and other limited viewing uses only unless otherwise authorized by Macrovision Corporation.
Reverse engineering or disassembly is prohibited.
PDF created with FinePrint pdfFactory Pro trial version http://www.fineprint.com
Page 3

Content
A. Introduction ....................................................................... 1
B. Cautions and Warnings ...................................................
C. Contents ........................................................................... 3
D. Powering and installation ................................................. 3
E. Controls, Indicators, and Connectors ..............................
F. Loading and Playing a Disc .............................................
G. Setup..................................................................................
H. Basic Operation .................................................................
I. Menu .................................................................................. 14
J. Display................................................................................ 14
K. Variable Playing Mode ..............................................
L. Playing MPEG4 Discs.........................................................
M. Connecting to other Electronic Equipment . .........................
N. Specifications ......................................................................
O. Troubleshooting ..................................................................
1
6
8
9
13
18
23
24
25
26
PDF created with FinePrint pdfFactory Pro trial version http://www.fineprint.com
Page 4

A. Introduction
Thank you for choosing the portable DVD player with twin 9”LCD
screen. The main features include two 9" Wide Screen (16:9 Aspect
Ratio) Liquid Crystal Display (LCD) monitors and a single DVD player.
Please read the entire instruction manual supplied with this product
prior to using. The documentationwillassist you in installing the system
properly to obtain the best equipment performance. Please save this
manual for later use.
B. Cautions and Warnings
1. Placement
To prevent fire or electric shock, do not expose this appliance to
rain or moisture. Do not place the set on an unstable cart, stand,
tripod, bracket or table to prevent it from falling. Keep the unit away
from strong magnets, heat sources, direct sunlight, excessive
dust. If the unit is brought directly from a cold to a warm location,
moisture may condense inside the unit. When you move it from a
cold to a warm location, wait for about one hour before operating
the unit, or remove the disc and leave the unit turned on until the
moisture evaporates.
2. Installation
Ensure that 9”the DVD player and monitors are installed in
accordance with the instructions and illustrations provided in this
manual.
3. Caution
Do not push objects of any kind into the unit through openings; do
not spill or spray liquid of any kind on or in the system (this may
result in a fire or electric shock). Do not place anything heavy on
the unit. To ensure proper ventilation and proper operation, never
cover or block the slots and openings with a cloth or other material.
Keep the unit away from an open flame such as fire, candle etc.It is
hazardous to replace the remote control battery incorrectly.Replace the
battery only with the same or equivalent type, in order to protect
1
PDF created with FinePrint pdfFactory Pro trial version http://www.fineprint.com
Page 5

the environment,please dispose the battery properly. Do not use
the unit in temperatures higher than 95 degrees Fahrenheit or 35
degrees Celsius.
4.Disassemble
Do not attempt to disassemble the cabinet. There is a risk of electric shock and/or exposure to Laser Radiation. Contact qualified
service personnel if your system needs repair.
5. Cleaning Unit
When cleaning, make sure the system is unplugged from the power
source. Do not use liquid cleaners or aerosol cleaners. Use a cloth
lightly dampened with water for cleaning the exterior of the system
only.
6. Disc
Do not use irregularly shaped discs such as heart or star-shaped
discs as they may cause the unit to malfunction. Do not stick paper,
tape or glue on the disc. Do not expose the disc to direct sunlight
or heat sources. Do not touch the surface of disc. Handle the disc
by its edge. Clean the disc by wiping the disc from the center out
with a cleaning cloth. Remove the disc from the unit and store it in
its case after playing. Some playback operations of discs may be
intentionally fixed by software producers. Since this unit plays discs
according to the disc contents the software producers designed,
some playback features may not be available. Also refer to the instructions supplied with the discs.
7. Regional Coding
Both the DVD player and disc are coded by region. These regional
codes must match in order for the disc to play. If the codes don’t
match, the disc won’t play. This unit’s code is region 2. DVD’s with
other regional codes cannot be played in this unit.
2
PDF created with FinePrint pdfFactory Pro trial version http://www.fineprint.com
Page 6

C. Contents
1. 1 x DVD Player
2. 2 x 9” Monitors
3. 1 x Remote Control with battery (CR2025)
4. 2 x DIN to AV Adapter
5. 1 x AC to DC Adapter
6. 1 x Cigarette Lighter Adapter
7. 1 x Instruction Manual
8. 1 x Carry Bag
9. 2 x Pouch for 9” single monitor
10. 1 x Pouch for DVD
D. Powering and installation
1. Powering the system indoors (Refer to Figure 1)
Plug one end of the AC to DC adapter into the DC Input jack on the
right side of the DVD player, then plug the other end into the
100~240V AC power receptacle.
2. Powering the system in a car (Refer to Figure 1)
Plug one end of the cigarette lighter adapter into the DC Input jack
on the DVD player, then plug the other end into the cigarette lighter
socket.
Figure 1
3
PDF created with FinePrint pdfFactory Pro trial version http://www.fineprint.com
Page 7

3. Connection with DVD player and monitors (Refer to Figure 2)
The single monitors only can be powered by DVD player.
9"LCD MONITOR
MONITOR
MONITOR
PORT 1
PORT 2
SD/DVD
PREV
STOP
NEXT
MEN U
OPEN
Figure 2
Note: Unplug the apparatus when not using for a long time or intent to
disconnect from the Mains power.
4. Installation Prior to use
1) Pouching the DVD player (Refer to Figure 3)
Pull out the slide fastener of the pouch to slide the DVD player into
the pouch, and feed the bottom piece of the DVD into the bottom of
the pouch. Then close the slide fastener.
MONITOR
MONITOR
PORT 2
PORT 1
SD/DVD
PREV
STOP
NEXT
ME NU
OPEN
Figure 3
4
PDF created with FinePrint pdfFactory Pro trial version http://www.fineprint.com
Page 8

2) Positioning the Monitor
Option 1 Vehicle Headrest (Refer to Figure 4)
Figure 4
Slide screen in to the case with display pointing out Squeeze the
magic tape between tilting foot and display and fix on back side.Then
loop the strap of the pouch around the headrest in the vehicle and
pull the end of the strap while holding the buckle until the pouch is
tightly secured.
Option 2 Flat Surface (Refer to Figure 5)
Figure 5
Rotate the base of Monitor backward and place it on a flat surface.
Adjust the screen for a proper viewing angle. This can be done with
the Monitor inside or outside the pouch.
5
PDF created with FinePrint pdfFactory Pro trial version http://www.fineprint.com
Page 9
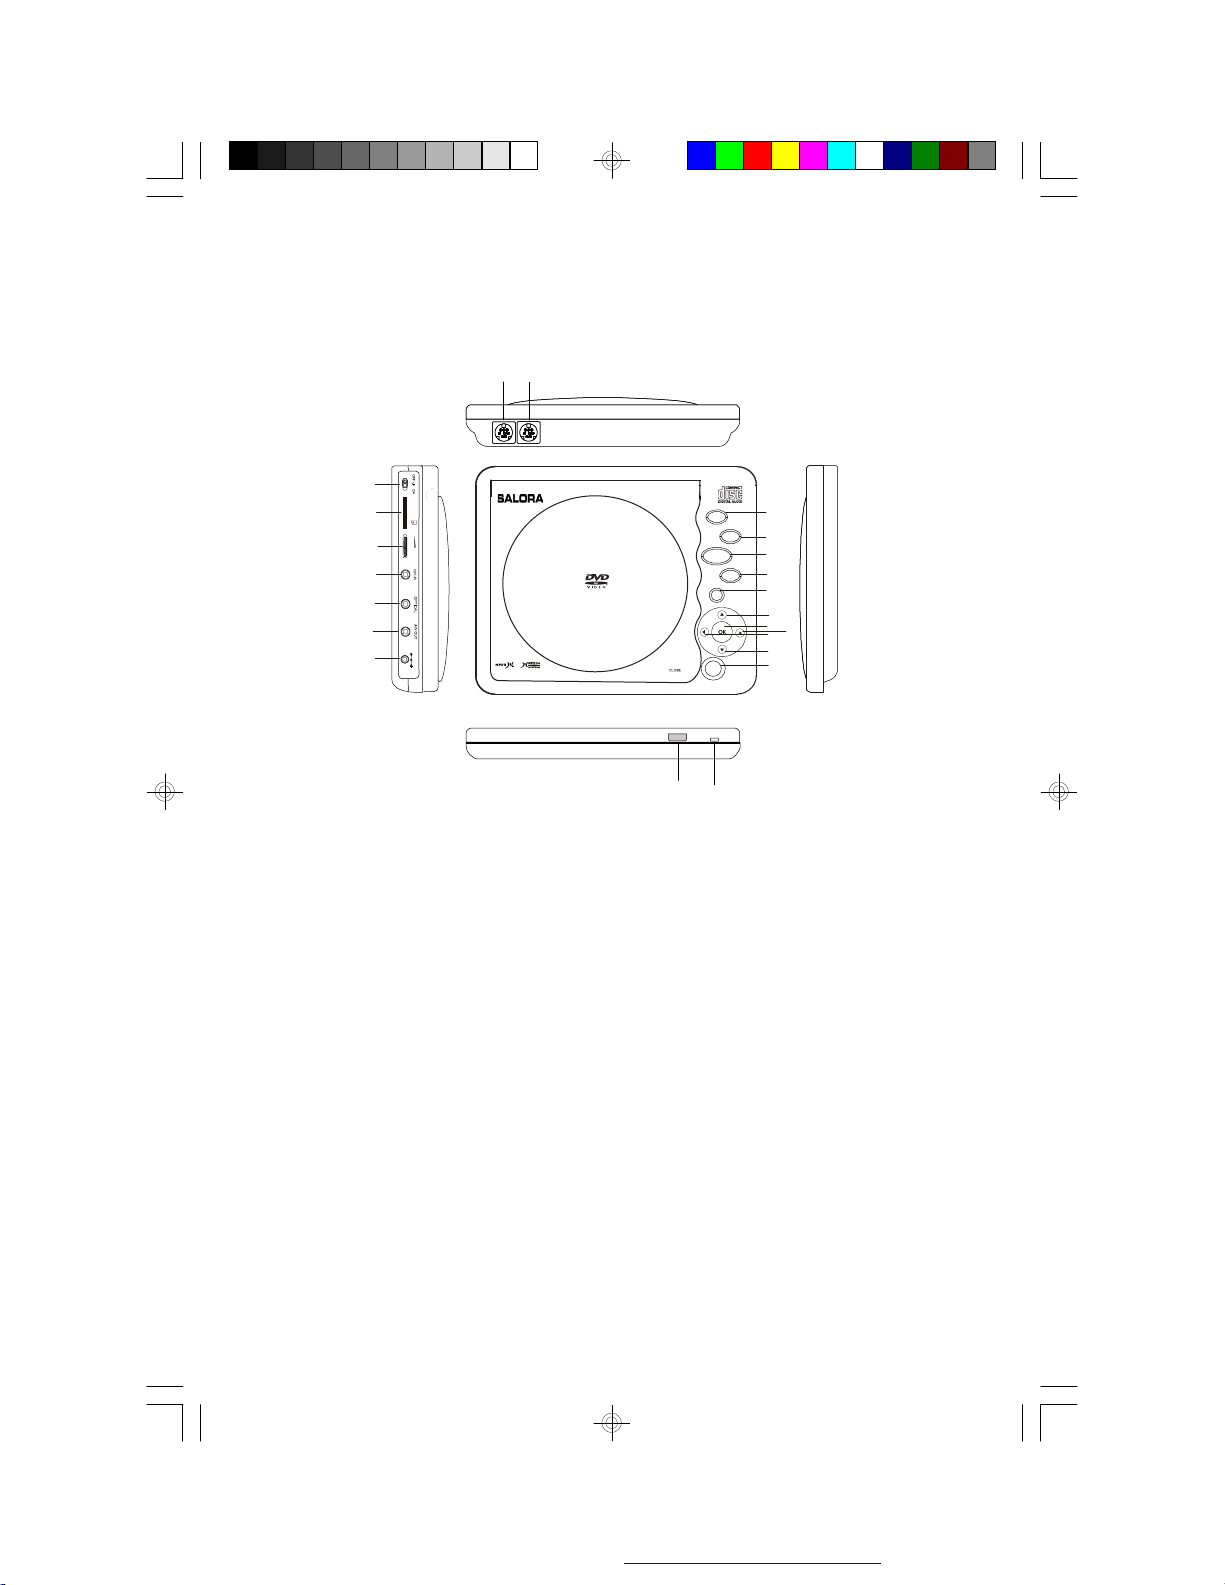
E. Controls, Indicators, and Connectors
1. Unit View (Refer to Figure 6)
22
21
MONITOR
12
SD
13
14
VOL
15
16
17
DC 9V
18
PORT 1
19
Figure 6
MONITOR
PORT 2
1
SD/DVD
PREV
NEXT
2
3
STOP
4
5
M EN U
6
7
8
9
10
11
OPEN
20
1)
SD/DVD
2) Previous Button
Stop
3)
Button
Next Button
4)
5) Menu Button
6) Up button
7) OK Button
8) Right Button
9)
Left
Button
10)
Down Button
Open Button
11)
12)
Power On/ Off Switch
13)
SD Card
14)
Volume Control
15)
HiFi Jack
Optical Jack
16)
17)
AV Out Jack
18)
DC 9V Input Jack
Remote Control Sensor
19)
20)
Power
21)
Monitor Port 1
22)
Monitor Port 2
LED
6
PDF created with FinePrint pdfFactory Pro trial version http://www.fineprint.com
Page 10

2. Single Monitor View (Refer to Figure 7)
Figure 7
1). Volume Up/Down Control
2). Power Off/On Switch
3). AV In Jack
4). DC 9V Input Jack
5). Headphone Jack
6). REVERSE Switch
7). Brightness Up/Down Control
NOTE: Press the REVISE Switch , you can reverse the screen
image.
7
PDF created with FinePrint pdfFactory Pro trial version http://www.fineprint.com
Page 11
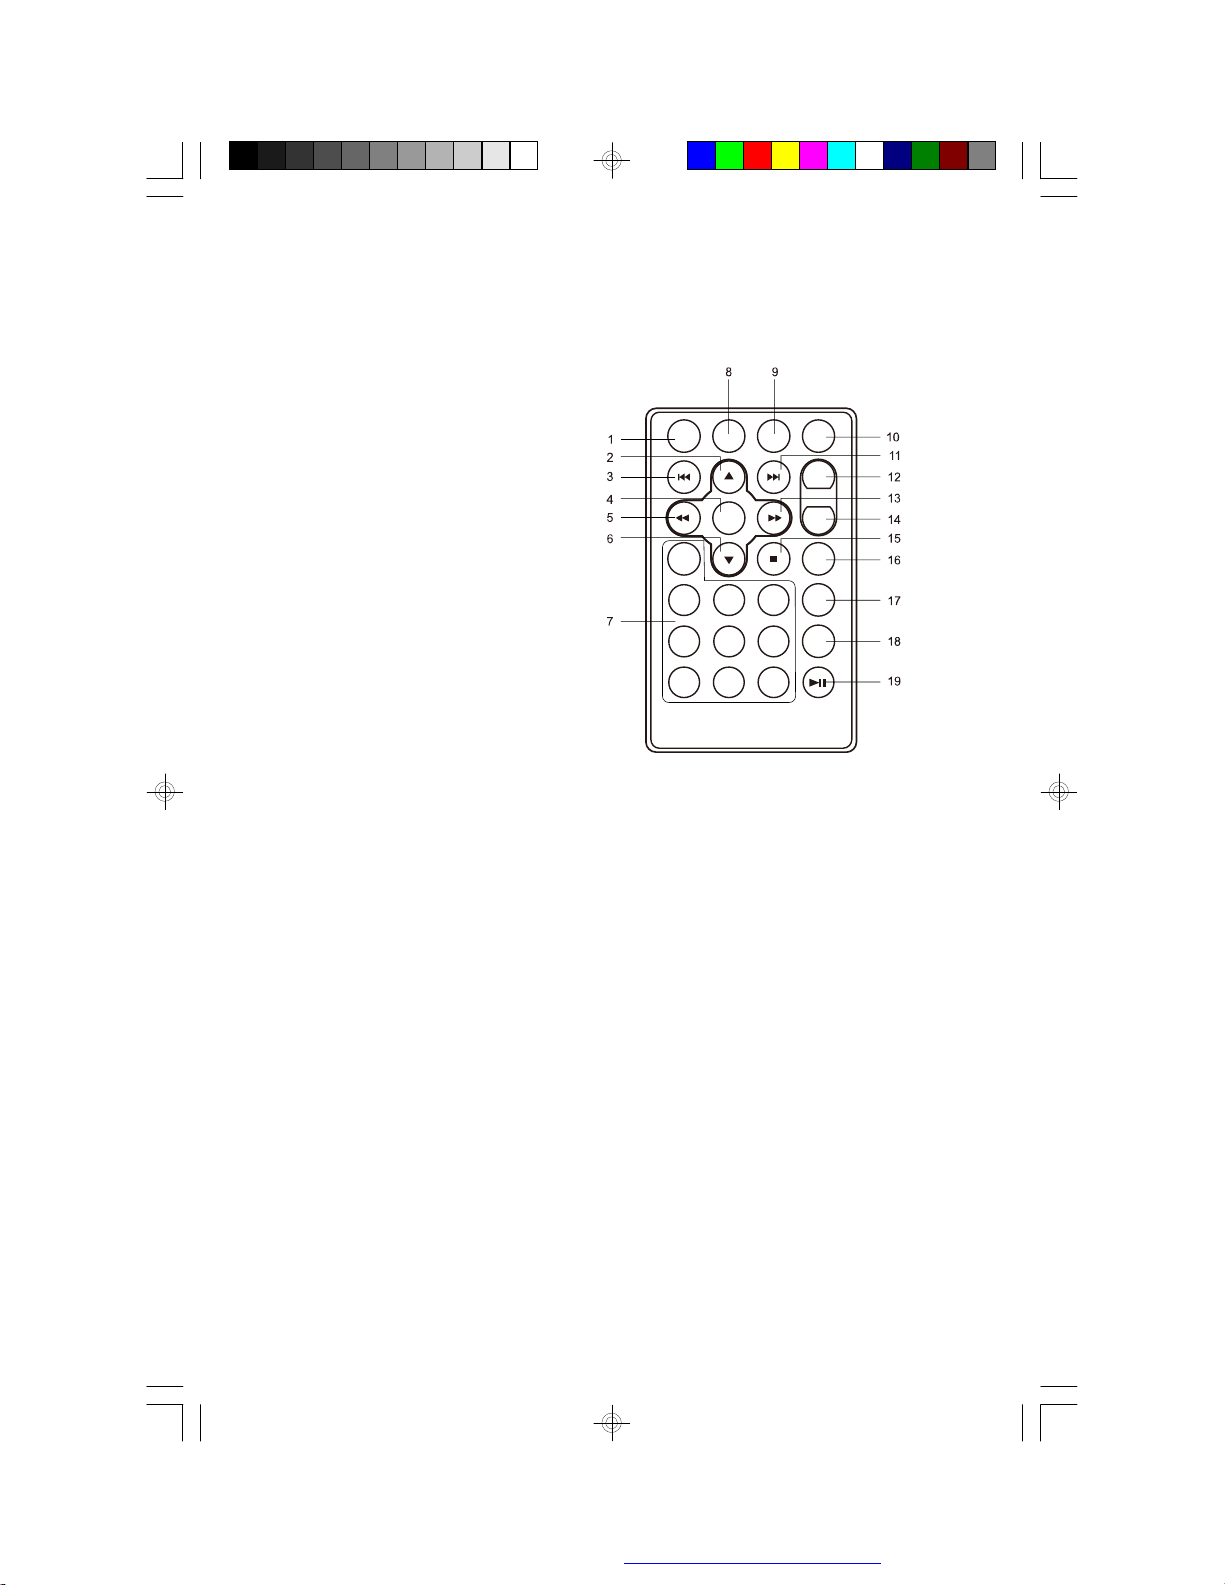
3. Remote Control View (Refer to Figure 8)
1) Setup Button
2) Up Button
3) Skip Button
4) Enter Button
5) Reverse/Left Keypad
6) DOWN Button
7) Numeric Button
8) Display Button
9) Zoom Button
10)
DVD/SD Button
11) Skip Button
12) A-B Repeat Button
13) Forward/Right Keypad
14) 1/All Repeat Button
15) Stop Button
16) Menu Button
17)
Sub
18)
Audio Button
Button
Figure 8
19) Play/Pause Button
F. Loading and Playing a Disc
a. After connecting power to the unit, power on “DVD player” with the
power switch. The power indicator will light.
b. Open the disc tray by pressing OPEN, and place a disc into the
tray with the label side facing up.
c. Close the tray by pressing the “CLOSE” button.The unit will load
the disc and start playing.
d. Rotate BRIGHTNESS and VOLUME to adjust the LCD’s bright-
ness and the DVD player’s volume.
e. To stop playing a disc, press STOP.
8
PDF created with FinePrint pdfFactory Pro trial version http://www.fineprint.com
Page 12

G. Setup
1. General Setup Page
1)With no disc inside the player, press ‘SETUP’to display the Main screen
of the Setup Menu on the screen and “General Setup Page”appears. At
the same time, “ ”is highlighted. Press ‘SETUP’again to exit the
Setup Menu and the unit will resume it’s last playback mode.
2)Press the ENTER button, “SPDIF Output”is highlighted.
3) Press the or button to select the other menus in general setup
page.
4) Press to enter the sub menu.
5) Press the or button to select the sub menu and press the
ENTER to confirm your selection.
6) Repeat steps 3-5 for other menus.
Note: Press to return the previous menu.
a) SPDIF Output
* SPDIF Off: The digital signal audio output will be off.
* SPDIF/RAW: The audio output will be not modulated.
* SPDIF/PCM: The audio output will be modulated in Pulse Code
Modulation mode.
b) TV Display
* Normal/PS: When the player outputs signal to a normal TV, a nor-
mal picture is shown on the full screen.
* Normal/LB: When the player outputs signal to a normal TV, a nor-
mal picture is shown on the screen with a black strip at both the top
and bottom of the screen.
* Wide: When the player outputs signal to a wide screen TV, a
wide picture is shown on the full screen.
9
PDF created with FinePrint pdfFactory Pro trial version http://www.fineprint.com
Page 13

c) Angle Mark
* On: The screen will show the angle mark icon. (*If an angle option is
available).
* Off: The screen will not display the Angle Mark
NOTE: Not all discs contain above features. The above features are
disc dependent.
d)Osd Language
Chosse different language as your OSD language
e). Screen Saver
*On: Enables screen saver
*NOTE: The DVD player will enter the Screen Saver mode after approximately five minutes if the same image remains on the screen.
*Off: Disables screen saver (off)
f) Last Memory
*On: The unit will return to the last position on the disc.
*Off: The unit will not return to the last position on the disc.
Note: The Last position memory function only effect for OPEN
operation.
2.Video Quality Setup
1)In Setup menu, Press the or button to select “Video Quality Setup”
and is highlighted. Press ENTER to enter the video quality setup
page.
2)Press the ENTER button, “Brightness”is highlighted.
3)Press the or button to select the other menus in video quality
setup page.
4) Press to enter the sub menu.
5) Press the or button to adjust the quantity and press the ENTER
to confirm your selection.
6) Repeat steps 3-5 for other menus.
Note: Press to return the previous menu.
a) Brightness b) Contrast
c) Hue d) Saturation
10
PDF created with FinePrint pdfFactory Pro trial version http://www.fineprint.com
Page 14

3. Password
In Setup menu, Press the or button to select “Password Setup
Page” and is highlighted. Press ENTER to enter the password page.
Press ENTER twice to enter the Password Change Page. Input the Old
Password or the Default Password, the New Password, and the Confirmed New Password. Press ENTER to confirm the change.
Note: The default password is 3308.
4. Preference Page
1) In Setup menu, Press the or button to select “Preference Page”and
is highlighted. Press ENTER to enter the preference page.
2)Press the ENTER button, “Audio”is highlighted.
3)Press the or button to select the other menus in preference
page.
4) Press to enter the sub menu.
5) Press the or button to select the sub menu and press the
ENTER to confirm your selection.
6) Repeat steps 3-5 for other menus.
Note: Press to return the previous menu.
a) Audio b) Subtitle
c) Disc Menu
Note: Language and subtitle selection is only available for discs that
are recorded in the above listed languages. If the selected language
is not available, the player will play and display on the screen the
original recorded language contained in the disc.
11
PDF created with FinePrint pdfFactory Pro trial version http://www.fineprint.com
Page 15

d) Select ‘Parental’ using the UP/DOWN button, then press RIGHT to
enter the submenu.
Select the parental level you desire using the UP/DOWN button for
discs with lock-out function or multiple rating levels. These are listed
from the lowest level (1 Kid Safe) to the highest level (8 Adult). Press
ENTER and input 4 digit password, then press ENTER again to confirm the parental level setting.
NOTE: The level of 8 Adult is the factory default.
e) Select ‘Default’ using the UP/DOWN button, then press RIGHT to en-
ter the submenu. Press ENTER to make the setting return to the factory-set mode.
NOTE: The parental setting is not affected by the default reset
function.
NOTE: The Default Password is 3308. This password is always
effective even after you have selected your own password and
changed it. To avoid the possibility of others using the default
password to set the parental level and change the password,
you can record this default password in another area and
delete it from this manual. Some discs can be limited depending on the age of users while some discs cannot.
12
PDF created with FinePrint pdfFactory Pro trial version http://www.fineprint.com
Page 16

H. Basic Operation
POWER
OPEN
PLAY
PAUSE
STOP
NEXT
PREVIOUS
FORWARD
REVERSE
LEFT/RIGHT/UP/DOWN
ENTER
NUMBERS
Turn the unit on/off
Remove/load the disc
Start Play/Execute item or setting
Still Picture
(1 time) Stop at the present playing point /
(2 times) Stop playing
Go to the next chapter, track or scene during play back
Go back to the previous chapter, track or
scene during play back
Scan forward at 2, 4, 8,16 or 32 times speed
Scan backward at 2, 4, 8, 16 or 32 times
speed
Used for Menu Navigation
Execute item or confirm setting
Select item or setting
MENU
REPEAT
A-B
DISPLAY
ANGLE
SUBTITLE
AUDIO
ZOOM
SETUP
Display the main menu of the disc
Repeat playing title, chapter, or track
Repeat a specific portion from point A to point
B of the disc
Display information (title, chapter, track,
time, etc.).
Change the viewing angles on the scene
Select the subtitle language and turn it on/
off
Select the audio language
Enlarge an image to 2, 3, or 4 times the
original size.
Display the setup menu to select and set
items, and exit the setup menu.
13
PDF created with FinePrint pdfFactory Pro trial version http://www.fineprint.com
Page 17
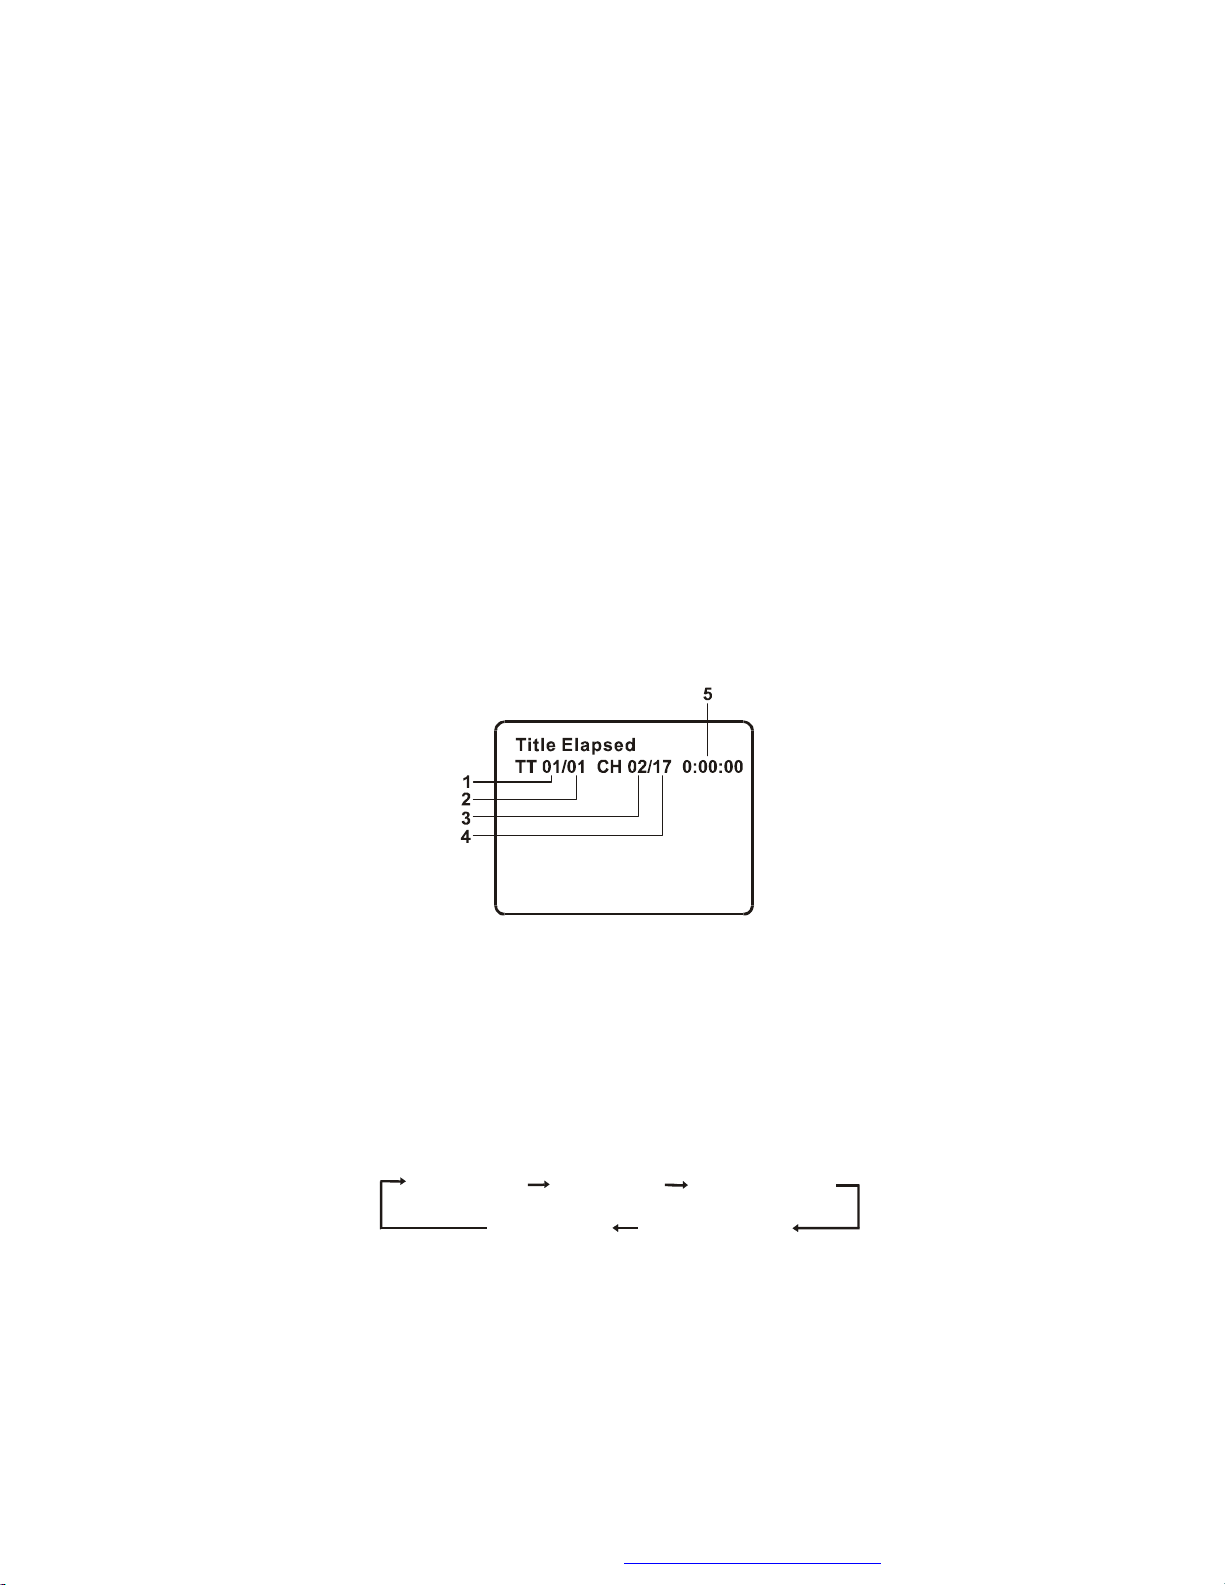
I. Menu
Title Elapsed
Title Remain
Chapter Elapsed
A DVD is divided into sections called titles and chapters. When you
play a DVD, a root menu of the disc will appear on the screen of your
TV or Monitor. The contents of the menu vary from disc to disc. Press
MENU during playback to display the menu. Some DVDs only allow
you to select disc playback options using the DVD root menu.
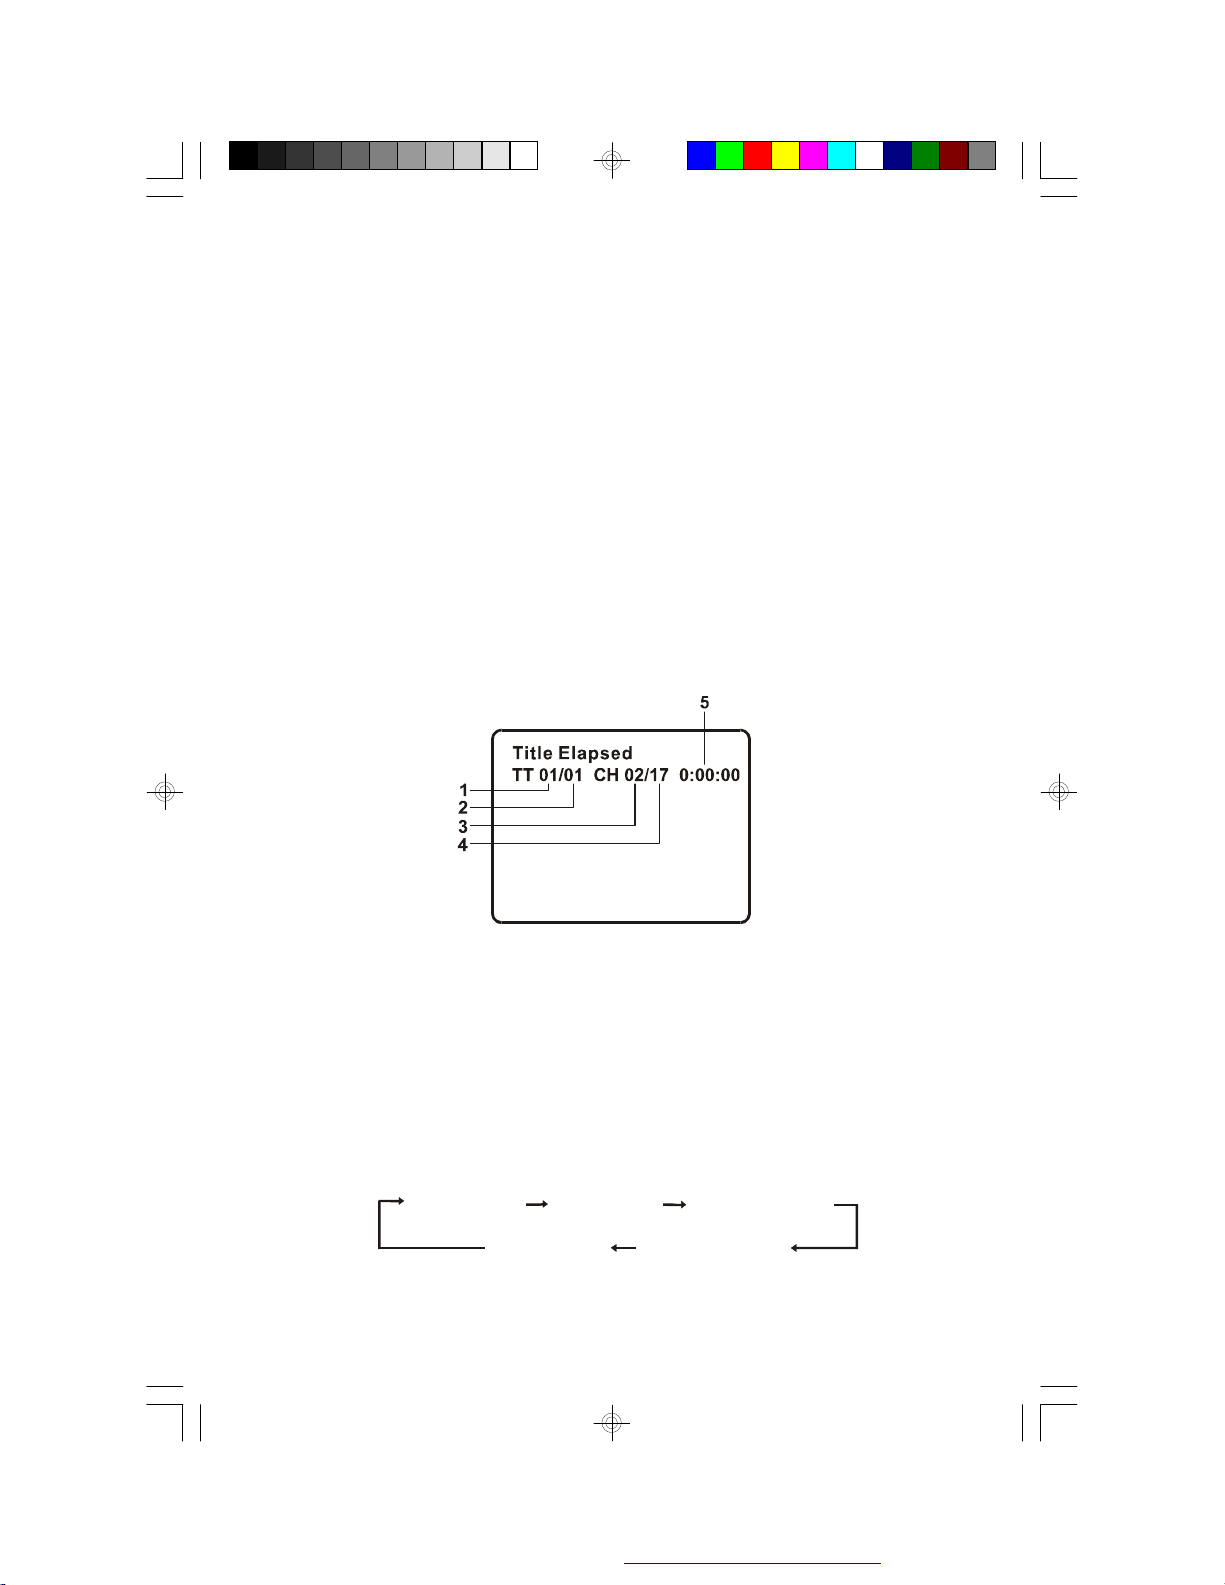
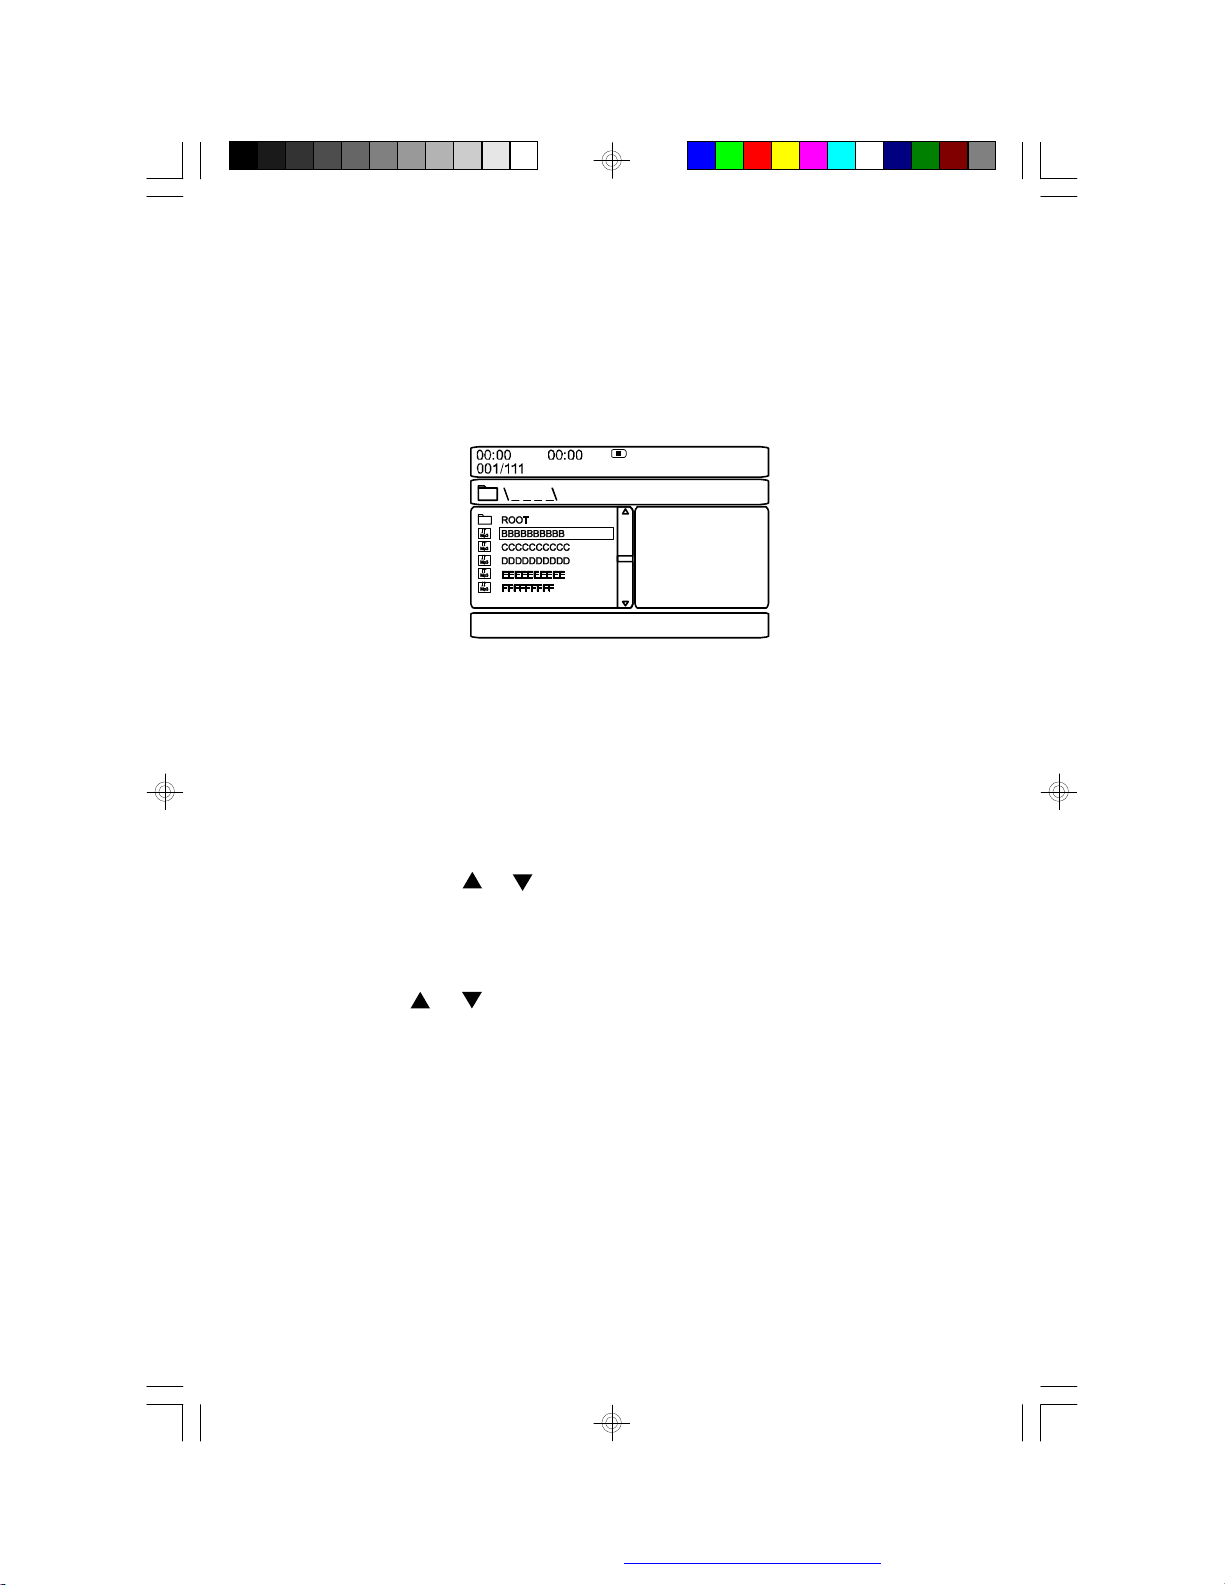
J. Display
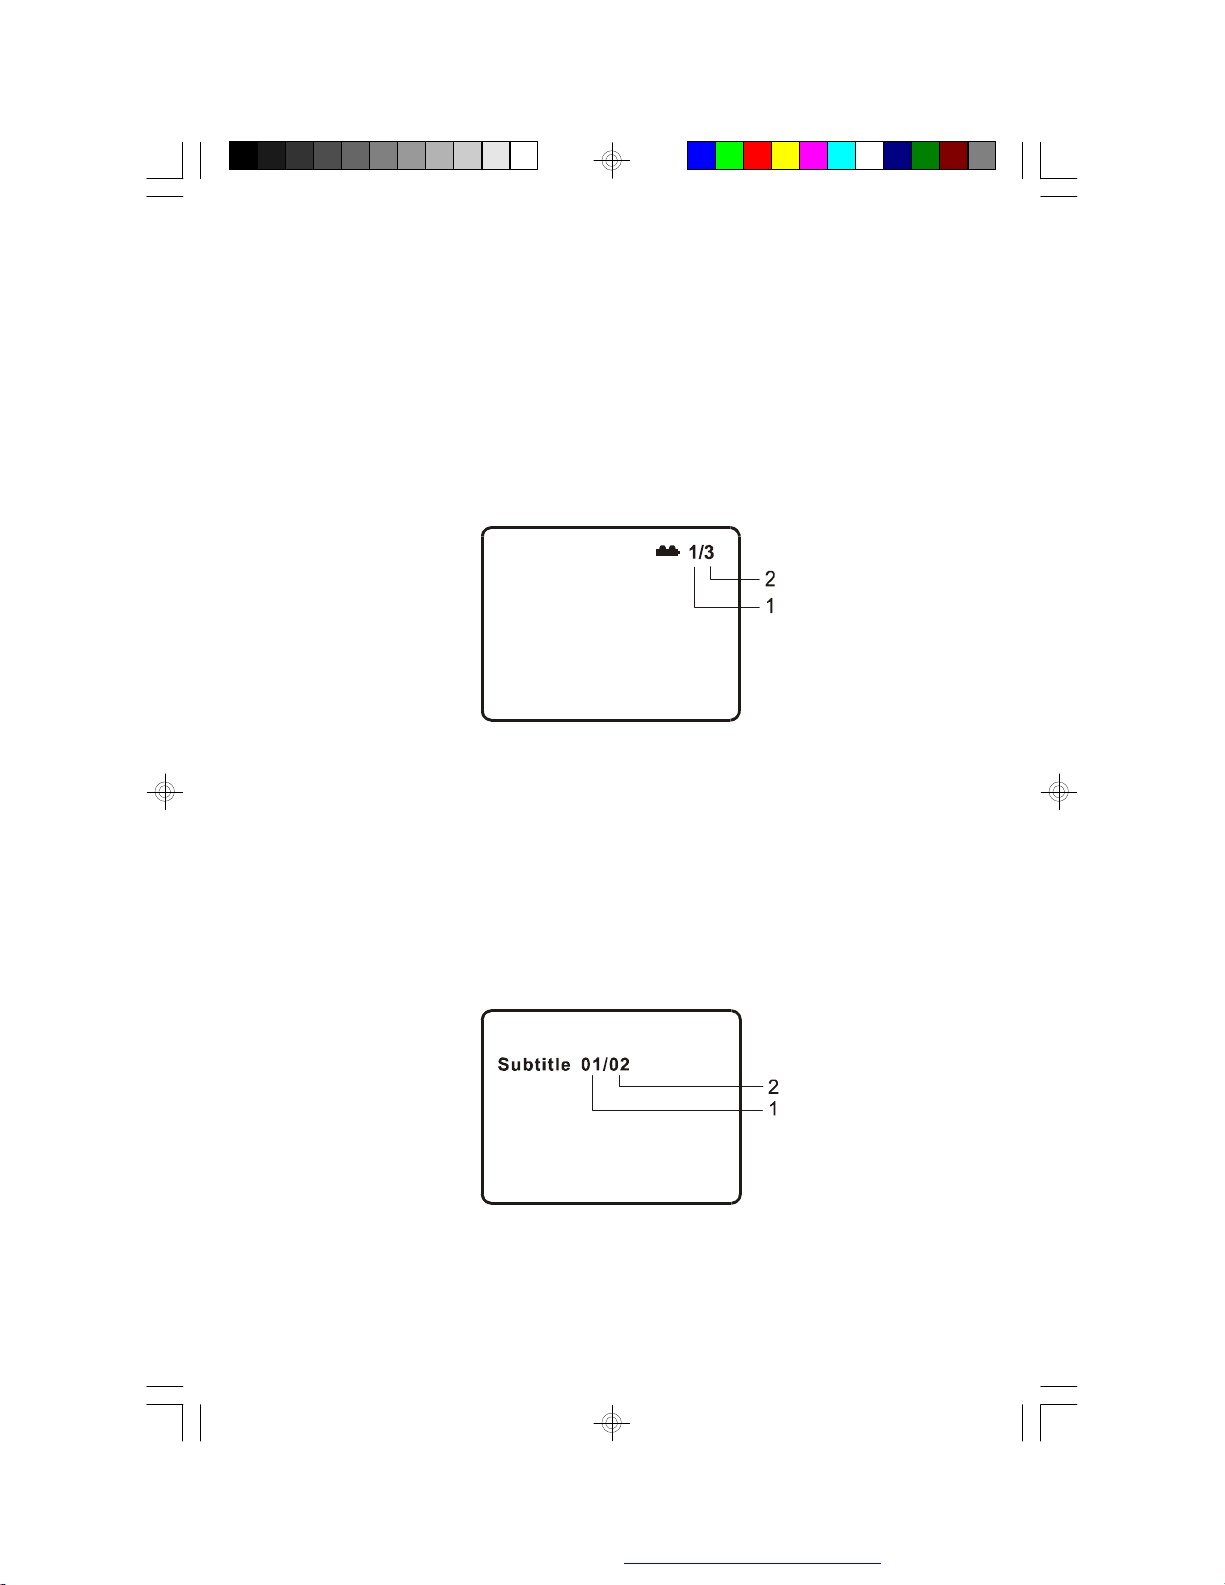
1. PLAYING TIME AND REMAINING TIME
a. During playback press the ‘DISPLAY’ button to display the cur-
rent Title Number (1), the total Number of Titles (2), the current
Chapter Number (3), the total Number of Chapters (4), and the
Playing elapsed Time for the title (5). The heading will disappear
automatically after 3 seconds if DISPLAY button is not pressed.
Title, Chapter Number, and Time Screen Display
b. Press ‘DISPLAY’constantly to choose the options below circularly.
Title Elapsed: The elapsed time of the title
Title Remain: The remaining time of the title
Chapter Elapsed: The elapsed time of the chapter
Chapter Remain: The remaining time of the chapter
Display Off: The DVD’s time Information will not be displayed.
Display Off
Chapter Remain
14
PDF created with FinePrint pdfFactory Pro trial version http://www.fineprint.com
Page 18
2. ANGLE
During playback of a disc, press‘ANGLE’to display the available angles
for discs containing multi-angles*, with the current angle number (1)
and the total number of angles (2) displaying. Press‘ANGLE’to select
another angle, then press again to exit and return to the normal viewing angle. The angle display will disappear automatically if the ‘ANGLE’
button is not pressed again within 3 seconds.
*NOTE: Not all discs contain this feature.
Angle Screen Display
3. SUBTITLE
During disc playback press ‘SUBTITLE’to select the subtitle language
you desire*, with the current Subtitle Language Number (1) and the
total Number of Subtitle Languages (2) displayed. If there are multiple languages press ‘SUBTITLE’again to select another subtitle lan-
guage. To turn subtitles OFF, press the ‘SUBTITLE’button until ‘Sub-
title Off’is displayed. The Subtitle display will disappear automatically
if the ‘SUBTITLE’ button is not pressed again within 3 seconds.
Subtitle Screen Display
* Some DVDs only allow access to this function through the DVD menu
15
PDF created with FinePrint pdfFactory Pro trial version http://www.fineprint.com
Page 19
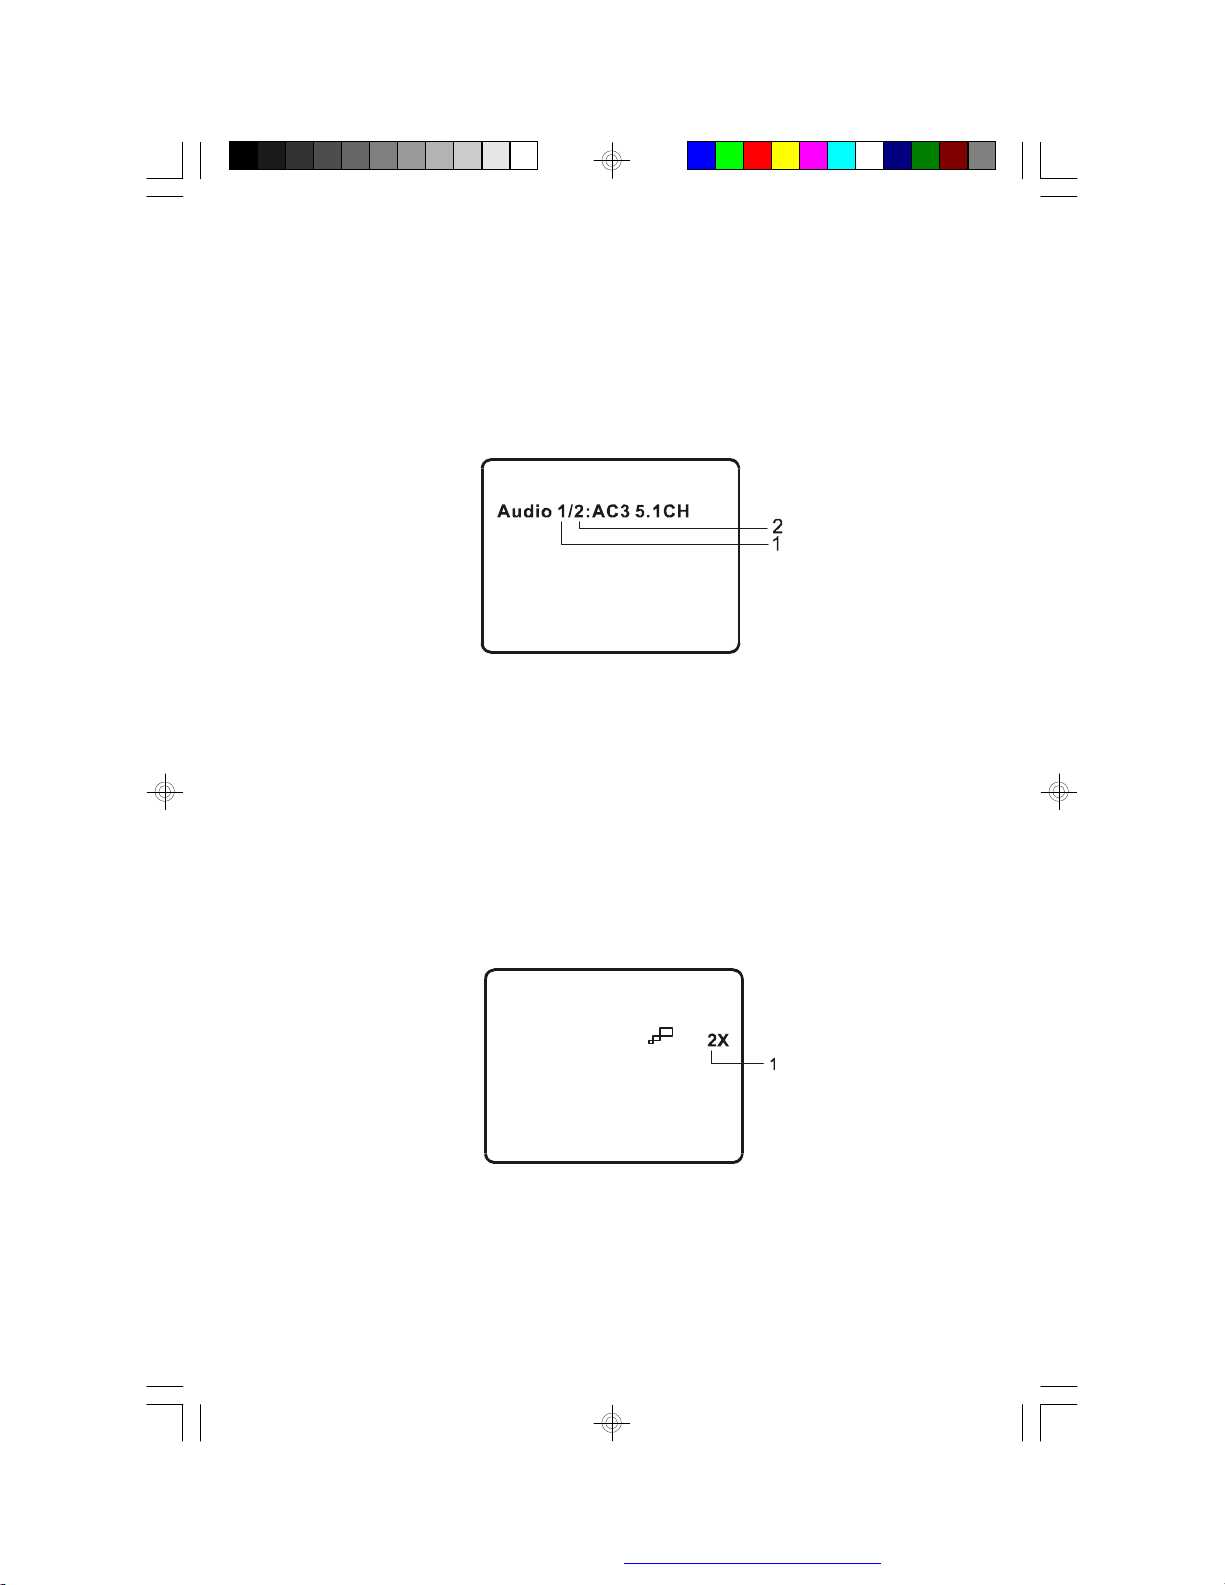
4. AUDIO
During playback press ‘AUDIO’to select the audio language you
desire*, with the current Audio Channel Number (1) and the total number of Audio Channels (2) displayed. Press AUDIO again to select
another audio language. The audio display will disappear automati-
cally if the ‘AUDIO’ button is not pressed within for 3 seconds.
Audio Language Screen Display
* Some DVDs only allow access to this function through the DVD
menu.
5. ZOOM
During playback press ‘ZOOM’ to enlarge the picture by 2x, 3x or 4X
with the current zoom multiple.(1)Press “zoom”one time ,the picture
will be enlarged 2X.(2)Press “zoom”a second time ,the picture will be
enlarged 3X.(3)Press “zoom” a 3rd time ,the picture will be enlarged
4X.(4)Press “zoom” a 4th time ,the picture will return to normal size.
Zoom Screen Display
16
PDF created with FinePrint pdfFactory Pro trial version http://www.fineprint.com
Page 20
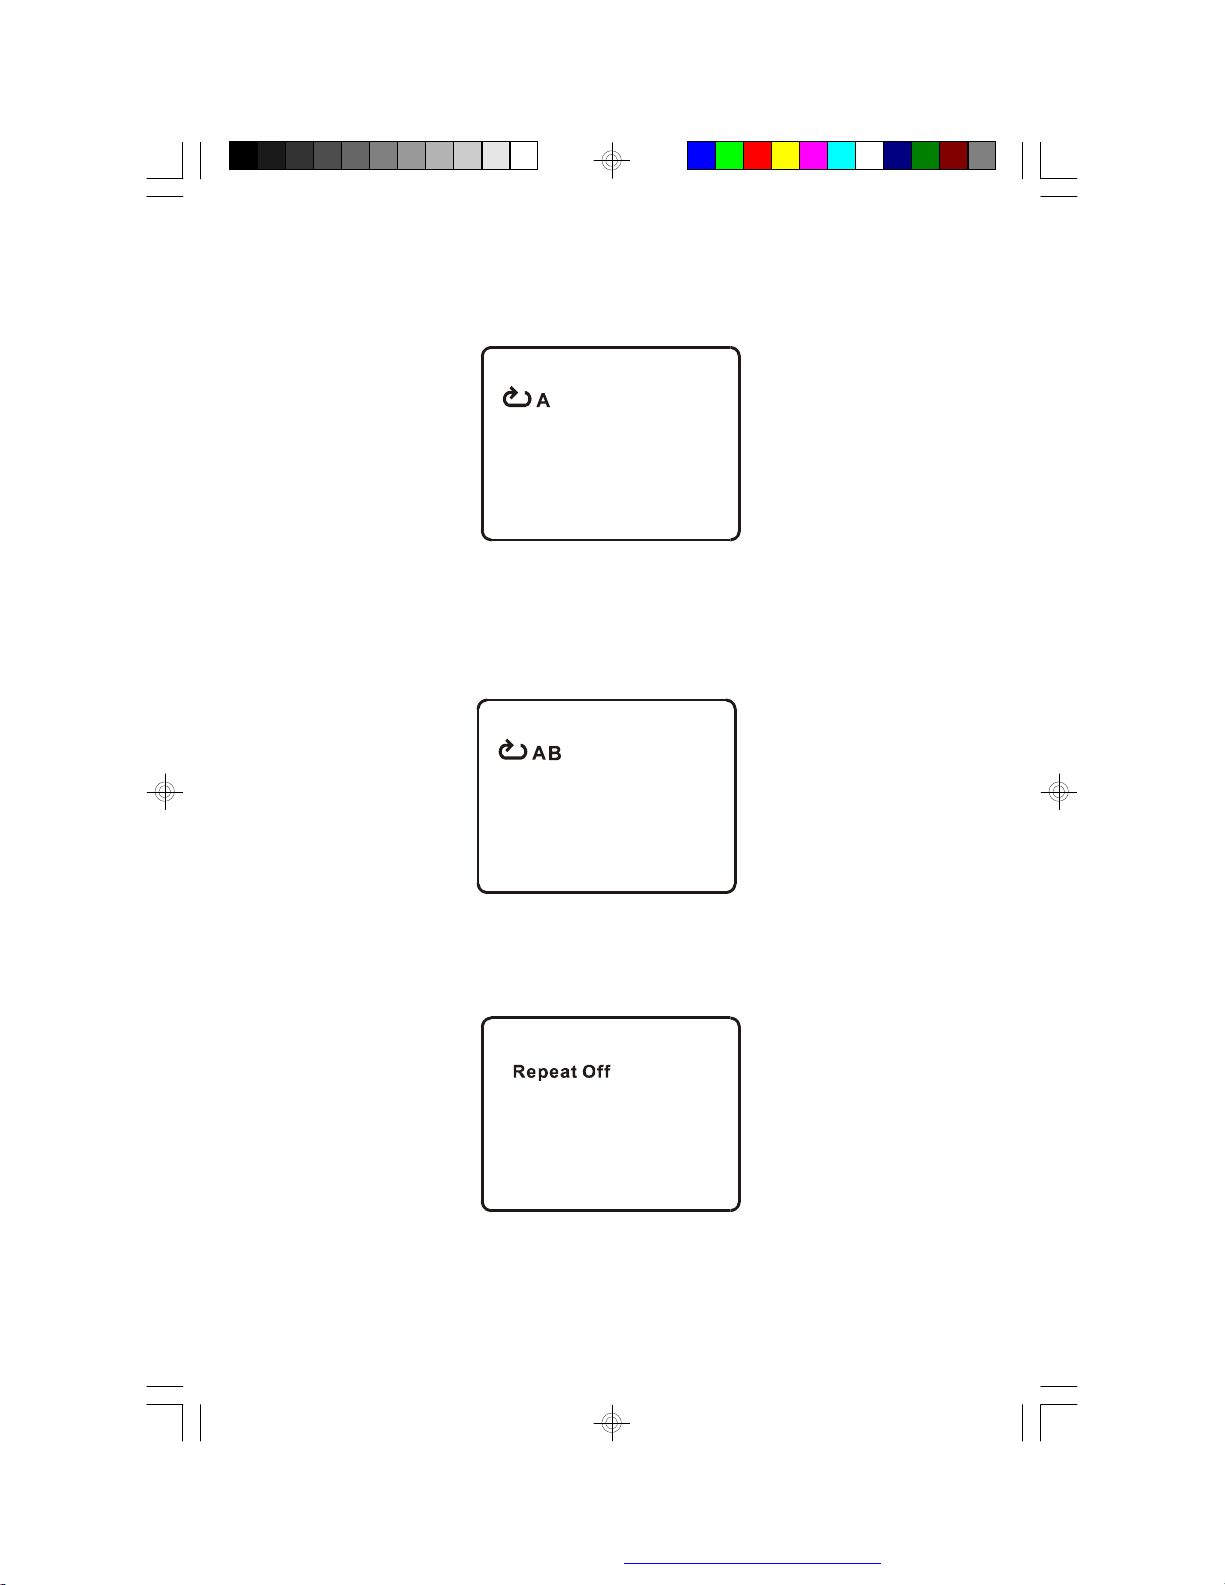
6. A-B REPEAT
a. During playback press a first time ‘A-B’ to set the Starting Point A.
A-B Repeat Starting Point Screen Display
b. Press ‘A-B’ a second time to set the Ending Point B and the player
will repeatedly play the part between Point Aand Point B.
A-B Repeat Ending Point Screen Display
c. Press A-B a third time to cancel A-B repeat and resume normal
playback.
A-B Repeat Cancelled Screen Display
17
PDF created with FinePrint pdfFactory Pro trial version http://www.fineprint.com
Page 21
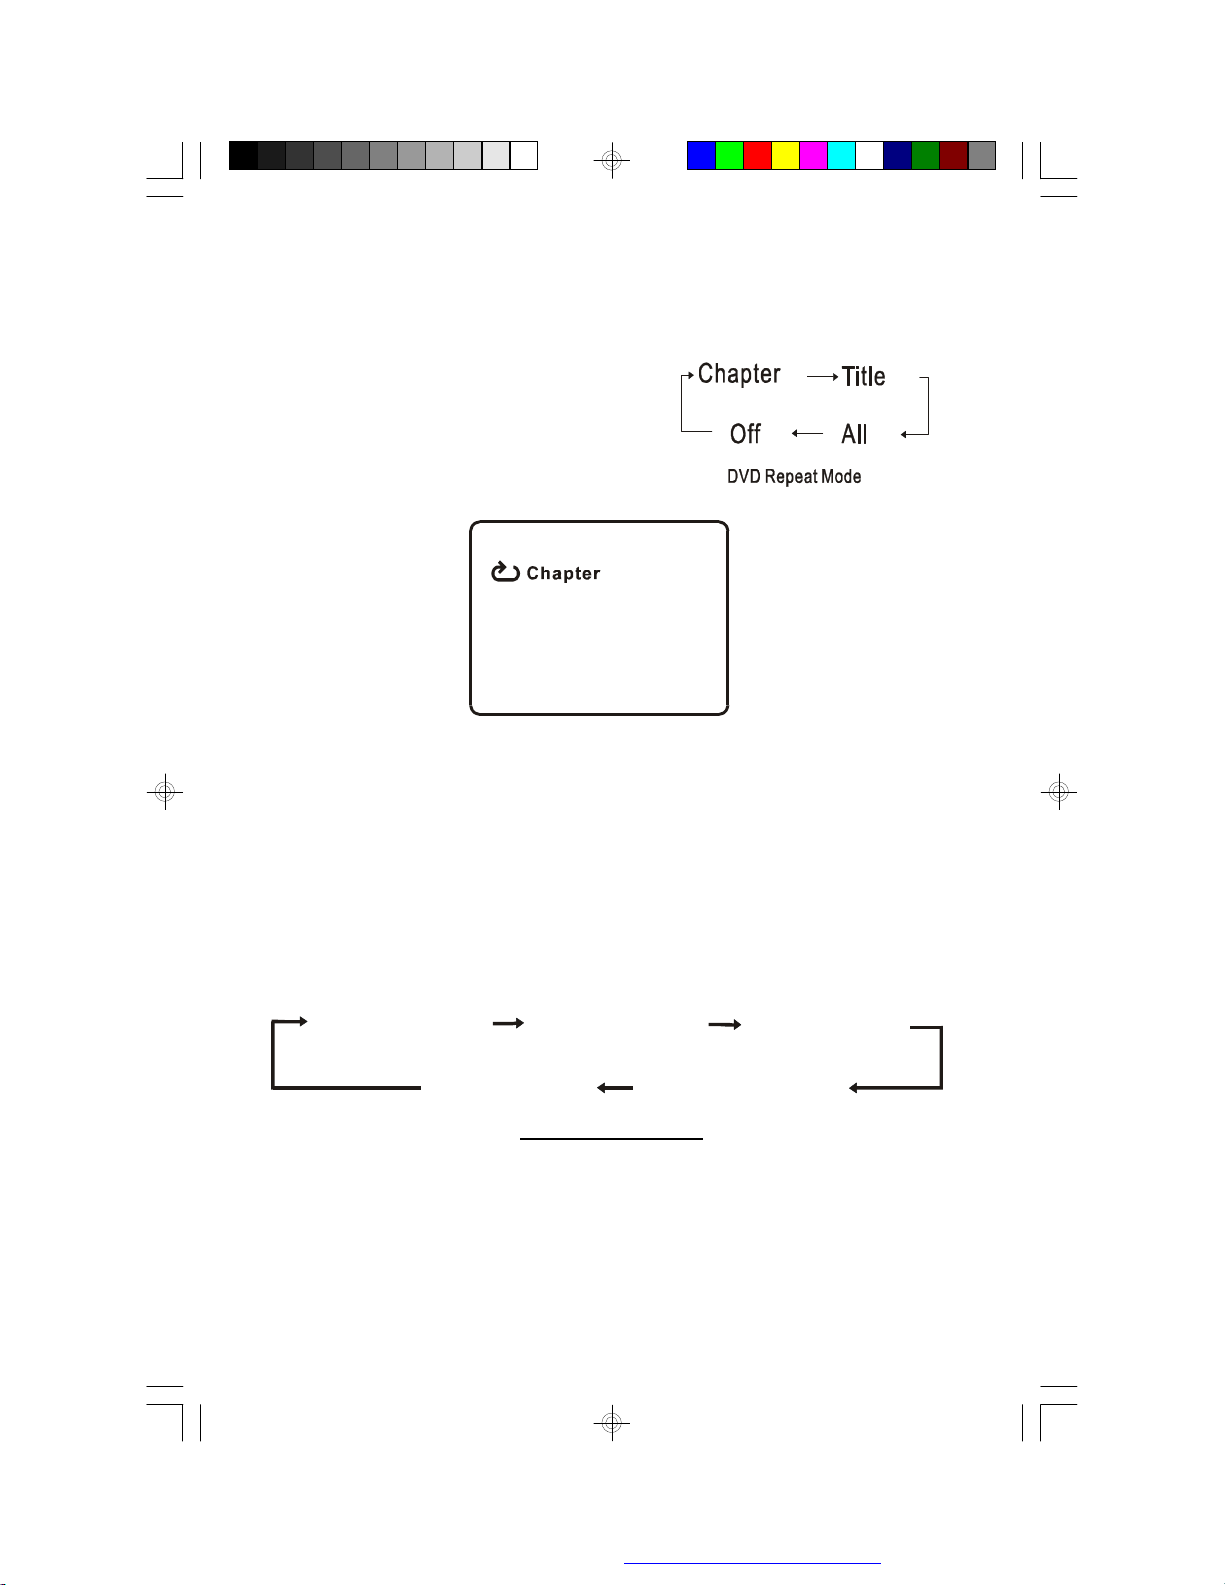
7. REPEAT
Single Elapsed
Single Remain
Total Elapsed
a. During playback press ‘REPEAT’constantly to see the repeat mode.
Chapter: Repeat the current chapter
Title: Repeat the current title
All: Repeat all chapters and titles
Off: Resume normal playback
The ‘Chapter’ repeat display shows below for example:
Chapter Repeat Screen Display
K. Variable Playing Mode
1. Playing Audio CDS
When playing an audio CD press the DISPLAY button constantly on
the remote to view time information. The options below appear on
screen display circularly to show you what information is available
using this function.
Display Off
CD Display Mode
Single Elapsed: The current track playing and playing time of that
track will display on the screen.
Single Remain: The current track playing and the amount of time
left.
Total Remain
18
PDF created with FinePrint pdfFactory Pro trial version http://www.fineprint.com
Page 22

Total Elapsed: The current track playing and the total time that the
CD has been playing.
Total Remain: The current track playing and the amount of time
remaining on the CD.
Display Off: The CD time Information will not be displayed.
Take ‘Single Elapsed’ display as a example:
Single Elapsed Screen Display
USING THE REPEAT FEATURE
The default mode for the Repeat feature is OFF. Pressing REPEAT
consecutively changes the repeat options:
• Track- repeats the track that is playing.
• All- repeats the disc that is playing.
• Off
As you toggle through the options, the repeat option changes. The
selected repeat option loops repeatedly until you turn it off.
19
PDF created with FinePrint pdfFactory Pro trial version http://www.fineprint.com
Page 23
2. Playing MP3 Discs
MP3 is a format for storing digital audio. An audio CD-quality song is
compressed into the MP3 format with very little loss of audio quality
while taking up much less disc space. CD-R /RW discs that have
been encoded in MP3 format are compatible with this system.
MP3 MENU Screen Displa y
When a MP3 disc is inserted into the unit, the menu screen appears
automatically. You can use the menu screen to select your desired
folders and songs or the system plays the songs in the order they
were burned onto the disc.
1. Press the or button to choose a folder from the folder list
on the left side of the screen.
2. Press ENTER to select the highlighted folder. The songs available under the folder will be listed.
3. Use or button to choose a song from the list. Press ENTER to select and begin playback of the highlighted song.
20
PDF created with FinePrint pdfFactory Pro trial version http://www.fineprint.com
Page 24

4. Use the ( NEXT ) button to move to the next song. Press the
(PREVIOUS) button to move to the beginning of the previous
song.
USING THE REPEAT FEATURE
The default mode for the Repeat feature is OFF(Folder). Pressing
REPEAT consecutively changes the repeat options:
• Single
• Repeat One (repeat playback of a song)
• Repeat Folder (repeat playback of a specific folder)
• Folder (normal playback)
As you toggle through the options, the repeat mode changes. The
selected repeat mode loops repeatedly until you turn it off.
NOTICE
“ ” icon in front of a file name indicates that this is a folder, not an
MP3 file.
“MP3” icon in front of a file name indicates that this is a MP3 file.
Note:
Due to the company’s policy of constant improvement and technical
refinement, the company reserves the right to change or alter software.
21
PDF created with FinePrint pdfFactory Pro trial version http://www.fineprint.com
Page 25

3. Playing JPG File
1) Load the JPG Disc into tray.
2) Select JPG file by pressing “UP/DOWN” or ENTER button through
menus or submenus. To go back previous menu page, use LEFT
button.
3) You can preview the JPG file which you selected by pressing “PLAY”
or “ENTER”.
4) Pressing the “LEFT” Key will rotate the picture 90 degrees
counterclockwise. Pressing the “RIGHT“ Key will rotate the
picture clockwise.
5) When browsing the photos, you can reverse the photo vertically by
pressing “UP” key,or you can reverse the photos horizontally by
pressing “DOWN” key.
6) When you browse the JPG file, press “DISPLAY”, there will be
different refresh mode below:
WIPE TOP, WIPE BOTTOM, WIPE LEFT, WIPE RIGHT, DIAGONAL
WIPE LEFT TOP, DIAGONAL WIPE RIGHT TOP, DIAGONAL WIPE
LEFT BOTTOM,DIAGONAL WIPE RIGHT BOTTOM,EXTEND FROM
CENTER H, EXTEND FROM CENTER V, COMPRESS TO CENTER
H, COMPRESS TO CENTER V, WINDOW H, WINDOW V, WIPE
FROM EDGE TO CENTER
7) When previewing the file, pressing “ANGLE”, “SUBTITLE”, “AUDIO”,
“NUMBER”, “AB”, a hand icon will appear on the display meaning
that these options are not available.
8) Press “STOP” to browse the JPG file, “SLIDE SHOW” “MENU” will
display on the screen.
9) When browsing the picture, press “STOP” and thumbnail size
picture will be displayed. You can select the picture you desire by
using the UP/DOWN/LEFT/RIGHT/ENTER key.
22
PDF created with FinePrint pdfFactory Pro trial version http://www.fineprint.com
Page 26

L.Playing MPEG4 Discs
MPEG4 is the brand name of the world's most popular video compression technology. It’s a piece of software that compresses video
from virtually any source down to a size that is transportable over
the Internet without reducing the original video's visual quality.
DVD, CD-R /RW discs that have been encoded in MPEG4 format
are compatible with this system.
Note: Only the files whose suffix is ‘avi’can be displayed.
The operation of a MPEG4 Disc is the same as the MP3 discs. Using UP, DOWN, LEFT, RIGHT to move the cursor and press ENTER to confirm.
* Press MENU to return to the available menu.
23
PDF created with FinePrint pdfFactory Pro trial version http://www.fineprint.com
Page 27
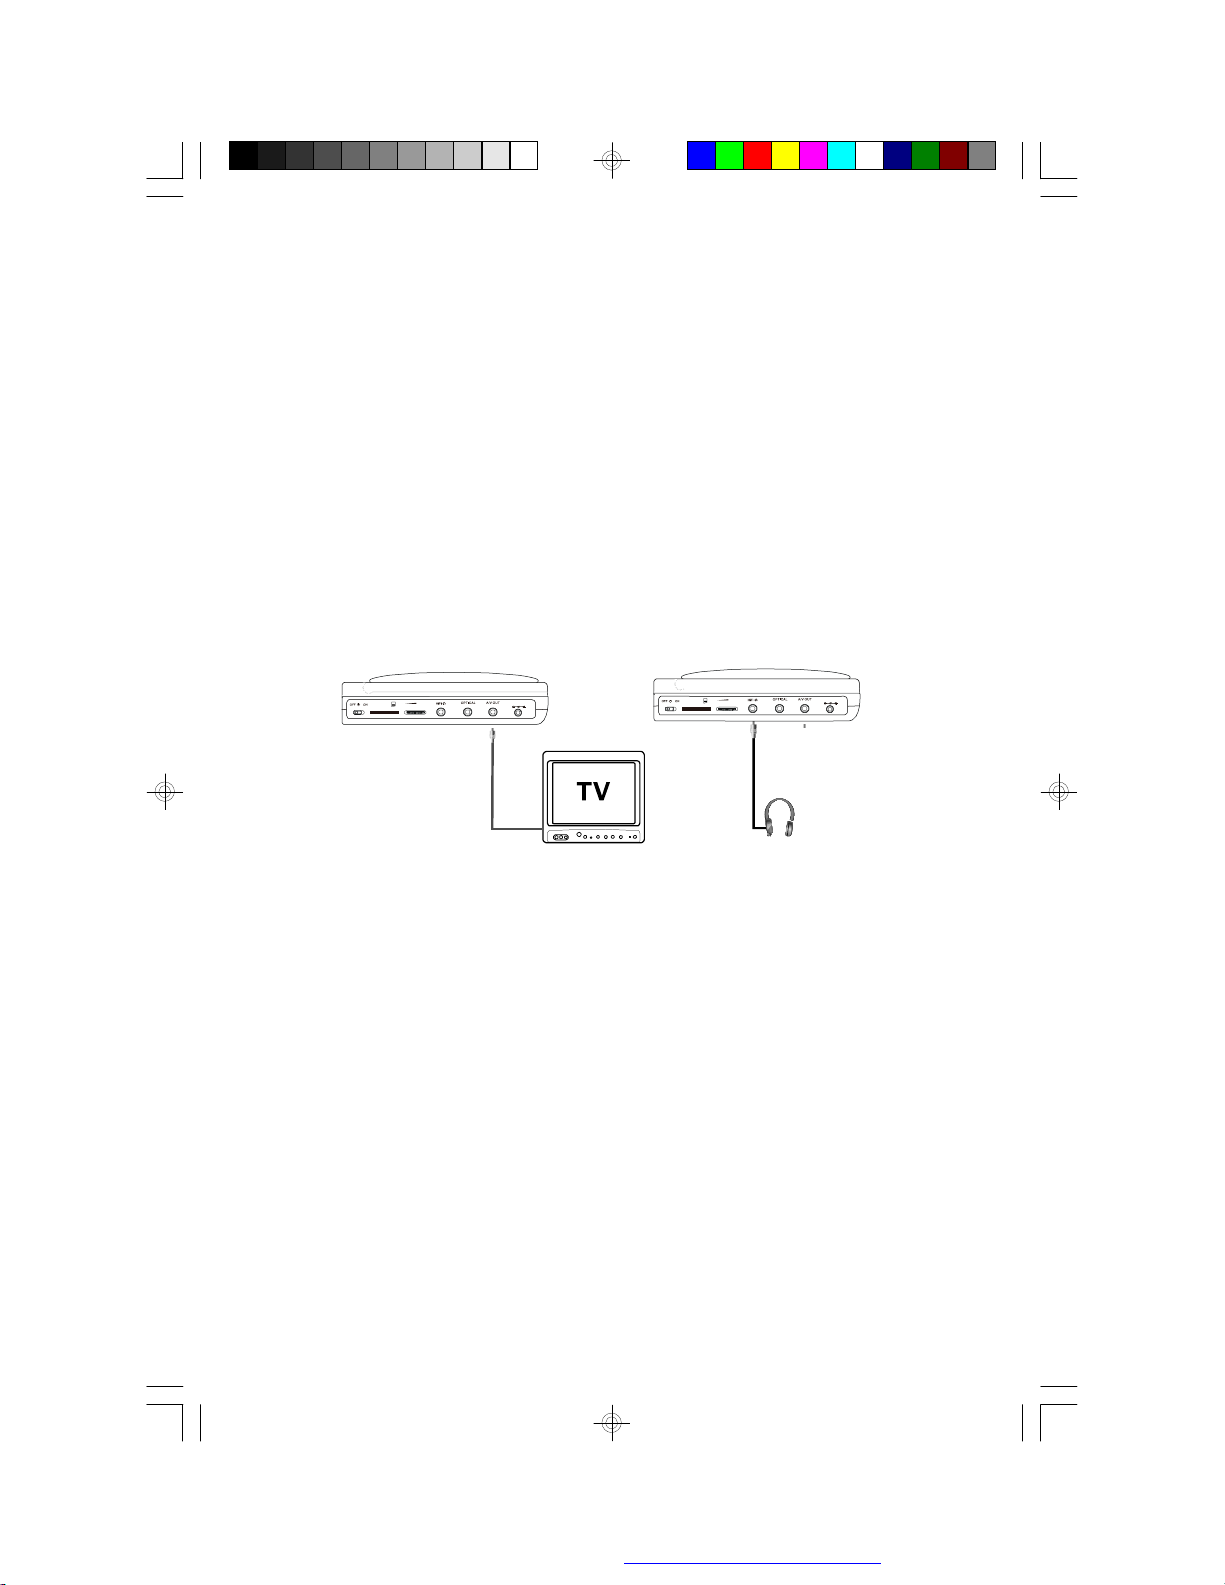
M. Connecting to other Electronic Equipment
1. Connecting to a TV or another monitor
( Refer to Figure 9)
You can also connect the DVD player to a TV to enjoy high quality
stereo sound and picture on another monitor.
1). Connect one end of the audio/video cable’s black plug (optional,
1/8”stereo plug) into the unit’s DVD AUDIO OUT jack, and connect
the other end to the AUDIO INPUT jacks on your TV or Monitor
(white = left channel, red = right channel).
2). Connect the audio/video cable’s yellow plug (optional) into the DVD
VIDEO OUT jack on the right of the unit, and the other yellow plug to
the VIDEO INPUT jack on your TV or Monitor.
VOL
VOL
SD
DC 9V
SD
DC 9V
Figure 9
* Optional wired headphones may be used with the unit. Simply plug in
the headset to headphone jack.
2. SD Card
With no disc in the unit, insert a SD card with JPEG or MP3 files into
the appropriate input. Press the DVD/SD button to switch between
DVD and SD modes.
24
PDF created with FinePrint pdfFactory Pro trial version http://www.fineprint.com
Page 28

N. Specifications
Compatible DISC: DVD/CD/MP3/MPEG4
Signal system: PAL
Panel size: 9 inch
Frequency response: 20 Hz to 20 kHz
Video output: 1 Vp-p/75 Ohm, unbalanced
Audio output: 1.4Vrms/10kOhm
Audio S/N: Better than 60 dB
Dynamic range : Better than 85 dB
Laser: Semiconductor Laser, Wave Length: 650 nm/795 nm
Power source: DC 9V
Power consumption: 6 W
Operating temperature: 5~35°C
Weight : 0.37 kg
Dimensions (W x D x H): 7.24 X 6.14 X1.14inches
184x 156 x 29mm
Single Monitor
Colour System:
Screen Size:
Power Supply:
Power Consumption:
Operating Temperature:
Operating Humidity:
Storage Temperature:
Dimensions (W x D x H):
Weight:
PAL
9 Inches
DC 9-12V
7W
41~104º F (5~40ºC)
10-75%
4~140º F (-20~60ºC)
238 x 158 x 12 mm
0.503kg
25
PDF created with FinePrint pdfFactory Pro trial version http://www.fineprint.com
Page 29

O. Troubleshooting
PROBLEM
No sound or
distorted sound
Can’t advance
through a movie
The icon ( )
appears on
screen
Picture is
distorted
SOLUTION
•Make sure your DVD is connected properly.
Make sure all cables are securely inserted
into the appropriate jacks.
•You can’t advance through the opening
credits and warning information that appears
at the beginning of movies because the disc
is programmed to prohibit that action.
The feature or action cannot be
completed at this time because:
1. The disc’s software restricts it.
2. The disc’s software doesn’t support the
feature (e.g., angles)
3. The feature is not available at the
moment.
4. You’ve requested a title or chapter
number that is out of range.
• The disc might be damaged. Try another
disc.
•It is normal for some distortion to appear
during forward or reverse scan.
No forward or
reverse scan
• Some discs have sections that prohibit rapid
scanning or title and chapter skip.
• If you try to skip through the warning information and credits at the beginning of a
movie, you won’t be able to. This part of the
movie is often programmed to prohibit
skipping through it.
26
PDF created with FinePrint pdfFactory Pro trial version http://www.fineprint.com
Page 30

Troubleshooting (Cont)
PROBLEM
IR sensor
inoperative
Disc won’t play
Play starts, but
then stops
immediately
SOLUTION
• Verify that the batteries in the remote are
fresh.
• Verify that the remote sensor eye is not
obstructed.
• Verify that the infrared transmitter is
affixed over the sensor eye of the component to be controlled.
• Insert a disc with the label side facing
up.
• Check the type of disc you put into disc
tray. This DVD only plays digital video
discs, audio CDs and MP3s.
• Both the unit and the disc are coded by
region. If the regional codes don’t
match, the disc can’t be played. This
DVD is Region Number 2.
• The disc is dirty. Clean it.
• Condensation has formed. Allow
player to dry out.
This symbol on the product or in the instructions means that your electrical and
electronic equipment should be disposed at the end of its life separately from
your household waste.There are separate collection systems for recycling in the
EU.
For more information, please contact the local authority or your retailer where you
purchased the product.
27
PDF created with FinePrint pdfFactory Pro trial version http://www.fineprint.com
Page 31

DVP-9021TWIN
Lecteur DVD portable avec 2 écrans de 9”
MONITOR
MONITOR
PORT 1
PORT 2
SD/DVD
PREV
STOP
NEXT
ME NU
OPEN
Mode d’emploi
PDF created with FinePrint pdfFactory Pro trial version http://www.fineprint.com
Page 32

Remarque
Ce produit inclut une technologie de protection des droits d’auteur
protégée par des revendications de
méthode de certains brevets des E.-U. et d’autres droits de propriété
intellectuelle détenus par Macrovision
Corporation et d’autres détenteurs de droits. L’utilisation de cette
technologie de protection des droits d’auteur
doit faire l’objet d’une autorisation explicite de Macrovision Corporation
et est destinée exclusivement à un usage
privé ou limité, sauf autorisation expresse de Macrovision Corporation.
Toute copie ou désassemblage
est interdit.
PDF created with FinePrint pdfFactory Pro trial version http://www.fineprint.com
Page 33

Contenu
A. Introduction..........................................................................1
B. Précautions et avertissements.........................................1
C. Contenu ..............................................................................3
D. Mise sous tension et installation.....................................3
E. Touches de contrôle, Indicateurs et connecteurs............6
F. Charger et lire un disque.................................................8
G. Réglages.............................................................................9
H. Fonctionnement de base.............................................13
I. Menu.................................................................................14
J. Aff ichage.........................................................................14
K. Modede lecture..............................................................18
L. Raccorder à d’autres appareils électroniques........... 24
M. Spécifications ..................................................................25
N. En cas de problèmes .....................................................26
PDF created with FinePrint pdfFactory Pro trial version http://www.fineprint.com
Page 34

A. Introduction
Merci d’avoir choisi ce lecteur DVD portable. Les caractéristiques
principales sont deux écrans 9 pouces (16 :9) et un lecteur DVD.
Veuillez lire la totalité de ce manuel avant d’utiliser l’appareil. Cette
documentation vous aidera à installer l’appareil afin d’assurer une
performance optimale. Veuillez garder ce manuel pour une consultation ultérieure.
B. Précautions et avertissements
1. Placement
Afin d’éviter tout choc électrique ou incendie, n’exposez pas cet
appareil à la pluie ou à l’humidité. Ne le placez pas sur une surface
instable de laquelle il pourrait tomber. Ne le placez pasà proximité
de champs magnétiques forts, de sources de chaleur. Ne l’exposez
pas non plus à la lumière directe du soleil ou à la poussière. Si vous
déplacez l’appareil directement d’une pièce froide dans une pièce
chaude, attendez environ une heure avant de faire fonctionner
l’appareil ou retirez le disque et laissez l’appareil sous tension jusqu’à
ce que l’humidité s’évapore.
2. Installation
Veillez à installer le lecteur comme décrit dans ce manuel.
3. Attention
N’introduisez pas d’objets dans les ouvertures de l’appareil. Ne
renversez ou ne vaporisez pas de liquides sur l’appareil ( risque
d’incendie ou de choc électrique). Ne placez pas d’objets lourds
sur l’appareil. Afin d’assurer une bonne ventilation de l’appareil, ne
bloquez pas les ouvertures. Veillez à ne pas approchez l’appareil
d’une flamme. Il est dangereux de ne pas placer la batterie
correctement. Remplacez la batterie uniquement avec une
batterie de même type. Veillez à respecter l’environnement.
N’utilisez pas l’appareil à des températures de plus de 40°C.
1
PDF created with FinePrint pdfFactory Pro trial version http://www.fineprint.com
Page 35

4.Démontage
N’essayez pas de démonter l’appareil. Il y a un risque de choc
électrique ou d’exposition au laser. Contactez un technicien qualifié
pour réparer votre appareil.
5.Nettoyer l’appareil
Veillez à débrancher l’appareil avant de le nettoyer. N’utilisez pas
d’aérosols. Utilisez un chiffon humide pour nettoyer l’extérieur de
l’appareil.
6.Disque
N’utilisez pas de disques déformés ou de forme irrégulière, ils
pourraient causer un disfonctionnement. Ne coller rien sur le disque.
N’exposez pas le disque à la lumière directe du soleil ou à la chaleur.
Ne touchez pas la surface du disque. Maintenez le par les bords.
Nettoyez-le en partant du centre vers les côtés. Après avoir écouté
le disque, ôtez-le de l’appareil et placez-le dans son boîtier de
rangement. Certaines options de lectures sont définies par le
fabricant. Certaines fonctions peuvent ne pas être disponibles. Veillez
vous référer aux instructions fournies avec le disque.
7.Codes régionaux
Le lecteur DVD et le disque sont munis de codes région. Ces codes
doivent correspondre. Si le code ne correspond pas, le disque ne
pourra pas être lu. Le code de cet appareil est « 2 ». Les DVD
comportant un autre code ne pourront pas être lus dans cet appareil.
2
PDF created with FinePrint pdfFactory Pro trial version http://www.fineprint.com
Page 36

C. Contenu.
1. Lecteur DVD/CD
2. 2 écrans 9 pouces
3. 1 télécommande avec pile
4. 2 adaptateurs AV
5. 1 adaptateur
6. 1 adaptateur pour allume-cigare
7. 1 mode d’emploi
8. 1 housse de transport
9. 2 pochettes pour moniteurs
10. 1 pochette pour DVD
D. Mise sous tension et installation.
1. Mise sous tension à la maison (illustration 1)
Connectez l’adaptateurà l’appareilet branchez l’autre extrémité dans
une prise de courant.
2. Mise sous tension dans une voiture (illustration 1)
Connectez une extrémité de l’adaptateur voiture à l’appareil et
connectez l’autre extrémité à l’allume cigare.
Illustration 1
3
PDF created with FinePrint pdfFactory Pro trial version http://www.fineprint.com
Page 37

3. Connexion du lecteur DVD aux moniteurs (Illustration2)
Les moniteurs peuvent être utilisés uniquement avec le lecteur DVD.
MONITOR
MONITOR
PORT 1
PORT 2
SD/DVD
PREV
STOP
NEXT
MEN U
OPEN
Illustration 2
Remarque: Débranchez l’appareil lorsque vous ne l’utilisez pas
pendant une période prolongée.
4. Installation avant usage
1). Attacher le lecteur DVD
Retirez l’attache de glissière de la pochette pour glisser le lecteur
DVD dans la pochette, introduisez la partie inférieure du DVD dans
le fond de la poche. Fermez l’attache.
MONITOR
MONITOR
PORT 2
PORT 1
SD/DVD
PREV
STOP
NEXT
ME NU
OPEN
Illustration 3
4
PDF created with FinePrint pdfFactory Pro trial version http://www.fineprint.com
Page 38

2). Placer l’écran
Option 1Appuie tête (Illustration4)
Illustration 4
Glissez le moniteur dans la pochette, introduisez le morceau inférieur
du moniteur dans la longue fente au fond de la pochette et attachez la
courroie de Velcro pour attacher le moniteur dans la pochette. Faites
passer la courroie de la poche autour de l’appuie-tête et serrez jusqu’à
ce que la poche soit étroitement fixée.
Option 2 Surface plane (Illustration 5)
Illustration 5
Tournez la base du moniteur vers l’arrière et placez-le sur une surface
plate. Ajustez l’écran pour obtenir un a ngle de vision correct. Vous
pouvez effectuer cette opération lorsque le moniteur est soit dans la
pochette soit en dehors de la pochette.
5
PDF created with FinePrint pdfFactory Pro trial version http://www.fineprint.com
Page 39

E. Contrôles, Indicateurs et connecteurs.
1. Vue de l’appareil (illustration 6)
SD
VOL
MONITOR
MONITOR
PORT 1
PORT 2
SD/DVD
PREV
STOP
NEXT
M EN U
DC 9V
1) SD/DVD
2) Touche précédente
3) Touche d’arrêt
4) Touche suivante
5) Touche Menu
6) Touche vers le haut
7) Touche OK
8) Touche vers la droite
9) Touche vers la gauche
10) Touche vers le bas
11) Touche ouverture
OPEN
illustration 6
12) Touche sous/hors tension
13) Carte SD
14) Controle de volume
15) Entrée casque d’écoute
16) Entrée cable optique
17) Sortie AV
18) Entrée DC 9V
19) Récepteur commande à distance
20) Moniteur de la tension
21) Moniteur porte 1
22) Moniteur porte 2
6
PDF created with FinePrint pdfFactory Pro trial version http://www.fineprint.com
Page 40

2. Moniteur
illustration 7
1. Contrôle de volume haut/bas
2. Touche de mise sous/hors tension
3. EntréeAV In
4. Entrée DV9V
5. Prise casque
6. Touche pour renverser l’image
7. Contôle luminosité plus/moins
Note: en poussant la touche Revise (renverser) vous pouvez
renverser l’image
7
PDF created with FinePrint pdfFactory Pro trial version http://www.fineprint.com
Page 41

3. Vue de la commande à distance
1) Touche Paramétrage
2) Touche Haut
3) Touche Saut
4) Touche Entrée
5) Touche Arrière/Gauche
6) Touche Bas
7) Touches numériques
8) Touche Affichage
9) Touche Zoom
10) Touche DVD/SD
11) Touche Saut
12) Touche Répétition A-B
13) Touche Avance/Droite
14) Touche 1/Répéter Tout
15) Touche Arrêt
16) Touche Menu
17) Touche Sub
18) Touche Audio
19) Touche Lecture/Pause
illustration 8
F. Chargement et lecture du disque
a. Après avoir branché l’appareil, appuyez sur la touche Power,
l’indicateur de mise sous tension s’allume.
b. Ouvrez le compartiment à disque en appuyant sur la touche Open
et placez-y un disque face étiquette vers le haut.
c. Fermez le chargeur en poussant la touche “fermer”
d. Réglez le volume et la luminosité.
e. Pour arrêter la lecture, appuyez sur Stop.
8
PDF created with FinePrint pdfFactory Pro trial version http://www.fineprint.com
Page 42

G.Réglages
1). Réglages Généraux
1. Lorsqu’il n’y a pas de disque dans l’appareil, appuyez sur la touche Setup pour afficher le menu principal des réglages. L’icône “
“ est illuminée. Appuyez à nouveau sur la touche Setup pour sortir
de la page du menu. L’appareil reprend la lecture.
2.Appuyez sur la touche ENTER, “ Sortie SPDIF” est illuminé.
3.Utilisez les touche ou pour sélectionner un autre menu dans
la page des réglages principaux.
4.Appuyez sur INSERT DRAWING pour accéder au sous-menu.
5.Utilisez les touches ou pour sélectionner le sous-menu et
appuyez sur ENTER pour confirmer la sélection
6.Répéter les étapes 3-5 pour accéder aux autres menus.
Remarque:Appuyez sur la touche INSERT DRAWING pourretourner
au menu précédent.
a)Sortie SPDIF
SPDIFF Off: Le signal audio digital est désactivé
SPDIF/RAW: la sortie audio n’est pas modulée
SPDIF/PCM: la sortie audio est modulée en mode Pulse Code
Modulation.
b)Affichage TV
Normal/PS : Lors de l’utilisation d’un téléviseur normal, une image
large est affichée en plein écran.
Normal/LB: Lors de l’ utilisation d’un téléviseur normal, une image large
est affichée avec des bandes noires en dessous et au dessus.
Wide : Lors de l’ utilisation d’un écran 16 :9, une image large est affichée
en plein écran.
9
PDF created with FinePrint pdfFactory Pro trial version http://www.fineprint.com
Page 43

c)Angle
On : L’écran affiche l’icône d’angle. (*Si cette option est disponible)
Off: L’écran n’affiche pas l’icône d’angle
REMARQUE : Tous les disques n’intègrent pas les options ci-dessus.
Ces options dépendent du disque.
d) Screen Saver (économiseur d’écran)
On (activé) : active l’économiseur d’écran.
NOTA : Le lecteur DVD va passer en mode d’écran de veille au
bout de 5 minutes environ si l’image demeure inchangée
sur l’écran.
Off (désactivé) : désactive l’économiseur d’écran.
e)Mémoire
On L’appareil retourne au dernier point mis en mémoire.
Off: L’appareil ne retourne pas au dernier point mis en mémoire.
REMARQUE: Cette fonction ne s’applique que pour le mode OPEN
2. Réglage de la qualité Vidéo
1) Dans le menu de réglages, appuyez sur la touche ou pour
sélectionner “ réglages qualité vidéo”, le symbole est illuminé.
Appuyez sur la touche ENTER pour accéder à la page des réglages
vidéo.
2)Appuyez sur la touche ENTER, “luminosité” est illuminé.
3)Utilisez les touches ou pour sélectionner un autre menu
dans la page des réglages vidéo.
4)Appuyez sur pour accéder au sous-menu.
5)Utilisez les touches et pour ajuster le r¨¦glage et appuyez sur
ENTER pour sélectionner.
6)Répéter les étapes 3-5 pour accéder aux autres menus
REMARQUE: Appuyez sur la touche pour retourner au menu
précédent
a.Luminosité b.Contraste
c.Nuanced.Saturation
10
PDF created with FinePrint pdfFactory Pro trial version http://www.fineprint.com
Page 44

3. Mot de passe
Dans le menu des réglages, appuyez sur la touche ou pour sélectionner “ page de réglage du mot de passe”. L’icône s’illumine.
Appuyez sur ENTER pour accéder ŕla page du mot de passe.
Appuyez à deux reprises sur la touche ENTER pour acc éder à la
page de réglage du mot de passe. Introduisez l’ancien mot de passe
ou le mot de passe par défaut. Introduisez ensuite le nouveau mot de
passe et confirmer celui-ci. Appuyez sur ENTER pour confirmer le
changement.
Remarque: Le mot de passe par défaut est 3308
4. Page de préférences
1) Dans le menu de réglages, utilisez les touches ou pour
sélectionner la page des préf érences. L’icône s’illumine. Appuyez
sur ENTER pour accéder à la page des préférences.
2)Appuyez sur la touche ENTER, “Audio” s’illumine
3)Utilisez les touches et pour sélectionner les autres menus
4) Appuyez sur la touche pour accéder au sous-menu
5) Utilisez les touches et pour sélectionner le sous-menu et
appuyez sur ENTER pour confirmer la sélection.
6) Répéter les étapes 3-5 pour accéder aux autres menus
REMARQUE: Appuyez sur la touche pour retourner au menu
précédent
a. Audio
b. Sous-titre
c. Menu du disque
Remarque : La sélection de langues et de sous-titres est disponible uniquement pour les langues ci-dessus. Si la langue n’est
pas disponible, le lecteur lira le disque dans la langue d ’origine.
11
PDF created with FinePrint pdfFactory Pro trial version http://www.fineprint.com
Page 45

d.Sélectionnez « Parental » à l’aide de la touche UP/DOWN (Haut /
Bas), appuyez sur la touche RIGHT( Droite) pour accéder au sousmenu
Sélectionnez le niveau désiré à l’aide des touches UP/DOWN,
appuyez sur Enter et introduisez votre mot de passe pour confirmer.
Les différents niveaux vont de 1 (enfants) à 8 (adultes)
Remarque : Le niveau 8, est le réglage par défaut
e.Sélectionnez « Défault » à l’aide des touches UP/DOWN, appuyez
sur la touche RIGHT(Droite) pour accéder au sous-menu. Appuyez
sur Enter pour retourner aux paramè tres par dé¦faut.
Remarque : Le réglage de verrouillage parental n’est pas influencé
par la fonction "paramè tres par dé¦faut".
Remarque : Le mot de passe par défaut est 3308. Ce mot de passe
fonctionne toujours, même après avoir introduit un nouveau mot de
passe. Afin d’éviter que d’autres personnes n’utilisent ce mot de passe
pour accéder au verrouillage parental veuillez effacer ce mot de passe
du manuel. Certains disques peuvent être programmés en fonction
de l’âge de l’utilisateur, d’autres disques ne comprennent pas cette
fonction.
12
PDF created with FinePrint pdfFactory Pro trial version http://www.fineprint.com
Page 46

H. Fonctionnement de base
POWERMettre l’appareil sous / hors tension
OPENInsérer / Oter un disque
PLAYLancer la lecture
PAUSEImage à l’arrêt
STOP(1 fois) Interrompt la lecture à un point précis
(2 fois) Arrête la lecture
NEXT Pendant la lecture, vers la piste / chapitre suivant
PREVIOUS Pendant la lecture, vers la piste / chapitre
précédent
FORWARD Lecture accélérée 2X, 4X, 8X, 16X ou 32X
REVERSE Lecture accélérée vers l’arrière 2X, 4X, 8X, 16X
ou 32X
LEFT/RIGHT Pour la navigation dans les menus
/UP/DOWN
ENTER Pour confirmer les réglages
NUMBERS Sélection ou réglage
(NUMEROS)
MENU Affiche le menu principal du disque
REPEAT Répétition d’un titre, chapitre, …
A-B REPEAT Répétition d’une section allant d’un point A à un
point B
DISPLAY Affichage de l’information (titre, chapitre, durée)
ANGLE Changement d’angle d’une scène
SUBTITLE Sélection de la langue des sou-titres, active/
désactive La fonction
AUDIO Sélection de la langue audio
ZOOM Agrandit l’image de 2 à 4 fois lors de la lecture
de Disques DVD. Agrandit l’image de 25%,
50%, 100%, 150%, 200% lors de la lecture de
disques JPEG.
SETUP Affiche le menu deréglage pour la sélection des
Sous-menus.Quitter la page des r églages.
13
PDF created with FinePrint pdfFactory Pro trial version http://www.fineprint.com
Page 47
I. Menu
Title Elapsed
Title Remain
Chapter Elapsed
Un disque DVD est divis é en sect ions appelées titres et
chapitres. Lors de la lecture d’un disque DVD, un menu racine
apparaît à l’écran de votre téléviseur. Le contenu du menu peut
varier selon le disque. Appuyez sur la touche Menu pendant la
lecturepourafficherlemenu. CertainsDVDne comprennentpas
cette option.
J. Affichage
1.TEMPS DE LECTURE ET DUREE RESTANTE
a. Pendant la lecture, appuyez sur la touche DISPLAY pour
afficher le num éro du titre en cours (1), le nombre total de
titres (2), le numéro du chapitre en cours (3), le nombre total
de chapitre (4) et le temps écoulé du titre (5). Le titre disparaît
automatiquement après 3 secondes si vous n’appuyez pas
sur la touche DISPLAY, l’indication de temps reste affichée
à l’écran.
Titre, numéro de Chapitre et affichage du temps
b. Appuyez à plusieurs reprises sur la touche DISPLAY pour
accéder de manière successive aux options ci-dessous:
Title elapsed: Durée écoulée du titre
Title remain: Durée restante du titre
Chapter Elapsed: Durée écoulée du chapitre
Chapter remain: Durée restante du chapitre
Display Off: L’information de durée n’est pas affichée.
Display Off
Chapter Remain
14
PDF created with FinePrint pdfFactory Pro trial version http://www.fineprint.com
Page 48

2. ANGLE
Pendant la lecture, appuyez sur la touche ANGLE pour afficher les
angles disponibles si votre disque le permet. Le numéro de l’angle en
cours (1) et le nombre total d’angles (2) est affiché. Appuyez sur la
touche ANGLE pour sélectionner un autre angle, appuyezà nouveau
sur cette touchepour retournerà l’angle de base. L’affichage de l’angle
disparaîtra automatiquement si vous n’appuyez pas sur la touche
pendant 3 secondes.
REMARQUE: Tous les disques ne comprennent pas cette fonction.
3. SOUS-TITRE
Pendant la lecture,appuyezsur la touche SUBTITLEpour sélectionner
la langue de sous-titres désirée*. Le numéro de la langue des soustitres actuel (1) et le nombre total delanguesdisponibles (2) est affiché.
Si le DVD comprend plusieurs langues de sous-titres différentes,
appuyez sur la touche SUBTITLE pour sélectionner une autre langue.
Pour annuler la fonction, appuyez sur la touche SUBTITLE jusqu’à ce
que l’indication « Subtitle Off » apparaisse. L’affichage de l’indication
des sous-titres disparaîtra automatiquement si vous n’appuyez pas
sur la touche SUBTITLE pendant 3 secondes.
Affichage des sous-titres
*Certains DVD autorisent l’accès à cette fonction uniquement via le menu
du DVD.
15
PDF created with FinePrint pdfFactory Pro trial version http://www.fineprint.com
Page 49

4. AUDIO
Pendant la lecture, appuyez sur la touche AUDIO pour sélectionner la
langue audio désirée*. Le numéro de la langue audio actuelle(1) et le
nombre total de langues disponibles (2) est affiché.Appuyezà nouveau
sur la touche AUDIO pour choisir une autre langue. . L’affichage de
l’indication de la langue audio disparaîtra automatiquement si vous
n’appuyez pas sur la touche AUDIO pendant 3 secondes.
Affichage de la langue audio
*Certains DVD autorisent l’accès à cette fonction uniquement via le
menu du DVD
5. ZOOM
Pendant la lecture, appuyez sur la toucheZOOMpour agrandir l’image
2X ou 4X.
(1) Appuyez une seule fois sur la touche ZOOM, l’image s’agrandit
2X
(2) Appuyez deux fois sur la touche ZOOM, l’image s’agrandit 3X
(3) Appuyez une troisième fois sur la touche ZOOM, l ’image
s’agrandit 4X
(4) Appuyezune quatrième fois sur la touche ZOOM, l’image revient
à sa taille normale.
Affichage Zoom
16
PDF created with FinePrint pdfFactory Pro trial version http://www.fineprint.com
Page 50

6. AB repeat(Ré pé tition d'un sé gment)
a. Pendant la lecture, appuyez sur la touche A-B pour régler le point
de départ A
Affichage du point de départ A-B repeat
b. Appuyez une deuxième fois sur la touche A-B pour régler le point
d’arrêt B. le lecteur lira de manière répétitive la section comprise
entre le point A et le point B.
Affichage du point d’arrêt A-B repeat
c. Appuyez une troisième fois sur la touche A-B pour annuler la
fonction et reprendre la lecture normale.
Affichage de l’annulation A-B repeat
17
PDF created with FinePrint pdfFactory Pro trial version http://www.fineprint.com
Page 51

7. REPEAT
Single Elapsed
Single Remain
Total Elapsed
a.Pendant la lecture, appuyez à plusieurs reprises sur la touche
REPEAT pour accéder aux fonctions suivantes:
Chapitre: Répè te le chapitre en cours
Titre: Répè te le titre en cours
All: répè te tous les chapitres et tous
les titres
Off: reprend la lecture normale
Mode Repeat
Affichage de répétition du chapitre par exemple:
Affichage de répétition du chapitre
K. Mode de lecture variable
1.Lecture de CD audio
Lors de la lecture de CDs audio, appuyez sur la touche DISPLAY de
la tè lè commande pour accéder aux informations relatives à la durée.
Les options ci-dessous illustrent les informations disponibles via cette
fonction.
Single elapsed- Single remain - Total elapsed-Display off - Totalremain
Display Off
Mode d’affichage CD
Single elapsed: La piste en cours et la durée de cette piste est affichée à
l’écran
Single remain: la piste en cours et la durée restante s’affichent
18
Total Remain
PDF created with FinePrint pdfFactory Pro trial version http://www.fineprint.com
Page 52

Total elapsed: la piste en cours et la durée restante totale
apparaissent.
Total remain: la piste en cours et la durée restante totale s’affichent
Display Off: L’information de durée n’est pas affichée.
Par exemple, single elapsed
Affichage de la durée restante
UTILISATION DE LA FONCTION DE REPETITION
Le mode par défaut est OFF. Appuyez de maniè re successive
sur la touche REPEAT pour accéder aux fonctions suivantes :
· Track -Répétition de la piste en cours.
· Disc – Répétition de tout le disque
· Off
Vous passez d’une option à l’autre à l’aide de la touche REPEAT.
L’option sélectionnée tourne en boucle jusqu’à ce que vous
l’arrétiez.
19
PDF created with FinePrint pdfFactory Pro trial version http://www.fineprint.com
Page 53

2. Lecture de disques MP3.
Le MP3 est un format audio digital. Une chanson avec une qualité
CD peut ętre compressée en MP3 sans perte de qualité. Les disques CD-R/RW enregistr és en MP3 sont compatibles avec ce
système.Insérez un disque MP3 dans l’appareil, l’appareil charge le
disque et le directory "Répèrtoire" apparaît àl’écran.
Affichage du menu MP3
Lorsqu’un disqu e MP3 est inséré dans l ’appareil, la lecture
commence automatiquement et le menu apparaît à l’écran. Vous
pouvez naviguer dans le menu pour changer dossier et de chanson.
Le systè me lit les pistes en suivant l’ordre d’enregistrement.
1. Appuyez sur la touche ou pour choisir un folder àgauche de
l’écran.
2. Appuyez sur ENTER pour sélectionner le folder. Les chansons
se trouvant dans ce dernier apparaissent à l’écran.
3. Appuyez sur la touche ou pour choisir unechanson dans la
liste. Appuyez sur ENTER pour s électionner et commencer la
lecture.
4. Utilisez la touche (NEXT) pour passer à la chanson suivante.
Utilisezla touche (PREVIOUS) pour retourner au début de la
chanson précédente.
20
PDF created with FinePrint pdfFactory Pro trial version http://www.fineprint.com
Page 54

LA FONCTION REPEAT
Le mode par défaut est OFF. Appuyez de manière successive
sur la touche REPEAT pour accéder aux fonctions suivantes :
• Single/Ré petition unique
• Répétition d’une chanson
• Répétition du dossier
• Off
Vous passez d’une option à l’autre à l’aide de la touche REPEAT.
L’option sélectionnée tourne en boucle jusqu’à ce que vous l’arrêtiez.
REMARQUE :
L’icône « » devant un nom de fichier signale que ce dernier est
un dossier, non un fichier MP3.
L’icône « MP3 » devant un nom de fichier signale que ce dernier est
un fichier MP3.
Remarque: Le fabricant se réserve le droit de changer de logiciel.
21
PDF created with FinePrint pdfFactory Pro trial version http://www.fineprint.com
Page 55

3. Lecture de fichiers JPEG
1) Placez le disque dans l’appareil, celui-ci est lu automatiquement.
2)Sélectionnez un fichier JPEG à l’aide de la touche « UP/DOWN ».
3)Vous pouvez afficher le fichier sélectionné en appuyant sur la
touche PLAY ou ENTER.
4) Appuyez sur la touche « LEFT »("Gauche") pour exercer une
rotation de 90° dans le sens contraire des aiguilles d’une montre.
Appuyez sur la touche « RIGHT » ("Droite") exerce une rotation
dans le sens des aiguilles d’une montre.
5)Pour passer d’une photo à l’autre, appuyez sur la touche UP
("Haut") pour un changement horizontal, appuyez sur la touche
DOWN ("Bas") pour un changement vertical.
6)Appuyez sur la touche display ("affichage") pour changer le mode
d’affichage de l’image: Haut, Bas, gauche, droite, Diagonale
gauche, diagonale droite, …
7)Lors de la lecture de fichiers JPEG, les fonctions “ANGLE”,
“SOUS-TITRE”, “AUDIO”, “NUMBER”, “AB”, “RETURN”, “REW/
FF”, SLOW
8)Appuyez sur la touche STOP pour regarder les fichiers JPEG,
“DIAPORAMA” et “ MENU” s’affiche à l’écran.
9)Appuyez sur STOP pour afficher l’image. Vous pouvez
sélectionner l’image à l’aide des touches UP/DOWN/LEFT/
RIGHT/ENTER.
22
PDF created with FinePrint pdfFactory Pro trial version http://www.fineprint.com
Page 56

4.Lecture des disques MPEG4
MPEG4 est le nom d’un systčme de compression vidéo le plus populaire
au monde. Il s’agit d’un logiciel qui compresse le signal vidéo dans un
format réduit qui peut ętre transporté par l’internet sans perte de qualité.
Les disques DVD, CD-R/RW enregistrés avec le format MPEG4 sont
compatibles avec ce lecteur.
Remarque : Uniquement les documents avec un suffixe ‘avi’
peuvent ętre reproduits.
L’opération d’un disque MPEG4 est identique a celle d’un disque MP3.
Utilisez les boutons UP, DOWN, LEFT, RIGHT pour bouger le curseur
et le bouton ENTER pour confirmer.
·poussez MENU pour revenir au menu disponible
23
PDF created with FinePrint pdfFactory Pro trial version http://www.fineprint.com
Page 57

L. Raccorder à d’autres appareils éléctroniques
1. Raccorder à un autre téléviseur ou autre moniteur (voir figure 9)
Vous pouvez connecter le lecteur DVD à un téléviseur pour pouvoir
bénéficier d’une meilleure qualité de son et d’image.
1) Raccordez un côté du cable audio/video (cable stéréo 1/8” optionel)
dans la sortie du DVD audio out, et raccordez l’autre côté dans
l’entrée audio de votre téléviseur ou moniteur. (blanc = canal
gauche et rouge = canal droit)
2) Raccor dez le cable audio/video jaune (optionel) dans la sortie video
out du DVD À droite de l’appareil, et l’autre côté jaune dans l’entrée
video de votre téléviseur ou moniteur.
Illustration 9
* Un casque peut ętre utilisé avec cet appareil. Branchez le casque
sur le côté droit DVD.
2. Carte SD
Sans disque dans l’appareil, introduisez la carte SD avec vos données
JPEG ou MP3 Dans l’endroit approprié. Poussez la touche DVD/SD
pour passer du mode DVD vers le mode SD.
24
PDF created with FinePrint pdfFactory Pro trial version http://www.fineprint.com
Page 58

M. Caractéristiques
Disques compatibles : DVD/CD/MP3/MPEG4
Signal système: PAL
Taille de l’écran: 9 pouces
Réponse fréquence: 20 Hz to 20 kH
Sortie vidéo: 1 Vp-p/75 Ohm, unbalanced
Sortie audio: 1.4Vrms/10kOhm
Audio S/N: Mieux que 60 dB
Dynamic range : Mieux que 85 dB
Laser: Laser Semi-conducteur,
Longueur faisceau: 650 nm/795 nm
Alimentation: DC 9V
Consommation: 6 W
Température de fonctionnement: 5~35°C
Poids : 0.37 kg
Dimensions (L xP x H): 7.24 X 6.14 X1.14inches
184 x 156 x 29mm
Moniteur
Système couleur PAL
Taille de l’écran 9 pouces
Alimentation: DC 9-12V
Consommation: 7 W
Température de fonctionnement: 5~45°C
Humidité 10-75%
Température de stockage -20~60°C
Dimensions (L xP x H):238 X 158 X 12 mm
Poids 0.503Kg
25
PDF created with FinePrint pdfFactory Pro trial version http://www.fineprint.com
Page 59

N. Dépannage
Problème
Absence de son ou
niveausonore très
faible.
Impossible de
passer certaines
parties du disque
L’icône “
apparaît à l’écran
L’image
est déformée
Impossible
d’effectuerune
lecture rapide
“
Solution
Assurez-vous que les connexions de sortie AUDIO et
d’entrée AV IN soient
correctementeffectuées.
Vous ne pouvez pas passer les informations relatives
aux avertissements apparaissant au début du disque.
Les disques sont programmés afin d’éviter cetteaction.
La fonction ou l’action ne peut pas être accomplie pour
l’instant car:
1. La programmation du disque l’interdit
2. Le disque n’inclut pas la fonction
3. La fonction n’est pas disponible pour l’instant
4. Vous demander un titre ou un chapitre qui n’est pas
accessible
- Le disque peut être endommagé. Changer de disque.
- Cette distorsion est normale en mode de recherche
avant/arrière
- Certains disques comprennent des sections ou cette
fonction n’est pas disponible
- Vous ne pouvez pas passer les avertissements au
début du disque
La commande
à distance ne
fonctionne pas
L’appareil ne
peut pas
lire le disque
La lecture
commence mais
s’arrête
immédiatement
-V érifiez que les piles sont neuves
-V érifiez que le capteur de la commande à distance
soit accessible
-V érifiez que le transmetteur soit en place
- Insérez un disque face vers le haut
-V érifie z le type de disq ue. Ce DVD ne lit que les
disques suivants: DVD, Audio, MP3
- Le code région du disque ne correspond pas au code
région de l’appareil
- Le disque est sale. Nettoyez-le
- Il ya de la condensation. Attendez que le lecteur sèche
26
PDF created with FinePrint pdfFactory Pro trial version http://www.fineprint.com
Page 60

Ce symbole qui apparaît sur le produit ou dans les instructions signifie
que votre appareil électrique ou électronique, lorsqu’il ne fonctionne
plus, doit être jeté séparément de vos déchets ménagers.
En Europe, il existe différents systèmes de collecte pour le recyclage.
Pour de plus amples informations, contactez l’autorité locale ou le
revendeur auprès duquel vous avez acheté le produit.
27
PDF created with FinePrint pdfFactory Pro trial version http://www.fineprint.com
Page 61
DVP-9021TWIN
Draagbare DVD speler met twee 9” LCD schermen
MONITOR
MONITOR
MONITOR
MONITOR
PORT 1
PORT 1
PORT 2
PORT 2
SD/DVD
SD/DVD
PREV
PREV
STOP
STOP
NEXT
NEXT
ME NU
ME NU
OPEN
OPEN
HANDLEIDING
PDF created with FinePrint pdfFactory Pro trial version http://www.fineprint.com
Page 62

Opmerking:
Dit product maakt gebruik van een techniek ter bescherming van
auteursrechten die op hun beurt beschermd zijn door
methodeclaims van bepaalde Amerikaanse patenten en andere
intellectuele eigendommen die in het bezit zijn van Macrovision
Corporation en andere rechtmatige eigenaars. Gebruik van die
techniek ter bescherming van auteursrechten vereist de toelating
van Macrovision Corporation en is uitsluitend bedoeld voor privé-
gebruik en weergave voor een beperkt publiek tenzij Macrovision
Corporation toelating heeft gegeven voor ander gebruik. Het
demonteren van het toestel of het uit elkaar en weer in elkaar
zetten ervan, is verboden.
PDF created with FinePrint pdfFactory Pro trial version http://www.fineprint.com
Page 63

Inhoud
A. Inleiding................................................................................1
B. Belangrijke veiligheidsinstructies.....................................1
C. Inhoud......................................................................3
D. Aansluitingen.....................................................................3
E. Bedieningselementen, indicators en aansluitingen.........6
F. Een disk laden en afspelen..............................................8
G. Installatie............................................................................9
H. Basisfuncties..................................................................13
I. Menu................................................................................14
J. Display / scherm............................................................14
K. Diverse afspeelmogelijkheden.......................................18
L. Aa
M. Specificaties...................................................................25
N. Mogelijke problemen en oplossingen.............................26
Aansluiten op andere Electronische Apparaten
.........24
PDF created with FinePrint pdfFactory Pro trial version http://www.fineprint.com
Page 64

A. Inleiding
Eerst en vooral willen we u danken voor de aankoop van deze DVD
speler met twee schermen. Het pakket bestaat uit twee 9” LCD
(Liquid Christal Display) schermen (16:9 Aspect Ratio) en een DVD
speler.
Het toestel is vlug en gemakkelijk te installeren. Lees de handleiding
wel aandachtig vooraleer u tot de installatie overgaat en bewaar ze
nadien goed.
B. Belangri jke veiligheidsinstructies
1. Plaatsen
Het toestel mag niet blootgesteld worden aan regen of vochtigheid
om brand en elektrische schokken te voorkomen. Plaats het toestel
niet op een onstabiele ondergrond zodat het niet kan vallen. Houdt
het toestel uit de nabijheid van sterke magneten, warmtebronnen,
direct zonlicht, veel stof.
Indien het toestel van een koude naar een warme plaats gebracht
wordt, kan er condensatie optreden binnenin het toestel. In dat geval
is het aangeraden om het toestel gedurende een uurtje niet te
gebruiken ofwel de disk uit het toestel te nemen en het toestel aan te
zetten tot wanneer de condensatie verdwenen is.
2. Installeren
Zorg ervoor dat de DVD speler en de schermen juist geïnstalleerd
zijn, rekening houdend met de instructies en afbeeldingen uit de
handleiding.
3. Gevaar
Duw geen voorwerpen in de openingen van het toestel en mors geen
vloeistoffen in of op het toestel (dit kan leiden tot brand en elektrische
schokken).
Plaats niets zwaar op het toestel. Belemmer de ventilatieopeningen
niet door bijvoorbeeld een doekje op het toestel te leggen.
Houdt het toestel uit de nabijheid van een open vlam, zoals vuur,
kaarsen, enz.
Wanneer u de batterijen van het toestel niet op de juiste manier
vervangt, kan dit schadelijk zijn voor het toestel. Het is aangeraden
om steeds batterijen te gebruiken van hetzelfde type of van een
gelijkaardigtype.Deponeer de gebruikte batterijen op de juiste manier,
1
PDF created with FinePrint pdfFactory Pro trial version http://www.fineprint.com
Page 65

rekening houdend met het milieu.
Het toestel mag niet gebruikt worden bij temperaturen van meer dan
95 graden Fahrenheit of 35 graden Celsius.
4.Onderdelen
Probeer het toestel niet uit elkaar te halen. Het gevaar voor elektrische
schokken en/of blootstelling aan laserstralen is immers te groot. Doe
een beroep op een gespecialiseerd vakman indien uw toestel hersteld
moet worden.
5.Schoonmaken
Schakel het apparaat steeds uit en koppel het netsnoer los vooraleer
u het apparaat reinigt. Gebruik nooit alcohol, benzine, thinner,
reinigingsvloeistoffen of andere chemicaliën. Veeg het apparaat
steeds schoon met een licht vochtige doek.
6.Disk
Gebruik steeds disks van een normaal type; andere disks kunnen
ervoor zorgen dat het toestel slecht zal functioneren.
Bevestig nooit papier, kleefband of lijm op de disk.
Disks mogen nooit blootgesteld worden aan direct zonlicht of
warmtebronnen.
Neem de disks steeds vast aan de randen en maak hem schoon
door met een zachte doek van het midden naar de uiteinden te wrijven
(maak geen cirkelvormige bewegingen). Plaats de disk terug in het
doosje nadat u hem bekeken heeft.
Soms is het mogelijk dat de gekozen functie of operatie niet
beschikbaar is. Dit komt doordat de fabrikant van de DVD disk de
specifieke functies bepaalt. Sommige functies zullen op bepaalde
disks niet beschikbaar zijn. Lees de documentatie die bij de DVD
disk zit.
7.Regionale codes
Zowel de DVD speler als de disk zijn regionaal gecodeerd. Deze
codes moeten in overeenstemming zijn want anders kan de disk niet
afgespeeld worden.
De code van dit toestel is regio 2. DVD’s met andere regionale codes
kunnen niet afgespeeld worden via dit toestel.
2
PDF created with FinePrint pdfFactory Pro trial version http://www.fineprint.com
Page 66

C. Inhoud
1. 1 x DVD speler
2. 2 x 9” single monitor
3. 1 x afstandsbediening met batterij (CR2025)
4. 2 x DIN voor de AV adapter
5. 1 x AC voor de DC adapter
6. 1 x sigarettenaansteker adapter
7. 1 x handleiding
8. 1 x draagtas
9. 2 x tas voor 9” single monitor
10. 1 x DVD tas
D. Aansluitingen
1. Het systeem binnen installeren (zie figuur 1)
Bevestig het ene uiteinde van de AC kabel op de DC adapter via
de DC aansluiting aan de rechterkant van de DVD speler.
Bevestig het andereuiteinde daarna in het 100~240Vstopcontact.
2. Het systeem aansluiten in de wagen (zie figuur 1)
Bevestig het ene uiteinde van de sigarettenaansteker adapter in
de DC aansluiting van de DVD speler, en het andere uiteinde in
de sigarettenaansteker.
Figuur 1
3
PDF created with FinePrint pdfFactory Pro trial version http://www.fineprint.com
Page 67

3. DVD speler en monitors aansluiten (zie figuur 2)
De monitors kunnen enkel functioneren via de DVD speler.
MONITOR
MONITOR
MONITOR
MONITOR
PORT 1
PORT 1
PORT 2
PORT 2
SD/DVD
SD/DVD
PREV
PREV
STOP
STOP
NEXT
NEXT
MEN U
MEN U
OPEN
OPEN
Figuur 2
Opmerking: Ontkoppel de apparaten wanneer u het toestel gedurende
een langere periode niet meer gaat gebruiken.
4. Basisaansluitingen
1) Installatie van de DVD speler (zie figuur 3)
Schuif de DVD speler in het daarvoor bestemde tasje en span de
veiligheidsband goed aan.
MONITOR
MONITOR
MONITOR
MONITOR
PORT 1
PORT 1
PORT 2
PORT 2
SD/DVD
SD/DVD
PREV
PREV
STOP
STOP
NEXT
NEXT
ME NU
ME NU
OPEN
OPEN
Figuur 3
4
PDF created with FinePrint pdfFactory Pro trial version http://www.fineprint.com
Page 68

2) Installatie van de monitor
Mogelijkheid 1: aan de hoofdsteun van de auto (zie figuur 4)
Figuur 4
Schuif de monitor in het daarvoor bestemde tasje. De Velcro band
dient om de monitor goed in het tasje te bevestigen.
Maak de band van het tasje nadien stevig vast rond de hoofdsteun.
Mogelijkheid 2: op een platte achtergrond (zie figuur 5)
Figuur 5
Plaats de achterkant van de monitor tegen een platte achtergrond.
Pas het scherm aan tot wanneer u een comfortabele kijkhoek heeft.
Dit is zowel mogelijk als de monitor in of uit het tasje is.
5
PDF created with FinePrint pdfFactory Pro trial version http://www.fineprint.com
Page 69

E. Bedieningselementen, indicators en aansluitingen
1. Toestel (zie figuur 6)
MONITOR
MONITOR
PORT 1
SD
VOL
PORT 2
SD/DVD
PREV
STOP
NEXT
M EN U
DC 9V
OPEN
Figuur 6
1) SD/DVD 12) Aan/Uit Schakelaar
2) Vorige Toets
3) Stop Toets
4) Volgende Toets
5) Menu Toets
6) Omhoog Toets
7) Ok Toets
8) Rechts Toets
9) Links Toets
10) Omlaag Toets
11) Open Toets
13) SD Kaart Gleuf
14) Volume Controle
15) HiFi Aansluiting
16) Optische Aansluiting
17) AV Uitgang
18) DC 9V Ingang
19) Afstandsbediening Sensor
20) Power Led
21) LCD Scherm 1
22) LCD Scherm 2
6
PDF created with FinePrint pdfFactory Pro trial version http://www.fineprint.com
Page 70

2. Monitor (zie figuur 7)
1) Volume Controle
2) Power on/off schakelaar
3) AV ingangsbus
4) DC 9V ingang
5) Uitgangsbus voor koptelefoon
6) 180 Graden Draai Toets
7) Helderheid Controle
Figuur 7
NOTE:
Beeld te Draaien
Druk op de Reverse (180 Graden Draai Toets) om het
7
PDF created with FinePrint pdfFactory Pro trial version http://www.fineprint.com
Page 71

3. Afstandsbediening (zie figuur 8)
1) Insteltoets
2) Omhoog toets
3) Skip toets
4) Enter toets
5) Achterwaarts/links toets
6) Omlaag toets
7) Numerieke toetsen
8) Display toets
9) Zoom toets
10) DVD / SD Toets
11) Skip toets
12) A-B herhalingstoets
13) Voorwaarts/rechts toets
14) 1/Alles herhalingstoets
15) Stop toets
16) Menu toets
17) Ondertiteling Toets
18) Audio toets
19) Weergave/pauze toets
Figuur 8
F. Een disk laden en afspelen
a) Voorzie het toestel van stroom en zet de power on/off schakelaar
van de DVD speler op “on”. De power indicator zal branden.
b) Open de disk lade door op “OPEN” te drukken en leg een disk in
de lade (bedrukte zijde naar boven).
c) Sluit het Klepje door voorzichtig op het gedeelte van de Klep te
Drukken waar staat Close
d) Regel de helderheid van het LCD scherm en pas het volume aan.
e) Om het afspelen van de disk te beëindigen, moet u op de STOP
toets drukken.
8
PDF created with FinePrint pdfFactory Pro trial version http://www.fineprint.com
Page 72

G. Installatie
1.Algemene instellingen
1)Wanneer u op de SETUP toets drukt, verschijnt het setup menu op
het scherm (enkel als er geen disk in het toestel zit). De “general
setup page” verschijnt. Op hetzelfde moment zal “symbol” verlicht
worden.
Druk een tweede keer op de SETUP toets om het menu te verlaten.
2)Druk op de ENTER toets; “SPDIF Output” zal verlicht worden.
3)Ga met de bovenste of onderste pijltjestoets naar de andere
menu’s op de algemene installatiepagina.
4)Druk op de > toets om naar het submenu te gaan.
5)Selecteer het submenu met de bovenste of onderste pijltjestoets
en bevestig met ENTER.
6)Herhaal stap 3 tot 5 voor de andere menu’s.
Opmerking: met de < toets gaat u terug naar het vorige menu.
a)SPDIF Output
SPDIF Off: digitale audio signalen worden niet uitgestuurd.
SPDIF/RAW: de audio uitgang wordt niet gemoduleerd.
SPDIF/PCM: de audio uitgang wordt gemoduleerd in PCM
formaat (Pulse Code Modulation).
b)TV Display
Normal/PS: Wanneer de DVD speler signalen naar een normale
TV stuurt, krijgt u een normaal beeld op het scherm.
Normal/LB: Wanneer de DVD speler signalen naar een normale
TV stuurt, krijgt u een normaal beeld met een zwarte
streep bovenaan en onderaan het scherm.
Wide: Stuurt de DVD speler signalen naar een breedbeeld
TV,dan zal u een breedbeeld te zien krijgen op het
scherm.
9
PDF created with FinePrint pdfFactory Pro trial version http://www.fineprint.com
Page 73

c)Hoek
On :het symbool van de hoekselectie zal op het scherm verschijnen.
Off : het symbool verschijnt niet op het scherm.
Opmerking:Niet alle disks hebben beelden die u uit verschillende
hoeken kunt bekijken.
d)Laatst in het geheugen
On: het toestel zal teruggaan naar de laatste positie op de disk.
Off: het toestel zal niet teruggaan naar de laatste positie op de
disk maar zal terug van in het begin afspelen.
Opmerking : Deze functie is enkel van toepassing wanneer het
toestel op OPEN staat.
2. Videokwaliteit instellen
1) Druk in het installatiemenu op de < of > toets om “video quality
setup” te installeren; “symbol” zal verlicht worden. Druk op de ENTER
toets om de installatiepagina rond videokwaliteit op te starten.
2)Druk op de ENTER toets; “brightness” zal verlicht worden.
3)Ga met het bovenste of onderste pijltje naar de andere menu’s
betreffende videokwaliteit.
4)Druk op de > toets om naar het sub menu te gaan.
5)Pas het aantal aan met het bovenste of onderste pijltje en bevestig
het ingevoerde met de ENTER toets.
6)Herhaal stap 3 tot 5 voor de andere menu’s.
Opmerking: met de < toets gaat u terug naar het vorige menu.
a) Helderheid b) Contrast
c) Kleur d) Verzadiging
10
PDF created with FinePrint pdfFactory Pro trial version http://www.fineprint.com
Page 74

3.Paswoord
Selecteer “password setup page” via de < of > toets; “symbol” wordt
verlicht.
Druk op de ENTER toets om naar de paswoord pagina te gaan.
Druk 2 keer op de ENTER toets om naar de Password Change pagina
te gaan (om paswoord te veranderen).
Geef het oude of het standaard paswoord in, gevolgd door uw nieuw
paswoord. Bevestig daarna uw nieuw paswoord (confirm password).
Druk op de ENTER toets om de verandering te bevestigen.
Opmerking: het standaard paswoord is 3308.
4. Voorkeurpagina
1)Ga met de linker of rechter pijltjestoets naar “Preference Page”;
“symbol” zal verlicht worden. Druk daarna op ENTER.
2)Duw op de ENTER toets; “audio” zal verlicht worden.
3)Ga met het bovenste of onderste pijltje naar de andere menu’s op
de voorkeurpagina.
4)Druk op de rechter pijltjestoets om naar het submenu te gaan.
5)Selecteer met de bovenste of onderste pijltjestoets het submenu
en druk op ENTER om uw selectie te bevestigen.
6)Herhaal stap 3 tot 5 voor de andere menu’s.
Opmerking: met de linker pijltjestoets keert u terug naar het vorige
menu.
a)Audio
b)Subtitle (ondertiteling)
c)Disk menu
Opmerking: Taal en ondertitelkeuze is enkel mogelijk bij disks die
opgenomen zijn in bovenstaande talen. Wanneer de geselecteerde
taal niet beschikbaar is, zal de disk afgespeeld worden in de originele
taal van opname.
11
PDF created with FinePrint pdfFactory Pro trial version http://www.fineprint.com
Page 75

d) Selecteer “parental” met de UP/DOWN toets en druk daarna op
het rechter pijltje om het submenu te selecteren.
Stel met de UP/DOWN toets het gewenste niveau in van films die
bekeken mogen worden. Die niveaus zijn gerangschikt van het laagste
(1 Kid Safe) naar het hoogste (8 Adult).
Druk op ENTER en geef een 4-cijferig paswoord in. Bevestig daarna
nogmaals met ENTER.
Opmerking: niveau 8 Adult (volwassene) is de standaardinstelling.
e) Selecteer “Default” met de UP/DOWN toets en druk op de rechter
pijltjestoets om naar het submenu te gaan. Druk op de ENTER toets
om terug naar de fabrieksinstellingen te gaan.
Opmerking: het kinderslot is niet standaard ingesteld.
OPMERKING: Het standaard paswoord is 3308 en is altijd geldig
(ook nadat u uw eigen paswoord gekozen en veranderd heeft).
Om te voorkomen dat anderen dit standaard paswoord zullen
misbruiken om het kinderslot te veranderen en het paswoord te
wijzigen, kan u het standaard paswoord ergens anders opslaan en
het schrappen uit deze handleiding.
12
PDF created with FinePrint pdfFactory Pro trial version http://www.fineprint.com
Page 76

H.Basisfuncties
POWERhet toestel aanzetten en uitschakelen
OPENdisk verwijderen / laden
PLAYafspelen
PAUSEpauze (stil beeld)
STOP(1x) stoppen op een bepaald punt
(2x) volledig stoppen met afspelen
NEXTom tijdens het afspelen naar een volgend hoofdstuk,
lied of scène te gaan.
PREVIOUSom naar het vorige hoofdstuk, lied of scène te gaan.
FORWARD2, 4, 8, 16 of 32 keer versneld vooruitspoelen
REVERSE2, 4, 8, 16 of 32 keer versneld terugspoelen
LEFT/RIGHT/wordt gebruikt om te navigeren in het menu
UP/DOWN
ENTERom selecties uit een menu te bevestigen
NUMBERSom een onderwerp te kiezen of selectie te maken
MENUom het disk menu op te roepen
REPEATom een titel, hoofdstuk of lied te herhalen
A-B om een gedeelte van de disk dat tussen 2 bepaalde
punten ligt (A en B) opnieuw af te spelen
DISPLAY
om de informatie te tonen(titel, hoofdstuk, lied, tijd, enz)
ANGLEom de camerahoek van de scène te wijzigen.
SUBTITLEom één van de talen voor de ondertiteling te kiezen.
AUDIOom het geluidsformat te selecteren.
ZOOMom een beeld 2, 3 of 4 keer in te zoomen
SETUPom het setup menu van het toestel te tonen zodat u de
juiste instellingen kunt doen.
13
PDF created with FinePrint pdfFactory Pro trial version http://www.fineprint.com
Page 77

I.Menu
Title Elapsed
Title Remain
Chapter Elapsed
DVD’s zijn verdeeld in titels en hoofdstukken. Bij het afspelen van
een DVD krijgt u een menu te zien op het scherm van uw TV of
monitor. De inhoud van dat menu verschilt van disk tot disk. Druk
tijdens het afspelen op MENU om het menu terug te krijgen. Bij
sommige disks kan u enkel de afspeelmogelijkheden selecteren, en
krijgt u dus geen menu.
J.Scherm
1. Afspeeltijd en resterende tijd
a. Druk tijdens het afspelen op de DISPLAY toets om het huidige
titelnummer (1) te zien, evenals het totaal aantal titelnummers (2),
het huidige hoofdstuknummer (4) en de reeds afgespeelde tijd van
de titel (5). Na 3 seconden zal deze informatie automatisch verdwijnen,
tenzij u op de DISPLAY toets drukt.
b. Druk enkele keren op de DISPLAY toets om onderstaande opties
achtereenvolgens te selecteren.
Title Elapsed: de afgespeelde tijd van een titel
Title Remain: de resterende tijd van een titel
Chapter Elapsed: de afgespeelde tijd van een hoofdstuk
Chapter Remain: de resterende tijd van een hoofdstuk
Display off: de afspeeltijd en de resterende tijd worden niet
getoond
Display Off
Chapter Remain
14
PDF created with FinePrint pdfFactory Pro trial version http://www.fineprint.com
Page 78

2. Hoekselectie
Sommige DVD’s bevatten scènes die met verschillende camerahoeken
zijn opgenomen. Die scènes kunnen dan vanuit meerdere hoeken
worden bekeken.
Druk tijdens het afspelen van zo’n disk op de ANGLE toets om het
nummer van de huidige hoek te zien (1) en het totaal aantal hoeken (2)
Druk telkens op de ANGLE toets om de scène vanuit de volgende
hoek te bekijken of terug te gaan naar het normale beeld. Wanneer u
de ANGLE toets niet indrukt binnen de 3 seconden verdwijnt de
hoekselectie van het scherm.
Opmerking: niet alle disks bevatten scènes die uit verschillende
camerahoeken zijn opgenomen.
3. Selectie van de taal van de ondertiteling
Druk tijdens het afspelen van een disk op de SUBTITLE toets om de
gewenste taal van ondertiteling te kiezen. Op het scherm ziet u het
nummer van de huidige taal (1) en het totaal aantal talen (2). Druk
telkens op de SUBTITLE toets om de gewenste taal te selecteren. Als
er slechts in 1 taal ondertitels zijn, verandert de taal niet als er op de
knop gedrukt wordt.
Om de ondertiteling uit te schakelen, moet u enkele keren op de
SUBTITLE toets drukken tot wanneer “subtitle off ” verschijnt.
Als er binnen de 3 seconden niet op de knop gedrukt wordt, verdwijnt
het menu van het scherm.
15
PDF created with FinePrint pdfFactory Pro trial version http://www.fineprint.com
Page 79

* Bij sommige DVD’s worden de ondertitels geactiveerd met het
hoofdmenu van de DVD.
4.Audioselectie
Bij sommige disks is het geluid in twee of meer formats opgenomen.
Om het geluidsformat te selecteren, moet u tijdens het afspelen op
de AUDIO toets drukken. Het huidige geluidsnummer zal verschijnen
(1), evenals het totaal aantal geluidsformats (2). Druk telkens op de
AUDIO knop om het gewenste geluidsformat te selecteren.
Als er binnen de 3 seconden niet op de knop gedrukt wordt, verdwijnt
het menu van het scherm.
* Bij sommige DVD’s kan u die functie enkel activeren met het
hoofdmenu van de DVD.
5.Inzoomen
Druk tijdens het afspelen op de ZOOM knop om het beeld 2, 3 of 4
keer in te zoomen.
(1)Druk 1 keer op ZOOM om het beeld 2 keer te vergroten.
(2)Druk 2 keer op ZOOM om het beeld 3 keer te vergroten.
(3)Druk 3 keer op ZOOM om het beeld 4 keer te vergroten.
(4)Druk een vierde keer op de ZOOM toets om terug te gaan
naar de normale grootte.
16
PDF created with FinePrint pdfFactory Pro trial version http://www.fineprint.com
Page 80

6. A-B Repeat
a. Druk een eerste keerop deA-Btoets om hetbegin vanhetherhaalstuk
(A) in te stellen.
b. Stel het einde van het herhaalstuk in door een tweede keer op deA-
B toets te drukken. Het toestel zal nu het ingestelde stuk (tussen A
en B) herhalen.
c. Om het afspelen van A-B te stoppen, moet u een derde keer op de
A-B toets drukken.
17
PDF created with FinePrint pdfFactory Pro trial version http://www.fineprint.com
Page 81

7.Repeat
a.Dit toestel kan een bepaalde titel of hoofdstuk herhalen. U moet
hiervoor een of meerdere keren op de REPEAT toets drukken.
Chapter: het huidige hoofdstuk herhalen
Title: de huidige titel herhalen
All: alle hoofdstukken en titels herhalen
Off: terug normaal afspelen
Bijvoorbeeld: het herhalen van een hoofdstuk.
K.Diverse afspeelmogelijkheden
1. Audio CD’s
Druk tijdens het afspelen van een audio CD herhaaldelijk op de
DISPLAY toets (op de afstandsbediening) om informatie over de tijd
te krijgen. Hieronder ziet u welke informatie op het scherm verschijnt.
Single Elapsed => Single Remain =>
Total elapsed => Total Remain => Display off
Single Elapsed: het huidige liedje dat afgespeeld wordt en de
reeds gespeelde tijd van het liedje verschijnen
op het scherm.
Single Remain: het huidige liedje dat afgespeeld wordt en de
resterende tijd.
18
PDF created with FinePrint pdfFactory Pro trial version http://www.fineprint.com
Page 82

Total Elapsed: het huidige liedje dat afgespeeld wordt en de tijd die
de CD al speelt.
Total Remain: het huidige liedje en de resterende tijd van de CD.
Display Off : de tijdsinformatie van de CD wordt niet getoond.
Bijvoorbeeld: “single elapsed”.
GEBRUIK MAKEN VAN DE HERHAALFUNCTIE
Deze functie staat standaard op OFF. Druk 1 of meerdere keren
op de REPEAT toets en u ziet het volgende:
• Track:herhaalt het huidige lied
• All:herhaalt de volledige CD
• Off:uit
U kunt telkens switchen tussen de verschillende opties.
19
PDF created with FinePrint pdfFactory Pro trial version http://www.fineprint.com
Page 83

2. MP3’s
MP3 is een formaat om digitale audio op te slaan. Wanneer een
audio CD opgenomen wordt op MP3 formaat zal er amper verlies
zijn van geluidskwaliteit en zal het veel minder plaats innemen op
de schijf.
Dit toestel kan MP3 enbeeldbestanden opgenomen op CD-R’s en
CD-RW’s afspelen.
Het menu zal automatisch verschijnen wanneer u een MP3 in het
toestel plaatst. Vi a dat menu kan u de gewenste folders en liedjes
selecteren. Doet u dit niet, dan zullen de liedjes afgespeeld worden
in de volgorde waarin ze op de disk gebrand zijn.
1. Druk op het bovenste of onderste pijltje om een folder te kiezen
uit de lijst die u links op het scherm ziet.
2. Selecteer de aangeduide folder door op de ENTER toets te
drukken. U krijgt nu een lijst van alle liedjes die zich onder deze
folder bevinden.
3. Gebruik het bovenste of onderste pijltje om een lied te kiezen uit
de lijst. Bevestig met ENTER; het aangeduide lied je zal
afgespeeld worden.
20
PDF created with FinePrint pdfFactory Pro trial version http://www.fineprint.com
Page 84

4.Gebruik de NEXT toets om naar het volgende liedje te gaan. Met
de PREVIOUS toets keert u terug naar het begin van het vorige
liedje.
GEBRUIK MAKEN VAN DE HERHAALFUNCTIE
Deze functie staat standaard op OFF. Druk 1 of meerdere keren op
de REPEAT toets en u ziet het volgende:
• Single
• Repeat One (een lied herhalen)
• Repeat Folder (een bepaalde folder herhalen)
• Folder (normaal afspelen)
U kunt telkens switchen tussen de verschillende opties.
OPMERKING
• Dit icoon “ ” voor een bestandsnaam wijst erop dat het een
folder is en geen MP3 bestand.
• Het “MP3” icoon voor een bestandsnaam wijst erop dat het een
MP3 bestand is.
Opmerking:
Omdat we als bedrijf steeds willen innoveren en technisch verfijnen,
verlenen we ons het recht om de software te verbeteren of aan te
passen.
21
PDF created with FinePrint pdfFactory Pro trial version http://www.fineprint.com
Page 85

3. JPG bestand
1) Plaats de JPG disk in de lade.
2) Selecteer het JPG bestand uit de menu’s of submenu’s door middel
van de UP/DOWN toets of de ENTER toets.
Om terug naar een vorige menupagina te gaan, moet u op de
LEFT toets drukken.
3) U kunt een preview krijgen van het geselecteerde JPG bestand
door op de PLAY of ENTER toets te drukken.
4) Door op de LEFT toets te drukken, draait u het beeld 90° tegen de
wijzers van de klok in. Een druk op de RIGHT toets zorgt ervoor
dat het beeld gedraaid wordt met de wijzers van de klok mee.
5) Het is ook mogelijk om de foto’s verticaal of horizontaal te draaien
door middel van de UP en de DOWN toets.
6) Wanneer u tijdens het bladeren door het JPG bestand op de
DISPLAY toets drukt, krijgt u de volgende mogelijkheden:
WIPE TOP, WIPE BOTTOM, WIPE LEFT, WIPE RIGHT, DIAGONAL
WIPE LEFT TOP, DIAGONAL WIPE RIGHT TOP, DIAGONAL WIPE
LEFT BOTTOM, DIAGONAL WIPE RIGHTBOTTOM, EXTEND
FROM CENTER H, EXTEND FROM CENTER V, COMPRESS TO
CENTER H, COMPRESS TO CENTER V,WINDOW H, WINDOW
V, WIPE FROM EDGE TO CENTER.
7) Wanneer u een beeld in preview bekijkt, zijn volgende functies
niet mogelijk: “ANGLE”, “SUBTITLE”, “AUDIO”, “NUMBER”, “AB”,
“RETURN”, “REW/FF”, “SLOW”. Er zal een icoontje in de vorm
van een hand op de display verschijnen om er u op te wijzen dat
deze opties op dat moment niet mogelijk zijn.
8) Druk op de STOP toets; het “slide show menu” zal op het scherm
verschijnen.
9) Wanneer u tijdens het overlopen van de beelden op de STOP
toets drukt, worden alle beelden in miniatuur afgebeeld. U kunt
het beeld naar keuze dan selecteren door middel van de
pijltjestoetsen.
22
PDF created with FinePrint pdfFactory Pro trial version http://www.fineprint.com
Page 86

4. Weergave van MPEG4 disks
MPEG-4 is de naam van één van ’s werelds meest populaire video
compressietechnieken. Het is software dat video van eender welke bron
samendrukt in een formaat dat over het Internet vervoerd kan worden
zonder de originele beeldkwaliteit te verminderen.
DVD, CD-R/RW disks die met het MPEG4-formaat zijn opgenomen
kunnen met dit toestel weergeven worden.
Opmerking: alleen documenten met het achtervoegsel ‘avi’ kunnen
weergegeven worden.
De bediening van MPEG4 disks is hetzelfde als die van MP3 disks.
Gebruik de OMHOOG, OMLAAG, LINKS en RECHTS toetsen om de
cursor te bewegen en druk ENTER om te bevestigen.
* Druk MENU om terug te gaan naar het beschikbare menu.
23
PDF created with FinePrint pdfFactory Pro trial version http://www.fineprint.com
Page 87

L. Aansluiten Op Andere Electronische Apparaten
1. Aansluiten op een TV of een andere monitor (zie figuur 9)
Het is oo
een anderemonitor, en dit om een kwaliteitsvolstereogeluid te krijgen
en een prachtig beeld. (VERBINDINGSKABEL NIET BIJGESLOTEN)
1) Bevestig het ene uiteinde van de audio/video kabel (1/8” stereo
(wit = linker kanaal, rood = rechter kanaal).
2) Bevestig de gele plug van de audio/video kabel in de VIDEO
k mogelijk om de DVD speler aan te sluiten op een TV of
plug) in de AUDIO uitgangsbus van de DVD speler en het andere
uiteinde in de AUDIO ingangsbus van uw TV of monitor.
uitgangsbus van de DVD speler (rechts op het toestel) en de
andere gele plug in de VIDEO ingangsbus van uw TV of monitor.
Figuur 9
* Het is ook mogelijk om een koptelefoon te bevestigen aan het
toestel. U moet dit dan gewoon in de daarvoor bestemdeingangsbus
steken.
2. SD Kaart
Zorg ervoor dat er geen disc in de speler zit. Plaats een SD kaart
met MP3 bestanden of JPEG bestanden in de kaartlezer. Druk op
de DVD/SD toets om te schakelen tussen DVD en SD modus.
24
PDF created with FinePrint pdfFactory Pro trial version http://www.fineprint.com
Page 88

M. Specificaties
Compatible DISC : DVD / CD / MP3 /MPEG4
Signaal systeem: PAL
Grootte scherm: 9 inch
Frequentie: 20 Hz tot 20 kHz
Video uitgang: 1 Vp-p/75 Ohm, ongebalanceerd
Audio uitgang: 1.4Vrms/10kOhm
Audio S/N: meer dan 60 dB
Dynamic range: meer dan 85 dB
Laser: Semiconductor Laser, Wave Length: 650 nm/795 nm
Voeding: DC 9V
Verbruik: 6 W
Temperatuur: 5~35°C
Gewicht: 0.37 kg
Afmetingen (WxDxH): 7.24x6.14x1.14 inches of 184x156x29mm
Monitor
Kleurensysteem : PAL
Grootte : 9 inches
Voeding : DC 9-12V
Verbruik : 7 W
Temperatuur in werking : 41~104°F (5~40°C)
Vochtigheid : 10-75%
Temperatuur om te bewaren : 4~140°F (20~60°C)
Afmetingen (W x D x H) : 238 x 158 x 12 mm
Gewicht : 0.503 kg
25
PDF created with FinePrint pdfFactory Pro trial version http://www.fineprint.com
Page 89

N. Mogelijke problemen en oplossingen
PROBLEEM
Geen of slecht
geluid
Niet mogelijk om
tijdens de film
vooruit te
spoelen
Dit symbool
verschijnt op de
display
Vaag beeld
OPLOSSING
• zorg ervoor dat uw DVD speler goed
aangesloten is en controleer of alle kabels in
de juiste ingangsbussen zitten.
• U kunt het begin van de film en de
waarschuwingsinformatie niet negeren.
Vooruitspoelen is niet mogelijk aangezien de
disks zo geprogrammeerd zijn.
U kunt een bepaalde actie niet uitvoeren omdat:
1.de software van de disk het verbiedt.
2.de software van de disk die bepaalde actie niet
aankan (bv. hoekselectie, enz).
3.de handeling op dat moment niet mogelijk is.
4.U een titel of hoofdstuk gevraagd heeft dat niet
mogelijk is.
• De disk is misschien beschadigd. Probeer
eens een andere disk.
• Een vager beeld is normaal bij het
vooruitspoelen of terugspoelen van het beeld.
Vooruitspoelen
of terugspoelen
is niet mogelijk.
• Bepaalde disks hebben fragmenten waarin u
niet vooruit of achteruit kan spoelen.
• Wanneer u de waarschuwingsinformatie bij het
begin van een film wil overslaan, dan zal dit
niet lukken. Dit deel van de film is immers zo
gemaakt dat skippen onmogelijk is.
26
PDF created with FinePrint pdfFactory Pro trial version http://www.fineprint.com
Page 90

Mogelijke problemen en oplossingen (vervolg)
PROBLEEM
Infrarood sensor
werkt niet.
De disk speelt
niet.
De disk begint
te spelen, maar
stopt nadien
onmiddellijk.
OPLOSSING
• Controleer of de batterijen van de
afstandsbediening nog werken.
• Zorg ervoor dat er niets voor de sensor van
de afstandsbediening staat.
• Richt de afstandsbediening goed op de
sensor.
• Plaats een disk in de lade met de bedrukte
zijde naar boven.
• Controleer het type van de disk. Deze DVD
speler speelt enkel digitale video disks,
audio CD’s en MP3’s.
• Het toestel en de disk zijn regionaal
gecodeerd. Als de regionale codes niet
overeenkomen, kan de disk niet afgespeeld
worden. De DVD speler heeft regio code
2.
• De disk is vuil; maak hem schoon.
• Er treedt condensatie op. Wacht tot
wanneer de DVD speler opgedroogd is.
27
PDF created with FinePrint pdfFactory Pro trial version http://www.fineprint.com
Page 91

Dit symbool op het product of in de handleiding
betekent dat uw elektrisch of elektronisch toestel
bij het einde van zijn leven gescheiden moet worden
van ander huiselijk afval. Er bestaan meerdere
manieren om uw oud apparaat in te leveren. Voor
meer informatie kunt u de locale autoriteiten of uw
dealer contacteren.
28
PDF created with FinePrint pdfFactory Pro trial version http://www.fineprint.com
 Loading...