

Page 1
Draagbare DVD speler met 2 x 7” monitor
DVP7040TWIN
Gelieve deze gebruiksaanwijzing te lezen alvorens het toestel te installeren, in
te stellen en te gebruiken.
Page 2

Verwittigingen en waarschuwingen
Plaatsing
Teneinde brand of een elektrische schok te vermijden, mag dit toestel niet blootgesteld worden aan regen of vocht. Plaats het toestel niet op een onstabiele kar, display
of plank om te vermijden dat het zou vallen. Hou het toestel weg van sterke magneten, warmtebronnen, direct zonlicht en overdreven stof. Als het toestel snel van een
koude in een warme locatie gebracht wordt, kan er binnenin condensatie ontstaan. In
dat geval dient een uur gewacht te worden alvorens het toestel te gebruiken. Verwijder de disc en laat het toestel ingeschakeld zodat het vocht kan verdampen.
Installatie
Zorg ervoor dat de DVD speler geïnstalleerd wordt volgens de instructies en afbeeldingen van de gebruiksaanwijzing.
Opgelet
Steek geen voorwerpen van eender welke vorm in de openingen van het toestel.
Mors of spuit geen vloeistof in het toestel (dit kan resulteren in brand of een elektrische schok). Plaats geen zware voorwerpen op het toestel. Om een goede ventilatie en werking te verzekeren, mogen de openingen van het toestel niet afgedekt worden met een doek of ander materiaal. Gebruik het toestel niet in de buurt van een
open vlam, zoals een vuur of een kaars. Gebruik het juiste type batterij. Gebruik het
toestel niet bij temperaturen hoger dan 40° Celsius.
Disc
Gebruik geen discs met een onregelmatige vorm zoals een hart of een ster, vermits
dit een slechte werking van het toestel kan veroorzaken. Plak geen papier, tape of
lijm op de disc. Stel de disc niet bloot aan direct zonlicht of een warmtebron. Raak
het oppervlak van de disc niet aan. Neem de disc vast bij de rand. Reinig de disc vanuit het midden naar de buitenkant met een reinigingsdoekje. Haal, na gebruik de
disc uit het toestel en bewaar hem in de originele verpakking. Sommige weergavefuncties worden soms met opzet door de fabrikanten geblokkeerd. Vermits dit toestel
ontwikkeld is om de inhoud weer te geven zoals bepaald door de softwarefabrikanten,
is het mogelijk dat sommige weergavemogelijkheden niet beschikbaar zijn. Lees ook
de instructies die bij de disc geleverd worden.
Page 3
OPGELET: OM HET RISICO OP ELEKTRISCHE SCHOK TE VERMIJDEN, HET
TOESTEL NIET BLOOTSTELLEN AAN WATER OF VOCHT. HET TOES TEL NIET
OPENEN 5BINNENIN BEVINDEN ZICH GEEN GEBRUIKSFUNCTIES).
CONTACTEER GESPECIALISEERD PERSONEEL VOOR SERVICE.
SERVICE MAG ALLEEN UITGEVOERD WORDEN DOOR BEKWAAM PERSONEEL,
ZONIET VERVALT DE WAARBORG.
Dit logo betekent dat het toestel voldoet aan de Europese normen
inzake veiligheid en elektromagnetische compatibiliteit.
De driehoek met een bliksem in afgebeeld, dient om de gebruiker te verwittigen
dat er zich in het toestel onafgeschermde gevaarlijke spanningen bevinden die
voldoende hoog zijn om elektrische schokken bij personen te veroorzaken.
De driehoek met een uitroepteken in afgebeeld, dient om de gebruiker te
verwittigen dat er zich bij het toestel belangrijke instructies voor het gebruik
en het onderhoud bevinden.
Het laser product label op de achterzijde van het toestel dient om erop te wijzen dat
dit een toestel van klasse 1 laser is. Het betekent dat er gebruikt gemaakt wordt van
een zwakke laser zonder gevaarlijke straling buiten het toestel.
Macrovision
Dit product bevat een beveiligingstechniek voor auteursrechten die beschermd wordt
door zekere US patenten en andere intelligente eigenaarsrechten door Macrovision
Corporation. Het gebruik van deze beveiligingstechniek is bedoeld voor huisgebruik
of ander beperkt gebruik, tenzij op een andere wijze toegelaten door Macrovision
Corporation. Omkerende techniek of ontmanteling is verboden.
DOLBY PROLOGIC:
Gefabriceerd onder licentie van Dolby Laboratories.
“Dolby”, “Pro Logic” en het dubbele D symbool zijn handelsmerken van Dolby Laboratories.
Belangrijke veiligheidsinstructies
Page 4

1. Lees de gebruiksaanwijzing.
2. Hou de gebruiksaanwijzing bij.
3. Hou rekening met alle verwittigingen.
4. Volg de instructies.
5. Gebruik het toestel niet naast water.
6. Reinig alleen met een vochtig doekje.
7. Sluit de ventilatieopeningen niet af. Installeer het toestel volgens de instructies
van de fabrikant.
8. Plaats het toestel niet naast een warmtebron zoals een radiator, kachel of andere
apparaten (inclusief een versterker) die warmte produceren.
9. Als de stekker niet in uw stopcontact past, consulteer dan een elektricien om een
juiste stekker aan te brengen.
10. Zorg ervoor dat er niet op de stroomkabel getrapt kan worden.
11. Gebruik alleen de accessoires die door de fabrikant aanbevolen worden.
12. Gebruik alleen een kar, een stand, een driepoot, een plank of een tafel zoals
aanbevolen door de fabrikant. Bij het verplaatsen met een kar, dient er op gelet te
worden dat deze niet omver kan vallen.
Dit symbool op het product of in de gebruiksaanwijzing betekent dat
uw elektrisch en elektronisch materiaal niet samen met uw huisvuil
mogen weggegooid worden. Er bestaan in de EU speciaal daartoe
voorziene collectiesystemen voor recyclage.
Meer informatie kan u verkrijgen bij de lokale overheid of bij de
verdeler bij wie u het toestel kocht.
Accessoires
1 x AC/DC adapter
1 x Afstandsbediening met batterij (CR2025)
1 x Gebruiksaanwijzing
1 x AV en DC kabel
1 x Adapter voor sigarenaansteker
1 x Tas (met riempjes)
Page 5
Afstandsbediening
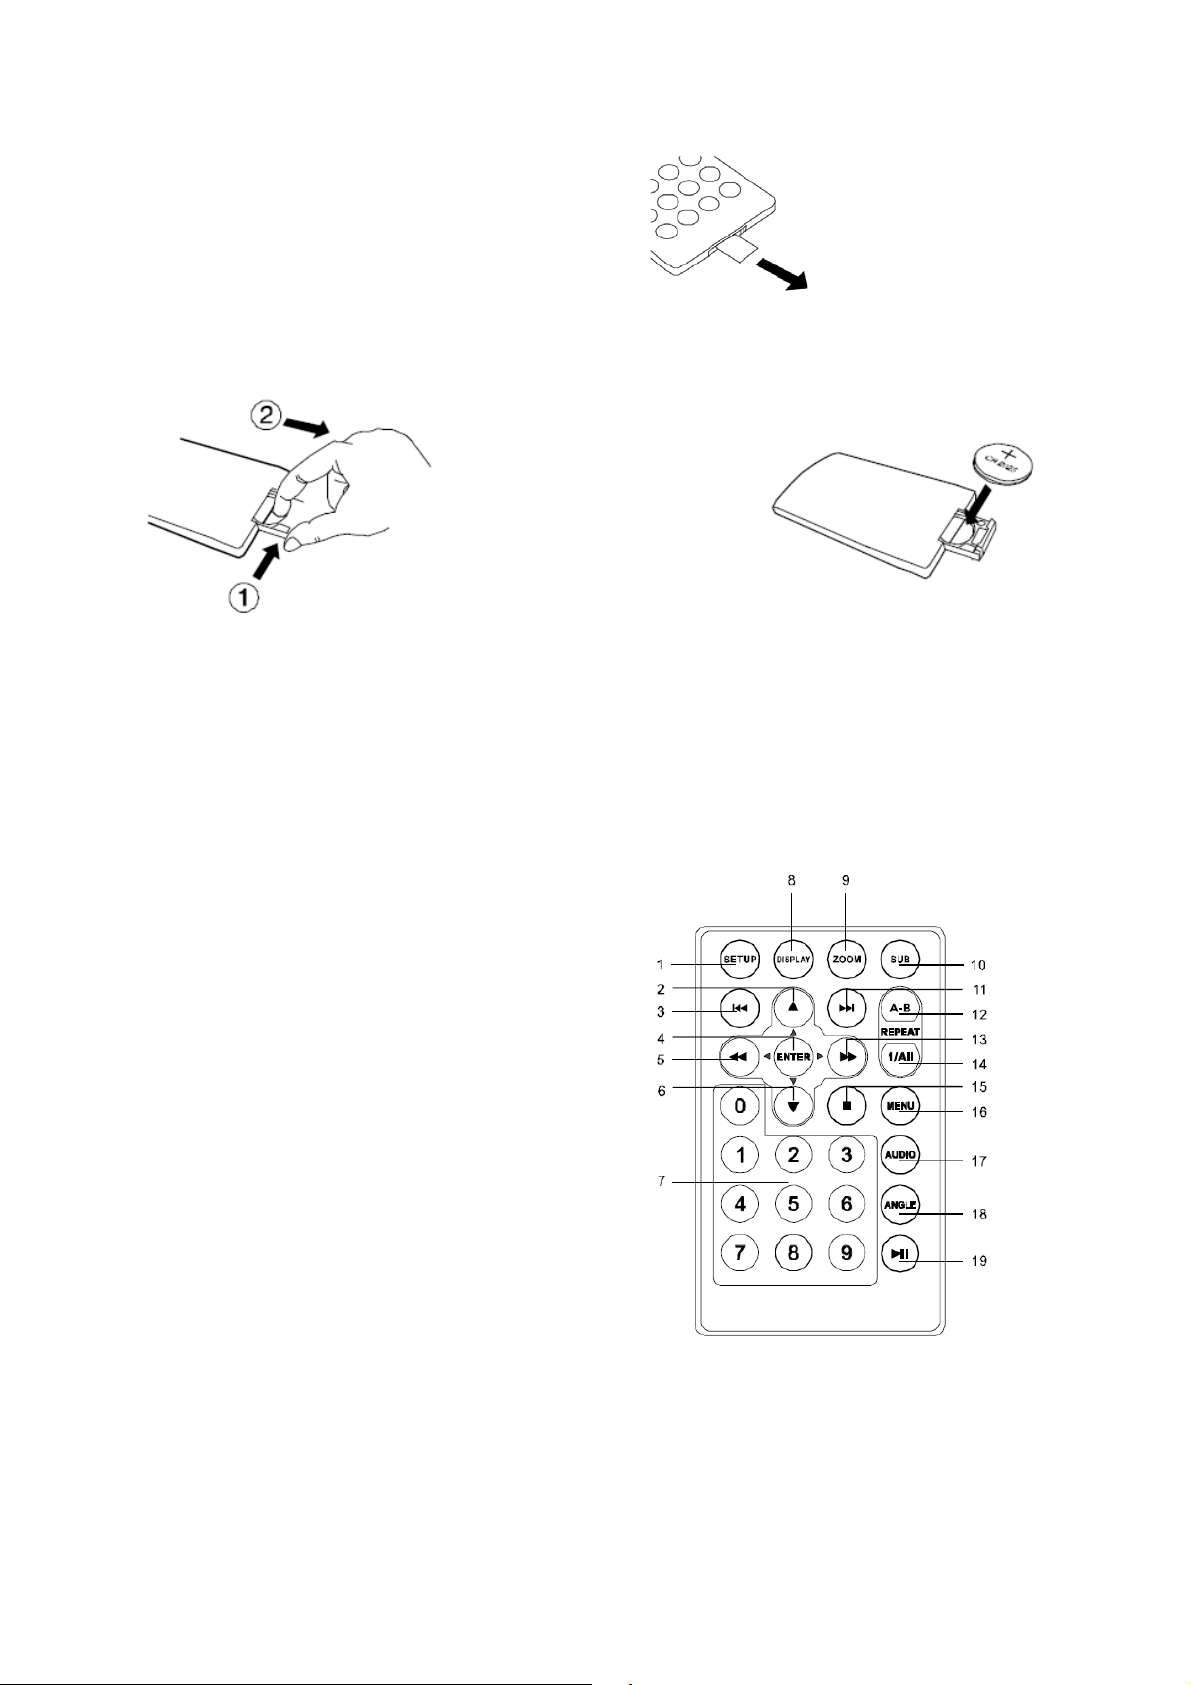
Gebruik van de afstandsbediening
Verwijder het plastic plaatje alvorens de
afstandsbediening te gebruiken.
Vervangen van de batterij voor de afstandsbediening
1. Open het batterijcompartiment 2. Plaats een CR2025 batterij
3. Richt de afstandsbediening naar de infrarood ontvanger van de speler (be-
diening binnen 3 meter en een hoek van 60°).
Bedieningen, aanduidingen en aansluitingen
Afstandsbediening
1) Setup
Om in of uit het instelmenu te gaan.
2) UP c
Om in het menu naar boven te navigeren.
3) Skip
Om terug te gaan naar de vorige titel of vorig hoofdstuk.
4) ENTER
Om de instelling te bevestigen.
Page 6

5)Rewind/left ee
Snel achterwaarts zoeken aan 2, 4, 8 16 of 32 maal de normale snelheid.
6)Down d
Om in het menu naar beneden te navigeren.
7)Cijfers
Om een item te selecteren of het paswoord in te brengen.
8)Display
Informatie op het scherm over de DVD zoals titel, nummer hoofdstuk, nummer en
tijd.
9)Zoom
Om het beeld 2, 3 of 4 maar groter te maken.
10)Sub
Om de taal van de ondertitels te kiezen.
11)Skip+
Om naar de volgende titel of het volgend hoofdstuk te gaan.
12)A-B Repeat
Om een bepaald deel van de disc te herhalen.
13)Snel voorwaarts/Rechts ff
Snel voorwaarts zoeken aan 2, 4, 8 16 of 32 maal de normale snelheid.
14)1/ALL Repeat
Herhaling van de titel, het hoofdstuk of een nummer.
15)Stop
(1 maal) Om de weergave op huidig punt te stoppen; (2 maal) Om de weergave
volledig te stoppen.
16)Menu
Om naar het hoofdmenu te gaan.
17)Audio
Om de gesproken taal te kiezen.
18)Angle
Om de scène vanuit een andere hoek te bekijken.
19)Play/Pause fII
Om de weergave te starten en te pauzeren.
DVD Speler
Page 7
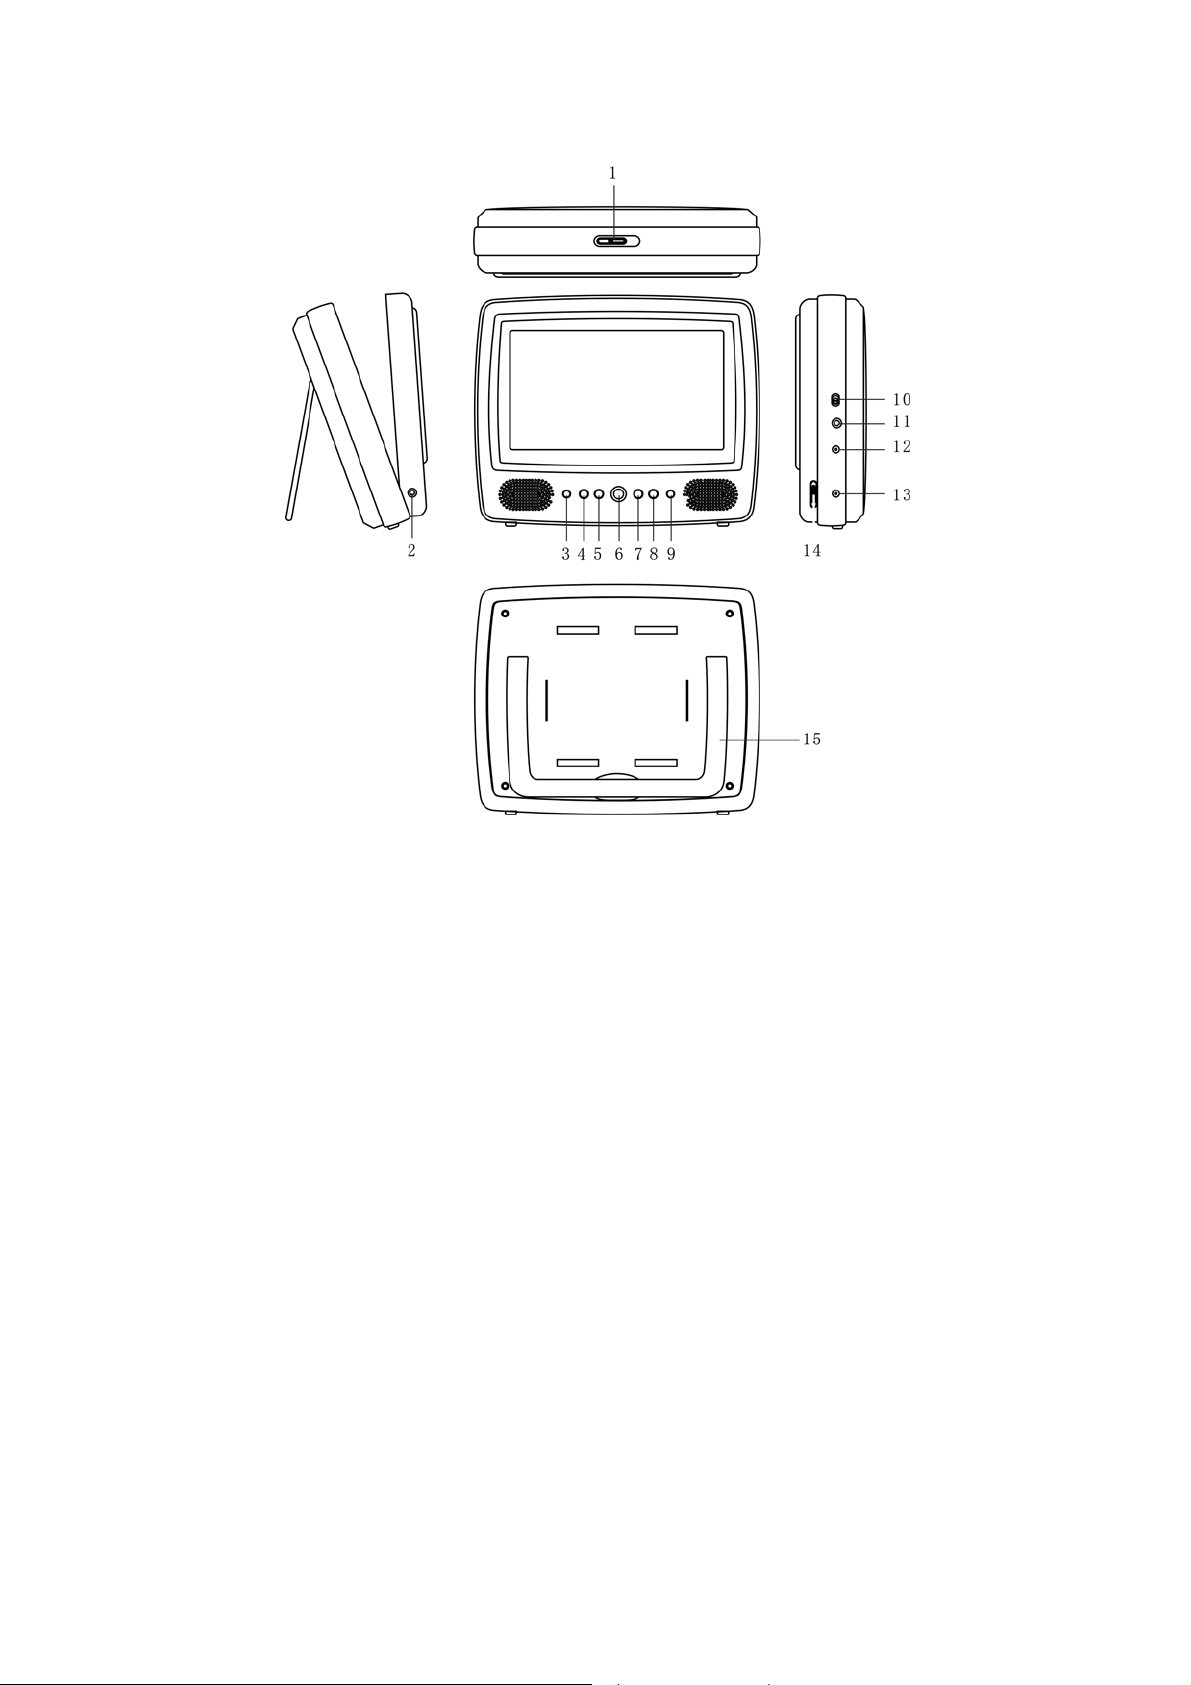
1).Open
Verschuiven om de disklade te openen.
2).Earphone
Om een hoofdtelefoon aan te sluiten.
3).Menu
Om het hoofdmenu weer te geven.
4).Pause
Om het beeld stil te zetten.
5).PREV.
Om naar vorige nummers, titels of hoofdstukken te gaan
6).Play
Om de weergave te starten
7).Next
Om naar het volgende nummer, titel of hoofdstuk te gaan.
8).Stop
(1 maal) Om de weergave op huidig punt te stoppen;
Page 8
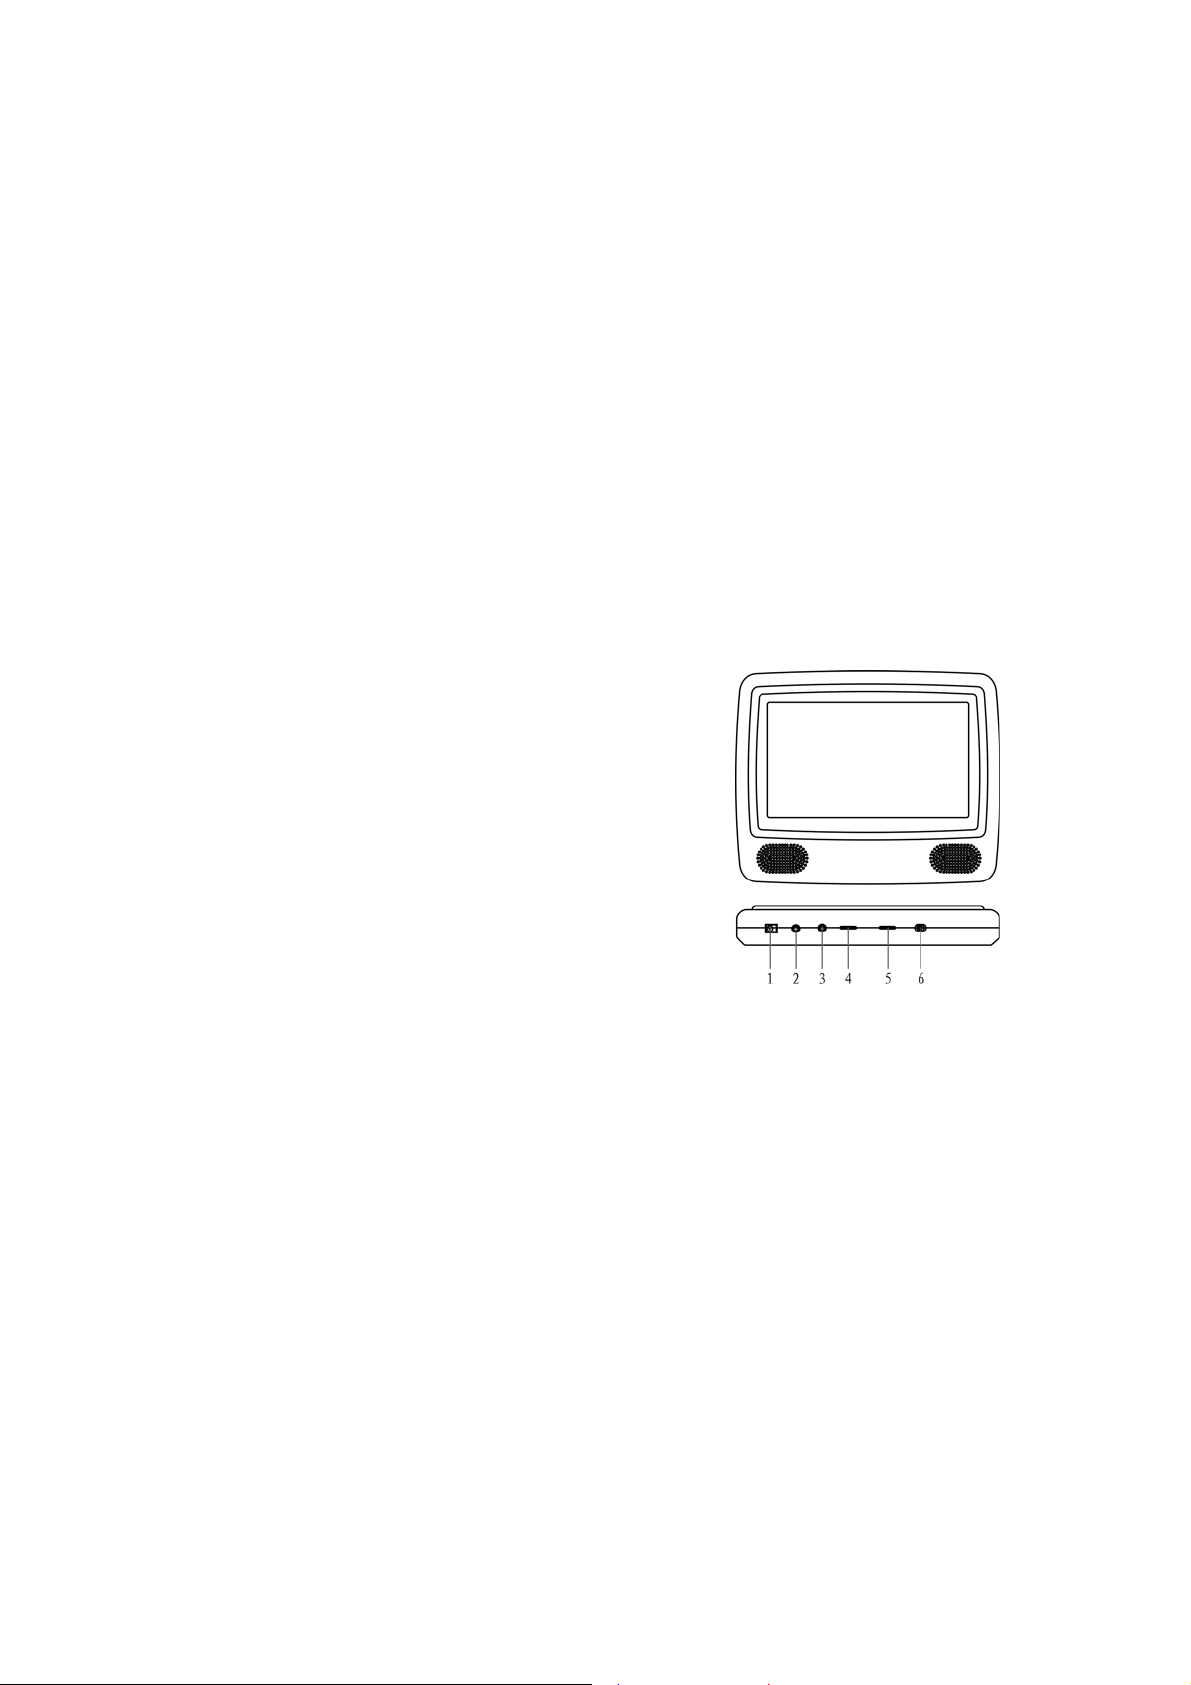
(2 maal) Om de weergave volledig te stoppen.
9).IR ontvanger
Ontvangt de signalen van de afstandsbediening.
10).On/Off
Om het toestel in en uit te schakelen.
11).A/V
Aansluiting met de monitor.
12).DC OUT
Aansluiting met de monitor.
13).DC IN
Aansluiting voor AC adapter of adapter voor sigarenaansteker.
14).Volume
Om het volume te regelen.
15).Kickstand
Monitor
1) DC 9-12 V
Aansluiting met DC OUT van de
speler (via AV en DC kabel).
2) AV IN
Aansluiting met de A/V van de speler.
3) Earphone
Aansluiting voor hoofdtelefoon. Schakelt
de luidsprekers uit.
4) Volume +/Om het volume te regelen.
5) Helderheid +/Om de helderheid in te stellen.
6) On/Off
Om het toestel in of uit te schakelen.
Voeding en installatie
Page 9
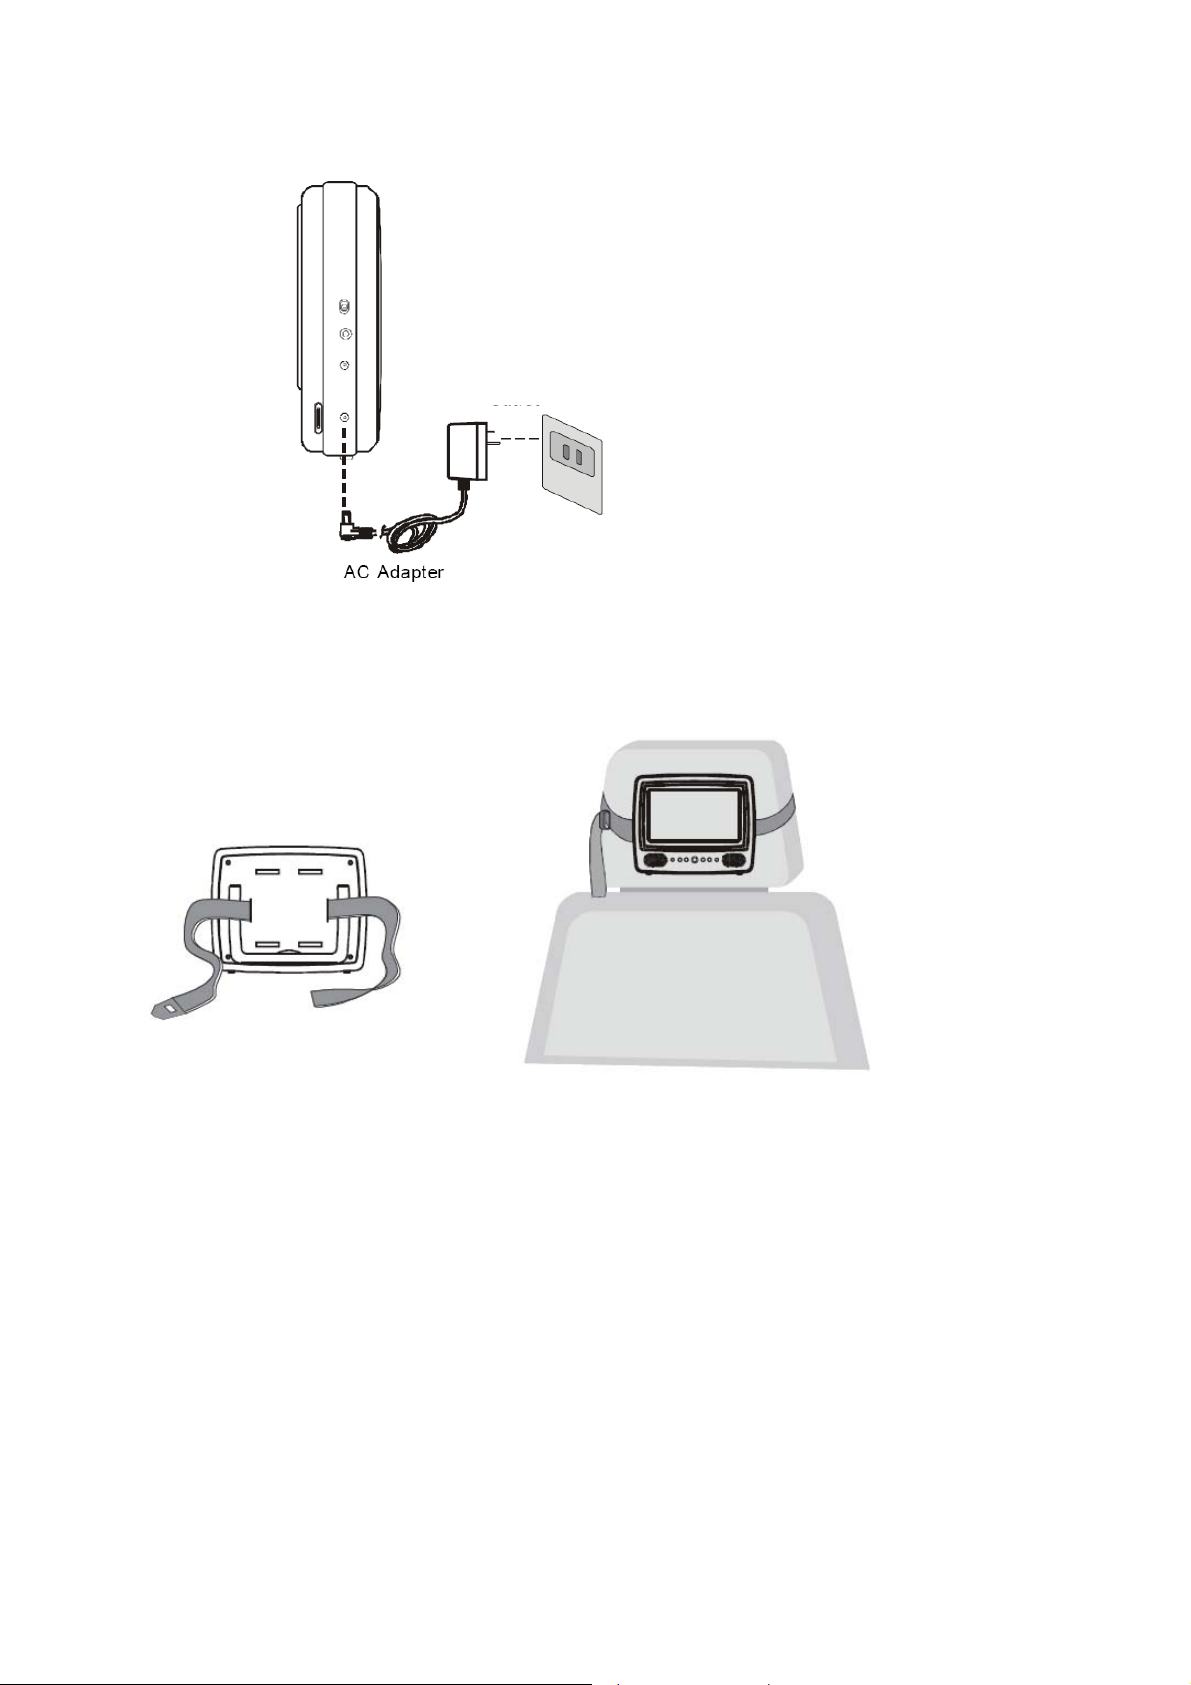
A. Voeding thuis
2 Naar stopcontact
IN aansluiting op het toestel en de andere
kant in een stopcontact (100-240V AC).
Opmerking: de meegeleverde AC adapter
dient alleen voor gebruik bij dit toestel. Gebruik hem niet voor andere apparatuur.
Trek de stekker uit het stopcontact als u ge-
durende langere tijd het toestel niet gebruikt.
1 Naar ‘DC IN’
van het toestel.
Steek een kant van de AC adapter in de DC
B. Plaatsing van de DVD-speler/Monitor op dehoofdsteun
Stap 1
Stap 2
Opmerking: installeer de DVD speler/monitor zoals hierboven getoond.
C. Voeding en installatie in de auto
Page 10
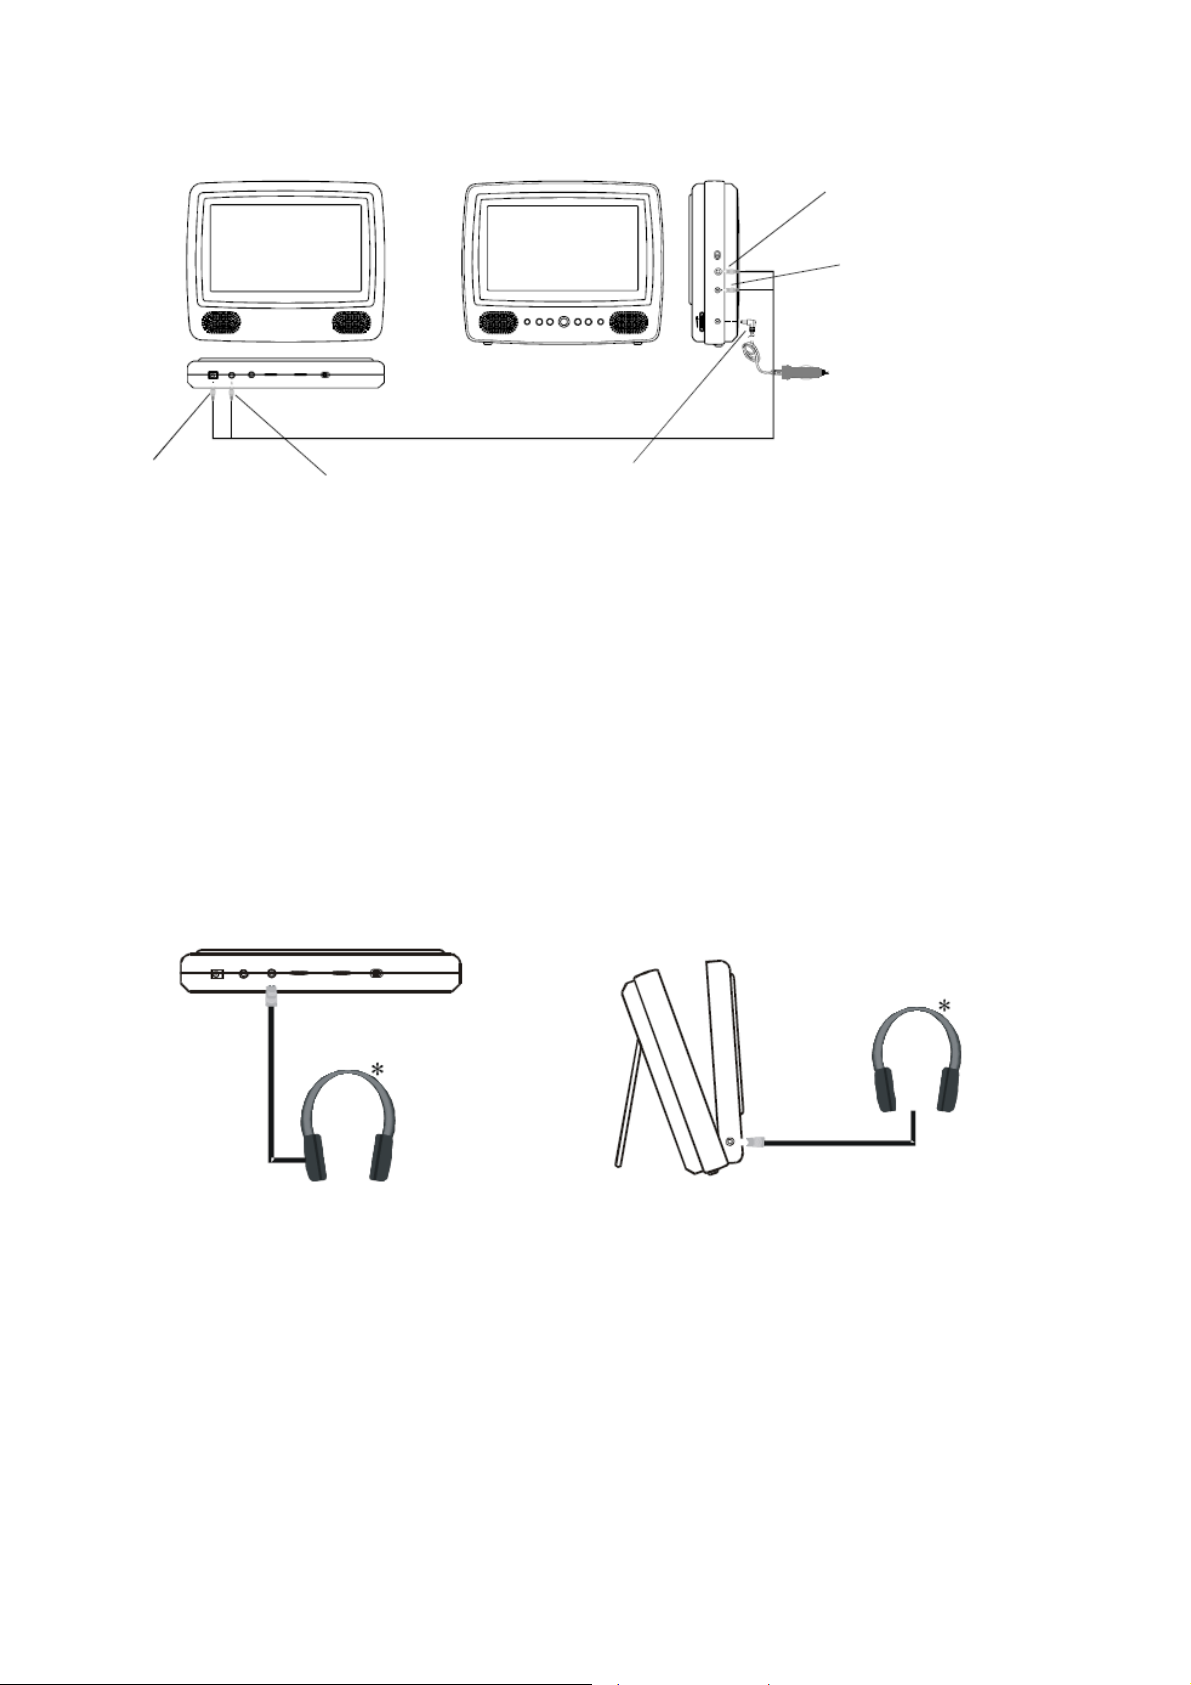
1 Naar de A/V aansluiting
op de DVD speler.
2 Naar de DC OUT
aansluiting op de DVD
speler
6 Naar de sigarenaansteker van de auto
3 Naar de DC
IN aansluiting
op de monitor
4 Naar de AV IN aansluiting
op de monitor
5 Naar de DC IN
aansluiting op de
DVD speler
Sluit de DVD speler en de monitor aan zoals hierboven afgebeeld.
Opmerking: trek de adapter uit de sigarenaansteker wanneer het toestel niet gebruikt wordt.
D. Aansluiting van hoofdtelefoon (niet meegeleverd)
Een hoofdtelefoon met snoer kan op de DVD speler/monitor aangesloten worden.
Steek de plug van de hoofdtelefoon in de hoofdtelefoonaansluiting van de DVd speler of van de monitor.
Weergave van een disc
Page 11

Deze gebruiksaanwijzing toont de basisinstructies om het toestel te bedienen. Sommige DVD’s zijn gemaakt zodat bepaalde bedieningen tijdens de weergave al dan
niet gebruikt kunnen worden. Daarom kan het gebeuren dat niet alle mogelijke bedieningsmogelijkheden uitgevoerd kunnen worden. Dit betekent niet dat het toestel
defect is. Lees de instructies die geleverd worden bij de DVD om meer informatie te
bekomen over de opties die de DVD biedt.
“;” kan op het scherm verschijnen tijdens de bediening. Het “;” symbool betekent
dat de gewenste operatie door de disc niet toegelaten is.
Een disc inbrengen en weergeven
1. Na het toestel aan de stroom te hebben aangesloten, de Power on/off schakelaar
naar “on” positie brengen.
2. Open het paneel.
3. Plaats voorzichtig een disc in de lade.
- U zal horen en voelen dat de disc zich stevig plaatst.
- Plaats de disc met de bedrukte zijde naar boven.
4. Sluit het deksel van de DVD speler zodat u een klik hoort. Het toestel laadt de
disc en start de weergave.
5. Weergave stoppen.
Druk op STOP () tijdens de weergave.
6. De weergave pauzeren.
Druk op PAUSE (fII) op de afstandsbediening.
- De weergave staat stil, er is geen geluid.
- Om verder te gaan, druk opnieuw op PAUSE (fII).
7. Snel voorwaarts/snel achterwaarts.
Druk op snel voorwaarts (ff) of snel achterwaarts (ee) om snel te zoeken aan
2x, 4x, 8x, 16x of 32x de normale snelheid.
8. Menu
Een DVD is ingedeeld in secties die titels en hoofdstukken genoemd worden.
Wanneer u een DVD weergeeft, verschijnt er een hoofdmenu op het scherm van
de speler of de monitor. De inhoud van het menu verschilt van disc tot disc. Druk
tijdens de weergave op MENU om het menu weer te geven.
Display
Page 12
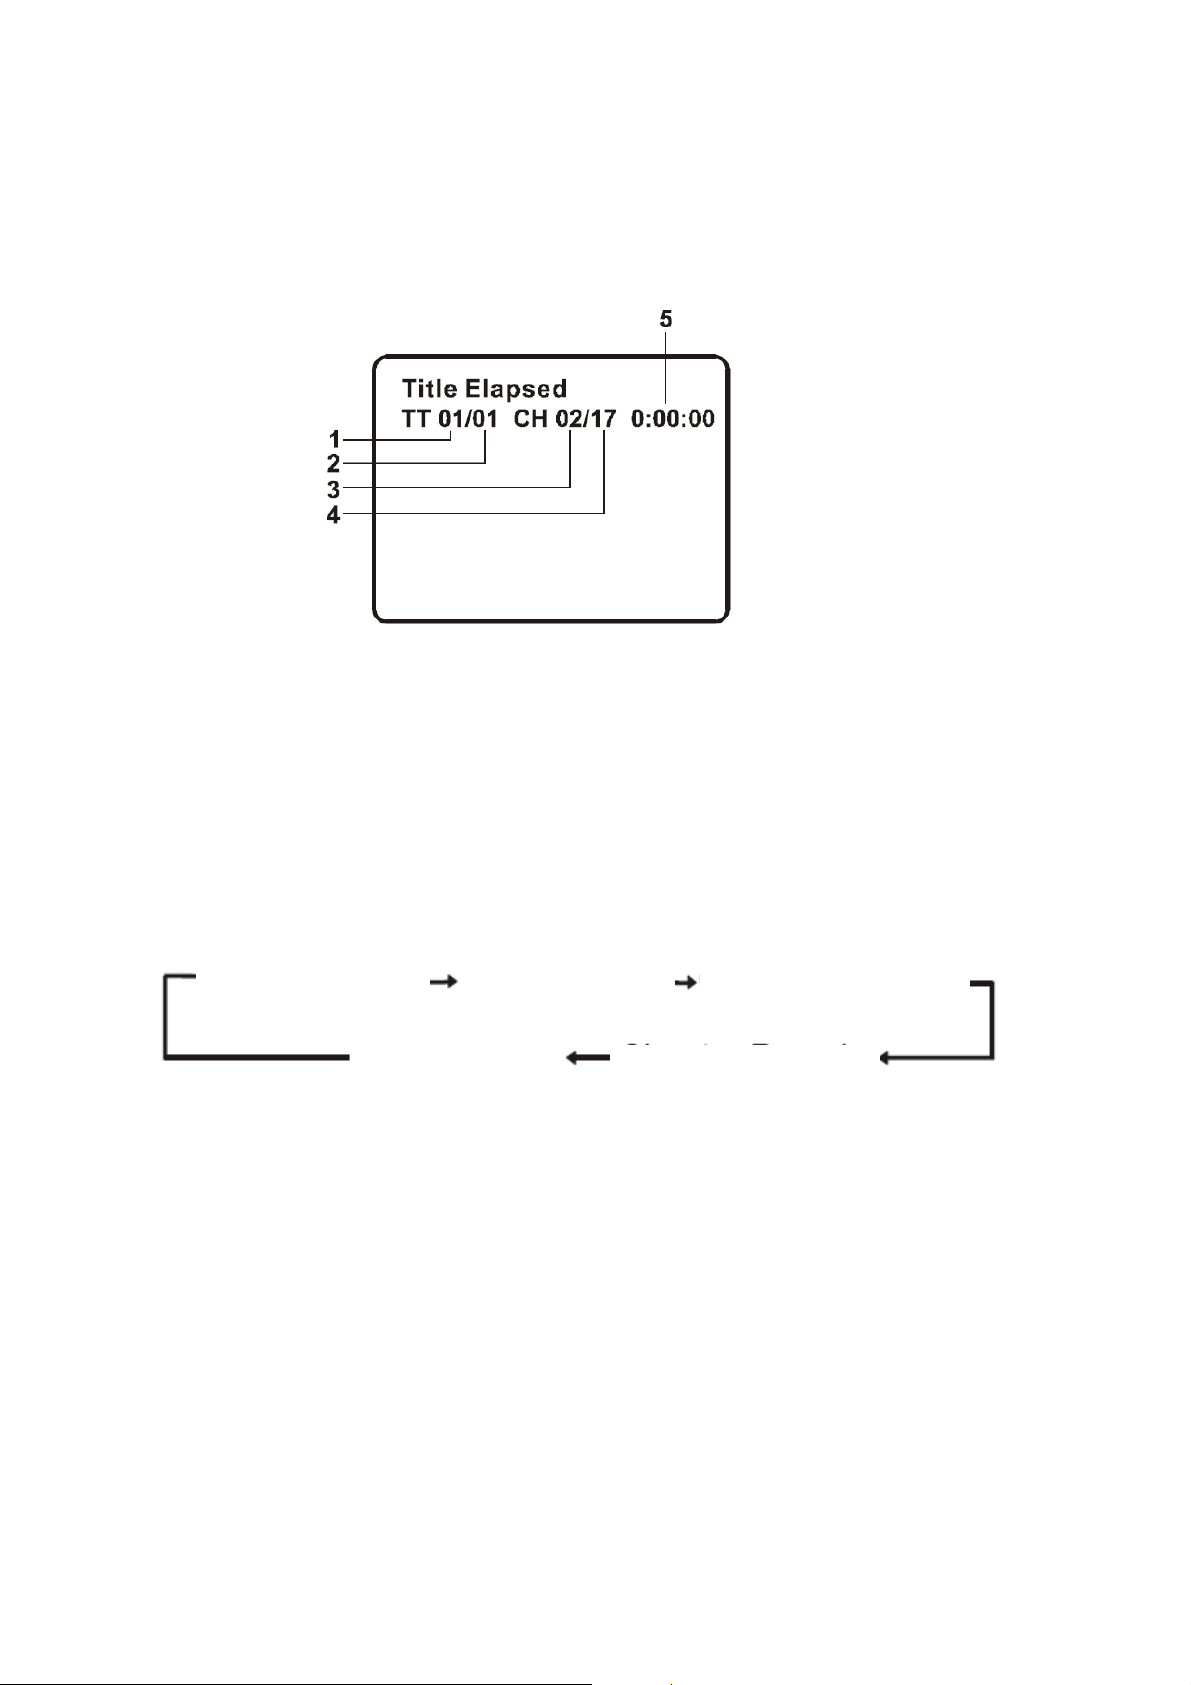
1.VERLOPEN EN RESTERENDE TIJD
a. Druk tijdens de weergave op de DISPLAY toets en het volgende wordt weergegeven: huidig titelnummer (1); totaal aantal titels (2); huidig hoofdstuknummer (3); totaal
aantal hoofdstukken (4); de verlopen tijd van de titel (5). Deze gegevens verdwijnen
na 3 seconden als er niet op de DISPLAY toets gedrukt wordt.
Titel, nummer hoofdstuk en tijdweergave
b. Druk op ‘DISPLAY’ om te kiezen tussen de volgende opties:
Title elapsed: de verlopen tijd van de titel.
Title remain: de resterende tijd van de titel.
Chapter elapsed: de verlopen tijd van het hoofdstuk.
Chapter remain: de resterende tijd van het hoofdstuk.
Display off: de informatie wordt niet getoond.
Title elapsed Title remain
Display off
Chapter remain
Chapter elapsed
Page 13
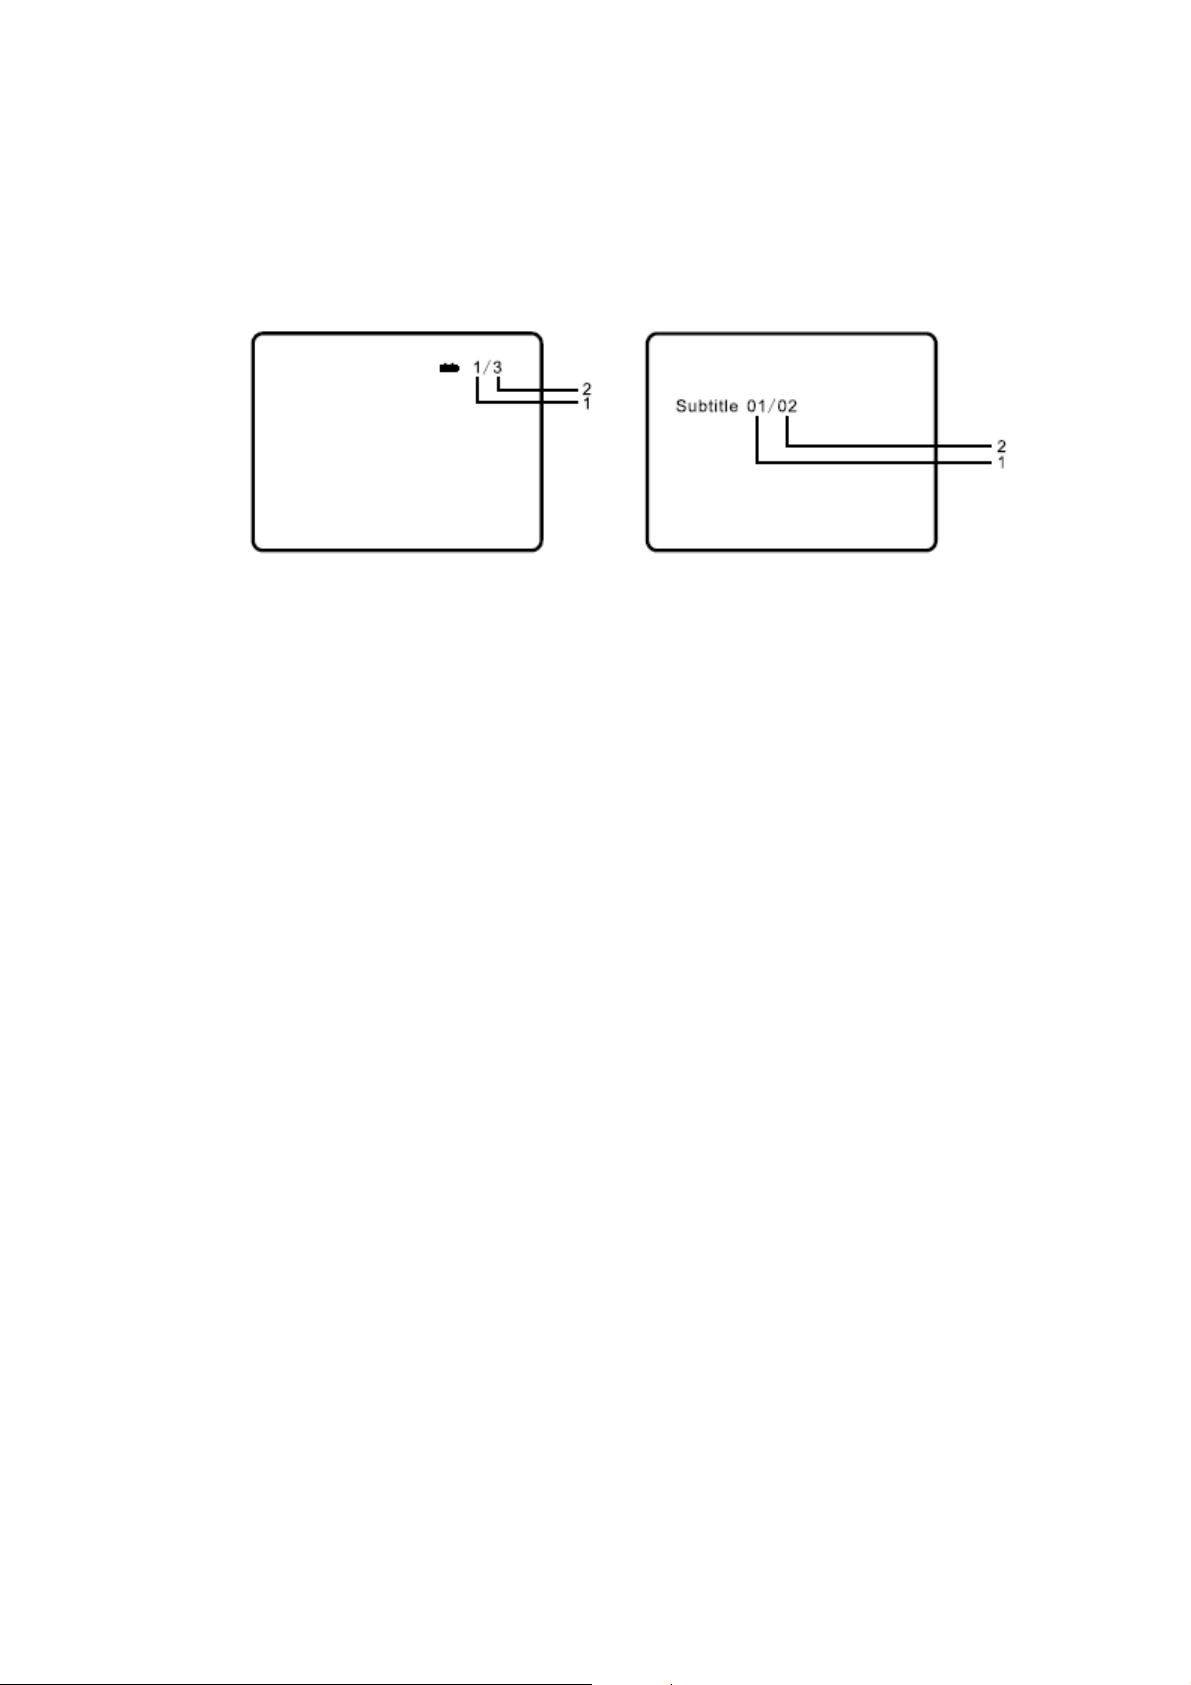
2.HOEK
Druk tijdens de weergave op de toets ANGLE om het aantal beschikbare hoeken te
zien waaronder een scène werd opgenomen*. Er wordt aangeduid: het huidige
hoeknummer (1); het totaal aantal beschikbare hoeken (2). Druk op ANGLE om tussen de verschillende hoeken te kiezen.
* OPMERKING: niet alle discs beschikken over deze eigenschap.
Onderti-
3.ONDERTITELS
Druk tijdens de weergave op de toets SUB om de gewenste taal voor de ondertitels te kiezen*. Er wordt aangeduid: het huidige nummer van de taal (1); het totaal
aantal talen voor ondertitels (2). Als er meerdere talen beschikbaar zijn, druk op
SUB, om de taal te kiezen. Om geen ondertitels weer te geven, druk op SUB totdat “Subtitel off” verschijnt. Het display voor de ondertitels verdwijnt na 3 seconden als er niet op de toets SUB gedrukt wordt.
* Sommige DVD discs laten deze keuze alleen toe in het DVD-menu.
Page 14

4.GESPROKEN TAAL
Druk tijdens de weergave op de toets AUDIO om de gewenste gesproken taal te
kiezen*. Er wordt aangeduid: het huidige nummer van de taal (1); het totaal aantal
gesproken talen (2). Als er meerdere talen beschikbaar zijn, druk op AUDIO, om de
taal te kiezen. Het display voor de gesproken taal verdwijnt na 3 seconden als er
niet op de toets AUDIO gedrukt wordt.
* Sommige DVD discs laten deze keuze alleen toe in het DVD-menu.
5.ZOOM
Druk tijdens de weergave op ZOOM om het beeld 2x, 3x of 4x te vergroten.
(1) druk ‘zoom’ eenmaal, het beeld wordt 2x vergroot;
(2) druk ‘zoom’ een tweede maal, het beeld wordt 3x vergroot;
(3) druk ‘zoom’ een derde maal, het beeld wordt 4x vergroot;
(4) druk ‘zoom’ een vierde maal, het beeld krijgt terug normaal formaat.
6.A-B HERHALING
a. Druk tijdens de weergave een eerste maal op de toets A-B om het startpunt te
bepalen.
b. Druk een tweede maal op A-B om het eindpunt te bepalen. De speler herhaalt
het deel tussen de punten A en B.
c. Druk een derde maal op A-B om de herhaling te stoppen en terug normale
weergave te bekomen.
Page 15
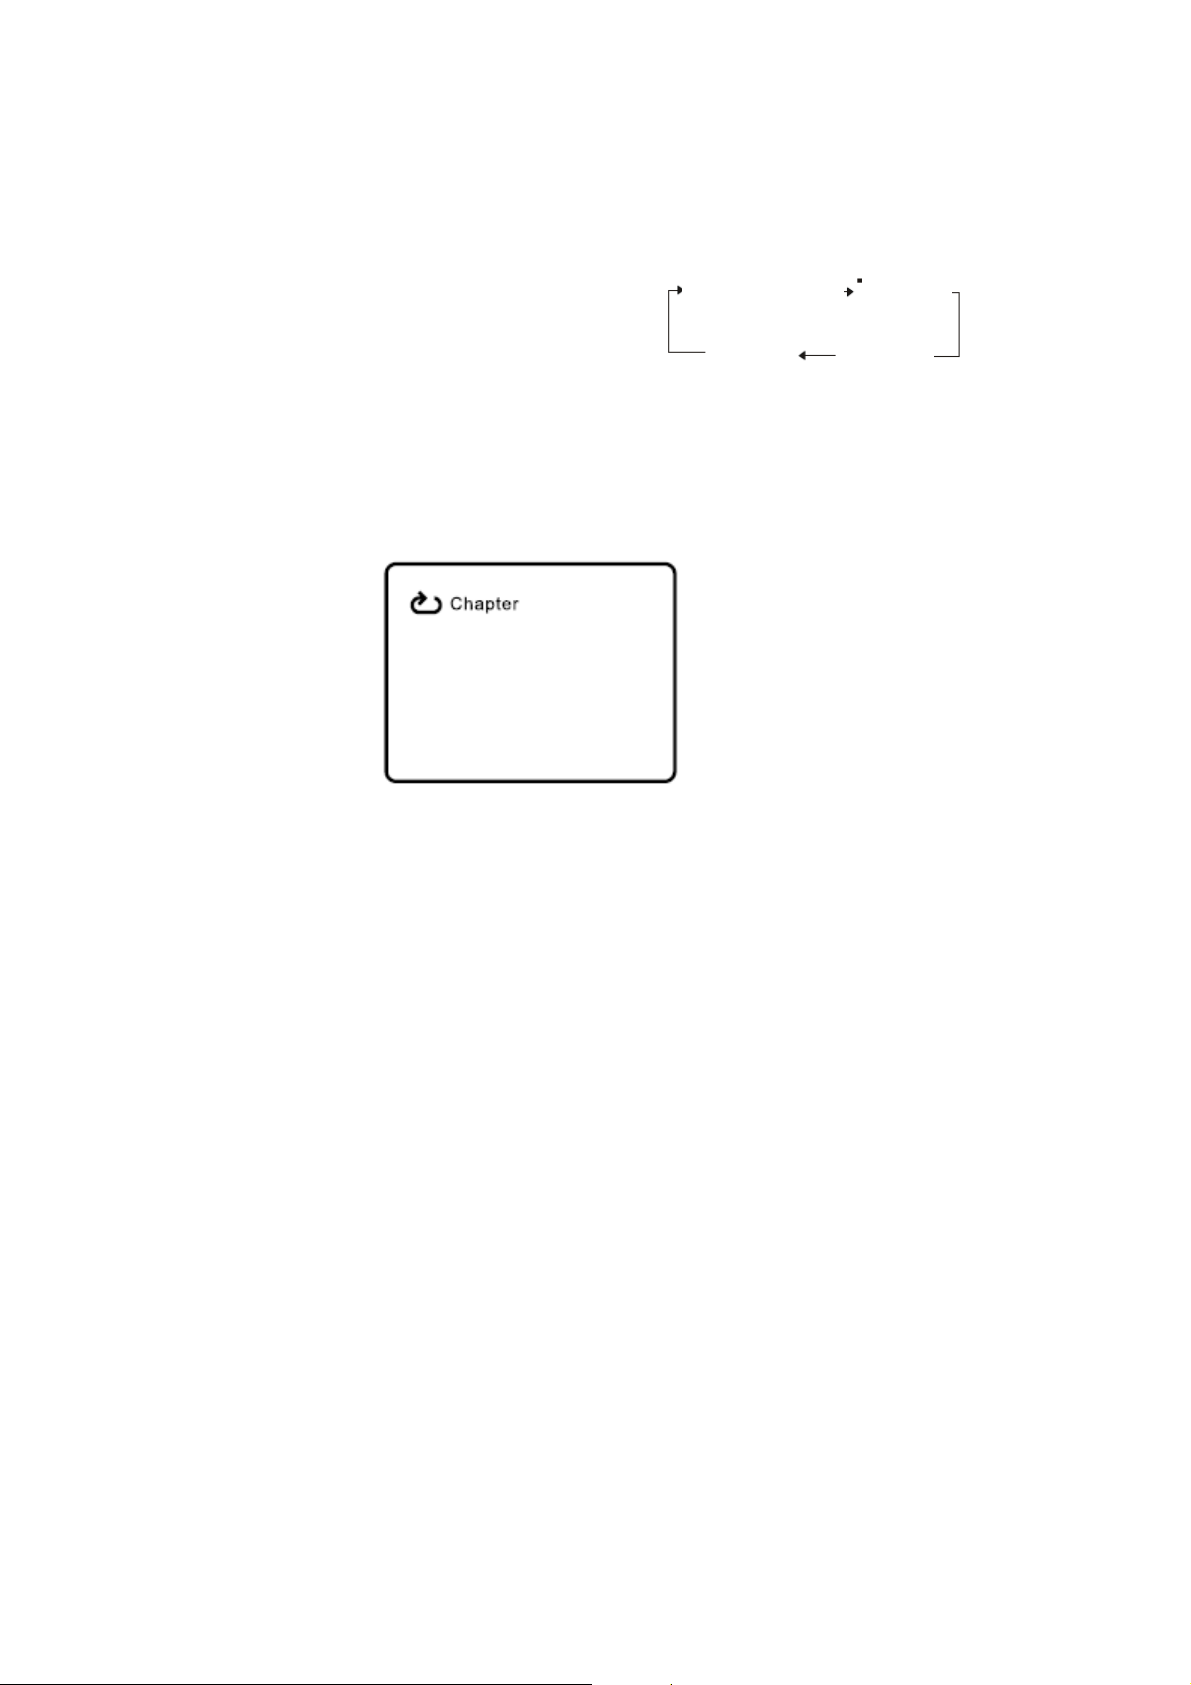
7.1/ALLES HERHALEN
a. Druk tijdens de weergave verschillende malen op de toets “1/ALL REPEAT’ om te
kiezen tussen de volgende mogelijkheden.
Hoofdstuk: herhaal het huidige hoofdstuk.
Titel: herhaal de huidige titel.
Alles: herhaal alle titels en hoofdstukken
Uit: terug naar normale weergave.
Hoofdstuk
Alles
DVD herhaalmogelijkheden
Voorbeeld: de display voor de herhaling van een hoofdstuk ziet er als volgt uit:
Herhaling hoofdstuk
Weergave MPEG4 discs
De MPEG4 standaard bevat een groot aantal formaten. Sommige kunnen op deze
speler weergegeven worden, andere worden herkend maar kunnen niet worden
weergegeven (zoals AVI documenten). Sommige documenten als WMV (Windows)
en MOV (Apple) worden door de speler niet herkend.
De bediening van MPEG4 discs is identiek aan die van MP3 discs. Gebruik de pijltoetsen om de cursor te bewegen en druk op ENTER om te bevestigen.
*Druk op MENU om terug te gaan naar het beschikbare menu.
Page 16
Weergave van MP3 discs
MP3 is een formaat om digitaal geluid op te slaan. Een muziekstuk met CD-kwaliteit
wordt gecomprimeerd naar het MP3 formaat met zeer weinig verlies aan kwaliteit,
maar neemt aldus veel minder plaats in beslag. CD-R/RW discs die opgenomen zijn
met het MP3 formaat kunnen op deze speler weergegeven worden.
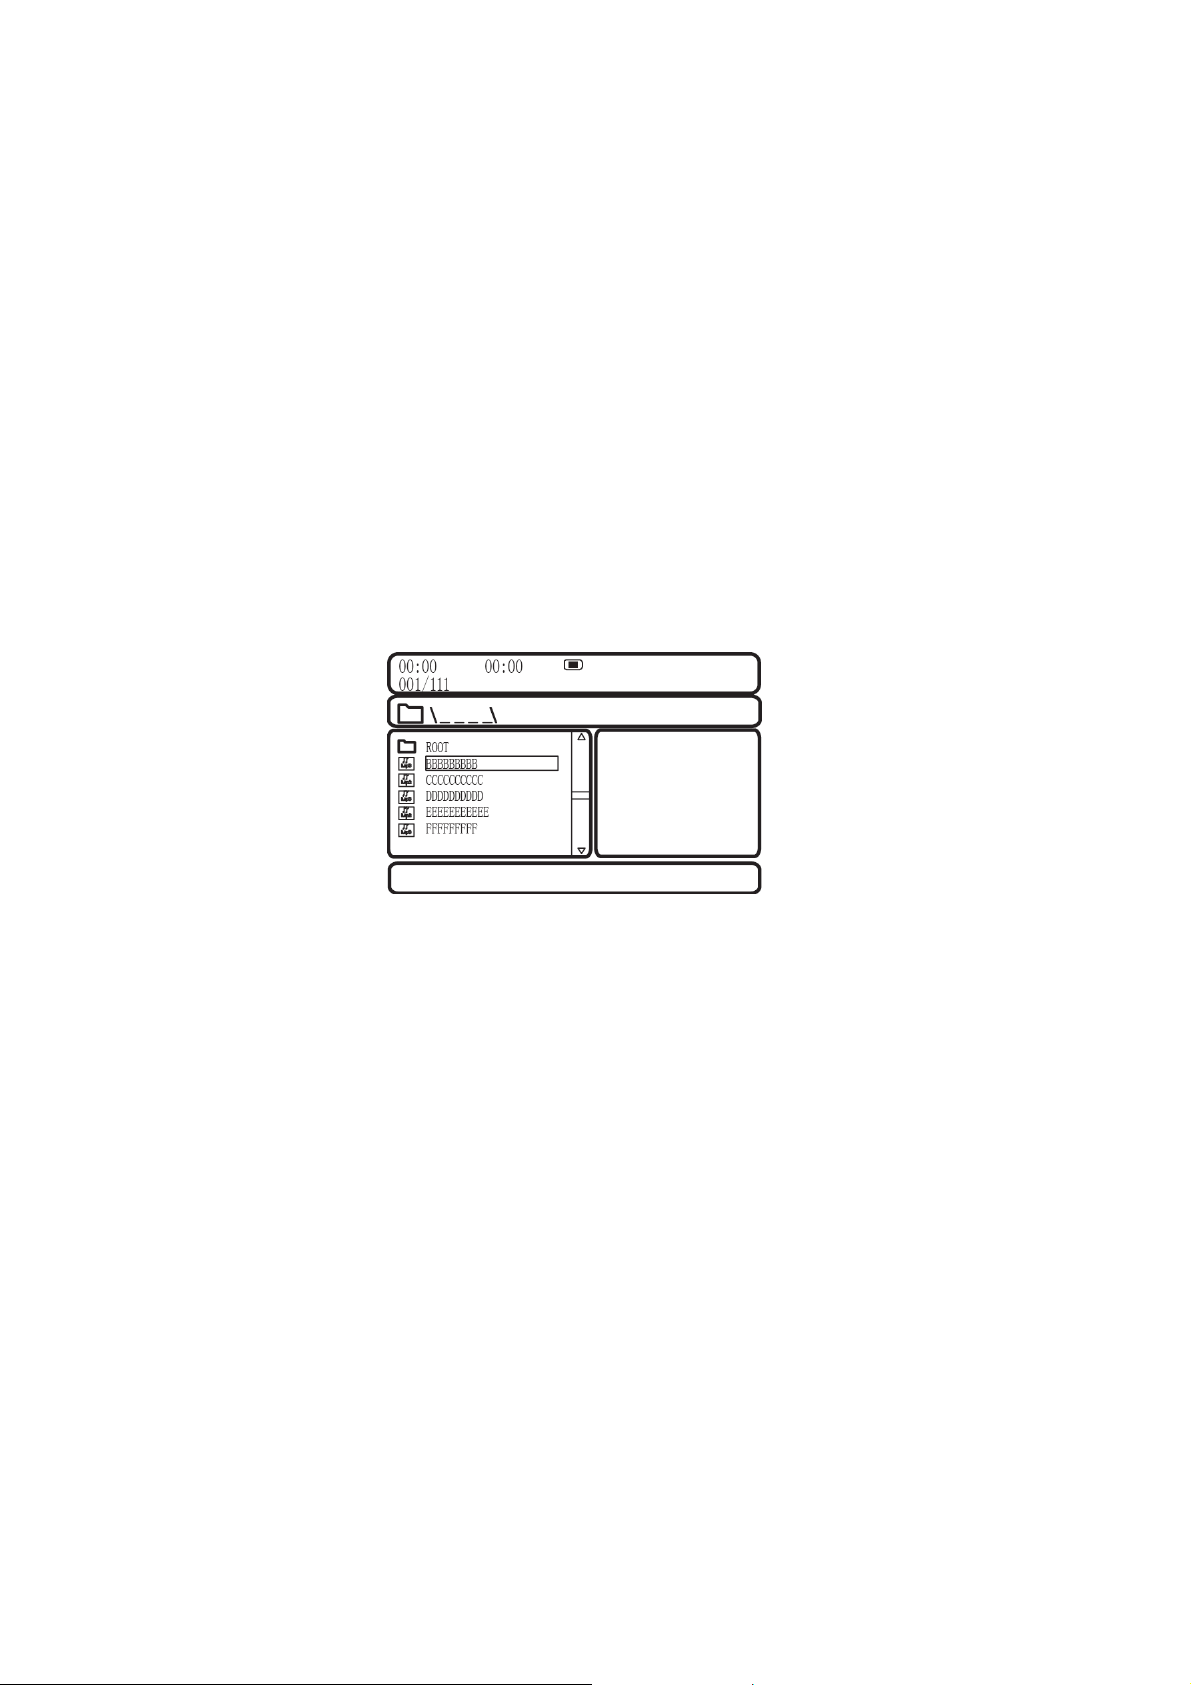
Als een MP3 disc in de speler wordt gebracht verschijnt er automatisch een menu. U
kan het menu gebruiken om de gewenste folders en nummers te kiezen of de weergave gewoon te laten gebeuren in de volgorde waarmee de nummers op de disc
staan.
1. Gebruik cof d om een folder in de folderlijst te kiezen.
2. Druk op ENTER om de gewenste folder aan te duiden. Er verschijnt een lijst met
de nummers in de folder.
3. Gebruik cof d om een nummer uit de lijst te kiezen. Druk op ENTER en de
weergave van het nummer begint.
4. Gebruik om naar het volgend nummer te gaan. Gebruik om naar het vorige
nummer te gaan.
GEBRUIK VAN DE 1/ALL REPEAT FUNCT I E
De standaardinstelling voor de herhaling is uitgeschakeld. Door op 1/ALL REPEAT te
drukken kan u kiezen tussen volgende opties:
• Repeat One (herhaling van één nummer)
• Repeat Folder (herhaling van een hele folder)
• Repeat Off (normale weergave).
Page 17

GEBRUIK VAN DE A-B HERHALING
a. Druk tijdens de weergave een eerste maal op de toets A-B om het startpunt te bepalen.
b. Druk een tweede maal op A-B om het eindpunt te bepalen. De speler herhaalt het
deel tussen de punten A en B.
c. Druk een derde maal op A-B om de herhaling te stoppen en terug normale weergave te bekomen.
Terwijl u door de opties navigeert, wijzigt de herhaalmodus. De geselecteerde herhaalmodus blijft in werking totdat u het uitschakelt.
OPMERKING:
• “” symbool voor een naam betekent dat het om een folder gaat, niet een MP3
document.
• “MP3” symbool voor een naam betekent dat het om een MP3 document gaat.
• Wanneer u een disc weergeeft die zowel MP3 als foto’s (JPEG) bevat, druk op c
om terug naar het menu te gaan om daar te kiezen tussen de gewenste foto of de
MP3.
Instellingen
1. Algemene instelpagina
1) Druk op SETUP om het hoofdscherm van het instelmenu op het scherm weer
te geven. Tegelijkertijd wordt “ “ aangeduid. Druk opnieuw op SETUP om
het menu te verlaten. De speler gaat terug naar de laatste weergavemodus.
2) Druk op ENTER. ‘TV display’ wordt aangeduid.
3) Gebruik c of d om andere menu’s aan te duiden.
4) Gebruik f om naar het submenu te gaan.
5) Gebruik c of d om in het submenu te selecteren en druk op ENTER om te
bevestigen.
Page 18

6) Herhaal stappen 3-5 voor andere menu’s.
Opmerking: gebruik eom terug te gaan naar het vorig menu
a) TV display
*Normaal/PS: wanneer de speler dit signaal naar een normale monitor stuurt,
verschijnt er een breedbeeld, maar sommige onderdelen ontbreken.
*Normaal/LB: wanneer de speler dit signaal naar een normale monitor stuurt,
verschijnt er een breedbeeld, maar met een zwarte zone boven en onderaan
het scherm.
*Breed: wanneer de speler dit signaal naar een breedbeeld monitor stuurt, vult
het breedbeeld het volledige scherm.
b) Hoekmarkering
*Aan: het scherm toont een hoekmarkering (als de hoekoptie beschikbaar is).
*Uit: het scherm toont de hoekmarkering niet.
OPMERKING: niet alle discs beschikken over deze mogelijkheid. Deze mogelijkheid is afhankelijk van de disc.
c) OSD taal
U kan kiezen uit verschillende talen voor de OSD.
d) Screen Saver
*Aan: activeert de screen saver.
OPMERKING: de DVD speler gaat over naar screen saver als hetzelfde beeld
gedurende ongeveer vijf minuten ongewijzigd op het scherm wordt weergegeven.
*Uit: schakelt de screen saver uit.
e) Laatste geheugen
*Aan: de speler gaat terug naar de laatste positie op de disc.
*Uit: de speler gaat niet terug naar de laatste positie op de disc.
Page 19

2. Video instelpagina
1) In het instelmenu gebruik e of f om ‘Video Instelpagina’ te kiezen en
‘ ‘ verschijnt. Druk op ENTER om in de video instelpagina’ te komen.
2) Druk op ENTER; helderheid wordt aangeduid.
3) Gebruik c of d om een ander menu in de instelpagina te kiezen.
4) Druk op f om in het submenu te gaan.
5) Gebruik e of f om de instelling te regelen en druk op ENTER om de instelling te bevestigen.
6) Herhaal punten 3-5 voor andere menu’s.
Opmerking: druk op ENTER om naar het vorig menu te gaan.
a) helderheid b) contrast c) kleur d) saturatie
3. Paswoord
In het instelmenu, gebruik e of f om ‘Paswoord instelpagina’ te selecteren en
‘ ‘ verschijnt. Druk op ENTER om in de paswoordpagina te komen. Druk tweemaal
op ENTER om te komen op de pagina voor het wijzigen van het paswoord. Breng het
oude paswoord of het standaard paswoord in; vervolgens het nieuwe paswoord, bevestig het nieuwe paswoord. Druk dan op ENTER om te wijzigen.
Opmerking: het standaard paswoord is 3308.
4. Voorkeurpagina (in te stellen zonder disc in de speler).
1) In het instelmenu, gebruik eoff om ‘Voorkeurpagina’ te selecteren en
‘ ‘verschijnt. Druk op ENTER om in de voorkeurpagina te gaan.
2) Druk op ENTER en ‘Audio’ wordt aangeduid.
3) Gebruik c of d om een ander menu in de instelpagina te kiezen.
4) Druk op f om in het submenu te gaan.
5) Gebruik e of f om de instelling te regelen en druk op ENTER om de instelling te bevestigen.
6) Herhaal punten 3-5 voor andere menu’s.
Opmerking: druk op eom naar het vorig menu te gaan.
a) audio b) ondertitels c) disc menu
Page 20

Opmerking: de gesproken taal en die voor de ondertitels kan alleen gekozen wor-
den uit de talen die beschikbaar zijn. Als de gekozen taal niet beschikbaar is, zal de
speler de taal gebruiken die op de disc beschikbaar is.
d) Ouderlijke controle
Selecteer met c of d ‘Ouderlijke controle’ in de voorkeurpagina. Druk op fom in
het submenu te gaan. Gebruik c of d om het niveau van de ouderlijke controle te
kiezen (voor discs die over deze functie beschikken). De niveaus gaan van het
laagste (1, Kindvriendelijk) tot het hoogste (8, Volwassenen). Druk op ENTER en
breng het 4-cijferig paswoord in. Druk weer op ENTER om te bevestigen.
1 Kid Safe
2 G
3 PG
4 PG-13
5 PG-R
6 R
7 NC-17
8 Adult
OPMERKING: niveau 8 (volwassenen) is de standaard instelling.
e) Standaardinstelling
Selecteer met c of d ‘Default’ in de voorkeurpagina. Druk op fom in het submenu te gaan. Druk op ENTER om terug naar de fabrieksinstellingen te gaan.
OPMERKING: de ouderlijke controle wordt niet beïnvloed door het instellen van de
standaardwaarden. Het standaard paswoord is 3308. Dit paswoord is altijd geldig,
zelfs nadat u zelf een nieuw paswoord ingevoerd heeft. Teneinde te vermijden dat
iemand anders het standaard paswoord zou gebruiken om de ouderlijke controle te
wijzigen, is het aanbevolen dit standaard paswoord uit de handleiding te verwijderen
en het ergens anders te bewaren. Het gebruik van sommige discs kan gelimiteerd
worden in functie van de leeftijd, bij andere kan dat niet.
5. Instelmenu verlaten
Druk op ENTER om het instelmenu te verlaten.
Page 21

Specificaties
DVD
Geschikte discs: DVD/CD/MP3/MPEG4
Systeem: PAL
Grootte scherm: 7 “
Frequentiebereik: 20 Hz – 20 kHz
Video uitgang: 1 Vp-p/75 Ohm, ongebalanceerd
Audio uitgang: 1.4 Vrms/10 kOhm (1 kHz, 0 dB)
Signaal/ruis-verhouding: Beter dan 60 dB
Dynamisch bereik: Beter dan 85 dB
Laser: Halfgeleider laser, golflengte 650 nm/795 nM
Voeding: DC 9 V
Gebruikstemperatuur: 5°C – 35° C
Gewicht: 0.74 kg
Afmetingen (b x d x h): 212 x 173 x 55 mm
Afzonderlijke monitor
Kleursysteem: PAL
Grootte scherm: 7 “
Voeding: DC 9 V
Gebruikstemperatuur: 5° C – 35° C
Gebruiksvochtigheid: 10-75%
Bewaartemperatuur: -10°C – 60° C
Afmetingen (b x d x h): 201 x 164 x 34 mm
Gewicht: 0.42 kg
Deze gebruiksaanwijzing dient als referentie. Wijzigingen aan de design en de specificaties toegelaten zonder voorafgaande verwittiging.
Page 22

In geval van problemen
Geen geluid of vervormd geluid?
Controleer of de DVD goed is aangesloten. Controleer of alle kabels goed in de aansluitingen zitten.
Kan niet snel vooruit doorheen een film?
U kan niet snel doorspelen bij het begin van de film met waarschuwingsinformatie
omdat dit verboden is.
Het symbool ; verschijnt op het scherm?
De functie kan op dat ogenblik niet gebruikt worden omdat:
1.de software van de disc het verbiedt;
2.de software van de disc de functie niet bevat (bv. Verschillende hoeken);
3.de functie op het ogenblik niet beschikbaar is;
4.u heeft een nummer voor een titel of hoofdstuk ingebracht dat niet bestaat.
Beeld is vervormd?
1.De disc is misschien beschadigd. Probeer een andere disc.
2.Enige vorm van vervorming is normaal bij snel voorwaarts of achterwaarts zoeken.
Geen versneld voorwaarts of achterwaarts zoeken?
1.Sommige discs hebben secties die deze operatie verbieden.
2.U kan niet snel doorspelen bij het begin van de film met waarschuwingsinformatie
omdat dit verboden is.
Afstandsbediening werkt niet goed?
1.Controleer de batterij in de afstandsbediening.
2.Controleer of de infrarood ontvanger niet geblokkeerd is.
3.Zorg ervoor dat de afstandsbediening gericht is op de infrarood ontvanger.
Disc wordt niet weergegeven?
1.Plaats de disc met de bedrukte zijde naar boven.
2.Controleer het type disc dat u heeft ingebracht. Deze speler is geschikt voor DVD,
audio CD’s en MP3.
Weergave start maar stopt meteen?
1.DVD-spelers en DVD-discs beschikken over een regionale code. Als deze niet
overeenkomen kan de disc niet weergegeven worden. Deze DVD-speler is Regio 2.
2.De disc is vuil. Reinig hem.
3.Er heeft zich condensatie gevormd. Wacht tot de condensatie verdampt is.
Page 23

Lecteur DVD portable avec 2 moniteurs 7’’
DVP7040TWIN
Lisez ce manuel d’utilisation avant d’installer, régler et utiliser le l’appareil
Page 24

Précautions et avertissements
Emplacement
Afin d’éviter du feu ou des chocs électriques, ne pas exposer l’appareil à la pluie ou
l’humidité. Ne pas placer sur un fond instable pour éviter que l’appareil tombe. Ne
mettez pas l’appareil aux environs des champs magnétiques, des sources de chaleur,
dans le soleil ou dans des environs poussiéreux. Quand l’appareil est transporté d’un
endroit froid dans un endroit chaud, la condensation peut se former à l’intérieur de
l’appareil. Attendez une heure avant d’utiliser l’appareil. Retirez le disque et laissez
l’appareil en fonction pour la condensation se vaporise.
Installation
Faites attention que le lecteur DVD est installé selon les instructions et illustrations
de ce manuel d’utilisation.
Précautions
Ne mettez pas des objets dans les ouvertures de l’appareil. Faites attention de na
pas gaspiller des liquides dans l’appareil (ceci peut causer du feu ou des chocs
électriques). Ne mettez pas des objets lourds au-dessus de l’appareil. Pour assurer
une bonne ventilation et une bonne opération, ne jamais couvrir les ouvertures avec
n’importe quel matériel. Ne pas mettre l’appareil à côté d’un feu ouvert comme une
bougie. Utilisez le bon type de batterie. Ne pas utiliser l’appareil dans les
températures qui dépassent 40° Celsius.
Disque
Ne pas utiliser les disques avec un format irrégulier comme cœur ou étoile, car ceci
peut causer des mal fonctionnements. Ne pas coller du papier, tape ou colle sur les
disques. Ne pas exposer les disques à la lumière du soleil ou d’autres sources de
chaleur. Ne pas toucher la surface du disque. Tenez le disque au bord. Nettoyez le
disque du milieu vers le bord avec un chiffon doux. Après lecture, enlevez le disque
et remettez-le dans son boîtier. Certaines possibilités de fonction de lecture sont
déterminées par les fabricants du software. Etant donné que ce lecteur reproduit les
disques en fonction de leur contenu, il se peut que certaines fonctions ne sont pas
toujours disponibles. Lisez les instructions fournies avec le disque.
Page 25

ATTENTION : POUR EVITER LE RISQUE DU FEU OU D’UN CHOC ELECTRIQUE
NE PAS EXPOSER L’APPAREIL A L’EAU OU L’HUMIDITE. NE PAS OUVRIR
L’APPAREIL.
PAS DE FONCTIONS D’UTILISATION A L’INTERIEUR. CONSULTEZ UN
SPECIALISTE POUR SERVICE.
LE SERVICE DOIT ETRE EFFECTUE PAR DU PERSONNEL SPECIALISE, SINON
LE GARANTIE N’EST PLUS VALABLE.
Ce symbole signifie que l’appareil est conforme aux standards européens
concernant la sécurité et la compatibilité électromagnétique.
Le triangle avec l’éclair sert à prévenir l’utilisateur qu’à l’intérieur de ce
produit se trouvent des voltages dangereux non isolés avec une puissance
suffisante pour donner des risques de chocs électriques aux êtres humains.
Le triangle avec le point d’exclamation sert à prévenir l’utilisateur que
l’appareil est accompagné d’instructions importantes d’opération et
d’entretien.
Symbole produit laser : sur le panneau arrière de l’appareil, ce symbole indique qu’il
s’agit d’un produit laser de classe 1. Ceci veut dire qu’on utilise un faible laser sans
radiation dangereux à l’extérieur de l’appareil.
Macrovision
L’appareil c ontient une tec hnologie de protection des droits d’auteurs protégé par
mdes patents US et d’autres propriétés intellectuelles par Macrovision Corporation et
d’autres propriétaires des droits. L’utilisation de cette technologie de protection doit
être approuvé par Macrovision Corporation et est prévu pour utilisation domestique
ou autre utilisation limitée, excepté les cas spécialement approuvés par Macrovision
Corporation. Une technologie inverse est défendu.
DOLBY PROLOGIC :
Fabriqué sous licence de Dolby Laboratories.
‘Dolby’, ‘Pro Logic’ et le symbole double-D sont des marques déposées de Dolby
Laboratories.
Page 26

Instructions de sécurité importantes
1. Lisez le manuel d’utilisation.
2. Gardez le manuel d’utilisation.
3. Suivez tous les avertissement.
4. Suivez toutes les instructions.
5. N’utilisez pas l’appareil à côté de l’eau.
6. Nettoyez seulement avec un chiffon légèrement humide.
7. Ne bloquez pas les ouvertures de ventilation. Installez l’appareil selon les
instructions du fabricant.
8. Ne pas installer à côté des sources de chaleur comme radiateur ou autres
appareils qui produisent du chaleur (y compris un amplificateur).
9. La prise courant secteur doit correspondre avec votre prise domestique. Sinon,
laissez le changer par un électricien.
10. Faites attention qu’on ne peut pas marcher sur le câble courant secteur.
11. Utilisez uniquement les accessoires recommandées par le fabricant.
12. Utilisez une planche, un table, un tripod recommandé par le fabricant. Si vous
déplacez l’appareil sur une charrette, faites attention que l’ensemble ne peut pas
tomber.
Ce symbole qui apparaît sur le produit ou dans les instructions signifie
que votre appareil électrique ou électronique, lorsqu’il ne fonctionne
plus, doit être jeté séparément de vos déchets ménagers.
En Europe, il existe différents systèmes de collecte pour le recyclage.
Pour de plus amples informations, contactez l'autorité locale ou le
revendeur auprès duquel vous avez acheté le produit.
Accessoires
1 x adaptateur AC/DC
1 x télécommande avec pile (CR2025)
1 x manuel d’utilisation
1 x câble AV et DC
1 x adaptateur allume-cigare
1 x sac (avec courroie)
Page 27

Télécommande
Utilisation de la télécommande
Retirez la pièce en plastique avant d’utilisez
la télécommande.
Remplacer la pile de la télécommande
1. Ouvrez le compartiment à pile. 2. Insérez une pile CR2025.
3. Pour utiliser la télécommande, dirigez-la vers le récepteur de l’appareil (distance
maximale de 3 mètres, angle maximale de 60°).
Commandes, indicateurs et connexions
Télécommande
1). Setup
Pour entrer ou pour quitter le menu de réglage
2). UP c
Pour naviguer vers le haut dans le menu
3). Skip
Pour retourner au chapitre ou titre précédent
4). ENTER
Pour confirmer le réglage
Page 28

5). Rewind/left ee
Pour une recherche rapide en arrière, 1, 4, 8, 16 ou 32 fois la vitesse normale.
6). Down d
Pour naviguer vers la bas dans le menu
7). Boutons numériques
Pour sélectionner un item dans le menu ou pour entrer le mot de passe
8). Display
Pour afficher des informations concernant le DVD, telle que titre, numéro chapitre,
numéro de la piste, temps
9) Zoom
Pour élargir l’image 2, 3 ou 4 fois
10). Sub
Pour choisir la langue des sous titres
11). Skip
Pour aller directement au titre ou chapitre suivant
12). A-B Repeat
Pour répéter une section du disque
13). Fast Forward/right ff
Pour une recherche rapide en avant, 1, 4, 8, 16 ou 32 fois la vitesse normale.
14). 1/ALL Repeat
Pour répéter un numéro, le titre ou le chapitre
15). Stop
(1 fois) : arrêter au présent point ; (2 fois) : arrêter complètement
16). Menu
Pour afficher le menu principal du DVD
17). Audio
Pour choisir la langue parlée
18). Angle
Pour changer l’angle de vue d’une scène
19). Play/Pause fII
Pour démarrer la lecture et pour pauser la lecture
Page 29

Lecteur DVD
1) Open switch
Pour ouvrit le tiroir disque
2) Earphone jack
Pour connecter le casque d’écoute
3) Menu
Pour afficher le menu principal du disque
4) Pause
Pour pauser la lecture
5) PREV
Pour aller vers le numéro, titre ou chapitre précédent
6) Play
Pour démarrer la lecture
7) Next
Pour aller vers le numéro, titre ou chapitre suivant
Page 30

8). Stop
(1 fois) : arrêter au point actuel ; (2 fois) : arrêt complet
9). IR Sensor
Récepteur des commandes de la télécommande
10). Power on/off
Pour mettre l’appareil en ou hors fonction
1 1). A/V jack
Pour connecter au moniteur
12). DC OUT
Pour connecter au moniteur
13). DC IN
Pour connecter l’adaptateur AC/DC ou l’adaptateur allume cigare
14). Volume
Réglage volume
15). Kickstand
Moniteur
1) DC 9-12 V
Connexion avec le DC OUT du lecteur
DVD (avec câble AV et DC)
2) AV IN
Connexion avec A/V du lecteur DVD
3) Earphone
Pour connecter le casque
d’écoute (coupe le son des haut-parleurs)
4) Volume +/Pour régler le volume
5) Brightness +/Pour régler la luminosité
6) Power on/off
Pour mettre en ou hors fonction
Page 31

r
Alimentation et installation
A.Installation à la maison
1 Vers DC IN
de l’appareil
2 Vers prise
courant secteu
Adaptateur AC
Connectez un bout de l’adaptateur AC à la
prise DC IN de l’appareil et l’autre bout à
le prise courant secteur 100-240V.
Remarque : l’adaptateur AC fourni ne peut
être utilisé qu’avec cet appareil. Ne pas
utiliser avec d’autres appareils.
Déconnectez l’appareil du courant secteur
quand vous ne l’utilisez pas pendant un
certain temps.
B. Installation du lecteur DVD/Moniteur au appuie-tête
Etape 1
Etape 2
Remarque : installez le lecteur DVD/Moniteur comme illustre ci-dessus.
Page 32

C. Alimentation et installation dans la voiture
3 Vers DC IN
du moniteur
4 Vers AV IN du
moniteur
5 Vers DC IN du
lecteur DVD
1 Vers la prise A/V du
lecteur DVD
2 Vers DC OUT du lecteur
6 Vers l’allu m e cigare
de la voiture
Connectez le lecteur DVD et le Moniteur comme illustré ci-dessus.
Remarque : déconnectez l’adaptateur de l’allume cigare quand vous n’utilisez pas
l’appareil.
D.Connexion casque d’écoute (pas livré)
Le casque d’écoute peut être connecté par câble au lecteur DVD ou Moniteur.
Connectez le casque à la prise ‘earphones’ du lecteur ou du moniteur.
Page 33

Lecture du disque
Ce manuel d’instructions explique les instructions de base pour utiliser l’appareil.
Certains disques sont produits de telle façon qu’ils permettent ou limites certaines
fonctions pendant la lecture. Dans ce cas, le lecteur ne peut pas effectuer toutes les
commandes voulues. Ceci n’est pas un défaut. Lisez les informations livrées avec le
disque pour voir les possibilités d’utilisation du DVD.
‘;’ peut apparaître sur l’écran pendant la lecture. Le symbole ‘;’ signifie que
l’opération voulue n’est pas permise par le disque.
Insérer et lire le disque
1. Après avoir connecté l’appareil au courant secteur, mettez le commutateur Power
on/off en position ‘on’.
2. Ouvrez le panneau.
3. Mettez le disque dans le tiroir.
- vous entendez et sentez le disque se mettre en place
- mettez le disque avec la face imprimée vers le haut
4. Fermez le compartiment DVD. L’appareil charge le disque et commence
automatiquement la lecture.
5. Arrêter la lecture
Poussez le bouton STOP () pendant la lecture.
6. Pauser la lecture
Poussez le bouton PAUSE (fII) de la télécommande
- l’image s’arrête, il n’y a pas de son
- pour continuer la lecture, repoussez le bouton PAUSE (fII)
7. Retour/avancement rapide
Poussez Fast Forward (ff) ou Fast Reverse (ee) pour effectuer une recherche
rapide en arrière ou en avant à 2x, 4x, 8x, 16x ou 32x la vitesse normale.
8. Menu
Le disque DVD comporte ses sections appelées titres et chapitres. Quand vous
reproduisez le disque DVD en menu principal du disque apparaît sur l’écran, dont
le contenu varie de disque en disque. Pendant la lecture, poussez MENU pour
afficher ce menu.
Page 34

Display
1. TEMPS DE LECTURE ET TEMPS RESTANT
a. Pendant la lecture, poussez DISPLAY et l’écran affiche : le numéro du titre actuel
(1), le nombre total des titres (2), le numéro du chapitre actuel (3), le nombre total
des chapitres (4) et le temps écoulé du titre (5). Si vous ne poussez pas le bouton
DISPLAY, l’affichage disparaît après 3 secondes.
b. Poussez plusieurs fois le bouton DISPLAY pour choisir entre les options suivantes :
Title elapsed : temps écoulé du titre
Title remain : temps restant du titre
Chapter elapsed : temps écoulé du chapitre
Chapter remain : temps restant du chapitre
Display off : l’affichage disparaît de l’écran
Title elapsed Title remain
Display off
Chapter remain
Chapter elapsed
Page 35

2. ANGLE
Pendant la lecture, poussez le bouton ANGLE pour voir le nombre des angles
disponibles (pour les disques possédant cette option) : numéro de l’angle actuel (1),
nombre total des angles (2). Poussez ANGLE pour sélectionner un autre angle.
REMARQUE : pas tous les disques offrent cette option.
Angle Sous titres
3. SOUS TITRES
Pendant la lecture poussez le bouton SUB pour sélectionner la langue des sous
titres. L’écran affiche : numéro de la langue actuelle (1), nombre total des langues
pour sous titres (2). Si plusieurs langues sont disponibles, poussez SUB pour choisir
la langue voulue. Pour ne pas afficher les sous titres, poussez SUB jusqu’au moment
où ‘subtitle off’ paraît. Si vous ne poussez pas le bouton SUB, l’aff ichage disparaît
après 3 secondes.
* Certains disques n’offrent ce choix que par le menu du DVD.
Page 36

4.LANGUE PARLEE
Pendant la lecture poussez le bouton AUDIO pour sélectionner la langue parlée.
L’écran affiche : numéro de la langue actuelle (1), nombre total des langues parlées
(2). Si plusieurs langues sont disponibles, poussez AUDIO pour choisir la langue
voulue. Si vous ne poussez pas le bouton AUDIO, l’affichage disparaît après 3
secondes.
* Certains disques n’offrent ce choix que par le menu du DVD.
Langue parlée Zoom
5.ZOOM
Pendant la lecture, poussez le bouton ZOOM pour agrandir l’image 2x, 3x ou 4x
(1) poussez zoom une fois : l’écran est agrandi avec un facteur 2
(2) poussez zoom une deuxième fois : l’écran est agrandi avec un facteur 3
(3) poussez zoom une troisième fois : l’écran est agrandi avec un facteur 4
(4) poussez zoom une quatrième fois : l’écran retourne au format normal.
6.REPETITION A-B
a. Pendant la lecture poussez une première fois le bouton A-B pour marquer le point
de début A.
b. Poussez une deuxième fois le bouton A-B pour marquer le point d’arrêt B. Le
lecteur commence directement la répétition entre le point A et le point B.
c. Repoussez le bouton A-B pour arrêter la répétition et revenir à la lecture normale.
Page 37

7.1/ALL REPEAT
p
a. Pendant la lecture poussez plusieurs fois le bouton ‘1/ALL REPEAT’ pour voir le
mode de répétition.
Chapitre
Titre : répétition du titre actuel
Hors fonction : répétition de tous les titres et
chapitres
Tous : lecture normale
: répétition du chapitre actuel
Chapitre
Hors
fonction
Mode de ré
Titre
Tous
étition DVD
Exemple : l’affichage répétition chapitre s’affiche comme :
Répétition chapitre
Lecture disques MPEG4
Le standard MPEG4 couvre beaucoup de formats. Certains de ces formats peuvent
être reproduits avec ce lecteur ; d’autres sont reconnus mais ne peuvent pas être lus
(comme AVI) ; d’autres ne sont pas reconnus comme WMV (Windows) et MOV
(Apple).
La commande MPEG4 est identique à celle des disques MP3. Utilisez les boutons
flèches pour bouger le curseur et poussez ENTER pour confirmer.
*Poussez MENU pour revenir au menu disponible
Page 38

Lecture disques MP3
MP3 est un format pour enregistrer l’audio digital. Une pièce de musique avec qualité
CD est comprimée dans le format MP3 avec très peu de perte en qualité mais en
prenant beaucoup moins d’éspace de mémorisation. Les disques CD-R/RW
enregistrés avec le format MP3 peuvent être reproduits avec ce lecteur.
Quand le disque MP3 est inséré, un menu apparaît automatiquement. Vous pouvez
utiliser le menu pour sélectionner les folders ou numéros à lire ou commencer la
lecture des numéros dans l’ordre avec lequel ils sont enregistrés sur le disque.
1. Utilisez les boutons c ou d pour choisir un folder.
2. Poussez ENTER pour marquer le folder. Les numéros du folder sont affichés
dans une liste
3. Utilisez les boutons c ou d pour choisir un numéro dans la liste. Poussez
ENTER et la lecture du numéro commence.
4. Utilisez pour aller vers le numéro suivant. Utilisez pour aller vers un numéro
précédent.
UTILISATION DE LA REPETION 1/ALL
Le mode standard pour la répétition est hors fonction. Poussez 1/ALL REPEAT pour
choisir entre les options :
z Repeat one (répétition d’un numéro)
z Répétition folder (répétition d’un folder)
z Repeat off (lecture normale)
Page 39

UTILISATION DE LA REPETITION A-B
a. Pendant la lecture poussez une première fois le bouton A-B pour marquer le point
de début A.
b. Poussez une deuxième fois le bouton A-B pour marquer le point d’arrêt B. Le
lecteur commence directement la répétition entre le point A et le point B.
c. Repoussez le bouton A-B pour arrêter la répétition et revenir à la lecture normale.
Quand vous naviguez entre les options, le mode de répétition change. Ceci continue
jusqu’au moment où vous arrêtez l’option.
REMARQUE
z Le symbole devant un nom indique qu’il s’agit d’un folder et pas d’un
document MP3.
z ‘MP3 ‘ devant le nom indique qu’il s’agit d’un document MP3.
z Quand vous utilisez un disque qui contient des documents MP3 et photos
(JPEG), poussez le bouton c pour revenir au menu, où vous pouvez choisir
entre photo ou MP3.
Réglages
1.Page de réglage générale
1) Poussez SETUP pour afficher le menu principal du menu de réglage et ‘General
Setup Page’ apparaît. En même temps ‘ ‘ est affiché. Repoussez SETUP
pour quitter le menu de réglage et le dernier mode de lecture est repris.
2) Poussez ENTER et TV Display est affiché.
3) Utilisez c ou d pour sélectionner d’autres menus dans le menu général.
4) Poussez f pour entrer dans le sous-menu.
5) Utilisez c ou d pour sélectionner le sous-menu et poussez ENTER pour
confirmer.
6) Répétez les points 3-5 pour les autres menus.
Remarque : Poussez e pour revenir au menu précédent.
Page 40

a) TV Display
* Normal/PS : quand le signal est transmis au moniteur normal l’image écran
large est affichée, mais certaines parties ne sont par reproduites.
* Normal/LB : quand le signal est transmis au moniteur normal l’image écran large
est affichée, mais des bandes noires apparaissent en haut en en bas de l’écran.
* Ecran large : quand le signal est transmis au moniteur écran large, l’écran est
complètement rempli.
b) Marquage angle
* On : l’écran affiche le marquage angle (quand disponible sur le disque).
* Off : le marquage angle n’est pas affiché.
REMARQUE : pas tous les disques offrent cette option. La fonction dépend du
disque
c) Langue OSD
Pour choisir la langue voulue pour le OSD.
d) Screen Saver
* On : met le screen saver en fonction
REMARQUE : le screen saver se met en fonction après qu’une image n’a pas
changé pendant 5 minutes.
* Off : le screen saver est hors fonction
e) Dernière mémoire
* On : l’unité retourne vers la dernière position sur le disque.
* Off : l’unité ne retourne pas vers la dernière position sur le disque.
Page 41

2. Page de réglage vidéo
1) Dans le menu de réglage, utilisez eou f pour sélectionner ‘page réglage vidéo’
et ‘ ‘ apparaît. Poussez ENTER pour entrer dans la page.
2) Poussez ENTER et ‘Luminosité’ est indiqué.
3) Utilisez c ou d pour indiquer d’autres menus dans la page réglage vidéo.
4) Poussez f pour entrer dans le sous-menu.
5) Utilisez e ou f pour effectuer le réglage et poussez ENTER pour confirmer.
6) Répétez les points 3-5 pour les autres menus.
Remarque : poussez ENTER pour revenir au menu précédent.
a) luminosité b)contraste c)couleurs d)saturation
3. Mot de passe
Dans le menu de réglage, utilisez eou f pour sélectionner ‘page mot de passe’ et
‘ ‘ apparaît. Poussez ENTER pour entrer dans la page. Poussez deux fois ENTER
pour arriver dans la page pour changer le mot de passe. Entrez l’ancien mot de
passe ou le mot de passe standard, le nouveau mot de passe et confirmez le
nouveau mot de passe. Poussez ENTER pour confirmer.
Remarque : le mot de passe standard est 3308.
Page de préférence (à régler sans disque dans l’appareil)
1) Dans le menu de réglage, utilisez eou f pour sélectionner ‘page préférence’ et
‘ ‘ apparaît. Poussez ENTER pour entrer dans la page.
2) Poussez ENTER et ‘Audio’ est indiqué.
3) Utilisez c ou d pour indiquer d’autres menus dans la page réglage vidéo.
4) Poussez f pour entrer dans le sous-menu.
5) Utilisez e ou f pour effectuer le réglage et poussez ENTER pour confirmer.
6) Répétez les points 3-5 pour les autres menus.
Remarque : poussez ENTER pour revenir au menu précédent.
a) audio b) sous-titre c) menu disque
Page 42

Remarque : la langue parlée et la langue pour sous-titre sont dépendants des
langues enregistrées sur le disque. Quand la langue choisie n’est pas disponible, le
lecteur affiche la langue disponible.
d) Contrôle parental
Dans la page de préférence, utilisez c ou d pour sélectionner ‘parental’. Poussez
f pour entrer dans le sous-menu. Utilisez c ou d pour sélectionner le niveau
parental désiré (pour les disques qui possèdent cette fonction). Les niveaux vont du
niveau le plus bas (1 enfants) jusqu’au niveau le plus haut (8 adultes). Poussez
ENTER en entrez le mot de passe (4 chiffres). Repoussez ENTER pour confirmer le
niveau parental.
1 ENFANTS
2 G
3 PG
4 PG-13
5 PG-R
6 R
7 NC-17
8 ADULTES
REMARQUE : le niveau standard est 8 (adultes).
e) Standard
Dans la page de préférence, utilisez c ou d pour sélectionner ‘default’. Poussez f
pour entrer dans le sous-menu. Poussez ENTER pour revenir aux réglages
standards (usine).
REMARQUE : le réglage parental n’est pas influencé en remettant les paramètres au
niveau standard. Le mot de passe standard est 3308. Ce mot de passe est toujours
disponible, même si vous avez changé le mot de passe. Afin d’éviter que quelqu’un
utilise le mot de passe standard pour changer le niveau parental, effacer ce numéro
du manuel d’utilisation et gardez le dans un autre endroit. Le niveau parental
fonctionne avec certains disques, mais pas avec tous.
5. Quitter le menu réglage
Poussez ENTER pour quitter le menu de réglage.
Page 43

Spécifications
DVD
Disques compatibles DVD/CD/MP3/MPEG4
Système couleurs PAL
Format écran 7 pouces
Réponse en fréquences 20 Hz – 20 kHz
Sortie vidéo 1 Vp-p/75 ohms, non balancé
Sortie audio 1.4 Vrms/10 kohms (1kHz, 0 dB)
Rapport S/B Mieux que 60 dB
Plage dynamique Mieux que 85 dB
Laser Semi-conducteur, longueur d’onde 650
nm/795 nm
Alimentation DC 9 V
Température d’utilisation 5° C – 35° C
Poids 0.74 kg
Dimensions (l x p x h) 212 x 173 x 55 mm
Moniteur
Système couleurs PAL
Format d’écran 7 pouces
Alimentation DC 9 V
Température d’utilisation 5° C– 35°C
Humidité d’utilisation 10-75%
Température stockage -10° C – 60° C
Dimensions (l x p x h) 201 x 164 x 34 mm
Poids 0.42 kg
Ce manuel sert uniquement comme référence. Les changements au design et
spécifications peuvent être faits sans préavis.
Page 44

En cas de problèmes
Pas de son ou son avec distorsion
Vérifiez que l’appareil est bien connecté. Vérifiez que les câbles sont bien connectés
au prises correctes.
Ne sait pas avancer rapidement dans le film ?
Vous en pouvez pas avancer rapidement au début du film pendant les avertissement
car ceci est défendu.
Le symbole ; apparaît sur l’écran ?
La fonction n’est pas disponible en ce moment parce que :
1 Le disque ne le permet pas.
2 Le disque ne supporte pas la fonction (par exemple angle)
3 La fonction n’est pas disponible à l’instant
4 Vous avez introduit un numéro de titre ou chapitre qui n’existe pas
Image avec distorsion ?
1 Le disque est endommagé. Essayez un autre disque.
2 Une certaine forme de distorsion est normale pendant la recherche rapide.
Pas de recherche rapide en avant ou en arrière ?
1 Certains disques contiennent des sections où la recherche rapide n’est pas
autorisée.
2 Vous en pouvez pas avancer rapidement au début du film pendant les
avertissement car ceci est défendu.
La télécommande ne fonctionne pas bien ?
1 Vérifiez l’état de la pile.
2 Vérifiez que le récepteur à infrarouges n’est pas bloqué.
3 Dirigez la télécommande vers le récepteur à infrarouges
Le disque ne fonctionne pas ?
1 Insérez le disque avec la face imprimée vers le haut.
2 Contrôlez le type de disque. Ce lecteur ne reproduit que des disques DVD,
audio CD et MP3.
La lecture démarre, mais s’arrête ensuite ?
1 Le lecteur et les disques possèdent un code régional. Si le code du disque ne
correspond pas avec celui du lecteur, le disque ne peut pas être reproduit. Ce
lecteur possède le code régional 2.
2 Le disque est sale. Nettoyez- le
3 La condensation d’est formée. Attendez que la condensation se vaporise.
Page 45

7’’ Portable DVD Player with
2 x 7’
’ Monitor
DVP740TWIN
Please read this user’s guide before installing,
setting up,or using your new product.
Page 46

Cautions and Warnnings
Placement
To prevent fire or electric shock, do not expose this appliance to rain or
moisture. Do not place the set on an unstable cart, stand, tripod, bracket or
table to prevent it from falling. Keep the unit away from strong magnets,
heat sources, direct sunlight, excessive dust. If the unit is brought directly
from a cold to a warm location, moisture may condense inside the unit.
When you move it from a cold to a warm location, wait for about one hour
before operating the unit, or remove the disc and leave the unit turned on
until the moisture evaporat
Installation
Ensure that the portable DVD player is installed in accordance with the
instructions and illustrations provided in this manual.
Caution
Do not push objects of any kind into the unit through openings; do not spill
or spray liquid of any kind on or in the system (this may result in a fire or
electric shock). Do not place anything heavy on the unit. To ensure
proper ventilation and proper operation, never cover or block openings
with a cloth or other material. Keep the unit away from an open flame
such as fire, candle etc. Use the correct type of battery. Do not use the
unit in temperatures higher than 104 degrees Fahrenheit or 40 degrees
Celsius.
Disc
Do not use irregularly shaped discs such as heart or star-shaped discs
as they may cause the unit to malfunction. Do not stick paper, tape or glue
on the disc. Do not expose the disc to direct sunlight or heat sources. Do
not touch the surface of disc. Handle the disc by its edge. Clean the disc
by wiping the disc from the center out with a cleaning cloth. Remove the
disc from the unit and store it in its case after playing. Some playback
operations of discs may be intentionally fixed by software producers.
Since this unit plays discs according to the disc contents the software
producers designed, some playback features may not be available. Also
refer to th
e instructions supplied with the discs.
es.
1
Page 47

WARNING: TO REDUCE THE RISK OF FIRE OR ELECTRIC SHOCK, DO NOT
EXPOSE THIS APPLIANCE TO WATER OR MOISTURE. DO NOT REMOVE COVER (OR
BACK). NO USER SERVICEABLE PARTS INSIDE. REFER SERVICING TO QUALIFIED
SERVICE PERSONNEL.
SERVICE MUST BE CARRIED OUT BY QUALIFIED PERSONNEL ONLY, OR THE
WARRANTY IS UNVALID.
This mark is applied to show the equipment conforms to European safety and
electro-magnetic compatibility standards.
The lightening flash with arrowhead symbol, within an equilateral triangle, is intended
to alert the user to the presence of non-insulated dangerous voltage within the
product. This may be of sufficient magnitude to constitute a risk of electric shock to
persons.
The exclamation point within an equilateral triangle is intended to alert user to the
presence of important operating procedures and maintenance (service) instructions in
the literature accompanying the appliance.
Laser product symbol: located on the rear panel of the unit, indicate this player is a class 1
laser product. It means it only uses weak laser and no hazardous radiation outside of the unit.
Macrovision:
This product incorporates copyright protection technology that is protected by method claims of certain U.S
patents and other intellectual property rights owned by Macrovision Corporation, and is intended for home and
other limited viewing uses only unless otherwise authorized by Macrovision Corporation. Reverse engineering or
disassembly is prohibited.
DOLBY PROLOGIC:
Manufactured under license from Dolby Laboratories.
"Dolby", "Pro Logic", and the double-D symbol are trademarks of Dolby Laboratories.
2
Page 48

Important Safety Instructions
1. Read these instructions.
2. Keep thes
3. Heed all w
4. Follow all inst
5. Do not u
6. Clean only with a dam
7. Do not bl
the manufacturer’s instructions.
8. Do not in
stoves, or other apparatus(including amplifiers) that produce heat.
9. Do not defeat the safety purpose of t
plug has two blades with one wider than the other. The wide blade is
provided for your safety. When the provided plug does not fit into your
outlet, consult an electrician for replacement of the obsolete outlet.
10. Protect the pow
plug, convenience receptacles, and the point where they exit from the
apparatus.
11. Only us
12. Use onl
manufacturer or sold with the apparatus. When a cart is used, use caution
when moving the cart/apparatus combination to avoid injury from tip-over.
e instructions.
arnings.
ructions.
se this apparatus near water.
p cloth.
ock any of the ventilation openings. Install in accordance with
stall near any heat sources such as radiators, heat registers,
he polarized-type plug. A polarized
er cord from being walked on or pinched particularly at
e attachments/accessories specified by the manufacturer.
y with a cart, stand, tripod, bracket, or table specified by the
Accessories
1 x AC to DC Adapter
1 x Remote Control with Battery (CR2025)
1 x Instruction Manual
1 x AV and DC Cable
1 x Car Cigarette Lighter Adapter
1 x Bag (with straps)
3
Page 49

Remote Control
Using the Remote Control
Remove the plastic sheet
before using the remote control.
To Change the Remote Control Battery
1. Open the Battery Door. 2. Insert one CR2025 size battery.
3. To use the remote control,point it at the remote sensor
on the player. (Op erate in the range of 3 meters (10 feet)
° )
and 60
Controls, Indicators, and Connectors
Remote Control View
1) Setup
Enter or exit the setup menu.
2) UP
Us
ed to move up for Menu
Navigation.
3) SkipMove back to the previous title
or chaptor.
4)ENTER
Run the option or validate the
setting.
7
4
Page 50

5) Rewind/Left
Scan backward at 2,4,8,16,or 32 times normal playback speed.
6) Down
Used to move down for Menu Navigation.
7) Numbers
Use to select an item in a menu or enter a password.
8) Display
Display information about the DVD, such as title,chapter number,
track number and time.
9) Zoom
En
large the image 2,3,or 4 times the original size.
10) Sub
Select the subtitle language or turn on subtitles.
11) Skip+
Move forward to next title or chaptor.
12) A-B Repeat
Repeat a specific portion of a disc.
13) Fast Forward/Right
Scan forward at 2,4,8,16,or 32 time normal playback speed.
14) 1/ALL Repeat
Repeat playing the title,chapter or track.
15) Stop
(1 time) Stop at the present playing point./ (2 times) Stop playing.
16) Menu
Press to show the DVD root menu.
17) Audio
Select the audio language for the DVD.
18) Angle
Change the viewing angle of a scene.
19) Play/Pause
Start playback or pause playback.
5
Page 51

DVD Player View
1
10
11
12
13
2
3 4 5 6 7 8 9
1). Open Switch
Slide to open the disc tray.
2). Earphone Jack
Connect a set of headphones here.
3). Menu Button
Display the main menu of the disc.
4). Pause Button
Press to still the picture.
5). PREV. Button
Skip to the previous titles,chapters,or tracks.
6). Play Button
Run the option or validate the setting.
7). Next Button
Skip to the next titles,chapters,or tracks.
6
14
15
Page 52

8). Stop Button
1
2
3
4 56
(1 time) Stop at the present playing point./ (2 times) Stop playing DVD/CD.
9). IR Sensor
Receives signals from the remote control.
10). Power On/Off Switch
Turns the player on or off.
11). A/V jack
Connects to the monitor.
12). DC OUT Ja
Connect
ck
s to the monitor.
13). DC IN Jack
Connects to the AC adapter or Car cigarette lighter adapter.
14). Volume control
Adjust the Volume.
15). Kickstand
Monitor View
1). DC 9-12V Jack
Connects to the DC OUT Jack
on the DVD Player with a AV
and DC Cable.
2). AV IN Jack
Connects to the A/V Jack
on the DVD Player.
3). Earphone Jack
Provides the output signal for
headphones. Disable internal
speakers.
4). Volume +/-
Adjust the Volume.
5). Brightness +/-
Adjust the brightness.
6). Pow
er On/Off Switch
Turns the player on or off.
7
Page 53

Powering and Installation
A. Powering the system Indoors
Plug one end of the AC adapter
into the DC IN jack o
themain unit, then plugthe other
of
end into the 100~240V AC power
2
To power
outlet
outlet.
Note: The included AC adapter is
for use with this unit only. Do not
1
To “DC IN"
Jack on the unit
AC Adapter
use it with other equipment.
Disconnect the player from the
main outlet if you don’t intend to
use it for an extended period of
time.
B. Positioning the DVD Player/Monitor On Headrest
n the side
Step 1
Step 2
Note: Install the the DVD player/Monitor according to the above
steps.
8
Page 54

C. Powering and Installation in a Car
1 To the A/V Jack
on the DVD player
2 To the DC
OUT Jac
the DVD pl
6 To the
cigarette ligh
socket on t
car
3 To the DC IN
Jack on the monitor
4 To the AV IN 5 To the DC IN
Jack on the monitor Jack on the DVD playe
r
Connect the DVD player and Monitor with the attached cable according
to the figure above.
Note: Unplug the car power adapter from the cigarette lighter socket
when not in use.
D. Connecting to Headphones (Optional)
Wired headphone may be used with the DVD or Monitor,Simply plug in
the headset to either Headphone jack on the Right DVD or Bottom
Monitor.
*
*
k on
he
ayer
ter
9
Page 55

Playing a Disc
This owner’s manual explains the basic instructions for operate the
unit. Some DVDs are produced in a manner that allows specific or
limited operation during playback. Therefore, this uint may not respond
to all operating commands. This is not defect. Please refer to the
instructions accompanying the specific DVD in question for more
information about the options available on that DVD.
“ ” may appear on the screen during operation. The“ ”symbol
means that the desired operation is not permitted by the unit or disc.
Loading and Playing a Disc
1. After connecting power to the DVD player, push the Power
On/ Off switch to the “On” position.
2. Move the panel up.
Place a disc gently into the tray.
3.
- You should hear and feel the disc snap firmly into place.
- Place a disc into the tray with the disc’s label facing up.
4. Close the DVD cover until it clicks shut. The unit will now load
disc and commence playback.
5. Stopping Play.
Press the STOP ( ) button during play.
6.
Pausing Play
Press the PAUSE ( ) button on the remote during play..
- Screen st
- To resume, press PA
Fast Forward/Fast Reverse
7.
Press Fast Forward ( ) or Fast Reverse ( ) to achieve the place
you desired with speed adjustable during 2X, 4X, 8X, 16X, 32X times.
8. Menu
A DV
play a DVD, a root menu of the disc will appear on the screen of your
DVD player or Monitor. The contents of the menu vary from disc to
disc. Press MENU during playback to display the menu.
ops, no sound.
USE ( ) button once again.
D is divided into sections called titles and chapters. When you
10
Page 56

Display
Title Elapsed
Chapter Elapsed
Title Remain
1. PLAYING TIME AND REMAINING TIME
During playback press the ‘DISPLAY’ button to display the current
a.
Title Number (1), the total Number of Titles (2), the current Chapter
Number (3), the total Number of Chapters (4), and the Playing elapsed
Time for the title (5). The heading will disappear automatically after 3
seconds if DISPLAY button is not pressed.
Title, Chapter Number, and Time Screen Display
b. Press ‘DISP
Title Elapsed: The elapsed time of the title
Title Remain: The remaining time of the title
Chapter Elapsed: The elapsed time of the chapter
Chapter Remain: The remaining time of the chapter
Display Off
LAY’ constantly to choose the options below in sequence.
: The DVD’s time Information will not be displayed.
Display Off
Chapter Remain
11
Page 57

2. ANGLE
During playback of a disc, press ‘ANGLE
angles for discs containing multi-angles*, with the current angle number (1) and the total number of angles (2) displaying. Press ‘ANGLE
to select other angles.
*NOTE: Not all discs contain this feature.
’ to display the available
’
Angle
3. SUBTITLE
During disc playback press ‘SUB
desire*, with the current Subtitle Language Number (1) and the total
Number of Subtitle Languages (2) displayed. If there are multiple
languages press ‘SUB
turn subtitles OFF, press the ‘SUB
displayed. The Subtitle display will disappear automatically if the
’ button is not pressed again within 3 seconds.
‘SUB
* Some DVDs only allow access to this function through the DVD
menu
’ again to select another subtitle language. To
’ to select the subtitle language you
’ button until ‘Subtitle Off’ is
Subtitle
12
Page 58

4. AUDIO
During playback press ‘AUDIO
with the current Audio Channel Number (1) and the total number of
Audio Channels (2) displayed. Press AUDIO again to select another
audio language. The audio display will disappear automatically if the
’ button is not pressed within for 3 seconds.
‘AUDIO
* Some DVDs only allow access to this function through the DVD
menu.
’ to select the audio language you desire*,
Audio Language
5. ZOOM
During playback press ‘ZOOM’ to enlarge the picture by 2X, 3X or 4X
with the current zoom multiple.
(1)Press “zoom”one time, the picture will be enlarged 2X.
(2)Press “zoom” a second time, the picture will be enlarged 3X.
(3)Press “zoom” a 3rd time, the picture will be enlarged 4X.
(4)Press “zoom” a 4th time, the picture will return to normal size.
6. A-B REPEAT
a. During pl
b. Press ‘A-B’ a second tim
will repeatedly play the part between Point A and Point B.
c. Press A-B a t
playback.
ayback press a first time ‘A-B’ to set the Starting Point A.
e to set the Ending Point B and the player
hird time to cancel A-B repeat and resume normal
Zoom
13
Page 59

7. 1/ALL REPEAT
During playback press ‘ 1/ALL REPEAT’ constantly to see the repeat
a.
mode as right.
Chapter: Repeat the current chapter
Title: Repeat the current title
All: Repeat all chapters and titles
Off: Resume normal playback
The ‘Chapter’ repeat display shows below for example:
Chapter Repeat
Playing MPEG4 Discs
The mpeg4 standard covers many proprietary formats. Some will play on
this player; other will be recognized by the player but will not play (such as
AVI files). Some files such as W MV (Windows) and MOV (Apple
QuickTime) files are not recognized by the player.
The operation of a MPEG4 Disc is the same as the MP3 discs. Using UP,
DOWN, LEFT, RIGHT to move the cursor and press ENTER to confirm.
* Press MENU to return to the available menu.
14
Page 60

Playing MP3 Discs
MP3 is a format for storing digital audio. An audio CD-quality song is
compressed into the MP3 format with very little loss of audio quality
while taking up much less disc space. CD-R /RW discs that have been
encoded in MP3 format are compatible with this system.
When a MP3 disc is inserted into the unit, the menu screen appears
automatically. You can use the menu screen to select your desired
folders and songs or the system plays the songs in the order they were
burned onto the disc.
1. Press the
2. Press EN
or button to choose a folder from the folder list.
TER to select the highlighted folder. The songs available
under the folder will be listed.
3. Use
or button to choose a song from the list. Press ENTER to
select and begin playback of the highlighted song.
4. Use the
button to move to the next song. Press the
button to move to the beginning of the previous song.
00:00 00:00
001/111
ROOT
BBBBBBBBB
CCCCCCCCCC
DDDDDDDDDD
EEEEEEEEEEE
FFFFFFFFF
USING THE 1/ALL REPEAT FEATURE
The default mode for the Re
peat feature is OFF. Pressing 1/ALL REPEAT
consecutively changes the repeat options:
• Repeat One (repeat playback of a song)
• Repeat Folder (repeat playback of a specific folder)
• Repeat Off (normal playback)
15
Page 61

USING THEA-B REPEAT FEATURE
a. During pl
b. Press ‘A-B
repeatedly play the part between Point A and Point B.
c. Press A-B a t
playback.
ayback press a first time ‘A-B’ to set the Starting Point A.
’ a second time to set the Ending Point B and the player will
hird time to cancel A-B repeat and resume normal
As you toggle through the
repeat mode loops repeatedly until you turn it off.
NOTE:
” icon in front of a file name indicates that this is a folder, not an
“
MP3 file.
“MP3” icon in front of a file name indicates that this is a MP3 file.
When you playing the disc which contains both MP3 and photos (JPEG),
press the button to return to the Menu Screen, then you can choose your
desired photo or MP3.
options, the repeat mode changes. The selected
Setup
1. General Setup Page
1) Press ‘SETUP’ to display the Main screen of the Setup Menu on the
screen and “General Setup Page
is highlighted. Press ‘SETUP’ again to exit the Setup Menu and the unit
will resume it’s last playback mode.
2) Press the ENTER button, “TV Display” is highlighted.
3) Press the or button to select the other menus in general setup
page.
4) Press to enter the sub menu.
5) Press the or button to select the sub menu and press the
ENTER to confirm your selection.
” appears. At the same time, “ ”
16
Page 62

6) Repeat steps 3-5 for other menus.
Note: Press
to return the previous menu.
a) TV Dis
b) Angle M
c) OSD La
d) Screen S
e) Last Mem
play
* Normal/PS: When the
Wide-screen images are shown on the screen.but with some parts
cropped automatically.
* Normal/LB: When the player outputs signal to a normal m
normal picture is shown on the screen with a black strip at both the
top and bottom of the screen.
* Wide: When the pl
wide picture is shown on the full screen.
ark
* On: The screen will show
is available).
* Off: The screen will n
NOTE: Not al
disc dependent.
You can c
setup language.
*On: Enables screen
NOTE: The DV
*Off: Disa
*On: The unit will return to the last position on the disc.
*Off: The unit will not return to the last position on the disc.
l discs contain above features. The above features are
ng
hoose one out of several different languages as the OSD
aver
D player will enter the Screen Saver mode after approximately five minutes if the same image remains on the
screen.
bles screen saver (off).
ory
player outputs signal to a normal monitor,
ayer outputs signal to a wide screen monitor, a
the angle mark icon. (*If an angle option
ot display the Angle Mark.
saver.
onitor, a
17
Page 63

2.Video Setup Page
Setup menu, Press the or button to select “Video Setup Page ”
1) In
and “” is highlighted. Press ENTER to enter the video quality
setup page.
2) Press the ENTER button, “Brightness” is highlighted.
3) Press the
setup page.
4) Press to enter the sub menu.
5) Press the or button to adjust the quantity and press the ENTER
to confirm your selection.
6) Repeat steps 3-5 for other menus.
Note: Press ENTER to return the previous menu.
a) Brightness b) Contrast c) Hue d) Saturation
or button to select the other menus in the video
3. Password
In Setup m
Page
pag
Old Password or t he Defau lt Passwo rd, the New Pass word, and
Confirmed the New Password. Press ENTER to confirm the change.
Note: The default password is 3308 .
4. Preference Page (This should be set with no disc in the player)
1) In Setup menu, Press the
2) Press the ENTER button, “Audio” is highlighted.
3) Press the or button to select the other menus in preference
page.
4) Press to enter the sub menu.
5) Press the or button to select the sub menu and press the
ENTER to confirm your selection.
6) Repeat steps 3-5 for other menus.
Note: Press to return the previous menu.
a) Audio b) Subtitle
c) Disc Menu
enu, Press the or button to select “Password Setup
” and " " is highlighted. Press ENTER to enter the password
e.Press ENTER twice to enter the Password Change Page. Input the
button to select
Page” and “ ” is highlighted. Press ENTER to enter the
Preference Page.
or
“
reference
P
18
Page 64

Note: Language and subtitle selection are only available for discs that are
recorded in the lis
the player will play and display on the screen the original recorded language
contained in the disc.
rental
d) Pa
Select ‘Parental’ by pressing the or button in the preference
page. And Press to enter the sub menu. Select the parental level
you desire using
multiple rating levels. These are listed from the lowest level (1
Kid Safe) to the highest level (8 Adult). Press ENTER and input 4
digit password, then press ENTER again to confirm the parental
level setting.
1 KID SAFE
2 G
3PG
4 PG-13
5PG-R
6 R
7 NC-17
8ADULT
NOTE: The level of 8 Adult is the factory default.
e) Default
Select ‘Default’ by pressing the or button in preference page. And
to enter the sub menu. Press ENTER to make the setting
Press
return to the factory-set mode.
NOTE: The parental setting is not affected by the default reset function.
The master password is 3308. This password is always effective
even after you have selected your own password and changed it. To
avoid the possibility of others using the default password to set the
parental level and change the password, you can record this master
password in another area and delete it from this manual. Some discs
can be limited depending on the age of users while some discs cannot.
ted languages. If the selected language is not available,
or button for discs with lock-out function or
5. Exit Se
Press ENT
tup Menu
ER to Exit the Setup menu.
19
Page 65

Specifications
DVD
Compatible DISC: DVD/CD/MP3/MPEG4
Signal system: PAL
Panel size: 7 Inches
Frequency response: 20 Hz to 20 kHz
Video output: 1 Vp-p/75 Ohm, unbalanced
Audio output: 1.4Vrms/10kOhm (1KHz, 0dB)
Audio S/N: Better than 60 dB
Dynamic range : Better than 85 dB
Laser: Semiconductor Laser, Wave Length: 650 nm/795 nm
Power source: DC 9V
Operating temperature: 5°C~35°C
Weight : 0.74Kg
Dimensions (W x D x H): 8.35 X 6.81 X 2.16 inches
Si ngle M onit or
Colour System:
Screen Size: 7 Inches
Power Supply: DC 9V
Operating Temperature: 41~95F(5~35 °C)
Operating Humidity: 10-75%
Storage Temperature: 14~140F(-10~60 °C)
Dimensions (W x D x H): 7.91 X 6.45 X 1.34 inches
Weight: 0.42Kg
212 X 173 X55 mm
PAL
201 x 164 x 34 mm
This manual is only for your reference. Changes to the design
and specification may be made without notice.
20
Page 66

Trouble Shooting
No sound or distorted sound?
Make sure your DVD is co
securely inserted into the appropriate jacks.
nnected properly.Make sure all cables are
Can’t ad
You can’t advance
appears at the beginning of movies because the disc is programmed to
prohibit that action.
The icon (
The feature or act
1. The di
2. The disc’s sof
3. The fea
4. You’ve requ
Picture is di
1. The disc mi
2. It is nor
No fo
1. Some discs
2. If you try t
IR sensor inoperative?
1. Ensure that the
2. Ensure that the
3. Ensure that the
vance through a movie?
through the opening credits and warning information that
) appears on screen?
ion cannot be completed at this time because:
sc’s software restricts it.
tware doesn’t support the feature (e.g., angles)
ture is not available at the moment.
ested a title or chapter number that is out of range.
storted?
ght be damaged. Try another disc.
mal for some distortion to appear during forward or
reverse scan.
rward or reverse scan?
have sections that prohibit rapid scanning or title and
chapter skip.
o skip through the warning information and credits at the
beginning of a movie, you won ’t be able to. This part of the movies
often programmed to prohibit skipping through it.
batteries in the remote are fresh.
remote sensor eye is not obstructed.
infrared transmitter is affixed over the sensor eye
of the component to be controlled.
21
Page 67

Disc won’t play?
1. Insert a disc
2. Check the typ
digital video discs, audio CDs and MP3s.
Play start
1.
Both the unit and the disc are coded by region. If the regional
codes don’t match, the disc can’t be played. This DVD is Region
Number 2.
2. The disc is dirty. Clean it.
3. Condensation has f
with the label side facing up.
e of disc you put into disc tray.This DVD only plays
s, but then stops immediately?
ormed. Allow player to dry out.
22
 Loading...