

Page 1
Page 2
Inhoud
Inleiding
Inleiding
Veiligheidsvoorschriften
Verpakking
Voornaamste eigenschappen
Toetsen toestel
Aansluitingen
Afstandsbediening
Basisbediening
Systeeminstelling
Specificaties
In geval van problemen
26
29
29
1
1
2
Dank u om deze draagbare Dvd-speler gekozen te hebben. Het toestel bevan een 7”
breedbeeld scherm en een Dvd-speler. Het toestel maakt gebruik van de nieuwste
elektronica en is geschikt voor gebruik thuis, in een hotel, op kantoor en voor
ontspanning. Het compacte formaat maakt het gemakkelijk draagbaar en installeerbaar.
Lees aandachtig de handleiding alvorens het toestel te gebruiken en bewaar de
handleiding voor later gebruik.
2
3
4
Veiligheidsvoorschriften
Gelieve deze gebruiksaanwijzing te lezen alvorens het toestel te gebruiken en bewaar
hem voor later gebruik.
7
8
Belangrijke veiligheidsinstructies
OPGELET
RISICO OP ELEKTRISCHE
SCHOKKEN NIET OPENEN
OPGELET
RISICO OP ELEKTRISCHE
SCHOKKEN NIET OPENEN
Verwittiging : om de gebruiker te verwittigen
dat er gevaarlijke spanningen zijn
Opgelet: om te verwittigen dat er belangrijke
instructies voor gebruik en onderhoud
meegeleverd worden.
Verwittiging: om het risico op een elektrische schok te vermijden, dit toestel niet
blootstellen aan regen of vocht.
1) Gelieve aandachtig de gebruiksaanwijzing te lezen en op te volgen om het toestel
veilig te kunnen gebruiken.
2) Gebruik dit toestel niet naast water. Plaats geen objecten, gevuld met een vloeistof,
boven het toestel.
3) Plaats het toestel niet naast warmtebronnen zoals radiatoren, kachels of andere
apparatuur (inclusief een versterker) die warmte verspreidt.
4) Trek de stekker uit in geval van bliksem, storm of als het toestel lange tijd niet
gebruikt wordt.
5) Reinigen: trek de stekker uit en gebruik een bevochtigd doekje. Gebruik geen
vloeibare detergenten of spuitbussen.
6) Gebruik alleen de accessoires die door de fabrikant aanbevolen worden.
7) Maak gebruik van een erkende servicedienst als onderhoud nodig is. Dat is het geval
wanneer het toestel beschadigd is, wanneer de netstroomkabel beschadigd is,
wanneer er vloeistof in of andere voorwerpen op het toestel gevallen zijn, wanneer
het blootgesteld is aan vocht of wanneer het niet goed meer functioneert. Probeer niet
zelf het toestel te herstellen wegens het gevaar van hoge spanningen en het risico op
een elektrische schok.
8) Gebruik geen discs met een onregelmatige vorm zoals een hart of een ster vermits
deze een slechte werking kunnen veroorzaken.
123
Page 3
Verpakking
Controleer eerst de inhoud van de verpakking
Dvd-speler
Audio/video kabel
Afstandsbediening met batterij
AC/DC stroomadapter
Sigarenaanstekeradapter
Gebruiksaanwijzing
Oortelefoon
Antenne
Als een item beschadigd is of mankeert, neem dan onmiddellijk contact met uw dealer.
Hou de verpakking bij; u kan die misschien nodig hebben om het toestel in de toekomst
te vervoeren.
VERWITTIGING: wijzigingen die aan dit toestel worden aangebracht zonder toelating
van de fabrikant of een geautoriseerd persoon, vernietigen de garantievoorwaarden.
1
1
1
1
1
1
1
1
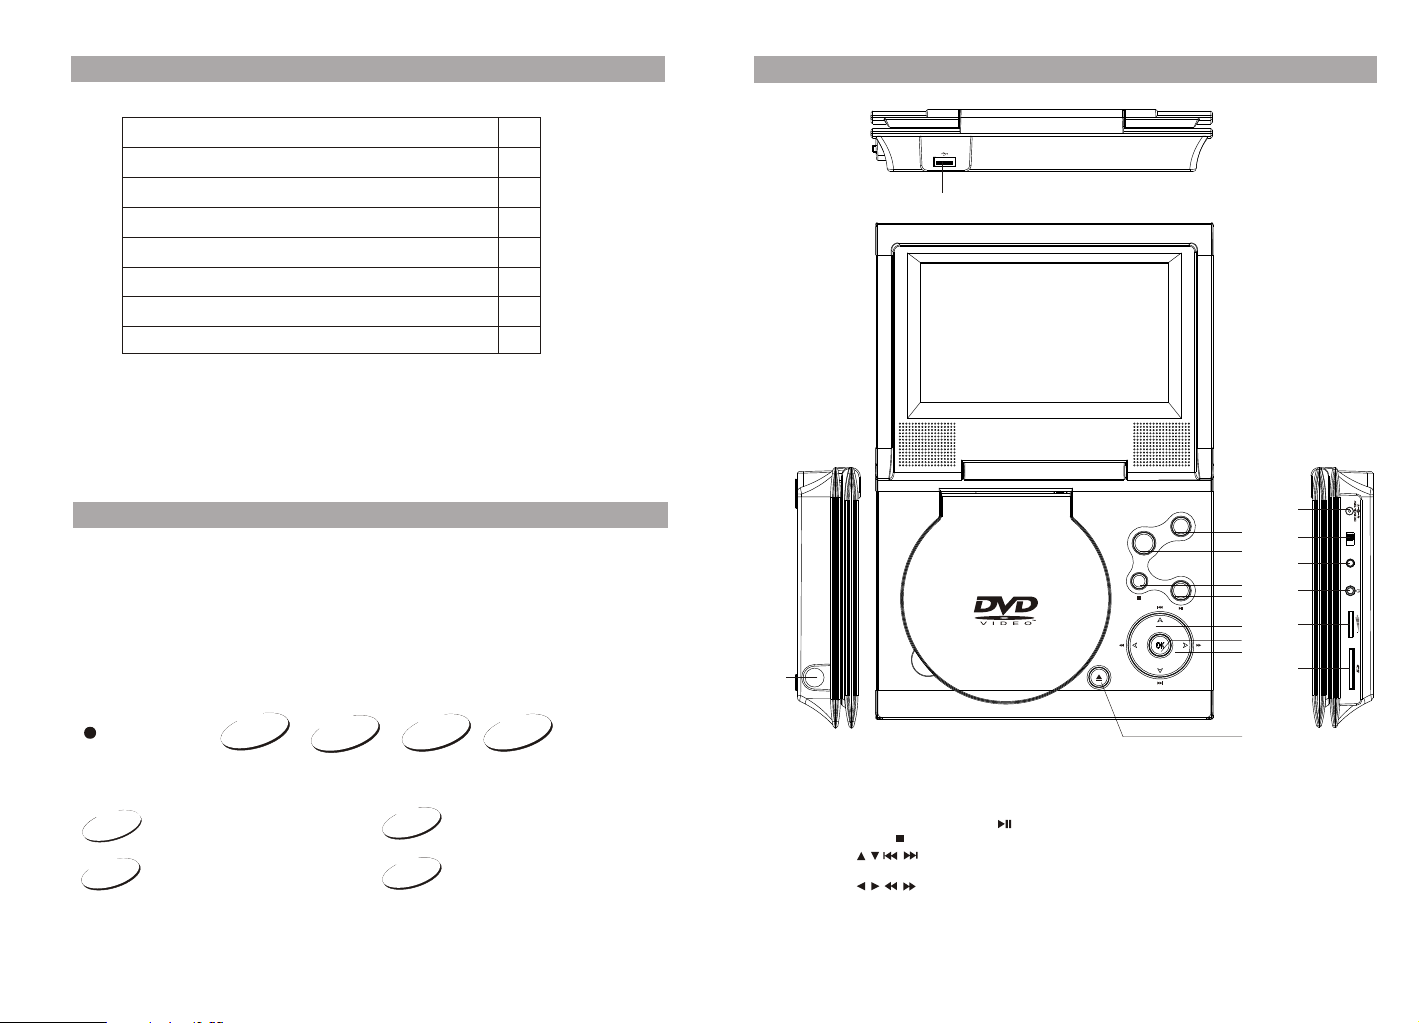
Toetsen toestel
1
Voornaamste eigenschappen
7” LCD scherm met hoge helderheid
Geschikt voor discs DVD, VCD, MP3, MPEG4, CD, JPG, enz
Ingebouwde Tv-tuner (digitaal)
SD/MMC kaartlezer (tot 2 GB) en USB (1.1) aansluiting
Ingebouwde luidspreker
Ingebouwde oplaadbare Lithium Polymeer batterij
Meertalige OSD, snel voorwaarts/achterwaarts, herhaalfunctie
Opmerking:
Betreffend:
·
Het symbool dat bij het begin van elke gebruiksomschrijving getoond wordt, wijst erop
dat de beschreven functie geldig is voor dit type disc.
DVD
VCD
Van toepassing op DVD
Van toepassing op VCD
DVD
VCD
CD MP3
CD
MP3
Van toepassing op CD
Van toepassing op Mp3
16
ANT
1. USB poort
2. SETUP (instellingen)
3. MODUS
4. WEERGAVE/PAUZE
5. STOP
6. TOETSEN
7. OK TOETS
8. TOETSEN
SETUP
MODE
9. DC IN 9-12 V
10. AAN/UIT SCHAKELAAR
11. AV UITGANG
12. HOOFDTELEFOON
13. VOLUME
14. SD slot
15. OPENEN
16. Antenne
2
3
4
5
6
7
8
15
10
11
12
13
14
9
OFF/ON
AV OUT
Page 4
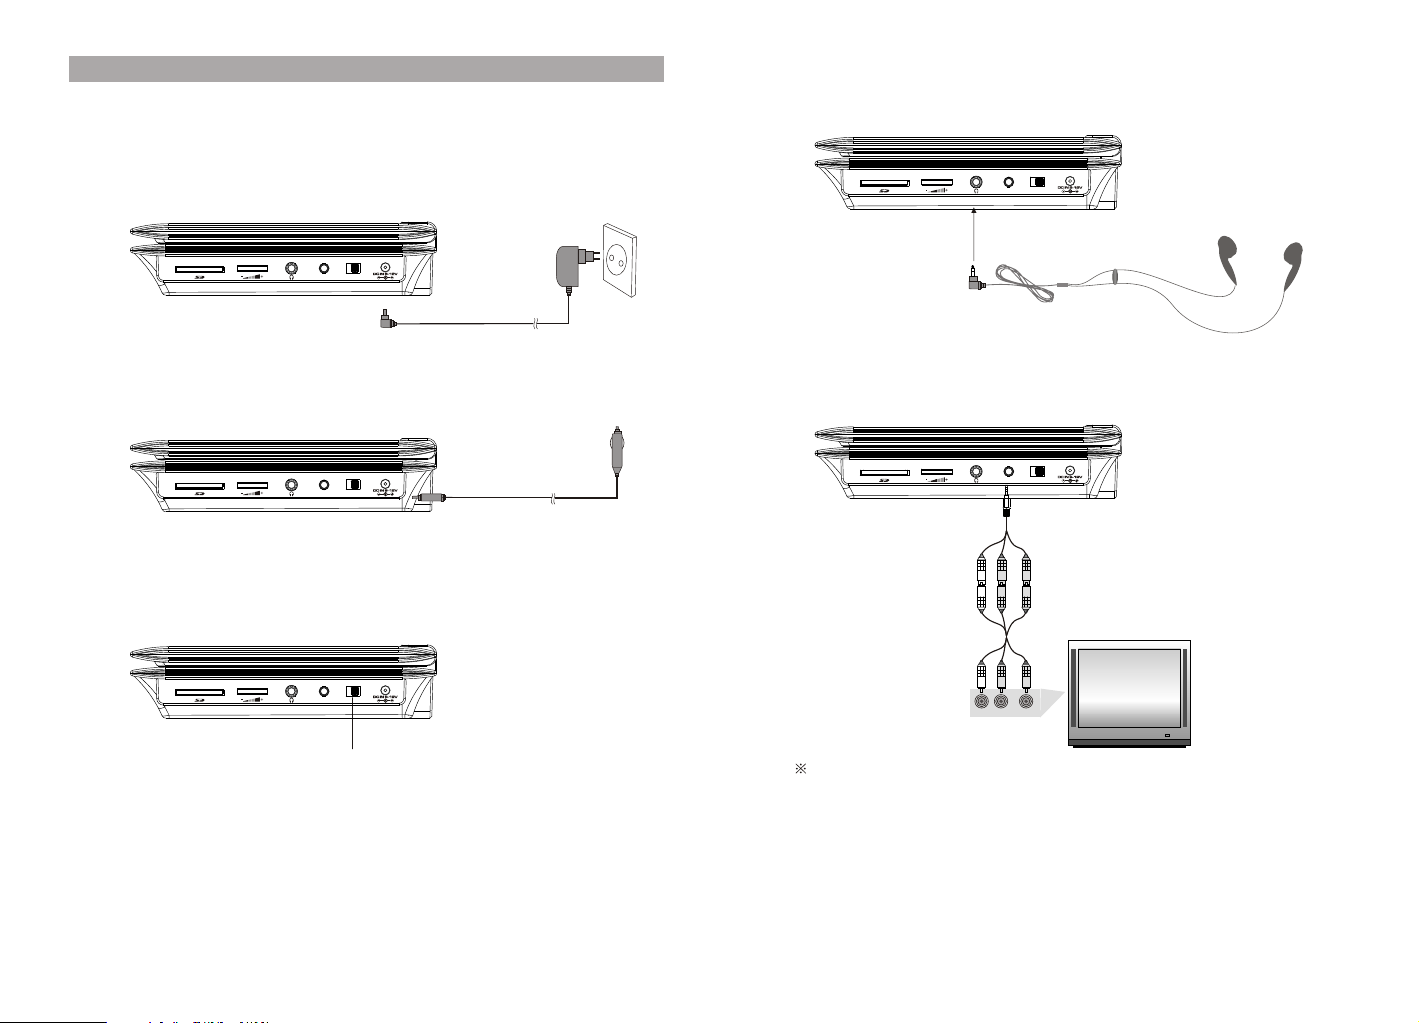
Aansluitingen
1.Stroomvoorziening
Steek één uiteinde van de AC/DC stroomadapter in de DC in 9-12 V aansluiting op de
zijkant van het toestel. Steek het andere uiteinde in het stopcontact.
OFF/ON
AV OUT
2.Stroomvoorziening in een auto
Steek één uiteinde van de sigarenaanstekeradapter in de DC in 9-12 V aansluiting op
de rechterkant van het toestel. Steek het andere uiteinde in het sigarenaansteker van
de auto.
OFF/ON
AV OUT
3.Schuif de AAN/UIT schakelaar in de AAN positie om het toestel in te
schakelen
5.Aansluiting van de oortelefoon.
AV OUT
6.Aansluiting aan een TV
AV OUT
AV CABLE
(Not Supplied)
OFF/ON
OFF/ON
OFF/ON
AV OUT
Power switch
Gebruik een AV kabel om het toestel aan een TV aan te sluiten.
Maak de juiste verbindingen.
4 5
AUDIO IN VIDEO IN
Page 5
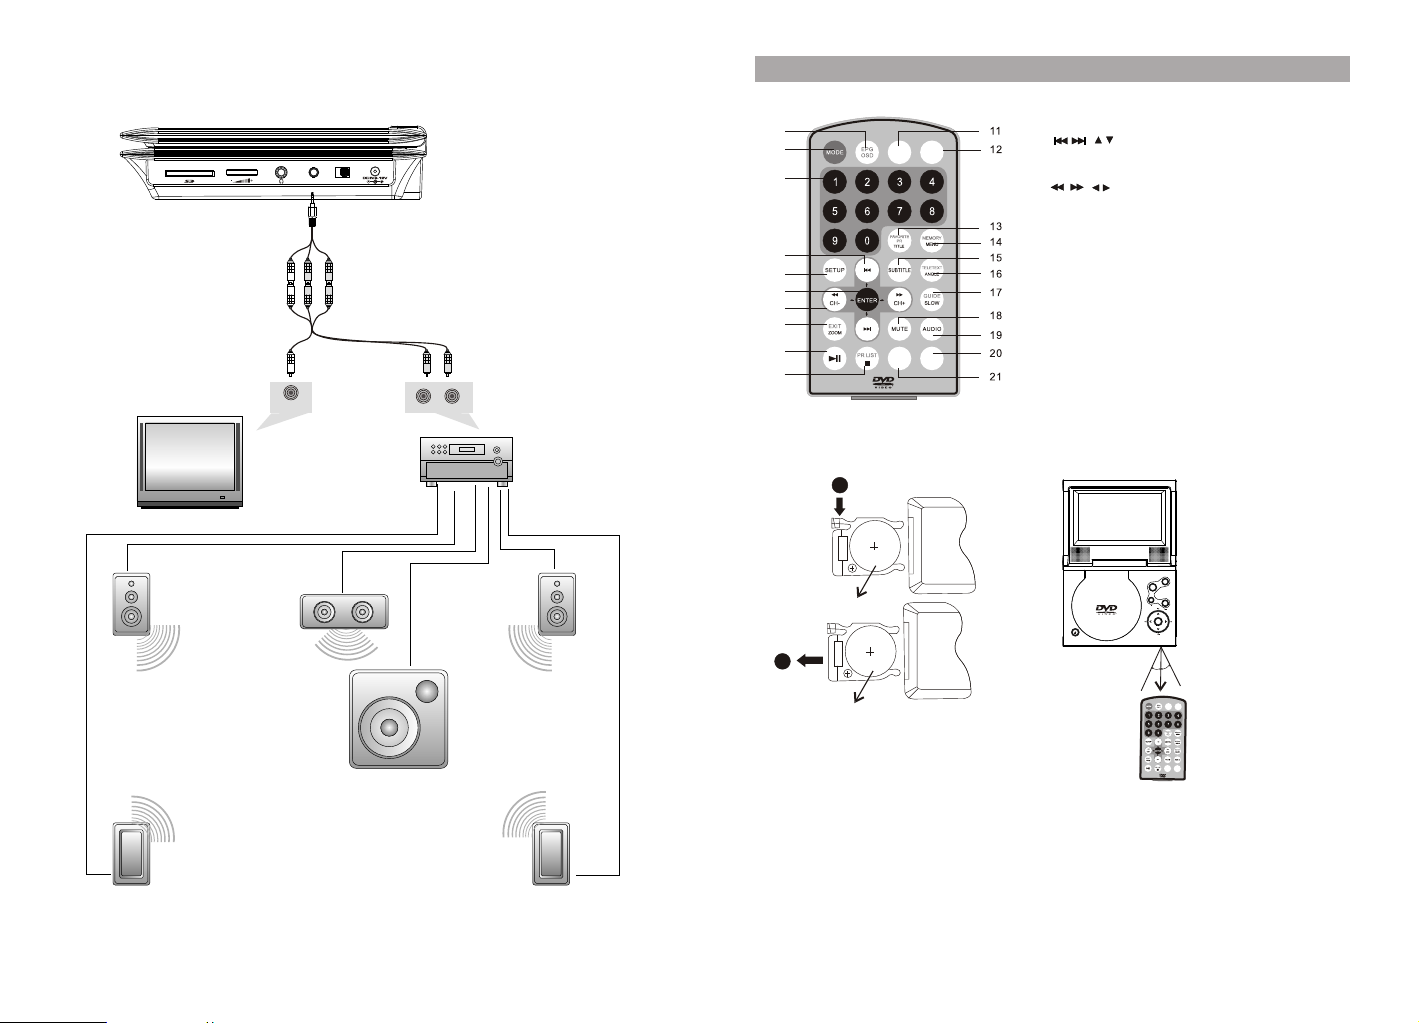
7.Aansluiting aan externe luidspreker
OFF/ON
AV OUT
AV kabel
(niet meegeleverd)
VIDEO IN
TV
AUDIO IN
VERSTERKER
Afstandsbediening
1. OSD/EPG
2. MODUS
1
2
TV/MUSIC
REPEAT
PIC
3
4
5
6
7
8
9
10
INFO
PG UP
RC-M32E
SLEEP
PG DN
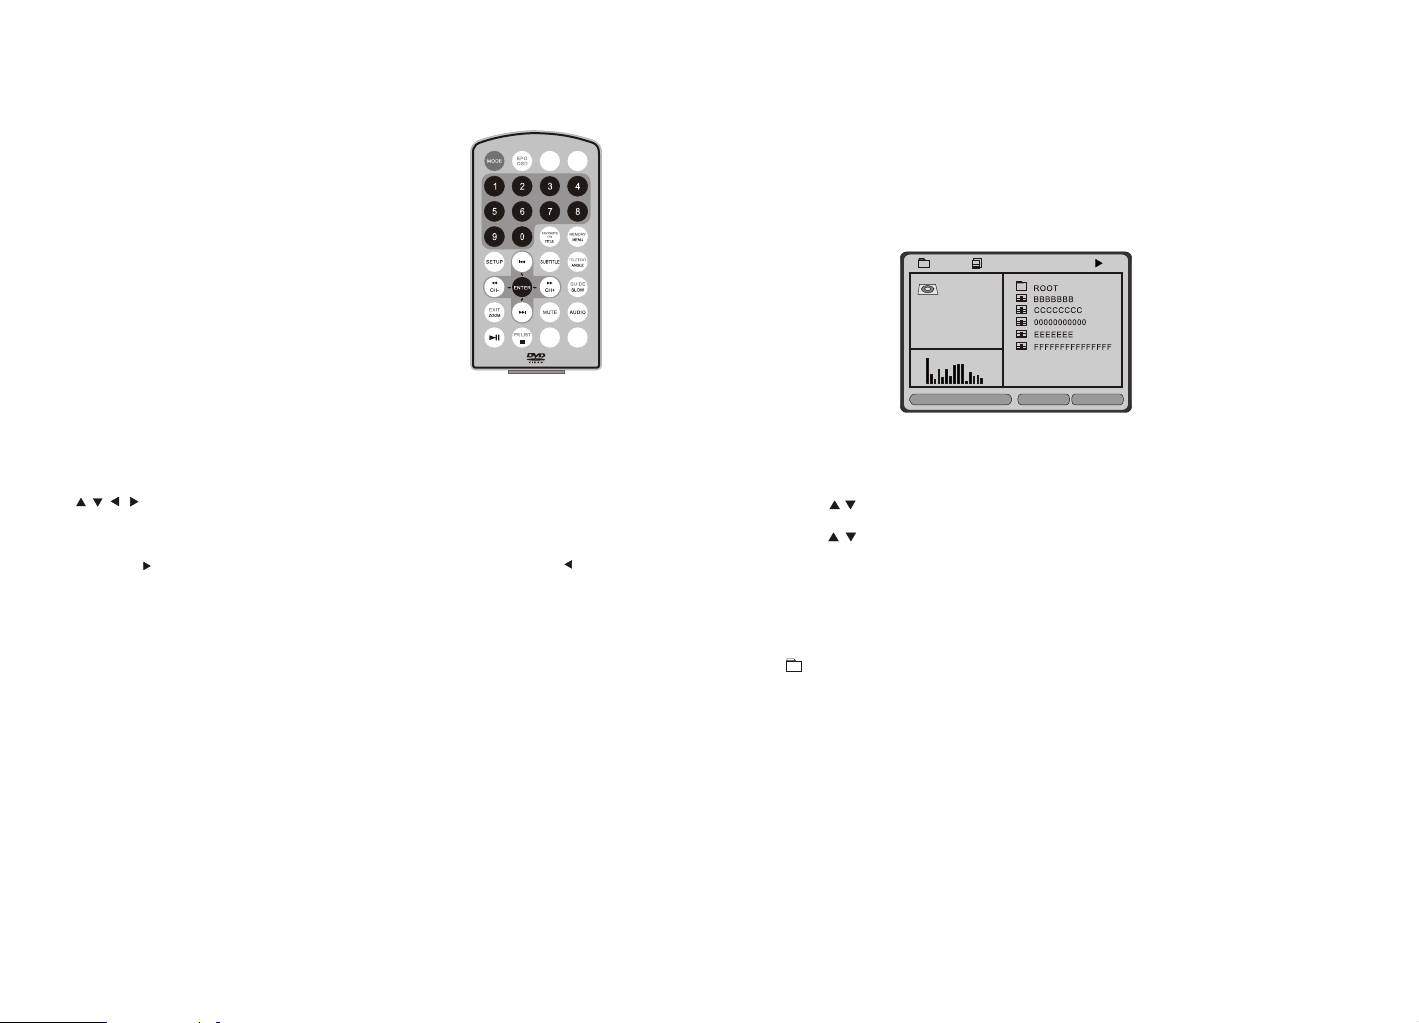
Gebruik van de afstandsbediening
Plaats de batterij in de afstandsbediening zoals hieronder getoond.
1
3. Numerieke toetsen 0-9
4. /
5. Setup (instellingen)
6. Enter (om te bevestigen)
7. /
8. Zoom/ exit
9. Weergave/pauze
10. PR (zender)lijst / Stop
11. TV / Muziek/ Herhaling
12. PIC
13. Voorkeur PR (zender) / Titel
14. Geheugen / Menu
15. Ondertitels
16. Teletekst / Hoek
17. Gids / Vertraagd
18. Mute
19. Audio
20. Sleep / PG DN (pagina naar beneden)
21. Info / PG UP (pagina naar boven)
Linkse luidspreker
vooraan
Center luidspreker
Rechtse
luidspreker
vooraan
SUBWOOFER
Rechtse luidspreker achteraan
Linkse luidspreker achteraan
Opmerking: er is geen 5.1 kanaal geluidweergave in het toestel, maar via aansluiting
met een versterker is deze wel beschikbaar;
6 7
SETUP
MODE
CR2025
2
CR2025
Bij gebruik van de afstandsbediening, zorg ervoor dat deze gericht is op de infrarood
ontvanger van het toestel. De afstand tussen het toestel en de afstandsbediening mag
niet meer dan 3 meter bedragen. Zie illustratie.
OK
0
0
30
30
T
V
/M
U
SIC
P
IC
R
E
P
EA
T
INF
O
SLE
EP
P
G
UP
PG
DN
RC
-M
32
E
Opmerking:
1.Zorg ervoor dat de afstandbediening niet valt of in een vochtige omgeving gebruikt
wordt.
2.Zorg ervoor dat de infrarood ontvanger van het toestel niet in direct zonlicht geplaatst
is.
3.Vervang de batterij als de afstandsbediening niet goed meer werkt.
Page 6
Basisbediening
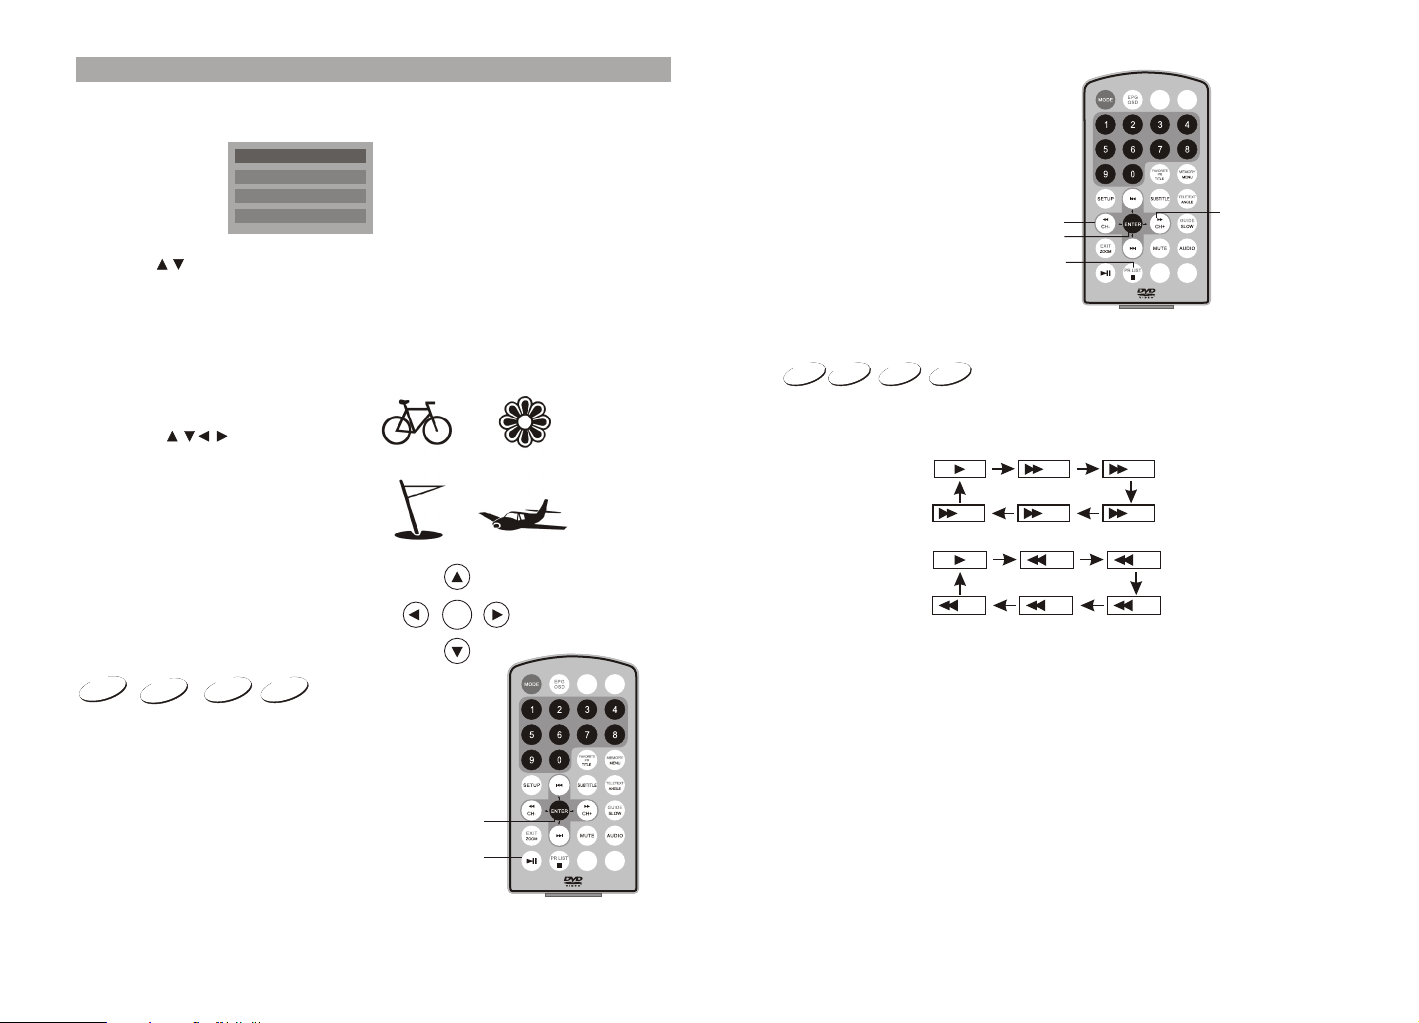
Als het toestel voor de eerste maal gebruikt wordt of wanneer u de MODUS toets indrukt,
verschijnt het volgend scherm.
DVD
DVB
USB
Card
Gebruik de toetsen om DVD te kiezen en druk op OK om te bevestigen.
Opmerking: dit toestel beschikt over een geheugenfunctie. Indien u het laatst de DVD
modus heeft gekozen, zal ook DVD gekozen worden als het terug opgestart wordt.
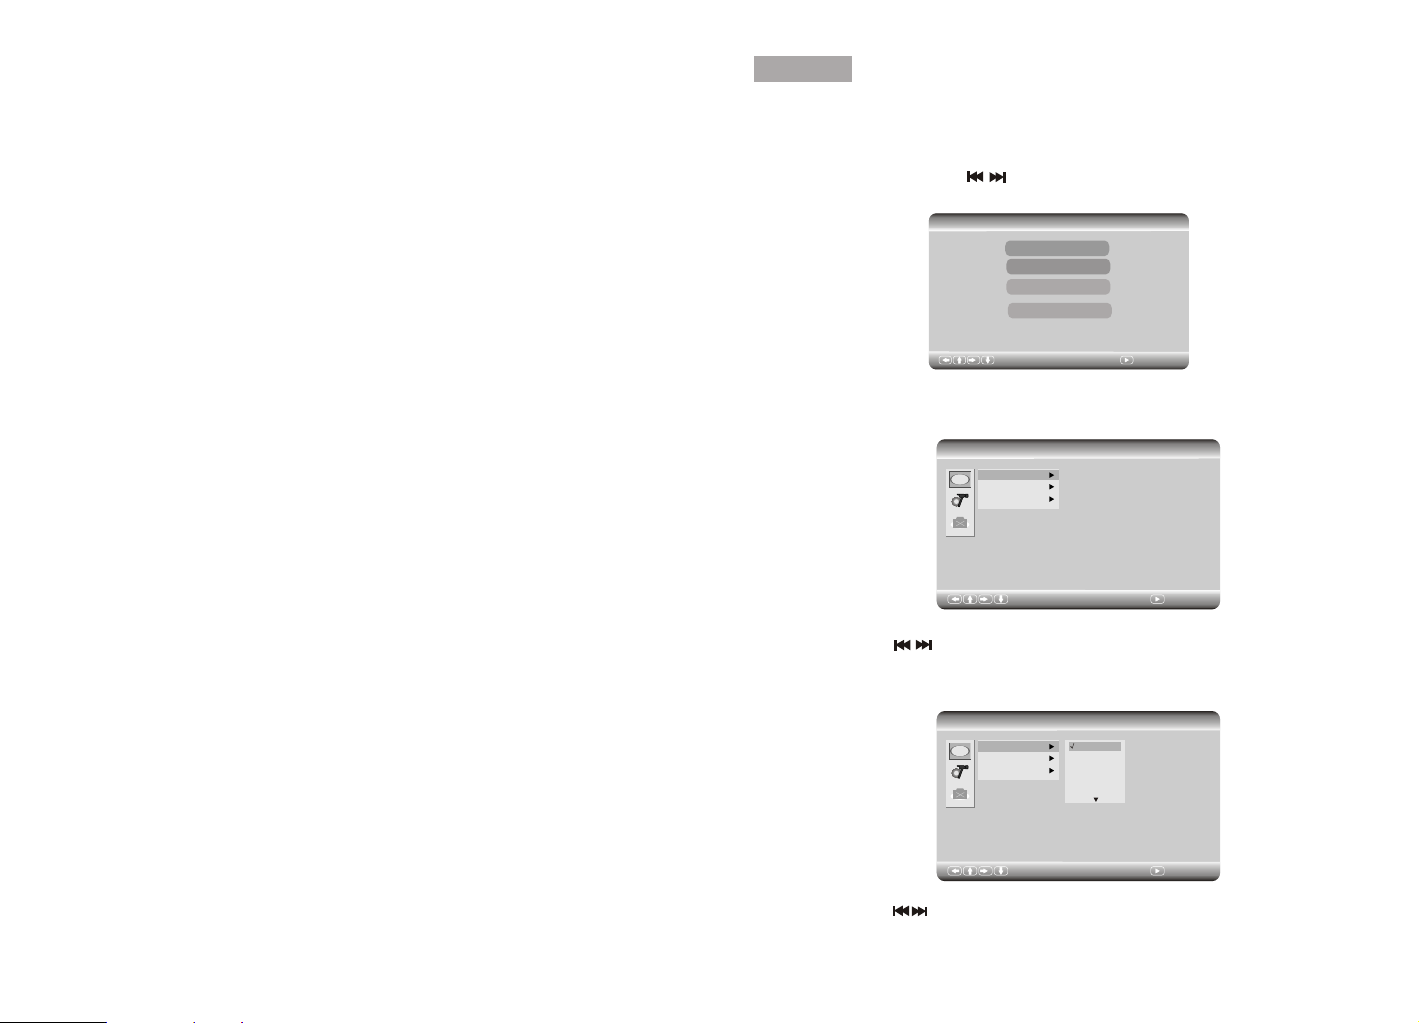
Hoe de weergave starten vanuit het menu.
1.Druk op TITEL/MENU om in het
menu te gaan.
2.Gebruik de toetsen of de
numerieke toetsen (alleen bij
sommige discs) om de gewenst titel
te kiezen.
Title 1 Title 2
Title 3
Title 4
Weergave stoppen
TV/MUSIC
PIC
REPEAT
Druk op STOP; de weergave stopt.
RC-M32E
Forward
SLEEP
PG DN
REV
ENTER
STOP
INFO
PG UP
Snel voorwaarts en achterwaarts
DVD
U kan de disc versneld voorwaarts of achterwaarts weergeven aan 2x, 4x , 8x, 16x of
32x de normale snelheid.
SVCD
VCD CD
2X 4X
8X16X32X
3.Druk op ENTER of PLAY.
Hoe de weergave pauzeren
DVD
Wanneer het beeld gepauzeerd is,
druk op PLAY om de weergave
verder te zetten.
VCD
CD MP3
8
OK
ENTER
PLAY/PAUSE
TV/MUSIC
REPEAT
INFO
PG UP
RC-M32E
SLEEP
PG DN
2X 4X
8X16X32X
Druk tijdens de weergave op REV of FWD.
De snelheid wijzigt telkens u op de REV of FWD toets drukt.
PIC
Opmerking:
Deze functie is niet beschikbaar op sommige DCD discs of tijdens bepaalde passages.
9
Page 7
Een bepaalde titel, hoofdstuk of nummer kiezen
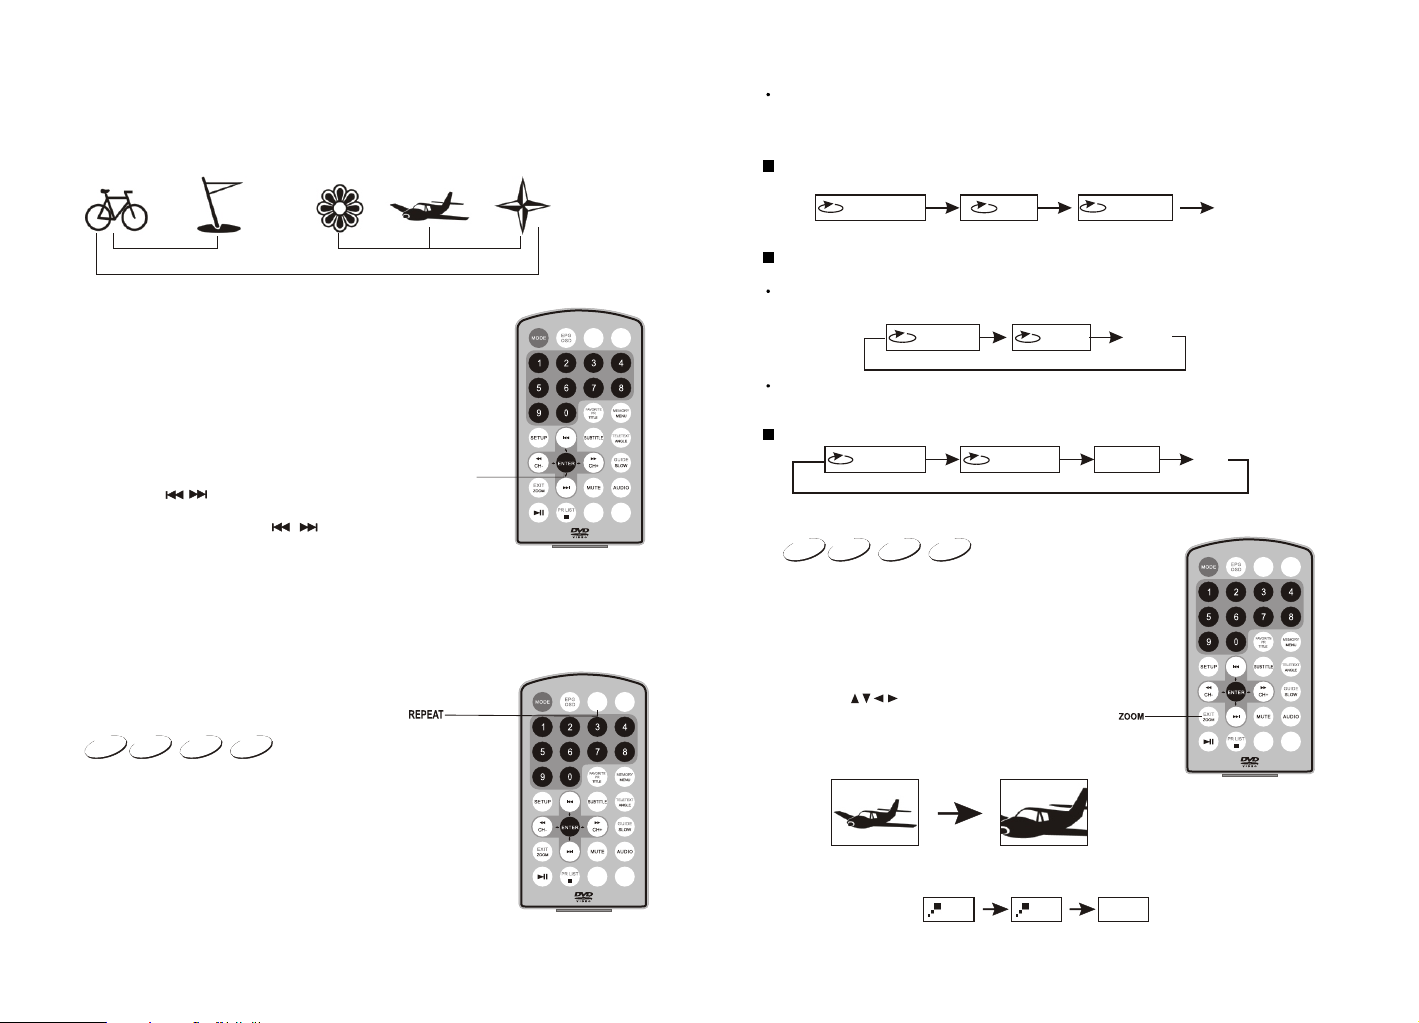
DVD discs worden ingedeeld in titels en onderverdeeld in hoofdstukken. CD's bevatten
nummers.
Chapter 1 Chapter 2 Chapter 3 Chapter 4 Chapter 5
U kan een titel, een hoofdstuk, een nummer of de hele disc herhalen.
1.Druk op de REPEAT toets. Iedere keer u deze toets indrukt kan u kiezen
uit verschillende herhaalmogelijkheden.
DVD
Hoofdstuk Titel Alles Uit
Title 1
DVD Video Disc
Title 2
Een titel kiezen via het menu.
U kan een titel kiezen via een menu als de
DVD disc over dergelijk menu beschikt.
1.Druk op TITLE en het titelmenu verschijnt.
2.Gebruik de pijltoetsen om de gewenste tite
l aan te duiden. U kan dat ook doen door ge
bruik te maken van de numerieke toetsen
(werkt niet bij alle DVD discs).
3.Druk op ENTER.
Daarmee begint de weergave van het eerste
hoofdstuk van de gekozen titel.
U kan ook de toetsen gebruiken om een
hoofdstuk of een nummer te kiezen.
Druk verschillende malen op totdat het
gewenste hoofdstuk/titel/nummer weergegeven wordt.
ENTER
Herhaling
DVD
De Dvd-speler laat toe om een titel, hoofdstuk, nummer
of een bepaald deel te herhalen (titel herhaling,
hoofdstuk/nummer herhaling).
SVCD
VCD CD
TV/MUSIC
REPEAT
INFO
PG UP
TV/MUSIC
REPEAT
RC-M32E
SLEEP
PG DN
Super VCD/CD
Alleen bij weergave van super VCD en VCD 2.0 is de herhaalfunctie beschikbaar voor
VCD1.1 en CD.
PIC
De herhaalfunctie is niet beschikbaar voor super VCD en VCD2.0 in menu weergave
modus.
Nummer Alles Uit
MP3 disc
Nummer Folder Alles Uit
Zoom
DVD
Met deze Dvd-speler kunt u op het beeld
inzoomen.
Druk tijdens de normale of vertraagde
weergave op ZOOM.
PIC
De speler vergroot het centrum van het beeld.
Gebruik de toetsen om het beeld te
verplaatsen.
SVCD
VCD CD
TV/MUSIC
REPEAT
INFO
PG UP
RC-M32E
SLEEP
PG DN
PIC
101110
SLEEP
INFO
PG DN
PG UP
RC-M32E
Druk verschillende malen op ZOOM om te kiezen tussen de verschillende
vergrotingsfactoren (zoals hieronder getoond).
2x 4x
Normal
view (1x)
Page 8
Weergave ondertitels
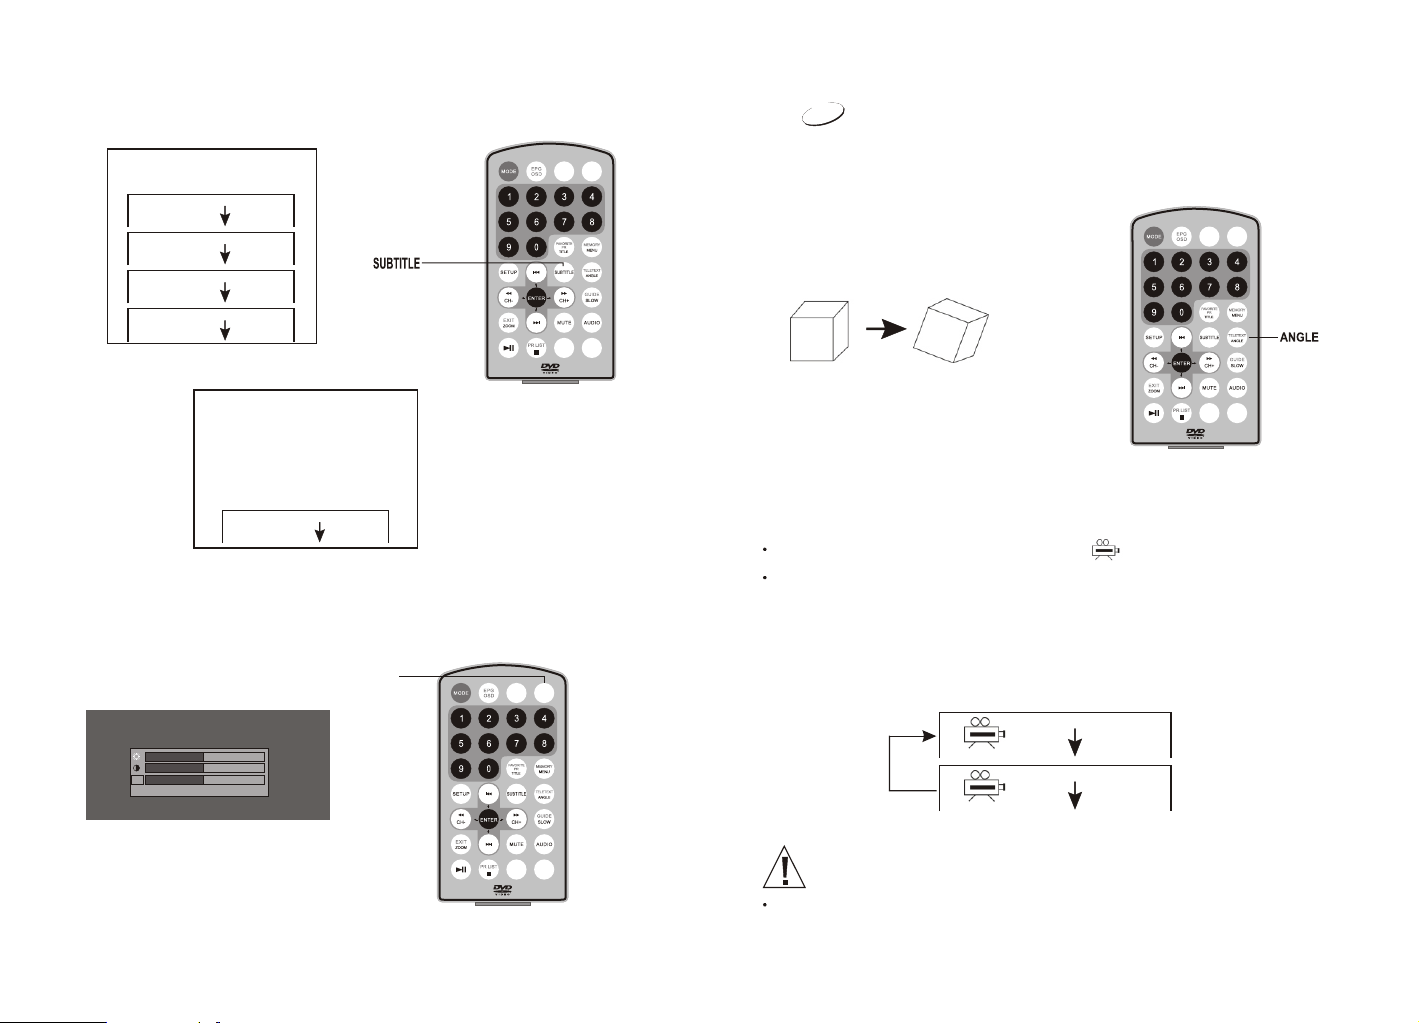
Met deze speler kan u ondertitels weergeven. Druk verschillende malen op SUBTITLE
om de gewenste taal te kiezen.
Hoek
DVD
Om de ondertitels uit te
schakelen.
SUBTITLE 1 1/03
SUBTITLE 2 2/03
SUBTITLE 3 3/03
SUBTITLE OFF
Druk verschillende malen op
de
SUBTITLE toets totdat
SUBTITLE OFF verschijnt en
de ondertitels
niet meer weergegeven
worden.
SUBTITLE OFF
Druk op PIC om in verschillende volgende menu's te komen.
PIC
TV/MUSIC
REPEAT
TV/MUSIC
PIC
REPEAT
De Dvd-speler laat toe om beelden vanuit een andere
hoek te bekijken (hangt af van de disc).
TV/MUSIC
PIC
REPEAT
ANGLE 1 ANGLE 2
SLEEP
INFO
PG DN
PG UP
RC-M32E
Camerahoek selectie
1.Selecteren van de camerahoek.
SLEEP
INFO
PG DN
PG UP
RC-M32E
2.Hoe de camerahoek wijzigen
Als de Dvd-disc uitgerust is met verschillende camerahoeken kan u een bepaalde scène
vanuit een verschillende hoek bekijken.
Druk tijdens de weergave verschillende malen op ANGLE.
U kan alleen de ANGLE toets gebruiken als het symbool op het scherm knippert.
Iedere keer dat u op ANGLE drukt, verandert de hoek.
PIC
2/2
RGB
RESET
12
1 /2
SLEEP
INFO
PG DN
PG UP
RC-M32E
De hoekfunctie werkt niet met DVD discs die geen scènes bevatten die vanuit
verschillende hoeken werden opgenomen.
13
Page 9
Weergave van een Kodak CD/JPEG
1.Breng de KODAK of de JPEG disc in de speler.
Wanneer een KODAK disc ingebracht wordt,
start de weergave automatisch.
2.Selecteer een folder of een foto/nummer dat zich
op de JPEG bevindt en er verschijnt een menu op
het scherm. Gebruik om een folder te selecteren
en druk op ENTER om de inhoud van de folder te
zien.
TV/MUSIC
REPEAT
Weergave MP3 discs
MP3 is een formaat om digitaal geluid op te slaan. Een liedje met Cd-kwaliteit kan in
PIC
het MP3 formaat gecomprimeerd worden met slechts een klein verlies aan kwaliteit,
terwijl het veel minder plaats op de disc inneemt. CD-R/RW discs die in het MP3
formaat zijn opgenomen, kunnen met deze speler weergegeven worden.
ROOT 2/17
ROOT
00:00:00
3.Selecteer de weergave modus.
U kan de REPEAT toets gebruiken om te kiezen
tussen eenmalige weergave, herhaling nummer,
herhaling folder, alles herhalen, uit.
4.Gebruik de STOP of MENU toets om de inhoud te bekijken. Bij een JPEG disc kan
STOP en MENU gebruikt worden om de JPEG folders en de corresponderende
documenten weer te geven. Wanneer het beeld doorlopen wordt, druk op STOP en
een thumbnail beeld verschijnt. U kan het gewenste beeld ook selecteren met de
/ OK toetsen.
5.Door op te drukken wordt het beeld 90° tegen wijzerzin gedraaid. Met wordt het
beeld 90° wijzerzin gedraaid.
6.Bij indrukken van TITLE, SUBTITLE, AUDIO en SLOW verschijnt er een handje op
het scherm, wat betekent dat deze functies niet beschikbaar zijn.
SLEEP
INFO
PG DN
PG UP
RC-M32E
48KHz 160Kbps 03:55
Wanneer een MP3 disc ingebracht wordt verschijnt er automatisch een menu. U kan het
menu gebruiken om de gewenste folders of liedjes te selecteren of om de liedjes weer te
geven in de volgorde waarmee ze op de disc werden opgenomen.
1.Gebruik om een folder te kiezen uit de folderlijst, links op het scherm.
2.Druk op ENTER om de geselecteerde folder. De liedjes in de folder worden getoond.
3.Gebruik om het gewenste liedje te kiezen. Druk op ENTER en de weergave van
het liedje begint.
File Type Sort File
OPMERKINGEN:
1)“ ” voor een naam betekent dat het om een folder gaat, niet een MP3 document.
2)“MP3” voor een naam betekent dat het om een MP3 document gaat.
14
15
Page 10
Gebruik van de oplaadbare batterij
Dit toestel maakt gebruik van een Li Polymeer batterij voor draagbaar gebruik.
De batterij heeft geen “geheugeneffect” en kan dus opgeladen worden wanneer de
batterij gedeeltelijk ontladen is. Het volledig opladen duurt niet langer dan 6 uur en
heeft dan een capaciteit voor 2 uur speelduur.
Voorzichtigheid met het opladen van de batterij
De batterij kan alleen opgeladen worden als het toestel uitgeschakeld is en de netstroom
aangesloten is. Een rood lampje brandt tijdens het opladen en wordt geel als de batterij
helemaal opgeladen is.
Gebruik en onderhoud van de oplaadbare batterij
1.De gebruikstemperatuur is 0°C 40° C.
2.Haal de stekker uit het stopcontact als het toestel niet gebruikt wordt.
3.Tijdens de weergave wordt het toestel warm. Dit is normaal, maar een te langdurig ge
bruik wordt toch afgeraden.
4.Zorg ervoor dat het toestel niet in aanraking komt met andere objecten en gebruik het
niet naast een warmtebron of in vochtige plaatsen.
DVD
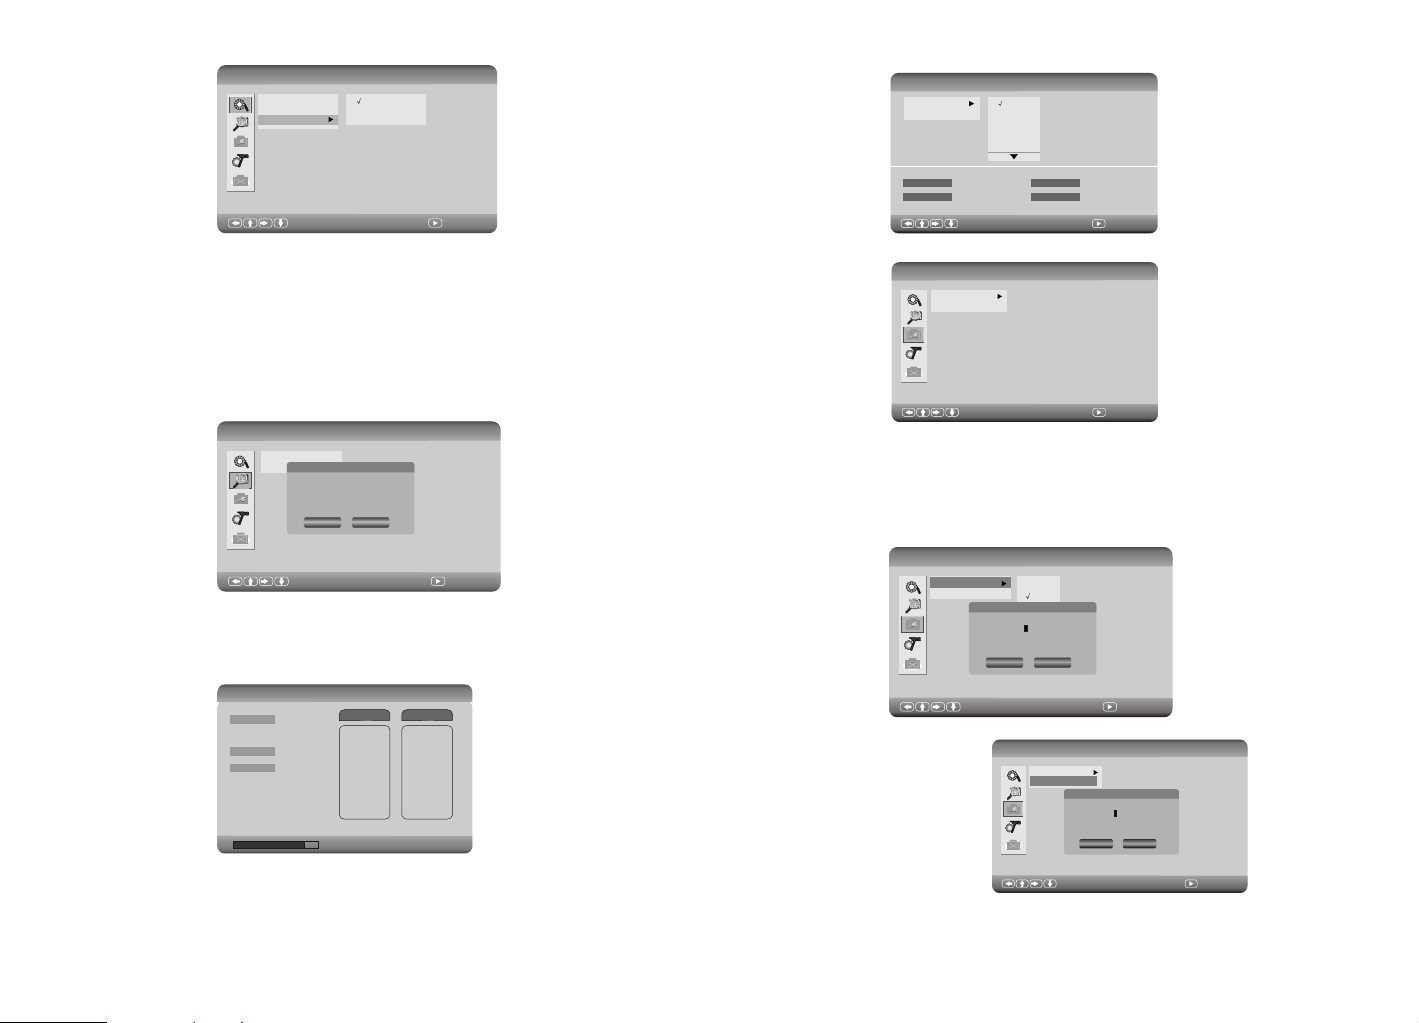
DVD instelling
Als de DVD functie gekozen is, gaat het toestel in DVD modus. Bij het inbrengen van een
disc herkent het toestel automatisch het formaat en start de weergave. Druk op SETUP
en het hoofdmenu verschijnt. In deze modus is het DVB menu niet beschikbaar.
Selecteer DVD instellingen met en het DVD instelmenu verschijnt op het scherm.
Main Menu
DVD Setup
DVB Menu
System Setting
Exit
:Select
DVD instelling
De volgende afbeelding toont de beginpagina van het DVD instelmenu. De basis
bediening wordt in de volgende stappen uitgelegd.
DVD Setup-Language Setup
Menu
Ae
Audio
Subtitle
:Confirm
16
:Select
Taal instelling
Selecteer Menu met en ga naar het submenu om de standaard taal voor het menu
in te stellen. Als de DVD disc de taal niet ondersteund wordt automatisch de eerste taal
van de disc geselecteerd.
DVD Setup-Language Setup
Menu
Ae
Audio
Subtitle
:Select
Audio
Selecteer Audio met om in het submenu te gaan en de standaard gesproken taal in
te stellen. Als de DVD disc de taal niet ondersteund wordt automatisch de eerste taal van
de disc geselecteerd.
English
French
German
Italian
:Confirm
:Confirm
17
Page 11
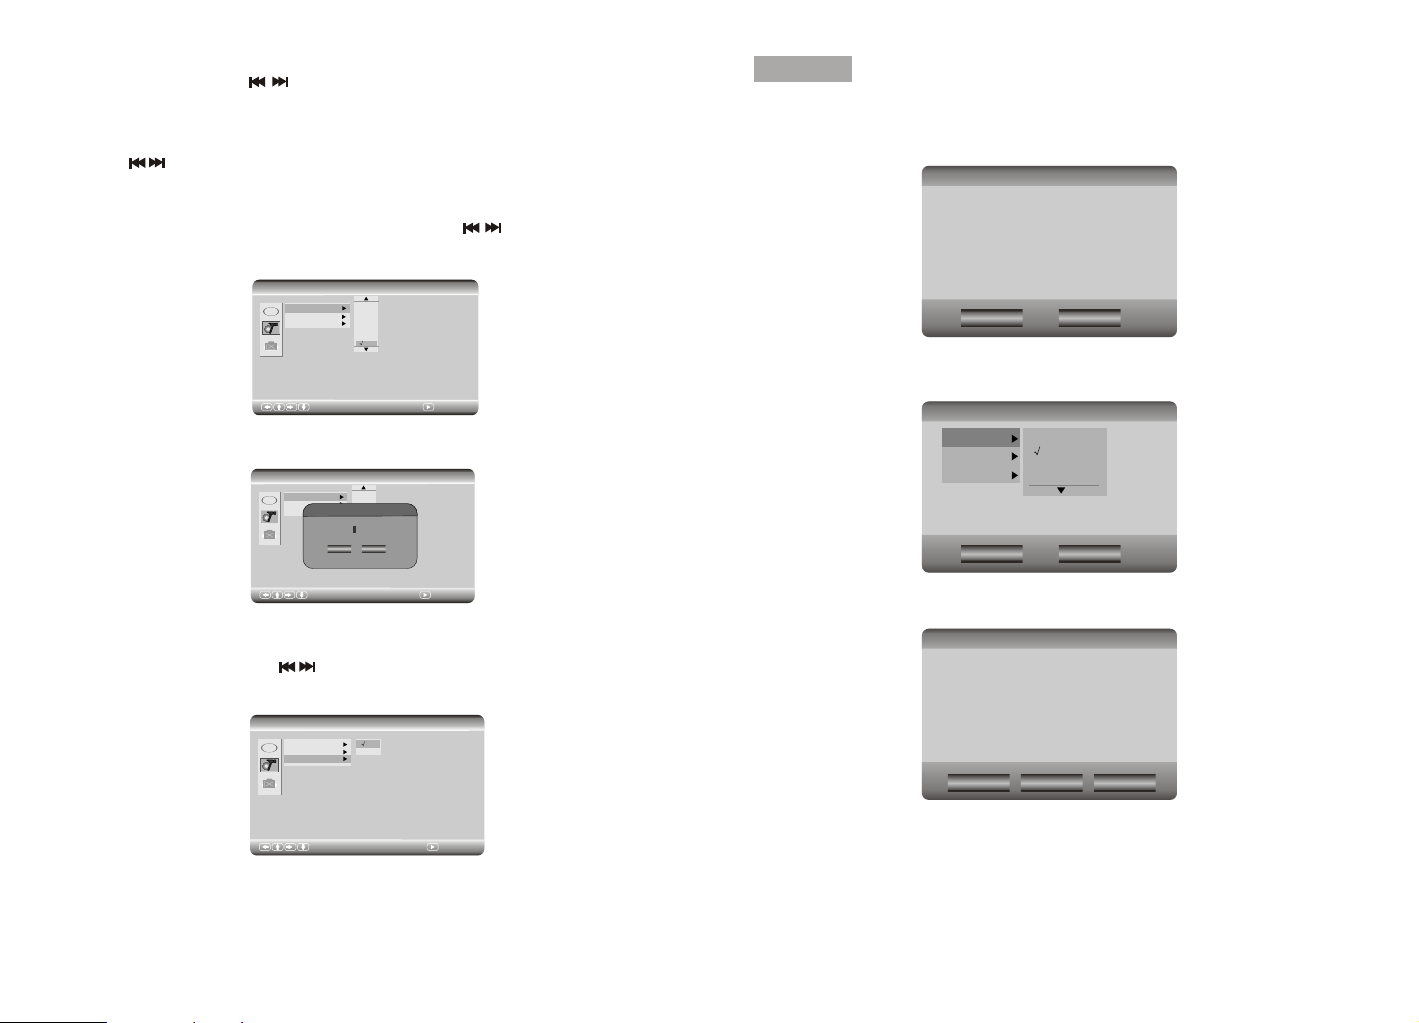
Ondertitels
Selecteer Ondertitels met om in het submenu te gaan en de standaard taal voor
de ondertitels in te stellen. Als de DVD disc de taal niet ondersteund wordt automatisch
de eerste taal van de disc geselecteerd.
Eigen instellingen
Gebruik om het taalmenu te verlaten en het menu voor eigen instellingen te
selecteren.
Ouderlijke controle
Druk op OK om Ouderlijke controle te selecteren. Gebruik om het niveau in te
stellen. Deze staan gerangschikt van het laagste niveau (1 kinderen) tot het hoogste
niveau (8 volwassenen). Om de functie te annuleren, druk op “uit”.
DVD Setup-Custom Setup
Parental Ctrl
Ae
Scree Saver
Angle Mark
Om het niveau te wijzigen moet het paswoord ingebracht worden.
DVD Setup-Custom Setup
Parental Ctrl
Ae
Scree Saver
Angle Mark
3
4
5
6
7
8
:Select :Confirm
3
4
5
Enter Parental PIN
6
7
Enter PIN:
8
Cancel
OK
DVB
Bij een eerste gebruik toont het toestel een “Eerste installatie” scherm. Het systeem
gidst u doorheen de instellingen van DVB. Kies eerst JA en druk dan op ENTER. Het
systeem begint met de initiële instellingen.
First Time Installation
Do you want to start first time
Installation Wizard ?
Yes
Breng vervolgens informatie van de gebruiker in, zoals het land waarin u woont, de taal
voor OSD en de tijdzone. DVB zal automatisch met deze informatie de zenders
opzoeken.
First Time Installation(1)
Country
Language
Time Zone
Back
No
England
Germany
Italy
France
Next
:Select :Confirm
Opmerking: het standaard paswoord is 8888.
Hoekmarkering
Selecteer Hoekmarkering met .Indien dit ingeschakeld is, verschijnt de
hoekmarkering op het scherm wanneer er een disc met meerdere camerahoeken wordt
weergegeven en ook het aantal hoeken wordt aangeduid.
DVD Setup-Custom Setup
Parental Ctrl
Ae
Scree Saver
Angle Mark
Exit
Druk op Exit om terug naar het hoofdmenu te gaan.
On
Off
:Select :Confirm
18
Druk op “Ja” en de zenders worden automatisch opgezocht.
First Time Installation(2)
Do you want to start Auto Search ?
Previous channel list will be replaced.
Back
Yes No
Het systeem gaat direct naar DVB modus en geeft de laats gevonden zender weer.
19
Page 12
In weergave modus, druk op SETUP en het toestel toont het hoofdmenu. Op dit ogenblik
is de DVD modus niet beschikbaar. Om naar de DVB instelpagina te gaan, selecteer
DVB menu.
Main Menu
DVD Setup
DVB Menu
System Setting
Exit
:Select :Confirm
DVB menu
DVB Menu-Program List
TV Program
Music Program
Sort
DVB Menu-Program List-Program Edit Table
N0. Program Name Favor Move Del
1 CTV #1
2 CTV #2
3 CTV #3
4 FTV #1
5 FTV #2
Verplaatsen
Met deze functie kan de volgorde van de zenders gewijzigd worden. Wanneer u een
zender wenst te verwijderen verschijnt er op het scherm. Gebruik om de zenders
van plaats te verwisselen. Druk op ENTER om de nieuwe volgorde te bevestigen.
DVB Menu-Program List-Program Edit Table
:Select
N0. Program Name Favor Move Del
1 CTV #1
2 CTV #2
3 CTV #3
4 FTV #1
5 FTV #2
:Confirm Exit:Save&Exit
:Select :Confirm
Zenderlijst
TV Programma
Deze optie laat toe de zenderlijst op drie verschillende manieren te bewerken, inclusief
het instellen van voorkeurzenders, het verplaatsen en het verwijderen van zenders.
Alle zenders die bekeken kunnen worden staan in de lijst. Drie items (voorkeur,
verplaatsen en verwijderen) kunnen gebruikt worden.
DVB Menu-Program List-Program Edit Table
N0. Program Name Favor Move Del
1 CTV #1
2 CTV #2
3 CTV #3
4 FTV #1
5 FTV #2
:Select :Confirm Exit:Save&Exit
Voorkeur
U kan meerdere zenders als voorkeurzender instellen. Als een zender aldus aangeduid
is wordt er een markering aangebracht. Om een zender uit de voorkeurlijst te
verwijderen, ga naar de markering van de zender en druk op ENTER.
20
:Select
Verwijderen
Met deze functie kan een zender verwijderd worden. Om een zender te verwijderen, ga
naar het Verwijdervakje van de zender en druk op ENTER (er verschijnt een X). Eens dit
ingesteld is, verschijnt de zender de volgende keer niet meer in de zenderlijst.
DVB Menu-Program List-Program Edit Table
N0. Program Name Favor Move Del
1 CTV #1
2 CTV #2
3 CTV #3
4 FTV #1 X
5 FTV #2 X
:Select
Opmerking: u kan de functie “zender zoeken” gebruiken om de verwijderde zenders terug
te zoeken.
Muziekprogramma
De bediening is identiek aan die van de TV zenders.
Sorteren
U kan de zenders in de lijst sorteren op naam, service ID of kanaalnummer.
:Confirm Exit:Save&Exit
:Confirm Exit:Save&Exit
21
Page 13
DVB Menu-Program List
TV Program
Music Program
Sort
By Name
By Service ID
By channel N0.
DVB Menu-Program Search-Manual
Channel No
Exit
21
22
23
24
25
:Select :Confirm
Zenders zoeken
Automatisch zoeken.
Met deze functie zoekt het toestel automatisch de zenders in functie van de land- en
tijdzone-instelling. Voor het zoeken vraagt het toestel of de reeds gevonden zenders
ook verwijderd moeten worden.
Kies “ja” en de bestaande zenders worden vervangen door nieuw gevonden zenders.
Kies “neen” en er worden nieuwe zenders aan de lijst van bestaande zenders
toegevoegd.
DVB Menu-Program Search
Automatic Search
Manual Search
Als het automatisch zoeken gedaan is, wordt de laatst gevonden zender weergegeven.
Druk op EXIT om het zoeken te onderbreken. De gevonden zenders worden aan de lijst
toegevoegd, maar het toestel gaat niet automatisch naar de weergave modus.
DVB Menu-Program Search-Automatic
Progress
Channel no
Frequency
Handmatig zoeken
U kan deze functie gebruiken om een bepaalde zender op te zoeken. De gebruiker moet
het kanaalnummer van de zender kennen om het zoeken te kunnen beginnen.
De handmatig gevonden zenders worden aan de lijst toegevoegd, maar het toestel gaat
niet automatisch naar de weergave modus.
Message
Do you want to start
Auto Search ?
Cancel
OK
:Select :Confirm
84%
33
587.0 MHz
TV List Music List
TTV-1
TTV-2
TTV WORLD
Mobile Radio
Exit:Save&Exit
Strength
0%
Quality
0%
:Select :Confirm
Frequency
Bandwidth
474.0 MHz
8 Mhz
Ouderlijke controle
DVB Menu-Parental Control
Channel Lock
Parental Setting
:Select :Confirm
Zenderblokkering.
Selecteer Zenderblokkering om bepaalde zenders met de ouderlijke controle te
blokkeren. Wanneer een zender geblokkeerd is, is een paswoord nodig om die te kunnen
bekijken.
Wanneer een zender geblokkeerd moet worden is geen paswoord nodig, maar als een
zender gedeblokkeerd moet worden, is er wel een paswoord nodig.
DVB Menu-Parental Control
Ouderlijke instelling
Ouderlijke instelling kan
tezamen gebruikt worden
met zenderblokkering.
Alvorens in de pagina van
ouderlijke instelling te
komen is het inbrengen van
het paswoord nodig.
Channel
Parental Setting
Yes
No
Enter Parental PIN
Enter PIN:
Cancel
OK
:Select :Confirm
DVB Menu-Parental Control
Channel
Parental Setting
Enter Parental PIN
Enter PIN:
Cancel
OK
:Select :Confirm
22
23
Page 14

Breng het juiste paswoord in om in de pagina van ouderlijke controle te komen.
DVB Menu-Parental Control-Parental Setting
N0. Program Name Lock
1 f tn
2 TMF
3 The HITS
4 Men & Motors
:Select :Confirm Exit:Save&Exit
Als de zender geblokkeerd is, is het paswoord nodig om hem te kunnen bekijken.
Opmerking: het standaard paswoord is 8888. Om het paswoord te wijzigen, ga naar
het hoofdmenu, selecteer systeeminstellingen en ga dan naar de voorkeurpagina en
selecteer de optie om het paswoord te wijzigen.
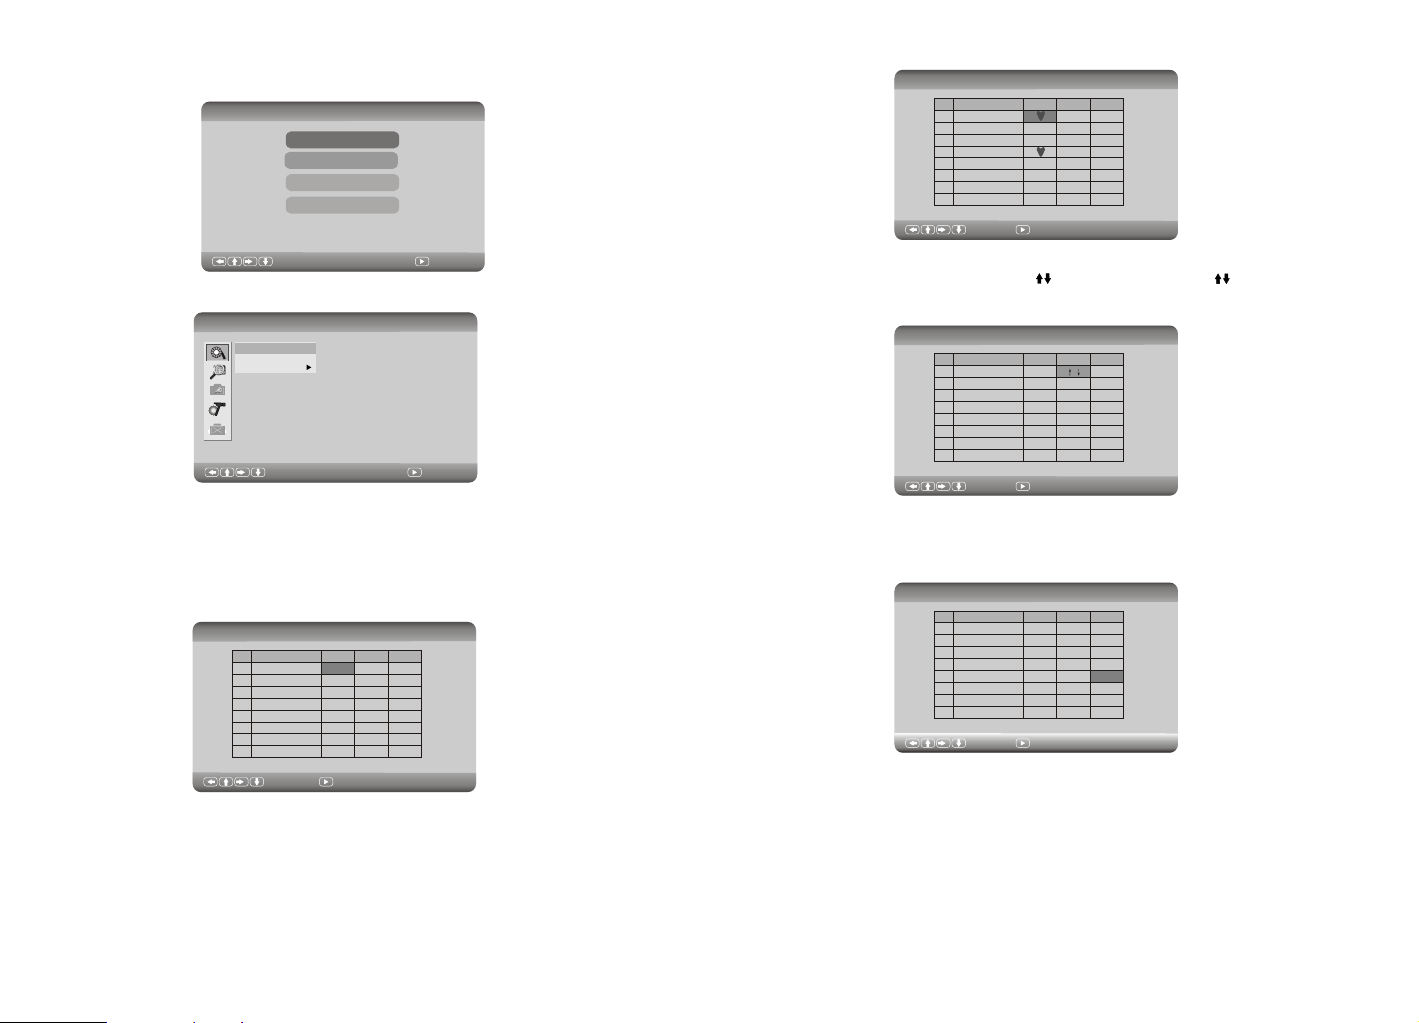
Systeeminstelling
DVB Menu-System Setting
Antenna Power
Country
Language
GMT Usage
Time Zone
System Schedule
:Select :Confirm
Antennekracht
Om de antennekracht in te stellen.
Land
Om het land waarin u woont te selecteren.
Taal
Ga in het submenu: er zijn 3 opties om uit te kiezen: 1 taal, 2 taal en ondertitels.
ee
1 /2 Taal
U kan de gesproken taal kiezen uit 1 taal of 2 taal. Deze optie werkt alleen als de
zender de taal voorziet. Anders wordt de vooringestelde taal van de zender
automatisch gekozen.
Ondertitels
U kan de taal voor ondertitels kiezen. Deze optie werkt alleen als de zender de taal
voorziet. Anders wordt de vooringestelde taal van de zender automatisch gekozen.
GMT gebruik
Om gebruik te maken van de GMT tijd. Als dit uitgeschakeld is, werkt de tijdzone optie
niet en dient de gebruiker de tijd zelf in te stellen. Indien het ingeschakeld is, kan de
gebruiker zijn tijdzone instellen.
Tijdzone
Om de tijdzone optie te gebruiken.
Systeemschema
Gebruik dit om de tijd in te stellen wanneer er van zender gewijzigd moet worden.
Dit kan bij maximum 10 zenders ingesteld worden.
ee
ee
Exit
Druk op Exit om terug naar het hoofdmenu te gaan.
Basisbediening
1.Zender oproepen.
1) Gebruik CH-/CH+ om naar de vorige of volgende zender te gaan of gebruik de
numerieke toetsen van de afstandsbediening.
2) Tijdens de weergave, druk op ENTER en de zenderlijst verschijnt op het scherm.
Gebruik om de zender aan te duiden en druk op PLAY voor de weergave.
3) Druk tijdens de weergave op GUIDE en gids verschijnt op het scherm. Hiermee
worden de zenders in het klein weergegeven. Duid de gewenste zender aan met
en druk dan op PLAY.
2.Mute gebruiken
Druk op de mute toets om het geluid uit te schakelen; er verschijnt een symbool op het
scherm. Druk opnieuw om het geluid terug weer te geven.
3.Zenderinformatie
Druk in DVB modus op INFO en er verschijnt informatie betreffende de zender.
4.Sleep modus
Druk op de sleep toets om het toestel na een bepaalde tijd te laten uitschakelen. U kan
de tijd instellen op 15, 30, 60 of 120 minuten. Druk verschillende malen op de toets
totdat de gewenste tijd aangeduid wordt. Om de functie uit te schakelen, druk
verschillende malen totdat Sleep Uit verschijnt.
5.Geluid
Druk op Audio om de gewenste audio uitgang te kiezen (Audio 1 of Audio 2). Er zijn 3
opties: LL, RR en LR.
6.Ondertitels
Druk op SUBTITLE om de taal van de ondertitels te kiezen. Het aantal talen hangt af van
diegene die door de zender worden meegestuurd. Al er geen andere taal ter beschikking
staat, is de enige optie de ondertitels uitschakelen.
7.EPG
Druk op EPG om in de EPG modus te komen. Gebruik om de zender aan te duiden en de
programmalijst op de volgende secties te vinden.
Om terug naar weergave te gaan, druk op PLAY.
Om de volledige programmalijst van de dag te bekijken, druk op de toets (de lijst
verschijnt op het scherm). Gebruik om meer informatie over een programma op te
roepen; dit verschijnt op de rechterkant van het scherm. Wanneer er een programma
gekozen is, druk op PLAY om de tijd in te stellen waarop van zender gewijzigd moet
worden.
24
25
Page 15

USB/Kaart
Als het toestel voor de eerste keer wordt ingeschakeld of wanneer er op MODE wordt
gedrukt, verschijnt het volgende scherm.
DVD
DVB
USB
CARD
Gebruik om USB of Card aan te duiden en klik op OK om te bevestigen. Zorg
ervoor dat de USB is aangesloten of dat de kaart in het toestel is gebracht. Voor
bediening: zie onder deel MP3 en JPEG.
Opmerking: haal de USB of de kaart niet uit het toestel wanneer deze in gebruik zijn.
Dit kan aanleiden tot een slecht werking.
Systeeminstelling
Main Menu
DVD Setup
DVB Menu
System Setting
:Select
Exit
:Confirm
Gebruik deze optie om bepaalde instellingen te regelen die niet met DVD en DVB te
maken hebben. Het systeem instelmenu verschijnt op het scherm.
OSD taalinstelling
Ga in dit menu om de taal van OSD in te stellen. Kies de gewenste taal met .
Display instelling
System Setting Menu-Display Setup
TV Standard
Ae
Display Type
Display type
Dit wordt gebruikt om het beeldformaat in te stellen. Als de uitzending in het formaat
16:9 is, kan deze omgezet worden naar het formaat 4:3 PS of 4:3 LB. Als de uitzending
in 4:3 formaat is, kan dit niet gewijzigd worden.
System Setting Menu-Display Setup
TV Standard
Ae
Display Type
Voorkeur
System Setting Menu-Preference
Change PIN
Ae
Default
NTSC
PAL
:Select :Confirm
4:3 PS
4:3 LB
16:9
:Select :Confirm
System Setting Menu-Language Setup
OSD
Ae
Encoding
Encoding
Gebruik om de standaard taal van de ondertitels te kiezen. Als de gekozen taal
niet door de DVD ondersteund wordt, wordt automatisch de eerste taal van de disc
gebruikt.
English
French
German
Italian
Spanish
Portuguese
:Select :Confirm
26
:Select :Confirm
Paswoord wijzigen
Gebruik dit om het paswoord te wijzigen (bestaande uit 4 cijfers). U moet eerst het oude
paswoord inbrengen en dan tweemaal het nieuwe. Druk op ENTER om te bevestigen.
System Setting Menu-Preference
Change PIN
Ae
Default
Change PIN
Old PIN:
New PIN:
Confirm New PIN:
Cancel
OK
:Select :Confirm
27
Page 16

Standaard
Gebruik dit om terug te gaan naar de originele instellingen. Als dit gebeurt tin DVB
modus, worden alle instellingen in DVB op de fabriekswaarden teruggebracht.
System Setting Menu-Preference
Ae
Change PIN
Default
Read
In geval van problemen
PROBLEEM
Geen geluid of
vervormd geluid
Kan niet snel
doorheen een film
gaan
Controleer of het toestel goed is aangesloten.
Controleer of alle kabels goed zijn aangesloten.
U kan niet snel doorheen de openingsfase en de
verwittiging aan het begin van de film omdat dit
verboden is.
OPLOSSING
:Select :Confirm
Exit
Druk op Exit om terug naar het hoofdmenu te gaan.
Specificaties
Systeem : PAL
Schermgrootte : 7 duim
Frequentiebereik : 20 Hz tot 20 kHz
Video uitgang: 1 Vp-p/75 Ohm, niet gebalanceerd
Audio uitgang: 1.7 Vrms:10 kOhm
Signaal/ruis verhouding: beter dan 80 dB
Dynamisch bereik: beter dan 85 dB
Laser: halfgeleider laser, golflengte 650 nm/795 nm
Voeding: DC 9-12 V
Verbruik : 10 W
Gebruikstemperatuur: 5-40° C
Gewicht: 0.71 kg
Afmetingen (b x d x h) : 210 x 160 x 38 mm
Batterijtype: Li Polymeer
Het symbool
verschijnt op het
scherm
Vervormd beeld
Geen versneld
opzoeken
Wegens voortdurende verbeteringen kunnen wijzigingen aan de eigenschappen en
specificaties aangebracht worden zonder voorafgaande verwittiging.
Indien u zich van het toestel wil ontdoen, zorg er dan voor dat elektrische
apparaten niet tezamen met ander huishoudelijk afval verwijderd wordt.
Gebruik de bestaande recyclagesystemen. Neem contact op met de
locale autoriteiten of met uw dealer (Richtlijn betreffende Afval van
Elektrische en Elektronische Apparatuur).
De gewenste functie is op het ogenblik niet beschibaar
omdat:
1. De software het niet toelaat.
2. De disc ondersteunt de functie niet (bv. hoek)
3. De functie is op het ogenblik niet beschikbaar
4. U heeft een nummer ingebracht dat niet bestaat.
De disc is misschien beschadigd. Probeer een andere
disc.
Een bepaalde vervorming is normaal bij snel
voorwaarts of achterwaarts zoeken.
Sommige discs verbieden het snel doorspoelen op
bepaalde delen.
U kan niet snel doorheen de openingsfase en de
verwittiging aan het begin van de film omdat dit
verboden is.
28 29
Page 17

Sommaire
Introduction
Introduction
Précautions de sécurité
Emballage
Caractéristiques principales
Commandes appareil
Connexions
Télécommande
Opération de base
Réglages système
Spécifications
En cas de problèmes
26
29
29
1
1
Merci d'avoir choisi ce lecteur DVD portable. L'appareil comprend un écran large de 7 pouces et
un lecteur DVD. L'appareil utilise la toute dernière technologie électronique et est développé pour
une utilisation domestique, dans des hôtels ou au bureau pour relaxions. Le format compact
permet un transport et une utilisation facile. Lissez attentivement le manuel d'utilisation et
gardez-le pour consultation ultérieure.
2
2
3
4
Précautions de sécurité
Lisez attentivement le manuel d'utilisation avant d'utiliser le lecteur et gardez
le pour consultation ult rieure.
7
Instructions importantes de s curit
8
ATTENTION
Hauts voltages. Ne pas ouvrir !
ATTENTION
Hauts voltages. Ne pas ouvrir !
Attention : pour éviter le risque d'incendie ou des chocs électriques, ne pas exposer cet
appareil à la pluie ou à l'humidité.
1) Lissez attentivement le manuel d'utilisation et suivez toutes les instructions pour
une opération sûre.
2) Ne pas utiliser l'appareil à côté d'eau. Ne pas placer un objet rempli d'une liquide au dessus de l'appareil.
3) Ne pas placer l'appareil à côté d'une source de chaleur telles que des radiateurs ou
des appareils qui produisent du chaleur (y compris un amplificateur).
4) Déconnectez la prise courant secteur pendant des orages ou quand vous n'utilisez
pas l'appareil pendant un certain temps.
5) Nettoyage : déconnectez le système et utilisez un chiffon légèrement humide. Ne
pas utiliser des détergents ou des aérosols.
6) Utilisez uniquement les accessoires recommandées par le fabriquant.
7) Contactez un service après-ventes dans les cas suivants : quand l'appareil est
endommagé, quand le câble courant secteur est endommagé, quand une liquide a
pénétré l'appareil, quand un objet est tombé sur l'appareil, quand l'appareil a été
exposé à l'humidité ou quand il ne fonctionne pas bien. N'essayez pas de réparer vous même l'appareil à cause des hauts voltages et le risque d'un choc électrique.
8) N'utilisez pas des disques avec une forme irrégulière telle que la forme d'un cœur ou
d'une étoile car ils peuvent causer des mal fonctionnements.
Pour prévenir d'être prudent
pour des chocs électriques
Attention : pour pr venir l'utilisateur
des instructions importantes
d'utilisation et d'entretien
1
Page 18

Emballage
Contrôlez le contenu de l'emballage :
Lecteur DVD
Câble audio/vidéo
Télécommande avec pile
Adaptateur AC/DC
Adaptateur allume-cigare
Manuel d'utilisation
Casque d'écoute
Antenne
Si un de ces objets est abimé ou pas présent, consultez immédiatement votre
revendeur.
Gardez l'emballage ; vous pouvez l'utiliser quand vous devez transporter l'appareil.
ATTENTION : changements apportés à cet appareil sans accord du fabriquant ou d'une
partie autorisée, annihile la garantie.
1
1
1
1
1
1
1
1
Commandes appareil
1
Caractéristiques principales
Ecran LCD à grande luminosité de 7 pouces
Compatible avec disques DVD, VCD, MP3, MPEG4, CD, JPG, etc.
Tuner TV (digital) incorporé
Lecteur cartes SD/MMC (max. 2GB) et connexion USB (1.1)
Haut-parleur stéréo incorporé
Accu lithium-polymère rechargeable incorporé
OSD multi-langues, avancement rapide en avant/arrière,
fonction de répétition.
Remarques :
Concernant
·
Le symbole affiché chez la description d'une fonction veut dire que cette
fonction est applicable avec le disque correspondant.
DVD
VCD
Valable pour DVD
Valable pour VCD
DVD
VCD
CD
MP3
2
CD MP3
Valable pour CD
Valable pour Mp3
16
ANT
1.Porte USB
2.REGLAGE
3.MODE
4.LECTURE/PAUSE
5.ARRET
6.BOUTONS ou
7.BOUTON OK
8.BOUTONS ou
SETUP
MODE
9. ENTREE DC 9-12 V
10. EN/HORS FONCTION
11. SORTIE AV
12. CASQUE D'ECOUTE
13. VOLUME
14. Entrée carte SD
15. OUVRIR
16. Antenne
3
2
3
4
5
6
7
8
15
10
11
12
13
14
9
OFF/ON
AV OUT
Page 19

Connexions
1.Alimentation
Connectez l'adaptateur AC/DC à l'entrée DC de l'appareil et connectez l'autre bout à
la prise courant secteur.
OFF/ON
AV OUT
5.Connexion casque d'écoute.
AV OUT
OFF/ON
2.Alimentation dans la voiture
Connectez l'adaptateur allume-cigare à l'entrée DC de l'appareil et connectez l'autre
bout à la prise allume-cigare.
OFF/ON
AV OUT
3.Glissez le bouton ON/OFF dans la position ON pour mettre l'appareil en fonction.
OFF/ON
AV OUT
Power switch
6.Connexion TV
OFF/ON
AV OUT
AV CABLE
(Not Supplied)
AUDIO IN VIDEO IN
Utilisez un câble AV pour connecter l'appareil au TV. Faites attention de faire
une connexion correcte.
4 5
Page 20

7.Connexion aux haut-parleurs externes
OFF/ON
AV OUT
CABLE AV
(Not Supplied)
VIDEO IN
TV
AUDIO IN
AMPLIFICATEUR
Télécommande
1.OSD/EPG
2.MODE
1
2
TV/MUSIC
REPEAT
PIC
3
4
5
6
7
8
9
10
INFO
PG UP
RC-M32E
SLEEP
PG DN
Utilisation de la télécommande
Placez la pile dans la télécommande comme illustré ci-dessous.
1
3.Boutons numériques 0-9
4. /
5.Réglages
6.Enter (pour confirmer)
7. / CH- CH+
8.Zoom/Exit
9.Lecture/pause
10.Liste PR (émetteurs)/Arrêt
11.TV/Musique/Répétition
12.PIC
13.Emetteurs préférés/Titre
14.Mémoire/Menu
15.Sous-titres
16.Télétexte/Angle
17.Guide/Ralenti
18.Mute
19.Audio
20.Sleep/Page vers le bas
21.Info/ Page vers le haut
Haut-parleur central
Haut-parleur
frontal gauche
Haut-parleur
frontal droite
SUBWOOFER
Haut-parleur arrière droite
Haut-parleur arrière gauche
Remarque : il n'y a pas de système 5.1 canaux dans l'appareil, mais le système est
disponible quand l'appareil est connecté à l'amplificateur.
6 7
SETUP
MODE
CR2025
2
CR2025
Quand vous utilisez la télécommande, faites attention à la diriger vers le récepteur
infrarouges de l'appareil. La distance maximale entre l'appareil et la télécommande
est 3 mètres. Voyez l'illustration.
OK
0
0
30
30
T
V
/M
U
SIC
P
IC
R
E
P
EA
T
INF
O
SLE
EP
P
G
UP
PG
DN
RC
-M
32
E
Remarques :
1.Faites attention à ne pas laisser tomber et ne pas utiliser dans un environnement
humide.
2.Le récepteur à infrarouges ne peut pas être exposé à la lumière du soleil.
3.Remplacez la pile quand la télécommande ne fonctionne pas bien.
Page 21

Opération de base
Quand l'appareil est utilisé pour la première fois ou quand vous poussez le bouton MODE,
l'écran suivant est affiché.
DVD
DVB
USB
Card
Utilisez les boutons pour sélectionner DVD et poussez OK pour confirmer.
Remarque : cet appareil possède une fonction de mémoire. Il mémorise le dernier mode
utilisé. Si, la dernière fois, vous avez utilisé le mode DVD, l'appareil reprend le mode
DVD quand vous le remettez en fonction.
Démarrage à partir du menu.
1.Poussez TITLE/MENU pour
afficher le menu.
2.Utilisez les boutons
ou les boutons numériques
(ne fonctionne pas avec tous
les disques) pour sélectionner
le titre voulu.
Title 1 Title 2
Title 3
Title 4
Arrêt lecture
TV/MUSIC
PIC
REPEAT
Poussez le bouton STOP
pour arrêter la lecture.
REV
ENTER
STOP
Forward
SLEEP
INFO
PG DN
PG UP
RC-M32E
Avancement rapide en avant ou en arrière
DVD
Vous pouvez choisir entre 2x, 4x, 8x, 16x ou 32x la vitesse normale pour avancement
en avant ou en arrière.
SVCD
VCD CD
2X 4X
8X16X32X
3.Poussez ENTER ou PLAY
Pauser la lecture
DVD
En mode pause, poussez le bouton PLAY
pour continuer la lecture.
VCD
CD MP3
8
OK
ENTER
PLAY/PAUSE
TV/MUSIC
REPEAT
INFO
PG UP
RC-M32E
SLEEP
PG DN
2X 4X
8X16X32X
Pendant la lecture, poussez les boutons REV ou FWD.
PIC
Chaque fois que vous poussez le bouton REV ou FWD la vitesse change
(comme illustré ci-dessus).
Remarque :
Cette fonction n'est pas disponible sur certains disques DVD ou pendant certaines
sections du disque.
9
Page 22

Chercher un titre, chapitre ou numéro
Les disques DVD sont divisés en titres et chapitres. Les disques CD ont des numéros.
Chapter 1 Chapter 2 Chapter 3 Chapter 4 Chapter 5
Vous pouvez répéter un titre, un chapitre, un numéro ou le disque
1.Poussez le bouton REPEAT. Chaque fois que vous poussez ce bouton, le mode
de répétition change.
DVD
Title 1
DVD Video Disc
Chercher un titre à partir du menu.
Si le disque possède un menu titres,
vous pouvez chercher le titre à partir
de ce menu.
1.Poussez le bouton TITLE et le menu apparaît.
2.Utilisez les boutons flèches pour marquer le titre
voulu. Vous pouvez aussi utiliser les boutons
numériques (mais ceci ne fonctionne pas avec
tous les disques).
3.Poussez le bouton ENTER. La lecture commence
avec le premier chapitre du titre choisi. Vous pouvez
également utiliser les boutons pour
sélectionner un chapitre ou numéro.Poussez
plusieurs fois jusqu'au moment où vous avez trouvé
le chapitre/titre/numéro.
Répétition
DVD
Ce lecteur DVD permet de répéter un titre, chapitre,
numéro ou une section déterminée (répétition titre,
répétition chapitre/numéro.
SVCD
VCD CD
Title 2
ENTER
TV/MUSIC
REPEAT
INFO
PG UP
TV/MUSIC
REPEAT
RC-M32E
SLEEP
PG DN
Chapitre
Titre
ToutHors fonction
Super VCD/CD
Uniquement quand le super VCD et VCD2.0 sont reproduits dans l'ordre, la fonction
de répétition est disponible pour VCD 1.1 et CD.
PIC
La fonction de répétition n'est pas disponible pour super VCD et VCD2.0 en mode de
lecture menu.
Numéro Tout
Hors fonction
MP3
Numéro Folder Tout
Horsfonction
Zoom
DVD
Ce lecteur DVD permet d'agrandir l'image
pendant la lecture.
Poussez le bouton ZOOM pendant la lecture ou
le ralenti.
PIC
Le lecteur agrandit le centre de l'image.
Utilisez les boutons pour déplacer
l'image.
SVCD
VCD CD
TV/MUSIC
REPEAT
INFO
PG UP
RC-M32E
SLEEP
PG DN
PIC
101110
SLEEP
INFO
PG DN
PG UP
RC-M32E
Poussez plusieurs fois le bouton ZOOM pour naviguer dans les différents niveaux
d'agrandissement (comme illusté ci-dessous).
2x 4x
Normal
view (1x)
Page 23

Sous-titres
Ce lecteur peut afficher les sous-titres. Poussez plusieurs fois le bouton SUBTITLE
pour choisir la langue voulue.
Angle
DVD
TV/MUSIC
PIC
REPEAT
Pour annuler les sous-titres.
SUBTITLE 1 1/03
SUBTITLE 2 2/03
SUBTITLE 3 3/03
SUBTITLE OFF
Poussez plusieurs fois le
bouton SUBTITLE
jusqu'au moment où
SUBTITLE OFF apparaît sur
l'écran
et les sous-titres disparaissent.
SUBTITLE OFF
SLEEP
INFO
PG DN
PG UP
RC-M32E
Poussez le bouton PIC de la télécommande pour entrer dans les menus suivants.
PIC
TV/MUSIC
REPEAT
PIC
1.Sélection de l'angle de la caméra.
Ce lecteur DVD permet de choisir entre les différents
angles caméra (si disponible sur le disque).
TV/MUSIC
REPEAT
PIC
ANGLE 1 ANGLE 2
Sélection de l'angle caméra
SLEEP
INFO
PG DN
PG UP
RC-M32E
2.Comment changer l'angle caméra
Poussez pendant la lecture plusieurs fois le bouton ANGLE pour voir une scène
sous différents angles (si disponible).
Vous pouvez uniquement pousser le bouton ANGLE quand le symbole
clignote sur l'écran.
Chaque fois que vous poussez ANGLE, l'angle caméra change.
2/2
RGB
RESET
12
1 /2
SLEEP
INFO
PG DN
PG UP
RC-M32E
La fonction angle ne fonctionne pas avec les disques DVD qui ne contiennent
pas de scènes enregistrées sous différents angles.
13
Page 24

Lecture d'un disque KODAK CD/JPEG
1.Insérez le disque KODAK ou le disque
JPEG.
Avec le disque KODAK, la lecture démarre
automatiquement.
2.Sélectionnez un dossier ou une image / numéro
sur le disque JPEG et un menu apparaît. Utilisez
les boutons pour sélectionner un dossier et
poussez ENTER pour voir le contenu.
3.Sélectionnez le mode de lecture.
Vous pouvez utiliser le bouton REPEAT pour
sélectionner le mode de lecture : répétition numéro,
répétition dossier, répétition tout, répétition hors
fonction.
TV/MUSIC
REPEAT
INFO
PG UP
RC-M32E
PIC
SLEEP
PG DN
Lecture disques MP3
MP3 est un format pour mémoriser l'audio digital. Une chanson avec qualité CD est
comprimée dans le format MP3 avec très peu de perte, mais en prenant beaucoup moins
d'espace sur le disque. Les disques CD-R/RW enregistrés en format MP3 peuvent être
reproduits avec ce lecteur.
ROOT 2/17
ROOT
48KHz 160Kbps 03:55
00:00:00
File Type Sort File
4.Utilisez le bouton STOP ou MENU pour voir le
contenu. Pendant la lecture d'un disque JPEG, utilisez le bouton STOP ou MENU
pour afficher les dossiers JPEG et les documents correspondants. En naviguant les
images, poussez STOP et les images sont reproduits en format réduit. Utilisez les
boutons OK pour sélectionner une image.
5.Poussez le bouton pour tourner l'image 90° vers la gauche ; poussez pour
tourner l'image 90° vers la droite.
6.Si vous poussez les boutons TITLE, SUBTITLE, AUDIO, SLOW , le symbole d'une
main peut apparaître sur l'écran, signifiant que ces fonctions ne sont pas disponibles
à l'instant.
14
Quand le disque MP3 est inséré dans l'appareil, un menu apparaît automatiquement.
Vous pouvez utiliser ce menu pour sélectionner les dossiers et numéros voulus, ou vous
pouvez reproduire les numéros dans l'ordre avec lequel ils ont été enregistrés sur le
disque.
1.Utilisez pour choisir un dossier dans la liste à gauche dans l'écran.
2.Poussez ENTER pour marquer le dossier. La liste des numéros dans le dossier
apparaît sur l'écran.
3.Utilisez pour choisir un numéro dans la liste. Poussez ENTER pour démarrer la
lecture du numéro.
REMARQUES
1)Le symbole ' ‘ devant un nom, veut dire qu'il s'agit d'un dossier et pas d'un
document MP3.
2)Le symbole 'MP' devant un nom, veut dire qu'il s'agit d'un document Mp3.
15
Page 25

Utilisation de l'accu rechargeable
L'appareil utilise un accu Li-polymère avec grande longévité. L'accu ne possède pas
d'effet de mémoire et peut être rechargé à n'importe quel moment, même partiellement
déchargé. Il faut 6 heures pour un chargement complet qui permet une utilisation de
2 heures.
Précautions concernant le chargement de l'accu
L'accu peut uniquement être rechargé quand l'appareil est hors fonction et connecté au
courant secteur. Pendant le chargement le témoin est rouge ; une fois complètement
chargé le témoin devient jaune.
Utilisation et entretien de l'accu rechargeable
1.La température d'utilisation est 0-40° C.
2.Déconnectez l'appareil du courant secteur quand il n'est pas utilisé.
3.L'appareil devient chaud pendant l'utilisation, ce qui est normal. Néanmoins n'utilisez
pas l'appareil pendant de longues périodes.
4.Evitez que des objets tombent sur l'appareil et ne le placez pas dans des
environnements humides ou trop chauds.
DVD
Réglage DVD.
Quand vous choisissez DVD, l'appareil se met en mode DVD. En insérant le disque,
l'appareil reconnait automatiquement le format et commence la lecture.
Poussez le bouton SETUP et l'écran affiche le menu principal. Dans ce mode, le menu
DVB n'est pas disponible. Sélectionnez DVD Setup avec les boutons et le menu
Réglage DVD apparaît.
Main Menu
DVD Setup
DVB Menu
System Setting
Exit
:Select
Réglage DVD
L'image ci-dessous montre l'image initiale de la page de réglage DVD. Les possibilités
de réglages sont expliquées plus loin.
DVD Setup-Language Setup
Menu
Ae
Audio
Subtitle
:Confirm
16
:Select
Réglage langue
Sélectionnez le menu avec et entrez dans le sous-menu pour choisir la langue
standard pour le menu. Si le DVD ne supporte pas la langue, la première langue du
disque sera sélectionnée.
DVD Setup-Language Setup
Menu
Ae
Audio
Subtitle
:Select
Audio
Sélectionnez le menu avec et entrez dans le sous-menu pour choisir la langue
parlée standard. Si le DVD ne supporte pas la langue, la première langue du disque
sera sélectionnée.
English
French
German
Italian
:Confirm
:Confirm
17
Page 26

Sous-titres
Sélectionnez le menu avec et entrez dans le sous-menu pour choisir la langue
standard pour les sous-titres. Si le DVD ne supporte pas la langue, la première langue
du disque sera sélectionnée.
Réglages personnels
Quittez le menu langue et choisissez le menu Réglage personnel avec les boutons .
Contrôle parental
Poussez OK pour sélectionner Contrôle parental. Sélectionnez le niveau avec les
boutons .
La liste commence avec le niveau le plus bas (1. Enfants) jusqu'au niveau le plus haut
(8. Adultes). Pour annuler la fonction, sélectionnez 'off'.
DVD Setup-Custom Setup
Parental Ctrl
Ae
Scree Saver
Angle Mark
Pour changer le niveau, il faut introduire le mot de passe.
DVD Setup-Custom Setup
Parental Ctrl
Ae
Scree Saver
Angle Mark
3
4
5
6
7
8
:Select :Confirm
3
4
5
Enter Parental PIN
6
7
Enter PIN:
8
Cancel
OK
DVB
Quand l'appareil est utilisé pour la première fois, la page 'Première Installation' apparaît
sur l'écran. Ce menu vous guide dans le réglage du système DVB. Choisissez OUI et
poussez ENTER. Le réglage initial commence.
First Time Installation
Do you want to start first time
Installation Wizard ?
Yes
Introduisez les données telles que votre pays, la langue OSD et votre zone de temps.
Le système y tiendra compte pour la recherche des émetteurs.
First Time Installation(1)
Country
Language
Time Zone
Back
No
England
Germany
Italy
France
Next
:Select :Confirm
Remarque : le mot de passe standard est 8888.
Marquage angle
Sélectionnez Marquage Angle avec . Avec cette fonction, l'écran affichera le
marquage angles quand un disque avec différents angles caméra est reproduit.
DVD Setup-Custom Setup
Parental Ctrl
Ae
Scree Saver
Angle Mark
Exit
Poussez le bouton Exit pour retourner au menu principal.
On
Off
:Select :Confirm
18
Poussez OUI et l'appareil commence avec la recherche automatique des émetteurs.
First Time Installation(2)
Do you want to start Auto Search ?
Previous channel list will be replaced.
Back
Yes No
Le système entre dans le mode DVB et reproduit le dernier émetteur trouvé.
19
Page 27

En mode de lecture, poussez SETUP pour aller dans le menu principal. En ce moment
le réglage DVD n'est pas disponible. Sélectionnez DVB Menu pour entrer dans le menu.
Main Menu
DVD Setup
DVB Menu
System Setting
Exit
:Select :Confirm
Menu DVB
DVB Menu-Program List
TV Program
Music Program
Sort
DVB Menu-Program List-Program Edit Table
N0. Program Name Favor Move Del
1 CTV #1
2 CTV #2
3 CTV #3
4 FTV #1
5 FTV #2
Changer
Avec cette option l'ordre des émetteurs peut être changé. Quand l'utilisateur veut
changer un émetteur apparaît sur l'écran. Utilisez pour changer l'ordre des
émetteurs. Poussez ENTER pour confirmer le régalge.
DVB Menu-Program List-Program Edit Table
:Select
N0. Program Name Favor Move Del
1 CTV #1
2 CTV #2
3 CTV #3
4 FTV #1
5 FTV #2
:Confirm Exit:Save&Exit
:Select :Confirm
Liste émetteurs
Programmes TV.
Cette option permet de changer la liste des émetteurs et de classer les émetteurs dans
trois catégories : émetteur préféré, changer l'ordre de l'émetteur et annuler l'émetteur.
Tous les émetteurs sont affichés dans la liste. Il existe trois items (préfére, changer et
annuler) pour marquer les émetteurs.
DVB Menu-Program List-Program Edit Table
N0. Program Name Favor Move Del
1 CTV #1
2 CTV #2
3 CTV #3
4 FTV #1
5 FTV #2
:Select :Confirm Exit:Save&Exit
Préféré
Vous pouvez marquer plusieurs émetteurs comme émetteur préféré. Une fois choisi
comme préféré, un marquage est affiché dans le tableau. Pour annuler, entrez ENTER
à l'endroit où se trouve le marquage.
20
Annuler
Avec cette option des émetteurs peuvent être annulés. Poussez ENTER dans la case
Delete correspondant avec l'émetteur à annuler (le symbole X apparaît). Une fois
marqué, l'émetteur ne sera plus repris dans la liste.
DVB Menu-Program List-Program Edit Table
Remarque : on peut utiliser la fonction de recherche stations pour retrouver les
émetteurs annulés.
:Select
N0. Program Name Favor Move Del
1 CTV #1
2 CTV #2
3 CTV #3
4 FTV #1 X
5 FTV #2 X
:Select
:Confirm Exit:Save&Exit
:Confirm Exit:Save&Exit
Programme musique
Les réglages pour le programme musique sont identiques à ceux pour le TV.
Trier
Vous pouvez trier les émetteurs par nom, ID service ou par numéro canal.
21
Page 28

DVB Menu-Program List
TV Program
Music Program
Sort
By Name
By Service ID
By channel N0.
DVB Menu-Program Search-Manual
Channel No
Exit
21
22
23
24
25
:Select :Confirm
Recherche des émetteurs (syntonisation)
Syntonisation automatique
Avec cette option l'appareil cherche automatiquement les émetteurs en fonctions des
informations concernant le pays et le zone de temps. Avant de commencer la recherche
l'appareil demande si les émetteurs déjà mémorisés doivent être annulés.
Oui : les nouveaux émetteurs trouvés remplacent les anciens émetteurs de la liste.
Non : les nouveaux émetteurs sont ajoutés à la liste.
DVB Menu-Program Search
Automatic Search
Manual Search
Après la syntonisation l'appareil reproduit le dernier émetteur trouvé. Si vous poussez
EXIT pendant la recherche, les nouveaux émetteurs sont ajoutés à la liste, mais
l'appareil ne retourne pas directement vers le mode de lecture.
DVB Menu-Program Search-Automatic
Progress
Channel no
Frequency
Syntonisation manuelle
Utilisez cette option pour trouver un émetteur spécifique. L'utilisateur doit connaître les
références (numéro canal) pour pouvoir utiliser cette fonction. Les nouveaux
émetteurs sont ajoutés à la liste, mais l'appareil ne retourne pas directement vers le
mode de lecture.
Message
Do you want to start
Auto Search ?
Cancel
OK
:Select :Confirm
84%
33
587.0 MHz
TV List Music List
TTV-1
TTV-2
TTV WORLD
Mobile Radio
Exit:Save&Exit
Strength
0%
Quality
0%
:Select :Confirm
Frequency
Bandwidth
474.0 MHz
8 Mhz
Contrôle parental
DVB Menu-Parental Control
Channel Lock
Parental Setting
:Select :Confirm
Blocage de l'émetteur.
Avec cette fonction l'émetteur peut être bloqué. Quand cette fonction est utilisé, il faut
introduire le mot de passe pour pouvoir regarder l'émetteur.
Pour changer le blocage de Non vers Oui, il ne faut pas de mot de passe.
Pour changer le blocage de Oui vers Non, le mot de passe est nécessaire.
DVB Menu-Parental Control
Channel
Parental Setting
Réglage parental
Le réglage parental fonctionne
avec le système de blocage
d'émetteurs. Avant d'entrer dans
la page de réglage parental, il
faut introduire le mot de passe.
Yes
No
Enter Parental PIN
Enter PIN:
Cancel
OK
:Select :Confirm
DVB Menu-Parental Control
Channel
Parental Setting
Enter Parental PIN
Enter PIN:
Cancel
OK
:Select :Confirm
22
23
Page 29

Introduisez le bon mot de passe et la page Réglage parental apparaît.
DVB Menu-Parental Control-Parental Setting
N0. Program Name Lock
1 f tn
2 TMF
3 The HITS
4 Men & Motors
:Select :Confirm Exit:Save&Exit
Pour débloquer l'émetteur il faut introduire le bon mot de passe.
Remarque : le mot de passe standard est 8888. Pour changer le mot de passe,
retournez vers le menu principal, sélectionnez Réglage Système, allez dans la page
de Préférences et sélectionnez la fonction de changement de mot de passe.
Réglage système
DVB Menu-System Setting
Antenna Power
Country
Language
GMT Usage
Time Zone
System Schedule
:Select :Confirm
Puissance antenne.
Sélectionnez cette fonction pour contrôler la puissance de l'antenne.
Pays
Sélectionnez cette fonction pour introduire votre pays.
Langue
Entrez dans le sous-menu et vous avez trois options : Audio 1, Audio 2 et Sous-titres.
Audio ½
Vous pouvez choisir entre la langue Audio1 ou Audio2. Cette option fonctionne
uniquement quand l'émetteur transmet l'audio. Autrement la langue de l'émetteur est
choisie.
Sous-titres
Sélectionnez cette option pour choisir la langue des sous-titres. Cette option
fonctionne uniquement quand l'émetteur transmet la langue. Autrement la langue de
l'émetteur est choisie.
Utilisation GMT
Sélectionnez cette fonction pour utiliser le temps GMT. Quand il n'est pas utilisé,
l'option Time Zone ne fonctionne pas et il faut régler manuellement le temps. Quand le
système est utilisé, l'utilisateur peut régler le temps en fonction de la zone de temps
dans laquelle il se trouve.
Zone Temps
Sélectionnez cette option pour régler la zone du temps.
Programmation système
Cette option permet de mémoriser le temps quand l'émetteur doit être changé. Ceci
peut se faire avec 10 émetteurs.
Exit
Pour quitter le menu de réglage DVB er revenir au menu principal, poussez Exit.
Opération de base
1.Sélection de l'émetteur
1) Utilisez les boutons CH-/CH+ pour aller vers l'émetteur précédent / suivant ou utilisez
les boutons numériques.
2) Pendant la lecture, poussez le bouton ENTER et la liste des émetteurs apparaît sur
l'écran. Utilisez les boutons pour choisir l'émetteur et poussez PLAY.
3) Pendant la lecture, poussez le bouton GUIDE. Le menu Guide est affiché. Dans ce
mode les symboles des émetteurs sont affichés en petit. Choisissez l'émetteur avec
les boutons et poussez OK.
2.Mute
Poussez le bouton MUTE pour couper le son ; un symbole apparaît sur l'écran.
Repoussez le bouton pour écouter le son.
3.Information émetteur
En mode DVB, poussez le bouton INFO et les informations concernant l'émetteur
apparaissent sur l'écran.
4.Mode Sleep
Avec cette fonction on peut programmer quand l'appareil doit se mettre hors fonction.
Le temps peut être réglé à 15, 30, 60 ou 120 minutes. Poussez plusieurs fois le bouton
pour sélectionner le temps voulu. Pour annuler la fonction, poussez plusieurs fois le
bouton jusqu'au moment où Sleep Off apparaît.
5.Audio
Utilisez ce bouton pour choisir la sortie audio (Audio 1 ou Audio 2). Il y a trois modes :
GG, DD et GD.
6.Sous-titres
Poussez ce bouton pour choisir la langue des sous-titres. Le nombre des langues
dépend du nombre que l'émetteur transmet. Si l'émetteur n'offre pas de choix,
uniquement l'option sans sous-titres reste.
7.EPG
Poussez le bouton EPG pour entrer dans le mode EPG. Utilisez les boutons pour
choisir l'émetteur et regarder le programme dans les deux sections suivantes.
Pour retourner à la lecture, poussez le bouton PLAY.
Pour voir la programmation du jour, poussez (la liste de programmation est affichée).
Utilisez les boutons pour voir les détails, dont l'information est affichée sur le côté
droit de l'écran. Quand vous choisissez une programme, poussez le bouton PLAY pour
mémoriser le temps quand l'émetteur doit changer.
24
25
Page 30

USB/Carte
Quand l'appareil est utilisé pour la première fois ou quand vous poussez le bouton
MODE, l'écran suivant apparaît.
DVD
DVB
USB
CARD
Utilisez pour sélectionner USB ou Carte et poussez OK pour confirmer. Faites
attention que le USB ou la Carte est connecté à l'appareil. Pour opération : voyez
sections MP3 et JPG.
Note : ne déconnectez pas le USB ou la carte quand ils sont utilisés. Ceci peut donner
des mal fonctionnements.
Réglage système
Main Menu
DVD Setup
DVB Menu
System Setting
Exit
:Select
Utilisez cette option pour effectuer des réglages indépendant des fonctions DVD et DVB.
Le menu apparaît sur l'écran.
Langue OSD
Pour régler la langue du OSD, sélectionnez cette option pour entrer dans le sous-menu.
Utilisez pour sélectionner la langue.
System Setting Menu-Language Setup
OSD
Ae
Encoding
Encoding
Utilisez pour sélectionner la langue des sous-titres. Quand le disque DVD ne
supporte pas la langue, la première langue sur le disque sera utilisée.
English
French
German
Italian
Spanish
Portuguese
:Select :Confirm
:Confirm
Réglage écran
Type écran
Cette option sert à choisir le format de l'écran. Si l'image est transmis en format 16 :9,
vous pouvez le changer en format 4 :3 PS ou 4 :3 LB. Ceci ne fonctionne pas quand
l'image est transmis en format 4 :3.
System Setting Menu-Display Setup
TV Standard
Ae
Display Type
System Setting Menu-Display Setup
TV Standard
Ae
Display Type
NTSC
PAL
:Select :Confirm
4:3 PS
4:3 LB
16:9
:Select :Confirm
Préférence
System Setting Menu-Preference
Change PIN
Ae
Default
:Select :Confirm
Changer le mot de passe
Sélectionnez cette option pour changer le mot de passe (4 chiffres). Introduisez
l'ancien mot de passe et ensuite deux fois le nouveau mot de passe.
System Setting Menu-Preference
Change PIN
Ae
Default
Change PIN
Old PIN:
New PIN:
Confirm New PIN:
Cancel
OK
:Select :Confirm
26
27
Page 31

Standard
Sélectionnez cette option pour revenir aux réglages d'origine. Si vous sélectionnez
cette option en mode DVB, tous les réglages DVB sont remis au niveau d'usine.
System Setting Menu-Preference
Ae
Change PIN
Default
Read
En cas de problèmes
PROBLEME SOLUTION
Pas de son ou son
déformé
Ne peut pas
avancer dans le
film
Contrôlez que l'appareil est bien connecté.
Contrôlez que les câbles sont bien connectés aux
prises correctes ;
Vous ne pouvez pas avancer rapidement lors des
informations au début d'un film car ceci est défendu.
:Select :Confirm
Exit
Poussez le bouton Exit pour revenir au menu principal.
Spécifications
Système : PAL
Format d'écran : 7 pouces
Réponse en fréquences : 20 Hz 20 kHz
Sortie vidéo : 1 Vp-p/75 ohms non balancée
Sortie audio : 1.4 Vrms/ 10 kOhm
Rapport signal/bruit : mieux que 80 dB
Plage dynamique : mieux que 85 dB
Laser : semi-conducteur, longueur d'onde 650nm/795nm
Alimentation : DC 9-12 V
Consommation : 10 W
Température d'utilisation : 5-40° C
Poids : 0.71 kg
Dimensions (l x p x h) : 210 x 160 x 38 mm
Type accu : Li Polymère
Le symbole
apparaît sur
l'écran
Image avec
distorsion
Pas d'avancement
rapide en avant ou
en arrière.
Pour des raisons d'amélioration les caractéristiques et les spécifications peuvent être
changées sans préavis.
Si, à un certain moment dans le futur, vous voulez vous écarter de votre
appareil, notez que les appareils électriques ne peuvent pas être enlevés
avec les autres déchets domestiques. Utilisez les facilités de recyclage.
Prenez contact avec les autorités locaux ou avec votre revendeur.
(Directive pour les Dechets d'Equipement Electrique et Electronique).
La fonction voulue ne peut pas être exécuté à ce
moment parce que :
1. Le logiciel du disque l'interdit.
2. Le logiciel du disque ne supporte pas la fonction.
3. La fonction n'est pas disponible en ce moment.
4. Vous avez introduit un numéro qui n'existe pas.
Le disque peut être endommagé. Essayez un autre
disque.
Une distorsion est normale pendant l'avancement
rapide en avant ou en arrière.
Certains disques ont des passages qui n'autorisent pas
l'avancement rapide.
Vous ne pouvez pas avancer rapidement lors des
informations au début d'un film car ceci est défendu.
28 29
Page 32

The Table Contents
Introduction
Introduction 1
Safety Precautions 1
Package 2
Main Features 2
Main Unit Controls 3
System Connection 4
Remote Control 7
Basic Operation 8
System Setup 26
Specifications 29
Troubleshooting 29
Thank you for choosing our portable device. The unit applies the latest state
of art electronics and is designed for use at home, in hotels, offices . The unit
is constructed to provide years of reliable, trouble-free service, and is compact
so that you can take it with you anywhere and is designed for quick and easy
installation. Please read the entire instruction manual supplied with this
product prior to use.Please save this manual for future reference.
Safety Precautions
Please read the Manual carefully before using this player, and keep the manual
well for turn-back consultation.
Important instruction for safety
CAUTION
RISK OF ELECTRIC SHOCK
DO NOT OPEN
CAUTION
RISK OF ELECTRIC SHOCK
DO NOT OPEN
Warning: To reduce the risk of fire or electric shock, do not expose this apparatus to rain
or moisture.
1) Please read the instruction manual carefully and follow all the requirements of safe
operation to operate the device.
2) Do not use this unit near water. Do not place over the unit any container with liquid inside.
3) Do not install near any heat sources such as radiators, heat registers, stoves, or other
apparatus (including amplifiers) that produce heat.
4) Unplug this unit during lightning storms or when unused for long time.
5) About Cleaning: Unplug the system, use only wet cloth to clean. Do not use liquid
detergent or aerosol.
6) Only use accessories specified by the manufacturer.
7) Refer all servicing to qualified service personnel, servicing is required when the unit
has been damaged in any way, such as power supply cord or plug is damaged, liquid
has been spilled or objects have fallen into the unit, exposed to moisture, does not
operate normally. Don't try to repair the machine by yourself because of the danger of
high voltage and electric shock.
8) Do not use irregular shaped discs such as heart or star-shaped discs as they may
cause the unit to malfunction.
Warning:To alert the user to dangerous
voltage on the spot
Caution:To remind the user of important
operating and maintenance instructions
attached
Page 33

Package
First check the contents of your Portable DVD player package:
DVD Player
Audio/Video cable
Remote Control with battery
AC/DC Power Adapter
Cigarette Lighter Adapter
Instruction Manua
Earphone
Antenna
1
1
1
1
1
1
1
1
If any item should be damaged or missing, please contact your dealer
without delay.
Keep the packaging materials, you may need them to transport your
player in the future
WARNING:Changes or modifications made to this equipment, not
expressly approved by us or parties authorized by us will avoid all
manufacture warranties.
Main Features
High brightness color 7” LCD screen
Compatible with disc of DVD,VCD,MP3,MPEG4,CD,JPG etc.
Built-in TV tuner( Digital)
SD/MMC card reader(up to 2GB)and USB connection (1.1)
Built-in stereo speaker
Built-in rechargeable Lithium polymer battery
Support Multi-language OSD,speed forward/backward,repeat function
Notices:
About
The icon marked in the description of each function means that the
described function applies to the corresponding disc type.
DVD
VCD
DVD
VCD
Applies to DVD
Applies to VCD
CD MP3
CD
MP3
Applies to CD
Applies to MP3 disc
Main Unit Controls
16
ANT
1.USB port
2.SETUP
3.MODE
4.PLAY/PAUSE
5.STOP
6. or BUTTON
7.OK BUTTON
8. Or BUTTON
1
MODE
SETUP
9
2
10
3
11
4
12
5
13
6
7
8
14
OFF/ON
AV OUT
15
9.DC IN 9-12V
10.POWER ON/OFF SWITCH
11.AV OUT
12.HEADPHONE
13.VOLUME
14.SD card slot
15.OPEN
16.Antenna
2
3
Page 34

System connection
1.Powering connection
Plug one end of the AC to DC adapter into the DC input jack on the side of
the unit, then plug the other end into the AC power receptacle.
OFF/ON
AV OUT
5.Connecting to the earphone
AV OUT
OFF/ON
2.Powering the system in a car
Plug one end of the cigarette lighter adapter into the DC input jack on the
unit, then plug the other end into the cigarette lighter socket.
OFF/ON
AV OUT
3.Slide the ON/OFF button to ON position to turn on the player.
OFF/ON
AV OUT
Power switch
6.Connecting to TV
OFF/ON
AV OUT
AV CABLE
(Not Supplied)
AUDIO IN VIDEO IN
Please use AV cable to connect the machine and the TV. Make sure it is
connected correctly.
4 5
Page 35

7.Connecting with external speaker
OFF/ON
AV OUT
AV CABLE
(Not Supplied)
VIDEO IN
TV
Centre speaker
Left front speaker
AUDIO IN
AMPLIFIER
Right front speaker
Remote Control
1 OSD/EPG
2 MODE
1
2
TV/MUSIC
REPEAT
PIC
3
4
5
6
7
8
9
10
INFO
PG UP
RC-M32E
SLEEP
PG DN
The use of remote control
Please put the battery into the remote control as per illustration below.
1
CR2025
3 Number buttons 0-9
4 /
5 Setup
6 Enter (To confirm)
7 / CH- CH+
8 Zoom/Exit
9 Play/Pause
10 PR List/Stop
11 TV/Music/Repeat
12 PIC
13 Favorite PR/Title
14 Memory/Menu
15 Subtitle
16 Teletext/Angle
17 Guide/Slow
18 Mute
19 Audio
20 Sleep/PG DN
21 Info/PG UP
SETUP
MODE
OK
SUBWOOFER
Left rear speaker
Right rear speaker
Note There is no 5.1 channel in the unit,however,after connecting to APM
it is available to output audio in 5.1 channel.
6 7
2
CR2025
0
0
30
30
T
V
/M
U
SIC
P
IC
R
E
P
EA
T
INF
O
SLE
EP
P
G
UP
PG
DN
RC
-M
32
E
When using remote control,make sure the infrared window is pointed to
infrared receiving window of the machine.The distance between machine
and remote control must be within 3 metres.Please refer to the illustration
above.
Note
1.To avoid falling off or place near damp environment.
2.To avoid infrared receiving window of the unit being under direct sunlight.
3.Please use a new battery to replace old one if the remote control doesn't work.
Page 36

Baisc Operation
When the unit is operated for the first time or if you press the MODE button,
the below screen is displayed.
DVD
DVB
USB
Card
Use Up/Down cursors to select DVD and press OK button to confirm.
Note: This machine has memory function. It'll auto save last mode. i.e.: If last
mode was set DVD, it'll enter DVD mode when start again.
How to start playback from the menu screen
1. Press TITLE/MENU to
access the menu screen.
2. Press / / /
(cursor keys) or the
numerical keys (will only
work on certain discs) to
select the desired title.
Title 1 Title 2
Title 3
Title 4
Stop playback
Press the STOP button,
playback will stop.
Fast forward & rewind
DVD
SVCD
VCD CD
You can playback a disc at 2x, 4x, 8x,
16x or 32x the normal speed for fast
forward or rewind.
REV
ENTER
STOP
2X 4X
TV/MUSIC
PIC
REPEAT
Forward
SLEEP
INFO
PG DN
PG UP
RC-M32E
8X16X32X
3. Press ENTER or
PLAY button.
How to pause playback
DVD
VCD
CD MP3
When paused, press PLAY button to
resume normal playback.
8
OK
ENTER
PLAY/PAUSE
TV/MUSIC
REPEAT
INFO
PG UP
RC-M32E
SLEEP
PG DN
2X 4X
8X16X32X
Press REV or FWD button during playback.
PIC
The playback speed changes, each time you press the REV or
FWD button(as shown above).
Note:
This function is not available on some DVD discs or during
certain sections of playback.
9
Page 37

Locating a Specific Title,Chapter or Track
DVD discs are normally divided into titles, which are sub-divided into
chapters, CDs are divided into tracks.
Chapter 1 Chapter 2 Chapter 3 Chapter 4 Chapter 5
You can repeat to play a title, a chapter, a track, or a disc.
1. Press the REPEAT key for repeat play. Every time you press the key,
you can have the following different repeat modes.`
DVD
Chapter
Title
All
Off
Title 1
DVD Video Disc
Title 2
Locating a title using the title menu
You can locate a specific title
using the title menu function,
if a DVD video disc contains a
title menu.
1. Press TITLE button
title menu will be shown
2. Press the cursor keys
to select the title you want.
ENTER
You can also directly locate
a specific title by pressing its
assigned number with the
numerical keys (this may only
function on certain discs).
3. Press ENTER button
This will cause the DVD video player to start
playback from chapter 1 of the title selected.
You also can use or buttons to select a chapter or track
desired:
Press or button repeatedly till the required Chapter/
Title/Track is shown.
Playing Repeatedly
DVD
SVCD
VCD CD
This DVD video player allows you to playback a
specific title, chapter, track or segment
repeatedly. (title repeat, chapter/track
repeat)
TV/MUSIC
REPEAT
INFO
PG UP
TV/MUSIC
REPEAT
INFO
PG UP
RC-M32E
RC-M32E
SLEEP
PG DN
Super VCD/CD
Only when the super VCD and VCD 2.0 are played in order, the repeat
function is available for VCD 1.1 and CD.
PIC
Track
All
Off
The repeat function is not available for super VCD and VCD 2.0 in
menu play mode.
MP3 disc
Zoom
DVD
SVCD
Track
VCD CD
Folder
All
Off
TV/MUSIC
REPEAT
PIC
This DVD video player allows you to
zoom into a picture as well as the
zoom point.
Press ZOOM during normal playback
PIC
or slow - motion.
The player magnifies in the center of the
picture.
Press keys during zoom mode to
SLEEP
INFO
PG DN
PG UP
RC-M32E
pan
SLEEP
PG DN
Press ZOOM button repeatedly to cycle through the available
magnification levels (as shown below).
2x 4x
Normal
view (1x)
101110
Page 38

Display subtitles
This player can display subtitles . To cycle through the available
subtitle languages, press SUBTITLE button repeatedly.
Press SUBTITLE button
during playback.
SUBTITLE 1 1/03
SUBTITLE 2 2/03
TV/MUSIC
REPEAT
Angle
DVD
1.Selecting the Camera Angle
PIC
This DVD video player allows you to select from
several different angles(disc dependent).
TV/MUSIC
REPEAT
PIC
SUBTITLE 3 3/03
SUBTITLE OFF
To TURN OFF the subtitles.
Press the SUBTITLE button
repeatedly during playback
until SUBTITLE OFF is
shown and the subtitles are
no longer shown.
SUBTITLE OFF
Press PIC button on the remote control to enter below menus in
consequence:
RGB
RESET
PIC
TV/MUSIC
REPEAT
PIC
ANGLE 1 ANGLE 2
SLEEP
INFO
PG DN
PG UP
RC-M32E
Selecting the camera angle
SLEEP
INFO
PG DN
PG UP
RC-M32E
2.How to change the camera angle
If the DVD video disc was recorded with multiple angles, you have the option
to change the camera angle for the scene you are watching.
Press ANGLE button repeatedly during playback of a scene recorded
with multiple angles (when available).
You may only press the ANGLE button when the angle icon is
flashing on the DVD display.
Each time you press the ANGLE button, the angle will change.
2/2
1 /2
12
SLEEP
INFO
PG DN
PG UP
RC-M32E
The angle function will not work on DVD video discs that do
not contain scenes recorded with multiple angles.
13
Page 39

Playing Back a KODAK Picture CD/JPEG
1. Load your KODAK Picture CD or
JPEG disc.
When a KODAK Picture CD is loaded,
TV/MUSIC
REPEAT
PIC
playback will start automatically.
2. Select a folder or a picture/track
contained on the JPEG, a menu
will appear on the screen.
Press UP or DOWN to select a folder,
SLEEP
and press ENTER to view folder
contents.
INFO
PG DN
PG UP
RC-M32E
3. Select playback mode.
You can use the button REPEAT to select one playback
mode, repeat track, repeat folder, repeat all,off.
4. Use the STOP or MENU button to view the contents . When JPEG CD is
played, the STOP or MENU is used to display JPEG folders and the
corresponding files. When browsing the picture, press "STOP" and
thumbnail size picture will be displayed. You can select the picture you
desire by using the / / / /OK key.
5.Pressing " " key will rotate the picture 90 degrees
counterclockwise. Pressing " " key will rotate the picture
clockwise.
6. When previewing the file, pressing " TITLE ", "SUBTITLE", "AUDIO",
" SLOW " ,a hand icon will appear on the display meaning that these
options are not available.
Playing MP3 Discs
MP3 is a format for storing digital audio. An audio CD-quality song is
compressed into the MP3 format with very little loss of audio quality while
taking up much less disc space. CD-R /RW discs that have been encoded
in MP3 format are compatible with this system.
ROOT 2/17
ROOT
48KHz 160Kbps 03:55
00:00:00
File Type Sort File
When a MP3 disc is inserted into the unit, the menu screen appears
automatically. You can use the menu screen to select your desired folders
and songs or the system plays the songs in the order they were burned
into the disc.
1. Press or button to choose a folder from the folder list on the left side
of the screen.
2. Press ENTER to select the highlighted folder. The songs available
under the folder will be listed.
3. Use or button to choose a song from the list. Press ENTER to
select and begin playback of the highlighted song.
NOTICE
1) " " icon in front of a file name indicates that this is a folder, not an Mp3
file.
2) "MP3" icon in front of a file name indicates that this is a MP3 file.
14
15
Page 40

Rechargeable Battery Use
The player utilizes long-life Li polymer battery, built inside the unit, for
portable power supply. Li battery features high storage capacity and
low level of degradation. This means the battery doesn't have "Memory
Effect" and thus can be recharged safely regardless whether the
battery is fully or partially discharged. It's enough to recharge no longer
than 6H each time, Fully recharged battery can last up to 2 hours.
Precautions related to Battery Recharge
1.The battery can be only recharged when turning power to OFF state,
and keep continuous power supply, the red light will be on, indicating
the unit is under recharging. When it's fully charged, the light will turn
yellow.
Using and Maintaining Rechargeable Battery
1.The normal working temperature is: 0 ~45 ;
2.Always unplug AC/DC power supply for the unit whenever not playing,
unless recharging the battery;
3.Heat will create during playing, it's normal, while avoid long time
playing and unattended;
4.Avoid the unit collide with other objects, and place it away from possible
heat sources, or damp areas;
DVD
DVD Setting
When DVD Drive option is chosen, the unit will enter into DVD mode. Putting
a disc in it, the unit will identify automatically the format of disc and play it.
Press SETUP button, the screen will display Main Menu. In this mode the
DVB menu is unavailable to operate. Select DVD Setup by / ,DVD Setup
Page will be shown on the screen.
DVD Setup
The following shows the initial image of the DVD Setup page: Basic operation
measures of the unit in DVD Setup mode will be introduced in the following
content.
Main Menu
DVD Setup
DVB Menu
System Setting
:Select
DVD Setup-Language Setup
Menu
Ae
Audio
Subtitle
Exit
:Confirm
16
:Select
:Confirm
Language Setup
Menu
Select Menu by using / button, then enter into the submenu to preset
the default Menu Language. When DVD disc does not support it, the first
language on the disc will be automatically chosen to display.
DVD Setup-Language Setup
Menu
Ae
Audio
Subtitle
:Select
English
French
German
Italian
:Confirm
Audio
Select Audio by / , then enter into the submenu to set up the default audio
language of DVD. When DVD disc does not support it, the first language on the
disc will be chosen automatically to display.
17
Page 41

Subtitle
Select Subtitle by / , then enter into the submenu to set default subtitle
language. When DVD disc does not support it, the first language on the disc
will be chosen automatically to display.
Custom Setup
Turn back from Language Setting, user can enter into Custom Setup by / .
Parental Ctrl
Press to select Parental Ctrl. To select the parental level by / . These
OK
are listed from the lowest level (1 kid) to the highest level (8 Adult). To cancel
this function, select off option.
DVD Setup-Custom Setup
Ae
Parental Ctrl
Scree Saver
Angle Mark
3
4
5
6
7
8
:Select :Confirm
When the level needs to be changed, user has to enter the correct password.
DVD Setup-Custom Setup
Parental Ctrl
Ae
Scree Saver
Angle Mark
Enter Parental PIN
Enter PIN:
OK
3
4
5
6
7
8
Cancel
DVB
At the first time operation, the screen will display First Time Installation
page. It will guide user to finish the initial setup of the DVB system.
Firstly, choose YES, then press ENTER button. The system will operate the
initial setup.
First Time Installation
Do you want to start first time
Installation Wizard ?
Yes
No
Secondly, input regional information of user, including the country, OSD
language and Time zone. DVB will automatically scan channels through the
information.
First Time Installation(1)
Country
Language
Time Zone
Back
England
Germany
Italy
France
Next
:Select :Confirm
Remark: To remind you again, the default pin for the unit is8888.
Angle Mark
Select Angel Mark by / ,if it is set as on, when playing DVD disc
containing multi-angles, the screen will display current angles mark and
total number of angles.
DVD Setup-Custom Setup
Parental Ctrl
Ae
Scree Saver
Angle Mark
:Select :Confirm
On
Off
code
Exit
Press Exit button to return to the Main Menu
18
Thirdly, choose 'Yes', the system will automatically scan the channels.
First Time Installation(2)
Do you want to start Auto Search ?
Previous channel list will be replaced.
Back
Yes No
Fourthly, the system will directly enter DVB mode and play the last
channel it finds.
19
Page 42

In playing mode, press SETUP button, the unit will enter into to the Main
menu. At this moment DVD Setup is unavailable to operate.To enter into DVB
Setup page, select DVB Menu.
Main Menu
DVD Setup
DVB Menu
System Setting
Exit
:Select :Confirm
DVB Menu
DVB Menu-Program List
TV Program
Music Program
Sort
DVB Menu-Program List-Program Edit Table
N0. Program Name Favor Move Del
1 CTV #1
2 CTV #2
3 CTV #3
4 FTV #1
5 FTV #2
:Select
:Confirm Exit:Save&Exit
Move
This option allows user to change the order of programs on the list. When
user choose the Move item of one program , will appear on the screen, Then
use to modify the order of programs. Then Press ENTER button to confirm
the setting.
DVB Menu-Program List-Program Edit Table
N0. Program Name Favor Move Del
1 CTV #1
2 CTV #2
3 CTV #3
4 FTV #1
5 FTV #2
:Select :Confirm
Program List
TV Program
This option allows user to edit the program list and set programs into three
types, including favorite program, Move the program and Delete. All programs
available to watch are on the list. The three items (Favor, Move& Del) are used
to set programs.
DVB Menu-Program List-Program Edit Table
N0. Program Name Favor Move Del
1 CTV #1
2 CTV #2
3 CTV #3
4 FTV #1
5 FTV #2
:Select :Confirm Exit:Save&Exit
Favor
You can edit more than one programs as favorite programs by this option.
Once a program is chosen, a mark will appear in its favor blank. To remove the
cursor from the favor list, press ENTER button in the favor blank of that
program.
20
Del
:Select
:Confirm Exit:Save&Exit
User can use this option to delete programs. To delete one program, Press
ENTER button on the Delete blank of that program (a sign will appear there) .
Once the setting is reserved, the deleted programs will not appear on the list
next time.
Notes: User can use Program Search option to recover the deleted programs.
DVB Menu-Program List-Program Edit Table
N0. Program Name Favor Move Del
1 CTV #1
2 CTV #2
3 CTV #3
4 FTV #1 X
5 FTV #2 X
:Select
:Confirm Exit:Save&Exit
Music Program
The operation setting of Music program is the same as that of TV Program.
Sort
You can sort channels on the list according to channel name, service ID or
channel number.
21
Page 43

DVB Menu-Program List
TV Program
Music Program
Sort
By Name
By Service ID
By channel N0.
DVB Menu-Program Search-Manual
Channel No
Exit
21
22
23
24
25
:Select :Confirm
Program Search
Automatic Search
By operation of this option, the unit can automatically search channels
according to the information in Country and Time Zone setting. Before
searching, the system will indicate whether reserved channels in the program
list are suposed to be deleted.
Choose Yes, new channels will replace the previous channels on the list.
Choose NO to add these new channels to the list.
DVB Menu-Program Search
Automatic Search
Manual Search
Message
Do you want to start
Auto Search ?
Cancel
OK
:Select :Confirm
When the automatic search is over, DVB mode will return to play the last
channel it searched.If pressing EXIT to suspend the search, new channels will
be added to the list, but the unit will not return directly to the playing status at
this moment.
DVB Menu-Program Search-Automatic
Progress
Channel no
Frequency
84%
33
587.0 MHz
TV List Music List
TTV-1
TTV-2
TTV WORLD
Mobile Radio
Exit:Save&Exit
Manual Search
To find particular channels, select this option searching manually.
User must provide the numbers of target channels to enable the system to
search.
The channels from manual search will be added to the list, but the unit will
not return directly to the playing status at this moment.
22
Strength
0%
Quality
0%
:Select :Confirm
Frequency
Bandwidth
474.0 MHz
8 Mhz
Parental control
DVB Menu-Parental Control
Channel Lock
Parental Setting
:Select :Confirm
Channel Lock
Select Channel Lock to setup whether locks the blocked channels in
Parental Setting. When it is set as Yes, user has to enter password before
watching these locked channels.
When the option is changed to No from Yes, No need entering the password.
But when it is changed from Yes to No, user must enter the password.
DVB Menu-Parental Control
Channel
Parental Setting
Parental Setting
Parental Setting can work
together with Channel lock
to lock channels.
Before entering into Parental
Setting page, the system
will require you to
enter the password.
Yes
No
Enter Parental PIN
Enter PIN:
Cancel
OK
:Select :Confirm
DVB Menu-Parental Control
Channel
Parental Setting
Enter Parental PIN
Enter PIN:
Cancel
OK
:Select :Confirm
23
Page 44

Enter correct PIN, user will enter into Parental Setting page
DVB Menu-Parental Control-Parental Setting
N0. Program Name Lock
1 f tn
2 TMF
3 The HITS
4 Men & Motors
:Select :Confirm Exit:Save&Exit
When switch to the locked channel, user must enter correct PIN before watching.
Notes:
the default PIN is 8888. To change it, return to Main Menu and select
System Setting, then enter into System Setting Menu-Preference
page, select Change PIN option.
System Setting
DVB Menu-System Setting
Antenna Power
Country
Language
GMT Usage
Time Zone
System Schedule
:Select :Confirm
Antenna power
Select this option to control Antenna Power.
Country
Select this option to set the country where user receives the DVB signal.
Language
Enter into this submenu, there will be 3 options for user to operate:
nd
2 Audio and Subtitle.
st nd
1 /2 Audio
User can choose the audio language from audio 1 or audio 2 . This option
st nd
st
1 Audio
only works when the channel provides Audio. Otherwise, the preset
language of that channel will be automatically chosen.
Subtitle
Select this option to choose subtitle language. This option only works
when the channel provides subtitle. Otherwise, the preset subtitle
language of that channel will be automatically chosen.
GMT Usage
Select this option to set the usage of GMT Time. When it is set with Off,
Time Zone option will not work, users can set the time by themselves.
When it is set with on, user can select Time Zone option to choose the time
zone where the DVB system locates.
Time Zone
Select this option to set the time zone where the DVB system locates.
System Schedule
Select this option to preset the time for changing channel. User can preset
10 channels to watch at most.
Exit
To return to the Main Menu from DVB Setup page, press Exit button
Basic Operation
Adjust Channel
1.
Press CH-/CH+ to turn to previous /next channels or press the number
buttons on the remote control.
In playing mode, press ENTER button again, the program list will be shown
2)
on the screen. Then choose channels by button, press PLAY button to
play.
During the playing, Press GUIDE button, the GUIDE MENU will be
3)
displayed.Under this mode, the icons of all channels will be displayed
with smaller size. User can choose channel by button, then
and
press OK button to play.
Switching to the mute
2.
Press Mute button to switch to mute mode, then the mute sign will appear on the
screen.Press it again, the unit will return to normal playing.
Program Information
3.
In DVB playing status, Press INFO button, the detail information of the program
will be displayed on the screen.
Sleeping Mode
4.
Press sleep button to set a time to turn the unit off. The time can be set with 15
min., 30 min., 60 min. and 120 min.At the first time of selecting Sleep, the
preset time will appear, Press it repeatedly, the time will be prolonged.
To cancel
the function, press the button repeatedly until Sleep Off appears.
Audio
5.
Press audio button to choose audio output port (Audio 1 or Audio 2). There
are three audio modes: LL, RR and LR.
Choosing Subtitle
6
Press subtitle button to choose subtitle language.The number of languages
user can choose depends on subtitle languages programs provide. If no other
language to choose, only off option appears there.
EPG Page
7.
Press EPG button to enter into EPG mode. Then user can use button to
choose channel and check the program list in the next two sections.
To return to playing mode, Press PLAY button.
To check the Complete program list of a day, press button (The screen will
display it). Press button to learn the detail information of one channel, those
information will be shown on the right blank of program list.When one program
is chosen, user can press Play button to setup the preset time for changing
channel.
24
25
Page 45

USB/Card
When the unit is operated for the first time or if you press the MODE button,
the below screen is displayed.
DVD
DVB
USB
CARD
Use / cursors to select USB or SD and press the OK button to confirm.
Make sure USB drive or SD card is inserted in the unit.For operation refer to
Mp3 and JPG section.
Note: Please do not disconnect USB devices or plug out SD/MMC cards
while they are working with the unit. Functional failure may occur in
case of wrong operations.
System Setup
Main Menu
DVD Setup
DVB Menu
System Setting
Exit
:Select
:Confirm
Select this option to set up some setting not related to DVD and DVB, the
System Setting Menu will appear on the screen.
Language Setup OSD
To set up the language on screen display, select this option to enter into the
submenu. Then select OSD language by / .
System Setting Menu-Language Setup
English
French
German
Italian
Spanish
Portuguese
:Select :Confirm
Encoding
OSD
Ae
Encoding
Select External Subtitle by / , then enter into the external submenu to
set default external subtitle language. When DVD disc does not support it, the
first language on the disc will be chosen automatically to display.
26
Display Setup
System Setting Menu-Display Setup
Ae
TV Standard
Display Type
NTSC
PAL
:Select :Confirm
Display Type
This option is used to choose the display ratio. If the video of channel is
transmitted with 16:9 ratio, it can be switched to 4:3PS or 4:3LB. But if the
video is transmitted with 4:3 ratio, it doesn't work.
System Setting Menu-Display Setup
Ae
TV Standard
Display Type
4:3 PS
4:3 LB
16:9
:Select :Confirm
Preference
System Setting Menu-Preference
Change PIN
Ae
Default
:Select :Confirm
Change PIN
Select this option to change the PIN (it is made up of 4 numbers).You must
enter the previous PIN, then enter your new PIN twice, press Enter to confirm.
System Setting Menu-Preference
Change PIN
Ae
Default
Change PIN
Old PIN:
New PIN:
Confirm New PIN:
OK
:Select :Confirm
Cancel
27
Page 46

Default
Select this option to return to original setting. For example, if user
operates this option in DVB Mode, all the setting in DVB mode will return to
original setting.
System Setting Menu-Preference
Exit
Ae
Change PIN
Default
Read
:Select :Confirm
Press Exit button to turn back to the Main Menu.
Specifications
Signal system: PAL
Panel size: 7 inch
Frequency response: 20 Hz to 20 kHz
Video output: 1 Vp-p/75 Ohm, unbalanced
Audio output: 1.4Vrms/10kOhm
Audio S/N: Better than 80 dB
Dynamic range : Better than 85 dB
Laser: Semiconductor Laser, Wave Length: 650 nm/795 nm
Power source: DC 9-12V
Power consumption: 10 W
Operating temperature: 5~40 C
Weight : 0.71kg
Dimensions (W x D x H): 210 x 160 x 38 mm
Battery Type: Li Polymer
Troubleshooting
PROBLEM
No sound or
distorted sound
Can't advance
through a movie
The icon ( )
appears on
screen
Picture is
distorted
No forward or
reverse scan
Design and specifications are subject to change without notice
If at any time in the future you should need to dispose of this product
please note that waste electrical products should not be disposed of
with household waste. Please recycle where facilities exist. Check
with your Local Authority or retailer for recycling advice.(Waste
Electrical and Electronic equipment Directive)
SOLUTION
Make sure your DVB-T/TV is connected properly. Make
sure all cables are securely inserted into the
appropriate jacks.
You can't advance through the opening credits and
warning information that appears at the beginning
of movies because the disc is programmed to
prohibit that action.
The feature or action cannot be completed at this time
because:
1. The softwares of SD Card/USB restricts it.
2. The softwares of SD Card/USB don't support the
feature(e.g., angles)
3. The feature is not available at the moment.
4. You've requested a title or chapter number that is
out of range.
The SD Card/USB might be damaged. Try another
SD Card/USB
It is normal for some distortion to appear during
forward or reverse scan.
Some SD Cards/USB has sections that prohibit rapid
scanning or title and chapter skip.
If you try to skip through the warning information
and credits at the beginning of a movie, you won't be
able to. This part of the movie is often programmed
to prohibit skipping through it.
28 29
 Loading...