

Page 1
DVP7025DVBT - USER MANUAL
ATV/DVBT/DVD/CD/MP3/MPEG4/HDCD/JPEG
ATV/DVBT/DVD/CD/MP3/MPEG4/HDCD/JPEG
SOURCE
SETUP
MENU/PBC
FUNCTION
Please read this User Manual carefully to ensure proper use of this
product and keep this manual for future reference.
Page 2
DVD Use Manual Content
INTRODUCTION
Safety Precautions
Important Safety Instructions
Precautions
Accessories
Panel Illustration
CONNECTIONS
Connecting to a TV set
Connecting to an AV Amplifier with Digital Audio Input
Connecting to the USB and 3 in 1 card reader
BASIC PLAYBACK
Basic Operation
REMOTE CONTROL OPERATION
Remote Control
Remote Control Operation
DVD PART
1
2
4
6
7
8
9
10
11
12
13
The Setup Menu System
MPEG4/MP3 PLAYBACK
Playing a JPEG file
KODAK Picture CD playback
DVB PART
The Setup Menu System
ATV PAR T
The Setup Menu System
SCREEN SET PART
The Setup Menu System
OTHERS
Troubleshooting
Specifications
18
28
29
30
31
40
43
44
46
Page 3
Safety Precautions
CAUTION
RISK OF ELECTRIC SHOCK
DO NOT OPEN
Introduction
THE LIGHTNING FLASH WITH ARROWHEAD SYMBOL WITHIN AN EQUILATERAL TRIANGLE IS INTENDED TO
ALERT THE USER TO THE PRESENCE OF UNINSULATED "DANGEROUS
VOLTAGE" WITHIN THE UNIT'S CABINET THAT MAY BE OF SUFFICIENT
MAGNITUDE TO CONSTITUTE A RISK
OF ELECTRIC SHOCK TO PERSONS.
THE EXCLAMATION POINT WITHIN AN
EQUILATERAL TRIANGLE IS
INTENDED TO ALERT THE USER TO
THE PRESENCE OF IMPORTANT
OPERATING AND MAINTENANCE
(SERVICING) INSTRUCTIONS IN THE
MANUAL ACCOMPANYING THE UNIT.
CAUTION:
THE DVD VIDEO PLAYER IS A CLASS 1 LASER
PRODUCT. USE OF CONTROLS OR ADJUSTMENTS OR PERFORMANCE OF PROCEDURES
OTHER THAN THOSE SPECIFIED HEREIN MAY
RESULT IN HAZARDOUS RADIATION
EXPOSURE.
AS THE LASER BEAM USED IN THIS DVD
VIDEO PLAYER IS HARMFUL TO THE EYES, DO
NOT ATTEMPT TO DISASSEMBLE THE
CABINET.
REFER SERVICING TO QUALIFIED
PERSONNEL ONLY.
-1-
Page 4

Important Safety Instructions
Introduction
1. Read Instructions
All the safety and operating instructions should be read
before the product is operated.
2. Retain Instructions
The safety and operating instructions should be
retained for future reference.
3. Water and Moisture
Do not use this product near water for example, near
a bathtub, wash bowl, kitchen sink, or laundry tub; in a
wet basement; or near a swimming pool; and the like.
4. Ventilation
Slots and openings in the cabinet are provided for
ventilation and to ensure reliable operation of the
product and to protect it from overheating, and these
openings must not be blocked or covered. The
openings should never be blocked by placing the
product on a bed, sofa, rug, or other similar surface.
This product should not be placed in a built-in
installation such as a bookcase or rack unless proper
ventilation is provided or the manufacturer's
instructions have been adhered to.
5. Power Sources
This product should be operated only from the type of
power source indicated on the marking label. If you are
not sure of the type of power supply to your home,
consult your product dealer or local power company.
For products intended to operate from battery power
or other sources, refer to the operating instructions.
6. Power Cord Protection
Power supply cords should be routed so that they are
not likely to be walked on or pinched by items placed
upon or against them, paying particular attention to
cords at plugs, convenience receptacles, and the point
where they exit from the product.
-2-
Page 5

Important Safety Instructions
7. Overloading
Do not overload wall outlets, extension cords, or
integral convenience receptacles, as this can result in a
risk of fire or electric shock.
8. Object and Liquid Entry
Never push objects of any kind into this product
through openings as they may touch dangerous
voltage points or short-out parts that could result in a
fire or electric shock. Never spill liquid of any kind on
the product.
9. Servicing
Do not attempt to service this product yourself as
opening or removing covers may expose you to
dangerous voltage or other hazards. Refer all servicing
to qualified service personnel.
Introduction
10. Damage Requiring Service
Unplug this product from the wall outlet and refer
servicing to qualified service personnel under the
following conditions:
A)When the power-supply cord or plug is damaged,
B)If liquid has been spilled, or objects have fallen
into the product,
C)If the product has been exposed to rain or water,
D)If the product does not operate normally by
following the operating instructions. Adjust only
those controls that are covered by the operating
instructions as an improper adjustment of other
controls may result in damage and will often
require extensive work by a qualified technician
to restore the product to its normal operation,
E)If the product has been dropped or damaged in
any way.
F)When the product exhibits a distinct change in
performance this indicates a need for service.
11. Replacement Parts
When replacement parts are required, be sure the
service technician has used replacement parts
specified by the manufacturer or have the same
characteristics as the original part. Unauthorized
substitutions may result in fire, electric shock, or other
hazards.
12. Heat
The product should be situated away from heat
sources such as radiators, heat registers, stoves, or
other products (including amplifiers) that produce heat.
-3-
Page 6
P re c a utio ns
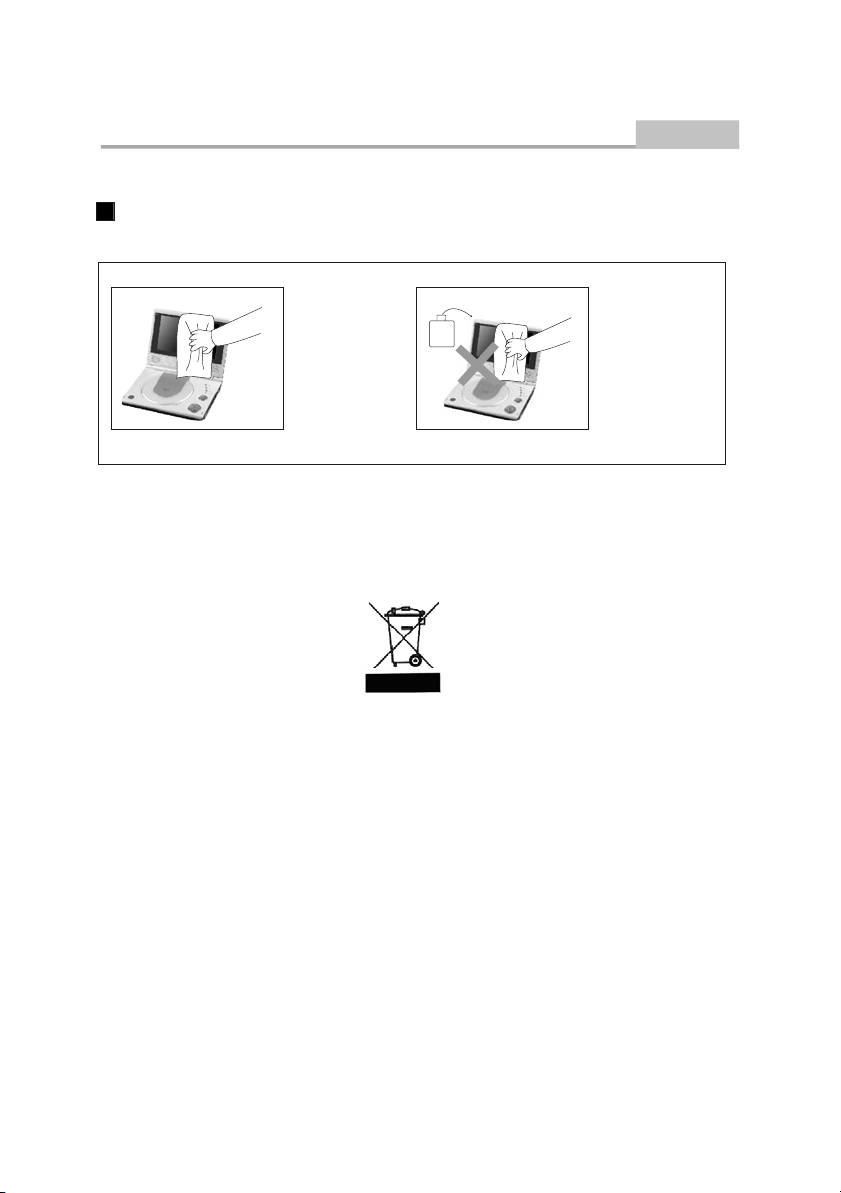
Maint enance
Please pl ug of f all co nn ec ti on wi re s befo re yo u s ta rt cle an in g t hi s m achine.
Intro duc tion
Ple ase si pe the
mac hine
cov er,
dis play
scr een
and
but tons w ith
sof t
clo th
dip ped
wit h
lit tle
sof t
abl uent
.
Alco hol
Nev er wip e this
mac hing
wit h
abr asion
clo th,
abs terge n
t
pow der,
alc ohol
and
ben zene e tc.
Var iou
s
pro pella nts
che mica
cle aning
or
l
med ia.
This symbol on the product or in the instructions means that your electrical and electronic equipment
should be disposed at the end of its life separately from your household waste. There are separate
collection systems for recycling in the EU.
For more information, please contact the local authority or your retailer where you purchased the product.
-4-
Page 7

Precautions
Introduction
Operation Precautions
1. Only the attached AC adapter and the automobile adapter(12V) are suitable.
2. For the sake of safety, when you do not intend to use the display, Please unplug the AC adapter or automobile
adapter.
-5-
Page 8
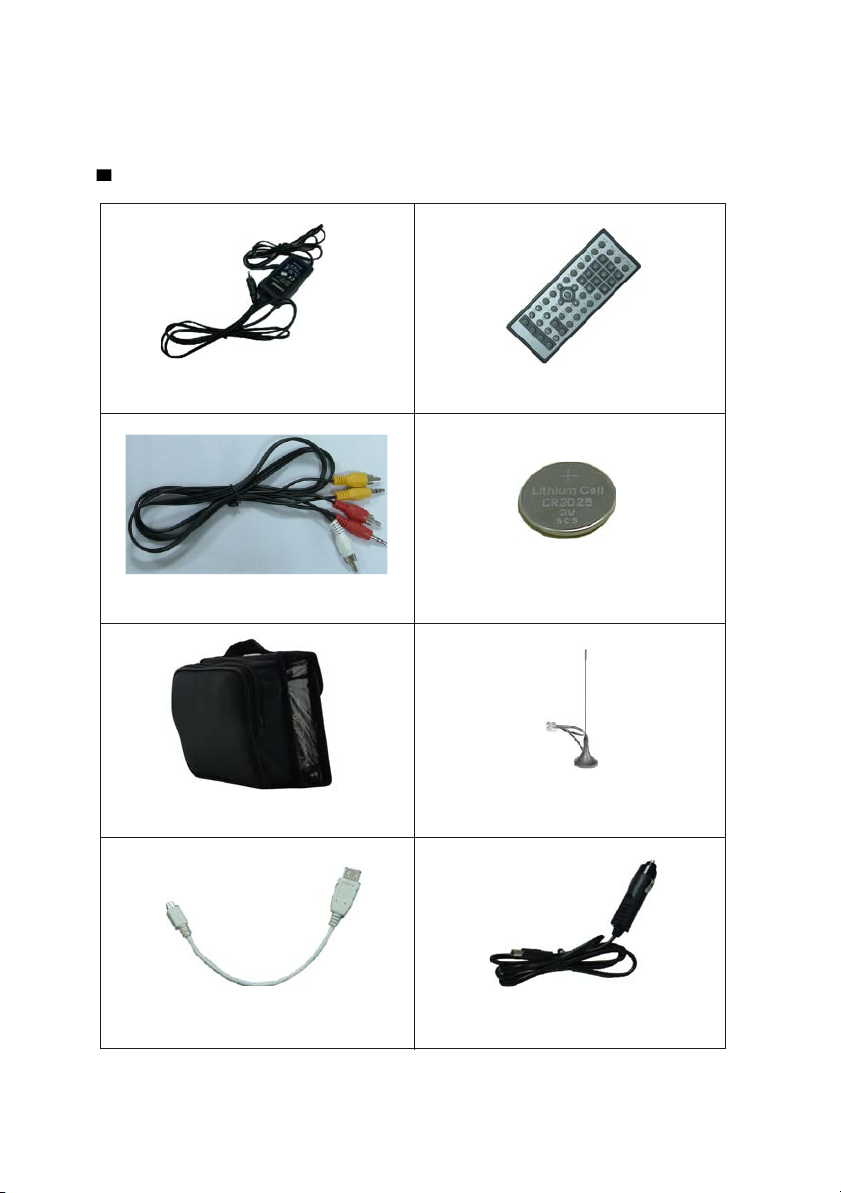
Ac ces s ori es
AC/DC adapter Remote control
AV line
Carry Bag
USB line
-6-
LI
type batteries
Digital DTV antenna
Car adapter
Page 9
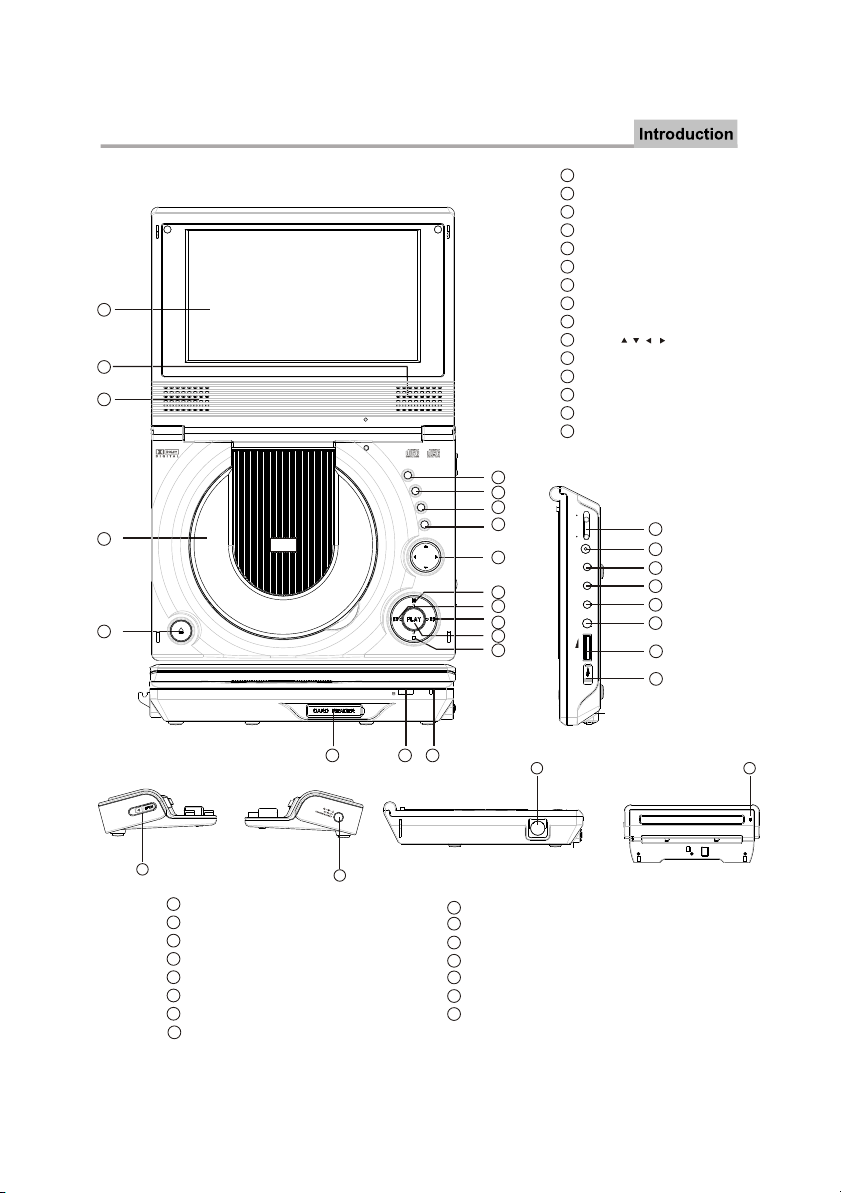
P a nel Illu s tr ation
1
2
3
DVD 7 MT K
1
LCD DISPLAY
2
SPEAKER RIGHT
3
SPEAKER LEFT
4
DISC
5
OPEN DISC TOP
6
SOURCE
7
SETUP
8
MENU/PBC
9
FUNCTION
10
MOVE( , , , )
11
PAUSE
12
PREV
13
NEXT
14
PLAY
15
STOP
TOP
SOURCE
SETU
P
MENU/PB
FUNCTIO
4
5
6
7
C
8
N
9
10
11
12
13
14
15
F
ON OF
V
2
N1
I
C
D
O
E
I
VD
I
A
I L AUD O
X
A
CO
ONE
H
P
L
VO
19
20
21
22
23
24
25
26
17
16
PHONE
24
25
VOLUME
USB
26
BATTERY INSERT/REMOVE BUTTON
27
DC 12V INPUT JACK (CHARGE SOCKET)
28
ANT IN
29
30
LED light (RED: batteries charge indicator
29
ANT IN
30
GREEN: batteries charge full indicator)
27
16
POWER INDICATOR
17
SENSOR
18
3 In1 CARD READER (SD, MS, MMC)
19
POWER ( ON/OF)
20
DC 12V INPUT JACK
21
VIDEO
22
AUDIO
23
COAXIAL
18
28
-7-
Page 10

Connecting to a TV Set
Connections
VIDEO IN
AUDIO IN
VOL
L R CVBS
WHITERED Yellow
ON OFFPHONE COAXIAL AUDIO VIDEO DC IN 12V
-8-
Page 11
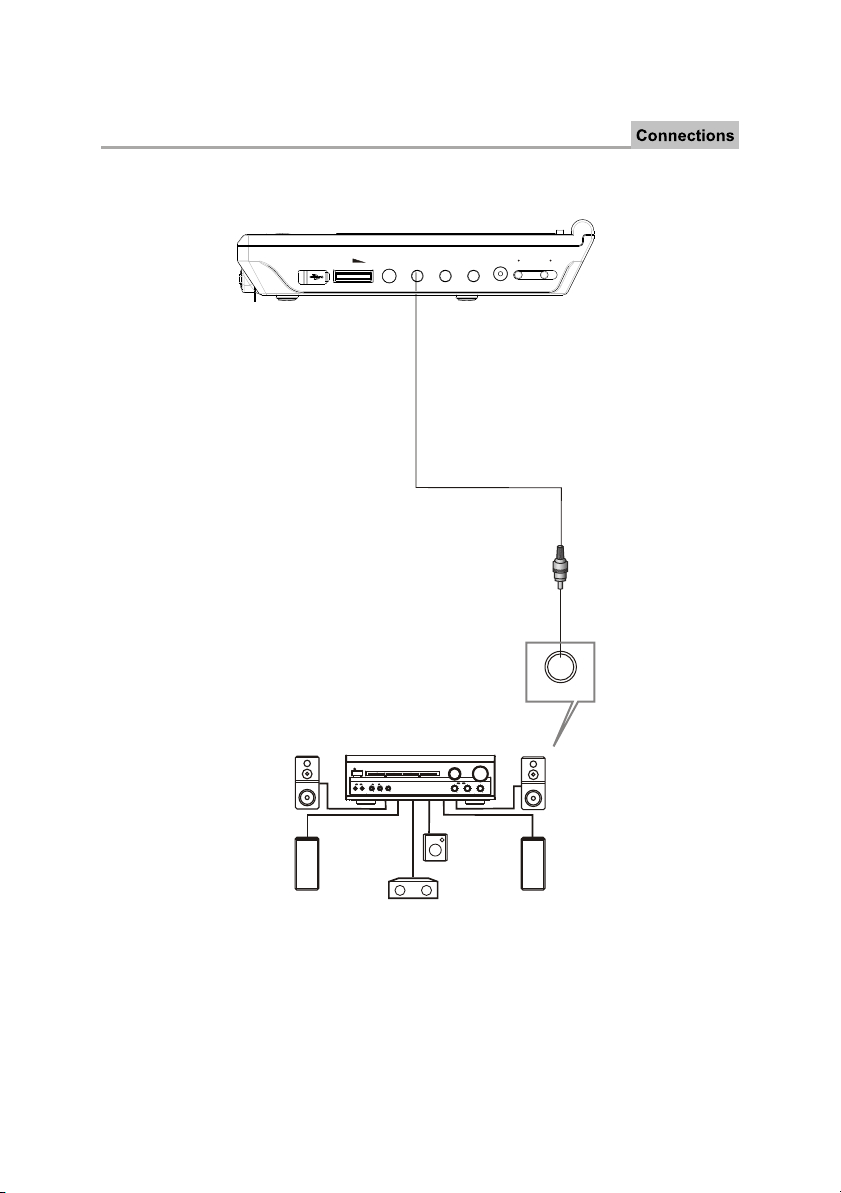
Connecting to an AV Amplifier with Digital Audio Input
VOL
Digital Amplifier
POWER
PRO LOGIC
3 STEREO
BYPASS
MIC
MIC VOL
EXCITE
211
2
ON OFFPHONE COAXIAL AUDIO VIDEO DC IN 12V
Coaxial cab
le
COAXIAL
VOLUME
INPUT SELECTOR
MUTE
CHANNEL
TEST
KARAOKE
MODE
DOWN
UP
BASS
ECHO
MIC
TREBLE
Notes:
1. Select the coaxial digital audio output.
2. Set the player's audio out to Raw or PCM mode .
3. Set the Digital Amplifier to the AV input connected to the DVD player.
-9-
Page 12
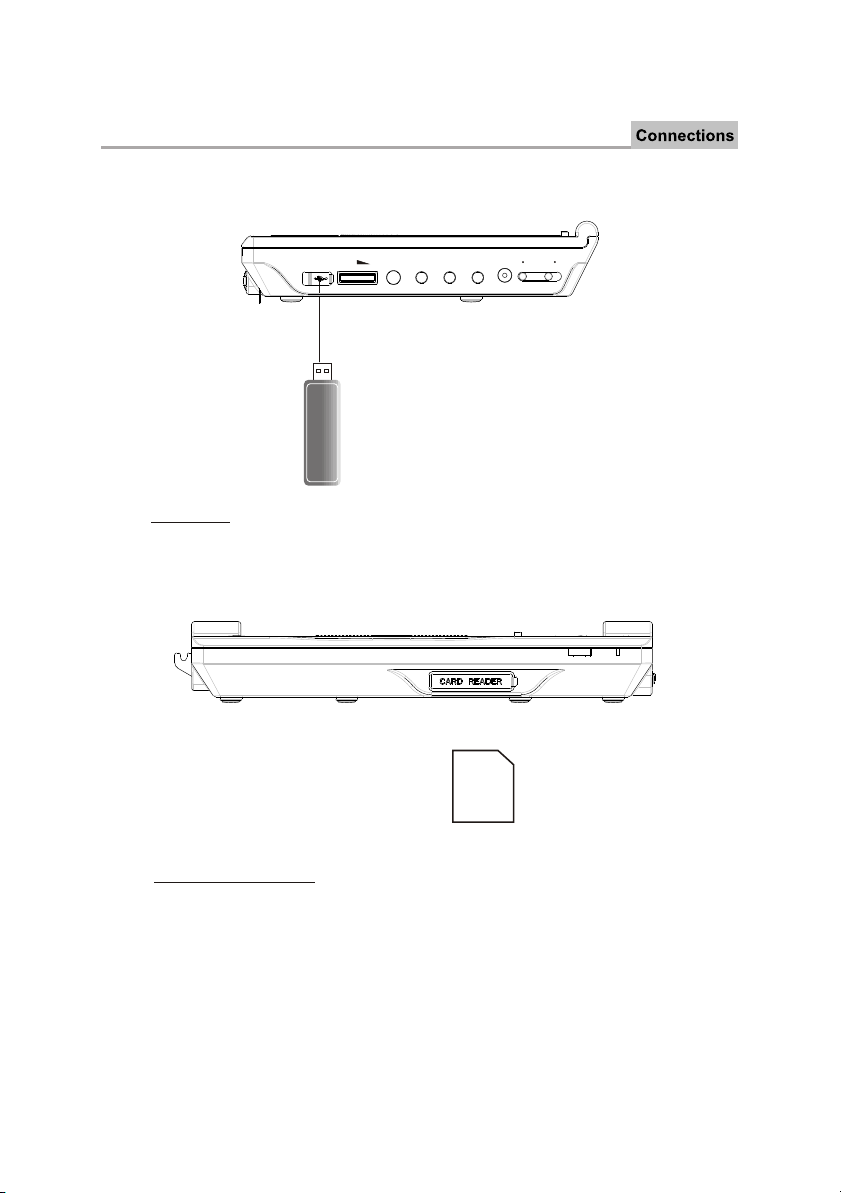
CONNECT TO THE USB AND 3IN1 CARD READER
Press the SOURCE key on the remote control until you switched into USB work mode
ON OFFPHONE COAXIAL AUDIO VIDEO DC IN 12V
USB interface
VOL
This unit can play music from USB player (flash memory to store datas).
SD, MS, MMC
3 In 1 Card Reader Function
This unit have a 3 in1 card jack, when no disc in the player.
appears. You can insert three kinds of card (MMC, SD ,MS)
movie and JPGE files. All the function is the same to play a disc.
Press Source button on the remote control until "CARD"
with card port interface to play the mp3 music or MPEG4
-10-
Page 13
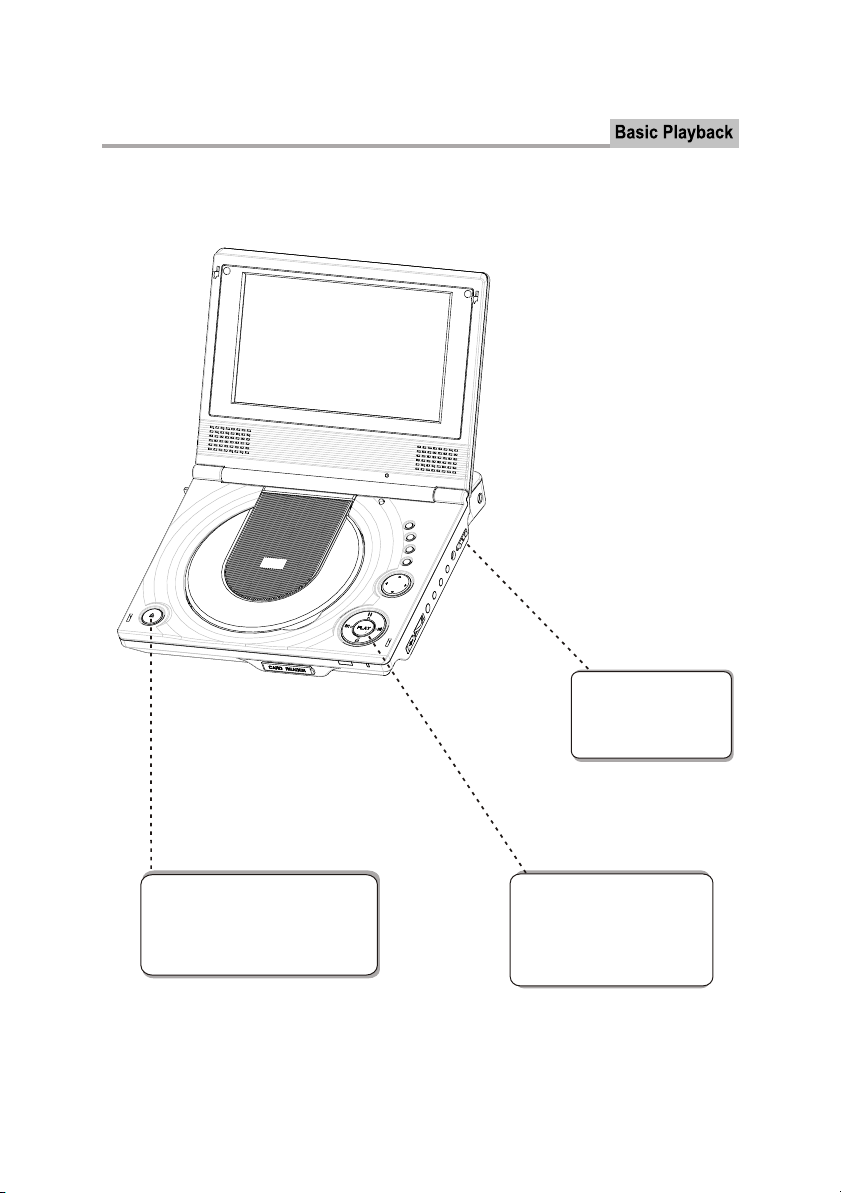
Basic Operation
Preparation before playing:
STEP 1 - Press ON to
start the player. The DVD
logo appears on the TFT
screen.
STEP 2 - Push OPEN on the front
panel . When the tray is opened, place
the disc on the tray with the label side
up.
STEP 3- Press the PLAY button
on the front panel or remote control. The player will automatically read and identify the disc, and
begin playback.
-11-
Page 14

Remote Control
Remote Control
1
1
2
3
4
5
6
7
8
9
10
11
12
13
14
15
16
17
18
Using the Remote Control
Point the remote control at the remote sensor in order for the player to function correctly. The
remote will function to approximately 21' from the remote sensor at an angle of approximately
30 each direction.
Note: Directing the remote sensor toward any light source, such as direct sunlight, may cause
the unit to malfunction. Do not spill water or put wet items on the remote control. Never
disassemble remote control.
19
20
21
22
23
24
25
26
27
28
29
30
31
32
33
34
CR2025
MUTE
2
DISPLAY
3
N/P
4
SUBTITLE
5
LANGUAGE
6
ANGLE
7
SETUP
8
MOVE ( )
9
ENTER
RETURN/EXIT
10
11
L/R CHANNEL
12
ZOOM
13
PLAY/PAUSE
14
STOP
15
REV
16
FWD
17
EPG
18
SCAN
HOW TO REPLACE THE BATTERY
STEP 1: PUSH THE BUTTON TOWARD LEFT;
STEP 2: PULL THE BATTERY LOADER OUT.
19
TFT on/off
20
SPEAKER
21
NUMBER KEY SELECT
22
GOTO
23
MENU/PBC
24
TITLE/TTX
25
FUNCTION
26
4:3/16:9
27
PROG
28
A-B REPEAT
29
REPEAT
30
VOLUME +/-
31
NEXT
32
PREV
33
TV/RADIO
34
SOURCE
2
BATTERIES
INCORRECT USE OF BATTERIES MAY CAUSE THEM TO LEAK, CORRODE OR EXPLODE.
Be sure to place the batteries in the correct direction.
It is dangerous to charge/heat/open or short-circuit the batteries.
Do not leave dead or expired batteries or mix old/new batteries.
When not using the remote control for a long duration of time, remove the batteries. When
operating range becomes reduced, replace all batteries with new, fresh ones.
If leakage from the battery occurs, wipe the battery liquid from the battery compartment, then
replace.
1
-12-
Page 15
Remote Control Operation
1. MUTE
Press MUTE to mute the Audio output
Press MUTE again to resume normal audio output
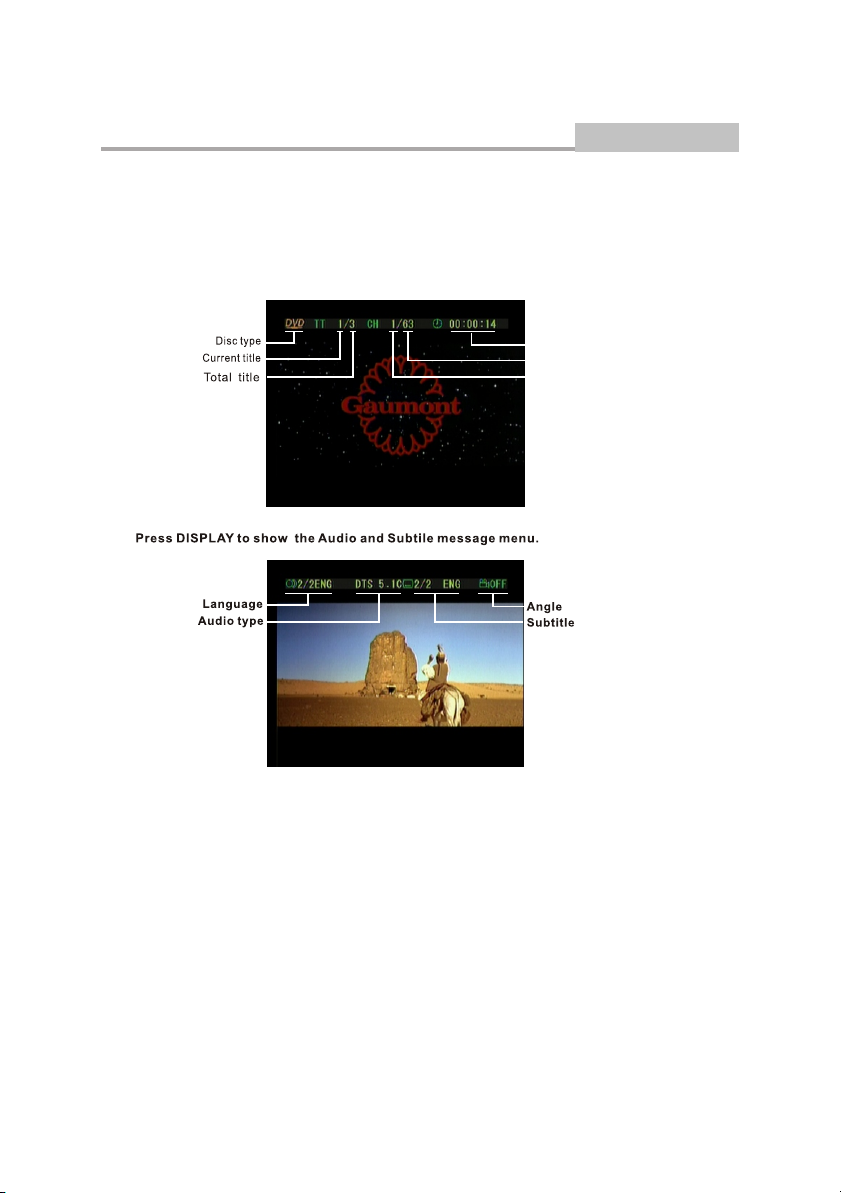
2. DISPLAY
During playback, press DISPLAY to display the current time counter position.
Play time of the current title
Total chapter
Current chapter
Advanced Features
3. N/P
During playback press N/P to PAL, AUTO, NTSC.
4. SUBTITLE
During DVD playback
Press SUBTITLE repeatedly to select from up to 32 subtitle languages.
Note: This function is disc specific (languages will vary).
5. LANGUAGE
During DVD playback
Press LANGUAGE repeatedly to select from up to 8 audio languages formats.
Note: This function is disc specific.
-13-
Page 16

Remote Control Operation
6. ANGLE
During DVD playback
Press ANGLE to view scenes from different camera angles.
Press ANGLE repeatedly to change from one camera angle to another.
Note: This function is disc specific.
7. SETUP
Press STEP during playback to pause playback.
Press STEP repeatedly to play frame.
Press PLAY to resume normal playback.
UP/DOWN/LEFT/RIGHT
8.
Used to navigate menus. When not in a menu, there are also DVB specific uses for each button.
Pressing <UP>/<DOWN> will go the the next/previous channel, in the list of all channels.
Pressing <RIGHT>/<LEFT> will go the next/previous channel of the current channel type.
9. ENTER
Pressing <ENTER> will enter the selected item in a menu.
10.
RETURN
During DVD playback, press RETURN to display the DVD title menu or play the first title.
Note: This function is subject to the disc.
11. L/R
When a DVD is played, the active dubbing language will be shown.
When a SVCD or VCD is played the left track, right track or stereo will be displayed accordingly.
When a bilingual story VCD is played, you may press the button to select the language desired.
12. ZOOM
During DVD playback, press ZOOM to magnify the image as follows:
Advanced Features
Zoom2 Zoom3 Zoom4
13. PLAY/PAUSE
Press PLAY from stop mode to start playback.
Press PAUSE during playback to pause playback.
Press PLAY to resume normal playback.
This function is not available if the elapsed time of current track is less than 10 seconds.
Note: MP3 discs and some DVD discs do not have a 10 second review feature.
14. STOP
Press STOP once during playback to stop and hole playback.
Press PLAY to resume playback from the point you pressed STOP.
Press STOP twice to stop playback completely.
15. REV
During DVD or CD playback, press and hold to scan in reverse.
The player will review the disc at 2, 4, 8 and 20 times normal speed as follows:
Press PLAY to resume normal playback.
Zoom1/2 Zoom1/4Zoom1/3
Zoom off
X20
-14-
Page 17

Remote Control Operation
16. FWD
During DVD or CD playback, press and hold to scan forward.
The player will review the disc at 2, 4, 8 and 20 times normal speed as follows:
Press PLAY to resume normal playback.
X2 X4 X8 X20X2 X4 X8
17. EPG
In DVB mode, Pressing EPG. Will display the EPG (Electronic Program Guide) Menu,
18. SCAN
During the DVB-T state
Press SCAN button to open the DVB-T channels tuning menu.
19. TFT on/off
Press TFT on/off Key to TFT-LCD display
Press it again to TFT-LCD tum off.
20. SPEAKER
During playback
Press the speaker to close .
the speaker or earphones output.
Advanced Features
-15-
Page 18

Remote Control Operation
0-10+ keys
21.
These keys are used to input the time, as well as title, chapter and track numbers.
When a numeric item is displayed on the screen, press the 0-10+ keys to select the desired
entry and press ENTER to confirm.
22. GOTO
During playback, press GOTO show the current time counter position.
Enter number to
choose the title
Advanced Features
Enter number to choose
the Play time
Total chapter
Enter number to choose
the Chapter.
Use the number keys to input the desired Time, Title or Chapter ENTER to confirm.
23.MENU/PBC
During DVD, playback , press MENU to return to the program menu.
In the Setup Menu, press MENU to return to the main menu or stop mode.
Any time, press MENU to cancel the current OSD or some menus
Note: This function is subject to the disc.
ITLE/TTX
24. T
In DVD mode, returns to the disc's title. In DVB mode, this displays additional information
regarding the DVB-T teletext.
25.
FUNCTION
Push the FUNCTION button once, the following menu show in the display screen:
Sharpness, Color hue, Saturation, Contrast, Brightness, Rest and save push
the UP or DOWN select the Parameter you wanted.
Press the LEFT button or RIGHT button adjust the parameter till available.
26. 4:3/16:9
Switch the display mode of 4:3or16:9 format.
-16-
Page 19

Remote Control Operation
27. PROG
While [PROGRAM] is on, press ENTER to display the [Program] submenu:
Advanced Features
PROG
1 [-- ] 5 [ -- ] 9 [-- ] 13 [ -- ]
2 [-- ] 6 [ -- ] 10 [-- ] 1 4 [-- ]
3 [-- ] 7 [ -- ] 11 [-- ] 15 [ -- ]
4 [-- ] 8 [ -- ] 12 [-- ] 1 6 [-- ]
PLAY CLEAR
PROG
T C T C T C
1 --:-- 5 --:-- 9 --:-- 13 --:--
2 --:-- 6 --:-- 10 --:-- 14 --:--
3 --:-- 7 --:-- 11 --:-- 15 --:--
4 --:-- 8 --:-- 12 --:-- 16 --:--
PLAY CLEAR
28. A-B
During playback, press A-B to select point A.
Press it again to select point B. The player will repeat the section from A to B automatically.
Press A-B third time to cancel A-B repeat and clear points A and B.
Note: 1. During CD playback, points A and B must be within the same track.
During DVD playback, points A and B can be selected from different chapters.
2. This function is subject to the disc.
T C
Input the track numbers in the order you would like
them to play. When finished, select [Play Program]
and then press ENTER to play the tracks in the new
programmed order.
Select [Clear All] and press ENTER to clear all the
numbers you have input.
Input the title number and the chapter number in
the desired order. Then select [Play Program]
and press ENTER to play the chapters in the
order you have set.
Select [Clear All] and press ENTER to clear all
the numbers you have input.
29. REPEAT
Select to press REPEAT to select Repeat Title, Repeat chapter, Repeat off During DVD playback.
Press REPEAT to select Repeat Single, Repeat All and Repeat off (CD or Others).
30. VOL-/ VOL+
Press Volume <VOL+> button to increase Volume.Press <VOL->
The adjustment can be done by setting the volume (25) manually first.
31. PREV
Press PREV to skip to previous chapter or track.
32. NEXT
Press NEXT to skip to the next chapter or track.
33.
TV/RADIO
In DVB mode, press <TV/RADIO> to switch between television and radio mode. This button
has no effect in DVD mode.
34. SOURCE
Switch between DVD,DVB,CARD and USB operation. This button has no effect iwhen the
system is in DVD mode and is still reading disc type.
Note:CARD and USB are optional according to your unit.
button to reduce volume.
-17-
Page 20
The setup menu system---DVD PART
Advanced Features
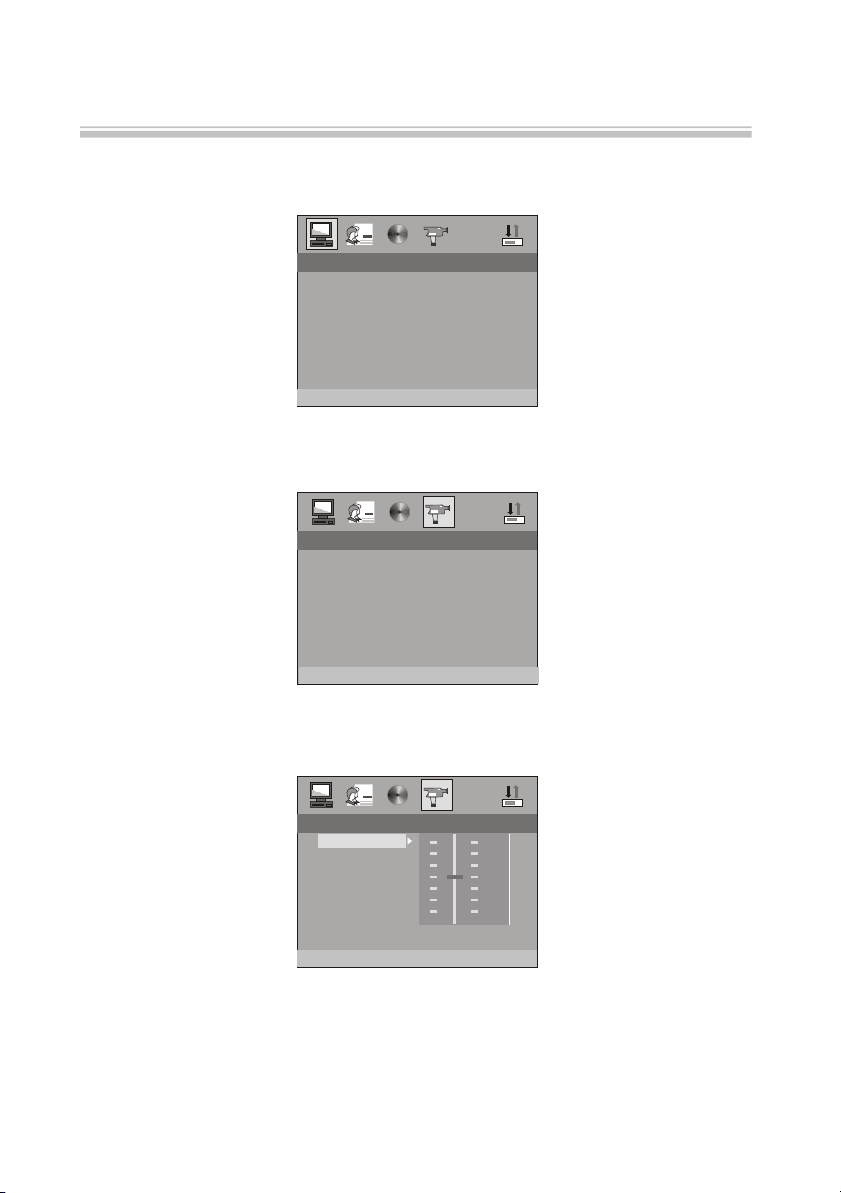
1. General Steps of setup menu
A) Press the setup button, the main setup menu appears.
SYSTEM SETUPSYSTEM SETUP
TV SYSTEM
SCREEN SAVER
VIDEO
TV TYPE
PASSWORD
RATING
DEFAULT
EXIT SETUP
B) Press the Left and Right arrow buttons to highlight the icon of the desired page, then press the Down
or Right arrow button to activate that page; For example, if you want to setup the video page, press
Right to highlight the video icon, the video page will be displayed on the screen.
VIDEO SETUPVIDEO SETUP
BRIGHTNESS
CONTRAST
HUE
SATURATION
SHARPNESS
EXIT SETUP
C) Press the Down arrow button to highlight the desired option. Press Enter or press Right to select.
The choices of that option appear on the right; For example, press the Down arrow button to highlight
the BRIGHTNESS option, the press Enter to select, the brightness choices appear on the right.
VIDEO SETUPVIDEO SETUP
BRIGHTNESS
CONTRAST
HUE
SATURATION
SHARPNESS
EXIT SETUP
D) Press the Arrow buttons to highlight the Exit Setup option,then press Enter or Setup again to exit Setup
Menu.
1212
1010
8 8
6 6
4 4
2 2
0 0
-18-
Page 21
The setup menu system---DVD PART
2. Setup Items Introduction
2.1 SYSTEM SETUP
The system setup options are illustrated below:
2.1.1 TV SYSTEM
According to the Color System of the TV, you can choose the TV System.
Advanced Features
TV SYSTEM
SCREEN SAVER
VIDEO
TV TYPE
PASSWORD
RATING
DEFAULT
EXIT SETUP
NTSC
PAL
2.1.2 SCREEN SAVER
Use the up/down arrows buttons to select the screen saver status.
ON: when the unit is not used for around 300 seconds, the video will disappear and a screen
saver starts.
OFF: no screen saver.
TV SYSTEM
SCREEN SAVER
VIDEO
TV TYPE
PASSWORD
RATING
DEFAULT
EXIT SETUP
ON
OFF
2.1.3 VIDEO
According to the output jack of TV set, you can choose S-VIDEO, YUV.
TV SYSTEM
SCREEN SAVER
VIDEO
TV TYPE
PASSWORD
RATING
DEFAULT
EXIT SETUP
S-VIDEOS-VIDEO
-19-
Page 22
The setup menu system---DVD PART
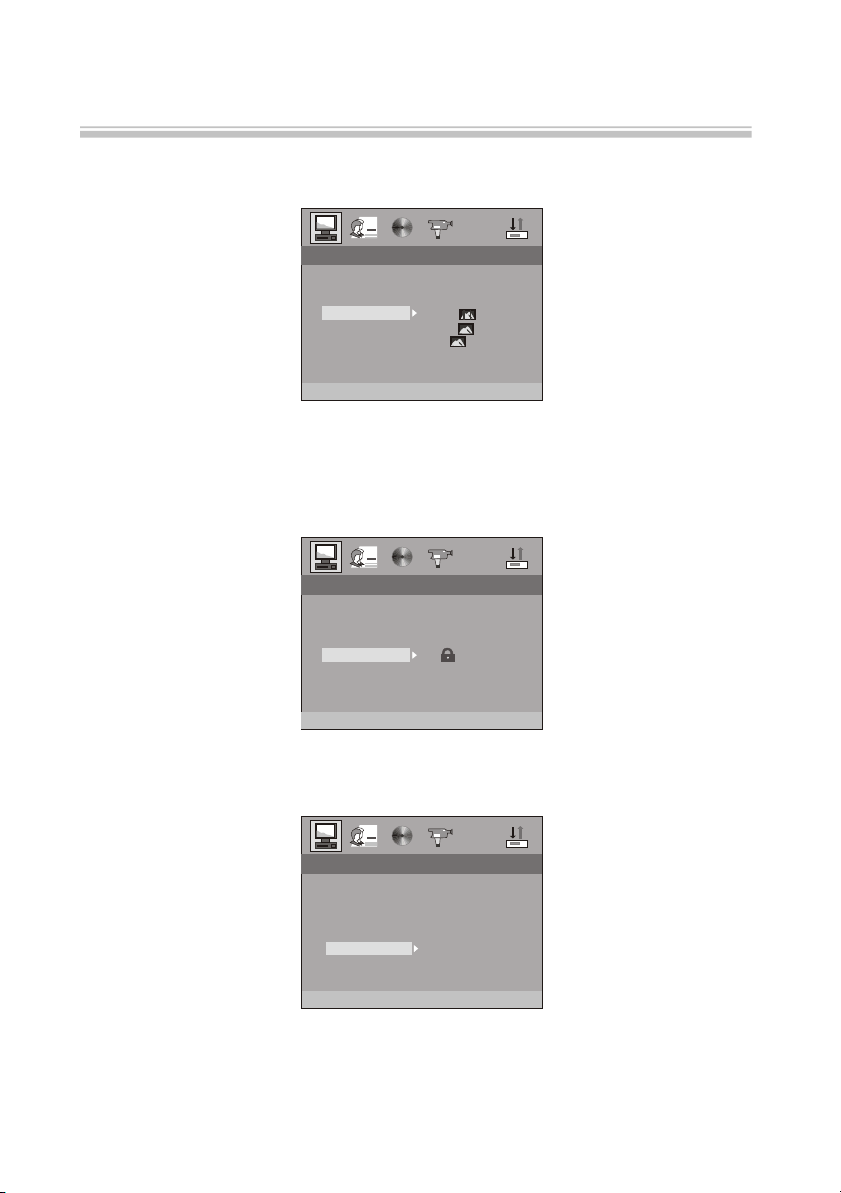
2.1.4 TV TYPE
According to the TV type, you can choose 16:9,4:3LB or 4:3PS.
SYSTEM SETUPSYSTEM SETUP
TV SYSTEM
SCREEN SAVER
VIDEO
TV TYPE
PASSWORD
RATING
DEFAULT
EXIT SETUP
2.1.5 PASSWORD
The password option is initialized locked, and you can not set the ratings limit or change the password.
In order for the Ratings feature to work, the password mode must be turned on. If you want to set the
ratings limit , you will need to enter the default password. Which is 6666, then press Enter to confirm.
To change the password , you will be prompted for the old password , then beprompted for anew.
Enter a 4-digit number ( this is you password). Press remember your PASSWORD, as the DEFAULT
setting will revert everything.But the PASSWORD to the factory defaults.
SYSTEM SETUPSYSTEM SETUP
TV SYSTEM
SCREEN SAVER
VIDEO
TV TYPE
PASSWORD
RATING
DEFAULT
EXIT SETUP
4:3 PS
4:3 PS
4:3 LB
4:3 LB
16:9
16:9
--------
Advanced Features
2.1.6 RATING
The Rating feature is a rating limit system, like movie ratings. It works with DVD discs that have been
assigned a rating. This helps you control the types for DVDs that your family watches.
SYSTEM SETUPSYSTEM SETUP
TV SYSTEM
SCREEN SAVER
VIDEO
TV TYPE
PASSWORD
RATING
DEFAULT
EXIT SETUP
1 KID SAFE
1 KID SAFE
2 G
2 G
3 PG
3 PG
4 PGB
4 PGB
5 PG-R
5 PG-R
6 R
6 R
7 NC-17
7 NC-17
8 ADULT
8 ADULT
-20-
Page 23
The setup menu system---DVD PART
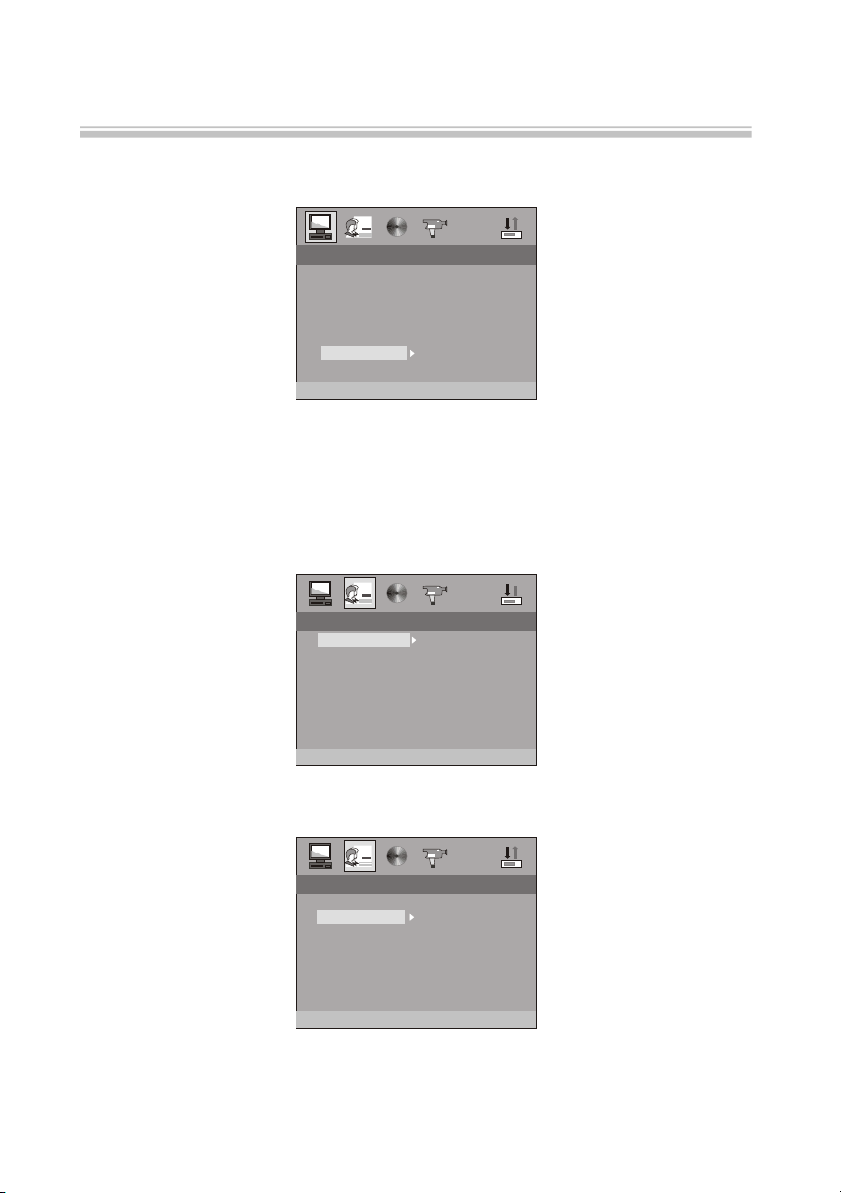
2.1.7 DEFAULT
The DEFAULT setup options are RESTORE factory setup. Let your player work on best state.
SYSTEM SETUPSYSTEM SETUP
TV SYSTEM
SCREEN SAVER
VIDEO
TV TYPE
PASSWORD
RATING
DEFAULT
EXIT SETUP
RESTORE
Advanced Features
When your unit does not work properly, it may probably result from some wrong settings.Please try the
Restore Factory Setting function to see if the unit can restore to its normal working status.
2.2 LANGUAGE SETUP
The language setup options are illustrated below:
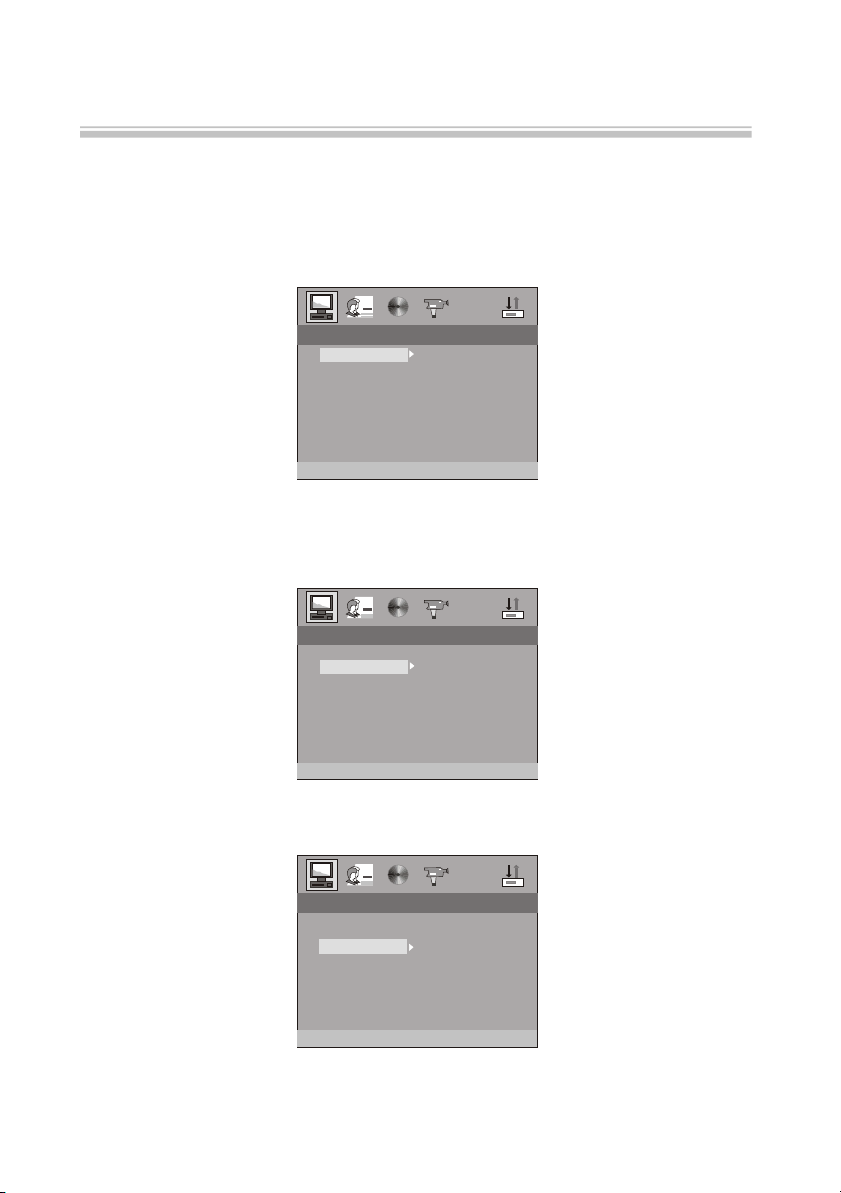
2.2.1 OSD LANGUAGE
Highlight the OSD LANGUAGE option, and press the Arrow buttons to choose the OSD language
you prefer. Press Enter to confirm, And it will display OSD in that language.
LANGUAGE SETUPLANGUAGE SETUP
OSD LANGUAGE
AUDIO LANG
SUBTITLE LANG
MENU LANG
ENGLISH
FRENCH
DUTCH
EXIT SETUP
2.2.2 AUDIO LANG
Highlight the AUDIO LANG option,and press the Arrow buttons to choose the audio language you
prefer.Press Enter to confirm.If the disc you are playing has that language available, it will output that
language.
LANGUAGE SETUPLANGUAGE SETUP
OSD LANGUAGE
AUDIO LANG
SUBTITLE LANG
MENU LANG
EXIT SETUP
ENGLISH
GERMAN
SPANISH
FRENCH
ITALIAN
CZECH
DUTCH
PORTUGUESE
-21-
Page 24
The setup menu system---DVD PART
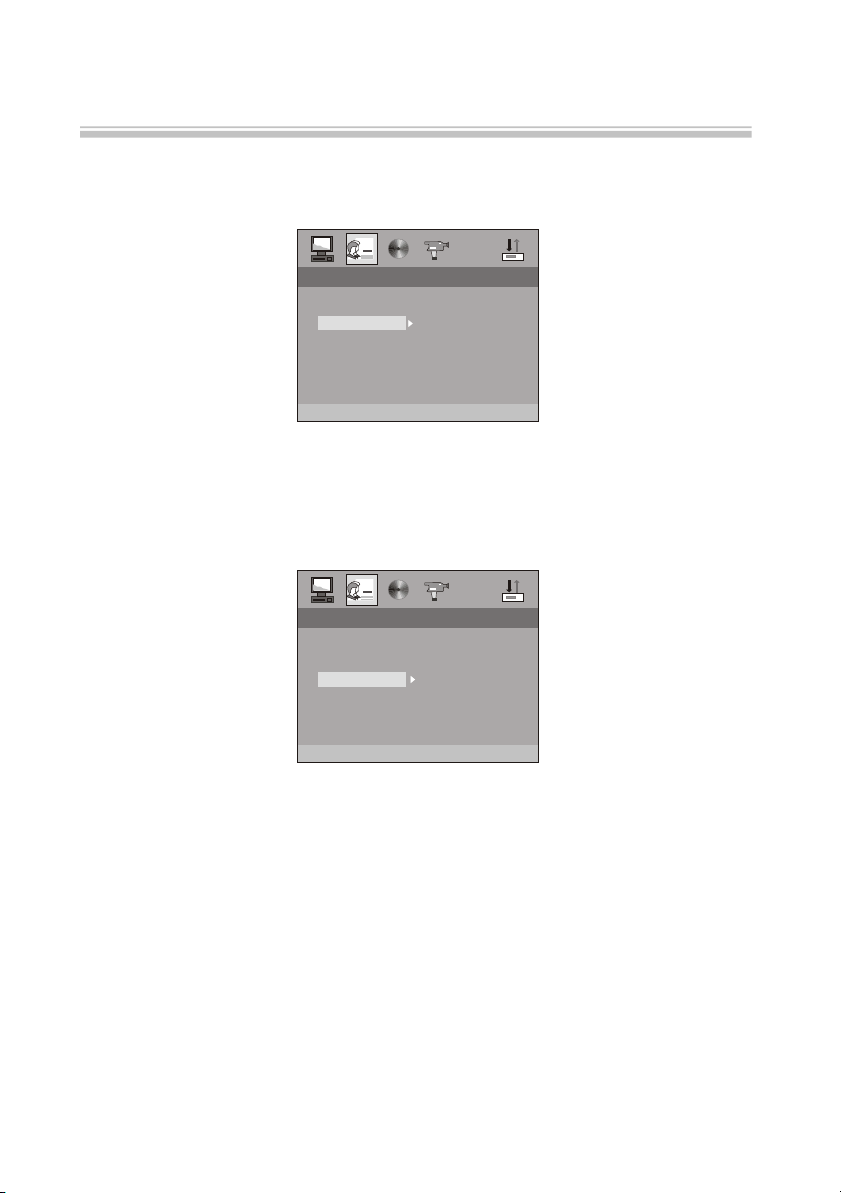
2.2.3 SUBTITLE LANG
Highlight the SUBTITLE LANG option, and press the Arrow buttons to choose the subtitle language
you prefer. Press Enter to confirm. If the disc you are playing has that language available,
it will displays subtitles in that language.
LANGUAGE SETUPLANGUAGE SETUP
OSD LANGUAGE
AUDIO LANG
SUBTITLE LANG
MENU LANG
EXIT SETUP
2.2.4 MENU LANG
Highlight the MENU LANG option, and press the Arrow buttons to choose the menu language you
prefer.
Press Enter to confirm. If the disc you are playing has that language, Availabel. It will display the
menu in the language..
ENGLISH
GERMAN
SPANISH
FRENCH
ITALIAN
CZECH
DUTCH
PORTUGUESE
Advanced Features
Notes:
If your preferred language is not available, the disc s default language will be played.
LANGUAGE SETUPLANGUAGE SETUP
OSD LANGUAGE
AUDIO LANG
SUBTITLE LANG
MENU LANG
EXIT SETUP
ENGLISH
GERMAN
SPANISH
FRENCH
ITALIAN
CZECH
DUTCH
PORTUGUESE
-22-
Page 25
The setup menu system---DVD PART
Advanced Features
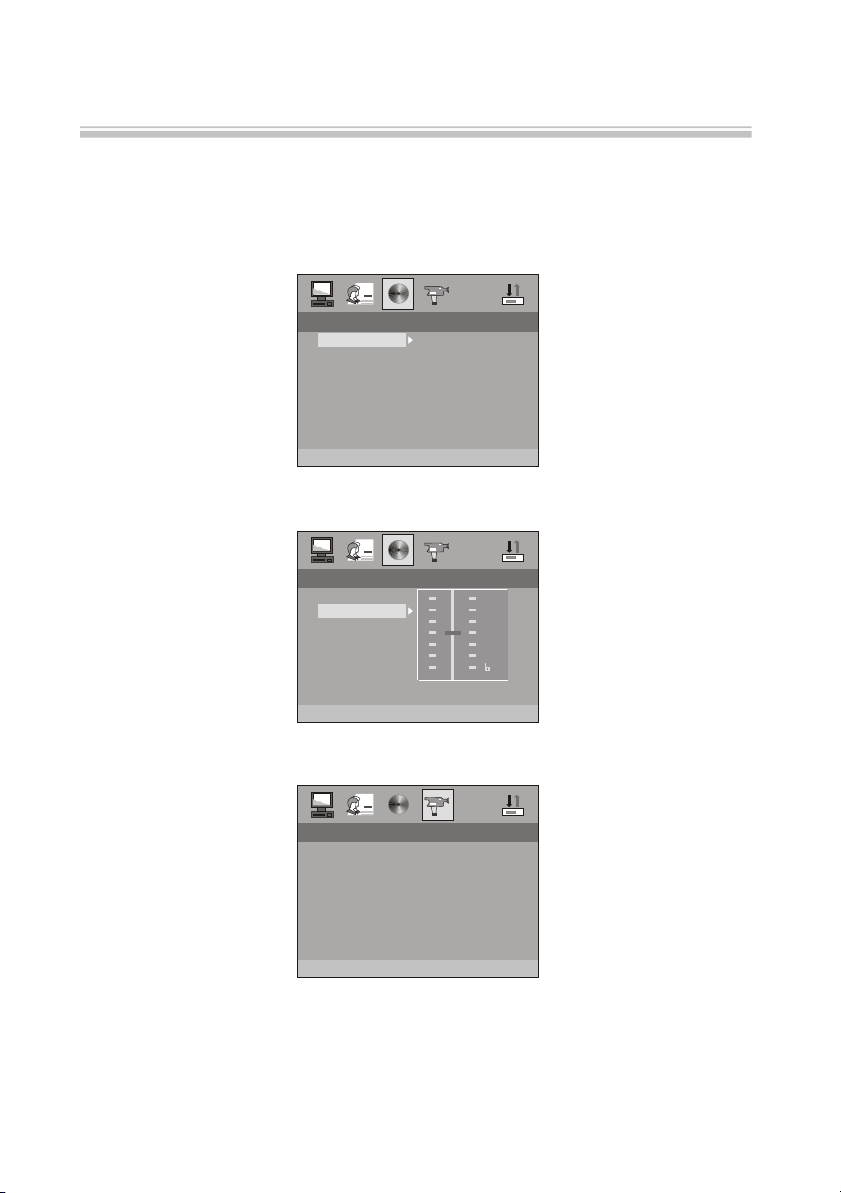
2.3 AUDIO SETUP
The audio setup options are illustrated below:
2.3.1 AUDIO OUT
Highlight the AUDIO OUT option, and press the Arrow buttons to choose the audio output mode you
prefer. Press Enter to confirm; There are 3 optional audio output modes: SPDIF/OFF, SPDIF / RAW,
and SPDIF/ PCM.
AUDIO OUTAUDIO OUT
AUDIO OUT
KEY
EXIT SETUP
2.3.2 KEY
Use the Up and Down arrow button to move the scroll and adjust the key.
AUDIO OUTAUDIO OUT
AUDIO OUT
KEY
EXIT SETUP
2.4 VIDEO SETUP
The video setup options are illustrated below:
VIDEO SETUPVIDEO SETUP
BRIGHTNESS
CONTRAST
HUE
SATURATION
SHARPNESS
EXIT SETUP
SPDIP/OFF
SPDIP/OFF
SPDIF/RAW
SPDIF/RAW
SPDIF/PCM
SPDIF/PCM
##
+4+4
+2+2
0 0
-2-2
-4-4
-23-
Page 26
The setup menu system---DVD PART
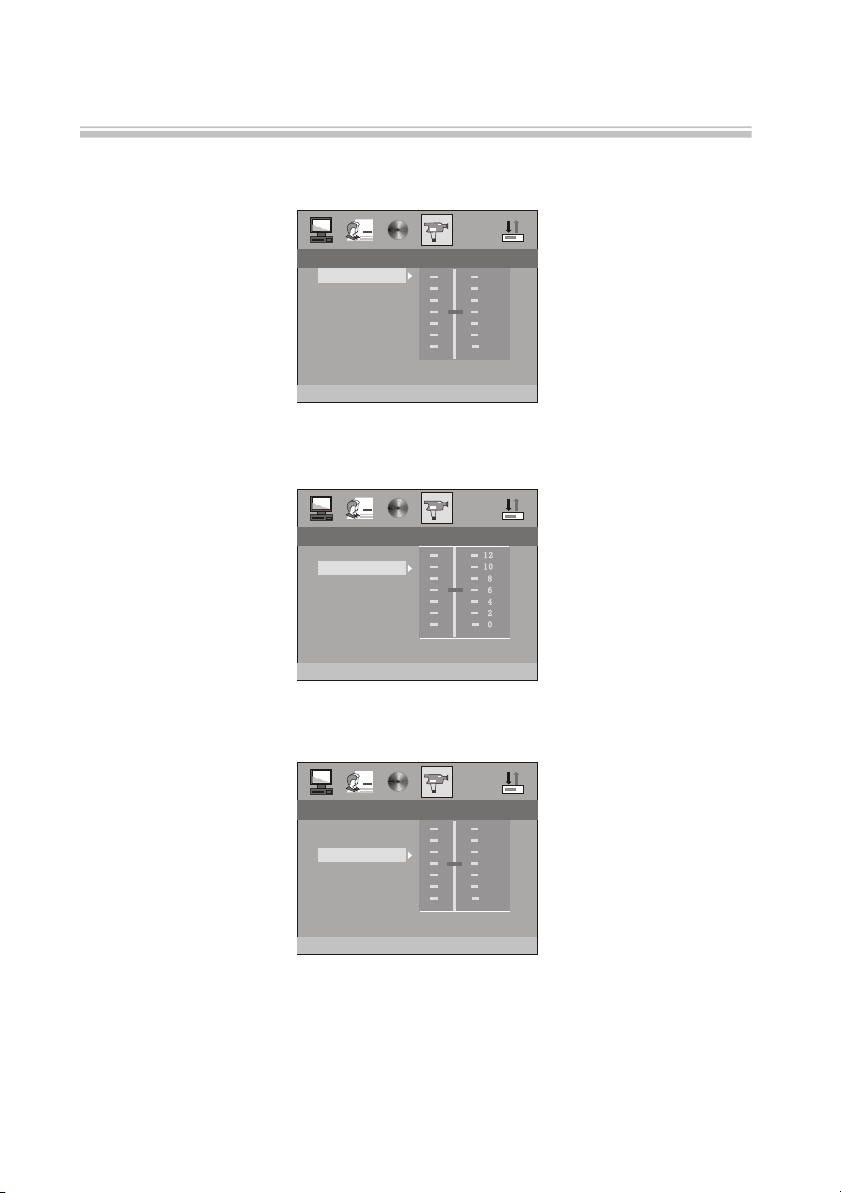
2.4.1 BRIGHTNESS
Use the Up and Down arrow buttons to move the scroll and adjust the brightness.
Advanced Features
VIDEO SETUPVIDEO SETUP
BRIGHTNESS
CONTRAST
HUE
SATURATION
SHARPNESS
EXIT SETUP
2.4.2 CONTRAST
Use the Up and Down arrow buttons to move the scroll and adjust the contrast.
VIDEO SETUPVIDEO SETUP
BRIGHTNESS
CONTRAST
HUE
SATURATION
SHARPNESS
EXIT SETUP
2.4.3 HUE
Use the Up and Down arrow buttons to move the scroll and adjust the HUE.
VIDEO SETUPVIDEO SETUP
BRIGHTNESS
CONTRAST
HUE
SATURATION
SHARPNESS
EXIT SETUP
1212
1010
8 8
6 6
4 4
2 2
0 0
+6+6
+4+4
+2+2
0 0
-2-2
-4-4
-6-6
-24-
Page 27

The setup menu system---DVD PART
2.4.4 SATURATION
Use the Up and Down arrow buttons to move the scroll and adjust the saturation.
Advanced Features
VIDEO SETUPVIDEO SETUP
BRIGHTNESS
CONTRAST
HUE
SATURATION
SHARPNESS
EXIT SETUP
2.4.5 SHARPNESS
Use the Up and Down arrow buttons to move the scroll and adjust the sharpness.
VIDEO SETUPVIDEO SETUP
BRIGHTNESS
CONTRAST
HUE
SATURATION
SHARPNESS
EXIT SETUP
1212
1010
8 8
6 6
4 4
2 2
0 0
8 8
6 6
4 4
2 2
0 0
-25-
Page 28
The setup menu system---DVD PART
Advanced Features
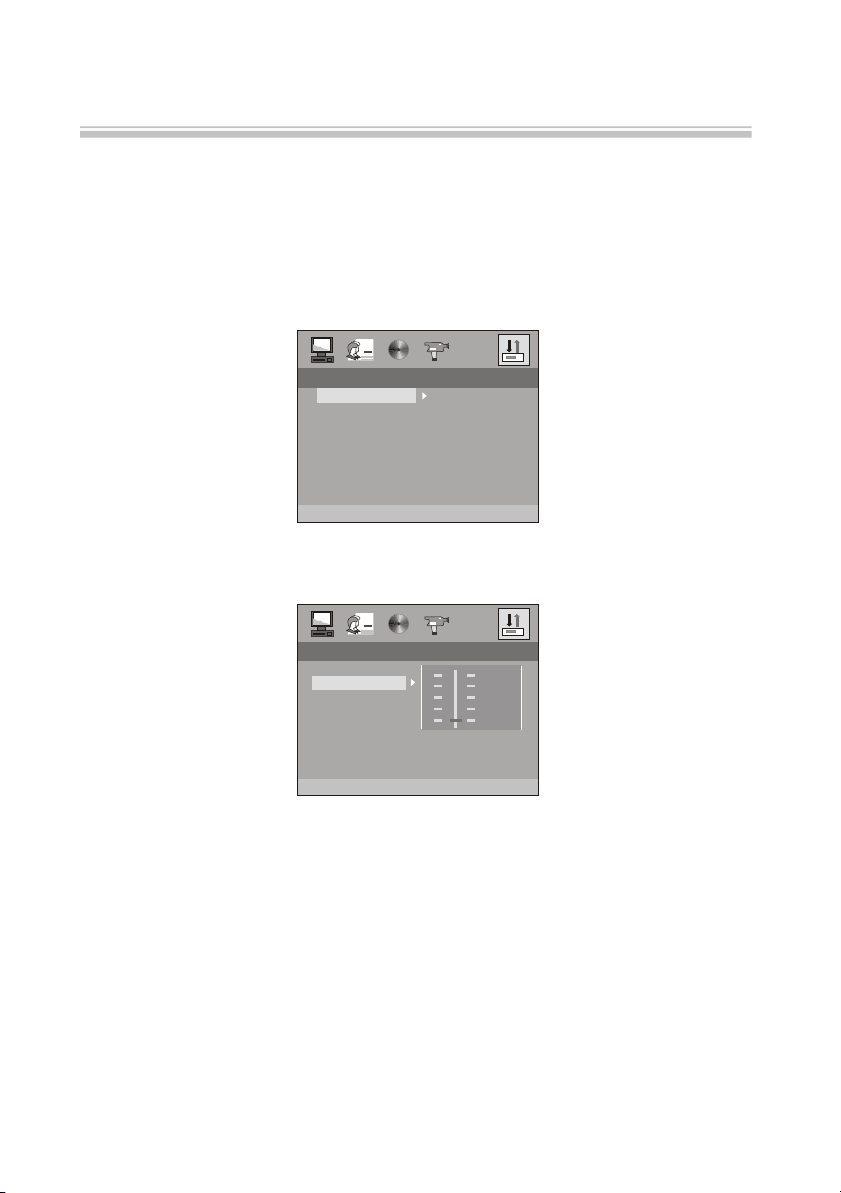
2.6 DIGITAL SETUP
Press SETUP button to select the setup page "Digital Setup" with up/down buttons. The screen will show as:
2.6.1 OP MODE
LINE OUT: Made with normalization of digital dialogues compression of linear input signal.
RF REMOD: RF mode,with strong compression and normalization of digital dialogues.
Volume is high.
DIGITAL SETUPDIGITAL SETUP
OP MODE
DYNAMIC RANGE
DUAL MONO
EXIT SETUP
LINE OUT
LINE OUT
R REMOD
R REMOD
FF
2.6.2 DYNAMIC RANGE:
When LINE OUT is selected,choose this setting to adjust the line out ratio for different effects.
DIGITAL SETUPDIGITAL SETUP
OP MODE
DYNAMIC RANGE
DUAL MONO
EXIT SETUP
FULL FULL
6/8 6/8
4/8 4/8
2/8 2/8
OFF OFF
-26-
Page 29

The setup menu system---DVD PART
2.6.3 DUAL MONO (LEFT + RIGHT)
Choose to setup the L and R mono output mode. There are four modes in this option:
STEREO, MONO L, MONO R,and MIX MONO.
DIGITAL SETUPDIGITAL SETUP
OP MODE
DYNAMIC RANGE
DUAL MONO
EXIT SETUP
STEREO
STEREO
MONO L
MONO L
MONO R
MONO R
MIX MONO
MIX MONO
Advanced Features
REFERENCE:
1. To protect your DVD player, the interval between turning the unit on and off, via the Main Power
button, should be more than 30 seconds.
2. If the unit will not be used for an extended period of time, please disconnect the power plug from the
outlet.
3. The player should only be operated with the correct power supply that corresponds to the marking
label. The incorrect power supply could damage the unit.
4. The player may not be compatible with some encrypted discs.
5. If the player stops during playback, eject the disc and power off the unit. Wait 10 minutes and power
the unit back on.
-27-
Page 30
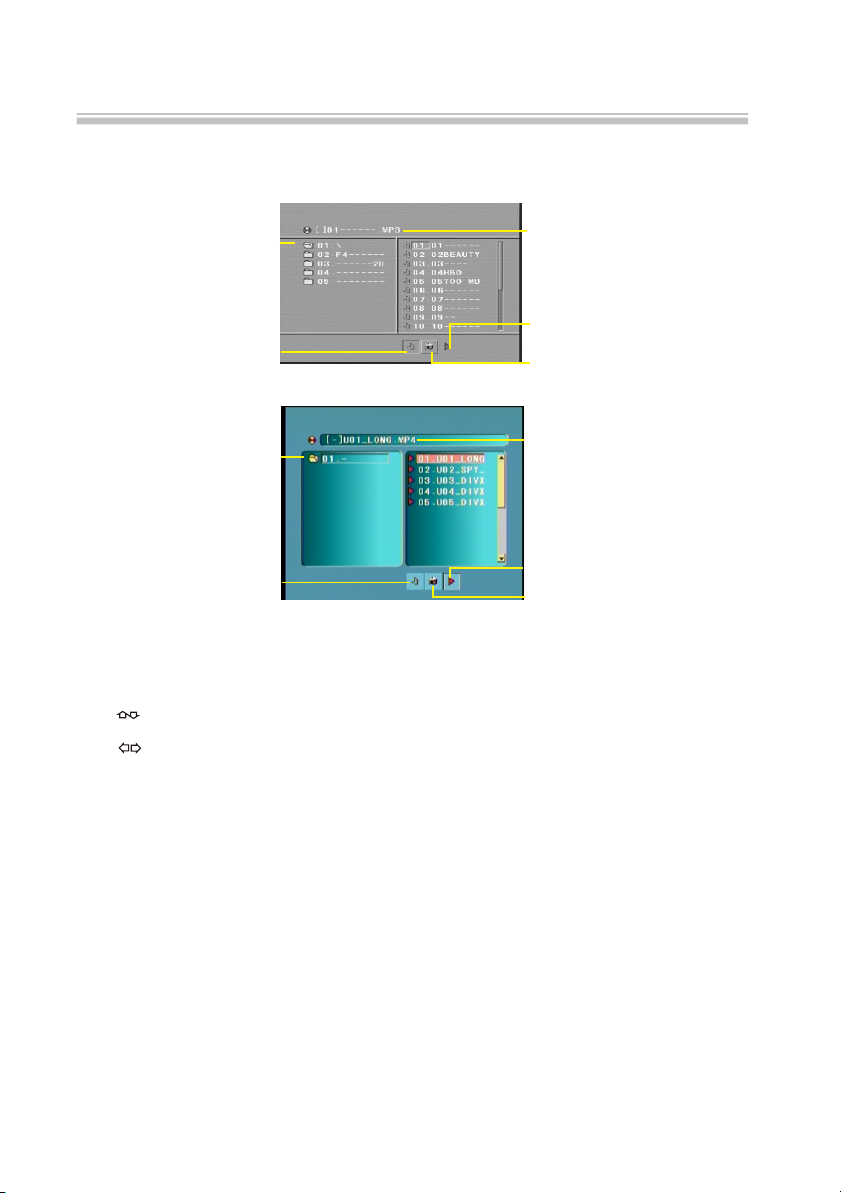
MPEG4/MP3 PLAYBACK
When a MPEG4 and a MP3 disc is loaded, the screen will display as follows:
Advanced Features
Current
directory
name
The playing file
is a Mp3 audio
file.
Current
directory
name
The playing file
is a Mp3 audio
file.
Current MP3/JPEG file
name. If a JPEG file is
playing, the name should
have a JPEG extension.
File Switch Region: Displays
the file typa of the playing
and the switching.
The playing file is
a JPEG picture file.
Current Mp4 file name.
If a JPEG file is playing,
the name should have a
JPEG extension.
File Switch Region: Displays
the file typa of the playing
and the switching.
The playing file is
a JPEG picture file.
Press to select the file when the cursor appears in the file window. Press select to play the current file
select by the cursor.
Press to switch between the directory window and the file window.
Note: The player will not function correctly under the following condition:
1. The disc is badly scratched, damaged or dirty.
2. The disc is not finalized.
3. The recording format is not supported by the player.
-28-
Page 31

Playing a JPEG file
Advanced Features
-29-
Page 32

Kodak Picture CD Playback
The introduction of KODAK Picture CD
A Kodak Picture CD has the size and shape of a regular CD. You can order a KODAK Picture CD simply by checking
the box on the photo finishing envelope when you drop off a roll of film (35 mm or Advanced Photo System (APS)
color print film) at the time of processing in Kodak Express store displaying "Kodak Picture CD" sign. When your
order is returned, you receive your prints, negatives, and your full roll of pictures safely stored on your KODAK
Picture CD. Each KODAK Picture CD brings you the tools to enhance, share and manage your pictures on your
computer. You also can record the JPEG picture into CD-R or CD-RW with the CD-Rewriter yourself.
Note: 1. The Max. Size of JPEG Picture can be supported: 3840X3840 pels
2. JPEG stands for Joint Picture Experts Group. It is the first International Standard on Still Picture
Compressing: ISO 10918-1, constituted by the Committee on Still Picture Compressing Standard of ISO.
The pictures on KODAK Picture CD are stored in this format (JPEG). This player can decode the JPEG
pictures in KODAK Picture CD and playback the pictures in different modes.
Now, you can playback Kodak Picture CDs on this player and view your wonderful pictures on your TV in the
comfort of your living room.
When a Kodak Picture CD is inserted on a player an automatic slide show is launched. Each picture in the Kodak
Picture CD will be displayed consecutively in a slide-show fashion and will be scaled to fit in the whole TV screen.
General function:
You can set slideshow transition modes for any pictures.
Press PAUSE to stop playing.
Press or to see the previous or next picture.
Press PLAY to continue slideshow transitions.
Press STOP to return to root menu.
Advanced Features
Image Rotation
There are three modes to rotate a picture: original, 90 Deg, and 180 Deg. These operations are
allowed only when a picture is being displayed normally and will be cancelled automatically
when a new picture is displayed. The ANGLE keys are used to select the different rotation modes:
Press ANGLE OSD display original.
Press ANGLE again OSD display 90 Deg.
Press ANGLE again OSD display 180 Deg.
Zoom Function:
This player provides both Zoom in/out and Zoom pan function. Press the ZOOM
consecutively, the picture will zoom in/out in turn as followings:
Q4/3 Q3/2 Q2
Note: During the ZOOM function, slideshow transitions and image rotation are disabled.
Q off: close zoom, press PLAY again to resume slideshow transition mode.
Q1/4Q1/2Qoff
-30-
Page 33

The setup menu system---DVB PART
Advanced Features
How to switch to DVB-T work mode?
Press the SOURCE key on the remote control until you switched into DVB-T work mode.
1. FIRST installation after power on
First Time Setup In Figure (1), a message appears, asking the user if he/she wants to run the First Time
Installation Wizard. Upon selecting Yes , a new box appears, shown in Figure (2), asking for country,
OSD language, and time zone. Use the arrow keys to make the correct selections. Select Next and press
<ENTER> to proceed to the next screen, which is shown in Figure (3).
First installationFirst installation
Do you want to start first
time installation wizard?
NO
YES
Figure (1) Figure (2)
First installation (2)First installation (2)
Do you want to start Auto
Scan?
BACK
YES
NO
Channel: 21
Progress 1/11/1
Figure(3)
First installation (1)First installation (1)
Selecl country
OSD Language
NEXTBACK
Frequency: 474000kHz
TV: 0004
0001. Xxxxx
0002. Xxxx
0003. Xxxx
0004. Xxxxxx
Figure (4)
Radio: 0009
0006. Xxxxx
0007. Xxxx
0008. Xxxx
0009. Xxxxxx
Dutch
English
-31-
Page 34

The setup menu system---DVB PART
2. The Main Menu Pressing <SETUP> will enter the Main Menu, which is shown in Figure (5). From here,
pressing <SETUP> again or <RETURN> will exit the menu. The the main menu is divided into four main
selection items: Channel Guide, System Config, Installation, and Game, which are displayed on
the left side. Selecting an item will open a submenu, with the menu s items displayed on the right side of
the screen. The menus are shown in Figures (5) to (8), and are detailed later in this document.
Advanced Features
Channel guide -> TV ChannelChannel guide -> TV Channel
Channel guide
System Config
Installation
Game
TV Channels
Radio Channels
Channels Class
Channels Edit
Book List
Channel guide -> TV ChannelChannel guide -> TV Channel
Channel guide
System Config
Installation
Game
TV Setting
Video Setting
Audio Setting
Language
Parent Control
Time Setting
System Info
Figure (5) Main Menu + Channel Guide Figure (6) System Config Menu
Channel guide -> TV ChannelChannel guide -> TV Channel
Channel guide
System Config
Installation
Game
Auto Scan
Manual Scan
Default Setup
Channel guide -> TV ChannelChannel guide -> TV Channel
Channel guide
System Config
Installation
Game
Box Man
Burning Tetris
Hit Rat
Figure (7) Installation Menu Figure (8) Game Menu
Upon entering the main menu, the first item, Channel Guide, will already be highlighted. Use the <UP> or
<DOWN> buttons to highlight a different item. Press <ENTER> to enter a new menu corresponding to the
highlighted item. The submenus are their items include:
Channel Guide:
This includes TV Channels, Radio Channels, Channels Class, and Channels Edit. See Figure (5).
System Setup:
This includes TV Setting, Video Setting, Audio Setting, Language, Parent Control, Time Setting, and
System Info. See Figure (6).
Installation:
This includes Auto Scan, Manual Scan, and Default Setup. See Figure (7).
Game:
This includes Boxman and Burning Tetris. See Figure (8).
-32-
Page 35

The setup menu system---DVB PART
Advanced Features
3. Channel Guide
3.1 TV Channels
The TV Channels Menu is shown in Figure (9). The channels are listed on the left side of the menu, and a
preview window is on the right side. From here, the channel can be changed using the <UP> or <DOWN>
keys, <ENTER> to start viewing, <LEFT> or <RIGHT> to change channel groups. Channel groups include
news, sports, favorites, etc. Press <DISPLAY> to sort the channels, which can be set to alphabetical (A-Z),
reverse alphabetical, free on top, scrambled on top, and transponder (Figure (10)).
Channel Guide -> TV ChannelsChannel Guide -> TV Channels
No
All TV
Xxx
0001
Xxx
0002
Xxx
0003
Xxx
0004
< >to switch calssify
DISPLAY key to sort channel
Picture
Channel Guide -> TV ChannelsChannel Guide -> TV Channels
No
All TV
Xxx
0001
0002
0003
0004
Xxx
Xxx
Xxx
Cancel
Cancel
A~Z
A~Z
Z~A
Z~A
Free~Scramble
Free~Scramble
Scramble~Free
Scramble~Free
Transponder
Transponder
Figure (9) TV Channels Menu Figure (10) Sort Channels
3.2 Radio Channels
The Radio Channels Menu, shown in Figure (11), is similar to the TV Channels Menu.
The channels are listed on the left side. The channel can be changed using <UP> and <DOWN>, and group
can be changed using <LEFT> or <RIGHT>. Press <DISPLAY> to sort the channels.
Channel Guide -> Radio ChannelsChannel Guide -> Radio Channels
No
All TV
Xxx
0001
Xxx
0002
Xxx
0003
0004
Xxx
Picture
< >to switch calssify
DISPLAY key to sort channel
Figure (11) Radio Channels Menu
3.3 Channels Class
From the Channels Class Menu, shown in Figure (12), each channel can be classified into
a group. Pressing <ENTER> will add the row s c hannel to the column s category. Use <TV/RADIO> to
switch between TV and radio channels. Note: If there are no channels, the user cannot enter this menu.
Channel Guide->Channel classChannel Guide->Channel class
NO TV Favor Movie News Show
0001
Xx
0002
Xxx
Xxxx
0003
Xxx
0004
Enter key to check/uncheck
Enter key to check/uncheck
TV/RADIO key to switch TV/RADIO
TV/RADIO key to switch TV/RADIO
Figure (12) Channel Class Menu
-33-
Page 36

The setup menu system---DVB PART
Advanced Features
3.4 Channels Edit
The Channel Edit Menu is shown in Figure (13). To change a channel name, select a channel
name and press <ENTER>. From here, use <LEFT> or <RIGHT> to select a character, and <UP> or
<DOWN> to change the character. Press <ENTER> to confirm the name change. To move a channel,
select the MOVE column of a channel and press <ENTER>. From here, use the <UP> or <DOWN> to change
the placement order of the channel, and <ENTER> to confirm the change. Select the DELETE column and
press <ENTER> to delete the channel. Use <TV/RADIO> to change between TV and radio channels. Note:
If there are no channels available, this user cannot be entered.
Channel Guide->Channel EditChannel Guide->Channel Edit
NO TV Move Delete
0001
Xx
0002
Xxx
Xxxx
0003
Xxx
0004
UP/DOWN key to move program
UP/DOWN key to move program
ENTER key to finish move
ENTER key to finish move
Figure (13) Channel Edit Menu
3.5 Book List
It will display all the program events you have booked in your EPG menu or manual added.
4. System Config
4.1 TV Setting
From the TV Setting Menu, shown in Figure (14), the TV system, video output, and TV aspect ratio can be
changed. Press <UP> or <DOWN> to select one of the items. To change the setting, press <LEFT> or
<RIGHT> to cycle between the different settings, or press <ENTER> and then <UP> or <DOWN> to select
from a list of settings. The possible settings are:
TV System: NTSC, PAL. See Figure (15).
Video: S-VIDEO. See Figure (16).
TV Type: 4:3 Pan-and-Scan, 4:3 Letterbox, 16:9. See Figure (17).
TV Setting -> TV SystemTV Setting -> TV System
TV System
Video
TV Type
PAL
S-VIDEO
16:9
TV Setting -> TV SystemTV Setting -> TV System
TV System
Video
TV Type
PAL
S-VIDEO
16:9
NTSC
NTSC
PAL
PAL
Figure (14) TV Setting Menu Figure (15) TV System
-34-
Page 37

The setup menu system---DVB PART
Advanced Features
TV Setting -> TV SystemTV Setting -> TV System
TV System
Video
TV Type
PAL
S-VIDEO
16:9
Figure (16) Video
4.2 Video Setting
From the Video Setting Menu, shown in Figure (18), the video brightness, contrast, hue, and
saturation can be changed. Press <UP> or <DOWN> to select one of the items. To change
the setting, press <LEFT> or <RIGHT> to cycle between the different settings. Alternatively,
press <ENTER> to select from a list of possible settings.
Brightness
Contrast
Hue
Saturation
TV Setting -> TV SystemTV Setting -> TV System
TV System
Video
TV Type
PAL
S-VIDEO
16:9
4:3PS
4:3LB
16:9
Figure (17) Video
6
6
0
0
Figure (18) Video Setting Menu
Settings:
Brightness: 0, 2, 4, 6, 8, 10, 12.
Contrast: 0, 2, 4, 6, 8, 10, 12.
Hue: +12, +10, +8, +6, +4, +2, 0.
Saturation: 0, 2, 4, 6, 8, 10, 12.
4.3 Audio Setting
From the Audio Setting Menu (Figure (19)), the Audio Out option can be changed using the
<LEFT> or <RIGHT> keys. Alternatively, press <ENTER> to select from a list of possible settings. Audio
Out: SPDIF OFF, SPDIF RAW, SPDIF PCM.
Audio Setting -> Audio OutAudio Setting -> Audio Out
Audio Out
SPDIF/OFF
SPDIF/OFF
SPDIF/OFF
SPDIF/RAW
SPDIF/RAW
SPDIF/PCM
SPDIF/PCM
Figure (19) Audio Setting Menu
-35-
Page 38

The setup menu system---DVB PART
4.4Language
The Language Menu, shown in Figure (202), allows the user to change the OSD language. Use
the <LEFT> or <RIGHT> to select a language, or <ENTER> to select from a list with all the possible
languages. OSD Language: English, Spanish, Italian.
Advanced Features
Language -> OSD Language
OSD Language
English
ENGLISH
FRENCH
DUTCH
Figure (20) Language Menu
4.5 Parent Control
The Parent Control Menu, Figure (21), has two items, Change Pin and Channel Lock. When changing the
pin, the user will be asked to enter the old pin(6666), the new pin, and the new pin again (Figure (22)).
In order to change the channel lock, the user must first enter the pin, as shown in Figure (23). If the pin is okay,
the Channel Lock Menu will appear (Figure (24)). Use <UP> or <DOWN> to select a channel, <ENTER> to
lock or unlock the channel, and <TV/RADIO> to switch between television and radio channels.
Parent Control -> Change pinParent Control -> Change pin
Change pin
Channel Lock
Press ENTER
Press ENTER
Parent Control -> Change pinParent Control -> Change pin
Change pin
Channel Lock
Press ENTER
Press ENTER
Old Pin:
Old Pin:
New Pin:
New Pin:
Confirm:
Confirm:
Figure (21) Parent Control Menu Figure(22) Change Pin
Parent Control -> Channel LockParent Control -> Channel Lock
Change pin
Channel Lock
Password:Password:
Press ENTER
Press ENTER
Figure (23) Enter Pin
Parent Control -> Channel LockParent Control -> Channel Lock
No
0001
0002
0003
0004
TV
XXXX
XXXXXXX
XXX
XXXXX
Lock
Figure(24) Channel Lock
-36-
Page 39

The setup menu system---DVB PART
4.6Time Setting
From the Time Setting Menu, Figure (25), the time zone can be changed.
Use <UP> or <DOWN> to select an item, and <LEFT> or <RIGHT> to change the setting. Alternatively, the
user can press <ENTER> to select from a list of possible settings.
Time Setting -> Time ZoneTime Setting -> Time Zone
Time Zone
GMT +1
Advanced Features
Figure (25) Time Setting Menu
System Info System Info displays the firmware version and date, along with tuner and model information.
See Figure (26).
System Info -> INFO PAGESystem Info -> INFO PAGE
UPDATE DATE:
TUNER INFO:
F/W VERSION:
MODEL VERSION:
Figure (26) System Infor
-37-
Page 40

The setup menu system---DVB PART
5. Installation
5.1 Auto Scan
The Auto Scan Menu is shown in Figure (27). First, select a country using <LEFT> or <RIGHT>. Then press
<DOWN> to highlight "Select Scan" and press <ENTER>.
After choosing yes or no, the scan will being (Figure (28)).
Advanced Features
Auto Scan -> Select CountryAuto Scan -> Select Country
Select Country
Start Scan
Dutch
Press Enter
Channel: 21
Progress 1/11/1
TV: 0004
0001. Xxxxx
0002. Xxxx
0003. Xxxx
0004. Xxxxxx
Figure (27) Auto Scan Menu
5.2 Manual Scan
The Manual Scan Menu is shown in Figure (29). A scan can be performed, be setting thefollowing items:
Country, Scan Type, Start Channel, Start Frequency, End Frequency, and Bandwidth.
If the scan type is single channel, then only the country and start channel can be set. If the scan type is
channel range, then the country, start channel, and end channel can be set.
Use the <UP>, <DOWN> keys to select an item and the <LEFT>, <RIGHT> keys to change the settings.
Once done, go to Start Scan and press <ENTER>.
Manual Scan -> Country
Country Dutch
Scan Type
Start Channel
Start Freq
End Channel
End Freq
Band Width
Start Scan
Single Channel
21
474000kHz
5
474000kHz
8MHz
Press Enter
Frequency: 474000kHz
Radio: 0009
0006. Xxxxx
0007. Xxxx
0008. Xxxx
0009. Xxxxxx
Figure (28)
Figure (29) Manual Scan Menu
-38-
Page 41

The setup menu system---DVB PART
5.3Default Setup
A message box will appear, as shown in Figure (30), asking if the user wants to reset the
machine to factory settings. After the settings are reset, the First Time Installation message will appear.
Installation -> Default Setup
Channel Guide Auto Scan
System Config
Installation
Game
Manual Scan
Message Box
Reset to Default!
OK
Cancel
Advanced Features
Figure (30) Default Setup
6. Game
The Game Menu is shown in Figure (31). There are three game:Box Man,Burning Tetris,Hit Rat.
Channel guide -> TV ChannelChannel guide -> TV Channel
Channel guide
System Config
Installation
Game
Box Man
Burning Tetris
Hit Rat
Figure (31) Game Menu
-39-
Page 42

ATV PART
1.Press source button to select ATV MODE
2.Press SETUP to display options as follows.
Advanced Features
A. Press DOWN button to select Auto search, Press Right button to start Search.
Auto Search
Manual Search
Fine Tune
Channel
Video Standard
Audio Standard
Skip
<Right> Key to Search
B. Press UP and DOWN button to select Manul Search, Press Right or Left button to start
Manual Search.
Auto Search
Manual Search
Fine Tune
Channel
Video Standard
Audio Standard
Skip
<Right/Left> Key to Scan
NOTE:
1.Auto Search Start from Program NO.0
2.When receive signal under Manual Search, the indication frequency stop means the
optimum position for signal storage. If channel under weak signal is received. The channel
storage will automatically identify it as no signal.
3.when Auto Search or Manual Search, you can press SETUP button to stop
Auto search or Manual Search.
C. Press UP and DOWN button to select Fine Tune, Press Left and Right button to Fine
Tune the Frequency .NOTE: Press Left and Right once then the Frequency desending 50K
or increase 50K.
Auto Search
Manual Search
Fine Tune
Channel
Video Standard
Audio Standard
Skip
VHFL Freq: 141.00MHz
D. Press UP and DOWN button to select Program to display the current Channel number and
Channel Frequency. Press Left or Right button to decrease or increase 1 channel and display this
,
channel s number and Frequency.
Auto Search
Manual Search
Fine Tune
Channel
Video Standard
Audio Standard
Skip
VHFL Freq: 141.00MHz
Channel : 000
-40-
Page 43

ATV PART
Advanced Features
E. Press UP and DOWN button to select Video Standard to display the TV system PAL.
Auto Search
Manual Search
Fine Tune
Channel
Video Standard
Audio Standard
Skip
PAL
F. Press UP and DOWN button to select Audio Standard to display the Audio system
I, DK, BG.
NOTE:
1.Notes on Sound system:6.0M stands for I, 6.5M stands for DK and 5.5M is BG,
please set the Sound system at local one.
2.Color system(all color system are auto setup)
A.While sound system is I, color system is PAL-I.
B.While sound system is DK, color system is PAL-DK.
C.While sound system is BG, color system si PAL-BG.
3.In case with picture while sound or with noise, please check the sound
system for correct setup first.
Auto Search
Manual Search
Fine Tune
Channel
Video Standard
Audio Standard
Skip
D/K
G. Press UP and DOWN button to section SKIP to skip the channel.
Auto Search
Manual Search
Fine Tune
Channel
Video Standard
Audio Standard
Skip
Off
-41-
Page 44

SCREEN SET PART
1.Under the VGA mode press the function button to display as bellow:
Sharpness
Color hue
Staurtion
contrast
Brightness
Reset
Save
A. Sharpness
Press to button DOWN select sharpness. Press LEFT and RIGHT can adjust the Screen
sharpness.
B. Color hue
Press to button UP and DOWN select Color hue. Press LEFT and RIGHT can adjust the
Screen Color hue.
C. Saturation
Press to button UP and DOWN select Saturation. Press LEFT and RIGHT can adjust the
Screen Saturation.
D. Contrast
Press to button UP and DOWN select Contrast. Press LEFT and RIGHT can adjust the
Screen Contrast.
Reset
Save
32
Reset
Save
32
Reset
Save
064
Reset
Save
128
Sharpness
Color Hue
Saturation
Contrast
Brightness
Sharpness
Color Hue
Saturation
Contrast
Brightness
Sharpness
Color Hue
Saturation
Contrast
Brightness
Sharpness
Color Hue
Saturation
Contrast
Brightness
Advanced Features
-42-
Page 45

SCREEN SET PART
E. Brightness
Press to button UP and DOWN select Brightness. Press LEFT and RIGHT can adjust the
Screen Brightness.
Sharpness
Color Hue
Saturation
Contrast
Brightness
Reset
Save
128
F. Reset
Press to button UP and DOWN select Reset item. Press ENTER button can set Sharpness,
Color hue etc of picture to factory default.
Sharpness
Color Hue
Saturation
Contrast
Brightness
Reset
Save
Reset?
G. Save
Press to button UP and DOWN select Save. Press ENTER button can save the
Sharpness,Color hue etc setup.
Sharpness
Color Hue
Saturation
Contrast
Brightness
Reset
Save
Save?
Advanced Features
-43-
Page 46

Troubleshooting
If you have any questions, please consult the troubleshooting guide below.
Other
NO PICTURE OR SOUND
Ensure the power button is on.
Ensure the power outlet is operational.
Ensure the power cord is not damaged.
Ensure the power plug is connected firmly to the
outlet.
PICTURE BUT NO SOUND
Ensure the audio jacks are securely connected.
Ensure the audio connector is not damaged.
Ensure the volume is turned up in VOL/CH setup.
Ensure you have set the player's AUDIO settings correctly.
Ensure you have ENTERed the correct AV input for your TV.
Ensure the audio is not set to mute.
SOUND BUT NO PICTURE
Ensure the video jacks are securely connected.
Ensure you have ENTERed the correct AV input for your TV.
Ensure the video connector is not damaged.
Ensure you have set the player's VIDEO settings correctly.
POOR PICTURE OR SOUND
Ensure you have set the player's AUDIO settings correctly.
Ensure the disc is not scratched or stained.
Ensure the AV connector or the output terminal is not
damaged.
"BAD DISC" DISPLAYED
Ensure the disc is not warped, damaged or deformed.
Ensure the disc is not badly stained or damaged.
Ensure the disc format is compatible with the player.
Please check whether you have tried to play a software CD.
If so, please restart the player.
REMOTE NOT WORKING
Ensure the remote batteries are working.
Point the remote control directly at the player's IR
sensor.
Remove any obstacles between the remote and
the IR sensor.
UNIT NOT WORKING
Turn off the power, and then turn it on again.
"NO DISC" DISPLAYED
Ensure you have put the disc on the tray.
Ensure the disc is not upside down.
Ensure the disc is not distorted, stained or
scratched.
-44-
Page 47

Troubleshooting
Before you request for repair
Phenomena below does not necessarily mean failure with TV set.
Please check following before you request for repair.
Phenomena Possible causes
Other
No picture, no sound
No image
No sound
Diamonds in picture
No signal
Dark picture
Diamonds in picture or
inferior sound during
driving.
Improper connection with AC adapter or
Car adapter. Use of unauthorized power
supply. Power Switch is on OFF position.
Whether antenna adjusted correctly;
Whether the correct Channel or Country
selected. May need to reset or search.
Whether the sound is turned to the end.
Whether earphone plugged in. Whether
press speaker button? Whether press mute
button? Sound system correct set in ATV mode?
Whether antenna adjusted correctly;
Maybe too weak signal at the receiving
place.
Whether the correct Country selected;
Maybe signal too weak.
Adjust Brightness, Contrast correctly
The signal too weak at that place
-45-
Page 48

Specifications
Type
Play mode
Disc mode
Video characteristic
Video S/N ratio
Resolution
Audio characteristic
Frequency response
Audio S/N ratio
Dynamic range
Distortion
D/A Converter
Output characteristic
Input Frequency
Display Device
Receiving Channel
Sound System
Screen Size
Video output
Audio output
Power Voltage
Power consumption
Size
Weight
Other
NTSC/PAL
DVD,VCD, CD, MP3, CD-R, CD-RW, JPEG, DVD+ -R/W, MPEG4,
65dB.
500 lines.
fs 96KHz: 20Hz-20KHz:+/-1dBI
90dB
90dB
< 0.01%
96KHz/24bit
VHF 48.25MHz~412.5MHz UHF 412.5MHz~863.25MHz
Color TFT-LCD
DI 48.25MHz~863.25MHz BG 48.25MHz~863.25MHz
DK I BG
7 inches
1Vp-p(75 W)
COAXIAL, 2CH
DC IN 12V
15W
206x160x40mm
1.0kg
Specifications are subject to change without notice.
-46-
Page 49

Page 50

DVP7025DVBT - Mode d’emploi
ATV/DVBT/DVD/CD/MP3/MPEG4/HDCD/JPEG
ATV/DVBT/DVD/CD/MP3/MPEG4/HDCD/JPEG
SOURCE
SETUP
MENU/PBC
FUNCTION
Page 51

Contenu
PRECAUTIONS D’EMPLOI..................................................................................................................... 3
Importantes instructions de sécurité........................................................................................................ 4
Recommandations de stockage de l’appareil..........................................................................................6
Entretien ..................................................................................................................................................6
Précautions d’emploi............................................................................................................................... 7
Précautions d’utilisation des écouteurs................................................................................................... 7
Illustration du panneau avant de l’appareil.............................................................................................. 8
Connexion à votre téléviseur................................................................................................................... 9
Connexion à un amplificateur AV à l’aide d’une entrée Audio digitale.................................................. 10
Utilisation d’une clé USB....................................................................................................................... 11
Fonction Carte 3 en 1............................................................................................................................ 11
Utillisation de Base................................................................................................................................12
Utilisation de la télécommande..............................................................................................................13
Options avancées Télécommande........................................................................................................ 14
l’installation du système......................................................................................................................... 19
1. Etapes générales de l’installation du système.............................................................................. 19
2. Introduction aux rubriques du Menu principal............................................................................... 20
LECTURE DE DOSSIERS.................................................................................................................... 28
Lecture d’un dossier JPEG.................................................................................................................... 29
Lecture d’un CD contenant des images Kodak..................................................................................... 30
PARTIE DVB-T...................................................................................................................................... 31
ère
1
installation après allumage......................................................................................................... 31
SETUP .............................................................................................................................................. 31
Channel Guide..................................................................................................................................32
System Config................................................................................................................................... 33
Installation......................................................................................................................................... 36
Game................................................................................................................................................. 37
PARTIE ATV.......................................................................................................................................... 37
PARTIE INSTALLATION ECRAN..................................................................................................... 38
Pannes...................................................................................................................................................40
INDICATIONS TECHNIQUES............................................................................................................... 41
2
Page 52

PRECAUTIONS D’EMPLOI
Le symbole d’un triangle dans lequel est dessiné un éclair se terminant par une flèche est destiné à
alerter l’utilisateur de risques éventuels d’électrocution (risque de choc électrique provoqué par une
forte magnitude).
Le symbole d’un triangle dans lequel est dessiné un point d’exclamation est destiné à faire savoir à
l’utilisateur que d’importantes opérations de même que des instructions d’entretien vont suivre le
symbole. Il faut alors les respecter fidèlement.
ATTENTION : Afin d’éviter un risque de feu ou de choc électrique, veillez à ne pas exposer l’appareil à
des projections d’eau. Ne jamais ouvrir le corps central de l’appareil lorsque ce dernier contient encore
de hauts volts. Seul un service technique qualifié peut ouvrir l’appareil.
PRECAUTION : Pour éviter tout choc électrique, assurez vous que la lame de la prise est bien
branchée dans la prise murale (on ne doit pas pouvoir constater un jeu).
ATTENTION : Ce lecteur DVD utilise un système laser. Afin d’éviter toute exposition aux rayons
lasers, veillez à ne pas ouvrir l’appareil. En effet, des radiations laser visibles se trouvent à l’intérieur
de ce dernier. NE JAMAIS REGERDER LES RAYONS LASER.
Afin d’assurer l’utilisation correcte de l’appareil, veuillez lire attentivement le manuel d’instructions et le
conserver pour de futures utilisations. Si l’appareil a besoin d’un entretien spécifique, adressez-vous à
un service technique qualifié pour le faire.
PROTEGEZ-VOUS !
Enregistrez le nom du modèle ainsi que le numéro de série de l’appareil tant que ces derniers sont
encore lisibles. Ces nombres se situent derrière le corps central de l’unité et pourront vous servir dans
le futur.
ATTENTION
RISQUE DE CHOC ELECTRIQUE NE PAS OUVIRIR
PRECAUTION
POUR REDUIRE LE RISQUE DE CHOC ELECTRIQUE, NE RETIREZ PAS LE COUVERCLE OU
L’ARRIERE DE L’APPAREIL. IL N’Y AUCUNE PARTIE SOLIDE A l’INTERIEUR. S’IL EST
NECESSAIRE D’OUVRIR L’APPAREIL, DEMANDEZ A UN SERVICE TECHNIQUE QUALIFIE.
3
Page 53

Importantes instructions de sécurité
1. Lire les instructions
est obligatoire de lire les instructions de
Il
sécurité
l’appareil.
2. Conserver les instructions
est également nécessaire de conserver les
Il
me
utilisations.
3.
Ne
ou
baig
piscine
4.
Des emplacements spécifiques sont situés sur
l’app
ventilation
fiabilité
l’app
dernier. Il est donc nécessaire de ne pas
bloquer
do
canapé, ou toute surface similaire.
5.
L’ap
d’él
l’app
source d’électricité de votre logement,
co
avant l’installation et l’utilisation de
sures de sécurité pour de futures
Eau et humidité
jamais utiliser l’appareil à proximité d’eau
d’humidité, par exemple à côté d’une
noire, d’une bassine, d’un évier, d’une
ou dans tout endroit humide.
Ventilation
areil afin de permettre une bonne
de ce dernier et ainsi assurer la
des opérations. La bonne ventilation de
areil évitera ainsi la surchauffe de ce
ou recouvrir ces ouvertures. Veillez
nc à ne pas placer l’appareil sur un lit, un
Sources d’électricité
pareil doit être banché à la source
ectricité indiquée sur l’étiquette de
areil. Si vous avez des doutes quand à la
nsultez votre vendeur.
Protection du fil électrique
6.
les fils électriques doivent être branchez
Tous
agencez corrctement afin de ne pas être
et
endo
mmagés : cela signifie qu’il faut éviter de
poser
tout objet dessus qui risquerait
notamm
7.
Une
un
8 Insertion de liquide et d’objet
L’ap
la
in
ouvertures : les objets risqueraient de
provo
feu.
toute insertion de liquide dans l’appareil.
9 Entretien
Ne
de l’appareil : ouvrir et démonter ce dernier
vous
Pour tout action d’entretien de l’appareil,
dema
qualifié.
ent de les pincer.
Surcharge
surcharge électrique risque de provoquer
feu ou un choc électrique.
pareil est équipé d’ouvertures permettant
bonne ventilation de ce dernier. Ne jamais
sérer d’objet dans l’appareil par ces
quer un choc électrique ou encore un
Cette précaution vaut également pour
vous chargez pas vous-même de l’entretien
expose à des risques de choc électrique.
ndez conseil à un service professionnel
4
Page 54

10.
Service endommagement
cas de dommage de l’appareil, débranchez
En
dernier et
ce
A.
Si la prise ou le fil électrique de l’appareil
endommagé
est
B.
Si du liquide a été renversé sur l’appareil.
C.
Si l’appareil a été exposé à la pluie ou à de
l’eau
D. Si l’appareil ne fonctionne pas
nor
malement alors que vous avez
respecté les instructions d’installation.
E.
Si votre appareil a été endommagé.
Remplacement des pièces
11.
vous devez remplacer des pièces de
Si
l’app
areil, assurez-vous que le service
technique ai bien utilisé des pièces de
lacement correspondant à celles
remp
sp
écifiées par le fabricant ou des pièces
présentant les mêmes caractéristiques que la
originale. Remplacer lapièce
pièce
endo
mmagée par une pièce non
recommandée risquerait de provoquer un choc
ique ou encore un feu.
électr
12.
Chaleur
pareil doit être éloigné de toute source de
L’ap
cha
leur comme les radiateurs, cuisinières ou
autre appareil diffusant de la chaleur.
tout
5
Page 55

Entretien
Veillez à débrancher toutes les prises et toutes autres connexions avant de
nettoyer
Ne jamais nettoyer votre appareil avec des tissus corrosifs, de l’alcool, du
be
votre appareil
nzène, des liquides d’entretiens ou encore des produits aérosols.
Ce symbole qui apparaît sur le produit ou dans les instructions signifie que votre appareil
électrique ou électronique, lorsqu’il ne fonctionne plus, doit être jeté séparément de vos
déchets ménagers.
En Europe, il existe différents systèmes de collecte pour le recyclage.
Pour de plus amples informations, contactez l'autorité locale ou le revendeur auprès
duquel vous avez acheté le produit.
6
Page 56

Précautions d’emploi
1. Seuls l’adaptateur AC fourni avec l’appareil ainsi que l’adaptateur automobile (12V) conviennent.
2. Pour des raisons de sécurité, lorsque vous n’utilisez pas votre appareil pendant une période
prolongée,
veillez à le débrancher
7
Page 57

Illustration du panneau avant de l’appareil
1. Ecran de lecture
2. Haut parleur droit
3. Haut parleur gauche
4. Disc top
5. Ouverture du compartiment
à disque
6. Source
7. Setup
8. Menu/PBC
9. Fonction
10. Touches directionnelles
11. Pause
12. PREV (précédent)
13. NEXT (suivant)
14. Play
15. Stop
6285&(
6(783
0(183%&
)81&7,21
21 2))
3+21( &2$;$,/ $8' 2,9',(2 '&, 1 9
92/
$17,1
16. Lumière
17. Capteur
18. Lecteur des cartes 3en1 (SD, MAIS, MMC)
19. Power (on/off)
20. Prise DC 12 V
21. Video
22. Audio
23. Sortie coaxiale
24. Phone
25. Volume
26. USB
27. Batterie
28. Prise DC 12
29. ANT IN (antenne)
30. Lumière LED (quand la lumière est
rouge: la batterie est en train de
charger; quand la lumière est verte: la
batterie est chargée)
8
Page 58

Connexion à votre téléviseur
VOL
ON OFFPHONE COAXIAL AUDIO VIDEO DC IN 12V
WHITERED Yellow
VIDEO IN
AUDIO IN
9
Page 59

Connexion à un amplificateur AV à l’aide d’une entrée Audio digitale
VOL
ON OFFPHONE COAXIAL AUDIO VIDEO DC IN 12V
Digital Amplifier
POWER
PRO LOGIC
CHANNEL
TEST
KARAOKE
MODE
3 STEREO
BYPASS
EXCITE
MIC
MIC VOL
211
2
Notes:
1. Sélectionner la sortie audio coaxiale
2. Installer le lecteur en mode audio Raw ou PCM
3. Installer l’amplificateur sur l’entrée AV du lecteur DVD
Coaxial ca
VOLUME
INPUT SELECTOR
MUTE
DOWN
UP
BASS
ECHO
MIC
TREBLE
ble
COAXIAL
10
Page 60

Utilisation d’une clé USB
Appuyez sur la touche SOURCE située sur la télécommande jusqu’à ce que le mot USB apparai sse à
l’écran.
VOL
ON OFFPHONE COAXIAL AUDIO VIDEO DC IN 12V
Cet appareil vous permet d’écouter de la musique à partir d’une clé USB.
Fonction Carte 3 en 1
SD, MS, MMC
Cet appareil bénéficie d’une prise Carte 3 en 1. Lorsqu’aucun CD n’est dans le lecteur, appuyez sur la
touche SOURCE de votre télécommande jusqu’à ce que le mot « CARD » apparaisse sur l’écran.
Vous pouvez alors insérer trois types de cartes (MMC, SD, MS). A noter : toutes les fonctions sont
similaires à celles d’une lecture de disque.
11
Page 61

Utillisation de Base
Préparation avant lecture
12
Page 62

Utilisation de la télécommande
1
2
3
4
5
6
7
8
9
10
11
12
13
14
15
16
17
18
Remar
que: si vous visez une source de lumière avec la télécommande, cela peut entraîner un dysfonctionnement de
ppareil. Ne renversez pas de l´eau sur la télécommande et évitez son contact avec des objets mouillés. Ne
l´a
19
20
21
22
23
24
25
26
27
28
29
30
31
32
33
34
1. MUTE (arrêt du son)
2. DISPLAY (lecture)
3. N/P
4. SUBTITLE
ngues)
5. LANGUAGE
(la
6. ANGLE
7. SETUP
8. MOVE ( )
9. ENTER
10. RETURN / EXIT
L / R CHANNEL
11.
12. ZOOM
13. PLAY / PAUSE
14. STOP
15. REV (retour rapide)
16
. FWD (avance rapide)
17. EPG
18
. SCAN
. TFT on / off
19
20
. SPEAKER (haut-parleur)
. NUMBER KEY SELECT
21
(touches
. GOTO
22
23
. MENU / PBC
. TITLE / TTX
24
25
. FONCTION
. 4:3 / 16:9
26
27
. PROG
. A-B REPEAT
28
29
. REPEAT
. VOLUME
30
31
. NEXT (suivant)
. PREV (precedent)
32
33
. TV / RADIO
. SOURE
34
numérotées)
démontez jamais la télécommande.
Comm
ent changer la pile
1. Poussez le bouton vers le gauche
2. Retirez le chargeur de pile
PILES
L`usage incorrect des piles peut les rouillir, entraîner une fuite ou une explosion.
Rassurez-vous de placer les piles dans la direction correcte.
Il est dangereux de charger, chauffer, ouvrir ou de mettre en circuit-court les piles.
Quand vous n´utilisez pas la télécommande pendant un temps assez long, enlevez les piles. Quand la gamme
d´exploitation est limitée, remplacez les piles avec de nouvelles piles.
En cas de fuite: essuyez le liquide dans le compartiment à piles, ensuite remplacez les piles.
13
Page 63

Options avancées Télécommande
1. MUTE
Appuyez sur la touche MUTE pour couper le son
Pour rétablir le son, appuyez une nouvelle fois sur la touche MUTE.
2. LECTURE
En mode lecture, appuyez sur la touche DISPLAY afin d’afficher le temps de lecture.
Temps de lecture du titre
Chapitre total
Chapitre en cours de lecture
Type de disque
Titre en cours
Titre total
Idioma
Audio Type
Ángulo
Subtítolo
Appuyez sur la touche SUBTITLE afin d’afficher l’installation audio et des sous-titres
3. N/P
Pendant la lecture, appuyez sur la touche N/P pour atteindre les modes suivants : AL, AUTO, NTSC
4. SUBTITLE
Pendant la lecture d’un DVD, appuyez sur la touche SUBTITLE afin de sélectionner la langue dans
laquelle vous désirez que les sous-titres apparaissent.
Note: Cette fonction n’est possible que si l’option est proposée dans le DVD
5. LANGUAGE
Pendant la lecture d’un DVD, appuyez sur la touche LANGUAGE de façon répétée afin de
sélectionner la langue de votre choix.
Note: Cette fonction n’est possible que si l’option est proposée dans le DVD.
6. ANGLE
Pendant la lecture d’un DVD
En appuyant sur la touche ANGLE, vous pourrez ainsi visionner les scènes sous différents angles.
En appuyant plusieurs fois sur la touche ANGLE, vous pourrez ainsi passer d’un angle de caméra à
un autres.
Note: Cette fonction n’est possible que si l’option est proposée dans le DVD.
Page 64

7. SETUP
Pendant la lecture, appuyez sur la touche STEP pour mettre la lecture sur pause. Appuyez une
nouvelle fois sur la touche STEP pour réactiver la lecture
8. HAUT / BAS / GAUHE / DROITE
Ces touches vous permettent de naviguer dans le menu. Lorsque vous n’êtes pas dans la ru brique
MENU, ces touches ont également d’autres fonctions. Appuyer sur les touches UP/DOW N vous
permet d’accéder à la chaîne suivante/précédente dans la liste de toutes les chaînes. Appuyer sur les
touches LEFT/RIGHT vous permet d’accéder à la chaîne suivante / précédente de la liste en cours.
9. ENTER
Appuyez sur la touche ENTER pour vous permettre d’accéder aux rubriques Menu.
10. RETURN
Pendant la lecture d’un DVD, appuyez sur la touche RETURN pour afficher le menu du DVD ou pour
lire le premier titre de ce dernier.
11. L/R
Pendant la lecture d’un DVD, il vous est possible d’activer le doublage.
12. ZOOM
Pendant la lecture d’un DVD, appuyez sur la touche ZOOM pour augmenter l’image comme indiqué
ci-dessous :
Æ ZOOM 2 Æ ZOOM 3 Æ ZOOM 4 Æ ZOOM 1/2 Æ ZOOM ¼
Å Å Å Å Å Å ZOOM OFF Å Å Å Å Å Å Å
13. PLAY / PAUSE
Lorsque le lecteur est en mode stop, appuyez sur la touche PLAY/PAUSE pour faire redémarrer
la lecture.
En mode lecture, appuyez sur la touche PLAY/PAUSE , afin de mettre le disque sur pause.
Appuyez sur PLAY/PAUSE pour revenir en lecture normale.
Cette fonction n’est pas utilisable si la durée de la piste est inférieure à 10 secondes. Note : Les
disques MP3 et certains DVD peuvent avoir des pistes présentant cette caractéristique.
14. STOP
Appuyez une fois sur la touche STOP pendant la lecture vous permet d’arrêter la lecture de ce
dernier. Appuyez sur PLAY pour réactiver la lecture du DVD (à noter : la lecture reprendra à l’endroit
où vous l’avez arrêté). En appuyant deux fois sur la touche STOP, vous arrêterez alors complètement
la lecture du DVD.
15. REV
En mode lecture d’un DVD ou d’un CD, appuyez sur la touche pour actionner la lecture rapide en
sens inverse (retour rapide). Le lecteur passera alors en revue les différentes vitesses: 2,4,8,16,32
puis retour à la vitesse normale, comme indiqué ci-dessous:
Æ 2X Æ 4X Æ 8X Æ 20X Æ
Appuyez sur la touche PLAY pour revenir directement à la lecture normale.
15
Page 65

16. FWD
En mode lecture de DVD ou d’un CD, appuyez sur la touche pour actionner l’avance rapide. Le
lecteur passera alors en revue les différentes vitesses: 2,4,8,16,32 puis retour à la vitesse normale,
comme indiqué ci-dessous:
Æ 2x Æ 4x Æ 8x Æ 20x Æ
Appuyez sur la touche PLAY pour revenir directement à la lecture normale.
17. EPG
En mode DVB, appuyez sur la touche EPG afin d’afficher le menu EPG (Electronic ProgramGuide).
18. SCAN
En mode DVB-T, appuyez sur la touche SCAN pour accéder au menu des chaînes DVB-T
19. TFT ON/FF
Appuyez sur la touche TFT on/off pour accéder à ce mode de lecture.
Appuyez sur la touche une nouvelle fois pour sortir du menu.
20. HAUTS PARLEURS
Pendant la lecture, appuyez sur la touche SPEAKER pour fermer la sortie hauts-parleurs
21. 0-10+ Touches
Ces touches sont utilisées pour installer l’heure, choisir les numéros de titres, chapitres ou encore
pistes de votre choix.
Lorsque des rubriques numérotées apparaissent à l’écran, appuyez sur les touches 0-10+ pour
sélectionner l’entrée de votre choix. Appuyez sur ENTER pour confirmer votre choix
22. GOTO
Pendant la lecture, appuyez sur la touche GOTO pour afficher le temps de lecture.
Entrez le numéro du chapitre de votre choix.
Entrez le numéro pour
choisir le titre
Entrez le numéro pour choisir le
temps de lecture du chapitre
Utilisez les touches numérotées pour inscrire le temps, le titre ou encore le chapitre désiré.
Appuyez sur la touche ENTER pour confirmer votre choix.
23. MENU/PBC
Pendant la lecture DVD, appuyez sur la touche MENU afin de revenir à la rubrique Menu. Une fois
dans le Menu, appuyez sur la touche MENU pour revenir au menu principal.
24. TITRE/TTX
En mode DVD, appuyer sur la touche TITLE/TTX vous permet de retourner aux titres du disque.
En mode DVB, cette touche vous permet de lire une information supplémentaire concernant le DVBTeletext.
16
Page 66

25. FUNCTION
Appuyez sur la touche FUNCTION pour faire apparaître à l’écran les rubri ques suivantes : Contrast,
Brightness (Luminosité), Saturation, rest.
Appuyez sur les boutons UP et DOWN afin de sélectionner l’option de votre choix, puis appuyez
sur les touches fléchées droite et gauche afin de régler les paramètres selon vos critères.
26. 4:3 / 16:9
Appuyer sur la touche vous permet de changer le format de l’image.
27. PROG
Lorsque la fonction PROG est activée, appuyez sur la touche
ENTER pour afficher ce dernier :
Entrez les numéros de pistes dans l’ordre de votre choix. Une
fois votre liste réalisée,sélectionnez la rubrique Play Program
puis appuyez sur la touche ENTER pour confirmer votre choix :
les chapitres seront alors lus dans l’ordre que vous aurez
déterminé. Sélectionnez la rubrique Clear All puis appuyez sur
ENTER pour effacer le programme que vous avez choisi.
28. A-B
Pendant la lecture d’un disque, appuyez sur les touches A-B pour sélectionner le point A.
Si vous désirez sélectionner le point B, appuyez encore une fois sur cette même touche. Le lecteur
DVD répétera alors automatiquement la séquence du point A au point B.
En appuyant sur A6B une troisième fois, vous effacerez alors l’option de répétition ainsi que
l’enregistrement des points A et B.
Note: Pendant la lecture d’un CD, les points A et B doivent être situés dans la même piste. Pendant la
lecture d’un DVD, les points A et B peuvent être sélectionnés dans deux chapitres différents.
29. REPEAT
Appuyez sur la touche REPEAT vous permet de répéter le titre, le chapitre de votre choix. Vous
pouvez également sélectionner la fonction Repeat Off afin d’annuler la fonction Repeat.
30. VOL+ / VOL-
Appuyez sur la touche <VOL+> pour augmenter le volume du son.
Appuyez sur la touche <VOL-> pour baisser le volume.
31. / 32. PREV / NEXT
Appuyez sur PREV pour atteindre directement la piste ou le chapitre précédent.
Appuyez sur NEXT pour atteindre directement la piste ou le chapitre suivant.
17
Page 67

33. TV / RADIO
En mode DVB, appuyez sur la touche TV/RADIO pour passer du mode TV au mode RADIO ou
inversement. Cette touche n’a aucun effet en mode DVD.
34. SOURCE
Vous permet de choisir la source de votre choix : DVD, DVB, et USB. Cette touche n’a aucun effet
lorsque votre appareil se trouve en mode DVD.
Note : Vous pouvez utiliser des clés USB ou autres cartes mémoires à partir de cet appareil.
18
Page 68

l’installation du système
1. Etapes générales de l’installation du système
a) Appuyez sur le bouton SETUP. Le menu des fonctions générales du lecteur s’affiche.
b) Appuyez sur les flèches droite et gauche pour sélectionner l’icône qui vous permettra d’atteindre
la page de votre choix. Par exemple, si vous voulez installer la page vidéo, appuyez sur la flèche
droite afin de sélectionner l’icône vidéo. La page Video s’affichera alors à l’écran.
c) Appuyez sur la touche fléchée DOWN pour faire défiler l’onglet vers le bas et sélectionner ainsi
l’option de votre choix. Appuyez sur ENTER pour confirmer votre sélection. Les différents choix
proposés par l’option apparaissent à droite de l’écran. Par exemple, appuyez sur la flèche DOWN
pour sélectionner BRIGHTNESS (luminosité de l’image) puis sur ENTER : les différents niveaux
de luminosité s’affichent sur l’écran.
d) Appuyez sur les touches fléchées pour sélectionner la rubrique « Exit Setup » (sortir de la page
menu principal). Puis appuyez une nouvelle fois sur la touche SETUP (ou sur la touche ENTE R)
pour confirmer votre choix de sortir du menu principal.
19
Page 69

2. Introduction aux rubriques du Menu principal
2.1 ORGANISATION DU SYSTEME
Les différentes options proposées au menu principal sont illustrées et expliquées ci-dessou s :
2.1.1 SYSTEME TV
Le choix de votre système TV (TV SYSTEM sur l’écran) dépend du système de couleurs de votre
téléviseur.
2.1.2 Ecran de veille
Utilisez les touches UP et DOWN afin de choisir les paramètres concernant la mise en veille de votre
écran.
ON: Lorsque l’appareil n’est pas utilisé pendant plus de 300 secondes, la vidéo disparaîtra et la mise
en veille de l’écran s’activera.
OFF: la mise en veille de l’écran n’est pas activée
2.1.3 VIDEO
Suivant le type de prise de votre téléviseur, vous pouvez choisir une sortie S-VIDEO ou YUV.
20
Page 70

2.1.4 TV TYPE
Suivant votre téléviseur, vous pouvez choisir différents formats de lecture d’image
2.1.5 MOT DE PASSE
Le mot de passe originel de l’unité est [6666].
En entrant le mot de passe correct et en appuyant sur la touche ENTER pour confirmer
1. Appuyer sur le touche ENTER permet d’entrer dans le menu mot de passe
2. Vous pouvez alors entrer un nouveau mot de passe (4 caractères)
3. Appuyer sur ENTER pour confirmer le nouveau mot de passe et sortir du menu mot de passe.
Veillez à vous souvenir de votre mot de passe. La fonction DEFAULT vous permet de revenir à la
situation initiale (avant installation de l’appareil) mais le mot de passe reste le même.
2.1.6 CLASSEMENT
Permet à l’utilisateur de classer les films qui pourront être lus sur le lecteur DVD : certains films que
vous enregistrez dans votre lecteur DVD pourront ainsi être interdits d’accè s aux enfants, leur lecture
nécessitant l’entrée du mot de passe
21
Page 71

2.1.7 DEFAUT
Cette option permet de revenir à la page du menu principal.
Lorsque votre appareil ne fonction plus normalement, cela peut provenir de mauvaises installations de
votre part. Dans ce cas, utilisez cette fonction pour vérifier que votre appareil peut revenir à son
ensemble initial (avant installations).
2.2 L’installation des langues est illustrée et expliquée ci-dessous:
2.2.1 OSD LANGUAGE / LANGUE AFFICHAGE ECRAN
Sélectionnez l’option OSD LANGUAGE puis choisissez la langue de votre choix en naviguant dans la
liste grâce aux touches fléchées. Appuyez sur ENTER pour confirmer votre choix.
LANGUAGE SETUPLANGUAGE SETUP
OSD LANGUAGE
AUDIO LANG
SUBTITLE LANG
MENU LANG
EXIT SETUP
ENGLISH
FRENCH
DUTCH
2.2.2 AUDIO LANG / LANGUE AUDIO
Sélectionnez l’option AUDIO LANG puis choisissez la langue de votre choix. Pour ce faire, déplacezvous dans la liste à l’aide des touches fléchées. Si votre disque possède la langue que vous avez
choisie, la sortie audio sera donc dans cette langue.
LANGUAGE SETUPLANGUAGE SETUP
OSD LANGUAGE
AUDIO LANG
SUBTITLE LANG
MENU LANG
EXIT SETUP
ENGLISH
GERMAN
SPANISH
FRENCH
ITALIAN
CZECH
GREEK
PORTUGUESE
22
Page 72

2.2.3 SUBTITLE LANGUAGE / LANGUE DE SOUS-TITRE
Sélectionnez l’option SUBTITLE LANG puis choisissez la langue de votre choix grâce aux touches
fléchées. Si le disque possède cette langue, vous pourrez alors lire les sous-titres dans cette dernière.
LANGUAGE SETUPLANGUAGE SETUP
OSD LANGUAGE
AUDIO LANG
SUBTITLE LANG
MENU LANG
EXIT SETUP
ENGLISH
GERMAN
SPANISH
FRENCH
ITALIAN
CZECH
GREEK
OFF
2.2.4 MENU LANGUAGE / MENU INSTALLATION DES LANGUES
Sélectionnez l’option MENU LANG et appuyez sur les touches fléchées pour choisir la langue dans
laquelle vous souhaitez que votre menu s’affiche à l’écran. Appuyez sur ENTER pour confirmer votre
choix.
Si votre disque possède la langue choisie, le menu du disque s’affichera alors dans cette
langue.
LANGUAGE SETUPLANGUAGE SETUP
OSD LANGUAGE
AUDIO LANG
SUBTITLE LANG
MENU LANG
EXIT SETUP
ENGLISH
GERMAN
SPANISH
FRENCH
ITALIAN
CZECH
GREEK
PORTUGUESE
2.3 AUDIO SETUP (Organisation audio)
Les options d’installation AUDIO sont illustrées ci-dessous:
2.3.1 AUDIO OUT / SORTIE AUDIO
Sélectionnez l’option AUDIO OUT et appuyez sur les touches fléchées pour vous déplacer dans la
liste et choisir la sortie audio qui vous convient. Il y a trois modes de sortie Audio:
23
Page 73

2.3.2 TOUCHE
Utilisez les touches UP et DOWN pour faire bouger les flèches et ainsi ajuster les touches.
2.4 VIDEO SETUP (Installation vidéo)
L’installation vidéo est illustrée et expliquée ci-dessous:
2.4.1 BRIGHTNESS (Luminosité)
Utilisez les touches fléchées Up et Down afin de sélectionner le curseur respectivement vers le haut
ou vers le bas : cette option permet de régler la luminosité de l’image.
24
Page 74

2.4.2 CONTRASTE
Utilisez les touches fléchées Up et Down afin de sélectionner le curseur respectivement vers le haut
ou vers le bas : cette option permet de régler le contraste de l’image.
2.4.3 HUE (Teinte)
Utilisez les touches fléchées Up et Down afin de sélectionner le curseur respectivement vers le haut
ou vers le bas : cette option permet de régler la teinte (les couleurs) de l’image.
2.4.4 SATURATION
Utilisez les touches fléchées Up et Down afin de sélectionner le curseur respectivement vers le haut
ou vers le bas : cette option permet de régler la saturation de l’image.
2.4.5 SHARPNESS (netteté)
Utilisez les touches UP et DOWN pour faire bouger le curseur et ainsi ajuster la netteté de l’image.
25
Page 75

2.5 DIGITAL SETUP
Appuyez sur la touche SETUP pour sélectionner la rubrique « Digital Setup ». L’écran affichera alors
les rubriques suivantes :
2.5.1 MODE OP
LINE OUT: compression classique des dialogues
RF REMOD: RF Mode est caractérisé par une forte compression des dialogues audio. Le volume est
haut.
2.5.2 DYNAMIC RANGE
Lorsque vous avez sélectionné la rubrique « LINE OUT », vous pouvez ajuster le son de votre lecteur
DVD et ainsi obtenir différents effets. Lorsque vous positionnez le curseur sur FULL, le volume du son
sera à son minimum. Au contraire, si vous placez le curseur au niveau de OFF, il sera à son
maximum.
2.5.3 DUAL MONO
Cette option vous permet de choisir différents modes de sortie audio. Vous avez le choix entre quatre
modes.
Stéréo (le son du lecteur DVD sortira du canal audio droit et du canal audio gau che) / L-Mono (le son
du lecteur DVD ne sortira que par le canal audio gauche) / R-Mono (le son du lecteur DVD n’émettra
que le son du canal droit, et ce grâce aux deux canaux) / MIX-Mono.
26
Page 76

REFERENCE:
• Pour protéger votre lecteur DVD, l’intervalle entre deux mises en marche consécutives de
l’appareil doit être de 30 secondes minimum.
• Si vous n’utilisez pas votre lecteur DVD pendant un certain temps, pensez à le débrancher
totalement.
• Pour que la mise en marche de l’appareil soit effective, son niveau d’approvisionnem ent en
électricité doit correspondre au niveau d’électricité fourni par votre circuit local. Si tel n’est pas
le cas, le lecteur DVD ne s’allumera pas.
• Le lecteur n’est pas compatible avec certains types de disques cryptés.
• Si le lecteur DVD arrête la lecture par accident, rallumez-le.
27
Page 77

LECTURE DE DOSSIERS
Lorsque vous lisez un disque, l’écran s’affiche de la façon suivante:
Nom du dossier
Le dossier en lecture est un
dossier audio
Nom du dossier
Noms de dossiers. Si vous lisez un
dossier au format JPEG, le nom du
dossier aura donc une extension
JPEG.
Dossier changelent de region :
lecture du type de dossier.
Le dossier en lecture est un dossier
d’image
Noms de dossiers. Si vous lisez
un dossier au format JPEG, le
nom du dossier aura donc une
extension JPEG.
Dossier changelent de region: lecture du
Le dossier en lecture est un
dossier audio
type de dossier.
Le dossier en lecture est un dossier
d’image.
Appuyez sur la rubrique de votre choix pour sélectionner le format de dossier de votre choix.
Appuyez sur Select pour lire le dossier que vous aurez sélectionné à l’aide du curseur.
Note : le lecteur ne fonctionnera pas normalement dans les cas suivants :
1. le disque est rayé, endommagé ou sale
2. le disque n’est pas finalisé
3. le format de lecture n’est pas reconnu ou est trop lourd pour le lecteur.
28
Page 78

Lecture d’un dossier JPEG
1. Lorsqu’un disque JPEG se trouve dans le lecteur DVD, un diaporama s’affichera
automatiquement à l’écran. Chaque image contenue dans le disque s’affichera à l’écran.
Appuyez sur STOP pour stopper le diaporama et accéder à la bibliothèque.
Utilisez les touches SCOll pour naviguer entre les différentes images puis sur ENTER pour
sélectionner l’image de votre choix.
2. Utilisez la touche SCOll pour faire tourner votre image. Cette fonction n’est possible que si
l’image s’affiche normalement à l’écran. De même, cette fonction s’annule automatiquement
lorsque s’affiche une nouvelle image à l’écran.
Appuyez sur la touche ZOOM pour agrandir l’image. Vous pouvez choisir la taille du zoom en
utilisant les touches << et >>. En mode ZOOM, appuyez sur la touche SCROLL pour faire
bouger l’image à l’écran. Appuyez sur la touche PLAY pour annuler la fonction Zoom et
réactiver le diaporama.
A noter:
1. Les dossiers JPEG contenant des couleurs CMYK ne sont pas supportés par ce lecteur
2. Le nombre de pixels ne doit pas excéder 3840 x 3840 pixels.
29
Page 79

Lecture d’un CD contenant des images Kodak
Introduction d’un CD Kodak Image
Un CD Kodak Image a la même taille qu’un CD classique. Il vous est possible de commander votre
CD Kodak en même temps que vous allez faire développer vos photos. Lorsq ue vous allez faire
développer ces dernières (35 mm ou APS) dans tous les magasins Kodak Express qui fournissent le
service (il est généralement indiqué sur la devanture du magasin « Kodoak Picture CD »). Ainsi,une
fois votre commande enregistrée, vous recevez par la suite la totalité de toutes vos images sur le CD
Kodak et vous pouvez alors gérer ces dernières sur votre ordinateur. Vous pouvez égaleme nt
enregistrer vous –même des images JPEG sur CD ou sur CD-RW à partir du graveur de CD.
Note
1. La taille max d’une image JPEG supportée par l’appareil est de 3840x3840 pixels.
2. JPEG appartient au groupe Joint Picture Experts Group. Il s’agit de la première compagnie en
matière de compression d’image : ISO 10918-1 a été constitué par le Comité Still Picture
Compressing Standard, autrement appelé ISO. Les images enregistrées sur CD KODAK le
sont au format JPEG et votre lecteur peut donc les lire.
Désormais, vous pouvez lire vos CD KODAK sur ce lecteur et ainsi regarder vos magnifiques images
sur l’écran de votre téléviseur. Lorsque vous insérez un CD KODAK dans le lecteur, un diaporama de
vos photos se met automatiquement en marche. Chacune de vos images KODAK défilera alors à
l’écran grâce à ce diaporama.
Fonctions générales
Æ Appuyez sur Pause pour arrêter le diaporama. Appuyez sur << ou >> pour regarder respectivement
la photo précédente ou suivante.
Æ Appuyez sur Play pour remettre en marche le diaporama.
Æ Appuyez sur Stop pour revenir au menu principal.
Rotation d’image
Il existe 3 modes de rotation d’images : original, 90degrés, 180 degrés. Cette fonction n’est possible
que lorsque vous lisez une image de manière normale (c'est-à-dire lorsque le diaporama n’est pas
activé). De même, cette fonction s’annulera dès lors que vous changerez d’image. La touche ANGLE
vous permet de choisir entre les différents modes de rotation.
Appuyez sur Angle l’écran affiche original
Appuyez encore une fois sur Angle l’écran affiche 90 Deg.
Appuyez encore une fois sur Angle l’écran affiche 180 Deg.
ZOOM
Ce lecteur vous permet enfin d’accéder à 2 fonctions Zoom : Zoom in/out et Zoom pan. Lorsque vous
appuyez sur la touche Zoom, l’image s’affiche alors de la façon suivante :
Note : Lorsque vous êtes en mode Zoom, le diaporama n’est alors plus en marche.
Que off : la fonction Zoom est annulée. Appuyez alors sur Play pour remettre en marche le diaporama
d’images
30
Page 80

PARTIE DVB-T
Comment passer en mode DVB-T ?
Appuyez sur la touche SOURCE située sur la télécommande et ce jusqu’à ce que l’appareil passe en
mode DVB-T.
ère
1. 1
Un message apparaît, demandant à l’utilisateur s’il/elle souhaite actionner la 1
installation après allumage
ère
installation Wizard.
Sélectionnez « YES », une nouvelle fenêtre apparaît demandant alors de choisir le langage que
l’utilisateur souhaite voir s’afficher à l’écran. Utilisez les touches fléchées afin d’effectuer les bonnes
sélections. Appuyez sur la touche NEXT puis sur ENTER pour accéder au nouvel écran.
First installationFirst installation
Do you want to start first
time installation wizard?
NO
YES
First installation (2)First installation (2)
Do you want to start Auto
Scan?
BACK
YES
NO
First installation (1)First installation (1)
Selecl country
OSD Language
Channel: 21
Progress 1/11/1
TV: 0004
0001. Xxxxx
0002. Xxxx
0003. Xxxx
0004. Xxxxxx
Frequency: 474000kHz
Dutch
English
NEXTBACK
Radio: 0009
0006. Xxxxx
0007. Xxxx
0008. Xxxx
0009. Xxxxxx
2. SETUP
En appuyant sur SETUP, le menu principal apparaît alors à l’écran. A partir de là, appuyez sur SETUP
encore une fois (ou sur RETURN pour sortir du menu). Le menu pr incipal est divisé en 4 rubriques :
Channel Guide, System Config., Installation et Game, qui s’affichent à gauche de l’écran. En
sélectionnant une des rubriques, vous accédez alors à des sous-menus, qui s’affichent à droite de
l’écran. Les menus sont illustrés dans les figures 5 à 8 et seront expliqués plus en détail dans la suite
du manuel d’utilisation.
31
Page 81

En accédant au menu principal, la rubrique Channel Guide est automatiquement sélectionnée. Utilisez
les flèches UP et DOWN pour sélectionner les autres rubriques. Appuyez sur ENTER pour accéder à
un nouveau menu correspondant à la rubrique sélectionnée. Il y a des sous-me nus contenus dans les
4 rubriques.
Channel Guide
Cette rubrique inclus les sous-menus suivants : TV Channels, Radio channels, Channel s Class, et
Channel Edit
System Setup
Cette rubrique inclus les sous-menus suivants : TV Setting, Audio Setting, Language, Parent Control,
Time Setting et System Info
Installation
Cette rubrique inclus les sous-menus suivants : Auto Scan, Manual Scan et Default Setup
Game
Cette rubrique inclus les sous-menus suivants : Boxman et Burning Tetris
3. Channel Guide
3.1. TV Channels
Les chaînes sont listées sur le côté gauche de l’écran. Sur le côté droit, une fenêtre s’affiche. A partir
de là, la chaîne peut être changée. Pour cela, utilisez les touches fléchées UP et DOWN. Appuyez sur
ENTER pour commencer le visionnage.
3.2. Radio Channels
Ce menu est similaire au menu TV Channel. Les chaînes sont également listées sur le côté gauche de
l’écran. La chaîne peut être changée en utilisant les flèches UP et DOWN de la télé commande. Les
froupes de chaîne sont modifiés grâce aux flèches RIGHT et LEFT.
32
Page 82

Channels Class
Grâce à ce menu, chaque chaîne peut être classée dans un groupe. Appuyer sur ENTER ajoutera
alors la chaîne sélectionnée dans la colonne de la catégorie de votre choix. Utilisez la touche
TV/RADIO pour passer du mode TV au mode RADIO
3.3. Channels Edit
Pour changer le nom d’une chaîne, sélectionnez la chaîne et appuyez sur ENTER. A partir de là,
utilisez les flèches LEFT et RIGHT pour sélectionner les caractères ainsi que les flèches UP et DOWN
pour changer les caractères. Appuyez ensuite sur ENTER pour co nfirmer le changement de nom.
Pour déplacer une chaîne, sélectionnez la colonne MOVE de la chaîne en question, puis sur ENTER.
Utilisez ensuite les flèches UP et DOWN pour modifier l’emplacement de la chaîne et sur ENTER pour
confirmer le changement. Sélectionnez la colonne DELETE et appuyez sur ENTER pour effacer la
chaîne. Utilisez la touche TV/RADIO pour passer des chaînes de radio aux chaînes de télévision, et
vice et versa.
4. System Config
4.1. TV Setting
A partir du menu TV Setting, le système TV, la sortie video et le ratio de la télé peut être modifié.
Appuyez sur les flèches UP et DOWN pour sélectionner la rubrique de votre choix. Pour changer
l’installation, appuyez sur les flèches LEFT et RIGHT : vous pourrez ainsi circuler entre les différentes
installations. Vous pouvez également appuyer sur ENTER puis sur les flèches UP et DOWN pour
sélectionner dans une liste d’installations. Les installations possibles sont les suivantes :
TV System: NTSC, PAL, Auto.
Video: YCbCr, TV-RGB, P-SCAN-YUV,PC-VGA,S-VIDEO
TV Type : 4:3 Pan-and-Scan, 4:3 Letterbox, 16:9.
33
Page 83

TV Setting -> TV SystemTV Setting -> TV System
TV System
Video
TV Type
PAL
S-VIDEO
16:9
TV Setting -> TV SystemTV Setting -> TV System
TV System
Video
TV Type
PAL
S-VIDEO
16:9
NTSC
NTSC
PAL
PAL
TV Setting -> TV SystemTV Setting -> TV System
TV System
Video
TV Type
PAL
S-VIDEO
16:9
4.2. Video Setting
A partir du menu Video Setting, vous pouvez modifier la luminosité, la saturation, le contraste de
l’écran ainsi que sa netteté. Appuyez sur les touches UP et DOWN pour sélectionner la rubrique de
votre choix. Pour changer l’installation, appuyez sur les touches LEFT et RIGHT et ainsi circuler dans
les différentes installations. Alternativement, appuyez sur ENTER pour sélectionner dans une liste
l’installation souhaitée.
4.3. Audio Setting
Les sorties Audio peuvent être modifiées en utilisant les touches LEFT et RIGHT de façon alternative.
Appuyez ensuite sur ENTER pour sélectionner la sortie Zudio de votre choix dans la liste su ivante :
SPDIF OFF, SPDIF RAW, SPDIF PCM
4.4. Langage
Le menu Langage permet à l’utilisateur de changer la langue qui apparaît à l’écran. Utilisez les
touches UP et DOWN pour sélectionner la langue de votre choix entre les suivantes : anglais,
français, allemand, et grecque. Appuyez sur ENTER pour confirmer votre choix.
34
Page 84

Language -> OSD Language
OSD Language
English
ENGLISH
GERMAN
SPANISH
FRENCH
4.5. Parent Control
Le menu Control Parent possède 2 rubriques : Charge Pin et Channel Lock. Lorsque vous changez le
code Pin, il vous sera demandé d’entrer l’ancien code, puis le nouveau code et enfin encore une fois
le nouveau code. Afin de changer la chaîne bloquée, vous devez avant tout rentrer le code Pin. Si le
code rentré est le bon, le menu Channel Lock apparaît alors à l’écran. Utilisez alors les touches UP et
DOWN pour sélectionner la chaîne que vous désirez bloquer. En appuyant sur ENTER, vous aurez
alors verrouillé la chaîne.
Parent Control -> Change pinParent Control -> Change pin
Change pin
Channel Lock
Press ENTER
Press ENTER
Old Pin:
Old Pin:
New Pin:
New Pin:
Confirm:
Confirm:
4.6. Time Setting
Le menu Time Setting vous permet de changer l’heure ainsi que l’heure de mise en veille de l’appareil.
Utilisez les touches UP et DOWN pour sélectionner la rubrique de votre choix, puis les touches LEFT
et RIGHT pour changer l’installation. Enfin, appuyez sur ENTER dès que vous désirez confi rmer u ne
action.
Time Setting -> Time ZoneTime Setting -> Time Zone
Time Zone
GMT +1
35
Page 85

5. Installation
5.1. Auto Scan
Le menu Auto Scan permet de sélectionner une région : pour cela, utilisez les flèches LEF T et RIGHT.
Puis, appuyez sur la touche DOWN pour sélectioner la rubrique « Select Scan » et enfin sur ENTER
pour confirmer votre choix. Après avoir choisi « oui » ou « non », vous accédez alors au scan.
5.2. Manuel Scan
Le menu Manuel Scan est illustré sur la figure en bas.
5.3. Default Setup
36
Page 86

Game (cf Fig.33)
L’appareil possède 3 jeux dans ce menu : Box Man, Burning Tetris, Hit Rat.
PARTIE ATV
1. Appuyez sur la touche SOURCE pour sélectionner le mode ATV MODE.
2. Appuyez sur SETUP pour faire apparaître les options à l’écran comme ci-dessous
A ; Appuyez sur le bouton DOWN pour sélectionner l’option Auto Search (recherche automatique) et
sur la touche RIGHT pour faire démarrer la Recherche.
B. Appuyez sur les touches UP et DOWN pour sélectionner la recherche manuelle (Manual
Research). Puis appuyez sur les boutons RIGHT et MEFT pour démarrer la recherche manuelle
C. Appuyez sur les boutons UP et DOWN pour sélectionner l’option Fine Tune, puis sur les touches
LEFT et RIGHT pour obtenir une réception fréquence de meilleure qualité.
D. Appuyez sur les touches UP et DOWN pour sélectionner la rubrique Chan nel vous permet de lire la
chaîne en cours. Appuyez sur les touches LEFT et RIGHT vous permet d’augmenter ou de diminuer la
fréquence de la chaîne.
37
Page 87

E. Appuyez sur les touches UP et DOWN pour sélectionner la rubrique Video Standard et ainsi
accéder au système TV PAL.
F. Appuyez sur les touches UP et DOWN pour sélectionner la rubrique Audio Standard et ainsi
accéder au Système Audio I, DK, BG.
G. Appuyez sur les touches UP et DOWN pour sélectionner la rubrique Skip : cette dernière vous
permet d’effacer la chaîne de votre choix.
PARTIE INSTALLATION ECRAN
En mode TFT, appuyez sur le bouton Fonction. L’écran affiche alors les rubriques suivantes:
H. Netteté
Appuyez sur la touche DOWN (flèche du bas) pour sélectionner la rubrique Sharpness. Appuyez
ensuite sur les touches fléchées LEFT et RIGHT pour ajuster la netteté de l’écran.
I. Teinte couleurs
Appuyez sur la touche DOWN (flèche du bas) pour sélectionner la rubrique Color Hue. Appuyez
ensuite sur les touches fléchées LEFT et RIGHT pour ajuster la teinte des couleu rs de l’écran.
38
Page 88

J. Saturation
Appuyez sur la touche DOWN (flèche du bas) pour sélectionner la rubrique Saturation. Appuyez
ensuite sur les touches fléchées LEFT et RIGHT pour ajuster la saturation d e l’écran.
K. Contraste
Appuyez sur la touche DOWN (flèche du bas) pour sélectionner la rubrique Contrast. Appuyez ensuite
sur les touches fléchées LEFT et RIGHT pour ajuster le contraste de l’écran.
L. Clarté
Appuyez sur la touche DOWN (flèche du bas) pour sélectionner la rubrique Brightness. Appuyez
ensuite sur les touches fléchées LEFT et RIGHT pour ajuster la clarté de l’écran.
M. Re set (Remettre à zéro)
Appuyez sur la touche DOWN (flèche du bas) ou UP (flèche du haut) pour sélectionner la rubrique
Reset. En appuyant sur ENTER, vous reviendrez alors aux réglages de l’écran d’origine.
N. Save (Sauver)
Appuyez sur la touche DOWN (flèche du bas) ou UP (flèche du haut) pour sélectionner la rubrique
Reset. En appuyant sur ENTER, vous sauvegarderez les réglages que vous aurez effectués.
39
Page 89

Pannes
LECTURE D’UN DISQUE EN MAUVAIS ETAT
Assurez-vous que le disque n’est ni raillé, ni endommagé.
Assurez-vous que le disque ne soit pas sali
Assurez-vous que le format du disque est compatible avec votre lecteur
PAS D’IMAGE NI DE SON
Assurez-vous que le bouton est sur ON
Assurez-vous que la sortie du courant est opérationnelle
Assurez-vous que le fil de la pride n’est pas endommagé
Assurez-vous que la prise est bien nranchée
“NON DISC” APPRAIT A L’ECRAN
Assurez-vous qu’il y a bien un disque dans votre lecteur
Assurez-vous que vous avez place le disque dans le bon sens
Assurez-vous que le disque n’est ni raillé, ni endommagé, ni sali.
Assurez-vous que les prises audio sont correctement connectées
Assurez-vious que le connecteur audio est correctement connecté
Assurez-vous que le volume est sur on
Assurez-ous que votre installation audio a été correctement mise en place
MAUVAISE QUALITE DE L’IMAGE ET DU SON
Assurez-vous que vous avez installé ele lecteur Audio correctement
Assurez-vous que le disque n’est ni raillé, ni endommagé.
Assurez-vous que le connecteur AV ou que la sortie terminal ne sont pas endommagés.
Assurez-vous que les prises video sont correctement branches
Assurez-vous que le connecteur video n’est pas endommagé
Assurez-vous que l’installation Video a été installée correctement
LA TELECOMMANDE NE FONCTIONNE PAS
Assurez-vous que le prise de la télécommande marchent encore
Dirigez la télécommande dans la direction du capteur situé sur votre lecteur
Enlevez tous les obstacles qui pourraient interférer entre la télécommande et le capteur de votre
lecteur
L’UNITE NE FONCTIONNE PAS
Eteignez votre appareil puis rallumez-le
SON SANS IMAGE
IMAGE SANS SON
Si vous avez des questions, veillez à consulter le guide des panes ci-dessous
Avant de vous adressez à un service réoaration
Les phénomènes décrits ci-dessous ne nécessitent pas forcément le recours à un service de
réparation. A l’aide de la liste ci-dessous, vérifiez que la panne n’est pas due à un de ces
phénomènes.
Ni son, ni image
Mauvaise connexion vace l’adaptateur AC ou Car.
Vous utilisez peut être un source de courant éléectrique non autorisée
Le bouton Power est peut être en position Off
Pas d’image
Assurez-vous que l’antenne est correctement installée
Assurez-vous que vous avez sélectionné la bonne région est les bonnes chaînes
Pas de son
Vérifiez que le volume est sur on
Vérifiez que vous avez branchez les hauts-parleurs
40
Page 90

Allumez le bouton des hauts-parleurs
Vérifiez que le volume n’est pas en mode Mute
Image de mauvaise qualité
Vérifiez que l’antenne est correctement installée
Le signal est peut être trop faible à cet emplacement
Pas de signal
Vérifiez que vous avez sélectionnez la bonne region
Le signal est peut être trop faible
L’image est noire
Ajustez la luminosité et le contraste correctement
Mauvaise qualité de l’image et du son
Le signal est trop faible à cet emplacement
INDICATIONS TECHNIQUES
Type
Modèle
Mode de lecture DDT765A
mode disque NTSC / PAL
Caractéristiques Video DVD, DVD+R/RW, DVD-R/RW, CD, CD-R, CD-R/RW, JPEG
Video S/N > 65 dB
Resolution > 500 Lines
Caractéristiques Audio
Fréquence de réponse fs 96 kHz: 20Hz-20kHz: +/-1dB
Audio S/N > 90 dB
Dynamic range > 90 dB
Distorsion > 0,01 %
Convertisseur D/A 96kHz / 24 bit
Caractéristiques d’entrée
Fréquence d’entrée VHF 48.25MHz~412.5MHz UHF 412.5MHz~863.25MHz
Mécanisme de lecture Color TFT-LCD
Chaînes DI48.25MHz~863.25MHz BG 48.25MHz~863.25MHz
Système son DK / I / BG
Taille de l’écran 7 inch
Sortie video 1V p-p (75 Ohm)
Sortie audio coaxial, 2CH
Volts du courant DC in 12V
Consommation < 15W
Taille 206 x 160 x 40 mm
Poids 770g
En raison des recherches permanentes pour améliorer la qualité de nos produits, la
compagnie se réserve le droit de changer la conception de ce dernier sans préavis.
41
Page 91

GEBRUIKSAANWIJZING
DVP7025DVBT
Gelieve deze gebruiksaanwijzing te lezen voor een correct gebruik en hou
hem bij voor later gebruik.
Page 92

Inhoud gebruiksaanwijzing DVD
INLEIDING
Veiligheidsvoorschriften .........................................................................................2
Belangrijke veiligheidsinstructies............................................................................ 3
Verwittigingen.........................................................................................................4
Accessoires.............................................................................................................. 5
Afbeelding toestel....................................................................................................6
AANSLUITINGEN
Aansluiting aan TV..................................................................................................7
Aansluiting aan AV versterker met digitale audio ingang ......................................8
Aansluiting aan de USB en 3-in-1 kaartlezer..........................................................9
BASIS WEERGAVE
Basisbediening.......................................................................................................10
Afstandsbediening .................................................................................................11
UITGEBREIDE FUNCTIES
Gebruik van den afstandsbediening.......................................................................12
Het instelmenu - DVD deel ..................................................................................17
Weergave MPEG4/MP3........................................................................................27
Weergave van een JPEG document....................................................................... 28
Weergave van een KODAK beeld CD.................................................................. 29
Instelmenu – DVB deel ........................................................................................ 30
Instelmenu – ATV deel .........................................................................................39
Instellingen beeldscherm ......................................................................................41
ANDERE
Hulp bij problemen................................................................................................ 44
Specificaties...........................................................................................................45
1
Page 93

Veiligheidsvoorschriften Inleiding
HET BLIKSEMSYMBOOL BINNEN EEN GELIJKBENIGE DRIEHOEK
DIENT ER VOOR OM DE GEBRUIKER TE VERWITTIGEN DAT ER ZICH
BINNEN HET APPARAAT GEVAARLIJKE SPANNINGEN AANWEZIG
ZIJN, VOLDOENDE HOOG OM ELEKTRISCHE SCHOKKEN TE KUNNEN
VEROORZAKEN.
HET UITROEPTEKEN IN EEN GELIJKBENIGE DRIEHOEK BETEKENT
DAT ER BELANGRIJKE INSTRUCTIES OVER HET GEBRUIK EN HET
ONDERHOUD TE VINDEN ZIJN IN DE BIJGEVOEGDE HANDLEIDING
VERWITTIGING
DEZE DVD SPELER IS EEN KLASSE 1 LASER PRODUCT. ANDER GEBRUIK DAN
GEPRESENTEERD IN DEZE HANDLEIDING KAN AANLEIDING GEVEN TOT
BLOOTSTELLING AAN STRALING.
DE LASERSTRAAL IN DIT TOESTEL IS SCHADELIJK VOOR HET OOG. PROBEER DUS
NIET HET TOESTEL TE OPENEN.
CONSULTEER EEN SPECIALIST VOOR HERSTELLING.
Macrovision:
Dit product bevat technologie voor copyrightbescherming die wordt
beschermd door conclusies in bepaalde octrooien
en andere intellectuele eigendomsrechten van Macrovision Corporation, die uitsluitend is
bestem voor gebruik in huishoudelijke kringen en andere beperkte afspeeltoepassingen,
behalve met de uitdrukkelijke toestemming van Macrovision Corporation. Reverseengineering of demonteren is verboden
DOLBY PROLOGIC:
Product onder licentie van Dolby Laboratories.
“Dolby”, “Pro Logic” en het symbool met de dubbele D zijn handelsmerken van Dolby
Laboratories.
2
Page 94

Belangrijke veiligheidsinstructies Inleiding
1. Lees de instructies.
Alle veiligheids- en bedieningsinstructies dienen gelezen te worden alvorens het toestel
te bedienen.
2. Hou de handleiding bij.
Bewaar de handleiding voor later gebruik.
3. Water en vocht
Gebruik dit toestel niet in de buurt van water, zoals een badkuip, een lavabo, in de
keuken of in een waslokaal, een kelder of naast een zwembad.
4. Ventilatie
De openingen in de behuizing dienen voor de ventilatie, zodat het toestel niet oververhit
kan raken. Ze mogen nooit afgesloten worden. Daarom mag het toestel ook niet gebruikt
worden op een bed, een sofa of dergelijke oppervlakten. Het toestel mag niet in een
gesloten ruimte, zoals een boekenkast, gebruikt worden, tenzij er voldoende ruimte voor
ventilatie aanwezig is.
5. Stroombron
Dit toestel mag alleen aangesloten worden op een stroombron die overeenkomt met die
gemarkeerd op het toestel. Indien u niet zeker bent over uw stroombron, consulteer dan
een dealer of uw stroomleverancier. Voor toestellen die voorzien zijn te werken op
batterijen of op andere bronnen, zie handleiding.
6. Bescherming van de stroomkabel
Stroomkabels moeten zodanig geplaatst worden dat er niet op getrapt kan worden en dat
er geen voorwerpen op geplaatst kunnen worden. Let vooral op bij het stopcontact en de
aansluiting aan het toestel.
7. Overbelasting
Overlaad het stopcontact niet met dubbele stekkers of verlengdraden vermits dit in brand
of elektrische schokken kan resulteren.
8. Binnentreden van voorwerpen of vloeistoffen
Duw nooit een voorwerp in de openingen van het toestel. Die kunnen punten met hoge
spanning aanraken, kortsluiting veroorzaken en resulteren in brand of elektrische
schokken. Mors geen vloeistoffen op het toestel.
9. Herstellingen
Probeer nooit het toestel zelf te herstellen. Door het toestel te openen stelt u zich bloot
aan hoge spanningen en andere gevaren. Breng het toestel naar een ervaren technicus.
10. Nood aan herstelling
Trek de stekker uit het stopcontact en breng het toestel naar een erkend servicecentrum
in de volgende gevallen:
A) Wanneer het netsnoer beschadigd is.
B) Als er vloeistof of een voorwerp in het toestel terecht is gekomen.
C) Als het toestel blootgesteld is aan regen of water.
3
Page 95

D) Als het toestel niet naar behoren functioneert. Gebruik alleen de
gebruiksmogelijkheden die in de handleiding beschreven zijn. Andere operaties kunnen
schade toebrengen en vaak resulteren in een nog grotere schade.
E) Als het toestel gevallen of beschadigd is.
F) Als de prestaties beduidend minder goed zijn en service nodig is.
11. Vervangonderdelen
Als er onderdelen vervangen moeten worden controleer dan dat de technicus onderdelen
heeft gebruikt zoals gespecificeerd door de fabrikant of onderdelen met dezelfde
eigenschappen. Niet toegelaten onderdelen kunnen resulteren in brand, elektrische
schokken of andere gevaren.
12. Warmte
Dit toestel mag niet naast warmtebronnen geplaatst worden zoals radiators, kachels of
andere toestellen die hitte veroorzaken.
Verwittigingen
Onderhoud
Verwijder eerst alle aansluitingen alvorens het toestel te reinigen.
Reinig het scherm, de
behuizing en de toetsen
met een licht bevochtigd
zacht doekje.
Dit symbool op het product of in de gebruiksaanwijzing betekent dat uw elektrisch en
elektronisch materiaal niet samen met uw huisvuil mogen weggegooid worden. Er bestaan in
de EU speciaal daartoe voorziene collectiesystemen voor recyclage.
Meer informatie kan u verkrijgen bij de lokale overheid of bij de verdeler bij wie u het toestel
kocht
4
Page 96

Voorzorgsmaatregelen Inleiding
Voorzorgsmaatregelen bij het gebruik
1. Enkel de meegeleverde AC adapter en de autoadapter (12V) zijn geschikt.
2. Voor veiligheid, wanneer u het toestel niet gebruikt, verwijder de AC adapter en de
autoadapter.
Accessoires
AC/DC adapter Afstandsbediening
AV kabel LI batterijen
Draagtas Digitale TV antenne
USB kabel Autoadapter
5
Page 97

Afbeelding toestel Inleiding
1. LCD scherm
2. Rechtse luidspreker
3. Linkse luidspreker
4. Disk deksel
5. Openen disk deksel
6. Bron
7. Instellingen
8. Menu/PCB
9. Functie
10. Bewegen (cdef)
11. Pauze
12. Prev (vorige)
13. Next (volgende)
14. Play (weergave)
15. Stop
16. Spanningindicator
17. Infrarood ontvanger
18. 3-in-1 kaartlezer (SD, MS, MMC)
19. Power (aan/uit)
20. DC 12 V ingang
21. Video
22. Audio
23. Coaxiaal
24. Hoofdtelefoon
25. Volume
26. USB
27. Batterij inbrengen/verwijderen
28. DC 12 V ingang (opladen)
29. Antenne-ingang
30. LED (rood: batterijen opladen; groen: batterijen volledig opgeladen)
6
Page 98

Aansluiten aan TV Aansluitingen
Rood wit geel
7
Page 99

Aansluiting aan AV versterker met digitale audio ingang Aansluitingen
Coaxiale kabel
Digitale versterker
Opmerkingen:
1. Selecteer de coaxiale digitale audio uitgang.
2. Stel de audio uitgang van de speler in Raw of PCM.
3. Stel de bron op de digitale AV versterker in op de gekozen aansluiting van de DVD.
8
Page 100

Aansluiting met USB en de 3-in-1 kaartlezer Aansluitingen
Druk op de Source toets op de afstandsbediening totdat u USB geselecteerd heeft.
USB interface
Dit toestel kan muziek weergeven van een USB speler (flash geheugen)
3-in-1 kaartlezer
Dit toestel beschikt over een 3-in-1 kaartlezer. Als er geen disk in de speler is, druk op source
van de afstandbediening totdat CARD geselecteerd is. U kan drie types kaarten inbrengen
(MMC, SD, MS) om MP3 muziek of MPEG4 films en JPEG beelden weer te geven. Alle
functies zijn identiek aan die van de weergave van een disk.
9
 Loading...