

Page 1
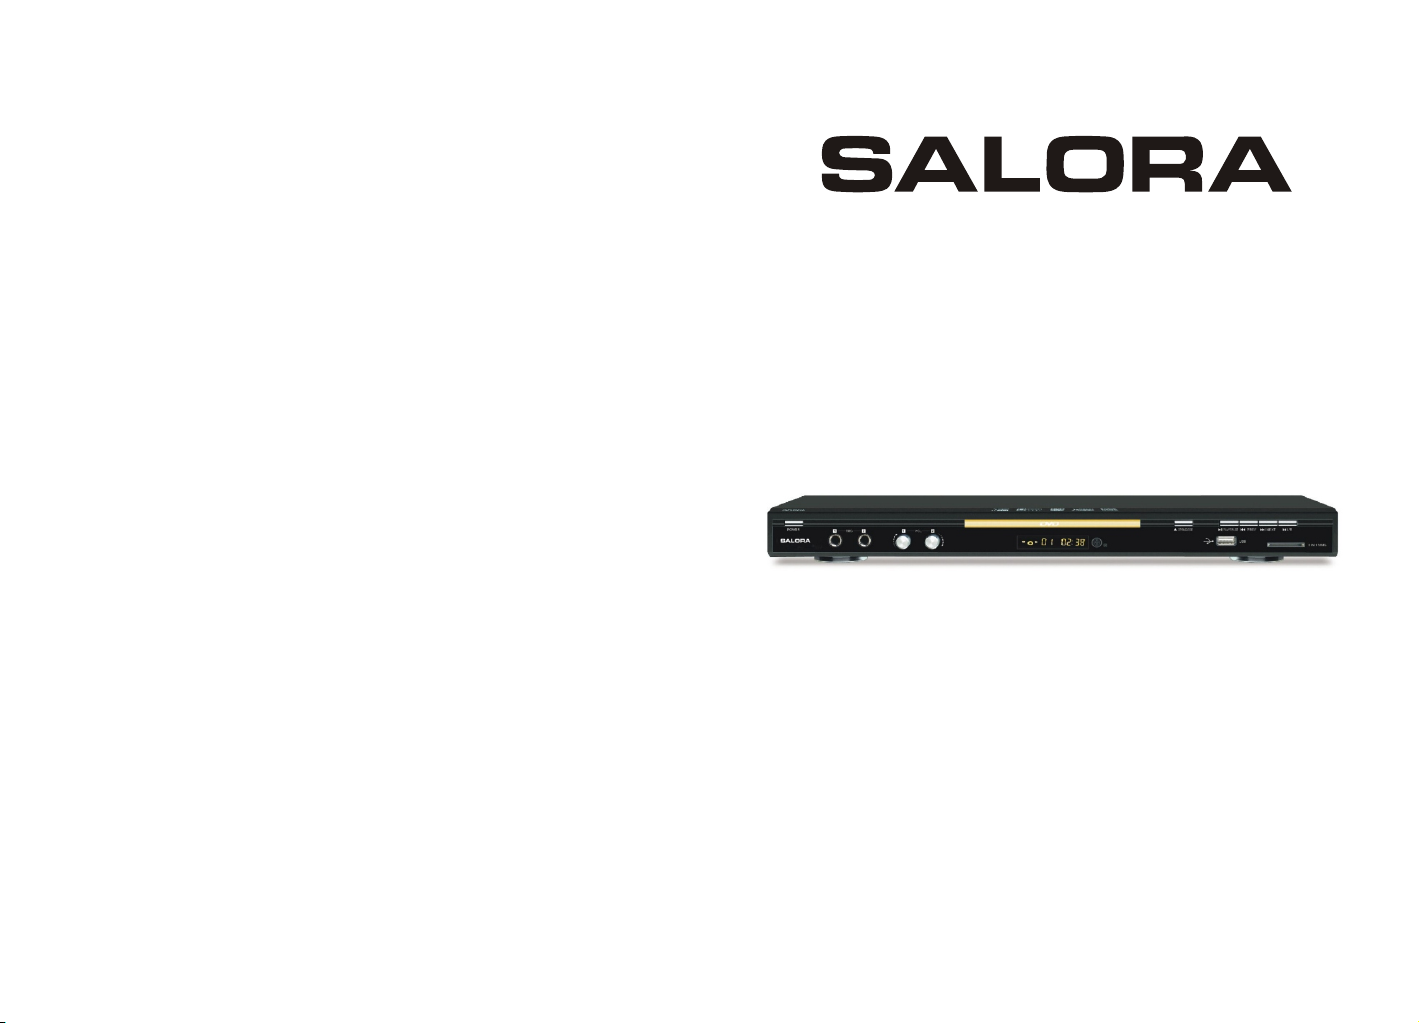
DVD340KM
GEBRUIKSAANWIJZING
MANUEL D UTILISATION'
USER MANUAL
Page 2
Inhoudsopgave
Veiligheidsinstructies
Verwittiging: dit symbool betekent dat er zich binnenin het product
gevaarlijke Spanningen bevinden.
Opgelet: dit symbool betekent dat er bij het product belangrijke
instructies betreffende de bediening en het onderhoud
meegeleverd worden.
Bij de design en het fabriceren van dit toestel werd rekening gehouden met de
veiligheid voor de mens. Nochtans kan onjuist gebruik aanleiding geven tot
elektrische schokken of brand. Daarom moeten de volgende
veiligheidsinstructies goed opgevolgd worden.
Opmerking: dit toestel mag niet met natte handen bediend worden. Plaats het
toestel op een droge plaats en zorg voor de nodige ventilatie.
Stroombron
Als de stekker zich in het stopcontact bevindt en het
toestel is uitgeschakeld, blijft het nog steeds onder
spanning staan.
De stekker dient uit het stopcontact gehaald te worden
als het toestel gedurende langere tijd niet gebruikt wordt.
Neem de stekker stevig vast en trek hem dan uit het
stopcontact. Trek nooit aan de stroomkabel.
Vervang indien nodig de stroomkabel door een nieuw exemplaar.
Plaatsing
Teneinde oververhitting te vermijden dient het
toestel in een goed geventileerde plaats gebruikt te
worden. Het toestel mag niet op een bed, een sofa of
dergelijke oppervlakte gebruikt worden omdat
daardoor de ventilatieopeningen geblokkeerd
kunnen worden.
Het toestel mag niet naast warmtebronnen
geplaatst worden en ook niet in direct zonlicht of op een stoffige plaats.
Er mogen geen zware voorwerpen bovenop het toestel geplaatst worden.
Verwittigingen
Als er iets zwaar op het toestel is gevallen trek dan de stekker uit het
stopcontact en gebruik het toestel pas opnieuw nadat het door een specialist
is nagekeken.
Er bevinden zich binnenin hoge spanningen. Open het toestel niet. Alleen
gespecialiseerd personeel mag herstellingen uitvoeren.
Binnenin het toestel bevindt zich een laser. Deze speler is geclassificeerd
als CLASS 1 LASER PRODUCT. Kijk niet direct in het licht van de laserstraal
vermits dit de ogen kan beschadigen.
Page 3

Condensatie in de speler
Als er zich grote temperatuurverschillen
voordoen kan er zich binnenin condensatie
voordoen en kan er vocht op de laserlens komen.
Dit kan gebeuren wanneer de speler snel van een
koude ruimte in een warme gebracht wordt. Door
de condensatie kan de speler niet goed werken.
Als dit gebeurt, breng het toestel naar een warme
ruimte, schakel het toestel in (ON) en wacht
gedurende een uur of twee zodat de condensatie
kan verdwijnen. Daarna zal het toestel terug goed
werken.
Reinigen
Reinig de behuizing, het scherm en de toetsten met een zacht en licht
bevochtigd doekje. Gebruik geen schurend materiaal, poeder of solvent zoals
alcohol of benzine. Dit kan schade of afdrukken op het toestel als gevolg hebben.
Voorzichtigheid met de discs
Gebruik geen bekraste, gebroken of vervormde discs.
Bekrast
Omdat de disc aan een hele hoge snelheid draait is het gevaarlijk een
gebroken disc te gebruiken. Kleef ook niets op de disc, want dat kan de speler
beschadigen.
Let op dat er tijdens de weergave geen eigenaardige geluiden of trillingen
voordoen. Als het beeld of geluid vervormd is, stop dan onmiddellijk de
weergave.
Gebroken
Vervormd
Voornaamste eigenschappen
Geschikt voor MPEG4, DVD, CD, MP3, KODAK, Beeld CD, CD-RW (gefinaliseerd).
Componenten (Y, Pb, Pr), S-Video en composiet video uitgang.
Progressieve scan.
Scart uitgang
Discs die met deze speler weergegeven kunnen worden:
U kan helpen het milieu te beschermen!
Hou u aan de plaatselijke reglementen: breng
versleten elektrische
apparatuur terug via het juiste systeem voor
recyclage.
Dit product bevat een beveiligingstechniek voor auteursrechten die beschermd
wordt door zekere US patenten en andere intelligente eigenaarsrechten door
Macrovision Corporation en andere eigenaars van rechten. Het gebruik van
deze beveiligingstechniek voor auteursrechten moet toegelaten worden door
Macrovision Corporation en is bedoeld voor huisgebruik of ander beperkt
gebruik, tenzij op een andere wijze toegelaten door Macrovision Corporation.
Verpakking
DVD speler
Audio/video-kabel
Afstandsbediening
Gebruiksaanwijzing
Dit product is compatibel met het KODAK Picture CD formaat en laat toe
KODAK beeld CD's weer te geven. Het 'KODAK Picture CD Campatible”
symbool is een handelsmerk van Eastman Kodak Company en het gebruik
1
1
1
1
ervan is toegelaten.
Gefabriceerd onder licentie van Dolby Laboratories. “Dolby” en het dubbele D
symbool zijn handelsmerken van Dolby Laboratories. Confidential
Unpublished Works. © 1992-1997 Dolby Laboratories, Inc. Alle rechten
voorbehouden.
4
Page 4
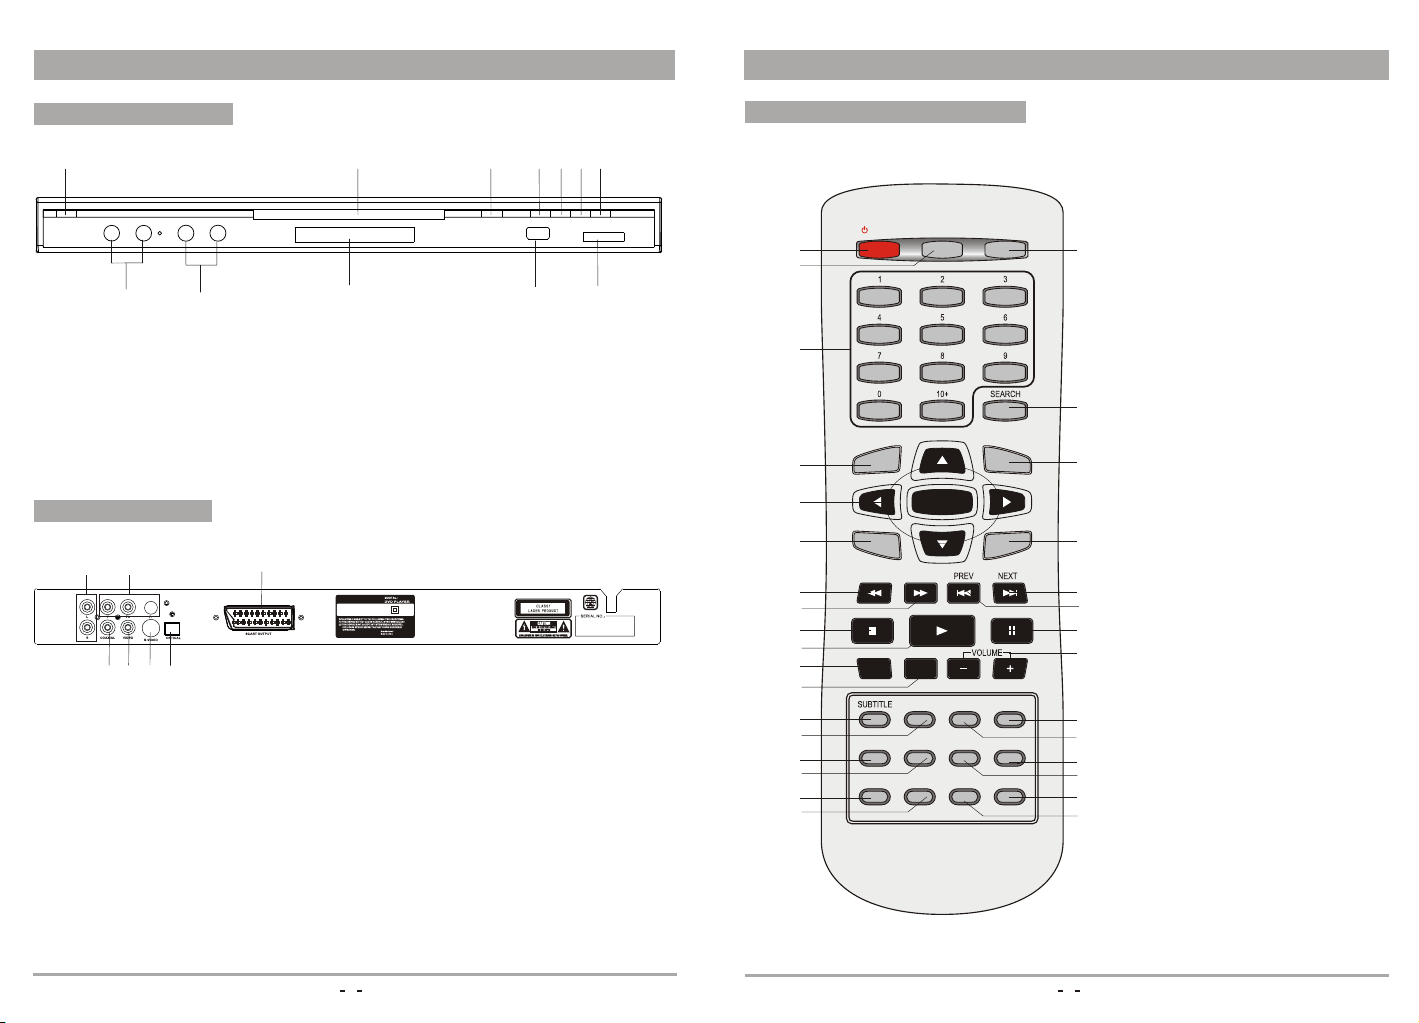
Bedieningen toestel
Afstandsbediening
Voorpaneel
1 2 3 4 5 6 7
8 9 10 11 12
1.Power (aan/uit)
2.Disc lade
3.Openen/sluiten
4.Weergave/pauze
5.Vorige
6.Volgende
7. Stop
8. Microfoon
9. Volume
10. LED display
11. USB poort
12. Kaartlezer
Achterpaneel
1
2
4 5 6
7
1.Audio L/R uitgang
2.Y, Pb, Pr uitgang
3.Scart uitgang
3
POWER SOURCE:110-240V~ 50/60Hz
POWER CONSUMPTION:9W
5. Video uitgang
6. S-video uitgang
7. Optische uitgang
4.Coaxiale uitgang
Instructies afstandsbediening
POWER
1
2
MUTE OPEN/CLOSE
3
SETUP TITLE/PBC
4
5
6
ZOOM MENU
REV FWD
7
8
STOP PAUSE
ENTER
PLAY
9
10
RESET DISPLAY
11
12
AUDIO ANGLE V-MODE
13
14
SLOW PROGRAM CLEAR N/P
15
16
17
18
REPEAT A-B RETURN USB/CARD
19
20
21
22
23
24
25
26
27
28
29
30
31
32
1.Power
2.Mute
3.Numerieke toetsen
4.Instellingen
5.Pijltoetsen
6.Zoom
7.Snel achterwaarts
8.Snel voorwaarts
9.Stop
10.Weergave
11.Reset
12.Display
13.Ondertitels
14.Audio
15.Vertraagd
16.Programma
17.Herhaling
18.A-B
19.Openen/sluiten
20.Zoeken
21.Titel/PBC
22.Menu
23.Volgende
24.Vorige
25.Pauze
26.Volume+/Volume-
27.V-modus
28.Hoek
29.N/P
30.Clear
31.USB/CARD
32.Terug
5
6
Page 5

Gebruik van de afstandsbediening
Aansluitingen
GEBRUIK VAN DE AFSTANDSBEDIENING:
Open het deksel van
het batterijencompartiment
Plaats de batterijen
Zorg ervoor dat de polariteit van de batterijen
overeenkomt met de aanduidingen in het compartiement
OMGAAN MET DE AFSTANDSBEDIENING
Richt de afstandsbediening naar de infrarood
ontvanger van het toestel.
Laat de afstandsbediening niet vallen.
Gebruik de afstandsbediening niet in warme of
vochtige omgevingen.
Mors geen water of een andere vloeistof op de
afstandsbediening.
Zorg voor de batterijen in de afstandsbediening: haal
de batterijen eruit als hij gedurende lange tijd niet
gebruikt wordt.
De afstandsbediening werkt tot op een afstand van 7
meter van het toestel.
Gebruik de afstandsbediening niet direct naast een
warmtebron.
Plaat het deksel terug
op het
batterijencompartiment
Within 7 meters
MUTE OPEN/CLOSE
POWER
SETUP TITLE/PBC
ENTER
ZOOM MENU
REV FWD
PLAY
STOP PAUSE
RESET DISPLAY
AUDIO ANGLE V-MODE
SLOW PROGRAM CLEAR N/P
REPEAT A-B RETURN USB/CARD
Aansluiting aan TV met audio/video kabel
Televisie
Geel Rood Wit
Naar video ingang (geel)
Naar audio ingang (rood, wit)
Naar S-video ingang
DVD-speler
Wit Rood Geel
Als de TV over een S-Video ingang beschikt, gebruik dan een S-Video kabel.
Als de S-video ingang gebruikt wordt, gebruik dan niet de gele videokabel.
Aansluiting aan een audio/video systeem en TV met een YUV video ingang
Audio systeem
Wit Rood
Naar CB/PR video uitgang
DVD speler
Naar Y video uitgang
Naar CB/PB video uitgang
Naar PR video ingang
Naar PB video ingang
Naar Y video ingang
Televisie
Aansluiting aan TV een versterker met coaxiale of optische ingang
Versterker
Naar optische
digitale ingang
Naar coaxiale
digitale ingang
Coaxiale kabel
OF
Optische kabel
DVD speler
Naar CB/PR video uitgang
Naar CB/PB video uitgang
Naar optische uitgang
Naar Y video uitgang
Naar CB/PR video ingang
Naar CB/PB video ingang
Naar Y video ingang
Televisie
7
8
Page 6

Aansluiting aan TV met Scart kabel
Televisie
Scart kabel
DVD speler
Basisbediening
Nadat alle aansluitingen gemaakt zijn, kan het toestel gebruikt worden via de
PWER toets.
Alvorens de speler te gebruiken, moet eerst het volgende gebeuren:
1. Schakel de TV in en selecteer de AV ingang. Als de S-video ingang gebruikt
wordt, selecteer dan de S-video ingang.
2. Als er een versterker is aangesloten, schakel hem dan in en selecteer “DVD”.
3. Zorg voor stroomvoorziening voor de speler.
Stap 1: druk op “OPEN/CLOSE” en de disclade
Gaat open.
Stap 2: breng een disc in en druk op
“OPEN/CLOSE” en de disclade gaat dicht. Op
het scherm verschijnt 'closing' ; de speler herkent
Het type disc en duidt dat aan in de linker bovenhoek van het scherm. De display
van de speler geeft eveneens het type disc aan.
Weergave met deze DVD speler
Schakel de TV, de speler en de versterker in.
1. Druk op “TV/AV” van de televisie om de video modus te kiezen.
* indien aangesloten met S-Video, selecteer S-Video
* indien aangesloten met Y, Pb, Pr, selecteer YUV modus
2. Selecteer de juiste audio ingang op de versterker.
* consulteer indien nodig de gebruiksaanwijzing van de versterker.
Weergave van een disc
Na de disc herkent te hebben, wordt de weergave gestart:
· met een DVD disc wordt overgegaan naar het menu of het titelmenu van de DVD;
· met een VCD2.0 disc wordt overgegaan naar het PCB controlescherm;
· met een CD worden de nummers achtereenvolgend weergegeven.
Weergave:
Als de speler stopt of in pauze gaat, druk dan terug op “PLAY” om de weergave
verder te zetten.
Pauze:
Tijdens de weergave van DVD, druk op “PAUSE” om het beeld te pauzeren.
Stop:
Tijdens de weergaven van DVD zorgt een eerste druk op “STOP” voor een
geheugenfunctie. Druk opnieuw op “PLAY” en de weergave start vanaf het punt waar
gestopt werd. Druk tweemaal op “STOP” om de weergave volledig te stoppen.
Vorig hoofdstuk, volgend hoofdstuk:
· Druk op “PREV” en het vorige hoofdstuk wordt weergegeven.
· Druk op “NEXT” en het volgende hoofdstuk wordt weergegeven.
Voorwaarts en achterwaarts:
· Druk de toets “FWD” verschillende malen in om snel voorwaarts te zoeken aan de
verschillende snelheden: 2x, 4x, 8x, 16x, 32x en dan terug normale snelheid.
· Druk de toets “REV” verschillende malen in om snel achterwaarts te zoeken aan de
verschillende snelheden: 2x, 4x, 8x, 16x, 32x en dan terug normale snelheid.
OPEN/CLOSE
POWER
9
10
Page 7
Opmerking:
Als de PCB functie ingeschakeld is wordt er alleen binnen één enkel nummer gezocht.
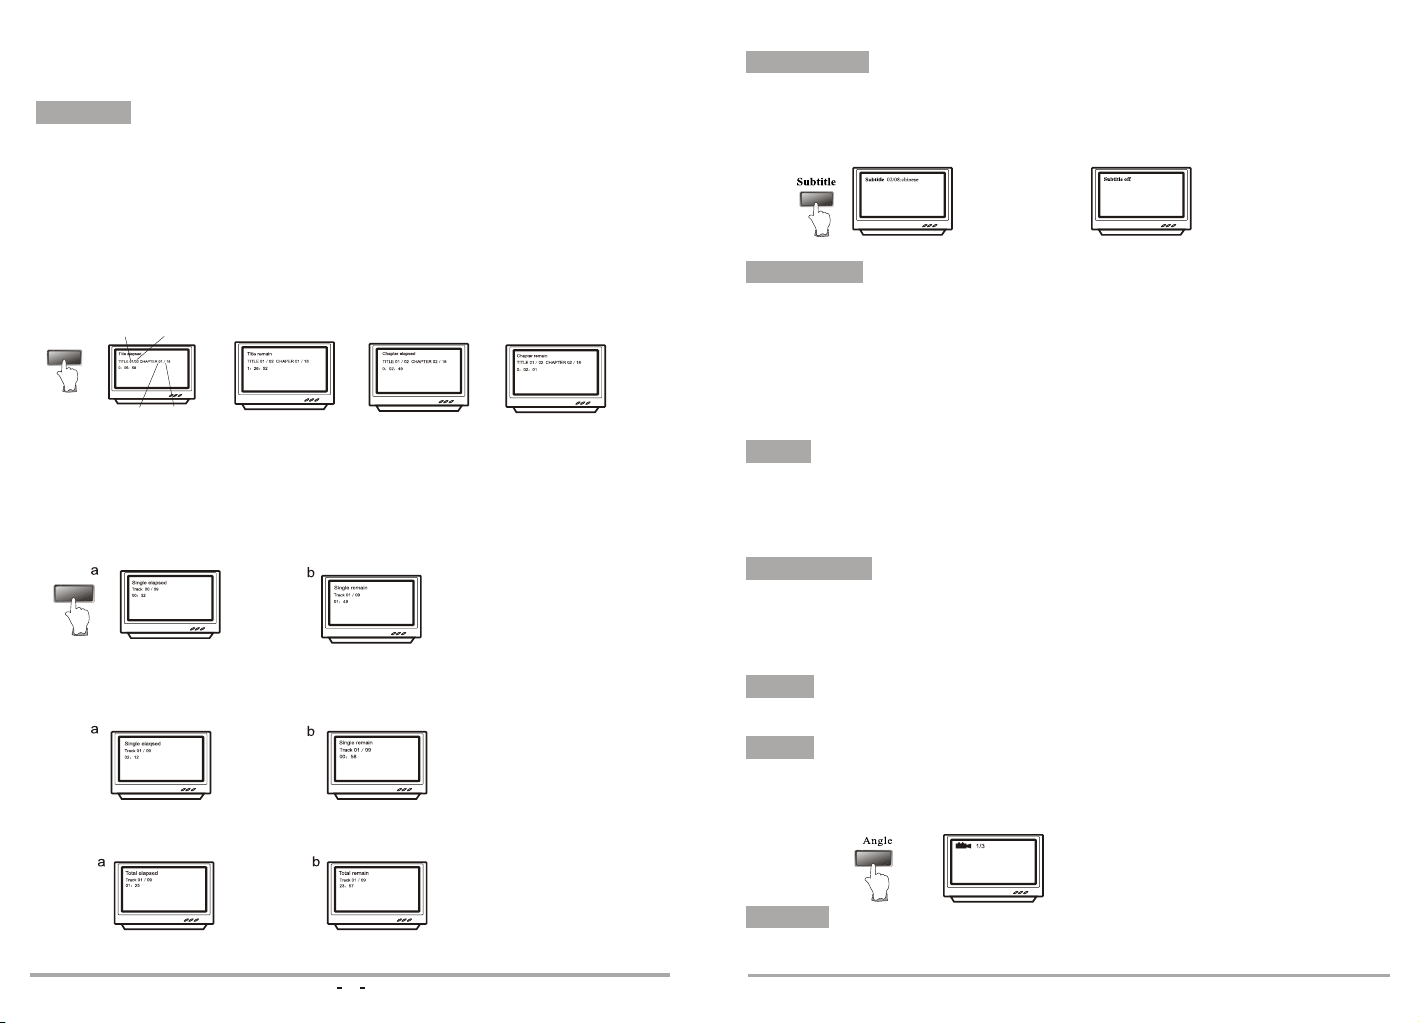
DISPLAY
Wanneer de volgende discs weergegeven worden, druk op “DISPLAY” van de
afstandsbediening en het scherm toont het volgende.
Tijdens de weergave van DVD, druk op “DISPLAY” en het scherm a wordt getoond.
Druk opnieuw op “DISPLAY” en scherm b wordt weergegeven.
Druk voor een derde maal op “DISPLAY” en scherm c wordt weergegeven.
Druk voor een vierde maal op “DISPLAY” en scherm d wordt weergegeven
Druk voor een vijfde maal op “DISPLAY” en de informatie verdwijnt.
a b c d
Current title title
DISPLAY
Current chapter
Chapter
Ondertitels
U kan de taal van de ondertitels kiezen (bij discs die deze mogelijkheid bieden) door
verschillende malen op de 'subtitle' toets te drukken. Voorbeeld: de tweede taal uit
de acht mogelijkheden is Nederlands.
USB/CARD
1)Schakel het toestel in.
2)Controleer dat er geen disc in de lade is.
3)Sluit een USB aan.
4)Druk op “USB&Card” en de speler leest de multimedia documenten die
zich op de USB bevinden.
Opmerking: afhankelijk van de grootte van het document, kan het een minuut duren
alvorens het beeld verschijnt.
Bij weergave van VCD en SVCD
Als 'PCB' ingeschakeld is:
Druk op “DISPLAY” en het scherm a wordt weergegeven.
Druk een tweede maal op “DISPLAY” en scherm b wordt weergegeven.
DISPLAY
Als 'PCB' uitgeschakeld is:
Druk op “DISPLAY” en het scherm a wordt weergegeven.
Druk een tweede maal op “DISPLAY” en scherm b wordt weergegeven.
Druk voor een derde maal op “DISPLAY” en scherm a wordt weergegeven.
Druk voor een vierde maal op “DISPLAY” en scherm b wordt weergegeven
Druk voor een vijfde maal op “DISPLAY” en de informatie verdwijnt.
11
Tijd
Druk tijdens de weergave op “SEARCH” en u kan de startpositie in tijd bepalen binnen
een bepaalde titel (bij DVD video) of op de disc (Video CD/Audio CD). Druk
tweemaal op “SEARCH” en bovenaan het scherm verschijnt een menustrook. Gebruik
de numerieke toetsen om de gewenste tijd in te stellen.
Programma
Druk op “PROG” en op het scherm verschijnt een informatiemenu. Gebruik de
numerieke toetsen om de gewenste nummers in te brengen. Als dat gebeurt is,
verschuif de cursor naar 'start' symbool om de geprogrammeerde weergave te starten.
Op het scherm verschijnt het 'Program' logo.
Clear
Gebruik deze toets om alle programma's te wissen.
Hoek
Bij weergave van een DVD disc, druk op “ANGLE” om bepaalde scènes vanuit
verschillende hoeken te kunnen bekijken. (Werkt alleen bij discs die deze functie
hebben).
V-mode
Druk op “V-mode” om te kunnen selecteren tussen YUV en S-Video/RGB.
-12-
Page 8

Audio
Bij de weergave van een DVD disk, druk op “AUDIO” en het scherm toont de volgende
informatie.
Audio
Titel
Tijdens de weergave van een DVD disc, druk op “TITLE” om direct naar het titelmenu
te gaan. Druk op “MENU” om naar het hoofdmenu te gaan. Binnen de menu's kunt u
de pijltoetsen of de numerieke toetsen gebruiken om een selectie te maken.
(Dit werkt alleen bij DVD discs met deze functie).
N/P
Om de speler af te stellen op het kleurformaat van uw TV.
Druk verschillende malen om “N/P” om te kiezen tussen NTSC, PAL,
en Auto.
Pijltoetsen
Tijdens de weergave van de menu's kunnen de pijltoetsen “ ”,“ ”,“ ”,“ ” gebruikt
worden om een selectie te maken.
Volume en mute
Druk op “Volume +/-“ om in het hoofdmenu volume te komen en regel dan het
hoofdvolume met deze toetsen.
Druk op “MUTE” om het geluid volledig uit te schakelen; druk opnieuw op “MUTE” om
terug op het vorige volume te komen.
Zoom functie
Tijdens de weergave of in pauze, druk op “ZOOM” om het beeld 2, 3 of 4 maal te
vergroten.
Herhaling
Tijdens de weergave van een DVD disc, druk “REPEAT” verschillende malen in om
achtereenvolgens de volgende mogelijkheden te bekomen:
Herhaling
Herhaling titel
Herhaling hoofdstuk
Herhalingsfunctie
uitschakelen
Bij weergave van SVCD/VCD, druk op “REPEAT” om achtereenvolgens te kunnen
kiezen uit (alleen als PBC uitgeschakeld is):
Herhaling
Numerieke toetsen
Tijdens de weergave van een disc kunnen de numerieke toetsen gebruikt worden om
bijvoorbeeld een hoofdstuk te selecteren. U kan een titel of hoofdstuk selecteren met
de linkse en rechtse pijltoets en dan een bepaalde sectie kiezen met de numerieke
toetsen. De selectie wordt automatisch weergegeven.
Menu
Druk op deze toets en het scherm toont 'Root Menu'. Selecteer dan het gewenste item.
(Dit is mogelijk met DVD disc die over een menu met meerdere lagen beschikt).
Vertraagde weergave
Druk op “SLOW” om een vertraagde weergave te verkrijgen aan ½, ¼, 1/8 en 1/16
normale snelheid.
13
Herhaling één nummer
Herhaling hele disc
Herhalingsfunctie uit
Opmerking: deze functie werkt alleen als PBC zich in de stand OFF bevindt.
PBC
Druk op deze toets om PBC in of uit te schakelen bij de weergave van SVCD en
VCD2.0 discs.
14
Page 9
MP3 bediening
MP3 basisbediening
De MP3 weergave gaat via een selectie per menu.
Voor herhaling kies tussen één nummer of folder.
Disk weergave
Volg de normale gebruikstappen, breng de disk in
en de speler zoekt de diskinformatie en gaat naar
het MP3 menu.
Karaoke bediening
Systeeminstellingen
Language
Video Audio
- - Language setup page - -
OSD lang ENG
Subtitle OFF
Audio AUTO
Disc Menu AUTO
Taalinstelling
Language
Video Audio
- - Language setup page - -
OSD lang ENG
Subtitle OFF
Audio AUTO
Disc Menu AUTO
English
French
German
Italian
Spanish
Preference
Preference
Druk op de Setup toets en het hoofdmenu
verschijnt. In de pagina Algemene
Instellingen, druk op om een item aan te
duiden.
Druk op ENTER om in het submenu te gaan.
Druk op om de instelling te selecteren.
Druk op OK om de instelling te bevestigen.
Druk op om het menu te verlaten.
In deze optie kan de gebruiker de taal voor het
OSD menu instellen (Engels, Frans, Duits,
Italiaans, Spaan).
Standaardinstelling: Engels
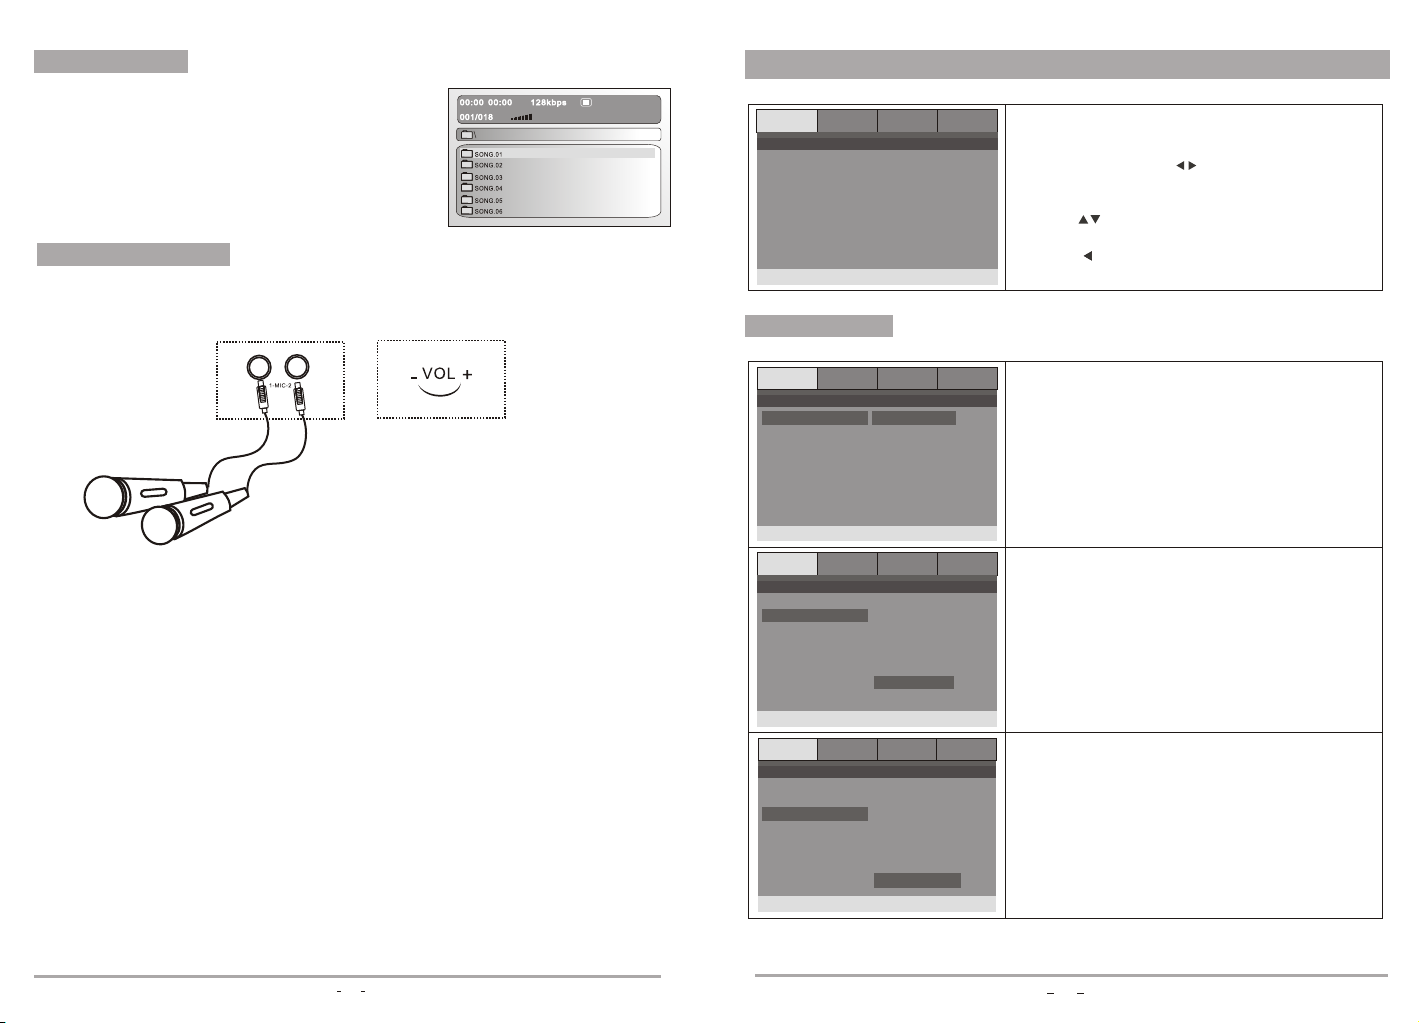
(Sluit de microfoon aan zoals hierboven getoond)
* Zet het 'Volume' in de laatste stand. Sluit de microfoon aan op de 'Mic'
aansluiting. U kan twee microfoons aansluiten. Druk op de Karaoke toets van de
afstandsbediening om karaoke in te schakelen.
* Draai aan 'Volume' om het niveau van de microfoon in te stellen.
* Wissen van het originele geluid. Indien het originele geluid weergegeven
wordt terwijl u zingt, druk dan op de AUDIO toets om het linker of rechter kanaal
te kiezen (VCD) of druk op de AUDIO toets (DVD, SDVD) op de
afstandsbediening om een ander geluidkanaal te kiezen en het originele geluid
weg te werken.
Opmerkingen:
1. Indien er een gehuil ontstaat, plaats de microfoon dan verder weg van de Tv
of de luidspreker. Verminder het geluid van de TV of de luidspreker. Verminder
het Mic volume.
2. De Karaoke functie is niet mogelijk met een digitale uitgangsmodus.
15
Language
Video Audio
- - Language setup page - -
OSD lang ENG
Subtitle OFF
Audio AUTO
Disc Menu AUTO
Language
Video Audio
- - Language setup page - -
OSD lang ENG
Subtitle OFF
Audio AUTO
Disc Menu AUTO
English
French
German
Italian
Spanish
Off
English
French
German
Italian
Spanish
AUTO
Preference
Preference
Selecteer de voorkeurtaal voor de ondertitels.
Standaardinstelling is OFF (uit).
De taal van de ondertitels hangt af van de
beschikbaarheid op de disk. U kan de taal
ook tijdens de weergave veranderen door op
de SUBTITLE toets te drukken.
In deze optie kan de gebruiker de voorkeur
geven voor de gesproken taal bij DVD.
De standaardinstelling is AUTO.
Opmerking:
1. De gesproken taal hangt af van de
beschikbaarheid op de disk.
2. U kan de taal ook tijdens de weergave
veranderen door op de AUDIO toets te
drukken.
16
Page 10

Language
Video Audio
- - Language setup page - -
OSD lang ENG
Subtitle OFF
Audio AUTO
Disc Menu AUTO
English
French
German
Italian
Spanish
AUTO
Video-instellingen
Language
Video Audio
- - Video setup page - -
TV Display 16:9
TV type PAL
Angle Mark On
Captions OFF
Screen Saver On
Component S-video
Language
- - Video setup page - -
TV Display LB
TV type PAL
Angle Mark On
Captions OFF
Screen Saver On
Component S-video
4:3/PS
4:3/LB
16:9
Video Audio
PAL
NTSC
AUTO
Preference
Preference
Preference
Met deze functie kunt u de menutaal van de
disk kiezen.
Standaardinstelling: AUTO.
Opmerking: de taal van jet diskmenu hangt af
van de beschikbaarheid op de disk.
In deze optie kan de gebruiker kiezen voor
het beeldformaat (Normaal/PS, Normaal/LB,
Breedbeeld).
Standaardinstelling: 16:9.
Opmerkingen:
1. Deze functie hangt af van het formaat
waarmee de DVD opgenomen is.
2. Kies breedbeeld (16:9) als u een
breedbeeldtelevisie gebruikt.
Gebruik deze optie om het TV type in te stellen
(PAL, AUTO, NTSC).
Standaardinstelling: PAL
Language
Video Audio
- - Video setup page - -
TV Display LB
TV type PAL
Angle Mark On
Captions OFF
Screen Saver On
Component S-video
Language
- - Video setup page - -
TV Display LB
TV type PAL
Angle Mark On
Captions OFF
Screen Saver On
Component S-video
Language
- - Video setup page - -
TV Display LB
TV type PAL
Angle Mark On
Captions OFF
Screen Saver On
Component S-video
On
Off
Video Audio
On
Off
Video Audio
S-Video
YUV
RGB
Scart
Audio instellingen
Preference
U kan dit op ON zetten om de verborgen tekst
weer te geven die op de disk is opgelagen.
Mogelijke instellingen: AAN, UIT.
Standaardinstelling: UIT.
Preference
Gebruik deze optie om de screen saver te
activeren.
Standaardinstelling: AAN.
Preference
Gebruik deze optie op de video uitgang te
kiezen (Side, YUV, RGB, Scart).
Standaardinstelling: S-video
Language
Video Audio
- - Video setup page - -
TV Display LB
TV type PAL
Angle Mark On
Captions OFF
Screen Saver On
Component S-video
Preference
On
Off
Gebruik deze optie om de hoek in te stellen
tijdens het kijken.
Mogelijke instellingen: AAN, UIT.
Standaardinstelling: UIT.
17
Language
Video Audio
- - Audio setup page - -
Spdif output RAW
downmix LTRT
Dual Mono STR
Dynamic
MIC Setup
SPDIF /OFF
RAW
SPDIF/PCM
Preference
Klik op de SPDIF audio uitgang optie en
gebruik de pijltoetsen om de gewenste
uitgangsmodus te kiezen.
Druk op ENTER om te bevestigen. Er zijn 3
mogelijke audio uitgangsmodi: RAW, PCM en
OFF (uit).
18
Page 11
Language
Video Audio
- - Audio setup page - -
Spdif output RAW
downmix LTRT
Dual Mono STR
Dynamic
MIC Setup
LT/RT
Stereo
Preference
U kan de downmix optie kiezen wanneer de
speler via de analoge uitgang verbonden is
met een versterker (geluidsinstallatie).
Mogelijke instellingen: LT/RT, Stereo.
Standaardinstelling: LT/RT.
Language
Video Audio
- - Micphone setup page - -
MIC ON
MIC VOL 20
Echo Level 15
Preference
Regel het volume van de microfoons met de
VOL1 en VOL 2 toetsen.
Instellingen: 0-20
Standaardinstelling: 20
Language
Video Audio
- - Audio setup page - -
Spdif output RAW
downmix LTRT
Dual Mono STE
Dynamic
MIC Setup
Language
- - Audio setup page - -
Spdif output RAW
Downmix LTRT
Dual Mono STR
Dynamic
MIC Setup
Stereo
L-Mono
R-Mono
Mix-mono
Video Audio
Microfooninstelling
Language
Video Audio
- - Micrphone setup page - -
MIC ON
MIC VOL 20
Echo Level 15
ON
OFF
Preference
Preference
Full
¾
½
¼
OFF
Preference
U kan de uitgangsmodus van de analoge
uitgang kiezen (DOWNM/IX).
Mogelijke instellingen:
Stereo, L-mono, R-mono, Mix-Mono.
Standaardinstelling: stereo
U kan de mate van de dynamische compressie
van de audio uitgang instellen.
Normaal moet deze instelling op OFF (uit)
staan.
Andere instellingen:
UIT, 1/8, ¼, 3/8, ½, 5/8, ¾, 7/8, FULL (volledig).
U kan kiezen voor MIC ON om Karaoke te
kunnen gebruiken.
Language
Video Audio
- - Micphone setup page - -
MIC ON
MIC VOL 20
Echo Level 15
Referentie-instellingen
Language
Video Audio
- - Preference Setup Page - -
Password
Parental
Defaults
Language
- - Preference Setup Page - -
Password
Parental
Defaults
Change
Video Audio
1Kids safe
2 G
3 PG
4 PG-13
5 PG-R
6 R
7 NC-17
8 Adult
Preference
Preference
Preference
Regel de echo van de microfoons met de
echo toetsen.
Instellingen: 0-20
Standaardinstelling: 15
In deze optie kan u een paswoord inbrengen
(vier cijfers). Alle ouderlijke controle functies
zijn beschermd door een paswoord.
Standaard paswoord: 0000
Gebruik deze optie om het niveau van de
ouderlijke controle in te stellen, zodat sommige
scènes niet door kinderen bekeken kunnen
worden.
De mogelijke instellingen zijn:
KINDVRIENDELIJK, G, PG, PG-13, PG-7, PGR, R, Nc17, VOLWASSENEN.
Standaardinstelling is VOLWASSENEN.
19
20
Page 12

Language
Video Audio
- - Preference Setup Page - -
Password
Parental
Defaults
Reset
Preference
Gebruik dit item en druk op OK om terug tot
de fabrieksinstellingen te komen.
Uitgang
Video uitgang
S-video uitgang
1.0 V (p-p), 75 ohm
(Y) 1.0 V (p-p), 75 ohm
(C) 0.286 V (p-p), 75 ohm
Specificaties
DVD SPELER
Voeding
Verbruik
Gewicht
Afmetingen
Videosysteem
Optisch leessyteem
Audio frequentiebereik
Signaal/ruis verhouding
Dynamisch bereik
Rotating ratio
Gebruikscondities
AC 110-240 V 50/60 Hz
12 W
2.0 kg
430 x 210 x 38 mm
NTSC/PAL
Halfgeleider laser ALGaAs, 650 nm, 780 nm
DVD audio: fs 48 kHz, PCM 4 Hz-22 kHz
fs 96 kHz, PCM 4 Hz 44 kHz
Audio CD: fs 44.1 khz, 4 hz 20 kHz
>90 dB
>60 dB
Binnen meetbaar gebied
Temperatuur 0°C 40°C, horizontaal gebruik
Audio uitgang
(analoog)
2.0 V (rms)
Hulp bij problemen
Gebruik, alvorens een specialist te consulteren, onderstaande tabel om een
oplossing te vinden voor een mogelijk probleem.
PROBLEMEN EN OPLOSSINGEN
PROBLEEM
Geen power
Geen beeld
Geen geluid
Geen weergave
Afstandsbediening
werkt niet goed
Storing in beeld
Werkt niet goed
Controleer of het toestel goed aangesloten is aan de netstroom.
Controleer de verbindingen tussen de speler en de TV
Controleer of de TV goed functioneert.
Controleer de aansluitingen tussen de speler en de andere
apparaten.
Controleer of de TV en de andere apparaten goed functioneren.
Controleer of de disc goed is ingebracht.
Reinig de disc.
Verwijder voorwerpen tussen de afstandsbediening en het toestel.
Richt de afstandsbediening naar het toestel.
Controleer de batterijen en vervang ze indien nodig;
Controleer of er krassen of vuil op de disc zijn. Reinig of
vervang de disc.
Schakel het toestel uit, wacht tien seconden en schakel het
dan terug in.
Probleem met voeding of andere elektrische problemen.
Schakel het toestel uit, wacht tien seconden en schakel het
dan terug in.
OPLOSSING
21
22
Page 13

Table Of Contents
Safety Instructions
Table of contents 1
Safety instructions 2
Package 3
Main features 4
Main unit control 5
Remote control 6
System connection 8
Basic operation 10
System setup 16
Specifications 21
Troubleshooting 22
Warning: this mark is a warning sign alerting you of dangerous voltage
inside the product.
Caution: this mark is a warning sign alerting you of important operation and
maintanance instructions accompanying the product
The design and manufacture of the appliance have fully considered the safety of
human body. However inappropriate handling of it may cause such accidents as
electric shocks and fire. So, the following safety instruction should be fully observed.
Notice: the appliance cannot be handled with wet hand. It should be kept at dry
place with proper ventilation.
Power sources
The power cord is connected to the jack, which
means when the appliance is shut, it still connects
to the power source.
The power cord of the appliance should be unplugged
from the jack when left unused for a long period of time.
When unplugging the power cord, hold tight the plug
contact and draw out. Please do not draw the power cord directly.
Change the power cord in a qualified shop if necessary.
Location
The appliance should be kept in a place with
proper ventilation to prevent being overheated.
For example, the appliance should not be put
on a bed, sofa, rug, or similar surface that may
block the ventilation openings.
The appliance should be situated away from
any heat sources, or any place subjected to direct sun radiation, dust-plagued,
or mechanical percussion.
Heavy weight goods should be removed from the top of the appliance.
Precautions
If there is anything other than disc drop into the play, please switch off the power
source, and resume using it after being checked by qualified maintenance staff.
There is high voltage inside the player. Do not remove the cover of the set.
Qualified service personnel should do all the maintenance operations.
There is laser system inside the set. This player is classified as CASS 1LASER
PRODUCT. Do not let the laser light go direct to you eyes, which may harm you
eyes.
Page 14

Condensation inside the player
If the player is subject to sharp temperature
change, or warm air affected any components,
moisture may condense on the lens inside(the
so call “sweltering”). For example, if the player
is brought directly from a cold to a warm location
in winter. With the ensuing condensation, the
player may not operation properly. Should this
occur, put the player in warm room, and turn the
POWER button to ON and wait about an hour or two (the duration) is environment
related) for the moisture to evaporate. The player will resume working after the
condensation evaporates.
Cleaning
Clean the cabinet, panel and controls with a soft cloth slightly moistened with a
mild detergent solution. Do not use any type of abrasive pad, scouring powder, or
solvent, such as alcohol or benzene, to avoid damaging the surface or removing
the prints on them.
Precaution about the disc
Do not play any cracked, broken ,or deformed disc.
Main Features
Full compatibility with MPEG4, DVD, CD, Mp3, KODAK Picture CD, CD-RW
(finalized)
Component (Y, Pb, Pr),S-video and composite video output
Progressive Scan
Scart Output
Disc format supported by this player:
You can help protect the environment!
Please remember to respect the local regulations:
hand in the non-wroking electrical equipments to an
appropriate waste disposal center.
Cracked
Because the disc should be rotated with high speed, so it is very dangerous to play
any broken or deform disc. Do not apply any tape or glue on the disc. Otherwise, it
may damage the player.
Notice if there is any strange noise or vibration while playing. If the picture or sound
skip or the picture distorted, please stop the player immediately.
Broken Deform
Package
DVD player
Audio/Video cable
Remote Control
User Manua
1
1
1
1
This product incorporates copyright protection technology that is protected by
method claims of certain U.S.patents and other intellectual property rights owner
by Macrovision Corporation and other rights owners. Use of this copyright
protection technology must be authorized by Macrovision Corporation, and is
intended for home and other limited viewing uses only unless otherwise authorized
by Macrovision Corporation.
The product complies with KODAK Picture CD format and will display KODAK
Picture CDs. The "KODAK Picture CD Compatible "logo is a trademark of Eastman
Kodak Company and is used with permission.
Manufactured under license from Dolby laboratories."Dobly" and the double-D
symbol are trademarks of Dolby laboratories. Confidential Unpublished Works.
C
1992-1997 Dolby laboratories, Inc. All rights reserved.
4
Page 15

Main Unit Control
Remote Control
Front panel instruction
1 2 3 4 5 6 7
8 9 10 11 12
1. Power
2. DISC tray
3. Open/close
4. Play/pause
5. Previous
6. Next
7. Stop
8.Microphone
9.Volume knob
10.LED display
11.USB port
12. Card Reader
Back panel instruction
1
2
4 5 6
7
1. Audio L/R output
2. Y, Pb, Pr output
3. Scart output
3
POWER SOURCE:110-240V~ 50/60Hz
POWER CONSUMPTION:9W
5. Video output
6. S-video output
7. Optical
4. Coaxial output
Remote control instruction
POWER
1
2
MUTE OPEN/CLOSE
3
SETUP TITLE/PBC
4
5
6
ZOOM MENU
REV FWD
7
8
STOP PAUSE
ENTER
PLAY
9
10
RESET DISPLAY
11
12
AUDIO ANGLE V-MODE
13
14
SLOW PROGRAM CLEAR N/P
15
16
17
18
REPEAT A-B RETURN USB/CARD
RC-DP04
1. Power
2. Mute
3. Number button
4. Setup
19
5. Direction button
6. Zoom
7. Fast backward
8. Fast forward
9. Stop
10. Play
11. Reset
20
12. Display
13. Subtitle
14. Audio
21
15. Slow
16. Program
17. Repeat
22
18. A-B
19. Open/close
23
20. Search
24
21. Title/PBC
25
22. Menu
26
23. Next
24. Previous
25. Pause
27
26. Volume+/Volume-
28
27. V-mode
29
28. Angle
30
29. N/P
31
32
30. Clear
31. USB/card
32. Return
5
6
Page 16

The use of remote control
System Connection
REMOTE CONTROL OPERATION:
CARE OF REMOTE CONTROL
Aim remote control at remote sensor of DVD.
Do not drop the unit from a high position or
cause high impact.
Do not place the remote control in hot or moist
environments.
Do not splash water or any other liquid on
remote control.
Do not pull the remote control.
*point remote control directly to the remote sensor.
Pay attention to batteries in the remote control:
if the remote control is idle too long, please take
out the batteries inside.
Distance:
the remote control work best within 7 metres from
the DVD player.
Do not expose the remote control sensor directly to
a heat source or it will be malfunction.
Within 7 meters
MUTE OPEN/CLOSE
POWER
SETUP TITLE/PBC
ENTER
ZOOM MENU
REV FWD
PLAY
STOP PAUSE
RESET DISPLAY
AUDIO ANGLE V-MODE
SLOW PROGRAM CLEAR N/P
REPEAT A-B RETURN USB/CARD
RC-DP04
Connecting to a TV with Audio/Video cable
Television
To video input(yellow)
To audio inputs(red, white)
To S-video input
DVD player
To S-video output
If the TV has an S-video input, connect the DVD player with an S-video cable.
When using an S-video cable, do not connect the yellow videocab le.
Connecting to a Audio/system and TV equipped with YUV video input
Audio system
To audio inputs of the amplifier
DVD player
To CB/ PB video output
To Y video output
Television
To CB/ PR video output
To PR video input
To PB video input
To Y video input
Connecting to TV and an amplifier equipped with Coaxial or Optical input
Amplifier
To Optical
type digital
audio input
To COAXIAL
type digital
audio input
OR
Optical Cord
Coaxial cable
DVD player
To Y video output
To OPtical output
To CR/PR video output
To CB/PB video output
To CR/PR video input
To CB/PB video input
To Y video input
Television
7
8
Page 17

Connecting to TV with Scart cable
Television
Scart cable
DVD player
Basic Operation
After complete connecting the appliances, it can be used with the power switch on.
Before using the player, the following work should be done:
1.Switch on the TV, and select AV state of audio input. If it is S-terminal connection,
then select S audio mode.
2.If the power amplifier is connected, switch on the power of the amplifier, and
select “ DVD”.
3.Connect the player to the power source.
Step 1:press “OPEN/CLOSE”button,the disc
tray will slide out automatically.
Step 2: load the disc tray with disc, and press
“OPEN/CLOSE”key, the screen will indicate “closing”, the player will identify
the format of different disc, and the indicate it on the upper left of the TV
screen. The display of the player will also indicate the type of the disc.
How to play this DVD player
Turn on the TV, player and amplifier.
1.press the “TV/AV”buttonon the TV, select video mode
*if connect with S-video,choose S-video mode
*if connect with Y Cb Cr select YUV mode
2.Select the correct audio output on the amplifier
*Maybe some amplifier is different, please refer to the manual of the amplifier.
Disc play
After reading the disc, the player will go directly to play it:
when playing DVD disc, it will go to the menu or the title menu of DVD;
when playing VCD 2.0 disc, it will go to the PBC control display;
when playing CD disc, it will play in the sequence specified chapter number.
Play:
When the player stop or pause, press “PLAY” button to resume normal play.
Pause :
During DVD play, press the “PAUSE”button, play will be pause.
Stop:
During DVD play, the first press of the “STOP” button is memory stop, press “PLAY”
button to resume memory play. Press the “STOP” button for the second time to stop
it completely.
Previous chapter, next chapter:
Press “PREV” button, the previous chapter will be played.
Press “NEXT”button, the next chapter will be played.
Forward and backward:
press the “FWD” button continuously to search forward at a faster speed X2,X4,
X8,X16,X32, and then return to normal.
Press the “REV”button continuously to search backward at a faster speed X2,X4,
X8 X16,X32.and then return to normal.
OPEN/CLOSE
POWER
9
10
Page 18

Notice:
when the PBC function is enabled, the player will only search within a signal song.
DISPLAY
When the following discs are played, press “DISPLAY” button on the remote control,
the screen will display the pictures.
When DVD disc is displayed: press “DISPLAY” button, the screen will display the
following picture a.
Press “DISPLAY” button for the second time, the screen will display the following
picture b.
Press “DISPLAY” button for the third time, the screen will have the following
picture c.
Press “DISPLAY” button for forth time, the screen will have the following picture d.
a b c d
Current title title
DISPLAY
Current chapter
Chapter
Press “DISPLAY” button for the fifth time, the indication will be cleared.
When play VCD, SVCD,
In the state of “PBC” on:
press “DISPLAY” for the first time, the screen display as picture a;
press “DISPLAY” for the second time, the screen display as picture b..
DISPLAY
In the state of “PBC off”:
press “DISPLAY” for the first time, the screen display as picture a;
press “DISPLAY” for the second time, the screen display as picture b.
press “DISPLAY” for the third time, the screen display as picture a;
press “DISPLAY” for the forth time, the screen display as picture b.
Subtitle
You can select a desired subtitle from available ones ( this operation works only
with DVD discs with this function) by pressing the “subtitle” button continuously.
For example: the second one of the 8 choices is Chinese.
USB&card
1)Power-on the unit.
2)Make sure no disc has been inserted.
3)Insert a USB or memory card inside the connector.
4)Press USB&Card button the player will read the multimedia files located on the
USB key or memory card.
Notice: depending on capacity of the device, the reading can take more then 1
minute before lauching the video.
SEARCH
Press "SEARCH" button during playback, you can play a disc from the desired position
by specifying the time from the beginning of the current title (for DVD VIDEO) or the
disc (Video CD/Audio CD). Press “SEARCH” twice, the menu bar appears on the TV
screen. Press the numeric buttons (0 to 9) to enter the desired time.
PROGRAM
Press this button and the screen will display info window, press numeric buttons to
input the program number what you want, when finished, move the cursor to select
the "Start" logo, at this time the unit will start program playback and the screen will
display"Program" logo.Press"Clear"to cancel this function.
CLEAR
You can press" CLEAR" button to clear the programmed contents.
ANGLE
When the DVD disc is played, such as sport events, music concerts or dramas,
press “ANGLE” button on the remote control, you can enjoy a certain action from
different angles (this operation works only with DVD discs with this function).
press “DISPLAY” for the fifth time to shut the display
11
V-mode
Press the "V-mode" button, the switch between YUV / S-video/RGB can be available.
-12-
Page 19

AUDIO
When playing DVD disc, press "AUDIO" button, the player will display as the figure
below.
Audio
TITLE
When playing DVD disc, press “TITLE” button to go directly to the title menu, and
press “MENU” button to return to the main menu. You can choose to select with
direction button or numeric buttons.
(This operation works only with DVD discs with this function)
N/P
Set the format of this player according to the color format of your TV, to match the
setting of your TV.
Press “N/P” button to switch within the cycle of NTSC, PAL and Auto .
Direction button
When playing the disc, in the menu mode ,direction button “ ”, , ,
can be applied to realize sections .
Numeric buttons
When playing the disc, select a program or a chapter by pressing one of the numeric
button. You can select title, chapter with the left and right button. And then select
desired section with numeric button, the selected will be played automatically.
MENU
Press this button and the screen will display" Root Menu", select item according to
your preference.(This key is valid to DVD disc possessing multi-layer menu.)
Slow motion
Press “SLOW” button to enjoy slow motion, slow for Forward 1/2,1/4,1/8,1/16.
Volume and mute
Press “volume +/-” buttons to get to the main volume menu, and adjust the main
volume with the “volume +/-” buttons.
Press “MUTE” button to close the sound, at this time, the audio signal stop outputting;
press “MUTE” again to resume the output of audio signal.
Zoom function
When enjoying a motion or still picture, press “ZOOM” for once, 2 times or 3 times to
enlarge the picture by 2 times,3 times or 4 times.
REPEAT
When playing DVD, press “REPEAT” button continuously, the screen will show
circularly as followings:
Repeat play a title Repeat play a chapter
Cancel the repeat
play function
When SVCD/VCD is played, press “REPEAT” button continuously, the screen will
show circularly as followings, only when the PBC are shut.
Repeat playing one song Cancel the repeat
Repeat playing the
whole disc
play function
Notes: the function is valid when the PBC is OFF.
PBC
Press this button to turn the PBC on or off when playing SVCD VCD2.0 disces.
13
14
Page 20

MP3 operation
Basic operation
MP3 disc is display by menu selection.
Press repeat button to select repeat one ,repeat all,
repeat off mode and play.
Disc play
Follow the normal basic operation steps, load the
disc, and the player will start to search for disc info
and enter into Mp3 menu mode
KAROKE operation
*(Connect micrphone according to the sketch map above)
*Adjust “Volume” on the panel to the lowest. Then plug Mic to the “Mic” jack. You
can plug in tow microphones each time. Press Karaoke key on the remote control,
turning on karaoke.
*Adjust “Volume” to control Mic volume.
*Clear the original sound. If you find the original sound exists when you sing, press
AUDIO key to select left channel or right channel (VCD), or press AUDIO key
(DVD,SDVD)on remote control to select different sound track to clear the original
sound.
Note:
1. If howling occurs, please move Mic farther away from TV or speaker. Lower down
the volume of TV or speaker. Lower down the Volume of Mic.
2. No karaoke function in digital audio output mode.
System Setup
Language
Video Audio
- - Language setup page - -
OSD lang ENG
Subtitle OFF
Audio AUTO
Disc Menu AUTO
Language setup
Language
Video Audio
- - Language setup page - -
OSD lang ENG
Subtitle OFF
Audio AUTO
Disc Menu AUTO
Language
Video Audio
- - Language setup page - -
OSD lang ENG
Subtitle OFF
Audio AUTO
Disc Menu AUTO
Language
Video Audio
- - Language setup page - -
OSD lang ENG
Subtitle OFF
Audio AUTO
Disc Menu AUTO
English
French
German
Italian
Spanish
English
French
German
Italian
Spanish
Off
English
French
German
Italian
Spanish
AUTO
Preference
Preference
Preference
Preference
Press Setup button, the main menu will be
displayed on the screen In the General Setup
Page, press button to highlight this item.
Press ENTER button to access.
Press button to select the setting.
Press OK button to confirm your selection.
Press button to return.
In the option user can set OSD menu language
(English,French, German, Italian, Spanish).
The default: English
Select your preferred language to show the
subtitles on the screen.
The default is OFF.
The subtitle languages depend on the
information available on each disc, you can
also change the subtitle language during
playback by press the SUBTITLE button.
Enter this option, user can select your preferred
audio language for DVDs.
The default is AUTO.
Note:
1. The audio language depend on the material
on each disc.
2.User can also change the audio language
during playback by pressing the Audio button.
15
16
Page 21

Language
Video Audio
- - Language setup page - -
OSD lang ENG
Subtitle OFF
Audio AUTO
Disc Menu AUTO
Video setup
Language
Video Audio
- - Video setup page - -
TV Display 16:9
TV type PAL
Angle Mark On
Captions OFF
Screen Saver On
Component S-video
Language
Video Audio
- - Video setup page - -
TV Display LB
TV type PAL
Angle Mark On
Captions OFF
Screen Saver On
Component S-video
English
French
German
Italian
Spanish
AUTO
4:3/PS
4:3/LB
16:9
PAL
NTSC
AUTO
Preference
Preference
Preference
This function allows you to choose the menu
language stored on the disc.
The default is AUTO.
Note: the disc menu languages depend on the
information available on the disc.
Enter this option, user can set screen display
format (Nomal/PS, Normal/LB,Wide).
The default is 16:9.
Note:
1.the function depends on the display ratio
with which the DVD disc is recorded.
2:please choose “Wide(16:9)"when using a
16:9 wide screen TV set
Enter this option to select TV type(PAL,AUTO,
NTSC).
The default is PAL.
Language
Video Audio
- - Video setup page - -
TV Display LB
TV type PAL
Angle Mark On
Captions OFF
Screen Saver On
Component S-video
Language
Video Audio
- - Video setup page - -
TV Display LB
TV type PAL
Angle Mark On
Captions OFF
Screen Saver On
Component S-video
Language
Video Audio
- - Video setup page - -
TV Display LB
TV type PAL
Angle Mark On
Captions OFF
Screen Saver On
Component S-video
Audio setup
On
Off
On
Off
S-Video
YUV
RGB
Scart
Preference
Preference
Preference
You can select ON to see the caption in the
contents of the disc.
Optional setting: ON/OFF.
The default is OFF.
Enter this option to set whether to activate the
screen saver function.
The default is ON.
Enter this option to select video output (
S-Video,YUV,RGB,Scart)
The default is S-Video.
Language
Video Audio
- - Video setup page - -
TV Display LB
TV type PAL
Angle Mark On
Captions OFF
Screen Saver On
Component S-video
Preference
Enter this option to set the angle during
playback.
Optional setting: ON, OFF.
On
Off
The default is ON.
17
Language
Video Audio
- - Audio setup page - -
Spdif output RAW
downmix LTRT
Dual Mono STR
Dynamic
MIC Setup
SPDIF /OFF
RAW
SPDIF/PCM
Preference
Highlight the SPDIF output option, and press
the arrow buttons to choose the audio output
mode you prefer.
Press the Enter button to confirm. There are 3
optional audio output modes: RAW, PCM, and
OFF.
18
Page 22

Language
Video Audio
- - Audio setup page - -
Spdif output RAW
downmix LTRT
Dual Mono STR
Dynamic
MIC Setup
LT/RT
Stereo
Preference
You can select downmix option when the player
is connect to an amplifier (sound system) using
analog audio output.
Options setting: LT/RT; Stereo.
The default is LT/RT.
Language
Video Audio
- - Micphone setup page - -
MIC ON
MIC VOL 20
Echo Level 15
Preference
Adjust the volume of Microphones using
VOL1,VOL2 control knobs.
Options setting: 0-20.
The default is 20.
Language
Video Audio
- - Audio setup page - -
Spdif output RAW
downmix LTRT
Dual Mono STE
Dynamic
MIC Setup
Language
- - Audio setup page - -
Spdif output RAW
Downmix LTRT
Dual Mono STR
Dynamic
MIC Setup
Stereo
L-Mono
R-Mono
Mix-mono
Video Audio
Microphone setup
Language
Video Audio
- - Micrphone setup page - -
MIC ON
MIC VOL 20
Echo Level 15
ON
OFF
Preference
Preference
Full
¾
½
¼
OFF
Preference
You can select the mode of analog output
(DOWNMIX).
Options setting:
Stereo L-Mono R-Mono Mix-mono.
The default is stereo.
You can select the level of dynamic range
compression in the audio output.
Normally, it should be set at OFF.
Options setting:
OFF,1/8,1/4,3/8,1/2,5/8,3/4,7/8,FULL.
You can select MIC ON to set KAROKE
model on .
Language
Video Audio
- - Micphone setup page - -
MIC ON
MIC VOL 20
Echo Level 15
Reference setup
Language
Video Audio
- - Preference Setup Page - -
Password
Parental
Defaults
Language
Video Audio
- - Preference Setup Page - -
Password
Parental
Defaults
Change
1Kids safe
2 G
3 PG
4 PG-13
5 PG-R
6 R
7 NC-17
8 Adult
Preference
Preference
Preference
Adjust the echo of Microphones using echo
control knobs.
Options setting: 0-20.
The default is 15.
Enter this option, you can set a password
(four numbers).All parental Control features
are password protected.
The default is 0000.
Enter this option to set the parental control
level to some unsuitable disc scenes being
watched by the children.
Optional parental control levels:
KIDS SAFE, G, PG, PG-13, PG-7,PG-R,R,
Nc17, ADULT.
The default of this option is ADULT.
19
20
Page 23

Language
Video Audio
- - Preference Setup Page - -
Password
Parental
Defaults
Reset
Preference
Select this item and press OK button to reset
all settings to the original factory settings.
Specifications
1
12w
2.0kg
430X210X38 MM
60dB
Temperature 0 ~40 ;operation status:horizotion
Troubleshooting
please check the following guide for the possible cause and solution for a problem
before connecting the nearest service center or dealer for repairs.
SYMPTOMS AND CORRECTIONS
SYMPTOMS CORRECTIONS
No power
No picture
No sound
Failed to Play
Failed to respond to
remote control
Picture Disturbance
Check to make sure that the power connection is secure.
Make sure the connection between the player and the TV is secure.
Make sure that the TV is in good working condition.
Make sure the connection between the player and other devices
are secure.
Make sure that the TV and AMP are in good working condition
and setup properly.
Check that the disc is properly inserted.
Clean the disc.
Remove obstacles between remote control and unit.
Aim remote control at the sensor on the front panel
Check batteries and replace them if necessary.
Check the disc for dirt and scratches. Clean or replace disc.
Shut down the unit, wait ten seconds, and restart the unit.
21
Failed to work
with keys
Power surges or brown outs or other electrical phenomena.
Shut down the unit, wait ten seconds, and restart the unit.
22
Page 24

Sommaire
Instructions de sécurité
Sommaire 1
Instructions de sécurité 2
Emballage 3
Caractéristiques principales 4
Commandes appareil 5
Télécommande 6
Connexions 8
Opération de base 10
Réglages système 16
Spécifications 21
En cas de problèmes 22
Attention : ce symbole vous signale qu'il y a des hautes voltages à
l'intérieur de l'appareil.
Attention : ce symbole vous signale que des documents d'instructions
pour l'opération et l'entretien sont livrés avec l'appareil.
Pendant le design et la fabrication de l'appareil beaucoup d'attention a été
donné à la sécurité pour personnelle. Néanmoins une mauvaise utilisation peut
causer des accidents tels que chocs électriques ou du feu. Suivez donc bien les
instructions de sécurité.
Remarque : l'appareil ne peut pas être utilisé avec les mains humides.
L'appareil doit se trouver dans un endroit sec avec de la ventilation.
Alimentation
Quand l'appareil est connecté au prise courant secteur,
il est toujours sous tension, même si l'appareil est hors
fonction.
Retirez la prise courant secteur quand vous n'utilisez pas
l'appareil pendant un certain temps. Tenez bien la prise et ne
tirez jamais au câble.
Remplacez le câble courant secteur si nécessaire.
Emplacement
Afin de prévenir le sur chauffage l'appareil doit
être utilisé dans un endroit bien ventilé. Ne pas
utiliser dans un lit, sur un sofa, ou d'autres
surfaces qui peuvent bloquer les ouvertures de
ventilation.
Ne pas placer l'appareil à côté des sources de
chaleur, ni dans la lumière directe du soleil, ni dans des endroits poussiéreux.
Ne placez pas des objets lourds au-dessus de l'appareil.
Précautions
Si un objet lourd est tombé sur l'appareil, mettez-le hors fonction en le
réutilisez pas qu'après avoir laisser faire un contrôle par un spécialiste.
Il y a des hautes voltages à l'intérieur de l'appareil. N'ouvrez pas l'appareil.
Consultez des spécialistes pour les réparations.
A l'intérieur se trouve un système de lecture laser. Il s'agit d'un CLASS 1
LASER PRODUCT. Ne regardez jamais directement dans la lumière du laser,
ceci peut endommager les yeux.
Page 25

Condensation dans le lecteur
Caractéristiques principales
En cas de grands changements de température
la condensation peut se former à l'intérieur de
l'appareil. Ceci peut se passer quand le lecteur
est porté d'un endroit froid dans un endroit
chaud. Dans ce cas il se peut que le lecteur ne
fonctionne pas bien. Dans ce cas, mettez
l'appareil dans un endroit chaud et mettez-le en
fonction (ON). Attendez deux heures pour que la
condensation se vaporise. Par après vous
pouvez utiliser votre lecteur.
Nettoyage
Nettoyez le boîtier, l'écran et les boutons avec un chiffon doux légèrement
humide. N'utilisez pas des poudres, des solvants, d'alcool ou de l'essence
car ceci peut abimer la surface ou laisser des traces.
Précaution avec les disques
N'utilisez pas des disques griffés, endommagés ou déformés.
Griffé
Endommagé
Déformé
Etant donné que le disque tourne à une très grande vitesse il est dangereux
d'utiliser les disques endommagés. Ne collez jamais quelque chose sur le
disque. Ceci peut endommager le lecteur.
Remarque : si vous entendez des bruits étranges, vous remarquez des
vibrations, quand le son ou l'image sont déformés, arrêtez directement la
lecture.
Emballage
Lecteur DVD
Câble audio/vidéo
Télécommande
Manuel d'utilisation
1
1
1
1
Compatible avec MPEG4, DVD, CD, MP3, CD images KODAK, CD-RW (finalisé).
Sortie vidéo : composants (Y, Pb, Pr), S-Vidéo et composite.
Progressive Scan
Sortie Scart
Disques qui peuvent être lus avec ce lecteur :
DVD vidéo
CD images KODAK
Documents MP3 sur CD-R/CD-RW
MPEG 4
Contrôle parental
Vous pouvez aider à protéger l'environnement.
Respectez la réglementation locale
et déposez vos anciens appareil électriques
chez un circuit de recyclage
approuvé.
L'appareil contient une technologie de protection des droits d'auteurs protégé
par des patents US et d'autres propriétés intellectuelles par Macrovision
Corporation et d'autres propriétaires des droits. L'utilisation de cette
technologie de protection doit être approuvé par Macrovision Corporation et
est prévu pour utilisation domestique ou autre utilisation limitée, excepté les
cas spécialement approuvés par Macrovision Corporation.
Ce lecteur est compatible avec le format images KODAK et peut donc
reproduire les disques CD images KODAK. Le logo 'KODAL Picture CD
Compatible' est une marque déposée de Eastman Kodak Company et est utilisé
avec permission.
Fabriqué sous licence de Dolby laboratories. 'Dolby' et le symbole 'Double D'
sont des marques déposées de Dolby laboratories. Confidential Unpublished
Works. © 1992-1997 Dolby laboratories, Inc. Tous droits réservés.
Dolby Digital
Formats écran
4
Page 26

Commandes appareil
Télécommande
Panneau frontal
1 2 3 4 5 6 7
8 9 10 11 12
1.Power (en/hors fonction)
2.Tiroir disque
3.Ouvrir/fermer
4.Lecture/pause
5.Précédent
6.Suivant
Panneau arrière
1
2
4 5 6
3
7
1.Sortie audio G/D
2.Sortie Y, Pb, Pr
3.Sortie Scart
4.Sortie coaxiale
7. Arrêt
8. Microphone
9. Volume
10. Display LED
11. Porte USB
12. Lecteur cartes
POWER SOURCE:110-240V~ 50/60Hz
POWER CONSUMPTION:9W
5. Sortie vidéo
6. Sortie S-vidéo
7. Sortie optique
Commandes télécommande
POWER
1
2
MUTE OPEN/CLOSE
3
SETUP TITLE/PBC
4
5
6
ZOOM MENU
REV FWD
7
8
STOP PAUSE
ENTER
PLAY
9
10
RESET DISPLAY
11
12
AUDIO ANGLE V-MODE
13
14
SLOW PROGRAM CLEAR N/P
15
16
17
18
REPEAT A-B RETURN USB/CARD
1.Power (en/hors fonction)
2.Mute
3.Boutons numériques
19
4.Réglages
5.Boutons flèches
6.Zoom
7.En arrière rapide
8.En avant rapide
9.Arrêt
10.Lecture
20
11.Reset
12.Affichage (display)
13.Sous titres
21
14.Audio
15.Ralenti
16.Programmation
22
17.Répétition
18.A-B
19.Ouvrir/fermer
23
24
20.Recherche
25
21.Titre/PBC
22.Menu
26
23.Suivant
24.Précédant
25.Pause
27
28
26.Volume+/volume
29
27.Mode V
30
28.Angle
31
29.N/P
32
30.Clear
31.USB/CARD
32.Retour
5
6
Page 27

Utilisation de la télécommande
Retirez le couvercle du
compartiment à piles.
Insérez les piles
Remettez le couvercle
du compartiment à piles.
Connexions
Connexion au TV avec câble audio/vidéo
Téléviseur
Lecteur DVD
Faites attention que la polarité des piles correspond
avec celle marquée dans le compartiment
ATTENTION POUR LA TELECOMMANDE
Dirigez la télécommande vers le récepteur à
infrarouges de l'appareil.
Ne laissez pas tomber la télécommande.
N'utilisez pas la télécommande dans des endroits
chauds ou humides.
Ne versez pas de l'eau ou des liquides sur la
télécommande.
Enlevez les piles si vous n'utilisez pas la
télécommande pendant un certain temps.
Distance : la télécommande fonctionne jusqu'à une
distance de 7 mètres de l'appareil.
N'exposez pas la télécommande à la lumière directe
du soleil ou d'autres sources de chaleur.
Within 7 meters
MUTE OPEN/CLOSE
POWER
SETUP TITLE/PBC
ENTER
ZOOM MENU
REV FWD
PLAY
STOP PAUSE
RESET DISPLAY
AUDIO ANGLE V-MODE
SLOW PROGRAM CLEAR N/P
REPEAT A-B RETURN USB/CARD
Jaune Rouge Blanc
Vers entrée vidéo (jaune)
Vers entrée audio (rouge, blanc)
Blanc Rouge Jaune
Vers entrée S-Vidéo
Si votre Tv possède une entrée S-vidéo, connectez le lecteur avec un câble S-vidéo.
Si vous connectez avec un câble S-vidéo, n'utilisez pas le câble vidéo jaune.
Connexion au système audio et TV avec entrée YUV
Système audio
Blanc Rouge
Vers ortie vidéo CB/PR
Lecteur DVD
Vers sortie vidéo Y
Vers sortie vidéo CB/PB
Vers entrée vidéo PB
Vers entrée vidéo Y
Vers entrée vidéo PR
Téléviseur
Connexion au TV et amplificateur avec entrée coaxiale ou optique
Amplificateur
Vers entrée audio
digitale optique
Vers entrée audio
Digitale coaxiale
Câble coaxiale
OU
Câble optique
Lecteur DVD
Vers sortie optique
Vers sortie vidéo CB/PR
Vers sortie vidéo CB/PB
Vers entrée vidéo CB/PB
Vers entrée vidéo Y
Vers sortie vidéo Y
Vers entrée vidéo CB/PR
Téléviseur
7
8
Page 28

Connexion au TV avec câble Scart
Téléviseur
Câble Scart
Lecteur DVD
Opération de base
Après avoir réalisé les connexions, l'appareil peut être utilisé avec le bouton power en
position 'on'.
Avant d'utiliser le lecteur ceci doit être effectué :
1. Mettez le TV en fonction et choisissez l'entrée AV. Si vous avec connecté avec S Vidéo, choisissez S-Vidéo.
2. Si vous avez connecté à l'amplificateur, mettez-le
en fonction et choisissez l'entrée DVD.
3. Connectez le lecteur au courant secteur.
Point 1 : poussez 'OPEN/CLOSE' et le tiroir
s'ouvre automatiquement.
Point 2 : mettez le disque dans le tiroir et
poussez 'OPEN/CLOSE'. L'écran affiche
'closing', le lecteur détecte le format du
disque et l'indique dans le coin gauche de
l'écran. L'écran du lecteur affiche également le type du disque.
Turn on the TV, player and a
Lecture avec lecteur DVD
Mettez le TV, le lecteur et l'amplificateur en fonction.
1.Poussez le bouton 'TV/AV' du téléviseur pour choisir le mode vidéo.
* choisissez S-vidéo si vous avec connecté avec câble S-vidéo.
* choisissez YUV si vous avec connecté avec câble Y, Cb, Cr.
2.Sélectionnez la bonne source sur l'amplificateur.
* consultez éventuellement le manuel d'utilisation de votre amplificateur.
Lecture disque
Après avoir reconnu le disque, la lecture commence automatiquement.
Disque DVD : le menu ou le menu disque DVD est affiché.
Disque VCD2.0 : l'affichage de contrôle PBC est affiché.
Disque CD : les numéros sont reproduits.
Lecture :
Quand le lecteur s'arrête ou se met en pause, poussez 'PLAY' pour continuer la
lecture.
Pause :
Pendant la lecture DVD, poussez 'PAUSE' pour pauser la lecture.
Stop (arrêt)
Pendant la lecture DVD, poussez une fois 'STOP' ; poussez 'PLAY' pour continuer la
lecture à partir du point ou vous aves poussé 'STOP'. Poussez deux fois 'STOP' pour
arrêter complètement la lecture.
Chapitre précédent, chapitre suivant
Poussez 'PREV' pour aller vers le chapitre précédent.
Poussez 'NEXT' pour aller vers le chapitre suivant.
En avant, en arrière
Poussez 'FWD' pour avancer rapidement en avant à 2x, 4x , 8x, 16x, 32x la
vitesse normale.
Poussez 'REV' pour avancer rapidement en arrière à 2x, 4x , 8x, 16x, 32x la
vitesse normale.
OPEN/CLOSE
POWER
9
10
Page 29

Remarque : quand PBC est en fonction, la recherche rapide ne se fait que dans un
seul numéro.
DISPLAY
Pendant la lecture des disques mentionnés ci-dessous, poussez le bouton ‘DISPLAY’
pour voir les affichages suivants sur l'écran.
Pendant la lecture DVD, poussez ‘DISPLAY' et l'écran affiche l'image a.
Repoussez le bouton ‘DISPLAY' et l'écran affiche l'image b.
Poussez une troisième fois ‘DISPLAY' et l'écran affiche l'image c.
Poussez une quatrième fois ‘DISPLAY’ et l'écran affiche l'image d.
a b c d
Current title title
DISPLAY
Current chapter
Chapter
Sous titres
Vous pouvez choisir la langue désirée pour les sous titres (à condition que le disque
DVD possède cette option) en poussant plusieurs fois le bouton 'subtitle'.
Exemple : la deuxième des 8 langues disponibles est le français.
USB/CARD
1)Mettez l'appareil en fonction.
2)Contrôlez qu'il n'y a pas de disque dans le tiroir.
3)Insérez le USB.
4)Poussez le bouton 'USB&cart' et le lecteur lit les documents multimédia qui
se trouvent sur le USB.
Remarque : dépendant du contenu, il se peut que le démarrage de la lecture prend
plus qu'une minute.
Poussez ‘DISPLAY' pour une cinquième fois et l'affichage disparaît.
Lecture VCD, SVCD
Avec PBC en fonction :
Poussez ‘DISPLAY' et l'écran affiche l'image a.
Repoussez le bouton ‘DISPLAY’ et l'écran affiche l'image b.
DISPLAY
Avec PBC hors fonction :
Poussez ‘DISPLAY' et l'écran affiche l'image a.
Repoussez le bouton ‘DISPLAY’ et l'écran affiche l'image b.
Poussez une troisième fois ‘DISPLAY' et l'écran affiche l'image a.
Poussez une quatrième fois ‘DISPLAY’ et l'écran affiche l'image b.
Poussez ‘DISPLAY’ pour une cinquième fois et l'affichage disparaît.
11
SEARCH
Pendant la lecture poussez 'SEARCH' pour déterminer un point (en temps réel) auquel la
lecture doit démarrer (dans un titre avec DVD, dans le disque avec VideoCD/AudioCD).
Poussez une deuxième fois ‘SEARCH’ et le menu apparaît sur l'écran. Utilisez les boutons
numériques pour introduire le temps.
PROGRAM
Poussez ce bouton et l'écran affiche un système d'information. Utilisez les boutons
numériques pour introduire les numéros voulus. Une fois fait, bougez le curseur vers
'start' pour démarrer la lecture programmée. L'écran affiche 'Program'.
CLEAR
Poussez ce bouton pour annuler la lecture programmée.
ANGLE
Pendant la lecture DVD, poussez ce bouton pour voir certaines scènes sous
différents angles. (Cette fonction est uniquement possible quand le disque DVD
possède différents angles).
V-mode
Poussez ce bouton pour choisir entre YUV/S-vidéo/RGB.
-12-
Page 30

AUDIO
Pendant la lecture DVD, poussez ce bouton et l'écran affiche les informations comme
montré ci-dessous.
Audio
TITLE
Pendant la lecture DVD, poussez ce bouton pour aller directement dan le menu titre.
Poussez 'MENU' pour revenir au menu principal. Pour sélectionner vous pouvez
utilisez les boutons flèches ou les boutons numériques.
(Ceci fonctionne uniquement avec les disques qui possèdent cette fonction)
N/P
Pour accorder le format couleurs du lecteur à celui de votre téléviseur.
Poussez 'N/P' pour choisir entre NTSC, PAL ou auto
Boutons flèches
Pendant l'affichage des menus, vous pouvez utilisez les boutons '' '',,'' '','' '','' '',
pour faire des sélections.
Volume et mute
Poussez 'volume+/-' pour aller dans le menu de volume principal et ajustez le volume
principal avec les boutons 'volume+/-'.
Poussez 'MUTE' pour couper complètement le son.
Repoussez 'MUTE' pour revenir à la reproduction sonore normale.
Fonction zoom
Pendant la lecture ou la pause, poussez 'ZOOM' pour agrandir 2 fois, 3 fois ou 4
fois l'image.
REPETITION
Pendant la lecture DVD, poussez plusieurs fois 'REPEAT' et l'écran offre les
possibilités suivantes :
Répétition
Répétition titre Répétition chapitre Pas de répétition
Pendant la lecture SVCD/VCD, poussez plusieurs fois 'REPEAT' , quand PBC est hors
fonction, et l'écran offre les possibilités suivantes :
Répétition
Boutons numériques
Pendant la lecture utilisez les boutons numériques pour effectuer une sélection. Vous
pouvez choisir le titre et le chapitre avec les boutons flèches gauche et droite. Effectuez
la sélection avec les boutons numériques. La sélection est lue automatiquement.
MENU
Poussez ce bouton et l'écran affiche le 'Root menu' dans lequel vous pouvez sélectionner
l'item voulu. (uniquement avec les disques DV D qui possèdent un menu à plusieurs
niveaux).
Ralenti
Poussez 'SLOW' pour obtenir une reproduction au ralenti : ½, ¼, 1/8 et 1/16 vitesse
normale.
13
Répétition un numéro Répétition disque entier Pas de répétition
Remarque : cette fonction est uniquement disponible quand PBC est en position OFF.
PBC
Remarque : cette fonction est uniquement disponible quand PBC est en
position OFF.
14
Page 31

Lecture MP3
Opération de base
La lecture MP3 se fait par sélection menu.
Utilisez le bouton de répétition pour répéter un
numéro, tous les numéros ou pour mettre la
répétition hors fonction.
Lecture disque
Suivez les étapes d'opération normales. Insérez le
disque, le lecteur cherche l'information du disque et
se met automatiquement en mode MP3.
Fonctionnement Karaoke
Réglage système
Language
Video Audio
- - Language setup page - -
OSD lang ENG
Subtitle OFF
Audio AUTO
Disc Menu AUTO
Réglage langue
Language
Video Audio
- - Language setup page - -
OSD lang ENG
Subtitle OFF
Audio AUTO
Disc Menu AUTO
English
French
German
Italian
Spanish
Preference
Preference
Poussez le bouton Setup et le menu principal
apparaît. Dans la page Réglage général,
utilisez les boutons pour choisir un item.
Poussez ENTER pour entrer dans le sousmenu.
Utili sez les bou tons pour effectuer le réglage.
Poussez OK pour confirmer le réglage.
Poussez pour retourner.
Avec cette option vous pouvez choisir la
langue du menu OSD (Anglais, Français,
Allemand, Italien, Espagnol).
Réglage standard : anglais
(Connectez le microphone comme illustré ci-dessus)
* Mettez le 'Volume' au minimum. Connectez le microphone à la prise 'Mic'. Vous
pouvez connecter deux microphones. Poussez le bouton Karaoke de la
télécommande pour démarrer le fonctionnement Karaoke.
* Utilisez 'Volume' pour régler le volume du microphone.
* Effacer le son original. Si le son original se reproduit pendant que vous chantez,
poussez le bouton AUDIO pour sélectionner le canal gauche ou droite (VCD) ou
poussez le bouton AUDIO (DVD, SDVD) de la télécommande pour sélectionner
un autre canal audio pour cacher le son original.
Remarque :
1. Quand un bruit gênant se produit, bougez le microphone plus loin du TV ou de
l'ah ut-parleu r. Diminuez le volume du TV ou du haut-parleur. Diminuez le volume
du microphone.
2. Il n'y a pas de fonction Karaoke en mode de sortie audio digitale.
15
Language
Video Audio
- - Language setup page - -
OSD lang ENG
Subtitle OFF
Audio AUTO
Disc Menu AUTO
Language
Video Audio
- - Language setup page - -
OSD lang ENG
Subtitle OFF
Audio AUTO
Disc Menu AUTO
English
French
German
Italian
Spanish
Off
English
French
German
Italian
Spanish
AUTO
Preference
Preference
Sélectionnez la langue préférée pour les
sous-titres.
Standard : OFF (hors fonction)
Le choix de la langue dépend du contenu du
disque. Pendant la lecture vous pouvez
changer la langue en utilisant le bouton
SUBTITLE.
Avec cette option vous pouvez choisir la
langue parlée (disques DVD).
Réglage standard : AUTO.
Remarque :
1. Le choix de la langue dépend du contenu
du disque.
2. Pendant la lecture vous pouvez changer la
langue en utilisant le bouton AUDIO.
16
Page 32

Language
Video Audio
- - Language setup page - -
OSD lang ENG
Subtitle OFF
Audio AUTO
Disc Menu AUTO
Réglage vidéo
Language
Video Audio
- - Video setup page - -
TV Display 16:9
TV type PAL
Angle Mark On
Captions OFF
Screen Saver On
Component S-video
Language
Video Audio
- - Video setup page - -
TV Display LB
TV type PAL
Angle Mark On
Captions OFF
Screen Saver On
Component S-video
English
French
German
Italian
Spanish
AUTO
4:3/PS
4:3/LB
16:9
PAL
NTSC
AUTO
Preference
Preference
Preference
Avec cette fonction vous pouvez choisir la
langue du menu disque.
Réglage standard : AUTO.
Remarque : Le choix de la langue dépend du
contenu du disque.
Avec cette option vous pouvez sélectionner le
format d'écran (normal/PS, normal/LB, écran
large).
Réglage standard : 16 :9.
Remarque :
1.La fonction dépend du format avec lequel
le disque DVD a été enregistré.
2.Choisissez 'écran large' (16 :9) quand
vous utilisez un Tv écran large.
Avec cette option vous pouvez sélectionner le
type TV (PAL, AUTO, NTSC).
Réglage standard : PAL.
Language
Video Audio
- - Video setup page - -
TV Display LB
TV type PAL
Angle Mark On
Captions OFF
Screen Saver On
Component S-video
Language
Video Audio
- - Video setup page - -
TV Display LB
TV type PAL
Angle Mark On
Captions OFF
Screen Saver On
Component S-video
Language
Video Audio
- - Video setup page - -
TV Display LB
TV type PAL
Angle Mark On
Captions OFF
Screen Saver On
Component S-video
Réglage audio
On
Off
On
Off
S-Video
YUV
RGB
Scart
Preference
Vous pouvez choisir On (en fonction) pour
afficher le texte caché du disque.
Possibilités : ON/OFF
Réglage standard : hors fonction.
Preference
Utilisez cette fonction pour activer le
screen saver.
Réglage standard : ON (en fonction).
Preference
Utilisez cette fonction pour sélectionner la
sortie vidéo (S-vidéo, YUV, RGB, Scart).
Réglage standard : S-vidéo.
Language
Video Audio
- - Video setup page - -
TV Display LB
TV type PAL
Angle Mark On
Captions OFF
Screen Saver On
Component S-video
Preference
Avec cette option vous pouvez régler l'angle
On
Off
pendant la lecture.
Possibilités : ON (en fonction), OFF (hors
fonction).
Réglage standard : en fonction.
Language
Video Audio
- - Audio setup page - -
Spdif output RAW
downmix LTRT
Dual Mono STR
Dynamic
MIC Setup
SPDIF /OFF
RAW
SPDIF/PCM
Preference
Sélectionnez l'option sortie SPDIF et utilisez
les boutons flèches pour marquer le mode de
sortie que vous préférez.
Poussez le bouton ENTER pour confirmer. Il
existe 3 modes de sortie audio : RAW, PCM,
OFF.
17
18
Page 33

Language
Video Audio
- - Audio setup page - -
Spdif output RAW
downmix LTRT
Dual Mono STR
Dynamic
MIC Setup
LT/RT
Stereo
Preference
Vous pouvez choisir l'option downmix quand le
lecteur est connecté par la sortie audio
analogique à l'amplificateur (chaîne audio).
Options : LT/RT ou stéréo.
Réglage standard : LT/RT.
Language
Video Audio
- - Micphone setup page - -
MIC ON
MIC VOL 20
Echo Level 15
Preference
Ajustez le volume du microphone avec les
boutons VOL1, VOL2.
Réglage : 0-20.
Réglage standard : 20
Language
Video Audio
- - Audio setup page - -
Spdif output RAW
downmix LTRT
Dual Mono STE
Dynamic
MIC Setup
Language
- - Audio setup page - -
Spdif output RAW
Downmix LTRT
Dual Mono STR
Dynamic
MIC Setup
Stereo
L-Mono
R-Mono
Mix-mono
Video Audio
Réglage microphone
Language
Video Audio
- - Micrphone setup page - -
MIC ON
MIC VOL 20
Echo Level 15
ON
OFF
Preference
Preference
Full
¾
½
¼
OFF
Preference
Vous pouvez choisir le mode de sortie
analogique (DOWNMIX).
Possibilités :
Stéréo, Mono-G, Mono-D, Mono mixte.
Réglage standard : stéréo.
Vous pouvez choisir le niveau de compression
dynamique de la sortie audio.
Normalement ceci doit être en position OFF
(hors fonction).
Autres possibilités :
OFF, 1/8, ¼, 3/8, ½, 5/8, ¾, 7/8, FULL.
Vous pouvez sélectionner MIC ON pour activer
le fonctionnement karaoke.
Language
Video Audio
- - Micphone setup page - -
MIC ON
MIC VOL 20
Echo Level 15
Réglage références
Language
Video Audio
- - Preference Setup Page - -
Password
Parental
Defaults
Language
- - Preference Setup Page - -
Password
Parental
Defaults
Change
Video Audio
1Kids safe
2 G
3 PG
4 PG-13
5 PG-R
6 R
7 NC-17
8 Adult
Preference
Ajustez l'effet echo des microphones avec le
bouton echo.
Réglage : 0-20.
Réglage standard : 15
Preference
Entrez dans cette option pour mémoriser un
mot de passe (quatre chiffres). Le mot de
passe est nécessaire pour pouvoir utiliser la
fonction de contrôle parental.
Mot de passe standard : 0000
Preference
Dans cette mode vous pouvez régler le niveau de
contrôle parental pour éviter que les enfants
voient certaines scènes.
Les options sont :
OK POUR ENFANTS, G, PG, PG-13, PG-7, PG-R,
R, Nc17, ADULTES.
Réglage standard : ADULTES.
19
20
Page 34

Language
Video Audio
- - Preference Setup Page - -
Password
Parental
Defaults
Reset
Preference
Choisissez cette option et poussez OK pour
revenir aux réglages d'usine.
Sortie
Sortie vidéo
Sortie S-vidéo
1.0 V(p-p), 75 ohms
(Y) : 1.0 V (p-p), 75 ohms
(C) : 0.286 V (p-p), 75 ohms
Spécifications techniques
LECTEUR DVD
Alimentation
Consommation
Poids
Dimensions
Système vidéo
Système de lecture
Réponse en
fréquences audio
Rapport signal/bruit
Plage dynamique
Rotating ratio
Conditions d'opération
AC 110-220 V 50/60 Hz
12 W
2.0 kg
430 x 210 x 38 mm
NTSC/PAL
Laser semi-conducteur ALGaAs, 650nm, 780nm
DVD audio : fs 48 kHz : 4 Hz 22 kHz
fs 96 kHz : 4 Hz 44 kHz
Audio CD : fs 44.1 kHz : 4 Hz 20 kHz
>90 dB
>60 dB
Dans la range mesurable
Température: 0°C 40°C, opération horizontale
Sortie audio
(analogique)
2.0 V (rms)
En cas de problèmes
Si vous avez des problèmes, regardez d'abord la liste ci-dessous avant de
consulter un spécialiste.
PROBLEMES ET SOLUTIONS
PROBLEME
Ne s'allume pas
Pas d'image
Pas de son
Pas de lecture
Télécommande
ne fonctionne
pas
Image avec
distorsions
Ne fonctionne pas
Contrôlez la connexion prise courant secteur.
Contrôlez la connexion avec le TV
Contrôlez que le TV est en bon état de marche.
Contrôlez les connexions avec le TV et les autres
appareils.
Contrôlez que le TV et les autres appareils sont en bon
état de marche.
Contrôlez que le disque est bien inséré.
Nettoyez le disque.
Enlevez les objets entre la télécommande et le lecteur.
Dirigez la télécommande vers le lecteur.
Contrôlez les piles et remplacez-les ci nécessaire.
Contrôlez le disque pour griffes ou saletés. Mettez un autre disque.
Mettez l'appareil hors fonction, attendez dix secondes et
remettez en fonction.
Du au courant secteur ou autres problèmes électriques.
Mettez l'appareil hors fonction, attendez dix secondes
et remettez en fonction.
SOLUTION
21
22
 Loading...