

Page 1
USER MANUAL
CDC300
Page 2
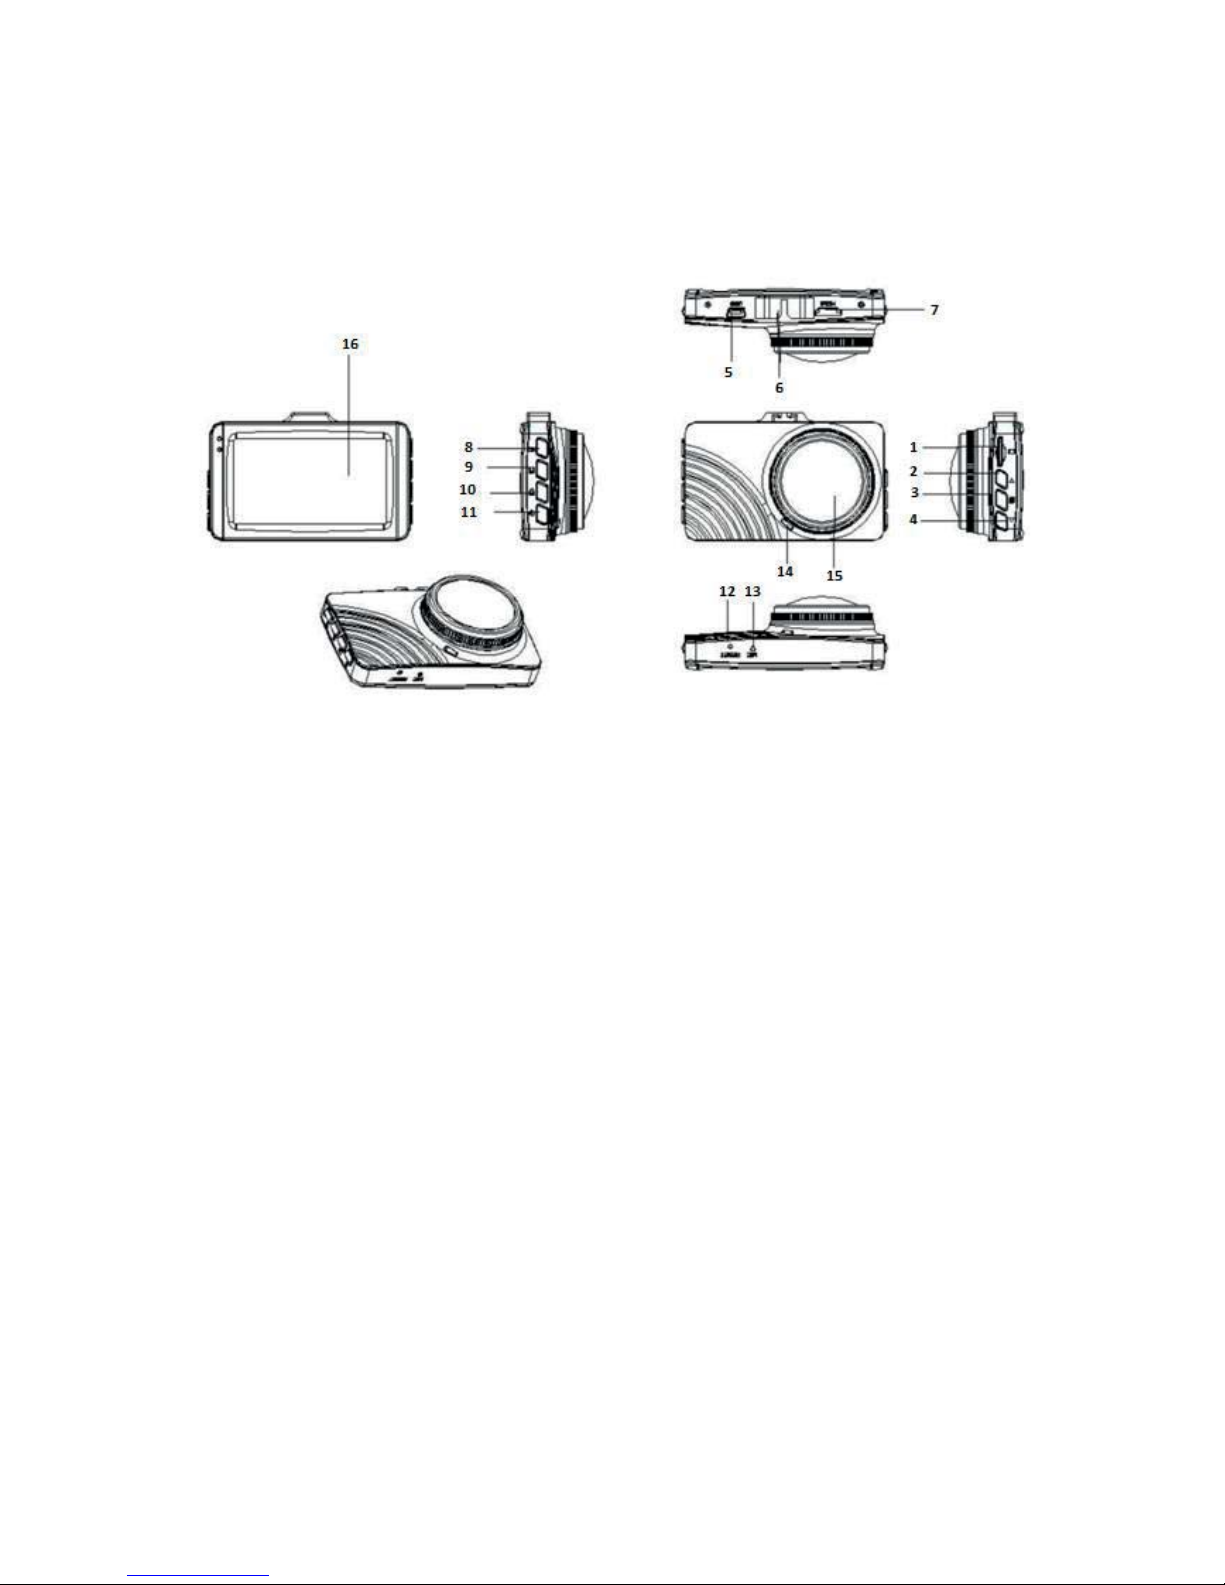
Product diagram
Functions of the camera:
1. TF card slot
Here you can insert or remove your memory card.
2. Up button
In Option menu: you can select an option by going up.
In Photo mode: you can zoom in.
In Playback mode: you can increase the volume or fast forward playback.
3. Menu button
By pressing briefly you can choose the desired menu.
4. Down button
In Option mode: you can select an option by going down.
In Recording mode: press briefly
In Photo mode: you can zoom out.
1.
TF Card Slot
7.
HDMI output socket
12.
RESET
2.
Up button
8.
OK button
13.
MIC
3.
Menu button
9.
Mode button
14.
Speaker
4.
Down button
10.
Recording lock button
15.
Lens
5.
USB socket
11.
Power on/off
16
Screen
6.
Mount holder
Page 3

In Playback mode: you can decrease the volume or rewind playback.
5. USB socket
① For connecting with a computer for data transmission.
② For connecting the battery charger to an external device or power supply whilst
in operation.
③ For using the camera as a PC CAM.
6. Mount holder
This can be used to attach the camera with a suction cup mount to the car window.
7. HDMI output socket
To connect an FHD device with the camera.
8. OK button
In Option mode: press to confirm.
In Video Recording mode: press briefly to start the recording, press again to stop the
recording.
In Photo mode: press briefly to take a picture.
In Menu mode: press to confirm settings.
9. Mode button
Press briefly to switch between: Video, Photo and Playback.
10. Recording lock button
After you have made a recording, you can press this button and the recording will be
locked, it cannot be deleted. If you would like to delete the recording, you will have
to unlock it first.
11. Power on/off
Hold the power button to power on and press briefly again to power off.
12. RESET
To restore the camera back to factory default settings, push a small, thin pin into the
little hole.
13. MIC
Microphone to record sound.
14. Speaker
To transmit a beep sound, using the function buttons and to transmit the recorded
sound in Playback mode.
15. Lens
To capture the image by taking a picture and make a recording.
16. Screen
3.0 inch screen to display the images and menu’s.
Special functions;
Video recording lock function:
After you have made a recording, with this function, the recording will be locked, it
cannot be deleted. If you would like to delete the recording, you will have to unlock it
first.
Power Save function
With this function, after a set period of time, the camera will turn off automatically
when not in use. You can set this period in the menu Settings.
Page 4

Basic operation Video recording/ Photo
Turn on and turn off
Press briefly the button, the indicator will turn blue to indicate that the camera has
been turned on; Press and hold the button to turn off the camera, the blue indicator
will turn off.
Note: The camera will automatically turn of as soon as the “low battery “icon appears.
Video mode
Press briefly the button, to switch to Video mode, the video icon will appear in the left
top corner;
Press briefly the button to start the recording, the red indicator will flash, meaning the
recording is in progress;
Resolution
1080FD 1920x1080, 720P 1280x720, WVGA 848x480, VGA
640x480
Loop recording
Off, 1min, 3min, 5min.
Exposure
+2/3, +1/3, +0.0, -1/3, -2/3, -1.0, -4/3, -5/3, -2.0
Motion detection mode
Off, On
Sound recording
Off, On
Date stamp
Off, On
Photo mode
Press briefly the button, to switch to Photo mode, the camera icon will appear in the
left top corner;
Press briefly the button to take a picture, the indicator will flash once, to indicate that
the picture has been taken.
Capture Mode
Single, 1sec, 5sec, 10sec.
Resolution
12M 4000x3000, 10M 3648x2736, 8M 3264x2448, 5M 2592x1944, 3M
2048x1536, 2MHD 1920x1080, VGA 640x480, 1.3M 1280x960
Sequence
Off, On
Quality
Fine, Normal, Economy
Sharpness
Strong, Normal, Soft
White Balance
Auto, Daylight, Cloudy, Tungsten, Fluorescent
Color
Color, Black/White, Sepia
ISO
Auto, 100, 200, 400
Exposure
+2/3, +1/3, +0.0, -1/3, -2/3, -1.0, -4/3, -5/3, -2.0
Anti shake
Off, On
Quick Review
Off, 2sec, 5sec.
Date stamp
Off, Date, Date &Time
Page 5

Video/Photo Playback
Press briefly the button, to switch to Playback mode, the playback icon will appear in
the left top corner;
Press briefly the button, to browse through the video and photo files;
Press briefly the button to open the page of the recording or photograph, then press
the Down button again to select the file you would like to playback;
Press brief the button to start the playback of the selected file.
In the Playback menu, you can delete or protect your files. Also you can view them in a slide
show (2sec, 5sec, 8sec)
General Setting Menu
Press the Mode button to enter the Video, Photo or Playback mode, press the button to
enter the System settings, press again to enter the General Setting Menu, the icon will be
highlighted. By using the and buttons, you can scroll up and down the items you
wish to adjust, press the button to confirm and adjust. Press to confirm and exit
the submenu. To exit the Video, Photo or Playback mode, press the button.
Date and Time
YY/MM/DD, MM/DD/YY, DD/MM/YY
Auto Power Off
Off, 1min, 3min.
Beep sound
Off, On
Auto Video Monitoring
Off, On
Language
English, Traditional Chinese, Simplified Chinese
TV mode
PAL, NTSC
HDMI
Off, On
Frequency
50Hz, 60Hz
G-sensor
Off, High, Medium, Low
Power Saving mode
Off, 3min, 5min, 10min.
Format
Cancel, OK
Manufacturing
Settings
Cancel, OK
Version
866TSW001.V1.0
Car owner’s plate
Enter your registration number
Time settings
Press briefly the button to enter the system setting menu, by using the and
buttons you select the date settings, press the button to enter the settings. By using the
Page 6

and buttons you adjust the year, press the button to confirm. The settings of
the month, date, hours, minutes and seconds can be adjusted I the same way as the year.
USB mode
Connect the camera with the computer using a USB cable, the car camera will now display a
USB menu as shown here below:
1. USB-disk
Here you can save your photo and video files onto your computer.
2. PC-Camera
Here you can use the camera as a PC camera.
Charging the battery
There are three different ways in which you can charge the built-in battery. When the
battery is charging, the indicator light will be red, when the charging has been completed,
the indicator light will be turned off. You can charge the battery:
1. Using the power adapter
2. Using the PC-USB
3. Using the car power supply
Note: When the camera does not function properly by cause of incorrect use, you can press
the reset button. All settings will be restored to factory default settings.
Product name
Car camera
Product number
CDC100
Feature
HD camera, HD video
Color
Black
Solution
96220
Screen size
3.0 inch
Lens
AR0330
Language
English, Traditional Chinese, Simplified
Chinese, Japanese, French, German,
Korean, Portuguese, Russian, Dutch
File format
MOV
Video Size
Up to 1080FHD
Color effect
Standard
Seamless Recording
No gaps between recorded files
Car mounted dashcam
Supports camera to turn on when the car
starts the engine, turns of when the engine
is turned off.
Time stamp
Supported
Photo mode
12MP
Photo format
JPG
Memory card
TF (supports up to 32GB)
Microphone
Supported
Built-in speaker
Supported
Power requirements
50Hz/60Hz
USB function
1. USB-disk
2. PC-Camera
Page 7

Power Interface
5V 1A
Battery
Built-in 250mAh
 Loading...