

Page 1
Gebruikershandleiding
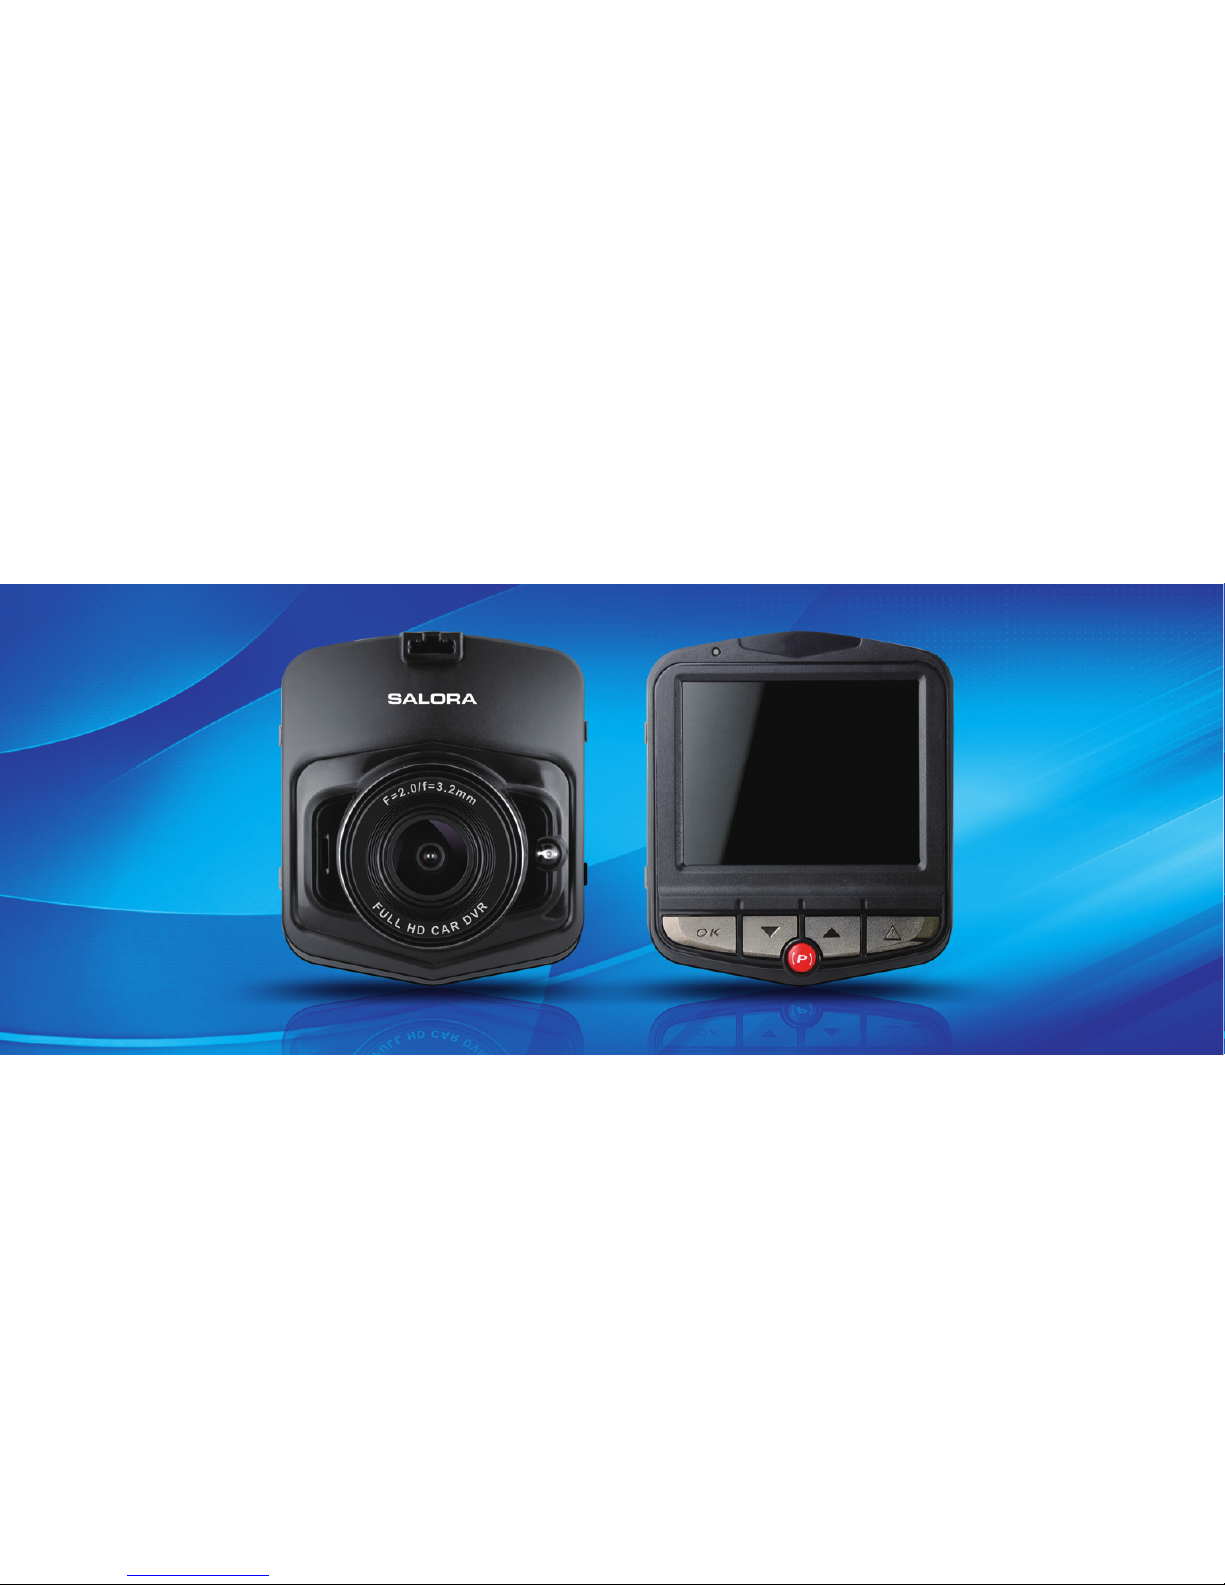
AUTO DVR IN FULL HD
CDC1300FD
Page 2

1
Voorwoord
Wij danken u hartelijk voor het aankopen van één van onze producten, dit product is speciaal ontwikkeld
om te dienen als hard bewijs voor ongelukken; Terwijl het tegelijk tegemoet komt aan de vraag bij andere
gelegenheden, zoals gegevens vastleggen, registreren van bewijs, opnamen maken op locatie, video en
overig bewijsmateriaal, dit alles om het u wat gemakkelijker te maken.
Dit product combineert de verschillende kenmerken, toonaangevende HDR hoog dynamische camera,
WDR groot dynamisch bereik, nooit een seconde missend, naadloos looping video, ultra groothoek
opname, zonder lensvervormingscorrectie, ultra high definition camera, geleverd met een scherm
voor de real time playback, bewegingssensor, afwijking van de rijstrook en nog veel meer nieuwste
technologische kenmerken in één product; Uniek en stijlvol, gestroomlijnd design, zeer gewaardeerd door
onze gebruikers.
Deze handleiding zal ingaan op de installatie, bediening, instellingen en waarschuwingen. Leest u deze
handleiding goed door en bewaar deze om alles later nog een keer door te lezen. We hopen dat dit
product aan uw wensen zal voldoen en we staan graag in de toekomst voor u klaar. Specicaties kunnen
zonder waarschuwing vooraf wijzigen, door nieuwe ontwikkelingen en updates ter verbetering van het
product. De fabrikant behoudt zich het recht voor om wijzigingen aan te brengen zonder kennisgeving
vooraf.
Inbreuk op auteursrecht/ Privacyverklaring
Let op dat dit product uitsluitend is bedoeld voor persoonlijk gebruik. Het gebruik mag niet in overtreding
zijn met nationaal of internationaal auteursrecht/privacywetten. Dit houdt in dat opgenomen beelden
uitsluitend voor persoonlijk gebruik zijn en niet openlijk mogen worden gepubliceerd, in sommige gevallen
zou dit in strijd zijn met andermans auteursrecht of wettelijk recht.
Installatie instructies
U dient dit product zo dicht mogelijk bij de spiegel te installeren om een optimaal beeld te verkrijgen.
Let op dat de lens binnen het bereik valt van de ruitenwissers van de voorruit. Zelfs in de regen zullen de
beelden van de omgeving duidelijk zijn. Raak de lens niet aan met de vingers, vet van uw vingers kan op
de lens achterblijven, zodat het beeld, video of foto, onduidelijk zal worden. Reinig daarom regelmatig de
lens.
Page 3
2
Waarschuwingen
Gebruik de standaard meegeleverde oplader van de fabrikant.
Demonteer het apparaat niet, indien u dit wel doet zal de garantie vervallen.
Schakel een erkende installateur in om de voedingskabel aan te passen.
Accessoires
Hieronder volgt een overzicht met de standaard en optionele accessoires. Indien er iets ontbreekt of is
beschadigd, neemt u dan direct contact op met uw winkelier.
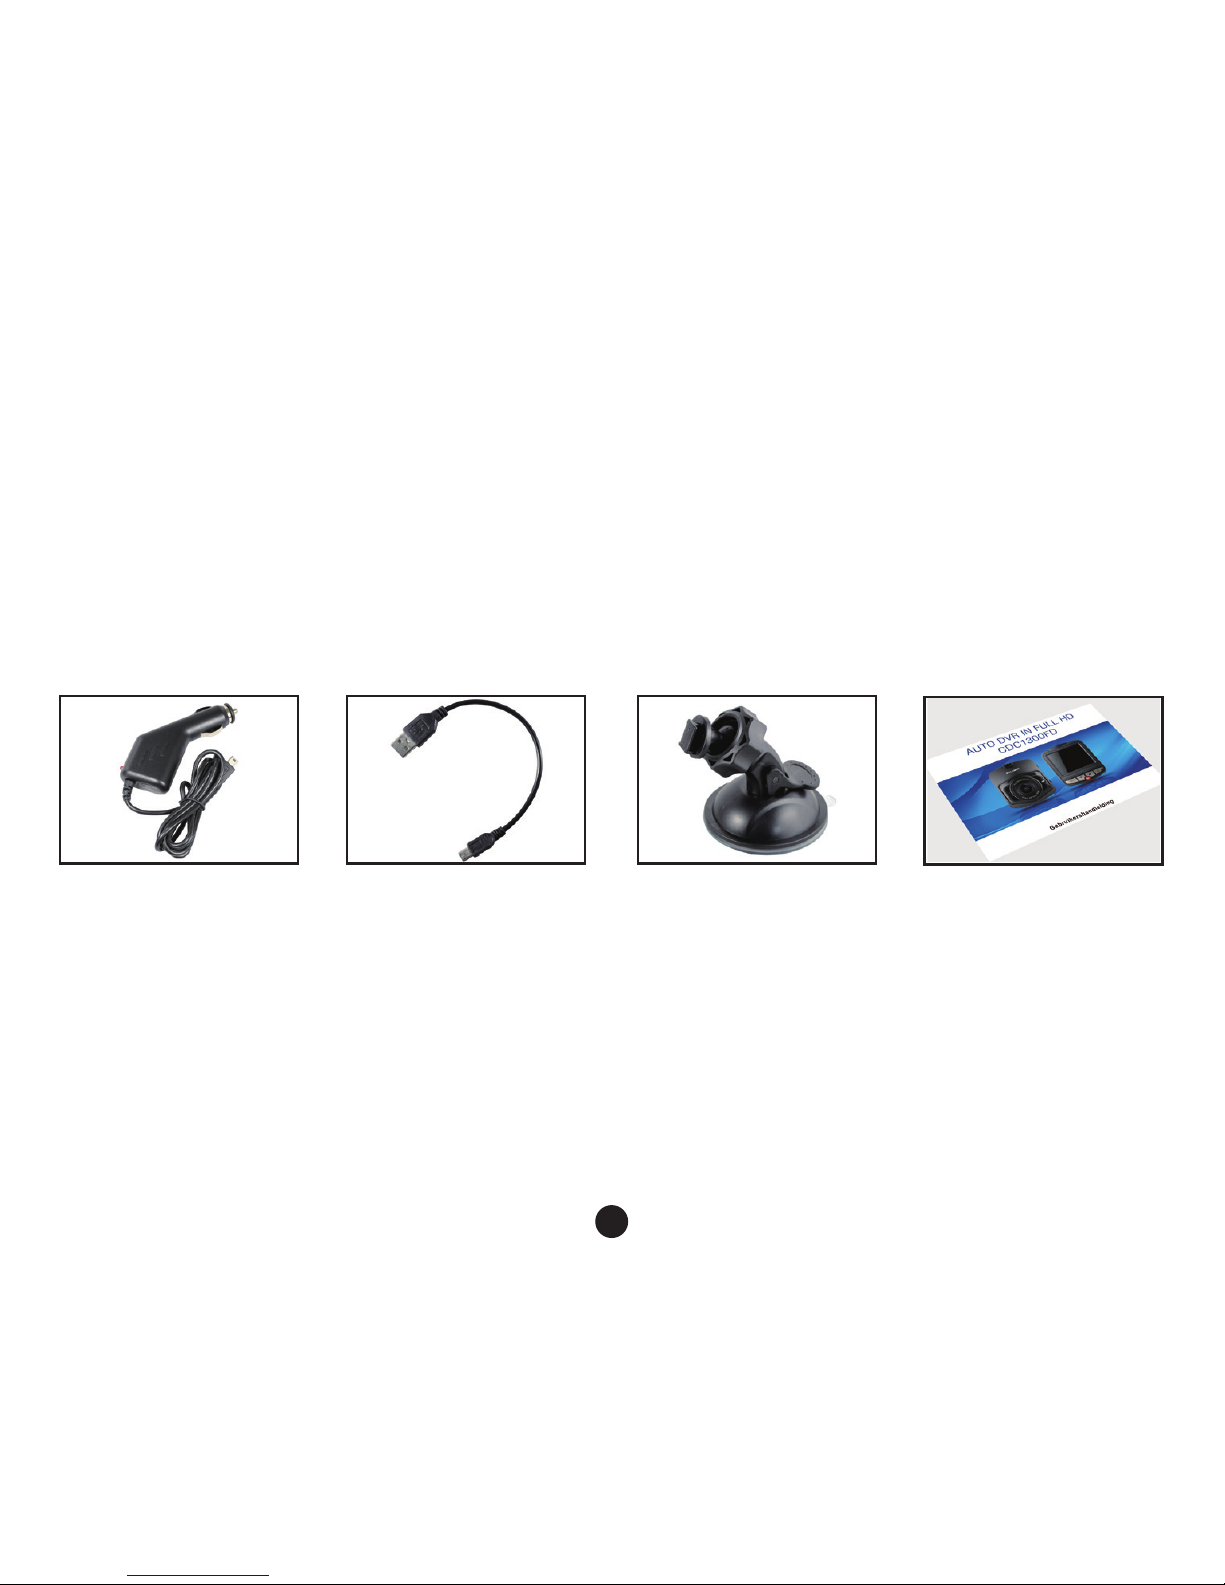
Standaard accessoires
Oplaadkabel USB kabel 3M bevestiging Instructies
Page 4
3
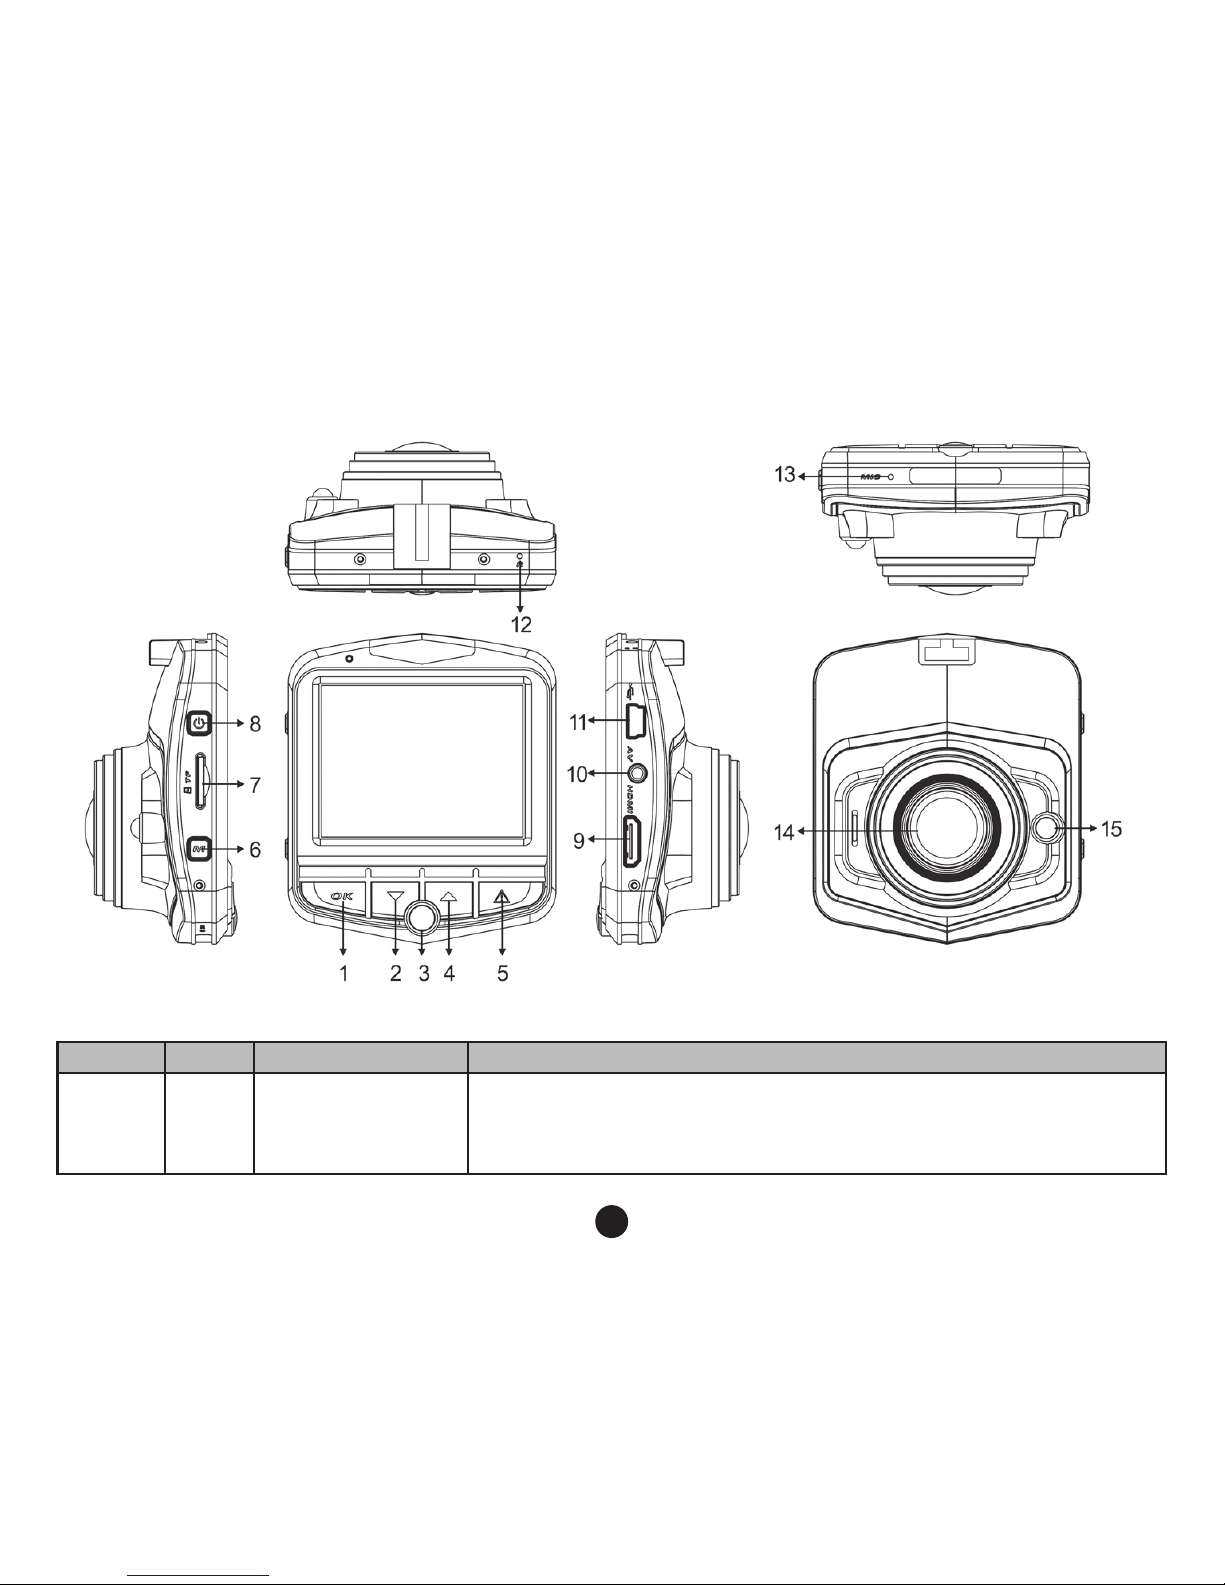
Afbeelding en functies
Nummering en omschrijving van de functie
Nummer Icoon Naam Bediening instructies
1 OK OK knop
Camera/camera/ bevestig, d.m.v. een korte druk op de omlaag knop om
de camera te starten, druk nogmaals om de opname te stoppen.
In camera modus kort drukken om een foto te maken, in de menu
modus om uw keuze te bevestigen.
Page 5
4
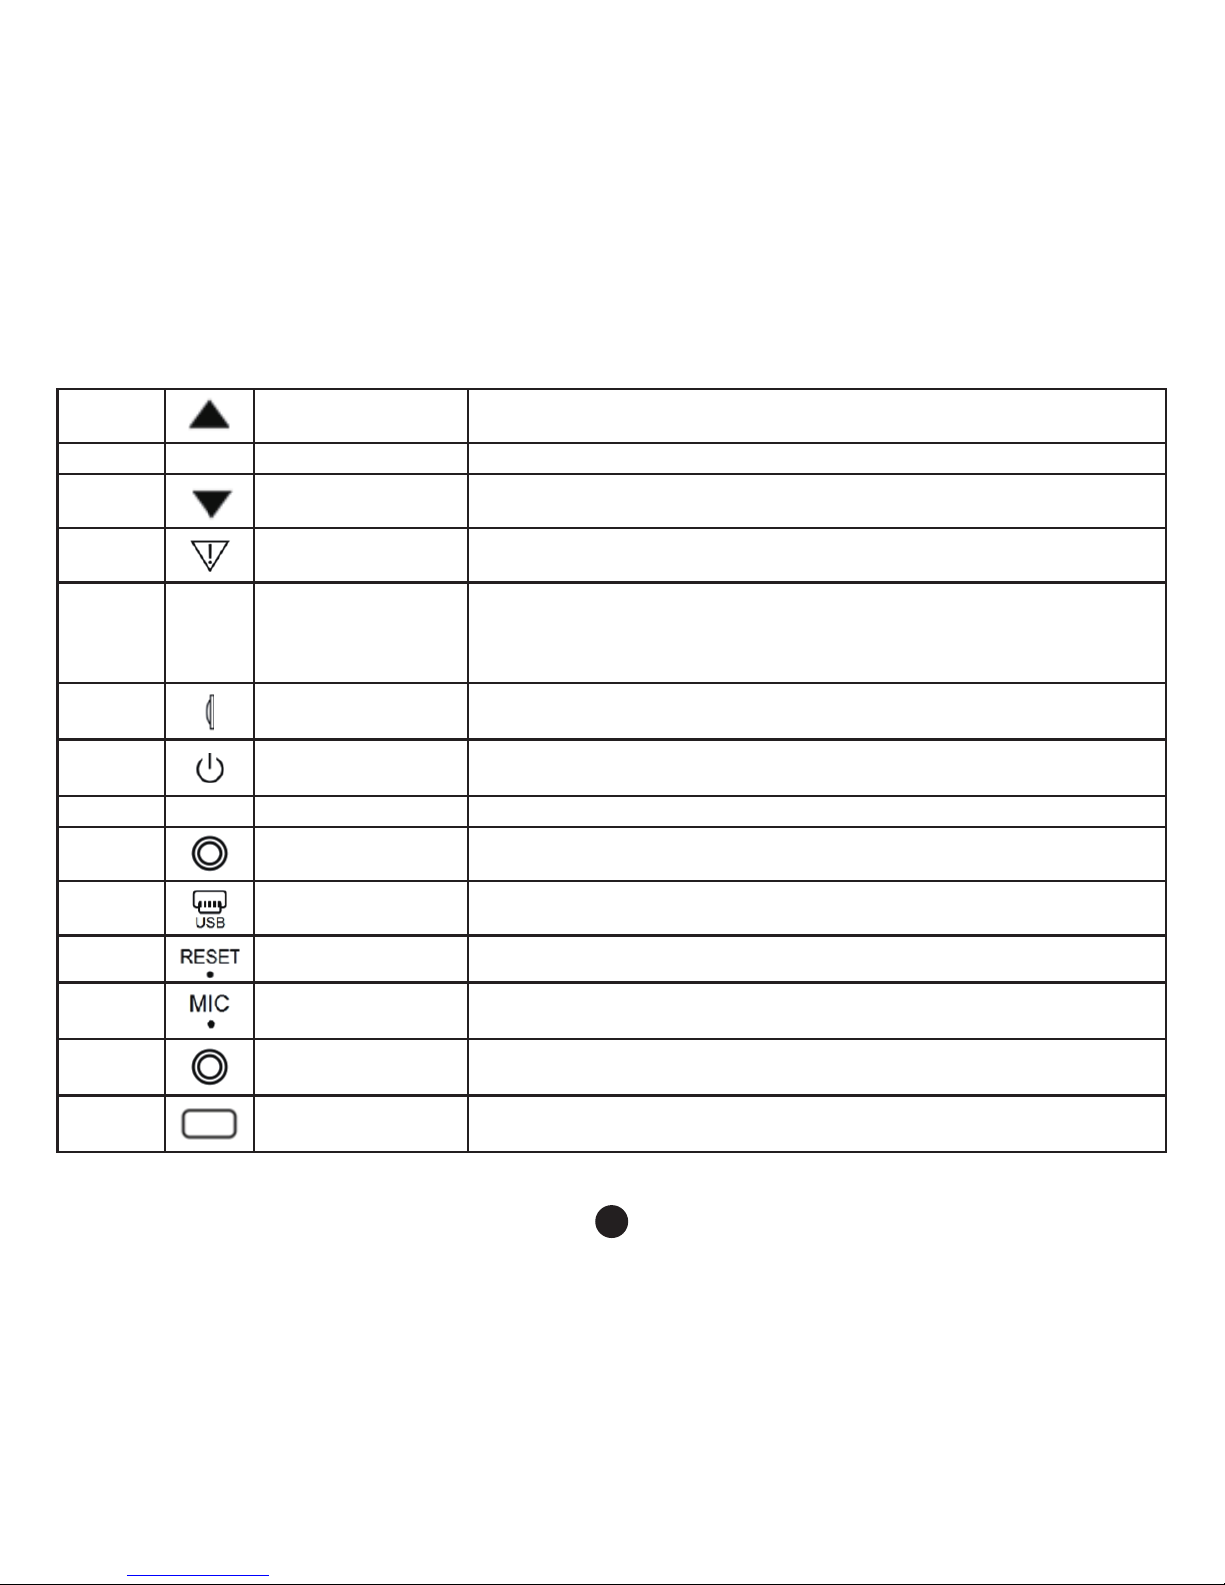
2 Omlaag knop
Bij de menu opties , gebruikt u deze knop om de functie te kiezen;
stand-by of video, nachtvisie lichten aan of uit;
3 P Pakeer modus knop Hiermee kunt u de Parkeer modus functie (de)activeren;
4
Omhoog knop
Menu opties, selecteer een functie omhoog gaand; stand-by of opname
status, beschermde of onbeschermde opnamen;
5
Nood knop
Korte druk op de Camera knop in de huidige status zal het videobestand
worden vergrendeld, dit bestand kan niet worden overschreven;
6 M Modus/ Menu knop
Voor wisselen tussen de verschillende modi /Camera/Afspelen;
In de stand-by modus, druk op deze knop om de kenmerken in te
stellen;
7
TF kaart gleuf TF geheugenkaart gleuf, installeer deze volgens de instructies;
8
Aan/Uit knop Zet het apparaat aan of uit;
9 HDMI HD uitgang interface HD uitgang voor aansluiting van High-denition apparaten;
10
AV ingang poort
AV kabel wordt gebruikt om de video uitgang aan te sluiten op AV
apparatuur;
11
Interface
Voor aansluiting van een PC om data te verzenden; voedingsconnector,
voorziet van stroom;
12
Reset knop Systeem herstarten d.m.v. de reset knop;
13
Microfoon Ontvangst geluidsopname poort;
14
Opname Beeld ontvangst;
15
Fill light ebruik deze in een omgeving met weinig licht.
Page 6

5
Installatie
1. installeer een geheugenkaart: Schuif de geheugenkaart in de daarvoor bedoelde gleuf van het apparaat, de
richting volgend van de opening, druk de kaart zover tot een klik te horen is.
____________________________________________________________________________________________
Let op dat er voor het opslaan van bestanden een geheugenkaart nodig is met een hoge snelheid (class6 of hoger).
N.B.: Indien u de geheugenkaart voor de eerste keer gebruikt, dient u deze eerst te formatteren.
2. Verwijderen van de geheugenkaart: druk op de geheugenkaart om deze uit de gleuf te verwijderen.
N.B.: In de opstart status, verwijdert u de geheugenkaart niet om beschadiging te voorkomen.
3. Het scherm dient te worden bevestigd op de voorruit aan de binnenzijde van het voertuig.
(1). Het apparaat wordt bevestigd aan de zuignap cup beugel, trek de houder vast d.m.v. van de zuignap , let op
dat de camera evenwijdig hangt aan de grond en controleer of het apparaat stevig is bevestigd.
(2). De zuignap dient plat te zijn, geplaatst op de voorruit.
(3.) Plaats de zuignap stevig op de voorruit, druk de klemmen , de houder bevestigd op de achteruitkijkspiegel op
de voorruit. Controleer of het apparaat stevig is bevestigd.
4. Aansluiten van de stroomtoevoer
Gebruik alstublieft de door de fabrikant meegeleverde oplader, het opstartapparaat en de ingebouwde batterij. Het
ene uiteinde van de oplader dient te worden verbonden met de USB poort van het apparaat en het andere uiteinde
dient te worden verbonden met de auto poort, zodra de auto start zal het apparaat automatisch worden opgestart.
____________________________________________________________________________________________
N.B.: U kunt de snoer verlengen en netjes wegwerken aan de bovenkant van de voorruit en
dashboard, zoals hierboven afgebeeld.
5. Het apparaat Aan-/Uitzetten
(1). Auto Aan/Uit: Zodra u de auto start zal het apparaat automatisch opstarten. Zodra het apparaat is opgestart
zal de camera automatisch beginnen met opnemen.
Indien de auto afslaat, zal het apparaat het bestand automatisch opslaan en binnen 15 seconden uitgaan.
Page 7

6
(2). Handmatig Aan/Uit: Handmatig opstarten van het apparaat, druk op de knop, druk nogmaals om het
apparaat uit te zetten.
Initiëren van logger instellingen
Instellen van datum en tijd:
1. Druk op de OK knop om het apparaat in de Stand-by status te zetten.
2. Druk twee keer op de M knop, selecteer <tijd/datum> d.m.v. de
en knoppen, druk daarna op de OK knop
om de instelling te bevestigen.
____________________________________________________________________________________________
3. D.m.v. de
en knoppen kunt u de waarden aanpassen, druk op OK om naar het andere veld te gaan, tot
dat u de instellingen heeft voltooid. Druk op de M knop om het menu te verlaten.
Video’s opnemen
1. zodra de auto is gestart, zal het apparaat automatisch aangaan en de opname zal starten. Zodra de motor
afslaat zal het apparaat automatisch stoppen met opnemen. U kunt ook op de OK knop drukken om het opnemen
handmatig te stoppen.
N.B.: Bij sommige, door een voertuig opgestarte opladers, zal de stroomvoorziening, zodra de
motor afslaat gewoon doorgaan. Indien dit gebeurt, kunt u het volgende doen: zet het apparaat
handmatig uit of trek de oplader uit de aansteker poort van de auto.
2. bij ander type auto’s: Druk op de OK knop, start daarna met opnemen; druk nogmaals op de OK knop om het
opnemen te stoppen.
N.B.:
1. De opname zal iedere 1,2,3,5 of 10 minuten worden opgeslagen, om dit in te stellen gaat u naar
het menu.
2. De bestanden zullen op de geheugenkaart worden opgeslagen, indien de kaart vol is, zal het
oudste bestand automatisch worden overschreven.
3. Noodopname
Page 8

7
N.B.: Indien de G-sensor is gestart, zal de het apparaat, zodra een botsing wordt gedetecteerd,
automatisch de huidige video opname worden vergrendeld en zal niet worden overschreven.
Foto’s maken
1. Druk kort op de M knop om de het apparaat in de camera modus te zetten, het icoon van de camera zal zichtbaar
zijn in de linker bovenhoek van het scherm.
2. Druk op de OK knop om een foto te maken, deze zal één keer knipperen om aan te geven dat de foto is gemaakt.
Video/Foto afspelen
1. In de camera modus dient u op de OK knop te drukken om het opnemen te stoppen.
____________________________________________________________________________________________
2. Druk op de M knop om naar de afspeelmodus te gaan, in de linker bovenhoek van het scherm verschijnt het icoon
van afspelen.
3. Druk op de
en knoppen om het bestand te selecteren.
4. Druk op de OK knop om het geselecteerde bestand af te spelen; druk kort op de OK knop om het afspelen te
pauzeren.
Menu instellingen
1. Indien u bezig bent met opnemen, drukt u op de OK knop om het opnemen te stoppen.
2. Houdt de M knop even vast om het Setup menu te selecteren, Lange druk twee keer om de pagina te selecteren.
3. Door kort op de
en knoppen te drukken kunt u uw keuze maken uit de verschillende mogelijkheden.
4. Selecteer de instelling die u wilt aanpassen, druk op de OK knop om uw keuze te bevestigen.
5. Om de stand-by modus te verlaten drukt u kort op de M knop.
Page 9

8
Extra kenmerken:
1. G-sensor functie
Zodra de G-sensor is geactiveerd, zal het apparaat de opname van het ongeluk automatisch opslaan en het bestand
zal niet worden gewist.
De G-sensor kan worden aangepast in het menu: Hoog-Middel-Laag-Uit. De standaard fabrieksinstelling is Middel.
2. Pakeer modus
(1). Nadat de parkeer modus is aangezet en de motor staat uit, zal de camera automatisch aangaan bij detectie
van door kracht veroorzaakte bewegingen, hierna zal de camera 10-15 seconden opnemen; Indien wederom
een door kracht veroorzaakte beweging wordt gedetecteerd, zal de camera weer aangaan.
(2). Opnemen parkeermodus video camera 1080P 15 frames/sec, zal het bestand automatisch vergrendelen.
N.B.: Het opslaan van langere tijd in de Parkeermodus werkt uitsluitend indien de tachograaf
automatisch stopt, indien u dit handmatig doet, werkt deze functie niet.
3. Bewegingsdetectie functie;
____________________________________________________________________________________________
Bij de bewegingsdetectie zal na een korte druk op de OK knop de camera starten, de camera zal automatisch 10
seconden opnemen, zodra er geen beweging wordt gedetecteerd zal het apparaat in de Stand-by modus gaan en
stoppen met opnemen. Indien er een beweging wordt gedetecteerd zal de camera beginnen met opnemen en het
rode lampje zal knipperen. De standaard instelling van de camera: Bewegingsdetectie uit.
4. USB modus
Verbindt d USB kabel met de computer, de tachograaf zal automatisch het menu tonen met de volgende opties:
(1). Geheugen
In deze modus kunt u video of foto bestanden raadplegen.
(2). Camera
In deze modus kunt u het USB video apparaat bekijken, dit kan een gewone camera zijn of een chat-camera
van de PC.
Page 10
9
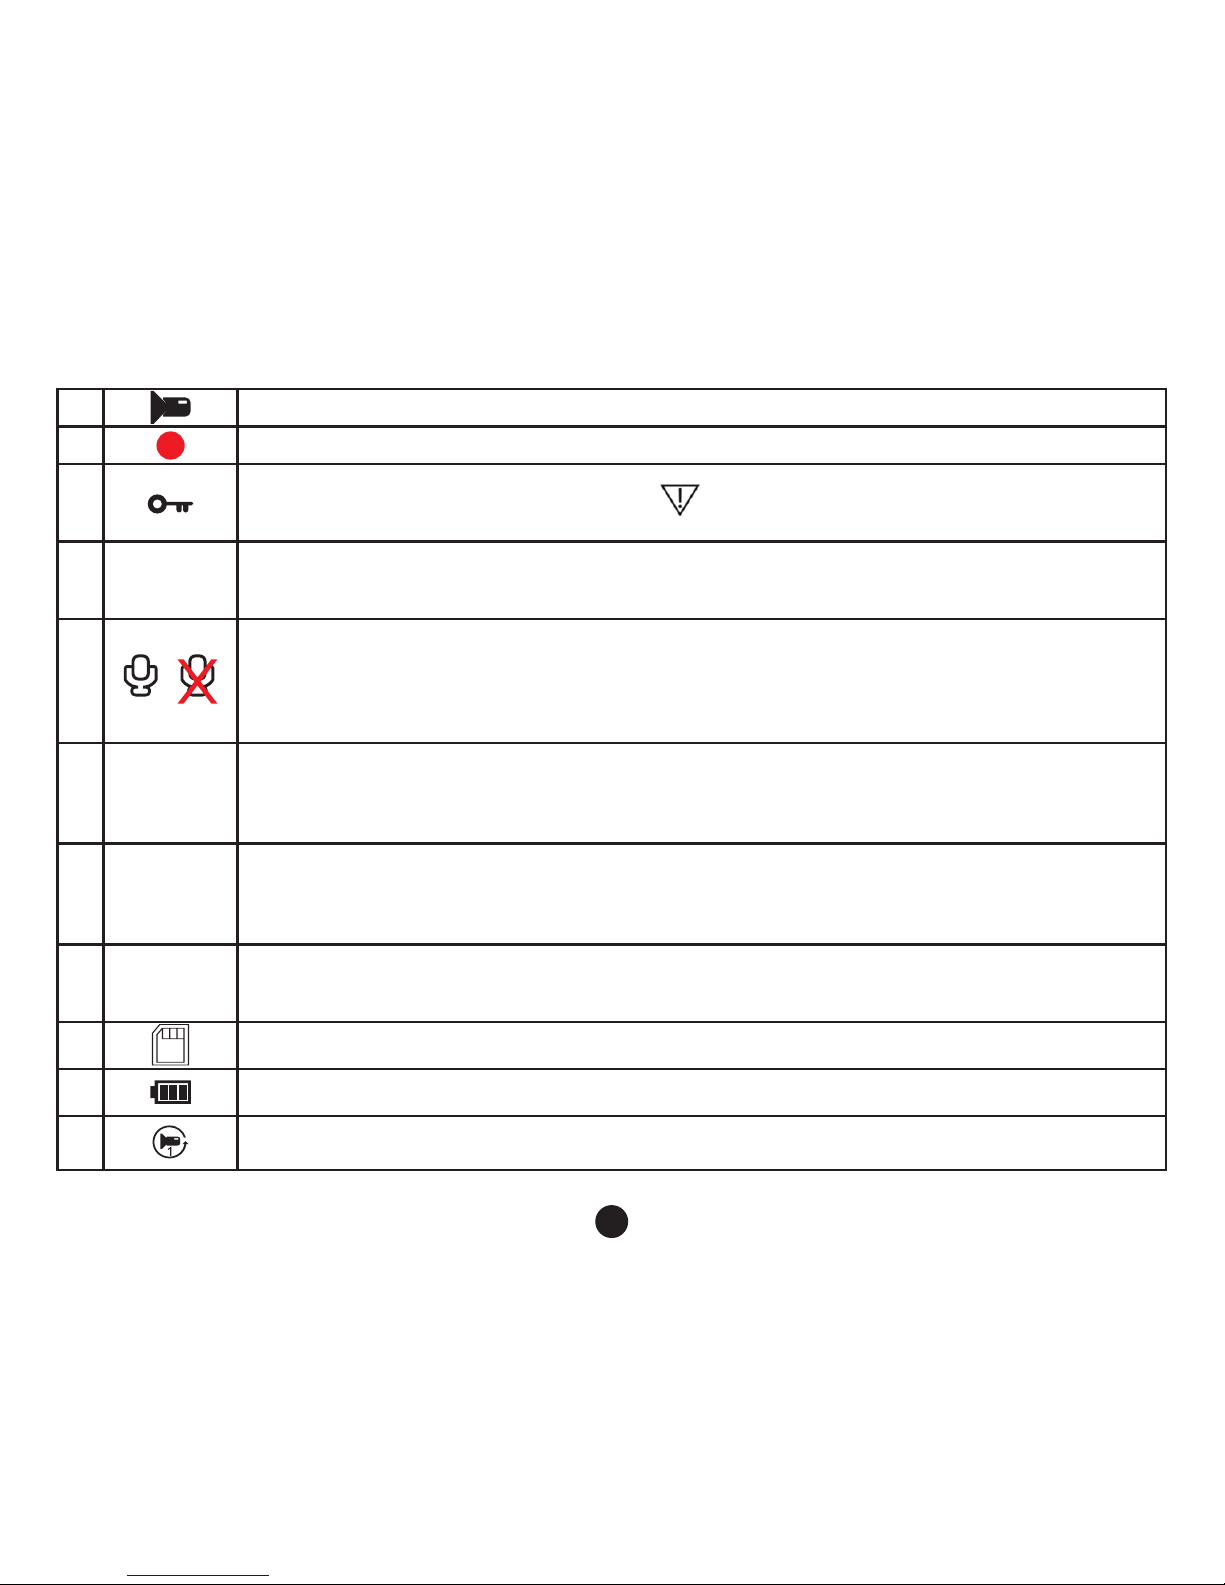
5. Batterij instructies
Batterij niveau indicator, volgens onderstaand schema:
Volledig opgeladen Minder stroom Weinig stroom Geen stroom
Nadat u de auto heeft gestart, zal het rode oplaadlampje branden om aan te geven dat het opladen is begonnen.
De gehele oplaadprocedure duurt ongeveer 180 minuten. Nadat het opladen is voltooid zal het lampje automatisch
uitgaan.
6. Reset
Indien, tijdens gebruik, het apparaat stoort of is gecrasht, kunt u het apparaat resetten door in het gaatje te drukken
d.m.v. een dunne naald.
____________________________________________________________________________________________
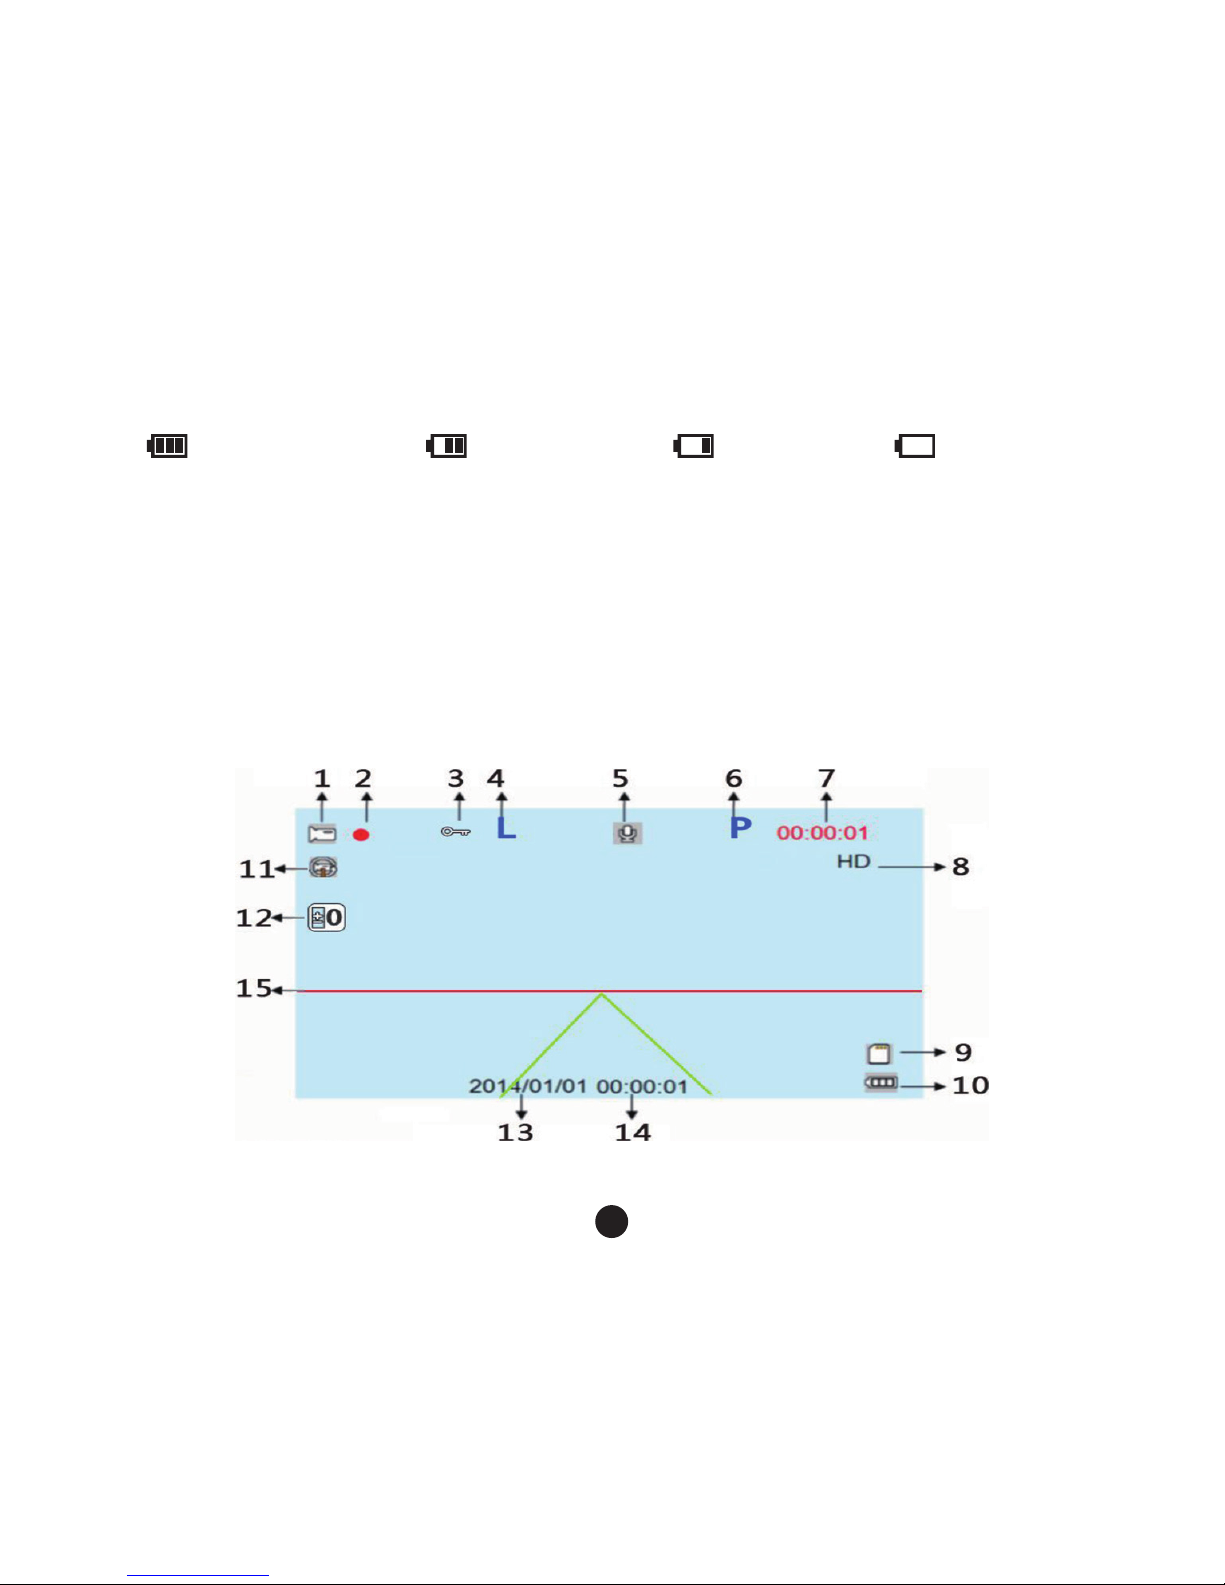
Omschrijving van de video interface iconen
Page 11
10
1. Camera modus
2.
Knipperend, bezig met opnemen
3.
Om video bestand te ontgrendelen
Indien de G-sensor is geactiveerd, zal het
verschijnen op het scherm, aangevend dat het
huidige bestand zal worden vergrendeld: als sneltoets om een video opname te vergrendelen.
4. L
Om de ll light te activeren;
Open het Instellingen menu of sluit de ll light functie, het icoon zal overeenkomstig branden.
Door kort op de s knop te drukken, kunt snel de ll light te activeren.
5.
Audio aan functie
Audio uit functie
Door het Instellingen menu te openen kunt de audio van het opnemen aan of uitzetten. Het
icoon zal overeenkomstig uw instelling aangaan. Door kort op de s knop te drukken, kunt snel
de audio openen.
6. P.
Parkeermodus icoon.
Door het Instellingen menu te openen kiest u de Parkeer Modus, het icoon zal aangeven of
de modus is geactiveerd of niet. Door kort op de P knop te drukken kunt u snel de stop modus
functie (de)activeren.
7. 00:15:30
Witte karakters: de resterende tijd van de geheugenkaart/ rode karakter: huidige
opnamesegment tijd. Nadat u een geheugenkaart is geplaatst, zal d.m.v. witte karakters de
resterende opnametijd worden aangegeven, bij opname zal d.m.v. rode karakters de tijd worden
aangegeven van het segment.
8. 1080FHD
Geeft aan dat momenteel een opnameresolutie is van 1080FHD, u kunt kiezen uit
1080FHD/720P/480P. In het menu resolutie kunt u de gewenste keuze maken waarna het
overeenkomstige icoon zal gaan branden.
9.
Icoon van de geheugenkaart, deze is zichtbaar zodra een geheugenkaart is geplaatst.
10
Geeft de status van de batterij aan.
11.
Icoon voor de duur van een videosegment, u kunt kiezen uit 1 minuut/2 minuten/3 minuten/5
minuten/10 minuten.
Page 12
11
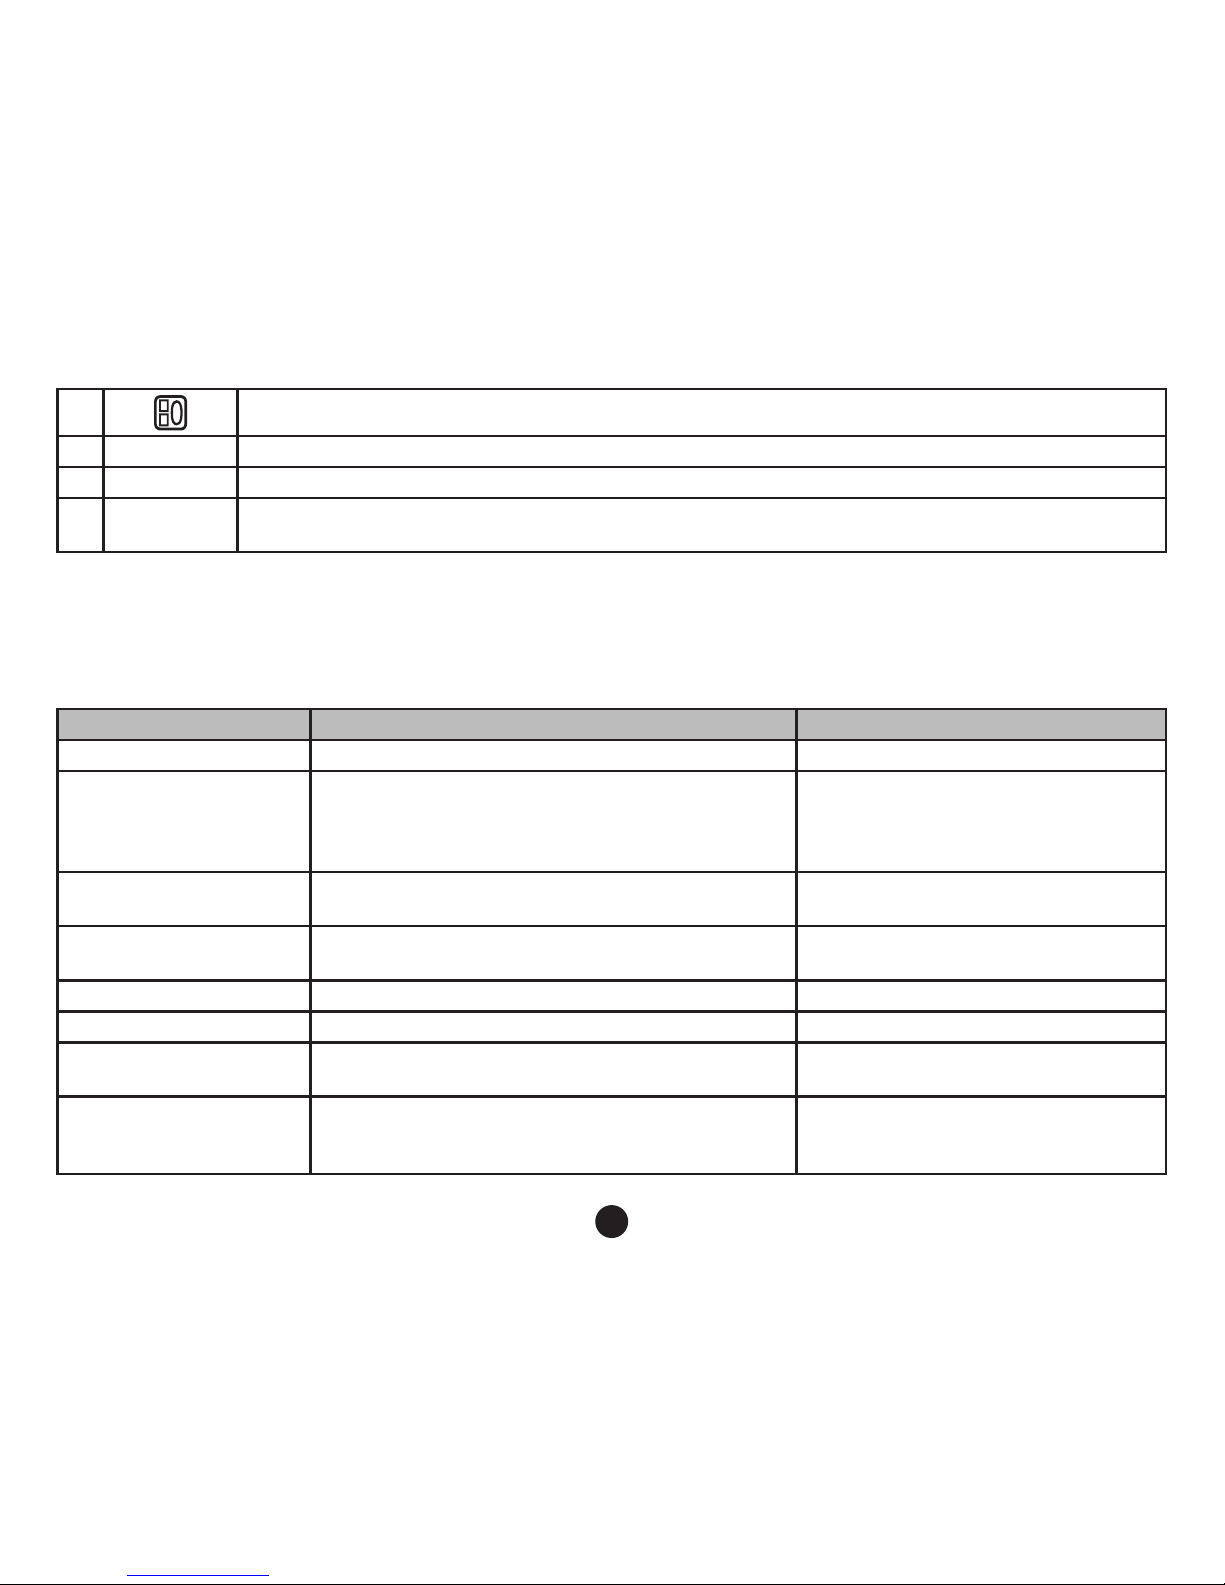
12. Geeft de huidige gekozen belichting parameters aan.
13. 00:00:01 Aanduiding van de tijd voordat u deze heeft ingesteld.
14. 2014/01/01 Aanduiding van de datum, voordat u deze heeft ingesteld.
15.
Rijstrook
verspringing
U kunt de rijstrook verspringing activeren of deactiveren.
Instellingen Menu
Menu opties Omschrijving Beschikbare opties
Resolutie Instellen video resolutie 1080FHD,1080P,720P,WVGA,VGA
Segment opname Instellen duur van elk segment
1 minuur, 2 minuten, 3 minuten, 5
minuten, 10 minuten; indien u het
apparaat afsluit zal het opname
segment niet worden vol gemaakt.
Belichting compensatie
Onderbelichting, het scherm zal donker zijn, u
kunt de ll light functie gebruiken
+0,0, -1/3, -2/3, -10, -4,3, -5/3, -2.0,
+2.0, +5/3, +4/3, +10+2/3, +1/3
Beweging sensor
In de standby modus, als het scherm is ingesteld
voor een video opname bij beweging.
Aan, Uit
Audio opname Audio opname is geactiveerd of gedeactiveerd. Aan, Uit
Datum stempel Camera video watermerk Aan, Uit
G-sensor
Video gemaakt door botsing, dit zal nooit worden
overschreven
High, Medium, Low, Off
Rijstrook verspringing
Zodra het voertuig van rijstrook verspringt, zal het
alarm afgaan.
Functie schakelaar, model,
gevoeligheid, gebied aanduiding,
start snelheid
Page 13

12
Stop modus
Na parkeren en uitschakeling van de motor. Zal
de camera automatisch aan gaan na een externe
door kracht veroorzaakte beweging.
Aan, Uit
Datum/Tijd Datum en Tijd
U kunt het volgende instellen: jaar,
maand, dag, uur, minuten, seconden
Automatische
uitschakeling
Automatische uitschakeling, na de ingestelde tijd
zal het apparaat uitgaan
1 minuut, 30 seconden
Screen saver Het apparaat schakelt automatisch het scherm uit 10 seconden, 30 seconden, 1 minuut
Piep Geluid tijdens het bedienen van de knoppen Aan, Uit
Instellen Taal Taal bedieningsmenu
Traditioneel Chinees, Gesimpliceerd
Chinees, Russisch, Japans, Frans,
Italiaans, Duits, Spaans, Engels,
Nederlands, Koreaans
TV modus TV Systeem NTSC, PAL
Licht Frequentie Lichtfrequentie 50HZ, 60HZ
Fill Light Gebruik in een omgeving met weinig licht Aan, Uit
Formatteren
Hiermee kunt u data van geheugenkaart
verwijderen
SD kaart
Fabrieksinstelling Herstellen van de fabrieksinstelling Annuleer, OK
Versie Software versie Versienummer
____________________________________________________________________________________________
Product naam HD tachograaf
Product kenmerken Extreem brede hoek van 170 °, 1080P full HD
G-sensor Ingebouwd (in geval van een ongeluk, permanente opslag, bestand zal niet worden
verwijderd
LCD scherm afmeting 2.3 inch, High dention LCD scherm
Opname A + grade High Resolution, 170 graden ultra groothoek lens
Page 14

13
Taal Russisch, Engels, Chinees, Japans, enz.
Bestand formaat MJPEG, AVI
Video resolutie 1920*1080P, 1280*720P
Video opname formaat Audio: AAC
Kleureffect Standaard
Doorlopende loop
opname
Naadloze loop opname, geen missende seconden
Automatische Aan/Uit
schakelaar
Ondersteund, motor aanzetten automatisch starten, motor uitzetten automatisch
uitschakelen.
Beweging detectie Ondersteund
Datum splitsing Ondersteund
Vector Media Ondersteund, ingebouwd geheugen (totaal 1024MB)
Camera Modus 1200M
Foto formaat JPEG
Geheugenkaart TF (maximale capaciteit 32GB)
Microfoon Ondersteund
Ingebouwde stereo Ondersteund
IR Ondersteund
Video Formaat PAL/NTSC
Frequentie 50HZ/60HZ
USB functies 1: USB schijf
Power Interface 2: PC-camera
Batterij 5V 1A
Ingebouwd 200mAh
____________________________________________________________________________________________
Page 15

14
Problemen oplossen
Indien u problemen heeft met het apparaat kijkt u dan eerst in onderstaand schema om deze eventueel op te lossen.
Het apparaat start niet:
Controleer of de alle kabels goed zijn aangesloten, of het apparaat handmatig is aangezet, of de batterij niet te
weinig vermogen heeft en dient te worden opgeladen. Soms is het nodig om het apparaat terug te zetten naar de
fabrieksinstellingen door deze te resetten.
De camera stopt automatisch met opnemen of er kunnen geen loop opnamen worden gemaakt:
Door de enorme HD video data, kan het voorkomen dat de geheugenkaart de hoeveelheid data niet aan kan.
Gebruik daarom een hoge klasse geheugenkaart, zoals een Class10 kaart.
Geen loop opname mogelijk kan veroorzaakt worden doordat de G-sensor aan staat en de geheugenkaart vol staat
met vergrendelde bestanden. Zorg ervoor dat G-sensor uitgeschakeld is en de geheugenkaart is geformatteerd.
De camerabeelden en ingesteld tijdsegment komt niet overeen:
Controleer of de beweging sensor is ingeschakeld, de opnametijd hangt af van de ingestelde tijd, uitsluitend indien
er bewegingen worden gedetecteerd.
Opnamebeelden zijn niet helder:
Controleer of er vingerafdrukken op de lens zitten. Reinig de lens voordat u de camera wilt gebruiken, houd deze
schoon.
De opgenomen video is van slechte kwaliteit:
Soms is de kwaliteit van de beelden afhankelijk van bijvoorbeeld, tegenlicht, gedimd licht, intensiteit van het licht,
door dit aan te passen zal de kwaliteit van de opname verbeteren.
Strepen interferentie:
Dit komt door de verkeerde ingestelde licht frequentie, dat wordt veroorzaakt door fluorescerend licht, de
vastgestelde frequentie voor normaal gebruik is 50HZ.
Indien het apparaat niet meer reageert:
Indien het apparaat niet meer reageert kunt door middel van de reset knop, alles terugzetten naar de
fabrieksinstellingen.
Page 16

15
Page 17

16
Introduction
Merci beaucoup pour votre achat, ce dispositif est spécialement développé comme preuve en cas d’un
accident ; dans le même temps cet appareil vous peut servir dans autres occasions, pour sauvegarder
des données, enregistrer des preuves, prendre des photos en extérieur, faire des vidéos et autres
preuves, ce tout pour avoir une vie plus confortable.
Cet appareil combine certaines de son caractéristiques, caméra HDR très dynamique, WDR grand
gamme dynamique, il ne manque jamais une seconde, vidéo looping sans problème, enregistrement ultra
grand angle, correction sans interruption, caméra ultra high-denition, fournit avec une lecture real time,
détection de mouvement, avertissement de déviation de la le et beaucoup de plus. Unique et élégant,
design aérodynamique et très apprécié par la plupart des nos clients.
Ce manuel vous expliquera l’installation, la navigation, les paramètres et le précautions. S’il vous plait
lisez ce manuel attentivement et sauvegardez-le. Nous espérons que cet appareil répond à vos souhaits
et nous serons à votre disposition avec plaisir. Les spécications techniques peuvent êtres modiées
pour l’amélioration du produit et les mises à jour. Le fabricant s’est réservé le droit de modier le produit
sans notication préalable.
Eteindre le droit d’auteur/Déclaration de condentialité
Attention : cet appareil est exclusivement pour utilisation personnel. L’utilisation ne doivent pas être en
violation des lois de condentialité et les droits d’auteur. Les enregistrements ne peuvent pas être publié,
ces performances, exhibitions ou activités commerciales pourraient violer les droits légaux ou d’auteur
de quelqu’un.
Instructions d’utilisation
Nous vous prions d’installer l’appareil près du miroir pour obtenir une meilleure vue.
Assurez-vous que la lente est dans la zone des essuie-glaces de la pare-brise, pour permettre une bonne
visibilité par temps pluvieux. Ne touchez pas la lentille avec les doits, des résidus de graisse pourraient
rester sur la lentille, résulter des photos pas clairs. Nettoyez la lentille périodiquement.
Page 18

17
Précautions
Utilisez le chargeur standard du fabrique
Ne démantelez pas l’appareil, pour éviter que la garantie est supprimée.
Quand vous voulez modier le l électrique, assurez-vous de contracter un électricien professionnel.
Accessoires
ci-dessous vous voyez une liste d’accessoires standards et optionnels. S’il manque quelque chose ou en
cas de dommage contactez votre commerçant local immédiatement
.
Accessoires standard
Câble chargeur Câble USB 3M bloc Instructions
Page 19

18
Explication du gure
Nummering en omschrijving van de functie
Numéro Icône Nom Instructions de navigation
1 OK Bouton OK
Caméra/caméra/conrmer : appuyez brièvement pour commencer la
caméra, appuyez une autre fois pour arrêter l’enregistrement ;
Appuyez brièvement en mode Caméra pour prendre des photos ; en
mode Menu pour conrmer.
Page 20

19
2 Bouton Bas
Dans le menu Options, sélectionnez le bouton Bas ; standby ou vidéo,
lumière de vision de nuit ;
3 P Bouton mode parking Activer ou désactiver le mode Parking ;
4
Bouton Haut
Options dans le menu, sélectionnez en allant en haut ; l’état standby
ou enregistrer, enregistrements protégées ou non protégées ;
5
Bouton Urgence
Appuyez brièvement le bouton Caméra, dans l’état actuel le chier
sera sauvegardé, et ne sera pas écrasé.
6 M Bouton Mode/Menu
Pour basculer entre les mode caméra/lecture ;
Dans l’état de standby, appuyez ce bouton pour entrer dans le menu
spécications
7
Fente carte TF La fente pour une carte TF, insérez-la correctement ;
8
Bouton Marche/Arrêt Pour mettre en marche ou arrêter l’appareil
9 HDMI Interface de sortie HD
Interface de sortie HD pour connecter des dispositifs à haute dénition
;
10
Port d’entrée AV Utilisez un câble AV pour connectez des appareils avec une sortie AV
11
Interface
Connecter l’ordinateur pour transférer les données, connecteur
d’alimentation, alimente en électricité ;
12
Bouton de initialisation Pour réinitialiser le système ;
13
Microphone Pour enregistrer le son ;
14
Photo Prendre une photo
15
Fill light Utilisez quand la lumière est faible
Page 21

20
Installation
Insérez une carte mémoire : insérez-la correctement conformément la fente, appuyez la carte jusqu’à ce
qua vous sentez un clique.
_________________________________________________________________________
Puisque l’appareil sauvegarde les données à haute dénition, assurez-vous que vous utilisez une carte à
haute vitesse (class10 ou plus).
Note : Si vous utilisez la carte mémoire pour la première fois, assurez-vous que vous formatez la
carte avant usage.
2. Retirer la carte mémoire : Appuyez sur la carte pour retirer-la.
Note : Dans l’état de démarrage, ne pas retirez la carte mémoire de l’appareil, pour éviter de
dommage à la carte.
3. L’écran doit être monté sur le pare-brise dans le véhicule.
(1). Montez l’appareil sur la fermeture avec la ventouse, serrez la fermeture avec la ventouse, assurez-
vous que la caméra est parallèle au sol, assurez-vous que la caméra est fermement verrouillée
(2). Assurez-vous que le ventouse est positionnée totalement plat sur le pare-brise.
(3). Positionnez solidement le support sur la pare-brise, serrez la fermeture, montez le mont sur le
rétroviseur au centre de la pare-brise. Assurez-vous que l’appareil est solidement verrouillé.
4. Connexion d’alimentation
Nous vous prions d’utiliser le chargeur original fourni, le logiciel et la batterie intégrée. Connectez une
extrémité du chargeur voiture au port USB de l’appareil et l’autre à l’allume-cigare de la voiture. La
caméra se met en marche automatiquement quand la voiture démarre.
Page 22

21
_________________________________________________________________________
Notez : L'adaptateur de voiture fourni a une longue câble pour permettre de placer
soigneusement le câble dans le véhicule, comme montré ci-dessus.
5. Mettre en marche/Arrêter l’appareil
(1). Auto On/Off : La caméra se met en marche automatiquement quand la voiture démarre. Quand
l’appareil se met en marche, la caméra commence l’enregistrement.
Quand le moteur de la voiture s’éteint, l’appareil sauvegarde le chier et s’éteint entre 15 secondes.
(2). Manuel On/Off : Appuyez sur le bouton q pour mettre en marche, appuyez une autre fois pour
arrêter.
Paramètres initiales :
Régler la date et l’heure :
1. Appuyez sur le bouton OK per mettre l’appareil en état Standby.
2. Appuyez sur le bouton M deux fois, sélectionnez <time/date> par les boutons et , puis appuyez
sur le bouton OK pour conrmer.
_________________________________________________________________________
3. Par les boutons et vous pouvez modier le réglage de la date et l’heure, après chaque réglage
vous appuyez sur le bouton OK pour conrmer, appuyez sur le bouton M pour quitter le menu.
Enregistrement du vidéo
1. La caméra se met en marche automatiquement quand la voiture démarre. Quand l’appareil se met en
marche, la caméra commence l’enregistrement. Quand le moteur s’éteint, la caméra arrêt l’enregistrement.
Ou vous appuyez sur le bouton OK pour l’utilisation manuel.
Note : Dans certains véhicules, l'alimentation est fournie lorsque les branchements sont faits,
dans d'autres, l'appareil se mettra en marche à l'allumage du véhicule. Si vous voulez arrêter
Page 23

22
l’appareil, vous pouvez déconnecter-le en manière manuel ou par déconnecter le câble chargeur
du port l’allume-cigare.
2. Autre modèles caméra : Appuyez sur le bouton OK, l’enregistrement commence ; appuyez une autre
fois et l’enregistrement s’arrêt.
Note :
(1). La caméra sauvegarde une séquence d’enregistrement d’une durée de 1,2,3,5,10 minutes. La
durée est programmable dans le menu Caméra.
(2). La caméra sauvegarde chaque séquence sur la carte mémoire. Lorsque que la carte est
pleine, les enregistrements les plus anciens seront supprimés.
3. Caméra Urgence
Note : lorsque vous activez le capteur G et un accident a été détecté, l’appareil automatiquement
permettra de protéger l’enregistrement.
Prendre des photos
1. Appuyez brièvement sur le bouton M pour mettre en mode caméra, l’icône du caméra apparaitra dans
le coin supérieur gauche de l’écran.
2. Appuyez sur le bouton OK pour prendre des photos, il clignote pour indiquer que la photo est prise.
Lecture Vidéo/Photo
1. En mode Caméra, vous appuyez sur le bouton OK pour arrêter l’enregistrement.
_________________________________________________________________________
2. Appuyez sur le bouton M pour entrer le mode Lecture, dans le coin supérieur gauche vous voyez l’icône
de lecture.
Page 24

23
3. Par les boutons et vous pouvez sélectionner un chier.
4. Appuyez sur le bouton OK pour lire le chier sélectionné ; appuyez une autre fois brièvement pour
pauser la lecture.
Réglage menu
1. Si vous êtes entrain d’enregistrer, appuyez sur le bouton OK pour arrêter.
2. Appuyez longuement sur le bouton M pour entrer dans le menu réglage, Appuyez longuement deux
fois pour la page menu.
3. En appuyant brièvement sur les boutons et , vous pouvez basculer entre les divers choix
4. Sélectionnez le réglage de votre choix que vous voulez modier et appuyez sur le bouton OK pour
conrmer.
5. Lorsque vous avez conclus le réglage vous appuyez sur le bouton M pour quitter le mode standby.
Caractéristiques spéciales
1 Fonction capteur G
Lorsque vous activez le capteur G et un accident a été détecté, l’appareil automatiquement permettra de
protéger l’enregistrement, le chier ne sera pas supprimé.
Vous pouvez régler le capteur G dans le menu réglage, High – Medium – Low – Off. Par défaut : Medium.
2 Fonction mode Parking
(1). Le capteur G va détecter automatiquement le moindre choc contre le véhicule, et enregistrera
automatiquement 10-15 secondes de vidéo sur une partie sécurisée de la carte mémoire,
ineffaçable. Si le capteur détecte un autre choc, la caméra se met en marche une autre fois.
(2). Enregistrement Parking du vidéo caméra 1080P 15 frames/sec, le fichier est verrouillé
automatiquement.
Note : Le stockage des chier en mode Parking, fonctionne uniquement en cas de Auto On/Off du
tachéographe, si vous le mettez en marche/Arrêtez manuellement, ce mode n’est pas disponibles.
Page 25

24
3. Fonction détection de mouvement
_________________________________________________________________________
Si ce fonction est activé, vous appuyez sur le bouton OK pour démarrer la caméra, en enregistrant un
séquence de 10 secondes. Si aucun mouvement est détecté la caméra s’arrêt en état de standby. Lorsque
la caméra détecte un mouvement, l’enregistrement commence et le témoin rouge d’enregistrement est
visible sur l’écran.
4. USB
Connectez le câble USB à votre ordinateur, le tachéographe montrera automatiquement le menu, avec
les options suivants :
(1). Mémoire
Vous pouvez accéder les chiers vidéo et photo.
(2). Caméra
Pour accéder un dispositif Vidéo USB, caméra réseau en temps réel ou vidéo-chat à l’ordinateur.
5. Instructions de batterie
Indicateur niveau batterie
Complètement chargée Moins de puissance Peut de puissance Pas de puissance
Lorsque vous démarre la voiture la charge de la batterie commence, le témoin rouge s’allume, le temps
de charge complète est plus ou moins 180 minutes. Le témoin rouge s’éteint lorsque la batterie est
complètement chargée.
6. RESET
Page 26

25
En cas de défaillance ou crash, vous pouvez le bouton RESET pour réinitialiser l’appareil en appuyez
dans le petit trou avec une aiguille ne .
_________________________________________________________________________
Dénition des icônes
1. Mode Caméra
2.
Clignoter, en train d’enregistrer
3.
Pour déverrouiller le chier vidéo;
En activant la capteur G, l’icône
apparait sur l’écran pour indiquer que le chier sera
verrouillé: comme raccourci, pour verrouiller les chiers vidéo.
4. L
Activer le Fill Light mode;
Dans le menu réglage, activer ou désactiver le fonction Fill Light. En appuyant le bouton s vous
pouvez activer le fonction rapidement.
Page 27

26
5.
Fonction son activé
Fonction son désactivé
Dans le menu réglage, activer ou désactiver le fonction Audio. En appuyant le bouton s vous
pouvez activer le fonction rapidement.
6. P.
L’icône mode Parking
Dans le menu réglage vous pouvez activer ou désactiver le mode Stop, l’icône vous montre si le
fonction est activé ou non. En appuyant brièvement sur le bouton P vous pouvez (dés)activer le
fonction rapidement.
7. 00:15:30
Caractères en Blanc- le temps d’enregistrement restant du carte mémoire/ caractères en rouge
– le temps d’enregistrement actuel d’une séquence. Après avoir inséré la carte mémoire, la
caméra vous montre le temps d’enregistrement restant avec les caractères en blanc, en mode
d’enregistrement, le temps d’enregistrement d’une séquence est montré avec les caractères en
rouge.
8. 1080FHD
Actuellement la résolution de l’enregistrement est 1080FHD, vous pouvez choisir entre:
1080FHD/720P/480P. dans le menu de réglage vous pouvez faire votre choix, sur l’écran l’icône
de la résolution sera visible.
9.
L’icône de la carte mémoire est montré, quand une carte mémoire est insérée.
10
Vous montre le niveau de la batterie.
11.
L’icône du mode boucle, les options d’une séquence d’un enregistrement sont : 1 minute/2
minutes/3 minutes/5 minutes/10 minutes.
12.
Vous montre les paramètres de l’exposition actuel.
13. 00:00:01 Vous montre le temps, avant réglage.
14. 2014/01/01 Vous montre la date, avant réglage.
15.
Rijstrook
verspringing
Activer ou désactiver avertissement déviation de la le.
Page 28

27
Réglages de Menu
Options Menu Explication Options disponibles
Résolution Réglage de résolution vidéo 1080FHD,1080P,720P,WVGA,VGA
Enregistrement en boucle
Réglage de chaque séquence d’un
enregistrement
1 minute, 2 minutes, 3 minutes,
5 minutes, 10 minute; Si la
caméra s’éteint la séquence d’un
enregistrement ne sera pas complété.
Valeur d’exposition
Sous-exposé, la luminosité est faible, vous
pouvez utiliser le fonction Fill Light
+0,0, -1/3, -2/3, -10, -4,3, -5/3, -2.0,
+2.0, +5/3, +4/3, +10+2/3, +1/3
Détection de mouvement
En mode standby, après détection d’un
mouvement, la caméra commence
l’enregistrement
On, Off
Audio enregistrement Enregistrement du son On, Off
Emprim. Date Timbre à date On, Off
Capteur G
Vidéo enregistrement activé par un choc, ne peut
pas être supprimé
High, Medium, Low, Off
Déviation File
L’alarme se déclenche en cas d’une déviation de
la le
Commutateur de fonction, modèles,
sensitivité, sélection région, vitesse
départ
Mode Stop
La caméra se met en marche, activée par un
mouvement externe
On, Off
Date/Temps Date et Temps
Vous pouvez régler l’ans, le mois,
le jour, l’heure, les minutes et les
secondes
Arrêt automatique Arrêt automatique en état d’opération 1 minute, 3 minutes
Econom. écran
L’écran automatiquement s’éteint après un
période d’inactivité programmable
10 secondes, 30 secondes, 1 minute
Bip
On entend un signal sonore en appuyant le
boutons
On, Off
Page 29

28
Réglage Langues Langues de réglages de menu
Chinois traditionel, Chinois
simplié,Russe, Japonais, Français,
Italien, Allemand, Espagnol, Anglais,
Coréain, Néerlandais
Mode TV Système TV connecté NTSC, PAL
Fréquence Fréquence de la lumière 50HZ, 60HZ
Fill Light
Utiliser dans un environnement avec un lumière
faible
On, Off
Format
Formatage de la carte SD insérée dans l'appareil,
tous les chiers contenus seront détruits.
Carte SD
Réglage par défaut Réinitialiser par défaut Supprimer, OK
Version
Afcher le numéro de version du logiciel de votre
appareil
Numéro version
Spécications Produit
Nom Produit HD tachéographe
Cractéristiques Produit Angle extrêmement grand de 170 °, 1080P Très Haute Dénition (Full HD)
Capteur G Intégré (en urgence, le chier ne sera pas supprimé)
LCD format d’écran 2.3 inch Haute Dénition LCD
Image A + grade Haute Dénition. 170 dégrées , lentille ultra grand angle
Langues Russe, Anglais, Chinois, Japonais, etc.
Format de Fichier MJPEG, AVI
Résolution Vidéo 1920*1080P, 1280*720P
Format enregistrement
Vidéo
Audio : AAC
Effets couleurs Standard
Enregistrement en boucle Enregistrement en boucle sans interruptions, pas de perte de secondes
Page 30

29
Interrupteur automatique
mettre en Marche/Arrêt
Compatible, auto démarrage ON/Off
Détection de mouvement Compatible
Scission date Compatible
Vector Média Compatible, mémoire intégré (total 1024MB)
Mode Caméra 1200M
Format Photo JPEG
Carte Mémoire TF ( maximum de 32GB)
microphone Compatible
Stéréo intégré Compatible
IR Compatible
Format Vidéo PAL/NTSC
Fréquence actuel 50HZ/60HZ
Fonctionnalité USB 1 : Disque USB 2 : Caméra PC
Interface alimentation 5V 1A
Batterie Intégré 200mAh
____________________________________________________________________________________________
Résolution des problèmes
Si un problème se produit avec votre appareil, veuillez en premier lieu vérier les points listés ci-dessous avant
d’amener votre produit en réparation.
L’appareil ne se met pas en marche
Assure-vous que le câble est bien connecté, si vous l’avez mis en marche manuellement, contrôlez le niveau de la
batterie. On peut également réinitialiser l’appareil en le mettant par défaut.
La caméra s’arrêt automatiquement ou il n’est pas possible d’enregistrer en boucle.
Par le massif des données haute dénition, c’est possible que la carte mémoire ne sufsse pas.
Veuillez utiliser une carte mémoires de grande vitesse, class10 per exemple.
Page 31

30
Si la caméra n’enregistre pas en boucle, peut être vous avez activé le capteur G et il n’y a plus d’espace sur votre
carte mémoire. Désactiver le capteur G et formater votre carte mémoire.
Les images du vidéo et la séquence d’un enregistrement ne correspondes pas.
Assurez-vous que la détection de mouvement est activé, la durée d’une séquence correspond avec le paramètre
que vous avez réglé dans le menu. S’il n’y a pas de mouvement la caméra ne registre pas.
Les images ne sont pas claires
Contrôlez la lentille, s’il n’y a pas des empreintes digitales. Nettoyez la lentille régulièrement.
La qualité des vidéos sont de mauvaise qualité
Parfois la qualité des images dépend de certain conditions, rétro éclairage, la lumière, l’intensité de la lumière, en
réglant les divers options dans le menu réglage on peut modier les options.
Interruptions des raies
Modiez l’option <Light Frequency> la valeur standard est 50HZ.
Si l’appareil ne réagit plus
Si l’appareil ne réagit plus, vous pouvez le réinitialiser, par le bouton RESET.
Page 32

31
Page 33

32
Thank you for purchasing one of our products, this product is especially developed as hard evidence.
Meanwhile it meets the needs of other occasions, like meeting records, monitoring evidence, location
shooting and video or other evidence. We hope to make you life in this way a bit easier.
This product combines the industry leading HDR high Dynamic camera, with, WDR wide camera, never
missing a second, seamless looping video, ultra wide angle shooting, without distortion correction,
ultra high denition, real time playback, motion detection, lane deviation shift an much more features in
accordance with the latest technology. The device is unique and stylish and has a streamlined design.
The product is very much appreciated by a vast majority of our customers.
This manual will inform you about the installation, operation, setting and precautions. Please read this
manual thoroughly and keep it for further reference. We sincerely hope that this product will meet your
needs and we are pleased to be at your disposal in the future. Specications may vary due to upgrades or
other reasons to improve our product. The manufacturer reserves the right to change the product without
prior notice.
Infringement of copyright/privacy Notice
Please note that this device is for personal use only. The use must not violate the national or international
copyright/privacy laws. The recorded images by this device are for personal use and cannot be published
freely, this could violate someone else’s copyright or legal rights.
Installation instructions
Installation of this device should be close to the rear-view mirror of the vehicle, to ensure the best view.
Make sure that the device is placed within the reach of the windshield wipers, so that with rainy weather
the view will still be good. Do not touch the lens with your ngers, it could leave oily residues on the lens,
thus causing unclear pictures. Clean the lens of the camera regularly.
Page 34

33
Precautions
Use the original standard charger supplied
Do not dismantle the device yourself, if you do you will lose the warranty.
If you would like to modify the power line, be sure this is done by a professional electrician.
Accessories Check
Here below you will nd a list of accessories, standard and optional. Check if there are any items missing
or damaged, if so please contact you dealer immediately.
Standard
Car charger cable USB cable 3M pad Instructions
Page 35

34
Keys and interface description
Number Icon Name Operating Instructions
1 OK OK key
Camera/camera/conrm: a short press to start the camera, the will go
in camera mode and start recording, press again to stop recording;
2
Down key
Menu options, you can select: standby or video, night vision lights on
or off.
3 P Parking Mode key You can active or deactivate the parking mode
Page 36

35
4 Up key
Menu options, you can select: standby or recording status, open or
closed recordings.
5
Emergency key
Short press, the camera will record segments, which cannot be
overwritten.
6 M Mode/Menu key
Changing between several modes, Camera/Playback;
In standby mode, press Menu and it will show on your screen.
7
TF card slot TF card slot, install following the directions
8
On/Off key Switching the device on or off
9 HDMI HD Output Interface HD output for connecting High-Denition display devices
10
AV input port AV cable is used to connect the video output to AV equipment
11
Interface For connecting a PC to transfer data; power connector to supply power
12
Reset key Restarting the system
13
Microphone Audio recording port
14
Image Image reception
15
Fill light Use in low lights environment
Page 37

36
Installation
1. Insert a memory card: insert the memory card, in accordance with the opening of the slot, press the
card until it clicks.
_________________________________________________________________________
Please note that the device operates with High speed storage, we advise you to use a high speed
memory card, (Class 6 or higher)
Note: the rst time you will be using a memory card be sure to format the card.
2. Remove the memory card: press the card until it comes out of the slot automatically.
Note: If the device is in the boot state, do not remove the card, in order to avoid damaging the
memory card.
3. The screen is mounted on the front windshield inside the vehicle.
(1). The device is mounted on the suction cup bracket, tighten the base holder with the suction cup,
make sure the camera is level with the ground, check if the device is rmly locked in place.
(2). Check if the suction cup is at on the windshield.
(3). Firmly place the suction cup on the windscreen, pressure the clamps, the holder is mounted on the
rear-view mirror in front of the windshield. Check if the device is rmly locked in place.
4. Connect the power
Please use the original standard charger supplied, the boot device and the built-in battery. The end of the
charger cable is connected to the device’s USB port, the other end is plugged into the car port. Once the
car engine is started, the device will automatically boot.
_________________________________________________________________________
Note: you can extend the line of the device along the sides of the windshield and dashboard, so
that the cable is not visible.
Page 38

37
5. Put the device On/Off
(1). Auto On/Off: once the car engine is started, the device will automatically boot. Once you put the
device on, the camera will automatically start recording. If the car engine stops, the device will save
the record and the power will be turned off, within 15 seconds.
(2). Manual on/off: if you want to put the device on manually, you press the
key, press again and the
device will be turned off.
Initial settings
Set the date and time:
1. Press the OK key to put the device into the standby state.
2. Press the M key twice, and choose < time/date>, by pressing the
and keys, then press OK to
enter the setting
_________________________________________________________________________
3. By pressing the
and keys, you can adjust the values, after each eld you press the OK key to
conrm, until you have completed your setting. Press M to exit the menu.
Recording Operations
1. When the car engine is started, the device will automatically be turned and start recording. When
the engine is stalled, the camera will stop recording. You can also pres the OK key to stop recording
manually.
Note: In some vehicles the, although the engine is stalled, the power supply will continue. If so,
you can stop the camera manually or you can pull out the plug of the cigarette lighter.
2. Other types of camera: press the OK key, the recording will start, press the OK key again to stop
recording.
Page 39

38
Note:
(1). The camera will record segments of 1, 2, 3, 5, 10 minutes, depending on the setting.
(2). These segments will be saved on the memory, in case of the memory card being lled, the
oldest segment will be replaced by a new one.
3. Emergency camera
Note: I f you start your Gravity sensor and it detects a collision, the device will make a record
which will be saved and locked automatically, the segment cannot be overwritten.
Camera operator
1. Short press the M key to enter Camera mode, the camera icon will be shown on the upper left corner of
the screen.
2. Press the OK key to make pictures, the icon will ash once the camera is ready.
Video/Photo playback
1. In camera mode, pres the OK key to stop recording
_________________________________________________________________________
2. Press the M key to switch to Playback mode, in the upper left corner of the screen the icon will be
visible.
3. Press the
and keys to select a le
4. Press the OK key to play the selected le, short press to pause the playback
Menu settings
1. If you are recording, press the OK key to stop recording
2. Long press the M key to show the setup menu, Long press twice to show the page menu
3. By short pressing the and keys you can cycle up and down the items
4. Select the setting you would like to modify, press OK to conrm
5. Short pres the M key to exit the menu
Page 40

39
Special Features
1. Gravity sensor
If you start your Gravity sensor and it detects a collision, the device will make a record which will be
saved and locked automatically, the segment cannot be overwritten, and this le cannot be deleted.
The options for the G sensor are: High/Medium/Low/Off. Factory default: Medium
2. Parking Mode
Turn on the Parking mode, the vehicle will now be stalled, the tachograph will now automatically turn of
the camera, as soon as the tachograph detects a vibration force generated, the tachograph will activate
the camera automatically for 10-15 seconds and then shut down again. When the vibration is detected
again, the camera will turn on again.
Recording video Parking mode 1080P 15 frames/sec, the le will automatically be locked.
Note: the Parking mode only works in case of automatic shutdown, if you do this manually, the
Parking mode does not work.
3. Motion detection
After pressing the OK key shortly, the camera will start the motion detection mode, the camera will
automatically record 10 seconds, after detecting a motion. If the camera detects no motions, it will
automatically turn off. When the camera detects a motion, it will turn on and the red recording light will
start to blink. Default: detection off
4. USB mode
Connect the USB cable to the computer, the tachograph will automatically pop up the menu, with the
following options:
(1). Memory
You can now access your video and photo les
(2). Camera
Page 41

40
Now you have access to you USB device, this can be a real-time network camera, or your chat PC
camera.
5. Battery instructions
Battery level indicator
Fully charged Lower power consumption Low power consumption Lack of power
After switching on the car power, the red charging indicator lights up, indicating that the charging is in
progress. The whole process will take approximately 180 minutes. The red indicator will turn of as soon
as the charging is completed.
6. RESET
If during use, the device has a malfunction or crashes, it good be necessary to reset the device.
You will be able to do so be putting a small needle into the hole.
_________________________________________________________________________
Page 42

41
1. Camera mode
2.
Flashing, indicates the device is in progress
3.
To unlock the video le
If the G sensor is activated will appear on the screen, indicating that the current video is a
locked le. As short key, locking the video le.
4. L
Activating Fill Light
You can activate or deactivate this function by entering the menu settings and the icon will be
displayed on the screen, by pressing the s key you can activate the ll light quickly.
5.
Audio On
Audio Off.
You can activate or deactivate this function by entering the menu settings and the icon will be
displayed on the screen, by pressing the key you can activate the audio quickly.
Page 43

42
6. P.
Parking mode icon.
You can activate or deactivate this function by entering the menu settings and the icon will be
displayed on the screen. By pressing shortly on the P key you can quickly activate or deactivate
this function.
7. 00:15:30
White font – the memory cards remaining record time is displayed, red font – the current
segment recording time is displayed.
8. 1080FHD
Indicates that the current resolution of the video is 1080FHD, You can choose between
1080FHD/720P/480P. In the menu you can modify the resolution of the video, on the screen
your choice will be visible.
9.
Icon of the memory card, this will be shown as soon as a memory card has been inserted.
10
Indicates the level of the battery
11.
Icon indicating the length of a segment: 1 minute/2 minutes/3 minutes/5 minutes/10 minutes.
12.
Indicates the current parameters of the exposure
13. 00:00:01 Indicates the time, before initial setup
14. 2014/01/01 Indicates the date, before initial setup
15. Lane offset You can activate or deactivate the lane offset
Settings menu
Menu options Explanation Available options
Resolution Set the video resolution 1080FHD,1080P,720P,WVGA,VGA
Loop recording Set the length of each segment
1 minute, 2 minutes, 3 minutes, 5
minutes, 10 minutes; if you stop
recording, the segment will not be
completed automatically
Exposure Compensation
Underexposed, dim the light, you can use the ll
light function
+0,0, -1/3, -2/3, -10, -4,3, -5/3, -2.0,
+2.0, +5/3, +4/3, +10+2/3, +1/3
Page 44

43
Motion detection
In standby mode, when the motion detection is
activated.
On, Off
Recording Audio Activate or deactivate Audio recording. On, Off
Date Stamp Camera video watermark date On, Off
G-sensor
Video recording generated by collision, cannot be
deleted.
High, Medium, Low, Off
Lane Shift
The alarm will go off, as soon as the vehicle will
shift lane.
Function switch, models, sensitivity,
area selection, start speed.
Parking Mode
After parking the vehicle, as soon as the
camera detects a vibration, the camera will be
automatically be activated
On, Off
Date/Time Date and Time
You can set: the year, month, day,
hour, minutes, seconds
Automatic shutdown Automatic shutdown, no operation possible 1 minute, 30 seconds
Screen saver
The device will automatically shut down the
screen after a set time
10 seconds, 30 seconds, 1 minute
Beep A sound is heard while using the keys On, Off
Set language Language Operating Menu
Traditional Chinese, simplied
Chinese, Russian, Japanese, French,
Italian, German, Spanish, English,
Korean, Dutch
TV mode TV System NTSC, PAL
Light Frequency Light frequency 50HZ, 60HZ
Fill Light To be used in a low light environment On, Off
Format You can deleted all les from you memory card SD card
Default setting Restore to factory settings Cancel, OK
Version Software version Versionumber
Page 45

44
Product specications
Product name HD tachograph
Product features Extreme wide angle of 170 degrees, 1080P Full HD
G-sensor Built-in (in case of emergency, like a car accident, the le will not be deleted)
LCD screen size 2.3 inch, High denition LCD screen
Shot A + grade High Resolution, 170 degree, ultra wide angle lens
Language Russian, English, Chinese, Japanese, dutch, etc.
File Format MJPEG, AVI
Video resolution 1920*1080P, 1280*720P
Recording video format Audio: AAC
Color effects Standard
Continuous loop
recording
Seamless loop recording, without missing seconds
Automatic switch On/Off Supported, automatic switching on/Off
Motion detection
function
Supported
Division Date Supported
Vector Media Supported, built-in memory( Total 1024MB)
Camera Mode 1200M
Photo format JPEG
Memory card TF (maximum support 32GB)
Microphone Supported
Built-in stereo Supported
IR Supported
Video Format PAL/NTSC
Frequentie 50HZ/60HZ
Page 46

45
USB functions 1 : USB disk 2 : PC-Camera
Power Interface 5V 1A
Battery Built-in 200mAh
____________________________________________________________________________________________
Troubleshooting
In case of any malfunctions or problems with the device, please refer to the possible solution mentioned here below:
Unable to boot
Check if the device is correctly connected to the car, check if the device has been manually been turned on, check if
the battery has enough power or if it needs recharging. Sometimes it is necessary to reset the device and restore to
the factory settings.
The camera stops automatically and the loops cannot be recorded.
Due to high denition recordings, it could be possible that the memory card does not function correctly, try a memory
card of a higher class, such as class10.
If the segments cannot be recorded, it could be possible that you have activated the G sensor, so that the memory
card is lled with locked les. You can format the card, so that the les will be deleted and deactivate the G sensor.
The camera recordings and the segments are not the same.
Check if the motion detection function is activated, the length of time of those segments, depend on the detection of
the motion of the vehicle and will be recorded only if a motion has been detected.
The recorded movie is not clear.
Check, whether the camera has no fingerprints on it. Please clean the lens before shooting and wipe the lens
regularly.
The recorded video is of bad quality
The quality of the video can depend on numerous external circumstances, backlight, sunlight, intensity of the light,
some can be adjusted by modifying the settings in the menu.
There is a streak interference on the images.
You could try to modify the settings of the light frequency, the normal rate is 50HZ.
Page 47

46
When the device shuts down for no reason
It could be necessary to reset the device, to restore to factory settings.
Page 48

 Loading...