

Page 1

22LCF-5000TD
22LCF-5000TDW
22LEF-6000TD
22LEF-6000TDW
Page 2

Page 3

The mains plug shall remain readily operable.
Page 4
Page 5

CONTENT
PANEL BUTTON FUNCTIONS
Front panel...................................................................................................................1
Side panel................................................................................................................... 2
EXTERNAL EQUIPMENT
Connecting diagram.....................................................................................................3
REMOTE CONTROL
Remote buttons.......................................................................................................... 5
Battery installation...................................................................................................... 7
LET'S START
Switching On...............................................................................................................8
Select source operation...............................................................................................8
DTV MENU SETUP
Channel ..................................................................................................................... 9
Picture .......................................................................................................................11
Sound.........................................................................................................................12
Time ..........................................................................................................................12
Option………………………………………………………………………………………..15
PVR Remote control key functions............................................................................16
PVR Functions.......................................................................................................... 17
Lock ……………………………...............................................................................…20
Electronic program guide (EPG)................................................................................21
Information.................................................................................................................21
ATV MENU SETUP
Channel .................................................................................................................... 22
Picture .......................................................................................................................24
Sound.........................................................................................................................24
Time ...........................................................................................................................25
Option………………………………………………………………………………………..25
Lock ……………………………...............................................................................….25
TELETEXT FUNCTION
Teletext function ........................................................................................................26
SCART/AV/COMPONENT/HDMI MENU SETUP
Video setting menu.................................................................................................... 27
PC MENU SETUP
Channel .................................................................................................................... 28
Picture .......................................................................................................................29
Sound.........................................................................................................................30
Option………………………………………………………………………………………..30
Time ...........................................................................................................................30
Lock ……………………………...............................................................................….30
USB OPERATION
Brief introduction.........................................................................................................31
Playback.....................................................................................................................32
Foto menu..................................................................................................................33
Music menu................................................................................................................35
Movie menu................................................................................................................36
Text menu...................................................................................................................38
Page 6

DVD OPERATION
Basic operation.......................................................................................................... 40
Supporting DVD format……………………................................................................ .40
DVD functions operating instructions......................................................................... 41
MP3/JPEG/AVI Playback………………………………………………………………….42
Function Settings....................................................................................................... 42
Care and Maintenance.............................................................................................. 49
TROUBLE SHOOTING
Display troubleshooting.............................................................................................. 50
Sound and TV troubleshooting................................................................................... 50
DVD troubleshooting.................................................................................................. 51
SPECIFICATIONS
Specifications............................................................................................................. 52
DISPLAY MODE
Display mode...............................................................................................................53
Page 7
3. Mains Power Switch - Completely turns ON or OFF the power to the TV set to save on electricity.
Sencor Touch Keyboard (controlled by a soft finger touch)
LABEL SIDE
Page 8
SIDE PANEL
1
2
3
4
6
5
7
8
9
1. TV signal input
2. USB connector
3. Audio Earphone output
4. AV (Right/Left/Video) input
5. Y/Pb/Pr input
6. CI connector
7. PC VGA input
8. PC and Y/Pb/Pr audio input
9. HDMI inputs
Page 9
EXTERNAL EQUIPMENT
CONNECTING DIAGRAM
Y
Pb
Pr
Page 10
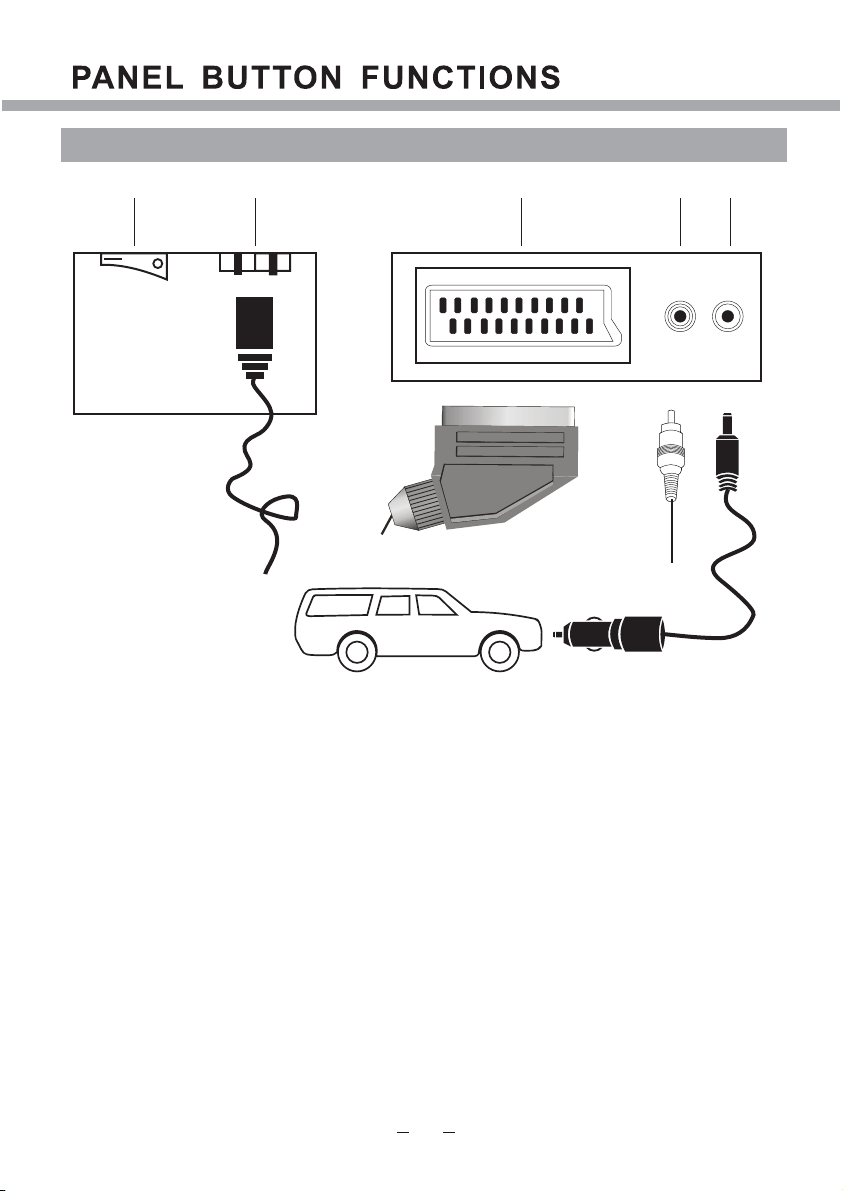
BACK PANEL
12 3 54
1. Mains Switch
2. AC Power supply
3. SCART connecting terminal
4. SPDIF output
5. 12V DC power input
(intended for feeding to the TV using a car battery power or
external 12V DC power supply adapter)
Page 11
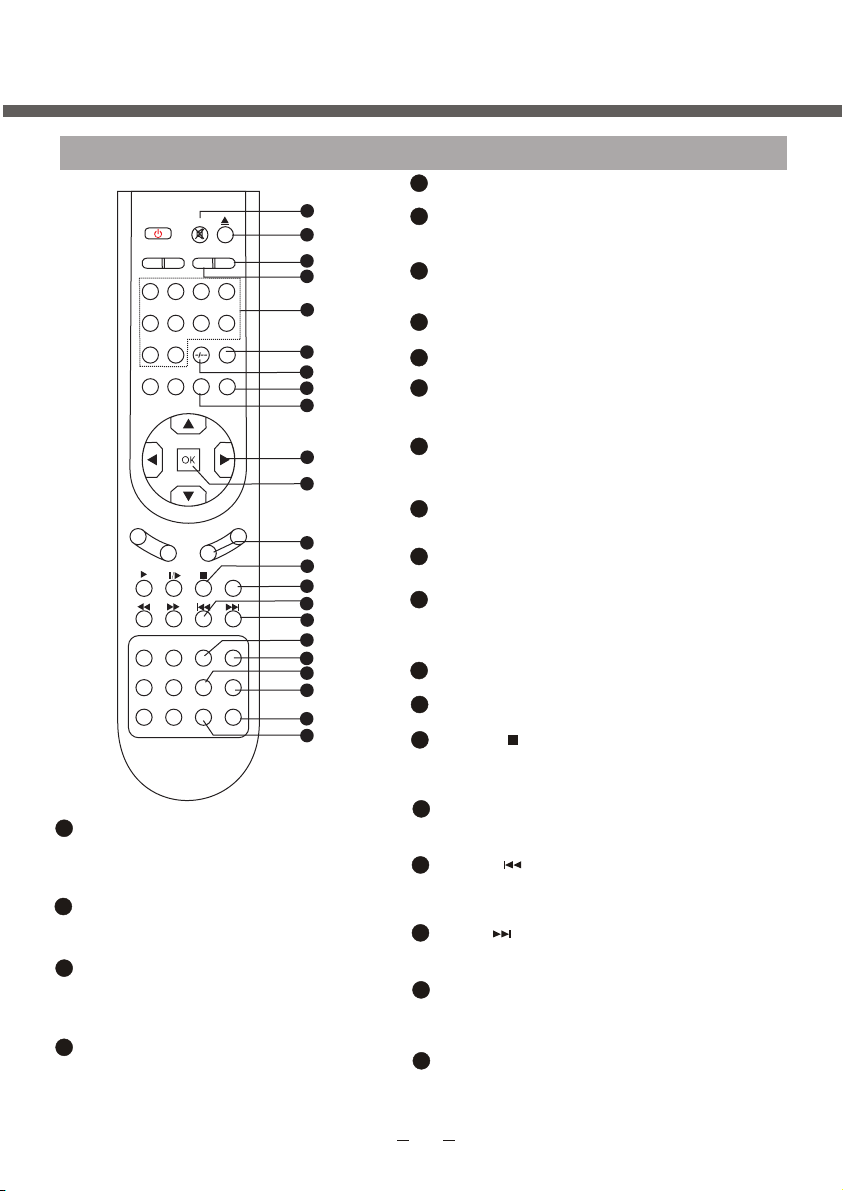
REMOTE CONTROL
REMOTE BUTTONS
1
2
2
2
3
4
5
5
5
6
7
8
9
10
11
12
13
14
15
16
17
18
19
20
21
22
.
19
PBC/PAGE+
POWER MUTE
P.MODE S.MODE
12
5
90
SETUP
CH-
T E X T
CANCEL REVEAL HOLD
GOTO
DVD-MENU TITLE PBC
S.PAGE
DISPLAY ZOOM- ZOOM+
i
SLEEP
3
678
CALL
EXIT
VOL-
CH+
M I X
INDEX
I/II
A-B
REPEAT
PAGE+
PAGE-
EPG
RADIO
FAV
SCALER
4
RECALL
SOURCE
SIZE
ANGLE
AUDIO
SUBTITLE
S.TITLE
VOL+
To setup the PBC on/off in DVD mode
/browse the next page of teletext in
analog TV mode.
20
AUDIO
To change the audio language and sound
track, valid in digital TV and DVD mode.
21
SUBTITLE
To select language or switch
subtitle's
to JPEG display mode, valid in DVD and
digital TV mode.
22
ZOOM+/EPG
To zoom in to the picture valid in DVD
mode/
To display the program guide
valid in digital TV mode
1
MUTE
Sound mute switch.
2
EJECT/FAV
Disc in/out ,valid in DVD mode/To switch in
favourite list, valid in DTV/ATV mode.
3
SCALER
To switch video format between "Auto", "16:9",
14:9, 4:3, ZOOM1, ZOOM2 (not valid in VGA)
4
SLEEP
To setup the sleep timer.
Number button
5
To select program number.
6
RECALL
To swap between a previous program and the
current program in analog TV and digital TV.
7 To switch between one or two-digit number
valid in ATV. To switch between one, two or three
digit number, valid in DTV.
.
.
8
SOURCE
SOURCE
To select input source: DTV, ATV, DVD, SCART,
AV, S-VIDEO, HDMI,VGA and USB.
9
CALL
To display the information on screen.
10
Left/Right cursor(menu adjustment )
To move leftward/ rightward or adjust the selected
item in the menu, or adjust sound volume (not valid
in DVD, digital TV).
11
OK button
To confirm the selections.
12
VOL+/-
To increase or decrease sound volume.
13
INDEX/
To display the teletext time in TV mode (not valid
for MHEG5).
To display main content page when playing the teletext
in analog TV/To stop playing valid in DVD mode.
14
I/II
To switch the audio channel in NICAM
/A2 or Mono TV channel(valid in analog TV)
15
HOLD/
.
To stop teletext on current page in analog TV/To
select the previous chapter or track, valid in DVD
mode.
16
SIZE/
To magnify teletext page in analog TV/To
select the next chapter or track in DVD mode.
17
REPEAT/YELLOW
To repeat playback(valid in DVD mode)/select
page in analog TV teletext mode/Fast enter
menu(not valid in digital TV and DVD).
18
ANGLE/BLUE
To change camera angle in DVD mode when playing
DVD disc/select page in analog TV teletext mode
/Fast enter menu(not valid in digital TV and DVD)
Page 12
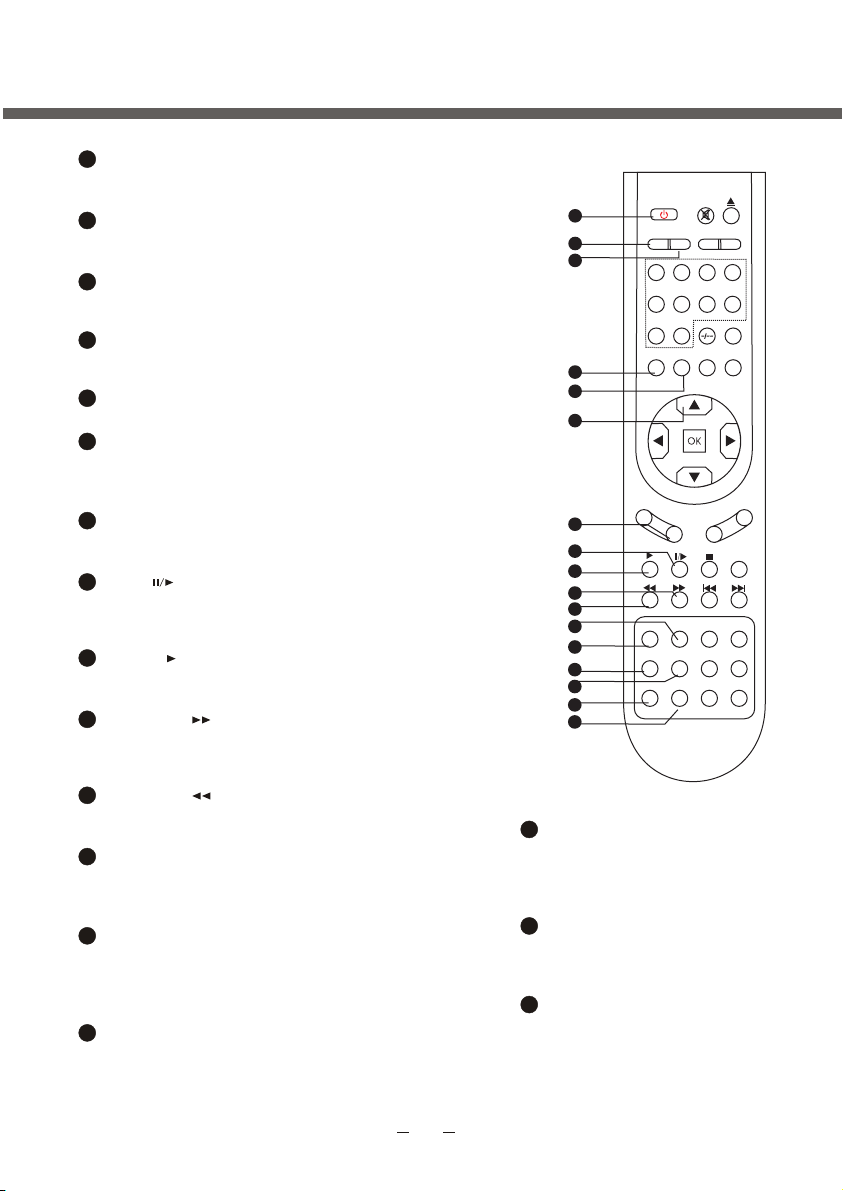
REMOTE CONTROL
23
POWER
To switch between standby mode and
power-on mode.
24
P-MODE
To select picture mode: Standard, Dynamic,
Mild, User(not valid in VGA mode).
25
S-MODE
To select sound field modes: User, Standard,
Music, Film and Sports.
26
SETUP
To display setup menu, different in different
source mode.
27
EXIT
To exit menu.
28
UP/DOWN cursor
To select upward/downward in the menu or
change the channel, valid in analog TV
mode.
29
CH+/-
To increase or decrease program number
valid in analog TV and digital TV mode.
30
MIX/
To display analog TV and teletext in the same time
/pause playing/steps playback in pause mode,
valid in DVD mode.
31
TEXT/
To enable or disable the function of teletext or
MHEG5 /To playback, valid in DVD mode.
32
REVEAL/
To display the hidden teletext information in analog
TV/To fast-forwards DVD playback, valid in DVD
mode.
33
CANCEL/
To cancel teletext in analog TV/ To fast backward
playback, valid in DVD mode.
34
A-B/GREEN
To segment repeat(valid in DVD mode)/select
page in analog TV teletext mode/Fast enter
menu(not valid in digital TV, DVD and FM).
35
GOTO/RED
To play from a certain time point(valid in DVD
mode)/select page in analog TV teletext mode
/fast enter menu(not valid in digital TV, DVD
and FM).
36
DVD-MENU/S.PAGE
To go to the menu of DVD menu ,valid in DVD
mode/To go to the sub page of teletext, valid
in analog TV mode.
23
24
25
26
27
28
29
30
1
3
32
33
34
35
36
37
38
39
37
TITLE/PAGE-
POWER MUTE
P.MODE S.MODE
SLEEP
12
5
678
90
CALL
SETUP
EXIT
CH-
CH+
TEXT
MIX
I/II
CANCEL REVEAL HOLD
A-B
GOTO
REPEAT
DVD-MENU TITLE PBC
S.PAGE
PAGE-
DISPLAY ZOOM- ZOOM+
RADIO
i
SCALER
3
VOL-
INDEX
PAGE+
EPG
To go to the menu of DVD menu ,
valid in DVD mode/browse the
previous page of teletext in
TV mode.analog
38
DISPLAY
To display track time in DVD
mode/Display information in
digital TV mode
39
TV/RADIO/ZOOM-
To switch between TV and radio
modes, valid in digital TV mode
/To zoom out to the picture valid
in DVD mode.
FAV
4
RECALL
SOURCE
VOL+
SIZE
ANGLE
AUDIO
SUBTITLE
S.TITLE
2
2
5
5
Page 13
REMOTE CONTROL
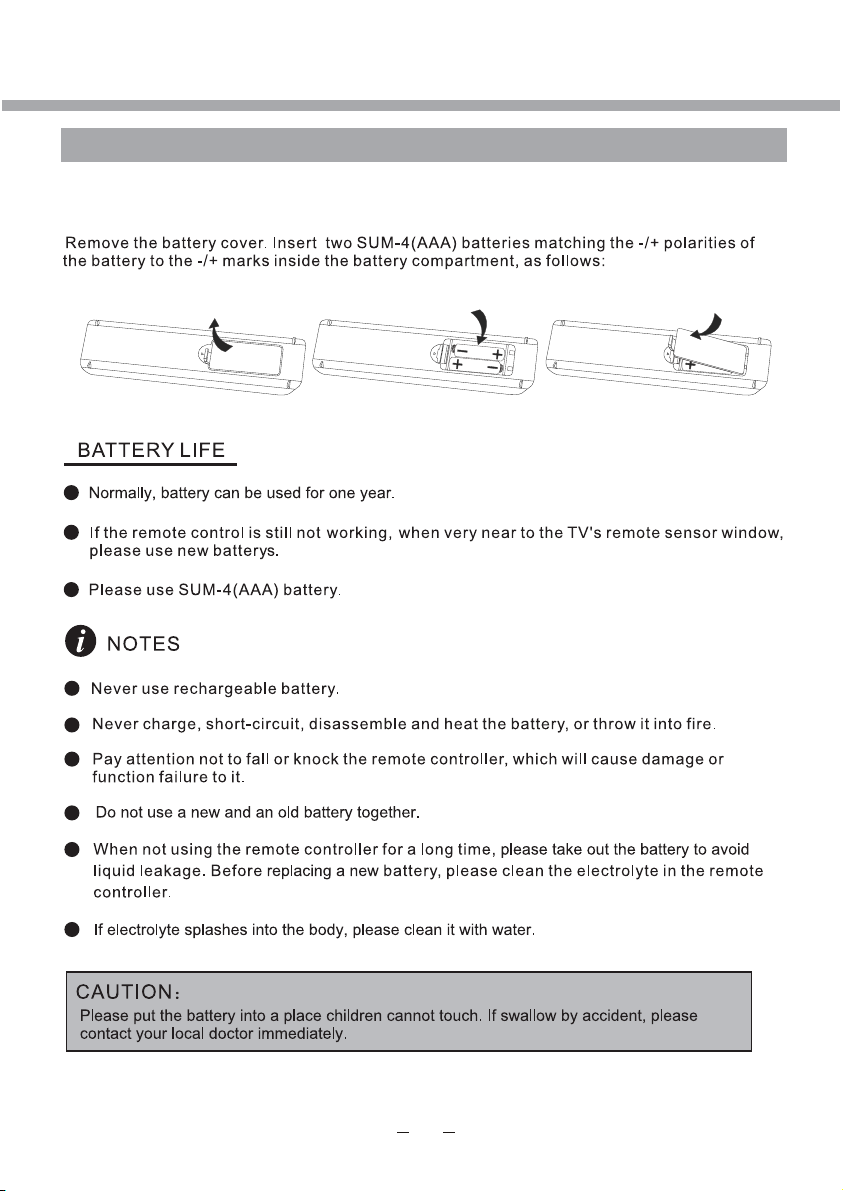
BATTERY INSTALLATION
Page 14

LET'S START
SWITCHING ON
After the unit has been suitably placed / fixed, on the desk or on the wall, and all necessary
cables include power have connected, the next you should do is:
Press the [STANDBY] button on the remote control to make the unit switch to power-on
mode - you will see the LED indicator turn green. Now you can enjoy the many features of
your new TV.
SELECT SOURCE OPERATION
You can select input source by using source menu. Press [SOURCE] button on the remote
control to show the menu as follows:
The current source item is highlighted. Through press [] button on the remote control
to select your desire. Press [OK] button to confirm your choice.
Input Source
DTV
ATV
SCART
Component
PC-RGB
HDMI1
HDMI2
AV
DVD
USB
OK
Select
Page 15
Retu rn
MEN U
DTV MENU SETUP
PLEASE NOTE, THAT IF SOME ITEMS ARE INACTIVE/UNAVAILABLE (GRAYED-OUT
IN THE OSD MENU) THEY ARE NOT DISCUSSED IN THIS CHAPTER. THESE ITEMS
ARE DETAILY DESCRIBED IN OTHER CHAPTERS.
In DTV mode, press [SETUP] button on the remote control
Through pressing [/] button on the remote control, you can select LCD menu sections
(menu sections consist of “CHANNEL”, "PICTURE", "SOUND", "TIME", "OPTION", "LOCK").
Press [] button on the remote control to select the item in this menu section, and then
press [/] button to adjust parameter value. Press [EXIT] or [SETUP] button to exit from
menu tables.
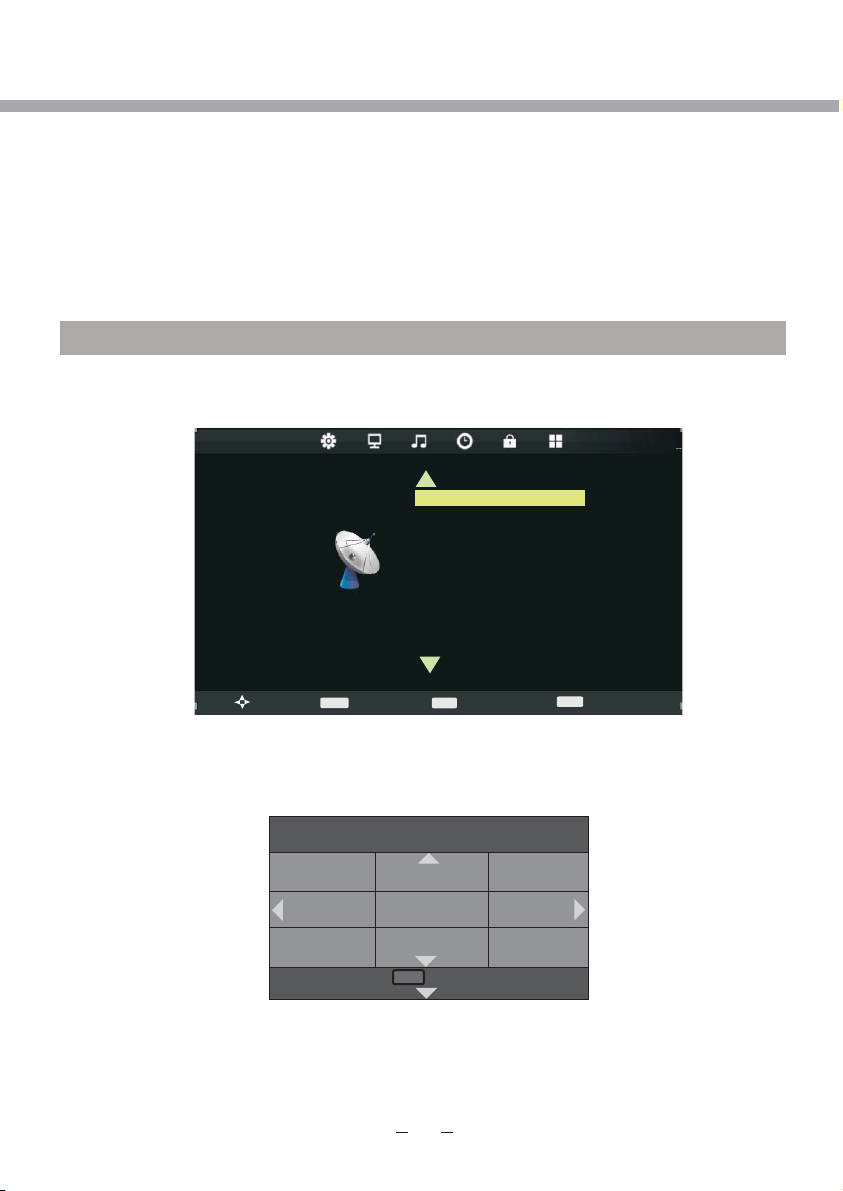
CHANNEL
Select CHANNEL section to setting DTV channels. You may select Auto Tuning, DTV
Manual Tuning, ATV Manual Tuning (described in ATV MENU SETUP), Programme Edit,
Signal Information, CI Information, LCN Sorting and Software Update(USB)
CHANNEL
CHANNEL
>
Auto Tuning
DTV Ma nu al Tu ni ng
ATV Ma nual Tun
Prog ra mm e Ed it
Sign al I nf or mat io n
CI Inf or ma ti on
LCN So rt in g
Soft wa re U pd ate ( US B)
ing
>
Auto Tuning item enables to adjust channel setting automatically.
Select Auto Tuning item, press [OK] button to enter Tune Type selection menu.
Press [ ] button to select tuning type between DTV+ATV, DTV or ATV.
/
Press [//] button to select your country.
Move
MENU
Return
Tune Type DTV+ATV
ENTER
Select
EXIT
Exit
UK Estonia Tunis
New Zealand Turkey Algeria
United Arab
Emirates
Press [OK] button to start auto searching.
Moro cc o Egypt
Page 16
Channel Tuning
TV : 0 Programme
DTV : 0 Programme
Radio : 0 Programme
Data : 0 Programme
0 %... (TV)
Signal information
Channel 255
Network ...
Modulation QPSK
Strenght 91
Quality 0
DTV MENU SETUP
Select DTV Manual Tuning item, press [/] button to
select channel number and press [OK] to start search.
Programme Edit item enables to enter submenu to set
channel Delete, Rename, Move, Skip and add to
favourite list Fav.
Signal Information item enables to obtain information
about the Channel Nomber, quality and strength of the
signal.
Programme Edit
17 Digital
Delete
OK
OK
Rename
FAV
Move
FAV
DTV
MENU
Skip
Return
Page 17
Aspe ct R at io
Nois e Re du ction
Colo r Temp er at ur e
Scre en
DTV MENU SETUP
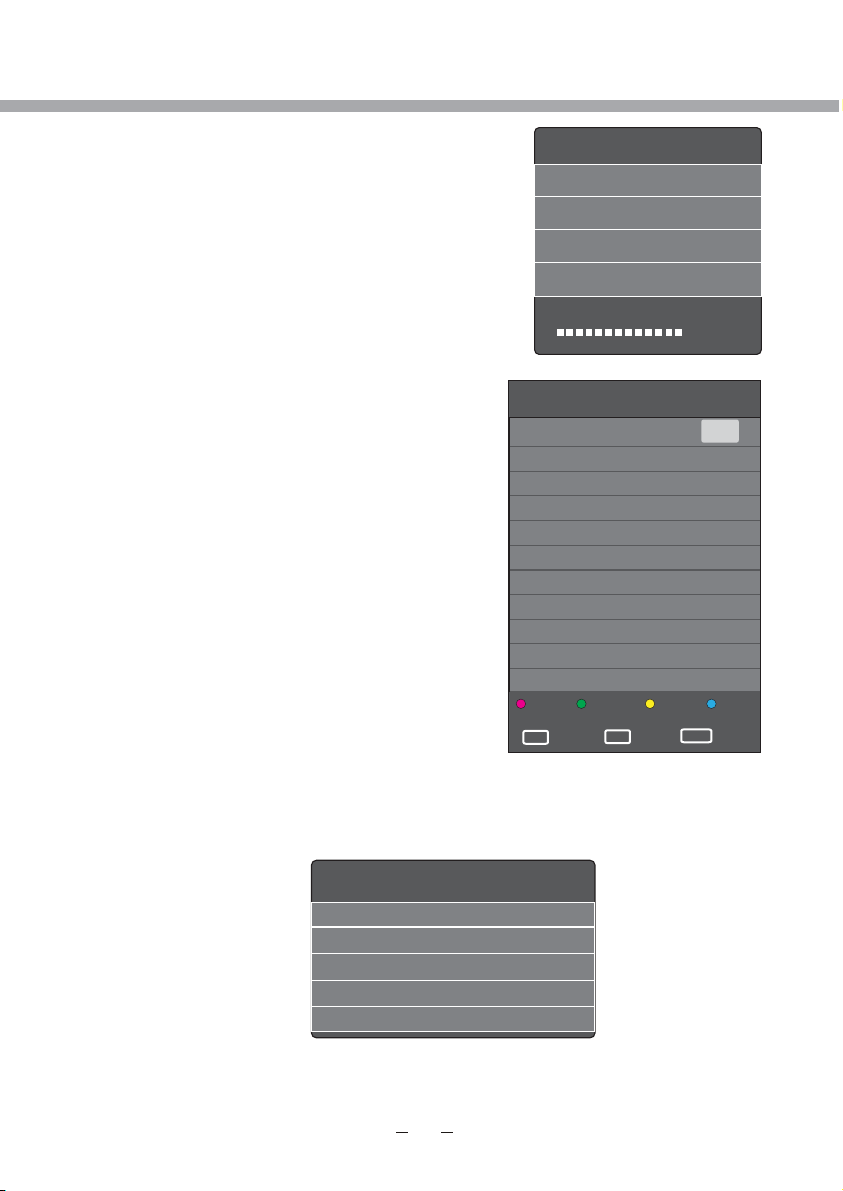
CI Information item enables to obtain information about the Conditional Access, if
CI Module inserted.
Viaccess Conditional Access
Main menu
System information
Smart card management
Language setting
Press ‘OK’ to enter; Press ‘EXIT’ to return
LCN Sorting item can be changed between On and Off.
Software Update (USB) enables to update the software via USB input.
PICTURE
Select PICTURE section to adjust picture parameters. You may select Picture Mode,
Colour Temperature, Aspect Ratio, Noise Reduction and Screen.
Picture mode item can be changed between User, Dynamic, Standard and Mild.
You may adjust Contrast, Brightness, Color, Sharpness and Tint for User mode
Color Temperature mode item can be changed between User, Cold, Medium and Warm.
Aspect Ratio mode item can be changed between Auto, 4:3, 16:9, Zoom1 and Zoom2.
Noise Reduction item can be changed between reduce noise mode: Off, Low, Middle, High
and Default.
PICTURE
>
Move
MENU
Return
Hoppa ov
Picture Mode Standard
EXIT
ENTER
Select
Exit
>
Page 18
Surr ou nd S ou nd
AD Swi tc h
SPDI F MO DE
Bala nc e
On Time
Slee p Tim er
Auto S ta nd by
Tim e Zo ne L ondon G MT
DTV MENU SETUP
SOUND
Select SOUND section to adjust sound parameters. You may select Sound Mode, Balance,
Surround Sound, AD Switch and SPDIF MODE.
Sound Mode item can be changed between User, Standard, Music, Movie and Sports.
You may adjust 120Hz, 500Hz, 1,5kHz, 5kHz and 10kHz equalizer for User mode
Balance item can be adjusted from -50 to +50 for L and R sound balance. Default value is 0.
Surround Sound item can be changed between Off, Surround and SRS TruSurround XT.
AD Switch item can be changed between On and Off
SPDIF Mode item can be changed between PCM or Auto.
TIME
Select TIME section to select Clock, Off Time, On Time, Sleep Timer, Auto Standby, Time
Zone and Daylight Saving.
SOUND
>
Move
MENU
Return
Sound Mode Standard
EXIT
ENTER
Select
Exit
>
>
TIME
MENU
Clock -- -- -- --
Off Ti me Off
Return
ENTER
Select
EXIT
>
Exit
Page 19
Retu rn
MEN U
Retu rn
MEN U
Retu rn
MEN U
DTV MENU SETUP
In Clock submenu you can set the Date, Month, Year, Hour and Minute.
Date 01
Month 01
Year 1980
Hour 00
Minute 03
The Off Time submenu can be changed between Off, Once, Every Day, Mon.-Fri., Mon.Sat., Sat,-Sun. and Sunday. You may adjust Hour and Minute in this submenu.
The On Time submenu can be changed between Off, Once, Every Day, Mon.-Fri., Mon.Sat., Sat,-Sun. and Sunday. You may adjust Hour, Minute, Input Source, Channel and
Volume in this submenu.
Off Time Off
Hour 00
Minute 00
On Time Off
Hour 12
Minute 00
Radio
Volume 30
Page 20

Retu rn
MEN U
Retu rn
MEN U
Retu rn
MEN U
DTV MENU SETUP
Sleep Timer item enables to set the sleep timer
(Off, 10min, 20min, 30min, 60min, 90min,
120min, 180min and 240min).
Auto Standby item enables to set the auto
standby function (Off, 3 Hour, 4 Hour and 5
Hour).
Sleep Timer
Off
10 min
20 min
30 min
60 min
90 min
Auto Stndby
Off
3 Hour
4 Hour
5 Hour
Time zone item enables to set the local time zone.
Time Zone
Canary GMT Rabat GMT Berlin GMT+1
Lisbon GMT Amsterdam GMT+1 Brussels GMT+1
London GMT
Beograd GMT+1 Budapest GMT+1
Daylight Saving item can be changed between On and Off.
Page 21
Retu rn
MEN U
Retu rn
MEN U
DTV MENU SETUP
OPTION
Select OPTION section to select OSD Language, Audio Languages, Subtitle Languages,
Hearing Impaired, Country, PVR File System, Restore factory defaults, OSD Animation,
OSD Time, ECO Mode.
OPTION
>
Move
MENU
OSD Language item enables to adjust OSD language.
OSD Language English
Audio languages
Subtitle Language
Hearing Impaired
Country
PVR File System
Restore Factory Default
OSD Animation
OSD Time
Return
ENTER
Select
EXIT
>
Exit
esky English Français
Dansk Espanol Hrv
Deutsch E Italiano
Audio Languages item enables to select a speech language of a program (available only in
DTV mode if program provider supports the multi language function)
esky English Français
Dansk Espanol Hrv
Deutsch E Italiano
Page 22
Retu rn
MEN U
DTV MENU SETUP
Subtitle Language item enables to select a
subtitle language of a programme
esky English Français
Dansk Espanol Hrv
Deutsch E Italiano
MEN U
Retu rn
Hearing impaired item can be turned on or off.
Country item enables to chose user’s country.
PVR FILE SYSTEM
PVR REMOTE CONTROL KEY FUNCTIONS
PVR RECORD key: GOTO/RED
Record a program.
PVR PLAY key: MEDIA/I
Play the recorded programs in Media mode. Each time you
press this button the play speed is decreased till 16x time.
PVR REWIND key:
Rewinds at high speed. Each time you press this button the
rewind speed is increased.
II/
TEXT MIX INDEX I/II
I
CANCEL REVEAL HOLD SIZE
GO TO A-B REPEAT ANGLE
I
PVR FAST FORWARD key:
Fast forward at high speed. Each time you press this button
the fast forward speed is increased.
PVR PAUSE key or PVR TSR KEY: II
Pause the play of recorded program or Start of the TSR
program. TSR records the program temporarily; this record
operation records the program permanently so you can
playback the recorded program at any time.
PVR PREVIOUS key: I
To go back to the previous recorded program.
PVR NEXT key: I
To go forward to the next recorded program.
PVR REPEAT key: REPEAT/YELLOW
To select repeat mode of recorded program.
PVR SEGMENT REPEAT key: A-B/GREEN
To select segment for repeat of recorded program.
PVR FUNCTIONS
Imagine coming home to your own personal library of
television programs, movies, and sports that you can watch
whenever it's convenient for you. It's TV for your schedule.
Country
UK Estonia Tunis
New Zealand Turkey Algeria
United Arab
Emirates
Moro cc o Egypt
Page 23
DTV MENU SETUP
Select Disc C:
Check PVR File System Start
USB Disc Pass
Format Pass
Time Shift Size All
Speed 682 KB
PVR Record Limit 6Hr
MEN U
Retu rn
Pause of live television!
Rewind and replay programs so you don't miss a beat.
Record your favourite programs and view them as many times as you want.
The PVR File system menu description
Select Disk: select the disk as a PVR file system disk.
Check PVR File System: check the disk file format.
USB Disk: display the USB Disk activation status, "PASS" flag is activation.
Format: format the USB disk, creat PVR file system format to the USB disk.
Time Shift Size: Show about the TSR capacity.
Speed: read and write speed.
Max record time: time the biggest recording set-up time, unit is hours.
File System Size
PVR File System Type FAT32
PVR File System Size All
SD 52 Mins
HD 15 Mins
MEN U
Retu rn
Digital Video Record
Insert a USB disk, select Setup menu under the PVR File System item, select Check
PVR File System option, if not previously formatted USB disk, the system will automatically
prompt USB disk formatting.
PVR File System Size can accord customer need constitution, the capacity establishes
bigger, record time more long.
Pressing the [RED] key while having no menu will get into to record video function, until
selecting [Stop] in command line or USB disk has been full. You can display the command
line with RC button [ ].
■
Page 24
OK
[00:00:42]
(0000:42:51)
15:46
DTV MENU SETUP
You can use the EPG menu, the program recording start and end time schedule to set.
RECORDER
1 YLE TV1
Start time
15 Minute
08 Hour
Dec Month
07 Date
End time
15 Minute
08 Hour
Dec Month
Mode AUTO
OK
While no menu to show, pressing the [MEDIA/I] key you can to switch to Media mode for
playing all recorded program. You can hint to operate according to the OSD menu at this
time, performance to have already recorded a program to look into or broadcast or delete
action.
Time Shift Record (TSR)
Time Shift Disk Size can according to customer need constitution, the capacity establishes
bigger, record time more long.
Back
Play FB FF Prev. Next Pause Stop
Pressing the [II] key while having no menu will get into record video function, until
pressing [ ] key or selecting command [Stop] in command line, or USB disk has been full.
■
Press [II] key repeatedly or select the command [Play] in command line to play.
Press [I] key or select the command [Next] in command line to go forward for 30 seconds.
Press [I] key or select the command [Prev.] in command line to go back for 30 seconds.
The process can be used button [/] or select the command [FB/FF] in command
line to play fast rewind / forward.
At this time press [ ] key or command [Stop] in command line will stop TSR function and
■
return to normal status.
Page 25

Retu rn
MEN U
Retu rn
MEN U
DTV MENU SETUP
PVR operator attentions
USB disk at least 1GB in capacity; the length of record determines the capacity of disk.
High-speed USB devices with Hi Speed FS file system are recommended for multimedia
and PVR application.
Mobile HDD or high-speed USB stick are recommended for better performance in PVR and
time shift application.
Formatted, it will delete all the contents out, pay attention to preservation of important
information. If USB disk have some virus, format function would be failure.
PVR functionality is only effective at the next port DTV.
Has multiple partitions such as the use of mobile hard disk, you can PVR File System menu,
and select the corresponding letter PVR.
PVR File System menu of the Recorder will be limited
one-time burn the longest. That time will automatically
exit. Recording maximum time period set for 24 hours.
Signal formats for DTV video format (TS streams).
PVR function is only available in DTV source.
PVR files will be played in USB mode only if the file
size is larger than 5 Mb.
USB device must be compatible USB 2.0 HS
specification.
Restore factory defaults item enables to reset all
values to default.
OSD Animation enables or disables fade and slide
effects of OSD items and menus.
OSD Time item enables to set OSD time on screen
(15s, 30s and 60s).
ECO mode enables to select level of power saving.
Blue Screen item can be changed between On and Off
Page 26
Please enter password
Clear Cancel
Please enter old password
Clear Cancel
Please enter new password
Confirm new password
DTV MENU SETUP
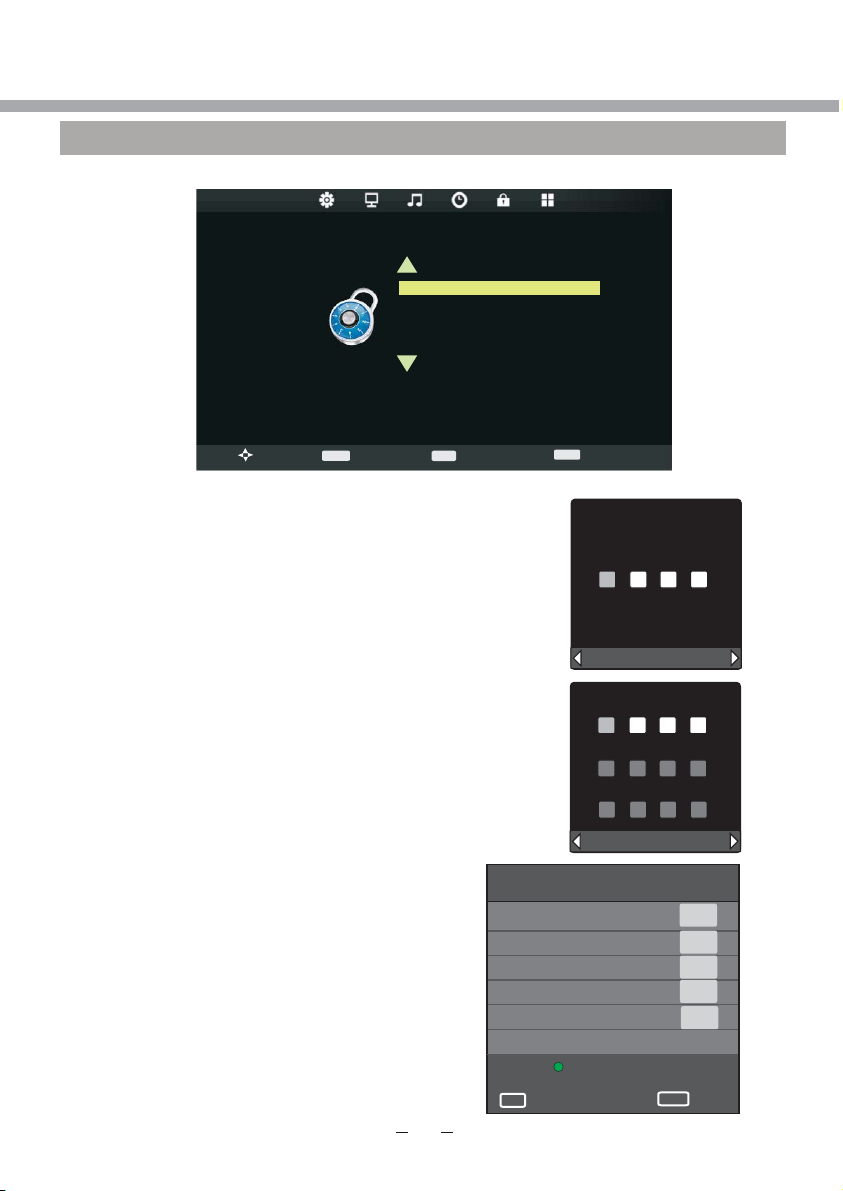
LOCK
Select LOCK section to Lock System, Set Password, Block Program, Parental Guidance.
LOCK
>
You can lock selected program or keyboard, set the parental guidance, if the item
Lock System is to On switched.
If you want to change the Lock System, you must
enter default password: 0000 first.
Move
MENU
Lock System
Set Password
Block Program
Parental Guidance Off
Return
ENTER
Select
>
EXIT
Exit
If you want to change default password, you must
select Set Password item.
Block program item enables to block access to
undesired programs.
Block Programs
1 BBC ONE
2 BBC TWO
7 BBC CHOICE
10 BBC FOUR
12 CBBC
Lock
OK
OK
MENU
DTV
DTV
DTV
DTV
DTV
Return
Page 27

Retu rn
MEN U
1 08:10 Thurs.Sep 02 2010
No Information
576i DTV SD
No Program information
DTV MENU SETUP
Parental Guidance item enables to set the age
limit for programs.
ELECTRONIC PROGRAM GUIDE (EPG)
By pressing the EPG button on the remote
control, an Electronic Program Guide is
PROGRAMME GUIDE TIME
displayed. The EPG supplies information,
such as program lists, starts and end times
of all available channels. In addition, the
detailed information about the program is
often available in the EPG. (The availability
and the amount of program details will vary
depending on the broadcaster.)
1 BBC ONE No information
2 BBC TWO No information
7 BBC CHOICE No information
10 BBC FOUR No information
12 CBBC No information
RECORD INFO
OK
INFORMATION
To obtain more information about present and following events, you can
press [DISPLAY] button. Like previously, the following event is displayed by
pressing the [/] buttons (toggle between present and following events):
Parental Guidance
13 Jul 09:00
OK
Off
4
5
6
7
8
SCHEDULE
REMINDER
INDEX
Index
Page 28
DTV Ma nu al Tu ni ng
ATV Ma nual Tun in g
Prog ra mm e Ed it
LCN So rt in g
Soft wa re U pd ate ( US B)
Retu rn
MEN U
ATV MENU SETUP
PLEASE NOTE, THAT IF SOME ITEMS ARE INACTIVE/UNAVAILABLE (GRAYED-OUT
IN THE OSD MENU) THEY ARE NOT DISCUSSED IN THIS CHAPTER. THESE ITEMS
ARE DETAILY DESCRIBED IN OTHER CHAPTERS.
This product can store up to 100-channel programs. You can select your favourite
channel through pressing [CH+/-] or number buttons, and you can scan and store all of the
channels through manual or automatic mode.
In ATV mode, press [SETUP] button on the remote control
Through pressing [/] button on the remote control, you can select LCD menu sections
(menu sections consist of “CHANNEL”, "PICTURE", "SOUND", "TIME", ”OPTION”, "LOCK").
Press [] or [OK] button to enter this menu section.
Press [] or [OK] button on the remote control to select the item in this menu section,
and then press [/] button to adjust parameter value. Press [SETUP] button to return to
main menu or [EXIT] button to exit from menu tables.
CHANNEL
Select CHANNEL section to adjust ATV channels.You may select Auto Tuning, ATV
Manual Tuning, Programme Edit, LCN Sorting and Software Update(USB).
Auto Tuning
CHANNEL
CHANNEL
>
Signal Information
CI Information
>
Move
Auto Tuning item enables to adjust channel setting automatically.
Select Auto Tuning item, press [] or [OK] button to enter Tune Type/Country selection menu.
Press [/] button to select Tune Type between DTV, DTV+ATV and ATV.
MENU
Return
ATV
UK Estonia Tunis
New Zealand Turkey Algeria
United Arab
Emirates
ENTER
Select
Moro cc o Egypt
EXIT
Exit
Page 29
ATV MENU SETUP
Channel Tuning
TV : 0 Programme
DTV : 0 Programme
Radio : 0 Programme
Data : 0 Programme
0 %... (TV)
Press [ ] button to enter Country menu. Press
[/] button to select Country and
[OK] button to start auto searching.
Select ATV Manual Tuning item, press [/]
button to select ATV Manual Tuning menu.
ATV Manual Tuning
Storage To 1
-
System BG
Current CH 1
Search
Fine-Tune
Frequency 477.55 Mhz
SAVE
MENU
You may select Storage To, Sound System, Current Channel, Search, Fine-Tune.
Storage To item Enables to select number of channel to store a program.
Current Channel item enables to select the channel number.
Sound System item enables to select sound system DK","I", L, BG .
Fine-Tune item enables to adjust the channel frequency accurately to make the sound
and picture effect better (or set channel frequency directly with number buttons).
Search item enables to adjust TV channel.
Programme Edit item enables to enter submenu to set
channel Delete, Rename, Move, Skip and add to
favourite list Fav.
Programme Edit
17 Digital
LCN Sorting item can be changed between On and Off.
Software Update (USB) enables to update the software
via USB input.
+
Return
DTV
Delete
OK
OK
Rename
FAV
FAV
Move
MENU
Skip
Return
Page 30
ATV MENU SETUP
PICTURE
Select PICTURE section to adjust picture parameters. You may select Picture Mode, Color
Temperature, Aspect Ratio, Noise Reduction and adjust Contrast, Brightness, Color,
Sharpness, Tint.
Picture mode item can be changed between Personal, Dynamic, Standard and Mild.
Color Temperature mode item can be changed between Normal, Cold and Warm, User.
Aspect Ratio mode item can be changed between Auto, 4:3, 16:9, Zoom1 and Zoom2.
Noise Reduction item can be changed between reduce noise mode: Off, Low, Middle, High
and Default.
You may adjust Brightness, Contrast, Colour, Sharpness, Tint for User mode.
SOUND
Select SOUND section to adjust sound parameters. You may select Sound Mode, Balance,
Surront Sound, SPDIF Mode.
PICTURE
>
Move
MENU
SOUND
>
Sound Mode item can be changed between Personal, Standard, Music, Movie and Sports.
Balance item can be adjusted from -50 to +50 for L and R sound balance. Default value is 0.
Surround Sound item can be changed between Off, Surround and SRS TruSurround XT
SPDIF Mode item can be changed between Off, PCM or Auto.
Move
MENU
Picture Mode Standard
Colo r Temper at ur e
Aspe ct R at io
Nois e Re du ct ion
Scre en
Return
Return
ENTER
Select
Sound Mode Standard
Balance
Surr ou nd S ou nd
AD Swi tc h
SPDI F MO D
ENTER
E
Select
EXIT
EXIT
>
Exit
>
Exit
Page 31

On Time
Slee p Tim er
Auto S ta nd by
Tim e Zo ne L ondon G MT
ATV MENU SETUP
TIME
Time menu is described in “DTV SETUP” Time section. Please refer to it for the detailed
instructions.
>
TIME
MENU
Clock -- -- -- --
Off Ti me Off
Return
ENTER
Select
EXIT
Exit
>
OPTION
Select OPTION section to select OSD Language, Country, Restore Factory defaults, OSD
Animation, OSD Time, ECO Mode, Blue Screen.
OSD Language, Country, Restore Factory defaults, OSD Animation, OSD Time and ECO
Mode items are discussed in DTV OPTION section and are exactly the same for ATV.
Please refer DTV manual for detailed instructions on these items.
Blue Screen item can changed between On and Off.
OPTION
>
Move
MENU
OSD Language English
Audio languages
Subtitle Language
Hearing Impaired
Country
PVR File System
Restore Factory Default
OSD Animation
OSD Time
Return
ENTER
Select
EXIT
>
Exit
LOCK
Lock menu and it’s items are discussed in DTV OPTION section and are exactly the same
for ATV. Please refer DTV manual for detailed instructions on these items.
Page 32

TELETEXT FUNCTION
Most TV stations provide cost-free teletext information, including the latest news, weather
information, TV program list and stock information etc. You just input the needed teletext
page according to the teletext content.
TELETEXT DISPLAY
Select the channel with teletext signal.
Press [TEXT] button.
Select the corresponding page according to the colourized buttons on the remote control.
Press [TEXT] button twice again and only TV screen displays.
PAGE SELECTION
You can input 3 digit numbers to enter the page you want to watch trough number buttons.
If the inputted number is invalid, you need to input correct 3 digit numbers again after you
finished inputting this 3 digit numbers.
You can select to turn pages forward or backward through [CH+/-] or [] button.
MIX MODE
This function may let you enjoy TV and teletext information at the same time.
When a certain teletext page displays, press [TEXT] button again, TV and teletext
information will display on screen at the same time.
Press [TEXT] button again and only TV screen displays.
LOCK
You can press [HOLD] button to lock teletext page. Press this button again to cancel
locking.
INDEX
Press [INDEX] button to display content page.
Enter a certain teletext page through inputting number buttons.
ZOOM IN TELETEXT
When teletext page shows, you may double zoom into display this teletext page.
Press [SIZE] button to zoom in the upper half part of teletext page.
Press [SIZE] button again to enter under half part of teletext page.
Press this button once more to return to original display mode.
DISPLAY MODE
Press [REVEAL] button to display the hidden teletext information. Press this button again
to cancel.
COLOURIZED BUTTONS (RED, GREEN, YELLOW, BLUE)
Select the corresponding teletext page through colourized buttons.
Page 33

SCART/AV/COMPONENT/HDMI/USB
MENU SETUP
VIDEO SETTING MENU
The menu setup of SCART/AV/COMPONENT/HDMI/USB modes is the same as that of TV
mode, except the CHANNEL section . You can find it in preceding pages.
NOTE
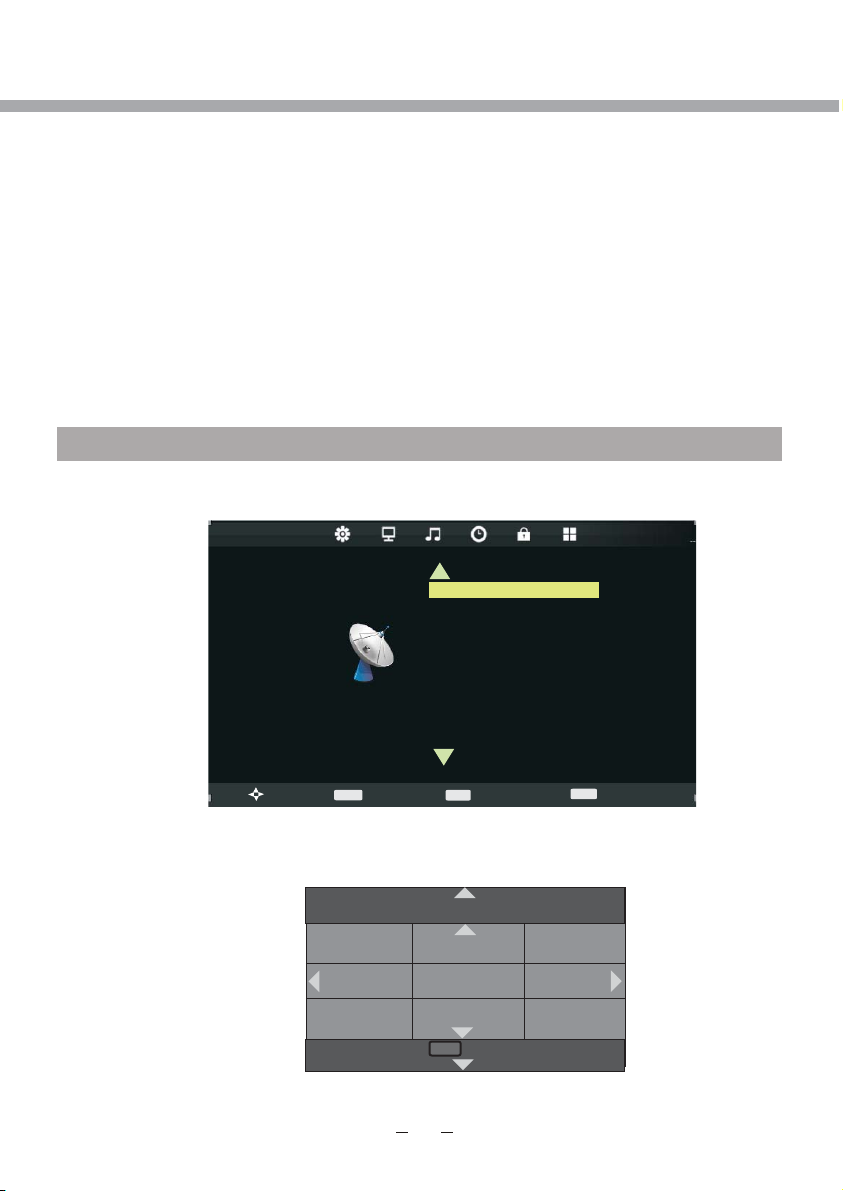
If no signal input in DTV, ATV, SCART/AV/COMPONENT/HDMI, the screen will show as
below.
This unit will switch to standby mode automatically if no signal input more than 15 minutes.
NO SIGNAL
Page 34

PC MENU SETUP
DTV Ma nu al Tu ni ng
ATV Ma nual Tun in g
Prog ra mm e Ed it
Sign al I nf or mat io n
CI Inf or ma ti on
LCN So rt in g
Soft wa re U pd ate ( US B)
PLEASE NOTE, THAT IF SOME ITEMS ARE INACTIVE/UNAVAILABLE (GRAYED-OUT
IN THE OSD MENU) THEY ARE NOT DISCUSSED IN THIS CHAPTER. THESE ITEMS
ARE DETAILY DESCRIBED IN OTHER CHAPTERS.
The VGA mode supported up to 1366X768@60Hz, you can use this unit as a
multimedia PC monitor. When this unit works in PC mode, the following setup can be done.
Press [SETUP] button on the remote control
Through pressing [/] button on the remote control, you can select LCD menu sections
(menu sections consist of “CHANNEL”, "PICTURE", "SOUND", "TIME", ”OPTION”, "LOCK").
Press [] or [OK] button to enter this menu section.
Press [] or [OK] button on the remote control to select the item in this menu section,
and then press [/] button to adjust parameter value. Press [SETUP] button to return to
main menu or [EXIT] button to exit from menu tables.
NO SIGNAL
CHANNEL
Select CHANNEL section to adjust PC channels. Only Software Update(USB) selection is
available, whitch is discussed in DTV Setup manual.
CHANNEL
CHANNEL
>
Move
MENU
Return
Auto Tuning
ENTER
Select
EXIT
>
Exit
Page 35

Aspe ct R at io
Nois e Re du ction
Colo r Temp er at ur e
Scre en
Retu rn
MEN U
PC MENU SETUP
PICTURE
Select PICTURE section to adjust picture parameters. You may select Picture Mode, Color
Temperature, Aspect ratio, Screen.
PICTURE
>
Picture mode, Color Temperature and Aspect Ratio mode items are discussed in DTV
Setup manual. Please refer to it for detailed instructions.
Screen item is used to adjust PC screen parameters (only available when inputting PCRGB signal). You may select Auto Adjust, Horizontal Position, Vertical Position, Size and
Phase.
Move
MENU
Picture Mode Standard
Return
ENTER
Select
EXIT
>
Exit
Screen
Auto Adjust
Horizontal Pos 133
Vertical Pos 27
Size 100
Phase 100
NOTE
When your PC goes into standby mode, the screen will show as bellow. This unit will go
into sleep mode if no input signal in 5-20 minutes (depending on choice in TIME menu).
You can wake it up by waking up your PC or pressing [STANDBY] button on the remote
control.
Page 36

Surr ou nd S ou nd
AD Swi tc h
SPDI F MO DE
Bala nc e
PC MENU SETUP
SOUND
Select SOUND section to adjust sound parameters. You may select Sound Mode, Balance,
Surround Sound, SPDIF Mode.
SOUND
>
Sound Mode, Balance, Surround Sound and SPDIF items are discussed in DTV Setup
manual. Please refer to it for detailed instructions.
OPTION
Select OPTION section to select OSD Language, Country, Restore Factory Default,
OSD Animation, OSD Time, ECO Mode.
OSD Language, Country, Restore Factory Default, OSD Animation, OSD Time, ECO Mode
items are discussed in DTV Setup manual. Please refer to it for detailed instructions.
TIME
Time menu is discussed in “DTV SETUP” Time section. Please refer to it for the detailed
instructions.
LOCK
Select LOCK section to Lock System, Set Password, Block Program and Key Lock.
Lock menu is discussed in “DTV SETUP” Time section. Please refer to it for the detailed
instructions.
Move
MENU
Return
Sound Mode Standard
EXIT
ENTER
Select
Exit
>
Page 37

USB OPERATION
BRIEF INTRODUCTION
This product has a USB 2.0 interface; you can play music, movie and picture
files from USB equipment.
USB refers to Universal Serial Bus. Most of USB devices on the market are
USB1.1 or USB2.0. There are some types USB1.1 devices:
Monitors Communication devices, Audio, Human Input Device (HID), Mass
Storage, Most flash memory, USB HDD ect. Belongs to Mass Storage Class.
Mass Storage Class includes 2 transport maners:
1. USB1.1 Mass Storage Class Control/Bulk/Interrupt (CBI) Transport.
2. USB1.1 Mass Storage Class Bulk-Only Transport. This unit supports USB1.1
Mass Storage Class Bulk-Only Transport, we are not sure that other USB
Devices can be supported! So please find out about the features of USB
equipments before using it.
NOTES
1. This product supports MP3, MPEG1, MPEG2, AVI, JPEG and BMP format files.
2. The file system supports FAT16, FAT32 and NTFS.
3. MTP (Media Transfer Protocol) is not supported.
4. Please connect directly to the USB port of your TV. If you are using a
separate cable connection, there may be a USB compatibility problem.
5. Before connecting your device to the TV, please back up your files to
prevent them from damage or loss of data. The manufacturer is not
responsible for any data file damage or data loss.
6. Do not disconnect the USB device while it is loading.
7. If you want to change playing mode, firstly you have to exit current playing
mode through pressing [EXIT] button.
8. The higher the resolution of the image, the longer it takes to display on the
screen.
9. For unsupported or corrupted files, the ‘Unsuported format’ message is displayed.
Page 38

USB OPERATION
USB MULTIMEDIA PLAYBACK FORMAT
Media
Movie
Music
Photo
File system: Hi Speed FS, FAT32, FAT16, NTFS (NTFS compressed file is not supported)
Note: Licenses are required for DivX, MPEG, MP3, WMA and AAC.
File
Ext.
.mpg MPEG-1, MPEG-2
.avi
.ts MPEG-2
.mov/
.mkv
.dat MPEG-1
.mp4
.vob MPEG-2
.mp3 - MP3
.wma - WMA
.m4a/
.aac
.jpeg
.bmp BMP
.png
DivX, Xvid, MJPEG,
MPEG-4 SP/ASP
MPEG-4 SP/ASP,
MPEG-4 SP/ASP,
MPEG-1, MPEG-2
Codec
Video Audio
MP3, WMA
- AAC
Progressive JPEG Max Resoliution: 1024 x 768 .jpg/
Baseline JPEG Max Resoliution: 8192 x 8192
Non-Interlaced Max Resoliution: 3000 x 3000
Interlaced Max Resoliution: 1500 x 1500
AAC
Max Resolution: 1366 x 768
Max Data Rate: 40
Max Resolution: 1366 x 768
Max Data Rate: 20
Max Resolution: 720 x 576
Max Data Rate: 40 Mbps
Sample Rate: 16K~48KHz
Bit Rate: 32K~442Kbps
Channel: Mono/Stereo
Sample Rate: 8K~48KHz
Bit Rate: 32K~320Kbps
Channel: Mono/Stereo
Max Resoliution: 6500 x 6500
Pixel Depth: 1/4/8/16/32 bpp
Remark
Mbps
Mbps
NOTE
Before operating MEDIA menu, plug in USB device, then press [SOURCE] button to set
the Input Source to USB.
Press [] button to select USB in the Source menu, then press [OK] button to enter.
Press [ / ] button to select the option
you want to adjust in the main MEDIA
menu, then press OK button to enter.
Page 39

PHOTO
EXIT
Exit
USB OPERATION
PHOTO MENU
Press [ / ] button to select PHOTO in the main menu, then press [OK] button to enter.
Press [EXIT] button to return back to the previous menu.
Press [ / ] button to select drive disk you want to watch, then press [OK] button to enter.
Press [ / ] button to select return option to back to the previous menu.
USB2.0
PHOTO
MUSIC
MOVIE
TEXT
Page 40

USB OPERATION
PHOTO
Delete
C:\F_IMAGES 1 / 1
IMG-02.jpg
IMG-02.jpg
Press [ / ] button to select the file you want to watch in the file selecting menu, then
press [Play] button to display picture.
When highlighting the option you select, the file information will appear on the right and
picture will be previewed in the center.
Press Play button to play the selected file.
Press OK button to display menu in the bottom.
Pause Prev. Next Stop Music
Press [ / ] button to select menu in the bottom you want to run, then press [OK] button
to operate.
Press [EXIT] button to back to the previous menu.
Press [ / ] button to select the file folder you want to search in the file selecting menu,
then press [OK] button on your remote control to enter sub-menu.
Press [ / ] button to select the file you want to delete in the file selecting menu, then
press red button on your remote control to delete files.
Repeat ALL
Resolution.: 2900 X 2100
Size: 397 KBytes
Date: 2010 / 05 / 07
Time: 12 : 07 : 09
Playlist Info.
Page 41

MUSIC
Album:
Title: With or Wit...
Bit Rate: 128K
Artist: U2
Sampling: 44K
Year:
Size: 3466KBytes
USB OPERATION
MUSIC MENU
Press [ / ] button to select MUSIC in the main menu, then press [OK] button to enter.
Press [EXIT] button to return back to the previous menu.
USB2.0
PHOTO
MUSIC
MOVIE
TEXT
Press [ / ] button to select drive disk you want to watch, then press [OK] button to enter.
Press [ / ] button to select return option to back to the previous menu.
When highlighting the option you select, the file information will appear on the right and
music will be previewed in the center.
Press [ / ] button to select the file you want to watch in the file selecting menu, then
press [OK] button to add the file to playlist.
Press [Play] button to start playing the music.
Page 42

USB OPERATION
01 - U2 - With or without you
Press [ / ] button to select menu in the bottom you want to run, then press [OK] button
to operate.
Press [EXIT] button to back to the previous menu.
00:03:30 / 00:04:45
Repeat ALL MUTE
Pause Prev. FB Next FF
MOVIE MENU
Press [ / ] button to select MOVIE in the main menu, then press [OK] button to enter.
Press [EXIT] button to return back to the previous menu.
USB2.0
PHOTO
MUSIC
Press [ / ] button to select drive disk you want to watch, then press [OK] button to
enter.
Press [ / ] button to select return option to back to the previous menu.
When highlighting the option you select, the file information will appear on the right and
movie will be previewed in the center.
Stop
MOVIE
TEXT
Page 43

USB OPERATION
MOVIE
Resolution: 688x512
Audio Track: 1/1
Subtitle: --/0
program: --/0
Size: 70073KBytes
MKV_crazy_loop-johanna_dvdrip-x
Press [Play] button to play the selected movie.
Press [OK] button to display menu in the bottom.
Pause Prev. FB Next FF
00:05:45 / 01:15:45
Repeat ALL
Stop
Set. A
Press [ / ] button to select menu in the bottom you want to run, then press [OK] button
to operate.
Press [EXIT] button to back to the previous menu.
Page 44

TEXT
Size: 1 KBytes
LCD 23641 L3M02
DVD DVB-T CI
FHD USB PVR PAL
/SECAM BG/DK/I/
LL“(
DUR 236F41BG T4
CI)
LCD 23641 L3M02
New Text Document.txt
USB OPERATION
TEXT MENU
Press [ / ] button to select [TEXT] in the main menu, then press [OK] button to enter.
Press [EXIT] button to return back to the previous menu.
Press [ / ] button to select drive disk you want to watch, then press [OK] button to enter.
Press [ / ] button to select return option to back to the previous menu.
When highlighting the option you select, the file information will appear on the right and text
will be previewed in the center.
USB2.0
PHOTO
MUSIC
T
MOVIE
TEXT
Press [Play] button to view the selected text.
Press [OK] button to display menu in the bottom.
Press [ / ] button to select menu in the bottom you want to run, then press [OK] button
to operate.
Press [EXIT] button to back to the previous menu.
Page 45

Page 46

DVD OPERATION
BASIC OPERATION
1. Turn ON and OFF the DVD function.
Turn on the LCD TV and .
remote control to select DVD and press [OK] button to confirm your choice.
2. Insert Disc to DVD.
Insert the Disc to the Disc slot (mirror (record) side of the disc has to face towards front of the
unit),
the player will load the disc automatically.There will have an on screen indication “CLOSE” then
“LOADING”. After loading the disc content, it will switch to play mode automatically. If the disc is
already placed inside, the disc will be read automatically.
3. Play the DVD.
According to the disc content, the disc menu will display for your selection. When playing the disc,
you may use button to toggle between Play and Pause mode. This product also supports Title and
Repeat playback.
NOTE: For some discs, after loading the content of the disc, need to press or select from the disc
menu to start. Please make sure when inserting the Disc, the mirror (record) side of the disc
should be
facing you. When inserting the Disc incorrectly, you may damage the DVD mechanism.
4. Title playback (for DVD disc only).
- Press TITLE button, there will have an on screen indication “TITLE”.
- Press the direction or numeric buttons to select your favorite title.
- Then will play from the first chapter of the selected title.
press [SOURCE] button on a remote control Press [ / ] button on the
SUPPORTING DVD FORMAT
Disc:
CD, HDCD, VCD, DVD, CD-R, CD-RW, DVD+R, DVD-R, DVD+RW, DVD-RW
Multimedia format:
JPEG, MP3, WMA, MPEG-1, MPEG-2, MPEG-4
MPEG-4 Format:
DivX 3,xx
DivX 5,xx
WARNING! Do not insert or play 8cm disc.
80 mm
40
Page 47

DVD OPERATION
DVD FUNCTIONS OPERATING INSTRUCTIONS
1. Play
- For DVD disc, press button from root or title menu; while playing the DVD, you may play your
favorite title directly with title selection by pressing the TITLE button.
- For Super VCD & VCD discs, while playing the disc, you may play your favorite tracks by numeric
buttons.
- For CD, CD-G & HD-CD discs, while playing the disc, you may play your favorite tracks by numeric
buttons.
- For MP3 / JPEG disc, you may play your favorite tracks by numeric buttons from the content menu.
- If input track number is not valid, it will not function.
2. Previous/Next
- Press button to play to the last Title / Chapter / track.
- Press button to play to the next Title / Chapter / track
3. Forward/ Backward
- While playing the disc, you may use forward or backward function.
- There are 4 speeds for forward. Press [ ] button to toggle between different speeds in
sequent. (FFx2 /FFx4 / FFx8 / FFx20 / PLAY or FRx2 /FRx4 / FRx8 / FRx20 / PLAY ).
4. Pause
- Press [ ] button to pause; press [ ] button to resume.
5. Repeat
- Press [REPEAT] button once to display the current repeat mode.
- There are 3 types of repeat function REPEAT (1) / REPEAT (DIR) / REPEAT (ALL).
6. Display
- Press [DISPLAY] button to activate the on screen roll-down menu for the current Title, Chapter, time
and other information.
7. Goto
- This function allows you to play your favorite Title / Chapter / track.
- Press GOTO button to activate the on screen scroll-down menu for edit.
- According to the highlighted area, input your favorite Title /Chapter / Track number by numeric
buttons or input the playback time. After editing, press [OK] to start.
- If the input is invalid, it will not function.
8. Audio
- Press [AUDIO] button once to display current audio mode.
- Press again to toggle between different audio modes in sequent.
9. Subtitle
- Press [SUBTITLE] button once to display current sub-title.
- Press again to toggle between different subtitle modes in sequent.
10. Mute
- Press [MUTE] button once to mute the audio output.
“MUTE”.
- Press again to cancel, or Press VOL + to cancel and adjust the volume.
11. ZOOM
- Press [ZOOM+] or [ZOOM-] button to zoom in or out the picture.
- There are 3 zoom modes ZOOM2 / ZOOM3 / ZOOM4 and ZOOM1/2 / ZOOM1/3 ZOOM1/4.
- In ZOOM2, ZOOM3 and ZOOM4, you may use the navigation buttons to pan the picture for your
favorite portion.
12. A-B
- In normal Playback, fast forward or fast reverse, press [A-B] button at where you want to start the
repeat portion. There will have an on screen indication “REPEAT A–“.
- In normal Playback, fast forward or fast reverse, press [A-B] button again at where you want to stop
the repeat portion. There will have an on screen indication “REPEAT A–B“.
- The repeat function started to playback the portion from A to B automatically.
- Press A-B button again to cancel. There will have an on screen indication “ A–B CANCEL”.
13. Volume
- Press [VOL- / VOL+] buttons to adjust the output volume.
There will have an on screen symbol indicate
41
Page 48

DVD OPERATION
After loading the MP3 / JPEG / AVI disc, it will start to scan for the stored MP3 /JPEG / AVI
folders. Then will
firstly display the MP3 contents automatically.
Using the navigation buttons to check you favorite folder and playback the first file or move to the
your favorite file.
NOTE:
- Press [ ] buttons to move the highlight to folders, documents or mode selection.
- Press numeric buttons to select the contents directly.
- When play, press [ ] button to select next / previous file.
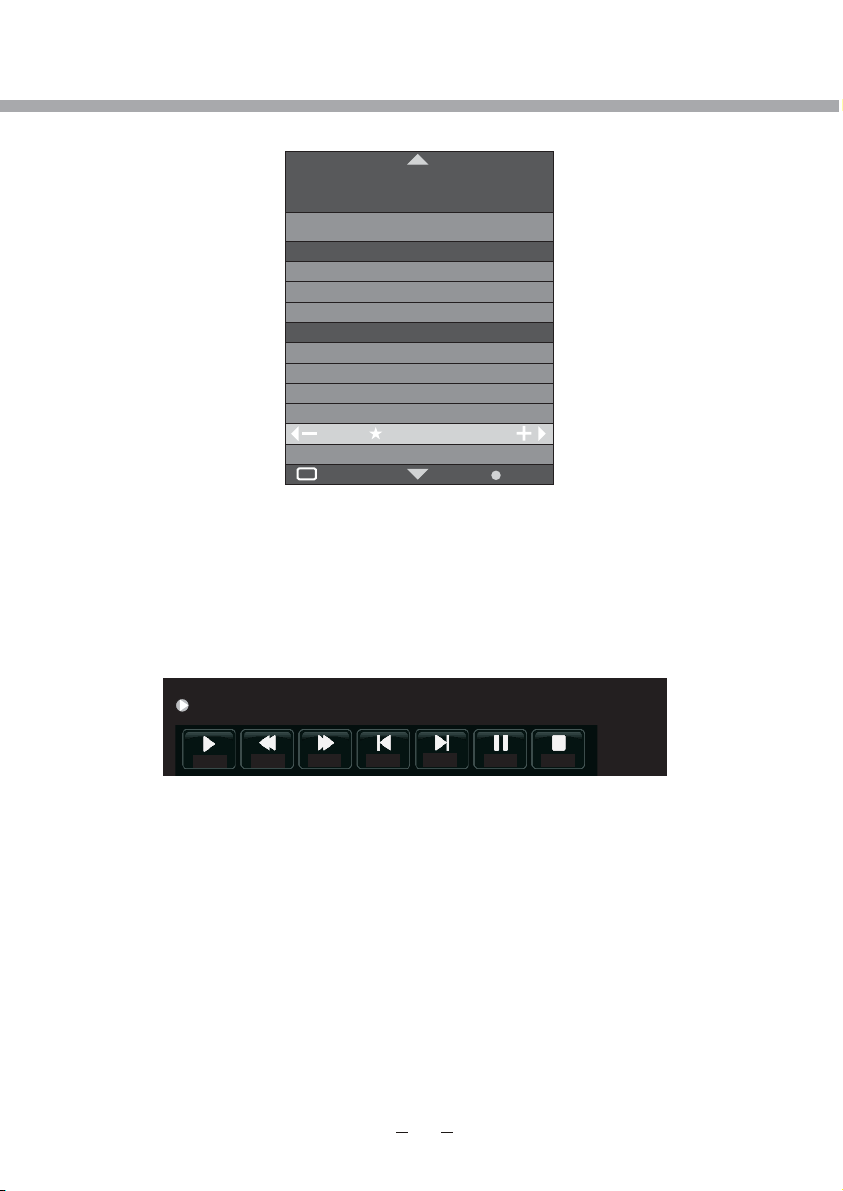
FUNCTIO N SETTIN GS
- Press [DVD-MENU] button t
- Press [ ] button to move and highlight between different sub-menu. Press [ ] button to
enter and navigate in the sub-menu.
[DVD-MENU]
- Press button to exit the OSD menu.
o activate the DVD player OSD menu;
SYSTEM SETUP
TV SYSTEM
- This menu enables you to set the picture format for your DVD.
NTSC. This format is used by some other countries, e.g. USA
PAL. This is the format used in the UK and the default setting.
AUTO. This format can be used if your TV/DVD is capable of both PAL and NTSC formats.
SYSTEM SETUP
TV SYSTEM
AUTO PLAY PAL
TV TYPE AUTO
PASSWORD
RATING
DEFAULT
NOTE: PAL format is generally used for TVs in the UK. Check your TV user guide for supported
formats.If NTSC is selected with a non-compatible television you may experience interference or
picture scrolling.
NTSC
42
Page 49

DVD OPERATION
AUTO PLAY
- You can enable or disable the autoplay function by selecting between ON or OFF.
SYSTEM SETUP
TV SYSTEM
AUTO PLAY
TV TYPE
ON
OFF
PASSWORD
RATING
DEFAULT
TV TYPE
- DVDs are produced in a variety of screen aspect ratios. This menu enables you to select one of
the three
aspect ratios:
SYSTEM SETUP
TV SYSTEM
AUTO PLAY
TV TYPE
PASSWORD
RATING
DEFAULT
4:3PS
Pan and Scan is used for most normal television broadcasts and it is the default setting. It has an
aspect ration of 4:3. If you select this setting when viewing a DVD the picture will fill the screen
but, you will not see the left and right edges of the picture.
4 : 3PS
4 : 3LB
16 : 9
4:3LB
Letter Box will show the DVD in its original aspect ratio so depending on the size of your television
screen, you may see black borders above and below the picture.
16:9
Choose this setting if you have a widescreen television
NOTE:
- Playback screen size may vary according to the discs contents.
- For discs with 4:3 contents, using any mode would only display a 4:3 screen
- Screen ratio selection should be according to the connected TV / Display aspect ratio.
4
Page 50

DVD OPERATION
PASSWORD
- The default setting is locked. No Rating selection or change password could be done. To edit
the Rating setting, please enter default password “0000” by numeric buttons, then press OK
button to confirm.
- To change password, input any 4 digit number when the lock is unlocked. Once the 4 digit
number is entered, that will be your new password.
SYSTEM SETUP
TV SYSTEM
AUTO PLAY
TV TYPE
PASSWORD
RATING
DEFAULT
RATING
- Playback for some discs with rating, you can select the rating setting according to your
preference.
- Rating restriction divided in eight different category from KID SAFE to ADULT.
SYSTEM SETUP
TV SYSTEM
AUTO PLAY
TV TYPE
PASSWORD
RATING
DEFAULT
1 KID SAFE
2 G
3 PG
4 PG13
5 PG-R
6 R
7 NC-17
8 ADULT
NOTE: Only editable when password is unlocked. And only can function when password is
locked. It does not, however, reset either the Password or the Rating setting.
DEFAULT SETTING
- Press [OK] button to restore factory default.
SYSTEM SETUP
TV SYSTEM
AUTO PLAY
TV TYPE
PASSWORD
RATING
DEFAULT
RESTORE
44
Page 51

DVD OPERATION
OSD LANGUAGE
- Use navigation buttons to select the OSD LANGUAGE setup icon, press OK button to confirm.
There are few languages for your selection, press [ ] buttons to toggle between different
languages.
LANGUAGE SETUP
LANGUAGE SETUP
OSD LANGUAGE
AUDIO LANG FRENCH
SUBTITLE LANG GERMAN
MENU LANG
AUDIO LANGUAGE
- Use navigation buttons to select the AUDIO LANG setup icon, press [OK] button to confirm.
There are few languages for you selection, press [ ] buttons to toggle between different
languages. Press OK button to confirm.
ENGLISH
ITALIAN
GREEK
SPANISH
PORTUGUES
DUTCH
LANGUAGE SETUP
OSD LANGUAGE
AUDIO LANG
SUBTITLE LANG
MENU LANG
ENGLISH
FRENCH
GERMAN
ITALIAN
GREEK
SPANISH
PORTUGUES
DUTCH
SUBTITLE LANGUAGE
-Use navigation buttons to select the SUBTITLE LANG setup icon, press [OK] button to confirm.
There are few languages for you selection, press [ ] buttons to toggle between different
languages. Press OK button to confirm.
LANGUAGE SETUP
OSD LANGUAGE
AUDIO LANG
SUBTITLE LANG
MENU LANG
ENGLISH
FRENCH
GERMAN
ITALIAN
GREEK
SPANISH
PORTUGUES
DUTCH
OFF
45
Page 52

DVD OPERATION
MENU LANGUAGE
- Use navigation buttons to select the MENU LANG setup icon, press [OK] button to confirm.
There are few languages for you selection, press [ ] buttons to toggle between different
languages. Press OK button to confirm.
LANGUAGE SETUP
OSD LANGUAGE
AUDIO LANG
SUBTITLE LANG
MENU LANG
ENGLISH
FRENCH
GERMAN
ITALIAN
GREEK
SPANISH
PORTUGUES
DUTCH
VIDEO SETUP
BRIGHTNESS
- Press [ ] buttons to toggle between different brightness. You can adjust from 0 to 12.
VIDEO SETUP
BRIGHTNESS
CONTRAST
HUE
SATURATION
CONTRAST
- Press [ ] buttons to toggle between different contrast. You can adjust from 0 to 12.
12
10
8
6
4
2
0
BRIGHTNESS
CONTRAST
HUE
SATURATION
VIDEO SETUP
12
10
8
6
4
2
0
46
Page 53

DVD OPERATION
HUE
- Press [ ] buttons to toggle between different hue. You can adjust from -6 to +6
VIDEO SETUP
BRIGHTNESS
CONTRAST
HUE
SATURATION
SATURATION
- Press [ ] buttons to toggle between different saturation. You can adjust from 0 to 12.
+6
+4
+2
0
-2
-4
-6
VIDEO SETUP
BRIGHTNESS
CONTRAST
HUE
SATURATION
12
10
8
6
4
2
0
SPEAKER SETUP
DOWNMIX
- Use navigation buttons to select LT/RT or STEREO option:
LT/RT- Left/Right mix mode
STEREO- Select this option if you don't have a 5.1 channels amplifier.
SPEAKER SETUP
DOWNMIX LT / RT
SUBWOOFER
CENTER DELAY
REAR DELAY
STEREO
47
Page 54

DVD OPERATION
SUBWOOFER
- Use navigation buttons to select ON or OFF.
SPEAKER SETUP
DOWNMIX
SUBWOOFER
CENTER DELAY
REAR DELAY
CENTER DELAY
- Use navigation buttons to toggle between delay. You can adjust in a range of
(0ms, 2ms and 4 ms).
OFF
ON
SPEAKER SETUP
DOWNMIX
SUBWOOFER
CENTER DELAY
REAR DELAY
REAR DELAY
- Use navigation buttons to toggle between delay. You can adjust in a range of
(0ms, 6ms and 12 ms).
+
4 MS
2 MS
0 MS
SPEAKER SETUP
DOWNMIX
SUBWOOFER
CENTER DELAY
REAR DELAY
+
12 MS
6 MS
0 MS
48
Page 55

DVD OPERATION
CARE AND MAINTENANCE
Earl y ma lfu nc tio ns c an be p re vente d. C are fu l and r eg ula r cl eanin g can ext en d the a mo unt o f ti me yo u
will h av e you r ne w TV. Be su re t o tur n th e power o ff a nd u npl ug t he po we r cor d be fore yo u be gin a ny
clea ni ng.
Clea ni ng th e sc ree n
1. Her e’ s a gre at w ay to k ee p the d us t off yo ur sc re en fo r a wh ile . We t a so ft clot h in a m ixt ur e of
luke wa rm wa te r and a l it tle fab ric sof te ner o r di sh wa sh ing d et ergen t. W ri ng th e cl oth u nt il it ’s alm ost
dry, and th en u sed i t to w ipe t he s creen .
2. Mak e su re th e ex ces s wa ter i s off th e scree n, a nd th en l et it a ir -dry be fore yo u tu rn on y ou r TV.
Clea ni ng th e ca binet
To remov e di rt or d us t, wi pe t he ca bi net wit h a so ft, d ry, l in t-fre e cloth . Pl eas e be s ure n ot t o use a w et
clot h.
Exte nd ed Abs enc e
If you e xp ect t o le ave y ou r TV d orman t for a lon g ti me( su ch as a v ac ati on ), it’s a goo d id ea to
Teletext operation
unpl ug t he po we r cor d to p rot ec t again st p oss ib le da ma ge fr om l ightn ing or po we r sur ge s.
If you e xp ect t o le ave y ou r TV d orman t for a lon g ti me (s uc h as a va ca tio n) , it’s a good i de a to
unpl ug t he po we r cor d to p rotec t again st p oss ib le da ma ge fr om l ightn ing or po we r sur ge s.
Hand in g Dis cs
1. To remove a d is c fro m it s sto ra ge ca se , press o n th e cen tr e of th e ca se an d ta ke the di sc o ut.
2. Hol d th e dis c by t he ed ge s, to avo id touc hi ng th e Re cor de d sid e of t he disc .
Clea ni ng di sc s
1. Fin ge rpr in ts an d du st sh ou ld be car ef ull y wi ped f ro m the d is c's sur face wi th a s oft C lo th.
Audio d is cs an d DV D dis cs h ave n o gr oov es t o colle ct d ust a nd m icr os cop ic d ebris s o gentl y
wipi ng w ith a s of t clo th s hould r emove m os t par ti cle s. W ipe i n a st raigh t li ne fr om t he in si de
to the o ut sid e of t he di sc . Small d ust par ti cle s an d lig ht s tains s hould h av e no effe ct o n
repr od uct io n qua li ty.
2. Nev er u se ch em ica ls s uch a s re cord sp rays, a nt ist at ic sp ra ys, Ben zine, o r th inn er s to cl ea n
the di sc s. Thes e ch emi ca ls ca n ir repar ably da ma ge th e di sc' s su rfa ce .
3. Dis cs s hou ld b e ret ur ned t o th eir cas es a fte r us e. This a vo ids s er ious sc ra tch es t hat c ou ld
caus e th e las er p ick up t o ski p.
4. Do no t ex pos e di scs t o di rec t su nligh t, h igh h um idi ty, o r hi gh temp eratu re f or ex te nde d pe rio ds .
Expo su re to h ig h tem pe ratur es can wa rp t he di sc .
5. Do no t st ick p ap er or w ri te anyt hing wi th a b all p oi nt pe n on t he la be l side of t he d isc .
49
Page 56

TROUBLESHOOTING
Please check for causes of problems in accordance with the following chart before contacting
any maintenance personnel.
DISPLAY TROUBLESHOOTING
Symptom
Black screen, power
indicator light off
Image display flicker,
unstable
Check whether power cord is well connected, and whether
this unit is power on
Check whether the signal cord of input device is well
connected
Check whether input device is power on
Check whether the input device signal is in this unit's
specification
Check computer output mode: control panel-display-setup
If the setup does not accord with this unit's specification,
please change the display setup
Hor scanning frequency: 30KHz 75KHz
Ver scanning frequency: 50 Hz 75Hz
Causes and Correction
SOUND AND TV TROUBLESHOOTING
Symptom
Cannot power on
No sound
Volume too low
Snowy picture
Remote control failure
Please make sure the well connecting of power cord
Please make sure the well connecting of audio cord
Check volume
Make sure there is nothing plugged in the headphone jack
Check volume
If volume is still too low when adjusting volume to maximum,
please check whether the input device is well set
Input antenna damaged or not well connected
Check whether remote control battery used up
Whether battery installation is correct
Whether obstacles exists between remote control and the
unit's receiving window
Check whether receiving window has strong light
Causes and Correction
~
~
50
Page 57

TROUBLESHOOTING
DVD TROUBLESHOOTING
Symptom
Not play
Sound distortion
No sound
No image
No color
No disc reading
Temporary
function failure
Causes
1. Condensation on laser head
2. Disc not properly loaded
3. Disc not compatible with the unit
1. Too large volume of connected
device
2. Sound field mode not suitable for
disc
1. Disc warped or dirty
2. The unit in mute state
1. TV not set for proper system
1.2.TV system not right
TV color not well adjusted
1. Disc warped or dirty
2. Disc not correctly placed
3. Condensation on laser head
1. Mal-fabricated disc used
2. Wrong buttons pressed
3. Static leakage into the unit from
outside
Correction
1. Switch on power and wait for 1 to 2 hours
2. Make sure label side of the disc facing up
3. Confirm whether this unit compatible with
the placed disc
1. Adjust the device volume
2. Adjust appropriate sound field
1. Clean the disc
2. Press MUTE button to cancel it.
1. Reset AV/TV state of TV
1. Try to change the color system
2. Reset the TV color
1. Clean the disc
2. Reload a disc with label side facing up
3. Witch on power, unload disc and leave
it for about 1 hour
1. Wait for 5 to 10 seconds to restore to
normality automatically
2. Operate again
3. Power off for 1 to 2 minutes to power
on again
No subtitle
Image rolling
If the above methods still cannot solve the problems or the troubles are special, please
contact the local maintenance personnel.
1. No subtitle made in disc
2. The unit subtitle is turned off
1. System setup not suitable
for disc
1. Disc problem
2. Press Subtitle button to select it
1. Adjust system mode
51
Page 58

SPECIFICATIONS
LCD screen Type TFT color (Glass Front)
Hor scanning frequency
Frequency
Display mode
Panel Life
signal
Input
TV/V
ideo
Ver scanning frequency
Display color
Recommended mode
Max mode
Hours
Synchronous signal
Video signal
Image system
system
Audio
Video form
22"- 47 cm
30 kHz 80 kHz
~
~
50 Hz 75 Hz
~
~
16.7M color()
1366 X 768
50,000
H/V separation, TTL positive/negative;
H/V composite, TTL positive/negative
Green synchronous, 0.3Vp p,negative
0.7 Vp p@75ohm
-
-
-
PAL/SECAM/NTSC(In video mode)
DK/I/BG/L
YPbPr,VGA
RGB,
CVBS、
Power From AC ~ 100V-240V (50 /60) Hz
From DC (car) 12V/4.5A
Working temperature
Environmental
factor
Working humidity
Storing temperature
Storing humidity
Media play (USB)
File format MP3, MPEG1, MPEG2, AVI, JPEG and BMP
Audio input
Audio parameter
Frequency response
_
___
。
。
C
。
C
。
C
C
535~
10 80%% ~
-20 45~
5 95%% ~
φ3.5 jack(L,R),0.5±0.3Vrms
TV signal: 100 Hz 12 kHz(-3dB)~
AV: 100 Hz 15 kHz (-3dB)~
DVD
Digital TV
Hint: the items with " " symbol are related to LCD screen. Specifications and design are subject
o change without notice.
*
Some discs labelled with MPEG 4 on the market actually are * .rm/* .ram/* .rmm and others which
are not compatible. Please take care when buying discs.
**
unit cannot play some SVCD discs with VCD format.
This
Because of disc quality and format difference, we cannot make sure smoothly read all discs; some
functions cannot be fulfilled for the disc speciality, but not machine trouble.
Disc type
Input connector
Frequency
Channel range(VHF/UHF)
range (VHF/UHF)
DVD VIDEO
SVCD
**
MPEG4 ;
*
VCD1.0, 1.1, 2.0 version;
IEC-Type, IEC 169-2, Female
174MHz 858MHz
7&8Mhz
~
CD-DA
52
Page 59

DISPLAY MODE
SUPPORTED PC INPUT MODE
Resolution
Hor scanning frequency
(KHz)
Ver scanning frequency
(Hz )
Format
640 350
720 400 31.5 0.0
640 480 31.5 60.0
640 480 37.9 .0
640 480 37.5 .0
800 600 35.1 .
800 600 37.9 60.0
800 600 48.1 .0
800 600 46.9 .0
1024 768 48.4 60.0
1024 768
1024 768 60.0
31.5 0.0
56.5
64.0 1280X1024 60.0
85.01280X1024 .0
75.01600X1200 60.0
81.31600X1200 6.0
0.
.0
DOS
DOS
DOS
VESA
VESA
VESA
VESA
VESA
VESA
VESA
VESA
VESA
VESA
VESA
VESA
VESA
53
Page 60

Disposal of Used Electrical & Electronic Equipment
The meaning of the symbol on the product, its accessory or packaging indicates that
this product shall not be treated as household waste. Please, dispose of this equipment
at your applicable collection point for the recycling of electrical & electronic equipments
waste. In the European Union and Other European countries which there are separate
collection systems for used electrical and electronic product. By ensuring the correct
disposal of this product, you will help prevent potentially hazardous to the environment
and to human health, which could otherwise be caused by unsuitable waste handling
of this product. The recycling of materials will help conserve natural resources. Please
do not therefore dispose of your old electrical and electronic equipment with your
household waste. For more detailed information about recycling of this product, please
contact your local city office, your household waste disposal service or the shop where
you purchased the product.
Page 61

Page 62

Page 63

Page 64

This item incorporates copy protection technology that is protected by U.S.
patents and other intellectual property rights of Rovi Corporation. Reverse
engineering and disassembly are prohibited.
8 T 1 0 0 0 1 0 3 3 / 6 2
Page 65

TELEVISEUR LCD COULEUR
22LCF-5000TD
22LCF-5000TDW
22LEF-6000TD
22LEF-6000TDW
MANUEL DE L’UTILISATEUR (FR)
A LIRE ATTENTIVEMENT AVANT L’UTILISATION
Page 66

Page 67

CONSIGNES IMPORTANTES DE SÉCURITÉ
Ce symbole indique la présence dans le boîtier de l’appareil de
tensions dangereuses qui présentent des risques d’électrocution et
de blessures corporelles.
Ce symbole indique que d’importants conseils de fonctionnement
sont fournis dans la documentation de ce produit.
Veuillez lire attentivement ce manuel avant l’utilisation de ce produit.
• Avant de brancher le cordon de l'adaptateur CC, assurez-vous que la tension
électrique du secteur local correspond à celle indiquée sur la télé LCD. Si vous
n'êtes pas certain, demandez conseil auprès du distributeur d'électricité local.
• N'introduisez jamais d'objets métalliques dans les fentes de votre télé LCD (écran à
cristaux liquides) /Moniteur ; cela peut provoquer des risques de chocs électriques.
• Pour éviter les chocs électriques, ne toucher jamais l'intérieur de la télé
LCD/Moniteur ou l’adaptateur. Seul un technicien qualifié est habilité à ouvrir le
boîtier de la télé LCD/moniteur/adaptateur.
• N'utilisez jamais votre télé LCD /moniteur si le cordon d’alimentation a été
endommagé. Ne rien déposer sur le câble d'alimentation et mettez le loin des
passages des gens afin que personne ne marche dessus.
• Débranchez le câble et le tenant par la prise et non en tirant sur le câble.
• Une pression acoustique excessive aux écouteurs ou au casque d'écoute peut
causer la perte auditive.
• Les piles ne doivent pas être exposées à une chaleur excessive telle que les rayons
du soleil, le feu et autres.
• Laissez un minimum d'espace libre de 5 cm autour de l'appareil pour garantir une
bonne ventilation d'air.
• Pour ne pas gêner la ventilation, les fentes de ventilation, ne doivent pas être
couvertes par des objets tels que des journaux, nappes de table, rideaux, etc.
• Ne pas poser au dessus l'appareil des sources de flamme nue telles que des
chandelles allumées.
• Il faut tenir compte de la protection de l'environnement lors de l'élimination des
piles.
• Utiliser l'appareil dans des climats modérés (non tropicaux).
• La fiche du cordon d’alimentation doit rester facilement accessible.
Page 68

CONSIGNES IMPORTANTES DE SÉCURITÉ
• Les fentes du boîtier de la télé LCD/moniteur/adaptateur servent à la ventilation.
Pour éviter toute surchauffe, ces fentes ne doivent pas être obstruées ou couvertes.
Evitez d'utiliser la télé LCD/moniteur sur un lit, un sofa, une couverture et toute
autre surface moelleuse. Cela pourrait bloquer les fentes de ventilation du bas du
boîtier. Si vous placez la télé LCD/moniteur dans une bibliothèque ou tout autre
espace fermé, assurez-vous de fournir une ventilation adéquate.
• N’exposez pas la télé LCD/moniteur à des températures ou des conditions
d’humidité extrêmes.
• Cet appareil ne doit pas être exposé au ruissellement ni à la projection d'eau ; évitez
de poser des objets remplis de liquides, tels que des vases, au dessus de l'appareil.
• Ne pas placer la télé LCD/moniteur sur un chariot, un support, un trépied, une table
ou un sol instables d’où elle risque de tomber. Si elle tombe elle sera endommagée,
touchée ou rayée. Ne nettoyez pas le panneau frontal avec un produit de type
acétone, de l'alcool éthylique, du toluène, de l'acide méthylique ou chlorhydrique
car ils peuvent l'endommager.
• Placez votre adaptateur CC près d'une prise électrique facilement accessible.
• Si votre la télé LCD/moniteur ne fonctionne pas normalement en particulier, en cas
de sons anormaux ou odeurs émanant de l'intérieur, débranchez-la immédiatement
et contacter un revendeur ou un centre de réparation autorisé.
• Les températures élevées peuvent engendrer des problèmes. N'exposez pas votre
télé LCD/moniteur directement aux rayons du soleil, évitez les chauffages, les fours,
les cheminées et toute autre source de chaleur.
• Débranchez l’adaptateur CC s'il ne va pas être utilisé pendant une longue période.
• Afin de limiter le risque d'incendie ou d'électrocution, et les interférences irritantes,
n'utilisez que les accessoires recommandés.
• N'essayez pas de réparer la télé LCD/moniteur par vous-même. Contactez un
centre de service qualifié.
• Débranchez l'adaptateur CC du secteur avant toute réparation.
• Assurez-vous que le centre de réparation n’utilise que des pièces de rechange
agréées ou équivalentes. L’utilisation de pièces non agréées pourrait causer un
incendie, un choc électrique ou d'autres risques.
• A la suite de tout entretien ou réparation, assurez-vous que le centre de réparation a
effectué les contrôles de sécurité nécessaires et certifie que la télé LCD
TFT/moniteur est utilisable en toute sécurité.
• L’appareil étant de CLASSE I, il doit être branché sur une prise SECTEUR
disposant d’une mise à la terre.
Page 69

SOMMAIRE
PANNEAUX DES TOUCHES DE FONCTIONS
Panneau frontal 1
Side panel 2
EQUIPEMENT EXTERNE
Schema de branchement 3
Panneau arriere 4
TÉLÉCOMMANDE
Télécommande 5
Installation des piles 7
DEMARRAGE
Mise en marche 8
Selection de la source 8
LE MENU TNT
Chaîne 9
Image 11
Son 19
Heure 19
Options 15
Système de fichiers evp 16
Verrouillage 27
Guide des chaînes électronique (GCE) 21
Informations 21
CONFIGURATION ATV
Chaînes de television 29
Image 24
Son 24
Heure 25
Options 25
Verrouillage 25
FONCTION TELETEXTE
Fonction teletexte 26
CONFIGURATION DES MODES PERITEL/AV/COMPOSANT/HDMI/USB
Configuration Vidéo 27
Page 70

CONFIGURATION DU MODE ORDINATEUR
Chaînes de television 28
Image 29
Son 37
Options 37
Heure 37
Verrouillage 37
MODE OPERATOIRE DE LA FONCTION USB
Breve Introduction 38
Formats de fichier compatibles 39
Photo 33
Musique 35
Vidéo 36
Texte 38
UTILISATION DU DVD
Utilisation de base 40
Formats DVD supportes 40
Fonctions du DVD et instructions d’ exploitation 41
Lecture MP3/JPEG/AVI 42
Parametres de function 42
Soin et entretien 49
DÉPANNAGE
Problemes d’affichage 50
Problemes audio et tele 50
Dépannage DVD 51
SPÉCIFICATIONS
Spécifications 52
Page 71

PANNEAUX DES TOUCHES DE FONCTIONS
FACE IMPRIMEE
PANNEAU FRONTAL
1. Voyant
2. Capteur
3. Interrupteur secteur
(il est rouge en mode veille,
infrarouge de la télécommande
bleu
3
en fonctionnement normal).
PANNEAUX DES TOUCHES
123456
.
1
2
789
1. Pour lancer ou suspendre la lecture
2.
Pour sortir le disque
3. TV/AV
4. MENU
5. CH-
6. CH+
7. VOL-
8. VOL+
9. POWER
veille et le mode fonctionnement)
(Sélectionne la source d'entrée)
(pour entrer ou quitter un menu)
(N° de programme précédent)
(N° de programme suivant)
(pour diminuer le volume)
(pour augmenter le volume)
(Pour basculer entre le mode
*
Page 72

PANNEAUX DES TOUCHES DE FONCTIONS
SIDE PANEL
1
2
3
4
6
5
7
8
9
1. Connecteur d’entrée pour antenne de télévision
2. Connecteur USB
3. Connecteur de sortie pour écouteurs
4. Connecteurs d’entrée AV (Audio droite/Audio
gauche/Vidéo)
5. Connecteurs d’entrée vidéo Y/Pb/Pr
6. Fente CI
7. Connecteur d’entrée Ordinateur/VGA
8. Connecteur d’entrée audio pour ordinateur
9. Connecteurs d’entrée HDMI
+
Page 73

EQUIPEMENT EXTERNE
SCHEMA DE BRANCHEMENT
Y
Pb
Pr
REMARQUE
Vous devez brancher tous les câbles avant de mettre sous tension.
Page 74

PRESENTATION DES COMMANDES DU PANNEAU
PANNEAU ARRIERE
12 3 54
1. Commutateur d’alimentation
2. Alimentation électrique CA
3. Connecteur PERITEL
4. Connecteur de sortie audio SPDIF
5. Connecteur d’alimentation CC 12 V
(permet l’alimentation du téléviseur via un adaptateur de courant pour auto ou un
adaptateur de courant 12 V CC externe).
Page 75

TÉLÉCOMMANDE
MUTE
S.MODE
SLEEP
3
21
678
CALLEXITSETUP
VOL-
CH+
PAGE+PAGE-
ZOOM+
S.TITLE
ZOOM-
FAV
SCALER
4
RECALL
SOURCE
VOL+
AUDIO
POWER
P.MODE
5
90
CH-
T E X T M I X I N D E X I/ II
CANCEL REVEAL H O L D S I Z E
GOTO A-B REPEAT ANGLE
DVD-MENU TITLE PBC
S.PAGE
DISPLAY TV/RADIO EPG SUBTITLE
I
1
2
3
4
5
6
7
8
9
10
11
12
13
14
15
16
17
18
19
20
21
22
19. PBC/PAGE+
Utilisable en mode DVD/Pour parcourir les
pages télétexte suivantes en mode TV
analogique.
20. AUDIO
Pour changer la langue audio et la piste
sonore, valable en mode TV numérique et
DVD.
21. SUBTITLE
Pour sélectionner la langue de sous-titrage
ou basculer vers le mode affichage JPEG,
valable en mode DVD et TV numérique.
22. ZOOM+/EPG (Guide Electronique des
Programmes)
Pour agrandir l’image, valable en mode
DVD/pour afficher le guide électronique des
programmes, valable en mode TV
numérique.
1. MUTE
Pour couper le son.
2. EJECT/FAV
Utilisable en mode DVD/ pour afficher la liste des
favoris, disponible en mode TV numérique.
3. SCALER
Pour changer de format vidéo parmi : Auto, 16:9, 4:3,
ZOOM1, ZOOM2 (non valable en VGA)
4. SLEEP
Pour régler la minuterie sommeil.
5. Touches numériques
Pour sélectionner un numéro de programme.
6. RECALL
Pour basculer entre le programme précédent et
actuel, disponible en mode TV numérique et
analogique.
7. Touche nombre à 2 chiffres
Pour basculer entre les nombre à 1 et 2 chiffres,
valable en DVD.
8. SOURCE
Pour sélectionner la source d'entrée : DTV, ATV,
DVD, SCART, AV, S-VIDEO, HDMI ou VGA.
9. CALL
Pour afficher les informations à l'écran.
10. Touches de déplacement Gauche/droite
(réglage)
Pour déplacer le curseur vers la Gauche/droite ou
ajuster l'élément sélectionné dans le menu, ou régler
le volume (non disponible en mode DVD et TV
numérique).
11. Touche OK
Pour confirmer les sélections.
12. VOL+/-
Pour augmenter ou diminuer le volume.
13. INDEX/
Pour afficher l’heure télétexte en mode DVD (non
valable pour MHEG5).
Pour afficher la page principale en mode télétexte en
mode TV analogique/Pour arrêter la lecture en mode
DVD.
14. I/II
Pour basculer le canal audio en canal TV NICAM/A2
ou Mono (valable en mode TV analogique).
15. HOLD/
Pour arrêter le défilement du texte de la page
courante en mode TV analogique/Pour sélectionner
le chapitre/piste précédent en mode DVD.
16. SIZE/
Pour agrandir le texte de la page courante en mode
TV analogique / Pour sélectionner le chapitre/piste
suivant en mode DVD
17. REPEAT/Jaune
Pour répéter la lecture (valable en mode DVD)/Pour
sélectionner une page télétexte en mode TV
analogique/Menu d'accès rapide (non valable en
mode TV numérique, DVD et FM).
18. ANGLE/BLEU
Pour changer l'angle de visualisation durant la
lecture de disque DVD/Pour sélectionner une page
télétexte en mode TV analogique/Menu d'accès
rapide (non valable en mode TV numérique, DVD et
FM).
5
Page 76

TÉLÉCOMMANDE
23. POWER
Pour basculer entre le mode veille et le mode
fonctionnement.
24. P-MODE
Pour sélectionner le mode image : Standard,
Dynamique, Dou
valide en mode VGA).
25. S-MODE
Pour sélectionner le mode champ sonore :
Musique, Film, N
26. SETUP
Pour ouvrir le menu de configuration, il varie en
fonction de la source.
27. EXIT
Pour quitter ou retourner au menu précédent.
28. Touches de déplacement Haut/Bas
Pour sélectionner un élément de menu vers le
Haut/Bas, ou changer de canal, disponible en
mode TV numérique et analogique.
29. CH+/-
Pour aller au programme suivant ou précédent,
disponible en mode TV numérique et
analogique.
30. MIX/
Pour afficher le programme analogique et le
télétexte en même temps/. Suspendre la
lecture/Lecture image par image en mode
pause, valable en mode DVD.
31. TEXT/
Pour activer ou désactiver la fonction télétexte
ou MHEG5/Lecture, valable en mode DVD.
32. REVEAL/
Pour afficher le texte masqué dans une page
télétexte en mode TV analogique/Lecture avant
rapide de DVD, valable en mode DVD.
33. CANCEL/
Pour annuler le télétexte en mode TV
analogique/Lecture arrière rapide de DVD,
valable en mode DVD.
34. A-B/VERT
Pour répéter la lecture d’un segment (valable en
mode DVD)/Pour sélectionner une page
télétexte en mode TV analogique/Menu
d'accès rapide (non valable en mode TV
numérique, DVD et FM).
35. GOTO/ROUGE
Pour commencer la lecture à partir d’un certain
point (valable en mode DVD)/Pour sélectionner
une page télétexte en mode TV
analogique/Menu d'accès rapide (non valable
en mode TV numérique, DVD et FM).
36. DVD-MENU/S.PAGE
Pour accéder au menu DVD, valable en mode
DVD/Pour atteindre une sous-page télétexte,
valable en mode TV analogique.
ce,Utilisateur
ews
et
Utilisateur.
(n'est pas
POWER
MUTE
S.MODE
SCALER
SLEEP
3
21
678
CALLEXITSETUP
CH+
VOL-
PAGE+PAGE-
ZOOM+
ZOOM-
FAV
4
RECALL
SOURCE
VOL+
AUDIO
S.TITLE
23
24
25
26
27
28
29
30
31
32
33
34
35
36
37
38
39
P.MODE
5
90
CH-
TEXT MIX INDEX I/I I
CANCEL REVEAL HO L D SIZE
GOTO A-B REPEAT ANGLE
DVD-MENU TITLE PBC
S.PAGE
DISPLAY TV/RADIO EPG SUBTITLE
I
37. TITLE/PAGE-
Pour accéder au menu DVD, valable en
mode DVD/Pour parcourir les pages
télétexte précédentes en mode TV
analogique.
38. DISPLAY
Pour afficher la durée de piste en mode
DVD/Affiche les informations en mode TV
numérique.
39. TV/RADIO/ZOOM-
Pour basculer entre les modes TV et
radio, valable en mode TV
numérique/Pour réduire l'image, valable
en mode DVD.
,
Page 77

TÉLÉCOMMANDE
INSTALLATION DES PILES
Retirez le couvercle des piles. Insérez deux piles SUM-4 (AAA) en faisant correspondre les
polarités +/- des piles avec celles inscrites au fond du compartiment pour piles comme
illustré :
AUTONOMIE DES PILES
• Normalement les piles peuvent durer un an.
• Changer les piles si la télécommande n’a plus d’effet lorsqu’elle est très proche du
capteur de la télé.
• Utiliser des piles SUM-4 (AAA).
REMARQUES
• N’utilisez jamais des piles rechargeables.
• Ne tentez jamais de recharger, court-circuiter, démonter, chauffer ou jeter les piles
dans du feu.
• Faites attention de ne pas faire tomber la télécommande ou lui donner des coups,
ceci peut l’endommager.
• N’utilisez pas des piles anciennes avec des nouvelles.
• Si vous n’allez pas utiliser la télécommande pendant une longue période, retirez les
piles pour éviter toute fuite de liquide. Nettoyez éventuellement l’électrolyte avant
de remplacer les piles de la télécommande.
• Nettoyez immédiatement à l’eau de l’électrolyte qui rentre en contact avec la peau.
AVERTISSEMENT :
Gardez les piles hors de la portée des enfants. Contactez immédiatement un médecin si
de l’électrolyte est avalé par accident.
-
Page 78

DEMARRAGE
SOURCE DU SIGNAL
MISE EN MARCHE
Une fois l’appareil est placé sur une table / accroché au mur convenablement, et que tous
les câbles, y compris l’alimentation, ont été branchés, tout ce qui vous reste à faire est :
D’appuyer sur la touche [STANDBY] (veille) de la télécommande pour mettre en marche la
télé, le voyant devient vert. A présent vous allez profiter des différentes fonctionnalités de
votre télé.
SELECTION DE LA SOURCE
Vous pouvez sélectionner la source d’entrée à l’aide du menu source. Appuyez sur la
touche [SOURCE] située sur le côté droit de la télé LCD pour afficher le menu suivant :
DTV
ATV
SCART
Component
PC-RGB
HDMI1
HDMI2
AV
DVD
USB
La source d’entrée ac
[/] de la télécommande pour sélectionner l’option de votre choix. Appuy
touche [OK] pour confi
OK
Select
tuellement sélectionnée est mise en surbrillance. Utilisez les touches
rmer votre choix.
ez sur la
.
Page 79

LE MENU TNT
Australie
Bulgarie
Danemark
Autriche
Croatie
Finlande
Belgique
Tchequie
France
A NOTER : LES OPTIONS INACTIVES/INDISPONIBLES (AFFICHEES GRISEES DANS
LE MENU) NE SERONT PAS MENTIONEES DANS CE CHAPITRE. CES FONCTIONS
SONT PRESENTEES DANS D’AUTRES CHAPITRES.
En mode TNT, appuyez sur la touche [CONFIGURATION] de la télécommande.
Utilisez les touches [/] de la télécommande pour sélectionner une option du menu (les
options suivantes sont disponibles : « CHAINES DE TELEVISION », « IMAGE », « SON »,
« HORLOGE », « OPTIONS » et « VERROUILLAGE »).
Utilisez les touches [/] de la télécommande pour sélectionner une option puis utilisez
les touches [/] pour configurer l’option. Utilisez la touche [QUITTER] ou
[CONFIGURATION] pour quitter le menu.
CHAINE
Sélectionnez l’option CHAINES DE TELEVISION pour configurer les options relatives aux
chaînes de télévision TNT. Les options suivantes sont disponibles : Réglage automatique,
Réglage manuel TNT, Réglage manuel ATV (décrit dans la section LE MENU ATV), Edition
de chaînes, Informations sur le signal reçu, Informations sur la carte CI, Classement NCL
et Mise à niveau logicielle (USB).
Réglage automatique
Scan manuelle numérique
CHANNEL
Saisie chaîne
>
Scan manuelle analogique
Prog ra mm e Ed it
Informations signal
CI Inf or ma ti on
LCN So rt in g
Mise a jour logicie (USB)
>
Move
MENU
Return
ENTER
Select
EXIT
Terminer
L’option Réglage automatique vous permet d’automatiquement rechercher et régler les chaînes
de télévision. Sélectionnez l’option Réglage automatique puis appuyez sur la touche [OK] pour
accéder à l’interface de configuration du réglage automatique des chaînes.
Utilisez les touches [///] pour sélectionner votre pays.
Type syntonisation DTV+ATV
MEN U
Retu rn
Appuyez sur la touche [OK] pour démarrer la recherche automatique.
7
Page 80

LE MENU TNT
Syntonisation
Informations signal
Sélectionnez l’option Réglage manuel TNT, utilisez les
touches [/] pour sélectionner un numéro de chaîne
puis appuyez sur la touche [OK] pour démarrer la recherche.
%TV : 0 Programme
DTV : 0 Programme
Radio : 0 Programme
Data : 0 Programme
0 %... (TV)
L’option Modification de chaînes permet d’accéder aux
sous-options suivantes : Suppression de chaînes,
Modification du nom, Déplacement, Saut et Ajout de
Programme Edit
17 Digital
DTV
chaînes de télévision à la liste des favoris.
Effacer
OK
OK
Rename
FAV
Move
FAV
MENU
Skip
Return
L’option Informations sur le signal reçu vous permet d’accéder aux sous-options suivantes :
Numéro de chaîne, Qualité du signal et Puissance du signal.
Saisie chaîne 255
Réseu Sandy Heath
Modulation QPSK
Qualité 0
Puissance 91
Page 81

LE MENU TNT
L’option Informations sur la carte CI vous permet d’obtenir des informations
supplémentaires sur l’accès conditionnel lorsqu’une carte CI est insérée.
Viaccess Conditional Access
Main menu
System information
Smart card management
Language setting
ENTER
Select
EXIT
>
Terminer
L’option Classement par NCL peut être activée ou désactivée.
La mise à niveau logicielle (USB) vous permet de mettre à niveau le firmware de l’unité via
USB.
IMAGE
Sélectionnez l’option IMAGE pour configurer les paramètres vidéo de l’unité. Les options
suivantes sont disponibles : Mode d’image, Température des couleurs, Format d’affichage,
Réduction du bruit et Ecran.
Vous pouvez sélectionner un des modes d’image suivants : Personnalisé, Dynamique,
Standard et Doux.
Le mode Personnalisé vous permet de régler les options suivantes : Contraste, Luminosité,
Couleurs, Netteté et Teinte.
L’option Température des couleurs vous permet de régler les sous-options suivantes :
Personnalisé, Froid, Moyen et Chaud.
Les formats d’affichage suivants sont disponibles : Automatique, 16:9, 4:3, ZOOM 1 et
ZOOM 2.
La fonction Réduction du bruit permet de réduire le niveau de volume de l’unité : Désactivé,
Faible, Moyen, Elevé et Par défaut.
Press ‘OK’ to enter; Press ‘EXIT’ to return
IMAGE
>
MENU
Move
Return
Mode Image Standard
Temp. de Coleur
Rapport image
Réduction de bruit
Image
**
Page 82

LE MENU TNT
SON
Sélectionnez l’option SON pour configurer les paramètres audio de l’unité. Les modes
audio suivants sont disponibles : Balance, Son surround, Sélection AD et SPDIF.
Mode de Son Standard
Bala nc e
SON
>
Surr ou nd S ou nd
AD Swi tc h
SPDI F MO DE
>
MENU
MENU
Return
tomatique.
Return
Move
Vous pouvez sélectionner un des modes audio suivants : Personnalisé, Standard, Musique, Vidéo
et Sports. L’option Balance du mode Personnalisé peut être réglée selon les valeurs suivantes :
120 Hz, 500 Hz, 1,5 kHz, 5 kHz et 10 kHz ; ou de -50 à +50 pour les pistes son G et D. La valeur
par défaut est 0. L’option Son Surround offre les sous-options suivantes : Désactivé, Surround
et SRS TruSurround XT.
L’option Sélection AD comprend les sous-options Activé et Désactivé. L’option Mode SPDIF
comprend les sous-options PCM et Au
HEURE
Sélectionnez l’option HEURE pour accéder aux sous-options suivantes : Horloge, Heure
d’arrêt, Heure de mise en marche, Minuterie sommeil, Activation automatique du mode
Veille, Fuseau horaire et Heure d’été.
Horaire
>
Move
ENTER
Select
Horloge -- -- -- --
Arret
Mise En Marche
Minuteur de sommeil
Auto S ta nd by
Fuseau horaire Paris GMT
ENTER
Select
EXIT
EXIT
Terminer
Terminer
>
*+
Page 83

Retu rn
MEN U
Retu rn
MEN U
Retu rn
MEN U
LE MENU TNT
Arret
Mise En Marche
La sous-option Horloge vous permet de régler la date, l’année, le mois, les heures et les
minutes.
Horloge
Date 01
Mois 01
Year 1980
Heure 00
Minute 03
La sous-option Heure d’arrêt peut être définie sur un des modes suivants : Désactivé, Une
fois, Quotidien, Lun-Ven., Lun-Sam., Sam-Dim et Dimanche. Cette option vous permet de
régler l’heure et les minutes.
Heure 00
Minute 00
Arrêt
La sous-option Heure de mise en marche peut être définie sur un des modes suivants :
Désactivé, Une fois, Quotidien, Lun-Ven., Lun-Sam., Sam-Dim et Dimanche. Cette option
vous permet de régler l’heure, les minutes, la source d’entrée et le niveau de volume de
mise en marche.
Heure 12
Minute 00
Radio
Volume 30
Arrêt
*
Page 84

Retu rn
MEN U
LE MENU TNT
Minuteur de sommeil
Auto Standby
Fuseau horaire
Copenhague GMT+1
Madrid GMT+1
Prague GMT+1
Ljubljana GMT+1
Oslo GMT+1
Bratislava GMT+1
Luxembourg GMT+1
Paris GMT+1
Berne GMT+1
Sélectionnez l’option Minuterie sommeil pour
régler la minuterie Sommeil (les options suivantes
sont disponibles : Désactivée, 10 minutes, 20
minutes, 30 minutes, 60 minutes, 90 minutes,
120 minutes, 180 minutes et 240 minutes).
L’option Activation automatique du mode Veille
permet de configurer l’activation automatique du
mode Veille (les options suivantes sont
disponibles : Désactivée, 3 heures, 4 heures et
5 heures).
L’option Fuseau horaire permet de sélectionner le fuseau horaire de votre région.
Arrêt
10 min
20 min
30 min
60 min
90 min
MEN U
Arrêt
3 Hour
4 Hour
5 Hour
MEN U
Retu rn
Retu rn
L’option Heure d’été peut être activée ou désactivée.
*
Page 85

Retu rn
MEN U
LE MENU TNT
OPTIONS
Sélectionner l’option pour accéder aux sous-options suivantes : Langue d’affichage,
Langue de doublage, Langue de sous-titres, Malentendants, Pays, Système de fichiers
EVP, Restauration de la configuration d’origine, Animation d’affichage, Délai d’affichage,
Mode Economie d’énergie.
Réglages langue Francais
Langues Audio
Langue sous-titres
OPTIONS
>
Malentendant
Pays
PVR File System
Réglage par défaut
OSD Animation
OSD Time
>
Move
MENU
Return
ENTER
Select
EXIT
Terminer
L’option Langue d’affichage permet de sélectionner la langue d’affichage des informations.
Réglages langue
esky English Français
Dansk Espanol Hrv!"#
Deutsch E$$%&'*+ Italiano
MEN U
Retu rn
L’option Langue de doublage permet de sélectionner une langue de doublage d’une chaîne
(seulement disponible en mode TNT, lorsque la chaîne sélectionnée offre le choix de
plusieurs langues de doublage).
Langues Audio
esky English Français
Dansk Espanol Hrv!"#
Deutsch E$$%&'*+ Italiano
*'
Page 86

LE MENU TNT
L’option Sous-titres permet de sélectionner
Langue sous-titres
une langue de sous-titres d’une chaîne de
télévision.
esky English Français
Dansk Espanol Hrv!"#
Deutsch E$$%&'*+ Italiano
MEN U
Retu rn
L’option Malentendants d’été peut être activée
Pays
ou désactivée. L’option Pays permet de
sélectionner le pays dans lequel vous vous
situez.
UK Estonia Tunis
New Zealand Turkey Algeria
United Arab
Emirates
Moro cc o Egypt
MEN U
Retu rn
SYSTEME DE FICHIERS EVP
PRESENTATION DES TOUCHES DE LA TELECOMMANDE LIEES AU MODE EVP
II/
TEXT MIX INDEX I/II
I
CANCEL REVEAL HOLD SIZE
GO TO A-B REPEAT ANGLE
Touche Enregistrement vidéo personnel : ALLER A/ ROUGE
Permet d'enregistrer une chaîne de télévision.
Touche Lecture d’enregistrement vidéo personnel : MEDIA/I
En mode Média, permet de démarrer la lecture d’un enregistrement. Appuyez sur
cette touche de manière répétée pour diminuer la vitesse de lecture jusqu’à 16x fois.
Touche Rembobinage d’enregistrement vidéo personnel :
Permet d’effectuer un rembobinage à haute vitesse. Chaque pression de cette
touche permet d’augmenter la vitesse de rembobinage.
Touche Avance rapide d’enregistrement vidéo personnel:
Permet d’effectuer une avance rapide à haute vitesse. Chaque pression de cette
touche permet d’augmenter la vitesse d’avance rapide.
Touche Pause d’enregistrement vidéo personnel ou Lecture décalée
d’enregistrement vidéo personnel : II
Permet de mettre en pause la lecture de l’enregistrement ou de démarrer la
fonction Lecture décalée. La fonction Lecture décalée permet d’effectuer un
I
enregistrement temporaire ; cette fonction d’enregistrement enregistre la chaîne
de télévision de manière permanente de manière à pouvoir lire l’enregistrement
à tout moment.
Touche Enregistrement vidéo personnel précédent:
Permet d’accéder à l’enregistrement précédent.
Touche Enregistrement vidéo personnel suivant : I
Permet d’accéder à l’enregistrement suivant.
Touche Répétition de l’enregistrement vidéo personnel : REPETITION/JAUNE
Appuyez sur cette touche pour sélectionner un mode de répétition de
l’enregistrement.
Touche Répétition d’un segment de l’enregistrement vidéo personnel :
A-B / VERTE
Appuyez sur cette touche pour définir un segment de l’enregistrement à répéter.
FONCTIONS EVP
Imaginez une bibliothèque d'enregistrements de films et de programmes
sportifs que vous puissiez visionner à tout moment. C’est vous qui décidez de
l’heure de la séance.
*,
Page 87

Jouer
LE MENU TNT
Select Disque C:
Check PVR File système fichiers Start
USB Disc Pass
Format Pass
Taille Shift Size All
Vitesse 682 KB
PVR Record Limit 6Hr
MEN U
Retu rn
Mettez en pause une chaîne diffusée en direct !
Rembobinez une émission en direct afin de ne rien manquer.
Enregistrez vos chaînes de télévision favorites puis visionnez-les autant de fois que vous le désirez.
Présentation du menu Système de fichiers EVP
Sélection du disque : Permet de sélectionner un emplacement de stockage et de le définir comme
emplacement de stockage par défaut du Système de fichiers EVP. Vérification du système de
fichiers EVP : Permet de vérifier le système de fichiers du périphérique de stockage sélectionné.
Disque USB : Permet d’afficher les informations d’activation du disque USB, « PASS » signifie que
le disque sélectionné est activé. Formater : Permet de formater un emplacement de stockage USB
et de le créer un système de fichiers EVP. Espace mémoire alloué à la fonction Lecture décalée :
Permet d’afficher la quantité de mémoire allouée à la fonction Lecture décalée. Vitesse : permet
d’afficher la vitesse de lecture et d'écriture.
Durée d’enregistrement maximale : permet de définir la durée d’enregistrement maximale, l’unité
est exprimée en heures.
File System Size
PVR File System Type FAT32
PVR File System Size All
SD 52 Mins
HD 15 Mins
MEN U
Retu rn
Enregistrement vidéo numérique
Connectez une clé USB, accédez à l’option Système de fichiers EVP puis Configuration, sélectionnez
Vérification du système de fichiers EVP, lorsque le disque USB n’a jamais été formaté, une demande
de formatage s’affiche automatiquement. L’espace mémoire alloué au système de fichiers EVP
peut être défini par l’utilisateur, un espace mémoire important permet d’enregistrer sur une plus
longue durée. Lorsqu’aucun menu n’est affiché, appuyer sur la touche [ROUGE] permet de débuter
l’enregistrement, appuyez sur la touche [Arrêt] pour arrêter l’enregistrement, l’enregistrement s’arrête
également lorsque la mémoire du disque USB est pleine. Il est possible d’afficher les commandes
d’enregistrement à l’aide de la touche [].
FB FF Prev. Next Pause Stop
*-
Page 88

LE MENU TNT
Jouer
Vous pouvez définir l’heure de début et de fin d’enregistrement via le GCE.
RECORDER
1 YLE TV 1
Heure de départ
15 Minute
08 Heure
Dec Mois
07 Date
Heure d'arrêt
15 Minute
08 Heure
Dec Mois
Mode AUTO
OK
OK
Lorsqu’aucun menu n’est affiché, appuyer sur la touche [MEDIA/I] pour activer le mode
Média et lire des enregistrements. Vous pouvez alors afficher le menu, visionner ou
supprimer un enregistrement.
Fonction Lecture décalée
L’espace mémoire alloué à la fonction Lecture décalée peut être défini par l’utilisateur, un
espace mémoire important permet d’enregistrer sur une plus longue durée.
FB FF Prev. Next Pause Stop
Lorsqu’aucun menu n’est affiché, appuyer sur la touche [[II] permet de débuter
l’enregistrement, appuyez sur la touche [] pour arrêter l’enregistrement, l’enregistrement
s’arrête également lorsque la mémoire du disque USB est pleine. Appuyez de manière
répétée sur la touche [
] ou sélectionnez la commande [Lecture] pour démarrer la
lecture. Appuyez sur la touche [I] ou sélectionnez la commande [Suivant] pour
effectuer une avance rapide de 30 secondes. Appuyez sur la touche [I] ou
sélectionnez la commande [Précédent] pour effectuer un rembobinage de 30 secondes.
Vous pouvez utiliser les commandes [/] ou sélectionner la commande
[Rembobinage rapide/Avance rapide] pour effectuer une avance rapide / rembobinage.
A ce moment, appuyez sur la touche [] ou utilisez la commande [Arrêt] pour désactiver la
fonction Lecture décalée et revenir au mode Télévision.
Back
[00:00:42]
(0000:42:51)
15:46
*.
Page 89

Retu rn
MEN U
LE MENU TNT
Remarques destinées aux utilisateurs de la fonction EVP
Le disque USB doit contenir un espace mémoire minimal de 1 Go ; la capacité du disque
détermine la durée de l’enregistrement. Afin de garantir les performances optimales des
fonctions multimédia et EVP, utilisez un périphérique USB haute vitesse avec système de
fichiers FS haute vitesse.
Afin de garantir les performances optimales des fonctions EVP et Lecture décalée, utilisez
un disque dur portable ou clé USB haute vitesse.
Formater un périphérique entrainera la suppression de tous les fichiers qu'il contient,
veuillez donc préalablement sauvegarder les données importantes. Toute présence de
virus sur le périphérique USB peut causer l’échec du formatage. La fonction EVP peut
seulement être utilisée pour enregistrer des chaînes de télévision TNT.
Lorsqu’un disque dur portable possède plusieurs partitions, vous pouvez utiliser l'option
Système de fichiers EVP pour sélectionner la partition « PVR ».
L’option système de fichiers EVP est définie au maximum par défaut. L’interface se ferme
automatiquement. La durée d’enregistrement maximale est de 24 heures. Les formats de
signaux pour le format vidéo TNT (flux TS). La fonction EVP est seulement disponible en
mode TNT. Seuls les enregistrements vidéo EVP d’une t’aile minimale de 5 Mo peuvent
être lus depuis un périphérique USB. Le périphérique USB doit être compatible avec la
norme USB 2.0 haute vitesse.
L’option Restauration de la configuration d’usine permet de rétablir la configuration par
défaut de l’unité.
L’option Animation d’affichage permet d’activer/de désactiver les effets d’affichage du
menu. L’option délai d’affichage permet de configurer le délai d’affichage du menu (les
options suivantes sont disponibles : 15 secondes, 30 secondes et 60 secondes).
#4
*'
>
,>
*7
Page 90

LE MENU TNT
VERROUILLAGE
Sélectionnez l’option VERROUILLAGE pour verrouiller le système, configurer un mot de
passe, bloquer des chaînes de télévision et accéder au Contrôle parental.
Verrou
>
Move
MENU
Verrouiller système
Donnez mot de passe
Bloquer programme
Accord parental
Return
ENTER
Select
Il est possible de verrouiller des chaînes de télévision ou le
panneau de commandes de l’unité et de configurer le niveau
de limitation de lecture lorsque le Verrou système est défini sur
activé.
Pour modifier l’état de l’option Verrou système, il est nécessaire
de saisir le mot de passe par défaut : 0000.
Pour modifier le mot de passe par défaut, accédez à l’option
Modification du mot de passe.
L’option Verrouillage de chaînes de télévision vous
permet de restreindre l’accès à certaines chaînes
de télévision.
1 BBC ONE
2 BBC TWO
7 BBC CHOICE
10 BBC FOUR
12 CBBC
>
EXIT
Terminer
Donnez mot de passe
Effacer Annuler
Donnez mot de passe précédent
Donnez mot de passe neuf
Confirmez nouveau mot de passe
Effacer Annuler
Bloquer programme
DTV
DTV
DTV
DTV
DTV
+>
OK
OK
Lock
MENU
Return
Page 91

LE MENU TNT
L’option Contrôle parental permet de définir un
niveau de limitation de lecture.
GUIDE DES CHAINES ELECTRONIQUE (EPG)
Appuyez sur la touche EPG de la télécommande,
le Guide des chaînes électronique s’affiche. Le
EPG offre des informations sur les programmes
diffusés telles que l’heure de début et de fin des
différents programmes de la chaîne sélectionnée.
De plus, il est possible d’obtenir des informations
détaillées sur la chaîne sélectionnée. (La
disponibilité des informations varie selon le
diffuseur de la chaîne.)
Guide des programmes Horaire
1 BBC ONE No information
2 BBC TWO No information
7 BBC CHOICE No information
10 BBC FOUR No information
12 CBBC No information
Accord parental
Off
4
5
6
7
8
MEN U
Retu rn
13 Jul 09:00
RECORD INFO
OK
OK
SCHEDULE
REMINDER
INDEX
Index
INFORMATIONS
Pour obtenir davantage d’informations sur le programme en cours et les programmes à
venir, appuyez sur la touche [DISPLAY]. Tel qu'indiqué précédemment, affichez le
programme suivant via les touches [/] (pour permuter entre les différents
programmes) :
1 08:10 Ven Jul 02 2010
No Information
576i DTV SD
No Program information
Sous-titleFrancais
+*
Page 92

Retu rn
MEN U
CONFIGURATION ATV
A NOTER : LES OPTIONS INACTIVES/INDISPONIBLES (AFFICHEES GRISEES DANS
LE MENU) NE SERONT PAS MENTIONEES DANS CE CHAPITRE. CES FONCTIONS
SONT PRESENTEES DANS D’AUTRES CHAPITRES.
Ce produit peut mémoriser jusqu'à 100 chaînes de télévision. Vous pouvez sélectionner la chaîne
de télévision de votre choix via les touches [Chaîne suivante/Chaîne précédente] ou les touches
numériques, vous pouvez ensuite rechercher et mémoriser les chaînes de télévision via la
recherche Manuelle ou Automatique. En mode ATV, appuyez sur la touche [CONFIGURATION]
de la télécommande.
Utilisez les touches [/] de la télécommande pour sélectionner une option du menu (les options
suivantes sont disponibles : « CHAINES DE TELEVISION », « IMAGE », « SON », « HORLOGE »,
« OPTIONS » et « VERROUILLAGE »).
Utilisez les touches [/] ou [OK] pour accéder.
Utilisez les touches [/] ou [OK] de la télécommande pour sélectionner une option puis utilisez
les touches [/] pour configurer l’option. Appuyez sur la touche [CONFIGURATION] pour
revenir au menu principal ou [QUITTER] pour quitter le menu.
CHAINES DE TELEVISION
Sélectionnez l’option CHAINES DE TELEVISION pour configurer les options relatives aux chaînes
de télévision ATV. Les options suivantes sont disponibles : Réglage automatique, Réglage
manuel ATV, Edition de chaînes, Classement NCL et Mise à niveau logicielle (USB).
Saisie chaîne
>
CHANNEL
Réglage automatique
Scan manuelle numérique
Scan manuelle analogique
Prog ra mm e Ed it
Informations signal
CI Inf or ma ti on
LCN So rt in g
Mise a jour logicie (USB)
>
Move
MENU
Return
ENTER
Select
EXIT
Terminer
L’option Réglage automatique vous permet d’automatiquement rechercher et régler les chaînes
de télévision. Sélectionnez l’option Réglage automatique puis appuyez sur la touche [] ou
[OK] pour accéder à l’interface de sélection du pays et du mode de réglage. Utilisez les touches
[/] pour sélectionner un mode de réglage parmi ATV, TNT et TNT+ATV.
ype syntonisation ATV
UK Estonia Tunis
New Zealand Turkey Algeria
United Arab
Emirates
Moro cc o Egypt
++
Page 93

CONFIGURATION ATV
Appuyer sur la touche [] pour accéder à l’option Pays
Utilisez les touches [/, /] pour sélectionner l’option
Pays, utilisez la touche [OK] pour démarrer la recherche
automatique.
Sélectionnez l’option Recherche manuelle de
chaînes ATV, utilisez les touches [/] pour
sélectionner la sous-option Recherche manuelle
-
de chaînes ATV.
SAVE
Les options suivantes sont disponibles : Destination de sauvegarde, Système audio,
Chaîne de télévision sélectionnée, Recherche et Recherche de précision.
L’option destination de sauvegarde vous permet de sélectionner un numéro de chaîne.
L’option Chaîne sélectionnée permet de sélectionner un numéro de chaîne.
L’option système audio vous permet de sélectionner un système audio parmi « DK », « I »,
« L » et « BG ».
L’option Réglage de précision vous permet de régler
avec précision une fréquence afin d’améliorer la qualité
de l’image et du son (vous pouvez également
sélectionner une
fréquence à l’aide des touches
17 Digital
numériques).
L’option Recherche permet de régler une chaîne de
télévision.
L’option Modification de chaînes permet d’accéder aux
sous-options suivantes : Suppression de chaînes,
Modification du nom, Déplacement, Saut et Ajout de
chaînes de télévision à la liste des favoris.
L’option Classement par NCL peut être activée ou
désactivée. La mise à niveau logicielle (USB) vous
permet de mettre à niveau le firmware de l’unité via USB.
Delete
OK
Syntonisation
%TV : 0 Programme
DTV : 0 Programme
Radio : 0 Programme
Data : 0 Programme
0 %... (%TV)
Scan manuelle numerique
Storage To 1
System BG
Current CH 1
Search
Fine-Tune
Frequency 477.55 Mhz
MENU
+
Return
Programme Edit
DTV
FAV
FAV
Move
MENU
Return
Rename
OK
Skip
+
Page 94

CONFIGURATION ATV
IMAGE
Sélectionnez l’option IMAGE pour configurer les paramètres vidéo de l’unité. Les options
suivantes sont disponibles : Mode d’image, Température des couleurs, Format d’affichage,
Réduction du bruit, Contraste, Luminosité, Couleurs, Netteté et Teinte.
Mode Image Standard
Temp. de Coleur
IMAGE
>
Move
Vous pouvez sélectionner un des modes d’image suivants : Personnalisé, Dynamique, Standard
et Doux. L’option Température des couleurs vous permet de régler les sous-options suivantes :
Personnalisé, Froid, Normal et Chaud. Les formats d’affichage suivants sont disponibles :
Automatique, 16:9, 4:3, ZOOM 1 et ZOOM 2. La fonction Réduction du bruit permet de réduire
le niveau de volume de l’unité : Désactivé, Faible, Moyen, Elevé et Par défaut.
Le mode Personnalisé vous permet de régler les options suivantes : Contraste, Luminosité,
Couleurs, Netteté et Teinte.
SON
Sélectionnez l’option SON pour configurer les paramètres audio de l’unité. Les modes
audio suivants sont disponibles : Balance, Son surround, mode SPDIF.
MENU
Rapport image
Réduction de bruit
Image
Return
ENTER
Select
EXIT
>
Terminer
Mode de Son Standard
Bala nc e
SON
>
Move
Move
Vous pouvez sélectionner un des modes audio suivants : Personnalisé, Standard, Musique, Vidéo
et Sports. L’option Equilibrage des canaux audio G et D peut être réglée de -50 à +50. La valeur
par défaut est 0. L’option Son surround comprend les sous-options Désactivé, Surround
et SRS TruSurround XT. L’option Mode SPDIF comprend les sous-options Désactivé, PCM
et Automatique.
MENU
Return
Surr ou nd S ou nd
AD Swi tc h
SPDI F MO DE
ENTER
Select
+
EXIT
Terminer
>
Page 95

CONFIGURATION ATV
HEURE
L’option HEURE est décrite dans le chapitre Heure de la section « CONFIGURATION
TNT » de ce manuel. Veuillez vous y référer pour obtenir davantage de détails.
Horaire
>
Move
MENU
Horloge -- -- -- --
Arret
Mise En Marche
Minuteur de sommeil
Auto S ta nd by
Fuseau horaire Paris GMT
Return
ENTER
Select
EXIT
Terminer
>
OPTIONS
Sélectionner l’option OPTIONS pour accéder aux sous-options suivantes : Langue
d’affichage, Pays, Restauration de la configuration d’origine, Animation d’affichage, Délai
d’affichage, Mode Economie d’énergie et Ecran bleu.
Réglages langue Francais
Langues Audio
Langue sous-titres
OPTIONS
>
Malentendant
Pays
PVR File System
Réglage par défaut
OSD Animation
OSD Time
>
Move
Les options Langue d’affichage, Pays, Restauration de la configuration d’origine, Animation
d’affichage, Délai d’affichage et Mode Economie d’énergie sont décrites dans la section
CONFIGURATION TNT de ce manuel, le mode opératoire de ces options est identique à celui du
mode ATV. Veuillez vous y référer pour obtenir davantage de détails. L’option Ecran bleu peut
être activée ou désactivée.
VERROUILLAGE
L’option VERROUILLAGE et ses sous-options sont présentées dans la section TNT de ce
manuel, le mode opératoire de ces options est identique à celui du mode ATV. Veuillez
vous y référer pour obtenir davantage de détails.
MENU
Return
ENTER
Select
EXIT
Terminer
+'
Page 96

FONCTION TELETEXTE
La plus part des stations de diffusion télévisé fournissent des informations télétexte
gratuitement concernant la météo, les programmes télé, la bourse etc. Vous pouvez juste
entrer le numéro de la page télétexte en fonction du contenu.
MODES D’AFFICHAGE DU TELETEXTE
Sélectionnez une chaîne qui contient du télétexte ;
Appuyez sur la touche [TEXT].
Sélectionnez la page de votre choix à l’aide des touches de couleur de la télécommande.
Appuyez deux fois sur la touche [TEXT] pour afficher à nouveau la chaîne de
télévision.
SELECTION DES PAGES
Vous pouvez entrer 3 chiffres, à l’aide des touches numériques, pour afficher la page
souhaitée. Si le nombre entré est non valide, vous devez le corriger.
Utilisez les touches [CH+/-] ou [/] pour changer de page.
MODE AFFICHAGE MIXTE
Cette option vous permet d’afficher simultanément une chaîne de télévision et l'interface
télétexte.
Lorsqu’une page télétexte est affichée, appuyez à nouveau sur la touche [TEXT], la
chaîne de télévision et l’interface Télétexte s’affichent.
Appuyez à nouveau sur la touche [TEXT] pour afficher à nouveau la chaîne de
télévision.
Verrouillage
Appuyez sur la touche [HOLD] pour figer une page télétexte. Appuyez de nouveau sur
cette touche pour libérer la page.
INDEX
• Appuyez sur la touche [INDEX] pour afficher la page Sommaire.
• Vous pouvez accéder à une page donnée en entrant son numéro.
ZOOM DANS LE TELETEXTE
• Vous pouvez agrandir la page affichée en faisant un zoom avant.
• Appuyez sur la touche [SIZE] pour faire un zoom avant sur la moitié supérieure de
la page.
• Appuyez sur la touche [SIZE] pour faire un zoom avant sur la moitié inférieure de la
page.
• Appuyez de nouveau sur cette touche pour retourner au mode d’affichage original.
MODE D’AFFICHAGE
• Appuyez sur la touche [REVEAL] pour afficher le texte masqué. Appuyez de
nouveau sur cette touche pour annuler.
TOUCHES COLOREES (ROUGE, VERTE, JAUNE, BLEUE)
Sélectionne la page de télétexte correspondante à la couleur des touches.
+,
Page 97

CONFIGURATION DES MODES
PERITEL/AV/COMPOSANT/HDMI/USB
CONFIGURATION VIDEO
Le menu de configuration des modes PERITEL/AV/COMPOSANT/HDMI/USB est
identique à celui du mode Télévision, à l’exception de l'option CHAINES DE TELEVISION.
Vous pouvez vous référer à cette section située dans les pages précédentes de ce manuel.
REMARQUE
En cas d’absence de signal en mode TNT, ATV, PERITEL/AV/COMPOSANT/HDMI,
l’interface ci-dessous s’affiche.
Le mode Veille s’active automatiquement au bout de 15 minutes d’absence de signal.
Pas de Signal
+-
Page 98

CONFIGURATION DU MODE ORDINATEUR
A NOTER : LES OPTIONS INACTIVES/INDISPONIBLES (AFFICHEES GRISEES DANS
LE MENU) NE SERONT PAS MENTIONEES DANS CE CHAPITRE. CES FONCTIONS
SONT PRESENTEES DANS D’AUTRES CHAPITRES.
Le mode VGA supporte une résolution maximale de 1920 X 1080@60 Hz (pour les
moniteurs de 24 pouces), vous pouvez donc utiliser ce téléviseur comme moniteur.
Lorsque le mode Ordinateur est activé, les paramètres suivants peuvent être configurés.
Appuyez sur la touche [CONFIGURATION] de la télécommande.
Utilisez les touches [/] de la télécommande pour sélectionner une option du menu (les
options suivantes sont disponibles : « CHAINES DE TELEVISION », « IMAGE », « SON »,
« HORLOGE », « OPTIONS » et « VERROUILLAGE »). Utilisez les touches [/] ou [OK]
pour accéder.
Utilisez les touches [/] ou [OK] de la télécommande pour sélectionner une option puis
utilisez les touches [/] pour configurer l’option. Appuyez sur la touche
[CONFIGURATION] pour revenir au menu principal ou [QUITTER] pour quitter le menu.
Pas de Signal
CHAINES DE TELEVISION
Sélectionnez l’option CHAINES DE TELEVISION pour configurer les options relatives aux
chaînes de télévision du mode Ordinateur. Seule l’option Mise à niveau logicielle (USB) est
disponible, celle-ci est présentée dans la section Configuration du mode TNT de ce
manuel.
Réglage automatique
Scan manuelle numérique
CHANNEL
Saisie chaîne
>
Move
MENU
Return
Scan manuelle analogique
Prog ra mm e Ed it
Informations signal
CI Inf or ma ti on
LCN So rt in g
Mise a jour logicie (USB)
ENTER
Select
EXIT
>
Terminer
+.
Page 99

CONFIGURATION DU MODE ORDINATEUR
IMAGE
Sélectionnez l’option IMAGE pour configurer les paramètres vidéo de l’unité. Les options
suivantes sont disponibles : Mode d’image, Température des couleurs, Format d’affichage
et Ecran.
Les options Mode d’image, Température des couleurs et Format d’affichage sont décrites
dans la section Configuration du mode TNT. Veuillez vous y référer pour obtenir davantage
de détails.
Ces options permettent de régler la qualité d’affichage de votre moniteur (ces options sont
seulement disponibles lors de la réception de signaux PC-RGB). Les options suivantes
sont disponibles : Réglage automatique, Position horizontale, Position verticale,
Dimensions et Phase.
Mode Image Standard
Temp. de Coleur
IMAGE
>
Move
MENU
Rapport image
Réduction de bruit
Image
Return
ENTER
Select
EXIT
>
Terminer
Image
Position auto.
Position H. 133
Position V. 27
Taille 100
Phase 100
MEN U
Retu rn
REMARQUE
Lorsque votre ordinateur entre en mode Veille, l’interface suivante s’affiche. Le mode
Sommeil de l’unité s’active au bout d’une période de 5-20 minutes d’absence de signal
(selon la durée sélectionnée sous l’option HEURE). Appuyez sur la touche [VEILLE] de la
télécommande pour activer/désactiver le mode Veille.
+7
Page 100

CONFIGURATION DU MODE ORDINATEUR
SON
Sélectionnez l’option SON pour configurer les paramètres audio de l’unité. Les modes audio
suivants sont disponibles : Balance, Son surround, mode SPDIF. Les options Mode audio,
Equilibrage, Son surround et SPDIF sont décrites dans la section Configuration du mode TNT.
Veuillez vous y référer pour obtenir davantage de détails.
Mode de Son Standard
Bala nc e
SON
>
Surr ou nd S ou nd
AD Swi tc h
SPDI F MO DE
>
MENU
Move
Move
OPTIONS
Sélectionner l’option OPTIONS pour accéder aux sous-options suivantes : Langue
d’affichage, Pays, Restauration de la configuration d’origine, Animation d’affichage, Délai
d’affichage, Mode Economie d’énergie.
Les options Langue d’affichage, Pays, Restauration de la configuration d’origine, Animation
d’affichage, Délai d’affichage et Mode Economie d’énergie sont décrites dans la section
CONFIGURATION TNT de ce manuel. Veuillez vous y référer pour obtenir davantage de
détails.
HEURE
L’option HEURE est décrite dans le chapitre Heure de la section « CONFIGURATION
TNT » de ce manuel. Veuillez vous y référer pour obtenir davantage de détails.
Return
ENTER
Select
EXIT
Terminer
VERROUILLAGE
Sélectionnez l’option VERROUILLAGE pour verrouiller le système, configurer un mot de
passe, bloquer des chaînes de télévision et verrouiller les commandes de l’unité. L’option
Verrouillage est décrite dans le chapitre Heure de la section « CONFIGURATION TNT » de
ce manuel. Veuillez vous y référer pour obtenir davantage de détails.
>
 Loading...