

Saivod Electron Dry User Manual [de]
^KZ^/sK>dZKEZz

ENGLISH 3-10
GB
FRANÇAIS
FR
ESPAÑOL
ES
PORTUGUÊS
PT
DEUTSCH 35-42
DE
11-18
19-26
27-34

GB
ENGLISH
Dear Customer,
Thank you for having chosen our product. Please read these instructions carefully before connecting and using the appliance.
A knowledge of the operating principles will help guarantee correct and safe use of the appliance.
If the appliance is sold or handed over for use by others, remember to give the new user the instruc-
tion booklet.
CONTENTS
NOTES AND ADVICE FOR THE USER 3-4
• Technical information 3
DESCRIPTION OF THE APPLIANCE 5
INSTALLING THE APPLIANCE 6-7
• Installation 6
• Levelling the appliance 6
• Connecting the air exhaust tube 6
• Connecting to the mains supply 7
USING THE APPLIANCE 7-9
• Description of the functions 7
• Door 8
• Drying the washing correctly 8
• Precautions for fabrics 8
• Program table 9
• Weights of washing 9
MAINTENANCE 10
• Cleaning the filter 10
• Fault finding 10
• Resolving problems 10
• Optional accessories 10
NOTES AND ADVICE FOR THE USER
TECHNICAL INFORMATION
Width cm.:
Dimensions:
Height cm.:
Depth cm.:
Max. capacity
Power rating
Voltage
see characteristics plate
see characteristics plate
see characteristics plate
MODEL: ...................................................................................................................................................................................................................................................
SERIAL NUMBER: ........................................................................................................................................................................................................................
DATE OF PURCHASE: .................................................................................................................................................................................................................
SM1676
59.5
85.0
57.0
3

GB
NOTES AND ADVICE FOR THE USER
■ This appliance has been de-
signed for use as a domestic
drier. Any other use is considered
as improper and therefore dangerous.
■ Keep this instruction book near
to the appliance always, in order
that it can be easily consulted
when necessary.
■ Any modifications or attempts to
interfere with the appliance can
be dangerous for the user and
may damage the product.
■ On delivery of the appliance,
check that it has not been damaged during transport. If any
damage is discovered, report the
matter to the retailer immediately.
■ During the drying cycle, the air in the
room is ducted through the back of
the appliance. Do not cover the drier
with washing or any other items.
■ When positioning the appliance,
ensure that the power supply
cable is not kinked or squashed
and is accessible.
■ Remember that the door glass and
exhaust tube will heat up during a
drying cycle and can reach temperatures of up to 60°. Do not touch
these parts before the cooling cycle has been completed.
■ The appliance must not be used by
children unless supervised.
■ Never dry washing that has been in
contact with chemical agents such
as dry-cleaning fluids
These products are volatile by
nature and could cause an explosion.
■ Do not dry items with parts con-
taining foam rubber or rubber in
general, in that the material could
melt and damage other items or
even the appliance itself.
■ If the appliance is sold or given
away, remember to hand over
this instruction book with it. This
will help the new owner use the
drier both correctly and safely.
■ Do not attempt to repair any ap-
pliance faults alone, in that repairs carried out by a non-professional may cause serious
damage and will nullify any rights
to repairs under guarantee.
■ Repairs to the appliance can only
be carried out by personnel authorised by the customer service
centres. All repairs must make
use of original spare parts only.
■ Spin dry or wring the washing
well before loading it into the
Never insert or remove the plug from
the mains socket with wet hands.
Do not expose the appliance to
atmosphe-ric agents.
4
The machine must be connected to a
mains socket fitted with an efficient
earth comply-ing with current safety
standards.
When servicing or cleaning the appliance, remember to disconnect it from
the mains supply.
Do not use extension leads or multiple plug adapters to connect the appliance to the mains supply.
Do not pull the power supply cable to
unplug the appliance from the mains
supply. Pull the plug only.
SM1676

NOTES AND ADVICE FOR THE USER
GB
drier. Spun dry washing will dry
quicker.
■ Clean the filter thoroughly each
time the drier is used in order to
guarantee perfect air circulation.
■ This appliance is marked accord-
ing to the European directive
2002/96/EC on Waste Electrical
and Electronic Equipment
(WEEE). By ensuring this product is disposed of correctly, you
will help prevent potential negative consequences for the environment and human health, which
could otherwise be caused by inappropriate waste handling of this
product. The symbol on the
product, or on the documents accompanying the product, indicates that this appliance may not
be treated as household waste.
Instead it shall be handed over to
the applicable collection point for
the recycling of electrical and
electronic equipment. Disposal
must be carried out in accordance
with local environmental regulations for waste disposal. For more
detailed information about treatment, recovery and recycling of
this product, please contact your
local city office, your household
waste disposal service or the
shop where you purchased the
product.
THE MANUFACTURER
WILL NOT BE HELD RESPONSIBLE FOR ANY INCIDENTS RESULTING FROM
NON-COMPLIANCE WITH
SAFETY STANDARDS OR
THE REQUIREMENTS OF
THIS INSTRUCTION BOOK.
DESCRIPTION OF THE APPLIANCE
The drier is a domestic appliance capable of drying any type of fabric at any time.
■ The machine has been con-
structed in steel panels which
have been treated and painted
to guarantees that its aesthetic
qualities remain unaltered
over time.
■ The motor and all moving
parts have been designed and
manufactured to guarantee
the minimum possible noise
levels
■ The control panel has been
designed to enable the user to
run the desired drying program without difficulty.
■ The wide door makes loading
and unloading the washing
much easier.
2
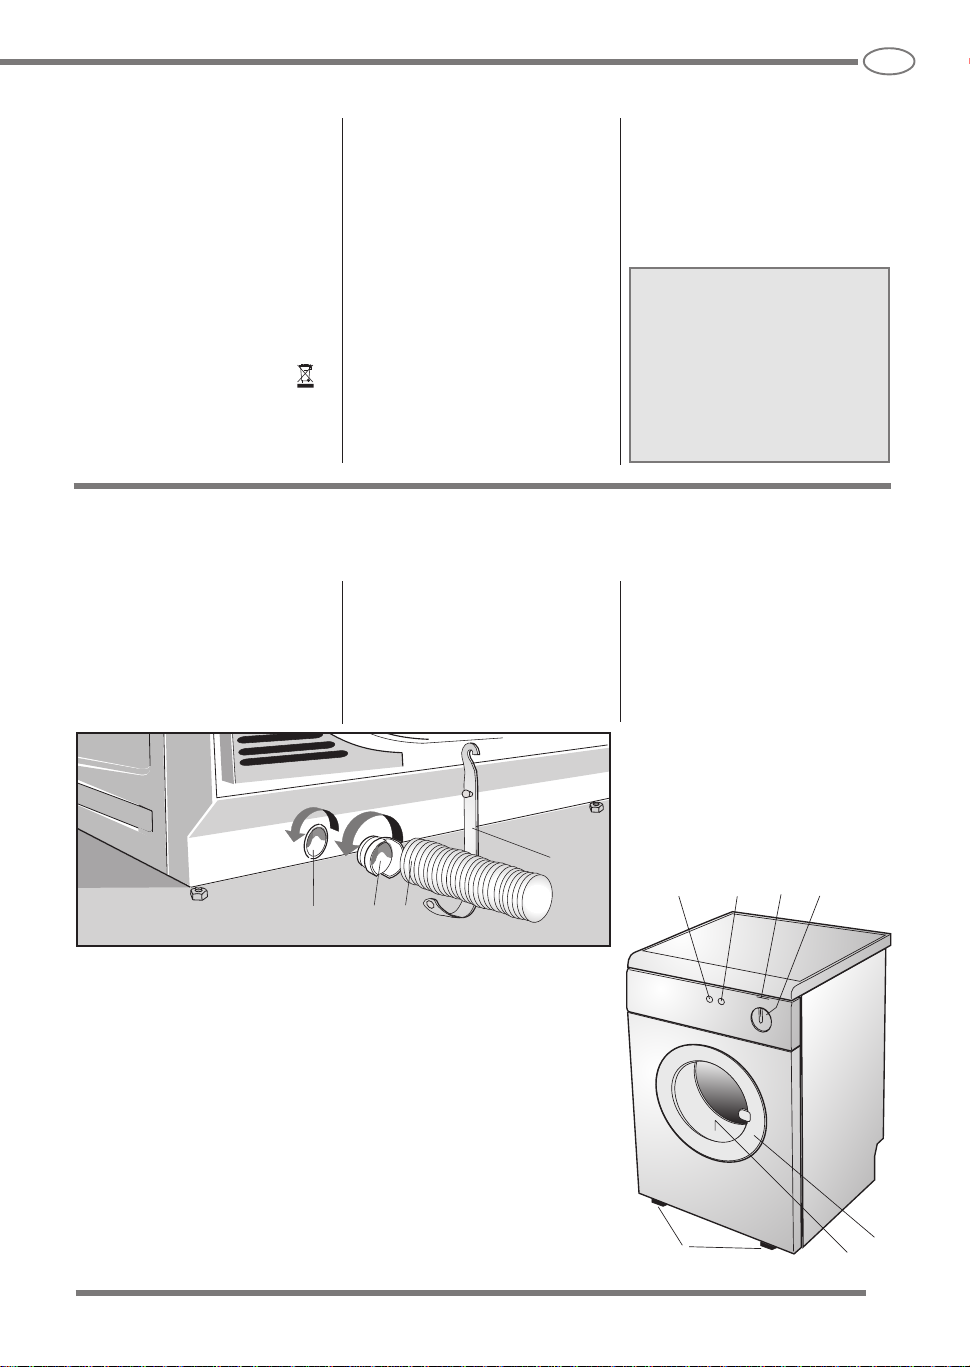
1 - ON/OFF button
2 - Delicate or energetic
drying button
3 - Drying time control
knob
4 - Spin function active in-
dicator light
5 - Door
SM1676
8
9 10
6 - Filter
7 - Adjustable feet
8 - Exhaust outlet
9 - Outlet coupling
10- Exhaust tube
11- Tube support
11
1243
1
7
5
6
5
GB
INSTALLING THE APPLIANCE
INSTALLATION
Installation must be carried out by qualified personnel in line with the instructions supplied by the manufacturer. Incorrect installation may result in damage and injury.
■ IInstall the drier near to a win-
dow to facilitate the evacuation
of the damp air from the drier.
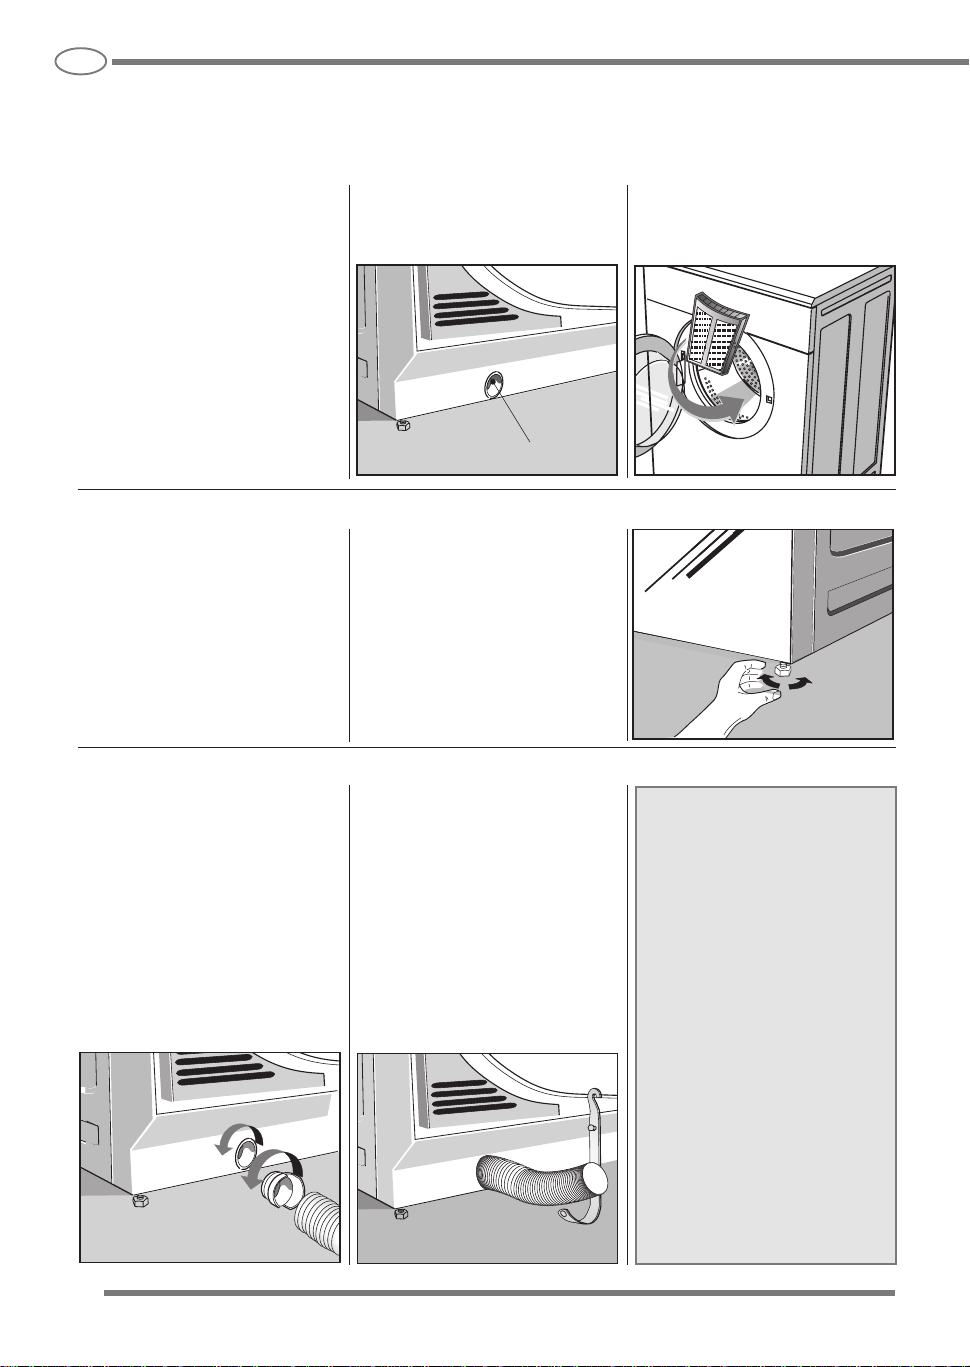
■ The exhaust tube must be
used to prevent condensation,
and must be inserted in hole
A at the bottom of the back
panel of the appliance (fig. 3).
■ Place the filter in its normal
position as shown (fig. 4).
■ Clean the inside of the drying
drum using a damp cloth to
remove any dust deposits.
■ Never cover the air intake at
the back of the appliance.
Adjustable feet. Place the
drier upright so that it rests
firmly on all four feet. Level
the drier by adjusting the feet
as follows:
■ Lift the drier slightly.
■ Adjust the feet to the correct
height (fig. 5).
CONNECTING THE AIR EXHAUST TUBE
Connect the exhaust tube to the
outlet on the back of the drier
(fig.6), as follows:
■ Connect one end of the tube to
the connector piece supplied.
■ Rotate the connecting piece (to-
gether with the tube) anticlockwise in the drier outlet hole.
■ Carry the tube away from the
back of the drier to the left or
6
3
LEVELLING THE DRIER
A
(Do not unscrew the feet to
much and do not use a
screwdriver).
■ Lower the drier.
A badly levelled machine may
cause damage to the bearings
and lead to their premature
wear. This drier does not need
to be anchored to the floor.
right by means of the recess
at the bottom of the drier body.
■ Position the other end of the tube
near to a window or a ventilation
outlet on an external wall. If this
is not possible, ensure that the
room is well ventilated when the
drier is being used. Use the support supplied to anchor the tube
(fig. 7).
7
4
5
Important: The air exhaust
tube must be connected
even if the air is not discharged outdoors, otherwise the drier will re-absorb
the discharged damp air and
thus prolong the drying
time. Damp air can also
damage the drier. Although
the air discharged from the
exhaust tube is only warm
and damp and does not constitute a danger, it must
never be directed towards
people, animals or plants.
Important: The exhausted air
must not be conveyed to a
chimney discharging fumes
generated by gas or other
fuel burning appliances.
6
SM1676
INSTALLING THE APPLIANCE
■ Make sure that the voltage in-
dicated on the identification
plate attached to the back of
the appliance corresponds to
that of the mains supply.
■ On completion of the installa-
tion, the appliance must be
connected to the mains supply through a two-pole switch.
■ All cutouts, electric wiring and
mains sockets must have a
rating such that enables them
to support the maximum load
indicated on the identification
plate.
■ The mains supply to which the
appliance is connected must
be fitted with an earthing sys-
USING THE APPLIANCE
DESCRIPTION OF THE FUNCTIONS
GB
ELECTRICAL CONNECTION
customer technical service
centre.
■ The drier must not be con-
nected to the mains supply
using indirect methods such
as extension leads or multiple
adapters.
■ Position the appliance so that
8
tem. If this is not the case, the
manufacturer will not be held
liable for any incidents that
may occur (fig. 8).
■ If the power supply cable is
damaged in any way, contact
the appropriate specialised
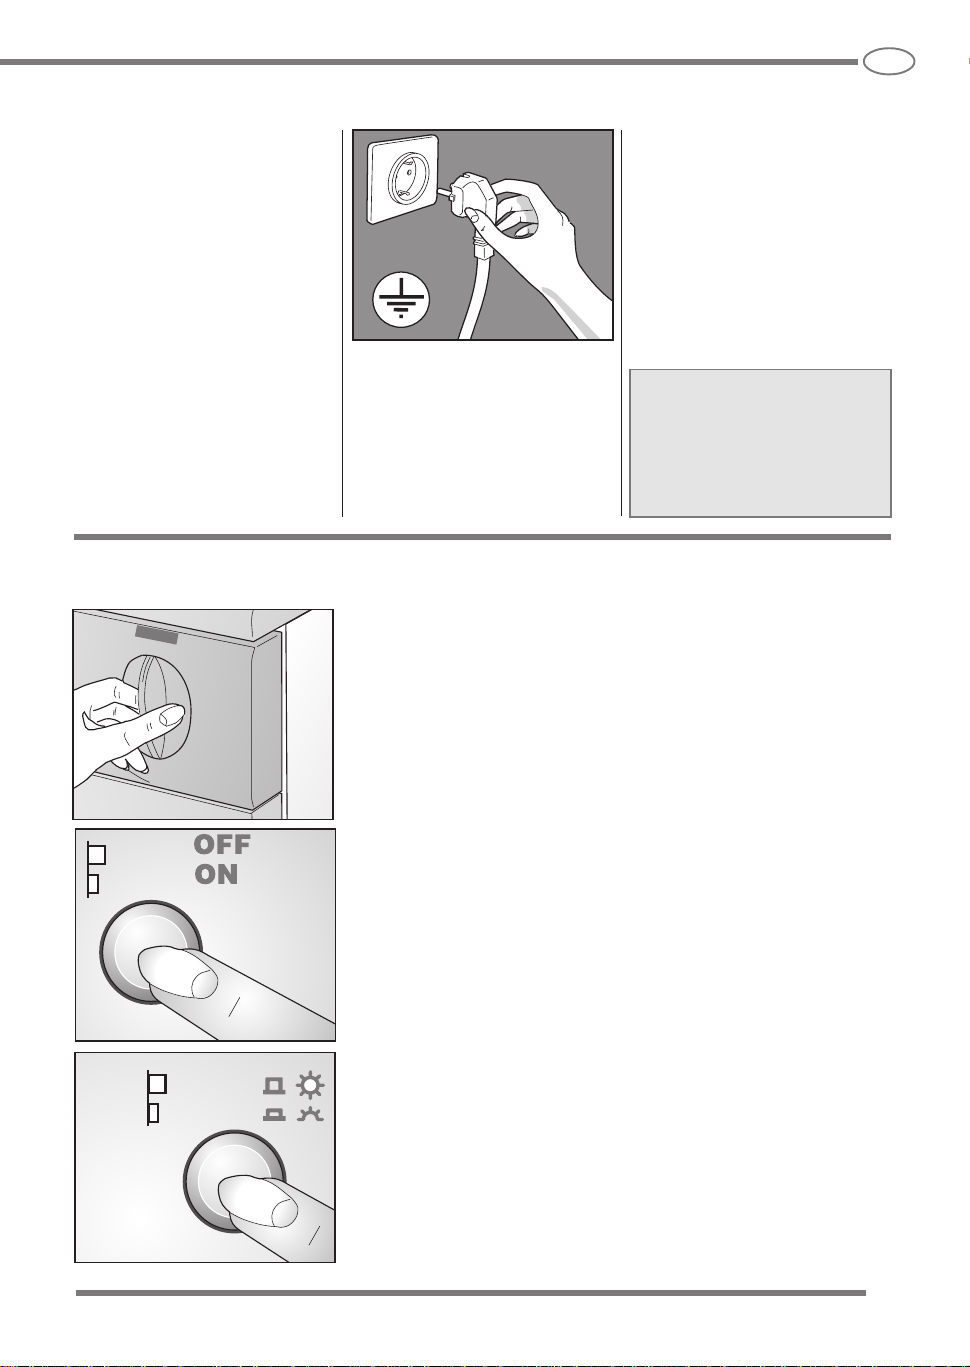
■ Drying time control knob: Rotate the knob to select the required
drying times (fig._9). Refer to the program table to select the program according to the type of fabric.
■ At the end of each drying cycle, the appliance effects a 4-5 minute
cooling cycle, during which time the appliance is still switched on.
the power supply cable is easily accessible for disconnection when the need arises.
Important: On completion of
the drying cycle, disconnect
the appliance from the mains
supply to prevent young children from operating the
drier.
9
10
11
SM1676
■ ON/OFF button: Press this button to connect the appliance to the
0
mains supply and not to start it. (fig. 10).
1
■ Delicate or energetic drying button: This button is used to se-
lect the type of drying cycle to run: Energetic or delicate (fig.11).
0
1
■ INDICATOR LIGHT: Stays lit during the drying cycle.
Flashes before the program has been set, and at the end of the
drying cycle together with an intermittent audible signal.
7
GB
USING THE APPLIANCE
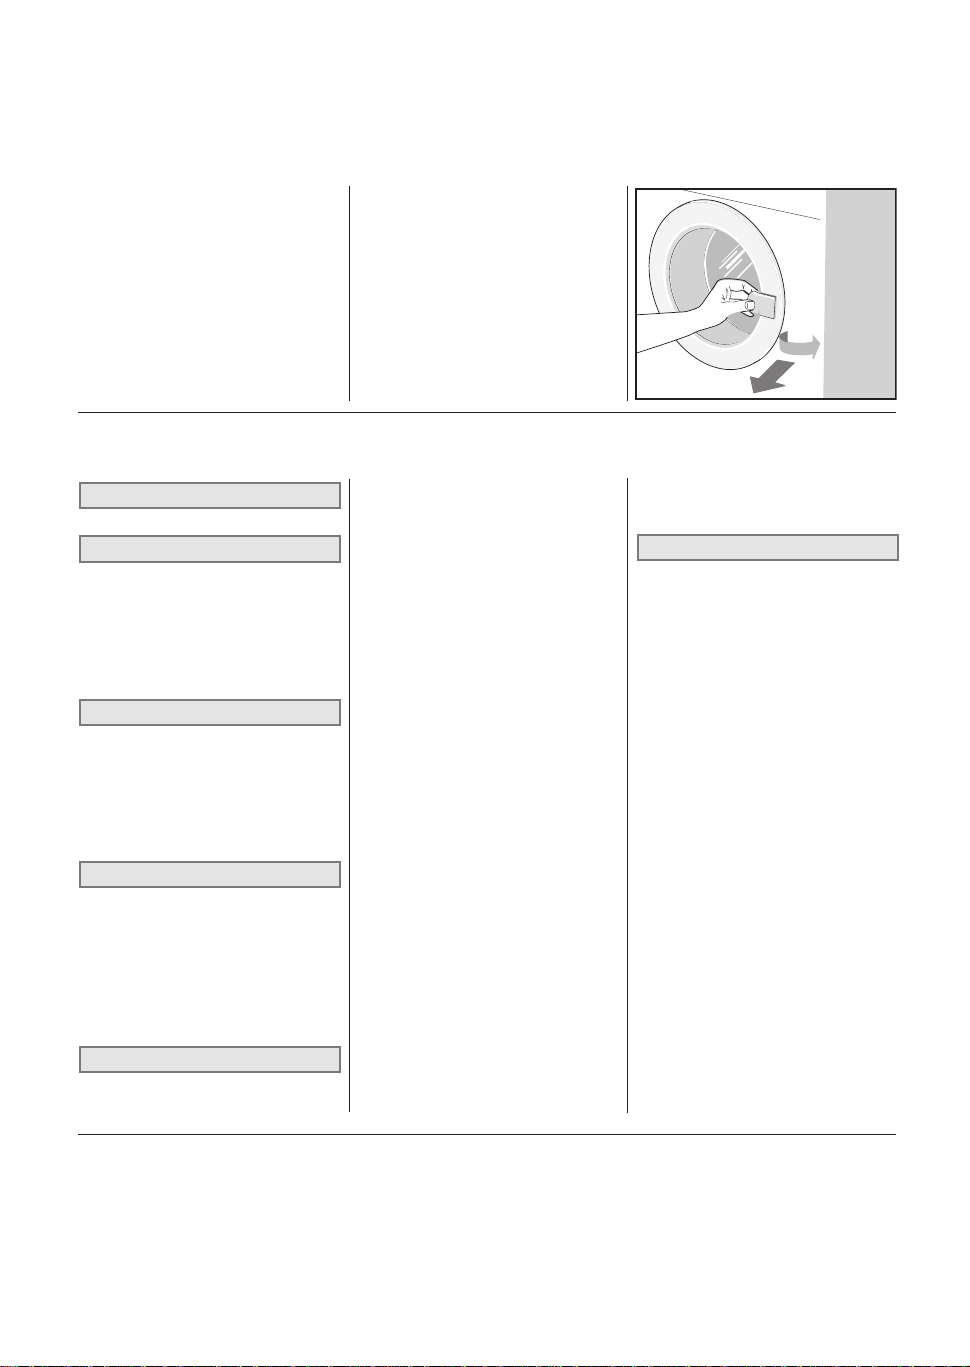
DOOR
The drier is the front-loading type. Pull the handle outwards, without forcing it, and gently open the door.
The appliance will stop if the door is opened during a drying cycle. The drum will continue to rotate for a
while, slowing down gradually to a stop.
Important:
■ Obviously, during a drying
cycle the washing in the drum
will be hot. The washing is
cooled during the cooling
cycle (Last 4-5 minutes of
each cycle).
steam or burned by the hot
washing, pay particular attention when opening the door
during the drying phase.
■ To avoid being scalded by
DRYING THE WASHING CORRECTLY
Follow the procedure below:
A
▼ Spin the washing.
B
▼ Separate the items into types or
fabrics.
▼ Close any zips and fasten buttons
and remember to empty the pockets of any clothing.
▼ Turn jumpers inside out.
C
▼ Open the door
▼ Load the washing in the drum and
remember to load sheets from a
corner first.
▼ It is advisable to load small and
large items together.
D
▼ Close the door
▼ Dry your hands (never touch elec-
tric appliances with wet hands).
▼ Make sure that the ON/OFF but-
ton is OFF.
▼ Insert the plug in the mains
socket.
E
▼ Make sure that the programmer
▼ At this point, the appliance will
IMPORTANT:
- When you want to change the
- When you want to add some
- When, for whatever reason,
In order to re-start the machine,
position the knob on STOP,wait
for the light to stop flashing and
then reset the programme required.
At the end of the drying cycle, if
the selector is not turned on STOP,
or if the ON/OFF switch is not positioned on OFF, the machine will
automatically perform an anti-
is positioned on “STOP”, press
the ON/OFF button and, after the
audible signal, set the required
program. (see program table)
start and the indicator light will
stay on.
programme being used;
items after the drying cycle
has already started;
there is an electric power cutout during drying cycle;
crease cycle with simultaneous
acoustic signalling.
F
▼ After having removed the dry
▼ Unplug the appliance from the
12
washing, clean the filter as follows:
- Lift the filter
- Open it and clean it using a
soft brush
- Close it and replace it in its
seating
- The filter must be washed
periodically using soapy water in order to remove very
small particles.
mains supply.
PRECAUTIONS FOR FABRIC TYPES
In the case of doubt as to the type of fabric, read the label on the item itself. Almost all items that can be
machine dried have this information specified on the label. To avoid static electricity being generated in
the items, add a conditioner to the rinse cycle of the washing machine.
Remove synthetic materials from the drum immediately to prevent them from creasing.
USING THE APPLIANCE
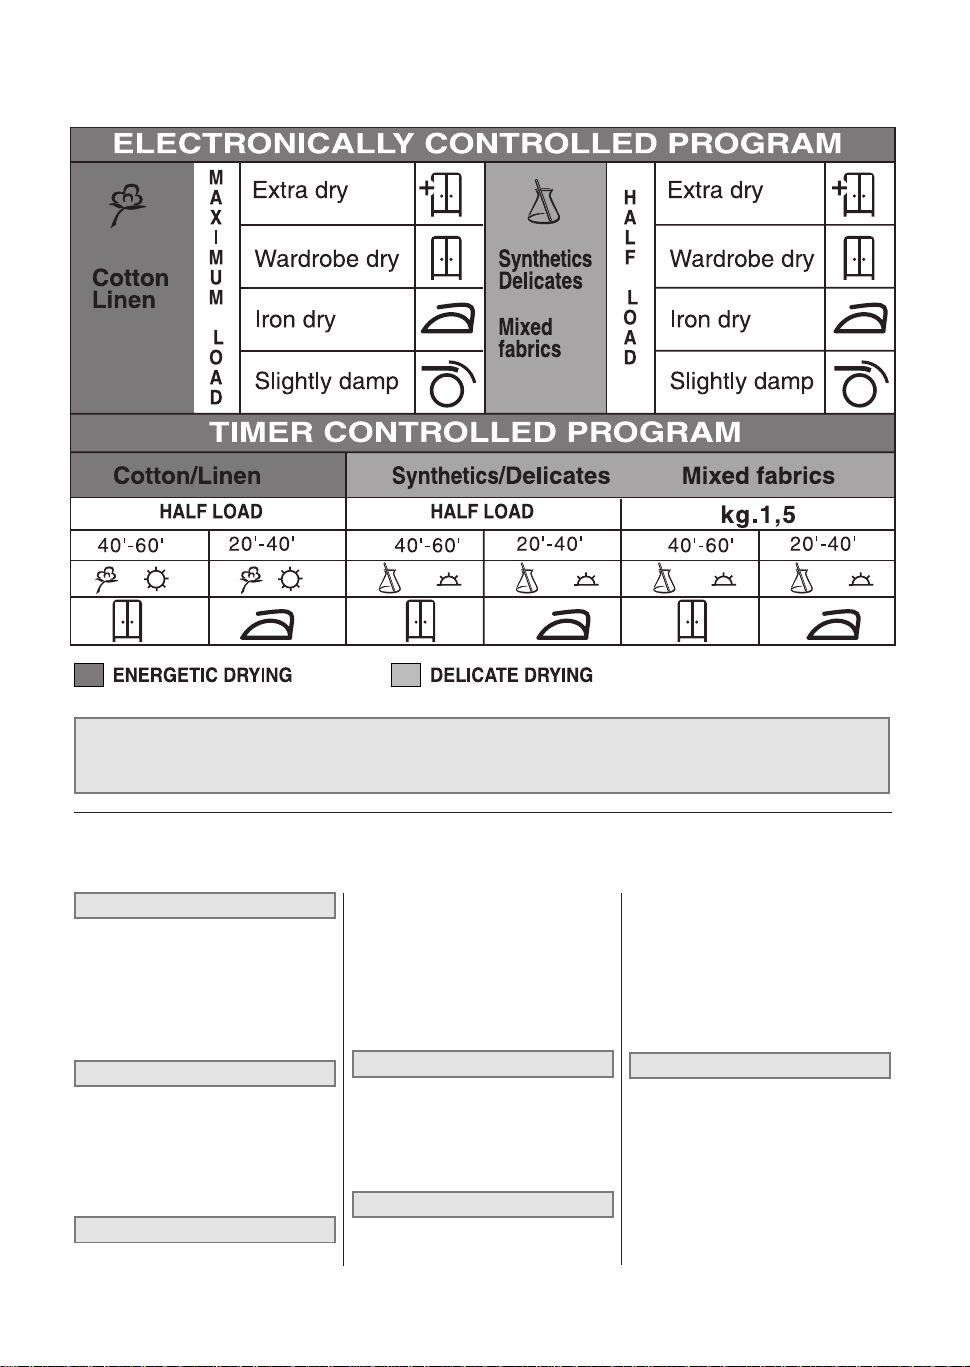
PROGRAM TABLE
GB
Important: The drying time is dependent on a number of factors: weight, size of the items, type
of fabric, degree of dampness. Well wrung/spun items dry quicker. To prevent items from creasing, do not overload the drier.
WASHING WEIGHTS
The indicated weights are approximate and may vary according to their manufacture, quality and finish.
Bedding
Quilt 700 g
Bottom sheet 550 g
Top sheet 600 g
Pillowcase 180 g
Household linen
Tea towel (dishes) 90 g
Tea towel (glasses) 70 g
Flannel 20 g
Hand towel 200 g
Other linen items
Bath robe 1200 g
Bath towel 800 g
Lady’s blouse 300 g
Man’s shirt 600 g
Blouse/shirt in synthetic
material 300 g
Table linen
Tablecloth 250 g
Large tablecloth 1000 g
Napkin 80 g
Men’s clothing
Wash ‘n wear shirt 250 g
Vest (sleeveless) 120 g
Briefs 80 g
Long johns 250 g
Pyjamas 480 g
Nightshirt 400 g
Handkerchief 25 g
Ladies’ clothing
Blouse 100 g
Jumper 100 g
Briefs 80 g
Slip 150 g
Nightdress 180 g
Pyjamas 450 g
Handkerchief 15 g

GB
MAINTENANCE
CLEANING THE FILTER
In order to guarantee optimum drying results under all circumstances, remember that the filter must be
cleaned regularly. Remember to check and clean the filter after each drying cycle.
Important:
The filter must only be cleaned when the appliance is cold! Clean the filter following the procedure described below:
▼ Open the door.
▼ Grasp the filter in both hands
and push it upwards to remove
it.
▼ Carefully widen the top edge
and open the filter.
▼ Remove the woollen particles.
▼ Close the filter, making sure
All electric appliance may breakdown at some time. Remember to call a qualified electrician in these
cases. However, many problems can be resolved without the need for external intervention.
Important: If a fault occurs, disconnect the appliance from the mains supply immediately.
Before calling the customer service centre, check the points listed below.
If the drier doesn’t start
• Check that:
1) The appliance is plugged
into the mains supply.
2) The mains socket is working correctly:
2a)The fuse has not
blown. (Check by plugging in another appliance such as a table
lamp).
2b) All the instructions in
the manual have been
followed.
that the catch closes at the
correct position.
▼ Clean the filter slide guides on
the appliance, using a vacuum
cleaner if necessary.
▼ Reposition the filter in the slide
guides (fig. 13).
FAULT FINDING
RESOLVING PROBLEMS
If the drier doesn’t start
• Check that:
1) The door is closed properly.
The washing does not dry
• Check that:
1) The air exhaust tube is not
twisted or kinked.
2) The filter is not blocked.
(Remember that when the
door is opened, the internal parts of the drier and
the washing may be very
hot).
13
If, after all these checks have
been carried out, the appliance still does not work, inform the nearest customer
service centre.
When contacting the service
centre, inform them of the
appliance model, serial number and type of fault.
This information will help the
service centre operator in
procuring the necessary
spare parts, thus guaranteeing a speedy and efficient
repair.
OPTIONAL ACCESSORIES
The retailer can provide an accessory to enable the drier to be mounted on top of a front-loading washing
machine, thus saving space. The installer will inform you of the appliance model for which this option is
possible.
10
SM1676
FRANÇOISE
Cher Client,
Nous vous remercions d’avoir choisi l’un de nos produits. Nous vous prions de bien vouloir lire attentivement
les instructions relatives à l’emploi avant d’effectuer la connexion et d’utiliser la machine.
La connaissance des principes de fonctionnement garantira une utilisation correcte et en toute sécurité de cet
appareil.
En cas de vente ou de cession du sèche-linge, il ne faudra pas oublier de remettre également au nouvel
utilisateur le manuel d’instructions pour l’emploi.
TABLE DES MATIÈRES
REMARQUES ET CONSEILS POUR L’UTILISATEUR 35-37
• Données techniques 35
DESCRIPTION DE LA MACHINE 37
INSTALLATION DE LA MACHINE 37-39
• Installation 37
• Nivellement du sèche-linge 38
• Connexion du tuyau d’évacuation de l’air 38
• Branchement à l’installation électrique 39
EMPLOI DE LA MACHINE 39-41
• Description des fonctions 39
• Hublot 40
• Pour effectuer correctement le séchage du linge 40
• Précautions à adopter pour les tissus 40
• Tableau des programmes 41
• Poids du linge 41
FR
ENTRETIEN 42
• Nettoyage du filtre 42
• Localisation des pannes 42
• Solution des problèmes 42
• Accessoires fournis sur demande 42
REMARQUES ET CONSEILS POUR L’UTILISATEUR
DONNÉES TECHNIQUES
Largeur cm.:
Dimensions:
Hauteur cm.:
Profondeur cm.:
Contenance Max.
Puissance Nominale
Tension
Voir plaquette des caractéristiques
Voir plaquette des caractéristiques
Voir plaquette des caractéristiques
MODÈLE: ..........................................................................................................................................................................................................................................
NUMÉRO DE SÉRIE: ............................................................................................................................................................................................................
DATE D’ACHAT: ..........................................................................................................................................................................................................................
SM1676
59.5
85.0
57.0
11

FR
REMARQUES ET CONSEILS POUR L’UTILISATEUR
■ Cet appareil devra être utilisé en tant
que sèche-linge pour usage domestique; tout autre emploi doit être considéré impropre et, par conséquent,
dangereux.
■ Conserver toujours le présent ma-
nuel d’emploi à proximité du sèchelinge, de façon à pouvoir le consulter rapidement, si nécessaire.
■ Toute modification ou tentative d’al-
tération de l’appareil peuvent être
dangereuses pour l’utilisateur et risquent d’endommager le produit.
■
Au moment de la livraison de l’électroménager, vérifier qu’il ne soit pas endommagé suite au transport. Si l’on
devait constater des dommages, il faudra s’adresser immédiatement au revendeur.
■ Pendant le cycle de séchage, l’air
de la pièce est convoyé à travers le
côté arrière de l’électroménager. Ne
pas couvrir le sèche-linge avec du
linge ou avec tout autre objet.
■ Lors du positionnement de l’appa-
reil, s’assurer que le câble d’alimentation ne se plie pas, ne soit pas
écrasé et soit accessible, pour toute
intervention éventuelle.
■ Il ne faut pas oublier que, pendant le
cycle de séchage, le verre du hublot
et le tuyau d’évacuation se réchaufferont, jusqu’à atteindre une température de 60°. Ne pas toucher ces
pièces avant la fin du cycle de refroidissement.
■ L’emploi de la machine est interdit
aux enfants sans surveillance.
■
Ne jamais faire sécher des pièces de
linge qui ont été en contact avec des
agents chimiques tels que, par exemple, les fluides du nettoyage à sec.
■ En effet, la nature de ces substan-
ces est volatile et elles pourraient
provoquer des explosions.
■ Ne pas faire sécher des pièces de
linge constituées par du caoutchouc
expansé ou avec des parties en
caoutchouc, étant donné qu’elles
pourraient fondre et endommager
les autres pièces de linge ou même
l’électroménager utilisé.
■ Si l’électroménager est vendu ou
cédé à des tiers, il ne faut pas oublier
de remettre également le présent
manuel, qui permettra au propriétaire suivant d’utiliser le sèche-linge
de façon correcte et en toute sécurité.
■ Il ne faut pas tenter de réparer par
soi-même les pannes de l’appareil,
étant donné que les réparations effectuées par des non professionnels
sont susceptibles de provoquer de
graves dommages et annulent le
droit aux réparations sous garantie.
■ Les réparations de cet appareil peu-
vent être effectuées exclusivement
par le personnel autorisé des cen-
Ne pas introduire ou sortir la fiche de
la prise de courant électrique avec les
mains mouillées.
Ne pas exposer l’appareil aux agents
atmosphériques.
12
La machine doit être branchée à une
prise de courant électrique équipée
de mise à la terre et qui soit conforme
aux exigences de sécurité.
Lorsque l’on effectue les révisions ou le nettoyage, il ne faut pas oublier de débrancher
l’appareil de la prise de courant électrique.
lI est interdit de brancher la machine
à la prise électrique en utilisant des
rallonges ou des fiches multiples.
Si l’on souhaite débrancher la machine de
la prise de courant, il ne faut pas tirer le
câble électrique mais la fiche.
SM1676
REMARQUES ET CONSEILS POUR L’UTILISATEUR
FR
tres du service après-vente. Pour les
réparations, il faut utiliser uniquement
des pièces de rechange originales.
■ Il faut essorer ou tordre soigneuse-
ment le linge avant de l’introduire
dans le sèche-linge. Le linge qui est
essoré correctement séchera plus
rapidement.
■ Nettoyer soigneusement le filtre cha-
que fois que l’on utilise le sèchelinge, afin de garantir une circulation
de l’air optimale.
■ Cet appareil porte le symbole du
recyclage conformément à la Directive Européenne 2002/96/CE concernant les Déchets d’Équipements
Électriques et Électroniques (DEEE
ou WEEE). En procédant correctement à la mise au rebut de cet appareil, vous contribuerez à empêcher toute conséquence nuisible
pour l’environnement et la santé de
l’homme. Le symbole présent sur
l’appareil ou sur la documentation
qui l’accompagne indique que ce
produit ne peut en aucun cas être
traité comme déchet ménager. Il doit
par conséquent être remis à un centre de collecte des déchets chargé
du recyclage des équipements électriques et électroniques. Pour la mise
au rebut, respectez les normes relatives à l’élimination des déchets en
vigueur dans le pays d’installation.
Pour obtenir de plus amples détails
au sujet du traitement, de la récupération et du recyclage de cet appareil, veuillez vous adresser au bureau
compétent de votre commune, à la
société de collecte des déchets ou
directement à votre revendeur.
LA SOCIÉTÉ PRODUCTRICE DÉCLINE TOUTE
RESPONSABILITÉ EN CAS
D’ACCIDENTS PROVOQUÉS PAR LE NON RESPECT DES NORMES CONCERNANT LA SÉCURITÉ
AINSI QUE DES INSTRUCTIONS POUR L’EMPLOI.
DESCRIPTION DE LA MACHINE
Cette machine est un électroménager qui sèche tout type de tissu lorsque vous le souhaitez.
■
La structure a été réalisée en panneaux de tôle traités et vernis, de
façon à ce que ses caractéristiques esthétiques puissent rester
inaltérées au cours du temps.
■ Le moteur et toutes les parties
en mouvement ont été conçus
et réalisés de façon à assurer le
maximum de silence.
■ Le tableau des commandes of-
fre la possibilité d’utiliser aisément tous les programmes de
séchage que l’on souhaite exécuter.
■ Le hublot très ample facilite le
chargement et le déchargement
du linge.
2
8
1 - Touche ON/OFF
2 - Touche séchage délicat ou
énergique
3 - Bouton de réglage des
temps de séchage
4 - Voyant de contrôle sèche-
linge en fonction
5 - Hublot
SM1676
11
9 10
6 - Filtre
7 - Pieds réglables
8 - Sortie pour évacuation
9 - Raccord d’accouplement
10- Tuyau d’évacuation
11- Support tuyau
1243
1
7
5
6
13

FR
INSTALLATION DE LA MACHINE
INSTALLATION
L’installation doit être effectuée par un personnel professionnellement qualifié, en respectant les instructions fournies par le
constructeur, étant donné qu’une installation erronée pourrait provoquer des lésions aux personnes et endommager des objets.
■ Installer le sèche-linge à proxi-
mité d’une fenêtre, afin de faciliter l’évacuation de l’air humide.
■
Utiliser le tuyau d’évacuation de
l’air pour éviter la formation de
condensat et le fixer dans le trou A
qui se trouve dans la partie arrière
en bas de la machine (fig. 3).
■ Ne jamais couvrir le prises d’air
qui se trouvent à l’arrière de l’appareil.
■ Mettre le filtre dans la position
NIVELLEMENT DU SÈCHE-LINGE
Pieds réglables. Mettre le sèche-linge
en position verticale, de façon à ce
qu’il soit solidement en appui sur les
quatre pieds. Effectuer le nivellement
de la machine en réglant le pieds,
comme indiqué ci-après.
■ Soulever légèrement la machine.
■ Régler les pieds à la bonne hau-
teur (fig. 5). (Il ne faut pas dévis-
d’emploi (fig. 4).
■ Nettoyer l’intérieur du tambour de
séchage au moyen d’un chiffon
3
A
ser excessivement les pieds et
ne pas utiliser des tournevis.)
■ Baisser la machine.
Une machine dont le nivellement
n’est pas correct est susceptible d’endommager les roulements et de
s’abîmer prématurément. Ce sèchelinge ne nécessite pas de fixation au
sol.
humide, pour éliminer la poussière qui pourrait éventuellement
se déposer dans ce dernier.
4
5
CONNEXION DU TUYAU D’ÉVACUATION DE L’AIR
Connecter le tuyau d’évacuation de l’air
à la sortie d’évacuation qui se trouve à
l’arrière du sèche-linge (fig.6).
■
Connecter une extrémité du tuyau
au raccord fourni avec l’appareil.
■ Tourner le raccord
(en même
temps que le tuyau) dans le sens
contraire à celui des aiguilles
d’une montre, dans le trou de vidange sur le sèche-linge.
■ Pousser le tuyau à l’extérieur depuis
6
14
l’arrière de la machine à gauche ou à
droite, à travers le logement sur le fond
de la carcasse de la machine.
■ Positionner l’autre extrémité du
tuyau à proximité d’une fenêtre ou
d’une sortie de ventilation vers l’extérieur. Si cela ne devait pas être
possible, il faudra s’assurer que la
pièce soit correctement ventilée
lorsque la machine est utilisée. Se
servir du support fourni avec l’appareil pour fixer le tuyau (fig. 7).
7
Important: le tuyau d’évacuation
de l’air doit être connecté même
si l’air n’est pas évacué à l’extérieur, autrement le sèche-linge absorberait à nouveau l’air humide
évacué et prolongerait le cycle de
séchage. L’air humide est en outre
susceptible d’endommager le sèche-linge. Uniquement l’air chaud
et humide est évacué par le tuyau
d’évacuation de l’air; l’air évacué
n’est pas dangereux mais, de tout
manière, il ne doit pas être dirigé
vers les personnes, les animaux
ou les plantes.
Important: L’air à la sortie ne doit
jamais être évacué dans une conduite utilisée pour l’évacuation
des fumées générées par des appareils qui brûlent des gaz ou tout
autre type de combustible.
SM1676
 Loading...