

Saivod CT 1830 NF, CT 1830D NF Instructions For Use Manual
GB
Instruction for use
ES
Instrucciones para el uso
PT
Manual de Instruções
CT 1830 NF
This appliance is not intended for use by person with reduced physical, sensory or mental
capabilities or lack of experience and knowledge unless they have been given supervision or
instruction concerning use of the appliance by a person responsible for their safety.
Children should be supervised to ensure that they do not play with the appliance.
Este aparato no ha sido diseñado para ser usado por personas con discapacidades
físicas, sensoriales o mentales; tampoco para personas sin experiencia o conocimiento del
aparato, a no ser que estén supervisadas o instruidas por alguien responsable de su
seguridad.
Los niños deben de estar controlados para que no jueguen con el aparato.
Este aparelho não deve ser utilizado por pessoas com capacidades reduzidas quer a nivel
físico, psíquico ou mental ou com falta de experiência e conhecimento, excepto quando
supervisionados ou se lhes foram dadas instruções relacionadas com a utilização do
aparelho, por alguem responsável pela sua segurança.
As crianças devem ser supervisionadas para se assegurar que não brincam com o
aparelho.
WARNING!
In order to ensure a normal operation of your refrigerating appliance, which uses a completely environmentally
friendly refrigerant the R600a (flammable only under certain conditions) you must observe the following rules:
Do not hinder the free circulation of the air around the appliance.
Do not use mechanical devices in order to accelerate the defrosting, others than the ones recommended by the
manufacturer.
Do not destroy the refrigerating circuit.
Do not use electric appliances inside the food keeping compartment, other than those that might have been
recommended by the manufacturer.
ADVERTENCIA !
Para asegurarse del funcionamiento normal de vuestro refrigerador, conteniendo le refrigerante R 600a que
contribuye a la protección del ámbito (inflamable sólo en ciertas condiciones), le conviene a respectar las reglas
siguientes :
No impide la circulación del aire alrededor del aparato.
No utilize utensilios mecánicos o otros dispositivos para acelerar el proceso de descongelación otros de los
recomendados por el fabricante.
No cause daño al circuito refrigerante.
No utilize aparatos eléctricos en el interior de los compartimentos de la conservación de los alimentos, si estos
no están conformes con el tipo de aparato recomendado por el fabricante.
AVISO!
Afim de assegurar um funcionamento normal do seu aparelho de refrigeração que utiliza um refrigerador, o R600a,
completamente amigo do ambiente (inflamável apenas sob certas condições), deve observar as seguintes normas:
Não obstrua a livre circulação do ar ao redor do aparelho.
Não utilize dispositivos mecânicos que não os recomendados pelo fabricante para acelerar o descongelamento.
Não destrua o circuito de refrigeração.
Não utilize aparelhos eléctricos que não aqueles que devem ter sido recomendados pelo fabricante dentro do
compartimento para guardar comida.

Safety comes first ! /1
Transport instructions /2
Disposal /2
Device Setup /2
Electrical connections /2
Get to know your device /3
Prior to startup /3
Setting the operating temperature /3
Cooling /5
Freezing /6
Defrosting of the device /6
Replacing the interior light bulb /7
Cleaning and care /7
Practical tips and notes /8
Examples of use /9
Normal operating noises /9
What, if.... /10
Reversing the doors /11
Technical data /11
La seguridad es lo primero /12
Instrucciones de transporte /13
Eliminación /13
Instalación del electrodoméstico /13
Conexiones eléctricas /13
Detalles del electrodoméstico /14
Antes de empezar /14
Ajuste de la temperatura de funcionamiento /14
Refrigeración /16
Congelación /17
Deshielo del aparato /17
Sustitución de la bombilla interior /18
Conservación y limpieza /18
Notas y consejos útiles /19
Ejemplos de utilización /20
Ruidos normales de funcionamiento /20
Resolución de problemas /21
Inversión de las puertas /22
Datos técnicos /22
A segurança está sempre em primeiro lugar! /23
Instruções de transporte /24
Eliminação /24
Configuração do dispozitivo /24
Ligações eléctricas /24
Detalhes do equipamento /25
Antes de colocar em funcionamento /25
Ajustar a temperatura de funcionamento /25
Arrefecimento /27
Congelar /28
Descongelação do equipamento /28
Substituição da lâmpada interior /29
Limpeza e cuidados /29
Notas e dicas práticas /30
Exemplos de utilização /31
Ruídos normais de funcionamento /31
O que fazer se /32
Inverter as portas /33
Significado da ficha de energia /33
GB
Index
ES
Índice
PT
Índice
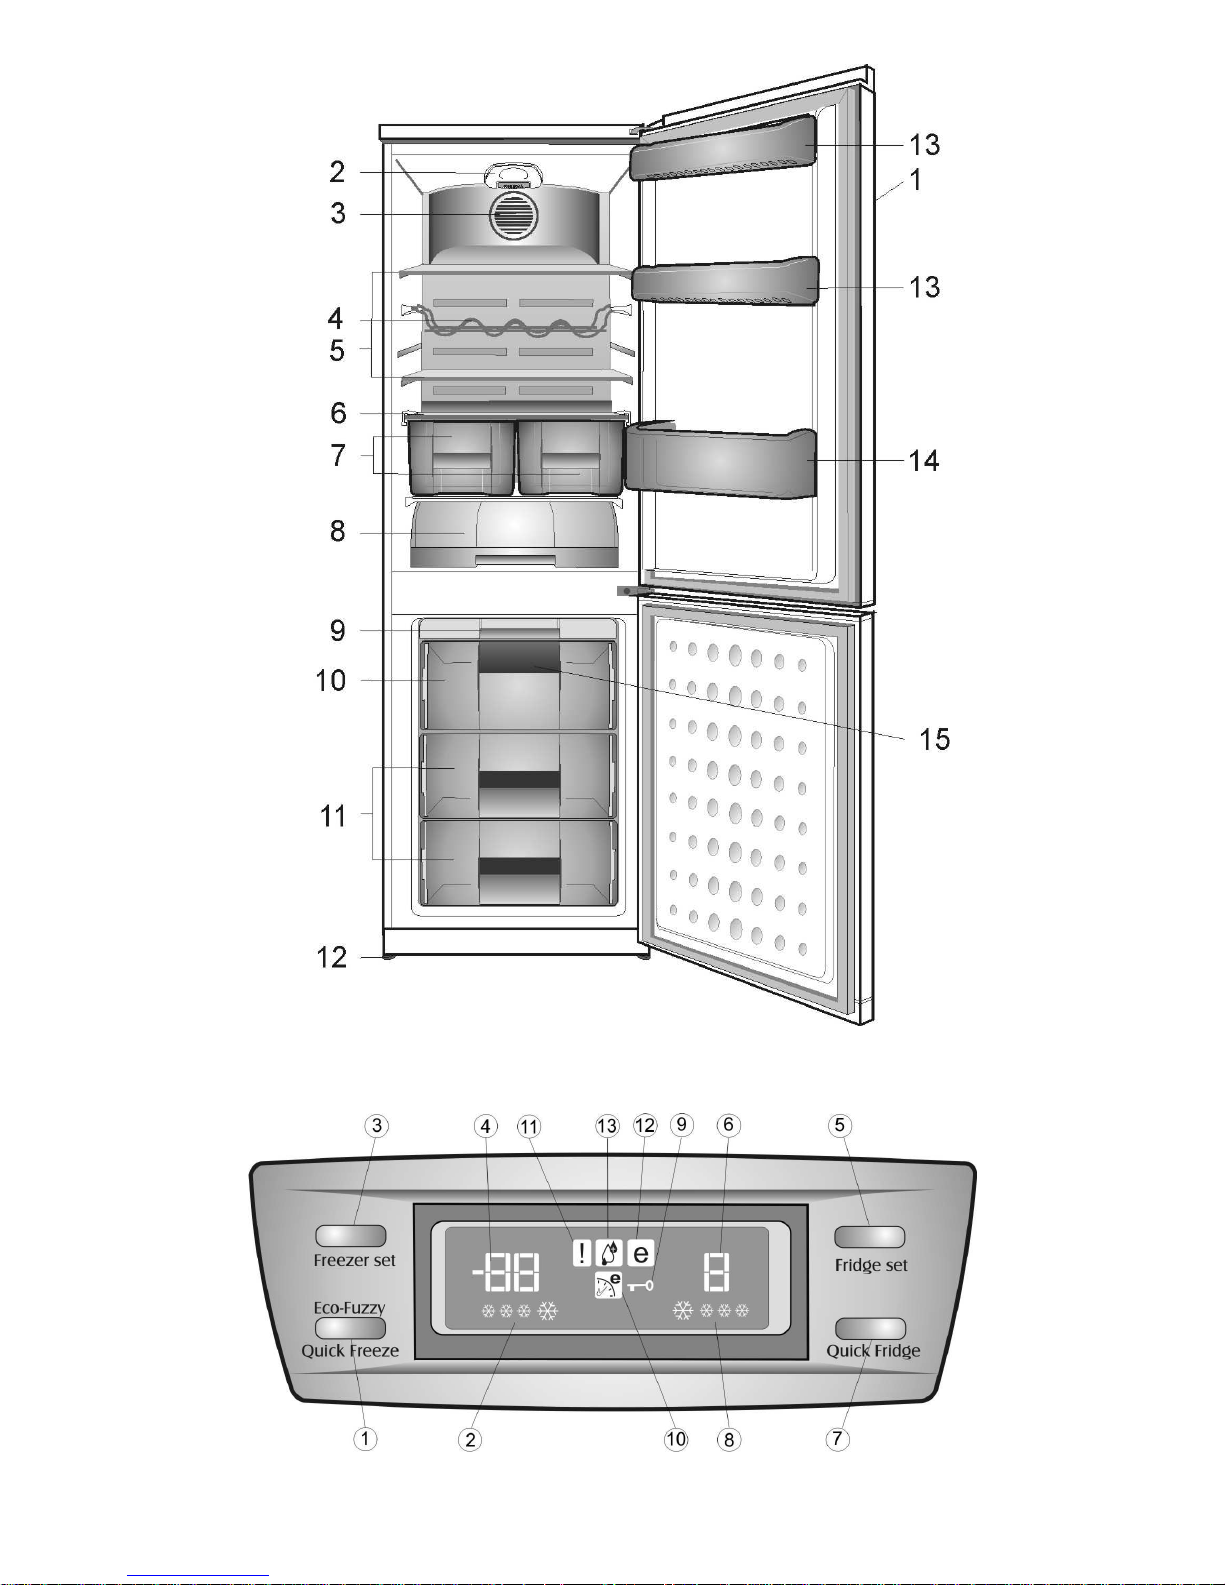
2
1
3
4 5
8
6
7
9
11
10
Congratulations on your choice of our product which will certainly provide you with many years of
good service.
Safety comes first!
Please read the operating manual carefully. It contains important information on how to use your
device. If instructions are not adhered to, you may lose your right to service at no charge during the
warranty period. Please keep this manual in a safe place and pass it on to later users if applicable.
•
Do not connect your appliance to the power supply until all packing and transit protectors have
been removed.
• Leave to stand upright for at least 4 hours before switching on to allow the system to settle if
transported horizontally.
• This appliance must only be used for its intended purpose, i.e. the storing and freezing of
edible foodstuff.
• We do not recommend use of this appliance in an unheated, cold room e.g. garage,
conservatory, annex, shed, outdoors, etc. See ‘Location’.
• On delivery, check to make sure that the product is not damaged and that all the parts and
accessories are in perfect condition.
• Do not operate a damaged appliance; if in doubt, check with your dealer.
• Do not allow children to play with the appliance.
• Do not sit or stand on or let the children sit or stand on the appliance or on the pull-out parts.
• Do not hang on the appliance door.
•
Your device contains no fluoridated coolants (CFC/HFC), but contains the coolant isobutane
(R600a), a natural gas which is highly compatible with the environment.
(R600a) is easily flammable. Therefore, be sure that the cooling circuit is not damaged either
during transport or during operations.
In the event of damage;
• Avoid any open flame, sources of sparks and flammable substances.
• Immediately air the room in which the appliance is located.
• In case the coolant spraying out contacts your eyes it may cause eye injuries.
• The space in the room where the appliance is installed must not be smaller than 10 cubic metres.
•
Do not dispose of the appliance in a fire. Your appliance contains non CFC substances in the
insulation which are flammable.
• Please contact the local authority in your region for information on disposal methods and
facilities available.
Warning - Keep ventilation openings on the appliance enclosure or in the built-in structure,
clear of obstruction.
Warning - Do not use mechanical devices or other means to accelerate the defrosting
process, other than those recommended by the manufacturer.
Warning - Do not damage the refrigerant circuit.
Warning - Do not use electrical appliances inside the food storage compartments of the
appliance, unless they are of the type recommended by the manufacturer.
• Avoid touching the metal condenser wiring on the backside of the appliance; there is risk of injury.
• In the event of a possible malfunction, disconnect the appliance from the power supply first.
• Prior to cleaning the device always unplug the power supply or shut off the fuse.
Do not pull from the cable - pull from the plug.
• Repairs to the electrical equipment may only be made by qualified experts. If the connection
cable is damaged, the manufacturer or customer service must replace it in order to avoid
danger.
1
GB
Instruction for use
2
Transport instructions
The appliance should be transported only in
upright position.
Before the performance of the working test in the
shop, the packing of the appliance must be intact.
After a transport in the horizontal position, the
device may only be taken into operation 4 hours
after being stood up vertically again.
The appliance must be protected against rain,
moisture and other atmospheric influences.
The manufacturer assumes no liability if safety
instructions are disregarded.
Disposal
Make the device unusable immediately.
Pull out the mains plug and cut the power cable.
Remove or destroy snap or latch locks
before disposing of the device. In this
manner you prevent children from locking
themselves in and endangering their lives.
Device setup
•
Do not operate your appliance in a room where
the temperature is likely to fall below
10°C at night and/or especially in winter. At lower
temperatures the appliance may not operate,
resulting in a reduction in the storage life of the
food.
•
The climate class rate of your appliance is given
in Technical Features leaflet and written on the
rating label inside the appliance. It specifies the
appropriate operating ambient temperatures as
explained below.
Climatic class
Ambient temperatures
SN........................... +10 °C to 32 °C
N ............................ +16 °C to 32 °C
ST .......................... +18 °C to 38 °C
T.............................. +18 °C to 43 °C
SN-ST..................... +10 °C to 38 °C
SN-T ...................... +10 °C to 43 °C
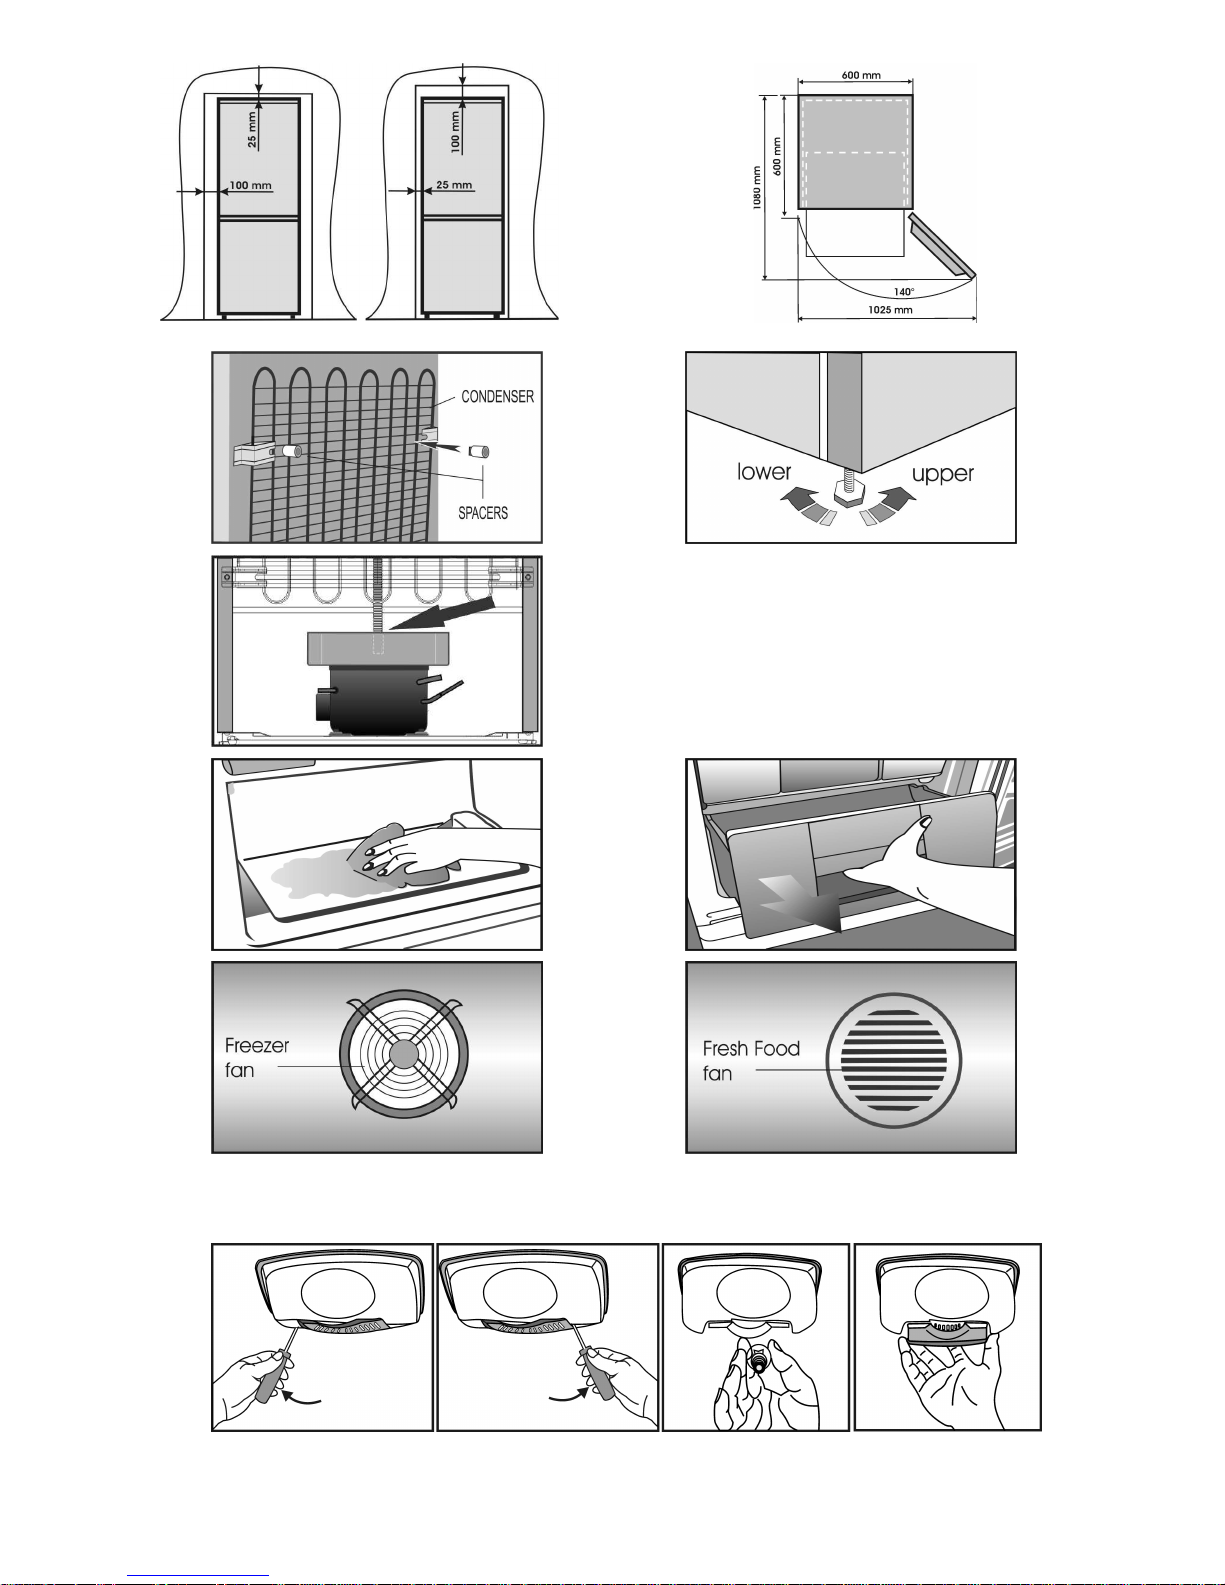
Location
Only place the appliance, as shown in the
illustration in dry rooms which can be aired.
Avoid direct sunlight or direct heat sources such
as a stove or a heater.
If this cannot be avoided, the following minimum
distances should be maintained:
Electric stoves: 3,00 cm
Heater: 3,00 cm
Cooling devices: 2,50 cm
• Ensure sufficient air circulation for your device.
• Make sure that sufficient room is provided
around the appliance to ensure free air circulation
(Item 3).
Fit the two plastic wall spacers supplied with
the appliance rotating 1/4 turn to the condenser at
the back of the appliance (Item 4).
• The appliance should be located on a smooth
surface. The two front feet can be adjusted as
required (Item 5). To ensure that your appliance is
standing upright adjust the two front feet by turning
clockwise or counter-
clockwise, until the product is in
firm contact with the floor.
Correct adjustment of feet avoids excessive
vibration and noise.
Electrical connections
Warning
This appliance must be grounded.
• Check whether the power type and voltage in
your region corresponds to the one stated on the
rating label inside the appliance.
• The electrical safety of the appliance is only
assured when the grounding system in the house is
installed in accordance with regulations.
• When placing the appliance, do not let the power
cable get stuck under it; otherwise the cable will
be damaged.
• Ensure that the plug remains readily accessible.
Do not use a multiple adapter bar or an extension
cable.
GB
Instruction for use

3
Get to know your device
Waring
Below information about accessories are supplied
just for reference. Below accessories may not be
exactly same as the accessories of your
appliance.
Item 1
1. Control panel
2. Interior light
3. Fresh Food fan
4. Wine rack
5. Adjustable Cabinet shelves
6. Crisper cover
7. Salad crispers
8. Fresh zone compartment
9. Ice tray support & ice tray
10. Compartment for quickly freezing
11. Compartments for frozen froods keeping
12. Adjustable front feet
13. Shelf for jars
14. Shelf for bottles
15. Freezer fan
The fans has the purpose to provide the
circulation of the air in compartment.
Prior to startup
Before you begin operating your device,
the following points should be re-checked for
safety:
• Is the device standing properly on the floor?
• Is there sufficient space for good air
circulation?
• Is the interior clean? (Also see the section
“Cleaning and care”)
• Now connect the appliance to the mains.
The compressor is turned on; the interior light
comes on when the Fridge door is opened.
Do not place foodstuff into the refrigerator until the
temperature has reached the desired level.
Setting the operating temperature
Fresh Food and Freezer Compartment Temperature
can be adjused by the electronic display (Item 2)
Control Panel
Control Functions
Considering Figure 2, the following functions
are implemented on the appliance.
1. Quick Freeze Function
2. Quick Freeze Indicator
3. Freezer Set Function
4. Freezer Compartment – Temperature Setting
Indicator
5. Fridge Set Function
6. Fridge Compartment - Temperature
Setting Indicator
7. Quick Fridge Function
8. Quick Fridge Indicator
9. Lock Function
10. Eco-Fuzzy Function
11. Hight Temperature/Error Warning Indicator
12. Economic Usage Indicator
13. Humidity Indicator
GB
Instruction for use

4
Description of the Control Functions
1. Quick Freeze Function
Quick Freeze indicator will remain lit when the
Quick Freeze function is enabled. To cancel this
function press Quick Freeze button again. Quick
Freeze indicator will turn off and return to its
normal settings. If you do not cancel it, Quick
Freeze will cancel itself automatically after 4 hours
or when the freezer compartment reaches to the
required temperature.
If you want to freeze large amounts of fresh food,
press the Quick Freeze button before putting the
food into the freezer compartment. Compressor
will not start running immediately if you press the
Quick Freeze button for more then once with short
intervals since the electronic circuit protection
system will be activated.
This function is not recalled when power restores
after a power failure.
2. Quick Freeze Indicator
This icon flashes in an animated style when the
Fast Freeze function is active.
3. Freezer Set Function
This function allows you to make the freezer
compartment temperature setting. Press this
button to set the temperature of the freezer
compartment to -18, -20, -22, -24
respectively.
4. Freezer Compartment Temperature
Setting Indicator
Indicates the temperature set for the Freezer
Compartment.
5. Fridge Set Function
This function allows you to make the fridge
compartment temperature setting. Press this
button to set the temperature of the fridge
compartment to 8, 6, 4, 2 respectively.
6. Fridge Compartment Temperature
Setting Indicator
Indicates the temperature set for the
Fridge Compartment.
7.
Quick Fridge Function
When you press Quick Fridge button, the
temperature of the compartment will be colder
than the adjusted values. This function can be
used for food placed in the fridge compartment
and required to be cooled down rapidly.
If you want to cool large amounts of fresh food, it
is recommended to active this feature before
putting the food into the fridge. Quick Fridge
indicator will remain lit when the Quick Fridge
function is enabled.
To cancel this function press Quick Fridge button
again. Quick Fridge indicator will turn off and
return to its normal settings. If you do not cancel it,
Quick Fridge will cancel itself automatically after 2
hours or when the fridge compartment reaches to
the required temperature. This function is not
recalled when power restores after a power
failure.
8. Quick Fridge Indicator
This icon flashes in an animated style when the
Quick Fridge function is active.
9. Lock Function
Press Freezer Set and Fridge Set buttons
simultaneously for 3 sec. to activate the Lock
function. Not other function can be selected from
the display panel when the lock function
is active. Press Freezer Set and Fridge Set
buttons simultaneously for 3 sec. again to
deactivate the Lock function.
10. Eco-Fuzzy (Special Economic
Usage) Function
Press the Quick Freeze button for 3 seconds to
activate the Eco Fuzzy Function. If this function is
activated, refrigerator will start to operate at the
most economic mode minimum
6 hours later and economic usage indicator will
turn on. Press the Freeze button for 3 seconds
again to deactivate the Eco Fuzzy Function.
GB
Instruction for use
5
11. High Temperature/ Error
Warnin
g
Indicator
This light comes on during high temperature
failures and error warnings.
12. Economic Usage Indicator
Economic Usage Indicator turns on when the
Freezer Compartment is set to -18°C. Economic
Usage Indicator turns off when the Quick Fridge or
Quick Freeze function is selected.
13. Humidity Indicator
Indicator light lights up continuously.
This light indicates that the food kept in the
refrigerator is preserved for a long time under
ideal humidity.
Cooling
Food storage
The fridge compartment is for the short-term
storage of fresh food and drinks.
Store milk products in the intended compartment
in the refrigerator.
Bottles can be stored in the bottle holder or in the
bottle shelf of the door.
Raw meat is best kept in a polyethylene bag at the
second shelf from the top of the refrigerator.
Allow hot foods and beverages to cool to room
temperature prior to placing them in the
refrigerator.
It is suggested not to keep frozen food over
crisper cover for thawing purposes.
The other shelves can be used for thawing
purposes.
Attention
Store concentrated alcohol only standing upright
and tightly closed.
Attention
Do not store explosive substances or containers
with flammable propellant gases (canned cream,
spray cans etc.) in the appliance. There is a
danger of explosion.
GB
Instruction for use
6
Freezing
Freezing food
The freezing area is marked with
symbol.
You can use the appliance for freezing fresh food
as well as for storing pre-frozen food Please refer
to the recommendations given on the packaging of
your food.
Attention
Do not freeze fizzy drinks, as the bottle may burst
when the liquid in it is frozen.
Be careful with frozen products such as coloured
ice-cubes.
Do not exceed the freezing capacity of your
appliance in 24 hours. See Technical Features
leaflet.
In order to maintain the quality of the food, the
freezing must be effected as rapidly as possible.
Thus, the freezing capacity will not be
exceeded, and the temperature inside the freezer
will not rise.
Attention
Keep the already deep-frozen food always
separated with freshly placed food.
When deep-freezing hot food, the cooling
compressor will work until the food is completely
frozen. This can temporarily cause excessive
cooling of the refrigeration compartment.
If you find the freezer or fresh food door difficult to
open just after you have closed it, don’t worry.
This is due to the pressure difference which will
equalize and allow the door to open normally after
a few minutes.
You will hear a vacuum sound just after closing
the door. This is quite normal.
Making ice cubes
Fill the ice-
cube tray 3/4 full with water and place it
in the freezer.
As soon as the water has turned into ice, you can
take out the ice cubes.
Never use sharp objects such as knives or forks to
remove the ice cubes. There is a risk of injury!
Let the ice cubes slightly thaw instead, or put the
bottom of the tray in water for a short moment.
Defrosting of the device
The appliance is a frost free refrigerator.
So there will not be any frost accumulation
inside the food storage area.
However there will be an automatic defrost at the
evaporation area of the appliance when it needs.
The water drams into reservoir at the back of the
appliance and evaporates automatically through
the compressor heat .
Ensure that the reservoir is fixed properly above
the compressor.
Warnings!
The fans inside the freezer and fresh food
compartments circulates cold air. Never insert any
object through the guard. Do not allow children to
play with the fresh food andfreezer fan.
Never store products that contain inflammable
propellant gas (eg dispensers, spray cans etc.) or
explosive substances.
Don’t cover the shelves with any protective
materials, which may obstruct air circulation.
Do not allow children to play with the appliance or
tamper with the controls.
Do not obstruct the fan guards to ensure that you
obtain the best possible performance from your
appliance. (Item 9 and Item 10)
Warning!
Your appliance is fitted with 2 circulating fans
which are essential for the performance of the
refrigerator. Please ensure the fans are not
blocked (stopped) or impaired by food or
packaging. Blocking (stopping) or impairing the
fan can result in an increase of the internal freezer
temperature (Thawing).
GB
Instruction for use

7
Replacing the interior light bulb
(Item 11)
In case that the light bulb is out of function it is
easily to replace. First make sure that the
refrigerator / freezer is disconnected from the
power supply by removing the plug. Take a flat
screwdriver and keep it carefully without force into
the left gap between lamp cover and internal
cabinet. Then press the handle of the screwdriver
carefully to the left side until you notice that the left
pin of the cover is disengaged . Repeat this
procedure on the right gap, however now press
the handle of the screwdriver carefully to the right
side. If both sides are loosened the cover can be
removed easily.
Ensure that bulb is screwed securely in the bulb
holder. Plug the appliance into the power supply. If
the light still fails, replace E14 screw-cap type 15
Watt (Max) bulb from your local electrical store
and then fit it. Carefully dispose of the burnt-out
light bulb immediately.
If you have changed the light bulb please fix the
cover again in it’s former position. Take care that
the cover snaps-in correctly.
Cleaning and care
Interior and Exterior Surfaces
Attention
Always unplug the power cable or switch
off the circuit breaker before cleaning.
Clean the exterior using lukewarm water and a
mild detergent.
Never use detergents, abrasive or acidic agents.
Wipe the inside compartment dry.
Be careful to prevent water from getting into
contact with the electrical connections of the
temperature control or the interior light.
If the device is not going to be used for a
long period of time, unplug the power cable and
remove all food. Clean the appliance and keep the
door open.
To preserve the appearance of your appliance,
you can polish the exterior and the door
accessories with a silicone wax.
Clean the condenser at the back of the appliance
once a year using a brush or a vacuum cleaner.
Dust build-up leads to increased energy
consumption.
Inspect the door gasket at regular intervals.
Clean with water only, and wipe totally dry.
Cleaning of the accessories
Door shelves:
Remove all food from the door shelves.
Lift the cover of the shelf upwards and pull it off
sideward.
Remove the bottom of the door shelf by pushing it
upwards.
Collecting container (Pan):
Make sure that the pan at the back of the
appliance is always clean.
Gently release the snap of the pan from the
compressor by pushing it using a tool (like
screwdriver), so that the pan can be removed.
Lift the pan, clean it and wipe it dry.
Re-assemble in reverse order.
Crisper or Drawers:
To clean a drawer, pull it out as far as possible, tilt
it upwards and then pull it out completely
(Item 7-8).
GB
Instruction for use
 Loading...