

Page 1
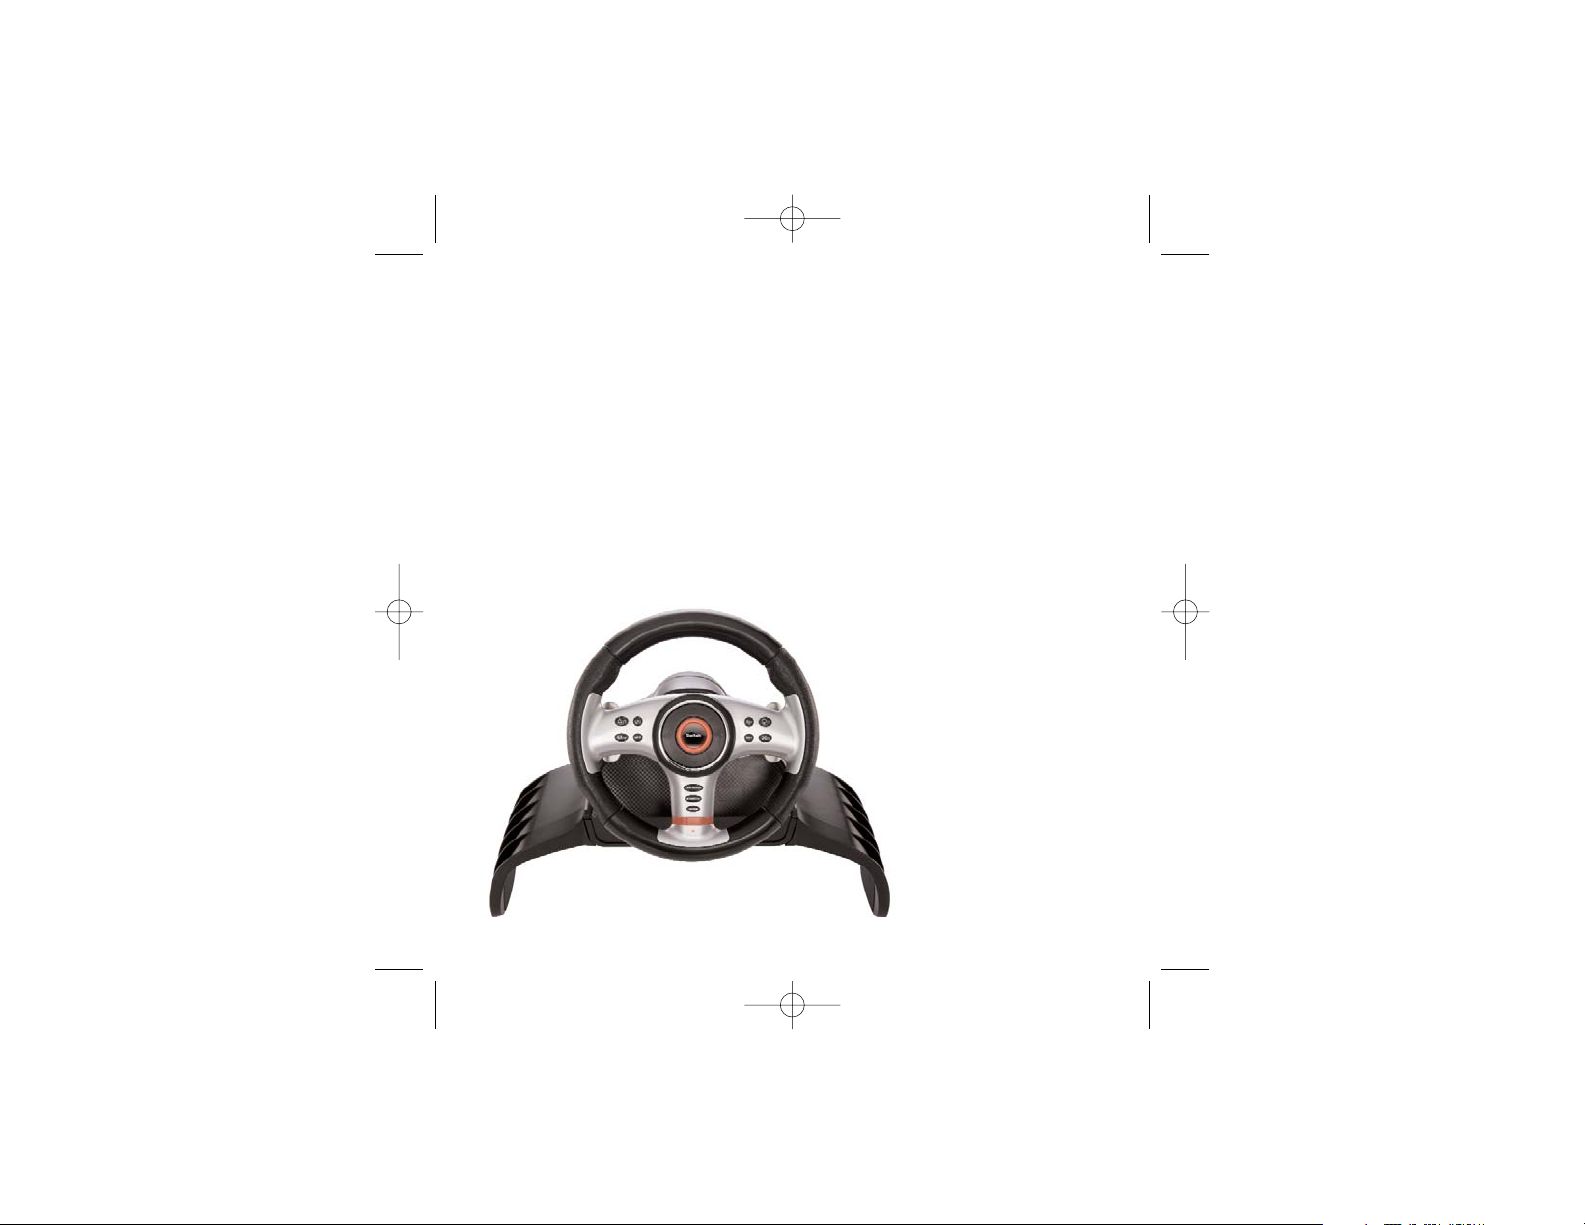
4-in-1 Vibration Wheel
USER MANUAL
BEDIENUNGSANLEITUNG
GUIDE D’UTILISATION
MANUALE D’USO
MANUAL DEL USUARIO
Saitek
®
PW21_manual_final.qxd 15/08/2008 15:21 Page 1
Page 2

Installation for users of PC or PS3
Plug the wheel’s USB cable into one of your PC or PS3’s free USB ports.
Mode switching
The 4-in-1 Vibration Wheel supports both Digital and Analog modes on PS2. Press the Mode
button to switch modes.
Vibration Force Feedback
The 4-in-1 Vibration Wheel offers vibration force feedback with PS2. Press the Select and Up
buttons to switch the force feedback on or off.
Auto calibration
To calibrate the wheel, press the Mapping button for two seconds and the red LED will blink quickly
to show the wheel is calibrating.
Sensitivity adjustment
The 4-in-1 Vibration wheel has six sensitivity settings. Normal setting is three.
To adjust sensitivity press the Select and Right buttons. Each time you press the two buttons, the
stick sensitivity will increase by one increment until it reaches six and then start from one again.
So, if you want to reduce sensitivity from normal setting (three) to one, press the Select and Right
buttons four times: 4, 5, 6, 1.
Button programming
1 Press and hold the Select button for 3 seconds to enter programming mode - the red LED will
blink quickly. Press the button that you want to change and the red LED will stop blinking. Now
press the desired function - the LED will blink quickly after programming is completed (PS2
only)
2 The 1, 2, 3, 4, 5, 6, 7, 8, RYK and RYL buttons all can be programmed when using a PC. Gas
Pedal, Brake Pedal, L-hand, R-hand, L1, L2, R1, R2, SL, ST,
, O, X and can all be
programmed when using a PS2.
Exiting program mode:
The wheel will automatically exit programming mode after 6 seconds or press the Select button to
leave programming immediately.
Resetting button programming
Press and hold the Mode button for 2 seconds to reset all button programming.
SAITEK 4-IN-1 VIBRATION WHEEL
Features
• Compatible with PC, PS2/PS3 and Xbox
• Button settings programmable when using PC and PS2
• Detachable lap rest for complete comfort and control when playing from your sofa
• Removable clamp locks the wheel in place when sat at a desk
• On-the-fly sensitivity adjustment helps you adapt to different driving games
• Use the included pedals or wheel paddles to accelerate and brake, depending on your playing
environment
Setting up your controller
1 Attach the main wheel unit to the desk clamp or lap support.
3 If using the desk clamp, position the wheel unit on the edge of your desktop, and turn the
clamp grip clockwise until the unit is securely attached to the desk. Do not overtighten!
4 Plug the PS/2 cable from the pedal unit into the socket in the wheel unit, making sure the
connector clicks firmly into place.
5 Place the pedal unit on the floor in your preferred driving position.
System Compatibility
PC running Windows XP/Vista (32-bit only), PS2/PS3 and Xbox
Software installation for PC
1. With your computer switched on, close down any programs that are currently running and
insert the Installation CD into your CD-ROM drive.
2. When the Introduction Screen appears, click Install Software to continue. If the CD does not
run automatically, select Start from the Windows® Taskbar, then Run and type D:\Setup.exe
and click OK - where D:\ is letter of your CD-ROM drive. For Vista users, the screen will ask
Do you want to run this file? Press Run. Ascreen will now appear saying A program needs
your permission to continue. Press Continue.
3. When the Welcome screen appears, click Next to continue.
4. After reading the Disclaimer, select the I accept the terms of the Disclaimer option and click
Next to continue.
5. Plug the USB cable into one of your computer's USB ports and click on Next.
6. At the Registration screen, select Check this box to register now and follow the on-screen
instructions, or you can choose to select this option later.
7. Click on Finish to complete the installation.
Installation for users of PS2 and Xbox
Plug the wheel’s PS2 or Xbox controller cable into one of your console’s free controller sockets.
PW21_manual_final.qxd 15/08/2008 15:21 Page 2
Page 3
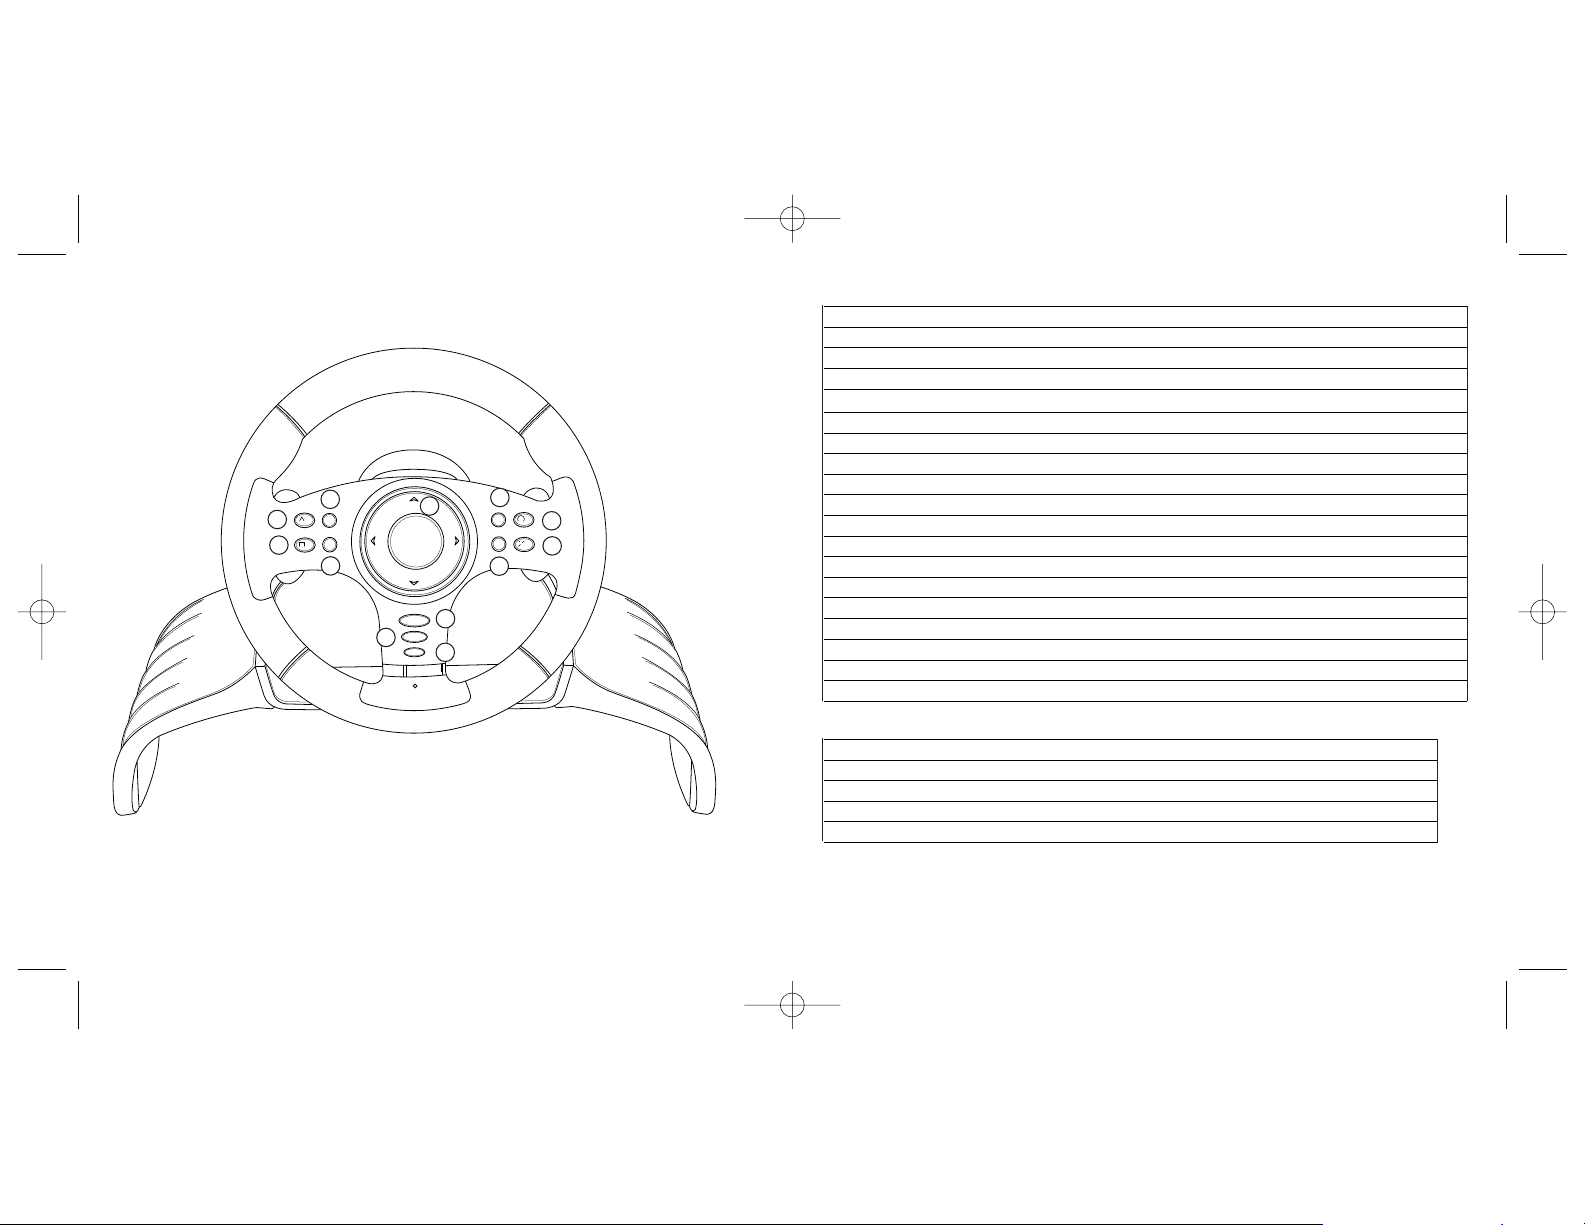
Button and axis designation
PC Mode PS2 Mode PS3 Mode Xbox Mode Digital/Analog
13XXAA
2 4 XA
31UU YA
42OO BA
5 7 L1 L1 White A
6 8 R1 R1 Black A
7 6 L2 L2 Left trigger A
8 5 R2 R2 Right trigger A
9 9 SL SL Back D
10 10 ST ST Start D
11 Mode Mode Mode Mode D
12 D_Pad D_Pad D_Pad D_Pad A
X Axis X Axis X Axis X Axis X Axis A
Left hand lever 2 L2 L2 A A
Right hand lever 1 R2 R2 X A
Gas Pedal RYK X X Right trigger A
Brake Pedal RYL Left trigger A
LED Red Red Red Red LED
Example 1
Step Action Result
1 Press and hold Select for 3 seconds LED blinks quickly
2 Press O LED stops blinking
3 Press Gas Pedal LED blinks quickly
O is now Gas Pedal and Gas Pedal is Gas Pedal
2
4
6
7
1
3
5
8
9
10
11
12
Button assignment for PC and PS2/PS3
PW21_manual_final.qxd 15/08/2008 15:21 Page 4
L1/7
/1
TRIANGLE
L2/6
/4
SQUARE
R1/8
C
I
/2
R
E
L
C
Saitek
CROSS
R2/5
/3
SELECT/9
START/10
MOD E
Page 4
• Reorient or relocate the receiving antenna;
• Increase the separation between the equipment and receiver;
• Connect the equipment into an outlet on a circuit different from that to which the receiver is
connected;
• Consult the dealer or an experienced radio/TV technician for help.
Mad Catz, Inc, 7480 Mission Valley Rd, Suite 101, San Diego, CA92108-4406
Canada ICES-003
Operation is subject to the following two conditions:
1 This device may not cause interference, and;
2 This device must accept any interference, including interference that may cause undesired
operation of the device.
This Class B digital apparatus complies with Canadian ICES-003.
Cet appareil numérique de la classe B est conforme à la norme NMB-003 du Canada.
Conditions of Warranty
1 Warranty period is 2 years from date of purchase with proof of purchase submitted.
2 Operating instructions must be followed.
3 Specifically excludes any damages associated with leakage of batteries.
Note: Batteries can leak when left unused in a product for a period of time, so it is advisable to
inspect batteries regularly.
4 Product must not have been damaged as a result of defacement, misuse, abuse, neglect,
accident, destruction or alteration of the serial number, improper electrical voltages or currents,
repair, alteration or maintenance by any person or party other than our own service facility or
an authorized service center, use or installation of non-Saitek replacement parts in the product
or the modification of this product in any way, or the incorporation of this product into any other
products, or damage to the product caused by accident, fire, floods, lightning, or acts of God,
or any use violative of instructions furnished by Saitek plc.
5 Obligations of Saitek shall be limited to repair or replacement with the same or similar unit, at
our option. To obtain repairs under this warranty, present the product and proof of purchase
(eg, bill or invoice) to the authorized Saitek Technical Support Center (listed on the separate
sheet packaged with this product) transportation charges prepaid. Any requirements that
conflict with any state or Federal laws, rules and/or obligations shall not be enforceable in that
particular territory and Saitek will adhere to those laws, rules, and/or obligations.
6 When returning the product for repair, please pack it very carefully, preferably using the
original packaging materials. Please also include an explanatory note.
Example 2
Step Action Result
1 Press and hold Select for 3 seconds LED blinks quickly
2 Press L1 LED stops blinking
3 Press X LED blinks quickly
L1 is now X and X is X
Technical Support
Nearly all the products that are returned to us as faulty are not faulty at all - they have just not
been installed properly. If you experience any difficulty with this product, please first visit our
website www.saitek.com. The technical support area will provide you with all the information you
need to get the most out of your product and should solve any problems you might have.
If you do not have access to the internet, or if the website cannot answer your question, please
contact your local Saitek Technical Support Team. We aim to offer quick, comprehensive and
thorough technical support to all our users so, before you call, please make sure you have all the
relevant information at hand.
To find your local Saitek Technical Support Center, please see the separate Technical Support
Center sheet that came packaged with this product.
Information for Customers in the United States
FCC Compliance and Advisory Statement
Warning: Changes or modifications to this unit not expressly approved by the party responsible for
compliance could void the user's authority to operate the equipment.
This device complies with Part 15 of the FCC Rules. Operation is subject to the following two
conditions:
1 This device may not cause harmful interference, and;
2 This device must accept any interference received, including interference that may cause
undesired operation.
NOTE: This equipment has been tested and found to comply with the limits for a Class B digital
device, pursuant to Part 15 of the FCC Rules. These limits are designed to provide reasonable
protection against harmful interference in a residential installation. This equipment generates, uses
and can radiate radio frequency energy and, if not installed and used in accordance with the
instructions, may cause harmful interference to radio communications. However, there is no
guarantee that interference will not occur in a particular installation. If this equipment does cause
harmful interference to radio or television reception, which can be determined by turning the
equipment off and on, the user is encouraged to try to correct the interference by one or more of
the following measures:
PW21_manual_final.qxd 15/08/2008 15:21 Page 6
Page 5
SAITEK 4-IN-1 VIBRATION WHEEL
Ausstattungsmerkmale
• Kompatibel mit PC, PS2/PS3 und Xbox
• Programmierbare Tasteneinstellung für PC und PS2
• Abnehmbare Beinauflage bietet vollkommenen Komfort und Kontrolle bei Spielen auf dem
Sofa
• Abnehmbare Klemme zur Befestigung des Lenkrads am Computertisch
• Unverzügliche Empfindlichkeitsanpassung hilft Ihnen bei der Umstellung auf verschiedene
Fahrspiele
• Verwenden Sie die mitgelieferten Pedale oder Lenkradsteuerungen zum Beschleunigen und
Bremsen - je nach Ihrer Spielumgebung.
Verbinden des Controllers
1 Verbinden Sie das Hauptgerät mit der Tischklemme oder der Beinauflage.
3 Bei Verwendung der Tischklemme stellen Sie das Rad auf die Tischkante und drehen Sie den
Klemmengriff im Uhrzeigersinn, bis das Gerät sicher auf dem Tisch befestigt ist. Drehen Sie
nicht zu fest!
4 Verbinden Sie das PS/2-Kabel der Pedaleinheit mit dem Anschluss der Radeinheit.
Vergewissern Sie sich, dass der Anschluss fest einrastet.
5 Legen Sie die Pedaleinheit in Ihrer gewünschten Fahrposition auf den Boden.
Systemkompatibilität
PC mit Windows XP/Vista (nur 32-Bit), PS2/PS3 und Xbox
Softwareinstallation für PC
1. Schalten Sie den Computer ein, schließen Sie alle laufenden Programme und legen Sie die
Installations-CD in Ihr CD-ROM-Laufwerk.
2. Wenn der Einführungsbildschirm erscheint, klicken Sie auf "Software installieren", um
fortzufahren. Falls die CD nicht automatisch anläuft, wählen Sie die Start-Schaltfläche von
Windows® und dann "Ausführen", tippen "D:\Setup.exe" ein und klicken auf OK. Dabei steht
"D:\" für den Buchstaben Ihres CD-ROM-Laufwerks. Vista-Anwender werden gefragt: "Möchten
Sie diese Datei ausführen?" Klicken Sie auf "Ausführen". Jetzt erscheint die Meldung "Zur
Fortsetzung des Programms ist Ihre Zustimmung erforderlich". Klicken Sie auf "Weiter".
3. Wenn der Willkommensbildschirm erscheint, klicken Sie auf "Weiter", um fortzufahren.
4. Nach dem Lesen des Rechtsverzichts wählen Sie die Option "Ich akzeptiere die Bedingungen"
und klicken auf "Weiter", um fortzufahren.
5. Schließen Sie das USB-Kabel an einen der freien USB-Anschlüsse Ihres Computers an und
klicken Sie auf "Weiter".
7 IMPORTANT: To save yourself unnecessary cost and inconvenience, please check carefully
that you have read and followed the instructions in this manual.
This warranty is in lieu of all other expressed warranties, obligations or liabilities. ANY
IMPLIED WARRANTIES, OBLIGATIONS, OR LIABILITIES, INCLUDING BUT NOT LIMITED
TO THE IMPLIED WARRANTIES OF MERCHANTABILITYAND FITNESS FOR A
PARTICULAR PURPOSE, SHALL BE LIMITED IN DURATION TO THE DURATION OF THIS
WRITTEN LIMITED WARRANTY. Some states do not allow limitations on how long an implied
warranty lasts, so the above limitations may not apply to you. IN NO EVENT SHALL WE BE
LIABLE FOR ANY SPECIAL OR CONSEQUENTIAL DAMAGES FOR BREACH OF THIS OR
ANY OTHER WARRANTY, EXPRESS OR IMPLIED, WHATSOEVER. Some states do not
allow the exclusion or limitation of special, incidental or consequential damages, so the above
limitation may not apply to you. This warranty gives you specific legal rights, and you may also
have other rights which vary from state to state.
This symbol on the product or in the instructions means that your electrical and
electronic equipment should be disposed at the end of its life separately from
your household waste. There are separate collection systems for recycling in
the EU.
For more information, please contact the local authority or your retailer where
you purchased the product.
PW21_manual_final.qxd 15/08/2008 15:21 Page 8
Page 6

Programmierungsmodus verlassen
Das Rad verlässt nach 6 Sekunden automatisch den Programmierungsmodus. Sie können zum
Verlassen des Programmierungsmodus auch die Taste Select (Auswahl) drücken.
Tastenprogrammierung zurücksetzen
Halten Sie die Taste Mode (Modus) 2 Sekunden lang gedrückt, um die Tastenprogrammierung
zurückzusetzen.
6. Auf dem Registrierungsbildschirm wählen Sie "Klicken Sie hier, um sich jetzt zu registrieren"
und folgen Sie den Anweisungen auf dem Bildschirm; Sie können sich jedoch auch dafür
entscheiden, diese Option später zu wählen.
7. Klicken Sie auf "Fertigstellen", um die Installation vollständig durchzuführen.
Installation für Benutzer von PS2 und Xbox
Verbinden Sie das PS2- oder Xbox-Steuerkabel des Rades mit einem freien Steuer-Anschluss auf
Ihrer Konsole.
Installation für Benutzer von PC oder PS3
Verbinden Sie das USB-Kabel des Rades mit einem freien USB-Anschluss auf Ihrem PC oder
PS3.
Moduswechsel
Das 4-in-1 Vibration Rad unterstützt sowohl Digital- als auch Analogmodus der PS2. Zum
Umschalten drücken Sie die Taste Mode (Modus).
Vibration Force Feedback
Das 4-in-1 Vibration Wheel bietet mit der PS2 Vibration Force Feedback. Drücken Sie zum Einoder Ausschalten der Funktion Force Feedback die Tasten Select (Auswahl) und Up (Aufwärts).
Automatische Kalibrierung
Zur Kalibrierung des Rades halten Sie die Taste Mapping (Zuordnung) 2 Sekunden lang gedrückt.
Die rote LED blinkt rasch um anzuzeigen, dass das Rad kalibriert wird.
Empfindlichkeitsanpassung
Das 4-in-1 Vibration Wheel verfügt über sechs Empfindlichkeitseinstellungen. Die Grundeinstellung
ist drei.
Zur Anpassung der Empfindlichkeit drücken Sie die Tasten Select (Auswahl) und Right (Rechts).
Mit jedem Mal Drücken beider Tasten erhöht sich die Stick-Empfindlichkeit um jeweils eine Stufe
bis zur Stufe sechs, danach geht sie wieder auf Stufe 1 zurück. Zur Reduktion der Empfindlichkeit
der Grundeinstellung (drei) auf eins drücken Sie viermal die Tasten Select (Auswahl) und Right
(Rechts): 4, 5, 6, 1.
Tastenprogrammierung
1 Halten Sie die Taste Select (Auswahl) 3 Sekunden lang gedrückt, um den
Programmierungsmodus zu aktivieren - dies rote LED blinkt schnell. Drücken Sie die zu
ändernde Taste, und die rote LED hört auf zu blinken. Drücken Sie nun die gewünschte
Funktion - nach Abschluss der Programmierung (nur PS2) blinkt die LED schnell.
2 Die Tasten 1, 2, 3, 4, 5, 6, 7, 8, RYK und RYL können allesamt über den PC programmiert
werden. Gaspedal, Bremspedal, Links, Rechts, L1, L2, R1, R2, SL, ST,
, O, X und
können allesamt über die PS2 programmiert werden.
4
6
7
1
5
8
9
10
11
12
Tastenzuweisung für PC und PS2/PS3
PW21_manual_final.qxd 15/08/2008 15:21 Page 10
L1/7
/1
TRIANGLE
L2/6
/4
SQUARE
Saitek
R1/8
C
I
/2
R
E
L
C
CROSS
R2/5
/3
SELECT/9
START/10
MOD E
Page 7

Tasten- und Achsenzuweisung
PC Modus PS2 Modus PS3 Modus Xbox Modus Digital/Analog
13XXAA
2 4 XA
31UU YA
42OO BA
5 7 L1 L1 Weiß A
6 8 R1 R1 Schwarz A
7 6 L2 L2 Linker Abzug A
8 5 R2 R2 Rechter Abzug A
9 9 SL SL Zurück D
10 10 ST ST Start D
11 Modus Modus Modus Modus D
12 D_Pad D_Pad D_Pad D_Pad A
X-Achse X-Achse X-Achse X-Achse X-Achse A
Linker Abzug 2 L2 L2 A A
Rechter Abzug 1 R2 R2 X A
Gaspedal RYK X X Right trigger A
Bremspedal RYL Left trigger A
LED Rot Rot Rot Rot LED
Beispiel 1
Schritt Vorgang Resultat
1 Halten Sie Select (Auswahl) 3 LED blinkt schnell
Sekunden lang gedrückt
2 Drücken Sie O LED hört auf zu blinken
3 Drücken Sie das Gaspedal LED blinkt schnell
O ist nun das Gaspedal und Gaspedal ist das Gaspedal
Beispiel 2
Schritt Vorgang Resultat
1 Halten Sie Select (Auswahl) 3 LED blinkt schnell
Sekunden lang gedrückt
2 Drücken Sie L1 LED hört auf zu blinken
3 Drücken Sie X LED blinkt schnell
L1 ist nun X und X ist X
Technischer Support
Probleme - keine Angst, wir lassen Sie nicht im Stich!
Wussten Sie, dass fast alle Produkte, die als fehlerhaft an uns zurückgeschickt werden, überhaupt
nicht defekt sind? Sie wurden einfach nicht richtig installiert!
Sollten Sie Probleme mit diesem Produkt haben, besuchen Sie bitte zuerst unsere Website
www.saitek.de. Unsere Website, speziell der Bereich Technischer Support, wurde erstellt, damit
Sie von Ihrem Saitek-Produkt die bestmögliche Leistung erhalten.
Sollten Sie trotzdem noch Probleme haben oder kein Internetanschluss haben, dann stehen Ihnen
unsere Produktspezialisten im Saitek Technical Support Team zur Verfügung, die Sie telefonisch
um Rat und Hilfe bitten können.
Wir möchten, dass Sie viel Freude an Ihrem Gerät haben. Bitte rufen Sie uns an, falls Sie
Probleme oder Fragen haben. Bitte stellen Sie auch sicher, dass Sie alle relevanten Informationen
zu Hand haben, bevor Sie anrufen.
Rufnummern und Adressen finden Sie auf der mit dem Produkt gelieferten Liste der Zentren für
Technischen Support.
Garantiebedingungen
1 Die Garantiezeit beträgt 2 Jahre ab dem nachgewiesenen Kaufdatum.
2 Die Bedienungsanleitung ist zu beachten.
3 Schäden im Zusammenhang mit dem Auslaufen von Batterien sind spezifisch aus dem
Garantieumfang ausgenommen.
Hinweis: Batterien können auslaufen, wenn sie über einen längeren Zeitraum ungenutzt in
einem Gerät verbleiben. Es ist daher ratsam, die Batterien regelmäßig zu überprüfen.
4 Die Garantie ist ausgeschlossen bei
Verunstaltung des Geräts, unsachgemäßer oder missbräuchlicher Benutzung, mangelnder
Sorgfalt, Unfall, Beseitigung oder Änderung der Seriennummer; Anschluss an eine falsche
PW21_manual_final.qxd 15/08/2008 15:21 Page 12
Page 8

Spannung oder Stromart; Reparatur, Umbau oder Wartung des Geräts durch fremde Personen
außerhalb unserer Serviceeinrichtung oder eines autorisierten Servicecenters; Verwendung
oder Einbau von nicht von Saitek stammenden Ersatzteilen in das Gerät oder sonstigen
Veränderungen: Einbau in andere Geräte; Beschädigung des Geräts durch höhere Gewalt
(z.B. Unfall, Brand, Hochwasser oder Blitzschlag) oder eine den Anweisungen von Saitek
zuwider laufende Benutzung des Geräts.
5 Die Garantiepflicht beschränkt sich darauf, dass Saitek das Gerät nach eigener Wahl
entweder repariert oder durch ein gleiches oder ähnliches Gerät ersetzt. Zur Inanspruchnahme
der Garantie sind dem autorisierten Saitek Technical Support Center (Anschrift liegt dem Gerät
in der Verpackung bei) Gerät und Kaufbeleg (z.B. Kassenzettel oder Rechnung) frachtfrei zu
übersenden.
6 Bei Einsendung des Geräts zur Reparatur ist eine angemessene Verpackung (vorzugsweise
die Originalverpackung) zu wählen und eine Schilderung des Problems beizufügen.
7 WICHTIGER HINWEIS: Achten Sie zur Vermeidung unnötiger Kosten und
Unannehmlichkeiten darauf, die Anweisungen in dieser Bedienungsanleitung sorgfältig
durchzulesen und zu beachten.
Dieses Produkt darf am Ende seiner Lebensdauer nicht über den normalen
Haushaltsabfall entsorgt werden, sondern muss an einem Sammelpunkt für das
Recycling von elektrischen und elektronischen Geräten abgegeben werden.
Das Symbol auf dem Produkt, der Gebrauchsanleitung oder der Verpackung
weist darauf hin.
SAITEK 4-IN-1 VIBRATION WHEEL
Fonctions
• Compatible avec les PC, PS2/PS3 et Xbox
• Boutons de réglages programmables sur PC et PS2
• Appuis détachables pour un confort et un contrôle total quand vous jouez dans votre canapé
• La pince de fixation détachable maintient le volant en place quand vous êtes assis à votre
bureau
• Sensibilité ajustable à la volée vous permettant de vous adapter aux différents jeux de course
• Utilisez les pédales ou les palettes du volant pour accélérer et freiner, en fonction de votre
environnement de jeu.
Régler votre contrôleur
1 Attachez le volant sur la pince de bureau ou le support
3 Si vous utilisez la pince de bureau, positionnez le volant sur votre bureau, et tournez l'attache
dans le sens des aiguilles d'une montre jusqu'à ce que l'appareil soit solidement attaché au
bureau. Ne serrez pas trop fort !
4 Branchez le câble PS/2 du pédalier dans la prise située sur le volant, en vérifiant que le
connecteur est fermement fixé.
5 Placez le pédalier sur le sol dans votre position de conduite préférée.
Compatibilité système
PC fonctionnant sous Windows XP/Vista (32-bit uniquement), PS2/PS3 et Xbox
Installation du logiciel pour PC
1. Votre ordinateur allumé, fermez tous les programmes en cours et insérez le CD d'installation
dans votre lecteur CD-ROM.
2. Quand l'écran d'introduction apparaît, cliquez sur Installer le Logiciel pour continuer. Si le CD
ne tourne pas automatiquement, cliquez sur Démarrer dans la barre des tâches Windows®, et
tapez D:\Setup.exe puis cliquez sur OK (la lettre D correspond généralement à votre lecteur
Cd-rom). Sous Vista, la question Voulez-vous exécuter ce fichier ? s'affiche à l'écran. Appuyez
sur Exécuter. Un écran apparaît alors disant qu'un programme a besoin de votre permission
pour continuer. Cliquez sur Continuer.
3. Quand l'écran de Bienvenue apparaît, cliquez sur Suivant pour continuer.
4. Après avoir lu la Clause de responsabilité, sélectionnez J'accepte les termes de la clause et
cliquez sur Suivant pour continuer.
5. Brancher le câble USB sur l'un des ports USB de votre ordinateur et cliquez sur Suivant.
6. À l'écran d'enregistrement, sélectionnez Cocher la case pour enregistrer maintenant ou vous
pouvez choisir de sélectionner cette option plus tard.
PW21_manual_final.qxd 15/08/2008 15:21 Page 14
Page 9

Désignation des boutons et des axes
Mode PC Mode PS2 Mode PS3 Mode Xbox Digital/Analogique
13XXAA
2 4 XA
31UU YA
42OO BA
5 7 L1 L1 Blanc A
6 8 R1 R1 Noir A
7 6 L2 L2 Gâchette gaucheA
8 5 R2 R2 Gâchette droite A
9 9 SL SL Retour D
10 10 ST ST Démarrer D
11 Modus Modus Modus Modus D
12 Croix dir. Croix dir. Croix dir. Croix dir. A
Axe X Axe X Axe X Axe X Axe X A
Levier main gauche 2 L2 L2 A A
Levier main droite 1 R2 R2 X A
Pédale des gaz RYK X X Right trigger A
Pédale de frein RYL Left trigger A
Diode Rouge Rouge Rouge Rouge Diode
Exemple 1
Etape Action Résultat
1 Maintenez enfoncé Select pendant La diode clignote
3 secondes rapidement
2 Pressez O La diode arrête de clignoter
3 Pressez la pédale des gaz La diode clignote
rapidement
O est maintenant la pédale des gaz et la pédale des gaz est la pédale des gaz
7. Cliquez sur Terminer pour achever l'installation.
Installation pour les utilisateurs PS2 et Xbox
Branchez le câble PS2 ou Xbox du volant dans une des prises libres de votre console.
Installation pour les utilisateurs PC et PS3
Branchez le câble USB du volant dans une des prises USB libres de votre PC ou de votre PS3.
Sélection de mode
Le 4-in-1 Vibration Wheel supporte les modes Digital et Analogique sur PS2. Pressez le bouton
Mode pour changer de mode.
Retour de force à vibration
Le 4-in-1 Vibration Wheel offre un retour de force à vibration sur PS2. Pressez les boutons Select
et Haut pour activer ou désactiver le retour de force.
Calibration automatique
Pour calibrer le volant, pressez le bouton Mapping pendant deux secondes et la diode rouge
clignotera rapidement pour indiquer que le volant est en train de se calibrer.
Réglage de la sensibilité
Le 4-in-1 Vibration wheel possède six réglages de sensibilité. Le réglage normal est trois. Pour
ajuster la sensibilité pressez les boutons Select et Droit. Chaque fois que vous pressez ces deux
boutons, la sensibilité s'incrémentera de un jusqu'à atteindre le six et elle repartira sur un. Donc, si
vous voulez réduire la sensibilité à partir du réglage normal (trois) vers un, pressez les boutons
Select et Droit quatre fois : 4, 5, 6, 1.
Programmation des boutons
1 Maintenez enfoncé le bouton pendant 3 secondes pour entrer en mode programmation - la
diode rouge clignotera rapidement. Pressez les boutons que vous voulez changer et la diode
rouge arrêtera de clignoter. Pressez maintenant la fonction désirée - la diode clignotera
rapidement lorsque la programmation sera terminée (PS2 uniquement)
2 Les boutons 1, 2, 3, 4, 5, 6, 7, 8, RYK et RYL peuvent être programmés quand vous utilisez un
PC. La pédale des gaz, la pédale de frein, la poignée-L, la poignée-R, L1, L2, R1, R2, SL, ST,
, O, X et peuvent être programmés quand vous utilisez une PS2.
Sortir du mode programmation :
Le volant sortira automatiquement du mode programmation après 6 secondes ou pressez le bouton
Select pour sortir immédiatement du mode programmation.
Réinitialiser la programmation des boutons
Maintenez enfoncé le bouton Mode pendant 2 secondes pour réinitialiser la programmation de tous
les boutons.
PW21_manual_final.qxd 15/08/2008 15:21 Page 16
Page 10

Exemple 2
Etape Action Résultat
1 Maintenez enfoncé Select pendant La diode clignote
3 secondes rapidement
2 Pressez L1 La diode arrête de clignoter
3 Pressez X La diode clignote
rapidement
L1 est à présent X et X est X
Support Technique
Je ne peux pas démarrer. Ne vous inquiétez pas, nous sommes là pour vous aider !
La plupart des produits qui nous sont retournés comme étant défectueux ne le sont pas du tout en
réalité : ils n'ont tout simplement pas été installés correctement.
Si vous rencontrez la moindre difficulté avec ce produit, merci de vous rendre tout d'abord sur
notre site web www.saitek.com. La section " Support Technique " vous fournira toute l'information
dont vous avez besoin pour tirer le meilleur parti de votre produit, et devrait vous aider à résoudre
tous les problèmes que vous pourriez éventuellement rencontrer.
Si vous n'avez pas accès à Internet, ou si vous ne trouvez pas de réponse à votre question sur
notre site web, merci de bien vouloir contacter l'équipe locale du Support Technique Saitek. Notre
objectif consiste à offrir un support technique complet et approfondi à tous nos utilisateurs, donc,
avant de nous appeler, merci de bien vouloir vérifier que vous avez toute l'information requise à
portée de main.
Pour trouver votre équipe locale du Support Technique Saitek, merci de vous référer à la feuille
" Centre de Support Technique " qui vous a été fournie dans l'emballage de ce produit.
Conditions de garantie
1 La période de garantie est de deux ans à compter de la date d'achat, avec soumission d'une
preuve d'achat.
2 Les instructions de fonctionnement doivent être correctement suivies.
3 Sont exclus spécifiquement tous les dommages dus à une fuite des piles.
NB : Les piles risquent de fuir si elles sont laissées trop longtemps à l'intérieur d'un appareil. Il
est donc recommandé d'inspecter les piles de façon régulière.
4 Le produit ne doit pas avoir été endommagé par une dégradation, une utilisation non
conforme, une négligence, un accident, une destruction ou une altération du numéro de série,
l'utilisation de voltages ou courants électriques inadaptés, la réparation, la modification ou la
4
6
7
1
5
8
9
10
11
12
Assignation des boutons pour PC et PS2/PS3
PW21_manual_final.qxd 15/08/2008 15:21 Page 18
L1/7
/1
TRIANGLE
L2/6
/4
SQUARE
Saitek
SELECT/9
START/10
MOD E
R1/8
C
I
/2
R
E
L
C
CROSS
R2/5
/3
Page 11

VOLANTE CON VIBRAZIONE 4-IN-1 SAITEK
Caratteristiche
• Compatibile con PC, PS2/PS3 e Xbox
• Impostazione dei bottoni programmabile usando PC e PS2
• Sostegno per il grembo staccabile per un completo comfort e controllo quando giocate sul
divano
• Il morsetto rimovibile fissa in posizione il volante quando siete seduti alla scrivania
• La regolazione dinamica della sensibilità vi aiuta ad adattarvi a diversi giochi di guida
• Usate i pedali inclusi o i comandi del volante per accelerare e frenare, in funzione della
posizione di gioco
Installazione
1 Agganciate l'unità principale del volante al morsetto per la scrivania o al sostegno per il
grembo.
3 Se usate il sostegno per la scrivania, posizionate il volante sul bordo del piano della scrivania
e girate in senso orario la vite del morsetto fino a quando l'unità è fissata alla scrivania in
modo sicuro. Non stringete troppo!
4 Inserite il cavo PS/2 dei pedali nella presa del volante, assicurandovi che il connettore sia
saldamente collegato.
5 Posizionate i pedali sul pavimento nella vostra posizione di guida preferita.
Compatibilità con i sistemi
PC con Windows XP/Vista (solo 32 bit), PS2/PS3 e Xbox
Installazione del software per PC
1. Dopo avere acceso il computer, chiudete tutti i programmi in esecuzione e inserite il CD di
installazione nel vostro drive CD-ROM.
2. Quando appare la schermata introduttiva, fate click su Install Software per continuare. Se il
CD non parte automaticamente, selezionate "Start" dalla barra delle applicazioni di Windows®,
poi "Esegui", digitate D:\Setup.exe e fate clic su OK (dove D:\ è la lettera che indica il vostro
drive CD-ROM). Per gli utenti Vista, la schermata chiederà "Do you want to run this file?"
Premete Run. Apparirà ora una finestra con il messaggio "Aprogram needs your permission to
continue". Premete Continue.
3. Quando appare lo schermo di benvenuto, fate click su Next per continuare.
4. Dopo avere letto il Disclaimer, selezionate l'opzione "I accept the terms of the Disclaimer" e
fate click su Next per continuare.
5. Inserite il cavo USB in una porta USB del vostro computer e fate click su Next.
maintenance par toute personne ou tiers autre que notre propre Service Après Vente ou un
centre de réparation agréé, l'utilisation ou l'installation de pièces de remplacement qui ne
soient pas des pièces Saitek, ou la modification du produit de quelque manière que ce soit, ou
l'introduction de ce produit dans n'importe quel autre produit, ou des dommages causés au
produit par un accident, le feu, des inondations, la foudre, les catastrophes naturelles, ou toute
utilisation allant à l'encontre des instructions fournies par Saitek PLC.
5 Les obligations de Saitek sont limitées à la réparation ou au remplacement par un produit
identique ou similaire, à notre convenance. Afin d'obtenir la réparation d'un produit sous cette
garantie, veuillez présenter le produit et sa preuve d'achat (c'est à dire le ticket de caisse ou
une facture) au Centre de Support Technique Saitek agréé (la liste vous est fournie sur une
feuille séparée se trouvant également dans l'emballage du produit), en ayant au préalable
payé les frais d'envoi. Toute condition en contradiction avec des lois, règles et/ou obligations
fédérales ou étatiques ne pourra pas être appliquée dans ce territoire spécifique et Saitek
adhèrera à ces lois, règles et/ou obligations.
6 Lors du renvoi du produit en vue d'une réparation, veillez s'il vous plaît à l'emballer
soigneusement, en utilisant de préférence l'emballage d'origine. Merci également de bien
vouloir inclure une note explicative.
IMPORTANT : afin de vous permettre d'éviter des coûts et des désagréments inutiles, merci
de vérifier soigneusement que vous avez lu et suivi les instructions figurant dans ce manuel.
Cette garantie agit en lieu et place de toutes les autres garanties, obligations et
responsabilités. TOUTES GARANTIES, OBLIGATIONS OU RESPONSABILITES IMPLICITES,
INCLUANT SANS RESTRICTION LES GARANTIES ET CONDITIONS IMPLICITES DE
QUALITE OU D'ADAPTABILITE A UN USAGE SPECIFIQUE, SONT LIMITEES, EN DUREE,
A LA DUREE DE CETTE GARANTIE LIMITEE ECRITE. Certains Etats n'autorisent pas de
restrictions de durée de la garantie, auquel cas les restrictions décrites ci-dessus ne vous sont
pas applicables. EN AUCUN CAS NOUS NE POURRONS ETRE TENUS POUR
RESPONSABLES POUR DES DEGATS SPECIFIQUES OU RESULTANT D'UNE
INFRACTION ACETTE GARANTIE OU A TOUTE AUTRE GARANTIE, EXPRESSE OU
IMPLICITE, QUELLE QU'ELLE SOIT. Certains Etats n'autorisent pas l'exclusion ou la
restriction des dégâts accidentels, indirects, spéciaux ou induits, auquel cas la restriction cidessus ne vous est pas applicable. Cette garantie vous accorde des droits légaux spécifiques,
et vous pouvez également bénéficier d'autres droits variant d'un Etat à l'autre.
Ce symbole sur le produit ou dans le manuel signifie que votre équipement
électrique et électronique doit être, en fin de vie, jeté séparement de vos
déchets ménagés. Il existe en France des systèmes de collecte différents pour
les déchets recyclables. Pour plus d'information, veuillez contacter les autorités
locales ou le revendeur chez qui vous avez acheté le produit.
PW21_manual_final.qxd 15/08/2008 15:21 Page 20
Page 12

6. Nella schermata di registrazione, selezionate "Check this box to register now" e seguite le
istruzioni sullo schermo, oppure scegliete di selezionare questa opzione in seguito.
7. Fate click su Finish per completare l'installazione.
Installazione per PS2 e Xbox
Inserite il cavo del controller per PS2 o Xbox del volante in una presa libera della vostra console.
Installazione per PC o PS3
Inserite il cavo USB del volante in una porta USB libera del vostro PC o della vostra PS3.
Cambio di modo
Il volante con vibrazione 4-in-1 supporta le modalità digitale e analogica su PS2. Premete il bottone
"Mode" per cambiare modalità.
Feedback con forza e vibrazione
Il volante con vibrazione 4-in-1 offre un feedback di forza e di vibrazione con PS2. Premete i
bottoni "Select" e "Up" per inserire o disinserire la forza di feedback.
Calibrazione automatica
Per calibrare il volante, premete il bottone "Mapping" per due secondi e il LED rosso inizierà a
lampeggiare rapidamente per mostrare che il volante si sta calibrando.
Regolazione della sensibilità
Il volante con vibrazione 4-in-1 ha sei livelli di sensibilità. Il livello normale è il tre.
Per regolare la sensibilità premete i bottoni "Select" e "Right". Ogni volta che premete i due bottoni,
la sensibilità aumenta di un livello fino a quando raggiunge il sei, e poi ricomincia da uno. Così, se
volete ridurre la sensibilità dall'impostazione normale (tre) a uno, premete i bottoni "Select" e
"Right" quattro volte: 4, 5, 6, 1.
Programmazione dei bottoni
1 Mantenete premuto il bottone "Select" per 3 secondi per entrare nel modo di programmazione
- il LED rosso lampeggerà rapidamente. Premete il bottone che volete modificare e il LED
rosso smetterà di lampeggiare. Ora premete la funzione desiderata - il LED lampeggerà
rapidamente dopo il completamento della programmazione (solo PS2)
2 Tutti i bottoni 1, 2, 3, 4, 5, 6, 7, 8, RYK e RYL possono essere programmati quando si usa un
PC. Il pedale dell'acceleratore, il pedale del freno, leva sinistra, leva destra, L1, L2, R1, R2,
SL, ST,
, O, X e possono essere programmati quando si usa PS2.
Uscita dal modo di programmazione:
Il volante esce automaticamente dal modo di programmazione dopo 6 secondi o premendo il
bottone "Select" per abbandonare immediatamente la programmazione.
Reset della programmazione dei bottoni
Mantenete premuto il bottone "Mode" per 2 secondi per annullare la programmazione di tutti i
bottoni.
Designazione di bottoni e assi
Modo PC Modo PS2 Modo PS3 Modo Xbox Digitale/Analogico
13XXAA
2 4 XA
31UUYA
42OOBA
5 7 L1 L1 bianco A
6 8 R1 R1 nero A
7 6 L2 L2 Grilletto sinistro A
8 5 R2 R2 Grilletto destro A
9 9 SL SL Back D
10 10 ST ST Start D
11 Modo Modo Modo Modo D
12 D_Pad D_Pad D_Pad D_Pad A
Asse X Asse X Asse X Asse X Asse X A
Leva sinistra 2 L2 L2 A A
Leva destra 1 R2 R2 X A
Pedale Gas RYK X X Right trigger A
Pedale freno RYL Left trigger A
LED Rosso Rosso Rosso Rosso LED
PW21_manual_final.qxd 15/08/2008 15:21 Page 22
Page 13

Esempio 2
Passo Azione Risultato
1 Premere "Select" per 3 secondi il LED lampeggia rapidamente
2 Premere L1 il LED smette di lampeggiare
3 Premere X il LED lampeggia rapidamente
L1 è ora X e X è X
Assistenza tecnica
Avvio impossibile? Non preoccupatevi, siamo qui per aiutarti!
Quasi tutti i prodotti che ci vengono resi come difettosi non sono affatto difettosi - non sono stati
semplicemente installati correttamente.
Se avete delle difficoltà con questo prodotto, visitate prima di tutto il nostro sito Web
www.saitek.com. L'area dell'assistenza tecnica vi fornirà tutte le informazioni che vi occorrono per
ottenere il meglio dal vostro prodotto e per risolvere qualsiasi problema da voi riscontrato.
Se non avete accesso all'Internet o il sito Web non è in grado di rispondere alla vostra domanda,
rivolgetevi al vostro Team Assistenza Tecnica Saitek locale. Offriamo l'assistenza tecnica rapida,
vasta e completa a tutti i nostri utenti. Prima di chiamarci accertatevi di avere tutte le informazioni
pertinenti a portata di mano.
Troverete nel foglio separato fornito con questo prodotto i dati relativi al vostro Centro di
Assistenza Tecnica locale.
Condizioni della garanzia
1 Il periodo di garanzia è di 2 anni dalla data d'acquisto con presentazione della prova
d'acquisto.
2 Seguire le istruzioni per il funzionamento.
3 Esclude espressamente qualsiasi danno associato alla perdita delle batterie.
NB: le batterie possono perdere se sono lasciate inutilizzate in un prodotto per un periodo di
tempo prolungato, e per questo è consigliabile controllarle regolarmente.
4 Il prodotto non deve essere stato danneggiato a causa di deturpazione, uso errato, abuso,
negligenza, incidente, distruzione o alterazione del numero di serie, incorrette tensioni o
correnti elettriche, riparazione, modificazione o manutenzione effettuata da qualsiasi persona o
parte eccetto dal nostro servizio di manutenzione o un centro di manutenzione autorizzato,
utilizzo o installazione di parti di ricambio non Saitek nel prodotto o la modifica di questo
prodotto in qualsiasi modo, o l'incorporazione di questo prodotto in qualsiasi altro prodotto, o
danni al prodotto provocato da incidente, incendio, inondazione, fulmini o forza maggiore, o
Esempio 1
Passo Azione Risultato
1 Premere "Select" per 3 secondi il LED lampeggia rapidamente
2 Premere O il LED smette di lampeggiare
3 Premere il pedale del gas il LED lampeggia rapidamente
O è ora il pedale del gas e il pedale del gas è il pedale del gas il
4
6
7
1
5
8
9
10
11
12
Assegnazione dei bottoni per PC e PS2/PS3
PW21_manual_final.qxd 15/08/2008 15:21 Page 24
L1/7
/1
TRIANGLE
L2/6
/4
SQUARE
Saitek
R1/8
C
I
/2
R
E
L
C
CROSS
R2/5
/3
SELECT/9
START/10
MOD E
Page 14

VOLANTE DE VIBRACIÓN 4-EN-1 SAITEK
Características
• Compatible con PC, PS2/PS3 y Xbox
• Configuraciones de botones programables si se usa PC y PS2
• Soporte de regazo desmontable para un confort y control completos cuando juega desde el
sofá
• Abrazadera desmontable que fija el volante en su sitio si está sentado junto a su escritorio
• El ajuste de sensibilidad sobre la marcha le ayuda a adaptarse a diferentes juegos de
conducir
• Utilice los pedales incluidos o paletas de volante para acelerar y frenar, dependiendo de su
entorno de juego
Instalación del controlador
1 Ajuste la unidad de volante principal a la abrazadera o al soporte de regazo.
3 Si utiliza la abrazadera, coloque la unidad de volante al borde de su escritorio, y gire el control
de la abrazadera en el sentido de las agujas del reloj hasta que la unidad esté acoplada de un
modo seguro a su escritorio. ¡No apriete demasiado!
4 Conecte el cable PS/2 de la unidad de pedal al enchufe de la unidad de volante,
asegurándose que el conector se engancha firmemente en su lugar.
5 Coloque la unidad de pedal en el suelo en su posición de conducir preferida.
Compatibilidad del sistema
PC con Windows XP/Vista (sólo 32-bits), PS2/PS3 y Xbox
Instalación de software para PC
1. Con su ordenador encendido, cierre todos los programas que estén en ese momento en
funcionamiento e introduzca el CD de Instalación en su unidad de CD-ROM.
2. Cuando aparezca la Pantalla de Introducción, haga clic en Instalar Software para continuar. Si
el CD no comienza automáticamente, seleccione Iniciar (Start) desde la Barra de Tareas de
Windows®, después Activar (Run) y escriba D:\Setup.exe y haga clic en OK - (si D:\ es la
letra que corresponda a su unidad de CD-ROM).Para usuarios de Vista, la pantalla le
preguntará ¿Quiere activar este archivo? (Do you want to run this file?) Pulse en Activar
(Run). Acontinuación aparecerá una pantalla diciendo Un programa necesita su autorización
para continuar. Pulse Continuar.
3. Cuando aparece la pantalla de Bienvenida (Welcome), haga clic en Siguiente (Next) para
continuar.
4. Después de leer el Descargo de Responsabilidad, seleccione Acepto los términos de la
opción Descargo de Responsabilidad (I accept….) y haga clic en Siguiente (Next) para
continuar.
qualsiasi uso che contravviene alle istruzioni fornite da Saitek plc.
5 Gli obblighi di Saitek saranno limitati alla riparazione o sostituzione con la stessa unità o con
un'unità simile, a scelta di Saitek. Per ottenere le riparazioni ai sensi della presente garanzia,
presentare il prodotto e la prova d'acquisto (ad es. la ricevuta o la fattura) al Centro Assistenza
Tecnica Saitek (elencato nel foglio separato contenuto nella confezione di questo prodotto),
con le spese di trasporto prepagate. Qualsiasi requisito che è in conflitto con qualsiasi legge,
regolamento e/o obbligo statale o federale non sarà applicabile in quel territorio particolare e
Saitek aderirà a quelle leggi, regole e/o obblighi.
6 Quando il prodotto viene reso per la riparazione, imballarlo molto attentamente,
preferibilmente utilizzando i materiali d'imballaggio iniziali. Includere inoltre una nota
esplicativa.
7 IMPORTANTE: per risparmiare costi e inconvenienti inutili, controllare attentamente di aver
letto e seguito le istruzioni in questo manuale.
8 Questa garanzia sostituisce tutte le altre garanzie, gli obblighi o le responsabilità esplicite. LA
DURATADI QUALSIASI GARANZIA, OBBLIGO, O RESPONSABILITÀ IMPLICITI,
COMPRESI MA NON LIMITATI ALLE GARANZIE IMPLICITE DI RESPONSABILITÀ E
IDONEITÀ PER UNO SCOPO PARTICOLARE, SARÀ LIMITATA ALLA DURATA DELLA
PRESENTE GARANZIA LIMITATA SCRITTA. Alcuni Stati non consentono limitazioni sulla
durata di una garanzia implicita, perciò le suddette limitazioni possono non essere pertinenti
nel vostro caso. NON SAREMO MAI RESPONSABILI PER QUALSIASI DANNO SPECIALE O
CONSEGUENTE PER VIOLAZIONE DI QUESTAO DI QUALSIASI ALTRA GARANZIA,
ESPLICITAO IMPLICITA, DI QUALSIASI TIPO. Alcuni Stati non consentono l'esclusione o la
limitazione di danni speciali, incidentali o conseguenti, per cui la suddetta limitazione può non
applicarsi nel vostro caso. La presente garanzia vi conferisce diritti legali speciali, e potete
avere anche altri diritti che variano da uno Stato all'altro.
Questo simbolo riportato sul prodotto o nelle istruzioni indica che, al termine
della loro vita, le apparecchiature elettriche ed elettroniche devono essere
smaltite separatamente dai rifiuti domestici. Nell'Unione Europea sono
disponibili sistemi per la raccolta separata e il riciclaggio dei rifiuti.
Per richiedere ulteriori informazioni contattare le autorità locali o il rivenditore dove è stato
effettuato l'acquisto del prodotto.
PW21_manual_final.qxd 15/08/2008 15:21 Page 26
Page 15

2 Todos los botones 1, 2, 3, 4, 5, 6, 7, 8, RYK y RYL se pueden programar si utiliza un PC.
Pueden programarse el Pedal de Gas, Pedal de freno, Mano Izquierda, Mano Derecha, L1,
L2, R1, R2, SL, ST,
, O, X y con PS2.
Modo de programa de salida:
El volante saldrá del modo de programación automáticamente después de 6 segundos o presione
el botón Seleccionar (Select) para salir de la programación inmediatamente.
Reconfiguración de la programación de botones
Presione y mantenga presionado el botón Modo (Mode) durante 2 segundos para reconfigurar
toda la programación de botones.
Designazione di bottoni e assi
Modo PC Modo PS2 Modo PS3 Modo Xbox Digital/Análogo
13XXA A
2 4 XA
31UUYA
42OOB A
5 7 L1 L1 Blanco A
6 8 R1 R1 Negro A
7 6 L2 L2 Disparador izquierdo A
8 5 R2 R2 Disparador derecho A
9 9 SL SL Atrás D
10 10 ST ST Inicio D
11 Modo Modo Modo Modo D
12 Alfombrilla_D Alfombrilla_D Alfombrila_D Alfombrilla_D A
Axis X Axis X Axis X X Axis Axis X A
Palanca izquierda 2 L2 L2 A A
Palanca derecha 1 R2 R2 X A
Pedal de gas RYK X X Right trigger A
Pedal de freno RYL Left trigger A
LED Rojo Rojo Rojo Rojo LED
5. Enchufe el cable USB en uno de los puertos USB de su ordenador y haga clic en Siguiente
(Next).
6. En la pantalla de Registro, seleccione Marque esta casilla (Check this box) para registrarse en
ese momento y siga las instrucciones en la pantalla, o puede elegir el seleccionar esta opción
más tarde.
7. Haga clic en Terminar (Finish) para completar la instalación.
Instalación para usuarios de PS2 y Xbox
Conecte el cable del controlador Xbox o PS2 del volante en uno de los enchufes de controlador
libres de su consola.
Instalación para usuarios de PC o PS3
Enchufe el cable USB del volante en uno de los puertos USB libres de su PS3 o PC.
Cambio de modo
El Volante de Vibración 4-en-1 permite modos Análogos y Digitales en PS2. Presione el botón
Modo (Mode) para cambiar los modos.
Reacciones de fuerza de vibración
El Volante de Vibración 4-en-1 presenta reacciones de fuerza de vibración con PS2. Presione los
botones Seleccionar (Select) y Arriba (Up) para encender y apagar las reacciones de fuerza.
Auto calibrado
Para calibrar el volante, presione el botón de Delineación (Mapping) durante dos segundos y el
LED (diodo emisor de luz) rojo destellará rápidamente para mostrar que el volante se está
calibrando.
Ajuste de sensibilidad
El Volante de Vibración 4-en-1 tiene seis configuraciones de sensibilidad. La configuración normal
es tres.
Para ajustar la sensibilidad presione los botones Seleccionar (Select) y Derecha (Right). Cada vez
que presione los dos botones, la sensibilidad del stick aumentará un incremento hasta que
alcance seis y después volverá a empezar desde uno. Por tanto, si quiere reducir la sensibilidad
de la configuración normal (tres) a uno, presione los botones Seleccionar (Select) y Derecha
(Right) cuatro veces: 4, 5, 6, 1.
Programación de botones
1 Presione y mantenga presionado el botón Seleccionar (Select) durante 3 segundos para
entrar en el modo de programación: el LED (diodo emisor de luz) rojo destellará rápidamente.
Presione el botón que quiera cambiar y el LED rojo dejará de destellar. Ahora presione la
función deseada- el LED destellará rápidamente después de completar la programación (sólo
PS2)
PW21_manual_final.qxd 15/08/2008 15:21 Page 28
Page 16

Ejemplo 2
Paso Acción Resultado
1 Presione y mantenga presionado LED destella rápidamente
Seleccionar (Select) durante 3 segundos
2 Presione L1 LED deja de destellar
3 Presione X LED destella rápidamente
L1 es ahora X y X es X
Asistencia técnica
¿No puede empezar?: No se preocupe, ¡aquí estamos para ayudarle!
Casi la totalidad de los productos que nos devuelven como averiados no tienen ningún fallo: es
simplemente que no se han instalado correctamente.
Si experimenta alguna dificultad con este producto, rogamos que visite primeramente nuestro sitio
web: www.saitek.com.
El área de asistencia técnica le proporcionará toda la información que necesita para obtener el
mayor rendimiento de su producto y debería resolver cualesquiera problemas que pudiese tener.
Si no dispone de acceso a Internet o si no encuentra en el sitio web respuesta a su pregunta,
rogamos que se ponga en contacto con el equipo de asistencia técnica de Saitek. Nuestro objetivo
es ofrecer asistencia técnica rápida y completa a todos nuestros usuarios, así que le rogamos que
antes de llamar tenga a mano toda la información relevante.
Para hallar el Centro de asistencia técnica de Saitek de su localidad, rogamos que consulte la hoja
de Centros de asistencia técnica incluida en el paquete de este producto.
Condiciones de la garantía
1 El período de garantía es de 2 años desde la fecha de compra con presentación de
comprobante.
2 Se deben seguir las instrucciones de funcionamiento.
3 Se excluye específicamente cualquier daño asociado con pérdidas de pilas.
Nota: Las pilas pueden perder cuando se dejan en un producto sin usar durante cierto tiempo,
por lo que se recomienda inspeccionar las pilas regularmente.
4 El producto no se deberá haber dañado como resultado de modificación, uso indebido, abuso,
negligencia, accidente, destrucción o alteración del número de serie, tensiones o corrientes
eléctricas inadecuadas, reparación, modificación o mantenimiento por parte de cualquier
persona que no sea de nuestras instalaciones de servicio o de un centro de servicio
autorizado, uso o instalación de piezas de repuesto que no sean de Saitek en el producto o
Ejemplo 1
Paso Acción Resultado
1 Presione y mantenga presionado LED destella rápidamente
Seleccionar (Select) durante 3 segundos
2 Presione O LED deja de destellar
3 Presione Pedal de Gas LED destella rápidamente
O es ahora Pedal de Gas y Pedal de Gas es Pedal de Gas
4
6
7
1
5
8
9
10
11
12
Asignación de botones para PC y PS2/PS3
PW21_manual_final.qxd 15/08/2008 15:21 Page 30
L1/7
/1
TRIANGLE
L2/6
/4
SQUARE
Saitek
R1/8
C
I
/2
R
E
L
C
CROSS
R2/5
/3
SELECT/9
START/10
MOD E
Page 17
HR
NL
Systeem compatibiliteit
PC met Windows XP/Vista
Het aansluiten van het apparaat
Met uw PC in geschakeld, sluit de USB connector aan op de PC. Volg de installatiestappen
van het apparaat om zo de installatie te voltooien van het nieuwe USB apparaat op het
systeem.
CZ
Vista/
Vista
Vista
modificación de este producto de cualquier manera o la incorporación de este producto en
cualesquiera otros productos o daños causados por accidente, incendio, inundación, rayos o
fuerza mayor o por cualquier uso que viole las instrucciones suministradas por Saitek plc.
5 Las obligaciones de Saitek se limitarán a reparar o sustituir la unidad por otra igual o similar,
según optemos. Para obtener reparaciones de acuerdo a esta garantía, deberá presentar el
producto y comprobante de compra (p. ej., una factura o un albarán) al Centro de asistencia
técnica de Saitek autorizado (listado en una hoja separada empaquetada con este producto) y
pagando los gastos de transporte. Cualesquiera requisitos que entren en conflicto con
cualesquiera leyes, normas y/u obligaciones estatales o federales no serán aplicables en
dicho territorio en particular y Saitek se atendrá a dichas leyes, normas y/u obligaciones.
6 Cuando se devuelva el producto para reparar, rogamos que se empaquete con mucho
cuidado, preferentemente utilizando los materiales de envasado originales. Se ruega adjuntar
una nota explicativa.
7 IMPORTANTE: Para ahorrarse costes e inconvenientes innecesarios, rogamos que
compruebe cuidadosamente que ha leído y seguido las instrucciones de este manual.
8 Esta garantía sustituye a cualesquiera otras garantías, obligaciones o responsabilidades
explícitas. CUALESQUIERA GARANTÍAS, OBLIGACIONES O RESPONSABILIDADES
IMPLÍCITAS, INCLUYENDO, SIN LIMITARSE A LO MISMO, LAS GARANTÍAS IMPLÍCITAS
DE COMERCIABILIDAD Y APTITUD PARA UN FIN PARTICULAR, SE LIMITARÁN EN
CUANTO A DURACIÓN AL PERÍODO DE ESTA GARANTÍA LIMITADAESCRITA. Algunos
estados no permiten limitaciones en cuanto al tiempo de duración de una garantía implícita,
así que las limitaciones anteriores podrían no ser aplicables para usted. EN NINGÚN CASO
SEREMOS RESPONSABLES DE NINGÚN DAÑO ESPECIAL O INDIRECTO POR
INCUMPLIENTO DE ESTA O CUALESQUEIRA OTRAS GARANTÍAS, EXPLÍCITAS O
IMPLÍCITAS Y DE LA NATURALEZA QUE FUESEN. Algunos estados no permiten la
exclusión o limitación de daños especiales, incidentales o indirectos, así que la limitación
anterior podría no aplicarse a usted. Esta garantía le da derechos legales específicos y
también podría tener otros derechos, que varían entre estados.
Este símbolo en el producto o en las instrucciones significa que no debería tirar
a la basura doméstica el equipo eléctrico o electrónico al final de su vida útil.
En los países de la UE existen sistemas de recogida separados para reciclaje.
Para más información, rogamos que se ponga en contacto con la autoridad
local o con el vendedor al que compró el producto.
PW21_manual_final.qxd 15/08/2008 15:21 Page 32
Page 18

SE Maskinvarukrav
DK PC med windows XP/Vista
NO Anslutning / Installation
Starta din dator, koppla in enheten till din dators USB port. Följ anvisningarna för att slutföra
installationen av den nya USB-enheten.
RU
TK
/Vista
Vista
GR
HU
Rendszerkövetelmények
PC Windows XP/Vista
Csatalakoztatás a számítógéphez
Csatlakoztassa Saitek egerét számítógépe USB portján keresztül.
Kövesse a telepítési varázsló utasításait a sikeres installálás érdekében.
PL
PT
Compatibilidade com sistema
PC Windows XP/Vista
Como conectar o aparelho
Ligue o computador, inserte o plugue USB do aparelho com uma das entradas USB do
computador. Siga as intruções indicadas para completar a instalação do novo aparelho no
sistema do computador.
/Vista
Vista
PW21_manual_final.qxd 15/08/2008 15:21 Page 34
Page 19

© 2007 Saitek Ltd. Made and printed in China.
All trademarks are the property of their respective owners.
V.1.0 15/08/08
PW21
www.saitek.com
4-in-1 Vibration Wheel
Saitek
®
PW21_manual_final.qxd 15/08/2008 15:21 Page 36
 Loading...