

Page 1

Saitek
Pro Bridge 3000
TM
User Manual
Pro Bridge manual final.qxd 1/11/2007 2:46 PM Page 1
Page 2

TABLE OF CONTENTS
QUICK START
INTRODUCTION
KEYS AND FEATURES
1. GETTING STARTED: THE BASICS
1.1 Power On
1.2 Get to Know the Menu System
1.3 Ready? Time to Deal!
1.4 Learn to Bid…
1.5 …and Learn to Play!
1.6 Checking Out the Results
a. Team of Four Results
b. Rubber Bridge Results
1.7 Playing the Next Hand
2. MAIN MENU OPTIONS
2.1 Accessing the Deal Menu
2.2 Selecting a Game Type/Level
a. Rubber Bridge
b. Team of Four (Duplicate Bridge)
c. Computer Peeks
2.3 Sound Effects On/Off
2.4 Light Too Weak/Strong? Adjust It!
2.5 Bidding Systems
2.6 English/French? It's Your Choice!
2.7 Resetting the Score
3. DEAL MENU OPTIONS
3.1 Random Deals
3.2 Numbered Deals
3.3 Edited Deals
3.4 Playing the Same Deal
4. EDIT MENU OPTIONS
4.1 Playing Your Edited Deal
4.2 Try Editing a Deal!
4.3 Changing the Dealer/Vulnerability
4.4 Rotating the Hands
5. MORE FEATURES TO EXPLORE
5.1 Viewing All the Hands
5.2 Illegal Bidding/Play
5.3 Need a Hint? Just Ask!
5.4 Change Your Mind? Try Again!
5.5 Autoplay: The Computer Takes Over
5.6 Review Play with History Mode!
5.7 Checking the Score
5.8 Game Memory
6. TECHNICAL DETAILS
6.1 The ACL Function
6.2 Care and Maintenance
6.3 Technical Specifications
6.4 Technical Support
6.5 Information for customers in the United
States
6.6 Conditions of Warranty
Appendix A: Bidding System Information
Appendix B: Scoring Information
QUICK START
To enjoy a game of Bridge right away,
without reading the entire manual first, simply
follow these Quick Start steps!
1 Locate the battery compartment in the
base of the unit, and slide the cover off
in the direction of the arrows. Insert four
"AAA"(AM4/R03) alkaline batteries,
making sure that you observe the correct
polarity (+/-).
2 Press the Cover Release Button, and
then lift up and remove the protective
cover. For convenience, you can store
the cover by attaching it to the back of
the unit whenever you're playing!
3 Press GO/STOP to turn the computer on.
When the display shows the Main Menu
(PGSIBLR), we're ready to start! If your
display shows something different, press
ESCAPE until the Main Menu is
displayed.
4 The flashing P indicates the current
option, Play. Press ENTER to select
this option for our sample game, and
you'll be taken directly to the Deal Menu.
5 The display now shows RNES, with the
letter R flashing to indicate Random
deal. Press ENTER to select Random
Deal, and the computer will automatically
deal the first hand. If you'd prefer a
different random hand, simply press
ESCAPE and ENTER for another deal.
6 Your hand is displayed, along with any
bids made so far. flashes,
indicating that it's your turn to bid for
South. Press a Suit Key (
qrew), and
then a Value Key (2/3/4…) to make your
bid. The NO TRUMP Key is also
available for bidding. Finally, press
ENTER. As you'll see later, the Cursor
Keys can also be used for bidding and
play. To pass at any point during bidding,
press PASS, and then ENTER. Bidding
continues until three consecutive passes
(P) have been made. The display now
shows your hand and dummy's hand.
The trump suit, if any, is underlined on
the left-hand side, and play begins.
7 If it's your opening lead, will flash;
otherwise the computer automatically
leads, and will flash on your turn.
The computer plays East, West, and
North (if North is not declarer or dummy).
If North is declarer or dummy, you'll play
both North and South. Play your cards in
turn, pressing a Suit Key, a Value Key,
and ENTER. If a suit is forced, you need
only press a Value Key and ENTER; if a
card is forced, you need only press
ENTER. Once the trick is complete, the
contract and score are displayed. Press
ENTER, as prompted. Then, continue as
described above, until all 13 tricks have
been won.
That's all there is to it - you've learned
the basics! Section 1.6 will show you
how to proceed from this point on…
To interrupt your game and store it in
memory, press GO/STOP. To continue
playing at any time, press GO/STOP
again to turn the computer back on!
SOUTH
SOUTH
SOUTH
Pro Bridge manual final.qxd 1/11/2007 2:46 PM Page 2
Page 3
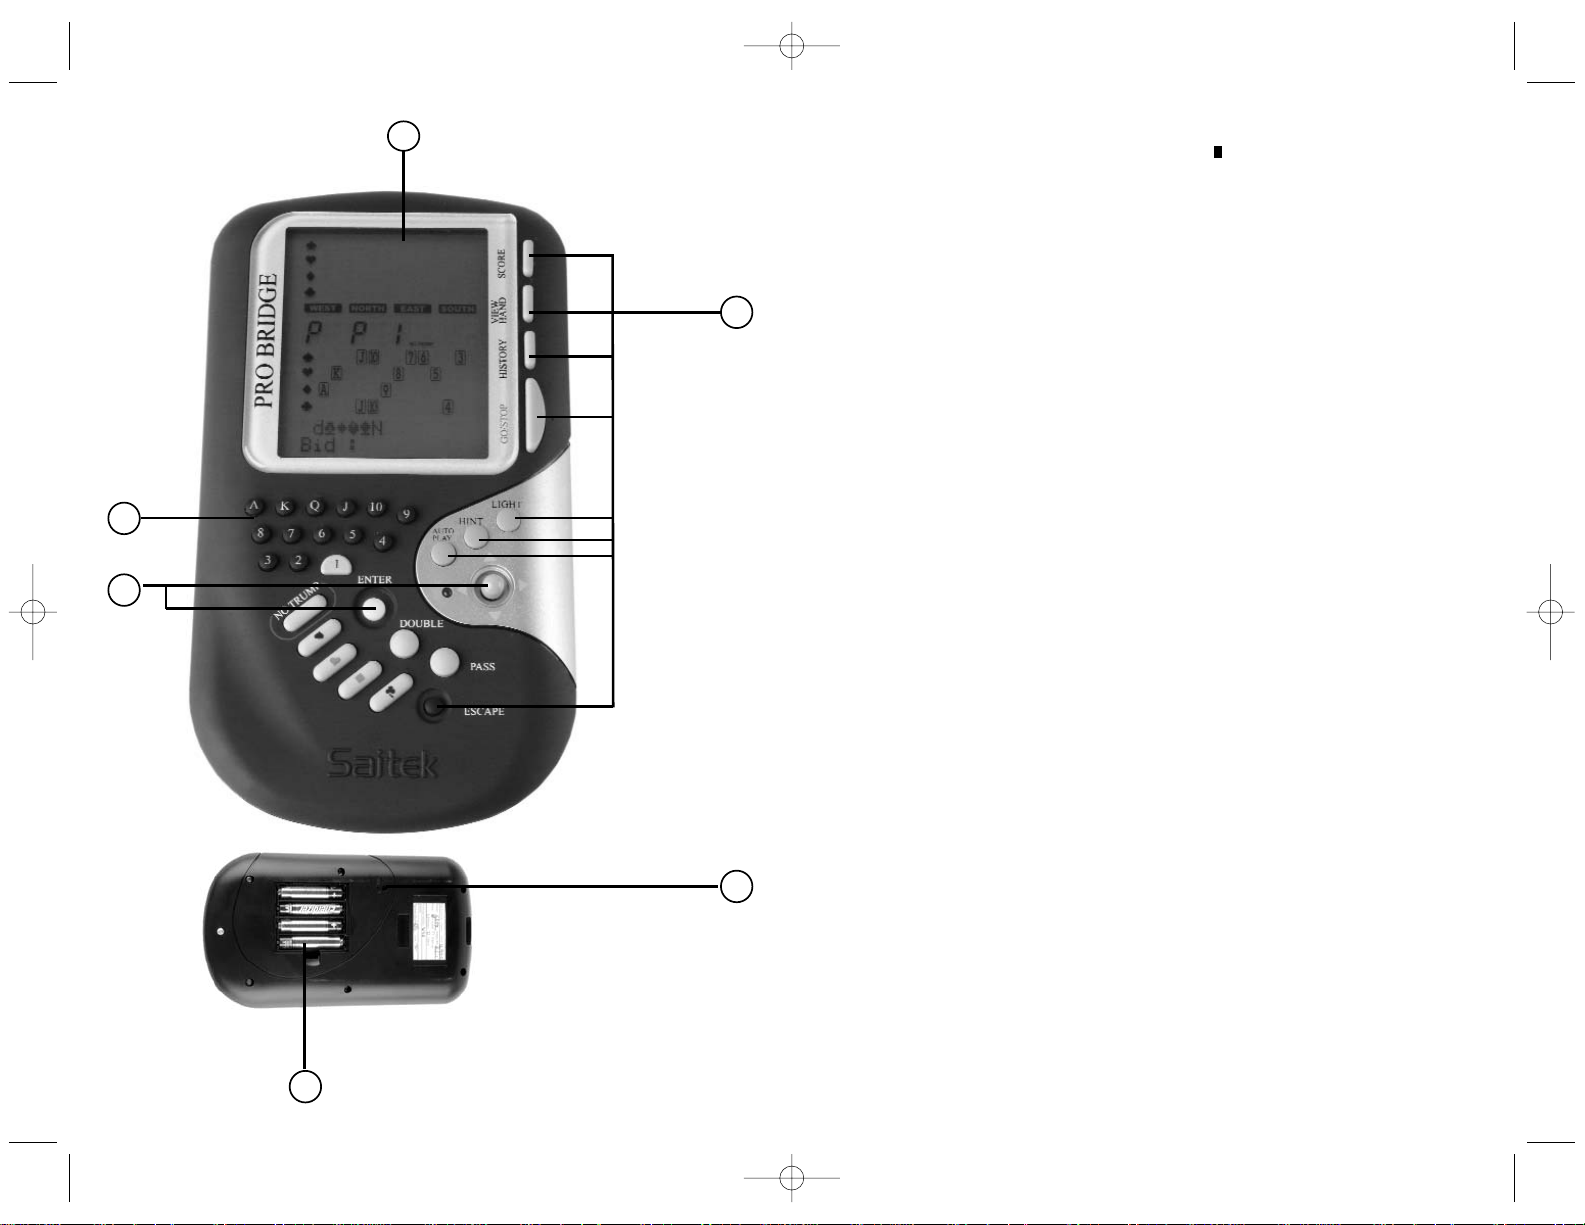
KEYS AND FEATURES
1. LCD Display:
Shows game play/information.
2. GAME/FUNCTION KEYS:
• GO/STOP: Press to turn unit on/off.
Current game is retained in memory
when switched off, along with selected
options.
• HISTORY: Press repeatedly during or
after game to review previous bidding
and play.
• AUTOPLAY: Press to have the computer
play the remaining game for you.
• HINT: Press to request a hint from the
computer during bidding or play.
• BACKLIGHT: Press to turn the backlight
on/off. Intensity is adjusted via the Main
Menu.
• VIEW HAND: Press repeatedly to see all
hands: North/South, then East/West.
Press to switch positions when editing a
deal.
• SCORE: Press repeatedly to display
current/cumulative scores.
• ESCAPE: Press to exit certain modes,
such as View Hand, History, and Score.
Press to return to previous menu or Main
Menu. Press to terminate your current
hand and return to deal selection during
bidding or play.
3. ACL (Reset): Used to recover from static
discharge after inserting new batteries.
Resets unit back to default settings.
4. Battery Compartment: In base of unit, at
top; uses four "AAA"(AM4/R03) batteries.
5. CURSOR 4-WAY PAD/ENTER:
• Cursor 4-way pad left/right
/. Press
to move flashing cursor when selecting
menu options/cards.
• Cursor 4-way pad up/down
/. Press
to move item under flashing cursor
from Line 1 of display to Line 2. Press
to cancel last Line 2 input (before
ENTER is pressed).
• ENTER: Press to confirm a bid or play;
press when prompted to confirm an
action (e.g., to accept a hint); press to
confirm and enter menu selections.
6. BIDDING/PLAYING KEYS:
• 1/ /Q....3/2/1 Value Keys: Press
to select cards, from Ace to 2. The 1 is
included for bidding.
• PASS: Press to pass (P).
• DOUBLE: Press to double (d) or
redouble (R) previous bid.
• NO TRUMP: Press to select No Trump.
•
qrew Suit Keys: Press to select a
suit.
1
2
3
4
5
6
Pro Bridge manual final.qxd 1/11/2007 2:46 PM Page 4
Page 4
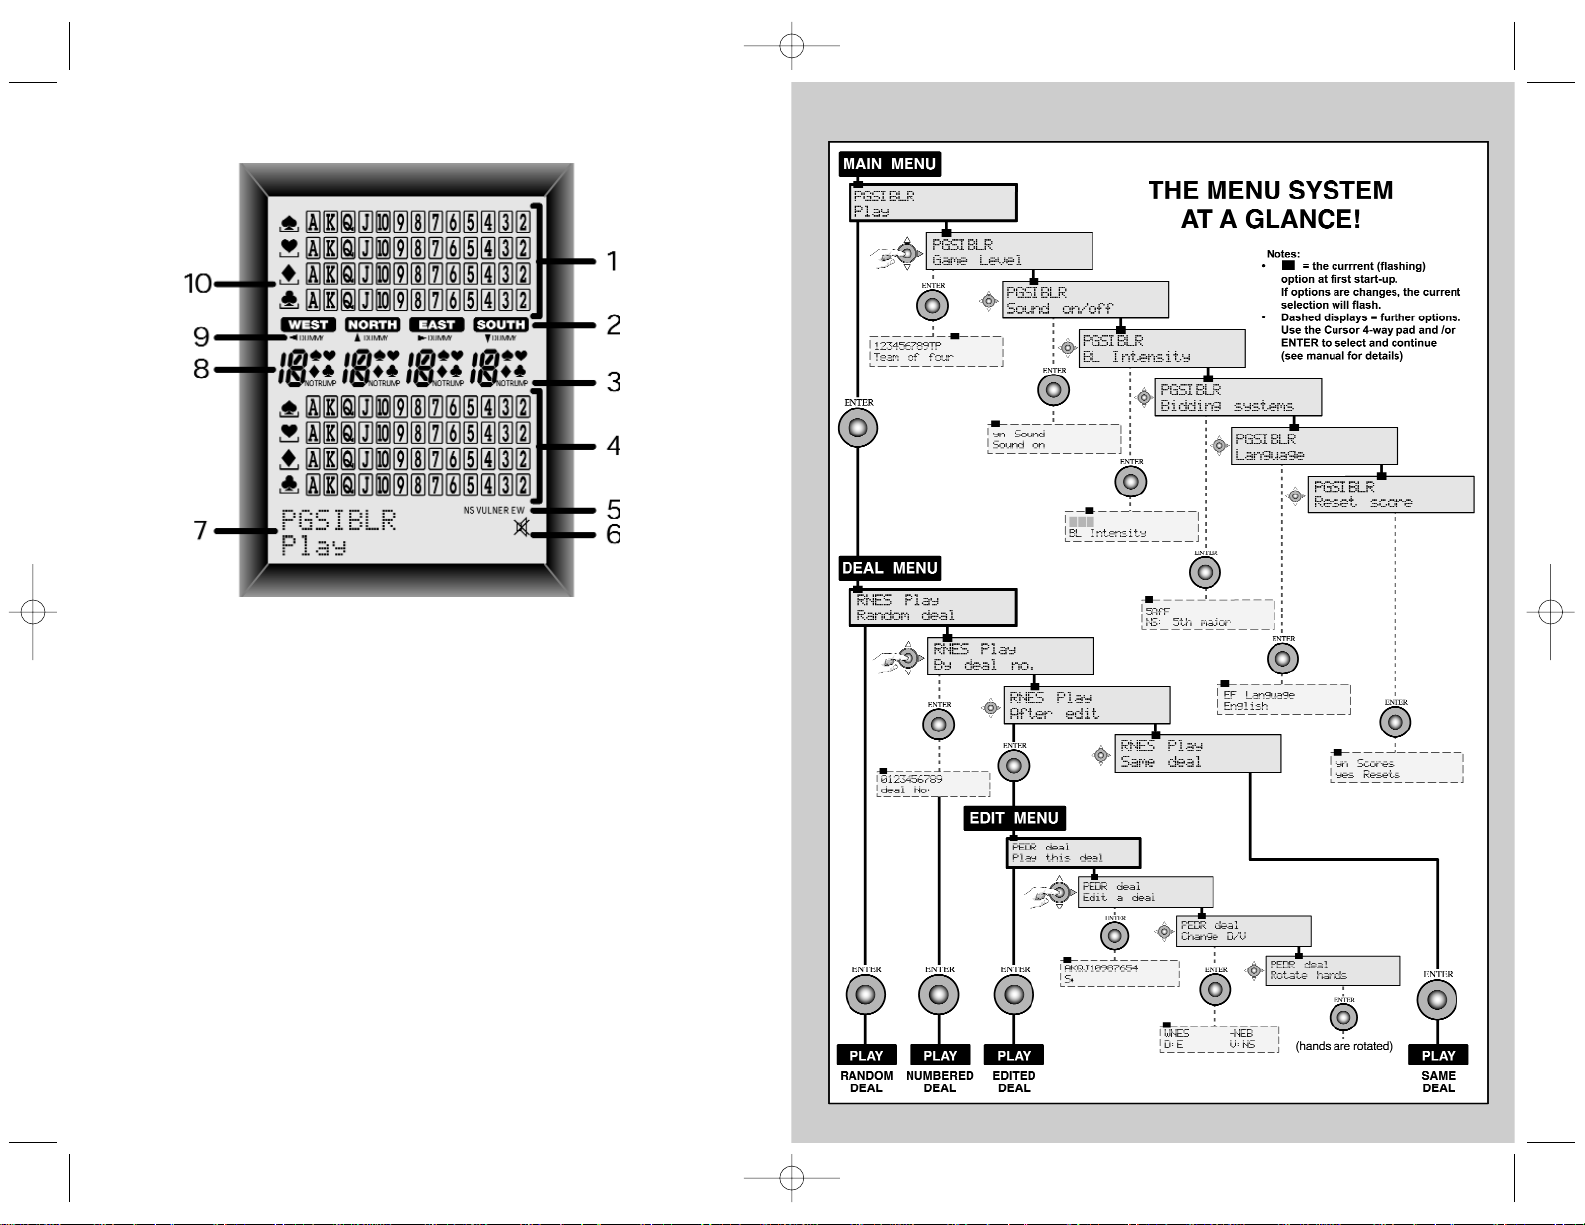
1. Dummy's Hand: Displays dummy's hand, or your hand for North if South is dummy. Also
displays hands for North and East with repeated presses of VIEW HAND.
2. Player/Position Indicators (w/ n/e/s): Flashing indicator indicates current player/position.
3. No Trump Indicator
4. South's Hand: Displays your hand for South, or dummy's hand if South is dummy. Also
displays hands for South and West with repeated presses of VIEW HAND.
5. Vulnerability Indicator
6. Sound Off Symbol: Displayed when the Sound Off menu option is activated.
7. Menu/Bid/Play Area: Used to bid, play, and select game options. Shows menus, prompts,
contracts, tricks, and scores.
8. Current Bid/Play Display
9. Dummy Indicator
10. Trump Suit Indicator: Underscored symbol (
qrew) indicates current trump suit, if any.
A LOOK AT THE LCD DISPLAY
Pro Bridge manual final.qxd 1/11/2007 2:46 PM Page 6
Page 5

USING THE ESCAPE KEY:
AN IMPORTANT NOTE!
Pressing ESCAPE at any time during bidding
or play (unless you're canceling a mode, as
specifically directed), will result in the
immediate termination of your current hand.
Be careful not to press ESCAPE
inadvertently during your game!
B - Bidding systems
L - Language
R - Reset score
Each of these Main Menu options will be
discussed in detail in Section 2. For now, let's
concentrate on starting our game!
To select Play Mode, as indicated by the
flashing P, press ENTER. The computer will
now switch to the Deal Menu, with a display
of RNES. Notice that the R is flashing, and
Random deal shows in Line 2, indicating
the currently selected option. If necessary,
press
or until the R flashes. The key
cycles through the remaining option choices,
as follows:
R - Random deal
N - By deal no.
E - After edit
S - Same deal
Each of these Deal Menu options will be
discussed in detail in Section 3. For now, let's
allow the computer to deal randomly.
To select the Random Deal option, as
indicated by the flashing R, press ENTER.
The computer will now shuffle the deck, deal
13 cards to each of the four players, and the
bidding can begin! If you don't like the
random hand that's just been dealt, return to
the Deal Menu with ESCAPE, and press
ENTER again to generate another randomlydealt hand.
1.4 Learn to Bid…
After the cards have been dealt, your hand
for South will appear on the lower portion of
the display. Any bids already made will show
under the appropriate Player Indicators, and
will flash when it's your turn to bid.
The vulnerability, if any, will also be
displayed.
Line 1 of the display now shows all the
symbols necessary to make your bid:
P
werqN (Pass/Clubs/Diamonds/Hearts/
Spades/No Trump), and Line 2 prompts you
to make a bid for South. There are two
different ways to bid:
• Direct Key Bidding: Press a Suit Key
(
qrew) or NO TRUMP, and then a
Value Key (2/3/4…), in that order. As
soon as the Suit Key is pressed, the
symbol for that suit will appear on Line 2
of the display. Likewise, when the Value
Key is pressed, that value will also
appear on Line 2, and the display will
prompt you to Press Enter.
Confirm your bid by pressing ENTER. To
pass, press PASS and ENTER.
• Cursor Key Bidding: Press > or < to
move the flashing cursor along the
characters in Line 1 of the display, until
you reach your desired suit symbol.
Next, press ? to copy that suit symbol to
Line 2 of the display. Line 1 now
changes to show the possible bid values:
1234567. Press
or to position the
flashing cursor over your desired bid
value, and press
to copy that number
to Line 2. Finally, press ENTER to
confirm your bid.
After you submit your bid with ENTER, using
either of the above methods, the computer
will bid the remaining hands. When
flashes again, it's time to enter your next bid.
For this and subsequent bids, Line 1 of the
display will again show the bid symbols as
before, with the addition of d for double or R
for redouble, if appropriate. Enter your bid as
described above. If you decide to double or
redouble, either press DOUBLE and then
ENTER, or use
to move the d or R down
to Line 2, and then press ENTER.
Continue bidding until there have been three
consecutive passes. At this point, the
computer will take you directly into the
playing phase.
Note that the computer's default settings are
Team of Four (Duplicate Bridge), and
American Standard (Five-Card Majors).
1. GETTING STARTED: THE BASICS
1.1 Power On
Your Pro Bridge 3000 runs on four
"AAA"(AM4/R03) batteries. Locate the
battery compartment in the base of the unit,
at the top, and slide off the cover in the
direction of the arrows. Insert the batteries,
making sure that you observe the correct
polarity (+/-), as marked inside the
compartment. We recommend fresh alkaline
batteries for longer battery life.
Important: To ensure that memory contents
are not lost if your computer is unplugged, try
to keep batteries installed.
To turn the computer on, press GO/ STOP.
After a brief start-up display, you'll see the
Main Menu (PGSIBLR), indicating that the
computer is ready to play. If the unit doesn't
respond, static discharge may have caused it
to lock up. To reset the unit, use a paper clip
or another sharp object to press down into
the hole marked ACL in the base of the unit
for at least one full second. This clears the
memory and resets the computer to its
default settings.
1.2 Get to Know the Menu System
Before learning how to play, you should take
a few moments to familiarize yourself with
the Pro Bridge 3000's integrated menu
system. Once you understand the basic
concept, it will be easier for you to explore all
the special features and options which are
accessed via the menus!
To get an overview of how the menus work,
take a look at the Menu System Chart on the
previous page. It provides a graphic
representation of the primary menus you'll
encounter as you select various options and
get ready to play. The dashed displays in the
chart signify further menu options, which are
described individually in the appropriate
sections of the manual. If you should ever
find yourself confused by where you are
within the menu system, simply refer back to
the chart. Back up to the previous menu by
pressing ESCAPE, if necessary, to locate
your place on the chart. Also, keep in mind
that pressing ESCAPE repeatedly will return
you to the Main Menu at any time.
See the Menu System Chart in Section 2 for
an illustrated overview of your menu choices
and options!
Follow these guidelines when using the
Menu System:
• The flashing character indicates the
current option/menu choice.
• The
and keys move the flashing
cursor through the current choices.
• The
key moves the flashing character
(suit, value, etc.) from Line 1 of the
display to Line 2 during bidding and play.
Some option selections are also made
this way.
• The
key cancels the last Line 2 input
during bidding and play (before pressing
ENTER).
• ENTER selects and confirms the
currently flashing option.
• ESCAPE returns you to the most recent
major menu: the Main Menu, Deal Menu,
or Edit Menu. Pressing
ESCAPE repeatedly takes you back to the
Main Menu.
1.3 Ready? Time to Deal!
After pressing GO/STOP to turn the Pro
Bridge 3000 on, the display will show the
Main Menu (PGSIBLR). If necessary, press
ESCAPE until this display shows. Notice that
the P is flashing, and Play shows on Line 2.
The flashing letter indicates the current
option choice. The
key cycles through the
remaining options, as follows:
P - Play
G - Game level
S - Sound on/off
I - BL Intensity
SOUTH
SOUTH
Pro Bridge manual final.qxd 1/11/2007 2:46 PM Page 8
Page 6

Press ENTER to start play of the next trick.
Enter a card, as before, and continue to play
until all 13 tricks have been taken.
1.6 Checking Out the Results
After the last trick has been won, the result
will be shown. Note that the result displays
will be different, depending on the type of
Bridge you're playing.
a. Team of Four Results
To help you understand the results of these
games, take a look at the following
examples:
• Result: W 3
r = / EW 120
Line 1 shows declarer playing , in
a contract of 3
r , bid and made (=).
Line 2 gives East/West 120 points.
• Result: N 4
q -2 / NS 50
Line 1 shows declarer playing ,
in a contract of 4
q , bid but down 2
tricks (-2). Line 2 gives North/South 50
points.
At this point, you may press ESCAPE to
return to the Deal Menu, or press ENTER to
store the result and have the computer replay
the hand, playing all four positions.
If you press ENTER, Replaying will show
briefly, as the computer goes into Autoplay
Mode and plays the same hand again. On
completion of the last trick, you'll be
prompted to press ENTER. The results will
then be shown, as in the first game. This
time, though, Line 2 also displays the
International Match Points (e.g., N 3
e +2, and then IMP: 0).
Press ENTER once more to display the next
set of results, showing the total number of
deals and the cumulative IMP for both teams
(e.g., deals 2, and then IMP: 0/14).
Finally, press ENTER to return to the Deal
Menu.
b. Rubber Bridge Results
Press ENTER after the last trick has been
completed, and the result will show on Line
1, e.g., E 4
w = (declarer playing
in a contract of 4
w , bid and made). Line 2
shows the above and below the line scores,
as in AL:0 BL:80.
At this point, you may press ESCAPE to
return to the Deal Menu, or press ENTER
repeatedly to display and store a variety of
results, as in the examples below.
o The current scores above and below the
line before a rubber is made (for North/South,
then East/West):
Total NS: / AL:150 BL:0
Total EW: / AL:0 BL:80
o The cumulative score of previous rubbers:
Total point / NS:0 EW:0.
Press ENTER or ESCAPE to return to the
Deal Menu.
1.7 Playing the Next Hand
At any time during or after game play, you
may reset for a new hand by pressing
ESCAPE. The Deal Menu will come up,
signifying that the computer is ready for
another hand, using the currently set level
and options.
Caution: Be sure not to press ESCAPE
inadvertently, as your current game will be
cleared from the computer's memory!
2. MAIN MENU OPTIONS
For a general overview of the menu options
and many of the sub-options, be sure to take
a look at the Menu System Chart.The chart
will show you how the menu system works,
and it will help you become comfortable
navigating through the menu displays. Each
of the individual menu options is also
covered in this section, or elsewhere in the
manual.
The Main Menu is the starting point, giving
you access to the other menus and game
options. As described previously in Section
1.3, the Main Menu is displayed as
PGSIBLR. The flashing character always
indicates the current option choice, and the
key cycles through the remaining options,
as follows:
1.5 …and Learn to Play!
Just as in a game played by four human
players, the bids made will have decided who
is to lead. The player with the highest bid is
declarer, and declarer's partner is dummy.
The player to the right of dummy leads the
first card, and play then continues in a
clockwise direction. The object is to win
tricks, and you must follow suit whenever
possible. Tricks are won by the highest card
of the suit that's been led, but cards from the
trump suit (if any) will outrank cards from any
other suit.
If it's your opening lead, will flash;
otherwise, the computer will lead. For
subsequent tricks, the first player is the
winner of the previous trick.
Once the first card is led, watch the display
for the following:
• The suits and values appear in the
middle of the display, as the cards are
being played.
• Dummy's hand is normally displayed at
the top half of the display, and your hand
is shown at the bottom. If South is
dummy, however, your hand as North will
be displayed at the top.
• The Dummy Indicator appears under
, , or .
• A symbol on the left-hand side of the
display (
qrew) will be underlined to
indicate the trump suit, if any. The
computer will play East and West, and it
will also play North (if North is not
declarer or dummy). If North is declarer
or dummy, you'll play both North and
South.
Whenever it's your turn, you'll see
flash (or if you're playing North). You'll
also choose the cards for dummy. On your
turn, Line 1 of the display will show your
available suits (e.g.,
werq), the current
player (e.g., S for South), and the
vulnerability, if any. Note that, if only one suit
or value is valid for that play, it will be played
for you automatically. After you have selected
the suit using one of the methods described
below, the display will show your available
cards in that suit (e.g., AQ943). Play a card
by using the Direct Keys or the Cursor Keys,
just as you did during the bidding phase:
• Direct Key Method: Press a Suit Key
(
qrew), then a Value Key (2 to A), in
that order. Then, press ENTER.
• Cursor Key Method: Press
or to
move the flashing cursor along the
characters in Line 1 of the display, until
you reach your desired suit symbol.
Next, press
to copy that suit symbol
to Line 2 of the display. Line 1 now
changes to show your available cards for
that particular suit. Press
or to
move the flashing cursor until you reach
your desired card. Again, press
to
copy that value to Line 2, and then press
ENTER.
If all the other cards have not yet been
played when you enter your card, the
computer will continue to play. Once the trick
has been won, Line 2 will show the contract,
along with the number of tricks won so far by
North/South and East/West (e.g., 2™
r NS
4 EW 2).
SOUTHEASTNORTHWEST
SOUTH
SOUTH
NORTH
BIDDING/PLAY INFORMATION
YOU NEED TO KNOW!
• If you change your mind after entering
a suit or value (but before pressing
ENTER), press the
key to cancel
and start over.
• When only a single suit or value is
valid, it is automatically selected and
moved down to Line 2.
• When only one card is left to play in
the final round, the computer will
automatically play that card for you.
• Attempting to enter an invalid suit or
value will result in an error beep.
• If all parties pass, All pass will be
displayed, along with a 0 result. If
this happens, return to the Deal Menu
for a new hand by pressing ESCAPE.
• Press ESCAPE during bidding or play
to terminate your current hand and
return to the Deal Menu.
WEST
NORTH
EAST
Pro Bridge manual final.qxd 1/11/2007 2:46 PM Page 10
Page 7

bids and plays the same hand in Autoplay
Mode, with the computer playing all four
hands.
c. Computer Peeks
[Level Menu Item: 123456789TP
]
This unique level, displayed as P for
computer Peeks, is also a Team of
Four Level. Here, the computer is given a
distinct advantage, in that it's allowed to
"see" game information that it would not
ordinarily be able to access! This level can
come in handy for those of you who find that
you're beating the computer once too often.
Try out Level P, and you'll definitely have to
work harder to win! Don't worry, though,
about giving up too much power- the
computer is fairly reasonable about peeking,
and uses only some of the available
information to gain an advantage.
Note, also, that the advantage the computer
gains is more significant in defensive play
than in bidding or declarer play. You can also
rest assured that the computer will never
peek on any other level!
2.3 Sound Effects On/Off
[Main Menu Item: PGS
IBLR]
Your computer's beeps and other sound
effects are on by default. However, if you'd
rather turn the sound off, it's easy to do! To
change the sound setting:
a. Press ESCAPE until you return to the
Main Menu, PGSIBLR.
b. Press repeatedly to select the letter S
for Sound on/off.
c. Press ENTER.
Line 1 = yn Sound, with the current
sound setting flashing.
Line 2 = Current sound setting.
d. Press
to select y for Sound on or n
for Sound off. Press ENTER to confirm
and return to the Main Menu.
Note that the symbol shows in the
display whenever the sound is turned off.
2.4 Light Too Weak/Strong? Adjust It!
[Main Menu Item: PGSI
BLR]
If you're in a dim light situation, you have the
option of turning on the backlight to illuminate
the display! Press BACKLIGHT to turn the
light on, and press it again to turn the light
off. You also have the option of adjusting the
light intensity via the Main Menu, as
described below.
To adjust the light intensity:
a. Press ESCAPE until you return to the
Main Menu, PGSIBLR.
b. Press
repeatedly to select the letter I
for BL Intensity.
c. Press ENTER.
Line 1 = From one to five symbols,
indicating the current light setting. Note
that is the dimmest setting, while
is the brightest.
Line 2 = BL Intensity.
d. Press
repeatedly to turn on up to five
symbols. Then, press ENTER to return to
the Main Menu.
2.5 Bidding Systems*
[Main Menu Item: PGSIBLR]
The Pro Bridge 3000 is set to the American
Standard 5-card major for both North/South
and East/West. We hope to further enhance
the feature, as described below, in future
version of the product.
Your computer offers various bidding systems
for both North/South and East/West:
American Standard, Acol, French Standard,
and French Strong Two. Note that the
computer defaults to the American Standard
on start-up. For more information on the
bidding systems, see Appendix A.
P - Play
G - Game level
S - Sound on/off
I - BL Intensity
B - Bidding systems
L - Language
R - Reset score
Each of these individual options is described
below.
TIP: To cancel menu changes before
confirming with ENTER, simply press
ESCAPE to return to the Main Menu!
2.1 Accessing the Deal Menu
[Main Menu Item: P
GSIBLR] Your computer
offers several interesting dealing options from
which to choose, including the following:
• Random deals: Play hands that are
randomly generated by the computer.
• Numbered deals: Choose from a series
of built-in deals, numbered from 1 to
999,999.
• Edited deals: Play hands that you've
constructed via the Edit Menu.
• Replayed deals: Play your previous hand
once again.
The dealing options are selected from the
Deal Menu, which is accessed directly from
the Main Menu. With the P flashing for Play,
press ENTER to display the Deal Menu
(RNES). Note that ESCAPE will also take
you directly back to the Deal Menu in many
cases, in preparation for a new hand. For
complete details on selecting deals, see
Section 3.
2.2 Selecting a Game Type/Level
[Main Menu Item: PG
SIBLR] Whether you
prefer playing Rubber Bridge or Duplicate
Bridge (Team of Four), you've come to the
right place! Not only can you choose which
type of game you'd like to play, but we've
even included nine different levels of Rubber
Bridge for you to try out, as described below.
Many of you will also want to check out the
unique Computer Peeks Level, which is
included especially for those who are looking
for more challenging game play!
To change the level setting:
a. Press ESCAPE until you return to the
Main Menu, PGSIBLR.
b. Press
repeatedly to select the letter G
for Game level.
c. Press ENTER.
Line 1 = 123456789TP, with the
current level setting flashing.
Line 2 = Current level description.
d. Press
to select the desired level.
Press ENTER to confirm and return to
the Main Menu.
The level settings are described below. For
details on scoring, see Appendix B, at the
back of the manual.
a. Rubber Bridge
[Level Menu Items: 123456789
TP]
The Rubber Bridge Levels (Levels 1 through
9) are used in conjunction with randomlydealt hands. Each level is displayed as 1, 2,
etc., along with a description, such as
Rubber bridge 1.
Here, the lower the level, the more likely it is
that the North/South pair will have more
honor points than the East/West pair.
b. Team of Four (Duplicate Bridge)
[Level Menu Item: 123456789T
P]
This level, the computer's default level, is
displayed as T (Team of four). In this
type of game, the same deal is played twice,
with you playing South's hand first. The
computer then plays all four hands by taking
your place, replaying the hand you've just
played, comparing the two results, and
calculating the difference in International
Match Points. Note that the dealer and
vulnerability are preset for each hand.
After selecting the Team of Four Level and
pressing ENTER, choose your dealing
method and play the hand as in Rubber
Bridge. At the end, after pressing ENTER to
see the result, press ENTER again to see the
score. At this point, pressing ENTER one
more time will cause the computer to replay
the hand, and you'll see Replaying
displayed briefly. The Pro Bridge 3000 now
REMEMBER:
SELECT OPTIONS, THEN PLAY!
Since pressing ESCAPE during the bidding
or playing phase will terminate your current
hand, make sure to select all your options
before starting to play!
Pro Bridge manual final.qxd 1/11/2007 2:46 PM Page 12
Page 8

b. With the P flashing, press ENTER to go
to the Deal Menu, RNES.
c. Line 1 = RNES, with the current deal
option flashing.
Line 2 = Current option description.
d. Press
to select the letter R for
Random deal.
e. Press ENTER. The computer will
immediately deal a random hand, and
you can begin to play!
3.2 Numbered Deals
[Deal Menu Item: RNES]
Your Pro Bridge 3000 comes to you
preprogrammed with thousands of numbered
deals, which are accessed from the Deal
Menu. Besides adding variety to your play,
these deals can also be used as a great
learning tool! Each deal (numbered from 1 to
999,999) is unique, and can be called up at
any time. You can use this feature to replay a
particular hand over and over, enabling you
to learn from any mistakes you might make!
To select a Numbered Deal:
a. Press ESCAPE until you return to the
Main Menu, PGSIBLR.
b. With the P flashing, press ENTER to go
to the Deal Menu, RNES.
c. Line 1 = RNES, with the current deal
option flashing.
Line 2 = Current option description.
d. Press
to select the letter N for By
deal no..
e. Press ENTER.
Line 1 = 0123456789, with the 0
flashing.
Line 2 = deal No:.
f. Enter any desired deal number, from 1 to
999,999. Enter the numbers by
(a) pressing individual Value Keys
(1/2/3) and pressing ENTER; or
(b) pressing
or to select each
number, pressing
to move each
number down to Line 2, and finally
pressing ENTER. Note that the initial
flashing 0 cannot be entered by itself,
and doing so will cause an error beep to
sound. The 0 can only be used after
another number has been entered first.
Note: When using the indvidual value
keys (0) functions as the key for (0).
After ENTER is pressed, the computer will
immediately deal the pre-programmed hand
you have selected, and the bidding can
begin!
3.3 Edited Deals
[Deal Menu Item: RNE
S]
Your computer offers several interesting
options for editing deals and other game
information! Since these options are
accessed via the Edit Menu, which is a
subset of the Deal Menu, we've given the
Edit Menu its own section in this manual.
For complete details on all your editing
options, see Section 4.
3.4 Playing the Same Deal
[Deal Menu Item: RNES
]
Have you ever wished that you could replay
a game you just finished, to try out a different
strategy or attempt to improve the outcome?
This feature allows you to do just that! After a
game ends, select this option to start the
same game over again.
To select the Same Deal option:
a. Press ESCAPE until you return to the
Main Menu, PGSIBLR.
b. With the P flashing, press ENTER to go
to the Deal Menu.
c. Line 1 = RNES, with the current deal
option flashing.
Line 2 = Current option description.
d. Press
to select the letter S for Same
deal.
e. Press ENTER. The computer will
immediately generate the same hand
you just played, and you can give it
another shot!
To select a bidding system:
a. Press ESCAPE until you return to the
Main Menu, PGSIBLR.
b. Press
repeatedly to select the letter B
for Bidding systems.
c. Press ENTER. Line 1 = 5AfF, with the
current system for North/South flashing.
5 = American Standard (5th major)
A = Acol
(Acol)
f = French Standard (5th major
f)
F = French Strong Two (5th
major F)
Line 2 = NS:plus the current bidding
system description.
d. Press
to select the desired system for
North/South.
e. Next, press to switch over to the
East/West display. Line 2 will now show
EW:, along with the current East/West
setting.
f. Press
to select the desired system for
East/West. Finally, press ENTER to
return to the Main Menu.
2.6 English/French? It's Your Choice!
[Main Menu Item: PGSIBL
R]
Your Bridge computer has the unique ability
to offer game play and menu interaction in
either English or French! Note that the
computer automatically defaults to English on
the first start-up.
To change the language setting:
a. Press ESCAPE until you return to the
Main Menu, PGSIBLR.
b. Press
repeatedly to select the letter L
for Language.
c. Press ENTER.
Line 1 = EF Language, with the
current language setting flashing.
Line 2 = Current language setting.
d. Press
to select E for English or F for
French. Press ENTER to confirm and
return to the Main Menu.
2.7 Resetting the Score
[Main Menu Item: PGSIBLR
]
This menu selection allows you to reset the
score at any time.
To reset the score:
a. Press ESCAPE until you return to the
Main Menu, PGSIBLR.
b. Press
repeatedly to select the letter R
for Reset score.
c. Press ENTER.
Line 1 = yn Scores, with the y
flashing.
Line 2 = yes Resets.
d. Press
to select y for Yes or n for No.
Press ENTER to confirm and return to
the Main Menu.
3. DEAL MENU OPTIONS
As previously noted in Section 2.1, your
computer allows you to select from various
dealing options:
R - Random deal
N - By deal no.
E - After edit
S - Same deal
Each of these options is described
individually below.
When following the steps below for the Deal
Menu options, please note that pressing
ESCAPE one time will often take you directly
to the Deal Menu. Therefore, Steps (a) and
(b) will not always be necessary.
3.1 Random Deals
[Deal Menu Item: R
NES]
Whenever you choose the Random Deal
option, the computer will immediately
generate a hand, and bidding will begin right
away. If you're not satisfied with the hand
that has been dealt, press ESCAPE to return
to the Deal Menu, and then press ENTER for
another hand. You can do this as often as
you wish.
To select the Random Deal option:
a. Press ESCAPE until you return to the
Main Menu, PGSIBLR.
Pro Bridge manual final.qxd 1/11/2007 2:46 PM Page 14
Page 9

• If you enter more than 13 cards for any
position, or if you enter a card that has
been used, an error beep will sound.
• If you enter less than 13 cards for any
position, the computer will randomly fill in
the additional cards when you play.
• You can also use the Cursor Keys to
enter cards, in the same manner as
during bidding or play.
• If you make a mistake or change your
mind while entering a card, press the
same key again to deselect it. If you've
just pressed Q, for example, press Q
again to cancel the input. If you're using
the Cursor Keys, cancel your input by
pressing , to move the cards back up to
Line 1, starting with the lowest card of
the current suit.
• If you change your mind and decide not
to edit the hand after all, press
ESCAPE to cancel and return to the
previous menu.
4.3 Changing the Dealer/Vulnerability
[Edit Menu Item: PED
R]
This option allows you to change the dealer
and vulnerability settings.
To select this option:
a. Access the Edit Menu (PEDR), as noted
at the beginning of Section 4.
b. Press
to select the letter D for
Change D/V.
c. Press ENTER. Line 1 = WNES -NEB,
where:
WNES = West/North/East/South
- = Neither side vulnerable
N = North/South vulnerable
E = East/West vulnerable
B = Both sides vulnerable.
Line 2 = Current settings, as in D:N
V:Nil, where:
D:N = Dealer North
V:Nil = Neither side vulnerable
d. Press
to select W, N, E, or S for
dealer. With the appropriate character
flashing, press
to move your choice to
Line 2. If you select E, for example, and
then press
, Line 2 will show D:E,
with East as dealer.
e. Continue to press
to select -, N, E, or
B for the vulnerability option.
With the appropriate character flashing,
press
to move your choice down to
Line 2. If you select E, for example, and
press
, Line 2 will now show V:EW,
with East/West vulnerable.
f. Press ENTER to confirm and return to
the Edit Menu. Notice that the
Vulnerability Indicator has changed to
reflect the new setting, if any.
4.4 Rotating the Hands
[Edit Menu Item: PEDR
]
This option lets you rotate the hands, along
with the dealer and vulnerability, in a
clockwise direction. Setting this option will
cause the following changes to be made:
Hand/Dealer:
Previous Setting New Setting
South . . . . . . . . . . . . . . . . .West
West . . . . . . . . . . . . . . . . . .North
North . . . . . . . . . . . . . . . . . .East
East . . . . . . . . . . . . . . . . . .South
Vulnerability:
Previous Setting New Setting
Nil . . . . . . . . . . . . . . . . . . . .Nil
EW . . . . . . . . . . . . . . . . . . .NS
NS . . . . . . . . . . . . . . . . . . . .EW
All . . . . . . . . . . . . . . . . . . . .All
To select this option:
a. Access the Edit Menu (PEDR), as noted
at the beginning of Section 4.
b. Press
to select the letter R for Rotate
hands.
c. Press ENTER, and the computer will
change the settings internally, as shown
above. It will then return you to the Edit
Menu, with the P flashing for Play
this deal. To play from the new
position, press ENTER.
4. EDIT MENU OPTIONS
As previously noted in Section 3.3, your
computer allows you to choose from various
types of editing options. Each of these
options is described below.
To access the Edit Menu:
a. Press ESCAPE until you return to the
Main Menu, PGSIBLR.
b. With the P flashing, press ENTER to go
to the Deal Menu, RNES.
c. Line 1 = RNES, with the current deal
option flashing.
Line 2 = Current option description.
d. Press
to select the letter E for After
edit.
e. Press ENTER.
The computer will now switch to the Edit
Menu, with a display of PEDR. Notice that
the P is flashing, and Play this deal
shows in Line 2, indicating the current option.
The
key cycles through the remaining
option choices, as follows:
P - Play this deal
E - Edit a deal
D - Change D/V
R - Rotate hands
4.1 Playing Your Edited Deal
[Edit Menu Item: P
EDR]
This option enables you to play the deal that
you have just edited. To select this option:
a. Access the Edit Menu (PEDR), as noted
at the beginning of Section 4.
b. Press
to select the letter P for Play
this deal.
c. Press ENTER, and the computer will
start a game using the current hand!
4.2 Try Editing a Deal!
[Edit Menu Item: PE
DR]
This handy option allows you to construct
your own deals from scratch! This feature
can be used in a number of ways, such as
trying your hand at Bridge games published
in newspapers and books, or keeping track of
your own games and reconstructing deals
that you've previously played for further
study.
To select this option:
a. Access the Edit Menu (PEDR), as noted
at the beginning of Section 4.
b. Press
to select the letter E for Edit
a deal.
c. Press ENTER.
Line 1 = AKQJ10987654, along with S
for South and the Spade symbol (
q ) in
line 2. The upper hand area also shows
the symbols for all 52 cards, and
flashes.
You can now begin editing this hand, starting
with selecting Spades for South.
(1) Press the Value Keys (A/ /Q…) to select
and enter any desired Spades for South. As
each key is pressed, that card is moved from
Line 1 to Line 2. Notice that it also
disappears from the upper hand area, and
reappears in South's hand.
(2) After entering all desired Spades, press
r ,e , or w to activate another suit.
Follow the same steps to enter cards for this
suit. Repeat for any other suit, entering up to
a total of 13 cards for this hand.
(3) Press VIEW HAND to edit the next
position, and will flash. Line 2 shows
that Spades is the active suit once again.
Follow Steps (1) and (2), above, to construct
a hand for West.
(4) After entering all desired cards for West,
press VIEW HAND again to edit the hand for
, and then for .
Note that the hands can be edited in any
order, and you can go back to any hand by
pressing VIEW HAND.
(5) Once all cards have been entered, press
ENTER. The Edit Menu will reappear, with
the P flashing for Play this deal.
Press ENTER, and the computer will start a
new game with the hand you've just
constructed!
Please also note these important points, in
regard to editing:
SOUTH
WEST
NORTH
EAST
Pro Bridge manual final.qxd 1/11/2007 2:46 PM Page 16
Page 10

• In Duplicate Bridge, press SCORE once
to show Score, along with the current
scores for North/South and East/West.
Press SCORE again to show the total
number of deals played so far, as well as
the cumulative IMP scores for both
teams. To exit, either press SCORE once
again, or press ESCAPE.
Note that the SCORE display is not available
while current results are showing during play.
Note, also, that you can reset the score, as
described in Section 2.7.
5.8 Game Memory
You may interrupt play at any time and turn
the unit off by pressing GO/STOP.
Play is then suspended, and the computer
will store your current game and option
settings. When you switch back on by
pressing GO/STOP again, you can simply
continue right where you left off!
6. TECHNICAL DETAILS
6.1 The ACL Function
Computers sometimes "lock up" due to static
discharge or other electrical disturbances. If
this should happen, reinstall the batteries and
use a paper clip or another sharp object to
press down into the hole marked ACL in the
base of the unit for at least one full second.
This clears the memory and resets the
computer to its default settings.
6.2 Care and Maintenance
Your Pro Bridge 3000 computer is a precision
electronic device, and should not be
subjected to rough handling, extreme
temperatures, or moisture. Be sure to
disconnect the adapter (if applicable) and
remove the batteries before cleaning the unit.
Do not use chemical agents or liquids to
clean the unit, as they may cause damage.
Weak batteries can cause incorrect displays,
loss of data, and even wrong bids and
responses. Low batteries should be replaced
promptly, since they can leak and damage
the unit. Please also note the following points
regarding batteries: Use only alkaline or zinc
carbon batteries. Do not mix different types
of batteries or new and used batteries. Do
not recharge nonrechargeable batteries. Use
only the recommended batteries or
equivalent. Be sure to observe the correct
polarity when inserting batteries. Worn out
batteries should be removed from the unit
promptly. Do not short circuit the supply
terminals.
6.3 Technical Specifications
Keys: 34
Display: 70mm x 58mm LCD
with back light
Buzzer: Piezo electric (27mm)
Batteries: 4 x AAA/AM4/R03
Dimensions: 200 x 110 x 35mm
Please retain this information for future
reference.
Saitek reserves the right to make technical
changes without notice in the interest of
progress.
6.4 Technical support
If you experience any difficulty with this
product, please first visit our website
www.saitek.com. The technical support area
will provide you with all the information you
need to get the most out of your product and
should solve any problems you might have.
If you do not have access to the internet, or if
the website cannot answer your question,
please contact your local Saitek Technical
Support Team from the list at the back of this
leaflet. We aim to offer quick, comprehensive
and thorough technical support to all our
users so, before you call, please make sure
you have all the relevant information at hand.
6.5 Information for customers in the
United States
FCC Compliance and Advisory Statement
Warning: Changes or modifications to this
unit not expressly approved by the party
responsible for compliance could void the
user's authority to operate the equipment.
This device complies with Part 15 of the FCC
Rules. Operation is subject to the following
two conditions:
1 This device may not cause harmful
interference, and;
2 This device must accept any interference
received, including interference that may
cause undesired operation.
5. MORE FEATURES TO EXPLORE
5.1 Viewing All the Hands
At any time after the cards have been dealt,
you may view all the hands (including those
that are concealed) by pressing
VIEW HAND. The first display will show
View:NS, along with the hand for North in
the upper portion of the display and the hand
for South in the lower portion.
Pressing VIEW HAND again will show
View:EW, along with the hand for East in
the upper portion of the display and the hand
for West in the lower portion. Athird press of
VIEW HAND returns you to the current game
display. Note that pressing ESCAPE also
exits this mode at any time.
5.2 Illegal Bidding/Play
Your computer is programmed with the
standard rules of Bridge, and it will never
accept an illegal bid or play! If you attempt to
do so, a low-pitched error beep will alert you
to the problem. To continue, simply make
another entry.
5.3 Need a Hint? Just Ask!
Whenever you need help, the Pro Bridge
3000 will be glad to oblige! Press HINT
during the bidding or playing phase of the
game, and the computer will display a
suggested bid or play. To accept the hint,
simply press ENTER. To disregard the hint,
press
to cancel the hint display, and then
make a bid or play of your own.
5.4 Change Your Mind? Try Again!
If you change your mind about a bid or play
or make an inadvertent input error before
pressing ENTER, you can retract your bid or
play by pressing
to cancel. The current
display will clear, and you can then enter
another bid or play, as usual.
5.5 Autoplay: The Computer Takes Over
As soon as a hand has been dealt, and at
any time during the bidding and play of the
hand, you can force the computer to take
over your game! Press AUTO PLAY and
then ENTER to have the computer complete
the current game automatically.
You'll see Continuing displayed briefly,
as the computer plays the game out
internally. Once the final trick is completed,
the score will be shown, as usual.
At this point, you have the option of going
back through to see how the hand was
played! To do this, press HISTORY
repeatedly, as described in Section 5.6.
If you change your mind after pressing AUTO
PLAY, but before pressing ENTER, press
to cancel Autoplay Mode.
5.6 Review Play with History Mode!
During a game, it's easy to go back and
review previous bids and plays, even in the
middle of your game! With each press of
HISTORY, the display will show you every
bid and play, from the beginning. As long as
History Mode is active, you'll see History
on Line 1 of the menu display.
As soon as you get back to the current place
in your game, the display will return to
normal, and you can continue.
Press ESCAPE at any time to exit History
Mode and return to your game.
You can also press HISTORY repeatedly to
step through your entire game after the game
has ended and the result is being displayed.
To automatically finish the game and return
to the result display at any time, press
ESCAPE.
After pressing ESCAPE, the computer will
show you the history one by one until the
end. Note that History Mode is not available
until after the first round of bidding has been
completed.
5.7 Checking the Score
Once play has started, you can review the
current score (if any) by pressing SCORE.
For further details on scoring, see
Appendix B.
• In Rubber Bridge, press SCORE once to
show Score, along with the current
scores above and below the line. Press
SCORE again to see the cumulative
scores of previous rubbers for
North/South, and again for East/ West.
To exit, either press SCORE once more,
or press ESCAPE.
Pro Bridge manual final.qxd 1/11/2007 2:46 PM Page 18
Page 11

This warranty is in Lieu of all other
expressed warranties, obligations or
liabilities. ANY IMPLIED WARRANTIES,
OBLIGATIONS, OR LIABILITIES,
INCLUDING BUT NOT LIMITED TO THE
IMPLIED WARRANTIES OF
MERCHANTABILITYAND FITNESS
FOR A P AR TICULAR PURPOSE,
SHALL BE LIMITED IN DURATION TO
THE DURATION OF THIS WRITTEN
LIMITED WARRANTY. Some states do
not allow limitations on how long an
implied warranty lasts, so the above
limitations may not apply to you. IN NO
EVENT SHALL WE BE LIABLE FOR
ANY SPECIAL OR CONSEQUENTIAL
DAMAGES FOR BREACH OF THIS OR
ANY OTHER WARRANTY, EXPRESS
OR IMPLIED, WHATSOEVER Some
states do not allow the exclusion or
limitation of special, incidental or
consequential damages, so the above
limitation may not apply to you. This
warranty gives you specific legal rights,
and you may also have other rights
which vary from state to state.Class 1
Laser product.
NOTE: This equipment has been tested and
found to comply with the limits for a Class B
digital device, pursuant to Part 15 of the FCC
Rules. These limits are designed to provide
reasonable protection against harmful
interference in a residential installation. This
equipment generates, uses and can radiate
radio frequency energy and, if not installed
and used in accordance with the instructions,
may cause harmful interference to radio
communications. However, there is no
guarantee that interference will not occur in a
particular installation. If this equipment does
cause harmful interference to radio or
television reception, which can be
determined by turning the equipment off and
on, the user is encouraged to try to correct
the interference by one or more of the
following measures:
• Reorient or relocate the receiving
antenna;
• Increase the separation between the
equipment and receiver;
• Connect the equipment into an outlet on
a circuit different from that to which the
receiver is connected;
• Consult the dealer or an experienced
radio/TV technician for help.
Saitek Industries, 2295 Jefferson Street,
Torrance, CA 90501, USA
Canada 210
Operation is subject to the following two
conditions:
1 This device may not cause interference,
and;
2 This device must accept any
interference, including interference that
may cause undesired operation of the
device.
This Class B digital apparatus complies with
Canadian ICES-003.
Cet appareil numérique de la classe B est
conforme à la norme NMB-003 du Canada.
6.6 Conditions of Warranty
1 Warranty period is 2 years from date of
purchase with proof of purchase
submitted.
2 Operating instructions must be followed.
3 Specifically excludes any damages
associated with leakage of batteries.
Note: Batteries can leak when left
unused in a product for a period of time,
so it is advisable to inspect batteries
regularly.
4 Product must not have been damaged
as a result of defacement, misuse,
abuse, neglect, accident, destruction or
alteration of the serial number, improper
electrical voltages or currents, repair,
alteration or maintenance by any person
or party other than our own service
facility or an authorized service center,
use or installation of non-Saitek
replacement parts in the product or the
modification of this product in any way,
or the incorporation of this product into
any other products, or damage to the
product caused by accident, fire, floods,
lightning, or acts of God, or any use
violative of instructions furnished by
Saitek plc.
5 Obligations of Saitek shall be limited to
repair or replacement with the same or
similar unit, at our option. To obtain
repairs under this warranty, present the
product and proof of purchase (eg, bill
or invoice) to the authorized Saitek
Technical Support Center (listed on the
separate sheet packaged with this
product) transportation charges prepaid.
Any requirements that conflict with any
state or Federal laws, rules and/or
obligations shall not be enforceable in
that particular territory and Saitek will
adhere to those laws, rules, and/or
obligations.
6 When returning the product for repair,
please pack it very carefully, preferably
using the original packaging materials.
Please also include an explanatory note.
7 IMPORTANT: To save yourself
unnecessary cost and inconvenience,
please check carefully that you have
read and followed the instructions in this
manual.
APPENDIX A:
BIDDING SYSTEM INFORMATION
The American Standard
• 5th major, best minor.
• 1NT: 15-17; 2NT: 20-22. In response:
transfer bids, Stayman.
• 2C forcing game. In response: 2D
negative.
• Weak Twos: 2(D,H,S).
Acol
• Natural: 4th major.
• 1NT: 12-14; 2NT: 20-22.
• 2C forcing game. In response: 2D
negative.
• Strong Twos: 2(D,H,S).
The French Standard
• 2NT: 20-21.
• 2C forcing one round: 2D relay. Then
2NT: 22-23, or a suit: 21-23.
• 2D Albarran. Responses showing
Aces.
• Weak Twos: 2(H,S).
The French Strong Two
• 2NT: 20-22
• 2C Albarran. Responses showing
Aces.
• Strong Twos: 2(D,H,S).
Pro Bridge manual final.qxd 1/11/2007 2:46 PM Page 20
Page 12

SYMPTOMS
The unit doesn't react or
behaves erratically.
The display is dim or difficult to
read.
The computer seems to be
bidding illegally.
The computer is silent.
No response or improper
response when keys are
pressed.
The computer rejects the card
you have selected.
The computer won't show
previous bids/plays when
HISTORY is pressed.
The computer won't accept a
card or suit when you're editing
a hand.
The score doesn't show when
SCORE is pressed.
POSSIBLE CAUSES
• Batteries are not installed
correctly.
• Batteries are weak or bad.
• Poor battery contacts.
• Static discharge or an
electrical disturbance has
caused a lock-up.
• Batteries are weak or bad.
• Dim setting requires LCD
backlight.
• Batteries are weak or bad.
• Sound option is turned off.
• Electrostatic discharge has
caused a malfunction.
• Batteries are weak or bad.
• The selected card isn't yours
(e.g., the card is in dummy's
hand).
• You are not following suit.
• You aren't in the bidding or
playing phase of the game.
• No bids have been made.
• You have already entered 13
cards for the current position.
• The card is already in use for
another player position.
• There are no more cards
available in that suit.
• An error beep will sound if
SCORE is pressed while
current results are showing
during play.
ACTION TO TAKE
• Reinstall batteries (Section
1.1).
• Replace batteries (Section
1.1).
• Ensure that contacts on
batteries and unit are clean.
Make sure that contacts have
not been bent.
• Press into the hole marked
ACL to reset unit (Section
6.1).
• Replace batteries. If problem
persists, use ACL feature to
reset unit (Section 6.1).
• Pressing BACKLIGHT turns
light on/off. Select BL
Intensity menu option to
increase/decrease amount of
light (Section 2.4).
• Replace batteries.
• Turn sound on in Main Menu
(Section 2.3).
• Use ACL feature to reset unit
(Section 6.1).
• Replace batteries. If problem
persists, use ACL feature to
reset unit, as described in
Section 6.1.
• Select and enter another card.
• Select and enter another card.
• You must be in the bidding or
playing phase for History
Mode to work.
• Bids must be made before the
HISTORY feature will work.
• You cannot enter more than
13 cards per player.
• Check the upper portion of
display for available cards.
• Check the upper portion of
display for available cards in
each suit.
• Press ENTER until current
results have all been shown;
then press SCORE.
TROUBLESHOOTING GUIDE
APPENDIX B: SCORING INFORMATION
RUBBER BRIDGE SCORING:
Score below the line for tricks bid and made:
Spaces or Hearts: 30 per trick; if doubled, multiply by two.
Diamonds or Clubs: 20 per trick; if doubled, multiply by two.
No Trumps: 40 for first trick and 30 for each additional trick; if redoubled: multiply by four.
One hundred points wins the game, but no separate score is recorded.
Score above the line: Overtricks
Not Vulnerable Vulnerable
Undoubled . . . . . . . . . . . . . . . .Ordinary trick value . . . . . . . . .Ordinary trick value
Doubled . . . . . . . . . . . . . . . . . .100 per trick . . . . . . . . . . . . . . .200 per trick
Redoubled . . . . . . . . . . . . . . . .200 per trick . . . . . . . . . . . . . .400 per trick
Making doubled or redoubled contract: Add 50 to all other scores.
Slams: Not Vulnerable Vulnerable
Small Slam . . . . . . . . . . . . . . . .500 . . . . . . . . . . . . . . . . . . . . . .750
Grand Slam . . . . . . . . . . . . . . .1,000 . . . . . . . . . . . . . . . . . . . . .1,500
Penalties: Not Vulnerable Vulnerable
Undoubled . . . . . . . . . . . . . . . .50 per trick . . . . . . . . . . . . . . . .100 per trick
Doubled . . . . . . . . . . . . . . . . . .100 for first trick . . . . . . . . . . . .200 for first trick
. . . . . . . . . . . . . . . . . . . . . . . . .200 for each additional trick . . .400 for each additional trick
Redoubled . . . . . . . . . . . . . . . .Twice the above . . . . . . . . . . . .Twice the above
Rubber bonus:
When the rubber is won in two games . . . . . . . . . . . . . . . . . . . .700
When the rubber is won by two games to one . . . . . . . . . . . . . .500
TEAM OF FOUR (DUPLICATE BRIDGE) SCORING:
Score on the hand:
Each hand played scores points independently of the other hands played. Points are not carried
forward from previous hands.
Points awarded:
Points are the same as for Rubber Bridge, with the following exceptions:
1. Points for an unfinished rubber are not relevant.
2. A pair succeeding in a contract scores 50 bonus points for a part score, 300 for a nonvulnerable game, and 500 for a vulnerable game.
3. Points scored by NS in a hand count as a negative score by EW in that hand.
4. The penalty score for a doubled contract with declarer non-vulnerable is 300 for each
additional trick, starting from the fourth trick.
International Match Points:
The score by a team's NS pair on a hand is added to the score by the team's EW pair on that hand
(with the result being either positive or negative). The result is then converted to International Match
Points (IMPs), according to the following table. The IMPs for all hands played are then aggregated to
give the result of the match.
International Match Point Scoring
Difference on Board IMP Difference on Board IMP
0 - 10 . . . . . . . . . . . . . . . . . . . .0 750 - 890 . . . . . . . . . . . . . . . . .13
20 - 40 . . . . . . . . . . . . . . . . . . .1 900 - 1090 . . . . . . . . . . . . . . . .14
50 - 80 . . . . . . . . . . . . . . . . . . .2 1100 - 1290 . . . . . . . . . . . . . . . .15
90 - 120 . . . . . . . . . . . . . . . . . .3 1300 - 1490 . . . . . . . . . . . . . . .16
130 - 160 . . . . . . . . . . . . . . . . .4 1500 - 1740 . . . . . . . . . . . . . . .17
170 - 210 . . . . . . . . . . . . . . . . .5 1750 - 1990 . . . . . . . . . . . . . . .18
220 - 260 . . . . . . . . . . . . . . . . .6 2000 - 2240 . . . . . . . . . . . . . . .19
270 - 310 . . . . . . . . . . . . . . . . .7 2250 - 2490 . . . . . . . . . . . . . . .20
320 - 360 . . . . . . . . . . . . . . . . .8 2500 - 2990 . . . . . . . . . . . . . . .21
370 - 420 . . . . . . . . . . . . . . . . .9 3000 - 3490 . . . . . . . . . . . . . . .22
430 - 490 . . . . . . . . . . . . . . . . .10 3500 - 3990 . . . . . . . . . . . . . . .23
500 - 590 . . . . . . . . . . . . . . . . .11 4000 and upwards . . . . . . . . . .24
600 - 740 . . . . . . . . . . . . . . . . .12
Pro Bridge manual final.qxd 1/11/2007 2:46 PM Page 22
Page 13

V.1.0 10/01/07
© 2007 Saitek Ltd. Made and printed in China.
All trademarks are the property of their respective owners.
CI05
www.saitek.com
Saitek
Pro Bridge 3000
TM
Pro Bridge manual final.qxd 1/11/2007 2:46 PM Page 24
 Loading...