

Page 1

SIXTY
User Guide
Page 2

3
Dear customer,
You have just acquired a new generation Sagemcom telephone and thank you for placing your confidence in us.
This device has been manufactured with the utmost care. If you should have difficulties in operating it, we recommend
that you consult this user manual.
You can also find information on the following site:
http://www.sagemcom.com/sixty
To operate the device safely and easily, please read carefully the paragraph “Recommendations and safety
instructions”, page 6.
The CE label confirms that the product complies with the 1999/5/EC regulations of the European Union
Parliament regarding wireless systems and telecommunications.
The declaration of compliance may be looked up on the www.sagemcom.com website, or can be obtained
from the following address :
Sagemcom Broadband SAS
250, route de l'Empereur - 92848 Rueil-Malmaison Cedex - France
Copyright © Sagemcom Broadband SAS
All rights reserved
Sagemcom is a registered trademark
Page 3

4
Contents
Recommendations and safety instructions .....................6
Unpacking .......................................................................8
Phone description ...........................................................8
Your base................................................................... 8
Your handset.............................................................. 9
Control panel............................................................ 10
Phone installation ............................................ 12
Connecting the base .....................................................12
Setting up the handset ..................................................12
Charging batteries .........................................................12
Settings required before use .........................................13
Navigating in the menu .................................................13
Menu structure ......................................................... 14
Browsing through the menus ................................... 14
Phone use......................................................... 15
Handset location ...........................................................15
Telephoning ..................................................................15
Receiving a call ........................................................ 15
Making a call ............................................................ 16
Ending a call............................................................. 16
During a call ............................................................. 16
Call key function....................................................... 17
Secret mode............................................................. 17
Hands-free/speakerphone mode.............................. 17
Calling the last number dialled ................................. 18
Call time display ....................................................... 18
Phonebook ....................................................... 18
Creating an entry ...........................................................18
Editing an entry .............................................................19
Associating a ring tone with a phonebook entry ............19
Other number ................................................................19
Deleting an entry ...........................................................19
Calling using the phonebook .........................................20
Searching for a contact .................................................20
Call log.............................................................. 20
Viewing the received and dialled call log ...................... 20
The events log .............................................................. 21
Viewing the events log............................................. 21
Activating/deactivating
the new event information screen............................ 21
Clearing notifications ............................................... 21
Information .................................................................... 21
Accessories...................................................... 22
Alarm clock ................................................................... 22
Activating / deactivating the alarm clock.................. 22
Changing the alarm clock ring tone ......................... 22
Modifying the alarm clock time ................................ 22
Timer ............................................................................ 22
Activate the timer..................................................... 22
Changing the programmed time of the timer ........... 23
Displaying or hiding the programmed time
of the timer............................................................... 23
Changing the timer ring tone ................................... 23
Ring tones ........................................................ 23
Changing the ring tones ............................................... 23
Activating or deactivating the beeps ............................. 23
Activating/deactivating the silent mode ........................ 24
Settings............................................................. 24
Modifying the date and time ......................................... 24
Adjusting the contrast ................................................... 24
Modifying the language ................................................ 24
the voice box number (according to operator) .............. 25
Defining forbidden prefixes - Call barring .....................25
Demo ............................................................................ 26
Advanced settings ........................................................ 26
Base settings ........................................................... 26
Line settings ............................................................ 27
Modifying the base code.......................................... 29
Page 4

5
Answering machine......................................... 29
Enabling / disabling the answering machine .................29
Modifying the OGM ....................................................... 30
Recording a personal outgoing message ................ 30
Deleting your personal OGM ................................... 30
Listen to a personal message.................................. 30
Playing messages .........................................................30
Remote access to answering machine .........................31
Deleting all the old messages ....................................... 31
TAM settings .................................................... 32
Activating and deactivating call screening ....................32
Modifying the remote access code ...............................32
Number of rings ............................................................ 32
Replacing the batteries................................... 33
Pairing GAP-compatible DECT handsets
on the SIXTY base ........................................... 33
Appendix .......................................................... 34
Care and Maintenance .................................................. 34
Problems ....................................................................... 34
Technical characteristics................................ 35
Initial condition .............................................................35
Environment..................................................... 36
Packaging ..................................................................... 36
Batteries and rechargeable batteries ............................36
The product ................................................................... 36
Guarantee......................................................... 37
Terms and Conditions for United Kingdom
& Ireland only ................................................................ 37
Terms and Conditions for other countries .....................39
Page 5

6
RECOMMENDATIONS AND SAFETY INSTRUCTIONS
Do not install your DECT telephone in a damp environment, such as a bathroom, washroom, kitchen etc, and
not within 1.50 metres of a source of water or outside. This device is designed for use in temperatures of
between 5 °C and 45 °C.
Do not attempt to remove screws or open the appliance. It does not contain any user-replaceable parts.
Only use the power unit supplied and connect it to the electricity mains in accordance with the installation
instructions in this user manual and the details on the sticker regarding voltage, electrical current and
frequency. As a precaution if there is a risk of danger, the power plug can be pulled out to disconnect the 230
volt power supply. Therefore the sockets should be near the device and easily accessible.
This device is designed to be used for connecting to the public telephone network. If problems should arise,
contact your nearest specialist dealer. Only use the telephone cable supplied.
For safety reasons, never put the handset in the base station without the battery inserted or without the lid on
the battery compartment as this could cause an electric shock.
To avoid damaging your handset/base, only use certified rechargeable batteries NiMH 1.2 V 450 mAh, never
use non rechargeable batteries. Insert the batteries in the handset/base battery compartment respecting
polarity.
The used battery must be disposed of in line with the recycling regulations in this user manual.
Your DECT telephone has a range of approx. 50 metres indoors and up to 300 metres outdoors. The range
can be affected by the proximity of metal objects, such as a television and electrical devices.
Zones without reception may appear owing to elements in the building. This can cause brief interruptions in
the conversation, caused by faulty transmission.
Page 6

7
Certain medical equipment and highly-sensitive machines or security systems may be affected by the
transmission power of the telephone. In these cases we recommend adhering to the safety information.
In regions greatly affected by electrical storms we recommend that you protect your telephone circuit with a
special fixture for excess voltage.
Your SIXTY has anti-skid pads that should leave no traces on your furniture and ensure stability. However,
given the the wide variety of finishes used by furniture manufacturers, traces may appear on surfaces in
contact with the parts of your SIXTY. Sagemcom Broadband SAS decline all responsibility in any such cases
of damage.
Page 7
8
UNPACKING
Place the box in front of you, open it and make sure it contains the following items:
• one base SIXTY, one handset, one telephone line cord, one equipped power adapter and this user guide.
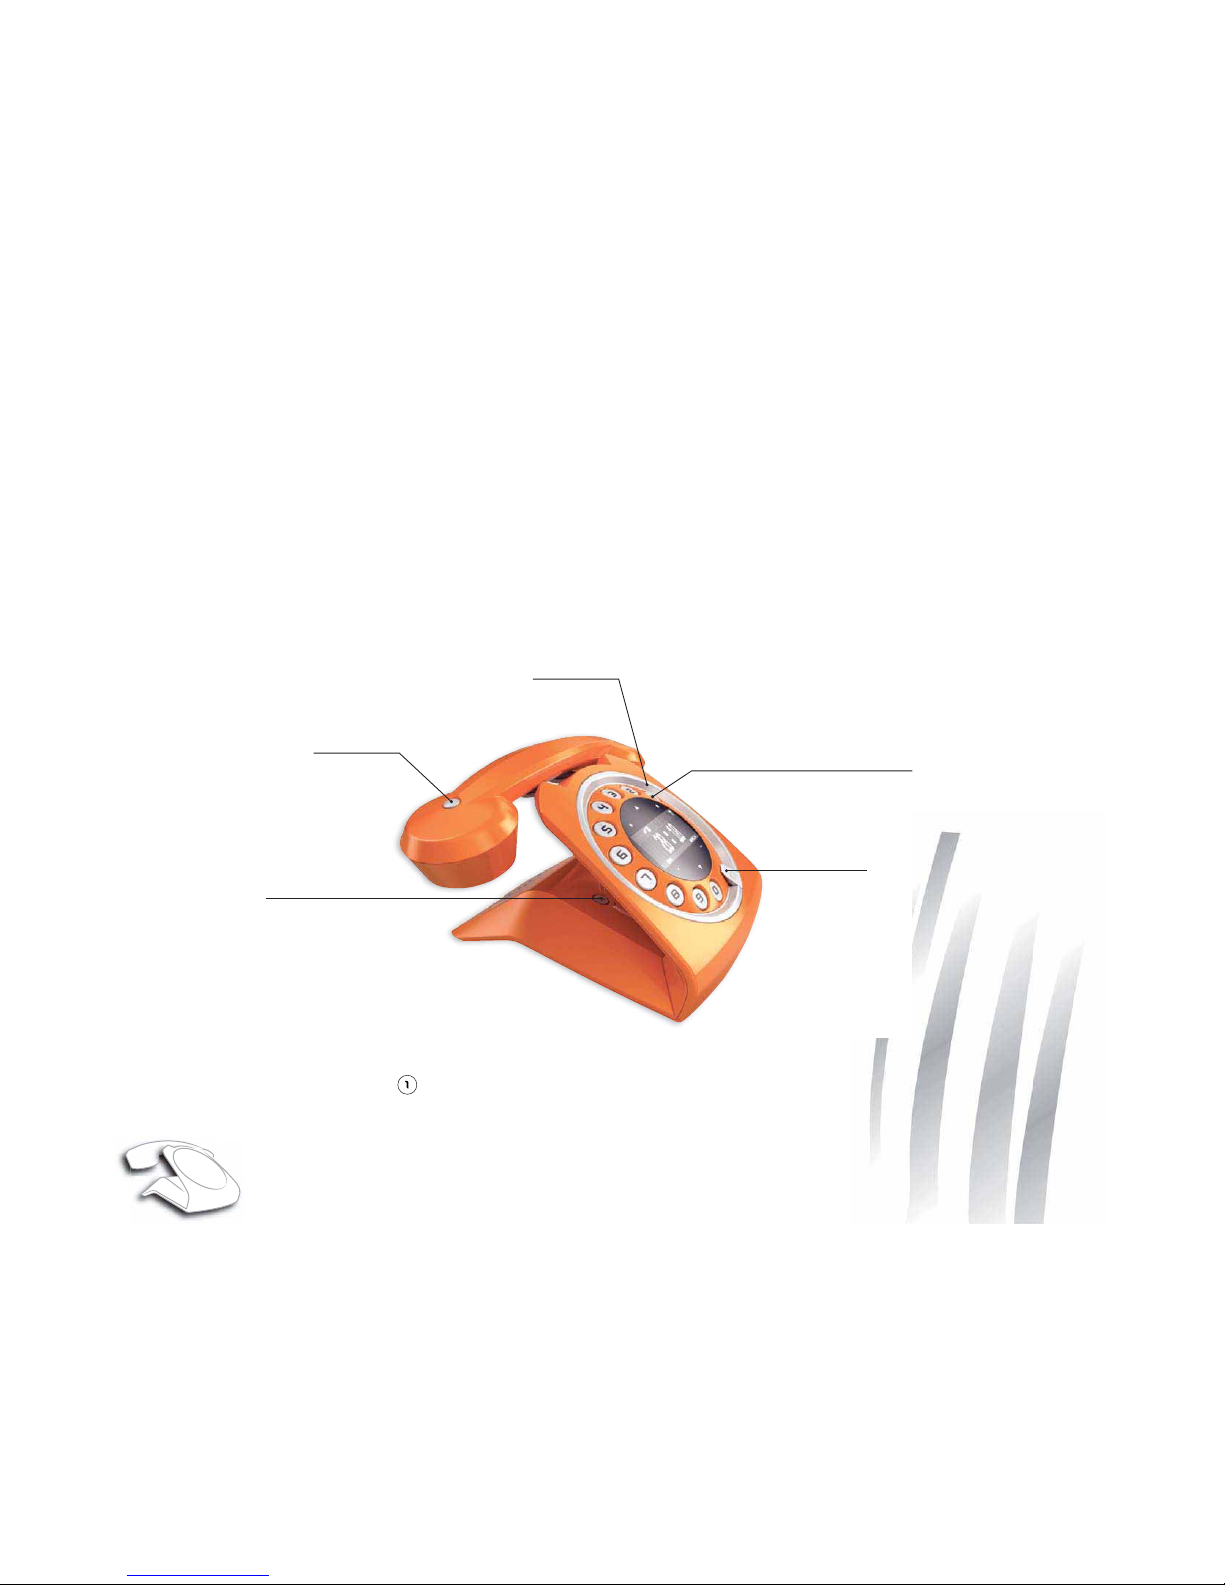
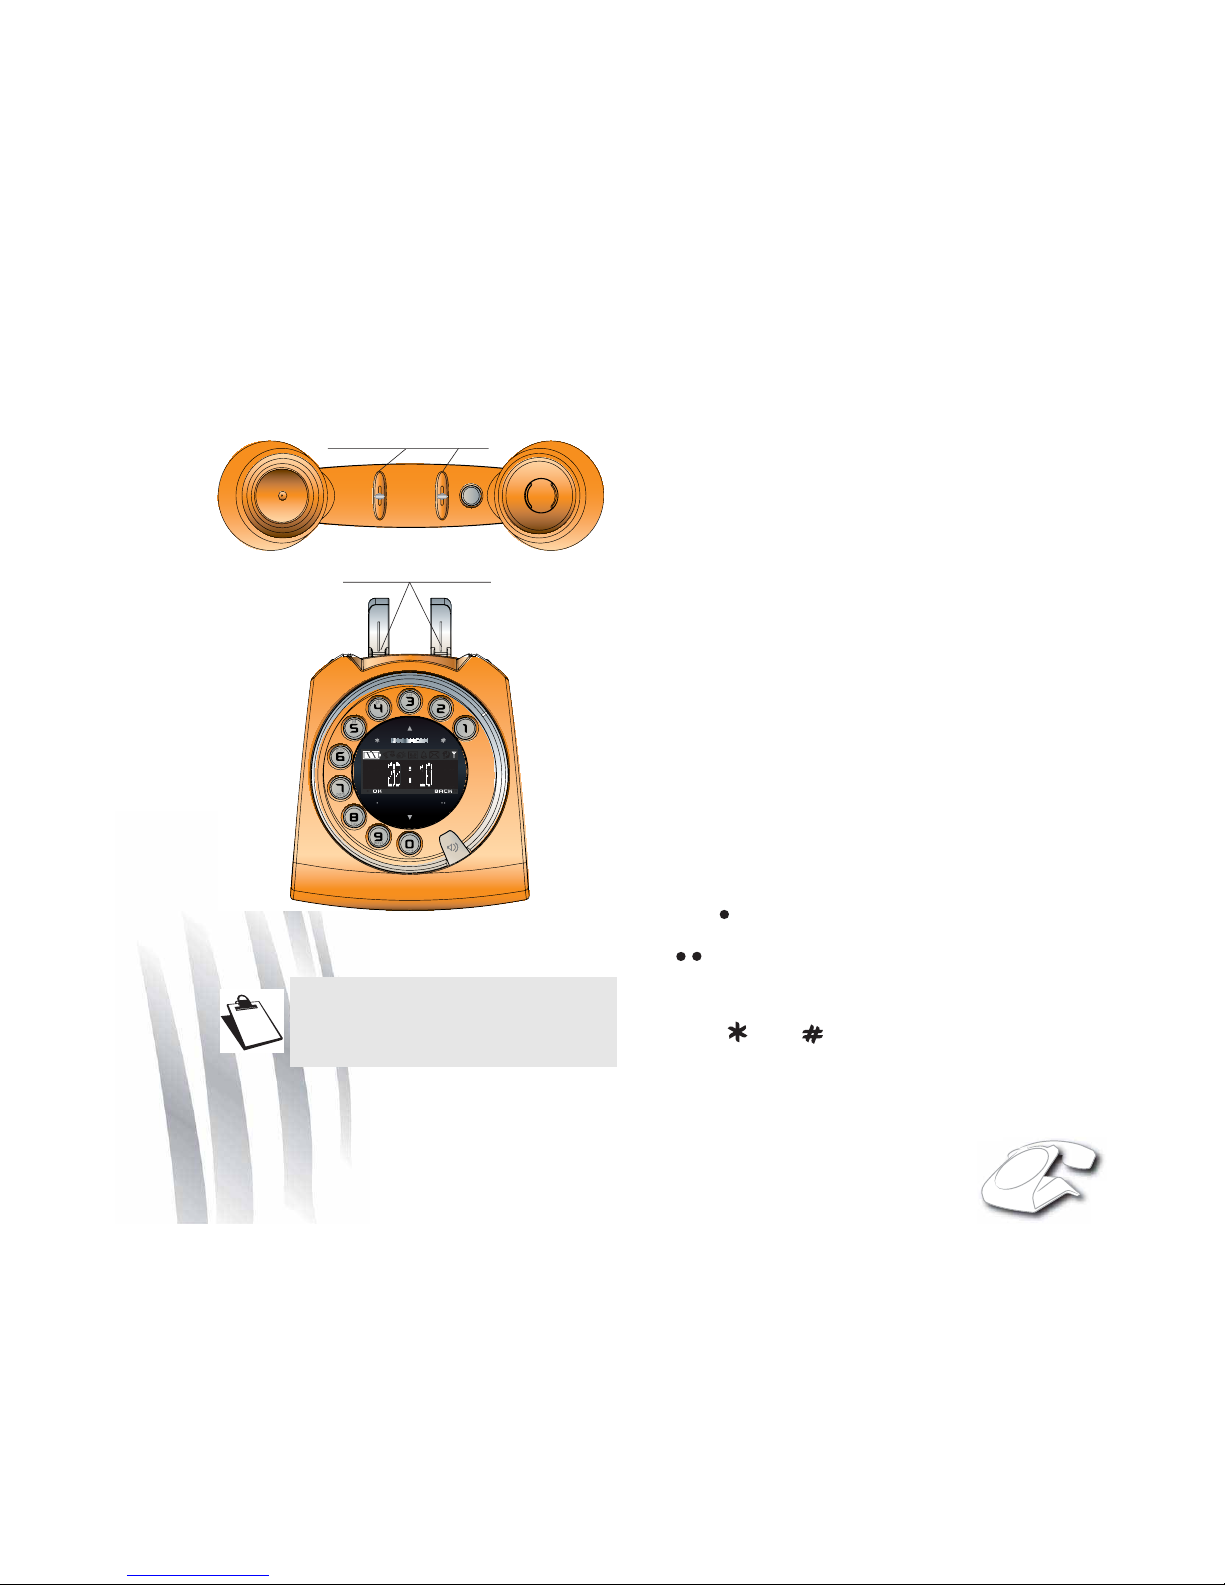
PHONE DESCRIPTION
Your base
The SIXTY is the contemporary interpretation by SAGEMCOM of the S63, which accompanied the development of
telephone communications in many countries in the 60s and 70s. It nevertheless has the latest technology, such as
browser touch buttons, Hifi ringtones, dialling light and sound effects.
* Keyway: indicates the position of the handset earpiece
** Press and hold the key :
- If the answering machine is turned off: access to voice messaging service.
- If the answering machine is turned on: access to your messages on the answering machine.
Base button/Paging
- Short press:
find handsets (Paging)
- Press and hold :
handset registration
Keyway *
Loudspeaker/
Pick up
Indicator light
Access to voice messaging service
/
Access to your messages
on the answering machine **
Page 8

9
Your handset
SIXTY's particularity is that it has a wireless handset.
The single button on the handset allows the user to hang up or answer an incoming call. It should be noted that the
handset is provided with a buzzer that sounds on receiving an incoming call with the handset not on its base.
The handset batteries are charged when the handset is placed on its base. When off the base, the handset's battery
power provides 120 hours of standby time and 10 hours of talk time.
Indicator light operation:
• Fast flashing: handset registration or paging.
• Slow flashing: handset on line or new events.
Make sure that when the handset is on the charger, the icon is animated.
Hang up/ Pick up
Battery compartment
Battery cover
Handset charging
contacts
Speaker
Microphone
+
-
Page 9
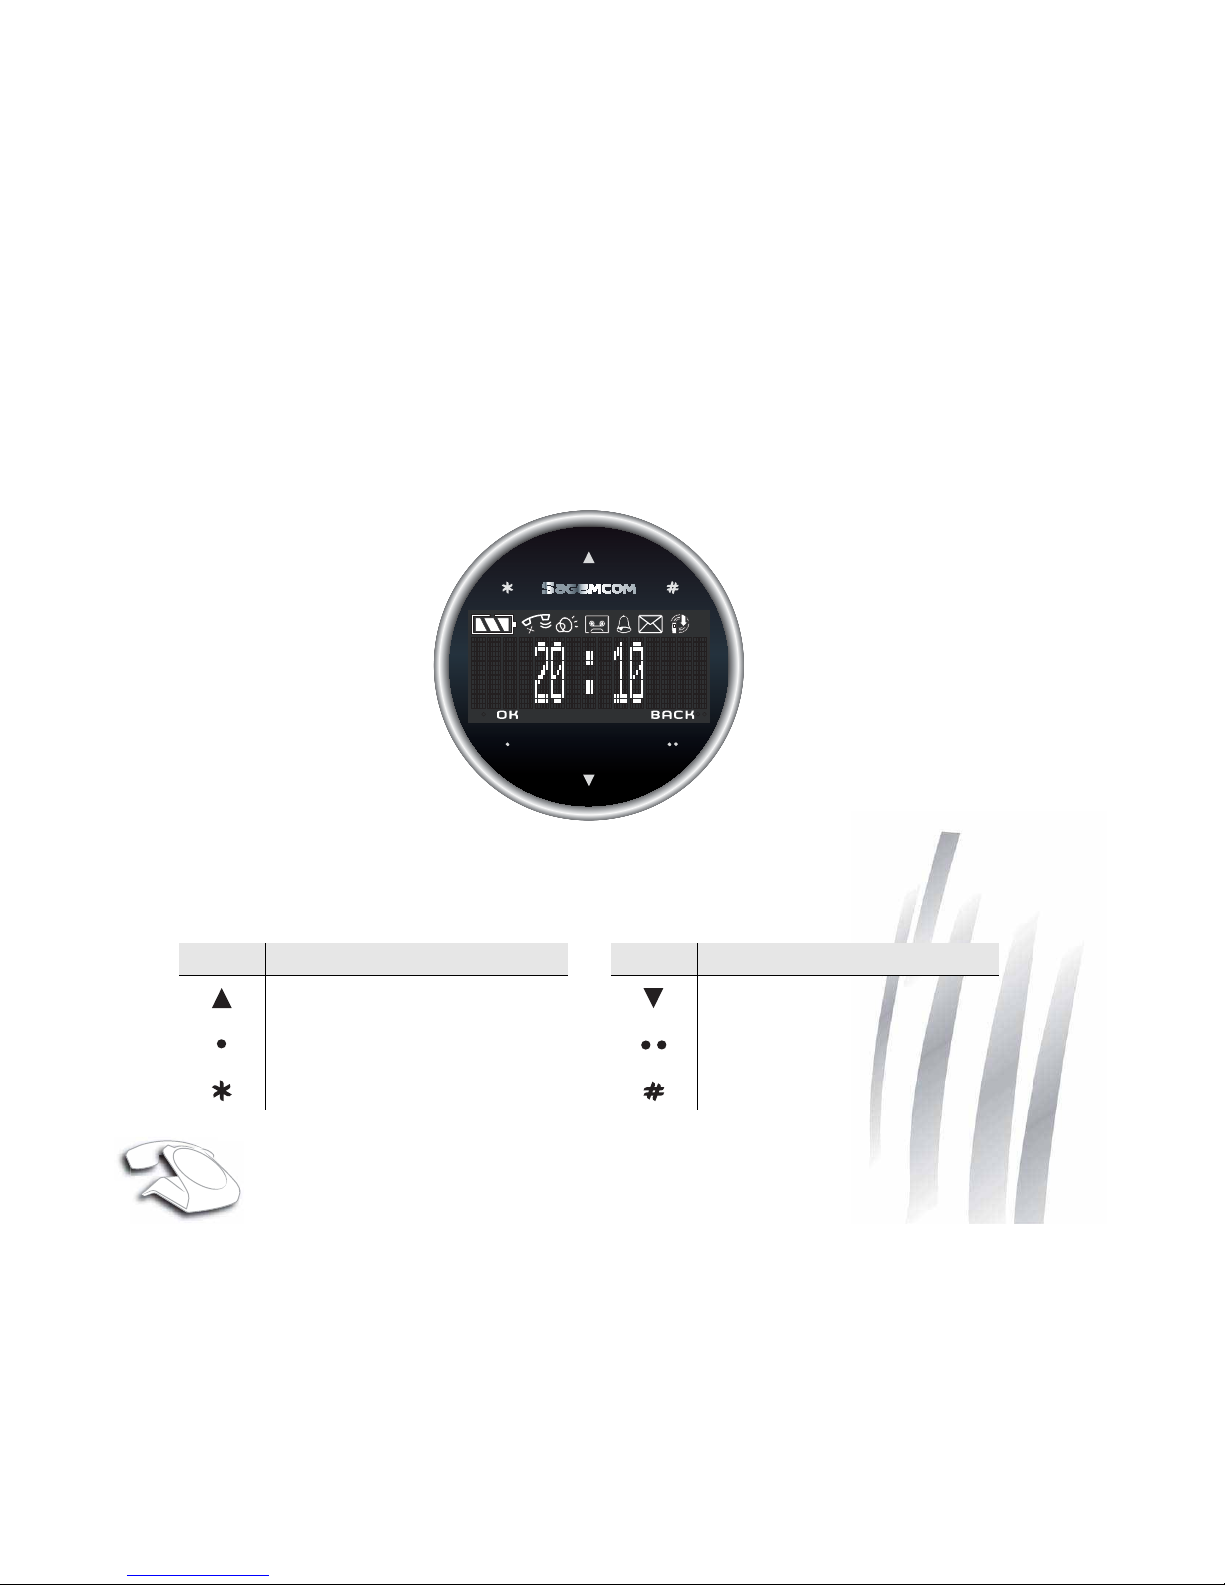
10
Control panel
Your SIXTY has a touch keys for access to configuration and settings functions. The screen tells you about the state
(date and time, unread message, etc..).
Using the touch buttons
The screen includes six touch keys around its periphery. Simply touch the tactile area for the function to be taken into
account:
Key Function(s) Key Function(s)
Scroll up /Go to the menu list. Browse down / Go to the menu list.
Context key 1: Access a menu / Validate the selection.
Context key 2: Delete an entry / Return
to the previous menu.
Asterisk key. # key.
Page 10
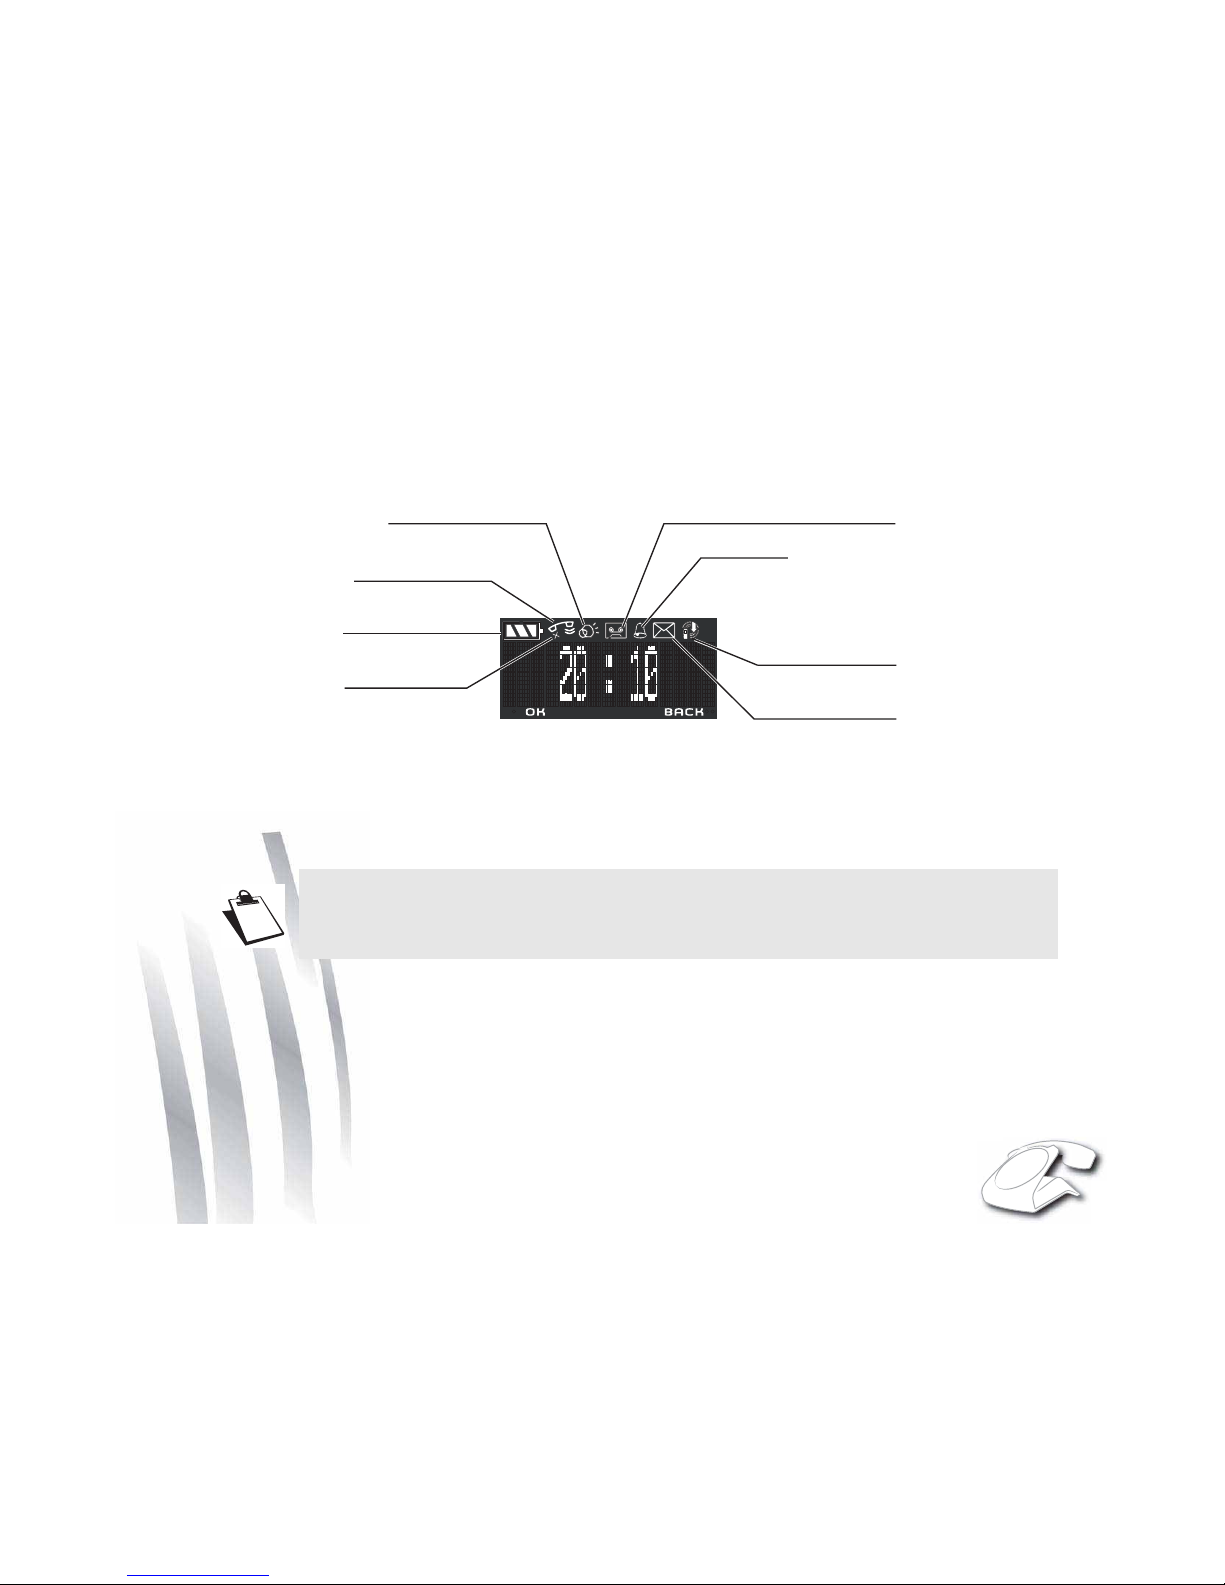
11
Display screen
During use or on standby, the screen of your SIXTY tells you about the state of your telephone by showing icons, and
in particular:
* The low emission icon (ECO mode): Your telephone is provided with an automatic power management
system. As soon as the handset is near its base, the power required is reduced to the minimum. Radio
transmissions are also cut off when the handset is placed on the base, and the low emission icon is then
displayed.
If a second handset is paired with the base, the "low emission" icon is no longer displayed.
Battery indicator
Microphone off
Current call
Speakerphone on
Recording answering machine on
Alarm on
New voice message
Low emission icon*
Page 11
12
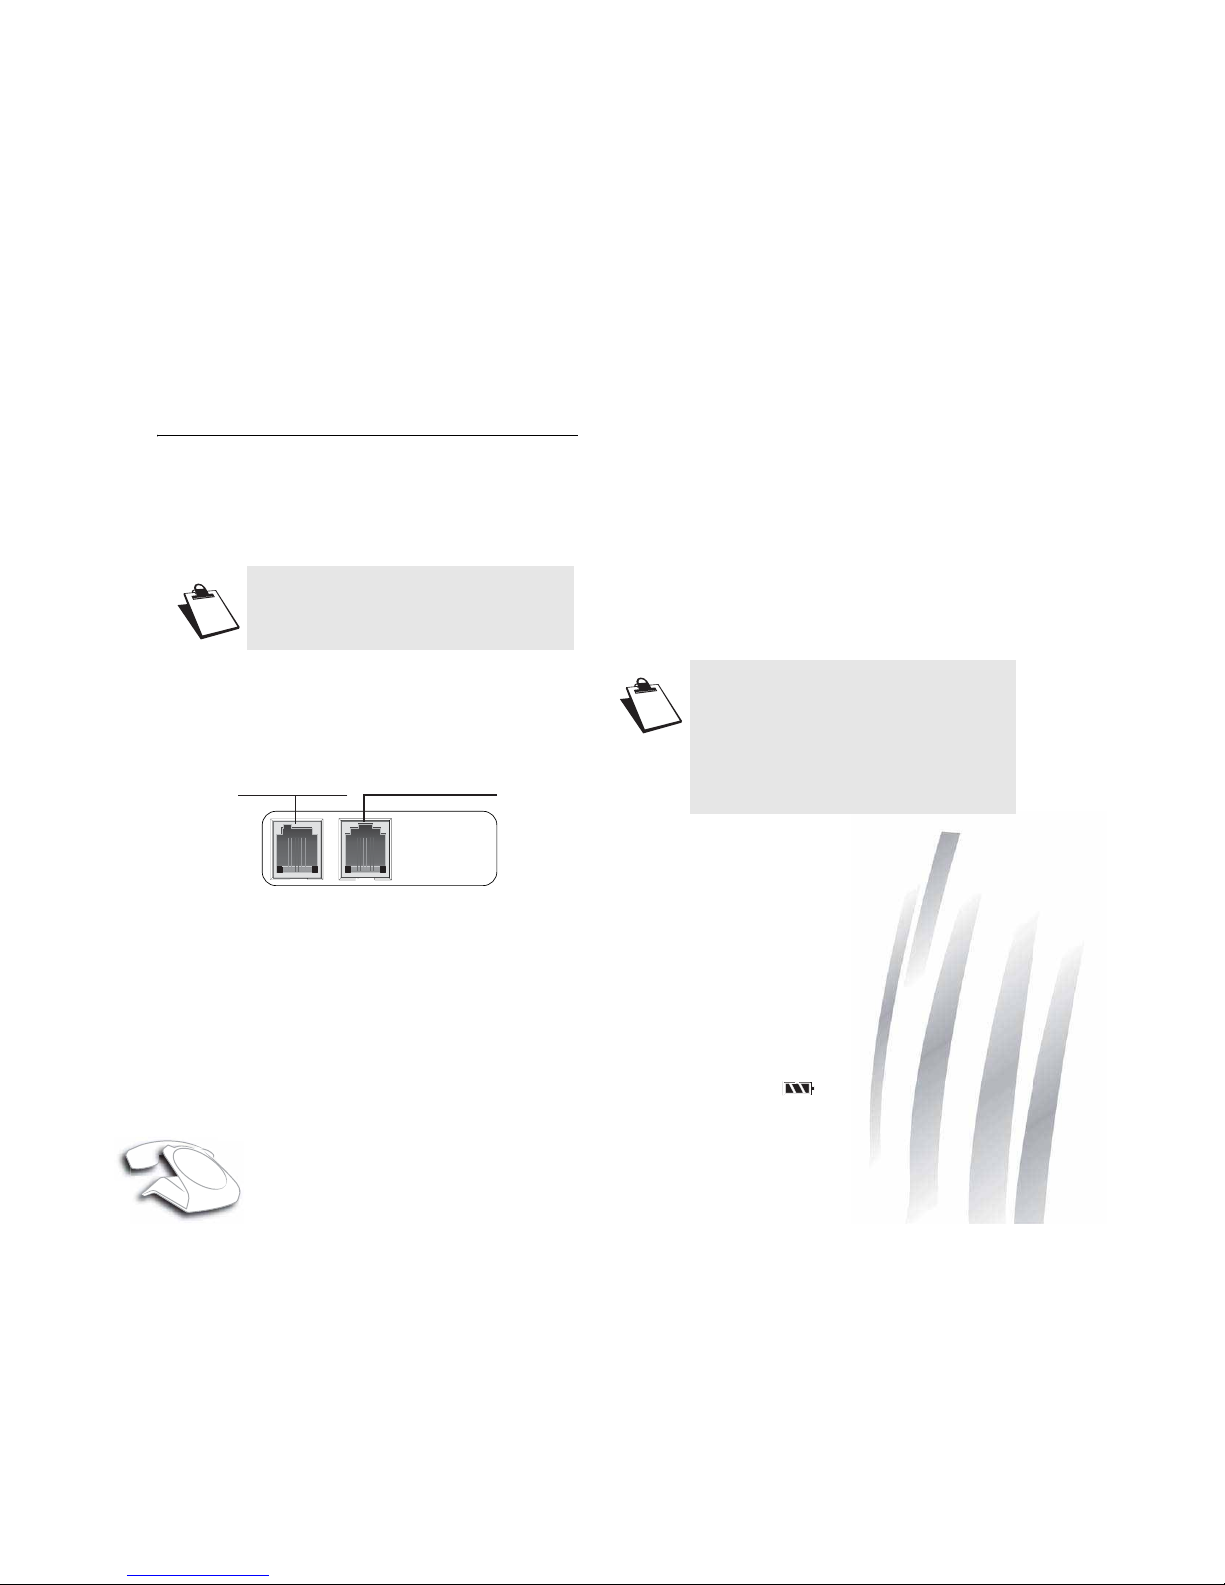
PHONE INSTALLATION
CONNECTING THE BASE
Never force the plugs: they are in different shapes to
avoid connection mistakes.
1. On the underside of the base, click the phone jack into
its socket and connect the other end of the cord to the
telephone wall outlet.
2. Connect the end of the power supply cord on the
underside of the base and connect the power adapter
to the mains socket. The phone display is turned on.
SETTING UP THE HANDSET
The batteries are already inserted in the handset. To put
the handset into use, simply remove the tab by pulling on
it firmly in the direction of the arrow.
The handset emits a double beep to indicate that it has
started and then a second beep to indicate that the
handset is synchronized with the base. From then on,
your handset becomes operative and you can use it to
make calls.
You can now use your telephone to make and receive
calls.
CHARGING BATTERIES
Place the handset on its base and fully charge the
batteries.
An audio signal is emitted and a light flashes when the
handset is placed correctly on the base.
The battery charge icon is animated to indicate that
the battery is being charged and stops to indicate that the
batteries are fully charged.
Before making any connections, please
refer to the safety instructions presented
at the beginning of this user guide.
Power socket
Telephone socket
On leaving the factory, the handset is
already registered in the base.
If your handset is not recognized by the
base, then launch a manual registration
(See paragraph "Set the base to
registration mode", page 26.
Page 12
13
SETTINGS REQUIRED BEFORE USE
Setting the date and time accurately will enable you to
Follow your calls and messages chronologically.
According to where your base is situated in the room, You
may have to adjust the contrast.
To set the date and time, refer to paragraph "Modifying
the date and time ", page 24.
To set the contrast or the brightness of the screen, refer
to paragraph "Adjusting the contrast ", page 24.
NAVIGATING IN THE MENU
With your SIXTY you can create your own telephone
directory, display the list of calls etc. To do this, use the
touch keys.
With the touch keys
and you can choose a menu, a
sub-menu or a precise setting.
The key allows you to enter the sub-menus of the
chosen function and select the setting to modify. With the
key you can return to the previous function or cancel
the current choice.
The keys and are used when you use the
answerphone.
See the menu structure to familiarise yourself with what
your phone can do.
The handset batteries charging time is 10
hours. During charging, the batteries may
heat up. This is quite normal and perfectly
safe.
Handset charging contacts
Base charging contacts
Page 13

14
Menu structure
To access one of your phone's menus, use key or .
Browsing through the menus
Use the browsing keys or to select the desired
menu. Press Valid. To confirm your selection.
Select the desired function by pressing the browsing keys
or and then press the Valid. key.
- To return to the previous menu, press Return.
- To save the settings, press Valid..
Example:
To access the menu SETTINGS /DATE/TIME:
1. Use or to access the menu list.
2. Select SETTINGS using or . Press Valid..
3. Select DATE/TIME using or . Press Valid.
You are now under the DATE/TIME menu.
P
PHONEBOOK
Menu
ACCESSORIES
CALLS
CALL
INCOMING CALLS
OUTGOING CALLS
EVENTS
ALARM
TIMER
EXTERNAL CALL
SILENT MODE
RING TONE
SETTINGS
Option
VIEW
RING TONE
DELETE
ADD NUMBER
NEW ENTRY
BEEPS
DATE/TIME
CONTRAST
DEMO
ANS.MACH
MESSAGES
ON/ OFF
OUTGOING MESS.
SETTINGS
LANGUAGE
Edit
RESTRICTION
ADVANCED SET.
VOICE BOX No
DATE/TIME
Page 14

15
PHONE USE
HANDSET LOCATION
Lost your handset? Press the button on the back of
the base, behind the keypad. The handset will then ring.
TELEPHONING
Receiving a call
• When a call is received, the phone rings.
• The caller's phone number is displayed on the screen
if you have subscribed to the "Caller ID" service.
The caller's name may also be displayed if it is
included in your phone book.
Accepting a call in handset mode
• Pick up the phone handset. You do not need to
press the handset's button.
• Make sure to identify the handset direction by the
dot which identifies the earpiece end. The call time
counter is displayed on the screen.
• To end the call, hang up the handset or press the
handset button.
• A visual and audible signal confirms that the hand-
set is hung up correctly.
• If the handset is not on the base, you have to press
the handset button to take the call.
Accepting a call in speakerphone mode
• Press to speak in speakerphone mode (with-
out holding the handset). The symbol and the
call time counter are displayed on the screen.
• To end the call, press again.
Toggle between handset mode and speakerphone mode
• If you are in handset mode, press and hold the
key and then hang up the handset to toggle to
speakerphone mode. Press the key again to
end the call.
• If you are in speakerphone mode:
- If the handset is hung up on the base, lift the pho-
ne handset to toggle to handset mode.
- If the handset is not hung up on the base, press
the dial tone button to toggle to handset mode.
• To end the call, hang up the handset on the base or
press .
Use the and keys to vary the
earphone volume or speakerphone
volume. The handset earphone volume or
speakerphone volume can vary from 1
to 5.
Page 15

16
Making a call
The call can be made in two ways:
Making a call in handset mode
• Pick up the handset.
• The icon is displayed on the screen. Dial your
number on the keypad.
The call time counter is displayed on the screen.
Making a call in speakerphone mode
• Press to obtain a dial tone prompt on the
screen. Dial your number on the keypad.
The and icons are displayed on the
screen. The call time counter is displayed on the
screen.
Ending a call
When you have finished your call, press or hang up
the handset on the base.
During a call
Receiving a second call
• During the call, a beep is transmitted to your telephone by your service provider to let you know that
you have a second call waiting.
•Press ACCEPT to take this new call.
• Your other caller is then put on hold and you can
talk with your second caller.
Making a second call
• During a call, you can put your contact on hold and
call a second one by pressing -R- and dial the number using the keypad.
• The second call is then launched, with the first call
still on hold.
To alternate from one call to the other
• To toggle from one call to the other, press Menu
then SWITCH.
• The call in progress is put on hold, and you can
then take the second call.
To end one of the calls and continue the other
one
• To toggle from one call and take the other, press
Menu and then HANGING UP.
• The call in progress is definitely terminated, and
you can then take the second call.
You can also dial a number in pre-dialling
mode, whether in handset or
speakerphone mode: dial the number on
the keypad and then lift the handset or
press .
If necessary, you can correct the number
entered by pressing BACK.
The caller on hold hears a beep emitted by
the network.
Page 16

17
To set up a 3 way-call (the two parties and
yourself)
• During a call, press Menu and then 3-PARTY
CONF.
• You can then talk to both parties simultaneously,
and "3-PARTY CONF" is displayed on the screen.
• To end the 3 way-call, Hang up the handset.
Call key function
This key is a shortcut to your phone's call log.
• From the idle screen, press the key :
- INCOMING CALLS,
- OUTGOING CALLS,
- EVENTS.
• Press keys or to select the calls list.
•Press Valid. and then select the number using keys
or .
Secret mode
During a call, you can switch to mute mode and your
phone's microphone will be muted. The person you are on
line with can no longer hear you.
To activate secret mode :
• During a call, press Menu/ SECRET and then
Activ..
• The "SECRET MODE" message will appear on the
screen.
To deactivate secret mode :
•Press Exit, "SECRET MODE" disappears from the
screen. Your correspondent will be able to hear you
again.
Hands-free/speakerphone mode
If you want to phone in speakerphone mode, do not lift the
handset, but press the base key; the icon is
displayed on your phone's screen.
The caller can then be heard through the loudspeaker and
you speak into the base microphone.
To end the call, press the key again .
If you want to toggle to speakerphone mode during a call
in handset mode, press the key; the icon is
displayed on your phone's screen.
The caller can then be heard through the base
loudspeaker and the handset earphone and you speak
into the handset microphone. In this mode the base
microphone is inactive.
You can return to speakerphone mode by holding down
the key and then replacing the handset.
To end the call, replace the handset or press the key .
When you call hand-free/speakerphone
mode, you can increase or decrease the
audio volume from 1 to 5, using
or
.
Page 17

18
Calling the last number dialled
Your SIXTY stores the last 20 dialled numbers:
•Go to CALLS / OUTGOING CALLS.
• Select the number you want to call.
•Go to Option / CALL.
The number is automatically dialed in speakerphone
mode.
Call time display
Once connected, the call time is displayed on the screen
(minutes and seconds).
PHONEBOOK
You can save up to 150 entries in your phone book, with
each sheet able to contain a 24-digit number and a name
up to 12 letters long.
CREATING AN ENTRY
To enter a text, repeatedly press the required key to
display the desired letter.
•Go to PHONEBOOK / New.
• Enter the name of your contact using the
alphanumeric keys.
•Press Valid..
• Enter the contact`s telephone number using the
alphanumeric keys.
•PressValid..
• Select an icon for this number to specify the type of
number.
•Press Valid..
The name and number are then stored in your phone
book.
Page 18

19
EDITING AN ENTRY
• Go to the menu PHONEBOOK.
• Press keys or to select the contact you want to
change.
• Select Option / Edit.
•Press Valid..
• You enter the name input screen.
To correct the name, press Return to delete
characters. Enter your changes on the keypad.
After making the changes, press Valid..
• You enter the number input screen.
To correct the number, press Return to delete the
numbers. Enter your changes on the keypad.
After making the changes, press Valid..
• Select an icon for this number.
•Press Valid..
ASSOCIATING A RING TONE WITH A
PHONEBOOK
ENTRY
You can associate a unique ring tone to each entry and
thus create your own call groups
As you need the active number presentation service on
your handset, contact your operator to find out about the
conditions for obtaining the service.
• Go to the menu PHONEBOOK.
• Select the entry with which you want to associate a
ring tone.
•Go to Option / RING TONE.
• Select the ring tone of your choice.
• Press Valid..
OTHER NUMBER
This function allows you to assign new numbers to the
same name.
• Go to the menu PHONEBOOK.
• Select the entry you want to assign another number
to.
• Go to Option / ADD NUMBER.
• Enter the phone number on the alphanumeric keys.
• Press Valid..
• Select an icon according to the type of number
entered. Press Valid..
DELETING AN ENTRY
• Go to the menu PHONEBOOK.
• Press keys or to select the contact you want to
delete.
• Select Option / DELETE.
• Press Valid..
• A confirmation screen asks you if you wish to delete
the entry.
- To delete the entry, press Yes , the contact is
deleted from your phone book.
- If you do not wish to delete the entry, press No.
Page 19

20
CALLING USING THE PHONEBOOK
• Go to the menu PHONEBOOK.
• From the list of names, select the contact you want to
call using keys or .
•Go to Option/CALL.
The number is automatically dialled in speakerphone
mode.
SEARCHING FOR A CONTACT
• Access your phonebook list, press successively on
the keypad key which corresponds to the first letter of
the name you are searching for so as to make it
appear at the top of the screen.
• Once the first letter of the name is displayed, wait a
moment.
• The phonebook selects the first name in the list that
starts with the selected letter.
CALL LOG
Caller identification is a service that requires prior
registration with your operator.
VIEWING THE RECEIVED AND DIALLED CALL
LOG
• Go to the menu CALLS / INCOMING CALLS or
OUTGOING CALLS.
• Select the event to be viewed.
•Press Valid..
• The screen presents the following information.
(depending on the operator and the subscription):
- the full name of your contact and the telephone
number,
- the number of consecutive calls,
- time (for calls during the day) or the date (for
previous calls) of the call.
The calls are organised in chronological order, from the
most recent call to the oldest call.
To see the previous calls, use the keys or .
To check your call log directly, press the
Log key from the idle screen.
Page 20

21
By pressing Option, a list of various executable actions
appears:
- CALL : To call the number.
- VIEW : To view the selected call again.
- STORE NUMBER : To store the name and number
in the phonebook.
- DELETE : To delete the call currently viewed.
- DELETE ALL : To delete all calls.
To return to the call viewing screen, press Return.
THE EVENTS LOG
Viewing the events log
If one or more new events occurred during your absence,
the information screen "NEW EVENTS !" appears and the
light starts flashing.
• If you do not wish to view the event log at this time,
press Return.
• To view the event log, press Valid..
• Choose the event using or .
•Press Valid..
Activating/deactivating the new event
information screen
The new event information screen can be inhibited.
The events which have occurred can then be viewed in
the menu CALLS / EVENTS / VIEW. The default setting
is active.
• Go to the menu CALLS / EVENTS.
• Select ACTIVATE or DEACTIVATE to enable or
disable the displaying of the new events screen.
• Press Valid..
Clearing notifications
The notifications received are saved in the event log and
can be deleted once they have been viewed.
• Go to the menu CALLS / EVENTS.
• Select DELETE NOTIF. and press Valid. to remove
the notifications received on your base.
INFORMATION
During an incoming call, following messages can be
displayed:
PRIVATE: Your contact does not want their number to be
displayed.
UNAVAILABLE: If there is a problem on the phone
network.
The light only stops flashing when all the
events have been viewed.
Page 21

22
ACCESSORIES
ALARM CLOCK
This function enable you to use your SIXTY as an alarm
clock.
When the alarm is triggered the selected ring tone sounds
for 60 seconds through the handset speaker and an alert
screen is displayed.
Activating / deactivating the alarm clock
•Go to ACCESSORIES / ALARM.
• An information screen shows the alarm clock status.
•Use or to select ACTIVATE or DEACTIVATE.
•Press Valid..
The alarm settings information screen appears showing
the new status.
Changing the alarm clock ring tone
•Go to ACCESSORIES / ALARM.
•Use or to select RING TONE in the list, press
Valid..
• Select the ring tone of your choice, press Vol ume .
• Select the desired ring tone using or to increase
or decrease the volume, press Valid.. OK is displayed
on the screen.
•Press Return to go back to the previous menu.
Modifying the alarm clock time
•Go to ACCESSORIES / ALARM.
•Use or to select SET TIME.
• Enter the time at which you would like the alarm clock
to sound.
•Press Valid.. OK is displayed on the screen.
•Press Return to go back to the previous menu.
TIMER
With this menu you can use your telephone as a timer.
Once the specified time has elapsed, the base rings for 60
seconds and the alarm screen is activated. Turn off the
alarm by pressing Stop, the base stops ringing.
Activate the timer
•Go to ACCESSORIES / TIMER.
•Press Start. If a timer duration is already specified,
the timer is directly activated. If not please follow
instructions in the next paragraph.
The timer function must be inactive so that
it can be set.
Page 22

23
Changing the programmed time of the
timer
•Go to ACCESSORIES / TIMER.
•Press Valid..
• Select SET DURATION in the list. Press Valid..
• Enter the desired time.
•Press Valid.. OK is displayed on the screen.
•Press Return to go back to the previous menu.
Displaying or hiding the programmed
time of the timer
•Go to ACCESSORIES / TIMER.
• Select VIEW in the list. Press Valid..
• If you want to show the timer, press Yes, else
press No.
•Press Return.
Changing the timer ring tone
•Go to ACCESSORIES / TIMER.
• Select RING TONE in the list of options, press Valid..
• The list of ring tones appears, the handset plays the
ring tone.
• Select the ring tone. Press Vol ume .
•Press
or to increase or decrease the volume.
•Press Valid.. OK is displayed on the screen.
•Press Return to go back to the previous menu.
RING TONES
CHANGING THE RING TONES
This menu enables you to associate a unique ring tone to
incoming calls.
• Go to RING TONE / EXTERNAL CALL.
• Press Valid..
• Select the ring tone of your choice.
• then press Volume.
Adjust the ringer volume using or .
• Press Valid.. OK is displayed on the screen.
• Press Return to go back to the previous menu.
ACTIVATING OR DEACTIVATING THE BEEPS
• Go to RING TONE / BEEPS.
• Press Valid..
• To change the beep status, press Edit.
The status is changed on the screen.
• Press Valid.. OK is displayed on the screen.
• Press Return to go back to the previous menu.
Page 23

24
ACTIVATING/DEACTIVATING THE SILENT MODE
When in silent mode, the telephone ringer and keypad
beeps are inhibited.
•Go to RING TONE / SILENT MODE.
• SILENCE MODE? is displayed on the screen.
•Press Yes to activate the silent mode.
SETTINGS
MODIFYING THE DATE AND TIME
•Go to SETTINGS / DATE/TIME.
• Enter the date in DD/MM/YY format.
•Press Valid..
• Enter the time in HH/ MM format.
•Press Valid.. OK is displayed on the screen.
•Press Return to go back to the previous menu.
ADJUSTING THE CONTRAST
•Go to SETTINGS / CONTRAST.
• A list with five levels of contrast is displayed.
• Select the level you want using the keys or . The
contrast is directly visible on the screen.
• when you have obtained a satisfactory level.
•Press Valid.. OK is displayed on the screen.
•Press Return to go back to the previous menu.
MODIFYING THE LANGUAGE
•Go to SETTINGS / LANGUAGE.
• An information screen presents the current language
used.
- To keep the setting, press Valid..
- To change the setting, press or .
• Select the language.
When you activate the silent mode, your
handset is muted for all timer and alarm
type functions.
Page 24

25
•Press Valid.. OK is displayed on the screen.
•Press Return to go back to the previous menu.
THE VOICE BOX NUMBER (ACCORDING TO
OPERATOR
)
This function allows you to receive calls in your absence
on your operator's voice messaging service.
To indicate that a new message has been received the
reception indicator on the the top of the '1' key is lit in red
and the new event message is displayed on the screen.
To change the voice box number, proceed as follows:
•Go to SETTINGS / VOICE BOX No.
• The programmed number is displayed on the screen.
- The number is correct, press Valid..
- To modify the number, press Edit.
DEFINING FORBIDDEN PREFIXES - CALL
BARRING
You can prohibit the use of certain prefixes on your
telephone.
When a prefix is forbidden, it becomes impossible to call
numbers that begin by this prefix.
• Go to SETTINGS/ RESTRICTION.
• Press Edit,
• Select PREFIX using or , press Valid..
• Enter the base code (by default 0000), press Valid..
• Select a location (dashes), press Valid..
• Enter the prefix using the keypad (for example : 06,
08, etc..).
• Press Valid..
• OK is displayed on the screen.
• Select ACTIVATE using or .
• Enter the base code (by default 0000), press Valid..
• Press Valid.. OK is displayed on the screen.
• Press Return to go back to the previous menu.
The answering machine message
language depends on the phone
language.
To check your voice messaging service,
hold down key .
Page 25

26
DEMO
This menu allows you to see an animation for each of your
phone's key and ring tones.
•Go to SETTINGS / DEMO.
•Press Valid..
• Display of "DEMO Chenillard" with the animation of
each key.
• Press the key during this animation, "DEMO
MELODY" is displayed, and the melody for external
calls is initiated.
•Press Exit to stop the demonstration.
ADVANCED SETTINGS
Base settings
Set the base to registration mode
Using this function you can add GAP compatible
hnadsets to your base. The handset that you want to pair
with your base must itself be in pair mode.
Consult the user booklet of your handset to find out what
to do.
•Go to SETTINGS / ADVANCED SET. / SET BASE /
REGISTR. MODE.
•Press Valid..
• REGISTR. MODE? is displayed on the screen, press
Yes.
• Indicator on the the top of the '1' key starts to flash
rapidly. Your base will remain in registration mode for
about 1 minute.
Resetting the base
When you reset your base, all the base parameters are
reset to their initial values (factory settings).
•Go to SETTINGS / ADVANCED SET. / SET BASE /
RESET BASE.
•Press Valid..
• REINIT. BASE? is displayed on the screen.
•Press Yes.
• Enter the base code.
•Press Valid..
The "RE-INIT. IN PROCESS" and the OK messages
are displayed successively.
Your base is now reset.
You can save up to 5 GAP-compatible
handsets on your SIXTY base.
You can also set the base to pairing mode
by holding down your base's key.
Page 26

27
De-registering a handset
•Go to SETTINGS / ADVANCED SET. / SET BASE /
DELETE HANDSET.
•Press Valid..
• Select the handset you wish to unregister using
or .
•Press Valid..
• A screen prompts you to confirm the unregistration.
Press Yes to unregister the handset.
The handset is no more registered to the base.
Line settings
Modifying the network type
Your telephone can be installed on a public or private
network (when using a PABX).
This function enables you to configure your telephone
according to the type of network.
•Go to SETTINGS / ADVANCED SET. / SET LINE /
NETWORK TYPE.
•Press Valid..
• A screen presents the current status.
- To keep the status, press Valid..
- To change the status, press Edit.
• Press Valid.. OK is displayed on the screen.
• Press Return to go back to the previous menu.
Modifying the dialling mode
The type of dialling generally used is voice frequency.
It is possible that the exchange to which you are
connected uses pulse dialling.
• Go to SETTINGS / ADVANCED SET. / SET LINE /
DIAL.
• Press Valid..
• A screen displays the current status.
- To keep the status, press Valid..
- To modify the status, press Edit. The status is
modified on the screen.
• Press Valid.. OK is displayed on the screen.
• Press Return to go back to the previous menu.
Before changing the settings of the
telephone line, contact your operator to
obtain the parameters for your line.
The default dialling mode is tone.
Page 27

28
Modifying the flash duration
If you connect your telephone to a private automatic
branch exchange or use it in a foreign country, you may
need to modify the flash duration in order to use your
telephone correctly with regard to the following
functionalities: outgoing 2nd call, incoming 2nd call, 3 way
calling.
Contact your service provider to obtain the correct flash
duration and then modify it by doing the following.
•Go to SETTINGS / ADVANCED SET. / SET LINE /
FLASHING.
•Press Valid..
• An information screen presents the current flash
duration.
- To keep the duration, press Valid..
- To modify the duration, press Edit.
• Select the new duration.
•Press Valid.. OK is displayed on the screen.
•Press Return to go back to the previous menu.
Setting a PABX prefix
If a private automatic branch exchange is used, you can
programme the external call prefix.
With this function you can set the:
- PABX prefix number,
- dialled number length at which point the PABX
prefix will be automatically inserted (this length is
called “digit before prefix”),
- prefix status (on or off).
• Go to SETTINGS / ADVANCED SET. / SET LINE /
PABX PREFIX.
•Press Valid..
• Press to modify this setting.
• Select the desired option:
- ACTIVATE / DEACTIVATE : to select a status.
- PREFIX : to enter the number giving you access to
the outside line.
- EDIT LENGTH : to specify the «digits before
prefix».
• To modify the prefix, select PREFIX press Valid..
• Enter the prefix using the keypad, press Valid..
OK is displayed on the screen.
• To modify the digits before prefix, select EDIT
LENGTH, press Valid..
• Enter the digits before prefix using the keypad.
•Press Valid.. OK is displayed on the screen.
•Press Return to go back to the previous menu.
• Now you can activate the automatic PABX prefix
functionality, select ACTIVATE and press Valid..
Page 28

29
Modifying the base code
This code securises and limits the use of your telephone.
•Go to SETTINGS / ADVANCED SET. / CHANGE
CODE.
•Press Valid..
• Enter the old base code using the keypad (default is
0000).
•Press Valid..
• Enter the new base code using the keypad.
•Press Valid..
• Confirm by entering the new base code again.
•Press Valid.. OK is displayed on the screen.
•Press Return to go back to the previous menu.
ANSWERING MACHINE
Your phone's answering machine provides the following
features:
• Active answering machine mode with pre-recorded
messages,
• Call filtering,
• Remote querying.
ENABLING / DISABLING THE ANSWERING
MACHINE
• Go to ANS. MACH / ON/OFF.
• Press Valid..
• A screen displays the current status of the answering
machine (On or Off).
- To keep the displayed status, press Valid..
- To change the status, press or :
To activate the answering machine, select
ACTIVATE.
To turn off the answering machine, select OFF.
Press Valid..
• OK is displayed on the screen.
• Press Return to go back to the previous menu.
If you have not recorded a personal
message, the answering machine will
automatically use one of the pre-recorded
messages in the selected language.
Page 29

30
MODIFYING THE OGM
Recording a personal outgoing message
•Go to ANS. MACH / OUTGOING MESS. / CHANGE.
•Press Valid..
• RECORD OGM is displayed on the screen.
•Press Begin to start recording your OGM. Start talking
in the base microphone.
• To stop recording press End. Your outgoing message
is automatically played back.
•Press Return to go back to the previous menu or
make a new recording.
Deleting your personal OGM
•Go to ANS. MACH / OUTGOING MESS. / DELETE.
•Press Valid..
• DELETE ANOUNCE? is displayed on the screen,
press Yes to confirm the deletion of your personal
outgoing message.
• OGM DELETED is displayed on the screen.
•Press Return to go back to the previous menu.
Listen to a personal message
•Go to ANS. MACH / OUTGOING MESS. / PLAY.
•Press Valid..
• PLAY OGM is displayed on the screen and the OGM
is played back. At the end of the playback you will
return to the menu RECORD OGM.
•Press Return to go back to the previous menu.
PLAYING MESSAGES
If you have new messages (unread), these messages are
read first. Afterwards, the messages that have already
been taken are played back in chronological order (from
the oldest messages to the most recent messages).
•Go to ANS. MACH / MESSAGES / PLAY.
•Press Valid..
• The messages are played through the loudspeaker.
In order to modify an OGM, you must first
turn on the answering machine.
If you delete your personal outgoing
message, the answering machine will
automatically use the anonymous
message.
If you have not recorded a personal
message, you will hear the anonymous,
pre-recorded message.
Page 30

31
• Depending on your service provider and your
subscription, the name and number of your contact
will be displayed on the screen (except for a
confidential call).
• During playback, you can use the touch-sensitive
keys to perform the following actions:
-
* : go back to the beginning of the message.
-
* x 2: return to the previous message.
- # : go to the next message.
- Pause/PLAY (context key 1): pause/resume
playback.
- DELETE (context key 2): delete the message being
played.
- : exit playback of messages.
REMOTE ACCESS TO ANSWERING MACHINE
Your answering machine can be queried remotely. This
feature allows you to read your messages and query your
answering from any phone when you are not at home.
To remotely access your answering machine:
• Dial your telephone number.
• Wait for the answering machine to come on.
• When your outgoing message is played, press «#».
• Enter your remote access code.
• A beep will indicate access to the answer machine,
Any unread messages will be automatically played
back.
• At the end of playback, a new beep will sound to let
you know that the answer machine is ready.
• You can carry out the following operations :
- 0 : delete the message being played.
- 1 : go back to the beginning of the message.
- 1 (x2): previous message.
- 2 : pause / play.
- 3 : next message.
- 5 : messages read.
- 9 : enable/disable the answering machine.
DELETING ALL THE OLD MESSAGES
• Go to ANS. MACH / MESSAGES / DELETE OLD.
• Press Valid..
• To confirm the deletion of all the old messages, press
Yes.
• Press Return to go back to the previous menu.
The remote access code is 0000 by
default. However, it can only be used once
it is customised, refer to paragraph
"Modifying the remote access code ",
page 32.
To delete old messages one by one, refer
to the previous paragraph and delete
unwanted messages during playback.
Page 31

32
TAM SETTINGS
This menu allows you to change the advanced settings of
your answering machine. You can access the answering
machine SETTINGS menu from the ANS. MACH menu.
ACTIVATING AND DEACTIVATING CALL
SCREENING
The filtering function, when activated, allows you to listen
to the message left by the caller as it is being recorded.
You can unhook to answer at any time.
•Go to ANS. MACH/SETTINGS/CALL SCREENING.
•Press Valid..
• A screen indicating the function status appears.
- To keep the current status, press Valid..
- To change the status, press or .
•Press Valid..
MODIFYING THE REMOTE ACCESS CODE
The remote access code enables you to listen to the
messages left on your answering machine via another
telephone.
•Go to ANS. MACH / SETTINGS / REMOTE CODE.
•Press Valid..
• CODE BASE is displayed, enter your Base code
(default setting is 0000).
•Press Valid..
• CODE DISTANCE is displayed, enter the new remote
access code (4 digits mandatory).
•Press Valid.. OK is displayed on the screen.
•Press Return to go back to the previous menu.
NUMBER OF RINGS
This parameter determines the number of times your
phone rings before your answering machine is started.
The number of rings is between 3 and 7.
•Go to ANS. MACH / SETTINGS / NO OF RINGS.
•Press Valid..
• The programmed number of rings is displayed on the
screen. Press keys or to change this number
(from 3 to 7).
•Press Valid.. OK is displayed on the screen.
•Press Return to go back to the previous menu.
Page 32

33
REPLACING THE BATTERIES
Your batteries' autonomy is no more satisfactory ? Please
contact your retailer, he will propose to you new
equivalent batteries.
• Remove the battery compartment hatch.
• Remove the old batteries, insert the new batteries one
by one in compliance with the polarity of the batteries,
as indicated in paragraph “Your handset”, page 9
• Refit the battery compartment hatch.
• Leave your handset on its base in order to fully charge
the batteries.
PAIRING GAP-COMPATIBLE
DECT HANDSETS ON THE
SIXTY BASE
Additional GAP-compatible DECT handsets can be
registered on the SIXTY base.
To register an additional handset on the SIXTY base:
• Set your base to pairing mode by holding down
the key. The light indicator on the top of the '1'
key starts flashing. The base remains in pairing mode
for one minute.
• Set the additional handset to registration mode. (Refer
to the your handset's user manual).
Up to five GAP-compatible DECT
handsets can be registered on the SIXTY
base.
Page 33

34
APPENDIX
CARE AND MAINTENANCE
Turn off your phone. Use a soft damp cloth to wipe it. Do not use a dry cloth, strong liquid detergents, thinners, alcohol
or any other type of solvent to clean your phone. These products may damage your phone.
PROBLEMS
Refer to the table presented below in case of an operational malfunction:
Problems Possible causes Remedies
You are having
trouble reading or
cannot read the
display when not in
standby mode.
Contrast too low. Increase the contrast level (refer to paragraph "Adjusting
the contrast ", page 24).
No display on the
base screen.
Power connection unplugged. Check the power connection to the phone.
No tone. The phone jack is not
connected or is incorrectly
connected.
Check the phone cable connection (refer to paragraph
"Connecting the base ", page 12).
Make sure you have a dialling tone.
The speaker volume is too low. Increase the speaker volume (refer to paragraph
"Receiving a call ", page 15).
The phone does not
ring when a call is
received.
The mute mode is turned on. Turn off the mute mode (refer to paragraph "Activating/
deactivating the silent mode ", page 24).
Your party cannot
hear you.
You have turned on the mute
mode (microphone off).
Turn off the mute mode (microphone off) in MENU then
MUTE.
Make sure that the "MUTE MODE" message is not
displayed.
You obtain a "busy"
dial tone for each
dialled number.
Incorrect flashing time. Set the flashing time (refer to paragraph "Modifying the
flash duration ", page 28).
Contact your operator to get it to provide you with the right
time.
Page 34

35
TECHNICAL CHARACTERISTICS
INITIAL CONDITION
Standard
Radio frequency band
Number of channels
Duplex mode
Spacing between channels
Bit rate
Modulation
Vocoding
Transmitting power
:
:
:
:
:
:
:
:
:
DECT, GAP
1.88-1.90 GHz
120
TDMA
1.728MHz
1152 kbit/s
GFSK
ADPCM
250 mW
Charging time
Range up to
Batteries
Handset operating time
Max answering machine
capacity
Ambient temperature
Dimensions
Weight including
batteries
:
:
:
:
:
:
:
:
Handset Batteries: 10 hours
300 m outside and up to,
up to 50 m inside buildings
Type Ni-MH, AAA,
2 x 1.2 V 450 mAh
talk time up to 10 hours
standby time up to 120
hours
20 minutes
+5°C to +45°C
Base(WxHxL)
220 x 63 x 39 mm
Handset(WxHxL)
176 x 130 x 89 mm
Base 172g
Handset 43 g
Accessories Advanced Settings
Alarm clock off Network type Public
Timer off Dial mode Tone
Ring Tone Flashing 100 ms
Ringer Traditional PABX prefix Off
Keyboard beeps On Answering Machine
Silent mode Off Status On
Settings Call screening Off
Date/Time 01/01/10 // 00:00 Remote access code 0000
Contrast Level 2 Number of rings 7
Language English
Restriction off
Base code 0000
Page 35

36
ENVIRONMENT
Environmental protection and sustainable development is an important priority for SAGEMCOM. SAGEMCOM has a
policy of using environmentally- friendly systems and makes environmental protection an essential part of the life-cycle
of its products – from the manufacturing, to the installation, operation and disposal.
PACKAGING
The logo (green point) on the packaging means that a fee is paid to an authorised national organisation to
improve packaging recycling and the recycling infrastructure. Follow the local sorting regulations for this type
of waste product in order to improve recycling.
BATTERIES AND RECHARGEABLE BATTERIES
If your product contains batteries or rechargeable batteries, these must be disposed of at designated
collecting centers.
THE PRODUCT
The crossed out dustbin displayed on the product signifies that it belongs to the electrical and electronic
equipment group. The European regulations request you to carry out your own selective recycling collection
at:
• the sales outlet when you buy a similar new device.
• the collection points available in your area (recycling centres, sorting points, etc).
This means you participate in the recycling and valorisation of used electric and electronic goods which would
otherwise have a negative impact on the environment and health.
Page 36

37
GUARANTEE
T
ERMS AND CONDITIONS FOR UNITED KINGDOM & IRELAND ONLY
In order to apply the guarantee, you should contact the SAGEMCOM Helpdesk or the retailer where you purchased
the equipment. Proof of purchase will be required in either case.
Please make sure that you use your equipment only for the purpose for which it was designed and under normal usage
conditions.
SAGEMCOM do not accept any liability for the equipment if used outside the frame of its original designed purpose or
any consequence that may arise from this usage.
Should any malfunction arise, the SAGEMCOM Helpdesk or your retailer will advise you how to proceed.
A) General Guarantee conditions
SAGEMCOM undertakes to remedy by repair or exchange at its own convenience, free of charge for labour and
replacement parts, any defects in the equipment during the guarantee period of 12 (twelve) months or 3 (three) months
for accessories, from the date of original invoice of the Equipment, where those defects are a result of faulty
workmanship.
Unless the customer has concluded with SAGEMCOM a maintenance contract in respect of the equipment which
specifically provides for repairs to be carried out at the customer`s premises, the repairs will not be carried out on the
equipment at the customer premises.
The customer must however return the defective equipment at his/her own expense, to the address supplied by the
SAGEMCOM Helpdesk or by the retailer.
In the case that a product needs to be sent in for a repair, it must always be accompanied by a proof of purchase (which
is not altered, written on or in any way made illegible) showing that the product is still under guarantee. In the case that
no proof of purchase is enclosed, the SAGEMCOM repair centre will use the production date as its reference for
establishing the guarantee status of the product.
Apart from all legal obligatory rules, SAGEMCOM, do not give any Guarantee, either implicit or explicit which is not set
force in the present section, and can not be held responsible for any direct or indirect, material or immaterial damage,
either in or out of the frame of the present guarantee.
If any provision of this guarantee shall be held to be in whole or in part invalid or illegal due to an obligatory rule
applicable to consumers pursuant to their national legislation, such invalidity or illegality shall not impair or affect the
remaining provisions or parts of this guarantee.
This guarantee does not affect the Customer statutory rights.
Page 37

38
B) Exclusions From Guarantee
SAGEMCOM shall have no liability under the guarantee in respect of:
• Damage, defects, breakdown or malfunction due to one or more of the following:
- Failure to properly follow the installation process and instructions for use
- An external cause to the equipment (including but not limited to: lightening, fire, shock, vandalism, inappropriate
conditions of electrical network or water damage of any nature)
- Modifications made without the written approval of SAGEMCOM
- Unsuitable operating conditions, particularly of temperature and humidity
- Repair or maintenance of the equipment by persons not authorised by SAGEMCOM
• Wear and tear from normal daily use of the equipment and its accessories
• Damage due to insufficient or bad packaging of equipment when returned to SAGEMCOM
• Usage of new versions of software without the previous approval of SAGEMCOM
• Work on any equipment or software modified or added without the prior written consent of SAGEMCOM
• Malfunctions not resulting from the Equipment or from software installed in user workstations for the purpose of
use of the equipment.
Communication problems related to an unsuitable environment including:
- Problems related to access and/or connection to the Internet such as interruptions by access networks or mal-
function of the line used by the subscriber or his correspondent
- Transmission faults (for example poor geographical coverage by radio and TV transmitters, interference or poor
line quality)
- Local network faults (wiring, servers, workstations) or the failure of the transmission network (such as but not
limited to interferences, fault or poor quality of the network)
- Modification of the parameters of the cellular or broadcast network carried out after the sale of the Product
• Normal servicing (as defined in the user guide supplied with the equipment) as well as malfunctioning due to servicing not being carried out. Servicing costs are in any event always borne by the customer.
• Malfunctions resulting from the usage of products, consumables or accessories not compatible with the equipment.
C) Out of Guarantee Repairs
In the cases set forth in B) as well as after expiry of the guarantee period, the customer must ask the Authorised
SAGEMCOM Repair Centre for a cost estimation prior to work being carried out.
In such cases, the repair and delivery costs will be invoiced to the customer.
The foregoing shall apply unless otherwise agreed in writing with the customer and only for the United Kingdom and
Ireland.
Page 38

39
TERMS AND CONDITIONS FOR OTHER COUNTRIES
If, despite our best efforts, your product presents any defects, you should refer to your retailer and present the proof
of purchase that they gave you on the day of purchase.
Should any malfunctioning arise, the retailer will advise you what to do.
For the warranty to apply, you should ensure that the product was used in accordance with the instructions for use and
the purpose for use, and that you have at your disposal the sales invoice or receipt stating the date of purchase, the
name of the retailer, the reference and the serial number of the product.
No coverage shall be given under this warranty if the following conditions are applicable:
• The required documents have been modified or altered in order to take advantage of the warranty.
• The manufacturing numbers, product brands or labels have been altered or made illegible.
• Interventions on the product have been made by an unauthorized person.
• The product has been subjected to abnormal or improper use.
• The product has been damaged by external factors such as lightning, over-voltage, moisture, accidental damage,
improper care as well as all Acts of God.
This present warranty does not affect the consumer rights that you may have under the laws in effect in your country.
Important:
Should you return the product to the after-sales department, please ensure that you return as well all the elements and
accessories originally supplied with the product.
Page 39

SIXTY
by
Sagemcom Broadband SAS
250, route de l'Empereur - 92848 Rueil-Malmaison - France
Tél. +33(0)1 57 61 10 00 - Fax : +33(0)1 57 61 10 01
www.sagemcom.com
All rights reserved. Sagemcom Broadband SAS reserves the right to change the technical characteristics of its products and services or to stop marketing
them at any time. The information and specifications included are subject to change without prior notice. Sagemcom Broadband SAS tries to ensure that
all information in this document is correct, but does not accept liability for error or omission. Non contractual document. All trademarks are registered by
their respective owners. Simplified joint stock company - Capital 35 703 000 € - 518 250 360 RCS Nanterre.
253359605A - 19/11/2010
 Loading...