

Page 1

8VHU0DQXDO
Page 2

Page 3
Dear Customer
You have just purchased our product and we thank you for the trust you have placed in us.
This user guide contains all the recommendations, descriptions and tips for using your machine.
For your safety and comfort, we urge you to carefully read the chapter “Safety”, page 5 before attempting use.
Rules for using symbols
This document makes use of symbols designed to help the reader identify the information supplied:
Symbol Definition
Indicates important safety information.
CAUTION
Warning
Failure to respect these notes may lead to serious or even fatal injury. Read these
notes carefully. You will find them in the Safety section of this manual.
Indicates important safety information.
Failure to respect these notes may lead to minor to moderate injury, or damage to
the apparatus or equipment. Read these notes carefully. You will find them in the
Safety section of this manual.
- 3 -
Page 4

Table of contents
Dear Customer.............................................................................................................................................3
Rules for using symbols ........................................................................................................................................3
Safety............................................................................................................................................................ 5
Safety Instructions of IB1100E product................................................................................................................5
Regulatory information ..........................................................................................................................................5
Certifications in Europe ........................................................................................................................................................... 5
Wi-Fi wireless network ............................................................................................................................................................ 5
Location conditions................................................................................................................................................6
Precautions for use ................................................................................................................................................6
Operating environment............................................................................................................................................................ 6
Precautions for using the machine..........................................................................................................................................6
Safety information ..................................................................................................................................................7
Safety during operation ...........................................................................................................................................................7
Environment ............................................................................................................................................................8
Packaging................................................................................................................................................................................ 8
The product ............................................................................................................................................................................. 8
Energy saving and Energy Star............................................................................................................................................... 8
Registered trademarks ...........................................................................................................................................8
Presentation of the machine ......................................................................................................................9
Description of the machine....................................................................................................................................9
Description of the LCD screen .............................................................................................................................................. 10
Installation ................................................................................................................................................. 11
Packaging contents ..............................................................................................................................................11
Installing the machine ..........................................................................................................................................11
Starting up the machine .......................................................................................................................................12
Network connection..............................................................................................................................................12
Wi-Fi wireless connection (WPS) ..........................................................................................................................................13
Connection via a network cable ............................................................................................................................................ 14
Advanced connections ..........................................................................................................................................................15
Using the machine .................................................................................................................................... 18
Loading documents..............................................................................................................................................18
Use of services......................................................................................................................................................19
Using tree structure services ..............................................................................................................................20
Browsing through the tree structure ...................................................................................................................................... 20
Level information................................................................................................................................................................... 20
Multiple service providers....................................................................................................................................21
Pairing ................................................................................................................................................................................... 21
Termination ...........................................................................................................................................................................21
Scanning to a USB flash drive.............................................................................................................................22
Web interface............................................................................................................................................. 23
Standby..................................................................................................................................................................24
Maintenance and incidents ...................................................................................................................... 25
Maintenance ..........................................................................................................................................................25
General information............................................................................................................................................................... 25
Cleaning ................................................................................................................................................................................25
Removing paper jams...........................................................................................................................................26
Several sheets of paper taken at the same time ................................................................................................27
Error messages.....................................................................................................................................................27
Error code..............................................................................................................................................................28
Maintenance menu................................................................................................................................................28
Software updating.................................................................................................................................................31
Machine recovery..................................................................................................................................................31
Packing and transporting the machine...............................................................................................................32
Frequently asked questions ................................................................................................................................33
1- Your machine's website cannot be accessed ................................................................................................................... 33
2 - Your machine's Internet connection via a proxy does not work ....................................................................................... 33
Characteristics .......................................................................................................................................... 34
- 4 -
Page 5
Safety
Safety Instructions of IB1100E product
Before connecting your machine, check that the mains plug to which you are connecting the machine complies
with the indications on the information label (voltage, current, frequency of electricity network) on the machine. This
machine must be connected to a single-phase mains power supply.
Do not connect your machine to a loose, damaged or defective power socket, as you could get an electric shock. The
machine should not be installed directly on the ground.
Only use the supplied power adapter and power cord, connect it to the main socket according to the installation
instructions provided in this booklet and the indications on the identification label affixed to it (voltage, current, electric
network frequency). As a safety measure, you can use the power adaptors to cut off the 230V current in case of danger.
They must be located near to the device, and must be easily accessible.
The machine's power plug may be the only means of disconnecting from the electricity supply. As a result, the
following precautions must be taken: the machine must be connected to a nearby power plug. The power plug must
remain easily accessible.
Packaging and electrical and electronic equipment (EEE), must be disposed of in accordance with the instructions in
the ENVIRONMENT chapter in this manual.
Connection to local network
Only connect the machine to an Ethernet LAN the wiring of which does not go outside the building and is not subject
to external surges.
Safety
Regulatory information
.GPSGV
Certifications in Europe
The CE mark applied to this product indicates the declaration of
conformity of Sagemcom Documents SAS with the followings applicable
directions of the European Union:
21 October 2009 : Directive 2009/125/CE establishing a framework for the setting of
ecodesign requirements for energy-related products.
12 December 2006 : Directive 2006/95/CE Harmonization of the laws of Member States
relating to low-voltage equipment.
15 December 2004 : Directive 2004/108/CE Harmonization of the laws of Member States
relating to electromagnetic compatibility..
9 March 1999 : Directive 1999/5/EC amended on radio and telecommunications terminal
equipment and mutual recognition of conformity.
The declaration of conformity can be consulted online at
www.sagemcom.com in the "support" section or may be requested from
the following address:
Sagemcom Documents SAS - Customer service department
250, route de l’Empereur - 92848 Rueil-Malmaison Cedex - France
Wi-Fi wireless network
The operation of some safety devices, medical equipment and other sensitive devices may be disrupted by the
machine's transmission power. Make sure to comply with the requirements (or restrictions) for use near such systems.
- 5 -
Page 6
The following warning sign indicates that the radio frequency band used is not fully harmonised at European level,
and that the user is required to refer to the existing national regulations in the country of use for any possible restrictions
on use.
For the countries of the European Union, there were some known restrictions especially in Norway (in certain areas),
at the time this manual was issued (see last page).
Safety
Sagemcom disclaims any liability in the event of non-compliance with the existing regulations at the place of
installation, or for any radio interference created with regard to third parties and due to national regulations for this
application not being complied with.
Location conditions
By choosing an appropriate location, you will preserve the longevity of the machine. Ensure that the selected
location has the following characteristics:
• Choose a well-ventilation location.
• Ensure that the machine is not directly exposed to sunlight.
• Do not place the machine in a zone subject to significant differences of temperature or humidity.
• Choose a stable, horizontal surface on which the machine will not be exposed to intense vibrations.
• Do not place the machine near drapes or other flammable objects.
• Choose a location where the risks of splashes of water or other liquids are limited.
• Ensure that this location is dry, clean and dust-free.
Precautions for use
Take account of the important precautions below when using the machine.
Operating environment
The following section describes the operating environment required for the machine:
• Temperature: 10 °C to 32 °C with ambient humidity of between 20 et 80 % (30°C).
Precautions for using the machine
The following section describes the precautions to be taken when using the machine. Failure to comply with these
precautions may result in a risk of fire or electric shock.
• During scanning, never move the machine, never switch the machine off or open its covers.
• Never use objects that generate an electromagnetic field near the machine.
• When disconnecting the mains cable, always take hold of the plug without pulling on the cable.
• Make sure the AC adapter is out of reach of children and pets and placed on a flat, stable surface so that the power
cord cannot be disconnected accidentally.
• Make sure that the power cord is properly plugged into the power supply unit and that it is properly seated in its
housing. It is important to fully insert the connector into its housing.
• Never touch the mains cable with wet hands. You risk getting an electric shock.
• Always disconnect the power cable before moving the machine; Otherwise, you risk damaging the cable and the
machine.
• Always disconnect the mains cable if you do not plan to use the machine for a prolonged period of time.
• Never place objects on the mains cable or the power supply unit.
• Never walk on, or roll equipment wheels over the power cord or the AC adapter.
• Ensure that the machine never lies on the mains cable or the communication cables from any other electrical appliances. Also ensure that no cables are inserted into the machine mechanism. This may prevent the machine from
operating correctly or create a fire hazard.
• Never try to remove a fixed panel or cover. Never modify the machine. Any contact with these circuits may lead to
a risk of electric shock.
• Ensure that all paper clips, staples or other small metal parts do not enter the machine through the openings.
- 6 -
Page 7

• Prevent any water or other liquids from being spilled on or near the machine. Any contact of the machine with water
or liquid may cause a risk of fire or electric shock.
• If liquid or a metal part accidentally penetrates the machine, disconnect immediately the mains cable and contact
your retailer.
• If heat, smoke or unusual smells are given off, or abnormal noises are heard, immediately unplug the power cord
and contact your retailer.
• If the machine emits heat, smoke, unusual smells or abnormal noises, disconnect immediately the mains cable and
contact your retailer.
• Avoid using the machine during a thunder storm, as there may be a risk of electrical shock caused by lightening.
Safety information
When using the machine, the following safety precautions must always be respected.
Safety during operation
To ensure continuous safe operation of your equipment, follow these safety instructions at all times (the list below is
non-exhaustive and may be added to or changed without prior notice).
In this section, the following symbols are used:
Indicates a potentially dangerous situation that may lead to serious
CAUTION
Warning
injury if instructions are not followed.
Indicates a potentially dangerous situation that may lead to minor or moderate
injury, or damage the equipment if instructions are not followed.
Safety
CAUTION
• Connect the mains cable directly to the wall socket and never use an extension cord.
• If a suspicious noise is heard from the power socket or power cord, immediately unplug the power cord from the
power socket, taking all the usual precautions, and then contact your dealer.
• Switch off the power and disconnect the power plug (by pulling on the plug and not the cable) if any one of the following situations occur:
– You spill something on the equipment.
– You suspect the equipment needs maintenance or repair.
– The equipment cover is damaged.
– The main cable or the socket is damaged.
Warning
• Protect the equipment from any humidity (rain, snow, etc.).
• When disconnecting the mains cable from the wall socket, always pull on the plug (and not the cable).
• Ensure that paper clips, staples and other small metal parts do not fall into the machine.
• Take care not to cut yourself when working inside the machine to remove paper jams.
• For environmental reasons, do not dispose of the machine at a household waste collection point.
Power supply
The plug must remain near the appliance and easily accessible.
- 7 -
Page 8
Environment
Preserving the environment is an essential concern of the manufacturer. The manufacturer wishes to operate
installations that are environmentally-friendly and has chosen to integrate environmental performance in the whole life
cycle of its products, from manufacture to installation, use and elimination.
Safety
Packaging
The presence of the logo (green point) means that a contribution has been paid to an approved
national body, for improving packaging recovery and recycling infrastructures.
To facilitate recycling, please respect the sorting rules in place locally for this type of waste.
The product
The crossed bin symbol on the product indicates that it belongs to the electric and electronic
equipment family.
As such, European regulations require that it be collected selectively:
At distribution points in the event an equivalent item of equipment is purchased.
In collection points available locally (household waste facility, selective collection, etc.).
In this way, you participate in the reuse and recovery of Waste Electrical and Electronic Equipment which may have
potential effects on the environment and human health.
Energy saving and Energy Star
EU legislation on energy conservation:
Your machine consumes less than 0.5 watts in standby mode, and thus complies with European Commission
Regulation No 1275/2008 of 17 December 2008 implementing the European Parliament and Council Directive 2009/
125/EC as regards the Eco-design requirements for the power consumption in standby mode for electrical and
electronic office equipment.
Power consumption is one of the main environmental impacts of electronic products. You can reduce your energy
consumption by adjusting your product's standby options (see section “Standby” en page 24).
The international ENERGY STAR® programme aims at promoting the development and
awareness of low-consumption office equipment.
As an ENERGY STAR® partner, Sagemcom Documents SAS has determined that this
product meets the ENERGY STAR® directives in terms of energy savings.
After a period of inactivity of adjustable duration, your device will automatically switch to
power saving mode.
Registered trademarks
Given the permanent evolution in technology, Sagemcom Documents SAS reserves the right to change the technical
characteristics indicated for this product at any time, without prior notice, and/or to interrupt the production of this
product.
Sagemcom is a registered trademark.
All other brands or product names mentioned as examples or for information are the registered trademarks of their
respective owners.
The information contained in this manual is subject to change without notice.
- 8 -
Page 9

Presentation of the machine
Description of the machine
Front view
4
3
2
1
5
6
7
8
9
Back view
14
1 Service button is used to scroll the different
choices or options
2Led
Green to indicate a normal condition
Red to indicate an error condition
Orange to indicate a boot condition
3 LCD screen 10 Master USB connector (USB key)
4 Paper thickness switch 11 Not used
5 Input paper tray 12 LAN connector
6 These buttons, one on either side of the machine,
are used to open the machine.
7 Button to cancel the operation in progress 14 Power cable connection
10
111213
8 Button to validate the operation in progress
9 Output paper tray
13
Setup button is used to activate the WPS pairing
mode of the Wi-Fi.
1 - Presentation of the machine
- 9 -
Page 10
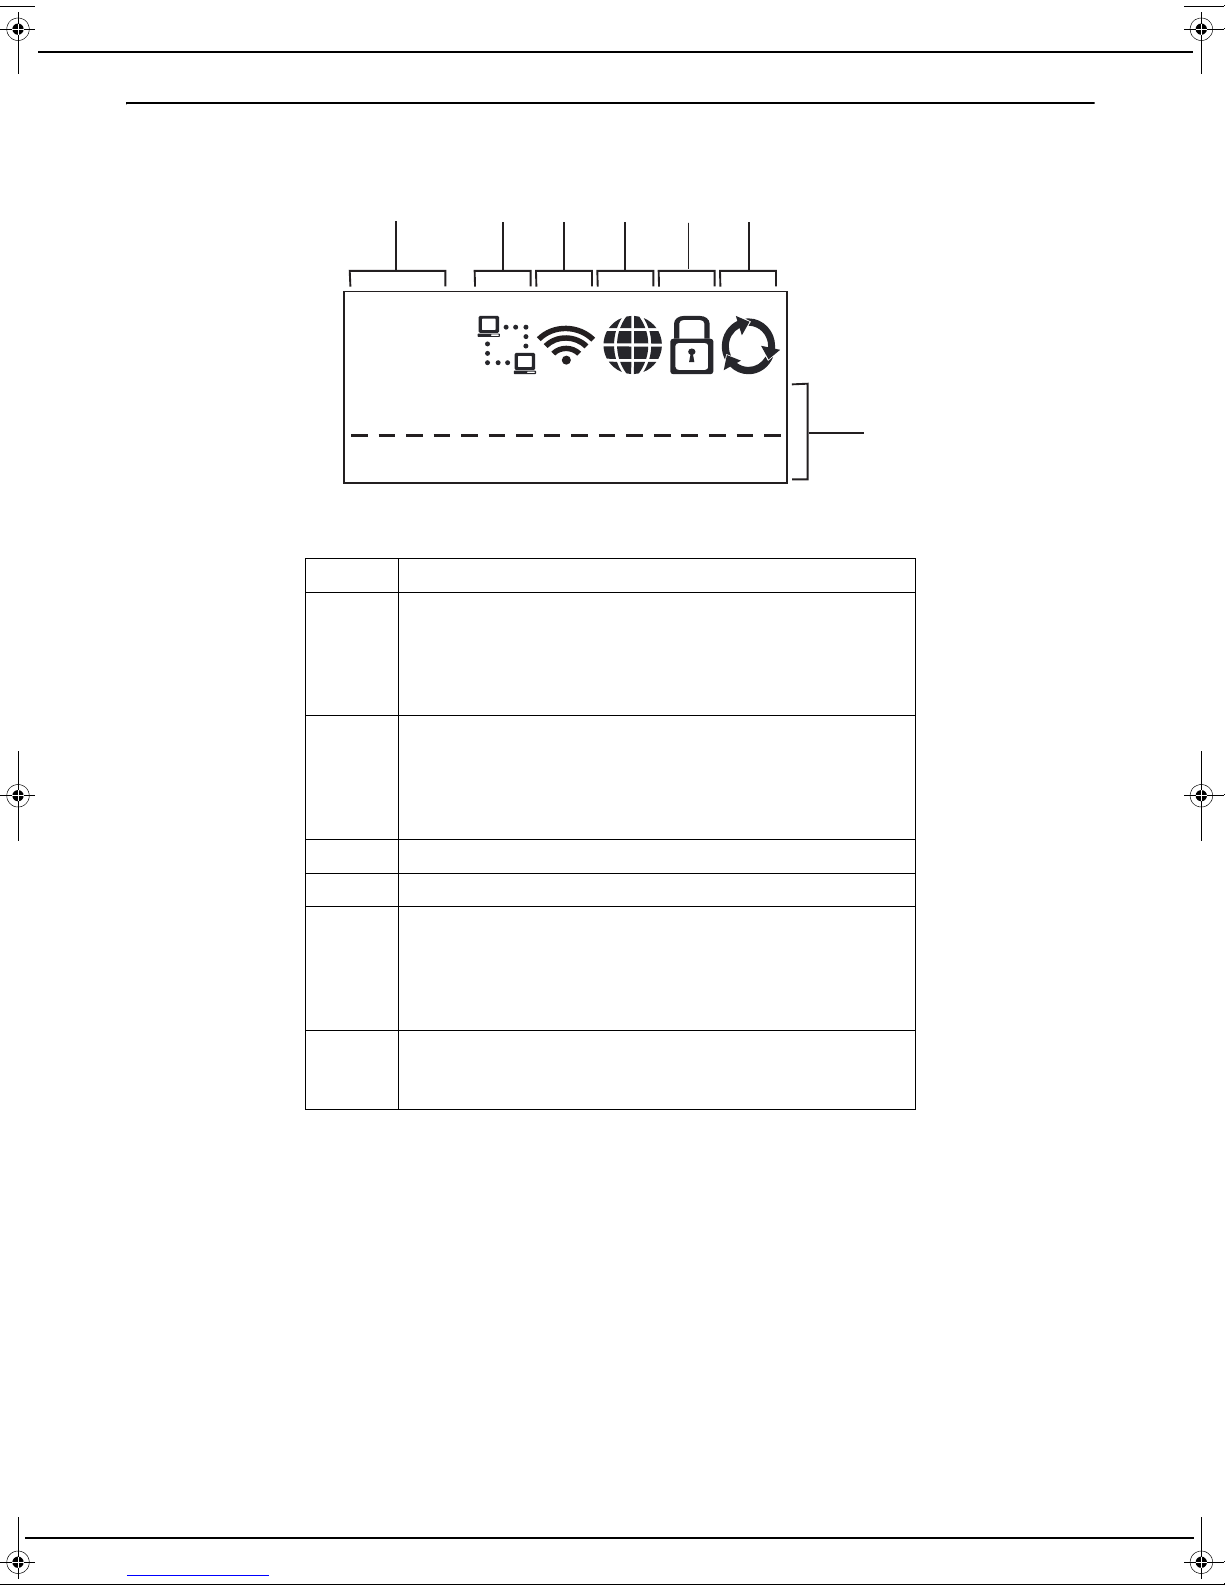
Description of the LCD screen
7
123456
10
The LCD screen displays the following:
1 - Presentation of the machine
1 Scanned sheet counter
2 Icon indicating the status of the network cable connection
with the Internet box.
Off: no connection
Flashing: connecting
Steady: connection established
3 Icon indicating the status of the Wi-Fi connection with the
Internet box.
Off: no connection
Flashing: connecting
Steady: connection established
4 Icon used during the Internet connection phase.
5 Icon used during the service provider site connection phase.
6 Icon indicating the service provider services status.
Off: no service enabled
Flashing: downloading of the list of services
Steady: services enabled and available to the user
Rotating: documents being sent
7 Line used to display machine messages up to 16 characters
long. When messages are longer than 16 characters, they
are scrolled on the screen.
- 10 -
Page 11
Installation
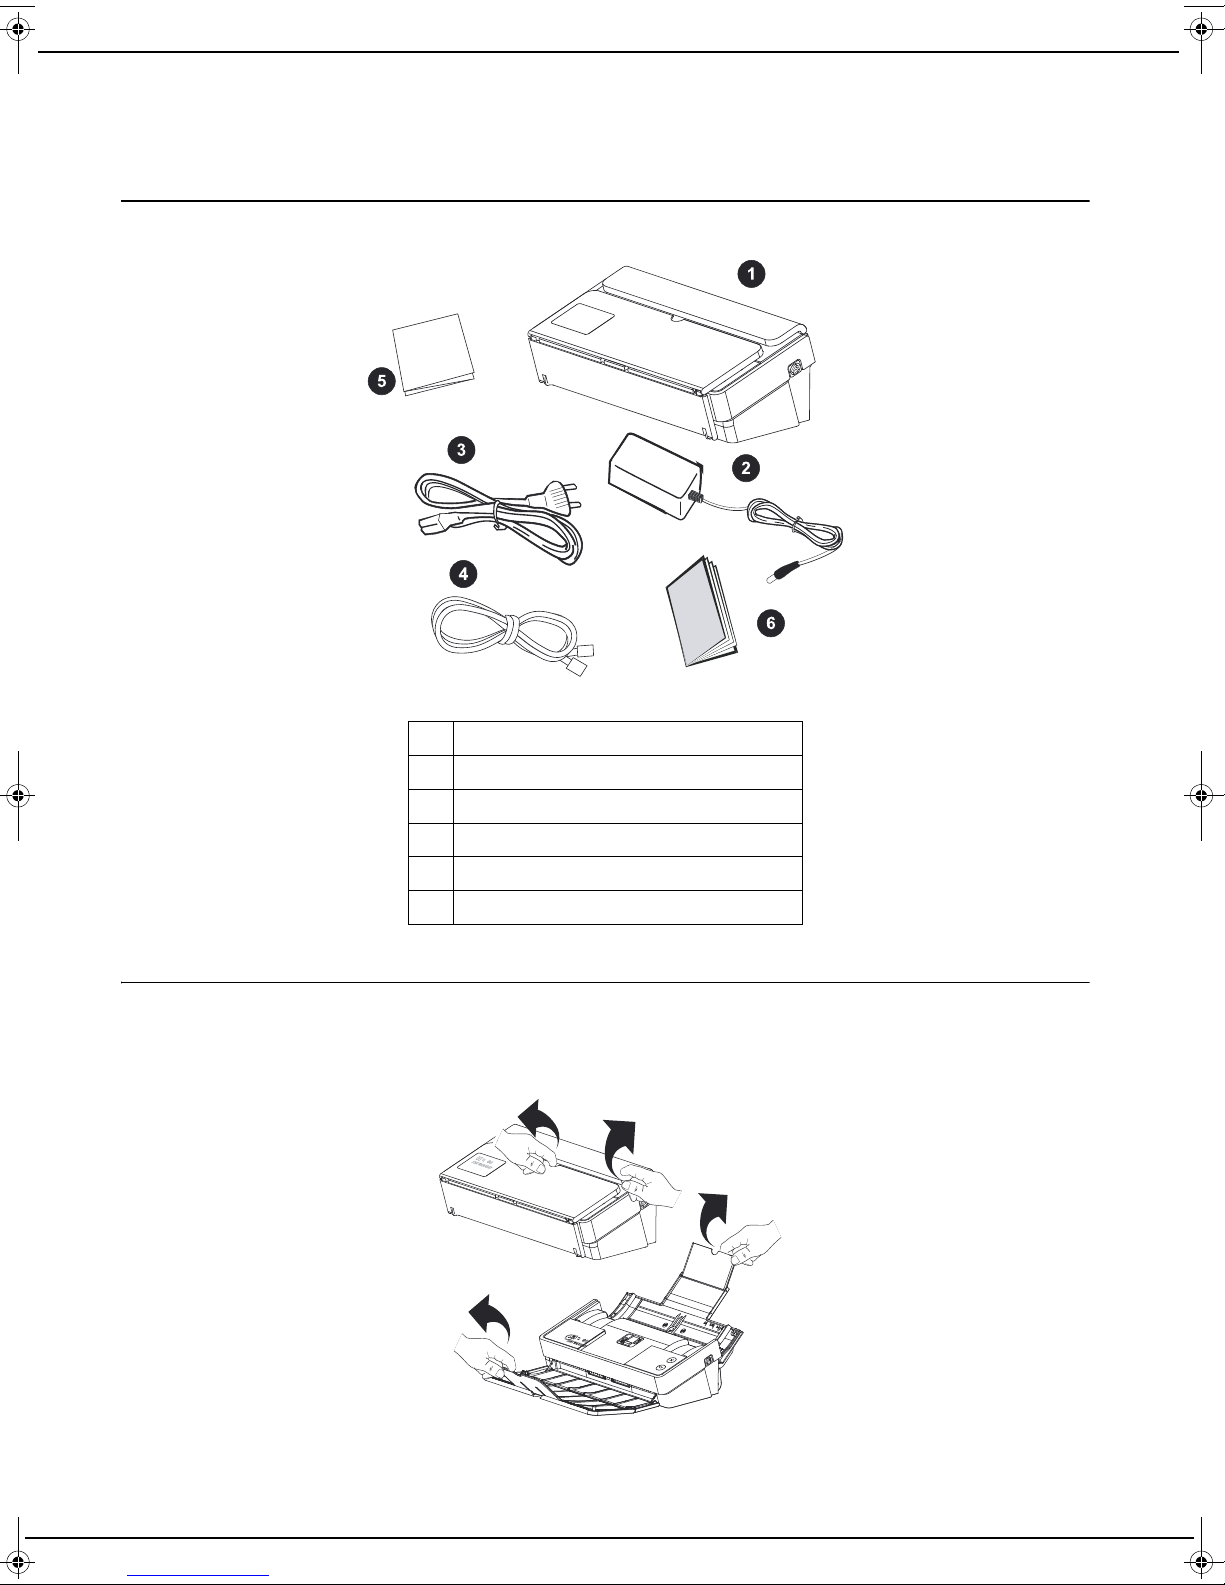
Packaging contents
The packaging contains the components listed below:
2 - Installation
1 A machine
2 A mains power supply unit
3 A power cable
4 A network cable
5 An installation guide
6 A safety instructions
Installing the machine
1 Unpack the machine and remove all protective shims, as illustrated in the installation guide.
2 Install the machine in a suitable place respecting the safety instructions described in the section Safety [ 5].
3 Unfold the document input and output trays.
- 11 -
Page 12

Starting up the machine
1
2
3
WARNING
Before connecting the mains cable, you must consult the Safety Instructions [
1 Take the power supply and power cord supplied.
2 Always first plug in the mains adapter cord into your machine (1), then the power cord into the mains adapter (2)
2 - Installation
and finally the power cord into the power socket (3). If you do not make the connections in this order, you expose
yourself to the risk of an electric shock.
5].
WARNING
The mains cable is used to disconnect the machine from the power supply. As a
precaution, the mains power socket must be located near the machine and easily
accessible in the event of danger.
The machine starts and if it is the first time it is switched on, the user is prompted to select the interface language.
3 Use the key to scroll through the available languages and the key to select the desired language.
4 Connect your machine to your Internet box. Refer to the Network connection section.
0.0
Network connection
The machine can be connected to the network by a network hard-wired cable or through a wireless (Wi-Fi) connection.
Use the procedure below appropriate to the type of connection you want.
WARNING
when switching on the machine for the first time, you must have a computer connected to the same network as the machine to activate the provider services
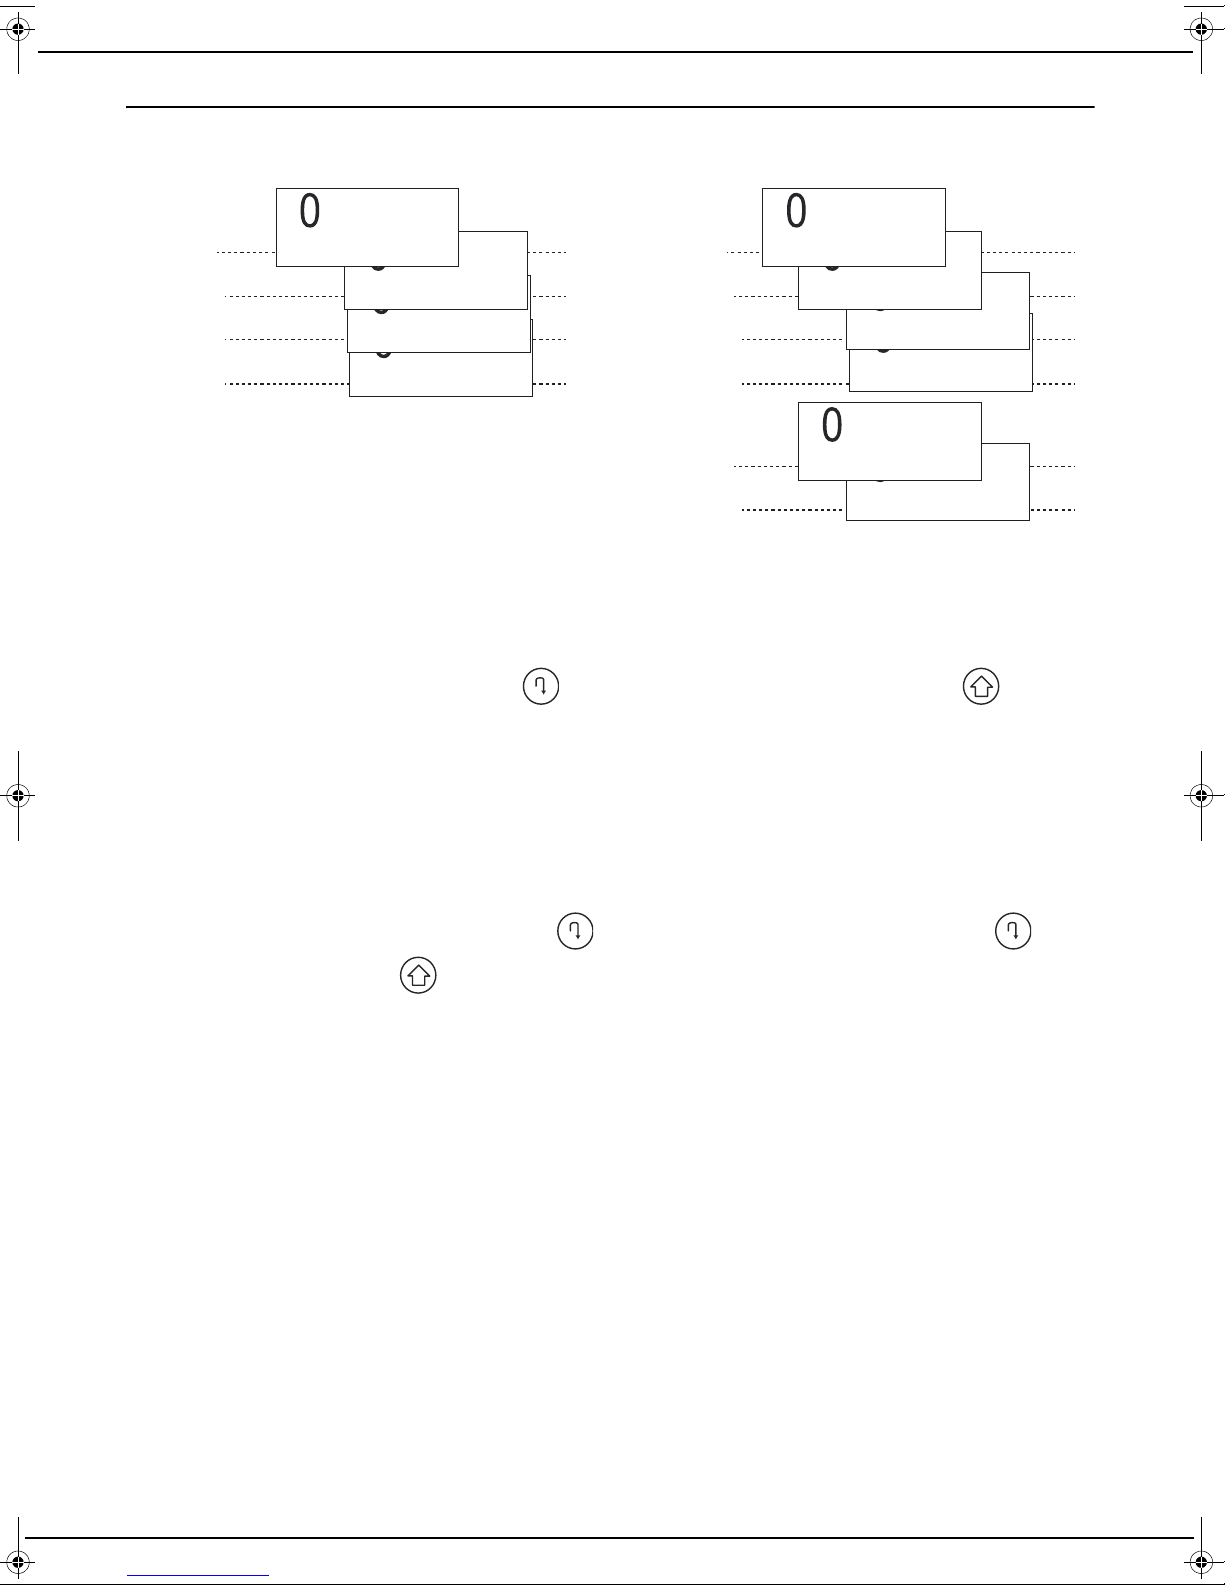
The connection always takes place in four steps. The various steps are represented by icons displayed on the screen.
These steps are as follows:
• Step 1: connecting the machine to the Internet box (via a network cable or through a Wi-Fi wireless connection).
When the operation is successful, the icon is displayed for the network cable or the icon for the Wi-Fi
connection
• Step 2: connection to the Internet. When the operation is successful, the icon is displayed.
• Step 3: logging on to the Service Provider’s website. When the operation is successful, the icon is displayed.
• Step 4: access to services. When the operation is successful, the icon is displayed, and the machine is then
ready for use. This step requires a manual step the first time the machine is switched on.
- 12 -
Page 13

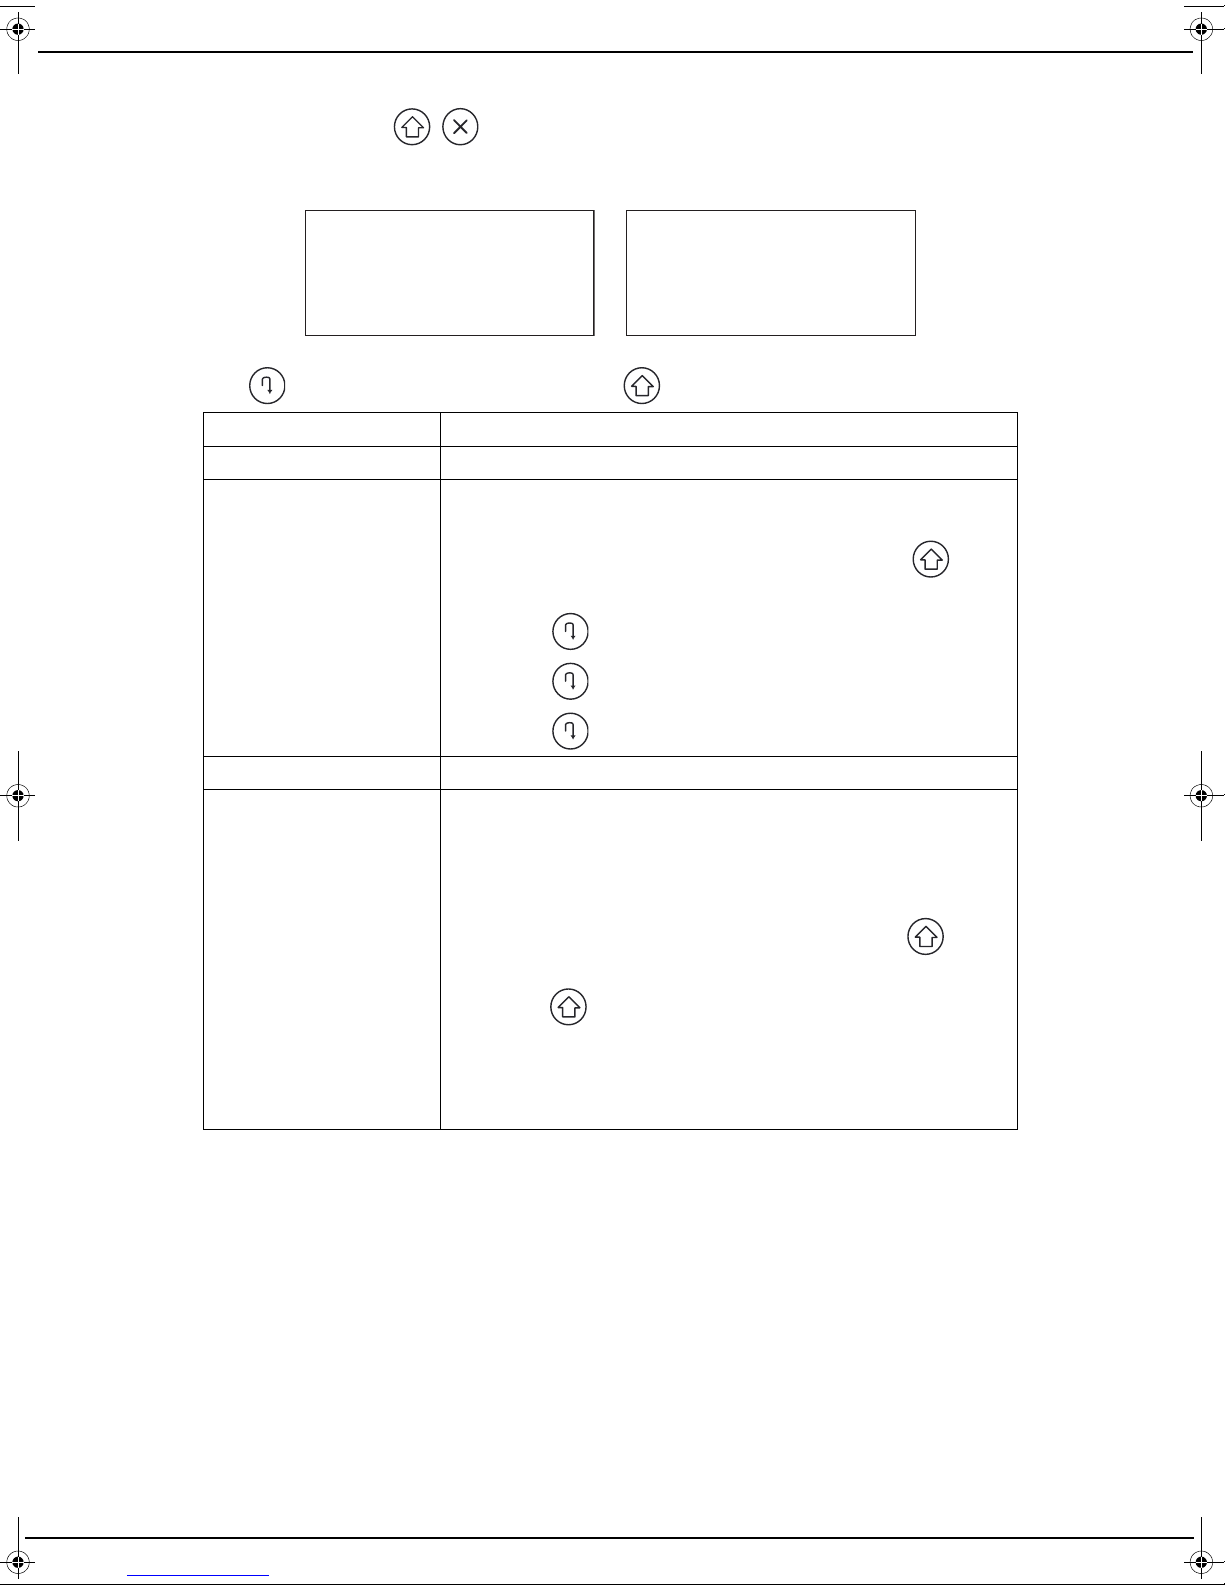
Wi-Fi wireless connection (WPS)
1
2
WHEN READY
CODE : xxxxxx
To connect your machine using the Wi-Fi wireless network (WPS), follow these steps:
1 Set the machine to WPS association mode by pressing the Setup button on the back of the machine.
2 Set Internet box to WPS association mode. For further information, refer to the Internet box manual.
3 The connection steps take place successively.
4 When the machine is switched on for the first time, a software updating operation can start automatically (see
the section “Maintenance menu”, page 28). Do not turn the device off during this operation, as it might not restart.
Once the software has been updated, the following messages are displayed alternately on the LCD screen:
2 - Installation
PAIRING NEEDED
5 Press the key, the following messages are displayed alternately on the LCD screen:
PAIRING...
6 Log onto the service provider's website from your computer and go to your machine's settings page.
Depending on your service provider, you may have to enter a pin code in a field. If this is the case, please enter
the code value displayed on your machine as this pin code.
To complete the pairing process, in all cases press the web page "pairing" button.
Note that you have 1 minute from the onset of pairing on your machine to complete the pairing process on your
service provider's website. If this period is exceeded, you will need to repeat the complete pairing procedure.
7 Once pairing is complete, the machine is ready for use and the screen shown below is displayed
SERVICE - 1
- 13 -
Page 14

Connection via a network cable
PAIRING NEEDED
PAIRING...
WARNING
ONLY CONNECT THE MACHINE TO AN ETHERNET LAN THE WIRING OF
WHICH DOES NOT GO OUTSIDE THE BUILDING AND IS NOT SUBJECT TO
EXTERNAL SURGES.
Remark: the network cable connection takes priority over the Wi-Fi connection.
2 - Installation
To connect your machine, follow these steps:
1 Connect the network cable supplied between your machine and your Internet box.
2 The connection steps take place successively.
3 When the machine is switched on for the first time, a software updating operation can start automatically (see
the section “Maintenance menu”, page 28). Do not turn the device off during this operation, as it might not restart.
Once the software has been updated, the following messages are displayed alternately on the LCD screen:
WHEN READY
4 Press the key, the following messages are displayed alternately on the LCD screen:
CODE : xxxxxx
5 Log onto the service provider's website from your computer and go to your machine's settings page.
Depending on your service provider, you may have to enter a pin code in a field. If this is the case, please enter
the code value displayed on your machine as this pin code.
To complete the pairing process, in all cases press the web page "pairing" button.
Note that you have 1 minute from the onset of pairing on your machine to complete the pairing process on your
service provider's website. If this period is exceeded, you will need to repeat the complete pairing procedure.
6 Once pairing is complete, the machine is ready for use and the screen shown below is displayed
SERVICE - 1
- 14 -
Page 15

Advanced connections
PAIRING NEEDED
WHEN READY
If you do not have Wi-Fi (WPS) or if your network is connected to the Internet through a proxy or more generally, if the
Wi-Fi or the network cable connection failed, please use the configuration method below.
WARNING
To configure these types of connection, you need a computer connected to your
machine with the network cable supplied.
To configure the advanced connection settings, you have to log on to the machine’s embedded website.
Wi-Fi connection without WPS
To connect to the Internet box using a Wi-Fi connection without WPS, follow these steps:
1 Connect your machine to your computer using the network cable supplied. Note the IP address displayed on the
machine’s LCD screen. This operation may take up to 1 minute. To display the IP address, you can also use the
“Maintenance menu”, page 28.
2 Open a web browser on your computer and enter the IP address as follows: http://machine’s adresseIP (IP
address displayed on the LCD screen).
L’interface web s’affiche.
3 Enter your user name (default user) and password (default user) and then click on Login.
2 - Installation
4 Click the Network Search button in the Wi-Fi menu to display the available networks.
5 Select your network from the list and click on Network Access.
6 Your Internet box's most secure type of encryption is displayed in the Encryption field. It is recommended not to
change the proposed value. Click the OK button. This information is available on the Internet box.
7 Leave the DHCP option enabled and click OK.
8 Once the settings have been made, click Logout to exit the web interface.
9 Unplug the network cable from your machine.
10 The connection steps take place successively.
11 When the machine is switched on for the first time, a software updating operation can start automatically (see
the section “Maintenance menu”, page 28). Do not turn the device off during this operation, as it might not restart.
Once the software has been updated, the following messages are displayed alternately on the LCD screen:
- 15 -
Page 16
12 Press the key, the following messages are displayed alternately on the LCD screen:
PAIRING...
CODE : xxxxxx
13 Log onto the service provider's website from your computer and go to your machine's settings page.
Depending on your service provider, you may have to enter a pin code in a field. If this is the case, please enter
2 - Installation
the code value displayed on your machine as this pin code.
To complete the pairing process, in all cases press the web page "pairing" button.
Note that you have 1 minute from the onset of pairing on your machine to complete the pairing process on your
service provider's website. If this period is exceeded, you will need to repeat the complete pairing procedure.
14 Once pairing is complete, the machine is ready for use and the screen shown below is displayed
SERVICE - 1
Connection with advanced settings
This paragraph is intended for advanced users who need to install the machine on a network with specific
characteristics, for example to use a fixed IP address. These specific settings can be configured on the embedded web
interface, in the LAN and Wi-Fi menus in particular.
To configure the machine’s settings, follow this procedure:
1 Connect your machine to your computer using the network cable supplied. Note the IP address displayed on the
machine’s LCD screen. This operation may take up to 1 minute. To display the IP address, you can also use the
“Maintenance menu”, page 28.
2 Open a web browser on your computer and enter the IP address as follows: http://machine’s adresseIP (IP
address displayed on the LCD screen).
The web interface is displayed.
3 Enter your user name (default user) and password (default user) and then click on Login.
- 16 -
Page 17
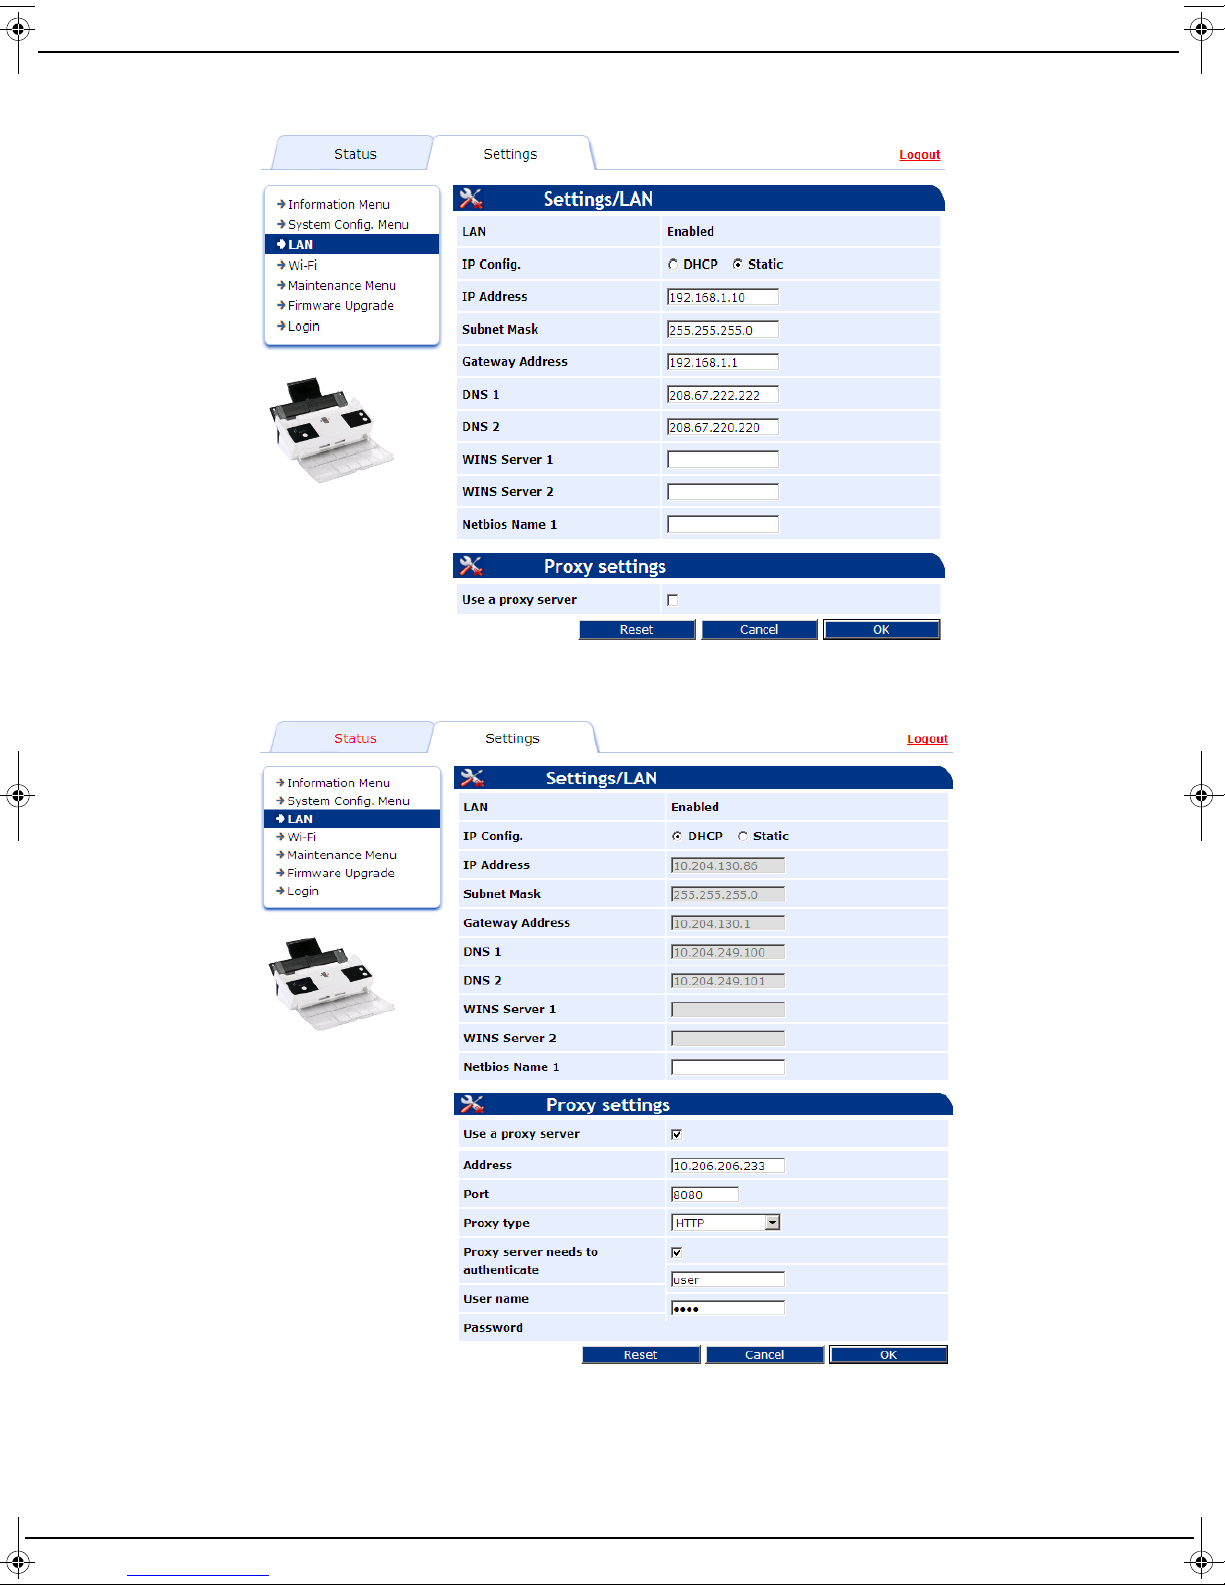
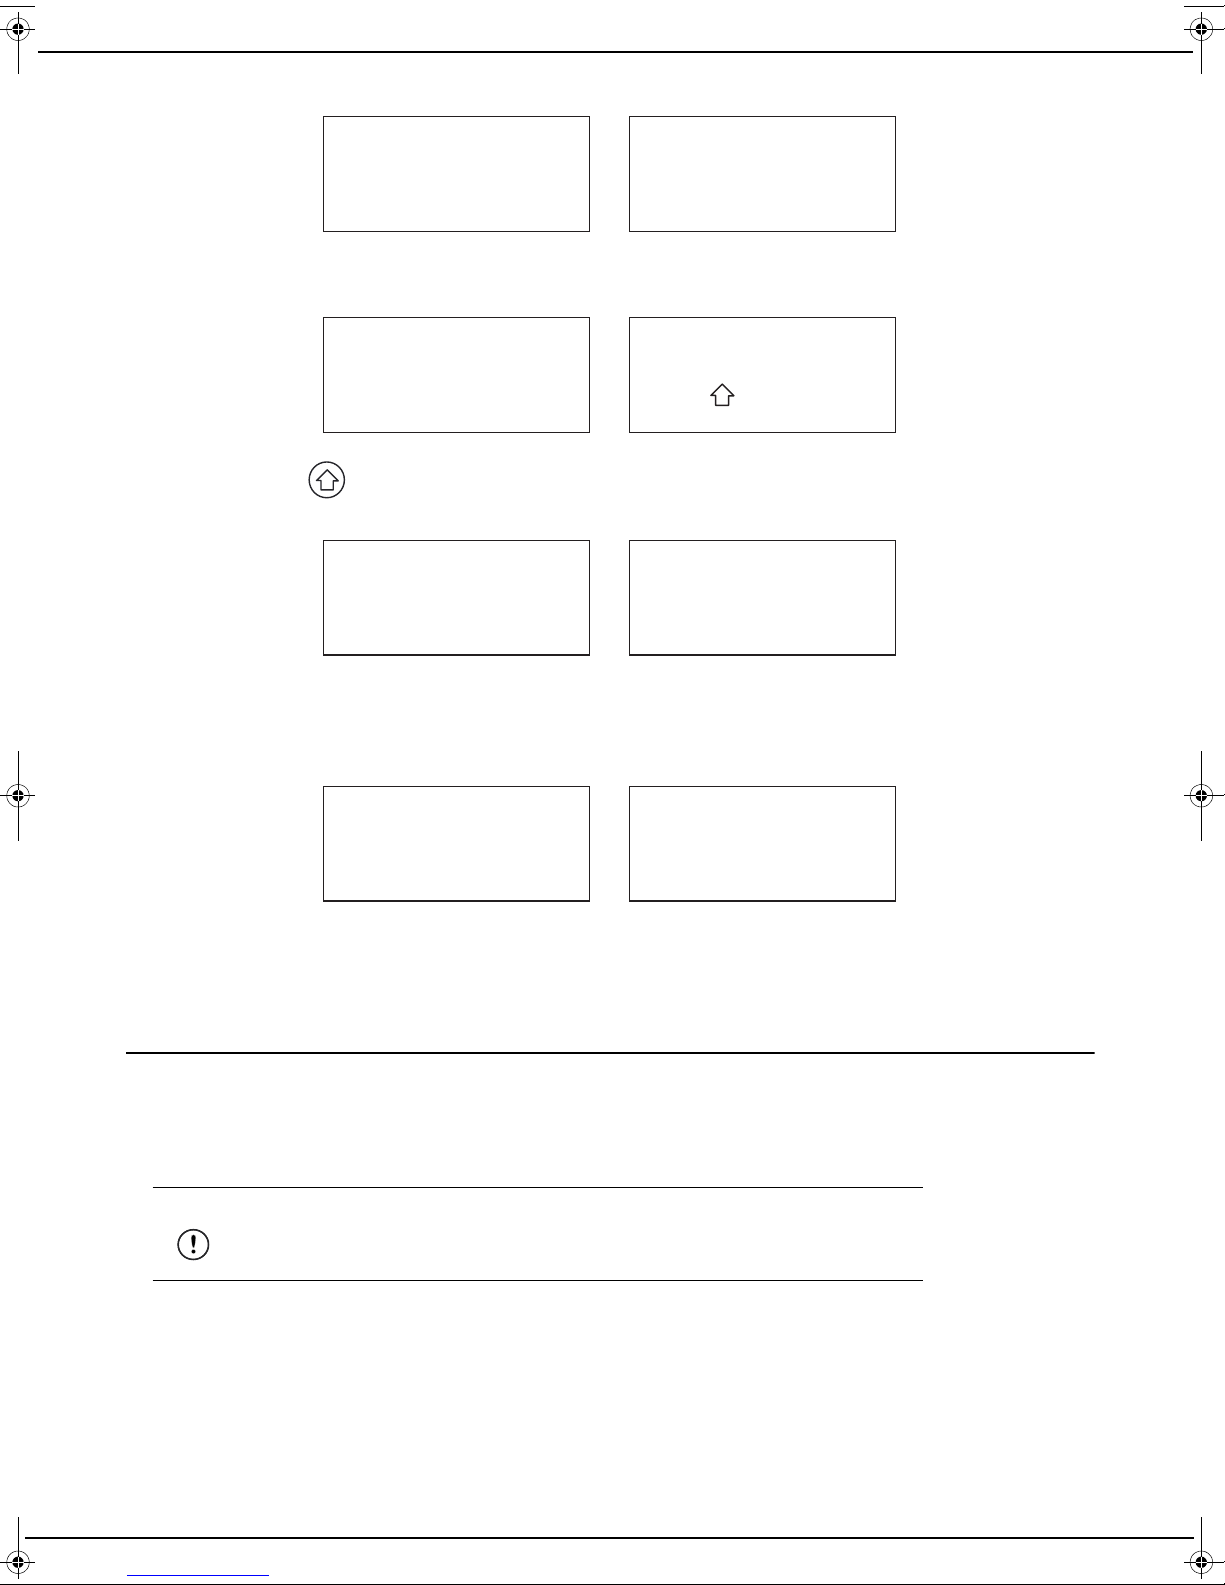
4 Configure the settings according to your needs. The screen below gives an example of how to configure LAN
settings. There is also a similar screen in Wi-Fi menu for configuring Wi- Fi settings.
2 - Installation
5 If your network is connected to the Internet through a proxy, check the Use a proxy server box and then fill in
the proxy settings. The screen below gives an example of how to configure LAN proxy settings.
6 Once you have finished, click Logout to exit the web interface.
- 17 -
Page 18

Using the machine
Thick Mode
Standard Mode
Loading documents
The scanner can scan original documents containing one or more sheets. You can load up to twenty 80 g/m² sheets
in the feeder.
Accepted formats
• A5, A4, Letter, Legal and other format complying with the following conditions:
• Length between 50 mm and 356 mm.
• Width between 50 mm and 229 mm.
• Paper weight of between 50 and 110 g/m² in standard mode.
Recommendations for use
• Do not load documents with different paper sizes or weights.
• Unfold sheets, remove staples and paper clips and separate sheets, sliding them over each other before inserting
the documents into the automatic feeder.
• Do not insert the following types of documents:
- Wrinkled or folded paper
- Torn paper
- Crumpled paper
To load your documents, follow these steps:
1 Depending on the document(s) to be analyzed, select the Standard or Thick mode.
3 - Using the machine
CAUTION
The standard mode allows you to place up to 20 pages in the feeder. It is recommended to separate
your pages and make sure that none of them are stapled.
2 Spread the paper guides as far apart as possible.
- 18 -
Page 19

3 Place your documents in the scanner feeder then move the paper guides up against the document.
1
2
1
2
2
3 - Using the machine
Use of services
To find out about the services offered, see you service provider's literature.
To scan your documents, follow these steps:
1 Load the sheets to be scanned taking into account the instructions given in the Document loading section.
2 Press the key to select the desired service.
3 Once the service is selected, press the key to start the operation.
If the number of sheets of paper does not correspond to the number of sheets indicated on the display or if you
want to cancel the sending, press the key.
4 When your document has been processed by your service provider, the 2-digit counter is decremented by num-
ber of sheets the scanned document contains. For example, if the counter is set to 0 before the document is
scanned, the counter returns to 0 after processing by the service provider.
Your service provider may display a message on your machine after processing your document. This may either
be an error message that requires the key to be pressed to confirm or an informational message that stays
on the screen for a given time.
- 19 -
Page 20

Using tree structure services
Group 1
Subgroup 21
Service 2212
Depending on your service provider, the services may be organized as a tree structure. This allows you for example to
group similar services together.
Contact your service provider to find out about the tree structures provided. The names (Group, Subgroup, Service,
etc.) presented below are given by way of example.
Tree structure example:
Level 1
Level 2
Level 2
Level 2
Group 1
Service 1
Service 2
Service 3
Level 1
Level 2
Level 3
Level 3
Level 2
Level 3
Group 2
Subgroup 21
Service 2211
Service 2212
Subgroup 22
Service 2221
Browsing through the tree structure
To browse through the tree structure at the same level (e.g. Group 1, Group 2, etc.), press the .
To go down a level, press .
To move up a level, press .
Level information
To indicate that you are at the lowest level in the tree structure, an arrow on the right is displayed alternately with .
3 - Using the machine
To indicate that you are at an intermediate level in the tree structure, two arrows are displayed on the right and left.
To indicate that you are at the lowest level in the tree structure, an arrow on the left is displayed alternately with .
Once the service is selected, press the key to start the operation.
- 20 -
Page 21
Multiple service providers
Level 1
Level 2
Level 3
Level 2
Level 3
Level 3
Service 21
Offer 2
Service 3
Service 2
Service 1
Operator 1
Service 12
Service 11
Offer 1
Operator 2
Level 1
Level 2
Level 2
Level 2
Your machine can manage several service providers and/or offers. The name of your service providers is displayed at
the top of your tree structure. This allows you to switch from one service provider to another quickly.
3 - Using the machine
Pairing
To access your new service provider or a new contract for the first time, you have to carry out a pairing process. Your
service provider will have provided you with the procedure for connecting to its services.
To start a pairing process, press and hold down until PAIRING is displayed on the screen. Press and follow
the instructions that are displayed. You can also use the MAINTENANCE menu to initiate a pairing process. See the
menu on page 28.
Termination
You have changed your service provider or offer and want to remove the settings of your previous service provider or
offer from your machine.
If you have trouble removing these data, contact your old service provider to obtain the information required.
To start a termination process, press and hold down until PAIRING is displayed on the screen. Press , select
the TERMINATION menu, press and follow the instructions that are displayed. You can also use the
MAINTENANCE menu to initiate a termination process. See the menu on page 28.
- 21 -
Page 22

Scanning to a USB flash drive
1
3
2
Depending on your service provider, scan services to a USB flash drive may be available on your machine. This feature
allows you to carry out additional local scans, for example, if no Internet connection is available.
1 Insert a USB flash drive into the back of your machine. The USB flash drive must be formatted for FAT16 or
FAT32.
2 Specific scan services to a USB flash drive have appeared in the list of services. Press the key to select the
desired service.
3 - Using the machine
3 Once the service is selected, press the key to start the operation. If the number of sheets in the document
does not correspond to the number of sheets indicated on the display or if you want to cancel the scan, press
the key.
CAUTION
During the processing of documents, your machine displays "DON'T DISCONNECT MEDIA". During
this phase, do not remove the USB flash drive from the machine otherwise you will not be able to
access its contents later.
4 Your locally scanned documents are stored in a "Scan" folder located in the root folder of the USB flash drive.
- 22 -
Page 23

Web interface
The web interface allows you to view, configure and customize the machine’s settings.
To access the web interface, you need:
• to have a computer connected to the same network as the machine or connected to the machine directly with the
cable supplied
• to know the machine’s IP address
To connect to the machine’s web interface, follow these steps:
1 Connect your machine to your computer or to the network using the network cable supplied. Note the IP address
displayed on the machine’s LCD screen. This operation may take up to 1 minute. To display the IP address, you
can use the “Maintenance menu” page 28.
2 Open a web browser on your computer and enter the IP address as follows: http://machine’s adresseIP (IP
address displayed on the LCD screen).
The web interface is displayed.
3 Enter your user name (default user) and password (default user) and then click on Login.
4 - Web interface
4 The web interface includes two tabs:
The Status tab which is used to view the machine’s information.
Item Description
Connection status Information about the status of the machine and the
connection.
Identification Machine-related information:
Name
Serial number
IP address
Netbios name
Software version
Usage Information about the memory used and the total number of
sheets scanned by the machine.
The Settings tab which is used to view and/or change the machine’s settings.
Item Description
Information Menu Is used to change the machine’s interface language.
System Config. Menu Is used to configure the idle time after which your machine
automatically switches over to power saving mode: 15 min,
1 h, 5 h, 13 h or 25 h.
Default setting: 25 h (see section “Standby” page 24).
LAN LAN connection settings.
Wi-Fi Wi-Fi connection settings.
Maintenance menu Menu used to reset the machine with the factory settings.
Firmware upgrade Menu used to update the machine’s software.
Login Menu used to change the name and password for connecting
to the web interface.
5 Once you have finished, click Logout to exit the interface.
- 23 -
Page 24

Standby
The power saving time allows you to configure the idle time after which your machine automatically switches over to
power saving mode. In this mode, your machine's power consumption is minimal (less than 0.5 W) the display is off,
and only the green LED flashes. Pressing a button or inserting a document in the feeder wakes up your machine: it will
be available again after an initialization time of twenty seconds.
CAUTION
1 - Your machine will not go into standby mode if there is a fault or a sheet is present in the feeder.
4 - Web interface
Depending on your machine's user profile, you can, for example, set the power saving time as follows:
1 15 minutes: you use your machine occasionally and you want to consume the least possible power.
2 5 hours: you use your machine every day; it will switch to standby mode after your day's work.
3 25 hours: you use your machine intensively every day and want it to be always available immediately. In this
configuration, your machine switches over standby mode on weekends.
2 - To reduce power consumption regardless of the power saving time, the display of your machine
is no longer lit after an idle time of 10 minutes. Pressing a button or inserting a document in the feeder will turn it on instantly.
- 24 -
Page 25

Maintenance and incidents
Maintenance
General information
Caution
For your safety, you must read the safety instructions in the chapter Safety [5].
In order to maintain your machine in good working order, it is recommended to periodically clean the inside.
Normal use of the machine, requires the following rules to be respected:
WARNING
Firstly, disconnect the mains power cable and all interface cables. Ensure that no
water or detergent enters the machine, or it may be damaged or cause electrocu-
5 - Maintenance and incidents
• To clean the machine, use a soft cloth.
• Never spray detergent directly onto the machine as it may infiltrate the vents and damage internal circuits.
• To clean the machine, avoid using abrasive or corrosive solvents or products containing solvents (alcohol or benzene).
• Always start by applying the cleaning product (mild detergent) to a small surface of the device to check the result.
• Never use abrasive or rough cloths (steel wool or plastic).
• Never try to lubricate the machine.
• Never try to dismantle the machine.
tion.
Cleaning
The presence of dust, dirt and paper debris on the external surfaces and inside the machine may hinder its operation.
We recommend you clean it regularly.
You can obtain cleaning wipes dampened in isopropyl alcohol, part number 189724942, from our Customer
Service (tel: 01 30 17 98 91).
Cleaning the outside of the machine
Clean the outside of the machine using a soft cloth moistened with neutral household detergent.
Use a soft damp to clean the machine. Never use abrasive materials or corrosive detergents.
Cleaning the scanner panes
To clean the scanner panes, follow these steps:
1 Turn the machine off by unplugging the power cord from the wall socket.
2 Open the scanner cover by pressing the buttons located on the left and right.
- 25 -
Page 26

3 Clean the two analysis windows (A) and (B) with a soft, lint-free cloth moistened with isopropyl alcohol or mild
!
"
A
B
detergent.
4 Close the scanner cover.
5 Plug the power cord into the wall socket to turn the machine on.
Cleaning the separation pad and rollers
The accumulation of paper dust and other debris on the rollers may cause paper feeding problems.
To clean the separation pad and rollers, follow these steps:
1 Turn the machine off by unplugging the power cord from the wall socket.
2 Open the scanner cover by pressing the buttons located on the left and right.
3 Clean the paper feeding rollers (A) using a soft, lint-free cloth dampened with isopropyl alcohol.
To clean the rollers, rotate them in the same direction as the normal paper transport.
5 - Maintenance and incidents
4 Clean the pad (B) with a soft, lint-free cloth moistened with isopropyl alcohol or mild detergent.
5 Close the scanner cover.
6 Plug the power cord into the wall socket to turn the machine on.
Removing paper jams
In the event of paper jam, follow these steps:
1 Open the scanner cover by pressing the buttons located on the left and right.
2 Remove the paper causing the jam without tearing it.
3 Close the cover of the sheetfeed scanner.
- 26 -
Page 27

Several sheets of paper taken at the same time
If your machine takes several sheets of paper at the same time, make sure that:
• the selector is not set to "Thick mode"
• there are not more than 20 sheets of standard paper weight in the feeder,
• the set of documents does not contain sheets of different size or weight,
• you have unfolded sheets properly and removed staples or paper clips.
It is recommended to separate the sheets to be scanned by sliding them over each other, especially if they were folded
or stapled.
Error messages
The section below describes any error messages you may encounter and the corrective steps you can take to solve
them.
If the suggested corrective action does not solve the problem, contact your Internet Service Provider.
Message Description/Action
5 - Maintenance and incidents
PAIRING
ERROR
SET LOCAL IP
WITH ETH CNX
NO INTERNET
LIMITED CNX
CONNECT LAN
OR PRESS SETUP
NO FRONTAL CNX
REMOVE DOCUMENT
MEMORY FULL
MEDIA FULL
MEDIA MISSING
WRONG MEDIA
This message may be the result of incorrect synchronization with the
Internet Service Provider’s website. Perform the pairing procedure again.
This message is displayed after a Wi-Fi connection attempt.
The Internet box is not configured for DHCP. A fixed IP address has to be
assigned to the machine through the embedded website.
The Internet box must have an Internet connection problem.
Check the connections and settings of the Internet box. (see section
“Connection with advanced settings” page 16).
The unit has not received a valid IP address. It has been assigned a
default IP address.
The Internet box may not have been configured for DHCP. The machine
then needs to be assigned with a fixed IP address from the ISP's website
(see section “Connection with advanced settings” page 16).
If this message is displayed after an initial WPS connection attempt, it
means that your Internet box is not WPS compatible. You have to use a
LAN connection or use a Wi-Fi connection without WPS (see section “WiFi connection without WPS” page 15).
The Internet Service Provider’s website is down or the Internet Service
Provider’s website address has changed; contact your Internet Service
Provider.
If this message is displayed during a scan, make sure that the machine is
placed on a flat horizontal surface and that the paper feed is not hindered
or obstructed by any object.
The memory of your machine is full and not all the pages can be stored.
Scan your document again once all pending documents have been sent.
If the problem persists, your document contains too many pages and you
will have to scan it in several stages.
This message may be displayed during scanning on an USB flash drive.
Your flash drive does not have enough free space to save the file. Free
up space on the flash drive and repeat the operation.
This message may be displayed during scanning on an USB flash drive.
Your flash drive was removed just before the start of the scan. Please
leave the flash drive inserted in your machine until the scan is completed.
This message may be displayed during scanning on an USB flash drive.
Your flash drive is not supported. Please only use a USB flash drive
formatted for FAT16 or 32.
- 27 -
Page 28

An error occurred when saving your settings on the flash drive. Please
SAVING ERROR
NO FILE FOUND
RESTORE ERROR
repeat the operation using a properly formatted flash drive with enough
free space and do not remove it until the operation is completed.
Your machine did not find the file on your flash drive containing the
settings to be restored.
An error occurred while restoring your settings from the flash drive.
Please repeat the operation using a properly formatted flash drive
containing the settings file to be restored and only remove it when the
operation is completed.
Error code
Error codes are provided during the use of the machine to help you solve any problems that may arise during its use.
Error codes Description / Solution
The LED is red and the
ERR01
button is flashing.
The LED is red and the
ERR02
button is flashing.
The LED is red and the
ERR03
button is flashing.
The LED is red and the
ERR04
button is flashing.
Problem during transmission.
Press , reload the document to be scanned and try
again.
The document could not be sent to your service provider.
Press , reload the document to be scanned and try
again.
The document was not sent to your service provider due to
an incident during sending (power failure).
Press , reload the document to be scanned and try
again.
The service with your service provider has been cancelled.
Press , reload the document to be scanned and try
again.
5 - Maintenance and incidents
Maintenance menu
The maintenance menu is a hidden menu that can be displayed through a key combination. This menu allows the
following operations to be carried out:
• run the machine pairing,
• check the software version,
• check the machine’s IP address,
• update the software,
• perform a calibration,
• change the interface language,
• restore the default configuration (factory settings),
• delete a provider,
• restore the settings previously saved on a USB flash drive,
• save the settings on a USB flash drive.
- 28 -
Page 29
To access the maintenance menu, follow this procedure:
1>PAIRING
1 Simultaneously press the , and Setup keys (key located on the back of the machine). The order in
which the first 2 keys is pressed is not important, but the Setup key must be the last key pressed in the sequence.
The following screens are displayed alternately:
MAINTENANCE MENU
2 Use the key to scroll through the menus and the key to confirm your selection.
Menu Description
PAIRING Is used to run the machine pairing.
Is used to display the software version.
To display the software version, follow these steps:
5 - Maintenance and incidents
VERSION
IP ADRESSE Is used to display the machine’s IP address.
FW UPDATE
1 Once the VERSION menu is displayed, press the .
The software version is displayed.
2 Press to display the build number.
3 Press to display the bootloader version.
4 Press to display the kernel version.
Important: This menu is only displayed when the machine is
connected to the Internet.
Is used to check whether a new software version is available.
To check whether a new software version is available, follow these
steps:
1 Once the FW UPDATE menu is displayed, press .
2 When the message UPDATE CHECKING is displayed,
press .
3 When a new software version is available, it is downloaded and
installed automatically. Do not turn the device off during this
operation, as it might not restart.
4 Once the software has been installed, the machine restarts.
- 29 -
Page 30

Is used to calibrate the scanner. This operation may be necessary
when the quality of the scanned pages is not good enough.
Two calibration options are available. It is recommended to use the
internal calibration option.
To carry out a calibration, follow these steps:
1 Once the CALIBRATION menu is displayed, press the .
CALIBRATION
2 Select INTERNAL or WHITE PAPER by pressing .
3 If INTERNAL, confirm the operation by pressing and fol-
low the instructions displayed on the screen.
If WHITE PAPER, Insert a blank page (width 216mm) in the
scanner and press the and follow the instructions displayed on the screen.
Once the operation is completed, a message is displayed on
the LCD screen.
LANGUAGE Is used to change the interface language.
FACTORY RESET Is used to restore the default configuration.
Restores the settings present on the connected USB flash drive.
This menu is only present if a USB flash drive is connected to the
machine.
1 Insert a USB flash drive the right way round into the connector
at the rear of the machine.
2 Once the RESTORE SETTINGS menu is displayed,
press .
RESTORE SETTINGS
3 Confirm by pressing .
4 Do not remove the USB flash drive under any circumstances.
5 After saving, RESTORE SETTINGS is displayed on the screen
again.
6 Remove the USB flash drive.
When you have several machines, this allows you to create a
settings file according to your choice and install this file on all your
machines.
Saving settings on the connected USB flash drive.
This menu is only present if a USB flash drive is connected to the
machine.
1 Insert a USB flash drive the right way round into the connector
at the rear of the machine.
SAVE SETTINGS
2 Once the SAVE SETTINGS menu is displayed, press .
Do not remove the USB flash drive under any circumstances.
3 After saving, SAVE SETTINGS is displayed on the screen
again.
4 Remove the USB flash drive.
5 - Maintenance and incidents
3 To exit the maintenance menu, press . The machine automatically exits the maintenance menu after 30 sec-
onds if no key is pressed.
- 30 -
Page 31

Software updating
xx
% INSTALLING
xx
DON'T SWITCH OFF
The software is automatically updated, and the machine periodically checks whether a new software version is
available.
Warning
Never unplug the machine during the software update
When a new software version is available,
The green LED is off and the red LED flashes.
The machine downloads and installs the software. This procedure is performed in two stages.
1 First stage: downloading from 0 to 50%
The following messages are displayed on the screen alternately.
xx
% DOWNLOADING
5 - Maintenance and incidents
2 Second stage: installation from 51 to 100%
The following messages are displayed on the screen alternately.
Once the software is installed, the machine restarts automatically.
xx
DON'T SWITCH OFF
Machine recovery
If your machine no longer starts when you turn it on, or its LED is illuminated steadily in orange and the LCD screen
seems frozen, this means that your machine's software is probably corrupted. This situation may occur if the power to
your machine was inadvertently disconnected during the software update.
You can restore your machine to its original condition by carrying out the recovery procedure described below. Note
that the on-screen messages are in English regardless of your machine's language setting.
Warning
This procedure should only be used if your machine no longer starts. Indeed, at
the end of the recovery procedure, your machine's settings are reset to their default value, and you will have to reconfigure them (language, network connection
settings, etc.)
1 Go to the Sagemcom support site (support.sagemcom.com), choose your country and find your machine in the
"scanners" section. On your product's home page, select the "Software/Drivers" section. Download the file
whose name starts with "fw_" and save it on a USB flash drive in the root directory.
2 Unplug the power cord from your machine. Press the Setup button on the back of your machine and while press-
ing the Setup button, reconnect the power cord to your machine.
- 31 -
Page 32
3 Your machine starts in recovery mode and displays the following messages on the screen alternately:
Recovery process
Insert USB stick
Recovery process
Press
xx
% WRITE PACKAGE
xx
DON'T POWER OFF
OK
End of Recovery
OK
Remove USB stick
4 Insert the USB flash drive on which you have saved the downloaded software file, into the back of your machine.
After a few seconds, your machine displays the following messages on the screen alternately:
5 Then press the button. The software checking process starts, the red LED flashes and your machine then
displays the following messages on the screen alternately:
5 - Maintenance and incidents
- xx indicates the percentage of the software file written to memory.
- Do not disconnect your machine during this writing to memory.
6 When the memory write process is completed, your machine displays the following messages on the screen al-
ternately:
7 Then remove your USB flash drive.
8 Your machine restarts and you then only have to reconfigure any language choices and network connection set-
tings you may have made.
Packing and transporting the machine
If you need to transport the machine, always use the original package. If the machine is not properly packed, the
warranty may be cancelled.
1 Unplug the power cord from the wall power socket.
1 Disconnect all the cables connected to the machine.
Warning
Make sure to keep the cables and the power cord so that you can reconnect your
machine again later.
2 Close the covers.
3 Place the machine in its packaging and pack it in its original carton with all the original packing bracing.
4 Close the carton and seal it with adhesive tape.
- 32 -
Page 33

Frequently asked questions
1- Your machine's website cannot be accessed
Except in cases of WPS Wi-Fi Internet and DHCP Internet via a direct LAN, case of Internet through a proxy, for
example, the Wi-Fi or LAN settings must be configured on the machine's website.
First, note the machine's IP address by entering the maintenance menu.
To do this, interconnect the PC and the machine directly using the LAN cable supplied with the machine. Then enter
the machine's IP address in the browser address bar.
If another device connected to the PC also uses an Apipa address (169.254.xx), for example, the machine's website
may not be displayed in the browser. To solve this problem, temporarily disconnect the other devices from the PC for
the time needed to carry out the setup on the machine's website.
2 - Your machine's Internet connection via a proxy does not work
The machine only supports the HTTP 1.0 and 1.1 proxies with the following authentication types:
BASIC, DIGEST and NTLM.
For all other authentication types (e.g. KERBEROS, NEGOTIATE, etc.), the machine cannot connect to the proxy
through a login/password.
5 - Maintenance and incidents
- 33 -
Page 34

Characteristics
Physical characteristics
Dimensions (trays folded) : Width: 303 mm
Depth: 163 mm
Height: 109 mm
Weight: Approx. 2,2 kg
Electrical and environmental characteristics
Power (see identification plate): 220V-240V AC / 47Hz~53 Hz
Electric consumption: ≤ 0,5 W on standby
≤ 15 W on average during scanning
Admissible ambient temperature: Operating: 10 °C to 32 °C with maximum difference of 10 °C per
hour.
Storage: -20 °C à 40 °C with maximum difference of 10 °C per
hour.
Admissible humidity: 20 % to 80 % RH (without condensation) with maximum difference of
10 % per hour.
Scanning characteristics
Type: Dual side colour scanner
Document sizes accepted: Width : between 50 mm and 229 mm
Lenght : between 50 mm and 356 mm
Paper weight of accepted documents
in Standard mode:
Documents accepted in Thick mode: up to Legal size: from 0.08 mm to 0.2 mm
Colour depth: 24 bits
Optical resolution: 600 dpi
Automatic feeder capacity: 20 sheets (80 g/m²)
Output tray capacity: 20 sheets
Recommended use: 20 000 pages
50 to 110 g/m²
up to 110 x 220 DL Envelope format: up to 0.76mm
Credit card: up to 1.4mm
6 - Characteristics
Connectivity
LAN: Ethernet 10 BaseT/100 BaseTx
Wi-Fi Wi-Fi 802.11 b-g-n
USB port: 1 x USB 2.0 master port (USB memory key reader FAT16 and 32)
Consumable specifications
Reference paper: Xerox Premier A4 (80g/m2)
These specifications may be changed, with a view to their improvement, without notice.
Infrastucture mode
With encryption:
WEP 64/128 bits
WPA/WPA-2 with TKIP
WPS (easy pairing)
DAS : 0,00608 W/kg
- 34 -
Page 35

Page 36

253553232A
05/2013
Sagemcom Documents SAS
250, route de l'Empereur
92848 Rueil-Malmaison cedex - FRANCE
www.sagemcom.com
All rights reserved. The information and specifications included are subject o change without prior notice. Sagemcom Documents SAS tries to ensure that all information in this document is correct, but does not accept liability for error or omission. Non contractual document. All trademarks are
registered by their respective owners. Simplified joint sock company - Capital 8.479.978 Euros - 509 448 841 RCS NANTERRE.
 Loading...