

Page 1

F@st Plug 502W
PLC Wireless Router
User Manual
Page 2

Page 3

PLC Wireless Router F@st Plug 502W
- 1 -
Contents
ABOUT THE USER MANUAL ............................................................................................ 4
FEATURES ......................................................................................................................... 4
PLC Features ............................................................................................................................... 4
Wireless Features ........................................................................................................................ 4
SAFETY PRECAUTIONS .................................................................................................... 5
SPECIFIC RECOMMENDATIONS TO USE THE SOCKET OF THE DEVICE ................... 6
ENVIRONMENT .................................................................................................................. 6
Meaning of logos present on the product or its packaging .................................................... 6
Product recycling and disposal ................................................................................................. 6
European Directive on Waste Electrical and Electronic Equipment (WEEE) ........................ 7
Directive on the Restriction of use of certain hazardous substances in electronic
equipment (ROHS) ...................................................................................................................... 7
CE MARKING ...................................................................................................................... 7
OVERVIEW ......................................................................................................................... 8
Product Introduction ................................................................................................................... 8
Packing List ................................................................................................................................. 8
HARDWARE DESCRIPTION AND DEVICE CONNECTION .............................................. 9
LED Status Description and Pushbutton Description ............................................................. 9
Interface Description ................................................................................................................. 10
Hardware Installation ................................................................................................................ 11
Operation Range ....................................................................................................................................... 11
Improving the Transmission Performance of Network .............................................................................. 11
System Requirements ............................................................................................................................... 12
Before You Begin ...................................................................................................................................... 12
Connecting the Device .............................................................................................................................. 12
CONFIGURING THE LAN PC ........................................................................................... 13
WEB CONFIGURATION ................................................................................................... 16
SETUP ............................................................................................................................... 17
Wizard ......................................................................................................................................... 17
DHCP .......................................................................................................................................... 19
Static IP ...................................................................................................................................... 20
PPPoE ......................................................................................................................................... 22
Bridge ......................................................................................................................................... 23
None .......................................................................................................................................................... 25
WEP .......................................................................................................................................................... 25
WPA-PSK .................................................................................................................................................. 26
WPA2-PSK ................................................................................................................................................ 27
WPA/WPA2 ............................................................................................................................................... 27
Internet Setup ............................................................................................................................ 29
DHCP ........................................................................................................................................................ 30
Static IP ..................................................................................................................................................... 31
Page 4

F@st Plug 502W PLC Wireless Router
- 2 -
PPPoE ....................................................................................................................................................... 33
Bridge ........................................................................................................................................................ 34
Wireless Setup ........................................................................................................................... 35
Wireless Basic Settings ............................................................................................................................ 35
Wireless Security Settings ........................................................................................................................ 36
None .......................................................................................................................................................... 37
WEP .......................................................................................................................................................... 37
WPA-PSK .................................................................................................................................................. 38
WPA2-PSK ................................................................................................................................................ 39
WPA/WPA2-PSK ...................................................................................................................................... 40
WPS Settings ............................................................................................................................. 41
PBC Mode ................................................................................................................................................. 42
PIN Mode .................................................................................................................................................. 42
LAN Setup .................................................................................................................................. 43
Time and Date ............................................................................................................................ 44
Logout ....................................................................................................................................................... 45
ADVANCED SETTINGS .................................................................................................... 46
DoS Protection .......................................................................................................................... 46
Access Control .......................................................................................................................... 47
MAC Filter ................................................................................................................................................. 47
DHCP Filtering .......................................................................................................................................... 48
List of IP Address Reserved for MAC .................................................................................................. 49
Black List .............................................................................................................................................. 50
IP Filtering ................................................................................................................................................. 50
Port Filtering .............................................................................................................................................. 52
URL Filtering ............................................................................................................................................. 53
Advanced Wireless ................................................................................................................... 54
Advanced Wireless Settings ..................................................................................................................... 55
Advanced Security .................................................................................................................................... 56
Access Control .......................................................................................................................................... 56
Advanced Network .................................................................................................................... 57
Static Routing ............................................................................................................................................ 58
UPnP ......................................................................................................................................................... 59
IGMP ......................................................................................................................................................... 59
DDNS ........................................................................................................................................................ 60
PLC Setting ................................................................................................................................ 61
Local Device Configuration .................................................................................................................. 61
WAN Port Switch ................................................................................................................................. 61
Remote Device Configuration .............................................................................................................. 62
Advanced Configuration ...................................................................................................................... 63
Logout ....................................................................................................................................................... 63
MAINTENANCE ................................................................................................................ 64
Device Management .................................................................................................................. 64
Account Password ............................................................................................................................... 64
Web Idle Time Out ............................................................................................................................... 64
Services ............................................................................................................................................... 64
Backup and Restore .................................................................................................................. 65
Reboot ................................................................................................................................................. 65
Backup Settings ................................................................................................................................... 65
Restore Default Settings ...................................................................................................................... 65
Page 5

PLC Wireless Router F@st Plug 502W
- 3 -
Firmware Update ....................................................................................................................... 66
Local Upgrade Mode ........................................................................................................................... 66
TFTP Upgrade Mode ........................................................................................................................... 67
FTP Upgrade Mode ............................................................................................................................. 67
HTTP Upgrade Mode ........................................................................................................................... 68
HTTPS Upgrade Mode ........................................................................................................................ 69
Configuration Update ................................................................................................................ 70
Local Upgrade Mode ........................................................................................................................... 70
TFTP Upgrade Mode ........................................................................................................................... 71
FTP Upgrade Mode ............................................................................................................................. 71
HTTP Upgrade Mode ........................................................................................................................... 72
HTTPS Upgrade Mode ........................................................................................................................ 72
Log Settings ............................................................................................................................... 73
Diagnostics ................................................................................................................................ 74
Ping Diagnosis ..................................................................................................................................... 74
Traceroute Diagnosis ................................................................................................................................ 75
Logout ........................................................................................................................................ 76
STATUS ............................................................................................................................ 77
Device Information .................................................................................................................... 77
LAN Client .................................................................................................................................. 78
Routing Table ............................................................................................................................ 78
Logout ........................................................................................................................................ 79
HELP ................................................................................................................................. 80
USING THE SECURITY PUSHBUTTON .......................................................................... 81
Forming a HomePlug AV Logical Network ............................................................................. 81
Joining an AVLN Network ........................................................................................................ 81
Leaving an AVLN Network ........................................................................................................ 82
TROUBLESHOOTING ...................................................................................................... 83
Why all the LED indicators are off? ......................................................................................... 83
Why the Ethernet indicator is off? ........................................................................................... 83
Why you fail to access the Web page? ................................................................................... 83
How to restore factory defaults after carrying out the incorrect configuration? ................ 83
SPECIFICATIONS ............................................................................................................. 84
Page 6

F@st Plug 502W PLC Wireless Router
- 4 -
About the User Manual
In purchasing this device, you have chosen a quality product made by Sagemcom.
Your device allows you to create a WiFi point and so enjoy an Internet connection. We
recommend that you read the chapters on security below.
This user manual mainly describes how to install and configure the F@st Plug 502W.
Our company reserves the right to modify this manual for product upgrade or other causes
without notifying users in advance. This user manual is only for reference.
Features
PLC Features
• Power voltage range is 100 to 240 V AC, 50/60 Hz.
• Support the HomePlug AV protocol and the IEEE1901 protocol.
• PLC physical link rate is up to 500 Mbps.
• Support the following modulation schemes: OFDM QAM 4096/1024/256/64/16/8,
QPSK, BPSK, and ROBO.
• Support 128-bit AES link encryption and user NMK authentication, for providing secure
power line communication.
• Support windowed OFDM with noise mitigation based on patented line synchronization
technique, for improving data integrity in noisy conditions.
• Support channel self-adaptation and channel estimation for maximizing real-time
throughput.
• Support priority-based CSMA/CA channel access scheme for maximizing efficiency
and throughput.
• Support four-level QoS.
• Support ToS and CoS packet classifications.
• Support IGMP multicast management session.
Wireless Features
• Support IEEE802.11b, IEEE802.11g, IEEE802.11n, IEEE802.3, IEEE802.3u,
IEEE802.11i and IEEE802.11e.
• Support 2T2R mode. Transmission data rate is up to 300 Mbps.
• Support WEP and WPA for secure data transmission.
• Support DHCP server.
• Support version upgrade through Web page.
• Support restoring factory default settings.
• Support the following wireless security modes: WEP, WPA, WPA2, and WPA/WPA2
Mixed.
• Support system status display.
• Support system log.
Page 7

PLC Wireless Router F@st Plug 502W
- 5 -
Safety Precautions
This device is intended for connection to the AC power line. Before using this product, please
read the following precautions:
• Follow all warnings and instructions marked on the product.
• Unplug the device from the wall outlet before cleaning. Use a dry cloth for cleaning. Do
not use liquid cleaners or aerosol cleaners.
• Do not put this product near water.
• Do not put this product near a radiator or heat source.
• Do not use an extension cord between the device and the AC power source.
• Only a qualified technician should service this product. Opening or removing covers
may result in exposure to dangerous voltage points or other risks.
• Unplug the device from the wall outlet and refer the product to qualified service
personnel for the following conditions:
• If liquid has been spilled into the product
• If the product has been exposed to rain or water
• If the product does not operate normally when the operating instructions are followed
• If the product exhibits a distinct change in performance
Warning: This product is equipped with a socket: recommendations also apply to
the device to be connected through this outlet (see section Erreur ! Source
du renvoi introuvable.)
• There is an identification label under the appliance or on the rear panel.
Read it, it gives you all the information on the mains voltage, current and frequency for
which your appliance was designed.
• Never open the appliance! There is a risk of electric shock. Any work on the appliance
must be carried out by a qualified person.
• Avoid violent mechanical shocks: do not use the appliance if it is damaged.
• Make sure that the appliance is out of reach of children or pets.
• Never connect your appliance to a socket that has come loose, or is damaged or
defective - you may receive an electric shock.
• Never touch the appliance with damp or wet hands. You may get an electric shock.
• Install the appliance in a dry, well aired place. Protect them from moisture and dust.
• Install the appliance indoors out of the sun and rain; avoid extremes of temperature.
Use the appliance in an environment where the following conditions apply:
ambient temperature: between 0 °C [32°F] and 40 °C [104°F],
ambient humidity: between 20% and 90%.
• Keep the appliance away, from sources of heat such as radiators or gas/electric
heaters. Do not place incandescent objects such as candles on the appliance.
• Do not place any object on the appliance (this would interfere with the ventilation): the
vent slots in the casing are there to protect your appliance from overheating. Do not
place any object such as a piece of fabric or paper on these slots.
• To avoid short-circuits (with a risk of fire or electric shock), place your appliance away
from the damp. If any liquid comes into contact with your appliance (drops, splashes), it
will damage it and may cause irremediable breakdown. If a liquid does enter the
appliance, unplug it immediately from the mains and contact your retailer electrician.
• Make sure that the device is properly inserted into the mains.
• Never place objects, walk, or pass a wheeled appliance on the device. You may
damage it and cause a risk of fire or electric shock.
Page 8

F@st Plug 502W PLC Wireless Router
- 6 -
• If there is any suspicious noise coming from the mains socket or mains lead, unplug the
appliance from the mains socket with all necessary precautions - you may get an
electric shock. Contact your retailer.
• If there is a thunderstorm, we advise you to unplug.
• To clean the appliance, the mains unit or adapter first unplug it from the mains. Clean
the appliance only with a soft dry cloth. Never use detergents or chemical additives.
Specific recommendations to use the socket of the device
When you plug or unplug the mains lead, always hold it by the plug. A damaged lead is a
potential source of fire or electric shock. Never pull by the lead to unplug the appliance from the
mains socket.
You must connect the mains lead to the appliance before plugging it in to the mains socket.
Make sure the lead is properly plugged in to the socket on the appliance. If it is not properly
plugged in, there is a risk of fire or electric shock on touching the appliance.
Never place objects on the mains lead, never pull on it and never bend it.
This could cause a risk of fire or electric discharge. Always make sure the appliance is not
standing on the mains lead or any other cable.
Environment
Preservation of the environment is an essential concern of the manufacturer. The desire of the
manufacturer is to operate systems observing the environment and consequently it has decided
to integrate environmental performances in the life cycle of its products, from manufacturing to
commissioning, use and elimination.
Meaning of logos present on the product or its packaging
The crossed-out dustbin sign stuck on the product or its accessories means that at
the end of its life, the product is subject to selective collection and must not be
thrown away in unsorted household waste.
The looped arrow sign means that the packaging may be recycled and must not be
disposed of with household waste.
The logo with three arrows shown on the plastic parts means that they may be
recycled and that they must not be disposed of with household waste.
Product recycling and disposal
To facilitate recycling, please respect the sorting rules set up locally for this kind of waste.
If your product contains batteries, they must be disposed of at appropriate collection points.
European regulations ask you to dispose of products belonging to the family of electrical and
electronic equipments ( ) selectively:
• At the collection points made available to you locally (drop-off centre, selective
collection, etc.),
• At sales points in the event of the purchase of similar equipment.
Page 9

PLC Wireless Router F@st Plug 502W
- 7 -
In this way you can participate in the re-use and upgrading of Electrical and Electronic
Equipment Waste, which can have an effect on the environment and human health.
European Directive on Waste Electrical and Electronic Equipment (WEEE)
In the context of sustainable development, the reduction of wastes to be eliminated by
reusing, recycling, composting and energy recovery is strongly advised.
In order to comply with this directive which is applicable to EEEs sold after 13/08/2005, your
recorder will be taken back free of charge and recycled by the distributor of the EEE within
the limits of the quantity and types of equipment bought from them. These appliances which
contain substances potentially dangerous to human health and the environment will be
recycled.
Directive on the Restriction of use of certain hazardous substances in electronic
equipment (ROHS)
Your recorder along with the batteries supplied comply with the directive relating to the RoHS
– dangerous materials such as lead, mercury or cadmium are not used. This avoids
environmental hazards and any risks to the health of personnel at the recycling centres. The
batteries of the remote control can be removed simply.
Note: When the batteries of the remote control are worn out, please dispose of them at a
collection point and not with household waste.
CE Marking
The marking certifies that the product complies with the essential requirements of the
Directive1999/5/EC concerning radio equipment and telecommunication equipment, and of
Directives 2006/95/EC concerning safety, 2004/108/EC concerning electromagnetic
compatibility and ErP 2009/125/EC concerning ecodesign requirements, defined by the
European Parliament and Council to minimize electromagnetic interferences, ensure the safety
of users and their equipment, efficient use of the radio spectrum, and protect their health, and
minimize the impact of products on the environment.
The CE declaration of conformity can be viewed in the support section of the Sagemcom site
www.sagemcom.com, or it can be obtained from the following address:
Sagemcom Broadband SAS
250, route de l'Empereur
92848 Rueil-Malmaison Cedex - FRANCE
Tel.: +33 (0)1 57 61 10 00 - Fax: +33 (0)1 57 61 10 01
www.sagemcom.com
Page 10

F@st Plug 502W PLC Wireless Router
- 8 -
Overview
Product Introduction
Thank you for using the F@st Plug 502W.
The F@st Plug 502W is compatible with the HomePlug AV, IEEE1901 and 802.11b/g/n
protocols. It supports CCK and OFDM modulation schemes. Its PLC physical link rate is up to
500 Mbps, and its wireless physical rate is up to 300 Mbps in the 802.11n mode.
The F@st Plug 502W supports 128-bit AES link encryption of power line communication and
wireless security modes including WEP, WPA, WPA2, and WPA/WPA2 mixed, which provide
secure and reliable communication for users.
Packing List
Please check whether your packing list includes the following items:
• 1 x F@st Plug 502W
• 1 x RJ45 network cable
• 1 x quick installation guide
• 1 x safety precaution notice
This notice is available on le website www.sagemcom.com/support.
Page 11

PLC Wireless Router F@st Plug 502W
- 9 -
Hardware Description and Device Connection
LED Status Description and Pushbutton Description
There are 5 LED indicators on the front panel of the PLC wireless router. By observing their
status, you can check whether the device runs normally.
The following table describes the status of LED indicators on the front panel:
LED Indicator Color Status Description
Green On System runs normally.
Green Blink
System is resetting.
System is in the process of password
synchronization.
Green On
Connection via the LAN1 or LAN2 interface
succeeds.
Green Blink
Data is being transmitted via the LAN1 or LAN 2
interface.
Green On
PLC transmission rate equals to or is greater
than 40 Mbps.
Orange On
PLC transmission rate is between 20 Mbps
and 40 Mbps.
Red On
PLC transmission rate is smaller than or equals
to 20 Mbps.
- Off Device is not connected to the power line network.
Green On WLAN is enabled.
Green Blink Wireless data is being transmitted.
Orange On WLAN is enabled and WPS connection succeeds.
Orange Blink
WPS negotiation is in progress and wireless data
is being transmitted.
Page 12
F@st Plug 502W PLC Wireless Router
- 10 -
The following table describes pushbuttons on the front panel:
Button Description
Security
It is used to set the status of the device members.
Press and hold the Security pushbutton for more than 10 seconds to
exit the current network and generate a random password of network
member.
Press and hold the Security pushbutton for less than 3 seconds, and
then the PLC wireless router becomes a member of the existing
AVLN.
Reset
Press the Reset pushbutton for more than 3 seconds and then
release it. System restores the factory default settings.
WPS
It has the following functions:
Press the WPS pushbutton for less than 3 seconds to enable the
negotiation of PBC mode.
Press the WPS pushbutton for more than 5 seconds to enable or
disable WLAN.
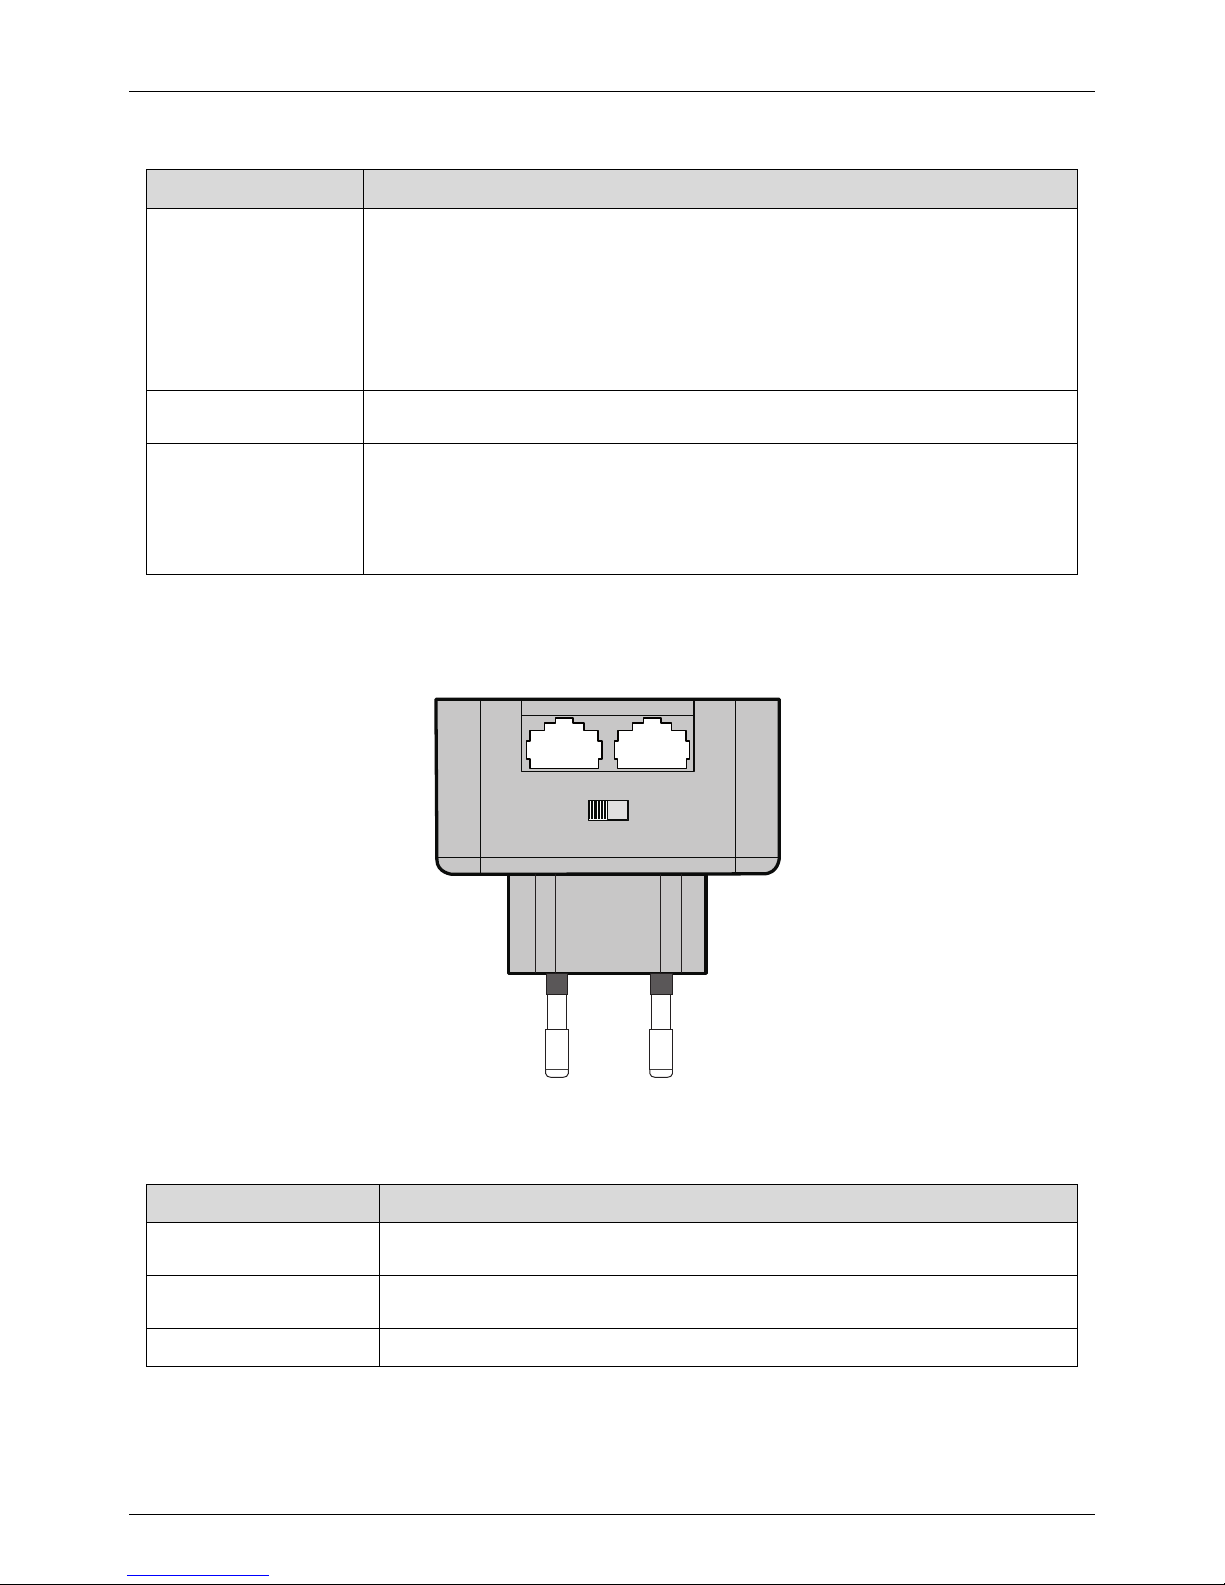
Interface Description
21
off / on
The following table describes interfaces on the PLC wireless router:
Interface Description
1
RJ45 LAN interface, for connecting a hub, switch, or computer on a
LAN
2
RJ45 LAN interface, for connecting a hub, switch, or computer on a
LAN or WAN over Ethernet interface
off / on Power switch
Page 13

PLC Wireless Router F@st Plug 502W
- 11 -
Hardware Installation
Operation Range
The operation range of the PLC wireless router depends on the actual environment. The
path and effect of signal transmission may vary with the deployment in a house or an office.
But for the practical application, coverage of PLC signal may vary due to the number of PLC
devices connected to the power line network. For wireless transmission, straight
transmission distance in the open air for some devices can reach 300 meters and indoor
transmission distance can reach 100 meters.
Improving the Transmission Performance of Network
In order to improve the transmission performance of network, it is recommended that you
insert the power plug of the device into the wall socket directly.
Recommended use of a multiple plug adapter, Place the PLC taken first on the multiple plug
adapter.
Page 14

F@st Plug 502W PLC Wireless Router
- 12 -
System Requirements
Before installing the device, please ensure that the following items are ready:
• At least one Ethernet RJ45 cable (10Base-T/100Base-T)
• One F@st Plug 502W
• One PLC device for PLC communication
• One PC installed with the TCP/IP protocol and can access the Internet
Before You Begin
Before you install the device, please pay attention to the following items:
• When the device is connected to a computer, hub, router, or switch, the Ethernet cable
should be shorter than 100 meters.
• Keep the device clean. Keep away the device from direct sunshine. Avoid any metal in
the device.
• Place the device in the center of the placement area, and try to optimize the wireless
coverage.
Connecting the Device
To connect the device, do as follows:
• Make sure the power switch is off.
• Connect one end of the RJ45 cable to the LAN interface of the F@st Plug 502W.
• Connect the other end of the RJ45 cable to your PC.
• Insert the power plug of the device into the wall socket.
• Put the power switch on.
1
21
off / on
21
432
21
off / on
To computer
To network
21
off / on
21
off / on
Page 15

PLC Wireless Router F@st Plug 502W
- 13 -
Configuring the LAN PC
By default, the DHCP server is enabled. The LAN IP address of the PLC wireless router is
192.168.1.1 and the subnet mask is 255.255.255.0.
Note
The configuration steps and figures on Windows XP are depicted as an example.
The configuration process may vary depending on operation system of your PC.
To manually set the network adapter on a Windows XP PC, do as follows:
Step 1 Right-click the icon of My Network Places and choose Properties from the menu.
The Network Connections window appears.
Step 2 Right-click the network adapter icon and choose Properties from the menu.
The Local Area Connections Properties window appears.
Page 16

F@st Plug 502W PLC Wireless Router
- 14 -
Note
If multiple network cards are installed on your PC, a window other than the Local
Area Connections Properties window may appears.
Step 3 Double-click Internet Protocol (TCP/IP) and the Internet Protocol (TCP/IP)
Properties window appears.
Step 4 Select Use the following IP address and enter the IP address of the network
adapter. Set the IP address to 192.168. 1.X (‘X’ is a number in the range of 2 to
254) and set the subnet mask to 255.255.255.0.
Configure the default gateway and IP addresses of the DNS servers according to
your actual network, or leave them blank.
After setting the parameters, click OK.
Page 17

PLC Wireless Router F@st Plug 502W
- 15 -
Step 5 Ping the default IP address of the PLC wireless router, to check whether the current
connection between your PC and the PLC wireless router is normal.
Choose Start > Run from the desktop and enter ping 192.168.1.1.
See the following figure:
Note
192.168.1.1 in the ping command is the default IP address of the LAN interface. If
the IP address changes, enter the current IP address instead.
Step 6 If your PC can ping through the default IP address of the PLC wireless router, the
following page appears, indicating that the connection between your PC and the
PLC wireless router is normal:
Page 18

F@st Plug 502W PLC Wireless Router
- 16 -
Web Configuration
This chapter describes how to log in to the PLC wireless router as a super user and how to
configure the parameters in the Web pages.
Login In to the PLC Wireless Router
If you log in to the PLC wireless router for the first time, do as follows:
Step 1 Open the IE browser, and enter http://192.168.1.1 in the address bar.
Step 2 In the login page, enter the user name and password.
Note
Both the default user name and password of super user is admin and both the
default user name and password of common user is user.
Step 3 Click Login, and the following page appears.
Note
The LAN user is allowed to access the PLC wireless router by two-level user names
and passwords (admin/admin and user/user).
Page 19

PLC Wireless Router F@st Plug 502W
- 17 -
Setup
Wizard
You can set the basic network parameters for accessing the Internet by following this wizard.
To configure the wizard, do as follows:
Step 1 Choose SETUP > Wizard, and the following page appears.
Note
When you order the broadband service, pay attention to the Internet connection
type. The PLC wireless router adopts Ethternet connection. Technical parameters
of Internet connection properities are provided by your Internet service provider
(ISP). For example, your ISP should tell you whether the Internet connection mode
is static IP or dynamic IP, and whether the protocol used for Internet communication
is DHCP or PPPoE.
Step 2 Click Setup Wizard to display the following page:
Page 20

F@st Plug 502W PLC Wireless Router
- 18 -
Step 3 There are 6 steps for configuring the wizard. Click Next to display the following
page:
Note
The password of the default super user of the PLC wireless router is admin. In order
to ensure your network security, it is recommended to change the default password.
Step 4 In this page, you can change the password of the PLC wireless router. If you do not
want to change the password, click Next or Skip. After setting the new password,
click Next to display the following page:
Step 5 In this page, you can set the Network Time Protocol (NTP) server according to your
time zone. After setting the NTP server and time zone, click Next to display the
following page:
Page 21

PLC Wireless Router F@st Plug 502W
- 19 -
Step 6 The PLC wireless router supports 4 types of Internet connection: DHCP, Static IP,
PPPoE, and Bridge. In this page, you can select the proper Internet connection
mode and configure the relevant parameters according to the actual requirements.
If you are not sure of your Internet connection mode, please contact your ISP.
DHCP
If you select DHCP, the PLC wireless router automatically obtains the IP address, subnet
mask and IP address of the gateway from the ISP. If your ISP does not provide IP network
parameters, please select this mode.
See the following figure:
The following table describes parameters in this page:
Field Description
Enable WAN Enable or disable the WAN connection of DHCP type.
Connection Type Select DHCP from the drop-down list.
Service Type
INTERNET: It is mainly used for the Internet service, for
example, surfing the Internet.
TR069: It is mainly used for the TR069 service, for example,
TR069 remote management.
TR069_INTERNET: It is a mixed type, which applies to both
the Internet and TR069 services.
Hostname Set the host name of local computer.
Vendor Class ID
Enter the vendor class ID. DHCP server assigns the IP
address to your router according to the vendor class ID.
MTU
Set the maximum transmission unit (MTU). It is 1,500 bytes
for most Ethernet networks. But some ISPs may require
smaller MTUs. Do not modify the value of MTU size unless it
is necessary for your ISP connection.
Page 22

F@st Plug 502W PLC Wireless Router
- 20 -
Field Description
Assignment
You can manually enter the IP address of domain name
server or let the DNS server automatically assign one to
your router.
DNS (Primary) IP
Enter the IP address of the primary DNS server. Domain
names should be resolved first by the primary DNS server.
DNS (Secondary) IP
If the ISP provides another DNS server, enter its IP address
in this field. If the primary DNS server fails to resolve the
domain name, the secondary will resolve it.
LAN Port
The PLC wireless router supports 2 LAN ports, which can be
bound to different interfaces.
WLAN Port
The PLC wireless router supports 1 WLAN ports, which can
be bound to different interfaces.
Enable VLAN Tagging
If you enable VLAN tagging and the VLAN value is not ‘0’,
message will carry the VLAN ID.
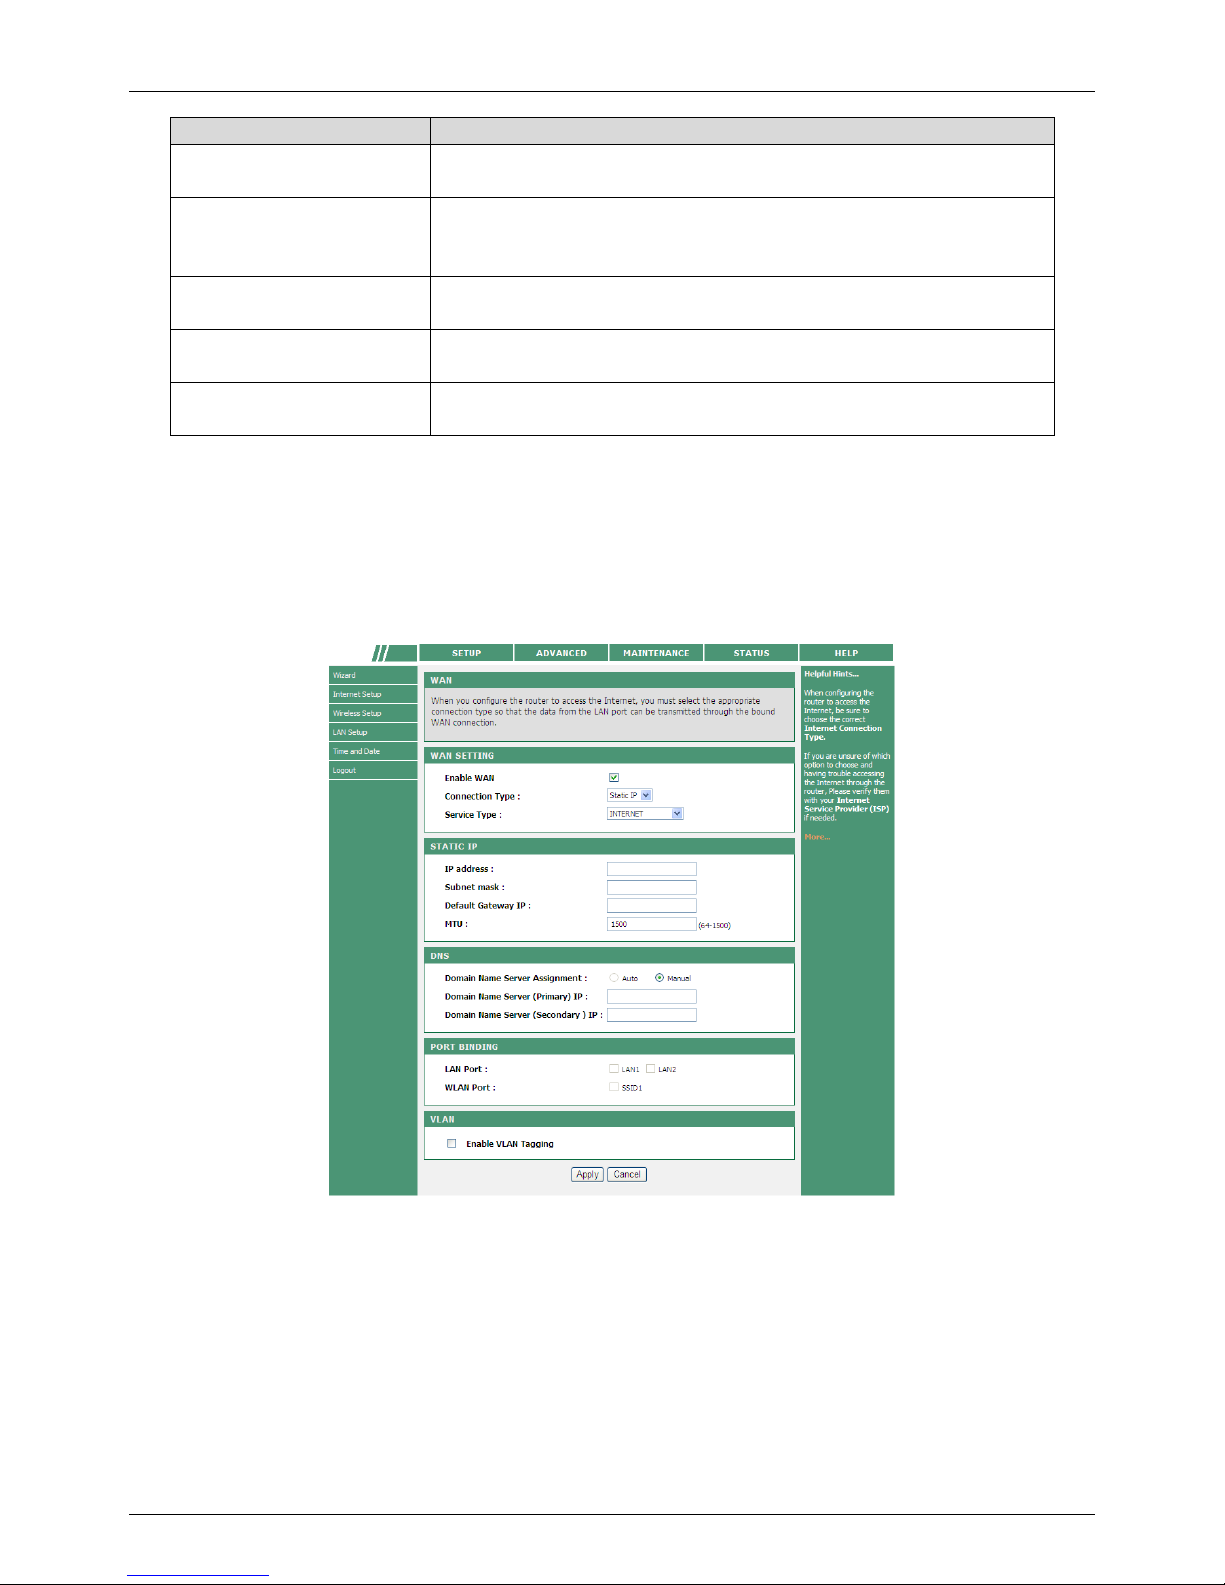
Static IP
If your ISP provides the information of IP address, subnet mask, gateway, and DNS server,
please select Static IP.
For detailed settings, refer to your ISP.
Page 23

PLC Wireless Router F@st Plug 502W
- 21 -
The following table describes parameters in this page:
Field Description
Enable WAN Enable or disable the WAN connection of static IP type.
Connection Type Select Static IP from the drop-down list.
Service Type
INTERNET: It is mainly used for the Internet service, for
example, surfing the Internet.
TR069: It is mainly used for the TR069 service, for example,
TR069 remote management.
TR069_INTERNET: It is a mixed type, which applies to both
the Internet and TR069 services.
IP address
Enter the WAN IP address provided by the ISP. Do not leave
this field blank.
Subnet mask
Enter the WAN subnet mask provided by the ISP. It varies
with the network types. Usually, the subnet mask is
255.255.255.0 (Class C).
Default Gateway IP
Enter the IP address of gateway provided by the ISP. This IP
address is used for connecting to the ISP.
MTU
Set the maximum transmission unit. it is 1,500 bytes for most
Ethernet networks. But some ISPs may require smaller
MTUs. Do not modify the value of MTU size unless it is
necessary for your ISP connection.
Assignment
You can manually enter the IP address of domain name
server or let the DNS server automatically assign one to your
router.
DNS (Primary) IP
Enter the IP address of the primary DNS server. Domain
names should be resolved first by the primary DNS server.
DNS (Secondary) IP
If the ISP provides another DNS server, enter the IP address
of the DNS server. If the primary DNS server fails to resolve
the domain name, the secondary will resolve it.
LAN Port
The PLC wireless router supports 2 LAN ports, which can be
bound to different interfaces.
WLAN Port
The PLC wireless router supports 4 WLAN ports, which can
be bound to different interfaces.
Enable VLAN Tagging
If you enable VLAN tagging and the VLAN value is not ‘0’,
message will carry the VLAN ID.
Page 24

F@st Plug 502W PLC Wireless Router
- 22 -
PPPoE
If the ISP provides the user name and password for PPPoE dialup, please select PPPoE.
The following table describes parameters in this page:
Field Description
Enable WAN Enable or disable the WAN connection of PPPoE type.
Connection Type Select PPPoE from the drop-down list.
Service Type
INTERNET: It is mainly used for the Internet service, for
example, surfing the Internet.
TR069: It is mainly used for the TR069 service, for example,
TR069 remote management.
TR069_INTERNET: It is a mixed type, which applies to both
the Internet and TR069 services.
PPPoE Account Enter the user name provided by the ISP for PPPoE dialup.
PPPoE Password Enter the password provided by the ISP for PPPoE dialup.
Confirm Password Enter the PPPoE password again.
Authentication Method
You can select AUTO, PAP, CHAP, MS-CHAP, or EAP from
the drop-down list.
MTU
Set the maximum transmission unit. It is 1500 bytes for most
Ethernet networks, 1492 bytes for PPPoE connection. But
some ISPs may require smaller MTUs. Do not modify the
value of MTU size unless it is necessary for your ISP
connection.
Assignment
You can manually enter the IP address of domain name
server or let the DNS server automatically assign one to your
router.
Page 25

PLC Wireless Router F@st Plug 502W
- 23 -
Field Description
DNS (Primary) IP
Enter the IP address of the primary DNS server. Domain
names should be resolved first by the primary DNS server.
DNS (Secondary) IP
If the ISP provides another DNS server, enter the IP address
of the DNS server. If the primary DNS server fails to resolve
the domain name server, the secondary will resolve it.
LAN Port
The PLC wireless router supports 2 LAN ports, which can be
bound to different interfaces.
WLAN Port
The PLC wireless router supports 1 WLAN ports, which can
be bound to different interfaces.
Enable VLAN Tagging
If you enable VLAN tagging and the VLAN value is not ‘0’,
message will carry the VLAN ID.
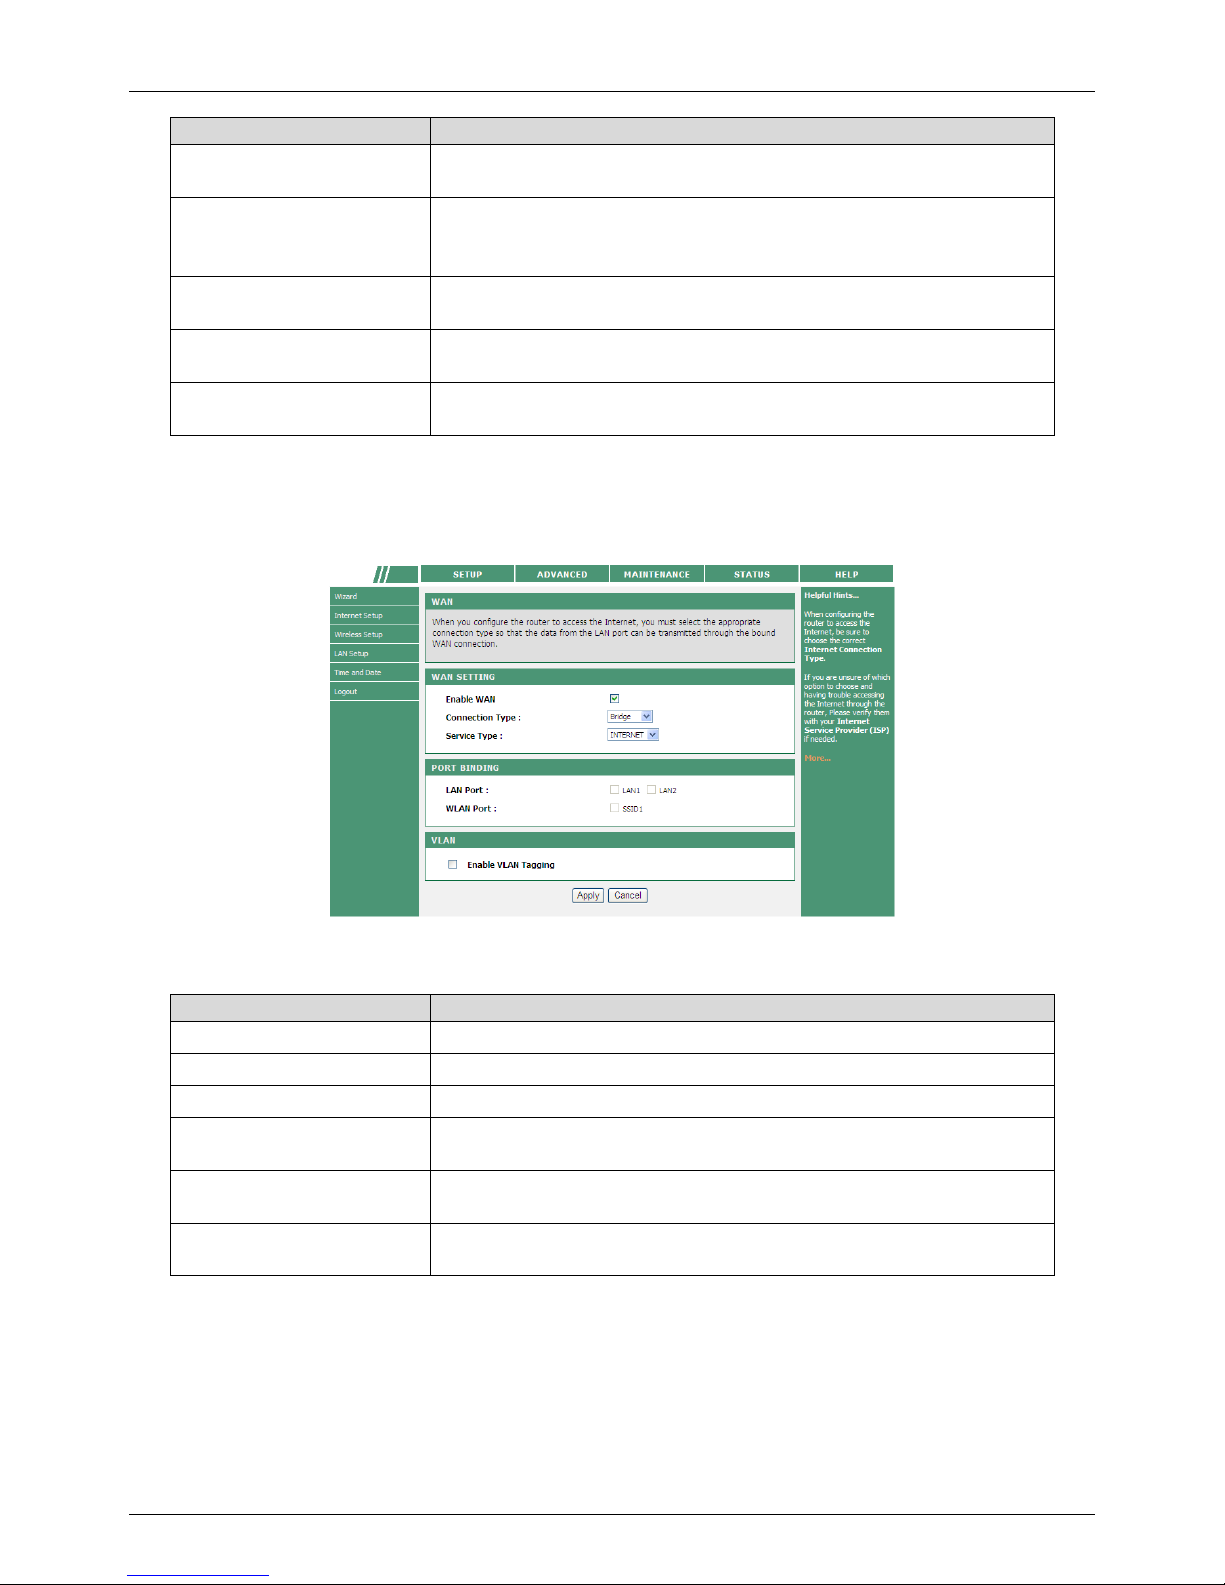
Bridge
In the Bridge mode, all physical ports and wireless interfaces co-exist in the virtual interfaces.
The following table describes parameters in this page:
Field Description
Enable WAN Enable or disable the WAN connection of bridge type.
Connection Type Select Bridge from the drop-down list.
Service Type You can only select Internet.
LAN Port
The PLC wireless router supports 2 LAN ports, which can be
bound to different interfaces.
WLAN Port
The PLC wireless router supports 1 WLAN ports, which can
be bound to different interfaces.
Enable VLAN Tagging
If you enable VLAN tagging and the VLAN value is not ‘0’,
message will carry the VLAN ID.
Page 26

F@st Plug 502W PLC Wireless Router
- 24 -
Step 7 After selecting the proper Internet connection type and setting the relevant
parameters, click Next to display the following page .
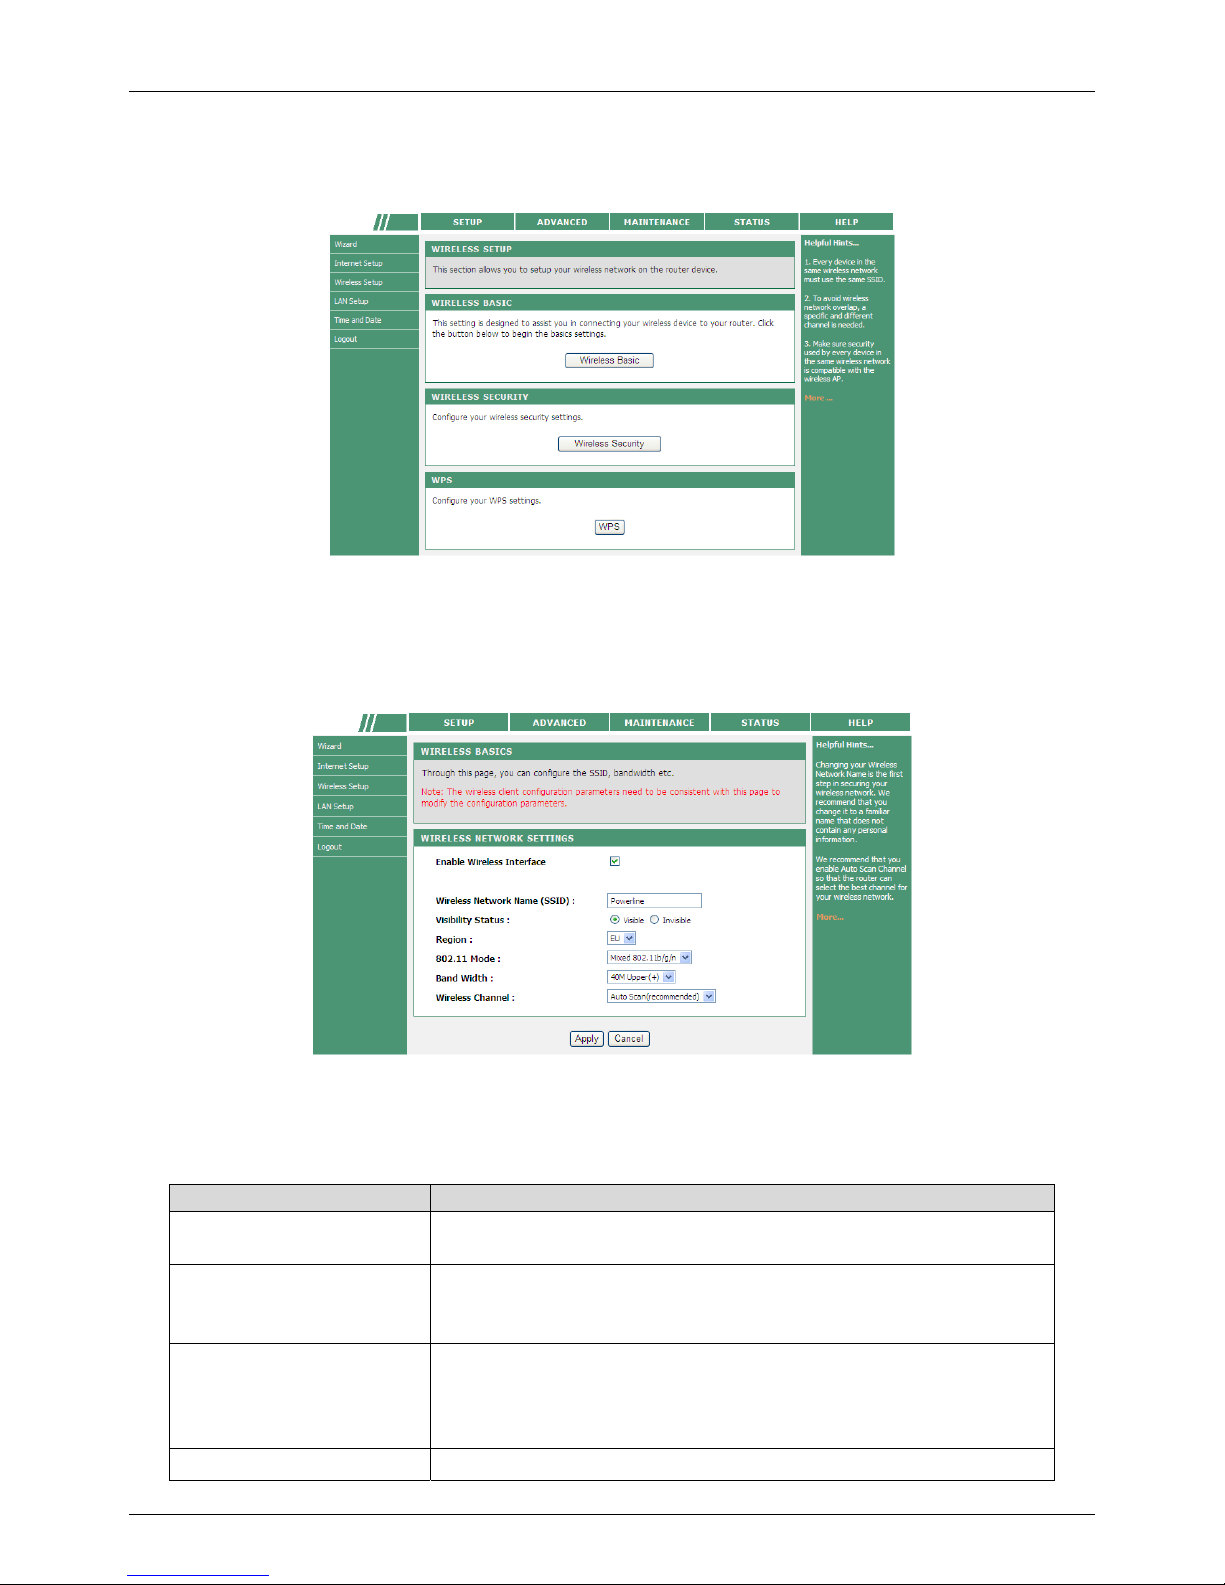
Step 8 In this page, you can configure the wireless parameters of the PLC wireless router.
The following table describes parameters in this page:
Field Description
Enable Wireless
Interface
Enable or disable the wireless interface.
Wireless Network Name
(SSID)
The wireless network name (SSID) can contain up to 32
characters and can be letters, numerals, underlines, and any
combinations of them. The SSID is case-sensitive.
Visibility Status
If Visible is selected, the PLC wireless router broadcasts its
SSID on the wireless network.
If Invisible is selected, the PLC wireless router does not
broadcast its SSID on the wireless network.
Region Select the country where you are from the drop-down list.
802.11 Mode
Select the appropriate wireless mode. The default is Mixed
802.11b/g/n.
802.11b only: The maximum rate is 11 Mbps.
802.11g only: The maximum rate is 54 Mbps.
802.11n only: For 20M bandwidth, the maximum rate is 130
Mbps (150 Mbps for short preamble); for 40M Upper (+) or
40M Lower (-) bandwidth, the maximum rate is 270 Mbps
(300 Mbps for short preamble).
Mixed 802.11b/g: It is compatible with 802.11b and 802.11g.
Mixed 802.11n/g: It is compatible with 802.11n and 802.11g.
Mixed 802.11b/g/n: It is compatible with 802.11b, 802.11n,
and 802.11g.
Band Width
You can set the band width only in the 802.11 mode that is
compatible with 802.11n. For 20M bandwidth, the maximum
rate is 130 Mbps (150 Mbps for short preamble); for 40M
Upper (+) or 40M Lower (-) bandwidth, the maximum rate is
270 Mbps (300 Mbps for short preamble).
Wireless Channel
Select the working channel of the wireless network. The
default is Auto Scan, which indicates that the wireless router
automatically searches for the best channel among the
available channels.
Page 27

PLC Wireless Router F@st Plug 502W
- 25 -
Step 9 After setting the wireless parameters, click Next to display the following page.
Step 10 In this page, you can set the wireless security mode.
The PLC wireless router provides the following 5 types of wireless security modes: None,
WEP, WPA, WPA2, and WPA/WPA2 Mixed.
None
Select None from the drop-down list of wireless security mode to display the following page.
None means that data encryption is not adopted, the network is not secure, and any station
can access the network. This option is not recommended.
WEP
Select WEP from the drop-down list of wireless security mode to display the following page.
Page 28

F@st Plug 502W PLC Wireless Router
- 26 -
The following table describes parameters related to the WEP mode:
Field Description
WEP Key Length
Select the encryption length of WEP key. You can select 64
bit or 128 bit.
Default Tx Key
Select one from the four keys as the default key of the
wireless network.
WEP Key Format
When the key format is 64 bit, you need to enter 5 ASCII
characters or 10 hexadecimal digits.
When the key format is 128 bit, you need to enter 13 ASCII
characters or 26 hexadecimal digits.
WEP Key 1/2/3/4 Set 64-bit or 128-bit key according to the key format.
Authentication
Select the proper authentication mode. You can select Open
or Share Key.
WPA-PSK
Select WPA-PSK from the drop-down list of wireless security mode to display the following
page.
The following table describes parameters related to the WPA mode:
Field Description
WPA Mode Only WPA-Personal is available.
Encryption Mode Only TKIP is available.
Group Key Update
Interval
Set the update interval of group key.
Pre-shared Key
Set the pre-shared key. The PLC wireless router uses this
key to authenticate the identity of workstation.
Page 29

PLC Wireless Router F@st Plug 502W
- 27 -
WPA2-PSK
Select WPA2-PSK from the drop-down list of wireless security mode to display the following
page.
The following table describes parameters related to the WPA2 mode:
Field Description
WPA Mode Only WPA2-Personal is available.
Encryption Mode Only AES is available.
Group Key Update
Interval
Set the update interval of group key.
Pre-shared Key
Set the pre-shared key. The PLC wireless router uses this
key to authenticate the identity of workstation.
WPA/WPA2
Select WPA/WPA2 from the drop-down list of wireless security mode to display the following
page.
Page 30

F@st Plug 502W PLC Wireless Router
- 28 -
The following table describes parameters related to the WPA/WPA2 Mixed mode:
Field Description
WPA Mode Only WPA/WPA2 Mixed-Personal is available.
Encryption Mode You can only select Both.
Group Key Update
Interval
Set the update interval of group key.
Pre-shared Key
Set the pre-shared key. The PLC wireless router uses this
key to authenticate the identity of workstation.
Step 11 After selecting the proper wireless security mode and its relevant parameters, click
Next to display the following page.
Step 12 In this page, you can view the configuration information of the PLC wireless router.
If you want to modify some settings, click Back. If you want to make the settings
take effect, click Complete.
Note
In any configuration page of Wizard, you can click Back to modify the previous
settings, or click Cancel to exit the page.
Page 31

PLC Wireless Router F@st Plug 502W
- 29 -
Internet Setup
Choose SETUP > Internet Setup, and the following page appears.
This device supports Internet access modes. In this page, you can add multiple WAN
connections and set the default gateway mode. You can manually or automatically set the
default gateway mode. If you select Manual, you need to select a proper WAN connection
from the drop-down list, except the bridge WAN connections.
Click Add to display the following page.
The PLC wireless router supports four types of Internet connection modes. The Internet
connection modes contain DHCP, Static IP, PPPoE, and Bridge. In this page, you can select
the proper Internet connection mode and configure the relevant parameters according to the
actual requirements.
Page 32

F@st Plug 502W PLC Wireless Router
- 30 -
DHCP
If you select DHCP, the PLC wireless router automatically obtains the IP address, subnet
mask, and IP address of the gateway from the ISP. If the ISP does not provide any IP
network parameters, please select this mode.
See the following figure:
The following table describes parameters in this page:
Field Description
Enable WAN Enable or disable the WAN connection of DHCP type.
Connection Type Select DHCP from the drop-down list.
Service Type
INTERNET: It is mainly used for the Internet service, for
example, surfing the Internet.
TR069 type: It is mainly used for the TR069 service, for
example, TR069 remote management.
TR069_INTERNET: a mixed type, which applies to both the
Internet and TR069 services.
Hostname Set the host name of local computer.
Vendor Class ID
Enter the vendor class ID. DHCP server assigns the IP
address to your router according to the vendor class ID.
MTU
Set the maximum transmission unit. It is 1500 bytes for most
Ethernet networks. But some ISPs may require smaller
MTUs. Do not modify the value of MTU size unless it is
necessary for your ISP connection.
Domain Name Server
Assignment
You can manually enter the IP address of domain name
server or let the DNS server automatically assign one to your
router.
Page 33
PLC Wireless Router F@st Plug 502W
- 31 -
Field Description
Domain Name Server
(Primary) IP
Enter the IP address of the primary DNS server. Domain
names should be resolved first by the primary DNS server.
Domain Name Server
(Secondary) IP
If the ISP provides another DNS server, enter the IP address
of the DNS server. If the primary DNS server fails to resolve
the domain name, the secondary will resolve it.
LAN Port
The PLC wireless router supports 2 LAN ports, which can be
bound to different interfaces.
WLAN Port
The PLC wireless router supports 1 WLAN ports, which can
be bound to different interfaces.
Enable VLAN Tagging
If you enable VLAN tagging and the VLAN value is not ‘0’,
message will carry the VLAN ID.
Static IP
If the ISP provides the information of the IP address, subnet mask, gateway, and DNS
server, please select Static IP.
For detailed settings, refer to your ISP.
Page 34

F@st Plug 502W PLC Wireless Router
- 32 -
The following table describes parameters in this page:
Field Description
Enable WAN Enable or disable the WAN connection of static IP type.
Connection Type Select Static IP from the drop-down list.
Service Type
INTERNET: It is mainly used for the Internet service, for
example, surfing the Internet.
TR069: It is mainly used for the TR069 service, for example,
TR069 remote management.
TR069_INTERNET: It is a mixed type, which applies to both
the Internet and TR069 services.
IP address
Enter the WAN IP address provided by the ISP. It cannot be
null.
Subnet mask
Enter the WAN subnet mask provided by the ISP. It varies
depending on the network type. Usually, the subnet mask is
255.255.255.0 (Class C).
Default Gateway IP
Enter the IP address of the gateway provided by the ISP.
This IP address is used for connecting to the ISP.
MTU
Set the maximum transmission unit. It is 1500 bytes for most
Ethernet networks. But some ISPs may require smaller
MTUs. Do not modify the value of MTU size unless it is
necessary for your ISP connection.
Domain Name Server
Assignment
You can manually enter the IP address of domain name
server or let the DNS server automatically assign one to your
router.
Domain Name Server
(Primary) IP
Enter the IP address of the primary DNS server. Domain
names should be resolved first by the primary DNS server.
Domain Name Server
(Secondary ) IP
If the ISP provides another DNS server, enter the IP address
of the DNS server. If the primary DNS server fails to resolve
the domain name, the secondary will resolve it.
LAN Port
The PLC wireless router supports 2 LAN ports, which can be
bound to different interfaces.
WLAN Port
The PLC wireless router supports 1 WLAN ports, which can
be bound to different interfaces.
Enable VLAN Tagging
If you enable VLAN tagging and the VLAN value is not ‘0’,
message will carry the VLAN ID.
Page 35

PLC Wireless Router F@st Plug 502W
- 33 -
PPPoE
If the ISP provides the user name and password for PPPoE dialup, please select PPPoE.
The following table describes parameters in this page:
Field Description
Enable WAN Enable or disable the WAN connection of PPPoE type.
Connection Type Select PPPoE from the drop-down list.
Service Type
INTERNET: it is mainly used for the Internet service, for
example, surfing the Internet.
TR069: It is mainly used for the TR069 service, for example,
TR069 remote management.
TR069_INTERNET: It is a mixed type, which applies to both
the Internet and TR069 services.
PPPoE Account Enter the user name provided by the ISP for PPPoE dialup.
PPPoE Password Enter the password provided by the ISP for PPPoE dialup.
Confirm Password Enter the PPPoE password again.
Authentication Method
You can select AUTO, PAP, CHAP, MS-CHAP, or EAP from
the drop-down list.
MTU
Set the maximum transmission unit. It is 1500 bytes for most
Ethernet networks, 1492 bytes for PPPoE connection. But
some ISPs may require smaller MTUs. Do not modify the
value of MTU size unless it is necessary for your ISP
connection.
Domain Name Server
Assignment
You can manually enter the IP address of domain name
server or let the DNS server automatically assign one to your
router.
Page 36
F@st Plug 502W PLC Wireless Router
- 34 -
Field Description
Domain Name Server
(Primary) IP
Enter the IP address of the primary DNS server. Domain
names should be resolved first by the primary DNS server.
Domain Name Server
(Secondary) IP
If the ISP provides another DNS server, enter the IP address
of the DNS server. If the primary DNS server fails to resolve
the domain name server, the secondary will resolve it.
LAN Port
The PLC wireless router supports 2 LAN ports, which can be
bound to different interfaces.
WLAN Port
The PLC wireless router supports 4 wireless WLAN ports,
which can be bound to different interfaces.
Enable VLAN Tagging
If you enable VLAN tagging and the VLAN value is not ‘0’,
message will carry the VLAN ID.
Bridge
In the Bridge mode, all physical ports and wireless interfaces co-exist in the virtual interfaces.
The following table describes parameters in this page:
Field Description
Enable WAN Enable or disable the WAN connection of bridge type.
Connection Type Select Bridge from the drop-down list.
Service Type You can only select Internet.
LAN Port
The PLC wireless router supports 2 LAN ports, which can be
bound to different interfaces.
WLAN Port
The PLC wireless router supports 1 WLAN ports, which can
be bound to different interfaces.
Enable VLAN Tagging
If you enable VLAN tagging and the VLAN value is not ‘0’,
message will carry the VLAN ID.
After setting the parameters, click Apply to save the settings.
Page 37
PLC Wireless Router F@st Plug 502W
- 35 -
Wireless Setup
Choose SETUP > Wireless Setup, and the following page appears.
Wireless Basic Settings
Choose Wirelss Setup > Wireless Basic on the left pane or click Wireless Basic in the
WIRELESS SETUP page to display the following page.
In this page, you can configure the basic wireless parameters.
The following table describes parameters in this page:
Field Description
Enable Wireless
Interface
Enable or disable the wireless interface.
Wireless Network Name
(SSID)
The wireless network name (SSID) can contain up to 32
characters and can be letters, numerals, underlines, and any
combinations of them. The SSID is case-sensitive.
Visibility Status
If Visible is selected, the PLC wireless router broadcasts its
SSID on the wireless network.
If Invisible is selected, the PLC wireless router does not
broadcast its SSID on the wireless network.
Region Select the country where you are from the drop-down list.
Page 38
F@st Plug 502W PLC Wireless Router
- 36 -
Field Description
802.11 Mode
Select the appropriate wireless mode. The default is Mixed
802.11b/g/n.
802.11b only: The maximum rate is 11 Mbps.
802.11g only: The maximum rate is 54 Mbps.
802.11n only: For 20M bandwidth, the maximum rate is 130
Mbps (150 Mbps for short preamble); for 40M Upper (+) or
40M Lower (-) bandwidth, the maximum rate is 270Mbps
(300 Mbps for short preamble).
Mixed 802.11b/g: It is compatible with 802.11b and 802.11g.
Mixed 802.11n/g: It is compatible with 802.11n and 802.11g.
Mixed 802.11b/g/n: It is compatible with 802.11b, 802.11n,
and 802.11g.
Band Width
Only in the 802.11 mode that is compatible with 802.11n,
can you set the band width. For 20M bandwidth, the
maximum rate is
130Mbphttp://192.168.1.1/cgi-bin/webproc?getpage=html/in
dex.html&var:menu=status&var:page=deviceinfos (150Mbps
for short preamble); for 40M Upper (+) or 40M Lower (-)
bandwidth, the maximum rate is 270Mbps (300 Mbps for
short preamble).
Wireless Channel
Select the working channel of the wireless network. The
default is Auto Scan, which indicates that the PLC wireless
router automatically searches for the best channel among
the available channels.
After setting the parameters, click Apply to save the settings.
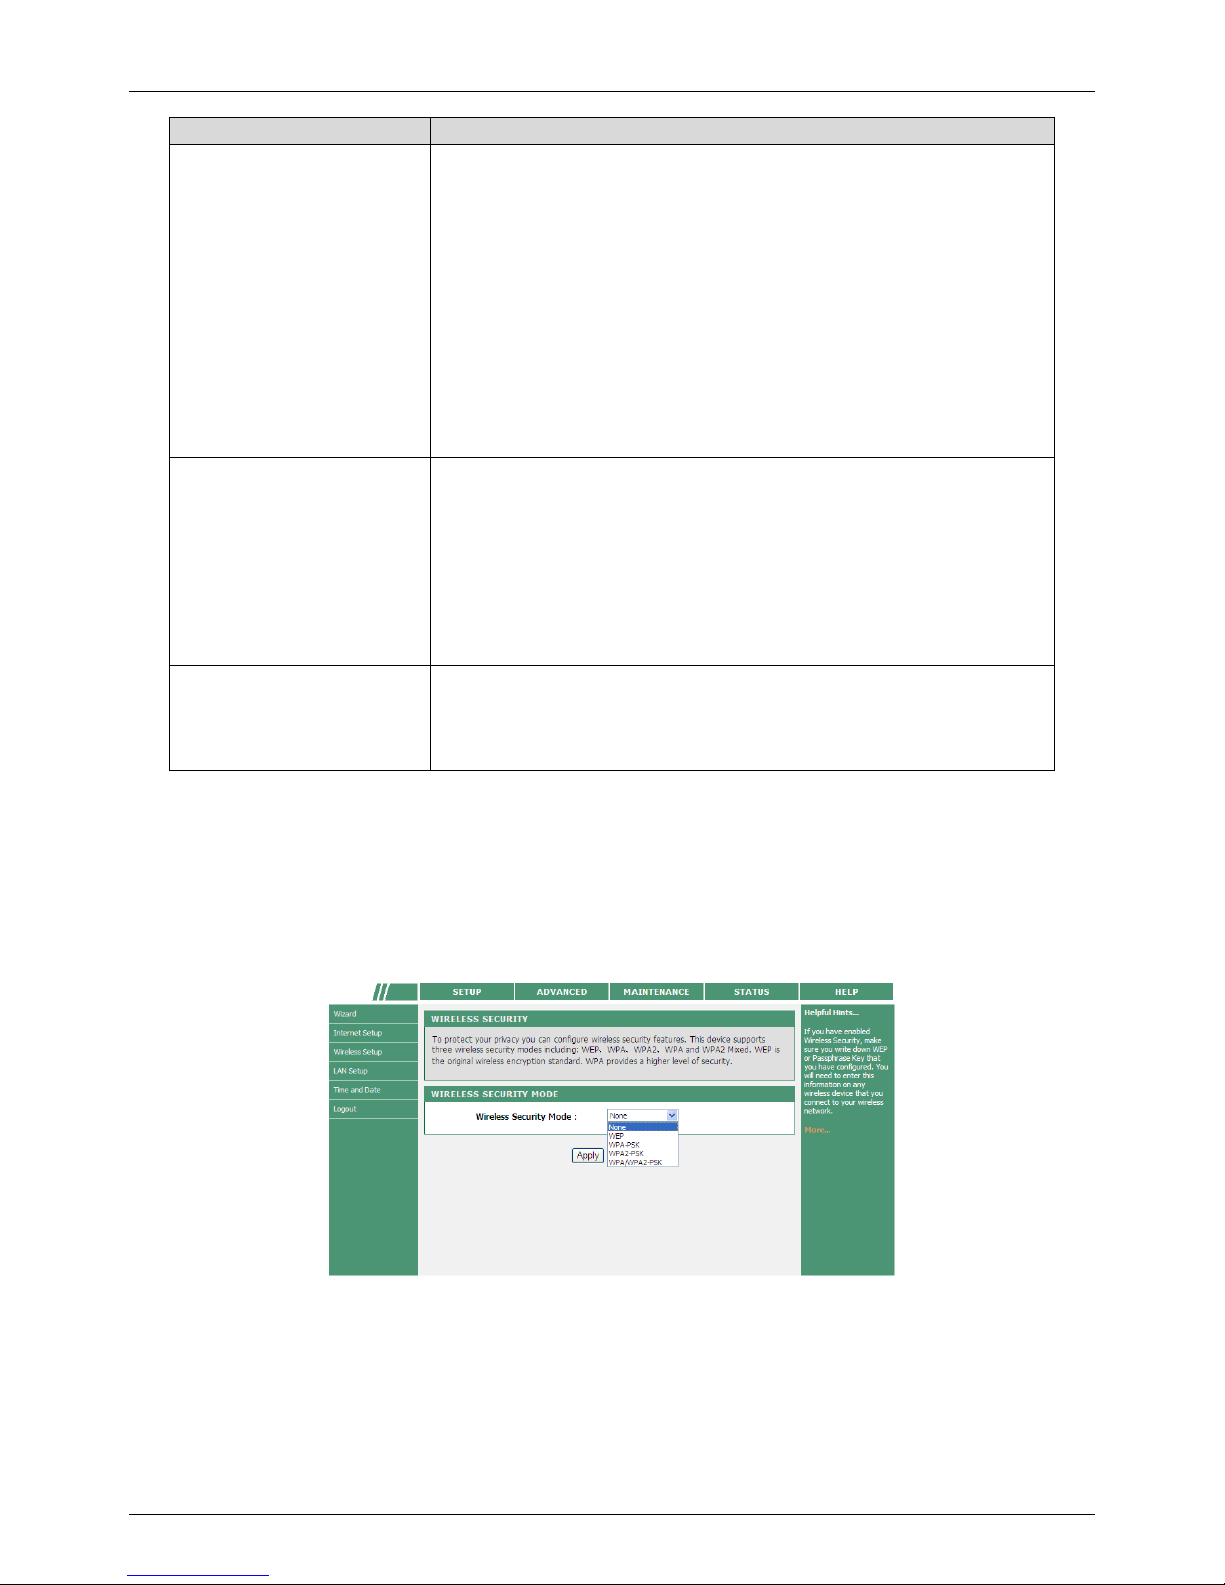
Wireless Security Settings
Choose Wirelss Setup > Wireless Security on the left pane or click Wireless Security in the
WIRELESS SETUP page to display the following page.
Wireless security settings are very important in protecting the wireless base stations on your
network and wireless communication between your router and wireless network. The PLC
wireless router provides 5 types of wireless security modes, which contain None, WEP,
WPA, WPA2, and WPA/WPA2 Mixed.
Page 39

PLC Wireless Router F@st Plug 502W
- 37 -
None
Select None from the drop-down list of wireless security mode to display the following page.
None means data encryption is not adopted and the network is not secure. Any station can
access the network. This option is not recommended.
WEP
Select WEP from the drop-down list of wireless security mode to display the following page.
Page 40
F@st Plug 502W PLC Wireless Router
- 38 -
The following table describes parameters related to the WEP mode:
Field Description
WEP Key Length
Select the encryption length of WEP key. You can select 64
bit or 128 bit.
Default Tx Key
Select one from the four keys as the default key of the
wireless network.
WEP Key Format
When the key format is 64 bit, you need to enter 5 ASCII
characters or 10 hexadecimal digits.
When the key format is 128 bit, you need to enter 13 ASCII
characters or 26 hexadecimal digits.
WEP Key 1/2/3/4 Set 64-bit or 128-bit key according to the key format.
Authentication
Select the proper authentication mode. You can select Open
or Share Key.
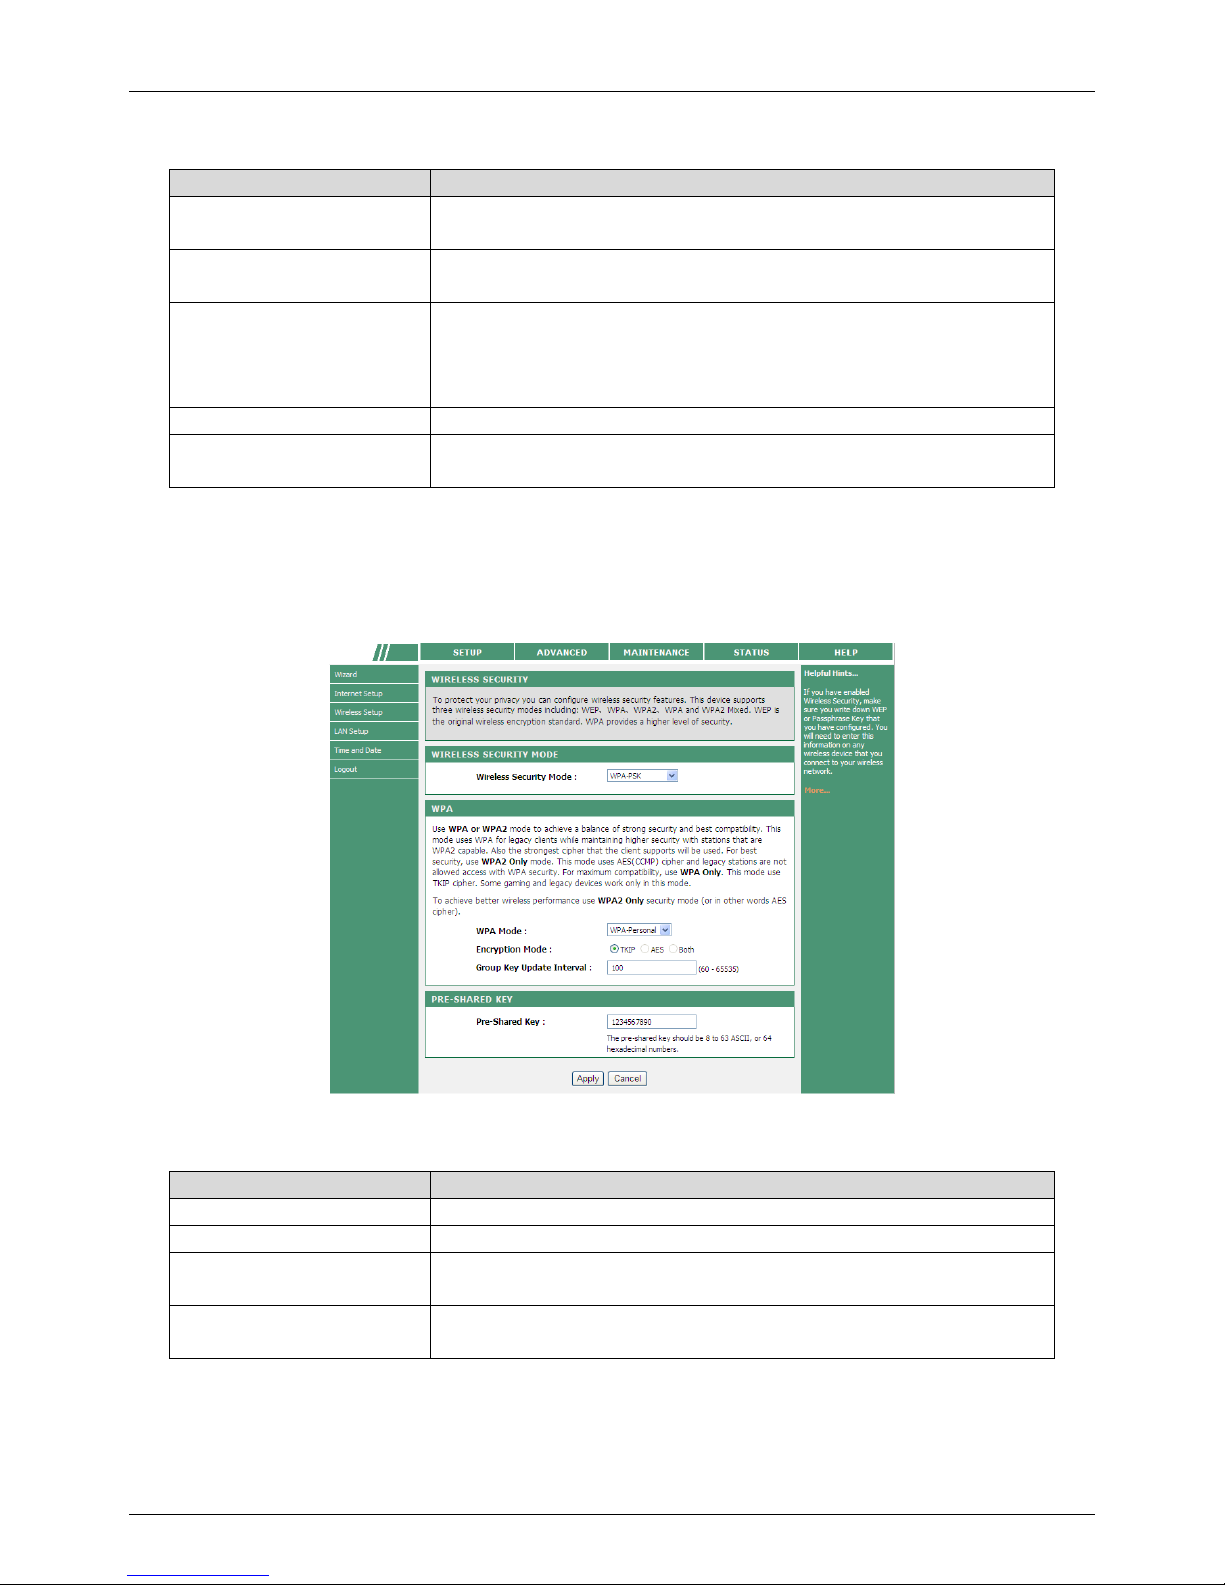
WPA-PSK
Select WPA-PSK from the drop-down list of wireless security mode to display the following
page.
The following table describes parameters related to the WPA mode:
Field Description
WPA Mode Only WPA-Personal is available.
Encryption Mode Only TKIP is available.
Group Key Update
Interval
Set the update interval of group key.
Pre-shared Key
Set the pre-shared key. The PLC wireless router uses this
key to authenticate the identity of workstation.
Page 41

PLC Wireless Router F@st Plug 502W
- 39 -
WPA2-PSK
Select WPA2-PSK from the drop-down list of wireless security mode to display the following
page.
The following table describes parameters related to the WPA2 mode:
Field Description
WPA Mode Only WPA2-Personal is available.
Encryption Mode Only AES is available.
Group Key Update
Interval
Set the update interval of group key.
Pre-shared Key
Set the pre-shared key. The PLC wireless router uses this
key to authenticate the identity of workstation.
Page 42

F@st Plug 502W PLC Wireless Router
- 40 -
WPA/WPA2-PSK
Select WPA/WPA2-PSK from the drop-down list of wireless security mode to display the
following page.
The following table describes parameters related to the WPA/WPA2 Mixed mode:
Field Description
WPA Mode Only WPA/WPA2 Mixed-Personal is available.
Encryption Mode You can only select Both.
Group Key Update
Interval
Set the update interval of group key.
Pre-shared Key
Set the pre-shared key. The PLC wireless router uses this
key to authenticate the identity of workstation.
After setting the parameters, click Apply to save the settings.
Page 43

PLC Wireless Router F@st Plug 502W
- 41 -
WPS Settings
WPS refers to Wi-Fi Protected Setup. You can use the WPS setup function to add a wireless
client to a network, without setting some specific parameters, such as SSID, security mode,
and password. To use this function, a wireless client must support WPS. If the wireless client
does not support WPS, you must manually configure the wireless settings of wireless client,
and ensure that its SSID and other wireless security settings are the same as that of the PLC
wireless router.
Choose Wirelss Setup > WPS on the left pane or click WPS in the WIRELESS SETUP page
to display the following page.
The following table describes parameters in this page:
Field Description
Wireless SSID Select a wireless SSID from the drop-down list.
WPS Config State It shows the current authentication mode.
Enable WPS Tick this box to enable WPS function.
Push Button
Click the PBC button in this page, and then click the PBC
button in the configuration utility page of wireless network
card or press the WPS pushbutton on the wireless network
card within 2 minutes to finish WPS configuration.
Input Station PIN
Enter the PIN code that is generated randomly by the
configuration utility of wireless card.
WPS Session State Display current WPS connection state.
Caution
If you want to use WPS, you must select the WPA-PSK/WPA2-PSK mode and the
SSID must be broadcasted.
WPS modes contain PBC mode and PIN mode.
Page 44

F@st Plug 502W PLC Wireless Router
- 42 -
PBC Mode
Click the PBC button in the WPS page or press down the WPS button on the PLC wireless
router to start WPS connection.
Press the WPS button on the network card or click the PBC button in the configuration utility
page of network card within two minutes to start WPS connection. After WPS connection is
established, the following page appears. The client can now visit the LAN.
PIN Mode
Enter the PIN of the network card in the WPS page (refer to the client of the network card),
and then click PIN to start WPS connection. The following page appears:
Click the PIN button in the configuration utility page of network card within two minutes to
start WPS connection. After WPS connection is established, the following page appears. The
client can now visit the LAN.
Page 45

PLC Wireless Router F@st Plug 502W
- 43 -
LAN Setup
Choose SETUP > LAN Setup, and the following page appears.
In this page, you can configure the LAN settings of the PLC wireless router. You can modify
the IP address of the LAN interface according to the actual network environment. The default
IP address is 192.168.1.1. Please note that this is an optional operation. Usually, you need
not to modify the default settings in this page.
You may use the default settings and DHCP service to manage the IP setting of the private
network. The IP address of your host is from the DHCP address pool. If you want to enable
the DHCP function of the PLC wireless router on the LAN, the network segment of DHCP IP
pool of PLC wireless router must be the same as that of the IP address of your host. If the IP
network segment of the PLC wireless router changes, the network segment of the DHCP IP
pool will also change automatically.
The following table describes parameters in this page:
Field Description
Router IP Address
Set the IP address that a LAN user uses to access the
router. The default IP is 192.168.1.1. You can change it if
necessary.
Subnet Mask
Subnet mask of the LAN interface. You can enter a different
subnet mask according to the actual network environment.
Enable Gateway Isolate
After the gateway isolation is enabled, PCs on the LAN side
cannot communicate with each other directly among
different gateways.
Enable DHCP Server Enable or disable the DHCP server.
IP Pool Starting
Address
The first address in a consecutive IP address pool.
IP Pool Ending Address The last address in a consecutive IP address pool.
IP Pool Subnet Mask
The subnet mask of the IP pool is the same as that of the
PLC wireless router.
Page 46

F@st Plug 502W PLC Wireless Router
- 44 -
Field Description
DHCP Lease Time
After the DHCP lease time is over, the PLC wireless router
automatically assigns new IP addresses for all connected
computers.
Domain Name Server
Assignment
You can manually enter the IP address of domain name
server or let the DNS server automatically assign one to your
router.
Domain Name Server
(Primary) IP
Enter the IP address of the primary DNS server. Domain
names should be resolved first by the primary DNS server.
Domain Name Server
(Secondary) IP
If the ISP provides another DNS server, enter the IP address
of DNS server. If the primary DNS server fails to resolve the
domain name, the secondary will resolve it.
After setting the parameters, click Apply to save the settings.
Time and Date
Choose SETUP > Time and Date, and the following page appears.
In this page, you can set the Network Time Protocol (NTP) server and your local time zone,
for updating and maintaining the router time.
After enabling the Internet time servers, select the proper time servers and your local time
zone, and then click Apply to save the settings.
When the PLC wireless router connects to the Internet, the router time will synchronize with
the time of selected time zone.
Page 47

PLC Wireless Router F@st Plug 502W
- 45 -
Logout
Choose SETUP > Logout to log out of the Web configuration page, and the following page
appears.
Page 48

F@st Plug 502W PLC Wireless Router
- 46 -
Advanced Settings
DoS Protection
DoS (Denial of Service) is a most common type of network attack. A DoS attack is launched
by a hacker to prevent legal users from using services, usually by overloading a system
server or crashing the system.
Choose ADVANCED > Dos Protection, and the following page appears.
Tick the checkbox “Enable Attack Prevent”, and the following page appears.
In this page, you may enable or disable firewall configuration such as ICMP Echo, Fraggle
and Echo Chargen.
Page 49
PLC Wireless Router F@st Plug 502W
- 47 -
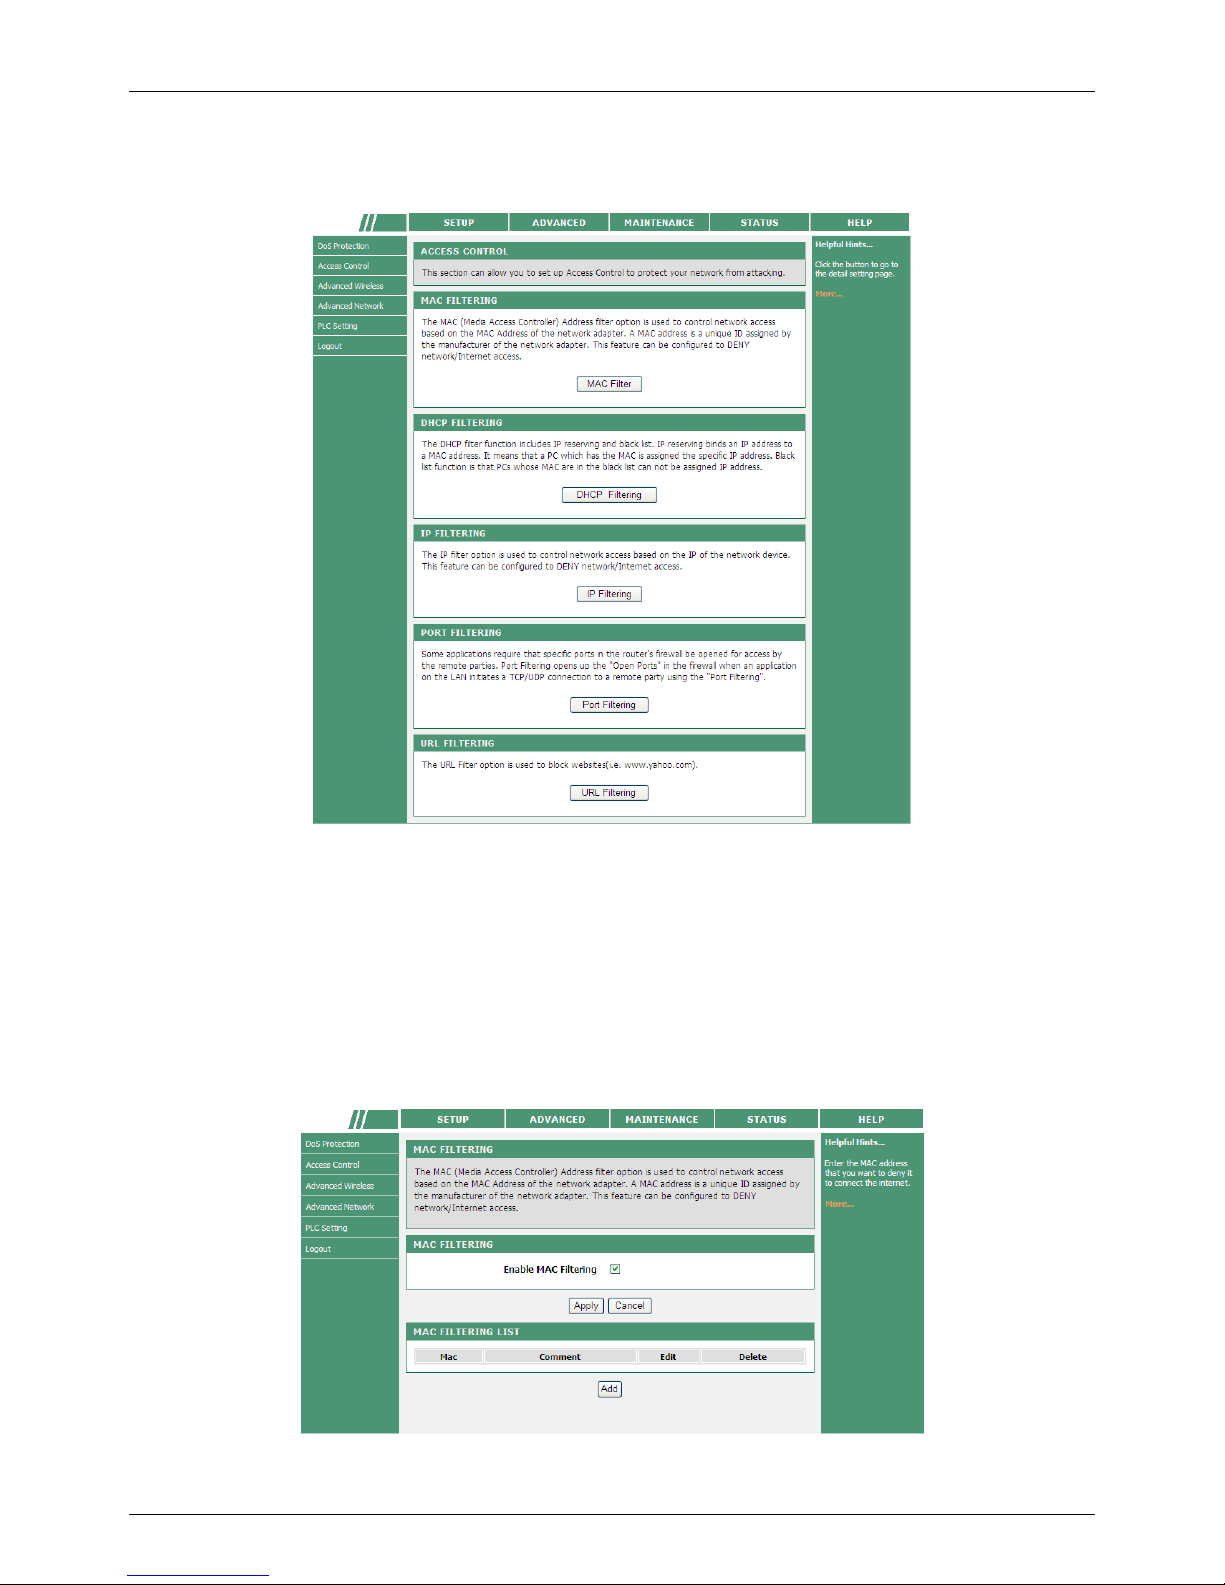
Access Control
Choose ADVANCED > Access Control, and the following page appears.
MAC Filter
MAC (Media Access Control) address filter is used to filter the transmission data according to
the physical address of wireless network card. In this page, you can add the MAC addresses
of devices to the MAC filtering list. The devices in the MAC filtering list are not allowed to
access the Internet.
Click ADVANCED > Access Control > MAC Filter to enter the MAC Filtering page, and then
check Enable MAC Filtering, and the following page appears.
Page 50

F@st Plug 502W PLC Wireless Router
- 48 -
Click Add to display the following page.
The following table describes parameters in this page:
Field Description
MAC
Enter the MAC address of the device that is not allowed to
access the Internet.
Comment Enter the comment about the MAC filtering rule.
After setting the parameters, click Apply to save the settings.
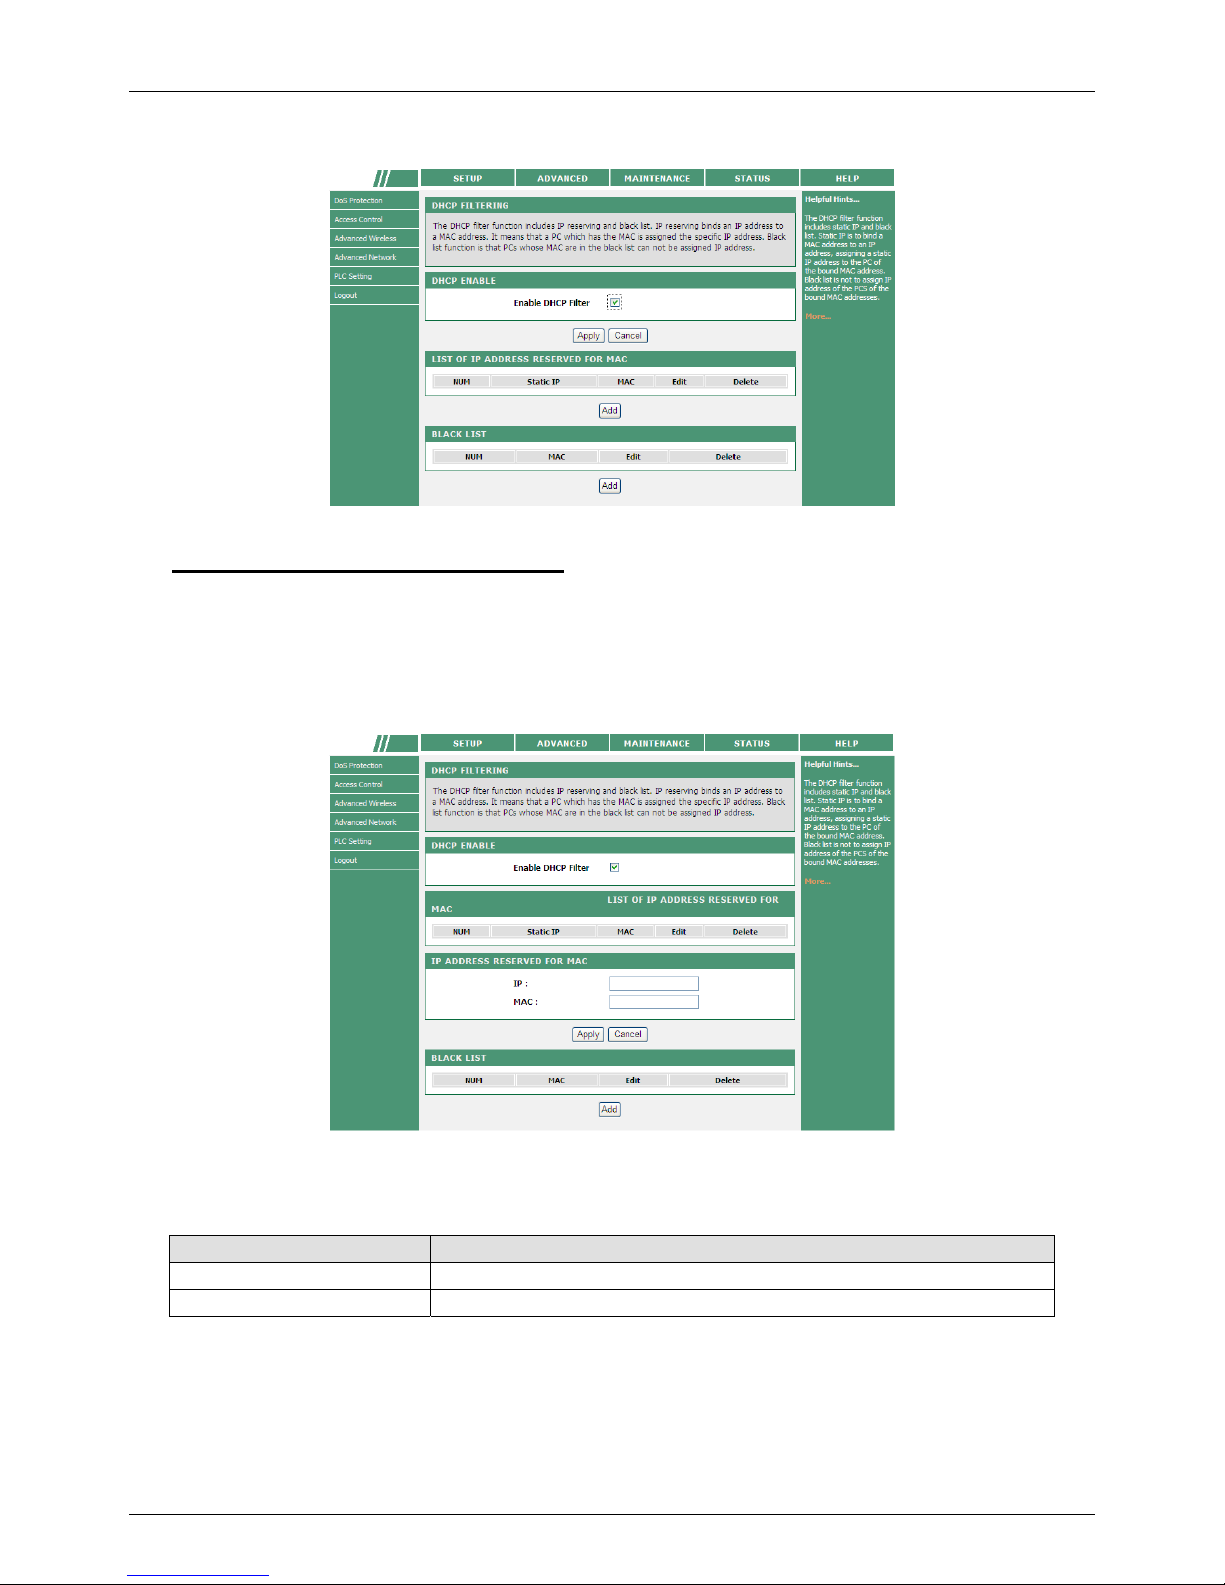
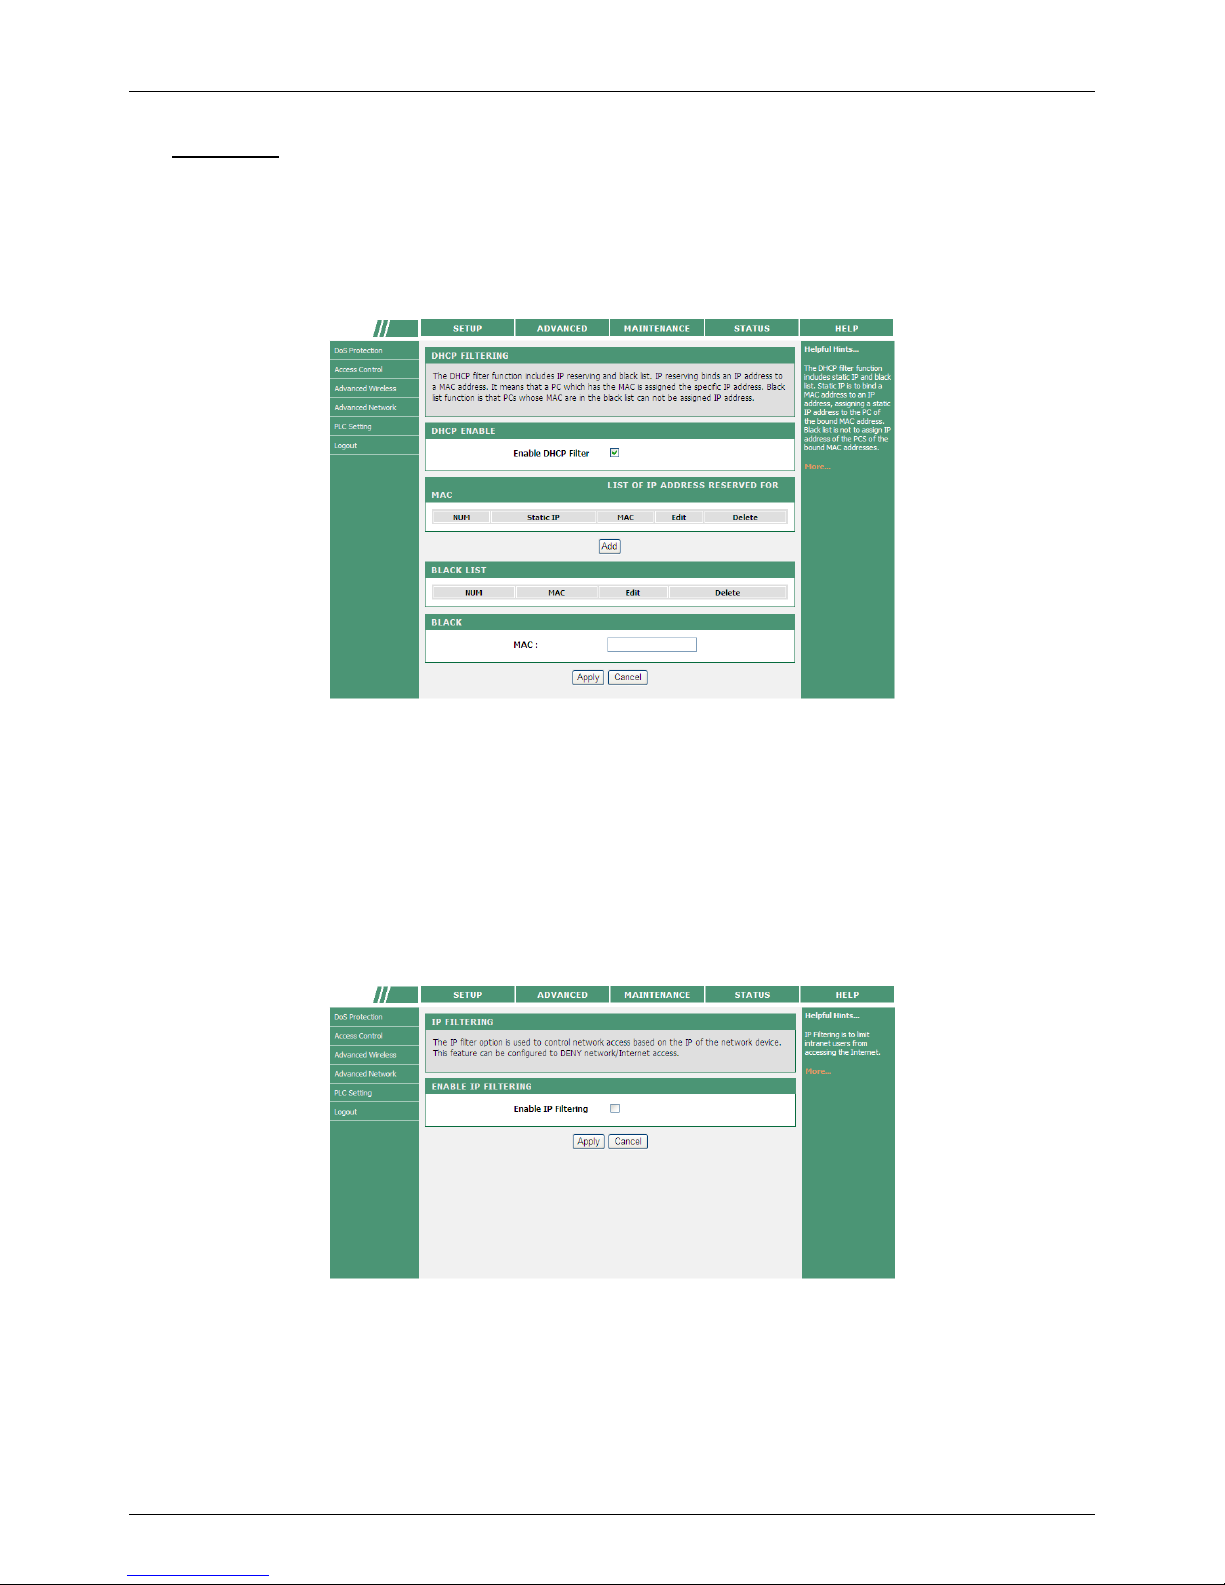
DHCP Filtering
DHCP filtering realizes network access control based on the IP addresses of network
devices.
Click ADVANCED > Access Control > DHCP Filtering, and the following page appears.
Page 51
PLC Wireless Router F@st Plug 502W
- 49 -
Check Enable DHCP Filter, and the following page appears.
List of IP Address Reserved for MAC
If a MAC address of a LAN device is consistent with the specified MAC address, the PLC
wireless router assigns the bound IP address to the device.
Click Add under the LIST OF IP ADDRESS RESERVED FOR MAC to display the following
page.
The following table describes the paramters for configuring an IP address reserved for a
MAC address:
Field Description
IP Enter an IP address for binding to a MAC address.
MAC Enter a MAC address for binding to an IP.
Page 52
F@st Plug 502W PLC Wireless Router
- 50 -
Black List
The black list means that if a MAC address of a LAN device is not consistent with the
specified MAC address, the PLC wireless router does not assign the bound IP address to the
device.
Click Add under the black list to display the following page.
In this page, enter the MAC address of the LAN device.
After setting the parameters, click Apply to save the settings.
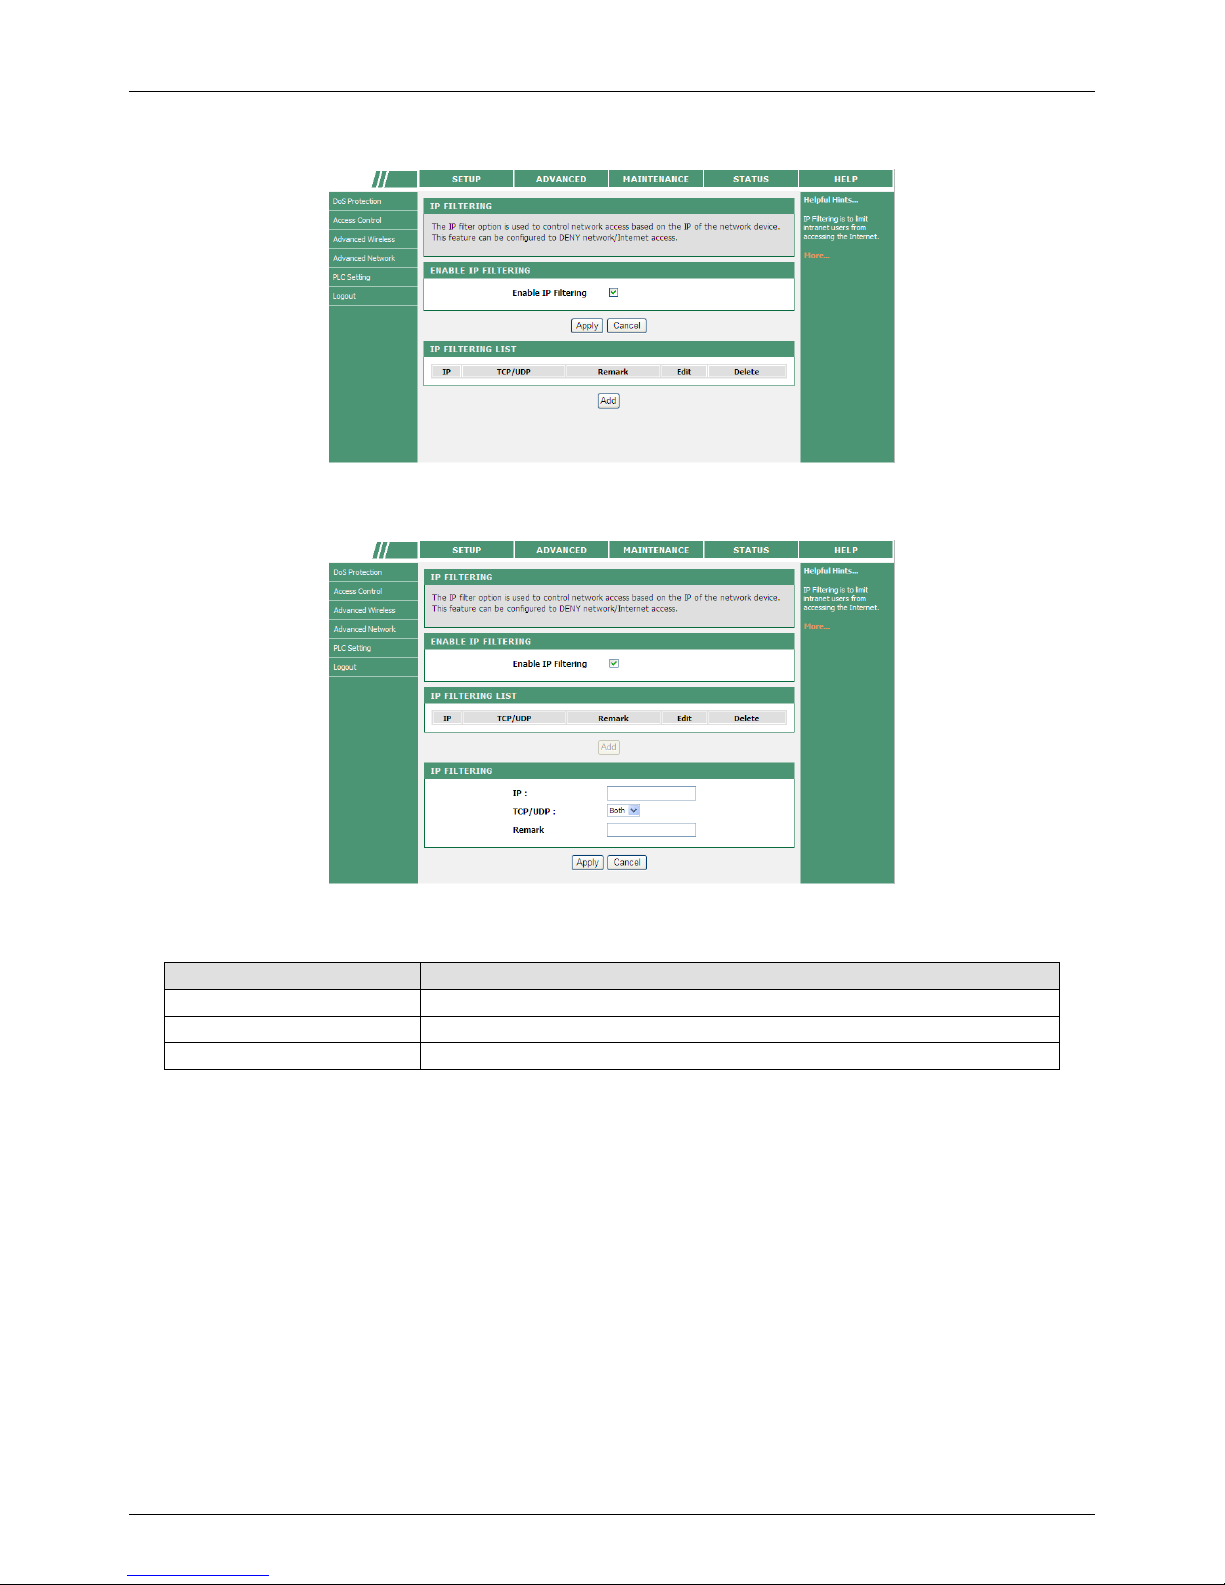
IP Filtering
The IP filter function can prevent the internal users from accessing the Internet.
Choose ADVANCED > Access Control > IP Filtering, and the following page appears.
Page 53
PLC Wireless Router F@st Plug 502W
- 51 -
Check Enable IP Filtering, and the following page appears.
Click Add to display the following page.
The following table describes parameters in this page:
Field Description
IP Enter the computer IP address that needs to be filtered.
TCP/UDP You can select TCP, UDP, or Both.
Remark Enter the comment about the IP filtering rule.
After setting the parameters, click Apply to save the settings.
Page 54

F@st Plug 502W PLC Wireless Router
- 52 -
Port Filtering
The port filtering function allows you to control all data transmitted through the PLC wireless
router. If a PC’s port is in the specified range of port filtering, data from this port cannot be
transmitted.
Choose ADVANCED > Access Control > Port Filtering to display the following page.
Check Enable Port Filtering, and the following page appears.
Click Add to display the following page.
Page 55

PLC Wireless Router F@st Plug 502W
- 53 -
The following table describes parameters in this page:
Field Description
Port Range Enter the port filtering range.
TCP/UDP You may select TCP, UDP, or Both.
Remark Enter the comment about the port filtering rule.
After setting the parameters, click Apply to save the settings.
URL Filtering
URL filtering function is used to block some websites that you do not want the LAN users to
access.
Choose ADVANCED > Access Control > URL Filtering to display the following page.
Check Enable URL Filtering, and the following page appears.
Page 56
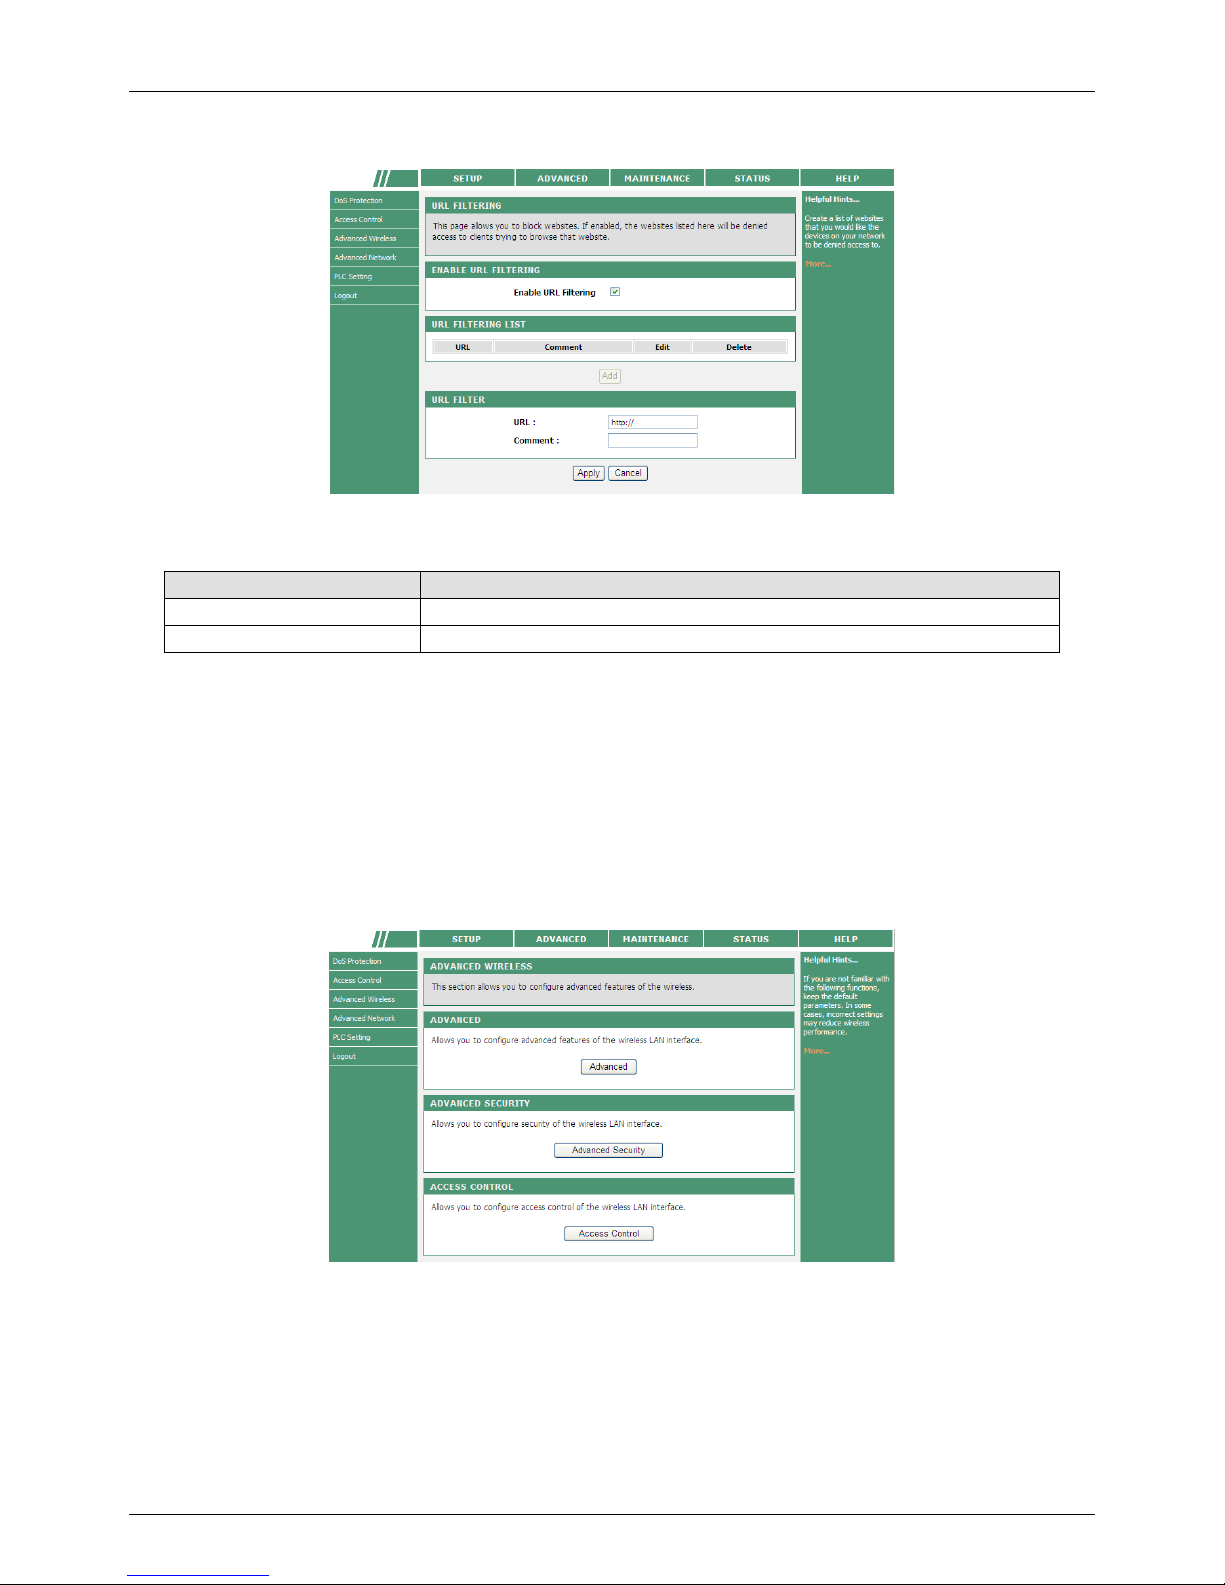
F@st Plug 502W PLC Wireless Router
- 54 -
Click Add to display the following page.
The following table describes parameters in this page:
Field Description
URL Enter the URL that needs to be filtered.
Comment Enter the comment about the URL filtering rule.
After setting the parameters, click Apply to save the settings.
Advanced Wireless
Usually, it is not recommended to modify the default settings of advanced wireless
configuration page. The default settings can provide the optimal wireless performance.
Improper modifications may influence the wireless performance.
Choose ADVANCED > Advanced Wireless, and the following page appears.
Page 57
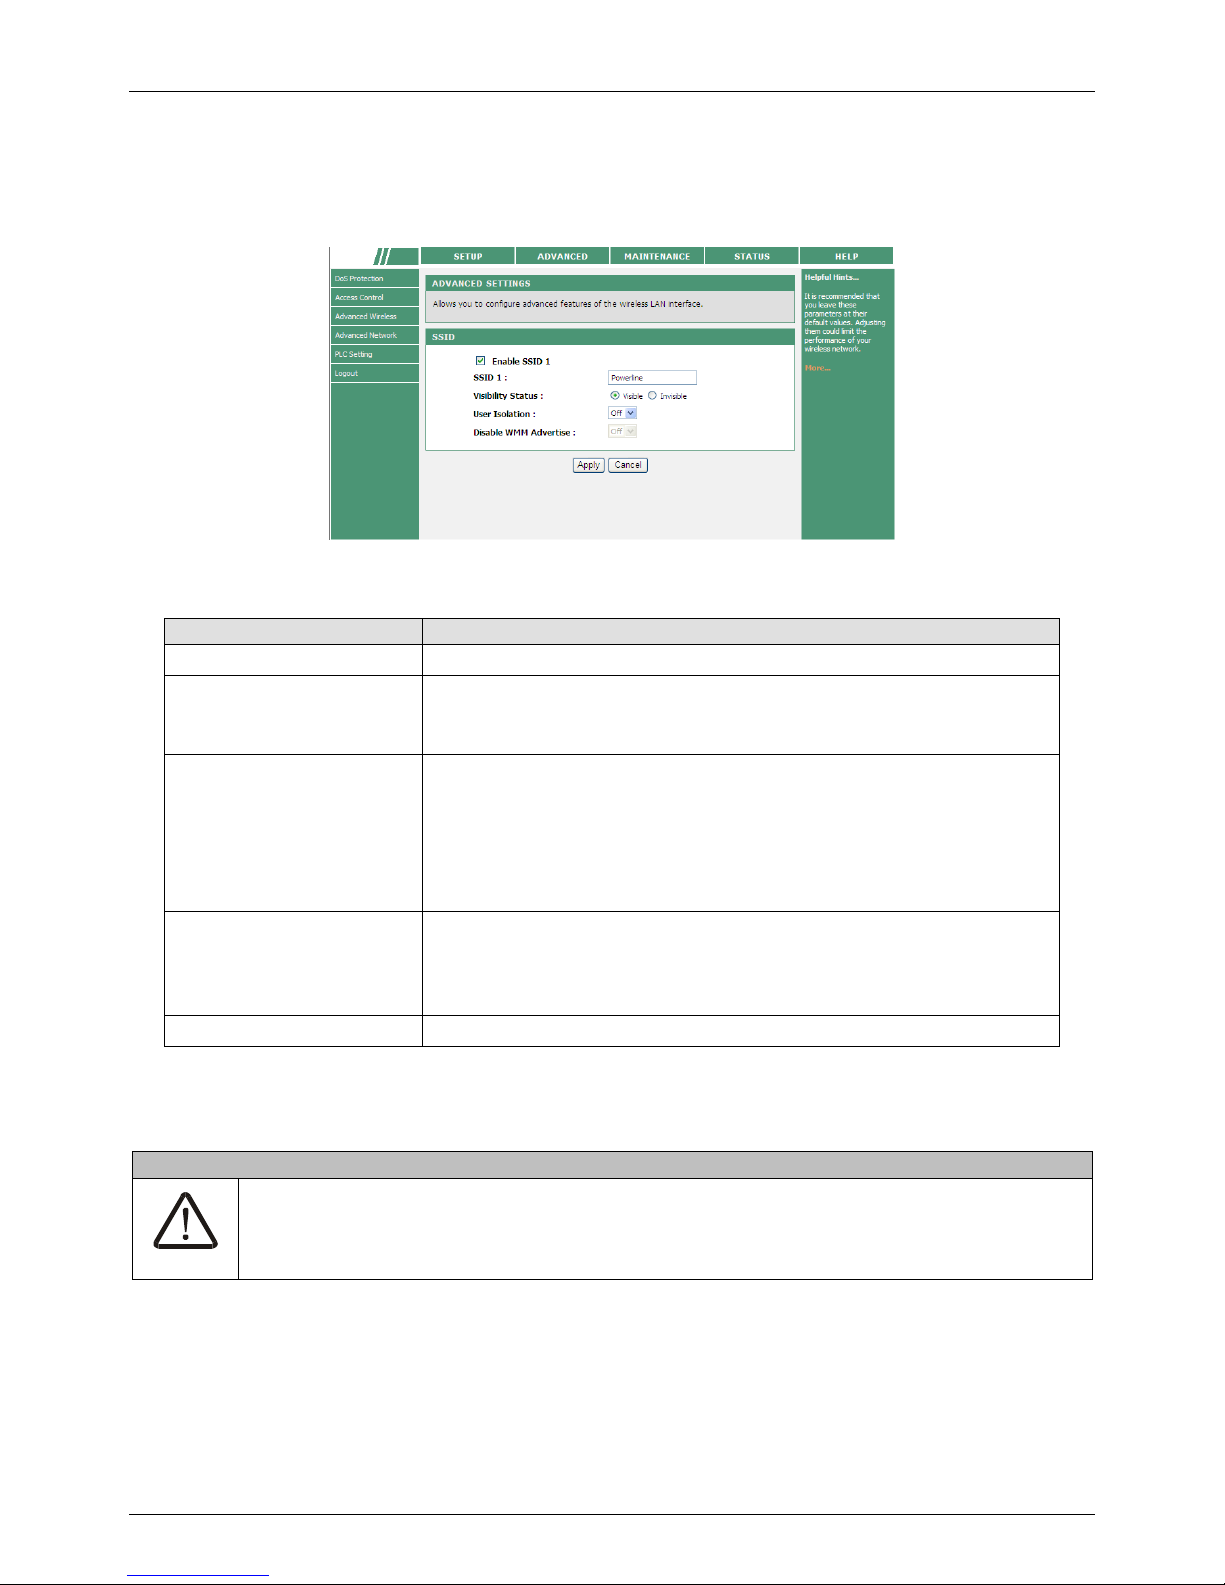
PLC Wireless Router F@st Plug 502W
- 55 -
Advanced Wireless Settings
Choose Advanced Wireless > Advanced on the left pane or click Advanced in the
ADVANCED WIRELESS page to display the following page.
The following table describes parameters in this page:
Field Description
Enable Wireless Enable or disable the wireless function.
Wireless Network Name
(SSID)
Set the network name. The SSID can contain up to 32
characters and can be letters, numerals, underlines, and any
combinations of them. The SSID is case-sensitive.
Visibility Status
If Visible is selected, the PLC wireless router broadcasts its
SSID on the wireless network, and the clients can scan the
SSID.
If Invisible is selected, the PLC wireless router does not
broadcast its SSID on the wireless network and the clients
cannot scan the SSID.
User Isolation
On indicates that the computers wirelessly connecting to the
same SSID cannot communicate with each other.
Off indicates that the computers wirelessly connecting to the
same SSID can communicate with each other.
Disable WMM Advertise This function is not available.
After setting the parameters, click Apply to save the settings.
Caution
The settings in this page only apply to professional users who have deeper
understanding in the wireless LAN. If you are not aware of the impact caused by the
modification, please do not modify the settings in this page.
Page 58

F@st Plug 502W PLC Wireless Router
- 56 -
Advanced Security
Choose Advanced Wireless > Advanced Security on the left pane or click Advanced Security
in the ADVANCED WIRELESS page to display the following page.
For the parameters in this page, refer to 0 Wireless Security Settings.
Access Control
Choose Advanced Wireless > Access Control on the left pane or click Access Control in the
ADVANCED WIRELESS page to display the following page.
In this page, you can configure the access control settings of the wireless LAN interface.
Page 59

PLC Wireless Router F@st Plug 502W
- 57 -
Click Add to display the following page.
The following table describes parameters in this page:
Field Description
Wireless SSID Select a port name of wireless SSID from the drop-down list.
Access control Mode You can select Disable, Allow or Deny.
MAC Enter the MAC address that needs to be filtered in the WLAN.
Comment Enter the comment about the filtering rule.
After setting the parameters, click Apply to save the settings.
Advanced Network
Choose ADVANCED > Advanced Network, and the following page appears.
Page 60

F@st Plug 502W PLC Wireless Router
- 58 -
Static Routing
Static routing is a special routing type. Applying proper static routing rules on a network can
reduce the routing problems, improve the overload of routing traffic, and increase the
forwarding speed of data packets. You can set the destination IP address, subnet mask, and
gateway to specify a routing rule. The destination IP address and subnet mask are used to
determine a destination network or a host. Then, the router sends the data packets to the
specified destination network or host through the gateway.
Choose Advanced Network > Static Routing on the left pane or click Static Routing in the
ADVANCED NETWORK page to display the following page.
In this page, you can set the static routing rules.
Click Add to display the following page.
The following table describes parameters in this page:
Field Description
Destination Network
Address
Set the IP address of destination network.
Subnet Mask Set the subnet mask of the destination IP address.
Use Gateway IP
Address
Set the IP address of host or router that data packets are sent to.
Forwarding Metric
Set the number of forwarding hops that network data packets are
forwarded by the router.
Page 61

PLC Wireless Router F@st Plug 502W
- 59 -
Field Description
Use Interface Select a local legal interface for the routing rule.
After setting the parameters, click Apply to save the settings.
UPnP
By using the Universal Plug and Play (UPnP) protocol, a host on the LAN side can require
the router to realize the conversion of specific port, so that an external host can access
resources on the internal host when necessary.
For example, if MSN Messenger is installed on Windows ME and Windows XP operating
systems, UPnP can be used for audio and video conversations. In this way, functions
restricted by NAT can work properly.
Choose Advanced Network > UPnP on the left pane or click UPnP in the ADVANCED
NETWORK page to display the following page.
In this page, you can enable the UPnP function and select a WAN connection.
After setting the parameters, click Apply to save the settings.
Note
UPnP is widely used in video and audio software. It can automatically search a
device on the network. If you worry about the security problems caused by UPnP,
you may disable UPnP.
IGMP
IGMP snooping is used to manage and control multicast. When a layer-2 Ethernet switch
receives an IGMP message transmitted between a host and the router, IGMP Snooping
analyzes the message to establish and maintain MAC multicast address list, and the
multicast message issued by the router will be forwarded according to the list. This
decreases traffic flooding at the port of receiver that has not registered as a multicast group.
IGMP Proxy enables the device to capture IGMP messages from the host machine via
Ethernet interfaces and send the messages via the WAN interface. When this function is
enabled, this device acts as a proxy agent of the host machine.
Page 62

F@st Plug 502W PLC Wireless Router
- 60 -
Click Advanced Network > IGMP on the left pane or click IGMP in the ADVANCED
NETWORK page to display the following page.
In this page, you may choose to enable or disable IGMP Snooping and IGMP Proxy.
When IGMP Snooping is enabled, only the host machines in multicast groups receive
multicast packets. Once the host machines are not in the groups, they no longer receive
multicast packets.
When IGMP Proxy is enabled, you may choose to enable or disable IGMP proxy of WAN
connection.
After configuration, click Apply to save the settings.
DDNS
DDNS service realizes the mapping of dynamic IP addresses to a fixed host name. All users
on the Internet may access this host using the name. The ISP assigns IP address via DHCP,
therefore it is difficult to find a specific host in a LAN via DNS.
For example, when you use a public Web server or VPN server in a LAN, you can ensure a
host be found when its IP address changes through using DDNS service.
Click Advanced Network > DDNS on the left pane or click DDNS in the ADVANCED
NETWORK page to display the following page.
In this page, you can configure DDNS parameters.
Page 63

PLC Wireless Router F@st Plug 502W
- 61 -
The following table describes parameters in this page:
Field Description
Enable Dynamic
DNS
Enable or disable dynamic DNS.
Server Address
Select a DDNS provider from “oray.cn” and “dyndns.org”
according to your actual server.
Hostname Input the host name used to register to the DDNS supplier.
Username Input the username of your DDNS account.
Password Input the password of your DDNS account.
Confirm Password Input your DDNS password again.
After setting, click “Apply” to save the settings.
PLC Setting
Choose ADVANCED > PLC Setting, and the following page appears.
In this page, you can configure the parameters of PLC settings.
Local Device Configuration
The Local Device Configuration allows you to configure the local network password and to
view the information of the local device such as MAC, and firmware version.
WAN Port Switch
WAN port switch function is used to switch the WAN interface of the PLC router. Check the
Ethernet Port, and then the LAN2 interface serves as a WAN interface. Check PLC Power
Line, and the two LAN interfaces still serve as the LAN interfaces, and the power line
interface serves as a WAN interface.
Page 64

F@st Plug 502W PLC Wireless Router
- 62 -
Remote Device Configuration
The Remote Device Configuration allows you to view the configuration of the remote PLC
devices and to set the network passwords of the remote devices.
You can search current remote PLC devices by clicking the Scan button.
Select Enable from the drop-down list of Change Remote NetworkPwd to display the
following page.
You can set the passwords of remote PLC devices according to their MAC addresses and
DEKs (Device Equipment Key).
The following table describes parameters in this page:
Field Description
Device Name Enter the names of the remote devices.
Remote MAC Enter the MAC addresses of the remote devices.
Password (DEK)
When you set the parameters of the remote devices, you need to
enter this password for authentication.
Remote NetworkPwd Set the network passwords for the remote PLC devices.
Note
You can set up to 8 network passwords for the remote PLC devices.
You can access the Internet by network password synchronization. But network
passwords of the two devices for password synchronization must be the same, and
either of the PLC devices must be connected to the Internet.
Page 65
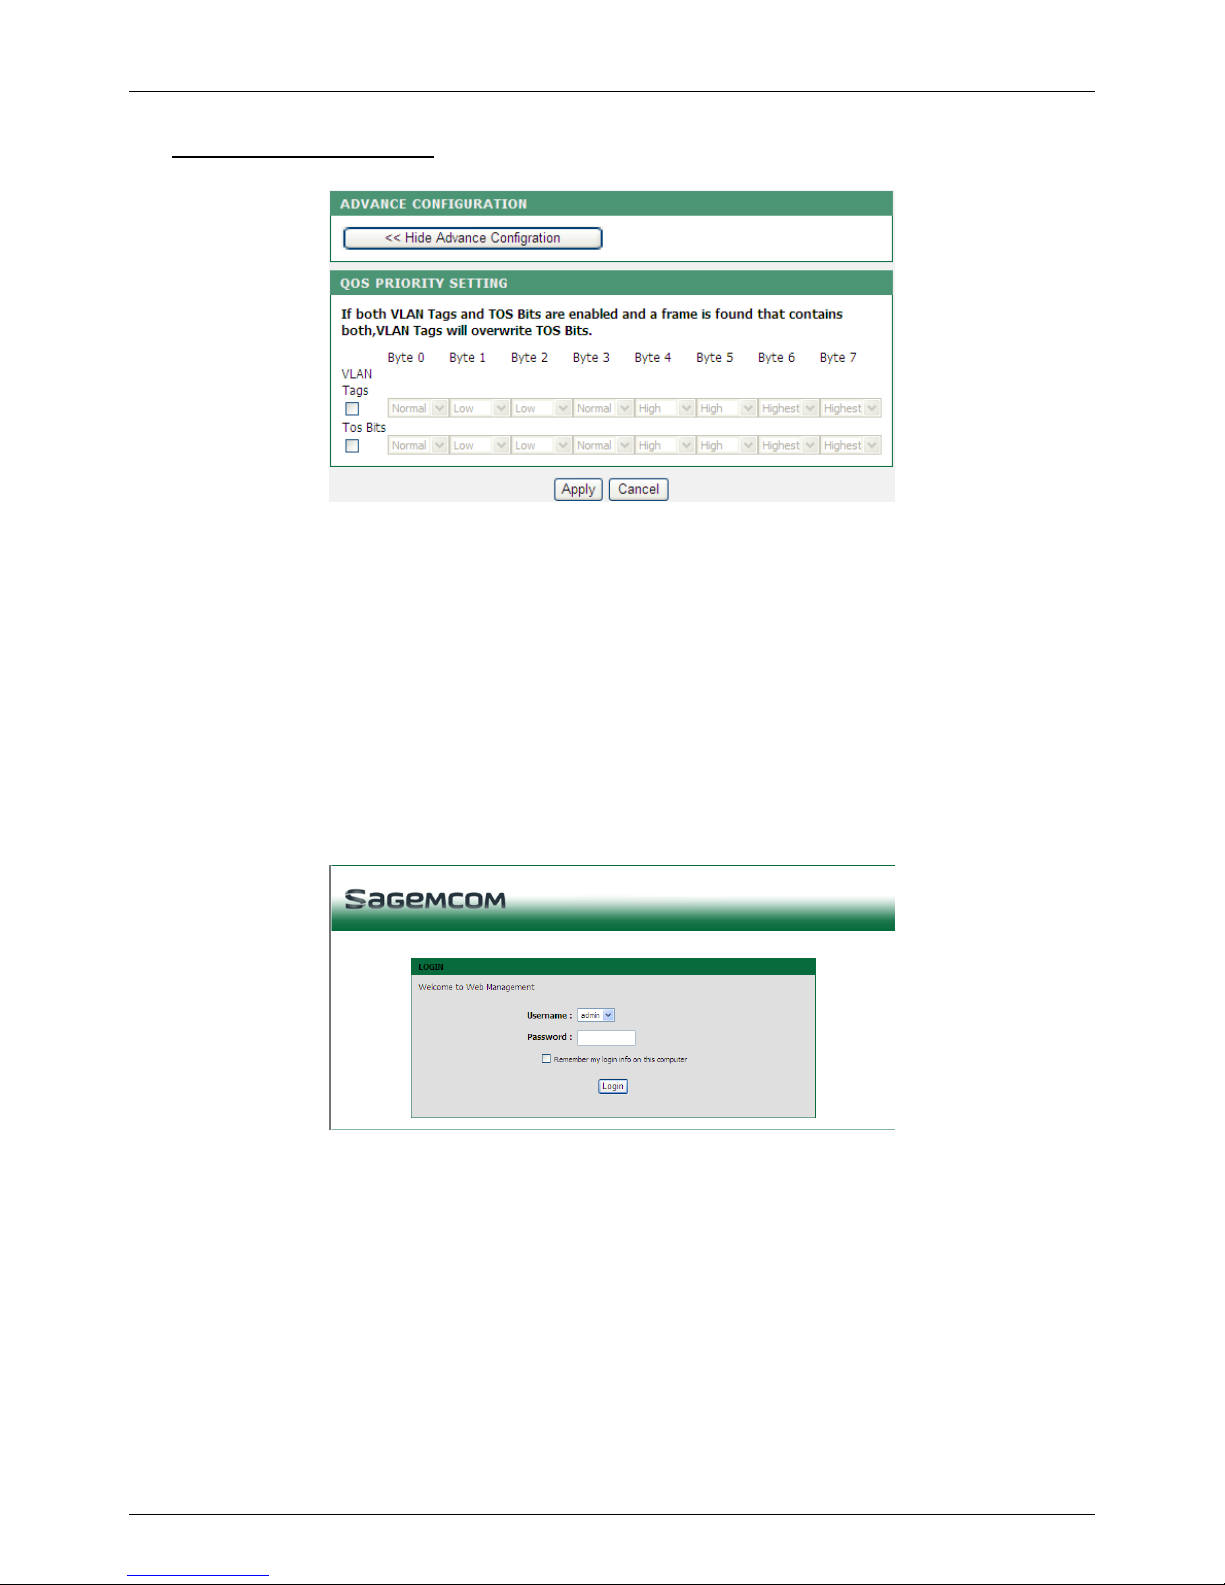
PLC Wireless Router F@st Plug 502W
- 63 -
Advanced Configuration
QoS priority settings in this page only apply to PLC data stream. QoS function contains
VLAN tag and ToS tag. Each VLAN tag or ToS tag contains 8 bits and defines 4-level QoS
priority settings.
By default, QoS priority settings are hidden.
After setting the parameters, click Apply to save the settings.
Logout
Choose SETUP > Logout to log out of the Web configuration page, and the following page
appears.
Page 66

F@st Plug 502W PLC Wireless Router
- 64 -
Maintenance
Device Management
Choose MAINTENANCE > Device Management, and the following page appears.
In this page, you can modify the password for logging in to the PLC wireless router, set Web
idle timeout, and enable or disable the WAN connection service.
Account Password
In order to ensure the network security, it is recommended that you change the default login
password. Please remember the new password if you change the default password. You
may write it down and keep it well for future use. If you forget the login password, you need
to restore the factory default settings of the PLC wireless router. After the default settings are
restored, the PLC router will lose the new settings that you configure.
Note
For the sake of network security, it is strongly recommended to change the
password of admin. If you forget the login password, please restore the factory
default settings of the PLC wireless router. The default user name and password of
the super user are admin.
Web Idle Time Out
Web idle timeout setting is used to set the time for system automatically exiting the Web
configuration page. The range is 5~30 minutes.
Services
If you have established some WAN connections, you may enable or disable the service
types of the selected WAN connections. You can also enable or disable the service types of
remote hosts. For example, enable the Telnet service, and then the remote host can log in to
the PLC wireless router by the Telnet service.
After setting the parameters, click Apply to save the settings.
Page 67

PLC Wireless Router F@st Plug 502W
- 65 -
Note
If HTTP service is disabled, you are not allowed to log in to the Web configuration
page of the PLC wireless router.
Backup and Restore
Choose MAINTENANCE > Backup and Restore, and the following page appears.
In this page, you can reboot the router, backup the configuration file, and restore the factory
default settings of the router.
Reboot
Click Reboot to reboot the router.
Backup Settings
Click Backup Setting and select the path to save the configuration file of the router to your
local PC.
Restore Default Settings
Click Restore to restore the factory default settings of the router. You may also press the
Reset pushbutton on the front panel for 3 seconds to restore the factory default settings of
the router.
Caution
When a configuration file is being loaded, do not power off the router. Otherwise,
the router may be damaged and fail to work.
When operating in this page, do not press the Reset pushbutton.
Page 68
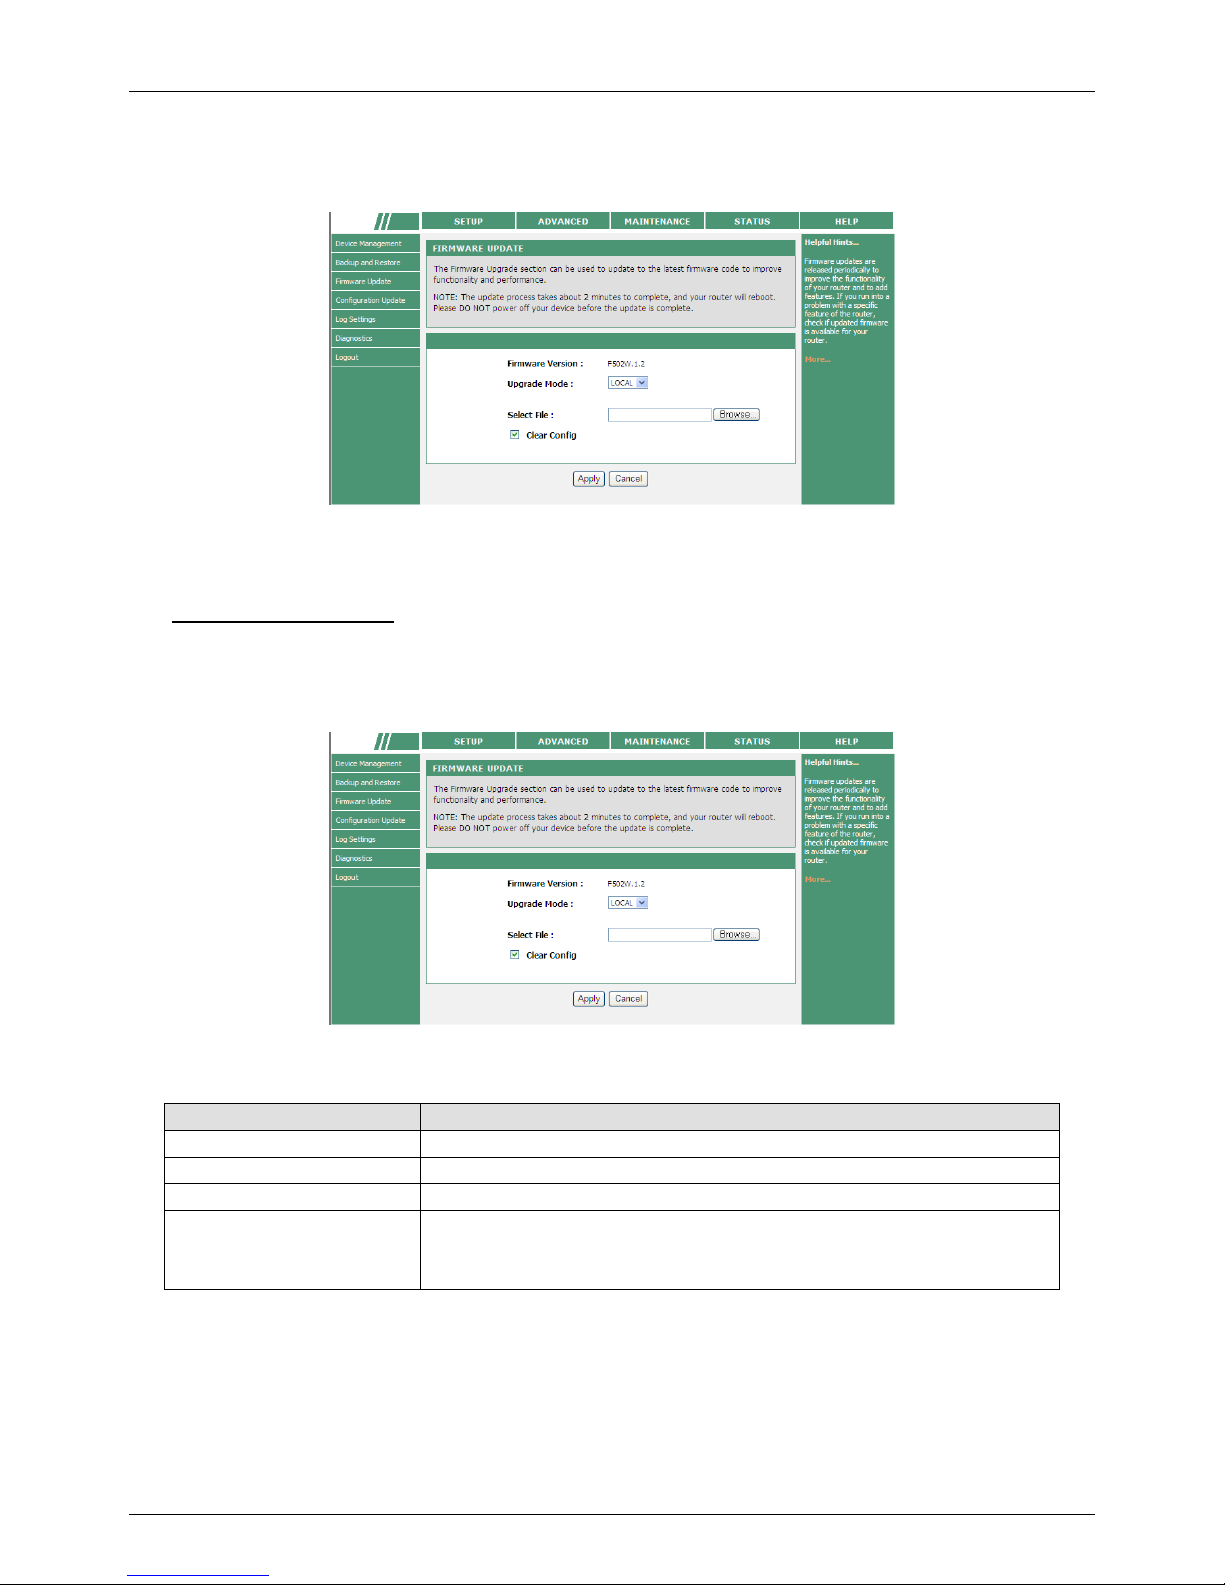
F@st Plug 502W PLC Wireless Router
- 66 -
Firmware Update
Choose MAINTENANCE > Firmware Update, and the following page appears.
In this page, you can update the firmware version of the PLC wireless router. You may obtain
the firmware from the local server or remote server.
Local Upgrade Mode
Usually, you can upgrade firmware from the local server.
If you select LOCAL from the drop-down list of upgrade mode, the following page appears.
The following table describes parameters in this page:^
Field Description
Firmware Version Display current firmware version.
Upgrade Mode Select LOCAL.
Select File Click Browse… to navigate to the latest firmware.
Clear Config
If you check Clear Config, the PLC router restores to the
default settings after upgrade. Otherwise, the PLC router
keeps the current settings.
Page 69
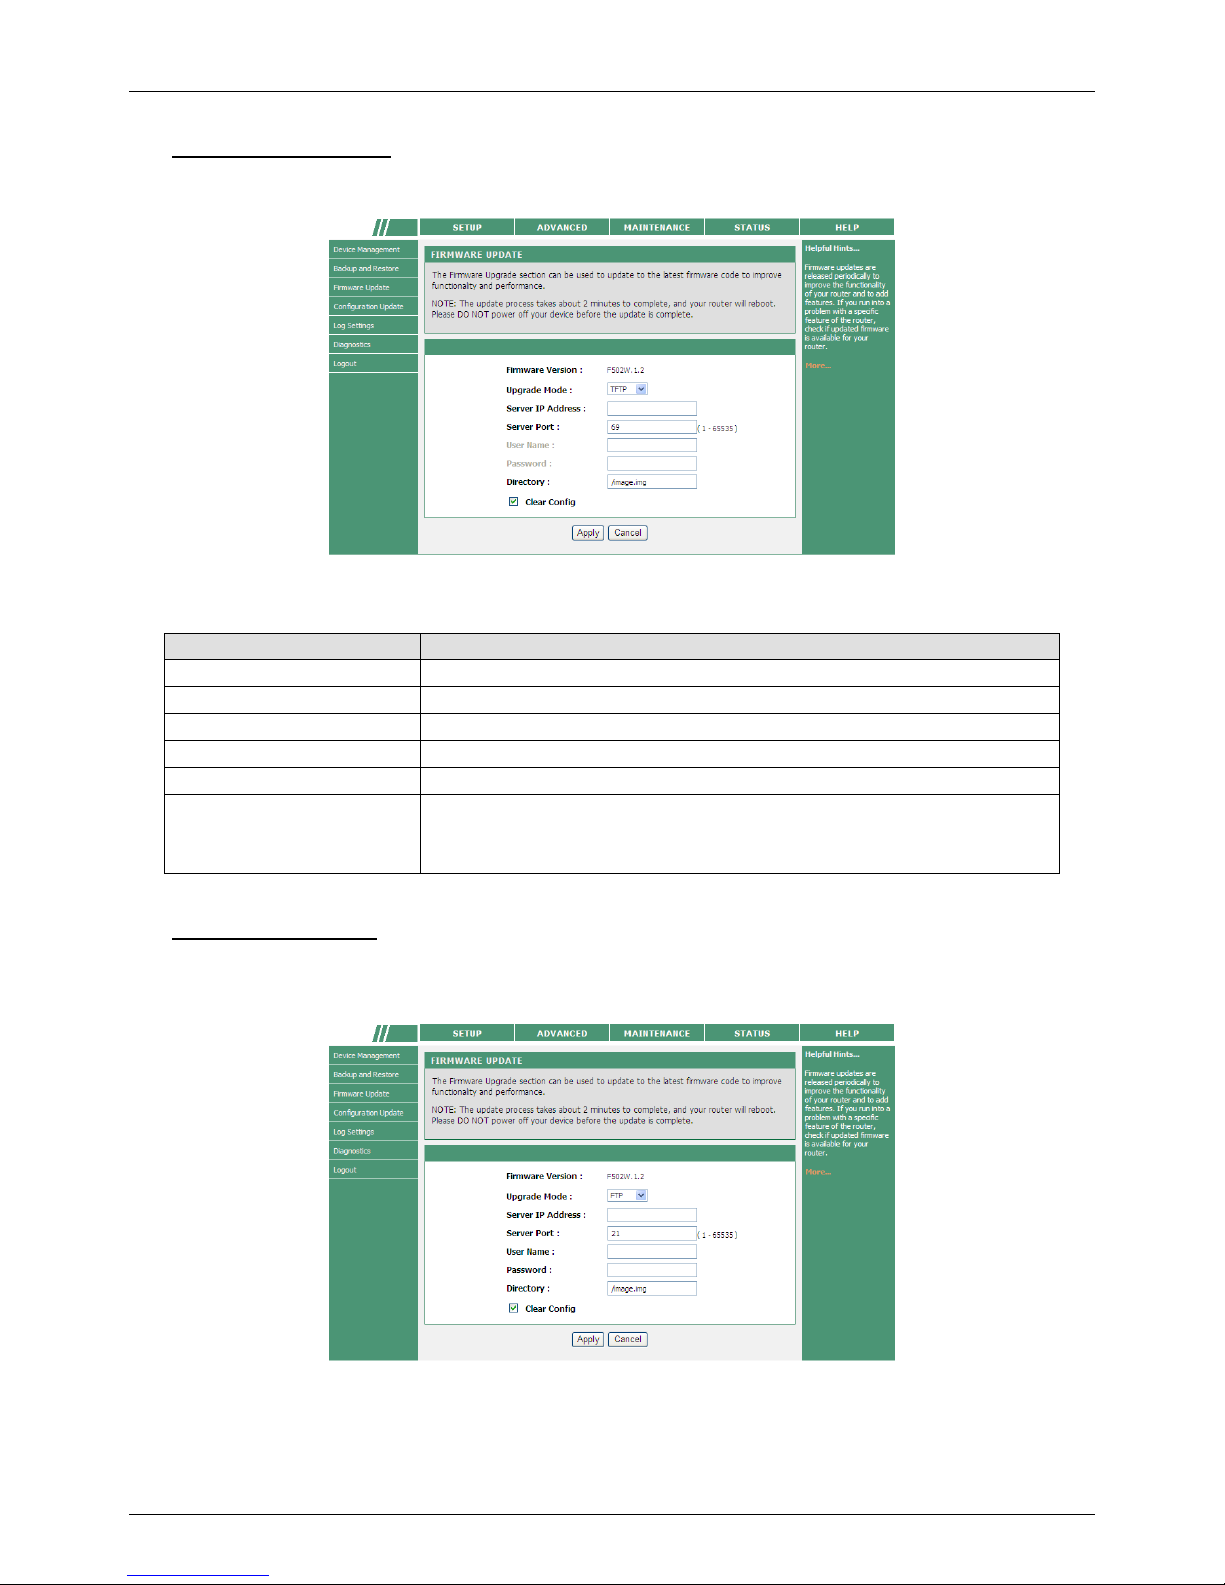
PLC Wireless Router F@st Plug 502W
- 67 -
TFTP Upgrade Mode
If you select TFTP from the drop-down list of upgrade mode, the following page appears.
The following table describes parameters in this page:
Field Description
Firmware Version Display current firmware version.
Upgrade Mode Select TFTP.
Server IP Address Enter the IP address of TFTP server.
Server Port Enter the port number of TFTP server.
Directory Enter the firmware directory.
Clear Config
If you check Clear Config, the PLC router restores to the
default settings after upgrade. Otherwise, the PLC router
keeps the current settings.
FTP Upgrade Mode
If you select FTP from the drop-down list of upgrade mode, the following page appears.
Page 70

F@st Plug 502W PLC Wireless Router
- 68 -
The following table describes parameters in this page:
Field Description
Firmware Version Display current firmware version.
Upgrade Mode Select FTP.
Server IP Address Enter the IP address of FTP server.
Server Port Enter the port number of FTP server.
User Name Enter the username for connecting to the FTP server.
Password Enter the password for connecting to the FTP server.
Directory Enter the firmware directory.
Clear Config
If you check Clear Config, the PLC router restores to the
default settings after upgrade. Otherwise, the PLC router
keeps the current settings.
HTTP Upgrade Mode
If you select HTTP from the drop-down list of upgrade mode, the following page appears.
The following table describes parameters in this page:
Field Description
Firmware Version Display current firmware version.
Upgrade Mode Select HTTP.
Server IP Address Enter the IP address of HTTP server.
Server Port Enter the port number of HTTP server.
User Name Enter the username for connecting to the HTTP server.
Password Enter the password for connecting to the HTTP server.
Directory Enter the firmware directory.
Clear Config
If you check Clear Config, the PLC router restores to the
default settings after upgrade. Otherwise, the PLC router
keeps the current settings.
Page 71
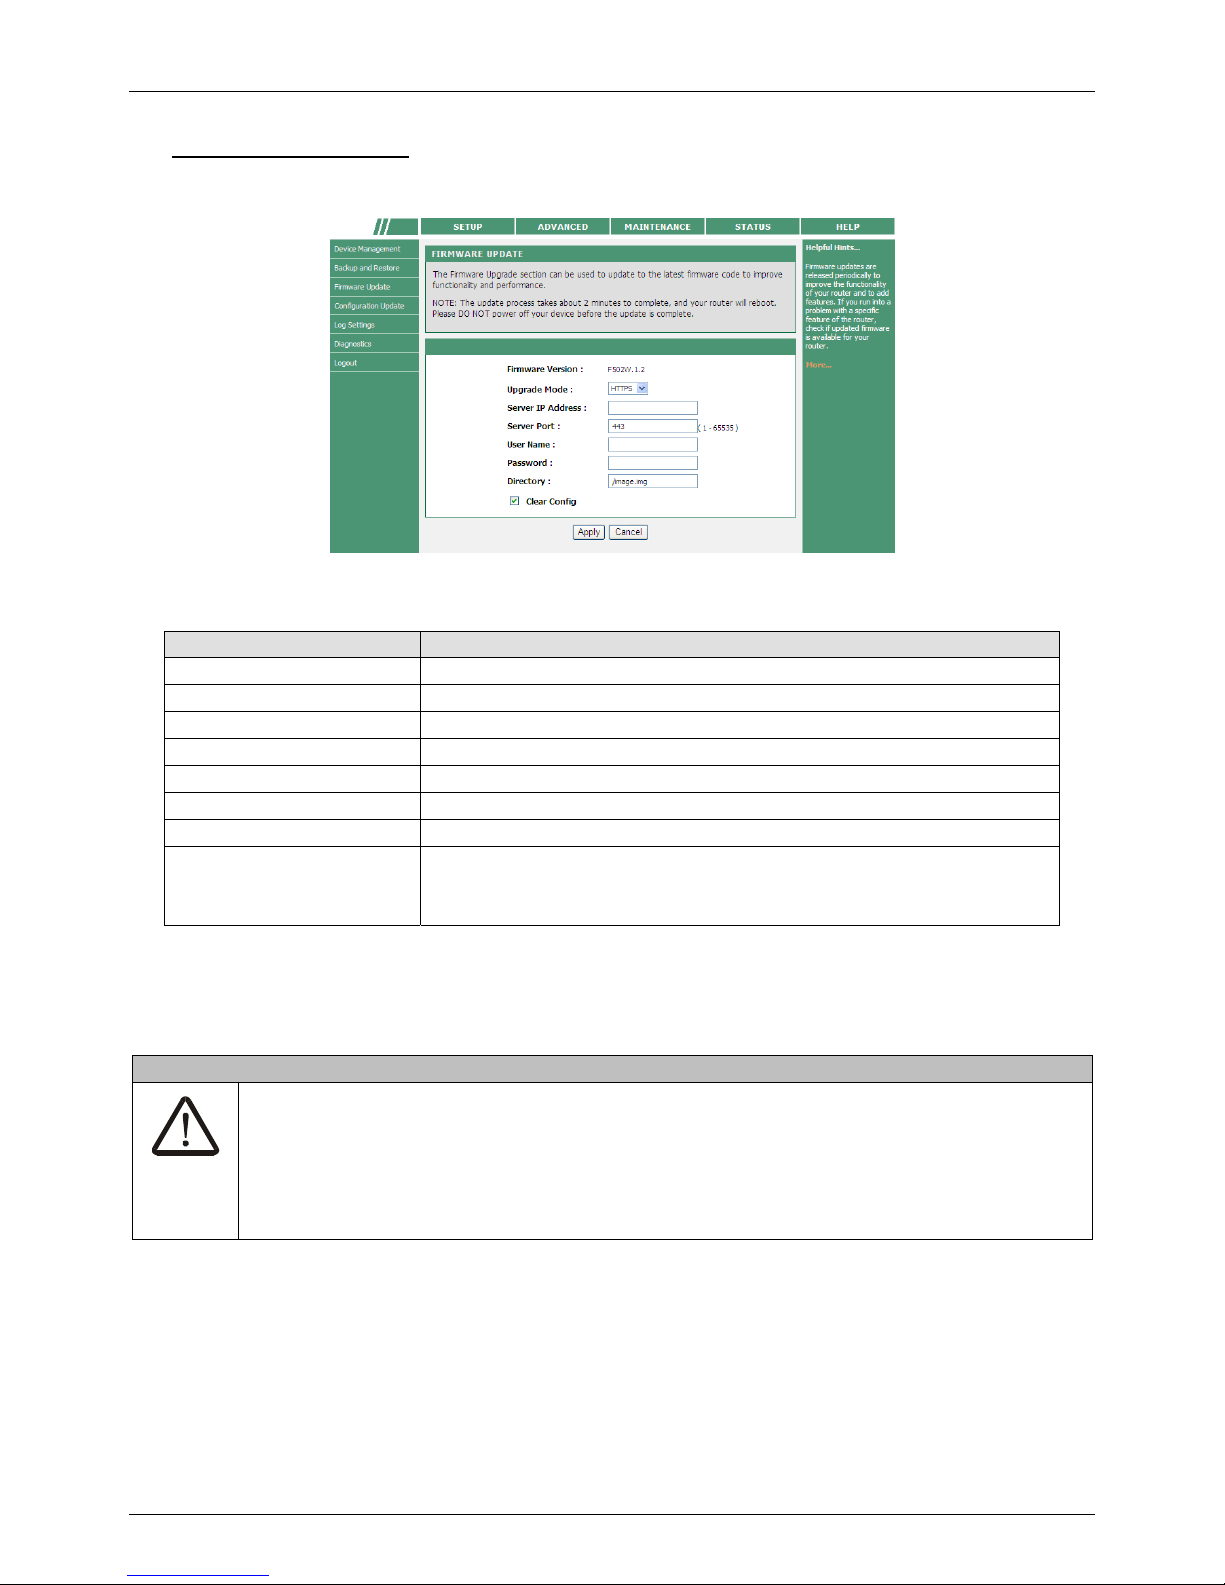
PLC Wireless Router F@st Plug 502W
- 69 -
HTTPS Upgrade Mode
If you select HTTPS from the drop-down list of upgrade mode, the following page appears.
The following table describes parameters in this page:
Field Description
Firmware Version Display current firmware version.
Upgrade Mode Select HTTPS.
Server IP Address Enter the IP address of HTTPS server.
Server Port Enter the port number of HTTPS server.
User Name Enter the username for connecting to the HTTPS server.
Password Enter the password for connecting to the HTTPS server.
Directory Enter the firmware directory.
Clear Config
If you check Clear Config, the PLC router restores to the
default settings after upgrade. Otherwise, the PLC router
keeps the current settings.
Click Apply, and then system begins to upgrade firmware.
After upgrade completes, the PLC wireless router automatically reboots.
Caution
To avoid losing previous configuration of the router, save the configuration before
upgrade.
During upgrade, do not power off the PLC wireless router or press the Reset
pushbutton.
The default upgrade mode is Local, and it supports only the firmware with the format
‘.img’.
Page 72

F@st Plug 502W PLC Wireless Router
- 70 -
Configuration Update
Choose MAINTENANCE > Configuration Update, and the following page appears.
In this page, you can update the configuration file of the PLC wireless router. You may obtain
the configuration file from the local server or remote server.
Local Upgrade Mode
Usually, you can upgrade configuration file from the local server.
If you select LOCAL from the drop-down list of upgrade mode, the following page appears.
The following table describes parameters in this page:
Field Description
Upgrade Mode Select LOCAL.
Select File Click Browse… to navigate to the latest configuration file.
Page 73
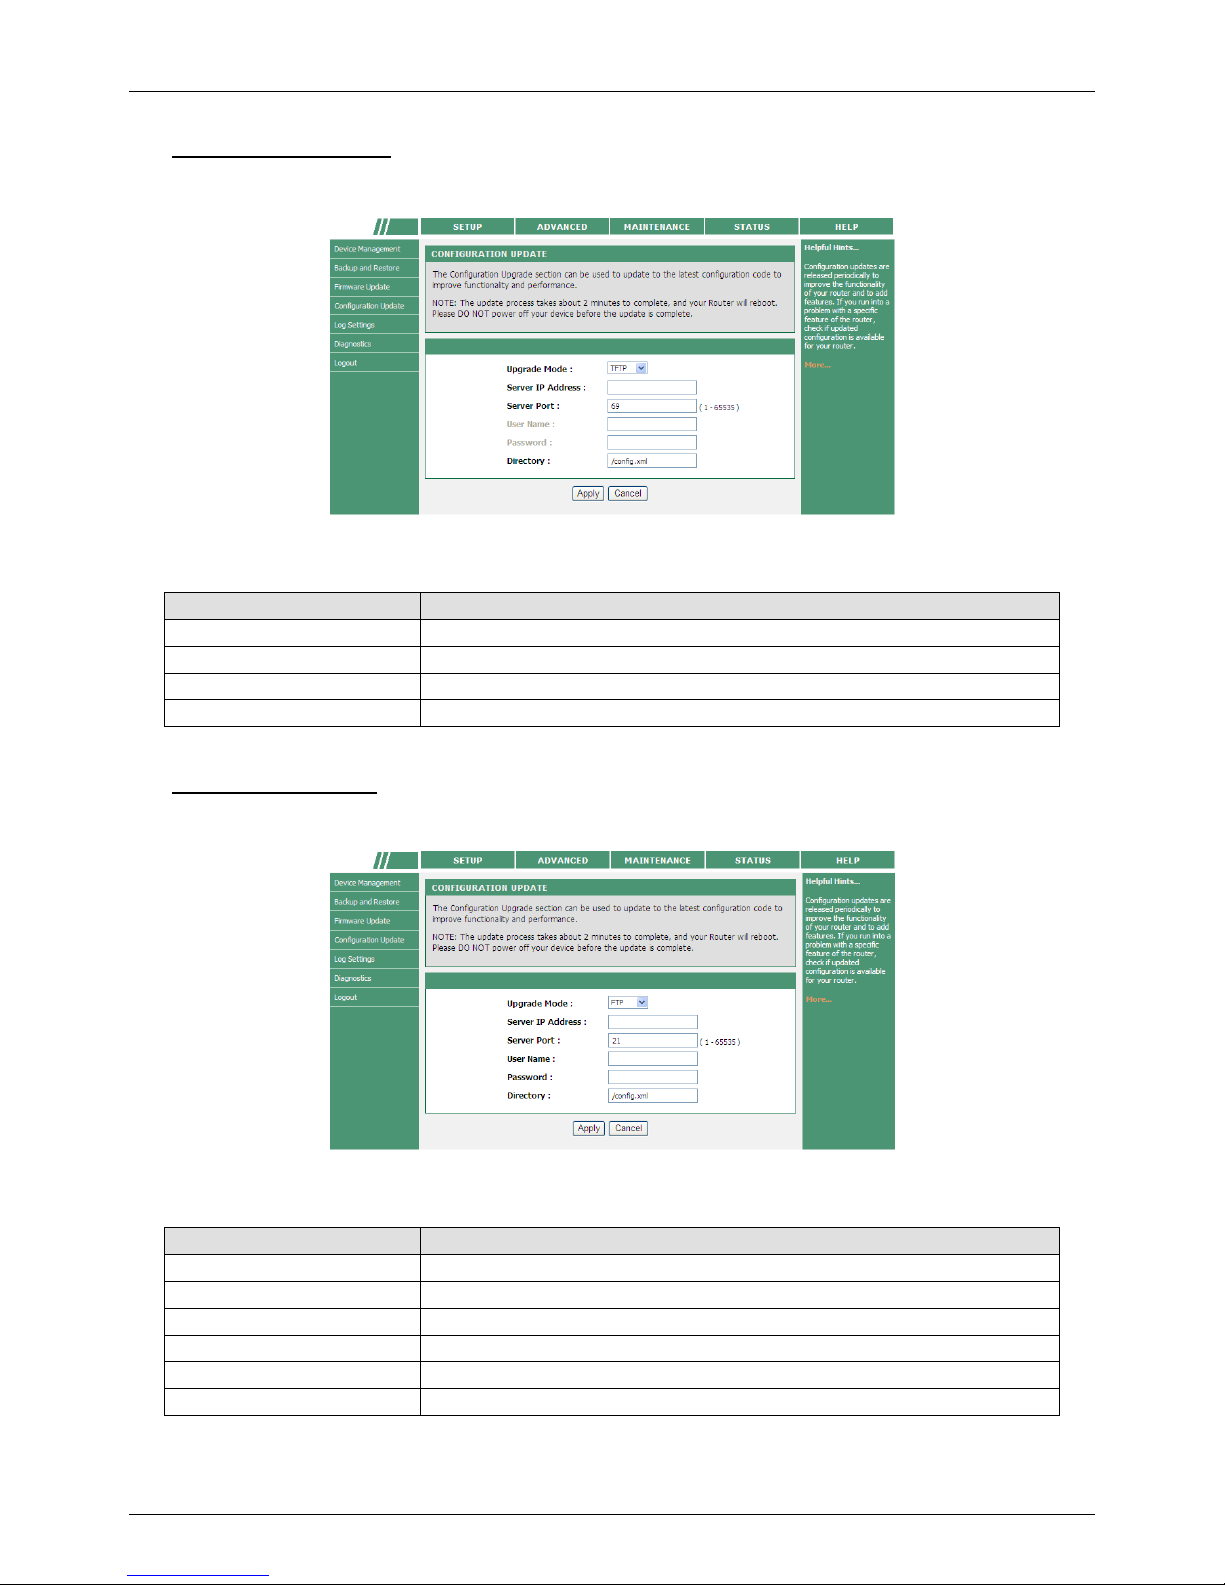
PLC Wireless Router F@st Plug 502W
- 71 -
TFTP Upgrade Mode
If you select TFTP from the drop-down list of upgrade mode, the following page appears.
The following table describes parameters in this page:
Field Description
Upgrade Mode Select TFTP.
Server IP Address Enter the IP address of TFTP server.
Server Port Enter the port number of TFTP server.
Directory Enter the directory of configuration file.
FTP Upgrade Mode
If you select FTP from the drop-down list of upgrade mode, the following page appears.
The following table describes parameters in this page:
Field Description
Upgrade Mode Select FTP.
Server IP Address Enter the IP address of FTP server.
Server Port Enter the port number of FTP server.
User Name Enter the username for connecting to the FTP server.
Password Enter the password for connecting to the FTP server.
Directory Enter the directory of configuration file.
Page 74

F@st Plug 502W PLC Wireless Router
- 72 -
HTTP Upgrade Mode
If you select HTTP from the drop-down list of upgrade mode, the following page appears.
The following table describes parameters in this page:
Field Description
Upgrade Mode Select HTTP.
Server IP Address Enter the IP address of HTTP server.
Server Port Enter the port number of HTTP server.
User Name Enter the username for connecting to the HTTP server.
Password Enter the password for connecting to the HTTP server.
Directory Enter the directory of configuration file.
HTTPS Upgrade Mode
If you select HTTPS from the drop-down list of upgrade mode, the following page appears.
The following table describes parameters in this page:
Field Description
Upgrade Mode Select HTTPS.
Server IP Address Enter the IP address of HTTPS server.
Server Port Enter the port number of HTTPS server.
User Name Enter the username for connecting to the HTTPS server.
Password Enter the password for connecting to the HTTPS server.
Directory Enter the directory of configuration file.
Page 75

PLC Wireless Router F@st Plug 502W
- 73 -
Click Apply, and then system begins to upgrade configuration file.
After upgrade completes, the PLC wireless router automatically reboots.
Caution
During upgrade, do not power off the router or press the Reset pushbutton.
The PLC wireless router supports only the firmware with the format ‘.xml’.
Log Settings
Choose MAINTENANCE > Log Settings, and the following page appears.
In this page, you can enable or disable the log function. After enabling the log function, you
can set 3 types of system log modes. The log modes contain Local, Remote, and Both.
• When you select Local, the events are recorded in the local memory.
• When you select Remote, the events are sent to the remote system log server with
specified IP address and UDP port.
• When you select Both, the events are recorded in the local memory or sent to the
remote system log server with specified IP address and UDP port.
Click the View System Log button to display the following page.
Page 76

F@st Plug 502W PLC Wireless Router
- 74 -
In this page, you can view the system log.
Click Refresh to refresh system log.
Diagnostics
Choose MAINTENANCE > Diagnostics, and the following page appears.
Ping Diagnosis
The ping diagnosis allows you to test a connection between 2 hosts in the same network or
in different networks in simple ways. If the command ping is successful, it means that there is
a correct physical as well as a logical connection between 2 hosts on any network. (Unless if
there is a firewall interfering somewhere in between.)
Choose Diagnostics > Ping on the left pane or click Ping in the DIAGNOSTICS page to
display the following page.
In this page, you can set the parameters of Ping diagnosis.
Page 77

PLC Wireless Router F@st Plug 502W
- 75 -
The following table describes parameters in this page:
Field Description
Ping Destination
Enter the IP address of the host that connects to the LAN interface
of the PLC wireless router.
Number of Ping Set the number of ping packet.
Ping Packet Size Set the length of the ping packet.
WAN Connection Select a WAN interface for ping diagnosis.
After finishing the settings, click the Test button, and then the result of ping diagnosis is
displayed in the page. Click Stop button to stop ping diagnosis.
Traceroute Diagnosis
Traceroute diagnosis is used to find out which path a packet takes to reach its destination. It
is a nice way to see which router it passes and which network it crosses to reach its
destination.
Choose Diagnostics > Traceroute on the left pane or click Traceroute in the DIAGNOSTICS
page to display the following page.
In this page, you can set the parameters of Traceroute diagnosis.
The following table describes parameters in this page:
Field Description
Host
Enter the IP address of host that performs the operation of tracing
routing.
Max TTL
Set the maximum TTL (Time to Live). You can estimate the
number of routers that data packet passes from the source host to
the destination host according to the TTL value.
Wait times Enter the waiting time.
After finishing the settings, click the Traceroute button, and then the result of Traceroute
diagnosis is displayed in the page. Click Stop button to stop Traceroute diagnosis.
Page 78

F@st Plug 502W PLC Wireless Router
- 76 -
Logout
Choose MAINTENANCE > Logout to log out of the Web configuration page, and the
following page appears.
Page 79

PLC Wireless Router F@st Plug 502W
- 77 -
Status
Device Information
Choose STATUS > Device Info, and the following page appears.
In this page, you can view basic information of the PLC wireless router, such as the
information of WAN and LAN interfaces, wireless LAN information and DHCP server
Information.
Click Refresh to refresh the information in this page.
Page 80
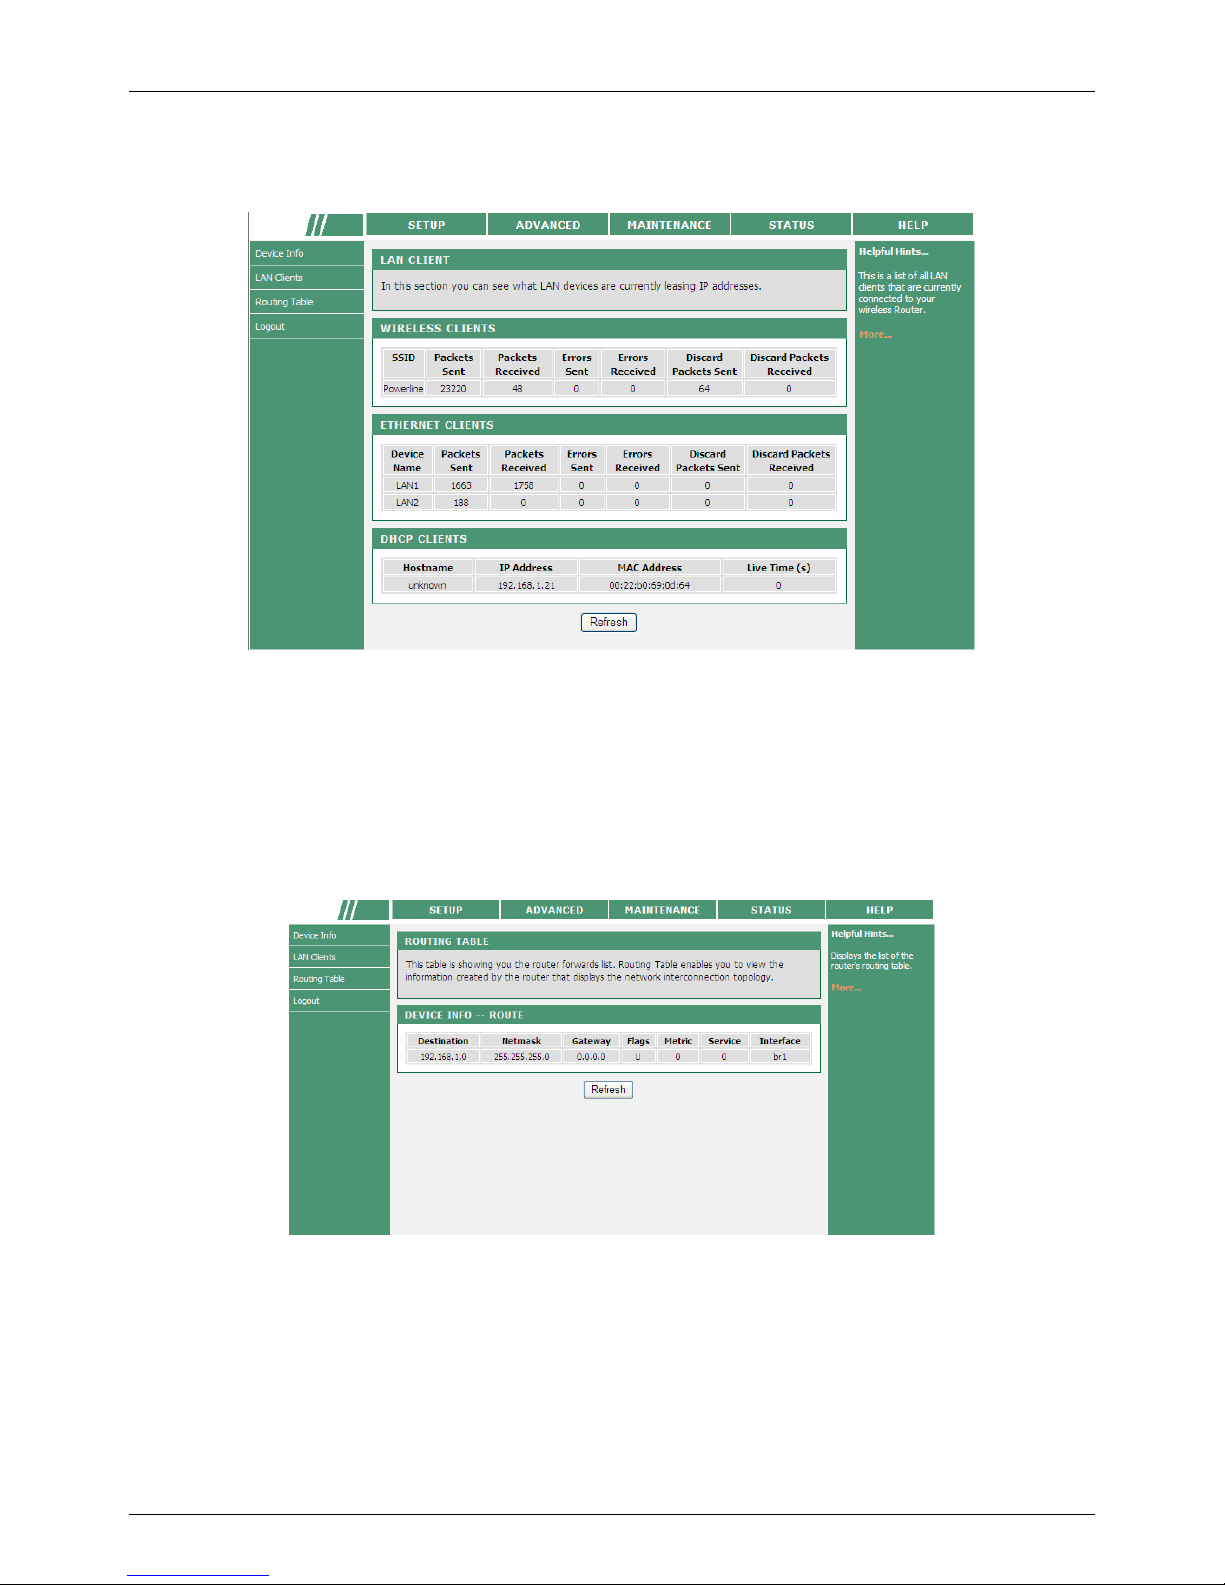
F@st Plug 502W PLC Wireless Router
- 78 -
LAN Client
Choose STATUS > LAN Clients, and the following page appears.
In this page, you can view the status information of wireless clients, Ethernet clients, and
DHCP clients.
Click Refresh to refresh the information in this page.
Routing Table
Choose STATUS > Routing Table, and the following page appears.
In this page, you can view the routing information of the PLC wireless router.
Click Refresh to refresh the information in this page.
Page 81

PLC Wireless Router F@st Plug 502W
- 79 -
Logout
Choose STATUS > Logout to log out of the Web configuration page, and the following page
appears.
Page 82
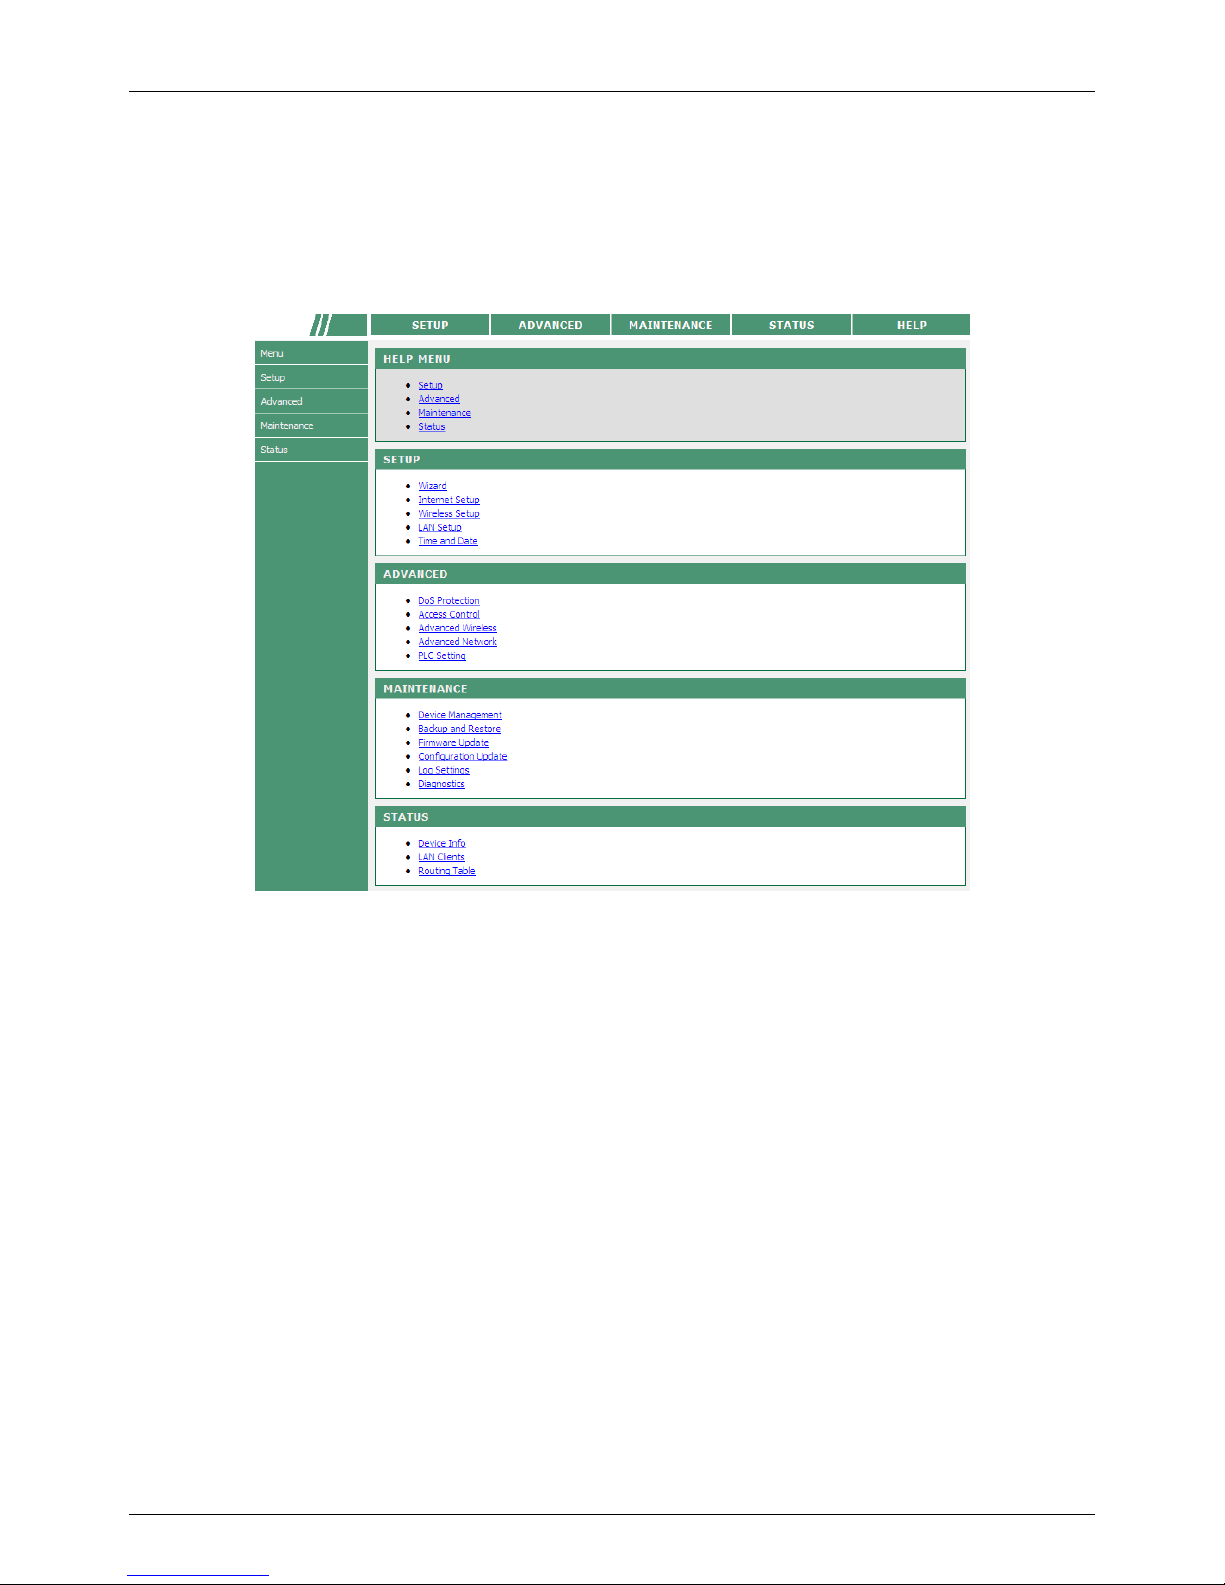
F@st Plug 502W PLC Wireless Router
- 80 -
Help
Viewing the help information can help you know more about each configuration page of the
PLC wireless router.
Choose HELP, and the following page appears.
In this page, you can click the menu that you are interested in to view the detailed
information.
Page 83

PLC Wireless Router F@st Plug 502W
- 81 -
Using the Security Pushbutton
This chapter describes how to add new devices to, or remove old devices from a HomePlug AV
logical network (AVLN). Both can be accomplished by using the Security (NMK) pushbutton.
Operation progress and outcome can be monitored by observing the behaviors of the Power and
Data LED indicators.
Forming a HomePlug AV Logical Network
By default ,the deveic is not in any network , When two devices (A and B) connect to the
same power line, you want them to form a logical network. Do as follows:
Step 1 Press the Security pushbutton on the first device A for less than 3 seconds.
Step 2 Press the Security pushbutton on the second device B for less than 3 seconds.
Press the pushbutton on B within 2 minutes
Step 3 Wait for the connection to complete.
The Power LED indicators on both devices will flash evenly at 1-second interval until the
operation succeeds or fails. If the connection is successful, the Power and Data LED
indicators on both devices illuminate steadily. If the connection is failed, the Power LED
indicators on both devices still illuminate steadily, but the Data LED indicators on both
devices go out. In that case, please repeat Step1 to Step3
Joining an AVLN Network
Assume that a network exists, a new device, the ‘joiner’, wants to join the network. Any
device on the existing network can become the ‘adder’.
Step 1 Press the Security pushbutton on the ‘joiner’ for at least 10 seconds. The device
will reset and restart with a random NMK.
Step 2 Press the Security pushbutton on the ‘joiner’ for less than 3 seconds.
Step 3 Press the Security pushbutton on any network device for less than 3 seconds,
making it the ‘adder’. Please press this pushbutton within 1 minute.
Step 4 Wait for the connection to complete.
The Power LED indicators on both devices will flash at 1-second interval until the process
succeeds or fails. If the connection is successful, the Power and Data LED indicators on both
devices illuminate steadily. If the connection is failed, the Power LED indicators on both
devices still illuminate steadily, but the Data LED indicators on both devices go out. In that
case please repeat Step1 to Step4.
Page 84
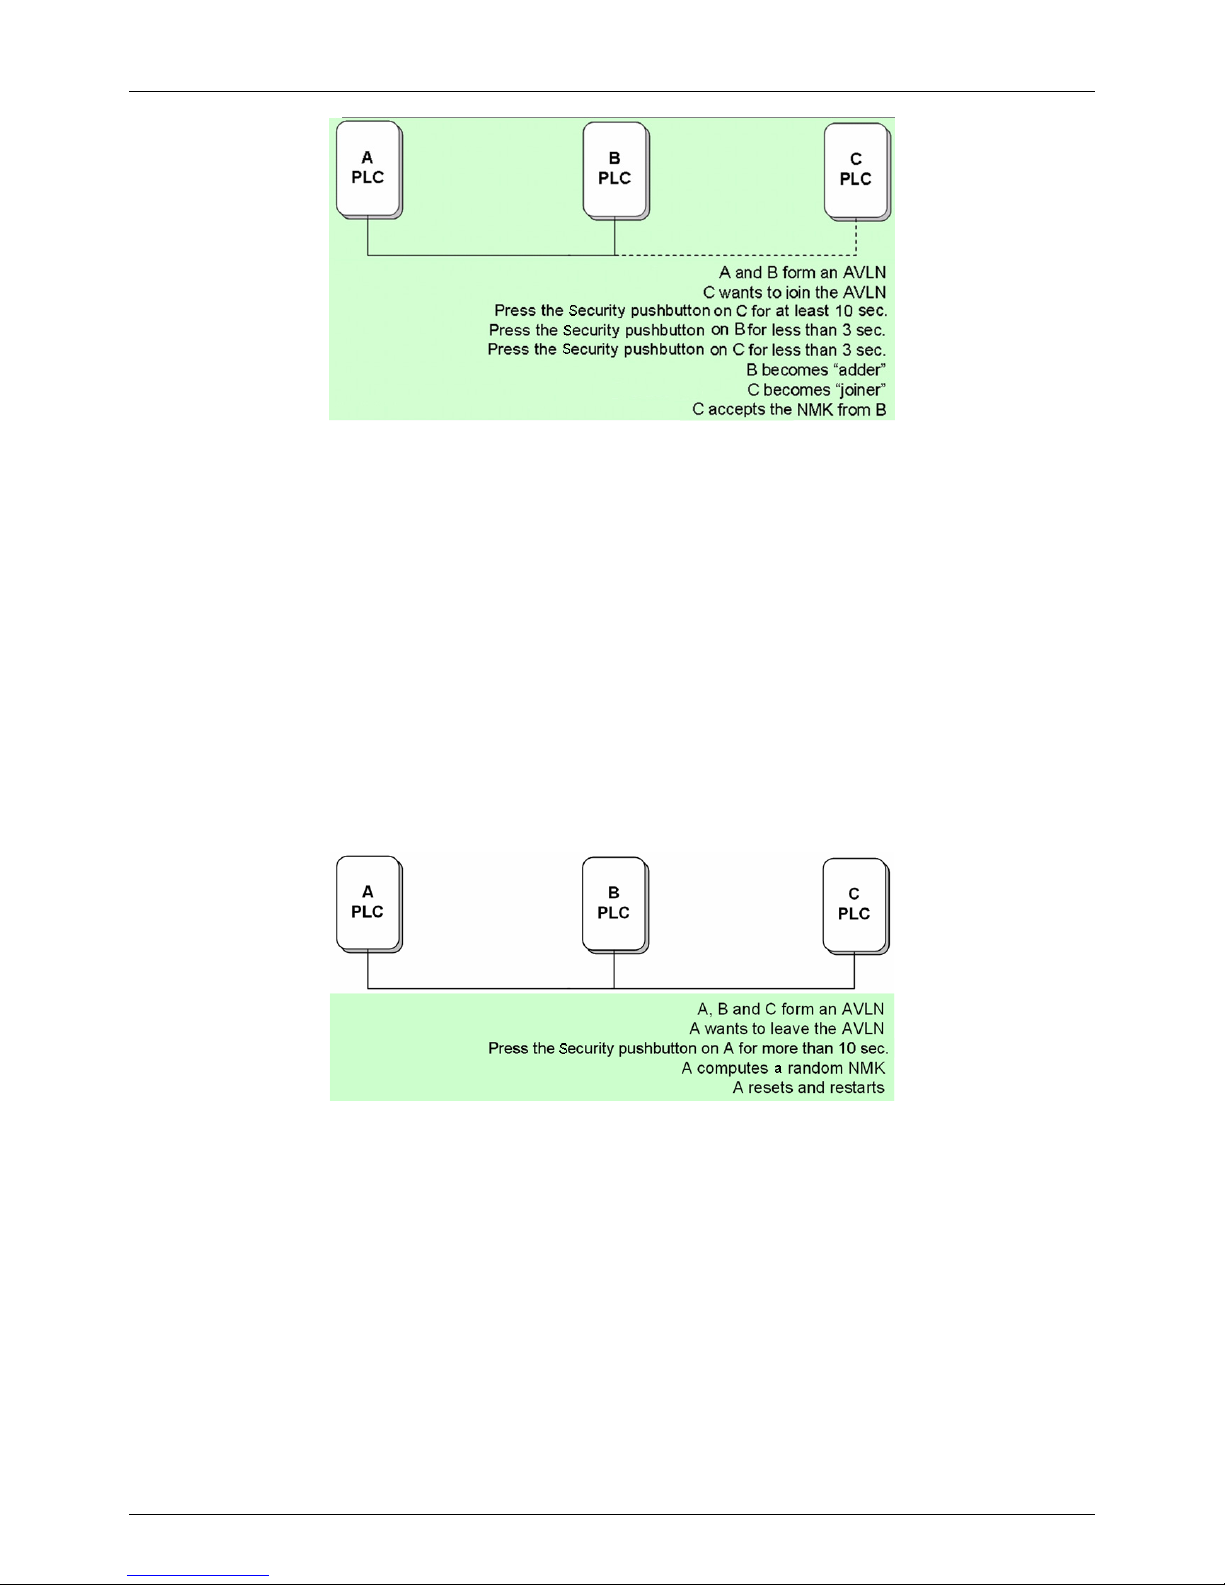
F@st Plug 502W PLC Wireless Router
- 82 -
Leaving an AVLN Network
Assume that a network exists. If you want to remove one device, the ‘leaver’ from an AVLN
network, or remove the device from the existing network and have it join another logical
network, do as follows:
Step 1 Press the Security pushbutton on the ‘leaver’ for more than 5 seconds. The device
will reset and restart with a random NMK.
Step 2 Wait for reset to complete.
The Power LED indicator on the ‘leaver’ will momentarily extinguish during reset and flash
during restart, then illuminate steadily. The ‘leaver’ is removed from the existing network
successfully.
Once the process completes, you may disconnect the device from the medium or join it to
another logical network on the same medium.
Page 85

PLC Wireless Router F@st Plug 502W
- 83 -
Troubleshooting
Why all the LED indicators are off?
• Check the connection between the power adapter and power socket.
• Check whether the device is turned on.
Why the Ethernet indicator is off?
• Check the connection between your PLC wireless router and the computer, hub, or
switch.
• Check the running status of your computer, hub or switch, and verify whether they run
normally or not.
• Check the network cable that is connected to the PLC wireless router and other
devices.
Why you fail to access the Web page?
Follow the steps below to check the connection between the computer and the device:
• Click start > Run and enter ping command ping 192.168.1.1 (the IP address of PLC
wireless router).
• If you fail to access the PLC wireless router, check the following settings:
The network cable type
The connection between your router and the computer
TCP/IP settings of PC
How to restore factory defaults after carrying out the incorrect configuration?
• Press the Reset pushbutton for 3 seconds and then release it. The PLC wireless router
restores the factory default settings.
• The default IP address of the PLC wireless router is 192.168.1.1 and the subnet mask
is 255.255.255.0.
• The user name and password of the super user are both admin.
• The user name and password of the common user are both user.
Page 86

F@st Plug 502W PLC Wireless Router
- 84 -
Specifications
PLC Module Specification
Chip Qualcomm ATHEROS AR7420/AR1540
Firmware Support North America/Europe/APAC/Japan
Protocol
HomePlug AV
IEEE1901
IEEE 802.3 10/100 Ethernet (100 Mbps)
IEEE 802.3u Fast Ethernet
PLC Rate 500 Mbps
Signal Band 2~68 MHz
Modulation Mode
Support OFDM 4096/1024/256/64/16/8-QAM, QPSK, BPSK,
and ROBO
Encryption 128-bit AES
QoS
Support four-level QoS
Support VLAN priority
Support ToS and CoS packet classifications
Operation Mode Support priority-based CSMA/CA channel access scheme
Multicast Support IGMP management multicast session
Wi-Fi Module Specification
Chip Qualcomm Atheros AR9341
Flash Memory 64 Mbps
DDR SDRAM: 256 Mbps
Protocol
IEEE 802.11b/g/n
IEEE 802.3/3x/3u
Wireless Frequency
Range
2.4 GHz~2.484 GHz
Channel 1~13
Wireless Signal Rate
11b: 11/5.5/2/1 Mbps
11g: 54/48/36/24/18/12/9/6 Mbps
11n: up to 300 Mbps in 40 MHz mode and up to 144.4 Mbps
in 20 MHz mode.
Output Power
11b: 16~17 dBm
11g: 14~17 dBm
11n: 11~16 dBm
Receiving Sensitivity
11b: 11 Mbps/-76 dBM
11g: 54 Mbps/-65 dBm
11n: 150 Mbps/-64 dBM
Operation Mode 2Tx/2Rx
Multiple SSID 1 BSSID
Security Authentication
WEP, WPA, WPA2 and WPA/WPA2 Mixed
SSID hiding
MAC address access control list
System Specification
LED Indicator
Power: Indicate power status.
LAN1/LAN2: Indicate the connection status of LAN1
interface or LAN2 interface.
Data: Indicate PLC rate.
WLAN: Indicate WLAN ON/OFF status and WPS connection
status.
Power Socket Support power sockets of English-style and European-style
Page 87

PLC Wireless Router F@st Plug 502W
- 85 -
Ethernet Port 2 x RJ45 for 10/100 Ethernet (Auto MDI/MDI-X)
Antenna PCB-Antenna x 2
Button
Security: Set the status of device members.
Reset: Restore factory default settings.
WPS: Press this pushbutton for less than 3 seconds to
enable the negotiation of PBC mode. Press this pushbutton
for more than 5 seconds to enable or disable WLAN.
Software Upgrade Support software upgrade by Web page.
Consumption 6.5 W
Environment Requirements
Operating Temperature 0~40ºC
Storage Temperature -10~70ºC
Operating Humidity 10%~85%, non-condensing
Storage Humidity 5%~90%, non-condensing
Rated Input 100~240 V AC, 50/60 Hz
EMC and Safety
Compliance FCC Part 15 Class B, CE
Safety Authentication UL
Green Standard RoHS
Physical Characteristics
Dimension L × W × H: 107 mm × 62 mm × 48.5 mm
Weight 180 g
Page 88

F@st Plug 502W PLC Wireless Router
*253574103*
All rights reserved. The information and specifications included are subject to change without
prior notice. Sagemcom Broadband SAS tries to ensure that all information in this document is
correct, but does not accept liability for error or omission.
Non contractual document. All trademarks are registered by their respective owners. Simplified
joint stock company - Capital 35 703 000 Euros - 518 250 360 RCS NANTERRE.
Sagemcom Broadband SAS
Headquarters: 250, route de l’Empereur
92848 Rueil-Malmaison Cedex - FRANCE
Tel : +33 (0)1 57 61 10 00 - Fax : +33 (0)1 57 61 10 01
www.sagemcom.com
 Loading...