

Page 1
1
Reference
Guide
Page 2

Table of contents
The Connection Hub ...........................................................................................................3
Setting up a wireless connection...............................................................................4
Connecting a USB device to the Connection Hub...........................................7
Setting an admin password .........................................................................................11
Modifying the Connection Hub settings...............................................................12
Updating Internet user ID and access password ...........................................16
Restart the Connection Hub.........................................................................................17
Reset the Connection Hub ............................................................................................17
Frequently asked questions .........................................................................................18
Page 3
3
Bell
Mail
My Bell profile
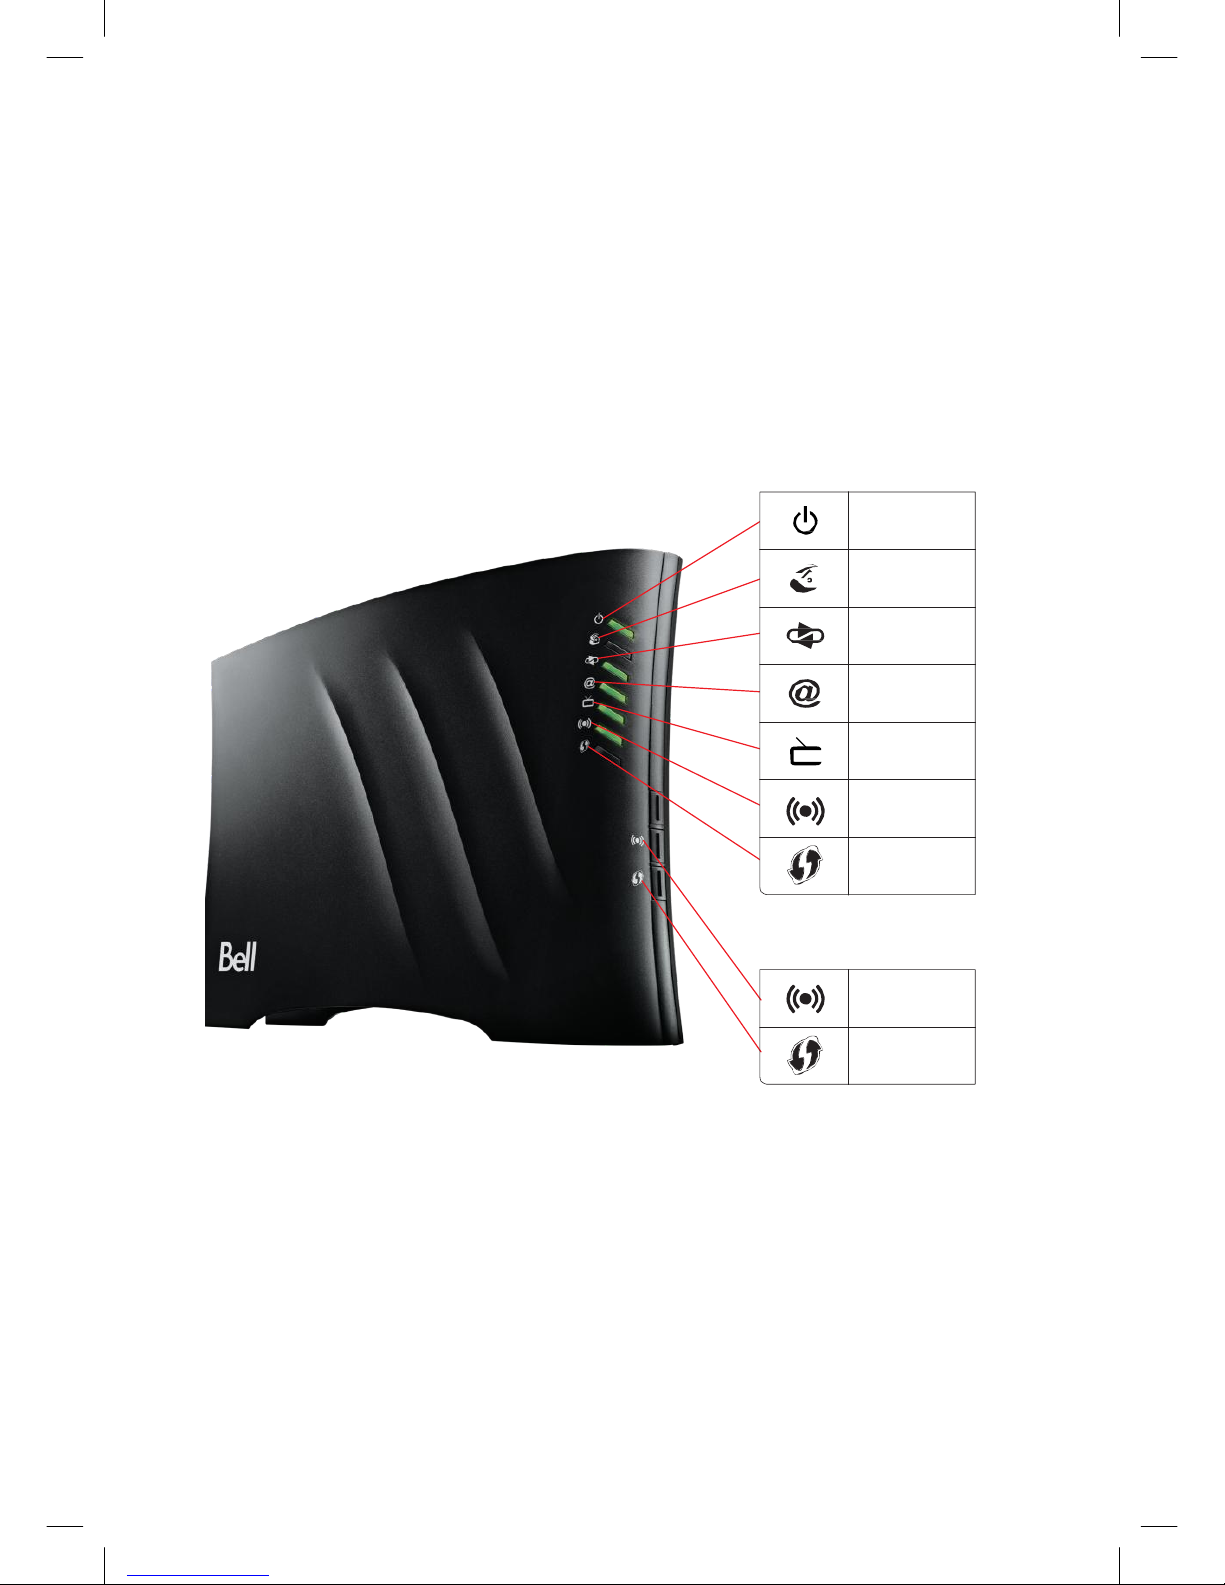
The Connection Hub
LED lights
Buttons
Wireless
WPS
Power
HPNA
WAN
Internet
TV
Wireless
WPS
Page 4

4
Setting up a wireless connection
There are two ways that you can set up your wireless Home Network
connection.
Primary wireless network
Connect to the Internet and shared devices connected to your home
network through the Connection Hub. The wireless SSID (Network name)
and WPA2 password on the back of your Connection Hub are used for the
“Primary” wireless network.
Guest wireless network
Enables you to provide Internet access to guests and/or visitors but
prevents access to any of your shared documents on your home network.
An additional benefit is that you can preset the duration that you want the
Guest wireless network to be active before it automatically switches off.
By default, this feature is turned off. See page 14 for more details on
configuring this feature.
Follow these instructions to activate your Primary wireless Home
Networking connection.
Using Wi-Fi protected setup (WPS)
If your wireless client is equipped with a WPS push button, you may use it
to connect using the WPS button on the Connection Hub. This will allow
you to securely connect your computer to your wireless network without
having to setup any passwords. Note that this method will work even if
you have changed any passwords on your Connection Hub.
To do this:
•
•
Ensure both the Connection Hub and your computer are powered on.
Press and hold down the WPS button
on the front of the
Connection Hub until the WPS light starts blinking.
Your Connection Hub will search for a wireless client. Note: If the
Connection Hub does not find a wireless client within 2 minutes, it will
stop searching. Therefore, you will have to complete the next step
within 2 minutes.
On your wireless client, please hold down the WPS button for 5-10
seconds before releasing.
The password for your Primary wireless network will automatically be
loaded onto your wireless client.
•
• •
Page 5
5
Note: If you are experiencing difficulties, ensure you use the utilities in
Windows for connecting to wireless networks and not the software that
comes with your wireless client.
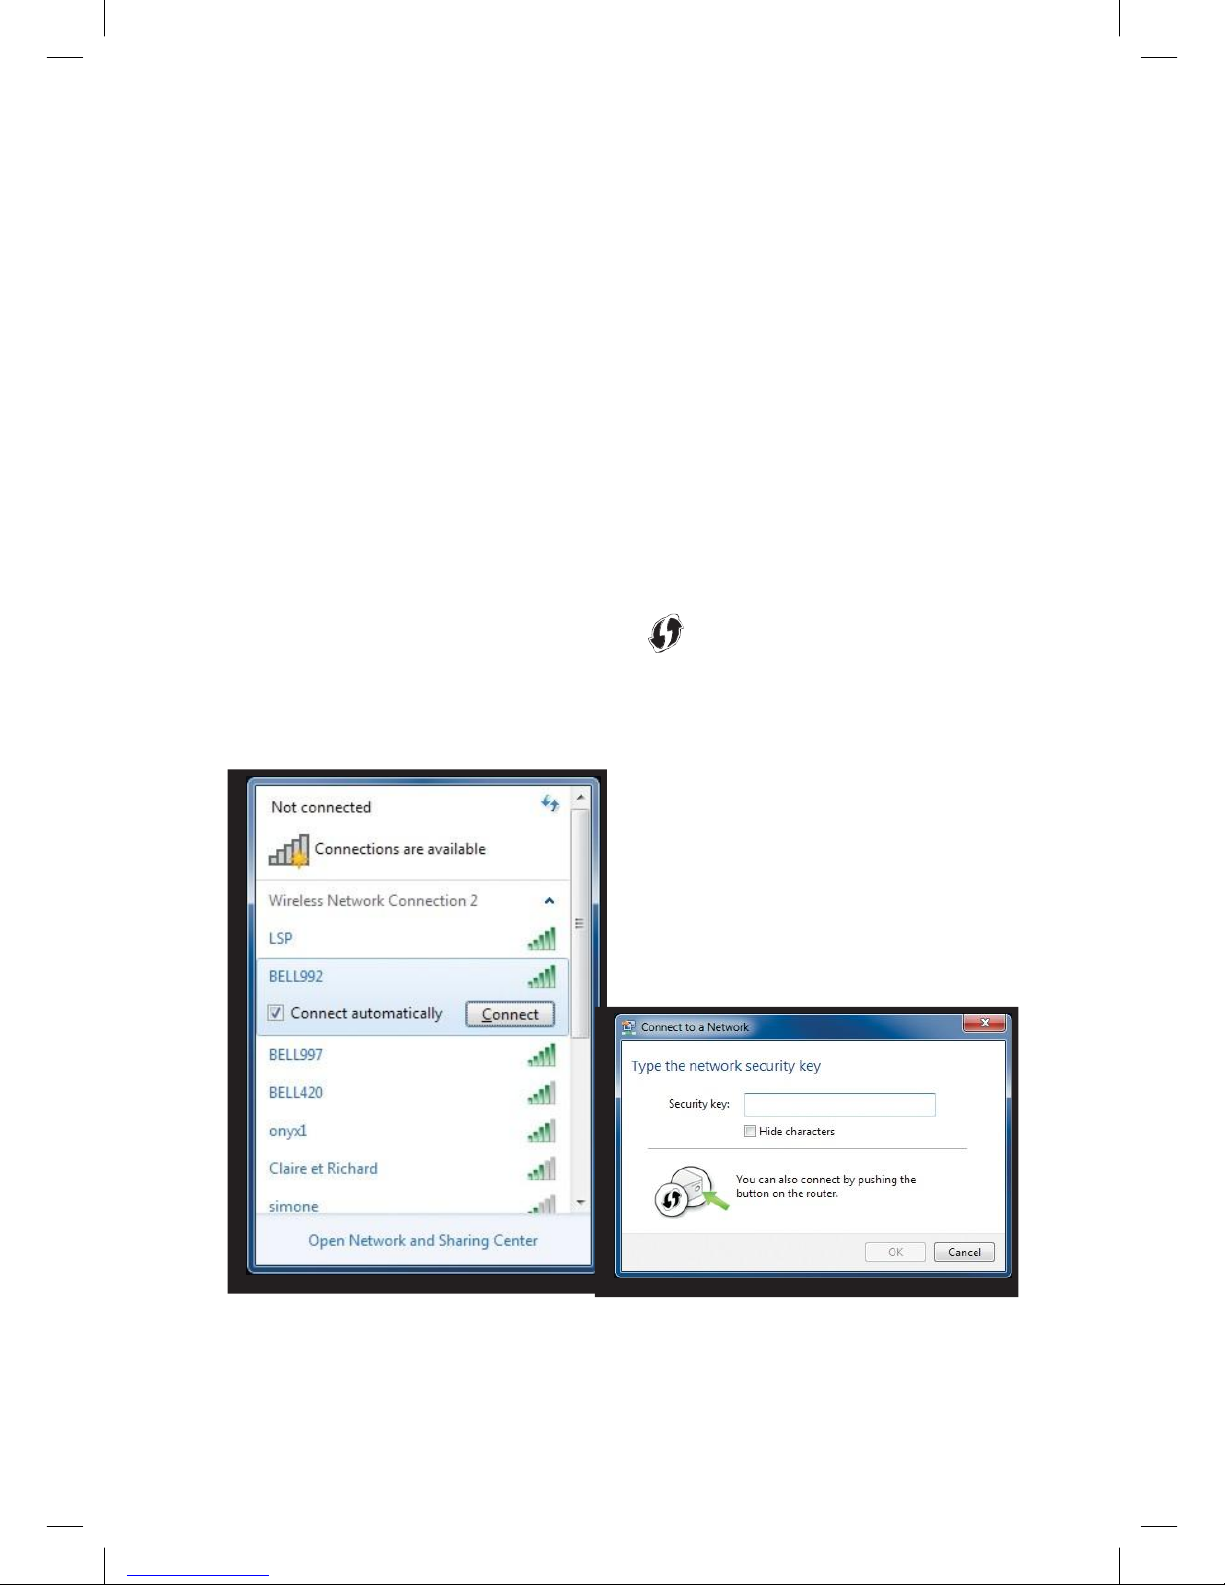
Windows 7
•
•
Click on the wireless bar located to the right of the system bar.
The list of available wireless networks appears with your network
name. Click Refresh network list if it does not appear.
Select your network name, and click Connect.
Either type your 8-digit WPA2 key (see back of Connection Hub) in
the Security key box, and click OK
•
•
Or
•
You can hold down the WPS button
on the Connection Hub for
5-10 seconds. The Connection Hub will automatically connect the
computer to the network and apply any wireless security settings.
Page 6

6
Windows Vista
•
•
Click Start, then Connect to.
Your network name will appear. If not, click the two arrows in the top
right corner.
Type your 8-digit WPA2 key in the Security key or Passphrase text
box.
Click Connect.
•
•
Windows XP
•
Click the wireless networks detected message or double-click the icon
in your system tray.
Your network name will appear. Double click it.
In the wireless network connection box, type in your 8-digit WPA2
key.
Click Connect.
•
•
•
Mac 10.4 – 10.6
•
•
•
•
•
Click on the Airport icon.
Your network name will appear. If not, click the Airport icon again.
Click on your network name in the list.
Type your 8-digit WPA2 key in the Password text box.
Click OK.
Page 7

7
Connecting a USB device to the
Connection Hub
Storage Devices
Share files within your home network by connecting a USB storage device
(i.e. flash drive, external hard drive, etc.) to the Connection Hub. All users
connected to the home network will be able to see, add, modify and delete
any files on the attached device (except when connected via Guest
wireless).
Once a USB storage device is connected, to access the files follow these
steps:
For Windows Users:
1.
2.
Connect the USB Storage device to the Connection Hub.
Open Windows Explorer. Click on Start, then All Programs, then
Accessories and select Windows Explorer.
Type \\mynetwork into the address bar of Windows Explorer.
You can now view your connected USB storage device.
3.
4.
For Mac Users:
1.
2.
3.
4.
5.
Connect a USB storage device to the Connection Hub.
On your Mac, click Go and then Connect to Server.
Type smb://mynetwork under Server Address.
Click on Connect.
You will be asked for your Mac Password. Enter it and then click on
Connect.
A window will appear with the contents of your USB drive.
Until the USB storage device is ejected from the Connection Hub, you
will be able to locate the device under Computer.
6.
7.
NOTE: To safely disconnect a USB storage device, you must first click the
Eject button in the Connection Hub Graphical user Interface to protect the
data.
Page 8

8
Mapping your USB Storage Device:
You can map your USB storage device to your computer which will enable
you to see the USB device listed within your My Computer folder, even after
the computer has been rebooted.
Once you have mapped the device, your Computer folder will show your
USB storage device similar to this:
Page 9

9
To Map a Storage Device to the Connection Hub:
Windows 7:
-
Go into the Computer folder and locate Map network drive on the top
menu.
In the window that pops up, type in the Folder textbox:
\\mynetwork\YOUR_USB_NAME, where YOUR_USB_NAME corresponds
to the name of your USB device. Your USB name can be found in
My Computer if it is plugged into your computer.
-
Page 10

10
Windows Vista:
See instructions for Windows 7.
Windows XP:
-
-
Right click on My Computer and select Map network drive.
In the window that pops up, type in the Folder textbox:
\\mynetwork\YOUR_USB_NAME, where YOUR_USB_NAME corresponds
to the name of your USB device. Your USB name can be found under
My Computer if it is plugged into your computer.
Printers
Share a USB printer on the home network by connecting it to the
Connection Hub. All computers connected to the home network will have
access to the printer.
Page 11

11
The Connection Hub's printer USB functionality is available for use.
Setting an admin password
An Admin Password is used for security. If you do change your Admin
Password, be sure to write it down and keep it handy for future reference.
Once you have set an Admin Password, you will need to enter it in before
making any changes to the Connection Hub settings.
1. Open your web browser.
2. Type 192.168.2.1 in the address bar, then press Enter. If you are
prompted to enter in a username and password, these are set to the
following defaults:
Username: admin
Password: admin
If you have changed the default password, you must enter in that
password.
3.
4.
Click on Account Settings from the left menu.
Type in your current password in Current Password (“admin” is the
default password if you have not already changed it).
Type in a new password in both the New Password and New Password
(again) fields.
Click Save.
5.
6.
Page 12

12
Modifying the Connection Hub settings
You can manually configure settings on your Connection Hub. To access
and modify these settings:
1. Open your web browser.
2. Type 192.168.2.1 in the address bar, and then press Enter. If you are
prompted to enter in a username and password, these are set to the
following defaults:
Username: admin
Password: admin
If you have changed the default password, you must enter in that
password.
The first screen will provide you with information about your network and
the ability to set various options and adjust settings. You can access and
modify the details of the settings through the menu on the left.
Page 13

13
Changing existing wireless settings
1. Open your web browser.
2. Type 192.168.2.1 in the address bar, press Enter. If you are prompted to
enter in a username and password, these are set to the following
defaults:
Username: admin
Password: admin
If you have changed the default password, you must enter in that
password.
3. Click Wireless from the left menu.
Page 14

14
4.
5.
For the Primary Wireless network, select Enable or Disable.
Choose whether to broadcast the network name (SSID) or to hide it
by enabling or disabling beside Broadcast Primary SSID.
Choose a name for your primary wireless network in the SSID field
under the Primary Wireless Settings category.
For the Guest Wireless Network, select Enable or Disable.
Choose a name for your Guest Wireless network in the SSID field
under the Guest Wireless Settings category.
In the Timer textbox, choose the duration you want your Guest
Wireless network to be active. The default setting is 720 minutes.
After the set time, the Guest Wireless network will disable and you will
not be able to access it again until it is enabled. To set up a Guest
Wireless network indefinitely, you must set the timer to 0.
6.
7.
8.
9.
Page 15

15
10. Choose whether to broadcast the network name (SSID) or to hide it
by enabling or disabling beside Broadcast Guest SSID.
11.
When you receive your Connection Hub, the security type is set to
WPA2-PSK and the security type is set to AES by default. This allows
you to use the default WPA2 key located on the back of your
Connection Hub. Some older devices and Windows operating systems
prior to XP SP1 do not support WPA.
a) To change the WPA2 key, enter a new one in the password box for
either the Primary or Guest Wireless network.
b) To change security to the less secure WEP method, choose WEP in
the Wireless Security Type section. Enter a new 26-character
password in the password box for either the Primary or Guest
wireless network. The characters for WEP can only be numbers 0-9
and letters A-F.
Click Save if you have changed any settings on this page.
Click General at the top of the page.
12.
13.
14.
The Interface type allows you to change which wireless standard will
be used when wireless clients connect with the Connection Hub. This
is common for both Primary and Guest Wireless access.
Page 16

16
15. Leave the Channel at the default value of Auto. If you experience any
interference with your wireless connection, change the wireless
channel drop-down to a number between 1 & 11. This can help
improve the range and speed of your wireless performance if you are
in an urban environment or an environment with heavy wireless
traffic.
16. Click Save.
Important: If you changed the network name or key, you will need to
reconfigure your wireless network on your wireless devices (laptops,
tablets, computers, etc.).
Updating Internet user ID and access
password
Important: This should only be changed when directed by a customer service
representative.
1. Open your web browser.
2. Type 192.168.2.1 in the address bar, press Enter. If you are prompted to
enter in a username and password, these are set to the following
defaults:
Username: admin
Password: admin
If you have changed the default password, you must enter in that
password.
3.
4.
5.
6.
7.
Click Internet from the left menu.
Click on Internet at the top of the page.
Type your Internet user ID in the User ID box.
Type your access password in the Password box.
Click Save.
Page 17

17
Restart the Connection Hub
Unplug the power cord from the Connection Hub, wait 10 seconds and plug
it back in. This will restart the Connection Hub without erasing your saved
settings.
Reset the Connection Hub
Reset to factory defaults
Use this option when you need to recover the factory default settings.
This might be necessary when:
-
-
-
A custom configuration did not go as planned.
You want a new configuration.
Your Connection Hub does not appear to be working properly.
Important: This option resets all personalized settings on your Connection
Hub.
Press and hold the reset button on the bottom of the Connection Hub until
the power light turns off.
When the Connection Hub lights are back on, you will need to update the user
ID and access password by following the instructions in the section titled
“Updating my Internet user ID and access password.” You will also need to
update any other settings you customized on the Connection Hub.
Page 18

18
Frequently asked questions
Q.
Why do I get an error message after entering my Internet User ID
and Access Password?
Ensure you enter your user ID and password correctly. These are case
sensitive. Both your Internet user ID and access password were
provided to you when you registered.
A.
Q.
My computer detects my wireless network but says it can’t access the
network. Why?
Ensure you have entered the correct Network name and/or Wireless
security key as they are case sensitive. The Connection Hub is
capable of setting up networks with WEP, WPA, WPA2. Ensure that
you are using a wireless adapter that is capable of the type of
wireless security your wireless network is on. Otherwise, you may
have to change the type of wireless security on the Connection Hub
to match the capabilities of your adapter.
A.
Q.
A.
Why can’t I access devices within the local area network?
The devices may not be configured to receive an IP address
automatically. Check the devices that are not available within the
network and check the IP Address settings.
Q.
My Connection Hub is not running properly after a power outage.
What can I do?
Reboot the Connection Hub by unplugging the power supply. Wait 10
seconds before plugging it back in.
A.
Q.
A.
What can I do if I am experiencing speeds that are slower than normal?
Try restarting/rebooting your Connection Hub. Unplug it and wait 10
seconds before plugging it back in. You should always try this as a
first step before calling for technical support.
Page 19

19
Q.
A.
How long should my Connection Hub cables be?
Use the cables the technician installed to ensure optimized
performance.
Q.
I setup a Guest wireless network, but why did my Guest wireless
network stop working?
The default timer for a Guest wireless network is 720 minutes. This
would mean that after 720 minutes, the Guest wireless network will
automatically disable on its own. If you want to permanently setup a
Guest wireless network, then you must set the timer to 0 minutes.
A.
 Loading...