

Page 1

guide
Page 2

Page 3

ENGLISH
2
TABLE OF CONTENTS
4INFORMATION
4Preface
4 Safety information
5 Application information
5Environment
6 Setting up/range
7SET-UP
7 D77 box contents
8 Presenting the base unit
9 Presenting the handset
10 The Navigator
11 Rapid access to the answering machine messages
11 Screen
12 Base unit connection
13 Inserting batteries in the handset
14 Battery function duration
14 Longevity of the battery
14 Battery charging status
14 Switching the handset on and off
14 Out of range
15 BLOCK DIAGRAM
16 MAKING TELEPHONE CALLS
16 Making an external call
16 Answering a call
16 Making an internal call
16 CLI (Caller Line ID) function
17 Managing calls whilst communication is underway
17 Call management
18 Locking the handset keypad
18 Using in hands-fre e mo de
19 Setting the volume
19 Secret mode
20 PHONEBOOK
20 Adding a phonebook entry
20 Viewing a phonebook entry
21 Editing a phonebook entry
21 Deleting a phonebook entry
21 Deleting the entire phonebook
22 DATE AND TIME
22 Set the time and date
Page 4

3
TABLE OF CONTENTS
23 CUSTOMISATION
23 Setting the melody and handset volume for an external call
23 Customising the name of the handset
23 Activating/deactivating automatic pick-up
23 Activating/deactivating automatic Hang-up
24 Setting the menu language
24 Setting the base unit melody and volume
25 ADVANCED SETTINGS
25 Setting the flash time
25 Registering a new handset
26 Removing a handset
26 Changing your PIN code
27 Resetting the handset and the base unit default settings
28 CALL LOG
28 To display the list of calls made
28 Removing numbers from the list of calls
28 Storing a caller's details in the phonebook
29 ANSWERING MACHINE (D77V only)
29 Playing a message
30 Recording a memo
30 Selecting answer machine mode
32 Activating/deactivating the answering machine
32 TAM Settings
33 Remote control
37 TECHNICAL DATA
37 Condition on delivery
38 Features
39 WARRANTY
39 Terms and Conditions for United Kingdom & Ireland only
Page 5

ENGLISH
4
INFORMATION
Preface
http://www.sagemcom.com
Safety information
INFORMATION
Dear customer, congratulations on buying your SAGEMCOM
DECT telephone and thank you for placing your confidence in
us. This device has been manufactured with the utmost care. If
you should have difficulties in operating it, we recommend that
you consult this user manual.
You can also find information on the following site:
To operate the device safely and easily, please read the followi ng
sections carefully:
- Do not install your DECT telephone in a damp environment,
such as a bathroom, washroom, kitchen etc, and not within
1.50 metres of a source of water or outside. This device is
designed for use in temperatures of between 5 °C and 45 °C.
- Only use the power unit supplied and connect it to the electricity
mains in accordance with the installation instructions in this user
manual and the details on the sticker regarding voltage,
electrical current and frequency. As a precaution if there is a
risk of danger, the power plug can be pulled out to disconnect
the 230 volt power supply. Therefore the sockets should be
near the device and easily accessible.
- This device is designed to be used for connecting to the public
telephone network. If problems should arise, contact your
nearest specialist dea ler. Only use t he telephone cable suppli ed.
- For safety reasons, never put the handset in the base station
without the battery inserted or without the lid on the battery
compartment as this could cause an electric shock.
- To avoid damaging your handset, only use certified
rechargeable battery NiMH 2.4 V 600 mAh, never use non
rechargeable battery. Insert the battery in the handset battery
compartment respecting polarity.
The used battery must be disposed of in line with the recycling
regulations in this user manual.
- Your DECT telephone has a range of approx. 50 metres
indoors and up to 300 metres outdoors. The range can be
affected by the proximity of metal objects, such as a television
and electrical devices.
- Certain medical equipment and highly-sensitive machines or
security systems may be affected by the transmission power of
the telephone. In these cases we recommend adhering to the
safety information.
- In regions greatly affected by electrical storms we recommend
that you protect your telephone circuit with a special fixture for
excess voltage.
Page 6

5
INFORMATION
- You cannot make calls with the device if there is a power cut.
Therefore keep another telephone at th
e ready in the event of
an emergency.
www.sagemcom.com
Support
SAGEMCOM SAS
Application information
Environment
Packaging
Batteries
The product
- The CE label confirms that the product complies with the 1999/
5/EC regulations of the European Union Parliament regarding
wireless systems and telecommunications for user protection
and for preventing electromagnetic interference. This ensures
the allocated communication network is used properly and
radio interference is avoided. The declaration of compliance
may be looked up on the
«S
250, route de l'Empereur - 92500 Rueil-Malmaison - France
» or can be obtained from the following address:
This telephone is to be used for transmitting voice messages via
telephone networks. Any other use is not permitted and is
considered unfit for the intended use.
website, section
Environmental protection and sustainable development is an
important priority for SAGEMCOM. SAGEMCOM has a policy
of using environmentally-friendly systems and makes
environmental protection an essential part of the life-cycle of its
products – from the manufacturing, to the installation, operati on
and disposal.
The logo (green point) on the packaging means that a fee is paid
to an authorised national organisation to improve packaging
recycling and the recycling infrastructure. Follow the local sorting
regulations for this type of waste product in order to improve
recycling.
If your product contains batteries, they must be disposed of at the
designated collection points.
The crossed out dustbin displayed on the pr oduct signifies that it
belongs to the electrical and electronic equipment group. The
European regulations request you to carry out your own selective
recycling collection at:
• the sales outlet when you buy a similar new device.
• the collection points available in your area (recycling centres,
sorting points, etc).
Page 7

ENGLISH
6
INFORMATION
Setting up/range
This means you participate in the recycling and valorisation of
used electric and electronic goods which would otherwise have
a negative impact on the environment and health.
Place the base station somewhere central and easily accessible
where you want to use it.
Depending on the ambient conditions, the range can be up to
approx. 300 metres outdoors. It has a range of up to 50 metres
indoors depending on the space and structure of the building.
The structure of the building can cause signal shadows to occur.
This can lead to short interruptions when speaking due to the
weak signal.
The connection breaks up temporarily when there is insufficient
field strength.
Place an anti-slip mat under the base station. The feet on the
device do not usually leave any undesirable marks behind. Due
to the variety of varnish and polish used on furniture, we cannot
completely rule out the possibility that marks from the feet of the
device are left on any surfaces.
SAGEMCOM does not accept any liability for this type of
damage.
Operating the base station or charger outside or in areas
exposed to frost is not permitted.
The recommended ambient temperature for operating the base
station is +5 °C – +45 °C, the recommended relative air
humidity is 20 % to 75 %.
The installation location must have a mains socket for 230 volts
for the base station or the charger.
Page 8

7
SET-UP
D77 box contents
SET-UP
Place the box in front of you, open it and make sure it contains
the following items:
• one base,
• one handset,
• one battery compartment cover,
• one equipped power adapter,
• a rechargeable battery unit,
• one telephone line cord,
•this user guide.
In the case of purchasing a pack duo or trio, you will find in
addition for each additional handset:
• a handset charger,
• an additional battery flap,
• A rechargeable battery unit.
Page 9
ENGLISH
8
SET-UP
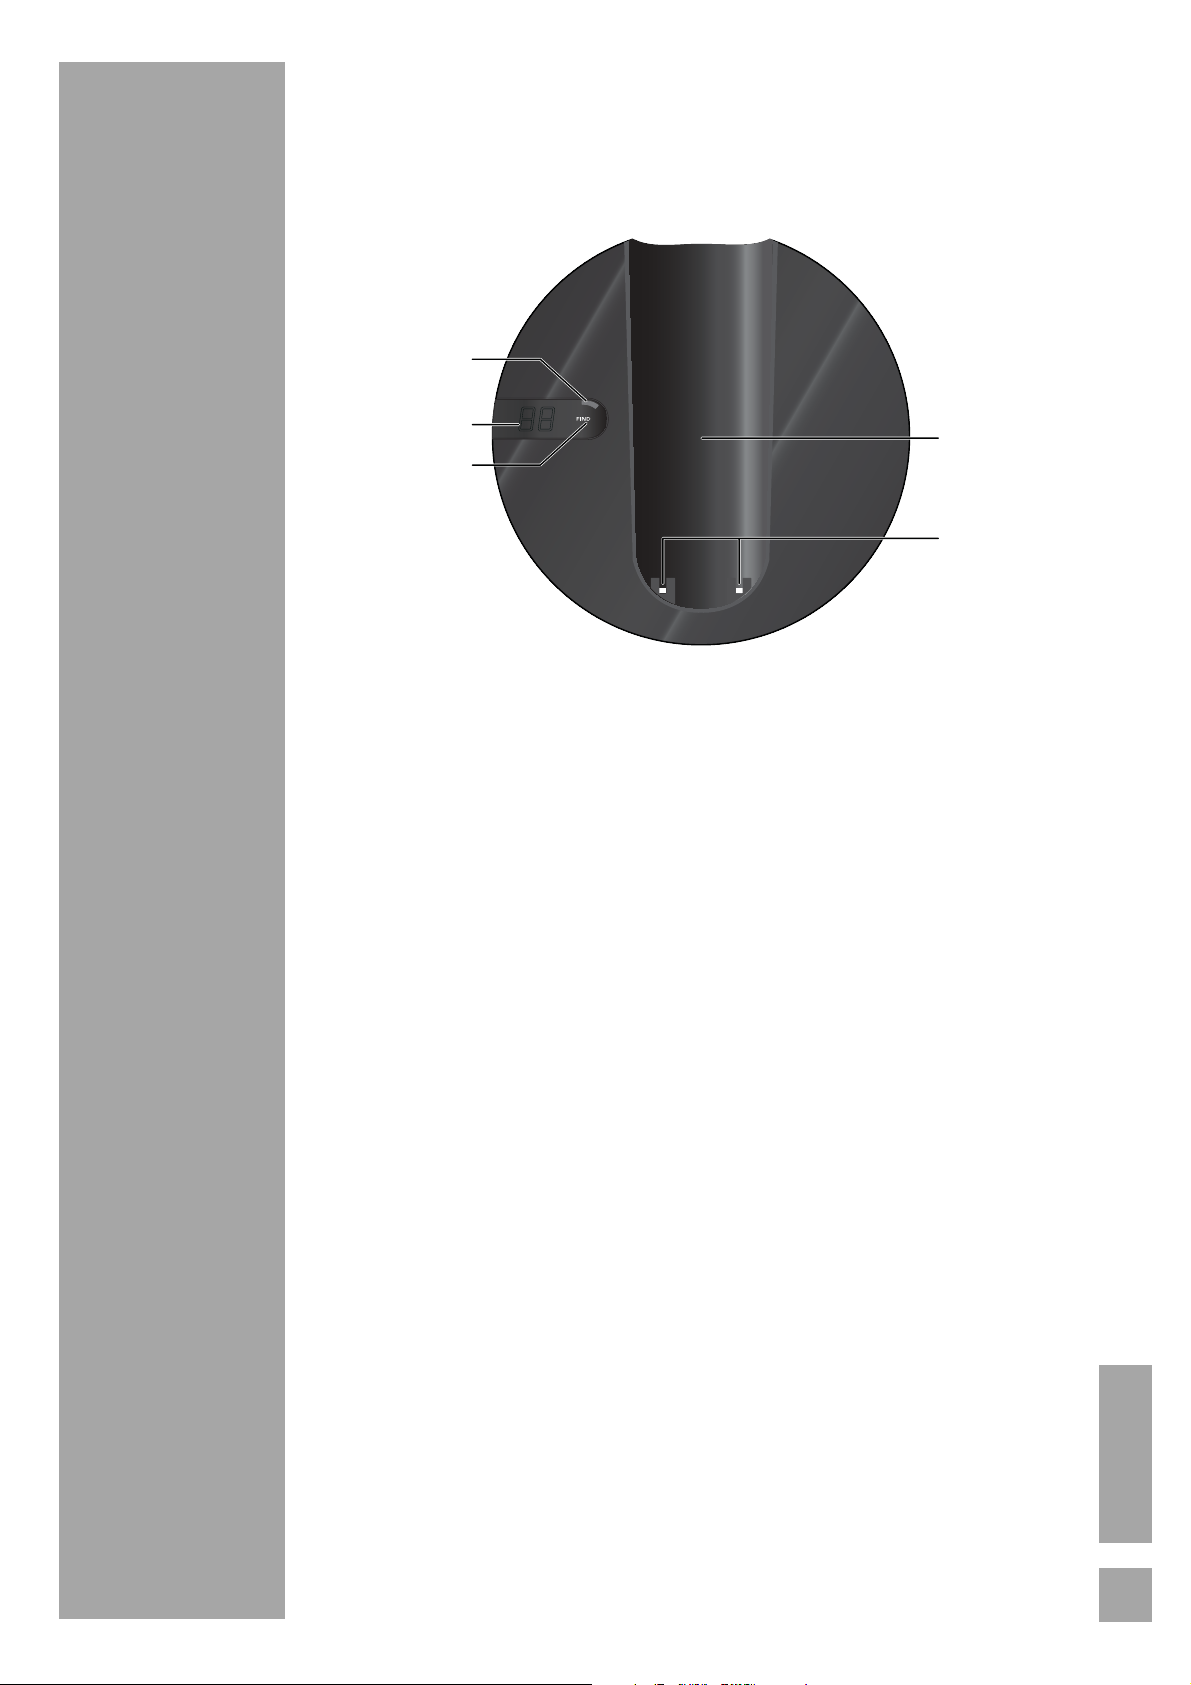
Presenting the base unit
Your base is designed to fit into your family environment.
1
2
3
1. Flashing light on the base unit :
Red : handset charging
Green : line connection
Orange : line connection and the handset is charging.
Green + flashing slowly: base unit in paging mode.
Orange + flashing slowly: base unit in paging mode and
the handset is charging.
Green + flashing quickly: base unit in pairing mode.
Orange + flashing quickly: base unit in pairing mode and
the handset is charging.
4
5
Green + flashing slowly + flashing display :
Presence of new unread answering machine messages.
2. Display (model with answering machine only) :
Record mode (example
- New messages : the display flashes indicating the
number of unread messages.
- No new messages : the display shows the number of
read messages.
Simple mode :
Deactivated :
3. Base unit button :
Short press: searches for handsets (paging).
Long press: matching of handsets.
4. Location of the handset.
5. Base unit charging contacts.
Ao is displayed.
-- is displaye d .
o2 ):
Page 10
9
SET-UP
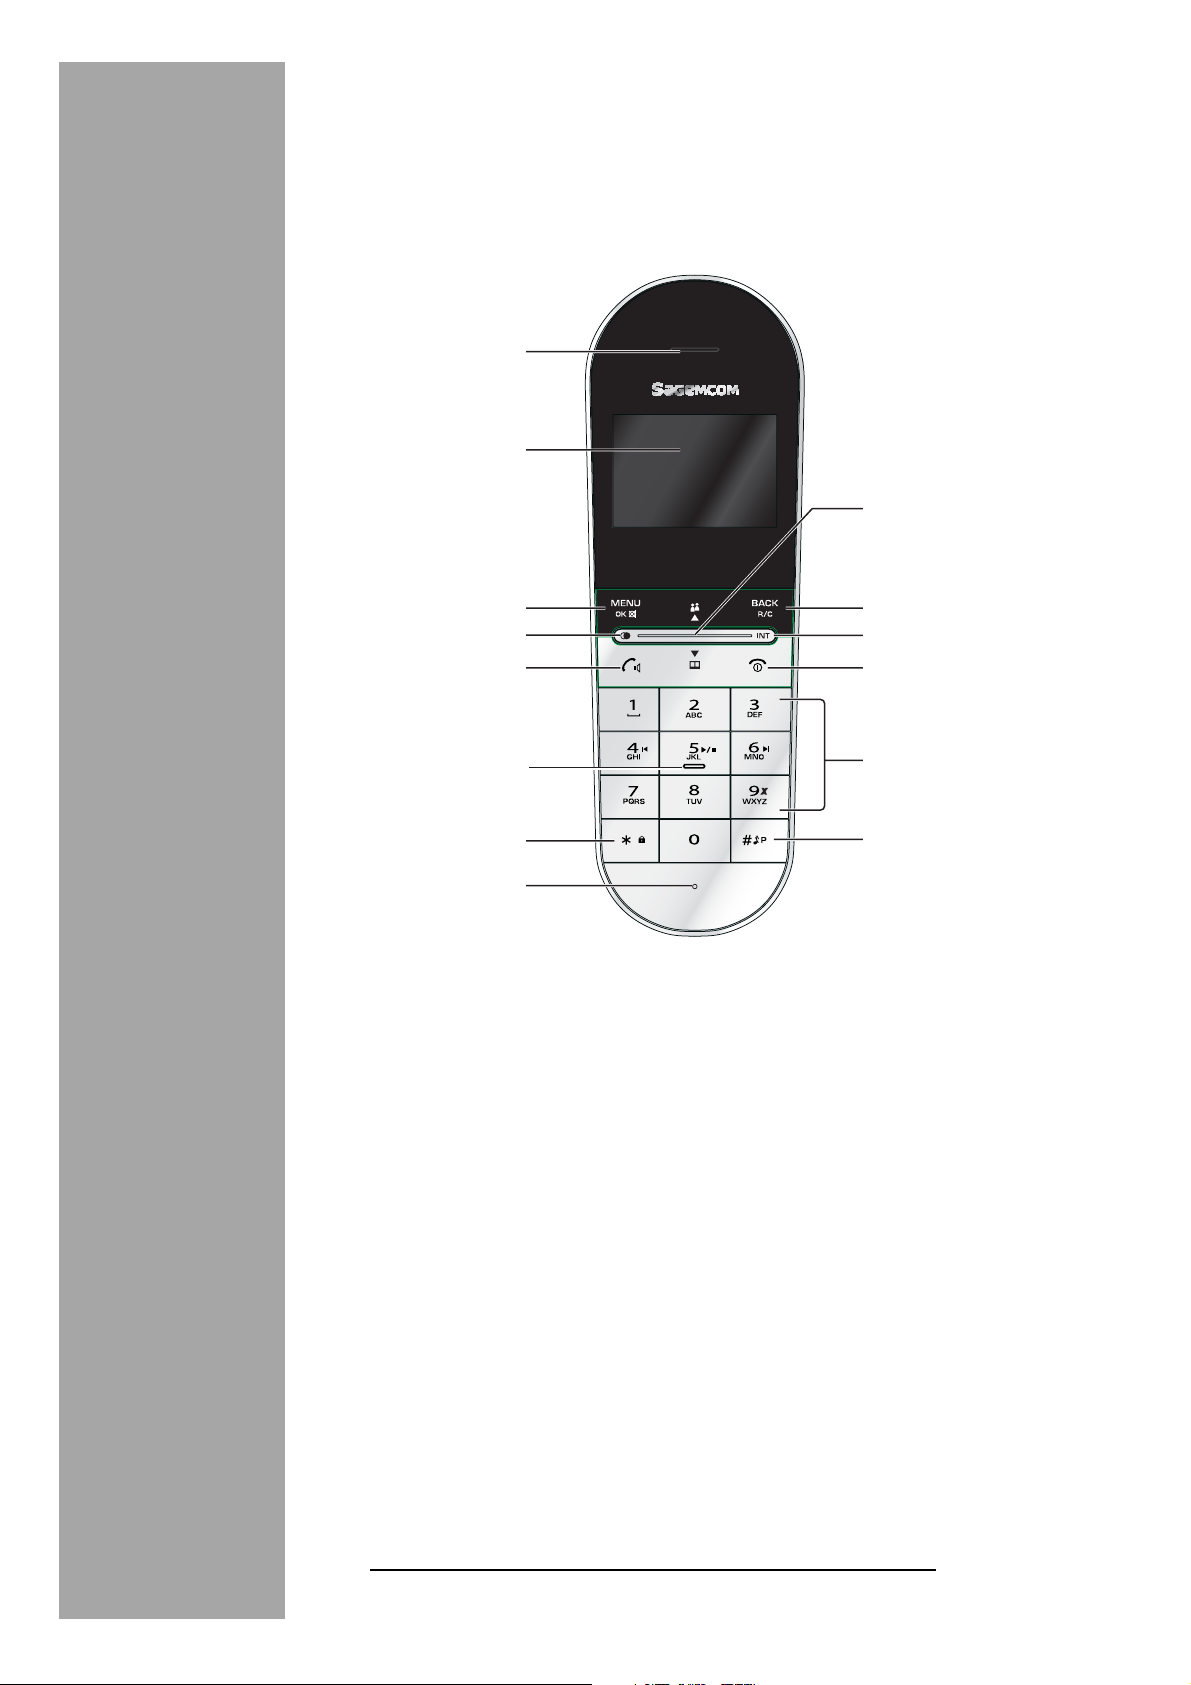
Presenting the handset
You will appreciate the design and quality of the handset during
conversations with your callers.
1
2
9
3
4
5
6
7
10
11
12
13
14
8
1. Speaker.
2. Display.
3. OK / Menu key / Secret mode key during communication
(Secret).
4. Access list of calls made.
5. Phone pick-up / Speaker key.
6. Rapid access to your messages on the answering
1
machine
messages”, page 11).
7. Lock/Unlock keypad.
8. Microphone.
9. Browser (refer to the next paragraph).
10. Return key / Cancelling an entry / R key.
11. Intercommunication (between handsets).
12. Hang up / Handset on/off.
13. Alphanumeric keypad.
14. Inserting a pause (long press) / Stopping the handset ring.
(“Rapid access to the answering machine
1. Model with answering machine only
Page 11
ENGLISH
10
SET-UP
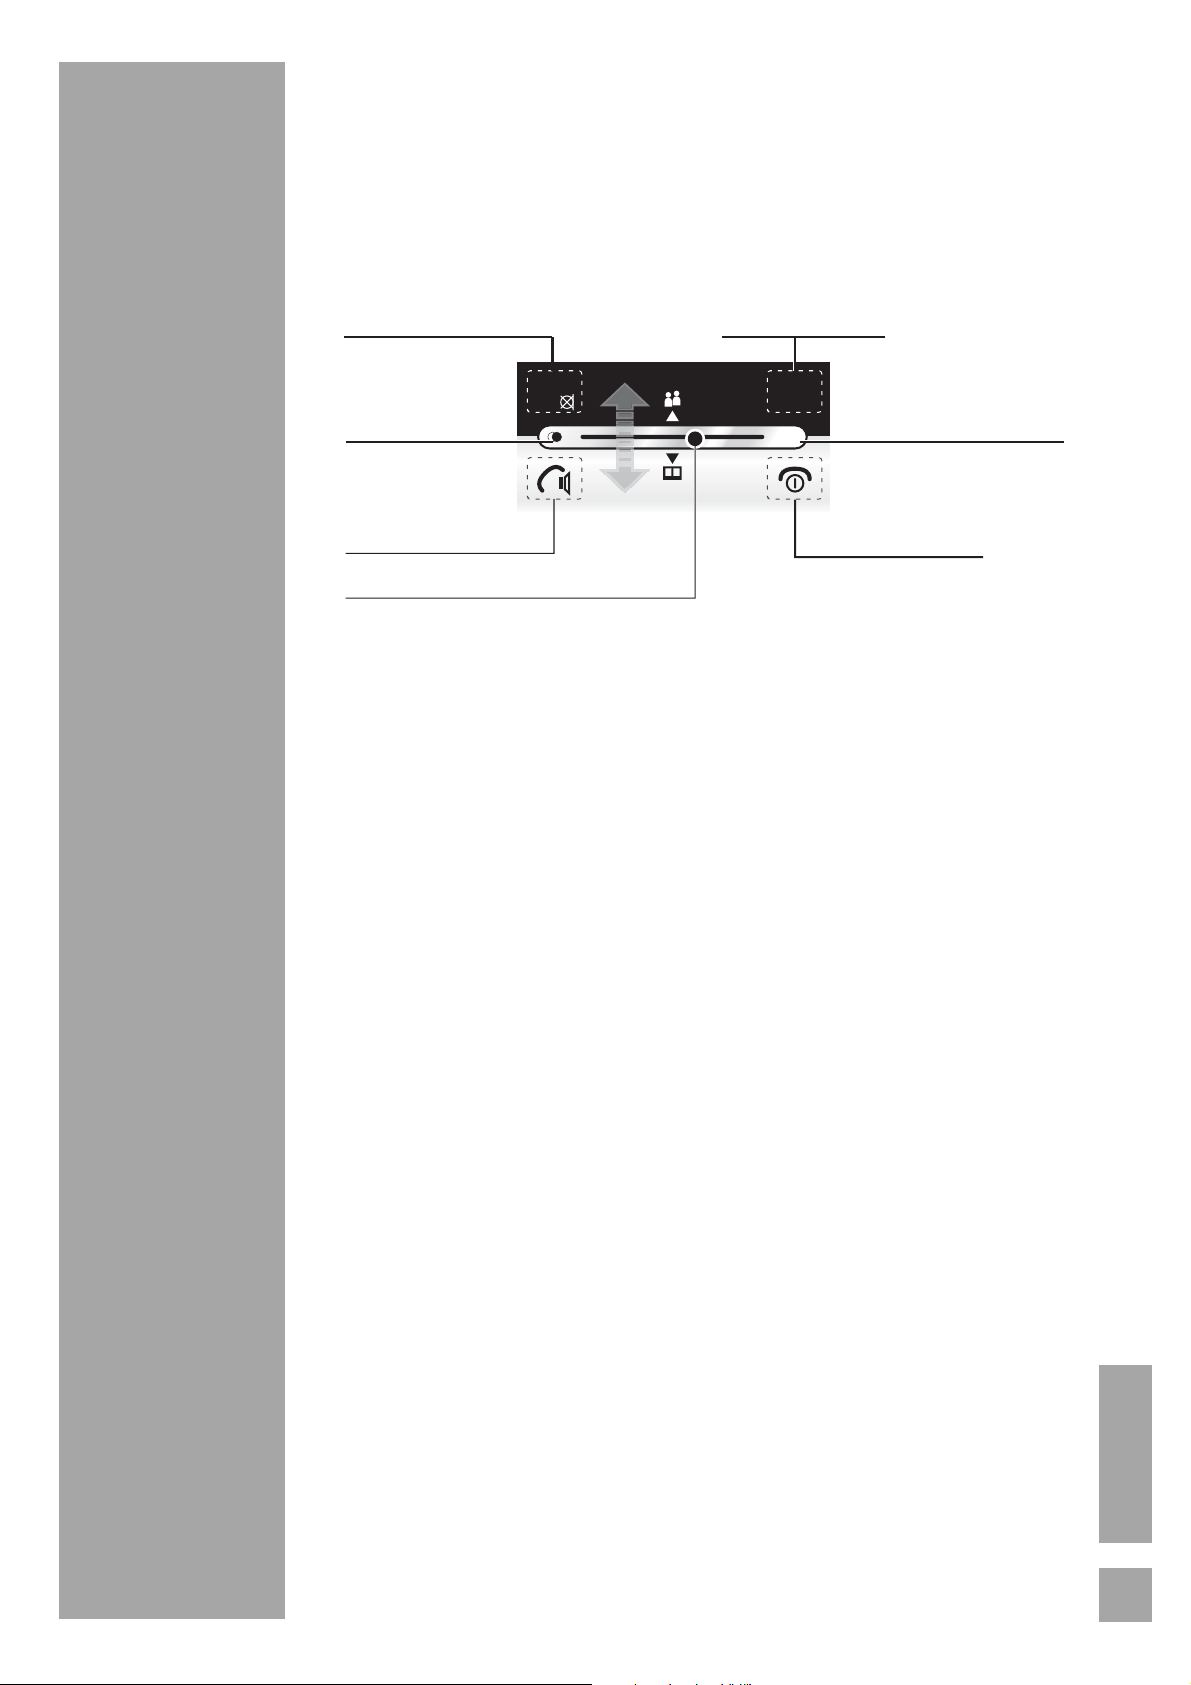
The Navigator
In standby mode
In the menu
This is the quick menu selection device.
OK / Menu key /
Secret mode key during
communication (Secret)
Access to
list of calls made
Phone pick-up /
Speaker key
Navigator :
- Access to the list of calls received */
- Rapid access to the Phonebook */
- Browsing upwards in the menus **/
- Browsing downwards in the menus **/
*I
MENU
OK
: the browser gives access to the list of calls
(1)
(2)
Return key /
Cancel an entry /
R key
BACK
INT
Access the list of handsets
R/C
registered in the database
Hang up /
Handset on/off
received or the Phonebook :
- to access the list of calls received, move the browser
upwards (direction 1).
- to access the Phonebook, move the browser downwards
(direct i on 2).
** I
: the browser enables you to navigate upwards
(direction 1) or downwards (direction 2). To do this, mov e the
browser upwards or downwards .
Page 12
11
SET-UP
Rapid access to the answering machine
messages
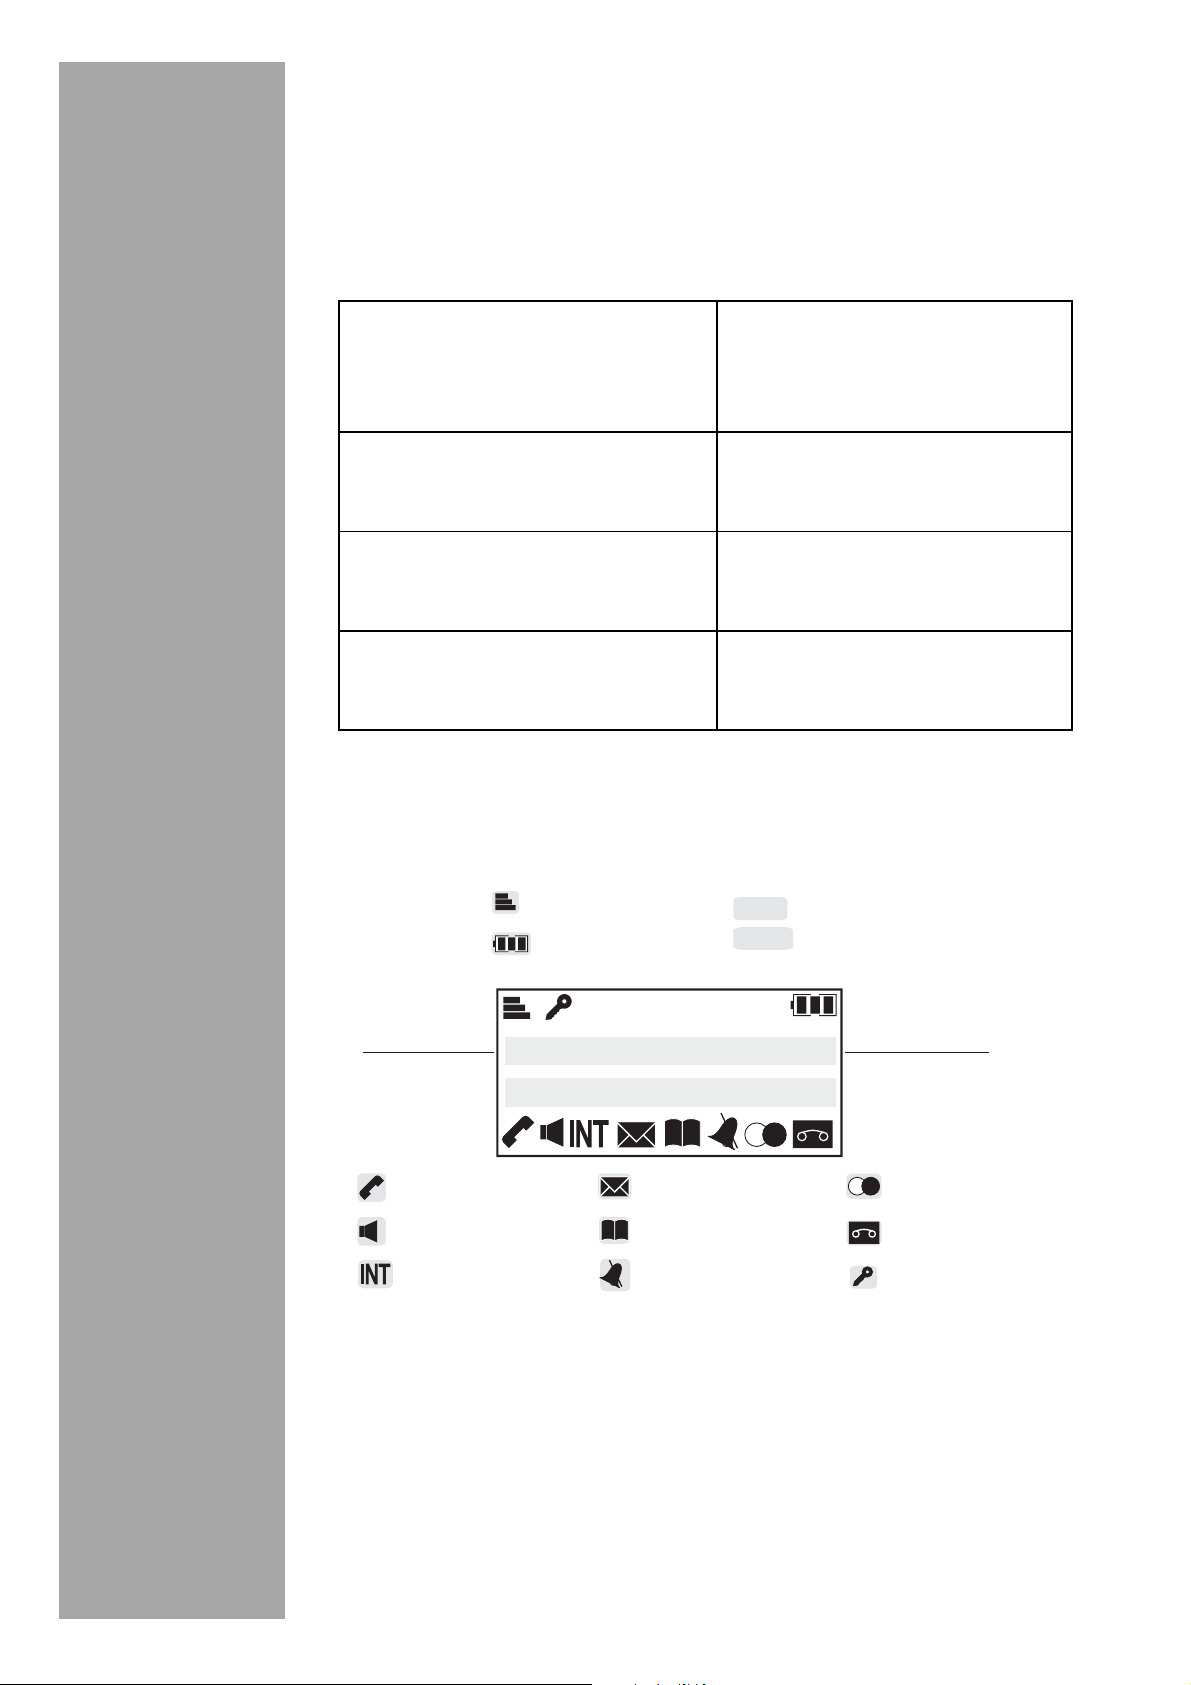
Screen
Operation using the menus and keys
Menu
OK
5
6
4
9
88:88 88/88
88:88
88/88
You can view your answering machine messages from the
standby screen by using the keyboard keys :
Long press on key 5
from the standby screen :
Long press on key 6
while reading :
Long press on key
while reading :
Long press on key 9
:
Visual interface of your handset.
Network indicator
Battery indicator
Start reading your
messages.
Stop play back.
Go to the next
message.
Return to the previous
message.
Delete the message being
read.
88:88
88/88
Time
Date
Name of
the handset
Press the »
Select the menu of your choice by moving the browser up or
down .
To enter the selected menu press the »O
HANDSET 1
In use
Handsfree
Intercommunication
« key to access to the menus.
88:88 88/88
PhoneMail
Phonebook
Silent mode
Number
of handset
Redial
Answering machine
Keypad lock
« key.
Page 13
ENGLISH
12
SET-UP
BACK
OK
BACK
Example:
Menu
OK
OK
OK
OK
Base unit connection
To return to the previous menu press the »B
In the menu, select the functions by moving the browser up or
down and save the modified settings by pressing the »O
key.
Once you have selected or set the function, you can return to th e
previous menu level (»B
(press » «).
1. Press the »
2. Select »Personal Set«, press the »O
3. Select »Handset Tones« by moving the browser up or
down , press the »O
4. Select »Ring Melody« by moving the browser up or
down , press the »O
5. Select the handset melody by moving the browser up or
down , press the »O
to change the handset melody for external calls:
« key.
« key) or leave the menu
« key.
« key.
« key.
« key.
« key.
«
6. Press on the » « key to exit the menu.
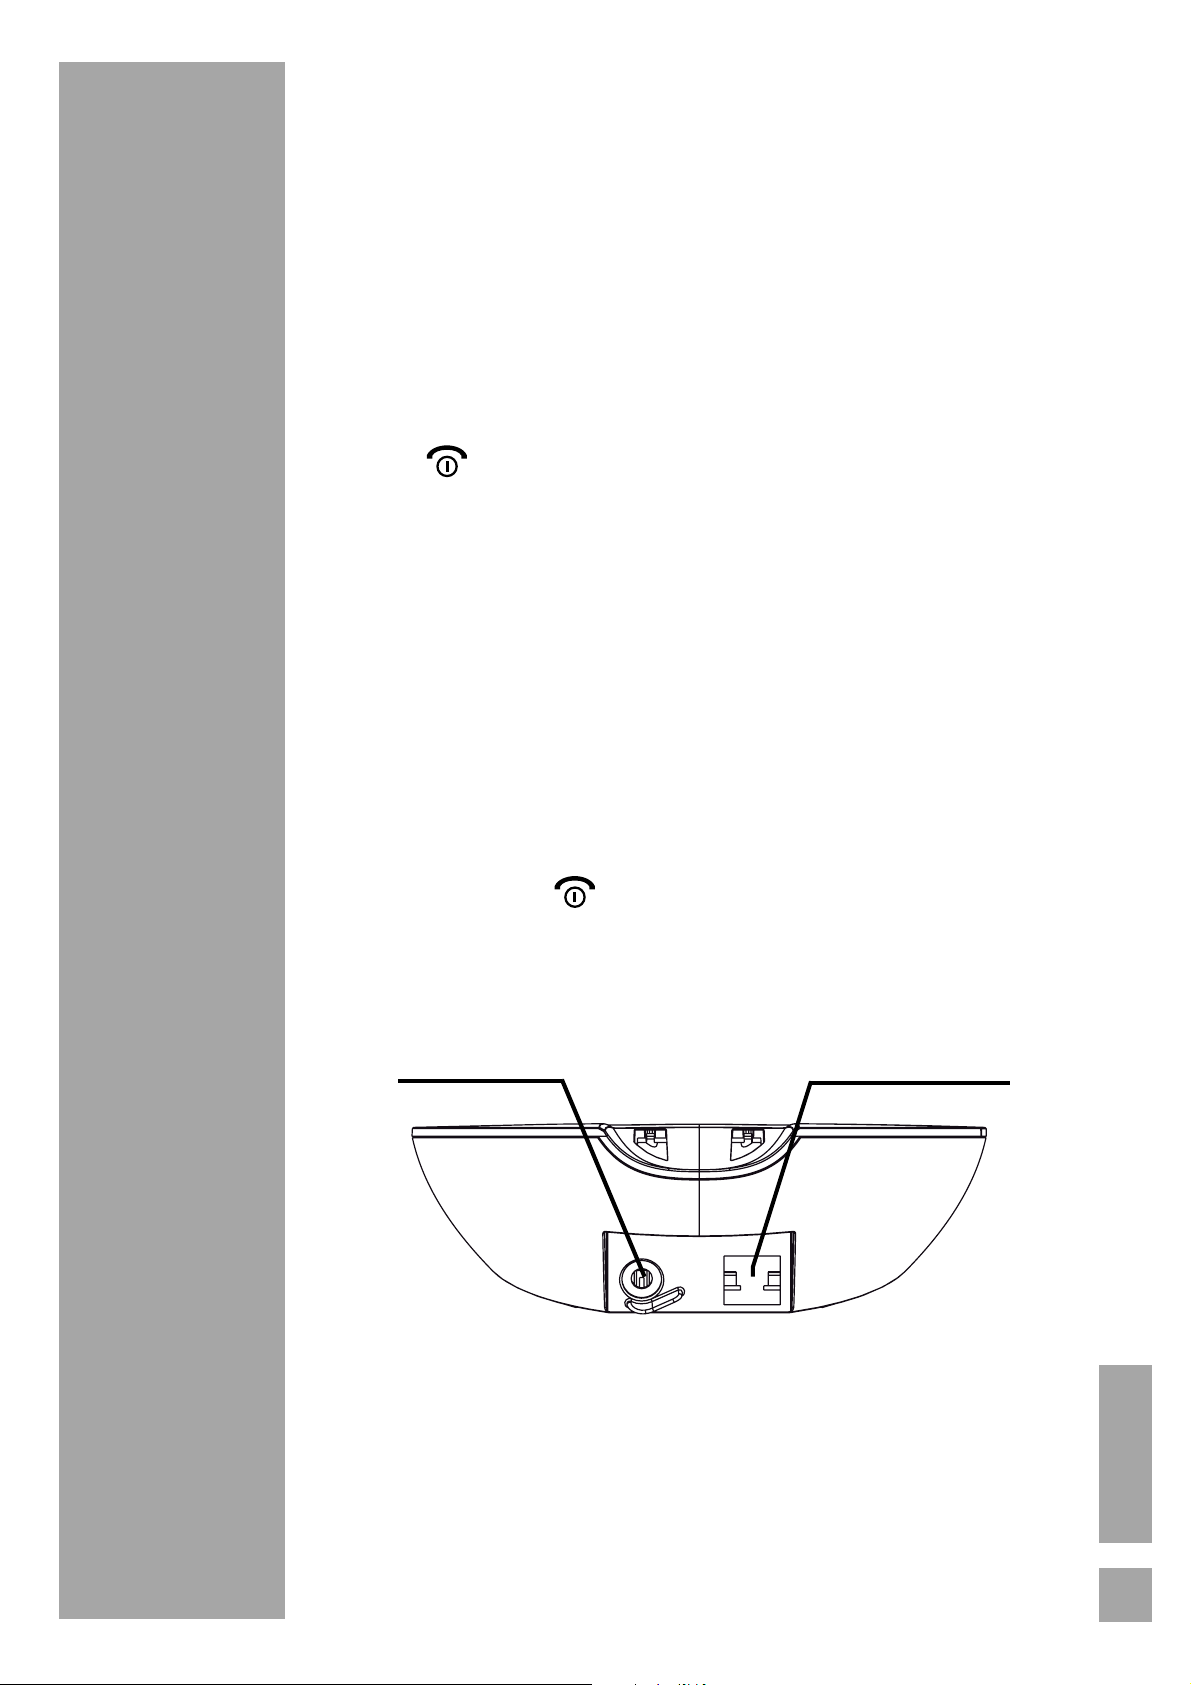
Before making connections read the safety instructions lo cated at
the start of this booklet.
Mains point
Insert the telephone point into its housing at the rear face of the
base unit and connect the other end of the lead to the telephone
wall point.
Telephone point
Connect the end of the mains power unit lead to the rear of the
base unit and the mains power unit to a mains power supply. The
base will emit an audible tone.
Page 14

13
SET-UP
Inserting batteries in the handset
Remark:
Pass the wires through the cable guide and place the base in its
desired location.
- Turn over the handset and open the battery unit hatch.
- Insert the connector into its slot following the direction of the
wires.
Connector
1
Battery
connection
Insertion
direction
Red wire
Black wire
battery unit
- Slide the battery unit into its slot.
2
The battery unit characteristics label must be
Red wire
Black wire
oriented towards the bottom.
- Put the battery unit hatch back in its place.
3
Red wire
Battery unit hatch
Black wire
The used battery unit must be disposed of complying with the
recycling instructions in the Environment paragraph of this
booklet.
Only use rechargeable battery units NiMH 2.4V 600 mAh. On
first use, to ensure maximum charging, leave the handset on the
base unit for at least 12 hours. While charging, the battery may
heat up. This is normal and presents no danger.
Page 15

ENGLISH
14
SET-UP
Battery function duration
Longevity of the battery
Battery charging status
Switching the handset on and off
Out of range
The battery capacity should allow for approximately 120 hours
on standby, 10 hours conversation.
To maximise battery longevity, note the following:
- Do not short-circuit the plug.
- Use your handset as a mobile phone and do not replace it in
the base station or charger (accessories) to be charged after
every phone call.
The battery charging status is displayed on the screen. The
number of strokes show the battery charge status (" " flat,
" " charged). If the battery unit capacit y is almost exhausted,
the screen backlight is deactivated with a warning beep sounds.
This sound is also produced when the battery unit is removed
then put back in its place. As a rule, a new battery unit only
reaches its maximum capacity after several charge/recharge
cycles, even if the battery unit display shows that the battery unit
of the handset is charged, you should take into account that the
length of normal calls and availability time is limited at the
beginning.
To switch on your handset press the » « key.
To switch off the handset hold down the » « key for a period.
Your handset is then switched off.
When the distance between the handset and the base is too
great, the "Antenna" signal flashes.
Move back towards the base unit
When the "Antenna" symbol stops flashing the link with the
base has been re-established.
Page 16

15
BLOCK DIAGRAM
BLOCK DIAGRAM
Phonebook - New Entry
- List Entry
-Edit Entry
- Delete Entry
- Delete All
Set Date/Time
Personal Set - Handset Tones - Ring Volume
- Ring Melody
- Handset Name
-Auto answer
Auto hang-up
- Language
-Base Tone -BS Ring Vol
Advanced Set - Recall Time
-Registeration
-Unregister
- Change PIN
- Reset
Answ. Machine - Play
-BS Ring Mel
-Record Memo
-Answ. Mode
-Ans. On/Off
- Settings - Ring Delay
- Remote access
- HS Screening
Page 17

ENGLISH
16
MAKING TELEPHONE CALLS
Making an external call
BACK
Answering a call
Making an internal call
INT
CLI (Caller Line ID) function
MAKING TELEPHONE CALLS
External calls are calls made to the public network.
Enter the number of the person you are calling using the keypad
and press the » « key. In the event of an error being made in
entering a number, press the »B
number.
If the person you are calling is recorded in the phonebook
contact list, move the browser downwards » « key, select
the name of the person you are calling then press the » « key.
« key to delete the incorrect
when a call is received, every handset registered on the base unit
will ring.
Press the » « key on one of the handsets to answer the call.
At the end of the conversation press the » « to hang up.
Internal calls are calls between two handsets registered on the
same base unit. Internal calls are not charged for by your
operator.
Press the »I
base unit will appear on the display. Enter the number
corresponding to the handset that you wish to call.
At the end of the conversation press the » « key.
« key, the numbers of h andsets registered on the
Before using the phone number transfer (CLI), please contact
your provider to subscribe to Caller Line Identification. This will
enable you to receive calls displaying the callers number.
There might be a special rate or a fee required for this function
to be enabled.
If the caller’s phone number is in the phone book, the name of
the caller is displayed as well as the number.
If the caller has suppressed or not activated the CLI function,
»Unknown« appears.
Page 18

17
MAKING TELEPHONE CALLS
Managing calls whilst communication is
underway
Transfering a call to another handset
INT
Remark
Switching between an external and internal call
INT
INT
Setting up a three party conference call
INT
*
INT
Call management
Receiving a second call
R/C
This function is available if your installation is made up of at least
two handsets registered on the same base unit.
This function allows you to transfer the call that is in progress to
another handset registered on the same base unit.
Keep the »I
number of the handset to which you wish to transfer the call.
When the handset being called is picked up, transfer the call by
pressing the key symbol .
« pressed, the external call is put on hold, enter the
Keep the I
the handset to which you want to transfer the call.
When the handset being called is picked up, keep the »I
pressed to switch between external/internal calls.
Keep the »I
number of the handset to which you wish to transfer the call.
When the handset being called is picked up, conference press
and hold »*
: If the handset called does not answer, you can
recover the call, Keep pressing the »INT« key.
« key pressed, the external call is put on hold, select
« key
« pressed, the external call is put on hold, enter the
« key pressed.
You can revert to a communication between two parties for bot h
internal and external calls. During a conference press and hold
« key pressed.
»I
When you are on the phone, a sound beep is issued to let you
know that another call is waiting. The screen displays the latter's
name and number (depending on the operator).
Press the »R
Caller #1 is put on hold and you can talk to Caller #2.
« keys + to take this new call.
Page 19

ENGLISH
18
MAKING TELEPHONE CALLS
Issue of a second call
R/C
To switch from one call to another
R/C
To finish one call and continue another
R/C
To make a conference call for 3 people (the 2 calls and
you)
R/C
Locking the handset keypad
*
Using in hands-free mode
While you're on the phone, press the »R
number to call.
« key then dial the
Press the »R
The current call goes on hold and you can then take the second
call.
Press the »R
The current call is terminated and you can then take the second
call.
Press the »R
You can then speak to both correspondents at once.
To terminate the 3-way conference call, press .
« keys + to switch from one call to another.
« keys + .
« keys + .
Keep the »**« key pressed until the » « icon is shown on the
display.
To unlock the keypad keep the »*
icon disappears from the display.
« key pressed until the » «
Hands-free mode allows you to hold a dialogue with your caller
without holding the handset. It also allows other persons pr esent
in the room to hear the conversation.
Press the » « key, the » « icon appears on the display. Dial the
number of the person you are calling.
When a call is received, press the » « key. Hands-free mode is
then activated.
Page 20

19
MAKING TELEPHONE CALLS
Setting the volume
Remark:
Secret mode
This function allows you to set the listening volume during a
conversation.
Move the browser up or down to increase or reduce the
listening volume. You can set the volume to a level from 1 to 5.
The volume level selected is shown on the display.
This function is also available in hands-free mode.
This function enables you to activate or deactivate the handset
microphone during a call. You can therefore allow your caller to
hear or prevent your caller from hearing what you are saying.
Press the » « key, the person on the line cannot then hear what
you are saying.
To deactivate secret mode press the » «, key. The person on
the line can now hear what you are saying.
Page 21

ENGLISH
20
PHONEBOOK
Adding a phonebook entry
Manually adding a phonebook entry
Menu
OK
OK
OK
Adding a phonebook entry using the call log
OK
OK
OK
Viewing a phonebook entry
Menu
OK
PHONEBOOK
You can store up to 200 contacts in your phonebook.
Each entry can contain the name of your contact as
10 characters (including spaces) and their telephone number as
20 numbers.
You can enter names and call numbers manually or add contacts
from the received or the outgoing call logs.
Go to »
Select »New Entry«. Enter the contact name and number using
the keypad. Confirm using the »O
« / »Phonebook«.
« key.
Enter the phone number using the keypad. Confirm using the
« key.
»O
Confirm using the »O
Access the calls list directly by pressing the » « key or moving
the browser upwards .
Press the »O
press the »O
the screen. Confirm using the »O
« key to select »Copy to Phbk«. Enter the name and
« key. The number of the contact is displayed on
« key.
« key.
This function allows you to view the data for your contact.
Go to »M
directly by moving the browser downwards » «).
« / »Phonebook« (you can access the Phonebook
Select »List Entry«.
Select the contact you wish to consult then press the »O
twice.
The display will show the name and the number assigned to your
contact.
« key
Page 22

21
PHONEBOOK
Editing a phonebook entry
Menu
OK
BACK
OK
Deleting a phonebook entry
Menu
OK
OK
BACK
Deleting the entire phonebook
Menu
OK
BACK
The function allows you to modify the name, number and melody
assigned to your contact.
Go to »
Select »Edit Entry«.
Select the contact you wish to modify then press the »O
Use the »B
Confirm using the »O
« / »Phonebook«.
« key to make changes.
« key.
Go to »
Select »Delete Entry«.
Select the contact you wish to delete then press the »O
Confirm using the »O
« / »Phonebook«.
« key.
« key.
« key.
An audible tone shows that the phonebook entry is deleted from
the list of contacts.
To cancel the deletion press the »B
« key .
This function allows you to delete all the entries in your
phonebook.
Go to »
Confirm using the »O
To cancel the deletion press the »B
« / »Phonebook« / »Delete All«.
« key.
« key.
Page 23

ENGLISH
22
DATE AND TIME
Set the time and date
Menu
OK
Remark:
BACK
DATE AND TIME
Go to »
Enter the new time in the format Hours: minutes, then enter the
new date in the format DD/MM. Press the »O
« / »Set Date/Time«.
« key.
In the event of an error during entry, the last
number can be edited by pressing the »B
« key.
Page 24

23
CUSTOMISATION
Setting the melody and handset volume for an
external call
Menu
OK
OK
OK
Customising the name of the handset
Menu
OK
Activating/deactivating automatic pick-up
Menu
OK
Activating/deactivating automatic Hang-up
Menu
OK
CUSTOMISATION
This menu enables you to customize your phone.
Go to »
Select »Ring Melody«, move the browser up or down to
define the handset melody. Confirm the selection by pressin g the
»O
Select »Ring Volume«, move the browser up or down to
adjust the handset melody volume. Confirm the selection by
pressing the »O
Select »Key Beep«, move the browser up or down to
activate/deactivate the beep keys. Confirm the selection by
pressing the »O
« key.
« / »Personal Set« / »Hands et Tones«.
« key.
« key.
This function allows you to assign a name to your handset (Max
12 characters).
Go to »
Enter the handset name, confirm using the »O
« / »Personal Set« / »Hands et Name«.
« key.
Automatic pick-up when activated enables automatic pick-up as
soon as the handset is removed from its base unit.
Got to »
Move the browser up or down to activate/deactivate
automatic pick-up, press the »O
« / »Personal Set« / »Auto answer«.
« key.
When automatic pick-up is activated, it enables automatic hangup when you replace the handset on the base unit.
Got to »
Move the browser up or down to activate/deactivate
automatic hang-up, press the »O
« / »Personal Set« / »Auto hang-up«.
« key.
Page 25

ENGLISH
24
CUSTOMISATION
Setting the menu language
Menu
OK
Setting the base unit melody and volume
Menu
OK
OK
This function allows you to change the language in which the
displays are shown.
Go to »
Select the desired language by moving the browser up or
down and pressing »O
« / »Advanced Set« / »Language«.
«.
Go to »
Select »BS Ring Mel« and move the browser up or down to
choose the base unit melody. Confirm the selection by pressing
the »O
Select »BS Ring Vol« and move the browser up or down to
adjust the melody volume. Confirm the selection by pressing the
»O
« key.
« / »Personal Set« / »Base Tone«.
« key.
Page 26

25
ADVANCED SETTINGS
Recall Time
Registeration
Unregister
Change PIN.
Reset
Setting the flash time
Menu
OK
Registering a new handset
Remark:
Menu
OK
BACK
ADVANCED SETTINGS
This function allows you to set the functions relating to the
handset.
If you connect your telephone to an automatic PBX or in a foreign
country, you may need to change the flash time in order to use
your telephone correctly for the following functions: call hold,
three party conference calls.
Contact your operator to provide you with the appropriate
duration and carry out a new setting operation.
Go to »
Select the flash time by moving the browser up or down .
Press the »O
« / »Advanced Set« / »Recall Time«.
« key to confirm the selection.
You can register up to five handsets on your base unit. It will then
be possible for you to make calls between handsets.
Keep the paging key of the base unit pressed until an audible
signal is heard.
Calls between handsets are only possible when
handsets are registered on the same base unit.
calls between handsets (internal) are not charged
by the operator.
Go to »
Enter the PIN code (Personal Identification Number), factory
setting: 0000).
Press »O
To cancel the handset registration, press the »B
Once registration is complete, the handsets will display the
available handset number (between 1 and 5).
« / »Advanced Set« / »Registeration«.
« to register the handset on the base unit.
« key.
Page 27

ENGLISH
26
ADVANCED SETTINGS
Removing a handset
Menu
OK
Non-Subscription
Changing your PIN code
Remark:
Menu
OK
OK
Remark
BACK
You can select the number that you want to be associated by
pressing the corresponding numbered key (press key 1 to select
handset number 1).
This function allows you to remove a handset from your base
unit. This may be necessary if a handset is lost or if you already
have 5 handsets assigned to the base unit.
Go to »
Enter the PIN code (Personal Identification Number, factory
setting : 0000).
Press »O
the numbers of the handsets registered on the base unit appear
on the display.
Enter the number of the handset that you wish to remove.
The removed handset will show "N
registered once again.
« / »Advanced Set« / »Unregister«.
«.
" until it is
This function is used to protect your settings against unauthorised
access; you can assign a personal identification PIN number
(0000 factory default setting).
Go to »
Enter the new PIN, confirm using the »O
Enter the new PIN once more, confirm using the »O
: In the event of an er ror during entry the last number
Ensure that you remember the PIN number; it will
be required should you wish to change certain
settings.
« / »Advanced Set« / »Change PIN«.
« key.
can be deleted by pressing the »B
« key.
« key.
Page 28

27
ADVANCED SETTINGS
Resetting the handset and the base unit default
settings
Menu
OK
OK
The reset function is used to return to factory default settings.
It deletes the contacts in the phonebook and from the call list.
Go to »
Enter the PIN code (Personal Identification Number, factory
setting : 0000). Press the »O
Press the »O
To cancel the reset press the » « key.
« / »Advanced Set« / »Reset«
«.
« key to confirm the reset.
Page 29

ENGLISH
28
CALL LOG
To display the list of calls made
Removing numbers from the list of calls
OK
OK
BACK
Storing a caller's details in the phonebook
OK
OK
OK
CALL LOG
The list of calls made by your telephone can contain 10 records
made up of a number with a maximum of 24 figures and a name
with a maximum of 10 characters.
The list of calls received by your telephone can contain 20
records made up of a number with a maximum of 24 figures and
a name with a maximum of 12 characters.
Press the » « key or move the browser up ( ) to display
the list of dialled or received numbers.
Select the number that you wish to call again; press the the » «.
The number is dialled automatically.
Press the » « key or move the browser up ( ) to display
the list of dialled or received numbers.
Press »O
up or down .
Press the »O
Press the »B
«, Select »Delete« or »Delete All« by moving the browser
« key to confirm deletion.
« key to cancel deletion.
Press the » « key or move the browser up ( ) to display
the list of dialled or received numbers.
Select the number that you wish to store.
Press the »O
press the »O
the screen. Confirm using the »O
« key to select »Copy to Phbk«. Enter the name and
« key. The number of the contact is displayed on
« key.
Page 30

29
ANSWERING MACHINE (D77V only)
14
Menu
Play
Record Memo
Answ. Mode
Ans. On/Off
Settings
Playing a message
Menu
OK
Menu
Repeat
Delete All
Delete
Prev. Message
Next Message
BACK
No message
Remark :
Remark :
ANSWERING MACHINE (D77V only)
This telephone is equipped with an integral digital answering
machine with a recording capacity of 1
Announcement messages (ANNOUNCEMENT 1 + 2) can last 1
minute each.
minutes.
Go to »
The following Functions appear on the display:
« / »Answ. Machine«.
Go to »
Press »O
Press the »
messages. The list of options is shown on the display.
« / »Answ. Machine« / »Play«.
« to play messages. New messages are played first.
« key to access the various options relating to
Press the »B
If there are no messages, the handset shows "N
« key to exit the menu.
Long press on key 55, from the standby screen,
starts reading the messages directly (see the
paragraph “Rapid access to the answering
machine messages”, page 11).
If your answering machine is full, the answering
machine moves to simple mode and the base unit
display flashes alternately between
number of messages.
88 and the
".
Page 31

ENGLISH
30
ANSWERING MACHINE (D77V only)
Recording a memo
Menu
OK
BACK
OK
Selecting answer machine mode
Menu
Recorder
Answer only.
Selecting an outgoing message
Menu
OK
Personalized
Predefined
Recording an outgoing message
Menu
This function allows you to place a personal message on your
answering machine. Whilst it wi ll not be heard, it will be regarded
as a new message by the answering machine.
Go to »
Press »O
»Memo« is shown on the display.
Press the »B
Press the »O
« / »Answ. Machine« / »Record Memo«.
« to switch to memo record mode; the heading
« key to return to the previo us menu.
« key to interrupt recording.
Go to »
Select answer machine mode by moving the browser up or
down .
-R
-A
The announcement to be used will be played.
« / »Answ. Machine« / »Answ. Mode.«.
: To activate the answering machine recorder.
: To activate the answering machine only.
Go to »
Select the announcement mode you wish to personalize by
moving the browser up or down .
Press »O
-P
-P
This function is used to customise the outgoing messages from
your answering machine.
Go to »
Select the announcement mode you wish to personalize by
moving the browser up or down .
answering machine mode (simple or recorder).
answering machine mode (simple or recorder).
« / »Answ. Machine« / »Answ. Mode«.
« key.
: selects the personalized announcement of the
: selects the predefined announcement of the
« / »Answ. Machine« / »Answ. Mode«.
Page 32

31
ANSWERING MACHINE (D77V only)
OK
OK
OK
OK
BACK
Playing back an outgoing message
Menu
OK
OK
OK
BACK
Press »O
Select »Personalized« by moving the browser up or down .
Press »O
Select »Record mess.« by moving the browser up or down .
Press the »O
Press the »O
Press the »B
Once the recording is complete, the announcement plays
automatically.
This function is used to play back your answering machine's
outgoing message.
« key.
« key.
« key to start the recording.
« key to stop the recording.
« key to return to the previo us menu.
Go to »
Select the announcement you wish to listen to again by moving
the browser up or down .
Press »O
Select »Personalized« by moving the browser up or down .
Press »O
Select »Play message« by moving the browser up or down .
Press the »O
Press the »B
« / »Answ. Machine« / »Answ. Mode«.
« key.
« key.
« key to start reading.
« key to return to the previo us menu.
Page 33

ENGLISH
32
ANSWERING MACHINE (D77V only)
Activating/deactivating the answering machine
Menu
OK
OK
TAM Settings
Menu
Ring Delay
Remote access
HS Screening
Delay before the answering machine answers the call
Menu
Automatic
Automatic
3~8 rings:
This function is used to activate or deactivate your answering
machine.
Go to »
Press the »O
Select »On« / »Off« by moving the browser up or down .
Press the »O
« / »Answ. Machine« / »Ans. On/Off«.
« key to display the answering machine status.
« key to confirm.
This menu allows you to change advanced settings on your
answering machine (according to model).
Go to »
The following functions appear on the display:
« / »Answ. Machine« / »Settings«.
This setting is used to specify the number of times your telephone
rings before your answering machine answers the call. The
number of rings can be between 3 and 8 and you can also select
Automatic mode.
Automatic mode will automatically determine the number of
rings, depending on the number of messages stored in the
answering machine.
Go to »
Select the number of rings by moving the browser up or
down .
« / »Answ. Machine« / »Settings« / »Ring Delay«.
:if you select "A
answer the call after the second ring if a new
message has been recorded. Otherwise it answers
after four rings. Users can therefore determine
whether or not a new message has been recorded
from the number of rings.
users can also programme the number of rings
before the answering machine switches on (the
default setting is 5 rings).
", the answering machine will
Page 34

33
ANSWERING MACHINE (D77V only)
Call filtering
Menu
ON
OFF
Remark
Remote control
General management
Enter PIN
When activated the filtering function allows you to monitor the
message being left by the caller as i t is being recorded. You can
pick up the phone to take the call at any time.
Go to »
Press the »O
access function.
To filter incoming calls you can allow callers to start recording
their message (in order to identify the caller), then pick up the
handset or press the » « key to take the call.
If call filtering is activated, the message recorded by the caller will
be audible; if call filtering is deactivated t he m essage will not be
audible.
The answering machine automatically interrupts recording when
you pick up the handset.
: Filtering only works with handset number 1 (see the
« / »Answ. Machine« / »Settings« / »Remote access «.
« / »O
paragraph “Screen”, page 11).
« key to activate/deactivate the Remote
You can play back your answering machine in remote mode.
This function allows you to recover your messages and access
your answering machine from any other telephone located
outside your place of residence.
When the answering machine is deactivated and remote control
is deactivated, the equipment does not answer any calls and
remote access is not possible. The base unit display is switched
off.
If the answering machine is deactivated and remote control is
active, the equipment answers a call after 10 rings by playing the
following message: "E
In this mode you can remotely activate your answering machine.
Once activated the telephone is in answering machine/recording
mode, the equipment uses the operating mode already selected
by the user.
".
Page 35

ENGLISH
34
ANSWERING MACHINE (D77V only)
Menu
On
Off
BACK
Activating/deactivating remote control
Go to »
Select »O
activate or deactivate remote control.
Press the »B
Remote control operatio n
When remote control and the answering machine are both
activated, enter the PIN code when the outgoing message is
being played back in order to access the answering machine. A
long audible confirmation signal is heard telling you that the
connection has been established.
The remote interrogation code corresponds to the base unit PIN
code (see “Changing your PIN code”, page 26.).
Remote control operation is described in the following section.
- If you do not press a key within 10 seconds, the machine
- The code is detected during the playback of the outgoing
- After three attempts at entering an incorrect PIN the telephone
- The maximum delay between two numbers is 4 seconds.
- The telephone receives commands whilst messages, memo
automatically stops.
message.
terminates the session and hangs up.
and the outgoing message are being read.
« / »Answ. Machine« / »Settings« / »HS Screening«.
« / »O
« by moving the browser up or down to
« key to return to the previo us menu.
Page 36

35
ANSWERING MACHINE (D77V only)
Playing messages and memos
Deleting messages and memos
Recording outgoing messages
Remote access key functi ons
Key
sequences
2 Play all messages
*2 Play new message only
5Pause
2 Repeat play back
55 Stop play back
1 Return to the start of the message
11 Go to the previous message
3 Go to the next message
Key
sequences
Answering machine function
Answering machine function
02 Delete a single message, whilst it is being
played
02 (After all
messages
were played)
Key
sequences
61 Recording a personalized message for the
62 Recording a personalized message for the
Delete all messages played after playback
Answering machine function
answering machine recorder.
answering machine only.
Page 37

ENGLISH
36
ANSWERING MACHINE (D77V only)
Playing back outgoing messages
Recording memos
Setting up the answering machine
Key
sequences
71 Reading the announcement currently used for
72 Reading the announcement currently used for
Key
sequences
63 Start recording a MEMO
5 Stop recording
Answering machine function
the answering machine recorder.
the answering machine only.
Answering machine function
Key
sequences
8 Activating the answering machine recorder/
Answering machine function
Activating the answering machine only/
Deactivating the answering machine.
Page 38

37
TECHNICAL DATA
Condition on delivery
Base:
Handset:
Answering machine (D77V only):
TECHNICAL DATA
Ring volume: Low
Ring melody: 3
PIN: 0000
Interval: On
Flash time: Medium
Ring volume: High
Ring melody: 5
Handset volume: 2
Keypad tone: On
Display language: English
Automatic pick-up: Off
Automatic Hang-up: Off
Telephone book: Empty
Call list: Empty
Redial: Empty
TAD-PIN remote message
enquiry: PIN (0000)
Answering machine: On (recorder)
Texts: 1 message text and
1 announcement text
Page 39

ENGLISH
38
TECHNICAL DATA
Features
Standard DECT, GAP
Frequency range 1880-1900 MHz
Transmission channels 1 20
Medium output Approx. 10 mW
Range Up to 300 m outdoors
Up to 50 m indoors
Power supply:
Power supply unit 230 V, 50 Hz, 40 mA
Battery bloc Type Ni-MH, 2,4 V 600 mAh
Dialling method DTMF (touch tone)
Handset operating life:
In use Up to 12 hours*
In standby Up to 120 hours*
Ambient temperature +5 °C to +45 °C
Dimensions:
Base station (L x W x H) 130 mm x 121mm x 43mm
Handset (L x W x H) 46mm x 146mm x 23mm
Weight:
Base station 110 gr.
Handset 110 gr.
Answering machine: Approx. 14 minutes
Length of recording
(D77V only)
* If the base station is not connected to the mains (such as in a
power outage), the handset continuously searches for a base
station.
Technical changes and errors reserved.
Page 40

39
WARRANTY
Terms and Conditions for United
Kingdom & Ireland only
A) General Guarantee conditions
WARRANTY
In order to apply the guarantee, you should contact the
SAGEMCOM Helpdesk or the retailer where you purchased the
equipment. Proof of purchase will be required in either case.
Please make sure that you use your equipment only for the
purpose for which it was designed and under normal usage
conditions.
SAGEMCOM do not accept any liability for the equipment if
used outside the frame of its original designed purpose or any
consequence that may arise from this usage.
Should any malfunction arise, the SAGEMCOM Helpdesk or
your retailer will advise you how to proceed.
SAGEMCOM undertakes to remedy by repair or exchange at its
own convenience, free of charge for labour and replacement
parts, any defects in the equipment during the guarantee period
of 12 (twelve) months or 3 (three) months for accessories, from
the date of original invoice of the Equipment, where those defects
are a result of faulty workmanship.
Unless the customer has concluded with SAGEMCOM a
maintenance contract in respect of the equipment which
specifically provides for repairs to be carried out at the customer's
premises, the repairs will not be carried out on the equipment at
the customer premises.
The customer must however return the defective equipment at
his/her own expense, to the address supplied by the
SAGEMCOM Helpdesk or by the retailer.
In the case that a product needs to be sent in for a repair, it must
always be accompanied by a proof of purchase (which is not
altered, written on or in any way made illegible) showing that the
product is still under guarantee. In the case that no proof of
purchase is enclosed, the SAGEMCOM repair cen tre will use the
production date as its reference for establishing the guarantee
status of the product.
Apart from all legal obligatory rules, SAGEMCOM, do not give
any Guarantee, either implicit or explicit which is not set force i n
the present section, and can not be held responsible for any
direct or indirect, material or immaterial damage, either in or out
of the frame of the present guarantee.
Page 41

40
WARRANTY
B) Exclusions From Guarantee
If any provision of this guarantee shall be held to be in whole or
in part invalid or illegal due to an obligatory rule applicable to
consumers pursuant to their national legislation, such invalidity
or illegality shall not impair or affect the remaining provisions or
parts of this guarantee.
This guarantee does not affect the Customer statutory rights.
SAGEMCOM shall have no liability under the guarantee in
respect of:
• Damage, defects, breakdown or malfunction due to one or
more of the following:
- Failure to properly follow the installation process and
instructions for use
- An external cause to the equipment (including but not
limited to: lightening, fire, shock, vandalism, inappropriate
conditions of electrical network or water damage of any
nature)
- Modifications made without the written approval of
SAGEMCOM
- Unsuitable operating conditions, particularly of temperature
and humidity
- Repair or maintenance of the equipment by persons not
authorised by SAGEMCOM
• W ear and tear from normal daily use of the equipment and its
accessories
• Damage due to insufficient or bad packaging of equipment
when returned to SAGEMCOM
• Usage of new versions of software without the previous
approval of SAGEMCOM
• Work on any equipment or software modified or added
withou t the prior written co nsent of SAGEM COM
• Malfunctions not resulting from the Equipment or from
software installed in user workstations for the purpose of use
of the equipment.
Communication problems related to an unsuitable
environment including:
- Problems related to access and/or connection to the
Internet such as interruptions by access networks or
malfunction of the line used by the subscriber or his
correspondent
- Transmission faults (for example poor geographical
coverage by radio and TV transmitters, interference or poor
line quality)
ENGLISH
Page 42

41
WARRANTY
C) Out of Guarantee Repairs
SAGEMCOM Helpdesk (from UK)
SAGEMCOM Helpdesk (from Ireland)
SAGEMCOM Helpdesk Email
- Local network faults (wiring, servers, workstations) or the
failure of the transmission network (such as but not limited
to interferences, fault or poor quality of the network)
- Modification of the parameters of the cellular or broadcast
network carried out after the sale of the Product
• Normal servicing (as defined in the user guide supplied with
the equipment) as well as malfunctioning due to servicing not
being carried out. Servicing costs are in any event always
borne by the customer.
• Malfunctions resulting from the usage of products,
consumables or accessories not compatible with the
equipment.
In the cases set forth in B) as well as after expiry of the guarantee
period, the customer must ask the Authorised SAGEMCOM
Repair Centre for a cost estimation prior to work being carried
out.
In such cases, the repair and deli very costs will be i nvoiced to the
customer.
The foregoing shall apply unless otherwise agreed in writing with
the customer and only for the United Kingdom and Ireland.
dti.faxservice-uk@sagemcom.com
: 08 45 09 00 316
:
: 01 60 583 84
Page 43

42
WARRANTY
Terms and Conditions for other countries
If, despite our best efforts, your product presents any defects, you
should refer to your retailer and present the proof of purchase
that they gave you on the day of purchase.
Should any malfunctioning arise, the retailer will advise you what
to do.
For the warranty to apply, you should ensure that the product was
used in accordance with the instructions for use and the purpose
for use, and that you have at your disposal the sales invoice or
receipt stating the date of purchase, the n ame of the retailer, th e
reference and the serial number of the product.
No coverage shall be given under this warranty if the following
conditions are applicable:
• The required documents have been modified or altered in
order to take advantage of the warranty.
• The manufacturing numbers, product brands or labels have
been altered or made illegible.
• Interventions on the product have been made by an
unauthorized person.
• The product has been subjected to abnormal or improper
use.
• The product has been damaged by external factors such as
lightning, over-voltage, moisture, accidental damage,
improper care as well as all Acts of God.
This present warranty does not affect the consumer rights that you
may have under the laws in effect in your country.
Important:
Should you return the product to the after-sales department,
please ensure that you return as well all the elements and
accessories originally supplied with the product.
ENGLISH
Page 44

User Manual
SAGEMCOM SAS
Data subject to change without notice
Société par actions simplifiée au capital de 158.291.895 €- 440 294 510 RCS PARIS
250, route de l'Empereur - 92500 Rueil-Malmaison - France
www.sagemcom.com
 Loading...