


MX2
®
SafeLine MX2
Installation manual
ENGLISH V. 4.02
10.2010
Small, inexpensive and intelligent
Probably the world’s smallest EN81-28 compatible lift telephone!

safeline.eu
SafeLine MX2
TECHNICAL DATA
Power:
Supply voltage: 10 - 30 VDC.
Current consumption max 50 mA.
Emergency signal button:
Can be set as NO or NC, 10-30VDC.
Auxillary input:
Can be set as NO or NC, 10-30VDC.
Size HxWxD:
130x78x18mm
Installation manual

3
© 2010 SafeLine and all the SafeLine products and accessories are copyrighted by law.
ENGLISH V. 4.02
Table of contents
General information 4
Concerning your personal safety 4
Component list 5
Measurements 6
Wiring diagram 7
Wiring diagram, SafeLine MX2 on PSTN line 8
LED indication 9
Programming interfaces 10
Programming method 11
Programming unit numbers 12
Programming example 13
Parameter list 14
Troubleshooting 19
Testing 17
Emergency calling process 18
Introduction
Installation
Programming
Service
Operating
Menu
4
© 2010 SafeLine and all the SafeLine products and accessories are copyrighted by law.
Introduction
ENGLISH V. 4.02
GENERAL INFORMATION
The emergency telephone SafeLine was built to state of the art-technology and to generally recognized
safety-related technical standards currently applicable. These installation instructions are to be followed by
all persons working with the SafeLine, in both installation and maintenance.
It is extremely important that these installation instructions are made available at all times to the relevant
technicians, engineers or servicing and maintenance personnel. The basis prerequisite for safe handling
and trouble-free operation of this system is a sound knowledge of the basic and special safety regulations
concerning conveyor technology, and elevators in particular.
The SafeLine may only be used for its intended purpose. Note in particular that, no unauthorized changes
or additions may be made inside the SafeLine or to individual components.
Exclusion of liability
The manufacturer is not liable with respect to the buyer of this product or to third parties for damage,
loss, costs or work incurred as a result of accidents, misuse of the product, incorrect installation or illegal
changes, repairs or additions. Claims under warranty are likewise excluded in such cases. The technical
data is the latest available. The manufacturer accepts no liability arising from printing errors, mistakes and
changes.
CONCERNING YOUR PERSONAL SAFETY
These operating instructions provide you with important safety details and information required for proper
installation of the SafeLine.
Carefully read through these operating instructions in full.
• Please refer to the current regulations.
• The mechanic must be familiar with the basic regulations concerning safety at work and accident
prevention and have been suitably instructed in the handling of elevators.
• Before installing the SafeLine system, secure the elevator to prevent it from being switched on
accidentally by someone else. Put up a warning sign at each fl oor: “Warning” Elevator out of
operation. Service work!”
• Danger of falling! The doors for the elevator at each fl oor should be kept closed during the
installation work. Block off the areas that constitute a risk.
• Only use tools that are in perfect condition for both installation and servicing work.
• Only carry out the work when the elevator is in ”inspection travel” mode.
• Ensure that lift shaft is clear of all personnel during inspection travel.
DO NOT throw the battery in municipal waste. You may return old SafeLine products, including
batteries, to us for recycling.

5
© 2010 SafeLine and all the SafeLine products and accessories are copyrighted by law.
2
4
3
1
2
5
Installation
ENGLISH V. 4.02
COMPONENT LIST
1. RJ45 connector.
For power, emergency button, phone line and auxillary input.
2. RS232 PC connection
For fi rmware update and programming with SafeLine Pro.
3. Volume control
Turn right to increase the volume.
4. Keyboard
For programming.
5. System LED
6
© 2010 SafeLine and all the SafeLine products and accessories are copyrighted by law.
100
80
83
53
89,5
69,5
12 12
15,4
16
155
90
141
76
83
53
n
6
17,3
141
155
90
76
53
110,5
n
6
23,5
130
78
42
92
18
155
89
117
53
29
Installation
ENGLISH V. 4.02
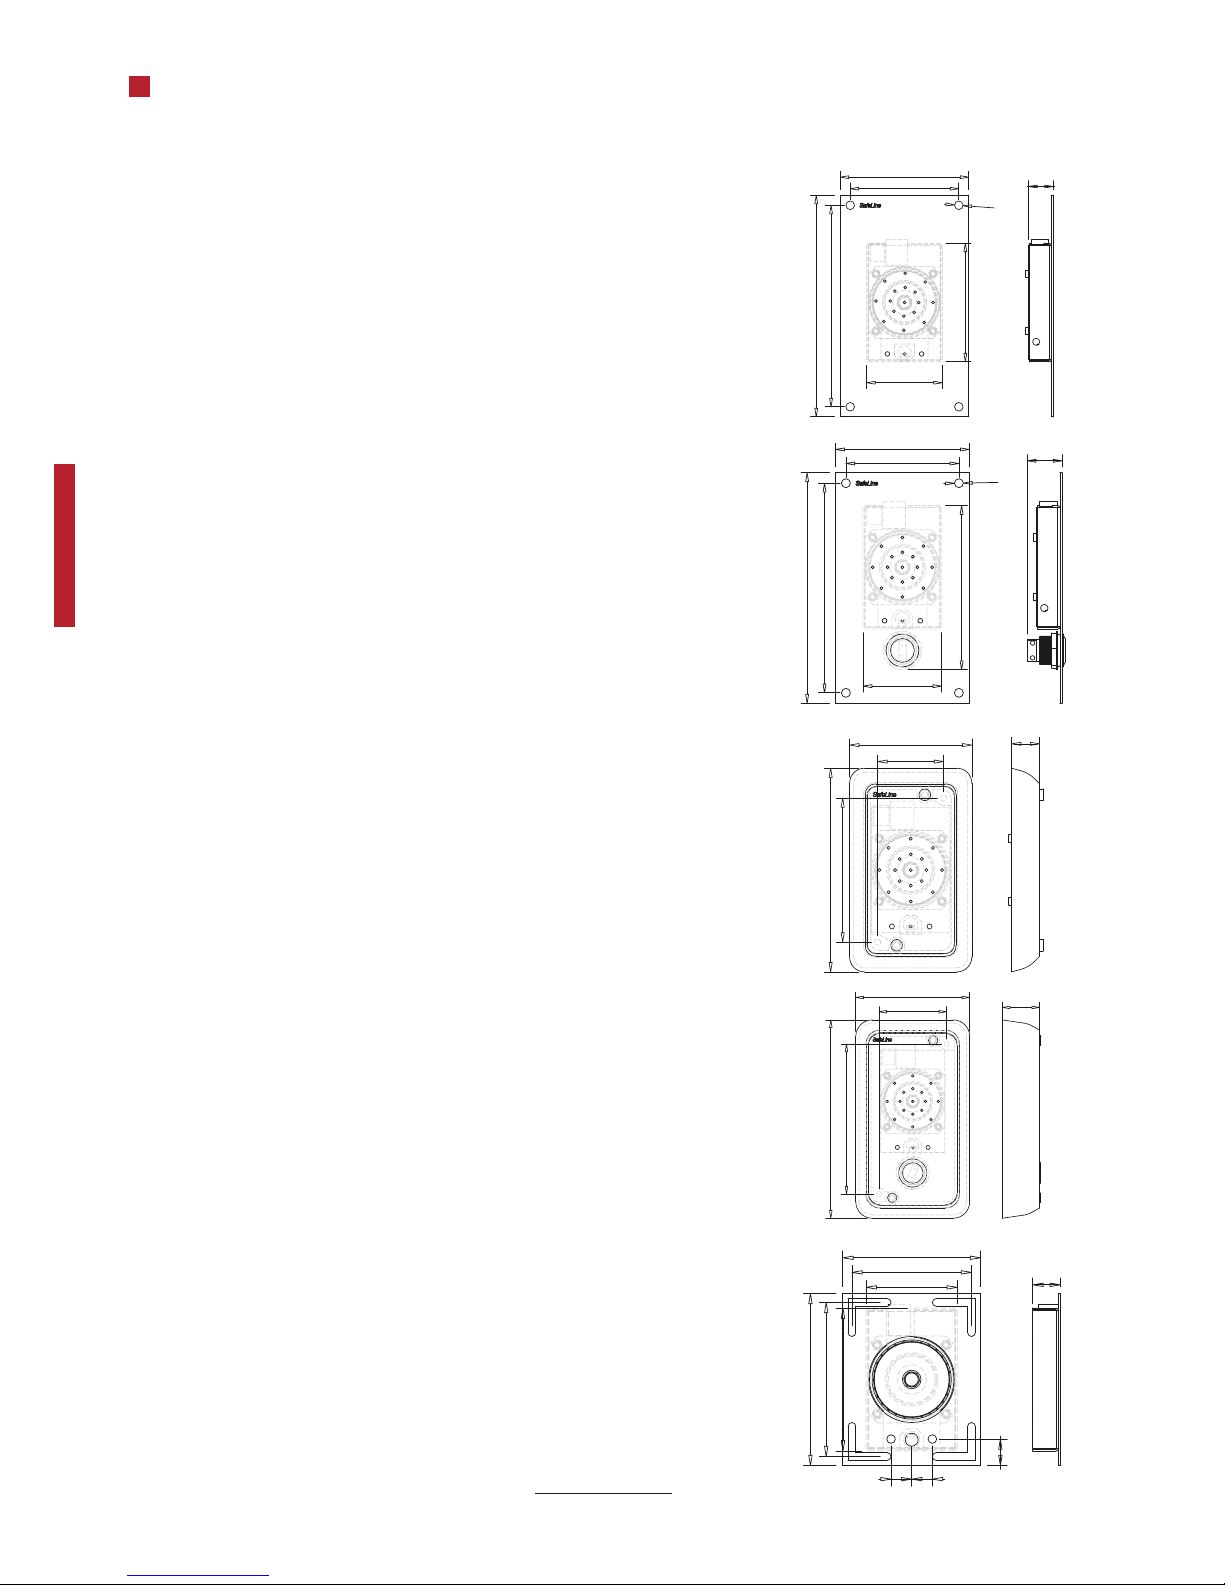
Flush mount SafeLine MX2 with pictograms
Article number: *SLMX_Rec-Pic
Flush mount SafeLine MX2 with pictograms
and emergency alarm button.
Article number: *SLMX_Rec-PicB
Surface mount SafeLine MX2 with pictograms
Cable hole diameter: 8mm
Article number: *SLMX_SM-Pic
Surface mount SafeLine MX2 with pictograms and emergency alarm button
Cable hole diameter: 8mm
Article number: *SLMX_SM-PicB
SafeLine MX2 COP
Article number: *SLMX_COP
MEASUREMENTS
 Loading...