


UK - Users Manual |
2 |
DK - Brugsanvisning |
19 |
SE - Bruksanvisning |
37 |
NO - Bruksanvisning |
55 |
Wireless IP Network Camera
IP601W Outdoor
JPT3813W
JPT3815 W

Table of Contents
0. |
Before you start |
3 |
|
Package Contents |
3 |
|
System Requirements |
3 |
|
System architecture |
3 |
|
Internet |
3 |
1. |
Product |
4 |
|
Front |
4 |
|
Back |
4 |
|
Functions |
4 |
2. |
Hardware installation and configuration |
5 |
|
Prepare the camera |
5 |
|
Installing software |
5 |
3. |
Log into the camera from the browser |
8 |
4. |
Control panel |
9 |
5. |
Administrators Menu |
10 |
|
Device Info |
10 |
|
Alias Settings |
10 |
|
Date & Time Settings |
10 |
|
User Settings |
10 |
|
Multi-Device Settings |
10 |
|
Basic Network Settings |
11 |
|
Wireless Lan Settings |
11 |
|
ADSL Settings |
11 |
|
UPnP Settings |
12 |
|
Setting up Email |
12 |
|
FTP Service Settings |
13 |
|
Alarm Service Settings |
14 |
|
PTZ Settings (Pan Tilt Zoom) |
15 |
|
Decoder Settings |
15 |
|
Device Firmware Upgrade |
15 |
|
Backup & Restore Settings |
15 |
|
Reboot Device |
15 |
|
Log |
15 |
|
Back |
15 |
6. |
Accessing the camera from the Internet |
|
|
outside your home |
|
|
Static IP address |
16 |
|
Dynamic IP address |
17 |
|
DDNS Service Settings |
17 |
7. |
FAQ - Troubleshooting |
18 |
|
Reset |
18 |
8. |
Disclaimer |
18 |
2 |
www.safehome.dk |

0. Before you start
Package Contents
•Wireless camera
•WI-FI Antenna
•Power Supply
•Manual
•CD with driver for the camera and IP camera program
•Mounting Brackets
Immediately contact the dealer if content is missing.
System Requirements
•10/100 Mbps Network Card with min. 64M memory
•CD-ROM drive
•CPU: 2.06 GHz or more
•Windows 2000/XP/Vista or 7
•Web Browser: Internet Explorer (6.0 or newer), Firefox and Safari (does not support all features)
•Wireless Router or Access Point (If you want wireless transmission. Otherwise the cable router)
•DHCP Server (is usually built into the router)
System architecture
Internet
Wireless router or acces point
Wireless Internet Camera with Web-server
JPT3813W
JPT3815W or
IP601W Outdoor
www.safehome.dk |
3 |

1. Product
Front
Linse CMOS sensor. Can be rotated manually to adjust the sharpness of the image
(Only JPT3813W and JPT3815W) Infrared LED light
Network indicator LED Built-in microphone
Back
LAN: RJ-45/10-100 Base T
Antenna Connector
For Power Supply
Audio Output (Only
JPT3813W and JPT3815W)
Functions
•Powerful high-speed video protocol processor
•High-sensitivity 1/4“ CMOS Sensor
•300K Pixels - color
•For day and night use. IR night light gives a range of up to 8 m for JPT3813W/
JPT3815W and up to 50 m for IP601W (sensor range up to 20 m for IP601W)
•Optimized MJPEG video compression (.avi)
•Multi-level user setup and access with password
•Built-in Web server for use with Internet Explorer, Firefox and Safari
•Supports wireless network (Wi-Fi/802.11/b/g)
•Supports Dynamic IP (DDNS) and UPnP LAN and Internet (ADSL, cable modem)
•Built-in motion sensor
•Oneway audio surviellance with microphone (Only JPT3813W and JPT3815W)
•Supports image snapshot
•Supports multiple network protocols: HTTP/TCP/IP/UDP/STMP/DDNS/SNTP/DHCP/FTP
•Supports remote system update
•Can be used and operated with multiple Mobile Apps for e.g. iPhone / IPAD or Android
•Contact SafeHome at support@safehome.dk for a few useable applications
4 |
www.safehome.dk |
2. Hardware installation and configuration
Prepare the camera
1.Connect the router / switch and camera with a RJ-45 network cable.
2.Connect the power adapter to the camera and then to a power outlet (use only the supplied power adapter. Others can damage the camera)
3.The camera uses about 30 seconds to start before it can be seen by the software you must install on your computer.
4.The camera head will rotate (on pan/tilt models), and stop in position. LED lights for the network will glow steadily if the cable is connected correctly.
Installing software
The supplied software must be installed on a computer in the network before the camera can be set up.
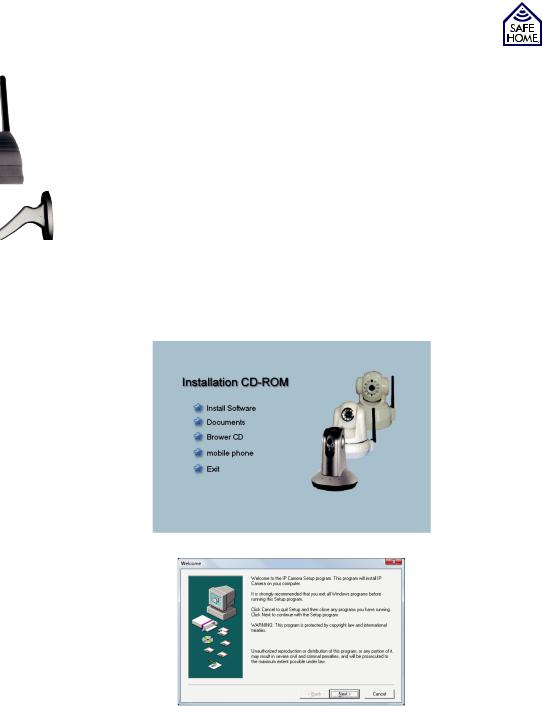
1.Insert the CD into the CD-ROM drive
2.If the installer does not start, open the CD drive in Explorer and double click on IPCamSetup.exe. If the CD is un-readable, you can download the software from www. safehome.dk
3. Click “Install Software”
4. Click “Next” to install
www.safehome.dk |
5 |
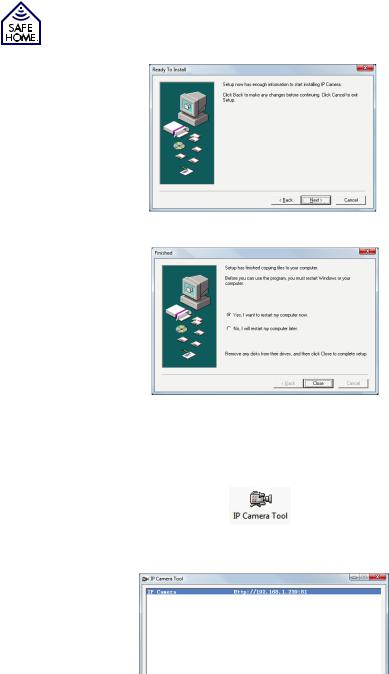
5. Click “Next” to continue installation
6.Click “Close” after you select “Yes I want to restart my computer now” to complete installation
7.After restart a new icon to open the tool to be used configuring the camera, is found on the computers desktop.
When the camera is turned on, and properly connected to the router/switch, click on the “IP Camera Tool” and a small window will open.
The program will automatically check for IP Servers with camera on the network, and show them on the list.
6 |
www.safehome.dk |

When the program searches, three things may occur:
1.There are no cameras found within a minute. Result field will show “no found IP Servers” and the program shuts down.
2.IP camera is installed with another “Subnet Mask” than registered on the computer you are using. A text box opens, and you can
double click to correct it. Then this box to the right appears: If you know the system’s network configuration, you can edit manually in the fields or you can try to mark in the top field “Obtain IP from DHCP server” and then click OK, the
program will attempt to fix the problem by issuing valid IP and subnet mask.
3.IP Camera/cameras found and listed. Doubleclick on the camera you want to acces thru your web browser. The browser will open and display a login window. Later you can acces the IP camera
by entering the IP address the camera has been assigned, for example.: http://192.168.1.239:81 (number
after “:” is the Http port the camera is set up to)
The icon for “IP Camera Tool” will still be on the desktop and can now be used for access.
www.safehome.dk |
7 |
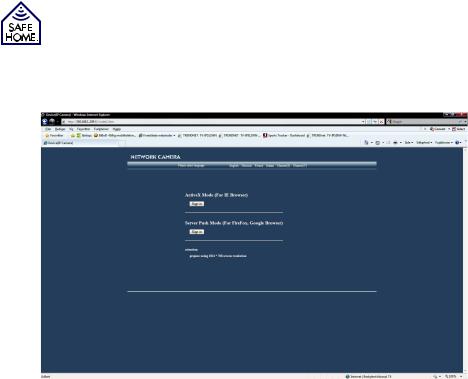
3. Log into the camera from the browser
Login from IP Camera Tool or by entering the camera IP address directly into the browser
You get to a window where you choose which web-browser you use.
Once you have chosen browser, enter the username and password, and you get into the camera’s control panel.
By default the username is admin and there should not be written anything in the password field.
You can change the username and password from the administration part of the control panel.
Read more about the setup and options under “Administrators Menu.
8 |
www.safehome.dk |
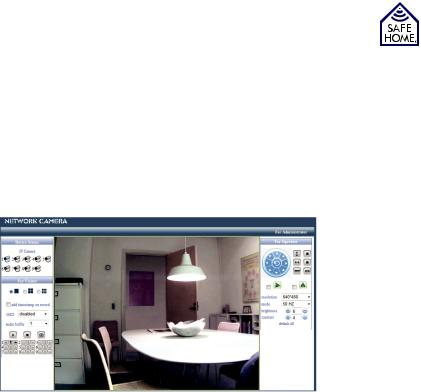
4. Control panel
Depending on your camera model, there may be different control layouts on the page where you see the video stream. If you log in as “Administrator”, you can use all the options in the control panel.
If you log in as “Guest” (see below under User Settings how you can grant users access to different levels), you only have the opportunities in the control panel’s left side.
As “Operator” you have access to options in both side.
Both “Guest” and “Operator” can tap into the administrative part, but can not see the settings or change anything.
1 |
|
|
|
|
|
8 |
|
|
|||||
|
|
|
|
|
||
2 |
|
|
|
|
|
9 |
|
|
|
|
|
||
|
|
|
|
|||
|
|
|
|
|
||
|
|
|
|
|
|
|
3 |
|
|
|
|
|
10 |
|
|
|
|
|
||
4 |
|
|
|
|
|
|
|
|
|
|
|
|
|
5 |
|
|
|
|
|
|
|
|
|
|
|
|
|
6 |
|
|
|
|
|
|
|
|
|
|
|
|
|
7 |
|
|
|
|
|
|
|
|
|
|
|
|
1.When multiple cameras are connected, you can select between the cameras. If the motion sensor is activated, the will be a flashing red dot on the camera icon when there is an alarm.
2.When multiple cameras are connected you can choose whether there should be from 1 up to 4 or up to 9 cameras on screen simultaneously.
3.Click if there should be time and date on recordings.
4.Show date and time on screen. You may choose color.
5.Audio Buffer - the unit is second.
6.Power on and off for display, if you press the button with a camera, it will take a picture that opens in a new window. The image can be stored on your computer by right clicking on it and choose “Save As”.
7.Turn speakerphone on or off. Turn microphone on and off or shoot video. Video are recorded in AVI format.
8.Area for maneuvering the camera (only if the camera is designed for pan/tilt).
9.Vertical or horizontal flip of the image.
10.Setting the picture quality, brightness and contrast.
www.safehome.dk |
9 |

5. Administrators Menu
Device Info
When you open the administrator menu, a menu opens on the left side.
On the opening page, you find the device’s MAC address (Device ID), version of firmware and web server version, and status of other settings you have chosen.
Alias Settings
Here you choose a name for the camera. The name will appear on the image if it is selected in the Control Panel menu.
If you have multiple cameras installed, it may be practical with unique names for each device instance. “Front door”, “Living Room” or “Children’s Room.”
Date & Time Settings
You can choose to set it manually, you can allow the device to synchronize with an NTP
Server or with the PC you use to control the camera.
User Settings
You can create up to 8 user accounts for the camera.
For each account you specify the username and password and access level (Group). During the access level you have three options:
Guest: Can only see the picture
Operator: Can control the camera movement, and can also provide simple parameters for the image.
Administrator: Can control everything, and adjust all the parameters for the camera.
Multi-Device Settings
You get a list of the cameras you have installed in the network. To add an extra camera, click on “The 2nd Device”. Click the camera you want to add to the list of the top, and the first three fields will be filled in automatically.
Enter the username and password for the camera and click “Add”. To remove a camera from the list, click on “Remove”.
10 |
www.safehome.dk |
Basic Network Settings
If the router the IP camera is connected to has a DHCP function, select “Obtain IP from DHCP Server”. It also means that the IP address changes when the camera is turned off and on again. Otherwise you can fill with static IP address e.g. as below:
The IP address should be in the same IP address range as other devices within the network, and must have same subnet mask. Gateway is the router’s IP address and DNS server, you were given by your Internet Service Provider
Http port will usually be 80. Port number must be used when the camera needs to be accessed from the Internet because the router must be configured to find the camera on the network (in this case 192.168.1.35). If your port 80 is blocked by your Internet Service
Provider or used for anything else, you can choose port 81 or 8005 etc.
Remember to open the port in question in your router. For instruction in this regards pls. consult the router manual or supplier hotline.
If you choose a different port number than 80, you must remember, that when you open the camera in your network, you must set port number after IP address and “:” in the browser address bar: E.g. http://192.168.1.35:81
The same must be done when you call the camera from the Internet: http://210.236.45.1:81 (where 210.236.45.1 is your external IP address, If you have no fixed IP address, please read Section 8 on DDNS).
Wireless Lan Settings
Once you have accessed the administrative part select “Wireless Lan Settings” from the menu on the left side, if you want the camera to use the wireless network.
Start by checking the box “Using wireless LAN” and press “Submit”. This will restart the camera, and Wi-Fi will now have been activated.
To choose which router the camera should connect with, click the “Scan” button.
The camera scan for wireless networks in the area. Select your network and enter the current password, depending on the security your network is protected by.
Remove the network cable and restart the camera.
You can now move the camera to it´s final place, and connect power, then you can always reach it from your computer, if it is connected to your wireless network.
Please note that a standard router only broadcast Wi-Fi up to 10 meters.
ADSL Settings
Connects you directly to the network through an ADSL connection, you can specify here the username and password you received from your ISP (it will rarely be relevant, since almost everyone has a router connected).
www.safehome.dk |
11 |

UPnP Settings
If you do not setup port forwarding in your router manually, then check and click submit, then it is automatically set up if your router supports UPnP.
In some routers UPnP must be enabled to be used.
Consult the router’s manual or contact your ISP if they have supplied your router.
Setting up Email
Fill each field with your mail setup. See the table “Summary and recommendation for various Internet Service
Providers” for the correct settings for different providers in Denmark.. Once you have completed mail settings and tested that it works, you should try the “Alarm Service Settings” and select the “Motion Detect Armed”, which opens a few
fields where you can adjust the alarm sensitivity.
You will now receive an email with attached photos whenever the camera detects motion. Be aware that you do not receive email when camera is open in your browser. You might have to apply your Internet
Service providers mail server instead of a web-based email services like Gmail, so if you find that you can not get setup for Gmail to work, try with the email address/email settings that you have been informed by your ISP.
When the Alarm Service Settings is enabled, to sending e-mail alerts, it will use the settings specified in this section.
Sender: The e-mail that appears as sender in the mail Receiver: You can specify up to 4 different receivers of e-mail when there is an alarm.
SMTP: The SMTP Server as the mail sender (can be supplied by your ISP).
SMTP Port: Usually 25, but the one that hosts your mail server (your ISP), has the number.
Need Authentication: Ticked if the mail server requires a username and password (as most do).
12 |
www.safehome.dk |

Summary and recommendation for various Internet Service Providers:
Provider |
Smtp server |
Port |
TLSP |
Need Au. |
SMTP User |
SMTP Password |
Eks. |
smtp.mydomain |
25 |
None |
Yes |
Email address |
Password |
Telia |
smtp.telia.dk |
25 |
None |
No |
Not used |
Not used |
TDC |
asmtp.mail.dk |
587 |
None |
Yes |
Email address |
Password |
Telenor |
mail.telenor.dk |
25 |
STARTTLS |
Yes |
Email address |
Password |
|
|
|
|
|
|
|
Gmail |
smtp.gmail.com |
465/587 |
TLSP/STARTTLS |
Yes |
Email address |
Password |
|
|
|
|
|
|
|
Hotmail |
smtp.live.dk |
25/587 |
STARTTLS |
Yes |
Email address |
Password |
|
|
|
|
|
|
|
Click “Submit” button to save the settings, then click on “Test” button and a new window will open and show whether the mail is sent, or whether there are errors in the settings. Lower field “Report Internet IP by Mail” is not really an e-mail settings, but if you do not have a fixed IP address from your provider, you can tick the box - you will then receive an email if your cameras IP address should change or the camera is restarted, so you always have the current address for the camera.
FTP Service Settings
FTP Service is designed to store pictures of e.g. a burglar at a second location. FTP is not always something a user has access to. If you do not have an FTP account, you can proceed to the next section about image transmission via email.
When the Alarm Service Settings is ticked to upload a photo at alarm, it use the settings specified in this section.
FTP Server: FTP server address (eg. Mydomain.com without ftp:// in front).
FTP Port: The port that the server is set to FTP access (usually 21). Fill in the FTP User, FTP Password, FTP Upload Folder.
FTP Mode: Supports POST (usually it is used) and PASV.
Upload Image Now: If this box is checked, there will open a few new lines, where you can select the interval for uploading images.
Additionally you can choose a “First Name” to the images that are saved in JPG format.
www.safehome.dk |
13 |

Alarm Service Settings
If marked in the first or second field will more boxes vil open.
Motion Detect Armed:
Motion sensor is on, and the alarm activated by motion in the image field.
Motion Detect Sensibility:
1 is the least sensitive, 10 is the highest sensitivity.
Alarm Input Armed:
Not used - it is for cameras with the ability to connect external alarm devices.
IO Linkage on Alarm:
Not used.
Send Alert Notification by Mail: Please tick if you want an e-mail alert. The mail can be sent up to 4 different receivers. This is set up under “Mail Service
Settings.”
Send Alert Notification
by Http: Camera can send a call to a page on the Internet, which is programmed for e.g. sending an SMS. Remember the “http://” in front page web address.
On www.safehome.dk you can join a service sending an SMS to your mobile phone at alarm. The price is quoted on the website.
Find your camera on the website and there will be a button to sign up.
After you have registered you can write in the “Http url”: http://sms.safehome.dk/?ID=XXXXXXXX where XXXXXXXX is your mobile number.
By registering you also get Http url address on the screen so you can copy it.
Upload Image on Alarm: Allows you to select the interval in seconds for uploading images on alarm.
Bottom opens for a Scheduler (plan) where you can set the camera to alarm status at fixed hours of the week.
14 |
www.safehome.dk |

PTZ Settings (Pan Tilt Zoom)
If the camera can be moved over the net, you can here set the speeds, etc. for the various movements.
Decoder Settings
Here you set the camera’s Baud rate (speed). You may try with different settings to find the best result. There is a dropdown box with the options you can select.
Device Firmware Upgrade
If a new firmware or WEB UI (the built-in Web server) is available, it will be possible to download from www.safehome.dk.
Download the new versions and install them after the installation guide included with the download.
NOTE: Follow the installation instructions carefully, because otherwise the camera may be damaged. Upgrading firmware and WEB UI are made at your own risk and any complications are not covered by warranty.
Backup & Restore Settings
Allows you to backup your camera settings and to reload the camera after it has been reset or have had installed new firmware.
Reboot Device
Restarts the camera.
Log
Showing all activity on camera. Deletes when the camera is turned off.
Back
Click here to go back to the control panel with the image from the camera.
www.safehome.dk |
15 |

6.Accessing the camera from the Internet outside your home
When the camera can be seen on the internal network, preparation must be made before it can be accessed from the Internet.
Ensure that the router port forward to the camera - it can be done in the administrator menu under UPnP menu by checking out of the “Using UPnP to Map Port” and make sure that the answer is “success” after Clicked “Submit“ button. If answer is not “success” it must be ensured that UPnP is enabled in the router (see router manual).
Alternatively, you can access the router and manually make port forwarding (see router manual).
Static IP address
If you have been issued a fixed IP address by your ISP, use the browser’s address bar followed by a colon and the port number you chose for the camera - the camera is “behind” the gate, and when it is “opened” by writing the number after the IP address and ”:”, the camera can be seen from outside. In the example above, type: http://210.235.45.1:81
Internet IP address can be found on www.safehome.dk - go to the FAQ where your WAN IP is displayed in the right column.
16 |
www.safehome.dk |

Dynamic IP address
Setting up the camera for access over the Internet can be difficult to some. SafeHome has already set the camera so it can easily be connected and accessed from the Internet, wherever in the world you are.
On the box of your new camera and on your camera is a label. For this example, we have used the following label:
Remote Access: http://safehome0001.webgoodcam.com:81
The camera is already set up for remote access. You can see more in the menu DDNS setting, but you should not change anything on the setup.
Step 1 Log on your camera using the IP Camera Tool.
If the camera did not initially find the IP address, tick the “Obtain IP from DHCP” after which an IP address will appear.
Step 2 Log on your camera from the Internet:
Open your browser and type in the address from the camera label: http://safehome0001.webgoodcam.com:81
If you changed the port number you should instead of “81”, type the port number you specified. You will be prompted to enter the camera’s user name and password, and you can then log on to the camera.
If the connection does not work, put a tick in the check box under “UPNP Settings” and ensure that the router has made a “port forwarding” from the camera’s specified port to the camera specified IP address. In this case you need to check that a “port forwarding” from port 81 to IP address 192.168.1.239 has been made.
DDNS Service Settings
If you have a dynamic (changing) WAN IP address, you can use one of the DDNS (Dynamic Domain Name Server) that are online. The camera connects to the service when it gets a new IP address, and “tells” it’s current IP-address.
DDNS then connects the new IP address to the camera. Therefore, one can connect to the camera whenever IP address changes.
1.Go to a website offering free domain names and register.
2.Log in to the camera site as administrator and go to “DDNS Service Settings” and insert name, password and Host. Click “Submit” button and the camera restarts.
3.Log back in as administrator and go to “Device Status” and check that the DDNS status is DynDNS Succeed.
4.Check on the same page that “UPnP Status” is “UPnP Succeed”. If the status is “Not Succeed”, try going to the “Basic Network Settings”, change the http port number, and click “Submit” button. Also verify that UPnP is enabled in the router.
5.Log back into the camera as an administrator and make sure the status of both of the above is “Succeed”.
6.Now you only need to enter the chosen domain name as well as “:” and port number in the browser address line to enter the IP camera.
When the camera restarts, it may take several minutes while connecting to the DDNS service before contact with the camera works for the first time.
www.safehome.dk |
17 |

7. FAQ - Troubleshooting
Visit www.safehome.dk where the product has an updated FAQ. You can also sign up for mail service, so you will recieve an email when there are updates etc.
Reset
Press and hold the reset button for 5 seconds and turn the power off, turn on power again, to reset the administrator access to username: admin password: (blank).
If the camera needs to be reset to factory settings, hold reset button for 30 seconds with power on and then it restarts by itself.
8. Disclaimer
SafeHome ApS is not liable for any errors in the manual in hand.
SafeHome ApS is not liable for for faulty products, collaterat, incidental or consequential damage in connection with or arising from the use of SafeHome Wireless IP cameras model IP601W, JPT3813W or JPT3815W.
SafeHome ApS reserves the right to revise and change all aspects of product and manuals with no further notice.
This product is not a toy and should not be used as such.
Please consult local rules, laws and regulation concerning surveillance og public and private areas or properties. SafeHome ApS can not be held responsible for any violations in this regard.
Products shall not be operated by children or persons who may be expected not to have the necessary psyche or physique to operate them properly. User must always be supported by competent adult user.
For support and further information visit www.safehome.dk
18 |
www.safehome.dk |

Brugsanvisning
Trådløst IP Netværks Kamera
IP601W Outdoor
JPT3813W
JPT3815 W

Indholdsfortegnelse
0. |
Før du starter |
21 |
|
Pakken indeholder |
21 |
|
Systemkrav |
21 |
|
System arkitektur |
21 |
|
Internet |
21 |
1. |
Produkt |
22 |
|
Forsider |
22 |
|
Bagsider/ledning |
22 |
|
Funktioner |
22 |
2. |
Hardware installation og konfiguration |
23 |
|
Klargør kameraet |
23 |
|
Installation af software |
23 |
3. |
Log ind i kameraet fra browseren |
26 |
4. |
Kontrolpanelet |
27 |
5. |
Administrators Menu |
28 |
|
Device (Enheds) Info |
28 |
|
Alias Settings (Navngivning af kamera) |
28 |
|
Date & Time Settings (Dato og tid opsætning) |
28 |
|
User Settings (Bruger opsætning) |
28 |
|
Multi-Device Settings (Opsætning af flere kameraer) |
28 |
|
Basic Network Settings (Basale netværksindstillinger) 29 |
|
|
Wireless Lan Settings (Indstilling af trådløst netværk) |
29 |
|
ADSL Settings (ADSL indstillinger) |
29 |
|
UPnP Settings (UPnP indstillinger) |
30 |
|
Mail Service Settings (Indstilling af email) |
30 |
|
Ftp Service Settings (Indstilling af FTP-server) |
31 |
|
Alarm Service Settings (Indstilling af alarm service) |
32 |
|
PTZ Settings (Pan Tilt Zoom) |
33 |
|
Decoder Settings (Indstilling af dekoder) |
33 |
|
Upgrade Device Firmware (Opgradering af firmware) |
33 |
|
Backup & Restore Settings (Indstilling af |
|
|
Backup og genindlæsning) |
33 |
|
Reboot Device (Genstart kameraet) |
33 |
|
Log (Log) |
33 |
|
Back (Tilbage) |
33 |
6. |
Fjernadgang til kameraet fra Internettet, |
|
uden for hjemmet |
34 |
|
|
Statisk IP-adresse |
34 |
|
Dynamisk IP-adresse |
35 |
|
DDNS Service Settings (Indstilling af DDNS service) |
35 |
7. |
FAQ - Problemløsning |
36 |
|
Reset |
36 |
8. |
Ansvarsfraskrivelse |
36 |
20 |
www.safehome.dk |
0. Før du starter
Pakken indeholder
Tjek pakkens indhold, når du åbner den. Den skal indeholde:
•Trådløst kamera
•WI-FI Antenne
•Strømforsyning
•Brugsanvisning
•CD med driver til kamera samt IP kamera program
•Monteringsbeslag
Kontakt straks forhandleren, hvis der er mangler i indholdet.
Systemkrav
•10/100 Mbps Netværkskort
•CD-ROM drev
•CPU: 2.06 GHz eller mere
•Windows 2000/XP/Vista eller 7
•Web Browser: Internet Explorer(6.0 eller nyere), Firefox og Safari (understøtter ikke alle funktioner)
•Trådløs router eller Acces point (Hvis der ønskes trådløs transmission. Ellers kablet router)
•DHCP-Server (er som regel indbygget i routeren)
System arkitektur
Internet
Trådløs router eller acces point
Trådløst Internet Kamera med web-server
JPT3813W
JPT3815W eller
IP601W Outdoor
www.safehome.dk |
21 |

1. Produkt
Forsider
Linse (CMOS sensor. Kan drejes manuelt på JPT3813W og JPT3815W, for at justere skarpheden af billedet)
Infrarøde LED lys Netværks indikator LED Indbygget mikrofon
Bagsider/ledning
LAN: RJ-45/10-100 Base T
Antennestik
Stik til strømforsyning
Funktioner
Lydudgang (kun JPT3813W og JPT3815W)
•Kraftig high-speed video-protokol processor
•Høj-følsomhed 1/4“ CMOS-sensor
•300K Pixels - farve
•Kan bruges dag og nat. Ved IR natlys er rækkevidden op til 8 m for JPT3813W/JPT3815W og op til 50 m for IP601W (sensor rækkevidde op til 20 m for
IP601W)
•Optimeret MJPEG video kompression (.avi)
•Multi-level brugeropsætning og adgang med adgangskode
•Indbygget webserver for brug med Internet Explorer, Firefox og Safari
•Understøtter trådløse netværk (Wi-Fi/802.11/b/g) mobil
•Understøtter Dynamisk IP (DDNS) og UPnP LAN og internet (ADSL, kabel modem)
•Indbygget bevægelsessensor
•Understøtter envejs-audio overvågning med den indbyggede mikrofon (kun JPT3813W og JPT3815W
•Understøtter billede snapshot
•Understøtter flere netværksprotokoller:
HTTP / TCP / IP / UDP / STMP / DDNS / SNTP / DHCP / FTP
•Understøtter remote system opdatering
•Kan anvendes og betjenes sammen med flere Mobile Applikationer til bl.a. iPhone/iPad eller enheder med Android
•Kontakt evt. SafeHome på support@safehome.dk for anvisning af et par mulige applikationer
22 |
www.safehome.dk |
 Loading...