

Page 1

OPERATOR’S MANUAL
MANUEL D’UTILISATION
MANUAL DEL OPERADOR
40 VOLT CHAIN SAW
SCIE À CHAÎNE 40 V
MOTOSIERRA DE 40 V
RY40500
Your chain saw has been engineered and manufactured to our high standard for dependability, ease of operation, and
operator safety. When properly cared for, it will give you years of rugged, trouble-free performance.
WARNING: To reduce the risk of injury, the user must read and understand the operator’s manual before using
this product.
Thank you for your purchase.
SAVE THIS MANUAL FOR FUTURE REFERENCE
Cette scie à chaîne a été conçue et fabriquée conformément
aux strictes normes de fiabilité, simplicité d’emploi et sécurité
d’utilisation. Correctement entretenue, elle vous donnera des années
de fonctionnement robuste et sans problème.
AVERTISSEMENT : Pour réduire les risques de
blessures, l’utilisateur doit lire et veiller à bien comprendre le
manuel d’utilisation avant d’employer ce produit.
Merci de votre achat.
CONSERVER CE MANUEL POUR
FUTURE RÉFÉRENCE
Su motosierra inalámbrica ha sido diseñada y fabricada de conformidad con nuestras estrictas normas para
brindar fiabilidad, facilidad de uso y seguridad para el operador. Con el debido cuidado, le brindará muchos años de sólido
y eficiente funcionamiento.
ADVERTENCIA: Para reducir el riesgo de lesiones,
el usuario debe leer y comprender el manual del operador antes
de usar este producto.
Le agradecemos su compra.
GUARDE ESTE MANUAL PARA
FUTURAS CONSULTAS
Page 2

TABLE OF CONTENTS
TABLE DES MATIÈRES / ÍNDICE DE CONTENIDO
Introduction .......................................................................................................................................2
Introduction / Introducción
General Power Tool Safety Warnings ............................................................................................ 3-4
Avertissements règles de sécurité relatives aux outils électriques / Advertencias de seguridad para herramientas eléctricas
Chain Saw Safety Warnings .......................................................................................................... 5-9
Avertissements de sécurité relatifs au scie à chaîne
Symbols .................................................................................................................................... 10-11
Symboles / Símbolos
Glossary of Terms ............................................................................................................................12
Glossaire / Glosario de términos
Features ..................................................................................................................................... 13-14
Caractéristiques / Características
Assembly ................................................................................................................................... 14-15
Assemblage / Armado
Operation ................................................................................................................................... 15-23
Utilisation / Funcionamiento
/ Advertencias de seguridad de la motosierra
Maintenance .............................................................................................................................. 24-31
Entretien / Mantenimiento
Bar and Chain Combinations ..........................................................................................................32
Combinaisons de guide et chaîne / Combinations de barra y cadena
Troubleshooting ............................................................................................................................... 32
Dépannage / Corrección de problemas
Warranty ..........................................................................................................................................33
Garantie / Garantía
Parts Ordering and Service ............................................................................................... Back Page
Commande de pièces et réparation / Pedidos de piezas y servicio ......................................................... Page arrière / Pág. posterior
INTRODUCTION
INTRODUCTION / INTRODUCCIÓN
This product has many features for making its use more pleasant and enjoyable. Safety, performance,
and dependability have been given top priority in the design of this product making it easy to maintain
and operate.
* * *
Ce produit offre de nombreuses fonctions destinées à rendre son utilisation plus plaisante et satisfaisante. Lors de la conception de ce produit, l’accent a été mis sur la sécurité, les performances et la
fiabilité, afin d’en faire un outil facile à utiliser et à entretenir.
* * *
Este producto ofrece numerosas características para hacer más agradable y placentero su uso. En el
diseño de este producto se ha conferido prioridad a la seguridad, el desempeño y la fiabilidad, por lo
cual se facilita su manejo y mantenimiento.
2
Page 3

GENERAL POWER TOOL SAFETY RULES
WARNING
Read all safety warnings and all instructions.
Failure to follow the warnings and instructions
may result in electric shock, fire and/or serious
injury.
Save all warnings and instructions for future
reference.The term “power tool” in the warnings
refers to your mains-operated (corded) power tool
or battery-operated (cordless) power tool.
WORK AREA SAFETY
Keep work area clean and well lit. Cluttered
or dark areas invite accidents.
Do not operate power tools in explosive
atmospheres, such as in the presence of
flammable liquids, gases or dust. Power
tools create sparks which may ignite the dust
or fumes.
Keep children and bystanders away while
operating a power tool. Distractions can cause
you to lose control.
ELECTRICAL SAFETY
Power tool plugs must match the outlet.
Never modify the plug in any way. Do not use
any adapter plugs with earthed (grounded)
power tools. Unmodified plugs and matching
outlets will reduce risk of electric shock.
Avoid body contact with earthed or grounded
surfaces such as pipes, radiators, ranges and
refrigerators. There is an increased risk of elec-
tric shock if your body is earthed or grounded.
Do not expose power tools to rain or wet
conditions. Water entering a power tool will
increase the risk of electric shock.
Do not abuse the cord. Never use the cord
for carrying, pulling or unplugging the power
tool. Keep cord away from heat, oil, sharp
edges or moving parts. Damaged or entangled
cords increase the risk of electric shock.
When operating a power tool outdoors, use
an extension cord suitable for outdoor use.
Use of a cord suitable for outdoor use reduces
the risk of electric shock.
If operating a power tool in a damp location
is unavoidable, use a ground fault circuit
interrupter (GFCI) protected supply. Use of a
GFCI reduces the risk of electric shock.
PERSONAL SAFETY
Stay alert, watch what you are doing and
use common sense when operating a power
tool. Do not use a power tool while you are
tired or under the influence of drugs, alcohol
or medication. A moment of inattention while
operating power tools may result in serious
personal injury.
Use personal protective equipment. Always
wear eye protection. Protective equipment
such as dust mask, non-skid safety shoes, hard
hat, or hearing protection used for appropriate
conditions will reduce personal injuries.
Prevent unintentional starting. Ensure the
switch is in the off-position before connecting to power source and/or battery pack,
picking up or carrying the tool. Carrying power
tools with your finger on the switch or energising power tools that have the switch on invites
accidents.
Remove any adjusting key or wrench before
turning the power tool on. A wrench or a key
left attached to a rotating part of the power tool
may result in personal injury.
Do not overreach. Keep proper footing and
balance at all times. This enables better control
of the power tool in unexpected situations.
Dress properly. Do not wear loose clothing or
jewellery. Keep your hair, clothing and gloves
away from moving parts. Loose clothes, jewel-
lery or long hair can be caught in moving parts.
If devices are provided for the connection
of dust extraction and collection facilities,
ensure these are connected and properly
used. Use of dust collection can reduce dust-
related hazards.
POWER TOOL USE AND CARE
Do not force the power tool. Use the correct
power tool for your application. The correct
power tool will do the job better and safer at the
rate for which it was designed.
3 - English
Page 4

GENERAL POWER TOOL SAFETY RULES
Do not use the power tool if the switch does
not turn it on and off. Any power tool that can-
not be controlled with the switch is dangerous
and must be repaired.
Disconnect the plug from the power source
and/or the battery pack from the power tool
before making any adjustments, changing
accessories, or storing power tools. Such
preventive safety measures reduce the risk of
starting the power tool accidentally.
Store idle power tools out of the reach of
children and do not allow persons unfamiliar
with the power tool or these instructions to
operate the power tool. Power tools are dan-
gerous in the hands of untrained users.
Maintain power tools. Check for misalign-
ment or binding of moving parts, breakage of
parts and any other condition that may affect
the power tool’s operation. If damaged, have
the power tool repaired before use. Many
accidents are caused by poorly maintained
power tools.
Keep cutting tools sharp and clean. Prop-
erly maintained cutting tools with sharp cutting
edges are less likely to bind and are easier to
control.
Use the power tool, accessories and tool bits
etc. in accordance with these instructions,
taking into account the working conditions
and the work to be performed. Use of the
power tool for operations different from those
intended could result in a hazardous situation.
BATTERY TOOL USE AND CARE
Recharge only with the charger specified by
the manufacturer. A charger that is suitable for
one type of battery pack may create a risk of
fire when used with another battery pack.
Use power tools only with specifically desig-
nated battery packs. Use of any other battery
packs may create a risk of injury and fire.
When battery pack is not in use, keep it away
from other metal objects, like paper clips,
coins, keys, nails, screws or other small
metal objects, that can make a connection
from one terminal to another. Shorting the
battery terminals together may cause burns or
a fire.
Under abusive conditions, liquid may be
ejected from the battery; avoid contact. If
contact accidentally occurs, flush with water.
If liquid contacts eyes, additionally seek
medical help. Liquid ejected from the battery
may cause irritation or burns.
SERVICE
Have your power tool serviced by a qualified
repair person using only identical replacement parts. This will ensure that the safety of
the power tool is maintained.
When servicing a power tool, use only iden-
tical replacement parts. Follow instructions
in the Maintenance section of this manual.
Use of unauthorized parts or failure to follow
Maintenance instructions may create a risk of
shock or injury.
4 - English
Page 5

CHAIN SAW SAFETY WARNINGS
Keep all parts of the body away from the
saw chain when the chain saw is operating.
Before you start the chain saw, make sure
the saw chain is not contacting anything. A
moment of inattention while operating chain
saws may cause entanglement of your clothing
or body with the saw chain.
Always hold the chain saw with your right
hand on the rear handle and your left hand on
the front handle. Holding the chain saw with a
reversed hand configuration increases the risk
of personal injury and should never be done.
Hold the power tool by insulated gripping
surfaces only, because the saw chain may
contact hidden wiring. Saw chains contacting
a “live” wire may make exposed metal parts of
the power tool “live” and could give the operator
an electric shock.
Wear safety glasses and hearing protec-
tion. Further protective equipment for head,
hands, legs and feet is recommended.
Adequate protective clothing will reduce per-
sonal injury by flying debris or accidental contact with the saw chain.
Do not operate a chain saw in a tree. Opera-
tion of a chain saw while up in a tree may result
in personal injury.
Always keep proper footing and operate
the chain saw only when standing on fixed,
secure and level surface. Slippery or unstable
surfaces such as ladders may cause a loss of
balance or control of the chain saw.
When cutting a limb that is under tension be
alert for spring back. When the tension in the
wood fibres is released the spring loaded limb
may strike the operator and/or throw the chain
saw out of control.
Use extreme caution when cutting brush and
saplings. The slender material may catch the
saw chain and be whipped toward you or pull
you off balance.
Carry the chain saw by the front handle with
the chain saw switched off and away from
your body. When transporting or storing the
chain saw always fit the guide bar cover.
Proper handling of the chain saw will reduce the
likelihood of accidental contact with the moving
saw chain.
Follow instructions for lubricating, chain ten-
sioning and changing accessories. Improperly
tensioned or lubricated chain may either break
or increase the chance for kickback.
Keep handles dry, clean, and free from oil
and grease. Greasy, oily handles are slippery
causing loss of control.
Cut wood only. Do not use chain saw for
purposes not intended. For example: do not
use chain saw for cutting plastic, masonry
or non-wood building materials. Use of the
chain saw for operations different than intended
could result in a hazardous situation.
CAUSES AND OPERATOR
PREVENTION OF KICKBACK
Kickback may occur when the nose or tip of the
guide bar touches an object, or when the wood
closes in and pinches the saw chain in the cut.
Tip contact in some cases may cause a sudden
reverse reaction, kicking the guide bar up and back
towards the operator.
Pinching the saw chain along the top of the guide
bar may push the guide bar rapidly back towards
the operator.
Either of these reactions may cause you to lose
control of the saw which could result in serious
personal injury. Do not rely exclusively upon the
safety devices built into your saw. As a chain saw
user, you should take several steps to keep your
cutting jobs free from accident or injury.
Kickback is the result of tool misuse and/or incorrect operating procedures or conditions and can
be avoided by taking proper precautions as given
below:
Maintain a firm grip, with thumbs and fingers
encircling the chain saw handles, with both
hands on the saw and position your body and
arm to allow you to resist kickback forces.
Kickback forces can be controlled by the operator, if proper precautions are taken. Do not let
go of the chain saw.
Do not overreach and do not cut above shoul-
der height. This helps prevent unintended tip
contact and enables better control of the chain
saw in unexpected situations.
5 - English
Page 6

CHAIN SAW SAFETY WARNINGS
Only use replacement bars and chains
specified by the manufacturer. Incorrect
replacement bars and chains may cause chain
breakage and/or kickback.
Follow the manufacturer’s sharpening and
maintenance instructions for the saw chain.
Decreasing the depth gauge height can lead to
increased kickback.
Do not start cutting until you have a clear work
area, secure footing, and a planned retreat path
from the falling tree. Cluttered areas invite accidents.
Keep ALL children, bystanders, visitors, and
animals out of the work area while starting or
cutting with the chain saw. Do not let visitors
contact chain saw or extension cord.
Do not operate chain saw in explosive atmo-
spheres, such as in the presence of flammable
liquids, gases, or dust. Chain saws create
sparks which may ignite the dust or fumes.
Dress Properly - Wear snug fitting clothing.
Always wear heavy, long pants, long sleeves,
overalls, jeans or chaps made of cut resistant
material or ones that contain cut resistant
inserts. Wear non-slip safety footwear. Wear
non-slip heavy duty gloves to improve your
grip and to protect your hands. Do not wear
jewelry, short pants, sandals, or go barefoot.
Do not wear loose fitting clothing, which could
be drawn into the motor or catch the chain or
underbrush. Secure hair so it is above shoulder
level. Wear hearing and head protection.
Heavy protective clothing may increase operator
fatigue, which could lead to heat stroke. During weather that is hot and humid, heavy work
should be scheduled for early morning or late
afternoon hours when temperatures are cooler.
Always wear eye protection with side shields
marked to comply with ANSI Z87.1 as well as
head and hearing protection when operating
this equipment.
Always be aware of what you are doing when
using the chain saw. Use common sense. Do
not operate the chain saw when you are tired,
ill, or under the influence of alcohol, drugs, or
medication.
Do not expose the chain saw to rain.
Do not use the chain saw in damp or wet loca-
tions.
Always be aware of extension cord while oper-
ating chain saw. Take precautions to avoid
tripping over cord. Keep cord away from chain
and operator at all times. Never carry saw by
the cord or pull it to disconnect from receptacle.
Keep cord from oil and sharp edges.
Stay alert and pay attention to what you are
doing. Use common sense when using this unit.
Keep all parts of your body away from the saw
chain when the unit is running.
Never let anyone use your chain saw who has
not received adequate instructions in its proper
use. This applies to rentals as well as privately
owned saws.
Before you start the unit, make sure the saw
chain is not contacting any object.
Stop the chain saw before setting it down.
To avoid accidental starting, never carry the unit
with your finger on the switch trigger.
Maintain the unit with care. Keep the cutting
edge sharp and clean for best performance and
to reduce the risk of injury. Follow instructions
for lubricating and changing accessories.
Do not operate a chain saw with one hand! Use
a firm grip with thumbs and fingers encircling the
chain saw handles. Serious injury to the operator, helpers, bystanders, or any combination
of these persons may result from one-handed
operation. A chain saw is intended for twohanded use.
Guard against electric shock - Avoid body con-
tact with grounded surfaces such as metal pipes
and wire fences. There is an increased risk of
electric shock if your body is grounded.
Do not operate a chain saw that is damaged,
improperly adjusted, or not completely and
securely assembled. Chain should slow to a
stop when the switch trigger is released. If the
chain continues to turn after the switch trigger
has been released, have the unit serviced by an
authorized service center.
Check for damaged parts. Check for alignment
of moving parts, binding of moving parts, breakage of parts, mounting, and any other conditions that may affect its operation. A guard or
6 - English
Page 7

CHAIN SAW SAFETY WARNINGS
other part that is damaged should be properly
repaired or replaced by an authorized service
center unless otherwise indicated elsewhere in
this manual.
All chain saw service, other than the items listed
in the operation and maintenance sections,
should be performed by an authorized service
center.
Always maintain a proper stance.
Do not use chain saw if switch does not turn it
on and off. Have defective switch replaced by
an authorized service center.
Do not adapt your powerhead to a bow guide
or use it to power any attachments or devices
not listed for the saw.
Disconnect chain saw from power supply when
not in use, before servicing, and when making
adjustments and changing attachments, such
as saw chain and guard.
Do not cut vines and/or small underbrush.
Do not operate a chain saw in a tree, on a ladder,
rooftop, scaffold, or other unstable support; this
is extremely dangerous.
NOTE: The size of the work area depends on the
job being performed as well as the size tree or
work piece involved. For example, felling a tree
requires a larger work area than making bucking
cuts.
Do not force the chain saw. The job can be per-
formed better and safer at the rate for which it
was intended.
Always use the right product for your applica-
tion. The chain saw should be used for cutting
wood only. Never use the chain saw to cut plastic, masonry or non-wood building materials.
Store chain saw when not in use. Chain saw
should be stored in a dry and high or locked
area out of the reach of children. When storing
chain saw place the scabbard on the bar and
chain and store the chain saw in carrying case.
Use only with battery and charger listed. For use
with 40V lithium-ion battery packs. See Tool/
Appliance/Battery Pack/Charger Correlation
Supplement 988000842.
NOTE: Although the chain saw will work
with all battery packs listed on the correlation supplement, for best performance, avoid
using first generation Ryobi 40V lithium-ion
batteries [OP4026 (part numbers 130186012
or 130186006) and OP4015 (part number
1300208001)]. The chain speed will be significantly reduced if these batteries are used.
Battery operated units do not have to be
plugged into an electrical outlet; therefore, they
are always in operating condition. Be aware
of possible hazards even when unit is not
operating.
Remove the battery pack from the chain saw
before cleaning, servicing, storing, removing
material from the unit, changing accessories
such as the bar and chain, or when not in use.
Save these instructions. Refer to them fre-
quently and use them to instruct others who
may use this product. If you loan someone this
product, loan them these instructions also.
7 - English
Page 8
CHAIN SAW SAFETY WARNINGS
KICKBACK
See Figures 1 - 4.
WARNING: Kickback may occur when the
moving chain contacts an object at the upper
portion of the tip of the guide bar or when the
wood closes in and pinches the saw chain in
the cut. Contact at the upper portion of the tip
of the guide bar can cause the chain to dig into
the object and stop the chain for an instant.
The result is a lightning fast, reverse reaction
which kicks the guide bar up and back toward
the operator. If the saw chain is pinched along
the top of the guide bar, the guide bar can be
driven rapidly back toward the operator. Either
of these reactions can cause loss of saw control
which can result in serious injury. Do not rely
exclusively upon the safety devices built into
the saw. As a chain saw user, you should take
several steps to keep your cutting jobs free from
accident or injury.
The following precautions should be followed
to minimize kickback:
• Always grip the saw firmly with both hands.
Hold the saw firmly with both hands when
the unit is running. Place your right hand on
the rear handle and your left hand on the
front handle with your thumbs and fingers
encircling the chain saw handles. A firm grip
together with a stiff left arm will help you
maintain control of the saw if kickback occurs.
• Make sure that the area in which you are cutting is free from obstructions. Do not let the
nose of the guide bar contact a log, branch,
fence, or any other obstruction that could be
hit while you are operating the saw.
• Always cut with the unit running at full speed.
Fully squeeze the throttle trigger and maintain
a steady cutting speed.
SAFE-T-TIP®
ANTI-KICKBACK
NOSE GUARD
Fig. 1
ROTATIONAL
KICKBACK
Fig. 2
KICKBACK
DANGER ZONE
Fig. 3
PULL
• Use replacement parts such as low kickback
chain, chain brakes, SAFE-T-TIP® anti-kickback nose guards special guide bars that
reduce the risks associated with rotational
kickback. Use only the replacement guide
bars and low kickback chains specified by
the manufacturer for the saw.
8 - English
PUSH
Fig. 4
Page 9

CHAIN SAW SAFETY WARNINGS
With a basic understanding of kickback, you
can reduce or eliminate the element of surprise.
Sudden surprise contributes to accidents.
Keep proper footing and balance at all times.
Do not cut above shoulder height or overreach
when cutting.
Keep the SAFE-T-TIP® anti-kickback nose
guard properly mounted on the guide bar to
prevent rotational kickback
Follow the sharpening and maintenance
instructions for the saw chain.
Push and Pull - This reaction force is always
opposite to the direction the chain is moving
where wood contact is made. Thus, the operator
must be ready to control the PULL when cutting
on the bottom edge of the bar, and PUSH when
cutting along the top edge. See Figure 4.
UNDERSTANDING YOUR CHAIN SAW
SAFETY DEVICES
SAFE-T-TIP® ANTI-KICKBACK NOSE
GUARD
See Figure 1.
The SAFE-T-TIP® prevents kickback from happening, because it covers the tip of the bar where
kickback is generated. Never attempt any kind of
cutting where the SAFE-T-TIP® would have to be
removed from the bar tip.
LOW KICKBACK SAW CHAIN
The rakers (depth gauges) ahead of each cutter
can minimize the force of a kickback reaction by
preventing the cutters from digging in too deeply
at the kickback zone. Only use replacement chain
that is equivalent to original chain or has been
certified as low kickback chain per ANSI B175.1.
Low kickback saw chain is chain that has met
the kickback performance requirements of ANSI
B175.1 - 1991 (American National Standard
for Power Tools - Gasoline-Powered Chain
Saws-Safety Requirements) when tested on the
representative sample of chain saws below 3.8
c.i.d. specified in ANSI B175.1 - 1991.
As saw chains are sharpened during their useful
life, they lose some of the low kickback qualities
and extra caution should be used.
GUIDE BARS
Generally, guide bars with small radius tips have
somewhat lower kickback potentials.
When making a replacement, be sure to order
one of the RYOBI bars listed for the saw in this
operator’s manual.
The proper size SAFE-T-TIP® nose guard comes
installed on the bar. Use only guide bars that have
a provision for mounting the SAFE-T-TIP®.
SAVE THESE INSTRUCTIONS
9 - English
Page 10

SYMBOLS
The following signal words and meanings are intended to explain the levels of risk associated with
this product.
SYMBOL SIGNAL MEANING
DANGER:
WARNING:
CAUTION:
NOTICE:
Some of the following symbols may be used on this product. Please study them and learn their
meaning. Proper interpretation of these symbols will allow you to operate the product better and safer.
Indicates an imminently hazardous situation, which, if not
avoided, will result in death or serious injury.
Indicates a potentially hazardous situation, which, if not avoided,
could result in death or serious injury.
Indicates a potentially hazardous situation, which, if not avoided,
may result in minor or moderate injury.
(Without Safety Alert Symbol) Indicates important information not
related to an injury hazard, such as a situation that may result in
property damage.
SYMBOL NAME DESIGNATION/EXPLANATION
Safety Alert Indicates a potential personal injury hazard.
Read Operator’s Manual
Eye and Head Protection
SAFE-T-TIP® Nose
Guard
Wet Conditions Alert Do not expose to rain or use in damp locations.
Operate With Two
Hands
One Handed Do not operate the saw using only one hand.
To reduce the risk of injury, user must read and
understand operator’s manual before using this product.
Always wear eye protection with side shields marked
to comply with ANSI Z87.1, along with head protection
The SAFE-T-TIP® nose guard on the guide bar helps
prevent rotational kickback.
Hold and operate the saw properly with both hands.
10 - English
Page 11

SYMBOLS
Some of the following symbols may be used on this product. Please study them and learn their
meaning. Proper interpretation of these symbols will allow you to operate the product better and safer.
SYMBOL NAME DESIGNATION/EXPLANATION
Kickback DANGER! BEWARE OF KICKBACK.
Bar Nose Contact Avoid bar nose contact.
Wear Gloves
Wear Safety Footwear
Keep Bystanders
Away
Oil Indicator
Recycle Symbol
V Volts Voltage
Direct Current Type or a characteristic of current
Wear non-slip, heavy-duty protective gloves when
handling the chain saw.
Wear non-slip safety footwear when using this
equipment.
Keep all bystanders and animals at least 50 ft. away.
Pour bar and chain lubricant into oil tank where
indicated. Do not use any other fluids.
This product uses lithium-ion batteries. Local, state or
federal laws may prohibit disposal of batteries in ordinary
trash. Consult your local waste authority for information
regarding available recycling and/or disposal options.
11 - English
Page 12

GLOSSARY OF TERMS
Bucking
The process of cross cutting a felled tree or log
into lengths.
Chain Saw Powerhead
A chain saw without the saw chain and guide bar.
Drive Sprocket or Sprocket
The toothed part that drives the saw chain.
Felling
The process of cutting down a tree.
Felling Back Cut
The final cut in a tree felling operation made on
the opposite side of the tree from the notching
undercut.
Front Hand Guard
A structural barrier between the front handle of a
chain saw and the guide bar, typically located close
to the hand position on the front handle.
Front Handle
The support handle located at or toward the front
of the chain saw. This handle is for the left hand.
Guide Bar
A solid railed structure that supports and guides
the saw chain.
Kickback
The backward or upward motion, or both, of the
guide bar occurring when the saw chain near the
nose of the top area of the guide bar contacts any
object such as a log or branch, or when the wood
closes in and pinches the saw chain in the cut.
Kickback (Pinch)
The rapid pushback of the saw which can occur
when the wood closes in and pinches the moving
saw chain in the cut along the top of the guide bar.
Kickback (Rotational)
The rapid upward and backward motion of the
saw which can occur when the moving saw chain
near the upper portion of the tip of the guide bar
contacts an object, such as a log or branch.
Lock-out button
A movable stop that prevents the unintentional
operation of the switch until manually actuated.
Low-Kickback Chain
A chain that complies with the kickback performance requirements of ANSI B175.1 when tested
on a representative sample of chain saws.
Normal Cutting Position
Those positions assumed in performing the bucking and felling cuts.
Notching Undercut
A notch cut in a tree that directs the tree’s fall.
Rear Handle
The support handle located at or toward the rear
of the saw. It normally contains the switch trigger.
This handle is for the right hand.
Reduced Kickback Guide Bar
A guide bar which has been demonstrated to
reduce kickback significantly.
Replacement Saw Chain
A chain that complies with the kickback performance requirements of ANSI B175.1 when tested
with specific chain saws. It may not meet the ANSI
performance requirements when used with other
saws.
SAFE-T-TIP® Nose Guard
An attachment that may be provided on the end
of the guide bar to prevent the chain at the end of
the guide bar from contacting the wood.
Saw Chain
A loop of chain having cutting teeth that cut the
wood, and that is driven by the motor and is supported by the guide bar.
Springpole
A small tree (sapling) or limb that is bent or trapped
under tension. It may “spring back” rapidly when
cut, causing a dangerous situation.
Switch Trigger
A device that when operated will complete or
interrupt an electrical power circuit to the motor
of the chain saw.
12 - English
Page 13

FEATURES
PRODUCT SPECIFICATIONS
Motor ....................................................................................................................................40 Volt DC
Bar Length .................................................................................................................................... 12 in.
Cutting Capacity.............................................................................................................................9 in.
Felling Capacity .............................................................................................................................. 7 in.
Chain oil tank capacity .................................................................................................................. 5 oz.
NOTE: This saw was designed for occasional light duty use and has some limitations as to what it
can cut.
FRONT HAND
GUARD
GUIDE
BATTERY PACK
CHAIN
COVER
BAR
REAR
HANDLE
SCABBARD
LOW KICKBACK
CHAIN
CHAIN COVER
LOCK KNOB
CHAIN
TENSIONING KNOB
FRONT HANDLE
SWITCH TRIGGER
BATTERY PACK
SAFE-T-TIP©
LOCK-OUT
BUTTON
CHAIN OIL
TANK CAP
QUICK VIEW OIL
INDICATOR
13 - English
Fig. 5
Page 14

FEATURES
KNOW YOUR CHAIN SAW
See Figure 5.
The safe use of this product requires an understanding of the information on the tool and in this
operator’s manual as well as a knowledge of the
project you are attempting. Before use of this product, familiarize yourself with all operating features
and safety rules.
CHAIN TENSIONING KNOB
This feature allows user to adjust the tension of
the chain.
GUIDE BAR
The factory-equipped guide bar has a small radius
tip that offers a somewhat lower kickback potential.
LOW KICKBACK CHAIN
The low kickback chain helps minimize the force
of a kickback reaction by preventing the cutters
from digging in too deeply at the kickback zone.
QUICK VIEW OIL INDICATOR
Semi-transparent oil reservoir that allows user to
see when to add oil.
SAFE-T-TIP® ANTI-KICKBACK NOSE
GUARD
The SAFE-T-TIP® Anti-Kickback Nose Guard is an
attachment provided on the end of the guide bar
to prevent the chain on the end of the guide bar
from contacting the wood.
LOCK-OUT BUTTON
A control feature designed to prevent the motor
from being accidently started.
SWITCH TRIGGER
Squeeze the switch trigger to operate the unit after
switch lock-out has been pushed in. Release the
switch trigger to stop the unit.
ASSEMBLY
UNPACKING
This product has been shipped completely
assembled.
Carefully remove the product and any acces-
sories from the box. Make sure that all items
listed in the packing list are included.
WARNING:
Do not use this product if any parts on the Packing List are already assembled to your product
when you unpack it. Parts on this list are not
assembled to the product by the manufacturer
and require customer installation. Use of a product that may have been improperly assembled
could result in serious personal injury.
Inspect the product carefully to make sure no
breakage or damage occurred during shipping.
Do not discard the packing material until you
have carefully inspected and satisfactorily operated the product.
If any parts are damaged or missing, please call
1-800-860-4050 for assistance.
PACKING LIST
Chain Saw with Scabbard
Bar and Chain Lubricant
Operator’s Manual
WARNING:
If any parts are damaged or missing do not
operate this product until the parts are replaced.
Use of this product with damaged or missing
parts could result in serious personal injury.
14 - English
Page 15

ASSEMBLY
WARNING:
Do not attempt to modify this product or create
accessories not recommended for use with this
product. Any such alteration or modification is
misuse and could result in a hazardous condition leading to possible serious personal injury.
OPERATION
DANGER:
Never cut near power lines, electric cords, or
other electric sources. If bar and chain jams
on any electrical cord or line, DO NOT TOUCH
THE BAR OR CHAIN! THEY CAN BECOME
ELECTRICALLY LIVE AND VERY DANGEROUS.
Continue to hold the chain saw by the insulated
rear handle or lay it down and away from you in
a safe manner. Disconnect the electrical service
to the damaged line or cord before attempting
to free the bar and chain from the line or cord.
Contact with the bar, chain, other conductive
parts of the chain saw, or live electric cords or
lines will result in death by electrocution, electric
shock, or serious personal injury.
WARNING:
To prevent accidental starting that could cause
serious personal injury, always remove the battery pack from the product when assembling
parts.
WARNING:
Do not use any attachments or accessories
not recommended by the manufacturer of this
product. The use of attachments or accessories
not recommended can result in serious personal
injury.
WARNING:
Never fell a tree or cut a log or limb that has a
diameter greater that the length of the guide
bar. Only properly trained professionals should
perform these cuts. Performing these types of
cuts can cause an accident and result in death
or serious personal injury.
WARNING:
Do not allow familiarity with this product to
make you careless. Remember that a careless
fraction of a second is sufficient to inflict serious injury.
WARNING:
Always wear eye protection with side shields
marked to comply with ANSI Z87.1, along with
head protection. Failure to do so could result in
objects being thrown into your eyes and other
possible serious injuries.
15 - English
Before each use, inspect the entire product for
damaged, missing, or loose parts such as screws,
nuts, bolts, caps, etc. Tighten securely all fasteners
and caps and do not operate this product until all
missing or damaged parts are replaced. Please call
1-800-860-4050 or contact an authorized service
center for assistance.
APPLICATIONS
You may use this product for the following purposes:
Limbing and pruning branches from trees
Felling small trees up to 7 in. diameter
Bucking the fallen tree into shorter lengths
This product will accept Ryobi 40 V lithium-ion
battery packs.
For complete charging instructions, refer to the
Operator’s Manual for your Ryobi 40 V battery
pack and charger model.
Page 16

OPERATION
TO INSTALL / REMOVE BATTERY PACK
See Figure 6.
WARNING:
Always remove battery pack from your tool
when you are assembling parts, making adjustments, cleaning, carrying, transporting or when
not in use. Removing battery pack will prevent
accidental starting that could cause serious
personal injury.
NOTE: To avoid serious personal injury, always
remove the battery pack and keep hands clear of
the look-out button when carrying or transporting
the tool.
To install:
Place the battery pack in your chain saw. Align
raised rib on battery pack with groove in chain
saw’s battery port.
NOTICE:
When placing battery pack in your chain saw,
be sure raised rib on battery pack aligns with
groove in chain saw’s battery port and latches
snap in place properly. Improper assembly of
battery pack can cause damage to internal
components.
Make sure the latch on bottom side of the bat-
tery pack snaps in place and that battery pack is
secured in chain saw before beginning operation.
BATTERY
PORT
BATTERY
PACK
LATCH
Fig. 6
Fig. 7
NOTICE:
Remove battery pack from unit. Fill oil tank with
Ryobi Bar and Chain Lubricant before starting
the chain saw. Failure to lubricate the chain will
cause damage to the bar and chain.
CHAIN OIL SYSTEM
See Figure 7.
WARNING:
Make sure the latch on the bottom of the battery pack snaps in place and the battery pack
is fully seated and secure in the chain saw battery port before beginning operation. Failure
to securely seat the battery pack could cause
the battery pack to fall out, resulting in serious
personal injury.
To remove:
Locate latch on bottom of battery pack and depress
both sides to release the battery pack from the
chain saw.
16 - English
Use Ryobi Bar and Chain Lubricant. It is formu-
lated to perform over a wide temperature range
with no dilution required.
NOTE: Do not use dirty, used or otherwise contam-
inated oils. Damage may occur to the bar or chain.
Carefully pour the bar and chain oil into the tank.
Check and fill the oil tank when battery is
recharged, or as needed.
NOTE: It is normal for lubricant to seep from the
saw when not in use. To prevent seepage, empty
the oil tank after each use. When storing the unit
for a long period of time (three months or longer) be
sure the chain is lightly lubricated; this will prevent
rust on the chain and bar sprocket.
Page 17

OPERATION
STARTING AND STOPPING THE CHAIN
SAW
See Figure 8.
WARNING:
Keep body to the left of the chain line. Never
straddle the saw or chain, or lean over past the
chain line.
Starting the chain saw:
Place the chain saw on a flat bare surface and
make sure no objects or obstructions are in
immediate vicinity which could come in contact
with the bar and chain.
Press and hold the lock-out button. This makes
the switch trigger operational.
Press and hold the switch trigger, release the
lock-out button and continue to squeeze the
switch trigger for continued operation.
Stopping the chain saw:
Release the switch trigger to stop the chain saw.
Upon release of the switch trigger, the lock-out
button will be automatically reset to the lock
position.
This cordless chain saw is not designed for cutting
trees larger than 7 in. in diameter.
This cordless chain saw is designed for limbing
and pruning type cutting, as well as cutting trees
up to 7 in. in diameter only.
Do not attempt to make any cut that would require
removal of the SAFE-T-TIP
®
.
PREPARATION FOR CUTTING
PROPER GRIP ON HANDLES
See Figures 9 - 11.
LOCK-OUT
BUTTON
SWITCH
TRIGGER
SWITCH
TRIGGER
LOCK-OUT
BUTTON
Fig. 8
Refer to GENERAL POWER TOOL SAFETY
RULES earlier in this manual for appropriate safety
equipment.
Wear non-slip gloves for maximum grip and
protection.
Hold the saw firmly with both hands. Always
keep your left hand on the front handle and your
right hand on the rear handle so that your body
is to the left of the chain line.
17 - English
Fig. 9
Page 18

OPERATION
WARNING:
Never use a left-handed (cross-handed) grip,
or any stance which would place your body or
arm across the chain line.
Maintain a proper grip on the saw whenever
the unit is running. The fingers should encircle
the handle and the thumb is wrapped under the
handlebar. This grip is least likely to be broken
(by a kickback or other sudden reaction of the
saw). Any grip in which the thumb and fingers
are on the same side of the handle, is dangerous because a slight kick of the saw can cause
loss of control.
WARNING:
Do not operate the switch trigger with your left
hand and hold the front handle with your right
hand. Never allow any part of your body to be
in the chain line while operating a saw.
Fig. 10
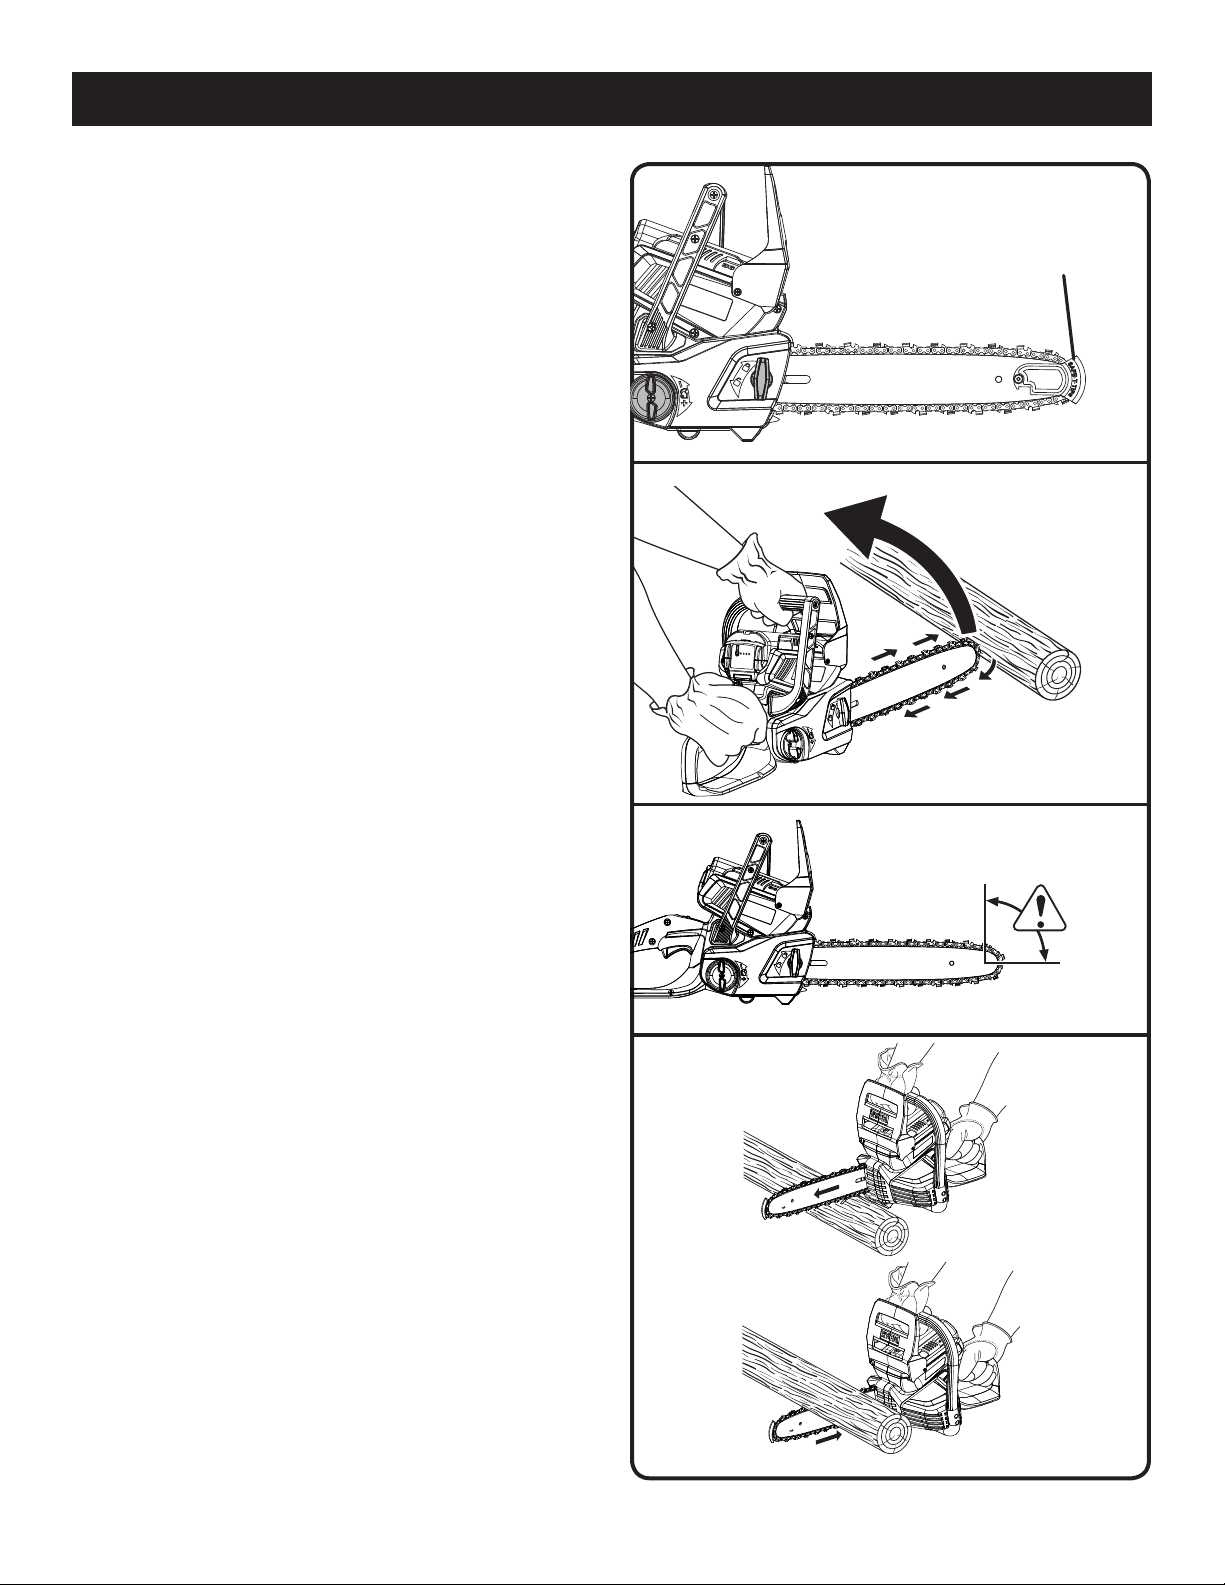
PROPER CUTTING STANCE
See Figures 12 - 13.
WARNING:
Always use the proper cutting stance described
in this section. Never kneel when using the
chain saw, except when felling a tree as illustrated in Figure 13. Kneeling could result in loss
of stability and control of the chain saw, resulting in serious personal injury.
Weight should be balanced with both feet on
solid ground.
Keep left arm with elbow locked in a “straight
arm” position to withstand any kickback force.
Your body should always be to the left of the
chain line.
Thumb should be on underside of handlebar.
BASIC CUTTING PROCEDURE
Practice cutting a few small logs using the following
technique to get the “feel” of using the saw before
you begin a major sawing operation.
CHAIN LINE
Fig. 11
STRAIGHT ARM
POSITION
Fig. 12
18 - English
Fig. 13
Page 19

OPERATION
45°
45°
Take the proper stance in front of the wood with
the saw off.
Squeeze the switch trigger and let the chain
accelerate to full speed before entering the cut.
Begin cutting with the saw against the log.
Keep the unit running the entire time you are
cutting, maintain a steady speed.
Allow the chain to cut for you; exert only light
downward pressure. If you force the cut, damage to the bar, chain, or unit can result.
Release the switch trigger as soon as the cut is
completed, allowing the chain to stop. If you run
the saw without a cutting load, unnecessary wear
can occur to the chain, bar, and unit.
Do not put pressure on the saw at the end of cut.
WORK AREA PRECAUTIONS
See Figure 14.
Cut only wood or materials made from wood, no
sheet metal, no plastics, no masonry, no nonwood building materials.
Never allow children to operate the saw. Allow no
person to use this chain saw who has not read this
Operator’s Manual or received adequate instructions for the safe and proper use of this chain saw.
When felling a tree, keep everyone - helpers,
bystanders, children, and animals - a safe distance
from the cutting area. During felling operations, the
safe distance should be a least twice the height of
the largest trees in the felling area. During bucking
operations, keep a minimum distance of 15 feet
between workers. Trees should not be felled in a
manner that would endanger any person, strike
any utility line or cause any property damage. If
the tree does make contact with any utility line, the
utility company should be notified immediately.
Always cut with both feet on solid ground to pre-
vent being pulled off balance.
Do not cut above chest height, as a saw held high-
er is difficult to control against kickback forces.
Do not fell trees near electrical wires or buildings.
Leave this operation for professionals.
Cut only when visibility and light are adequate for
you to see clearly.
RETREAT PATH
PLANNED LINE
OF FALL
RETREAT PATH
Fig. 14
FELLING TREES
See Figures 14 - 17.
HAZARDOUS CONDITIONS
WARNING:
Do not fell trees during periods of high wind or
heavy precipitation. Wait until the hazardous
weather has ended.
WARNING:
Closely check for broken or dead branches,
which could fall while cutting and do not cut
near buildings or electrical wires if you do not
know the direction of tree fall. Do not cut at
night or during bad weather conditions, such as
rain, snow, or strong winds, which can reduce
visibility and control of the chain saw. If the tree
you are felling makes contact with any utility
line, you should discontinue use of the chain
saw and immediately notify the utility company.
Failure to follow these instructions could result
in death or serious personal injury.
19 - English
Page 20
OPERATION
When felling a tree, it is important that you follow
these warnings and instructions to prevent possible serious injury.
■Do not cut down trees having an extreme lean or
large trees with rotten limbs, loose bark, or hollow trunks. Have these trees pushed or dragged
down with heavy equipment, then cut them up.
■Do not cut trees near electrical wires or buildings.
■Check the tree for damaged or dead branches
that could fall and hit you during felling.
■Periodically glance at the top of the tree during
the backcut to assure the tree is going to fall in
the desired direction.
If the tree starts to fall in the wrong direction,
or if the saw gets caught or hung up during the
fall, leave the saw and save yourself!
Felling a tree - When bucking and felling operations are being performed by two or more persons, at the same time, the felling operation
should be separated from the bucking operation
by a distance of at least twice the height of the
tree being felled. Trees should not be felled in a
manner that would endanger any person, strike
any utility line or cause any property damage. If
the tree does make contact with any utility line, the
utility company should be notified immediately.
Before any cuts are started, pick your escape
route (or routes in case the intended route is
blocked); clear the immediate area around the
tree and make sure there are no obstructions
in your planned path of retreat. Clear path of
safe retreat approximately 135° from planned
line of fall. The retreat path should extend back
and diagonally to the rear of the expected line
of fall. See Figure 14.
Before felling is started, consider the force and
direction of the wind, the lean and balance of
the tree, and the location of large limbs. These
things influence the direction in which the tree
will fall. Do not try to fell a tree along a line different from its natural line of fall.
The chain saw operator should keep on the
uphill side of the terrain as the tree is likely to
roll or slide downhill after it is felled.
Remove dirt, stones, loose bark, nails, staples,
and wire from the tree where felling cuts are to
be made.
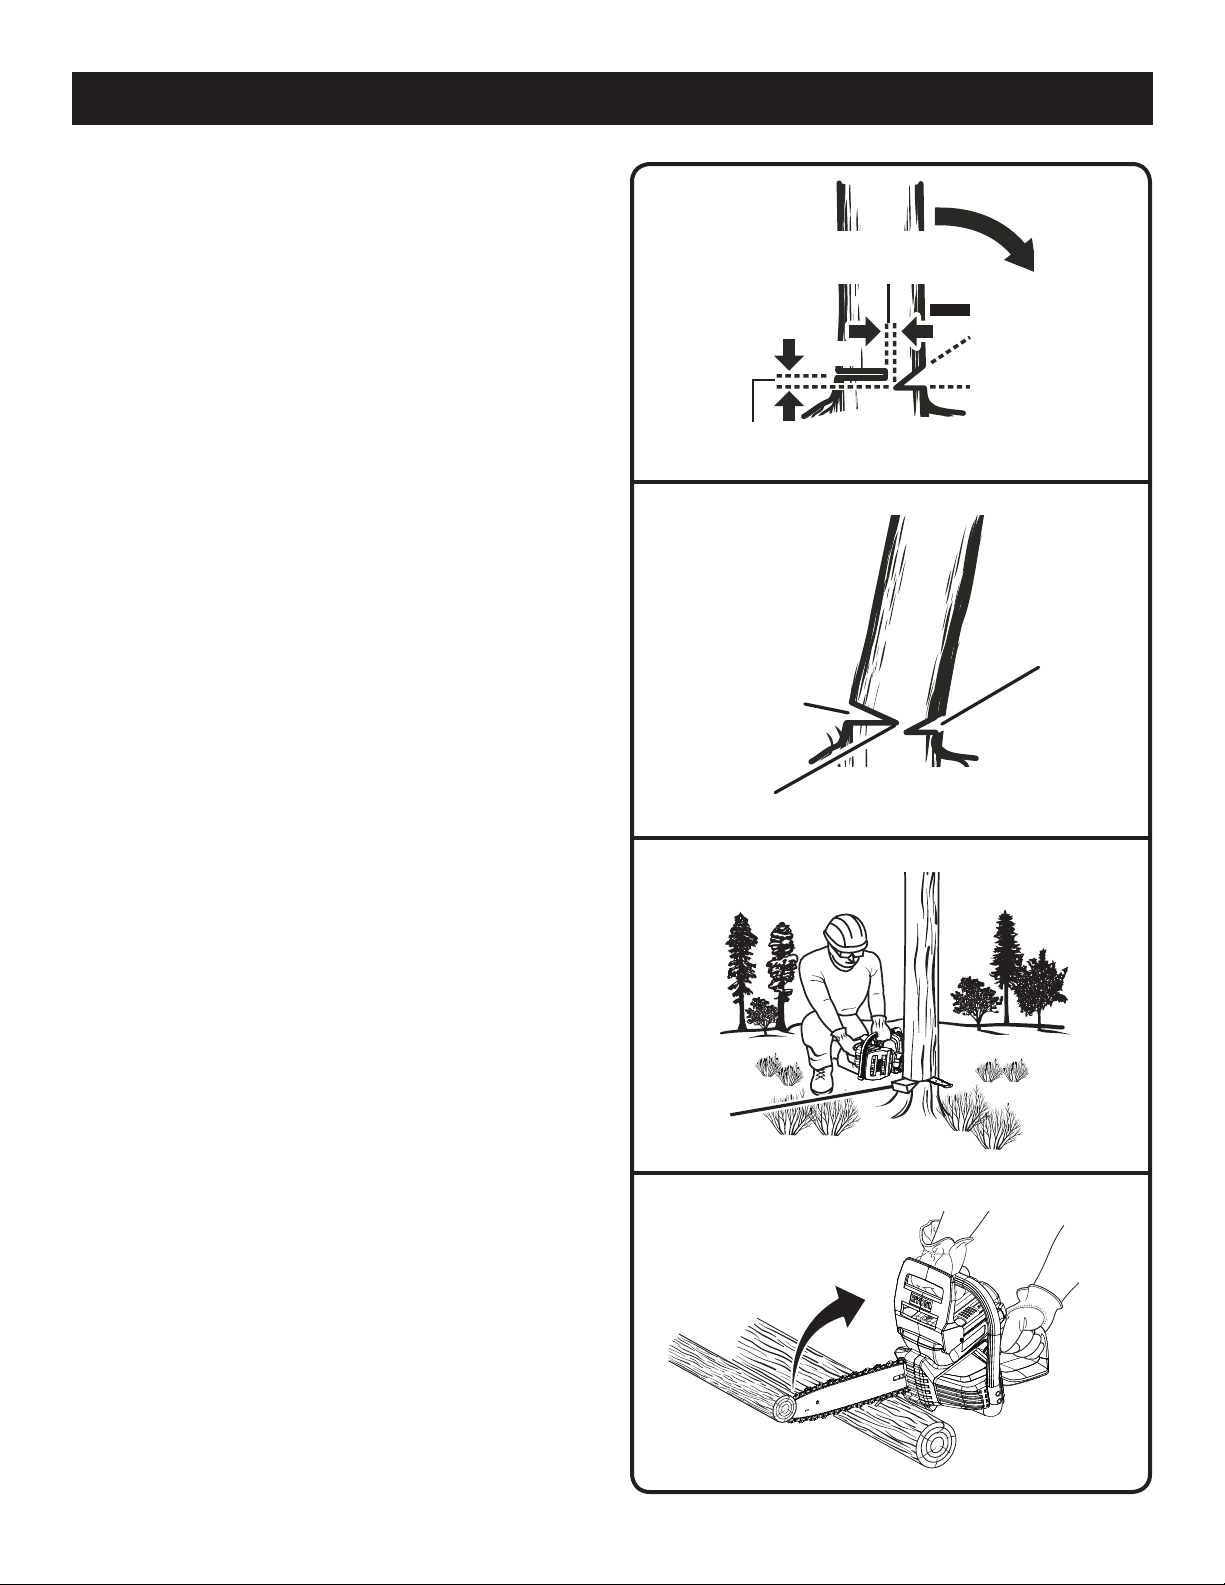
BACK CUT
2 in.
BACK CUT
HINGE
WEDGE
KICKBACK
HINGE
2 in. OR 1/10 DIA
NOTCH -
APPROX. 1/3
DIAMETER OF
TRUNK
Fig. 15
NOTCH
Fig. 16
Fig. 17
Fig. 18
20 - English
Page 21

OPERATION
Notched Undercut. Cut a notch about 1/3 the
diameter of the tree, perpendicular to the direction of fall. Make the cuts of the notch so they
intersect at a right angle to the line of fall. This
notch should be cleaned out to leave a straight
line. To keep the weight of the wood off the saw,
always make the lower cut of the notch before
the upper cut. See Figure 15.
Felling Backcut. The backcut is always made lev-
el and horizontal, and at a minimum of 2 in. above
the horizontal cut of the notch. See Figures 15 - 16.
Never cut through to the notch. Always leave a
band of wood between the notch and backcut
(approximately 2 in. or 1/10 the diameter of the
tree). This is called “hinge” or “hingewood.” It
controls the fall of the tree and prevents slipping or twisting or shoot-back of the tree off the
stump. See Figures 15 - 16.
On large diameter trees, stop the back cut
before it is deep enough for the tree to either
fall or settle back on the stump. Then insert
soft wooden or plastic wedges into the cut so
they do not touch the chain. The wedges can
be driven in, little by little, to help jack the tree
over. See Figure 17.
NOTE: When bucking or felling with a wedge, it
may be necessary to remove the SAFE-T-TIP®
anti-kickback nose guard to allow the bar to be
drawn through the cut. After the cut is complete,
the tip should be reinstalled immediately.
As tree starts to fall, stop the chain saw and put
it down immediately. Retreat along the cleared
path, but watch the action in case something
falls your way. Be alert for overhead limbs or
branches that may fall and watch your footing.
LOG SUPPORTED AT ONE END:
FINISHING CUT
LOG SUPPORTED AT BOTH ENDS:
LOAD
FINISHING CUT
OVERBUCKING
Fig. 19
LOAD
1ST CUT
1/3 DIA
1ST CUT 1/3 DIA
Fig. 20
WARNING:
Never cut through to the notch when making a
backcut. The hinge controls the fall of the tree,
this is the section of wood between the notch
and backcut.
BUCKING
See Figures 18 - 21.
Bucking is the term used for cutting a fallen tree
to the desired log length.
Always make sure your footing is secure and
your weight is distributed evenly on both feet.
21 - English
UNDERBUCKING
Fig. 21
Page 22

OPERATION
■ Cut only one log at a time.
■ Support small logs on a saw horse or another
log while bucking.
■ Keep a clear cutting area. Make sure that no
objects can contact the guide bar nose and
chain during cutting, this can cause kickback.
To avoid the danger, keep the SAFE-T-TIP® antikickback nose guard attached while cutting.
Refer to Precautions Against Kickback earlier
in this manual.
When bucking on a slope, always stand on the
uphill side of the log. To maintain complete control of the chain saw when cutting through the
log, release the cutting pressure near the end of
the cut without relaxing your grip on the chain
saw handles. Do not let the chain contact the
ground. After completing the cut, wait for the
saw chain to stop before you move the chain
saw. Always stop the motor before moving from
tree to tree.
■ Sometimes it is impossible to avoid pinching
(with just standard cutting techniques) or difficult
to predict which way a log will settle when cut.
To avoid pinching while cutting, rotate or move
the log so that the pinch is eliminated.
BUCKING LOGS UNDER STRESS
See Figures 20 - 21.
When the log is supported along its entire length,
it should be cut from the top or overbucking.
When the log is supported on one end, cut 1/3
the diameter from the underside or underbucking. Then make the finishing cut by overbucking
to meet the first cut.
As the log is being cut, it will tend to bend. The saw
can become pinched or hung in the log if you make
the first cut deeper than 1/3 of the diameter of the log.
Give special attention to logs under stress to prevent the bar and chain from pinching.
When bucking on a slope, always stand on the uphill
side of the log as shown in figure 18. When “cutting
through,” to maintain complete control of the chain
saw, release the cutting pressure near the end of
the cut without relaxing your grip on the chain saw
handles. Do not let the chain contact the ground.
After completing the cut, wait for the saw chain
to stop before you move the chain saw. Always
stop the motor before moving from tree to tree.
TYPES OF CUTTING USED
See Figure 21.
OVERBUCKING
Begin on the top side of the log with the bottom
of the saw against the log; exert light pressure
downward. Note that the saw will tend to pull
away from you.
UNDERBUCKING
Begin on the under side of the log with the top
of the saw against the log; exert light pressure
upward. During underbucking, the saw will tend
to push back at you. Be prepared for this reaction
and hold the saw firmly to maintain control.
WARNING:
Never climb into a tree to limb or prune. Do not
stand on ladders, platforms, a log, or in any
position which can cause you to lose your balance or control of the saw.
LIMBING
See Figure 22.
Limbing is removing branches from a fallen tree.
Work slowly, keeping both hands on the chain
saw with a firm grip. Always make sure your
footing is secure and your weight is distributed
evenly on both feet.
Leave the larger support limbs under the tree to
keep the tree off the ground while cutting.
Limbs should be cut one at a time. Remove the
cut limbs from the work area often to help keep
the work area clean and safe.
Branches under tension should be cut from the
bottom up to avoid binding the chain saw.
Keep the tree between you and the chain saw
while limbing. Cut from the side of the tree
opposite the branch you are cutting.
22 - English
Page 23

3
OPERATION
PRUNING
See Figure 23.
Pruning is trimming limbs from a live tree.
Work slowly, keeping both hands on the chain
saw with a firm grip. Always make sure your
footing is secure and your weight is distributed
evenly on both feet.
Do not cut from a ladder, this is extremely dan-
gerous. Leave this operation for professionals.
Do not cut above chest height as a saw held
higher is difficult to control against kickback.
When pruning trees it is important not to make
the finishing cut next to the main limb or trunk
until you have cut off the limb further out to
reduce the weight. This prevents stripping the
bark from the main member.
Underbuck the branch 1/3 through for your first cut.
Your second cut should overbuck to drop the
branch off.
Now make your finishing cut smoothly and
neatly against the main member so the bark will
grow back to seal the wound.
2
1
4
CUT LIMBS ONE AT A TIME AND LEAVE SUPPORT LIMBS
LOAD
FIRST CUT
1/3 DIAMETER
FINISHING CUT
UNDER TREE UNTIL LOG IS CUT
SECOND CUT
Fig. 22
Fig. 23
WARNING:
If the limbs to be pruned are above chest height,
hire a professional to perform the pruning. Failure to do so could result in serious personal
injury.
SPRINGPOLES
See Figure 24.
A springpole is any log, branch, rooted stump, or
sapling which is bent under tension by other wood
so that it springs back if the wood holding it is cut
or removed. On a fallen tree, a rooted stump has
a high potential of springing back to the upright
position during the bucking cut to separate the log
from the stump. Watch out for springpoles, they
are dangerous.
WARNING:
Springpoles are dangerous and could strike the
operator, causing the operator to lose control
of the chain saw. This could result in severe or
fatal injury to the operator.
SPRINGPOLE
Fig. 24
23 - English
Page 24

MAINTENANCE
WARNING:
When servicing, use only identical replacement
parts. Use of any other parts may create a
hazard or cause product damage.
WARNING:
Always wear eye protection with side shields
marked to comply with ANSI Z87.1, along with
head protection. Failure to do so could result in
objects being thrown into your eyes and other
possible serious injuries.
WARNING:
To avoid serious personal injury, always remove the
battery pack from the product when cleaning
or performing any maintenance.
Only the parts shown on the parts list are intended
to be repaired or replaced by the customer. All
other parts should be replaced at an Authorized
Service Center.
BATTERY PACK REMOVAL AND
PREPARATION FOR RECYCLING
WARNING:
Upon removal, cover the battery pack’s terminals with heavy-duty adhesive tape. Do not
attempt to destroy or disassemble battery pack
or remove any of its components. Lithium-ion
and nickel-cadmium batteries must be recycled
or disposed of properly. Also, never touch both
terminals with metal objects and/or body parts
as short circuit may result. Keep away from
children. Failure to comply with these warnings
could result in fire and/or serious injury.
GENERAL MAINTENANCE
Before each use, inspect the entire product for
damaged, missing, or loose parts such as screws,
nuts, bolts, caps, etc. Tighten securely all fasteners
and caps and do not operate this product until all
missing or damaged parts are replaced. Please call
1-800-860-4050 or contact an authorized service
center for assistance.
Avoid using solvents when cleaning plastic parts.
Most plastics are susceptible to damage from
various types of commercial solvents and may be
damaged by their use. Use clean cloths to remove
dirt, dust, oil, grease, etc.
WARNING:
Do not at any time let brake fluids, gasoline,
petroleum-based products, penetrating
oils, etc., come in contact with plastic
parts. Chemicals can damage, weaken or
destroy plastic which may result in serious
personal injury.
REPLACING BAR AND CHAIN
See Figures 25 - 31.
WARNING:
Remove the battery pack from the chain saw and
make sure the chain has stopped before you do
any work on the saw. Failure to do so may result
in accidental starting and possible serious injury.
WARNING:
The safety instructions in this section are to
protect the user from serious personal injury.
CAUTION:
Always wear gloves when handling the bar and
chain; these components are sharp and may
contain burrs.
WARNING:
Never touch or adjust the chain while the motor
is running. The saw chain is very sharp; always
wear protective gloves when performing maintenance to the chain to avoid possible serious
lacerations.
24 - English
Page 25

MAINTENANCE
NOTE: When replacing the guide bar and chain,
always use the specified bar and chain listed in
the Bar and Chain Combinations section later
in this manual.
Remove the battery pack before you do any
work on the chain saw.
Rotate the chain cover lock knob counterclock-
wise and remove knob.
Remove the chain cover.
Remove the bar and chain from the mounting
surface.
Remove the old chain from the bar.
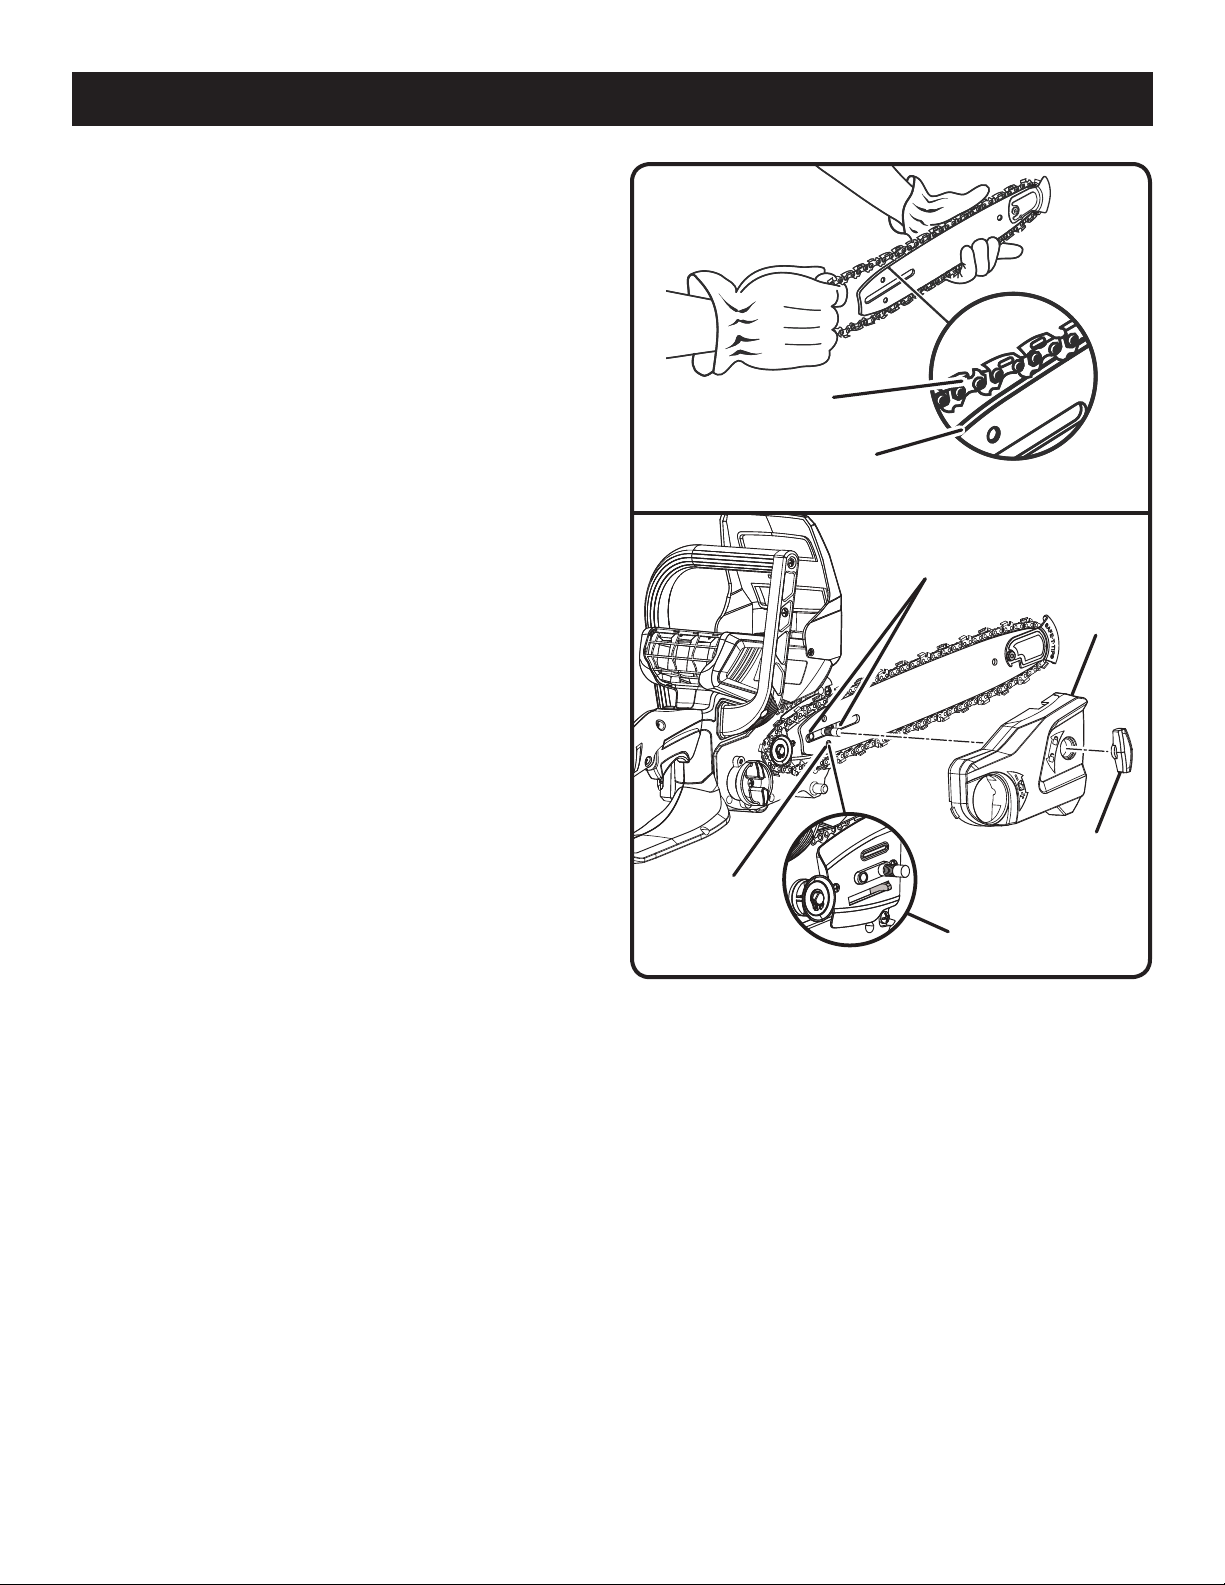
Lay out the new saw chain in a loop and
straighten any kinks. The cutters should face
in the direction of chain rotation. If they face
backwards, turn the loop over.
Place the chain drive links into the bar groove as
shown.
NOTE: Make certain of direction of chain.
Position the chain so there is a loop at the back
of the bar.
Hold the chain in position on the bar and place
the loop around the sprocket.
Fit the bar flush against the mounting surface so
that the bar studs are in the long slot of the bar.
WARNING:
When placing the bar on the bar studs, ensure
that the chain tensioning pin is in the chain tension pin hole. Failure to properly place the chain
tensioning pin in the chain tensioning pin hole
could cause the chain to come loose, resulting
in serious personal injury.
CHAIN
TENSIONING
KNOB
MOUNTING
SURFACE
CUTTERS
CHAIN COVER
LOCK KNOB
Fig. 25
CHAIN
CHAIN
COVER
BAR
CHAIN COVER
LOCK KNOB
Fig. 26
CHAIN ROTATION
25 - English
CHAIN DRIVE LINKS
Fig. 27
Page 26
MAINTENANCE
Replace the chain cover.
Replace the chain cover lock knob; rotate knob
clockwise to tighten. The bar should still be free
to move for tension adjustment.
Remove all slack from the chain by turning the
chain tensioning knob clockwise until the chain
seats snugly against the bar with the drive links
in the bar groove.
Lift the tip of the guide bar up to check for sag.
Release the tip of the guide bar and turn the
chain tensioning knob 1/2 turn clockwise.
Repeat this process until sag does not exist.
Hold the tip of the guide bar up and tighten the
chain cover lock knob.
The chain is correctly tensioned when there is no
sag on the underside of the guide bar, the chain is
snug, but it can be turned by hand without binding.
CHAIN DRIVE
LINKS
BAR
GROOVE
Fig. 28
BAR STUDS
CHAIN
COVER
NOTE: If chain is too tight, it will not rotate. Loosen
the chain cover lock knob slightly and turn the
chain tensioning knob 1/4 turn counterclockwise.
Lift the tip of the guide bar up and retighten the
chain cover lock knob. Ensure that the chain will
rotate without binding.
CHAIN
TENSION PIN
HOLE
COVER LOCK
CHAIN
TENSIONING
PIN
CHAIN
KNOB
Fig. 29
26 - English
Page 27

MAINTENANCE
ADJUSTING THE CHAIN TENSION
See Figures 31 - 32.
WARNING:
Never touch or adjust the chain while the motor
is running. The saw chain is very sharp. Always
wear protective gloves when performing maintenance on the chain.
Remove the battery pack before you do any
work on the chain saw.
Slightly loosen the chain cover lock knob.
Turn the chain tensioning knob clockwise to
tension the chain.
NOTE: A cold chain is correctly tensioned when
there is no slack on the underside of the guide
bar, the chain is snug, and it can be turned by
hand without binding.
Rotate the chain cover lock knob clockwise to
secure.
LIFT THE TIP OF
THE GUIDE BAR
UP TO CHECK FOR
SAG
Fig. 30
Retension the chain whenever the flats on the drive
links hang out of the bar groove.
NOTE: During normal saw operation, the tem-
perature of the chain increases. The drive links
of a correctly tensioned warm chain will hang
approximately .050 in. out of the bar groove.
NOTE: New chains tend to stretch; check the
chain tension frequently and tension as required.
NOTICE:
A chain tensioned while warm may be too tight
upon cooling. Check the “cold tension” before
next use.
CHAIN
TENSIONING
KNOB
FLATS
CHAIN COVER
LOCK KNOB
Fig. 31
APPROX. .050 in.
27 - English
Fig. 32
Page 28

MAINTENANCE
CHAIN MAINTENANCE
See Figures 33 - 35.
WARNING:
Remove the battery pack and make sure the chain
has stopped before you do any work on the saw.
Use only low-kickback chain on this saw. This
fast-cutting chain will provide kickback reduction
when properly maintained.
For smooth and fast cutting, chain needs to be
maintained properly. The chain requires sharpening when the wood chips are small and powdery,
the chain must be forced through the wood during cutting, or the chain cuts to one side. During
maintenance of your chain, consider the following:
Improper filing angle of the side plate can
increase the risk of a severe kickback.
Raker (depth gauge) clearance.
Too low increases the potential for kickback.
Not low enough decreases cutting ability.
If cutter teeth have hit hard objects such as nails
and stones, or have been abraded by mud or sand
on the wood, have service dealer sharpen chain.
NOTE: Inspect the drive sprocket for wear or damage when replacing the chain. If signs of wear or
damage are present in the areas indicated, have the
drive sprocket replaced by a Ryobi Service dealer.
CHECK FOR WEAR
OR DAMAGE
TOP PLATE
RIVET HOLE
HEEL
RAKER CLEARANCE
.025 in.
Fig. 33
Fig. 34
CUTTING
CORNER
SIDE PLATE
DEPTH GAUGE
TOE
28 - English
GULLET
Fig. 35
Page 29

MAINTENANCE
HOW TO SHARPEN THE CUTTERS
See Figures 36 - 37.
Be careful to file all cutters to the specified angles
and to the same length, as fast cutting can be
obtained only when all cutters are uniform.
Wear gloves for protection. Properly tension
the chain prior to sharpening. Refer to Chain
Tension Section earlier in this manual. Do all
of your filing at the mid-point of the bar.
Use a 5/32 in. diameter round file and holder.
Keep the file level with the top plate of the tooth.
Do not let the file dip or rock.
Using light but firm pressure, stroke towards the
front corner of the tooth.
Lift file away from the steel on each return stroke.
Put a few firm strokes on every tooth. File all left
hand cutters in one direction. Then move to the
other side and file the right hand cutters in the
opposite direction. Occasionally remove filings
from the file with a wire brush.
LEFT HAND
CUTTERS
RIGHT HAND
CUTTERS
Fig. 36
Fig. 37
WARNING:
Improper chain sharpening increases the potential of kickback.
WARNING:
Failure to replace or repair damaged chain can
cause serious injury.
WARNING:
The saw chain is very sharp, always wear protective gloves when performing maintenance
to the chain.
TOP PLATE FILING ANGLE
See Figure 38.
CORRECT 30° - File holders are marked with
guide marks to align file properly to produce
correct top plate angle.
CORRECT TOP PLATE
FILING ANGLE
30°
INCORRECT TOP PLATE FILING
ANGLE
LESS
THAN 30°
MORE
THAN 30°
Fig. 38
LESS THAN 30° - For Cross Cutting.
MORE THAN 30° - Feathered Edge Dulls Quickly.
29 - English
Page 30

MAINTENANCE
SIDE PLATE ANGLE
See Figure 39.
CORRECT - 80° Produced automatically if cor-
rect diameter file is used in file holder.
HOOK - “Grabs” and dulls quickly. Increases
potential of KICKBACK.
Results from using a file with diameter too small,
or file held too low.
BACKWARD SLOPE - Needs too much feed
pressure, causes excessive wear to bar and
chain.
Results from using a file with diameter too large,
or file held too high.
DEPTH GAUGE CLEARANCE
See Figures 40 - 41.
The depth gauge should be maintained at a
clearance of .025 in. Use a depth gauge tool
for checking the depth gauge clearances.
Every time the chain is filed, check the depth
gauge clearance.
Use a flat file and a depth gauge jointer to lower
all gauges uniformly. Depth gauge jointers are
available in .020 in. to .035 in. Use a .025 in. depth
gauge jointer. After lowering each depth gauge,
restore original shape by rounding the front. Be
careful not to damage adjoining drive links with
the edge of the file.
Depth gauges must be adjusted with the flat file in
the same direction the adjoining cutter was filed
with the round file. Use care not to contact cutter
face with flat file when adjusting depth gauges.
CORRECT SIDE
PLATE FILING
ANGLE
80°
INCORRECT SIDE PLATE
FILING ANGLE
HOOK
BACKWARD
SLOPE
Fig. 39
DEPTH GAUGE JOINTER
FLAT FILE
Fig. 40
RESTORE ORIGINAL
SHAPE BY ROUNDING
THE FRONT
Fig. 41
A bar with any of the following faults should be
replaced.
GUIDE BAR MAINTENANCE
When the guide bar shows signs of wear, reverse
it on the saw to distribute the wear for maximum
bar life. The bar should be cleaned every day of
use and checked for wear and damage.
Feathering or burring of the bar rails is a normal process of bar wear. Such faults should be smoothed
with a file as soon as they occur.
30 - English
Wear inside the bar rails which permits the chain
to lay over sideways.
Bent guide bar.
Cracked or broken rails.
Spread rails.
Lubricate guide bars with a sprocket at their tip
weekly. Using a grease syringe, lubricate weekly in
the lubricating hole. Turn the guide bar and check
that the lubrication holes and chain groove are free
from impurities.
Page 31

MAINTENANCE
MOUNTING THE SAFE-T-TIP® NOSE
GUARD
See Figures 42 - 43.
Remove the battery pack from the chain saw.
Mount the SAFE-T-TIP® on the bar nose.
Fit the locking rivet or tab in the recessed hole
in the guide bar.
Tighten the screw with wrench until snug.
From the snug position, tighten the screw an
additional 3/4 of a turn using a wrench.
MAINTAINING THE SAFE-T-TIP® NOSE
GUARD
See Figures 42 - 43.
WARNING:
Although the guide bar comes with a SAFE-TTIP® anti-kickback nose guard already installed,
check the tightness of the mounting screw
before each use to avoid possible serious personal injury.
MOUNTING
SCREW
SAFE-T-TIP
Fig. 42
TIGHTEN 3/4
OF A TURN
Use the following instructions to tighten the mounting screw of the nose guard. These are specially
hardened screws. If you cannot install the screw
tightly, replace both the screw and the SAFE-T-TIP
before further operation.
NOTE: Do not replace the screw with an ordinary
screw. Use only identical replacement parts from
the manufacturer when replacing parts.
In addition to preventing chain contact with solid
objects at the nose of the bar, the SAFE-T-TIP® also
helps keep the chain away from abrasive surfaces,
such as the ground. Keep it on the right hand side
of the bar where it will be between the chain and
the ground during flush with ground cutting.
The mounting screw requires a 5/16 in. wrench (or
adjustable wrench) to achieve the recommended
torque of 35 to 45 in.lb. A torque within this range
can be achieved by using the following method.
Tighten the screw with wrench until snug.
From the snug position, tighten the screw an
additional 3/4 of a turn using a wrench.
®
Fig. 43
Fig. 44
TRANSPORTING AND STORING
See Figure 44.
Do not store or transport the chain saw when
it is running. The chain saw should always be
idle before storing or transporting.
Always place the guide bar scabbard on the
bar and chain before storing or transporting the
chain saw. Use caution to avoid the sharp teeth
of the chain.
Clean the chain saw thoroughly before storing.
Store the chain saw indoors, in a dry place that
is locked and/or inaccessible to children.
Keep away from corrosive agents such as gar-
den chemicals and de-icing salts.
31 - English
Page 32

BAR AND CHAIN SPECIFICATIONS
Chain specifications: .375 in. pitch, low profile narrow kerf, .043 in. chain gauge, 5-tooth drive
sprocket.
Length of Bar Guide Bar Part Number Chain Part Number Drive Links
12 in. 099966002001 099966002002 45
TROUBLESHOOTING
PROBLEM CAUSE SOLUTION
Bar and chain running
hot and smoking.
Motor runs, but chain is
not rotating.
1. Check chain tension for
over tight condition
2. Chain oil tank empty.
1. Chain tension too tight.
2. Check guide bar and chain
assembly.
3. Check guide bar and chain
for damage.
1. Tension chain. Refer to Chain
Tension earlier in this manual.
2. Check oil tank.
1. Retension chain, Refer to Chain
Tension earlier in this manual.
2. Refer to Assembling the Bar and
Chain earlier in this manual.
3. Inspect guide bar and chain for
damage.
CALL US FIRST
For any questions about operating or maintaining your product,
call the Ryobi® Help Line!
Your product has been fully tested prior to shipment to ensure
your complete satisfaction.
32 - English
Page 33

WARRANTY
LIMITED WARRANTY STATEMENT
Techtronic Industries North America, Inc., warrants to the
original retail purchaser that this RYOBI® brand outdoor
product is free from defect in material and workmanship
and agrees to repair or replace, at Techtronic Industries
North America, Inc.’s, discretion, any defective product
free of charge within these time periods from the date of
purchase.
■ Five years if the product is used for personal, family or
household use;
■ 90 days, if used for any other purpose, such as
commercial or rental.
This warranty extends to the original retail purchaser only
and commences on the date of the original retail purchase.
Any part of this product found in the reasonable judgment
of Techtronic Industries North America, Inc. to be defective
in material or workmanship will be repaired or replaced
without charge for parts and labor by an authorized service
center for RYOBI® brand outdoor products (Authorized
Ryobi Service Center).
The product, including any defective part, must be returned
to an authorized Ryobi service center within the warranty
period. The expense of delivering the product to the service
center for warranty work and the expense of returning it
back to the owner after repair or replacement will be paid
by the owner. Techtronic Industries North America, Inc.’s,
responsibility in respect to claims is limited to making the
required repairs or replacements and no claim of breach of
warranty shall be cause for cancellation or rescission of the
contract of sale of any RYOBI® brand outdoor product. Proof
of purchase will be required by the dealer to substantiate
any warranty claim. All warranty work must be performed
by an authorized service dealer.
This warranty is limited to ninety (90) days from the date
of original retail purchase for any RYOBI® brand outdoor
product that is used for rental or commercial purposes, or
any other income-producing purpose.
This warranty does not cover any product that has been
subject to misuse, neglect, negligence, or accident, or that
has been operated in any way contrary to the operating
instructions as specified in this operator’s manual. This
warranty does not apply to any damage to the product that
is the result of improper maintenance or to any product
that has been altered or modified. The warranty does not
extend to repairs made necessary by normal wear or by the
use of parts or accessories which are either incompatible
with the RYOBI® brand outdoor product or adversely affect
its operation, performance, or durability. In addition, this
warranty does not cover:
A. Tune-ups – Spark Plugs, Carburetor, Carburetor
Adjustments, Ignition, Filters
B. Wear items – Bump Knobs, Outer Spools, Cutting
Lines, Inner Reels, Starter Pulleys, Starter Ropes, Drive
Belts, Tines, Felt Washers, Hitch Pins, Mulching Blades,
Blower Fans, Blower and Vacuum Tubes, Vacuum Bag
and Straps, Guide Bars, Saw Chains
Techtronic Industries North America, Inc., reserves the
right to change or improve the design of any RYOBI® brand
outdoor product without assuming any obligation to modify
any product previously manufactured.
ALL IMPLIED WARRANTIES ARE LIMITED IN DURATION
TO THE STATED WARRANTY PERIOD. ACCORDINGLY,
ANY SUCH IMPLIED WARRANTIES INCLUDING
MERCHANTABILITY, FITNESS FOR A PARTICULAR
PURPOSE, OR OTHERWISE, ARE DISCLAIMED IN
THEIR ENTIRETY AFTER THE EXPIRATION OF THE
APPROPRIATE FIVE-YEAR OR NINETY-DAY WARRANTY
PERIOD. TECHTRONIC INDUSTRIES NORTH AMERICA,
INC.’S, OBLIGATION UNDER THIS WARRANTY IS
STRICTLY AND EXCLUSIVELY LIMITED TO THE
REPAIR OR REPLACEMENT OF DEFECTIVE PARTS
AND TECHTRONIC INDUSTRIES NORTH AMERICA,
INC., DOES NOT ASSUME OR AUTHORIZE ANYONE
TO ASSUME FOR THEM ANY OTHER OBLIGATION.
SOME STATES DO NOT ALLOW LIMITATIONS ON HOW
LONG AN IMPLIED WARRANTY LASTS, SO THE ABOVE
LIMITATION MAY NOT APPLY TO YOU. TECHTRONIC
INDUSTRIES NORTH AMERICA, INC., ASSUMES NO
RESPONSIBILITY FOR INCIDENTAL, CONSEQUENTIAL,
OR OTHER DAMAGES INCLUDING, BUT NOT LIMITED
TO, EXPENSE OF RETURNING THE PRODUCT TO AN
AUTHORIZED RYOBI SERVICE CENTER AND EXPENSE
OF DELIVERING IT BACK TO THE OWNER, MECHANIC’S
TRAVEL TIME, TELEPHONE OR TELEGRAM CHARGES,
RENTAL OF A LIKE PRODUCT DURING THE TIME
WARRANTY SERVICE IS BEING PERFORMED, TRAVEL,
LOSS OR DAMAGE TO PERSONAL PROPERTY, LOSS
OF REVENUE, LOSS OF USE OF THE PRODUCT, LOSS
OF TIME, OR INCONVENIENCE. SOME STATES DO NOT
ALLOW THE EXCLUSION OR LIMITATION OF INCIDENTAL
OR CONSEQUENTIAL DAMAGES, SO THE ABOVE
LIMITATION OR EXCLUSION MAY NOT APPLY TO YOU.
This warranty gives you specific legal rights, and you may
also have other rights which vary from state to state.
This warranty applies to all RYOBI® brand outdoor products
manufactured by or for Techtronic Industries North America,
Inc., and sold in the United States and Canada.
To locate your nearest Authorized Ryobi Service Center,
dial 1-800-860-4050.
33 - English
Page 34

AVERTISSEMENTS RÈGLES DE SÉCURITÉ
RELATIVES AUX OUTILS ÉLECTRIQUES
AVERTISSEMENT
Lire tous les avertissements et toutes
les instructions. Ne pas suivre l’ensemble
des avertissements et des instructions peut
entraîner une électrocution, un incendie ou des
blessures graves.
Conserver les avertissements et les instructions
à des fins de référence ultérieure. Le terme « outil
motorisé », utilisé dans tous les avertissements cidessous désigne tout outil fonctionnant sur secteur
(câblé) ou sur piles (sans fil).
SÉCURITÉ DU LIEU DE TRAVAIL
Garder le lieu de travail propre et bien éclairé.
Les endroits encombrés ou sombre s sont propices
aux accidents.
Ne pas utiliser d’outils électriques dans des
atmosphères explosives, par exemple en
présence de liquides, gaz ou poussières
inflammables. Les outils électriques produisent
des étincelles risquant d’enflammer les poussières
ou vapeurs.
Garder les enfants et badauds à l’écart pendant
l’utilisation d’un outil électrique. Les distractions
peuvent causer une perte de contrôle.
SÉCURITÉ ÉLECTRIQUE
Les fiches des outils électriques doivent
correspondre à la prise secteur utilisée. Ne
jamais modifier la fiche, de quelque façon que
ce soit. Ne jamais utiliser d’adaptateurs de fiche
avec des outils mis à la terre. Les fiches et prises
non modifiées réduisent le risque de choc électrique.
Éviter tout contact du corps avec des surfaces
mises à la terre, telles que tuyaux, radiateurs,
cuisinières et réfrigérateurs. Le risque de choc
électrique est accru lorsque le corps est mis à la
terre.
Ne pas exposer les outils électriques à l’eau ou
l’humidité. La pénétration d’eau dans ces outils
accroît le risque de choc électrique.
Ne pas maltraiter le cordon d’alimentation. Ne
jamais utiliser le cordon d’alimentation pour
transporter l’outil et ne jamais débrancher ce
dernier en tirant sur le cordon. Garder le cordon
à l’écart de la chaleur, de l’huile, des objets
tranchants et des pièces en mouvement. Un
cordon endommagé ou emmêlé accroît le risque
de choc électrique.
Pour les travaux à l’extérieur, utiliser un cordon
spécialement conçu à cet effet. Utiliser un cordon
conçu pour l’usage extrérieur pour réduire les
risques de choc électrique.
S’il est nécessaire d’utiliser l’outil électrique
dans un endroit humide, employer un dispositif
interrupteur de défaut à la terre (GFCI). L’utilisation
d’un GFCI réduit le risque de décharge électrique.
SÉCURITÉ PERSONNELLE
Rester attentif, prêter attention au travail et faire
preuve de bon sens lors de l’utilisation de tout
outil électrique. Ne pas utiliser cet outil en état de
fatigue ou sous l’influence de l’alcool, de drogues
ou de médicaments. Un moment d’inattention
pendant l’utilisation d’un outil électrique peut
entraîner des blessures graves.
Utiliser l’équipement de sécurité. Toujours porter
une protection oculaire. L’équipement de sécurité,
tel qu’un masque filtrant, de chaussures de sécurité,
d’un casque ou d’une protection auditive, utilisé
dans des conditions appropriées réduira le risque
de blessures.
Éviter les démarrages accidentels. S’assurer
que le commutateur est en position d’arrêt avant
de brancher l’outil. Porter un outil avec le doigt
sur son commutateur ou brancher un outil dont le
commutateur est en position de marche peut causer
un accident.
Retirer les clés de réglage avant de mettre l’outil
en marche. Une clé laissée sur une pièce rotative
de l’outil peut causer des blessures.
Ne pas travailler hors de portée. Toujours se tenir
bien campé et en équilibre. Ceci permettra de
mieux contrôler l’outil en cas de situation imprévue.
Porter une tenue appropriée. Ne porter ni
vêtements amples, ni bijoux. Garder les cheveux,
les vêtements et les gants à l’écart des pièces
en mouvement. Les vêtements amples, bijoux et
cheveux longs peuvent se prendre dans les pièces
en mouvement.
3 - Français
Page 35

AVERTISSEMENTS RÈGLES DE SÉCURITÉ
RELATIVES AUX OUTILS ÉLECTRIQUES
Si les outils sont équipés de dispositifs de
dépoussiérage, s’assurer qu’ils sont connectés
et correctement utilisés. L’usage de ces dispositifs
de dépoussiérage peut réduire les dangers présentés
par la poussière.
UTILISATION ET ENTRETIEN DES OUTILS
ÉLECTRIQUES
Ne pas forcer l’outil. Utiliser l’outil approprié pour
l’application. Un outil approprié exécutera le travail
mieux et de façon moins dangereuse s’il est utilisé
dans les limites prévues.
Ne pas utiliser l’outil si le commutateur ne permet
pas de le mettre en marche ou de l’arrêter.
Tout outil qui ne peut pas être contrôlé par son
commutateur est dangereux et doit être réparé.
Débrancher l’outil et/ou retirer le bloc-piles
avant d’effectuer des réglages, de changer
d’accessoire ou de remiser l’outil. Ces mesures
de sécurité préventives réduisent les risques de
démarrage accidentel de l’outil.
Ranger les outils motorisés hors de la portée
des enfants et ne laisser personne n’étant pas
familiarisé avec l’outil ou ces instructions utiliser
l’outil. Dans les mains de personnes n’ayant pas
reçu des instructions adéquates, les outils sont
dangereux.
Entretenir les outils motorisés. Vérifier qu’aucune
pièce mobile n’est mal alignée ou bloquée,
qu’aucune pièce n’est brisée et s’assurer
qu’aucun autre problème ne risque d’affecter
le bon fonctionnement de l’outil. En cas de
dommages faire réparer l’outil avant de l’utiliser de
nouveau. Beaucoup d’accidents sont causés par
des outils mal entretenus.
Garder les outils bien affûtés et propres. Des
outils correctement entretenus et dont les tranchants
sont bien affûtés risquent moins de se bloquer et
sont plus faciles à contrôler.
Utiliser l’outil, les accessoires et embouts,
etc. conformément à ces instrutions pour les
applications pour lesquelles ils sont conçus,
en tenant compte des conditions et du type de
travail à exécuter. L’usage d’un outil motorisé pour
des applications pour lesquelles il n’est pas conçu
peut être dangereux.
UTILISATION ET ENTRETIEN DE LA PILE
Ne recharger qu’avec l’appareil spécifié par le
fabricant. Un chargeur approprié pour un type de
pile peut créer un risque d’incendie s’il est utilisé
avec un autre type de pile.
Utiliser exclusivement le bloc-pile spécifiquement
indiqué pour l’outil. L’usage de tout autre bloc peut
créer un risque de blessures et d’incendie.
Lorsque le bloc-piles n’est pas en usage, le garder
à l’écart d’articles tels qu’attaches trombones,
pièces de monnaie, clous, vis ou autres petits
objets métalliques risquant d’établir le contact
entre les deux bornes. La mise en court-circuit
des bornes de piles peut causer des étincelles, des
brûlures ou un incendie.
En cas d’usage abusif, du liquide peut s’échapper
des piles. Éviter tout contact avec ce liquide. En
cas de contact accidentel, rincer immédiatement
les parties atteintes avec de l’eau. En cas
d’éclaboussure dans les yeux consulter un
médecin. Le liquide s’échappant des piles peut
causer des irritations ou des brûlures.
DÉPANNAGE
Les réparat ions doivent être confiées à un
technicien qualifié, utilisant exclusivement des
pièces identiques à celles d’origine. Ceci assurera
le maintien de la sécurité de l’outil.
Utiliser exclusivement des pièces identiques
à celles d’origine pour les réparations. Se
conformer aux instructions de la section
Entretien de ce manuel. L’usage de pièces non
autorisées ou le non-respect des instructions peut
présenter des risques de choc électrique ou de
blessures.
4 - Français
Page 36

AVERTISSEMENTS DE SÉCURITÉ RELATIFS AU SCIE À CHAÎNE
Éloigner toutes les parties du corps de la scie à
chaîne pendant que cette dernière fonctionne.
Avant de démarrer la scie à chaîne, s’assurer que
la scie à chaîne n’est pas en contact avec aucun
objet. Un moment d’inattention pendant l’utilisation
de la scie à chaîne peut causer l’enchevêtrement
des vêtements ou toucher le corps.
Toujours tenir la scie à chaîne en plaçant la main
droite sur la poignée arrière et la main gauche sur
la poignée avant. Tenir la scie à chaîne en inversant
cette configuration des mains augmente le risque
de blessures et ne devrait jamais être faite.
Tenir l’outil électrique seulement par les surfaces
de prises isolées, car la scie à chaîne peut
toucher des câbles sous tension. Le contact
d’une scie à chaîne avec un fil sous tension peut
exposer les pièces métalliques de l’outil électrique
et électrocuter l’utilisateur.
Porter des lunettes de sécurité et d’un serre-tête
antibruit. De plus, un équipement de protection
pour la tête, les mains, les jambes et les pieds
est recommandé. Des vêtements de protection
adéquats réduiront le risque de blessures causées
par les objets projetés ou le contact accidentel avec
la scie à chaîne.
Ne jamais utiliser une scie à chaîne en se tenant
perché dans un arbre. L’utilisation d’une scie à
chaîne en se tenant perché dans un arbre peut
causer des blessures.
Toujours garder les pieds bien appuyés et faire
fonctionner la scie à chaîne seulement lorsque
les pieds sont sur une surface fixe, sécuritaire
et à niveau. Les surfaces glissantes ou instables,
comme les échelles, représentent un risque de
déséquilibre et de perte de contrôle de la scie à
chaîne.
Pendant la coupe d’une branche tendue, prendre
garde au rebond. Lorsque la tension des fibres du
bois est relâchée, la branche tendue peut frapper
l’utilisation et/ou provoquer la perte de contrôle de
la scie à chaîne.
Être très prudent lors de la coupe de buissons ou
de jeunes arbres. Les branches fines peuvent se
coincer dans la scie à chaînes et fouetter en direction
de l’utilisateur et lui faire perdre l’équilibre.
Transporter la scie à chaîne par la poignée avant,
avec l’interrupteur positionné à OFF (éteint) et
éloignée du corps. Toujours installer le couvercle
du guide-chaîne pour transporter ou ranger la
scie à chaîne. Une manipulation adéquate de la
scie à chaîne réduira le contact accidentel habituel
occasionné par le mouvement de la scie à chaîne.
Suivre les instructions de lubrification, de tension
de chaîne et de changement d’accessoires. Une
tension ou une lubrification inadéquate de la chaîne
peut provoquer son bris ou augmenter le risque de
rebond.
Garder les poignées sèches, propres et exemptes
d’huile ou de graisse. Les poignées graisseuses ou
huileuses sont glissantes et peuvent provoquer une
perte de contrôle.
Couper seulement du bois. Ne pas utiliser
la scie à chaîne pour des applications pour
lesquelles elle n’est pas conçue. Par exemple :
ne pas utiliser la scie à chaîne pour couper du
plastique, de la maçonnerie ou des matériaux
de construction non dérivés du bois. L’utilisation
de la scie à chaîne pour des opérations autres que
celles prévues représente un risque de situation
dangereuse.
CAUSES DU REBOND ET PRÉCAUTIONS
À PRENDRE
Le rebond peut survenir lorsque le nez ou la pointe
du guide-chaîne touche un objet ou lorsque le bois se
referme et se pince pendant la coupe de la scie à chaîne.
Dans certains cas, le contact de la pointe avec un objet
peut causer une réaction inverse soudaine, projetant
le guide-chaîne vers le haut et l’arrière, en direction
de l’opérateur.
Le pincement de la chaîne au haut du guide-chaîne
peut causer une projection rapide de la lame en arrière,
en direction de l’utilisateur.
Chacune de ces deux réactions peut entraîner la perte
de contrôle de la scie et causer des blessures graves.
Ne pas se fier exclusivement aux dispositifs de sécurité
intégrés à la scie. L’utilisateur de la scie à chaîne doit
prendre un certain nombre de précautions pour éviter
les accidents et les blessures.
Le rebond est causé par une utilisation et/ou des
méthodes de travail incorrectes et il peut être évité en
prenant les précautions suivantes :
Conserver une prise ferme en plaçant les pouces
et les doigts autour des poignées de la scie à
chaîne, en gardant les deux mains sur la scie et
en positionnant le corps et le bras de manière
à résister à la force du rebond. S’il prend les
précautions nécessaires, l’utilisateur peut contrôler
la force du rebond. Ne pas échapper la scie à chaîne.
5 - Français
Page 37

AVERTISSEMENTS DE SÉCURITÉ RELATIFS AU SCIE À CHAÎNE
Ne pas étirer le corps et ne pas faire de coupe
au-dessus des épaules. Ceci aidera à prévenir le
contact involontaire de la pointe et procurera un
meilleur contrôle de la scie à chaîne lors de situations
inattendues.
Utiliser seulement les guide-chaîne et les chaînes
de rechange mentionnées par le fabricant. Le
remplacement des guide-chaîne et de chaînes
inadéquates peut provoquer le bris et le rebond de
la chaîne.
Suivre les instructions d’affûtage et d’entretien
fournies par le fabricant de la scie à chaîne. La
diminution du limiteur de profondeur augmente le
risque de rebond.
Ne pas commencer à couper avant d’avoir déblayé
la zone de travail, d’être bien campé et d’avoir prévu
une trajectoire pour échapper à l’arbre en train de
s’abattre. Les endroits encombrés sont propices
aux accidents.
Tenir TOUS les autres travailleurs, enfants, badauds
et animaux domestiques à distance sécuritaire de la
zone de travail. Ne pas laisser les visiteurs toucher
la scie à chaîne ou son cordon d’alimentation.
Ne pas utiliser de scie à chaîne dans des atmosphères
explosives, par exemple en présence de liquides,
gaz ou poussières inflammables. Les scie à chaîne
produisent des étincelles risquant d’enflammer les
poussières ou vapeurs.
Porter une tenue appropriée - Porter des vêtements
bien ajustés. Toujours porter une combinaison,
des jeans, des manches longs, des jambières
en tissu résistant ou dotés de pièces résistantes
aux coupures. Porter des chaussures de sécurité
antidérapantes. Porter des gants épais pour assurer
une bonne prise et protéger les mains. Ne pas
porter de bijoux, shorts, sandales et ne pas travailler
pieds nus. Ne pas porter des vêtements amples
qui pourraient être happés dans le moteur ou se
prendre dans la chaîne ou les broussailles. Attacher
les cheveux longs pour les maintenir au-dessus des
épaules. Porter une protection auditive et un casque.
Le port d’un vêtement de protection lourd peut
accroître la fatigue chez l’utilisateur et lui occasionner
un coup de chaleur. Par temps chaud et humide, les
travaux exigeants devraient être planifiés en début
de matinée ou à la fin de la journée, lorsque le temps
est plus frais.
Porter une protection oculaire avec écrans latéraux
certifiée conforme à la norme ANSI Z87.1, ainsi
qu’une protection auditive et un casque lors de
l’utilisation de cet outil.
Toujours se concentrer sur le travail lors de
l’utilisation de cette scie à chaîne. Faire preuve
de bon sens. Ne pas utiliser cette scie en état de
fatigue, si l’on est souffrant ou sous l’influence de
l’alcool, de drogues ou de médicaments.
Ne pas exposer la scie à chaîne à la pluie.
Ne pas utiliser la scie dans des endroits humides ou
mouillés.
Toujours être conscient de l’emplacement du cordon
prolongateur lors de l’utilisation de cette scie à
chaîne. Prendre soin de ne pas trébucher sur le
cordon. Maintenir le cordon en permanence à l’écart
de la chaîne et de l’opérateur. Ne jamais utiliser le
cordon d’alimentation pour transporter l’outil et ne
jamais débrancher ce dernier en tirant sur le cordon.
Garder le cordon à l’écart de l’huile et des objets
tranchants.
Rester vigilant et être attentif au travail. Utiliser l’outil
avec bon sens.
Garder toutes les parties du corps à l’écart de la
scie à chaîne lorsque le moteur tourne.
Ne jamais laisser quiconque n’ayant pas reçu des
instructions d’utilisation appropriées utiliser la scie.
Cette règle s’applique aux scies de location aussi
bien qu’à celles appartenant à des particuliers.
Avant de lancer le moteur, s’assurer que la chaîne
n’est en contact avec aucun objet.
Arrêter le moteur avant de poser la scie.
Pour éviter un démarrage accidenter, ne jamais
transporter l’outil avec le doigt sur la gâchette.
Entretenir soigneusement l’outil. Garder l’outil bien
affûté et propre, pour obtenir des performances
optimales et réduire les risques d’accident. Suivre
les instructions de lubrification et de changement
d’accessoires.
Ne pas tenir la scie d’une seule main ! La tenir
fermement, les doigts et pouces encerclant les
poignées. Ceci exposerait l’utilisateur, les autres
travailleurs et toutes les personnes présentes à des
risques de blessure grave. Les scies à chaîne sont
conçues pour être utilisées à deux mains.
Se protéger contre les décharges électriques - Éviter
tout contact du corps avec des surfaces mises à la
terre, telles que tuyaux métalliques et palissades
grillagées. Le risque de choc électrique est accru
lorsque le corps est mis à la terre.
Ne jamais utiliser une scie à chaîne endommagée,
incorrectement réglée ou pas complètement et
solidement assemblée. La chaîne doit ralentir jusqu’à
l’arrêt lorsque la gâchette est relâchée. Si la chaîne
continue de tourner une fois la gâchette relâchée,
faire réparer la scie au centre de réparations agréé
le plus proche.
6 - Français
Page 38

AVERTISSEMENTS DE SÉCURITÉ RELATIFS AU SCIE À CHAÎNE
Vérifier l’état des pièces. Vérifier l’alignement des
pièces mobiles, s’assurer qu’aucune pièce n’est
bloquée ou cassée, vérifier la fixation de chaque
pièce et s’assurer qu’aucun autre problème ne
risque d’affecter le bon fonctionnement de l’outil.
Tous les entretiens et dépannages, autres que ceux
décrits dans le manuel d’utilisation doivent être
confiés au centre de réparations agréé.
Toujours se tenir bien campé.
Ne pas utiliser l’outil si le commutateur ne permet
pas de le mettre en marche et de l’arrêter. Faire
remplacer les commutateurs défectueux dans un
centre de réparations agréé.
Ne pas adapter le bloc-moteur à un guide à archet, ni
l’utiliser pour entraîner des accessoires non spécifiés
pour la scie.
Débrancher la scie à chaîne de la source de courant
lorsqu’elle n’est pas utilisée, avant son entretien et
lors de réglages et du changement d’accessoires,
tels que la garde et la chaîne de la scie.
Ne pas couper de lianes ou de petites broussailles.
Ne pas travailler en se tenant dans un arbre, sur une
échelle, toit ou un échaffaudage, ou autre support
instable, ce qui est extrêmement dangereux.
NOTE : La taille de la zone de travail dépend du type
de sciage effectué ainsi que de la taille de l’arbre ou
de la pièce à débiter. Par exemple, l’abattage d’un
arbre exige une zone de travail plus grande que le
tronçonnage de branches.
Ne pas forcer la scie. Un outil exécutera le travail
mieux et de façon moins dangereuse s’il fonctionne
dans les limites prévues.
Toujours utiliser l’outil adéquat pour le travail. La
scie à chaîne ne doit être utilisée que pour couper
du bois. Ne jamais l’utiliser pour couper du plastique,
du béton ou des matériaux autres que le bois.
Remiser la scie à chaîne lorsqu’elle n’est pas en
usage. La remiser dans un endroit sec, en hauteur
ou sous clé, hors de la portée des enfants. Avant de
remiser la chaîne, installer le fourreau sur le guide et
la chaîne ou placer la scie dans un étui de transport.
Utiliser seulement la pile et le chargeur indiqués.
Conçu pour les bloc-piles au lithium-ion de 40 V.
Consulter la documentation de correspondance
988000842 de l’outil, de l’appareil, du bloc-piles et
du chargeur.
NOTE : Bien que la scie à à chaîne fonctionne avec
les blocs-piles indiqués sur la liste de corrélation,
éviter d’utiliser la première génération de piles au
lithium-ion de 40 V de Ryobi (OP4026 [nos de pièces
130186012 ou 130186006]) et OP4015 (no de pièce
1300208001) afin d’obtenir des résultats optimaux.
L’utilisation de ces piles réduira considérablement
la vitesse de la chaîne.
Les outils fonctionnant sur piles n’ayant pas
besoin d’être branchés sur une prise secteur, ils
sont toujours en état de fonctionnement. Rester
conscient des dangers lorsque l’outil n’est pas en
usage.
Retirer le bloc de batteries avant tout réglage,
nettoyage, remisage ou déblocage, lors du
remplacement d’accessoires tels que le guide et la
chaîne et lorsque l’outil n’est pas en usage.
Conserver ces instructions. Les consulter
fréquemment et les utiliser pour instruire les autres
utilisateurs éventuels. Si cet produit est prêté, il doit
être accompagné de ces instructions.
7 - Français
Page 39

AVERTISSEMENTS DE SÉCURITÉ RELATIFS AU SCIE À CHAÎNE
REBOND
Voir les figures 1 à 4.
AVERTISSEMENT : Le rebond se produit lorsque
la chaîne en rotation heurte un objet dans la partie
supérieure de l’extrémité du guide ou lorsque
l’entaille du bois se referme et pince la chaîne
dans le bois. Le contact de la partie supérieure de
l’extrémité du guide peut faire plonger la chaîne
dans le bois et la bloquer pendant un instant. Il en
résulte une réaction fulgurante, projetant le guide
vers le haut et l’arrière, en direction de l’utilisateur.
Le pincement de la chaîne sur la partie supérieure
du guide peut causer une projection violente de
la barre vers l’arrière, en direction de l’utilisateur.
Ces réactions peuvent faire perdre le contrôle de
la scie et entraîner des blessures graves. Ne pas
se fier exclusivement sur les dispositifs de sécurité
intégrés à la scie. L’utilisateur d’une scie à chaîne
doit prendre un certain nombre de précautions pour
éviter les accidents et blessures.
Pour minimaliser le risque de rebond, prendre
les précautions suivantes :
• Toujours tenir la scie fermement, à deux mains.
Toujours maintenir la scie fermement à deux
mains lorsque le moteur tourne. Placer la main
droite sur la poignée arrière et la main gauche
sur la poignée avant, le pouce et les autres doigts
solidement refermés sur les deux poignées. Une
prise ferme, bras gauche tendu facilite le contrôle
de la scie en cas de rebond.
• S’assurer que l’endroit ou la scie est utilisée
est dépourvu de tout obstacle. Ne pas laisser
l’extrémité du guide entrer en contact avec une
bille, une branche, une palissade ou tout autre
obstacle risquant d’être heurté pendant le sciage.
• Toujours couper avec le moteur tournant
à sa vitesse maximum. Serrer la gâchette
d’accélérateur à fond et maintenir une vitesse de
coupe constante.
• Utiliser des pièces de rechange telles que
chaînes à faible rebond, freins de chaîne,
protection d’extrémité SAFE-T-TIP® et guides
spéciaux réduisant les risques de rebond. Utiliser
exclusivement les guides et chaînes à faible
rebond spécifiés par le fabricant pour la scie.
TIRAGE
POUSSÉE
PROTECTION
D’EXTRÉMITÉ
SAFE-T-TIP
Fig. 1
REBOND
ROTATIF
Fig. 2
ZONE DE DANGER
DE REBOND
Fig. 3
®
8 - Français
Fig. 4
Page 40

AVERTISSEMENTS DE SÉCURITÉ RELATIFS AU SCIE À CHAÎNE
Une compréhension élémentaire du rebond peut
réduire ou éliminer l’élément de surprise. Les
surprises sont favorables aux accidents.
Toujours se tenir bien campé et en équilibre.
Ne pas travailler hors de portée ni couper au-dessus
de la hauteur des épaules.
Garder la protection de nez antirebond SAFE-T-
TIP® correctement intallé sur le guide pour eviter le
rebond rotatif.
Suivre les instructions d’affûtage et d’entretien
fournies par le fabricant de la chaîne.
Poussée et tirage - La force de réaction s’exerce
toujours dans le sens opposé à la rotation de
la chaîne, au point de contact avec le bois. Par
conséquent, l’opérateur doit être prêt à contrôler
la TIRAGE lorsque la coupe est effectuée avec le
bas du guide et la POUSSÉE lorsque la coupe est
effectuée avec le haut du guide. Voir la figure 4.
COMPRÉHENSION DES DISPOSITIFS DE
SÉCURITÉ DE LA SCIE À CHAÎNE
GARDE ANTIREBOND SAFE-T-TIP®
Voir la figure 1.
Le dispositif SAFE-T-TIP® empêche le rebond, car il
couvre l’extrémité du guide, où le rebond se produit.
Ne jamais essayer d’effectuer des coupes exigeant le
retrait de la garde SAFE-T-TIP®.
CHAÎNE À REBOND RÉDUIT
Les limiteurs d’épaisseur de copeaux placés en avant
de chaque gouge peuvent réduire la force de réaction
du rebond en empêchant les gouges de mordre
trop profondément dans la zone de rebond. Utiliser
exclusivement des chaînes de rechange équivalentes
à celle d’origine ou certifiées « rebond réduit » selon
ANSI B175.1.
Une scie à chaîne est considérée comme étant à rebond
réduit lorsqu’elle répond aux spécifications ANSI B175.1
de 1991 (norme nationale américaine pour les outils
motorisés – Exigences de sécurité pour scies à chaîne
à moteur à essence). Les tests ont été effectués sur
des échantillons de scies à chaîne de moins de 3,8 cc,
conformément aux directives ANSI B175.1 de 1991.
À mesure qu’une chaîne est affûtée au cours de sa vie
utile, elle perd une partie de ses qualités antirebond. Il
convent donc de l’utiliser avec une prudence accrue.
GUIDES
En général, les guides à extrémité de faible rayon
présentent une moindre tendance au rebond.
Lors du remplacement, veiller à utiliser l’un des guides
Ryobi indiqués pour la scie dans ce manuel d’utilisation.
Une garde SAFE-T-TIP® de taille appropriée est installée
sur tous les guides. N’utiliser que des guides conçus
pour l’installation d’une garde SAFE-T-TIP®.
CONSERVER CES INSTRUCTIONS
9 - Français
Page 41

SYMBOLES
Les termes de mise en garde suivants et leur signification ont pour but d’expliquer le degré de risques associé
à l’utilisation de ce produit.
SYMBOLE SIGNAL SIGNIFICATION
Indique une situation extrêmement dangereuse qui, si elle n’est
DANGER :
pas évitée, aura pour conséquences des blessures graves ou
mortelles.
AVERTISSEMENT :
ATTENTION :
AVIS :
Certains des symboles ci-dessous peuvent être utilisés sur ce produit. Veiller à les étudier et à apprendre leur
signification. Une interprétation correcte de ces symboles permettra d’utiliser ce produit plus efficacement
et de réduire les risques.
Indique une situation potentiellement dangereuse qui, si elle n’est
pas évitée, pourrait entraîner des blessures graves ou mortelles.
Indique une situation potentiellement dangereuse qui, si elle
n’est pas évitée, pourrait entraîner des blessures légères ou de
gravité modérée.
(Sans symbole d’alerte de sécurité) Indique une information
importante ne concernant pas un risque de blessure comme
une situation pouvant occasionner des dommages matériels.
SYMBOLE NOM DÉSIGNATION / EXPLICATION
Symbole d’alerte de
sécurité
Lire le manuel d’utilisation
Protections oculaire et
casque
Indique un risque de blessure potentiel.
Pour réduire les risques de blessures, l’utilisateur doit lire
et veiller à bien comprendre le manuel d’utilisation avant
d’utiliser ce produit.
Toujours porter une protection oculaire avec écrans latéraux
certifiée conforme à la norme ANSI Z87.1 ainsi qu’un
protection un casque.
Protection d’extrémité
SAFE-T-TIP
Avertissement concernant
l’humidité
Tenir la scie à deux mains Tenir la scie à deux mains et l’utiliser correctement.
Une main Ne pas tenir la scie d’une seule main.
®
La protection d’extrémité SAFE-T-TIP® du guide-chaîne
permet d’éviter le rebond.
Ne pas exposer l’outil à la pluie ni à l’humidité.
10 - Français
Page 42

SYMBOLES
Certains des symboles ci-dessous peuvent être utilisés sur ce produit. Veiller à les étudier et à apprendre leur
signification. Une interprétation correcte de ces symboles permettra d’utiliser ce produit plus efficacement
et de réduire les risques.
SYMBOLE NOM DÉSIGNATION / EXPLICATION
Rebond DANGER ! ATTENTION AUX REBONDS.
Contact avec l’extrémité
du guide
Gants
Chaussures de sécurité
Ne laisser personne
s’approcher
huile là où indiqué
Symboles de recyclage
V
Volts Tension
Éviter tout contact avec l’extrémité du guide.
Porter des gants épais antidérapants lors de l’utilisation de
la scie à chaîne.
Porter des chaussures de travail à semelle antidérapante
lors de l’utilisation de l’outil.
Garder les badauds et animaux domestiques à une distance
de 15 m (50 pi) minimum.
Verser le lubrifiant de chaîne et barre dans le réservoir
d’huile là où indiqué. Ne pas utiliser aucun autre liquide.
Ce produit utilise les piles de lithium-ion. Les réglementations
locales ou gouvernementales peuvent interdire de jeter
les piles au nickel-cadmium dans les ordures ménagères.
Consulter les autorités locales compétentes pour les options
de recyclage et/ou l’élimination.
Courant continu Type ou caractéristique du courant
11 - Français
Page 43

GLOSSAIRE
Tronçonnage
Coupe transversale d’un arbre abattu ou d’une bille de
bois pour le débiter en tronçons.
Bloc moteur de scie à chaîne
Scie à chaîne sans la chaîne et le guide.
Pignon d’entraînement
Roue dentée entraînant la chaîne.
Abattage
Opération de coupe d’un arbre pour le faire tomber.
Entaille d’abattage
Entaille finale d’une opération d’abattage, pratiquée à
l’opposé de l’entaille de dessous.
Garde avant de main
Barrière structurelle placée entre la poignée avant et le
guide de chaîne de la scie, se trouvant généralement
près de la position de la main sur la poignée avant.
Poignée avant
Poignée de maintien placée à l’avant de la scie à chaîne.
Cette poignée est pour la main gauche.
Guide de chaîne
Structure rigide, dotée d’un rail de support et guidage
de la chaîne.
Rebond
Mouvement du guide vers le haut ou vers l’arrière se
produisant lorsque la chaîne heurte un objet, tel qu’une
bille de bois ou une branche, dans la partie supérieure
de l’extrémité du guide, ou lorsque l’entaille se referme
et pince la chaîne dans le bois.
Rebond (pincement)
Recul brutal de la scie se produisant lorsque le bois
de l’entaille se referme, sur la chaîne en rotation dans
la partie supérieure du guide.
Rebond (rotatif)
Mouvement brutal de la scie vers le haut et l’arrière
pouvant se produire lorsque la chaîne en rotation heurte
un objet, tel qu’une bille de bois ou une branche, dans
la partie supérieure de l’extrémité du guide.
Bouton de verrouillage de gâchette
Butée articulée empêchant d’actionner accidentellement
le commutateur tant qu’il n’est pas manuellement
actionné.
Chaîne à rebond réduit
Chaîne conforme aux normes antirebond ANSI B175.1
lorsqu’elle est testée sur des échantillons représentatifs
de scies à chaîne.
Position de coupe normale
Positions utilisées pour le tronçonnage et l’abattage.
Sifflet d’abattage
Entaille permettant de diriger le sens de chute de l’arbre.
Poignée arrière
Poignée de maintien placée à l’arrière de la scie. Elle
comporte généralement la commutateur.
Cette poignée est pour la main droite.
Guide de chaîne à rebond réduit
Guide ayant été prouvé réduire considérablement le
rebond.
Chaîne de rechange
Chaîne conforme aux normes antirebond ANSI B175.1
lorsque testée sur certaines scies. Une telle chaîne peut
ne pas répondre aux exigences de performances ANSI
lorsqu’elle est utilisée sur d’autres scies.
Garde SAFE-T-TIP®
Accessoire pouvant être monté à l’extrémité du guide
pour empêcher que la chaîne ne contacte le bois à
cet endroit.
Chaîne
Une chaîne en boucle dotée de dents pour la coupe du
bois, entraînée par le moteur et supportée par le guide.
Fouet
Arbuste ou branche fléchie ou bloquée sous tension.
Cette pièce peut se détendre brusquement lorsqu’elle
est coupée, créant une situation dangereuse.
Gâchette de commutateur
Dispositif permettant d’ouvrir ou de fermer le circuit
d’alimentation du moteur de la scie à chaîne.
12 - Français
Page 44

CARACTÉRISTIQUES
FICHE TECHNIQUE
Moteur .....................................................................................................................................................40 V c.c.
Longueurs de guide ................................................................................................................. 304,8 mm (12 po)
Capacités de coupe ................................................................................................................... 228,6 mm (9 po)
Abattage d’arbustes ................................................................................................................... 177,8 mm (7 po)
Volume du réservoir de lubrifiant de chaîne ..................................................................................... 150 ml (5 oz)
NOTE : Cette scie est conçue pour des travaux occasionnels légers et sa capacité de coupe présente certaines
limites.
PROTECTION DE POIGNÉE
AVANT
POIGNÉE
ARRIÈRE
FOURREAU
BLOC-PILES
SAFE-T-TIP©
TIGE DE GUIDE
CARTER DE
LA CHAÎNE
CHAÎNE À
REBOND RÉDUIT
COUVERCLE DE
CHAÎNE DE BOUTON
DE VERROUILLAGE
BOUTON DE TENSION DE
CHAÎNE
POIGNÉE AVANT
GÂCHETTE
DE COMMUTATEUR
BLOC-PILES
BOUTON DE
VERROUILLAGE
DE GÂCHETTE
CAPUCHON DU
RÉSERVOIR
D’HUILE DE
CHAÎNE
NIVEAU D’HUILE
REGARD DE
Fig. 5
13 - Français
Page 45

CARACTÉRISTIQUES
POUR SE FAMILIARISER AVEC LA
SCIE À CHAÎNE
Voir le figure 5.
L’utilisation sûre de ce produit exige une comprehension
des renseignements figurant sur l’outil et contenus dans
le manuel d’utilisation, ainsi qu’une bonne connaissance
du projet entrepris. Avant d’utiliser ce produit, se
familiariser avec toutes ses caractéristiques et règles
de sécurité.
BOUTON DE TENSION DE CHAÎNE
Cette fonction permet aux utilisateurs de régler la
tension de la chaîne.
GUIDE
La tête du guide installé en usine est de faible rayon,
ce qui offre une moindre tendance au rebond.
CHAÎNE À REBOND RÉDUIT
La chaîne à rebond réduit aide à limiter la force de
réaction du rebond en empêchant les dents de mordre
trop profondément dans la zone de rebond.
REGARD DE NIVEAU D’HUILE
Réservoir d’huile semi-transparent permettant à
l’utilisateur de voir à quel moment ajouter de l’huile.
PROTECTION ANTIREBOND SAFE-TTIP®
La protection antirebond SAFE-T-TIP® est un
accessoire monté sur l’extrémité du guide,
empêchant que la chaîne à cet endroit touche le
bois.
VERROUILLAGE DE COMMUTATEUR
Une fonction de commande permettant d’empêcher
de démarrer le moteur accidentellement.
GÂCHETTE DE COMMUTATEUR
Serrer la gâchette de commutateur pour faire fonctionner
l’outil une fois le verrouillage de commutateur poussé
vers l’intérieur. Relâcher la gâchette pour arrêter l’outil.
ASSEMBLAGE
DÉBALLAGE
Ce produit a été expédié complètement assemblé.
Avec précaution, sortir le produit et les accessoires
de la boîte. S’assurer que toutes les pièces figurant
sur la liste de contrôle sont incluses.
AVERTISSEMENT :
Ne pas utiliser le produit si, en le déballant,
vous constatez que des éléments figurant
dans la Liste de contrôle d’expédition sont déjà
assemblés. Certaines pièces figurant sur cette
liste n’ont pas été assemblées par le fabricant
et exigent une installation. Le fait d’utiliser un
produit qui a été assemblé de façon inadéquate
peut entraîner des blessures.
Examiner soigneusement le produit pour s’assurer
que rien n’a été brisé ou endommagé en cours de
transport.
Ne pas jeter les matériaux d’emballage avant d’avoir
soigneusement examiné le produit et avoir vérifié
qu’il fonctionne correctement.
Si des pièces sont manquantes ou endommagées,
appeler le 1-800-860-4050.
LISTE DE CONTRÔLE D’EXPÉDITION
Scie à chaîne avec fourreau
Lubrifiant pour guide et chaîne
Manuel d’utilisation
AVERTISSEMENT :
Si des pièces manquent ou sont endommagées,
ne pas utiliser ce produit avant qu’elles aient été
remplacées. Le fait d’utiliser ce produit même
s’il contient des pièces endommagées ou s’il lui
manque des pièces peut entraîner des blessures
graves.
14 - Français
Page 46

ASSEMBLAGE
AVERTISSEMENT :
Ne pas essayer de modifier ce produit ou de
créer des accessoires non recommandés pour ce
produit. De telles altérations ou modifications sont
considérées comme un usage abusif et peuvent
créer des conditions dangereuses, risquant
d’entraîner des blessures graves.
UTILISATION
PELIGRO:
Ne jamais effectuer de coupes près de cerca de
lignes, lignes cordon de électriques ou de sources
de courant. Si les embouteillages de barre et
chaîne sur la cordon électrique ou línea, Ne pas
manipuler la guide ou la chaîne! ELLE PEUT ÊTRE
SOUS TENSION ET DONC, EXTRÊMEMENT
DANGEREUSE. Continuer de tenir scie à chaîne
par la poignée arrière isolée ou le poser à l’écart en
prenant les précautions nécessaires. Mettre le circuit
électrique de la ligne électrique hors tension ou
débrancher le cordon endommagé avant d’essayer
de débloquer la lame. Le contact avec la barre et
chaîne, d’autres parties conductrices du scie à
chaîne, ou des cordons ou des fils électriques sous
tension entraînerait mortelles, choc électrique, ou
des blessures graves.
AVERTISSEMENT :
Ne pas laisser la familiarité avec ce produit faire
oublier la prudence. Ne pas oublier qu’une fraction
de seconde d’inattention peut entraîner des
blessures graves.
AVERTISSEMENT :
Pour empêcher un démarrage accidentel pouvant
entraîner des blessures graves, toujours déconnecter
le fil de bougie de moteur de la bougie d’allumage
avant d’assembler des pièces.
AVERTISSEMENT :
Ne pas utiliser d’outils ou accessoires non
recommandés par le fabricant pour ce produit.
L’utilisation de pièces et accessoires non
recommandés peut entraîner des blessures graves.
AVERTISSEMENT :
Ne jamais abattre un arbre ou couper des bûches
ou des branches ayant un diamètre plus grand
que le guide-chaîne. Seuls les professionnels bien
formés peuvent exécuter ces coupes. L’exécution
de ce genre de coupes peut provoquer un accident
et occasionner des blessures graves ou mortelles.
Avant chaque utilisation, inspecter au complet le produit
afin de s’assurer qu’aucune pièce (vis, écrous, boulons,
chapeaux, etc.) n’est endommagée, manquante ou
desserrée. Serrer solidement toutes les pièces de
fixation et les chapeaux et ne pas utiliser le produit tant
que toutes les pièces manquantes ou endommagées
n’ont pas été remplacées. Veuillez composer le
1-800-860-4050 ou communiquer avec un centre de
réparations agréé pour obtenir de l’aide.
AVERTISSEMENT :
Toujours porter une protection oculaire avec écrans
latéraux certifiée conforme à la norme ANSI Z87.1
avec protection un casque. Si cette précaution n’est
pas prise, des objets peuvent être projetés dans les
yeux et causer des lésions graves.
15 - Français
APPLICATIONS
Ce produit peut être utilisé pour les applications
ci-dessous :
Ébranchage et émondage
Abattage d’arbustes de 177,8 mm (7 po) de diamètre
maximum
Tronçonnage des arbres abattus
Ce produit est compatible avec les piles 40 V au
lithium-ion.
Page 47

UTILISATION
Pour prendre connaissance de l’ensemble des
instructions relatives à la charge, consulter les manuels
d’utilisation des blocs-piles 40 V de Ryobi et des
modèles de chargeur connexes.
RETRAIT/INSTALLATION DU
BLOC-PILES
Voir la figure 6.
AVERTISSEMENT :
Toujours retirer la pile de l’outil au moment
d’assembler des pièces, d’effectuer des réglages
et de procéder au nettoyage, ou lorsque l’outil
n’est pas utilisé. Le fait de retirer la pile permet
d’empêcher un démarrage accidentel pouvant
entraîner des blessures graves.
NOTE : Pour éviter des blessures graves, tojours retirer
le bloc-piles et tenir à distance de mains le bouton de
verrouillage en portant l’outil.
Installation :
Placer le bloc-piles dans la scie. Aligner la saillie du
bloc-piles sur la rainure du logement de la scie.
AVIS :
Lors de l’installation du bloc-piles sur la scie, veiller
à ce que sa nervure en saillie s’aligne sur la rainure
du logement de la scie et que les loquets latéraux
s’engagent correctement. Une insertion incorrecte
du bloc-piles peut causer des dommages aux
composants internes.
S’assurer que le loquet situé au côté du bloc-piles
s’enclenche correctement et que le bloc-piles est
installé correctement à la scie à chaîne avant de
commencer le travail.
AVERTISSEMENT :
S’assurer que le loquet au bas du bloc-piles
s’enclenche et que le bloc-piles est installé et fixé
correctement au taille-haie avant de commencer
le travail. Ne pas installer et fixer correctement le
bloc-piles peut provoquer la chute de ce dernier et
occasionner des blessures graves.
Retrait :
Repérer le loquet au bas du bloc-piles et appuyer sur
les deux côtés pour dégager le bloc-piles de la scie
à chaîne.
LOGEMENT
DE PILES
BLOC-PILE
LOQUETS
Fig. 6
Fig. 7
AVIS :
Retirer le bloc-piles de l’outil. Remplir le réservoir
d’huile pour chaîne et guide avant de mettre la scie
en marche. Un manque de lubrification causerais
des dommages à la chaîne et au guide.
SYSTÈME DE LUBRIFICATION DE LA
CHAÎNE
Voir la figure 7.
Utiliser de l’huile Ryobi pour guide et chaîne. Cette
huile est formulée pour fonctionner dans une vaste
plage de températures sans être diluée.
NOTE : Ne pas utiliser d’huile sale, usagée ou
autrement contaminée. Cela pourrait endommager
le guide ou la chaîne.
Verser soigneusement l’huile pour guide et chaîne
dans le réservoir.
Vérifier le niveau d’huile et faire l’appoint lors de la
recharge des piles ou selon le besoin.
NOTE : Il est normal que de l’huile suinte de la
scie lorsqu’elle n’est pas en usage. Pour éviter ce
suintement, vider le réservoir d’huile après chaque
utilisation. Lorsque la scie est remisée pour une période
prolongée (trois mois ou plus), s’assurer que la chaîne
et le pignon d’entraînement sont légèrement lubrifiés
pour les protéger de la rouille.
16 - Français
Page 48

UTILISATION
DÉMARRAGE ET ARRÊT DE LA SCIE À
CHAÎNE
Voir la figure 8.
AVERTISSEMENT :
Garder le corps à droite de la ligne de chaîne.
Ne jamais chevaucher la scie ou la chaîne ou se
pencher au-delà de la ligne de chaîne.
Démarrage de la scie à chaîne :
Placer la scie sur un sol plan dégagé et veiller à ce
qu’aucun objet ou obstacle risquant d’être heurté
par le guide ou la chaîne se trouve à proximité.
Maintenir le bouton de verrouillage de gâchette
enfoncé. Ceci permet d’actionner la commutateur.
Pour le fonctionnement continu, appuyer sur la
commutateur , désengager le bouton de verrouillage
et maintenir la commutateur enfoncée.
Arrêt de la scie à chaîne :
Pour arrêter la scie, relâcher la commutateur .
Lorsque la commutateur est relâchée, le bouton de
verrouillage se remet automatiquement en position
verrouillée.
Cet outil n’est pas conçu pour couper des branches,
d’un diamètre de plus de 177,8 mm (7 po).
Cette scie à chaîne sans fil est conçue pour émonder,
élaguer et couper des branches ou petits arbres, d’un
diamètre maximum de 177,8 mm (7 po).
Ne pas essayer d’effectuer des coupes qui exigeraient
le retrait de la protection SAFE-T-TIP®.
BOUTON DE
VERROUILLAGE
DE GÂCHETTE
COMMUTATEUR
BOUTON DE
VERROUILLAGE
DE GÂCHETTE
COMMUTATEUR
Fig. 8
PRÉPARATION POUR LA COUPE
SAISIR CORRECTEMENT LES DEUX
POIGNÉES
Voir les figures 9 à 11.
Voir AVERTISSEMENTS RÈGLES DE SÉCURITÉ
RELATIVES AUX OUTILS ÉLECTRIQUES, plus haut
dans ce manuel, pour des informations détaillées au
sujet de l’équipement de sécurité.
Porter des gants antidérapants pour assurer une
prise et une protection maximum.
Tenir la scie fermement, à deux mains. Toujours
garder la main gauche sur la poignée avant et la
main droite sur la poignée arrière, de façon à ce que
le corps se trouve à gauche de la ligne de chaîne.
17 - Français
Fig. 9
Page 49

UTILISATION
AVERTISSEMENT :
Ne jamais utiliser une prise gauchère (mains
inversées) ou une position qui placerait le bras ou
le corps en travers de la ligne de chaîne.
Toujours tenir solidement la scie lorsque le moteur
tourne. Les doigts doivent entourer la poignée, le
pouce étant passé au-dessous. Avec cette prise,
la scie risque moins d’échapper à l’utilisateur (sous
l’effet d’un rebond ou d’une autre réaction soudaine
de la scie). Il est dangereux de tenir la scie avec les
doigts et le pouce du même côté de la poignée, car
le moindre à-coup peut faire perdre le contrôle de
la scie.
AVERTISSEMENT :
Ne pas actionner la commutateur avec la main
gauche en tenant la poignée avant avec la main
droite. Ne jamais laisser une partie du corps
quelconque se trouver dans la ligne de chaîne
pendant l’utilisation de la scie.
Fig. 10
POSITION DE COUPE CORRECTE
Voir les figures 12 et 13.
AVERTISSEMENT :
Toujours, employer une position de coupe adéquate
comme décrite dans ce chapitre. Ne jamais
s'agenouiller pendant l'utilisation de la scie à chaîne
sauf pour abattre un arbre comme démontré à la
Figure 13. Le fait de s'agenouiller peut provoquer
une déstabilisation et une perte de contrôle de la
scie à chaîne et provoquer des blessures graves.
Se tenir bien campé et en équilibre sur les deux
pieds, sur un sol ferme.
Garder le bras gauche tendu afin de pouvoir résister
à la force d’un éventuel rebond.
Toujours garder le corps à gauche de la ligne
de chaîne.
Garder le pouce au-dessous de la poignée.
MÉTHODE DE COUPE ÉLÉMENTAIRE
S’exercer en coupant quelques petites branches avec la
technique décrite ci-après, pour se familiariser avec la
scie avant d’entreprendre un travail de coupe important.
Se mettre en position correcte, face à la pièce à
couper, avec la scie arrêtée.
LIGNE DE CHAÎNE
PLANO DE LA CADENA
Fig. 11
BRAS TENDU À
LA VERTICALE
Fig. 12
Fig. 13
18 - Français
Page 50

45°
45°
UTILISATION
Appuyer sur la commutateur et laisser la chaîne
parvenir à plein vitesse avant de commencer la
coupe.
Commencer la coupe avec la scie appuyée contre
la bille.
Maintenir un régime moteur uniforme pendant toute
la durée de la coupe.
Laisser la scie effectuer le travail, ne la pousser que
légèrement vers le bas. Une force excessive pourrait
endommager la chaîne, le guide ou le moteur.
Relâcher la commutateur dès que la coupe a été
effectuée et attendre que la chaîne s’immobilise.
Le fonctionnement sans charge de coupe peut
inutilement causer une usure excessive de la chaîne
du guide et du moteur.
Ne pas appuyer sur la scie en fin de coupe.
PRÉCAUTIONS DE CHANTIER
Voir la figure 14.
Ne couper que du bois ou des matériaux dérivés
du bois. Ne jamais couper de la tôle, des matières
plastiques, du béton ou matériaux de construction
autres que le bois.
Ne jamais laisser un enfant utiliser la scie. Ne jamais
laisser quiconque n’ayant pas lu le manuel d’utilisation
ou reçu des instructions appropriées concernant
la sécurité et l’utilisation correcte de la scie.
Lors de l’abattage, tenir les autres travailleurs,
badauds et animaux domestiques à distance
sécuritaire de la zone de travail. Pour l’abattage,
la distance sécuritaire doit être au moins deux fois
la taille de l’arbre le plus grand se trouvant dans la
zone de coupe. Pendant l’ébranchage, maintenir
une distance d’au moins 4,5 m (15 pi) entre les
travailleurs. Les arbres ne doivent pas être abattus
d’une manière risquant de mettre quiconque en
danger, de heurter une ligne électrique ou de causer
des dommages matériels. Si une ligne électrique
est heurtée, la compagnie d’électricité doit être
immédiatement notifiée.
Toujours couper avec les deux pieds posés sur un
sol ferme pour éviter toute perte d’équilibre.
Ne pas couper au-dessus du niveau de la poitrine,
car il est difficile de contrôler une scie maintenue
plus haut en cas de rebond.
Ne pas abattre d’arbres se trouvant à proximité de
lignes électriques ou de bâtiments. Ce type de travail
doit être confié à des professionnels.
Ne couper que lorsque la visibilité et la lumière
permettent de voir clairement.
19 - Français
LIGNE DE
CHUTE PRÉVUE
Fig. 14
ABATTAGE D’ARBRES
Voir les figures 14 à 17.
SITUATIONS DANGEREUSES
AVERTISSEMENT :
Ne pas effectuer d’abattage par grand vent ou en
cas de fortes précipitations. Attendre que le temps
se calme.
AVERTISSEMENT :
Surveiller attentivement les branches brisées ou
mortes qui peuvent tomber pendant le taillage et
éviter de tailler près des édifices ou fils électriques
si la direction de la chute de l’arbre est incertaine.
Ne pas tailler le soir ou pendant des conditions
climatiques mauvaises, comme sous la pluie, la
neige, lors de vents forts. Ces conditions peuvent
réduire la visibilité et la manoeuvrabilité de la scie
à chaîne. Si l’arbre à abattre entre en contact avec
tout câble de service public, il faut cesser l’utilisation
de la scie à chaîne et informer immédiatement le
fournisseur de service public. Ne pas suivre ces
directives peut causer des blessures graves ou
mortelles.
Page 51

UTILISATION
Lors de l’abattage d’un arbre il est impératif de suivre
le avertissements et les instructions pour éviter des
risques de blessure grave.
Ne pas couper d’arbres extrêmement inclinés ou
de gros arbres aux branches pourries, à l’écorce
décollée ou au tronc creux. Ces arbres doivent être
poussés ou tirés à terre par un engin de chantier
lourd avant d’être débités.
Ne pas abattre d’arbres se trouvant à proximité de
lignes électriques ou de bâtiments.
Regarder si l’arbre comporte des branches mortes
ou endommagées, risquant de tomber et de heurter
l’utilisateur pendant l’abattage.
Pendant la coupe du trait d’abattage, observer de
temps à autre la cime de l’arbre pour s’assurer qu’il
tombera dans la direction souhaitée.
Si l’arbre commence à tomber dans le mauvais sens
ou si la scie est pincée ou bloquée pendant la chute,
l’abandonner et s’échapper !
Abattage - Lorsque deux personnes ou plus effectuent des opérations de tronçonnage à proximité d’un
abattage, elles doivent se trouver à une distance correspondant à au moins deux fois la hauteur de l’arbre
abattu. Les arbres ne doivent pas être abattus d’une
manière risquant de mettre quiconque en danger, de
heurter une ligne électrique ou de causer des dommages matériels. Si une ligne électrique est heurtée,
la compagnie d’électricité doit être immédiatement
notifiée.
Avant de commencer une coupe, déterminer un
chemin d’échappement (ou plusieurs au cas ou le
chemin prévu serait bloqué) déblayer les environs
immédiats et s’assurer qu’aucun obstacle se trouve
sur le chemin d’échappement prévu. Déblayer le
chemin d’échappement sur environ 135º par rapport
à la ligne de chute prévue. Le chemin d’échappement
doit s’étendre en diagonale, à l’opposé de la ligne
de chute prévue. Voir la figure 14.
Avant de commencer l’abattage, tenir compte de la
force et de la direction du vent, de l’inclinaison et de
l’équilibre de l’arbre et de la position des grosses
branches. Tous ces facteurs influencent la direction
dans laquelle l’arbre tombera. Ne pas faire levier
pour abattre un arbre dans une direction autre que
la ligne de chute naturelle.
L’opérateur doit se tenir en amont de l’arbre, étant
donné qu’une fois abattu, l’arbre glissera ou roulera
vers le bas de la pente.
CHARNIÈRE, 51 mm (2 po)
OU 1/10 ÈME DU DIAMÈTRE
ENTAILLE ARRIÈRE
DE 51 mm [2 po]
ENTAILLE
D’ABATTAGE
CHARNIÈRE
COIN
REBOND
SIFFLET -
ENVIRON 1/3
DU DIAMÈTRE
DU TRONC
Fig. 15
ENCOCHE
Fig. 16
Fig. 17
Fig. 18
20 - Français
Page 52

UTILISATION
Éliminer la terre, les pierres, l’écorce décollée, les
clous, agrafes et fils métallique des endroits où les
entailles doivent être pratiquées.
Entaille de dessous. Pratiquer une entaille d’environ
le tiers du diamètre du tronc, perpendiculairement
à la ligne de chute. Veiller à ce que les entailles du
sifflet se rejoignent à angle droit par rapport à la ligne
de chute. Le sifflet doit être taillé de façon à présenter
une ligne droite. Pour empêcher le pincement de
la scie sous le poids du bois, toujours effectuer
l’entaille inférieure en premier. Voir la figure 15.
Entaille d’abattage. L’entaille d’abattage doit
toujours être de niveau et horizontale et effectuée
à au moins 51 mm (2 po) au-dessus de l’entaille
horizontale du sifflet. Voir les figures 15 et 16.
Ne jamais couper jusqu’au sifflet. Toujours
laisser une épaisseur de bois d’environ 51 mm
(2 po) ou 1/10ème du diamètre du tronc entre
l’entaille d’abattage et le sifflet. Ceci s’appelle une
« charnière ». Cette charnière contrôle la chute de
l’arbre et empêche le tronc de glisse, de pivoter ou
de basculer sur la souche. Voir les figures 15 et 16.
Sur les arbres de grand diamètre, arrêter le trait
d’abattage avant qu’il ne soit assez profond pour
causer la chute de l’arbre ou son affaissement sur
la souche. Ensuite, insérer des coins en bois ou en
plastique dans le trait, de façon à ce qu’ils ne touchent
pas la chaîne. Les coins peuvent être enfoncés petit
à petit pour faire levier sur l’arbre. Voir la figure 17.
NOTE : Lorsque des coins sont utilisés pour l’entaille
ou l’abattage, il peut être nécessaire de retirer la
garde antirebond SAFE-T-TIP® afin de pouvoir tirer
la lame au travers de l’entaille. Une fois la coupe
effectuée, la garde doit être immédiatement remise
en place.
Dès que l’arbre commence à tomber, arrêter la scie
et la poser immédiatement à terre. S’échapper par
le chemin dégagé tout en prenant garde que rien ne
tombe vers soi. Se méfier des branches risquant de
tomber et regarder où l’on met les pieds.
BILLE SOUTENUE À UNE EXTRÉMITÉ :
CHARGE
COUPE DE FINITION
1ÈRE COUPE
1/3 DIAM
BILLE SOUTENUE AUX DEUX EXTRÉMITÉS :
CHARGE
1ÈRE COUPE 1/3
DIAM
COUPE DE FINITION
COUPE PAR LE DESSUS
Fig. 19
Fig. 20
AVERTISSEMENT :
Ne jamais couper l’entaille d’abattage jusqu’au
sifflet. La charnière, qui est la section de bois laissée
intacte entre le trait d’abattage et le sifflet contrôle
la chute de l’arbre.
21 - Français
COUPE PAR LE DESSOUS
Fig. 21
Page 53

UTILISATION
DÉBITAGE
Voir les figures 18 à 21.
Tronçonnage est le terme utilisé pour la coupe d’un
arbre abattu en billes de la taille désirée.
Toujours veiller à se tenir bien campé et en équilibre,
le poids également réparti sur les deux pieds.
Ne couper qu’une bille à la fois.
Soutenir les petites billes avec un chevalet ou une
autre bille.
Garder le lieu de travail propre et déblayé. S’assurer
que rien ne risque d’entrer en contact avec
l’extrémité du guide et la chaîne, car cela pourrait
causer un rebond. Pour éviter ce risque, laisser la
garde antirebond SAFE-T-TIP® en place pendant le
travail de coupe. Voir Précautions à prendre pour
éviter les rebonds, plus haut dans ce manuel.
Lors du tronçonnage sur une pente, toujours se
tenir en amont de la bille. En fin de coupe, réduire la
pression exercée sur la scie, sans relâcher la prise des
deux mains sur les poignées afin de garder le contrôle
de la scie. Ne pas laisser la chaîne heurter le sol.
Une fois la coupe terminée, attendre l’immobilisation
complète de la chaîne avant de se déplacer. Toujours
arrêter le moteur avant de passer d’un arbre à un autre.
Il est parfois impossible d’éviter le pincement (en
employant seulement les techniques de coupe
standard) ou difficile de prévoir dans quel sens la bille
va ployer lorsqu’elle est coupée. Tourner ou déplacer
la bille pendant la coupe pour éviter un pincement.
DÉBITAGE DE BILLES SOUS
CONTRAINTE
Voir les figures 20 et 21.
Lorsqu’une bille est soutenue sur toute sa longueur,
elle doit être coupée par le dessus.
Lorsqu’une bille est soutenue à une extrémité, elle
doit être coupée par le dessous, jusqu’au tiers de son
diamètre. Ensuite la coupe de finition doit être pratiquée
par le dessus, de manière à rejoindre la coupe initiale.
À mesure qu’elle est coupée, la bille a tendance à fléchir. Si
la première coupe dépasse le tiers du diamètre de la bille,
la lame risque d’être pincée ou bloquée dans l’entaille.
Prêter une attention particulière aux billes sous contrainte
pour éviter que le guide et la chaîne ne soient pincés.
Lors du tronçonnage sur une pente, toujours se tenir
en amont de la bille, comme le montre la figure 18.
En fin d’une coupe « traversante », réduire la pression
exercée sur la scie, sans relâcher la prise des deux mains
sur les poignées afin de garder le contrôle total de la
scie. Ne pas laisser la chaîne heurter le sol. Une fois
la coupe terminée, attendre l’immobilisation complète
de la chaîne avant de se déplacer. Toujours arrêter le
moteur avant de passer à un autre arbre.
TYPES DE COUPE UTILISÉS
Voir la figure 21.
COUPE PAR LE DESSUS
Commencer sur le dessus de la bille, le bas de la scie
appuyé contre le bois et exercer une légère pression vers
le bas. Noter que la scie aura tendance à tirer vers l’avant.
COUPE PAR LE DESSOUS
Commencer par le dessous de la bille, le haut de la scie
appuyé contre le bois et exercer une légère pression vers
le haut. Noter que la scie aura tendance à pousser vers
l’utilisateur. Être préparé à cette réaction et maintenir
la scie fermement pour garder le contrôle.
AVERTISSEMENT :
Ne jamais grimper dans un arbre pour l’ébrancher
ou l’émonder. Ne pas travailler en se tenant sur une
échelle, une plate-forme, dessus de toit ou une bille,
ni se tenir dans une position risquant de faire perdre
l’équilibre ou le contrôle de la scie.
ÉBRANCHAGE
Voir la figure 22.
L’ébranchage consiste à couper les branches d’un
arbre abattu.
Travailler lentement et tenir la scie fermement à
deux mains. Toujours veiller à se tenir bien campé
et en équilibre sur les deux pieds.
Ne pas couper les grosses branches soutenant
l’arbre, afin de le maintenir à distance du sol.
Ne couper qu’une branche à la fois. Éloigner
les branches coupées de la zone de travail
fréquemment pour maintenir l’endroit dégagé et sûr.
Les branches sous tension doivent être coupées par
le dessous pour éviter le pincement de la chaîne.
Pendant l’ébranchage, garder le tronc entre le corps
et la scie. Couper en se tenant du côté du tronc
opposé à la branche à couper.
22 - Français
Page 54

3
UTILISATION
ÉLAGAGE
Voir la figure 23.
L’élagage consiste à couper les branches d’un arbre
sur pied.
Travailler lentement et tenir la scie fermement à deux
mains. Toujours veiller à se tenir bien campé et en
équilibre sur les deux pieds.
Ne pas utiliser la scie en se tenant sur une échelle, ce
qui est extrêmement dangereux. Ce type de travail
doit être confié à des professionnels.
Ne pas couper au-dessus du niveau de la poitrine,
car il est difficile de contrôler une scie maintenue
plus haut en cas de rebond.
Lors de l’élagage il est important de ne pas couper
au ras d’une branche maîtresse ou du tronc avant
d’avoir coupé la branche à distance pour en réduire
le poids. Ceci évite d’endommager l’écorce.
La première entaille doit être effectuée par le
dessous, jusqu’au tiers du diamètre de la branche.
La deuxième entaille doit être effectuée par le dessus
pour faire tomber la branche.
Ceci fait, la coupe finale peut être effectuée nettement
au ras du tronc ou de la branche maîtresse, de façon
à ce que l’écorce puisse pousser pour sceller la plaie.
2
1
4
COUPER LES BRANCHES UNE À UNE ET LAISSER CELLES
SOUTENANT LE TRONC JUSQU’À CE QU CELUI-CI SOIT DÉBITÉ
Fig. 22
DEUXIÈME
COUPE
CHARGE
PREMIÈRE
COUPE 1/3 DU
DIAMÈTRE
COUPE DE FINITION
Fig. 23
AVERTISSEMENT :
Si les branches à couper se trouvent au-dessus
du niveau de la poitrine, confier le travail à un
professionnel. Ne pas prendre cette précaution peut
entraîner des blessures graves.
FOUETS
Voir la figure 24.
Un fouet est une bille, une branche, une souche
déracinée ou un arbrisseau fléchi sous tension par une
autre pièce de bois qui se détendra une fois que cette
pièce est coupée ou enlevée. La souche déracinée d’un
arbre abattu risque fortement de se remettre à la verticale
lorsque la coupe destinée à séparer le tronc de la souche
est effectuée. Se méfier des fouets, ils sont dangereux.
AVERTISSEMENT :
Les fouets sont dangereux et peuvent heurter
l’opérateur, lui faisant perdre le contrôle de la scie.
Ceci peut entraîner des blessures graves ou mortelles.
FOUET
Fig. 24
23 - Français
Page 55

ENTRETIEN
AVERTISSEMENT :
Utiliser exclusivement des pièces d’origine pour les
réparations. L’usage de toute autre pièce pourrait
créer une situation dangereuse ou endommager
l’produit.
Seules les pièces figurant sur la liste de contrôle
sont conçues pour être réparées ou remplacées par
l’utilisateur. Toutes les autres pièces doivent être
remplacées dans un centre de réparations agréé.
RETRAIT ET PRÉPARATION DU PILES
POUR LE RECYCLAGE
AVERTISSEMENT :
Toujours porter une protection oculaire avec écrans
latéraux certifiée conforme à la norme ANSI Z87.1,
avec protection un casque. Si cette précaution n’est
pas prise, des objets peuvent être projetés dans les
yeux et d’autres lésions graves.
AVERTISSEMENT :
Pour empêcher un démarrage accidentel pouvant
entraîner des blessures graves, toujours retirer le
piles de l’produit avant tout nettoyage ou entretien.
ENTRETIEN GÉNÉRAL
Avant chaque utilisation, inspecter au complet le produit
afin de s’assurer qu’aucune pièce (vis, écrous, boulons,
chapeaux, etc.) n’est endommagée, manquante ou
desserrée. Serrer solidement toutes les pièces de
fixation et les chapeaux et ne pas utiliser le produit tant
que toutes les pièces manquantes ou endommagées
n’ont pas été remplacées. Veuillez composer le
1-800-860-4050 ou communiquer avec un centre de
réparations agréé pour obtenir de l’aide.
Éviter d’utiliser des solvants pour le nettoyage des
pièces en plastique. La plupart des matières plastiques
peuvent être endommagées par divers types de solvants
du commerce. Utiliser un chiffon propre pour éliminer
la saleté, la poussière, l’huile, la graisse, etc.
AVERTISSEMENT :
Après avoir retiré le piles, couvrir ses bornes avec
un ruban adhésif de qualité industrielle. Ne pas
essayer de démonter ou détruire le piles, ni de
retirer des composants quels qu’ils soient. Les
piles épuisées doivent être recyclées ou éliminées
selon une méthode appropriée. Ne jamais toucher
les deux bornes avec des objets en métal ou une
partie du corps, car cela pourrait créer un courtcircuit. Garder hors de la portée des enfants. Le
non-respect de ces mises en garde peut résulter en
un incendie et/ou des blessures graves.
REMPLACEMENT DU GUIDE ET DE LA
CHAÎNE
Voir les figures 25 à 31.
AVERTISSEMENT :
Retirer le bloc-pile et s’assurer que la chaîne s’est
immobilisée avant d’entreprendre tout travail sur
la scie. Ne pas débrancher l’outil peut causer un
démarrage accidentel, entraînant des blessures
graves.
AVERTISSEMENT :
Les instructions de sécurité contenues dans cette
section ont pour objectif d’éviter des blessures graves.
AVERTISSEMENT :
Ne jamais laisser de liquides tels que le fluide de
freins, l’essence, les produits à base de pétrole, les
huiles pénétrantes, etc., entrer en contact avec les
pièces en plastique. Les produits chimiques peuvent
endommager, affaiblir ou détruire le plastique, ce qui
peut entraîner des blessures graves.
24 - Français
ATTENTION :
Toujours porter des gants lors de la manipulation du
guide et de la chaîne qui sont tranchants et peuvent
présenter des bavures.
AVERTISSEMENT :
Ne jamais toucher ou régler la chaîne lorsque le
moteur tourne. La chaîne de la scie est extrêmement
tranchante. Toujours porter des gants lors de son
entretien pour éviter des lacérations profondes.
Page 56

ENTRETIEN
NOTE : Lors du remplacement du guide et de la chaîne,
toujours utiliser les pièces indiquées à la section
Combinaisons de guide et chaîne, plus loin dans ce
manuel.
Retirer le bloc-piles avant d’entreprendre tout travail
sur la scie.
Tournez couvercle de chaîne de bouton de
verrouillage gauche retirer bouton.
Retirer le couvercle de chaîne.
Retirer le guide et la barre de leur support.
Retirer la chaîne usée du guide.
Former une boucle avec la nouvelle chaîne et
éliminer les entortillements. Les gouges doivent être
orientées dans le sens de rotation de la chaîne. Si
elles sont orientées dans le sens contraire, retourner
la boucle.
Engager les maillons d’entraînement de la chaîne
dans la rainure du guide conformément à l’illustration.
NOTE : S’assurer du sens de la chaîne.
Positionner la chaîne de façon à obtenir une boucle
à l’arrière du guide.
Maintenir la chaîne en place sur le guide et engager
la boucle sur le pignon.
Ajuster le guide au ras de la surface de montage,
de manière à ce que ses goujons s’engagent dans
la fente longue du guide.
BOUTON DE TENSION DE
CHAÎNE
BARRE DE LEUR
SUPPORT
CARTER DE
LA CHAÎNE
COUVERCLE
DE CHAÎNE DE
BOUTON DE
VERROUILLAGE
Fig. 25
CHAÎNE
BARRE
COUVERCLE DE
CHAÎNE DE BOUTON
DE VERROUILLAGE
Fig. 26
AVERTISSEMENT :
Au moment d’engager le guide-chaîne sur ses
goujons, veiller à ce que la tige de tension de chaîne
soit insérée dans son trou. Le non-respect de cette
directive peut amener la chaîne à se relâcher, ce qui
peut entraîner des blessures graves.
DENTS
MAILLONS D’ENTRAÎNEMENT
ROTATION DE LA
CHAÎNE
Fig. 27
25 - Français
Page 57

ENTRETIEN
Remettre le couvercle de chaîne.
Maintenir la couvercle de chaîne de bouton de
verrouillage; tournez droit le bouton serrer.Le
mouvement du guide est nécessaire pour le réglage
de la tension.
Éliminer complètement le mou de la chaîne en
tournant la bouton de réglage de tension de la
chaîne vers la droite jusqu’à ce que la chaîne soit
bien ajustée sur le guide, les maillons d’entraînement
étant engagés dans la rainure du guide.
Relever l’extrémité du guide pour vérifier le mou.
Lâcher l’extrémité du guide et tourner la bouton
de tension de la chaîne de 1/2 tour vers la droite.
Répéter l’opération jusqu’à ce que le mou soit
complètement éliminé.
Maintenir l’extrémité du guide et serrer fermement
le couvercle de chaîne de bouton de verrouillage.
Une chaîne est correctement tendue lorsqu’elle ne
présente pas de mou au dessous du guide et qu’elle
est bien serrée, mais peut cependant être tournée à la
main sans se gripper.
NOTE : Si la chaîne est trop tendue, elle ne peut pas
tourner. Desserre légèrement couvercle de chaîne de
bouton de verrouillage et tourner la bouton de tension
de chaîne 1/4 de tour vers la gauche. Relever l’extrémité
du guide et serrer fermement couvercle de chaîne de
bouton de verrouillage. Vérifier que la chaîne peut
tourner sans se gripper.
MAILLONS
D’ENTRAÎNEMENT
ORIFICE DE
BROCHE DE
TENSION DE
CHAÎNE
RAINURE
DU GUIDE
GOUJONS
DU GUIDE
BROCHE DE RÉGLAGE DE
TENSION DE CHAÎNE
Fig. 28
CARTER DE
LA CHAÎNE
COUVERCLE
DE CHAÎNE DE
BOUTON DE
VERROUILLAGE
Fig. 29
26 - Français
Page 58

ENTRETIEN
RÉGLAGE DE LA TENSION DE CHAÎNE
Voir les figures 31 et 32.
AVERTISSEMENT :
Ne jamais toucher ou régler la chaîne lorsque
le moteur tourne. La chaîne est extrêmement
tranchante. Toujours porter des gants lors de
l’entretien de la chaîne.
Retirer le bloc-piles avant d’entreprendre tout travail
sur la scie.
Dévisser légèrement le bouton de verrouillage du
couvercle de chaîne
Tourner la bouton de tension vers la droite pour
tendre la chaîne.
NOTE : Une chaîne froide est correctement tendue
lorsqu’elle ne présente pas de mou au dessous du
guide et qu’elle est bien serrée mais peut cependant
être tournée à la main sans se gripper.
Tournez droit couvercle de chaîne de bouton de
verrouillage la droit pour fixer.
La chaîne doit être retendue lorsque les méplats des
maillons d’entraînement sortent de la rainure du guide.
NOTE : Pendant l’utilisation normale de la scie, la
température de la chaîne augmente. Les maillons
d’entraînement d’une chaîne chaude correctement
tendue pendent à environ 1,25 mm (0,050 po) audessous de la rainure du guide.
NOTE : Les chaînes neuves ont tendance à s’étirer.
Il convient donc de vérifier fréquemment leur tension
et de la corriger le cas échéant.
RELEVER
L’EXTRÉMITÉ
DU GUIDE POUR
VÉRIFIER LE MOU
BOUTON DE TENSION DE
CHAÎNE
Fig. 30
COUVERCLE DE
CHAÎNE DE BOUTON
DE VERROUILLAGE
Fig. 31
AVIS :
Une chaîne réglée à chaud peut présenter une
tension excessive une fois refroidie. Vérifier la
« tension à froid » avant l’utilisation suivante.
27 - Français
≈ 1,25 mm (0,050 po)
MÉPLATS DES MAILLONS D’ENTRAÎNEMENT
Fig. 32
Page 59

ENTRETIEN
ENTRETIEN DE LA CHAÎNE
Voir les figures 33 et 35.
AVERTISSEMENT :
Retirer le bloc-pile et s’assurer que la chaîne s’est
immobilisée avant d’entreprendre tout travail sur
la scie.
Utiliser exclusivement des chaînes à rebond réduit sur
cette scie. Correctement entretenue, cette chaîne à
coupe rapide réduira les risques de rebond.
Pour couper rapidement et nettement, la chaîne doit
être correctement entretenue. La chaîne doit être
affûtée lorsque les copeaux de bois sont petits et
poudreux, lorsqu’il est nécessaire de forcer sur la scie
pour couper ou lorsque la chaîne ne coupe que d’un
côté. Lors de l’entretien de la chaîne, tenir compte des
points suivants :
Un angle d’affûtage incorrect de la plaque latérale
peut accroître les risques de rebond puissant.
Jeu du limiteur de profondeur
Un réglage trop profond accroît le risque de rebond.
Un réglage pas asez profond réduit la capacité de
coupe.
Si les dents de la chaîne ont heurté des objets
durs tels que des clous ou des pierres, ou ont été
abrasées par du sable ou de la boue se trouvant
sur le bois, la faire affûter chez un concessionnaire
réparateur.
NOTE : Lors du remplacement de la chaîne, s’assurer
que le pignon d’entraînement n’est ni usé, ni
endommagé. En cas de signes d’usure ou de dommages
aux endroits indiqués faire remplacer le pignon dans
un centre de réparations Ryobi.
JEU DU LIMITEUR 0,6 mm
S’ASSURER DE
L’ABSENCE D’USURE
OU DE DOMMAGES
PLAQUE
SUPÉRIEURE
TROU DE
RIVET
TALON
(0,025 po)
CREUX
COUPE DE
COIN
Fig. 33
Fig. 34
PLAQUE
LATÉRALE
LIMITEUR DE
PROFONDEUR
SABOT
Fig. 35
28 - Français
Page 60

ENTRETIEN
COMMENT AFFÛTER LES DENTS
Voir les figures 36 et 37.
Veiller à limer toutes les dents aux angles spécifiés et
à la même longueur, car une coupe rapide ne peut être
obtenue qu’avec des dents uniformes.
Porter des gants protecteurs. Tendre la chaîne
correctement avant de l’affûter. Voir la section
Tension de la chaîne plus haut dans ce manuel. Tout
le limage doit être effectué au point central du guide.
Utiliser une lime ronde de 4,5 mm (5/32 po), et un
porte-lime.
Garder la lime de niveau avec la plaque supérieure
de la dent. Ne pas incliner la lime ou utiliser un
mouvement de bascule.
Exercer une pression légère mais ferme et limer en
direction du coin avant de la dent.
Soulever la lime du métal à chaque retour.
Effectuer quelques passes fermes sur chaque dent.
Limer toutes les gouges de gauche dans un sens.
Ensuite, passer à l’autre côté et limer toutes les
gouges de droite dans l’autre sens. De temps à
autre, éliminer la limaille de la lime au moyen d’une
brosse métallique.
DENTS DE
DROITE
ANGLE D’AFFÛTAGE DE
LA PLAQUE SUPÉRIEURE
CORRECT
30°
Fig. 36
DENTS DE
GAUCHE
Fig. 37
ANGLE D’AFFÛTAGE DE
LA PLAQUE SUPÉRIEURE
INCORRECT
MOINS
DE 30°
PLUS DE
30°
AVERTISSEMENT :
Un affûtage incorrect de la chaîne accroît le risque
de rebond.
AVERTISSEMENT :
L’utilisation d’une chaîne endommagée peut causer
de blessures graves.
AVERTISSEMENT :
La chaîne de la scie est extrêmement tranchante.
Toujours porter des gants lors de son entretien.
Fig. 38
ANGLE D’AFFÛTAGE DE LA PLAQUE
SUPÉRIEURE
Voir la figure 38.
CORRECT 30° - Les porte-limes sont dotés de repères
permettant d’aligner la lime correctement, de façon
à obtenir un angle de plaque supérieure satisfaisant.
MOINS DE 30° - Pour les coupes transversales.
PLUS DE 30° - Tranchant aminci, s’émousse
rapidement.
29 - Français
Page 61

ENTRETIEN
ANGLE DE PLAQUE LATÉRALE
Voir la figure 39.
CORRECT - 80° - Obtenu automatiquement si une
lime de taille appropriée est placée dans le portelime.
CROCHET - « Accroche » le bois et s’émousse
rapidement. Accroît le risque de REBOND.
Résulte de l’emploi d’une lime de trop petit diamètre
ou d’une lime tenue trop bas.
ANGLE ARRIÈRE - Nécessite une pression d’attaque
excessive, causant l’usure prématurée du guide et
de la chaîne.
Résulte de l’emploi d’une lime de trop grand
diamètre ou d’une lime tenue trop haut.
DÉGAGEMENT DE JAUGE DE
PROFONDEUR
Voir les figures 40 à 41.
Le jeu du limiteur de profondeur doit être maintenu à
0,6 mm (0,025 po). Utiliser un outil de réglage de
jauge de profondeur pour vérifier les dégagements
du limiteur de profondeur.
Vérifier le jeu du limiteur de profondeur lors de
chaque affûtage de la chaîne.
Utiliser une lime plate et un coupleur pour limer tous les
limiteurs de profondeur uniformément. Les coupleurs
de limiteur de profondeur sont disponibles en tailles
0,5 à 0,9 mm (0,020 à 0,035 po). Utiliser un calibre de
jauge de profondeur de 0,6 mm (0,025 po). Après avoir
abaissé chaque limiteur de profondeur, lui rendre sa
forme d’origine en arrondissant l’avant. Veiller à ne pas
endommager les maillons d’entraînement adjacents
avec le bord de la lime.
Les limiteurs de profondeur doivent être ajustés avec la
lime plate, dans le sens dans lequel les dents adjacentes
ont été affûtées avec la lime ronde. Veiller à ne pas
toucher la face de la gouge avec la lime plate lors de
l’ajustement des limiteurs de profondeur.
ENTRETIEN DU GUIDE
Lorsque le guide présente des signes d’usure, l’inverser
afin de répartir l’usure et d’obtenir une vie utile maximum.
Le guide doit être nettoyé après chaque journée
d’utilisation et inspecté en vue d’usure ou de dommage.
Les déformations et barbes sur les rails du guide font
partie de l’usure normale. Ces défauts doivent être
limés dès qu’ils apparaissent.
ANGLE D’AFFÛTAGE
DE LA PLAQUE
LATÉRALE CORRECT
80°
ANGLE D’AFFÛTAGE DE
LA PLAQUE LATÉRALE
INCORRECT
CROCHET
ANGLE
ARRIÈRE
Fig. 39
COUPLEUR DE LIMITEUR
DE PROFONDEUR
LIME PLATE
Fig. 40
RENDRE LA FORME
D’ORIGINE EN
ARRONDISSANT
L’AVANT
Fig. 41
Un guide présentant l’un ou plusieurs des défauts cidessous doit être remplacé.
Usure de l’intérieur des rails permettant à la chaîne
de se coucher sur le côté.
Guide tordu.
Rails fendus ou brisés.
Rails écartés.
En outre lubrifier les barres du guide doté d’un pignon
d’extrémité chaque semaine. Injecter la graisse dans le
trou de lubrification, à l’aide d’une seringue, une fois par
semaine. Retourner le guide et s’assurer que les trous
de lubrification et la rainure de chaîne sont propres.
30 - Français
Page 62

ENTRETIEN
INSTALLATION DE LA GARDE
SAFE-T-TIP
Voir les figures 42 et 43.
Retirer le bloc-piles de scie à chaîne.
Installer la garde SAFE-T-TIP® sur l’extrémité du
guide.
Engager le rivet ou tenon de verrouillage dans le
trou à évidement du guide.
Serrer la vis avec la clé jusqu’à ce que sa tête fasse
contact.
Une fois que la tête est en contact, donner 3/4 de
tour supplémentaire.
®
ENTRETIEN DE LA GARDE
SAFE-T-TIP
Voir les figures 42 et 43.
®
AVERTISSEMENT :
Bien que le dispositif antirebond SAFE-T-TIP® ait
été installé en usine, vérifier le serrage de sa vis de
montage avant chaque utilisation pour éviter tout
risque de blessures graves.
VIS DE MONTAGE
SAFE-T-TIP
Fig. 42
SERRER DE 3/4
DE TOUR
Fig. 43
Suivre les instructions ci-dessous pour serrer la vis de
montage sur la garde. La vis est en acier spécialement
trempé. Si la vis ne peut pas être installée correctement,
la remplacer, ainsi que le dispositif SAFE-T-TIP avant
d’utiliser la scie.
NOTE : Ne pas utiliser une vis ordinaire. Utiliser
exclusivement des pièces identiques à celles d’origine
pour les réparations.
Non seulement le dispositif SAFE-T-TIP empêche
l’extrémité du guide de heurter des objets durs, il protège
la chaîne des matériaux abrasifs tels que la terre. Le
garder du côté droit du guide, afin que la chaîne soit
protégée lors des travaux de coupe au ras du sol.
La vis de fixation doit être serrée au moyen d’une clé
de 7,9 mm (5/16 po) (ou d’une clé à molette), au couple
recommandé de 4 à 5 Nm (35 à 45 lb∙pi). Ce couple
peut être obtenu de la manière suivante.
Serrer la vis avec la clé jusqu’à ce que sa tête fasse
contact.
Une fois que la tête est en contact, donner 3/4 de
tour supplémentaire.
Fig. 44
TRANSPORT ET REMISAGE
Voir la figure 44.
Ne jamais remiser ou transporter la scie lorsque
le moteur tourne. La chaîne doit toujours être
immobilisée avant de remiser ou transporter la scie.
Toujours placer le fourreau sur le guide lors du
transport ou du remisage de la scie. Veiller à ne pas
se couper sur les dents de la chaîne.
Nettoyer soigneusement la scie à chaîne avant de
la remiser. Le remiser dans un endroit bien aéré,
verrouillé et/ou inaccessible aux enfants.
La tenir à l’écart de produits corrosifs, tels que
les produits chimiques de jardinage et le sel de
dégivrage.
31 - Français
Page 63

1-800-860-405
COMBINAISONS DE GUIDE ET CHAÎNE
Caractéristiques de la chaîne : pas de 9,5 mm (0,375 po), trait d'abattage à profil bas, calibre de chaîne
1,1 mm (0,043 po), roue à 5 dents.
Longueur N° de référence N° de référence Maillons
du guide du guide de la chaîne d’entraînement
12 po 099966002001 099966002002 45
DÉPANNAGE
PROBLÈME CAUSE SOLUTION
Le guide et la chaîne
chauffent et fument.
Le moteur tourne, mais
la chaîne ne se met pas
en rotation.
1. Regarder si la chaîne
est trop tendue.
2. Réservoir d’huile
vide.
1. Tension de la chaîne
excessive.
2. Vérifier l’ensemble
guide et chaîne.
3. S’assurer que
l’ensemble guide
et chaîne n’est pas
endommagé.
1. Tendre la chaîne. Voir Tension
de la chaîne plus haut dans ce
manuel.
2. Vérifier le niveau d’huile du
réservoir.
1. Retendre la chaîne selon les
instructions du chapitre Tension
de la chaîne, plus haut dans ce
manuel.
2. Voir Assemblage du guide et
de la chaîne plus haut dans ce
manuel.
3. S’assurer que l’ensemble guide
et chaîne n’est pas endommagé.
BESOIN D’AIDE?
0
NOUS APPELER D’ABORD
Pour toute question concernant l’utilisation ou l’entretien
utiliser ce produit, appeler le service d’assistance
téléphonique Ryobi®!
Le taille-bordures à été entièrement testé avant expédition
pour assurer la complète satisfaction de l’utilisateur.
32 - Français
Page 64

GARANTIE
ÉNONCÉ DE LA GARANTIE LIMITÉE
Techtronic Industries North America, Inc., garantit à l’acheteur
original que ce produit RYOBI® est exempt de tous vices de
matériaux ou de fabrication et s’engage à réparer ou remplacer
gratuitement, à son choix, tout produit s’avérant défectueux
au cours des périodes indiquées ci-dessous, à compter de
la date d’achat.
Cinq ans sur les produits utilisés par des particuliers ;
90 jours sur les produits utilisés à toutes autres fins, telles
que les travaux commerciaux et la location.
Cette garantie n’est offerte qu’à l’acheteur original et entre
en vigueur à la date de l’achat original.
Toute pièce de ce produit jugée, après évaluation raisonnable
par Techtronic Industries North America, Inc., comme
présentant des vices de matériaux ou de fabrication, sera
réparée ou remplacée, sans facturation pour pièces ou main
d’oeuvre par un centre de réparations agréé pour produits
d’extérieur de marque RYOBI® (centre de réparations Ryobi
agréé).
Le produit, y compris toutes les pièces défectueuses devront
être retournés à un centre de réparations Ryobi agréé, avant
expiration de la période de garantie. Les frais d’expédition
au centre de réparations pour les travaux sous garantie et
de retour au propriétaire du produit seront assumés par le
propriétaire. En ce qui concerne les réclamations en garantie,
la responsabilité Techtronic Industries North America, Inc.,
se limitera à la réparation ou au remplacement des produits
défectueux et aucune revendication de rupture de garantie
ne pourra causer l’annulation ou la résiliation du contrat de
vente d’un produit d’extérieur RYOBI® quel qu’il soit. Une
preuve d’achat sera exigée par le centre de réparation, afin
de valider toute réclamation au titre de la garantie. Toutes
les réparations sous garantie devront être effectuées par un
centre de réparations agréé.
La garantie sur tout produit d’extérieur RYOBI® utilisé pour
la location, des travaux commerciaux ou tout autre usage
lucratif, sera limitée à quatre-vingt-dix (90) jours, à compter
de la date d’achat au détail original.
Cette garantie ne couvre pas les produits ayant fait l’objet
d’un usage abusif ou négligent, d’un manque d’entretien,
ayant été impliqués dans un accident ou employé de façon
contraire aux instructions du manuel d’utilisation. Cette
garantie ne couvre ni les dommages aux produits résultant
d’un manque d’entretien, ni les produits qui ont été altérés
ou modifiés. La garantie exclut les réparations rendues
nécessaires par l’usure normale ou l’utilisation de pièces et
accessoires incompatibles avec le produit d’extérieur RYOBI®
ou nuisibles à son bon fonctionnement, ses performances
ou sa durabilité. En outre, cette garanti exclut :
A. Les réglages – Bougies, carburateur, réglages du
carburateur, allumage, filtres
B. Les articles consommables – Boutons d’avance par choc,
bobines externes, lignes de coupe, bobines internes,
poulies et cordons de lanceur, courroies d’entraînement,
dents, rondelles en feutre, axes d’attelage, lames de
paillage, ventilateur de soufflante, tubes de soufflage et
d’aspiration, sacs à débris, guides, chaînes de scie
Techtronic Industries North America, Inc., se réserve le droit
d’apporter des modifications ou améliorations à tout produit
extérieur RYOBI®, sans obligation de modifier les produits
fabriqués antérieurement.
LA DURÉE DE TOUTES LES GARANTIES IMPLICITES NE
SAURAIT EN AUCUN CAS EXCÉDER LA PÉRIODE DE
GARANTIE DÉCLARÉE. PAR CONSÉQUENT, TOUTES LES
GARANTIES IMPLICITES, Y COMPRIS LES GARANTIES
DE VALEUR MARCHANDE OU D’ADÉQUATION À UN
USAGE PARTICULIER OU AUTRES SERONT INVALIDÉES À
L’EXPIRATION DE LA PÉRIODE DE GARANTIE APPROPRIÉE
DE CINQ ANS OU QUATRE-VINGT-DIX JOURS. LES
OBLIGATIONS DE TECHTRONIC INDUSTRIES NORTH
AMERICA, INC., DANS LE CADRE DE CETTE GARANTIE
SE LIMITENT EXCLUSIVEMENT À LA RÉPARATION OU
AU REMPLACEMENT DES PIÈCES DÉFECTUEUSES
ET TECHTRONIC INDUSTRIES NORTH AMERICA, INC.
N’ASSUME OU N’AUTORISE QUICONQUE À ASSUMER
QUELQUE AUTRE OBLIGATION QUE CE SOIT. CERTAINS
ÉTATS ET PROVINCES NE PERMETTANT PAS DE
LIMITATION DE DURÉE DES GARANTIES IMPLICITES,
LES RESTRICTIONS CI-DESSOUS PEUVENT NE PAS
ÊTRE APPLICABLES. TECHTRONIC INDUSTRIES NORTH
AMERICA, INC., DÉCLINE TOUTE RESPONSABILITÉ
EN CE QUI CONCERNE LES DOMMAGES DIRECTS,
INDIRECTS OU AUTRES, Y COMPRIS, MAIS SANS S’Y
LIMITER, LES FRAIS DE RETOUR DE PRODUITS À UN
CENTRE DE RÉPARATION RYOBI AGRÉÉ ET DE RENVOI
AU PROPRIÉTAIRE, DE DÉPLACEMENT D’UN TECHNICIEN,
DE TÉLÉPHONE OU TÉLÉGRAMME, DE LOCATION
D’UN PRODUIT SIMILAIRE PENDANT LA DURÉE DES
RÉPARATIONS SOUS GARANTIE, DE DÉPLACEMENT, DE
PERTES OU DOMMAGES À DES BIENS PERSONNELS, DE
MANQUE À GAGNER, DE PERTE D’USAGE DU PRODUIT,
DE PERTE DE TEMPS OU DE DÉRANGEMENT. CERTAINS
ÉTATS ET PROVINCES NE PERMETTANT L’EXCLUSION OU
LA LIMITATION DES DOMMAGES DIRECTS OU INDIRECTS,
LES RESTRICTIONS CI-DESSOUS PEUVENT NE PAS ÊTRE
APPLICABLES.
Cette garantie donne au consommateur des droits
spécifiques, et celui-ci peut bénéficier d’autres droits, qui
varient selon les états ou provinces.
Cette garantie couvre tous les produits d’extérieur RYOBI®
fabriqués par Techtronic Industries North America, Inc.,
vendus aux États-Unis et au Canada.
Pour obtenir l’adresse du centre de réparations Ryobi agréé
le plus proche, appeler le 1-800-860-4050.
33 - Français
Page 65

ADVERTENCIAS DE SEGURIDAD
PARA HERRAMIENTAS ELÉCTRICAS
ADVERTENCIA
Lea todas las advertencias de seguridad
y las instrucciones. La inobservancia de las
advertencias e instrucciones puede causar
descargas eléctricas, incendios o lesiones graves.
Guarde todas las advertencias e instrucciones para
consultarlas en el futuro. El término “herramienta
eléctrica” en las advertencias se refiere a las
herramientas eléctricas que funcionan con corriente (con
cordón) o las que funcionan con batería (inalámbricas).
ÁREA DE TRABAJO
Mantenga limpia y bien iluminada el área de
trabajo. Un área de trabajo mal despejada o mal
iluminada propicia accidentes.
No utilice herramientas motorizadas en
atmósferas explosivas, como las existentes
alrededor de líquidos, gases y polvos inflamables.
Las herramientas eléctricas generan chispas que
pueden encender el polvo y los vapores inflamables.
Mantenga alejados a los niños y circunstantes
al maniobrar una herramienta eléctrica. Toda
distracción puede causar la pérdida del control de
la herramienta.
SEGURIDAD ELÉCTRICA
Las clavijas de las herramientas eléctricas deben
corresponder a las tomas de corriente donde se
conectan. Nunca modifique la clavija de ninguna
forma. No utilice ninguna clavija adaptadora con
herramientas eléctricas dotadas de contacto
a tierra. Conectando las clavijas originales en
las tomas de corriente donde corresponden se
disminuye el riesgo de una descarga eléctrica.
Evite el contacto del cuerpo con las superficies
de objetos conectados a tierra, como las
tuberías, radiadores, estufas y refrigeradores.
Existe un mayor riesgo de descargas eléctricas si
el cuerpo está haciendo tierra.
No exponga las herramientas eléctricas a la lluvia
ni a condiciones de humedad. La introducción de
agua en una herramienta eléctrica aumenta el riesgo
de descargas eléctricas.
No maltrate el cordón eléctrico. Nunca utilice
el cordón para trasladar, desconectar o tirar de
la herramienta eléctrica. Mantenga el cordón
lejos del calor, aceite, bordes afilados y piezas
3 - Español
móviles. Los cordones eléctricos dañados o
enredados aumentan el riesgo de descargas
eléctricas.
Al utilizar una herramienta eléctrica a la
intemperie, use un cordón de extensión apropiado
para el exterior. Usando un cordón adecuado para
el exterior se disminuye el riesgo de descargas
eléctricas.
Si debe operar una herramienta en lugares
húmedos, use un suministro protegido por un
interruptor de circuito con pérdida a tierra (GFCI).
El uso de un GFCI reduce el riesgo de descargas
eléctricas.
SEGURIDAD PERSONAL
Permanezca alerta, preste atención a lo que esté
haciendo y aplique el sentido común al utilizar
herramientas eléctricas. No utilice la herramienta
eléctrica si está cansado o se encuentra bajo los
efectos de alguna droga, alcohol o medicamento.
Un momento de inatención al utilizar una herramienta
eléctrica puede causar lesiones corporales serias.
Utilice protección el equipo otros. Siempre
póngase protección ocular. El uso de equipo
protector como mascarilla para el polvo, calzado
de seguridad, casco y protección para los oídos en
las circunstancias donde corresponda disminuye el
riesgo de lesiones.
Evite que la herramienta se active accidentalmente.
Asegúrese de que el interruptor esté en la
posición de apagado antes de conectar la
herramienta a un suministro de corriente o de
colocar un paquete de baterías. Transportar
herramientas eléctricas con el dedo en el interruptor
o enchufar herramientas eléctricas que tienen el
interruptor encendido puede ocasionar accidentes.
Retire toda llave o herramienta de ajuste antes
de encender la herramienta eléctrica. Toda llave o
herramienta de ajuste dejada en una pieza giratoria
de la herramienta eléctrica puede causar lesiones.
No estire el cuerpo para alcanzar mayor
distancia. Mantenga una postura firme y buen
equilibrio en todo momento. De esta manera se
logra un mejor control de la herramienta eléctrica
en situaciones inesperadas.
Vístase adecuadamente. No vista ropas holgadas
ni joyas. Mantenga el cabello, la ropa y los
guantes alejados de las piezas móviles. Las ropas
holgadas y las joyas, así como el cabello largo,
pueden engancharse en las piezas móviles.
Page 66

ADVERTENCIAS DE SEGURIDAD
PARA HERRAMIENTAS ELÉCTRICAS
Si se suministran dispositivos para conectar
mangueras de extracción y captación de polvo,
asegúrese de que éstas estén bien conectadas y
se usen correctamente. El uso de la captación de
polvo puede reducir los peligros relacionados con
éste.
EMPLEO Y CUIDADO DE LA HERRAMIENTA
ELÉCTRICA
No fuerce la herramienta eléctrica. Utilice la
herramienta eléctrica adecuada para cada
trabajo. La herramienta eléctrica adecuada efectúa
mejor y de manera más segura el trabajo, si además
se maneja a la velocidad para la que está diseñada.
No utilice la herramienta si el interruptor no
enciende o no apaga. Cualquier herramienta
eléctrica que no pueda controlarse con el interruptor
es peligrosa y debe repararse.
Desconecte la clavija del suministro de
corriente o retire el paquete de baterías de
la herramienta eléctrica, según sea el caso,
antes de efectuarle cualquier ajuste, cambiarle
accesorios o guardarla. Tales medidas preventivas
de seguridad reducen el riesgo de poner en marcha
accidentalmente la herramienta.
Guarde las herramientas eléctricas desocupadas
fuera del alcance de los niños y no permita
que las utilicen personas no familiarizadas
con las mismas o con estas instrucciones. Las
herramientas eléctricas son peligrosas en manos de
personas no capacitadas en el uso de las mismas.
Preste servicio a las herramientas eléctricas.
Revise para ver si hay desalineación o
atoramiento de piezas móviles, ruptura de piezas
o cualquier otra condición que pueda afectar el
funcionamiento de la herramienta. Si está dañada
la herramienta eléctrica, permita que la reparen
antes de usarla. Numerosos accidentes son
causados por herramientas eléctricas mal cuidadas.
Mantenga las herramientas de corte afiladas y
limpias. Las herramientas de corte bien cuidadas y
con bordes bien afilados, tienen menos probabilidad
de atascarse en la pieza de trabajo y son más fáciles
de controlar.
Utilice la herramienta eléctrica, los accesorios
y brocas, hojas y cuchillas de corte, ruedas
de esmeril, etc. de conformidad con estas
instrucciones, tomando en cuenta las condiciones
de trabajo y la tarea por realizar. Si se utiliza la
herramienta eléctrica para operaciones diferentes de
las indicadas podría originar una situación peligrosa.
EMPLEO Y CUIDADO DE LA HERRAMIENTA
DE BATERÍAS
Sólo cargue el paquete de baterías con el
cargador especificado por el fabricante. Un
cargador adecuado para un tipo paquete de baterías
puede significar un riesgo de incendio si se emplea
con un paquete de baterías diferente.
Utilice las herramientas eléctricas sólo con los
paquetes de baterías específicamente indicados.
El empleo de paquetes de baterías diferentes puede
presentar un riesgo de incendio.
Cuando no esté utilizándose el paquete de
baterías, manténgalo lejos de otros objetos
metálicos, como clips, monedas, llaves, clavos,
tornillos o otros objetos metálicos, pequeños
que puedan establecer conexión entre ambas
terminales. Establecer una conexión directa entre
las dos terminales de las baterías puede causar
quemaduras o incendios.
Si se maltratan las baterías, puede derramarse
líquido de las mismas; evite todo contacto con
éste. En caso de contacto, lávese con agua. Si
el líquido llega a tocar los ojos, además busque
atención médica. El líquido de las baterías puede
causar irritación y quemaduras.
SERVICIO
Permita que un técnico de reparación calificado
preste servicio a la herramienta eléctrica, y sólo
con piezas de repuesto idénticas. De esta manera
se mantiene la seguridad de la herramienta eléctrica.
Al dar servicio a una herramienta eléctrica,
sólo utilice piezas de repuesto idénticas. Siga
las instrucciones señaladas en la sección
Mantenimiento de este manual. El empleo de
piezas no autorizadas o el incumplimiento de las
instrucciones de mantenimiento puede significar un
riesgo de descarga eléctrica o de lesiones.
4 - Español
Page 67

ADVERTENCIAS DE SEGURIDAD DE LA MOTOSIERRA
Mantenga todas las partes del cuerpo alejadas de
la motosierra mientras esté en funcionamiento.
Antes de encender la motosierra, asegúrese de
que no esté en contacto con nada. Un momento
de distracción mientras usa la motosierra puede
hacer que la motosierra agarre su ropa o una parte
de su cuerpo.
Siempre sostenga la motosierra con la mano
derecha en el mango trasero y la mano izquierda
en el mango delantero. Sostener la motosierra con
las manos invertidas aumenta el riesgo de sufrir
lesiones personales y siempre debe evitarse.
Sostenga la herramienta eléctrica únicamente
por las partes aisladas, porque la misma podría
morder cables ocultos. Si la motosierra toca un
cable vivo, las piezas metálicas de la herramienta
podrían energizarse y producirle una descarga
eléctrica al operador.
Use gafas de seguridad y protección auditiva.
También se recomienda usar equipo de
protección para la cabeza, las manos, las piernas
y los pies. La indumentaria de protección adecuada
reducirá las lesiones personales en caso de que
salgan partículas despedidas o su cuerpo toque
accidentalmente la motosierra.
No use la motosierra sobre un árbol. Si usa la
motosierra subido a un árbol, podría sufrir lesiones
personales.
Siempre mantenga un buen apoyo y utilice la
motosierra únicamente sobre superficies fijas,
firmes y niveladas. Las superficies resbaladizas
o inestables como las escaleras pueden hacerle
perder el equilibrio o el control de la motosierra.
Cuando corte una rama que esté sometida a
tensión, esté atento al retorno. Cuando se libera
la tensión de las fibras de madera, la rama podría
golpear al operador o lanzar la motosierra en forma
descontrolada.
Tenga extremo cuidado al cortar maleza o
retoños. El material delgado podría quedar atrapado
en la motosierra y salir disparado hacia usted o
hacerle perder el equilibrio.
Transporte la motosierra apagada, lejos de su
cuerpo y tomada del mango frontal. Siempre que
transporte o almacene la motosierra, coloque la
cubierta de la barra guía. Manipular la motosierra
correctamente reduce la probabilidad de tocar
accidentalmente la cadena en movimiento.
Siga las instrucciones para lubricar la herramienta,
tensionar la cadena y cambiar los accesorios.
Si la cadena no está correctamente tensionada o
lubricada, podría romperse o presentar un mayor
riesgo de que ocurra un contragolpe.
Mantenga los mangos secos, limpios y sin aceite
ni grasa. Los mangos con aceite o grasa son
resbaladizos y pueden hacerle perder el control.
Corte únicamente madera. No use la motosierra
para usos distintos de los previstos. Por ejemplo:
no use la motosierra para cortar plástico,
mampostería ni materiales de construcción que
no sean de madera. El uso de la motosierra para
fines distintos de los previstos podría dar lugar a
una situación de riesgo.
CAUSAS Y PREVENCIÓN DEL
CONTRAGOLPE
Puede ocurrir un contragolpe cuando la punta de la
barra guía toca un objeto o cuando la madera se cierra
y pellizca la cadena de la sierra en el punto de corte.
En algunos casos, el contacto de la pieza de trabajo
con la punta de la barra guía puede causar una reacción
súbita en dirección inversa, la cual lanza la barra guía
hacia arriba y hacia atrás, en dirección al operador.
El pellizcamiento de la cadena de la sierra en la parte
superior de la barra guía puede empujar la barra
rápidamente hacia atrás, en dirección al operador.
Cualquiera de estas dos reacciones puede causar la
pérdida del control de la sierra, lo cual a su vez puede
producir lesiones personales serias. No dependa
exclusivamente de los dispositivos de seguridad
incorporados de la sierra. Como usuario de una
motosierra, debe tomar varias medidas para evitar los
accidentes y las lesiones en todos sus trabajos de corte.
El contragolpe es el resultado de un uso indebido de
la herramienta o de procedimientos o condiciones
de utilización incorrectos, y se puede evitar tomando
las precauciones apropiadas que se presentan a
continuación:
■Mantenga la herramienta bien sujeta, con los
pulgares y los dedos alrededor de los mangos
de la motosierra; sostenga la herramienta con
ambas manos y posicione su cuerpo y su brazo
de una forma que le permita resistir la fuerza de
un contragolpe. El operador puede controlar las
fuerzas del contragolpe si toma las precauciones
adecuadas. No suelte la motosierra.
No se estire ni corte por encima de la altura del
hombro. Esto ayuda a evitar el contacto accidental
con la punta y permite un mejor control de la
motosierra ante situaciones inesperadas.
Use únicamente barras y cadenas de repuesto
indicadas por el fabricante. El uso de barras y
cadenas de repuesto incorrectas podría hacer que la
cadena se rompa o que se produzcan contragolpes.
5 - Español
Page 68

ADVERTENCIAS DE SEGURIDAD DE LA MOTOSIERRA
Siga las instrucciones de afilado y mantenimiento
de la cadena de la sierra que provee el fabricante.
Disminuir la altura del calibrador de profundidad
puede aumentar la probabilidad de que ocurra un
contragolpe.
No comience a cortar sino hasta tener despejada el
área de trabajo, bien firmes los pies y una trayectoria
planeada de retirada de la caída del árbol. Las áreas
de trabajo mal despejadas propician accidentes.
Mantenga a TODOS los niños, circunstantes,
visitantes y animales fuera del área de trabajo al
arrancar la motosierra o al estar cortando con la
misma. No permita que los visitantes se acerquen
a la motosierra o al cordón de extensión.
No utilice la motosierra en atmósferas explosivas,
como las existentes alrededor de líquidos, gases
y polvos inflamables. Las motosierras generan
chispas que pueden encender el polvo y los vapores
inflamables.
Vístase de forma adecuada - Póngase ropa ajustada.
Siempre póngase pantalones largos gruesos,
mangas largas, overoles, pantalones vaqueros o
zahones (chaparreras) de material cortado resistente
o que contengan partes incorporadas de tal material.
Póngase calzado antideslizante. Póngase guantes
antideslizantes para trabajo pesado con el fin de
mejorar la sujeción de la unidad, y para protegerse
las manos. No se ponga joyas, pantalones cortos
o sandalias, ni ande descalzo. No se ponga ropa
holgada, ya que puede ser atraída hacia adentro
del motor o puede quedar atrapada en la cadena o
en la maleza misma. Recójase el cabello de manera
que le quede arriba del nivel de los hombros. Utilice
protección para los ojos y para la cabeza.
La ropa protectora pesada puede aumentar la
fatiga del operador, lo cual puede originar un golpe
de calor. En climas cálidos y húmedos, el trabajo
pesado debe programarse para las primeras horas
de la mañana o las últimas horas de la tarde, cuando
las temperaturas son más bajas.
Al utilizar esta herramienta, póngase protección
para los ojos con protección lateral con la marca
de cumplimiento de la norma ANSI Z87.1, así como
protección para los oídos y la cabeza.
En todo momento esté consciente de lo que está
haciendo al utilizar la motosierra. Aplique el sentido
común. No utilice la motosierra si está cansado,
enfermo, o se encuentra bajo los efectos de alguna
droga, alcohol o medicamento.
No exponga la motosierra a la lluvia.
No use la motosierra en lugares húmedos o mojados.
Siempre tenga presente el cordón de extensión al
utilizar la motosierra. Tenga precaución para evitar
tropezarse con el cordón. El cordón debe estar lejos
de la cadena y del operador todo el tiempo. Nunca
porte la sierra sujetándola por el cordón eléctrico,
ni tire del mismo para desconectarla de la toma de
corriente. Mantenga el cordón eléctrico lejos del
aceite y de todo borde afilado.
Permanezca alerta y preste atención a lo que está
haciendo. Actúe con sentido común al utilizar esta
unidad.
Mantenga todas las partes del cuerpo alejadas de
la cadena de la sierra cuando esté funcionando la
unidad.
Nunca permita utilizar la motosierra a quien no haya
recibido instrucciones adecuadas sobre la forma
correcta de emplear la unidad. Esto se aplica tanto
a las sierras alquiladas como a las propias.
Antes de arrancar la unidad, asegúrese de que la
cadena no esté tocando ningún objeto.
Apague la motosierra antes de ponerla en reposo.
Para evitar un arranque accidental; nunca traslade
la unidad con el dedo en el gatillo del interruptor.
Dé mantenimiento con cuidado a la unidad.
Mantenga afilado el filo de corte y límpielo para
lograr un desempeño óptimo de la unidad y para
reducir el riesgo de lesiones. Siga las instrucciones
para la lubricación y el cambio de accesorios.
¡No maneje la motosierra con una sola mano!
Sujete firmemente los mangos de la motosierra,
rodeándolos con los pulgares y los dedos restantes.
Si se maneja con una sola mano la unidad, pueden
resultar lesionados el operador, los ayudantes y
demás personas presentes. La motosierra está
hecha para ser manejada con las dos manos.
Protege contra descargas eléctricas - Evite tocar
con el cuerpo objetos conectados a tierra, como los
tubos de metal y las cercas de alambre. Existe un
mayor riesgo de descargas eléctricas si su cuerpo
está en contacto con tierra.
No utilice la motosierra si está dañada, mal ajustada
o no está armada completamente y de manera que
funcione de forma segura. La cadena debe aminorar
la velocidad hasta detenerse completamente al
soltarse el gatillo del interruptor. Si la cadena
continúa desplazándose al soltarse el gatillo del
interruptor, permita que presten servicio a la unidad
en un establecimiento de servicio autorizado.
6 - Español
Page 69

ADVERTENCIAS DE SEGURIDAD DE LA MOTOSIERRA
Inspeccione para ver si hay piezas dañadas.
Verifique la alineación de las partes móviles, que no
haya atoramiento de partes móviles, que no haya
piezas rotas, el montaje de las piezas y cualquier otra
condición que pudiera afectar su funcionamiento.
Cualquier protección o pieza que esté dañada debe
ser reparada o reemplazada en un establecimiento
de servicio autorizado, a menos que se indique otra
cosa en este manual.
Todas las tareas de servicio de la motosierra no
señaladas en los apartados sobre funcionamiento
y mantenimiento deben ser efectuados en el
establecimiento de servicio autorizado.
Siempre mantenga una postura correcta.
No utilice la motosierra si el interruptor no enciende
o no apaga. Lleve todo interruptor defectuoso a un
centro de servicio autorizado para que lo reparen.
No adapte la cabeza motriz de la sierra a ningún
arco tipo sierra de mano, ni la use para accionar
ningún accesorio o dispositivo no especificado para
la sierra.
■ Desconecte la motosierra del suministro de corriente
cuando no la use, antes de darle servicio, al
efectuarle ajustes y cambiarle aditamentos, como
la cadena y la protección.
No corte enredaderas ni maleza pequeña.
No utilice ninguna motosierra subido en un árbol,
en una escalera, tejado o en un andamio, o otro
soporte inestable; es extremadamente peligroso.
NOTA: El tamaño del área de trabajo depende de
la tarea, así como del tamaño del árbol o pieza de
trabajo. Por ejemplo, para talar un árbol se requiere
un área de trabajo más grande que para tronzarlo.
No fuerce la motosierra. La herramienta efectúa el
trabajo mejor y de manera más segura si se maneja
a la velocidad para la que está diseñada.
■Siempreutilicelaherramientaadecuadaalatarea.
La motosierra sólo debe emplearse para cortar
madera. Nunca utilice la motosierra para cortar
plástico, obras de albañilería ni materiales de
construcción que no sean madera.
■Guarde la motosierra cuando noesté usándola.
Debe guardarse la motosierra en un lugar seco y alto
o cerrado con llave, lejos del alcance de los niños.
Al guardar la motosierra coloque la funda en la barra
y la cadena, y guarde la unidad en el estuche.
Usar únicamente con la batería y el cargador
indicados. Para utilice con baterías de iones de
litio de 40 V. Consulte el suplemento 988000842 de
correlación entre herramientas, artefactos, paquetes
de baterías y cargadores.
NOTA: Si bien la motosierra funciona con todos
los paquetes de baterías mencionados en el
suplemento de correlación, para obtener un mejor
rendimiento, evite baterías de iones de litio Ryobi de
40 V de primera generación [OP4026 (números de
pieza 130186012 o 130186006) y OP4015 (número
de pieza 1300208001)]. Si se utilizan estas baterías,
se reducirá significativamente la velocidad de la
motosierra.
Las herramientas de baterías no necesitan
conectarse a una toma de corriente; por lo tanto,
siempre están en condiciones de funcionamiento.
Esté consciente de los posibles peligros incluso si
no está encendida la unidad.
Retire el paquete de baterías de la motosierra antes
de limpiar, dar servicio, guardar, quitar material,
cambiar accesorios (como la barra y la cadena) a
la unidad, o cuando no la tenga en uso.
■ Guarde estas instrucciones. Consúltelas con
frecuencia y empléelas para instruir a otras personas
que puedan utilizar esta producto. Si presta a alguien
esta producto, facilítele también las instrucciones.
7 - Español
Page 70

REGLAS DE SEGURIDAD GENERALES
CONTRAGOLPE
Vea las figuras 1 y 4.
ADVERTENCIA: El contragolpe ocurre cuando la
cadena en movimiento hace contacto con un objeto
en la parte superior de la punta de la barra, o cuando
la madera se cierra y pellizca la cadena de la sierra
en el punto de corte. El contacto de la parte superior
de la punta de la barra con la madera puede causar
que la cadena se clave en el material y se detenga
instantáneamente. El resultado es una reacción
súbita en dirección inversa, la cual lanza la barra guía
hacia arriba y hacia atrás, en la dirección donde se
encuentra el operador. Si la cadena de la sierra se
pellizca en el corte, a lo largo de la parte superior
de la barra guía, puede causarse un rápido empuje
de dicha barra hacia atrás, en la dirección donde
se encuentra el operador. Cualquiera de estas dos
reacciones puede originar una pérdida de control,
la cual a su vez podría ser causa de lesiones serias.
No dependa exclusivamente de los dispositivos de
seguridad incorporados en la sierra. Como usuario
de una motosierra, debe tomar varias medidas para
evitar accidentes y lesiones en todos sus trabajos
de corte.
Deben seguirse las siguientes medidas de
precaución para reducir al mínimo el contragolpe:
• Siempre sujete firmemente la sierra con ambas
manos. Sujete la sierra firmemente con ambas
manos cuando esté encendida. Coloque la mano
derecha en el mango trasero y la izquierda en
el mango delantero, rodeando ambos con los
pulgares y los dedos restantes. Una sujeción
firme con el brazo izquierdo rígido le ayuda a
mantener el control de la sierra si ésta llega a dar
un contragolpe.
• Asegúrese de que no haya obstrucciones en
el área donde esté cortando. No permita que
la punta de la barra guía entre en contacto con
ningún tronco, rama, cerca, o cualquier otra
obstrucción a la que le pueda pegar al estar
operando la sierra.
• Siempre corte con la unidad funcionando a plena
velocidad. Oprima completamente el gatillo del
acelerador y mantenga una velocidad de corte
estable.
• Utilice piezas de repuesto como la cadena de bajo
contragolpe, freno de la cadena, SAFE-T-TIP®
y barras guía especiales, los cuales reducen los
riesgos relacionados con el contragolpe rotatorio.
Sólo use las barras guía y las cadenas de
contragolpe moderado de repuesto especificadas
por el fabricante para su sierra en particular.
PROTECCIÓN SAFE-T-TIP®
DE LA PUNTA
Fig. 1
CONTRAGOLPE
ROTATORIO
Fig. 2
ZONA DE PELIGRO
DE CONTRAGOLPE
Fig. 3
TIRÓN
EMPUJÓN
Fig. 4
8 - Español
Page 71

REGLAS DE SEGURIDAD GENERALES
Sólo use las barras guía y las cadenas de contragolpe
moderado de repuesto especificadas por el
fabricante para su sierra en particular.
Con un conocimiento básico del contragolpe de la
sierra, puede reducir o incluso eliminar el elemento
sorpresa. La sorpresa súbita contribuye a los
accidentes.
Mantenga una postura firme y buen equilibrio en
todo momento.
No trate de cortar objetos fuera de su alcance, ni arriba
de la altura de los hombros.
Mantenga la protección anticontragolpe SAFE-T-TIP®
de la punta de la barra guía debidamente montada en
ésta para evitar el contragolpe rotatorio.
Siga las instrucciones de afilado y mantenimiento
correspondientes a la cadena de la sierra.
Empujón y tirón - Esta fuerza de reacción es siempre
opuesta a la dirección en que está moviéndose la
cadena donde hace contacto con la madera. Así,
el operador debe estar preparado para controlar el
TIRÓN al cortar por el borde inferior de la barra guía,
y el EMPUJÓN al cortar por el borde superior de dicha
barra. Vea la figura 4.
EXPLICACIÓN DE LOS DISPOSITIVOS DE
SEGURIDAD DE LA MOTOSIERRA
PROTECCIÓN SAFE-T-TIP® DE LA PUNTA
La protección SAFE-T-TIP® evita el contragolpe ya
que cubre la punta de la barra, donde se genera el
contragolpe. Nunca intente ninguna tarea de corte
para la cual tuviera que desmontar la protección
SAFE-T-TIP® de la punta de la barra.
CADENA DE SIERRA DE CONTRAGOLPE
MODERADO
Los dientes limpiadores (calibres de profundidad)
situados delante de cada diente de corte pueden reducir
al mínimo la fuerza de la reacción de contragolpe al
evitar que los dientes de corte se introduzcan demasiado
profundamente en la zona de contragolpe. Sólo use una
cadena de repuesto que equivalga a la cadena original
o que esté certificada como cadena de contragolpe
moderado según la norma ANSI B175.1.
La cadena de contragolpe moderado es una cadena que
satisface los requisitos relativos al nivel de contragolpe
estipulados en la norma ANSI B175.1 - 1991 (Norma
Nacional Americana para Herramientas Motorizadas
- Requisitos de Seguridad para Sierras de Cadena de
Gasolina) al probarse en una muestra representativa
de las sierras de cadena abajo del nivel 3.8 c.i.d.
especificado en la norma ANSI B175.1 - 1991.
A medida que las cadenas de sierra se afilan durante su vida
de servicio, pierden algo de su capacidad de disminución
del contragolpe y debe tenerse mayor precaución.
BARRAS GUÍA
En general, las barras guía con puntas de radio pequeño
tienen una capacidad de disminución del contragolpe
un poco menor.
Al efectuar un remplazo, asegúrese de pedir una
de las barras Ryobi indicadas para su sierra en
particular en este manual del operador. En la
punta de la barra viene montada la protección
SAFE-T-TIP® del tamaño adecuado. Sólo utilice
barras guía que permitan montarles la protección
SAFE-T-TIP®.
GUARDE ESTAS INSTRUCCIONES
9 - Español
Page 72

SÍMBOLOS
Las siguientes palabras de señalización y sus significados tienen el objeto de explicar los niveles de riesgo
relacionados con este producto.
SÍMBOLO SEÑAL SIGNIFICADO
PELIGRO:
ADVERTENCIA:
PRECAUCIÓN:
Indica una situación peligrosa inminente, la cual, si no se evita,
causará la muerte o lesiones serias.
Indica una situación peligrosa posible, la cual, si no se evita, podría
causar la muerte o lesiones serias.
Indica una situación peligrosa posible, la cual, si no se evita, podría
causar lesiones menores o leves.
(Sin el símbolo de alerta de seguridad) Indica información importante no
AVISO:
Es posible que se empleen en este producto algunos de los siguientes símbolos. Le suplicamos estudiarlos
y aprender su significado. Una correcta interpretación de estos símbolos le permitirá utilizar mejor y de
manera más segura la producto.
SÍMBOLO NOMBRE DENOMINACIÓN / EXPLICACIÓN
Alerta de seguridad Indica un peligro posible de lesiones personales.
Lea el manual del
operador
Póngase protección para
los ojos y la cabeza
relacionada con ningún peligro de lesiones, como una situación que puede
ocasionar daños físicos.
Para reducir el riesgo de lesiones, el usuario debe leer y
comprender el manual del operador antes de usar este
producto.
Siempre póngase protección para los ojos con la marca de
cumplimiento de la norma ANSI Z87.1, así como protección
la cabeza.
Protección SAFE-T-TIP®
de la punta
Alerta de condiciones
húmedas
Use las dos manos Sujete y opere la sierra debidamente con ambas manos.
Con una mano No maneje la motosierra con una sola mano.
La protección SAFE-T-TIP® de la punta de la barra guía
ayuda a evitar un contragolpe de la sierra.
Do not expose to rain or use in damp locations.
10 - Español
Page 73

SÍMBOLOS
Es posible que se empleen en este producto algunos de los siguientes símbolos. Le suplicamos estudiarlos
y aprender su significado. Una correcta interpretación de estos símbolos le permitirá utilizar mejor y de
manera más segura la producto.
SÍMBOLO NOMBRE DENOMINACIÓN / EXPLICACIÓN
Contragolpe ¡PELIGRO! ESTÉ ALERTA DE UN POSIBLE CONTRAGOLPE.
Contacto de la punta de la
barra con el material
Póngase guantes
Póngase calzado de
seguridad
Mantenga alejadas a
las personas presentes
Indicador del nivel de
aceite
Símbolos de reciclado
Evite el contacto del material con la punta de la barra.
Al manejar la motosierra póngase guantes protectores
antideslizantes de uso pesado.
Cuando utilice este equipo póngase zapatos de seguridad
antideslizantes.
Mantenga a todos los circunstantes y animales a una distancia
mínima de 15 metros (50 pies).
Vierta lubricante para la barra y la cadena en el tanque de
aceite en los momentos indicados. No utilizar para ningún
otro líquido.
Este producto contiene baterías iones de litio. Es
posible que algunas leyes municipales, estatales
o federales prohíban desechar las baterías de
níquel-cadmio en la basura normal. Consulte a las autoridades
reguladoras de desechos para obtener información en relación
con las alternativas de reciclado y desecho disponibles.
V
Voltios Voltaje
Corriente continua Tipo o característica de corriente
11 - Español
Page 74

GLOSARIO DE TÉRMINOS
Tronzado
Es el proceso de cortar transversalmente un árbol o
tronco talado en tramos.
Cabeza motriz de la motosierra
Es la motosierra sin la cadena de aserrar ni la barra
guía.
Rueda dentada de impulsión
Es la pieza dentada que impulsa la cadena de la sierra.
Tala
Es el proceso de cortar un árbol para derribarlo.
Corte trasero de tala
Es el corte final de la operación de tala de un árbol,
el cual se efectúa en el lado opuesto al del corte de
muescado.
Protector delantero de la mano
Es una barrera protectora estructural situada entre el
mango delantero de una motosierra y la barra guía,
normalmente localizada cerca de la posición de la
mano en el mango delantero.
Mango delantero
Es el mango de soporte situado en la parte frontal
de la motosierra, o en esa dirección. Este mango es
para la mano izquierda.
Barra guía
Es una estructura sólida con un riel, la cual sirve para
sostener y guiar la cadena de la sierra.
Contragolpe
Es el movimiento de la barra guía hacia atrás o hacia
arriba, o ambos, el cual ocurre cuando la cadena de
aserrar, cerca de la parte superior de la punta de la
barra guía, toca cualquier objeto como un tronco
o rama, o cuando la madera se cierra y pellizca la
cadena en la abertura del corte.
Contragolpe por pellizco
Es el rápido empuje de la sierra hacia atrás, el cual
puede ocurrir cuando la madera se cierra y pellizca
la cadena en movimiento en el corte a lo largo de la
parte superior de la barra guía.
Contragolpe rotatorio
Es el movimiento rápido de la sierra hacia arriba y
hacia atrás, el cual puede ocurrir cuando la cadena
en movimiento, cerca de la parte superior de la punta
de la barra guía, toca un objeto como un tronco o
una rama.
Seguro de apagado del interruptor
Es un seguro movible que si no se acciona
manualmente, impide una opresión involuntaria del
interruptor.
Cadena de contragolpe moderado
Es una cadena que cumple con los requisitos relativos
al nivel de contragolpe estipulados en la norma ANSI
B175.1 al probarse en una muestra representativa
de las sierras de cadena.
Posición normal de corte
Son aquellas posiciones adoptadas para efectuar
los cortes de tronzado y de tala de árboles.
Corte de muescado
Es un corte en forma de muesca efectuado para
dirigir la caída del árbol.
Mango trasero
Es el mango de soporte situado en la parte trasera
de la motosierra, o en esa dirección. Es donde
normalmente está alojado el gatillo del interruptor.
Este mango es para la mano derecha.
Barra guía de contragolpe reducido
Es una barra guía la cual se ha demostrado que
reduce el contragolpe de manera notable.
Cadena de repuesto de la sierra
Es una cadena que cumple con los requisitos
relativos al nivel de contragolpe estipulados en la
norma ANSI B175.1 al probarse con ciertas sierras
de cadena en particular. Es posible que no cumpla
con los requisitos de desempeño de la norma ANSI
al emplearse con otras sierras.
Protección SAFE-T-TIP® de la punta
Es un accesorio que puede suministrarse montado
en el extremo de la barra guía, y cuyo objetivo es
evitar que la cadena toque la madera en el extremo
de la barra guía.
Cadena de aserrado
Es una cadena en forma de collar, con dientes de
corte para cortar madera, la cual es impulsada por
un motor y está soportada por la barra guía.
Pértiga
Es un árbol pequeño (un árbol joven) o rama que
está doblado o atrapado bajo tensión. Puede saltar
hacia atrás rápidamente al cortarse, causando así
una situación peligrosa.
Gatillo del interruptor
Es un dispositivo que al accionarse abre o cierra
el circuito de la corriente eléctrica del motor de la
motosierra.
12 - Español
Page 75

CARACTERÍSTICAS
ESPECIFICACIONES DEL PRODUCTO
Motor .............................................................................................................................................. 40 voltios C.C.
Longitud de la barra ...............................................................................................................304,8 mm (12 pulg.)
Capacidad de corte ..................................................................................................................228,6 mm (9 pulg.)
Tala de árboles pequeños con un diámetro hasta de ..............................................................177,8 mm (7 pulg.)
Capacidad del tanque de aceite de la cadena ..................................................................................150 ml (5 oz)
NOTA: Esta sierra fue diseñada para uso ligero ocasional, y tiene algunas limitaciones en cuanto a lo que puede
cortar.
PROTECCIÓN
DELANTERA
DE LA MANO
PAQUETE DE
BATERÍAS
MANGO
POSTERIOR
SAFE-T-TIP©
GATILLO DEL
INTERRUPTOR
CUBIERTA DE
LA CADENA
DE LA COBERTURA
PERILLA DE
TENSADO DE LA
CADENA
BARRA
GUÍA
CADENA DE
CONTROGOLPE
MODERADO
PERILLA DE
FIJACIÓN
DE LA CADENA
MANGO
DELANTERO
PAQUETE DE
BATERÍAS
FUNDA
TAPA DEL
TANQUE DEL
ACEITE DE LA
CADENA
INDICADOR DE
NIVEL DE ACEITE
13 - Español
BOTÓN DE
SEGURO
Fig. 5
Page 76

CARACTERÍSTICAS
FAMILIARÍCESE CON LA MOTOSIERRA
Vea la figura 5.
Para usar este producto con la debida seguridad
se debe comprender la información indicada en
la herramienta misma y en este manual, y se debe
comprender también el trabajo que intenta realizar.
Antes de usar este producto, familiarícese con todas
las características de funcionamiento y normas de
seguridad del mismo.
PERILLA DE TENSADO DE LA CADENA
Esta pieza permite ajustar la tensión de la cadena.
BARRA GUÍA
La barra guía instalada en la fábrica dispone de una
punta de radio pequeño, la cual ofrece una capacidad
de disminución del contragolpe un poco menor.
CADENA DE SIERRA DE CONTRAGOLPE
MODERADO
La cadena de contragolpe moderado de la sierra
reduce al mínimo la fuerza de la reacción de
contragolpe al evitar que los dientes de corte se
introduzcan demasiado profundamente en la zona
de contragolpe.
INDICADOR DE NIVEL DE ACEITE
Es un tanque semitransparente de aceite que permite
ver cuándo reabastecerlo de aceite.
PROTECCIÓN ANTICONTRAGOLPE
SAFE-T-TIP® DE LA PUNTA
La punta anticontragolpe SAFE-T-TIP® de la punta
es un aditamento montado en el extremo de la barra
guía cuyo objeto es evitar que la parte de la cadena
situada en el extremo de la barra guía toque la madera.
BOTÓN DE SEGURO
Es una característica de control cuyo fin es evitar un
arranque accidental del motor.
GATILLO DEL INTERRUPTOR
Para accionar la unidad después de ponerse el seguro
de apagado del interruptor, oprima el gatillo. Para
detener la unidad, suelte el gatillo.
ARMADO
DESEMPAQUETADO
Embarcamos este producto completamente armado.
Extraiga cuidadosamente de la caja el producto y
los accesorios. Asegúrese de que estén presentes
todos los artículos enumerados en la lista de
empaquetado.
ADVERTENCIA:
No utilice este producto si alguna pieza incluida
en la lista de empaquetado ya está ensamblada al
producto cuando lo desempaqueta. El fabricante
no ensambla las piezas de esta lista en el producto.
Éstas deben ser instaladas por el usuario. El uso
de un producto que puede haber sido ensamblado
de forma inadecuada podría causar lesiones
personales graves.
Inspeccione cuidadosamente el producto para
asegurarse de que no haya sufrido ninguna rotura
o daño durante el transporte.
No deseche el material de empaquetado hasta que
haya inspeccionado cuidadosamente el producto y
la haya utilizado satisfactoriamente.
Si hay piezas dañadas o faltantes, le suplicamos
llamar al 1-800-860-4050, donde le brindaremos
asistencia.
LISTA DE EMPAQUETADO
Motosierra con funda
Lubricante para barra y cadena
Manual del operador
ADVERTENCIA:
Si falta o está dañada alguna pieza, no utilice este
producto sin haber reemplazado la pieza. Usar este
producto con partes dañadas o faltantes puede
causar lesiones serias al operador.
14 - Español
Page 77

ARMADO
ADVERTENCIA:
No intente modificar este producto ni hacer
accesorios no recomendados para la misma.
Cualquier alteración o modificación constituye
maltrato, el cual puede causar una condición
peligrosa, y como consecuencia posibles lesiones
corporales serias.
FUNCIONAMIENTO
DANGER:
Nunca couper cerca de líneas de corriente,
cordón eléctrico o de otras fuentes eléctricas. Si
mermeladas de barra y cadena en alguna cordón
del eléctrica o líneas, ¡No toque la barra ni la
cadena! PUEDE CARGARSE DE ELECTRICIDAD
Y SER MUY PELIGROSA. Continúe sujetando
las motosierra por el mango trasero, el cual está
aislado, o déjela reposar lejos de usted, de alguna
forma segura. Desconecte el servicio de corriente
eléctrica conectado a la línea o cordón dañado
antes de intentar liberar de éste(a) la hoja. Contacte
con la barra, la cadena, otras partes conductivas
de la motosierra, o viven cordón eléctrico o
líneas eléctricas puede producir la muerte por
electrocución, una descarga eléctrica o lesiones
serias.
ADVERTENCIA:
No permita que su familarización con este producto
lo vuelva descuidado. Tenga presente que un
descuido de un instante es suficiente para causar
una lesión grave.
ADVERTENCIA:
Siempre póngase protección para los ojos con la
marca de cumplimiento de la norma ANSI Z87.1,
así como protección la cabeza. Si no cumple esta
advertencia, los objetos que salen despedidos
pueden producirle lesiones serias en los ojos.
ADVERTENCIA:
Para evitar un arranque accidental que podría causar
lesiones corporales graves, siempre desconecte el
cable de la bujía del motor de la bujía misma al
ensamblar las piezas.
ADVERTENCIA:
No utilice ningún aditamento o accesorio no
recomendado por el fabricante de este producto.
El empleo de aditamentos o accesorios no
recomendandos podría causar lesiones serias.
Antes de cada uso, inspeccione todo el producto para
detectar partes dañadas, faltantes o sueltas, como
tornillos, tuercas, pernos, tapas, etc. Apriete firmemente
todos los sujetadores y las tapas y no accione este
producto hasta que todas las partes faltantes o
dañadas sean reemplazadas. Llame al 1-800-860-4050
o comuníquese con un centro de servicio autorizado
para recibir asistencia.
APLICACIONES
Este producto puede emplearse para los fines
siguientes:
Desramado y poda de árboles
Tala de árboles pequeños con un diámetro hasta de
177,8 mm (7 pulg.)
Tronzado del árbol talado en tramos más cortos
Este producto admite paquetes de baterías de iones
de litio Ryobi de 40 V.
Para conocer todas las instrucciones de carga, consulte
el Manual del operador correspondiente a su modelo
de paquete de baterías y cargador.
15 - Español
Page 78

FUNCIONAMIENTO
PARA DESMONTAR Y MONTAR EL
PAQUETE DE BATERÍAS
Vea la figura 6.
ADVERTENCIA:
Retire siempre el paquete de baterías de la
herramienta antes de instalar las piezas, realizar
ajustes. limpiarla o cuando no la utilice. Retirar el
paquete de baterías evitará que la unidad se accione
accidentalmente y provoque lesiones graves.
NOTA: Para evitar lesiones corporales serias, siempre
desmonte de la herramienta el paquete de baterías y
mantenga manos vacían del botón del seguro al llevar
herramiento.
Para conectar:
Coloque el paquete de baterías en la motosierra. Alinee
la costilla realzada del paquete de baterías con la ranura
interior del receptáculo para baterías de la motosierra.
AVISO:
Al colocar el paquete de baterías en la motosierra,
asegúrese de que la costilla realzada del mismo
quede alineada con la ranura interior del receptáculo
para baterías de la sierra, y de que los pestillos entren
adecuadamente en su lugar con un chasquido. Si
no se monta debidamente el paquete de baterías
pueden dañarse los componentes internos.
Asegúrese de que la traba de la parte inferior del
paquete de baterías quede insertada en su lugar y de
que el paquete de baterías esté firme en la motosierra
antes de poner la máquina en funcionamiento.
ADVERTENCIA:
Asegúrese de que el pestillo en la parte inferior
del paquete de baterías entre adecuadamente en
su lugar y que el paquete de baterías esté bien
colocado y asegurado en el puerto de batería de la
podadora de setos antes de que encenderla. Una
falla en colocar el paquete de baterías de forma
segura puede causar que el paquete de baterías
se desprenda y termine provocando lesiones
corporales serias.
Para el desmontaje:
Localice la traba de la parte inferior del paquete de
baterías y presione ambos laterales para soltar el
paquete de baterías de la motosierra.
RECEPTÁCULO
DE LAS
BATERÍAS
PAQUETE DE
BATERÍAS
PESTILLO
Fig. 6
Fig. 7
AVISO:
Retire el paquete de baterías de la unidad. Llene el
tanque de aceite con lubricante Ryobi para la barra
y la cadena antes de arrancar la motosierra. Si no
se lubrica la cadena pueden causarse daños a la
barra y a la cadena.
SISTEMA LUBRICACIÓN DE LA CADENA
Vea la figura 7.
Use aceite Ryobi para barra y cadena. Está
formulado para desempeñarse en una amplia gama
de temperaturas sin requerir diluirse.
NOTA: No use aceite sucio, usado o contaminado de
ninguna forma. Puede dañarse la barra o la cadena.
Cuidadosamente vierta el aceite para la barra y la
cadena en el tanque correspondiente.
Check and fill the oil tank when battery is recharged,
or as needed.
NOTA: Es normal que el aceite se escurra de la sierra
cuando no está ésta en uso. Para evitar el escurrimiento,
vacíe el tanque de aceite cada vez después de usar la
unidad. Al guardar la unidad durante un largo período
de tiempo (tres meses o más), asegúrese de lubricar
ligeramente la cadena; de esta manera se evita la
oxidación de la cadena y de la rueda dentada de la barra.
16 - Español
Page 79

FUNCIONAMIENTO
ENCENDIDO Y APAGADO DE LA
MOTOSIERRA
Vea la figura 8.
ADVERTENCIA:
Mantenga el cuerpo a la izquierda del plano de la
cadena. Nunca se coloque a horcajadas por encima
de la sierra o de la cadena, ni incline el cuerpo a
través del plano de la cadena.
Encendido de la motosierra:
Coloque la motosierra en una superficie plana
descubierta, y asegúrese de que no haya objetos
ni obstrucciones en el área inmediata que puedan
tocar la barra o la cadena.
Oprima y no suelte el botón de seguro del gatillo.
Con esto se vuelve capaz de funcionar el gatillo del
interruptor.
Oprima y no suelte el gatillo del interruptor, suelte
el botón de seguro del gatillo y continúe oprimiendo
el gatillo del interruptor para continuar operando la
unidad.
Apagado de la motosierra:
Suelte el gatillo del interruptor cuando desee apagar
la motosierra.
Al soltar el gatillo del interruptor, el botón de seguro
del gatillo regresa automáticamente a la posición de
inmovilización de este último.
Esta motosierra inalámbrica no está diseñada para
cortar árboles de diámetro superior a 177,8 mm (7 pulg.).
Esta sierra inalámbrica de cadena está diseñada para
corte de desramado y poda, así como para talar árboles
de diámetro inferior a 177,8 mm (7 pulg.).
No intente efectuar ningún tipo de corte que requiera
desmontar la protección SAFE-T-TIP®.
PREPARACIÓN PARA EL CORTE
BOTÓN DE
SEGURO
GATILLO DEL
INTERRUPTOR
GATILLO DEL
INTERRUPTOR
BOTÓN DE
SEGURO
Fig. 8
SUJECIÓN CORRECTA DE LOS MANGOS
Vea las figuras 9 a 11.
Con respecto al equipo de seguridad adecuado,
consulte la sección ADVERTENCIAS DE SEGURIDAD
PARA HERRAMIENTAS ELÉCTRICAS más arriba en
este manual.
Póngase guantes antideslizantes para lograr una
capacidad de sujeción y protección máximas.
Sujete la sierra firmemente con ambas manos.
Siempre mantenga la mano izquierda en el mango
delantero y la mano derecha en el mango trasero,
de manera que su cuerpo quede a la izquierda del
plano de la cadena.
17 - Español
Fig. 9
Page 80

FUNCIONAMIENTO
ADVERTENCIA:
Nunca use sujete la unidad a zurdas (con la posición
de las manos intercambiada), ni con el cuerpo en
ninguna postura que pueda colocar el mismo o el
brazo a través del plano de la cadena.
Mantenga una sujeción adecuada de la sierra
siempre que esté funcionando el motor. Los dedos
deben rodear el mango, con el pulgar doblado
bajo la barra del mismo. Esta forma de sujeción
es la que tiene menor probabilidad de fallar (por
un contragolpe o cualquier otra reacción súbita de
la sierra). Cualquier forma de sujeción en la cual
el pulgar y los dedos restantes están en el mismo
lado del mango es peligrosa, debido a que incluso
un contragolpe leve de la sierra puede originar la
pérdida del control.
Fig. 10
ADVERTENCIA:
No accione el gatillo del interruptor con la mano
izquierda, sujetando el mango delantero con la
mano derecha. Nunca permita que ninguna parte
del cuerpo cruce el plano de la cadena mientras
esté funcionando la sierra.
POSTURA CORRECTA PARA EL CORTE
Vea las figuras 12 a 13.
ADVERTENCIA:
Siempre utilice la postura de corte correcta que se
describe en esta sección. Nunca se arrodille cuando
utilice la motosierra, salvo cuando tale un árbol
según se ilustra en la Figura 13. Si se arrodilla podría
perder la estabilidad y el control de la motosierra, y
eso podría derivar en lesiones personales graves.
El peso debe quedar distribuido de forma equilibrada
con ambos pies en suelo firme.
Mantenga el brazo izquierdo con el codo rígido en
posición de “brazo recto” para poder tolerar la fuerza
de cualquier contragolpe.
Su cuerpo debe estar siempre a la izquierda del
plano de la cadena.
Mantenga el pulgar bajo la barra del mango.
PLANO DE LA CADENA
EL BRAZO
RECTO
Fig. 11
POSICIÓN CON EL
BRAZO RECTO
Fig. 12
PROCEDIMIENTO BÁSICO DE CORTE
Practique cortando unos pocos troncos pequeños
aplicando la siguiente técnica para acostumbrarse al
manejo de la sierra antes de comenzar una tarea de
corte de mayores proporciones.
18 - Español
Fig. 13
Page 81

FUNCIONAMIENTO
45°
45°
Adopte una postura correcta del cuerpo frente a la
madera, con la sierra apagada.
Oprima el gatillo del interruptor y permita a la cadena
acelerarse a plena velocidad antes de iniciar el corte.
Inicie el corte poniendo la sierra contra el tronco.
Mantenga encendida la unidad todo el tiempo que
esté cortando; mantenga una velocidad uniforme.
Permita que la cadena efectúe el corte; sólo aplique
una leve presión hacia abajo. Si fuerza el corte,
puede dañarse la barra, la cadena o la unidad.
Suelte el gatillo del interruptor tan pronto como
termine el corte, permitiendo así detenerse a la
cadena. Si acciona la sierra a la aceleración máxima
cortando en vacío, puede ocurrir un desgaste
innecesario de la cadena, de la barra y de la unidad.
No aplique presión en la sierra al final del corte.
PRECAUCIONES EN EL ÁREA DE TRABAJO
Vea la figura 7.
Sólo corte madera o materiales hechos de madera;
no corte lámina metálica, plásticos, obras de
albañilería ni materiales de construcción que no
sean de madera.
Nunca permita utilizar la sierra a ningún niño. No
permita utilizar la sierra a ninguna persona que
no haya leído este manual del operador o no haya
recibido instrucciones adecuadas sobre la forma
correcta de emplear esta motosierra.
Al talar un árbol, mantenga a todas las personas,
ayudantes, circunstantes, niños y animales a una
distancia segura del área de corte. Durante las
operaciones de tala de árboles, una distancia
segura es por lo menos el doble de la altura de los
árboles más altos presentes en el área de la tala.
Durante las tareas de tronzado (corte en tramos
más pequeños), mantenga una distancia mínima de
15 pies (4,5 metros) entre los trabajadores. Debe
evitarse cortar los árboles de una manera que
pudieran poner en peligro a cualquier persona,
golpear las líneas de servicios públicos o causar
cualquier daño material. Si el árbol golpea cualquier
red de servicio público, la compañía correspondiente
debe ser notificada de inmediato.
Siempre corte con ambos pies bien apoyados en
suelo sólido para evitar perder el equilibrio.
No corte arriba de la altura del pecho, ya que si se
tiene la sierra más arriba de esa altura, es difícil de
controlar bajo la fuerza del contragolpe.
No corte árboles cerca de cables eléctricos o de
edificios. Deje tal operación a los profesionales.
Corte solamente cuando al visibiliad y la luz sean
adecuadas para ver claramente.
LÍNEA
PLANEADA
DE CAÍDA
Fig. 14
TALA DE ÁRBOLES
Vea las figuras 14 a 17.
CONDICIONES PELIGROSAS
ADVERTENCIA:
No tale árboles durante períodos de viento o lluvia
intensos. Espere hasta que cese el tiempo peligroso.
ADVERTENCIA:
Controle con cuidado que no haya ramas rotas o
muertas que puedan caer mientras tala, y no tale
cerca de edificios o cables eléctricos si no sabe en
qué dirección caerá el árbol. No tale de noche o con
malas condiciones climáticas como lluvia, nieve o
fuertes vientos, porque tendrá menor visibilidad y
menor control de la motosierra. Si el árbol que está
talando cae sobre una línea de transmisión de algún
servicio, deje de usar la motosierra y notifique de
inmediato a la compañía de servicios. No seguir
estas instrucciones podría causar la muerte o
lesiones personales graves.
Al talar un árbol, es importante siga las siguientes
advertencias y instrucciones para evitar toda posible
lesión seria.
19 - Español
Page 82

FUNCIONAMIENTO
■No corte árboles extremadamente delgados ni
árboles grandes con ramas podridas, corteza suelta
o troncos huecos. Permita que expertos derriben
estos árboles con equipo pesado de empuje o
arrastre, y después recórtelos.
■No corte árboles cerca de cables eléctricos o de
edificios.
■Revise cada árbol para ver si tiene ramas muertas
que pudiesen caer y golpearlo al talar aquél.
■Periódicamente eche un vistazo a la copa del árbol
durante el corte trasero, para asegurarse de que
caiga en la dirección deseada.
Si el árbol comienza a caer en una dirección
equivocada, o si la sierra se pellizca o queda colgada
en el tronco durante la caída del árbol, ¡deje la sierra
y sálvese!
Tala de árboles - Cuando las tareas de tronzado
(corte en tramos más pequeños) y de tala de árboles
son efectuadas por dos o más personas al mismo
tiempo, la operación de tronzado de un árbol
previamente talado debe separarse de la de la tala
del árbol siguiente por una distancia igual al doble
de la altura del árbol que esté talándose en ese
momento. Debe evitarse cortar los árboles de una
manera que pudieran poner en peligro a cualquier
persona, golpear las líneas de servicios públicos o
causar cualquier daño material. Si el árbol golpea
cualquier red de servicio público, la compañía
correspondiente debe ser notificada de inmediato.
Antes de iniciar cualquier corte, escoja su ruta de
escape (o rutas, en caso de que esté bloqueada la
ruta planeada); despeje el área inmediata alrededor
del árbol y asegúrese de que no haya obstrucciones
en la trayectoria de retirada planeada. Despeje una
trayectoria de retirada segura aproximadamente
a 135º de la línea planeada de caída del árbol. La
trayectoria de retirada debe extenderse hacia atrás
de usted, diagonalmente en dirección opuesta a la
línea de caída esperada del árbol. Vea la figura 14.
Antes de iniciar la tala del árbol, considere la fuerza
y la dirección del viento, la inclinación y el equilibrio
del árbol, y por último la ubicación de las ramas
más grandes del mismo. Estos aspectos influyen
en la dirección de caída del árbol. No trate de talar
ningún árbol a lo largo de una línea diferente de su
línea natural de caída.
El operador de la motosierra debe permanecer en el
lado colina arriba del terreno, ya que probablemente
el árbol rodará o se deslizará colina abajo una vez
talado.
BISAGRA 51 mm (2 pulg.)
CORTE TRASERO
51 mm (2 pulg.)
CORTE TRASERO
BISAGRA
CUÑA
CONTRAGOLPE
Ó 1/10 DEL DIÁM.
MUESCA -
APROX. 1/3 DEL
DIÁMETRO DEL
TRONCO
Fig. 15
MUESCA
Fig. 16
Fig. 17
Fig. 18
20 - Español
Page 83

FUNCIONAMIENTO
Retire la tierra, piedras, corteza floja, clavos, grapas
y alambre del árbol, donde se vayan a efectuar los
cortes de tala.
Corte de muescado. Corte una muesca de
1/3 del diámetro del tronco aproximadamente,
perpendicular a la dirección de la caída. Efectúe
los cortes de la muesca de manera que queden
cruzando en ángulo recto el plano de caída. Esta
muesca debe limpiarse para dejar una línea recta.
Para mantener el peso de la madera fuera de la
sierra, siempre efectúe el corte inferior de la muesca
antes del corte superior. Vea la figura 15.
Corte trasero de tala. El corte trasero siempre
se realiza nivelado y horizontal, y a un mínimo
de 51 mm (2 pulg.) arriba del corte horizontal de la
muesca. Vea las figuras 15 y 16.
Nunca corte hasta la muesca. Siempre deje una
franja de madera entre la muesca y el corte trasero
(aprox. 51 mm [2 pulg.] ó 1/10 del diámetro del árbol).
Esto se llama “bisagra” o “madera de bisagra”.
Controla la caída del árbol y evita el deslizamiento,
el torcimiento o la separación violenta del árbol de
su cepa. Vea las figuras 15 y 16.
En árboles de diámetro grande, detenga el corte
trasero antes de que esté tan profundo que el árbol
pudiese caer o asentarse en la cepa. Después
introduzca cuñas de madera o plástico suaves en
el corte, de manera que no toquen la cadena. Las
cuñas pueden encajarse, poco a poco, para ayudar
a derribar el árbol. Vea la figura 17.
NOTA: Al tronzar o talar un árbol con una cuña,
puede ser necesario desmontar la protección
anticontragolpe SAFE-T-TIP® de la punta para
permitir pasar la barra por todo el corte. Después
de terminar el corte, debe volver a montarse de
inmediato la protección de la punta.
A medida que comience a caer el árbol, apague la
motosierra y deposítela en el suelo de inmediato.
Retírese por la trayectoria despejada, pero observe
lo que sucede por si algo llega a caer en su camino.
Permanezca alerta a las ramas elevadas que puedan
caer y fíjese en dónde pisa.
TRONCO APOYADO POR UN EXTREMO :
CARGA
CORTE FINAL
TRONCO APOYADO POR AMBOS EXTREMOS :
CARGA
PRIMER CORTE,
1/3 DEL DIÁM.
CORTE FINAL
TRONZADO POR ARRIBA
TRONZADO POR ABAJO
Fig. 19
PRIMER CORTE,
1/3 DEL DIÁM.
Fig. 20
ADVERTENCIA:
Nunca corte hasta la muesca al efectuar el corte
trasero. La bisagra, que es la parte de madera
existente entre la muesca y el corte trasero, controla
la caída del árbol.
21 - Español
Fig. 21
Page 84

FUNCIONAMIENTO
TRONZADO
Vea las figuras 18 a 21.
Tronzado es el término aplicado al corte del tronco
de un árbol talado, en tramos de la longitud deseada.
Siempre asegúrese de mantener una postura firme y de
distribuir su peso de forma equilibrada en ambos pies.
Solamente corte un tronco a la vez.
Apoye los troncos pequeños en un caballete de
aserrar o en otro tronco mientras lo tronza.
Mantenga despejada el área del corte. Asegúrese de
que ningún objeto pueda tocar la punta de la barra
guía ni la cadena durante el corte, ya que puede
originarse un contragolpe. Para evitar tal peligro,
mantenga montada la protección anticontragolpe
SAFE-T-TIP® mientras efectúa el corte. Consulte
el apartado Medidas de precaución para el
contragolpe, más arriba en este manual.
Al efectuar tareas de tronzado en una pendiente,
siempre párese en el lado colina arriba de los troncos.
Para mantener un control completo de la motosierra
al cortar a través del tronco, afloje la presión de
corte cerca del final del corte sin disminuir la fuerza
de sujeción de los mangos de la sierra. No permita
que la cadena toque el suelo. Después de terminar
el corte, espere a que se detenga la cadena antes
de mover la motosierra. Siempre apague el motor
antes de desplazarse de un árbol a otro.
Algunas veces es imposible evitar el pellizcamiento
(sólo con las técnicas de corte estándar) o es difícil
predecir en qué dirección irá a asentarse un tronco al
cortarse. Para evitar un pellizcamiento de la cadena
al cortar, gire o mueva el tronco de manera que se
elimine el pellizco.
TRONZADO DE TRONCOS BAJO TENSIÓN
Vea las figuras 20 y 21.
Cuando el tronco está sostenido a lo largo de toda su
longitud, debe cortarse a partir de la parte superior, o
sea tronzado por arriba.
Cuando el tronco está sostenido por un extremo, corte
1/3 del diámetro a partir de la parte inferior, o sea
tronzado por abajo. Después realice el corte final con
un tronzado por arriba hasta encontrar el primer corte.
A medida que se corta el tronco, tenderá a doblarse.
La sierra puede resultar pellizcada o quedar colgada en
el tronco si efectúa el primer corte a una profundidad
mayor de 1/3 del diámetro del tronco.
Preste atención en especial a los troncos sujetos a
tensión para evitar el pellizcamiento de la barra y de
la cadena en la madera.
Al efectuar tareas de tronzado en una pendiente,
siempre párese en el lado colina arriba de los troncos,
como se muestra en la figura 18. Al cortar “a través
del tronco”, para mantener un control completo de la
motosierra, afloje la presión de corte cerca del final del
corte sin disminuir la fuerza de sujeción de los mangos
de la sierra. No permita que la cadena toque el suelo.
Después de terminar el corte, espere a que se detenga
la cadena antes de mover la motosierra. Siempre apague
el motor antes de desplazarse de un árbol a otro.
TIPOS DE CORTE EFECTUADOS
Vea la figura 21.
TRONZADO POR ARRIBA
Comience por el lado superior del tronco, con la parte
inferior de la sierra puesta contra el tronco; ejerza una
presión leve hacia abajo. Observe que la sierra tenderá
a alejarse de usted.
TRONZADO POR ABAJO
Comience por el lado inferior del tronco, con la parte
superior de la sierra puesta contra el tronco; ejerza una
presión leve hacia arriba. Durante el tronzado por abajo,
la sierra tenderá a venirse hacia usted. Esté preparado
para esta reacción y sujete firmemente la sierra para
conservar el control de la misma.
ADVERTENCIA:
Nunca se suba a un árbol para desramarlo o
podarlo. No se pare en escaleras, plataformas,
tejado o troncos, ni en ninguna posición que pueda
causarle la pérdida del equilibrio o del control de
la sierra.
DESRAMADO
Vea la figura 22.
El desramado es la eliminación de las ramas de un
árbol cortado.
Trabaje lentamente, manteniendo ambas manos
en la motosierra, sujetándola firmemente. Siempre
asegúrese de mantener una postura firme y de
distribuir su peso de forma equilibrada en ambos
pies.
Deje las ramas de soporte más grandes bajo el
árbol para mantenerlo separado del suelo mientras
efectúa los cortes.
Solamente corte una rama a la vez. Retire las ramas
cortadas del área de trabajo con frecuencia para
mantener el área de trabajo limpia y segura.
22 - Español
Page 85

3
FUNCIONAMIENTO
Las ramas bajo tensión deben cortarse de abajo
hacia arriba para evitar el atoramiento de la
motosierra.
Mantenga el árbol entre usted y la motosierra
mientras realice el desramado. Corte desde el lado
del árbol que quede opuesto a la rama que esté
cortando.
2
1
4
PODA
Vea la figura 23.
La poda es el recorte de las ramas de un árbol vivo.
Trabaje lentamente, manteniendo ambas manos
en la motosierra, sujetándola firmemente. Siempre
asegúrese de mantener una postura firme y de
distribuir su peso de forma equilibrada en ambos
pies.
No realice tareas de corte subido en una escalera,
ya que es extremadamente peligroso. Deje tal
operación a los profesionales.
No corte arriba de la altura del pecho, ya que si se
tiene la sierra más arriba de esa altura, es difícil de
controlar bajo la fuerza del contragolpe.
Al podar árboles es importante no realizar el corte
final de una rama, junto a la rama o tronco de donde
sale, sin haber recortado la primera para reducir
el peso de la misma. De esta manera se evita
desprender la corteza del miembro progenitor.
Para el primer corte de tronzado, corte por abajo la
rama 1/3 del diámetro de la misma.
El segundo corte de tronzado debe ser por arriba
para cortar completamente la rama.
Ahora efectúe el corte final, liso y bien hecho, contra
el miembro progenitor, de manera que se forme la
corteza para sellar el corte.
CORTE UNA RAMA A LA VEZ Y DEJE RAMAS DE SOPORTE
BAJO EL ÁRBOL HASTA QUE ESTÉ CORTADO EL TRONCO
Fig. 22
SEGUNDO
CARGA
PRIMER
CORTE 1/3 DEL
DIÁMETRO
CORTE FINAL
CORTE
Fig. 23
PÉRTIGA
Fig. 24
ADVERTENCIA:
Si las ramas por podar están arriba de la altura del
pecho, contrate a un experto para que efectúe la
poda. La inobservancia de esta advertencia puede
causar lesiones serias.
PÉRTIGAS
Vea la figura 24.
Una pértiga es cualquier tronco, rama, cepa enraizada
o árbol joven que ha sido doblado por la presión de
otro árbol o rama, de manera que azota si se corta
o se elimina el elemento que lo detiene. Con la cepa
23 - Español
enraizada de un árbol caído hay un gran peligro de
que la misma vuelva súbitamente a la posición vertical
durante el corte de tronzado para separar el tronco de
la cepa. Tenga cuidado con las pértigas, ya que son
peligrosas.
ADVERTENCIA:
Las pértigas son peligrosas y podrían golpear al
operador, obligándole a perder el control de la
motosierra. Esto podría causarle lesiones mortales
o serias al operador.
Page 86

MANTENIMIENTO
ADVERTENCIA:
Al dar servicio a la unidad, sólo utilice piezas de
repuesto idénticas. El empleo de piezas diferentes
puede causar un peligro o dañar el producto.
ADVERTENCIA:
Siempre póngase protección para los ojos con la
marca de cumplimiento de la norma ANSI Z87.1,
así como protección la cabeza. Si no cumple esta
advertencia, los objetos que salen despedidos
pueden producirle lesiones serias en los ojos.
ADVERTENCIA:
Para evitar lesiones corporales serias, siempre retire
el paquete de baterías de la herramienta al limpiarla
o darle mantenimiento.
MANTENIMIENTO GENERAL
Antes de cada uso, inspeccione todo el producto para
detectar partes dañadas, faltantes o sueltas, como
tornillos, tuercas, pernos, tapas, etc. Apriete firmemente
todos los sujetadores y las tapas y no accione este
producto hasta que todas las partes faltantes o
dañadas sean reemplazadas. Llame al 1-800-860-4050
o comuníquese con un centro de servicio autorizado
para recibir asistencia.
Evite el empleo de solventes al limpiar piezas de
plástico. La mayoría de los plásticos son susceptibles
a diferentes tipos de solventes comerciales y pueden
resultar dañados. Utilice paños limpios para eliminar
la suciedad, el polvo, el aceite, la grasa, etc.
REMOCIÓN Y PREPARACIÓN DEL PAQUETE
DE BATERÍAS PARA EL RECICLADO
ADVERTENCIA:
Al retirar el paquete de baterías, cubra las terminales
del mismo con cinta adhesiva reforzada. No
intente destruir o desarmar el paquete de baterías,
ni de desmontar ninguno de sus componentes.
Las baterías deben reciclarse o desecharse
debidamente. Asimismo, nunca toque ambas
terminales con objetos metálicos y partes del
cuerpo, ya que puede producirse un corto circuito.
Manténgase fuera del alcance de los niños. La
inobservancia de estas advertencias puede causar
incendios y lesiones corporales serias.
REEMPLAZO DE LA BARRA Y DE LA
CADENA
Vea las figuras 25 a 31.
ADVERTENCIA:
Retire el paquete de baterías y asegúrese de
que se haya detenido la cadena antes de realizar
cualquier labor de mantenimiento de la sierra. De
lo contrario la unidad puede ponerse en marcha
accidentalmente, con el consiguiente riesgo de
lesiones serias.
ADVERTENCIA:
Las instrucciones de seguridad contenidas en esta
sección tienen el objeto de proteger al operador de
lesiones corporales serias.
ADVERTENCIA:
No permita en ningún momento que fluidos para
frenos, gasolina, productos a base de petróleo,
aceites penetrantes, etc., lleguen a tocar las piezas
de plástico. Las sustancias químicas pueden dañar,
debilitar o destruir el plástico, lo cual a su vez puede
producir lesiones corporales serias.
Solamente las piezas mostradas en la lista de piezas
pueden ser reparadas o cambiadas por el consumidor.
Todas las piezas restantes deben ser reemplazadas en
un centro de servicio autorizado.
24 - Español
PRECAUCIÓN:
Siempre póngase guantes la manipular la barra y
la cadena; estos componentes han sido afilados y
pueden contener rebabas.
ADVERTENCIA:
Nunca toque ni ajuste la cadena mientras esté
funcionando el motor. La cadena de la sierra está
sumamente afilada; siempre póngase guantes
protectores al efectuar labores de mantenimiento de
la cadena para evitar posibles heridas desgarradas
serias.
Page 87

MANTENIMIENTO
NOTA: Al reemplazar la barra guía y la cadena, siempre
utilice la barra y la cadena especificadas en la sección
Combinaciones de barra y cadena, más adelante en
este manual.
Retire el paquete de baterías antes de realizar
cualquier trabajo en la motosierra.
Gire izquierdo la tapa del cadena de perilla de
bloqueo y retire perilla.
Retire la tapa de la cadena.
Retire la barra y la cadena de la superficie de
montaje.
Retire la cadena vieja de la barra.
Extienda la nueva cadena de la sierra en un círculo y
enderece todo retorcimiento presente en la misma.
Los dientes de corte deben estar orientados en
la dirección de desplazamiento de la cadena. Si
están orientados en la dirección opuesta, invierta
la posición de la cadena.
Coloque los eslabones de impulsión de la cadena
en la ranura de la barra.
NOTA: Verifique el sentido de desplazamiento de
la cadena.
Acomode la cadena de tal manera que haya una
holgura en la parte posterior de la barra.
Mantenga la cadena en su posición en la barra y
coloque la holgura alrededor de la rueda dentada.
Acomode la barra contra la superficie de montaje
de manera que los pernos de la barra queden en la
ranura larga de la misma.
ADVERTENCIA:
Cuando coloque la barra en los pernos de la barra,
asegúrese de que el pasador de tensado de la
cadena esté en su orificio. Si no coloca el pasador
de tensado de la cadena de forma adecuada en
su orificio, la cadena podría aflojarse y causarle
lesiones graves.
PERILLA DE
TENSADO DE LA
CADENA
DIENTES DE
SUPERFICIE DE
MONTAJE
BARRA
CUBIERTA DE
LA CADENA
CORTE
ESLABONES DE IMPULSIÓN
DE LA CADENA
AVANCE DE LA
TAPA DEL CADENA
DE PERILLA
DE BLOQUEO
Fig. 25
CADENA
TAPA DEL CADENA
DE PERILLA DE
BLOQUEO
Fig. 26
CADENA
25 - Español
Fig. 27
Page 88

MANTENIMIENTO
Vuelva a montar la tapa de la cadena.
Mantenga tapa del cadena de perilla de bloqueo; gire
a derecho la perilla apretar. La barra debe quedar
libre para moverse para el ajuste de la tensión.
Elimine toda la holgura de la cadena; para ello, gire
hacia la derecha el perilla de tensado de la cadena
hasta que ésta se siente ajustadamente en la barra,
con los eslabones de impulsión dentro de la ranura
de la misma.
Levante la punta de la barra guía para revisar la
holgura de la cadena.
Suelte la punta de la barra guía y gire 1/2 vuelta
hacia la derecha el perilla de tensado de la cadena.
Repita este proceso hasta que desaparezca toda
holgura presente.
Mantenga levantada la punta de la barra guía y
apriete firmemente la tapa del cadena de perilla de
bloqueo.
La cadena está bien tensada cuando no hay holgura de
la misma en la parte inferior de la barra guía, la cadena
se siente bien ajustada en la barra, y puede avanzarse
con la mano sin ningún atoramiento de aquélla.
NOTA: Si queda demasiado ajustada la cadena, no
podrá desplazarse. Afloje levemente tapa del cadena de
perilla de bloqueo y Gire el perilla tensor de la cadena
1/4 de vuelta hacia la izquierda. Levante la punta de
la barra guía a apretar firmemente la tapa del cadena
de perilla de bloqueo. Asegúrese de que la cadena se
desplace sin atorarse.
ESLABONES DE
IMPULSIÓN DE LA
CADENA
ORIFICIO DE LA
ESPIGA TENSORA
DE LA CADENA
RANURA DE
LA BARRA
MONTAJE DE LA
PERNOS DE
BARRA
PERILLA DE
DE LA COBERTURA
DE LA CADENA
ESPIGA TENSORA
DE LA CADENA
Fig. 28
COBERTURA
DE LA
CADENA
FIJACIÓN
Fig. 29
26 - Español
Page 89

MANTENIMIENTO
AJUSTE DE LA TENSIÓN DE LA CADENA
Vea las figuras 31 y 32.
ADVERTENCIA:
Nunca toque ni ajuste la cadena mientras esté
funcionando el motor. La cadena de la sierra está
sumamente afilada. Siempre lleve puestos guantes
protectores al efectuar labores de mantenimiento
de la cadena.
Retire el paquete de baterías antes de realizar
cualquier trabajo en la motosierra.
Afloje levemente tapa del cadena de perilla de
bloqueo.
Gire a la derecha el perilla de tensado de la cadena
para tensar ésta.
NOTA: La cadena, estando fría, está bien tensada
cuando no hay holgura de la misma en la parte
inferior de la barra guía, la cadena se siente bien
ajustada en la barra, y puede avanzarse con la mano
sin ningún atoramiento.
Gire a la derecho la tapa del cadena de perilla de
bloqueo para asegurar.
Vuelva a tensar la cadena cada vez que las partes
planas de los eslabones de impulsión sobresalen
suspendidos de la ranura de la barra.
NOTA: Durante el funcionamiento normal de la
sierra, aumenta la temperatura de la sierra. Si la
cadena está bien tensada, estando caliente los
eslabones de impulsión sobresalen suspendidos
de la ranura de la barra aproximadamente 1,25 mm
(0,050 pulg.).
NOTA: Las cadenas nuevas tienden a estirarse;
revise frecuentemente la tensión de la cadena y
tense ésta según se requiera.
LEVANTE LA
PUNTA DE LA
BARRA GUÍA
PARA REVISAR LA
HOLGURA DE LA
CADENA
PERILLA DE TENSADO
DE LA CADENA
Fig. 30
TAPA DEL CADENA
DE PERILLA
DE BLOQUEO
Fig. 31
AVISO:
Si se tensa la cadena estando ésta caliente, puede
quedar demasiado apretada al enfriarse. Revise
la “tensión en frío” de la cadena, antes de usar la
sierra.
27 - Español
≈ 1,25 mm (0,050 pulg.)
PARTES
PLANAS
Fig. 32
Page 90

MANTENIMIENTO
MANTENIMIENTO DE LA CADENA
Vea las figuras 33 y 35.
ADVERTENCIA:
Retire el paquete de baterías y asegúrese de que se
haya detenido la cadena antes de realizar cualquier
labor de mantenimiento de la sierra.
Sólo utilice cadena de contragolpe moderado con
esta sierra. Esta cadena de corte rápido proporciona
reducción del contragolpe si se le da debido
mantenimiento.
Para poder dar un corte liso y rápido, la cadena necesita
recibir un mantenimiento adecuado. La cadena requiere
afilarse cuando las virutas de madera salen pequeñas y
polvorientas, cuando la es necesario forzar la cadena a
pasar a través de la madera durante el corte, o cuando
la cadena corta hacia un lado. Durante el mantenimiento
de la sierra considere lo siguiente:
Un ángulo incorrecto de limado de la placa lateral
puede aumentar el riesgo de un contragolpe violento.
Espacio libre de los dientes limpiadores (calibres de
profundidad).
Demasiado bajo aumenta el peligro de contragolpe.
Si no está lo suficientemente bajo disminuye la
capacidad de corte.
Si los dientes de corte han tocado objetos duros
como clavos y piedras, o han sido desgastados por
el lodo o la arena presentes en la madera, permita
que afilen la cadena en un establecimiento de
servicio apropiado para la tarea.
NOTA: Al cambiar la cadena, inspeccione la rueda
dentada de impulsión para ver si tiene desgaste o daños.
Si hay señales de desgaste o daños presentes en las
áreas indicadas, lleve la sierra a un establecimiento
de servicio de productos Ryobi para que cambien la
rueda dentada.
ESPACIO LIBRE DE LOS DIENTES
LIMPIADORES 0.025 pulg. (0.6 mm)
REVISE PARA VER
SI HAY DESGASTE
O DAÑOS
PLACA
SUPERIOR
ORIFICIO DEL
REMACHE
TALÓN
Fig. 33
Fig. 34
ESQUINA DE
CORTE
PLACA
LATERAL
CALIBRE DE
PROFUNDIDAD
PUNTERA
GARGANTA
Fig. 35
28 - Español
Page 91

MANTENIMIENTO
FORMA DE AFILAR LOS DIENTES DE
CORTE
Vea las figuras 36 y 37.
Tenga cuidado de limar todos los dientes de corte a
los ángulos especificados y a la misma longitud, ya
que sólo puede lograrse un corte rápido cuando están
uniformes todos los dientes de corte.
Siempre póngase guantes para su protección.
Tense adecuadamente la cadena antes de afilarla.
Consulte el apartado Tensado de la cadena, más
arriba en este manual. Efectúe toda la limadura en
el punto medio de la barra.
Use una lima redonda de 5/32 pulg. de diámetro
con mango.
Mantenga la lima al nivel de la placa superior de los
dientes de corte. No permita que la lima se incline
ni se balancee.
Con presión leve pero firme, pase la lima por el
diente, hacia la esquina delantera del mismo.
Levante la lima para separarla del acero en cada
movimiento de regreso.
Dé unas pocas pasadas firmes a cada diente de
corte. Lime todos los dientes de corte izquierdos
en una dirección. Después lleve la lima al otro lado
y lime los dientes de corte derechos en la dirección
opuesta. Ocasionalmente, con un cepillo de alambre
limpie las limaduras producidas por la lima.
ADVERTENCIA:
DIENTES
DE CORTE
IZQUIERDOS
DIENTES DE
CORTE DERECHOS
ÁNGULO CORRECTO DE
LIMADURA DE LA PLACA
SUPERIOR
30°
Fig. 36
Fig. 37
ÁNGULO INCORRECTO DE
LIMADURA DE LA PLACA
SUPERIOR
MENOS
DE 30°
MÁS DE
30°
Un afilado inadecuado de la cadena aumenta el
peligro de contragolpe.
ADVERTENCIA:
Si no se cambia o se repara la cadena cuando está
dañada, puede causar lesiones serias.
ADVERTENCIA:
La cadena de la sierra está sumamente afilada;
siempre póngase guantes protectores al efectuar
labores de mantenimiento de la cadena.
Fig. 38
ÁNGULO DE LIMADURA DE LA PLACA
SUPERIOR
Vea la figura 38.
ÁNGULO CORRECTO: 30º - Los mangos de las
limas están marcados con marcas guía para alinear
correctamente la lima con el fin de generar el ángulo
correcto de la placa superior.
MENOS DE 30º - Para corte transversal.
MÁS DE 30º- El canto en bisel se desafila
rápidamente.
29 - Español
Page 92

MANTENIMIENTO
ÁNGULO DE LA PLACA LATERAL
Vea la figura 39.
ÁNGULO CORRECTO: 80º - Se genera
automáticamente si se pone una lima de diámetro
correcto en el mango.
EN FORMA DE GARFIO - “Agarra” y se
desafila rápidamente. Aumenta el peligro de
CONTRAGOLPE.
Resulta de esta forma por usarse una lima de
diámetro demasiado pequeño, o por sostenerse
ésta muy abajo.
PENDIENTEHACIAATRÁS-Senecesitademasiada
presión para avanzar el corte, causa desgaste
excesivo en la barra y en la cadena.
Resulta de esta forma por usarse una lima de
diámetro demasiado grande, o por sostenerse ésta
muy alto.
ESPACIO LIBRE DEL CALIBRE DE
PROFUNDIDAD
Vea las figuras 40 y 41.
El calibre de profundidad debe mantenerse a un
espacio libre de 0,6 mm (0,025 pulg.). Utilice
un instrumento de calibración de profundidad
para verificar el espacio libre de los calibres de
profundidad.
Cada vez que se lima la cadena verifique el espacio
libre de los calibres de profundidad.
Con una lima plana y un igualador de calibres de
profundidad baje de manera uniforme todos los calibres.
Los igualadores de calibres de profundidad vienen de
0,5 mm a 0,9 mm (0,020 pulg. a 0,035 pulg.). Use un
igualador de calibres 0,6 mm (0,025 pulg.). Después
de bajar cada calibre de profundidad, devuélvales
su forma original redondeando la parte frontal de los
mismos. Tenga cuidado de no dañar los eslabones de
impulsión adyacentes con el borde de la lima.
Cada calibre de profundidad debe ajustarse con la lima
plana, en la misma dirección en que se limó con la lima
redonda el diente de corte adyacente. Tenga cuidado
de no tocar la cara del diente de corte adyacente con
la lima plana al ajustar los calibres de profundidad.
MANTENIMIENTO DE LA BARRA GUÍA
Cuando la barra guía muestre señales de desgaste,
inviértala en la sierra para distribuir el desgaste y
prolongar al máximo su vida de servicio. La barra debe
limpiarse cada día de uso y debe revisarse para ver el
desgaste y los posibles daños.
ÁNGULO CORRECTO
DE LIMADURA DE
LA PLACA LATERAL
80°
ÁNGULO INCORRECTO DE
LIMADURA DE LA PLACA
LATERAL
PENDIENTE
GANCHO
HACIA ATRÁS
Fig. 39
IGUALADOR DE CALIBRES
DE PROFUNDIDAD
LIMA PLANA
Fig. 40
RESTABLEZCA LA
FORMA ORIGINAL
REDONDEANDO LA
PARTE FRONTAL
Fig. 41
La formación de minúsculos surcos y protuberancias en
los rieles de la barra es un proceso normal de desgaste
de la misma. Tales fallas deben alisarse con una lima
tan pronto como aparezcan.
Debe cambiarse toda barra que presente cualquiera
de las siguientes fallas.
Desgaste dentro de los rieles de la barra que permite
a la cadena descansar sobre su costado.
Barra guía doblada.
Rieles agrietados o rotos.
Rieles ensanchados.
Lubrique semanalmente las barras guía dotadas de
rueda dentada en la punta. Con una jeringa de grasa
lubrique semanalmente el orificio de lubricación. Gire
la barra guía y verifique que no tengan impurezas los
orificios de lubricación y la ranura de la cadena.
30 - Español
Page 93

MANTENIMIENTO
MONTAJE DE LA PROTECCIÓN
SAFE-T-TIP® DE LA PUNTA
Vea las figuras 42 y 43.
Retire el paquete de baterías antes de realizar
cualquier trabajo en la motosierra.
Monte la protección SAFE-T-TIP® en la punta de la
barra.
Acomode la orejeta de inmovilización en el ranura
en hueco de la barra guía.
Apriete el tornillo de montaje con la llave hasta
dejarlo ajustado.
De donde quedó ajustado, con una llave apriételo
3/4 de vuelta más.
MANTENIMIENTO DE LA PROTECCIÓN
SAFE-T-TIP® DE LA PUNTA
Vea las figuras 42 y 43.
ADVERTENCIA:
Aunque la barra guía viene con una protección
anticontragolpe SAFE-T-TIP® ya montada, verifique
el apriete del tornillo de montaje cada vez antes de
usar la sierra.
TORNILLO DE
MONTAJE
APRIÉTELO 3/4
DE VUELTA
SAFE-T-TIP
®
Fig. 42
Fig. 43
Para apretar el tornillo de montaje de la protección de la
punta, siga las instrucciones explicadas a continuación.
Estos son tornillos especiales endurecidos. Si no
puede apretarse el tornillo, cambie tanto éste como
la protección SAFE-T-TIP® antes de utilizar la unidad.
NOTA: No sustituya el tornillo con uno ordinario. Al
reemplazar piezas sólo utilice piezas de repuesto
idénticas del fabricante.
Además de evitar el contacto de la cadena con
objetos sólidos en la punta de la barra, la protección
SAFE-T-TIP® también ayuda a mantener la cadena
alejada de superficies abrasivas, como la tierra.
Manténgala en el lado derecho de la barra, entre la
cadena y el suelo, durante el corte a nivel con el suelo.
El tornillo de montaje requiere una llave de tuercas de
7,9 mm (5/16 pulg.) (o una llave ajustable) para lograr
fuerzadetorsiónde4a5N■∙m(35a45lb∙■pulg.).Puede
lograrse fuerza de torsión dentro de este intervalo
mediante el siguiente método.
Apriete el tornillo con la llave hasta dejarlo ajustado.
De donde quedó ajustado, con una llave apriételo
3/4 de vuelta más.
Fig. 44
TRANSPORTE Y ALMACENAMIENTO
Vea la figura 44.
No guarde ni transporte la motosierra mientras la
tenga encendida. La motosierra siempre debe estar
apagada al guardarla o transportarla.
Siempre coloque la funda en la barra y la cadena antes de
guardar o transportar la motosierra. Tenga precaución
y evite tocar los afilados dientes de la cadena.
Limpie la motosierra completamente antes de
guardarla. Guarde la motosierra en el interior, en
un lugar seco y cerrado con llave, o inaccesible a
los niños.
Evite que la unidad entre en contacto con agentes
corrosivos como las sustancias químicas para el
jardín y las sales para derretir el hielo.
31 - Español
Page 94

1-800-860-4050
COMBINACIONES DE BARRA Y CADENA
Especificaciones de la cadena: 9,5 mm (0,375 pulg.), ranura estrecha de perfil bajo, paso de cadena
de 1.1 mm (0.043 pulg.), rueda impulsora de 5 dientes.
Longitud Núm. pieza Núm. pieza Eslabones
barra barra guía cadena de impulsión
12 po 099966002001 099966002002 45
CORRECIÓN DE PROBLEMAS
PROBLEMA CAUSA SOLUCIÓN
La barra y la cadena
están muy calientes y
despiden humo.
El motor funciona pero
la cadena no avanza.
1. Revise la tensión de la
cadena para ver si es
excesiva.
2. Está vacío el tanque
de aceite de la
cadena.
1. Demasiada tensión en
la cadena.
2. Revise el conjunto
de la barra guía y la
cadena.
3. Revise la barra guía y
la cadena para ver si
están dañados.
1. Tensión de la cadena. Consulte
el apartado Tensado de la
cadena, más arriba en este
manual.
2. Revise el tanque de aceite.
1. Vuelva a tensar la cadena.
Consulte el apartado Tensión de
la cadena, más arriba en este
manual.
2. Consulte el apartado Montaje
de la barra y de la cadena, más
arriba en este manual.
3. Inspeccione la barra guía y
la cadena para ver si están
dañados.
¿NECESITA AYUDA?
LLÁMENOS PRIMERO
Si tiene preguntas sobre el funcionamiento o el mantenimiento este
producto,llame al teléfono de atención al consumidor de Ryobi®!
La recortadora ha sido probada enteramente antes de embarcarse
para asegurar la satisfacción del consumidor.
32 - Español
Page 95

GARANTÍA
DECLARACIÓN DE LA GARANTÍA LIMITADA
Techtronic Industries North America, Inc. garantiza al
comprador original al menudeo que este producto de la marca
RYOBI® carece de defectos en los materiales y en la mano de
obra, y acuerda reparar o remplazar, a la sola discreción de
Techtronic Industries North America, Inc., cualquier producto
defectuoso, sin cargo alguno al comprador, dentro de los
siguientes períodos de tiempo a partir de la fecha de compra.
Cinco años si los productos se emplean para uso personal,
familiar o casero;
90 días si el producto se emplea para cualquier otro
propósito, como el uso comercial o el de alquiler.
Esta garantía se otorga solamente al comprador original al
menudeo, y comienza en la fecha de la compra original al
menudeo.
Cualquier parte de este producto Techtronic Industries
North America, Inc. que, a juicio razonable de la compañía,
tenga defectos en los materiales o en la mano de obra, será
reparado o reemplazado por un centro de servicio autorizado
de herramientas para uso en el exterior de la marca RYOBI®,
sin cargo alguno al comprador por concepto de piezas y mano
de obra (Centro de Servicio Autorizado Ryobi).
El producto, incluida toda pieza defectuosa, debe enviarse a
un centro de servicio autorizado Ryobi dentro del período de
la garantía. El gasto de enviar el producto al centro de servicio
para cualquier trabajo cubierto por la garantía, así como el
gasto de devolverlo al propietario después de la reparación,
correrán por cuenta del propietario. La responsabilidad de
Techtronic Industries North America, Inc. con respecto a
todo reclamo se limita a las reparaciones o remplazo del
producto, y ningún reclamo de incumplimiento de la garantía
será causante de la cancelación o rescisión del contrato de
venta de ninguna herramienta de uso en el exterior de la
marca RYOBI®. En el establecimiento se requerirá el recibo
de compra para respaldar cualquier reclamo al amparo de
la garantía. Todo trabajo cubierto en la garantía debe ser
realizado por un concesionario de servicio autorizado.
Esta garantía se limita a noventa (90) días a partir de la fecha
original de la compra de cualquier herramienta de uso en
el exterior de la marca RYOBI® empleada para propósitos
comerciales o de alquiler, o cualquier otro propósito generador
de ingresos.
Esta garantía no cubre ningún producto que haya sido
sujeto a un uso indebido, maltrato, negligencia o accidente,
o que haya sido utilizado de cualquier forma contraria a las
instrucciones de manejo especificadas en el manual del
operador del producto. Esta garantía no aplica a ningún daño
en el producto que resulte de un mantenimiento indebido
ni a ningún producto que haya sido alterado o modificado.
La garantía no cubre ninguna reparación necesaria por el
uso normal ni por el uso de piezas o accesorios que sean
incompatibles con la herramienta para uso exterior de la marca
RYOBI®, o afecten de forma desfavorable su funcionamiento,
desempeño o durabilidad.
Además, esta garantía no cubre:
A. Afinación – Bujías, carburador, ajustes del carburador,
encendido, filtros
B. Artículos sujetos a desgaste – Perillas de tope, carretes
exteriores, hilos de corte, carretes interiores, poleas
del arrancador, cuerdas del arrancador, correas de
transmisión, aspas, arandelas de fieltro y pasadores de
enganche, hojas de triturar, ventiladores de sopladoras,
tubos de sopladoras y de aspiradoras, sacos y correas
de aspiradoras, barras guía y cadenas de sierras
Techtronic Industries North America, Inc. se reserva
el derecho a cambiar o mejorar el diseño de cualquier
herramienta para uso en el exterior de la marca RYOBI® sin
asumir ninguna obligación de modificar ningún producto
fabricado previamente.
TODASLASGARANTÍASIMPLÍCITASESTÁNLIMITADAS
EN DURACIÓN SEGÚN EL PERÍODO DE GARANTÍA
DECLARADA. POR CONSIGUIENTE, CUALQUIER GARANTÍA
IMPLÍCITA, INCLUSO LAS DE COMERCIABILIDAD,
IDONEIDAD PARA UN PROPÓSITO EN PARTICULAR,
O DE CUALQUIER TIPO, PIERDEN TOTALMENTE SU
VALIDEZ DESPUÉS DEL VENCIMIENTO DEL PERÍODO
DE GARANTÍA CORRESPONDIENTE DE CINCO AÑOS O
NOVENTA DÍAS. DE CONFORMIDAD CON ESTA GARANTÍA,
LA OBLIGACIÓN DE TECHTRONIC INDUSTRIES NORTH
AMERICA, INC. SE LIMITA ESTRICTA Y EXCLUSIVAMENTE
A LA REPARACIÓN O REMPLAZO DE LAS PIEZAS
DEFECTUOSAS, Y TECHTRONIC INDUSTRIES NORTH
AMERICA, INC. NO ASUME NINGUNA OTRA OBLIGACIÓN,
NI AUTORIZA A NADIE ASUMIRLA A NOMBRE DE
DICHA COMPAÑÍA. ALGUNOS ESTADOS NO PERMITEN
LIMITACIONES EN CUANTO A LA DURACIÓN DE UNA
GARANTÍA IMPLÍCITA, POR LO CUAL ES POSIBLE QUE
LA LIMITACIÓN ANTERIOR NO SE APLIQUE EN EL CASO
DE USTED. TECHTRONIC INDUSTRIES NORTH AMERICA,
INC. NO ASUME NINGUNA RESPONSABILIDAD POR
DAÑOS DIRECTOS, INDIRECTOS O DE NINGÚN OTRO
TIPO, COMO EL GASTO DE ENVIAR EL PRODUCTO A UN
CENTRO DE SERVICIO AUTORIZADO RYOBI Y EL GASTO
DE ENVIARLO DE ALLÍ AL PROPIETARIO, EL TIEMPO
DE VIAJE DEL MECÁNICO, CARGOS TELEFÓNICOS
O TELEGRÁFICOS, ALQUILER DE UN PRODUCTO
SUSTITUTO DURANTE EL TIEMPO DE REALIZACIÓN DEL
SERVICIO DE LA GARANTÍA, VIAJES, PÉRDIDA O DAÑOS
A OBJETOS DE PROPIEDAD PERSONAL, PÉRDIDA DE
INGRESOS, PÉRDIDA DEL USO DEL PRODUCTO, PÉRDIDA
DE TIEMPO O INCONVENIENTES. EN ALGUNOS ESTADOS
NO SE PERMITE LA EXCLUSIÓN O LIMITACIÓN DE DAÑOS
DIRECTOS O INDIRECTOS, POR LO CUAL ES POSIBLE
QUE LA LIMITACIÓN O EXCLUSIÓN DESCRITA ARRIBA
NO SE APLIQUE EN SU CASO.
Esta garantía le confiere derechos legales específicos, y
es posible que usted goce de otros derechos, los cuales
pueden variar de estado a estado.
Esta garantía se aplica a todas las herramientas para uso
en el exterior de la marca RYOBI® fabricadas por Techtronic
Industries North America, Inc. y vendidos en Estados Unidos
y Canadá.
Para encontrar el centro de servicio autorizado Ryobi más
cercano a usted, llame al 1-800-860-4050.
33 - Español
Page 96

OPERATOR’S MANUAL
MANUEL D’UTILISATION / MANUAL DEL OPERADOR
40 VOLT CHAIN SAW
SCIE À CHAÎNE 40 V / MOTOSIERRA DE 40 V
CALIFORNIA PROPOSITION 65
WARNING:
This product, its exhaust, and other
substances that may become airborne
from its use may contain chemicals,
including lead, known to the State
of California to cause cancer, birth
defects, or other reproductive harm.
Wash hands after handling.
PROPOSITION 65 DE LA
CALIFORNIE 65
AVERTISSEMENT :
Ce produit, les gaz d’échappement
qu’il dégage et les autres substances
rejetées dans l’air à la suite de son
utilisation peuvent contenir des
produits chimiques, notamment
du plomb qui, selon l’État de la
Californie, peuvent causer le cancer,
des anomalies congénitales et d’autres
dommages au système reproducteur.
Bien se laver les mains après toute
manipulation.
CALIFORNIA - PROPUESTA DE
LEY NÚM. 65
ADVERTENCIA:
Este producto, su escape y otras
sustancias que puedan llegar a ser
aerotransportadas por su uso pueden
contener sustancias químicas (por
ejemplo, plomo) consideradas por el
estado de California como causantes
de cáncer, defectos de nacimiento
u otras alteraciones reproductivas.
Lávese las manos después de
utilizar el aparato.
RYOBI is a registered trademark of Ryobi
Limited and is used pursuant to a license
granted by Ryobi Limited.
RYOBI est une marque déposée de RYOBI
Limited et est utilisée en vertu d’une licence
accordée par Ryobi Limited.
RYOBI es una marca registrada de Ryobi
Limited y se utiliza conforme a una licencia
otorgada por Ryobi Limited.
988000-839
8-6-14 (REV:05)
RY40500
• PARTS AND SERVICE
Prior to requesting service or purchasing replacement parts, please obtain your model
and serial number from the product data plate.
• MODEL NO. ______________________SERIAL NO. __________________________
• HOW TO OBTAIN REPLACEMENT PARTS:
Replacement parts can be purchased online at www.ryobitools.com or by calling
1-800-860-4050. Replacement parts can also be obtained at one of our Authorized
Service Centers.
• HOW TO LOCATE AN AUTHORIZED SERVICE CENTER:
Authorized Service Centers can be located online at www.ryobitools.com or by calling 1-800-860-4050.
• HOW TO OBTAIN CUSTOMER OR TECHNICAL SUPPORT:
To obtain Customer or Technical Support please contact us at 1-800-860-4050.
• PIÈCES ET SERVICE
Avant de faire la demande de service ou l’achat de pièces de remplacement, veuillez
obtenir le numéro de série du modèle à partir de la plaque de données du produit.
• NUMÉRO DE MODÈLE ____________NUMÉRO DE SÉRIE ___________________
• COMMENT OBTENIR LES PIÈCES DE REMPLACEMENT :
Les pièces de remplacement peuvent être achetées en ligne sur le site
www.ryobitools.com ou par téléphone au 1-800-860-4050. Les pièces de remplacement
peuvent être obtenues à un de nos centres de service autorisés.
• COMMENT TROUVER UN CENTRE DE SERVICE AUTORISÉ :
Les centres de service autorisés peuvent être localisés en ligne au www.ryobitools.
com ou en téléphonant au 1-800-860-4050.
• COMMENT OBTENIR DE L’AIDE EN CONTACTANT LE SERVICE À LA CLIENTÈLE :
Pour contacter le service à la clientèle pour une question technique ou pour tout autre
renseignement, veuillez nous téléphoner au 1-800-860-4050.
• PIEZAS DE REPUESTO Y SERVICIO
Antes de solicitar servicio técnico o comprar piezas de repuesto, obtenga su modelo
y número de serie de la placa de datos del producto.
• NÚMERO DE MODELO ____________NÚMERO DE SERIE ___________________
• CÓMO OBTENER PIEZAS DE REPUESTO:
Las piezas de repuesto se pueden comprar en nuestro sitio en la red mundial, en la
dirección www.ryobitools.com o llamando al 1-800-860-4050. Las piezas de repuesto
también se pueden obtener en uno de nuestros Centros de Servicio Autorizados.
• CÓMO LOCALIZAR UN CENTRO DE SERVICIO AUTORIZADO:
Puede encontrar los Centros de Servicio Autorizados visitando nuestro sitio en la red
mundial, en la dirección www.ryobitools.com or by calling 1-800-860-4050.
• CÓMO OBTENER SERVICIO O ASISTENCIA TÉCNICA AL CONSUMIDOR:
Para obtener Servicio o Asistencia Técnica al Consumidor, sírvase comunicarse con
nosotros llamando al 1-800-860-4050.
TECHTRONIC INDUSTRIES NORTH AMERICA, INC.
1428 Pearman Dairy Road, Anderson, SC 29625 USA
1-800-860-4050 • www.ryobitools.com
A subsidiary of Techtronic Industries Co., Ltd. • OTC: TTNDY
 Loading...