

Page 1

Page 2

OWNER’S OPERATING MANUAL
GRASS TRIMMER
MODEL RLT-552
SPECIFICATIONS
Voltage...................................................................................................230V~50Hz
Rated input......................................................................................................550W
No load speed.........................................................................................10000min
Cutting diameter...............................................................................................30cm
Cutting line size..................................................................................Ø1.4mm x 6m
Telescopic shaft extension length.................................................................... 18cm
Cable length..................................................................................................... 35cm
Sound pressure level..........................................................L
Sound power level........................................................... LWA94.29dB(A),k=3dB(A)
Vibration level......................................................................... 4.675m/s
Net weight........................................................................................................ 2.3kg
THANK YOU FOR BUYING A RYOBI
90.4dB(A),k=3dB(A)
pA
2
, K=1.5m/s
-1
2
GRASS TRIMMER
Your new grass trimmer has been engineered and manufactured to Ryobi’s high
standard of dependability, ease of operation and operator safety. Properly cared
for, it will give you years of rugged, trouble free performance. If you use your
grass trimmer properly and only for what it is intended, you will enjoy years of
safe, reliable service.
CAUTION: Carefully read through this entire owner’s
manual, paying close attention to the general
safety rules and rules for safe operation,
before using.
KEEP THIS MANUAL FOR FUTURE REFERENCE
1
Page 3

IMPORTANT SAFETY INSTRUCTIONS
The purpose of safety rules is to attract your
ttention to possible dangers. The safety symbols
a
and the explanations with them, require your
areful attention and understanding. The safety
c
arnings do not by themselves eliminate any
w
danger. The instruction or warnings they give are
not substitutes for proper accident prevention
measures.
SAFETY ALERT SYMBOL. Indicates
danger, caution or warning. May be used
in conjunction with other symbols or
pictures.
Failure to obey a safety warning can result in
serious injury to yourself or to others. Always follow
the safety precautions to reduce the risk of fire,
electric shock and personal injury.
Do not attempt to operate this tool until you have
read thoroughly and completely understood the
safety rules, etc. contained in this manual. Failure
to comply can result in accidents involving fire,
electric shock or serious personal injury. Save this
Owners Operating Manual and review it frequently
for continual safe operation and for instructing
others who may use this tool.
INTENDED USE
This product should only be used outdoors.
The product is intended for cutting long grass,
weed, and similar vegetation at or about ground
level. The cutting plane should be approximately
parallel to the ground surface. The product should
not be used to cut or trim hedges, bushes or other
vegetation where the cutting plane is not parallel to
the ground surface.
WARNING
To reduce the risk of injury, the user must
read and understand the operator’s
manual.
WARNING
Do not attempt to operate this trimmer
until you have read thoroughly and
understood completely all instructions,
safety rules etc contained in this manual.
Failure to comply may result in accidents
involving fire, electric shock or serious
personal injury. Save operator’s manual
and review frequently for continuing safe
operation, and instructing others who
may use this tool.
SPECIFIC SAFETY INSTRUCTIONS
ead all these instructions before attempting to
R
operate this product and save these instructions.
hen using the unit, basic safety precaution,
W
including the following, should always be followed
o reduce the risk or serious personal injury and
t
damage to the unit. Read all these instructions
before operating this product and save these
instructions.
The device must not be used by people (including
children) with limited physical, sensory or mental
faculties or who lack the necessary experience
and/or knowledge - other than they are supervised
by a person responsible for safety or are being
instructed to operate the machine by such a
person.
Keep children and pets at a safe distance away
from the device. Children must be supervised in
order to ensure that they do not play with the
equipment.
Never allow children or other persons unfamiliar
with the user manual to use the grass trimmer.
Local regulations or bylaws may determine the
minimum age for using the machine.
Observe local noise and other regulations.
CAUTION! When using powered tools, observe the
following basic safety measures for the prevention
of electric shocks and the risk of injury and fire:
The safety rules must be observed during tool use.
Before starting the tool, read the instructions
regarding personal safety and the safety of
unauthorised persons.
Keep the instructions in a good state for future use.
In order to reduce the risk, disconnect the plug
from the supply power, only use recommended
accessories as required, otherwise personal injury
may result.
Periodically inspect the condition of the cutting
head. If the spool is damaged, switch off, remove
the plug from the power point and replace the
spool.
Do not use the tool to cut grass, which is not on the
ground. For example, do not cut grass, which is on
walls or rocks.
2
Page 4

IMPORTANT SAFETY INSTRUCTIONS
Do not switch on the tool in enclosed or poorly
entilated spaces or in the presence of inflammable
v
and /or explosive substances such as liquid, gases
nd powders.
a
Always stop the trimmer and switch off at the mains
hen cutting is delayed or when walking from one
w
cutting location to another.
Do not cross roads or gravel paths with tool still
running.
After use, disconnect the tool from the power
supply and check for damage. If you have the
slightest doubts, check with the authorised service
centre.
Only use the tool according to the instructions
given in this manual.
Do not extend the trimming line beyond the guard
and do not operate the trimmer without both lines
extended and proper line installed.
Check regularly that the nuts, bolts and screws are
tight.
USING THE GRASS TRIMMER
When using the tool, always use caution and take
on a firm and well-balanced position.
Where possible, avoid working on wet, slippery
ground or in any case on uneven or steep ground
that does not guarantee stability for the operator.
Never run, but walk carefully paying attention to the
lay of the land and any eventual obstacles.
Assess the potential risks of the ground to be
mown and take all necessary precautions to ensure
your own safety, especially on slopes or on bumpy,
slippery or unstable ground.
Do not use the tool if you are unable to hold it with
both hands or keep it steady on your legs while
working.
Never allow children or persons unfamiliar with
these instructions to use the tool. Local regulations
can restrict the age of the user.
The tool must never be used by more than one
person.
Never use the tool:
When people, especially children or pets are in the
vicinity.
If the user is tired or unwell, or has taken medicine,
rugs alcohol or any substances which may slow
d
his reflexes and compromise his judgement;
f the guards are damaged or have been removed.
I
LECTRICAL SAFETY
E
CAUTION! The following states how damage to the
grass trimmer and possible injury to people can be
avoided:
Handle the unit with care. Clean the ventilation
slots regularly, follow the maintenance instructions.
Do not overload your device. Work only within the
indicated range of performance. Do not use low
power machines for heavy duty work. Do not use
your device for purposes for which it has not been
designed.
Do not attempt to repair the machine yourself
unless you are qualified to do so. Any work not
specified in this manual may only be carried out by
a qualified service centre.
Only use extension cables that have been
approved for outdoor use and are resistant to
splash water. The core diameter for extension
cables measuring up to 25m must be at least 1.5
2
mm
, and 2.5 mm2for cables longer than 25m.
Always roll the whole cable off the reel before use.
Check the cable for damage.
The supply voltage must correspond to the voltage
specified on the modelplate.
Do not abuse the cable. Never move the unit by the
cable or pull the cable to disconnect it from the
mains socket. Keep the cable away from heat, oil
and sharp edges. Ensure that the cable is arranged
so that it cannot be tripped over, stepped on or
have heavy weights rested on it. Make sure the
cable will not be subjected to any damage.
Do not use the machine if the cables are damaged
or worn.
Do not connect a damaged cable to the mains
supply or touch a damaged cable before it is
disconnected from the mains supply. A damaged
cable can lead to an electric shock.
3
Page 5

IMPORTANT SAFETY INSTRUCTIONS
GENERAL SAFETY RULES
ARNING! Read all instructions Failure to follow
W
all instructions listed below may result in electric
hock, fire and/or serious injury. The term "power
s
ool" in all of the warnings listed below refers to
t
your mains operated (corded) power tool or battery
operated (cordless) power tool.
SAVE THESE INSTRUCTIONS
1) WORK AREA
a) Keep work area clean and well lit. Cluttered and
dark areas invite accidents.
b) Do not operate power tools in explosive
atmospheres, such as in the presence of
flammable liquids, gases or dust. Power tools
create sparks which may ignite the dust or
fumes.
c) Keep children and bystanders away while
operating a power tool. Distractions can cause
you to lose control.
2) ELECTRICAL SAFETY
a) Power tool plugs must match the outlet. Never
modify the plug in any way. Do not use any
adapter plugs with earthed (grounded) power
tools. Unmodified plugs and matching outlets
will reduce risk of electric shock.
b) Avoid body contact with earthed or grounded
surfaces such as pipes, radiators, ranges and
refrigerators. There is an increased risk of
electric shock if your body is earthed or
grounded.
c) Do not expose power tools to rain or wet
conditions. Water entering a power tool will
increase the risk of electric shock.
d) Do not abuse the cord. Never use the cord for
carrying, pulling or unplugging the power tool.
Keep cord away from heat, oil, sharp edges or
moving parts. Damaged or entangled cords
increase the risk of electric shock.
e) When operating a power tool outdoors, use an
extension cord suitable for outdoor use. Use of
a cord suitable for outdoor use reduces the risk
of electric shock.
3) PERSONAL SAFETY
a) Stay alert, watch what you are doing and use
common sense when operating a power tool.
Do not use a power tool while you are tired or
nder the influence of drugs, alcohol or
u
medication. A moment of inattention while
perating power tools may result in serious
o
ersonal injury.
p
) Use safety equipment. Always wear eye
b
protection. Safety equipment such as dust
mask, non-skid safety shoes, hard hat, or
hearing protection used for appropriate
conditions will reduce personal injuries.
c) Avoid accidental starting. Ensure the switch is
in the off position before plugging in. Carrying
power tools with your finger on the switch or
plugging in power tools that have the switch on
invites accidents.
d) Remove any adjusting key or wrench before
turning the power tool on.
A wrench or a key left attached to a rotating part
of the power tool may result in personal injury.
e) Do not overreach. Keep proper footing and
balance at all times. This enables better control
of the power tool in unexpected situations.
f) Dress properly. Do not wear loose clothing or
jewellery. Keep your hair, clothing and gloves
away from moving parts. Loose clothes,
jewellery or long hair can be caught in moving
parts.
g) If devices are provided for the connection of
dust extraction and collection facilities, ensure
these are connected and properly used. Use of
these devices can reduce dust related hazards.
4) POWER TOOL USE AND CARE
a) Do not force the power tool. Use the correct
power tool for your application. The correct
power tool will do the job better and safer at the
rate for which it was designed.
b) Do not use the power tool if the switch does not
turn it on and off. Any power tool that cannot be
controlled with the switch is dangerous and
must be repaired.
c) Disconnect the plug from the power source be-
fore making any adjustments, changing accessories, or storing power tools. Such preventive
safety measures reduce the risk of starting the
power tool accidentally.
4
Page 6

IMPORTANT SAFETY INSTRUCTIONS
d) Store idle power tools out of the reach of
hildren and do not allow persons unfamiliar
c
with the power tool or these instructions to
operate the power tool. Power tools are
angerous in the hands of untrained users.
d
) Maintain power tools. Check for misalignment
e
or binding of moving parts, breakage of parts
and any other condition that may affect the
power tools operation. If damaged, have the
power tool repaired before use. Many accidents
are caused by poorly maintained power tools.
f) Keep cutting tools sharp and clean. Properly
maintained cutting tools with sharp cutting
edges are less likely to bind and are easier to
control.
g) Use the power tool, accessories and tool bits
tc., in accordance with these instructions and
e
in the manner intended for the particular type of
power tool, taking into account the working
onditions and the work to be performed. Use of
c
the power tool for operations different from
intended could result in a hazardous situation.
5) SERVICE
a) Have your power tool serviced by a qualified
repair person using only identical replacement
parts. This will ensure that the safety of the
power tool is maintained.
5
Page 7
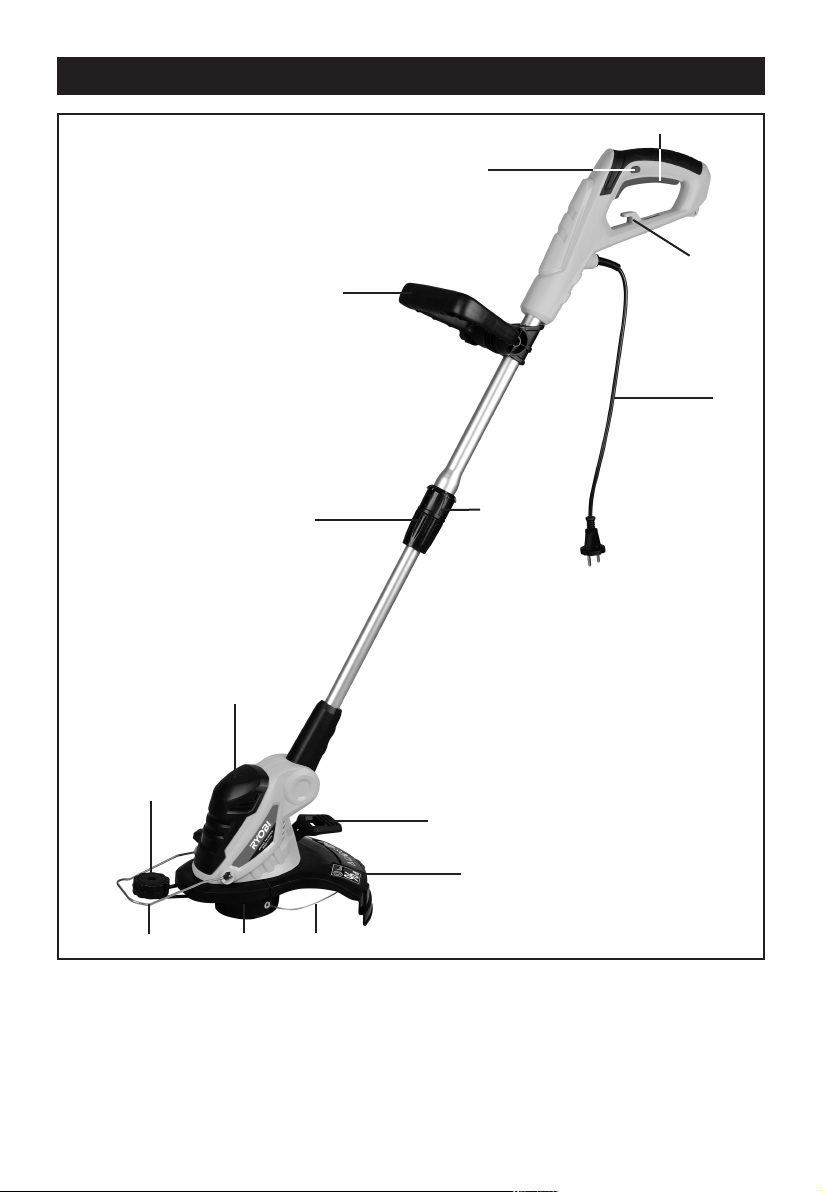
DESCRIPTION
2
1
3
4
5
14
13
12
11
1. Auxiliary handle
2. Trigger safety lock button
3. Switch trigger
4. Power cable retainer
5. Power cable
6. Handle rotation locking catch
7. Foot pedal for head angle adjustment
10 9
6
7
8
8. Grass deflector
9. Filament line
10. Double line spool
11. Flower bed guard
12. Edger wheel
13. Trimmer head/motor housing
14. Telescopic tube adjustment
6
Page 8
UNPACKING
CAUTION. This packaging contains
harp objects. Take care when
s
ogether with the accessories supplied, from the
t
p
machine is in good condition and account for all the
accessories listed in this manual. Also make sure
that all the accessories are complete.
unpacking. Remove the machine,
ackaging. Check carefully to ensure that the
ASSEMBLY
PACKING CONTENTS
• Trimmer Assembly
• Grass deflector assembly with 4 screws.
• Auxiliary handle
• Operator’s manual.
WARNING. If any parts are damaged or
missing, do not operate this product until
the parts are replaced. Use of this
product with damaged or missing parts
could result in serious personal injury.
WARNING. Do not connect to power
supply until assembly is complete.
Failure to comply could result in
accidental starting and possible serious
personal injury.
WARNING. Do not attempt to modify this
product or create accessories not
recommended for use with this product.
Any such alteration or modification is
misuse and could result in a hazardous
condition leading to possible serious
personal injury.
TOOLS NEEDED
The following tools (not included) are needed for
assembly:
Phillips Screwdriver
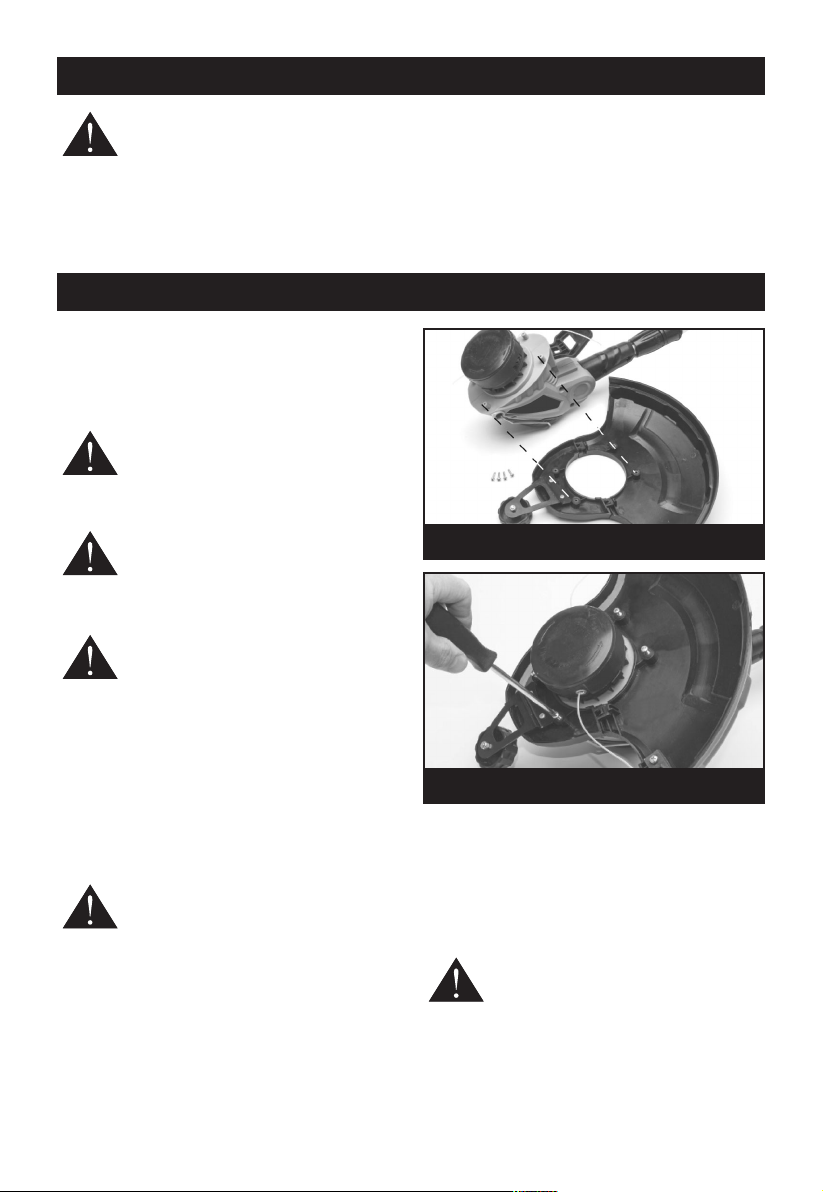
ATTACHING THE GRASS DEFLECTOR
Remove the bag with screws from the grass
deflector.
Place the guard on the shaft. Put the guide wheel
on the guard and line up the 4 screw holes in the
WARNING. The line cutting blade on the
grass deflector is sharp. Avoid contact
with the blade. Failure to avoid contact
can result in serious personal injury.
If any parts are found to be missing, the machine
nd its accessories should be returned together in
a
their original packaging to the retailer. Do not throw
he packaging away, keep it safe throughout the
t
uarantee period, then recycle if possible,
g
otherwise dispose of it by the proper means. Do
not let children play with empty plastic bags due to
the risk of suffocation.
Fig. 1
Fig. 2
grass deflector with the holes in the motor housing,
Fig.1.
Install the 4 supplied screws and tighten by turning
clockwise with a phillips screwdriver, Fig.2.
Remove the protective tape from the line cutting
blade.
WARNING! Take care not to cut yourself
on the bade. Its extremely sharp.
7
Page 9
ASSEMBLY
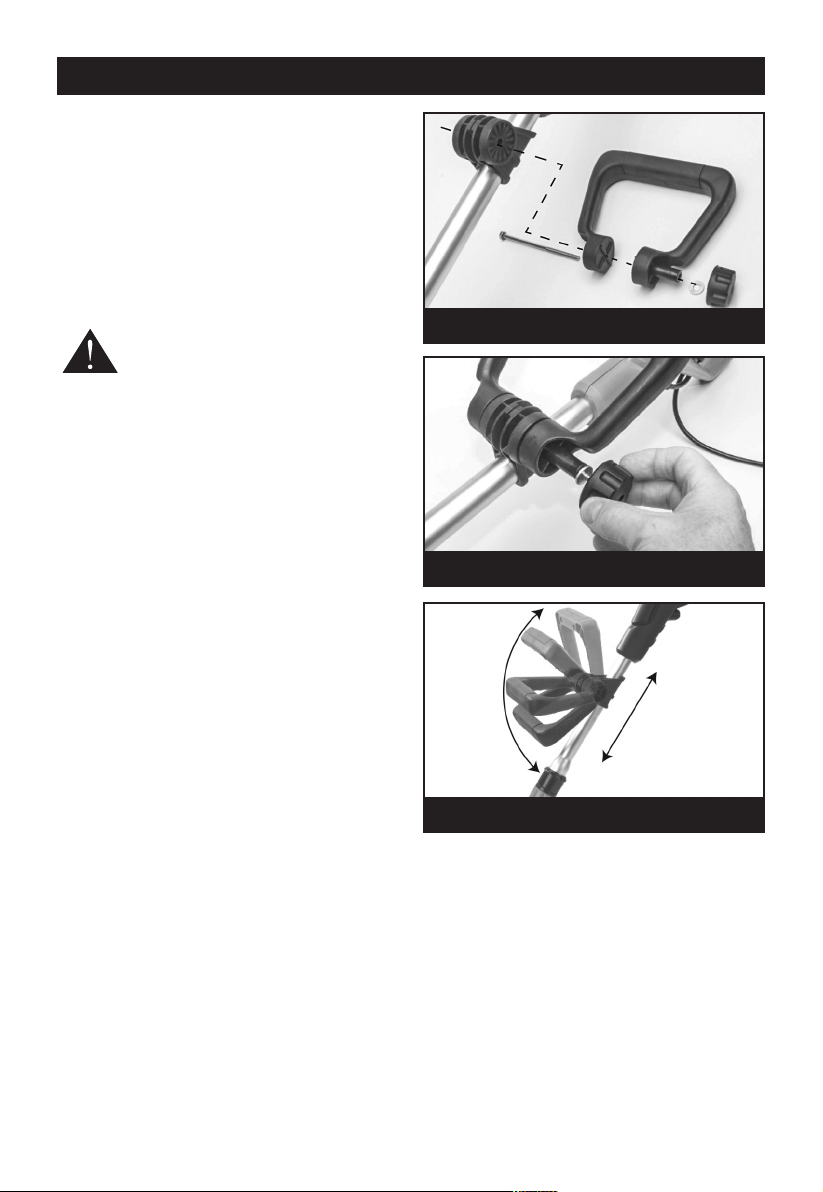
ATTACHING THE AUXILIARY HANDLE
he auxiliary handle has 4 parts (Fig.3):
T
Fixing bolt
•
Handle
•
• Washer
Locking knob
•
Place the handle onto the fixing point on the shaft
and slide the fixing bolt through the centre hole.
Attach the washer and tighten with the locking
knob, Fig.4
WARNING. To avoid injury, adjust the
auxiliary handle for optimum control and
balance. Do not overreach when
operating trimmer. Keep proper balance
at all times for better control of the tool in
unexpected situations.
The auxiliary handle can be moved either up and
down the shaft (B), forward and backwards (A) or
rotated 360º around the shaft, Fig.5.
Fig. 3
Fig. 4
A
B
Fig. 5
8
Page 10
OPERATION
WARNING. Do not allow familiarity with
roducts to make you careless.
p
Remember that a careless fraction of a
econd is sufficient to inflict severe
s
njury.
i
ARNING. Always wear eye protection
W
with side shields marked to comply with
ANSI Z87.1. Failure to do so could result
in objects being thrown into your eyes,
resulting in possible serious injury.
WARNING. Never use blades, flailing
devices, wire or rope on this product. Do
not use any attachments or accessories
not recommended by the manufacturer
of this product. The use of attachments
or accessories not recommended can
result in serious personal injury.
CONNECTING TO A POWER SUPPLY
This product is designed with a power cable
retainer that prevents the extension cord from
being pulled loose while using.
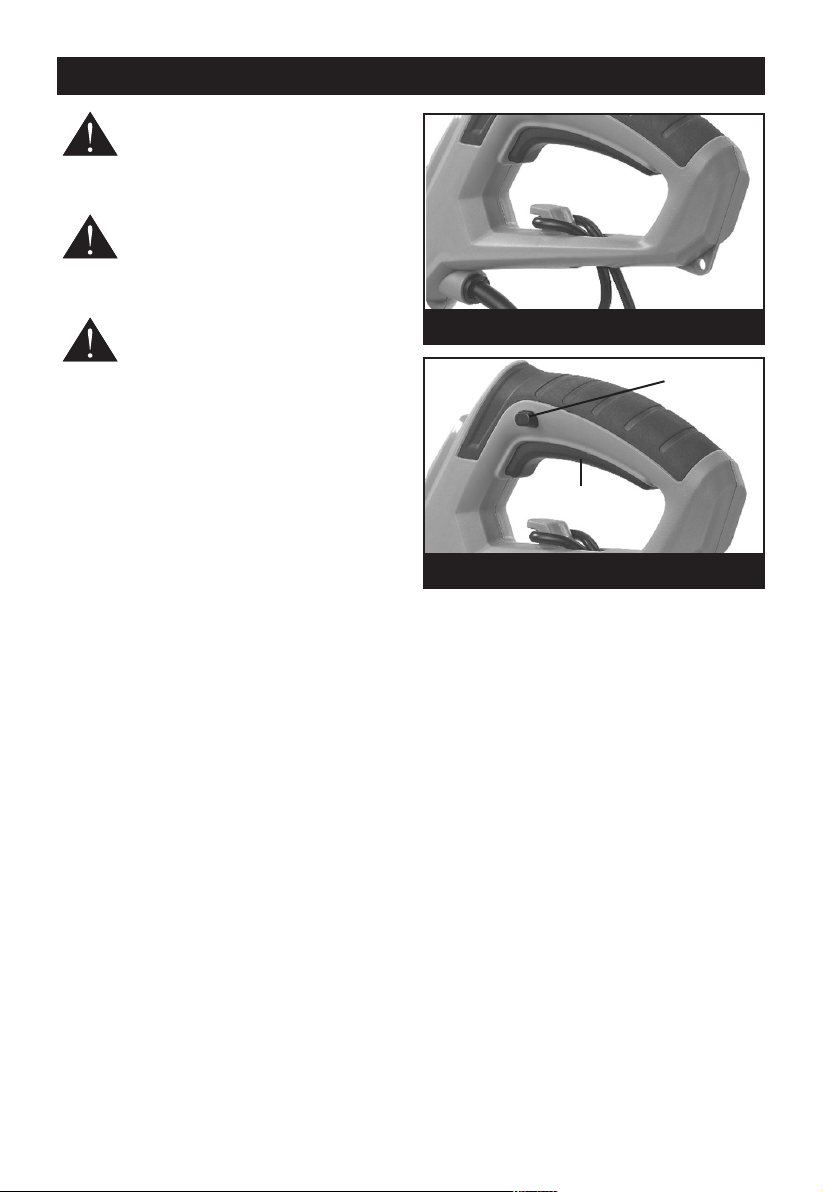
Form a loop with the end of the extension cord.
Insert loop portion of extension cord through the
opening in the bottom of the rear handle and place
over power cable retainer, Fig.6.
Slowly pull loop against power cable retainer until
the slack is removed.
Plug product into extension cord.
NOTE: Failure to remove all excess cord slack
from extension cord retainer could result in plug
loosening from the receptacle.
NOTE: Use only approved outdoor extension
cords.
NOTICE: Always use cord retainer to properly
attach extension cord to string trimmer. Failure to
use cord retainer may result in damage to string
trimmer and/or extension cord.
STARTING/STOPPING THE TRIMMER (FIG.7)
To increase safety, the On/Off trigger and trigger
safety lock have to be used together to activate the
trimmer.
Press and hold the trigger safety lock (7.1).
Depress the On/Off trigger (7.2).
Release the On/Off trigger to stop the trimmer.
Fig. 6
7.1
7.2
Fig. 7
Caution: Always allow 5 seconds or more for the
cutting linespool to stop rotating after releasing the
trigger switch. Do not invert the grass trimmer, or
place your hands under the protective guard until
the grass trimmer spool has come to a complete
stop.
ADVANCING LINES
The trimmer is equipped with an auto-feed head.
Bumping the head to try to advance the line will
damage trimmer and void warranty.
With the trimmer running, release the switch
trigger.
Wait two seconds, and press the switch trigger.
NOTE: The line will extend approximately 1/4 in.
with each stop and start of the switch trigger until
the line reaches the length of the grass deflector
blade.
Resume trimming.
ADVANCING THE LINE MANUALLY
Disconnect the string trimmer from the power
supply, then push the spool retainer button in while
pulling on trimmer line to manually advance.
9
Page 11
OPERATION
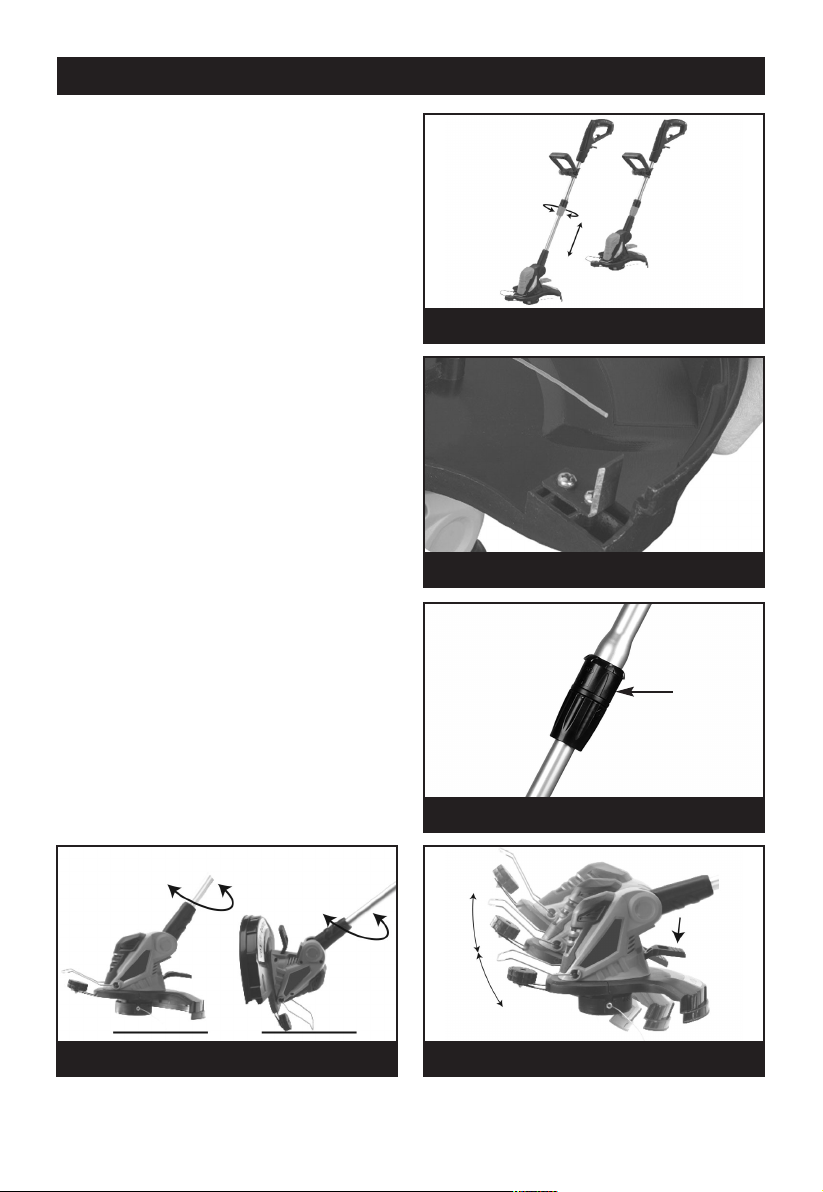
ADJUSTING THE SHAFT LENGTH (FIG.8)
nplug the string trimmer.
U
Set the trimmer on a flat surface and loosen the
ower part of the centre collar. This will allow the
l
lower part of the shaft to be extended or retracted .
For trimming, adjust the handle upward.
For edging, adjust the handle downward.
When the shaft is at a comfortable length, retighten
the collar.
LINE CUT-OFF BLADE (FIG.9)
This trimmer is equipped with a line cut-off blade
on the grass deflector. For best cutting, advance
line until they are trimmed to length by the cut-off
blade. Advance line whenever you hear the motor
running faster than normal, or when trimming
efficiency diminishes. This will maintain best
performance and keep trimmer line long enough to
advance properly.
ADJUSTING THE ANGLE OF THE TRIMMER
HEAD
The motor head can be rotated to the 0 or 180º
position for trimming and edging operations.
Pull the upper part of the centre collar (Fig.10)(A).
This will allow the motor to be rotated between the
0 or 180º position.
Note: The head will only lock in the 0 or 180º
position. Fig.11.
TRIMMER HEAD ANGLE
The motor head can be adjusted to 3 different
pre-set angles. Step down on the foot pedal (A) to
set the angle, Fig.12
Fig. 8
Fig. 9
A
Fig. 10
0º
180º
Fig. 11
3
A
2
1
Fig. 12
10
Page 12
OPERATION
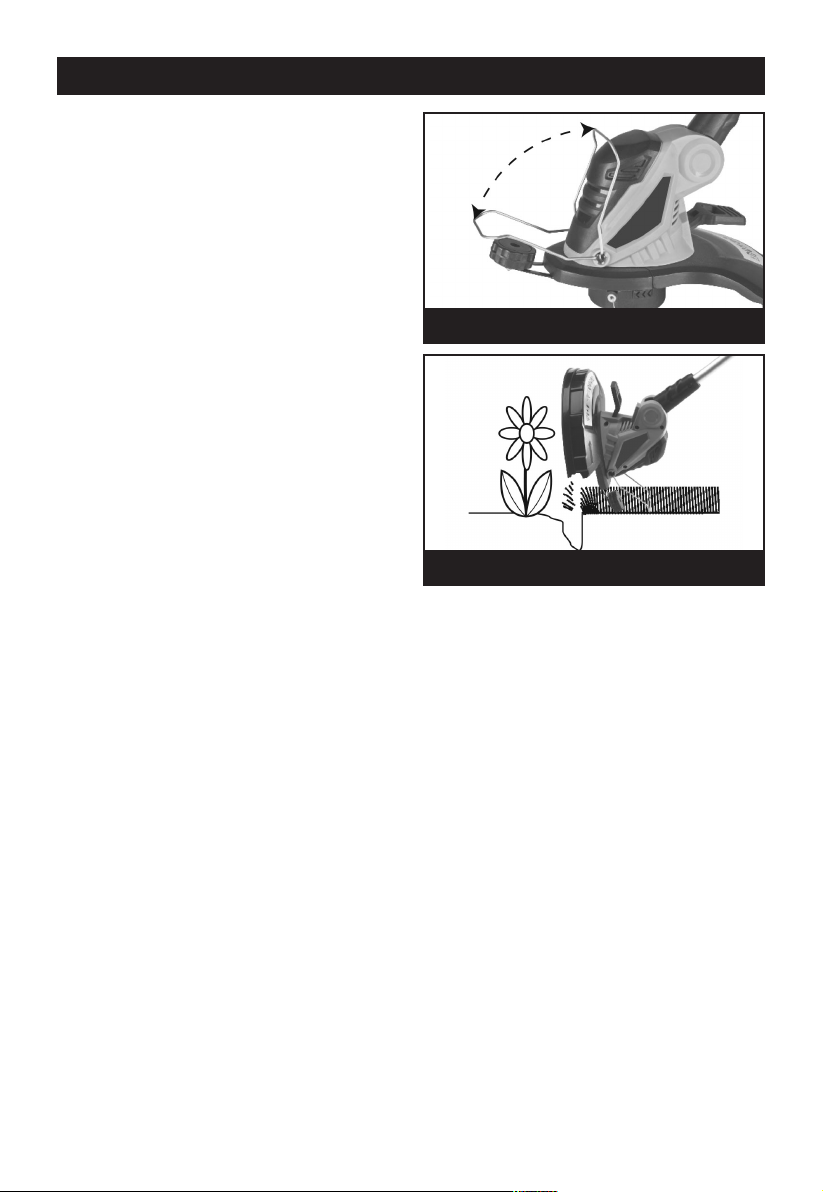
ADJUSTING THE FLOWER GUARD
ift the flower guard up when edging and put it
L
down before trimming, as shown in Figure 13.
efore trimming or edging make sure the flower
B
uard is locked firmly in position.
g
DGING
E
Rotate the motor head using the instructions in the
“Adjusting the angle of the trimmer head” section.
Position the edging wheel on the edge of the
sidewalk or abrasive surface so the cutting line is
over the grass or dirt area to be edged, Fig.14.
NOTE: The auto feed system may not operate
correctly if wheeled edge guide is not used.
NOTE: You will experience faster than normal
cutting line wear if the edging wheel is positioned
too far from the edge with the cutting line
positioned over the sidewalk or abrasive surface.
To make a closer cut, slightly tilt the trimmer.
Return to the trimming postion by loosening the
lock collar and rotating the lower housing back
180°. The tool will lock in the trimmer position.
PREPARING TO WORK
CHECKING THE TOOL
Ensure that the strimmer is not connected to a
power supply.
Before starting work please:
Check that the trigger switches and the safety
switch should move freely without forcing and
return automatically and rapidly back to their
neutral position;
Check that the cooling air vents are not obstructed;
Check that hand grips and protection devices are
clean and dry, correctly mounted and well fastened
to the tool;
Check that the tool is not showing signs of wear or
damage due to knocks or other causes, and carry
out the necessary repairs.
Check that the mains cable is in good working
condition and there are no signs of damage.
Never use the tool with a damaged or worn mains
cable.
Fig. 13
Fig. 14
TRIMMING AND EDGING
For the most effective grass trimming, ensure the
tool is operating at full speed and then use slow
shallow sweeps of the line, ensuring that you do
not overload the tool by cutting too fast or cutting
through heavy terrain.
Make sure that the work area is free of rock, debris,
lines and other foreign objects.
Start the tool before approaching the grass to be
cut.
Cut the grass by swinging the tool from right to left
and proceed slowly keeping the trimmer inclined
forwards at an angle of about 30 deg. Light cuts
are better than heavy cuts as they allow the cut
grass to fall away from the spool preventing the
grass from clogging the spool.
High grass should be cut in layers always
beginning from the top. Do not cut damp or wet
grass. Do not overload your tool.
Avoid wearing the line out quickly by knocking
against hard objects (stones, walls, fences etc).
11
Page 13
OPERATION
Watch out for kickbacks in the events of impact
ith hard objects.
w
After finishing the cutting operation, keep the head
lose to ground level, release the trigger switch and
c
allow the motor to come to a complete stand still.
lace the trimmer on the ground, remove the bat-
P
tery.
For edging, rotate the motor head
Note. Periodically clean out the grass between the
spool and the rim of the guard to prevent the tool
from vibrating.
TIPS FOR TRIMMING
Avoid hot surfaces by always keeping the tool
away from your body.
MAINTENANCE
WARNING. Before inspecting, cleaning,
or servicing the machine, shut off motor,
wait for all moving parts to stop, and
disconnect extension cord. Failure to
follow these instructions can result in
serious personal injury or property
damage.
GENERAL MAINTENANCE
Avoid using solvents when cleaning plastic parts.
Most plastics are susceptible to damage from
various types of commercial solvents and may be
damaged by their use. Use clean cloths to remove
dirt, dust, oil, grease, etc.
WARNING. Do not at any time let brake
fluids, gasoline, petroleum based
products, penetrating oils, etc., come in
contact with plastic parts. Chemicals can
damage, weaken or destroy plastic
which may result in serious personal
injury.
Periodically, clean all foreign material from the
trimmer head air vents.
You can often make repairs described here. For
other repairs, have the trimmer serviced by an
authorized service center.
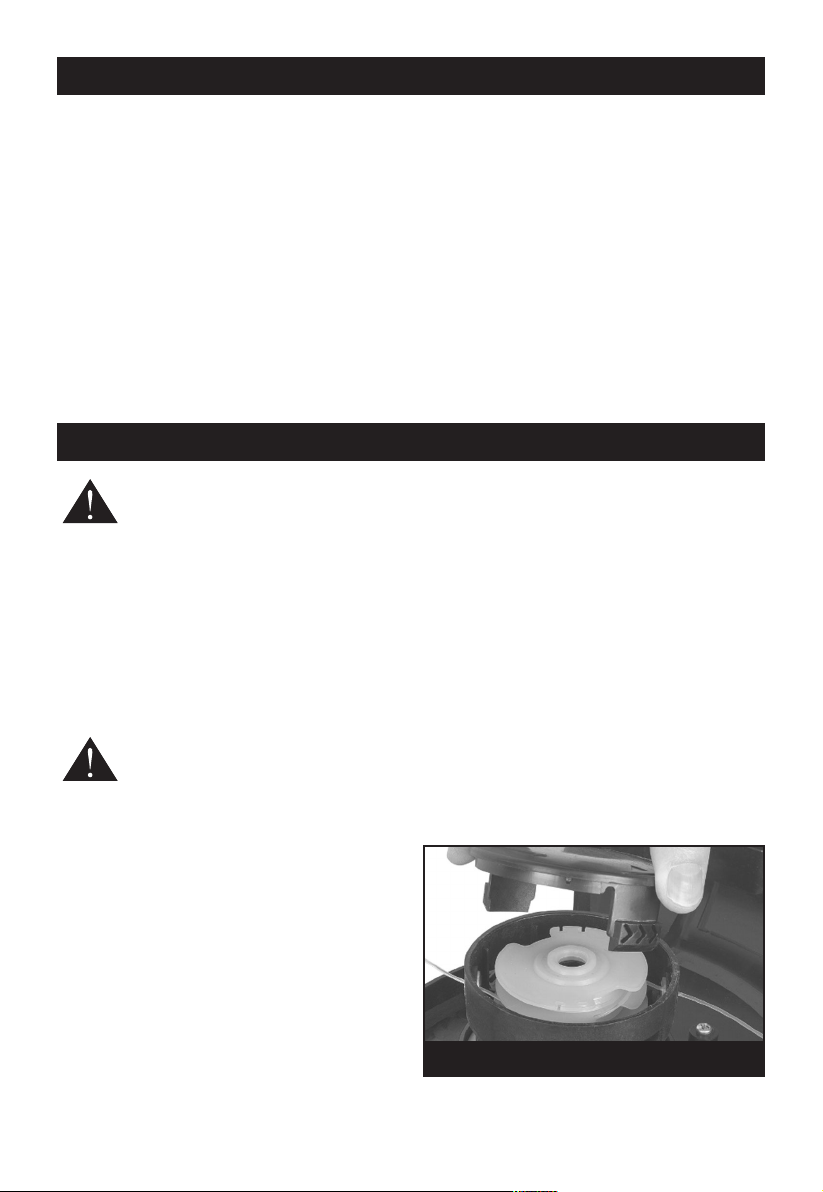
SPOOL REPLACEMENT
Use only 1.4mm. diameter filament line. Use
original manufacturer’s replacement line for best
performance.
Cut all grass from top to down. This will prevent
rass from wrapping around the shaft housing and
g
string head which could cause damage from
verheating. If grass becomes wrapped around the
o
tring head, STOP THE ENGINE, disconnect the
s
spark plug wire, and remove the grass.
Use the tip of line to trim grass; do not force string
head into uncut grass.
Avoid trees, flowers, stones, walls and other
objects which can cause the line breakage.
Check and feed the line regularly to maintain full
cutting width and performance.
Unplug the string trimmer.
Push in tabs on side of spool retainer.
Pull spool retainer up to remove. Fig.15.
Remove spool.
To install the new spool, make sure the two lines
are captured in the slots opposite each other on the
new spool. Make sure the end of each line is
extended approximately 15cm beyond each slot.
Install the new spool so that the lines and slots
align with the eyelets in the line head. Thread the
lines into the eyelets.
Pull the lines extending from the line head so the
line releases from the slots in the spool.
Reinstall the spool retainer by depressing tabs into
slots and pushing down until spool retainer clicks
into place.
Fig. 15
12
Page 14
MAINTENANCE
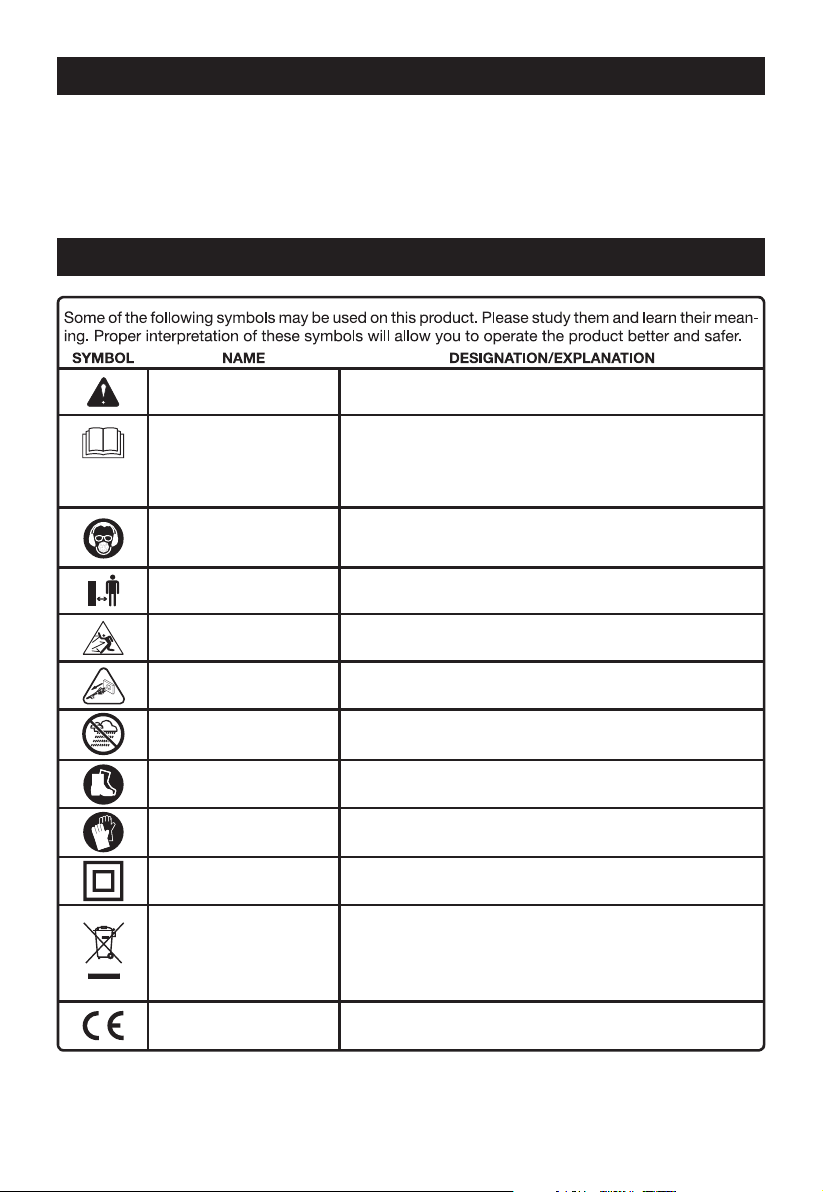
Safety Alert Symbol
Indicates danger, warning or caution. It means attention!!!
Your safety is involved.
Read Your Operator's
Manual
Your manual contains special messages to bring attention
to potential safety concerns as well as operating and
servicing information. Please read all the information
carefully to ensure satisfaction and safe use.
Wear eye, hearing and
head protection
Wear eye, hearing and head protection when operating
this equipment.
Keep bystanders away Keep all bystanders at least 15 m away.
Ricochet
Danger of Ricochet.
Damaged cable
Remove cable from power if it is damaged.
Boots
Wear non-slip safety footwear when using this equipment.
Gloves
Wear non-slip, heavy-duty gloves.
Recycle Symbol
Waste electrical products should not be disposed of with
household waste. Please recycle where facilities exist.
Check with your Local Authority or retailer for recycling
advice.
CE Marking
Conforms to relevant safety standards.
Wet conditions alert
Do not expose to wet or damp conditions.
Insulation Symbol Double insulated for additional protection.
STORING THE TRIMMER
nplug the trimmer.
U
Depress telescopic tube adjustment coupler and
et at shortest setting.
s
lean all foreign material from the trimmer.
C
SYMBOLS
Store it in a place that is inaccessible to children.
Keep away from corrosive agents such as garden
chemicals and de-icing salts.
13
Page 15

NOTES
14
Page 16

NOTES
15
 Loading...