

Page 1
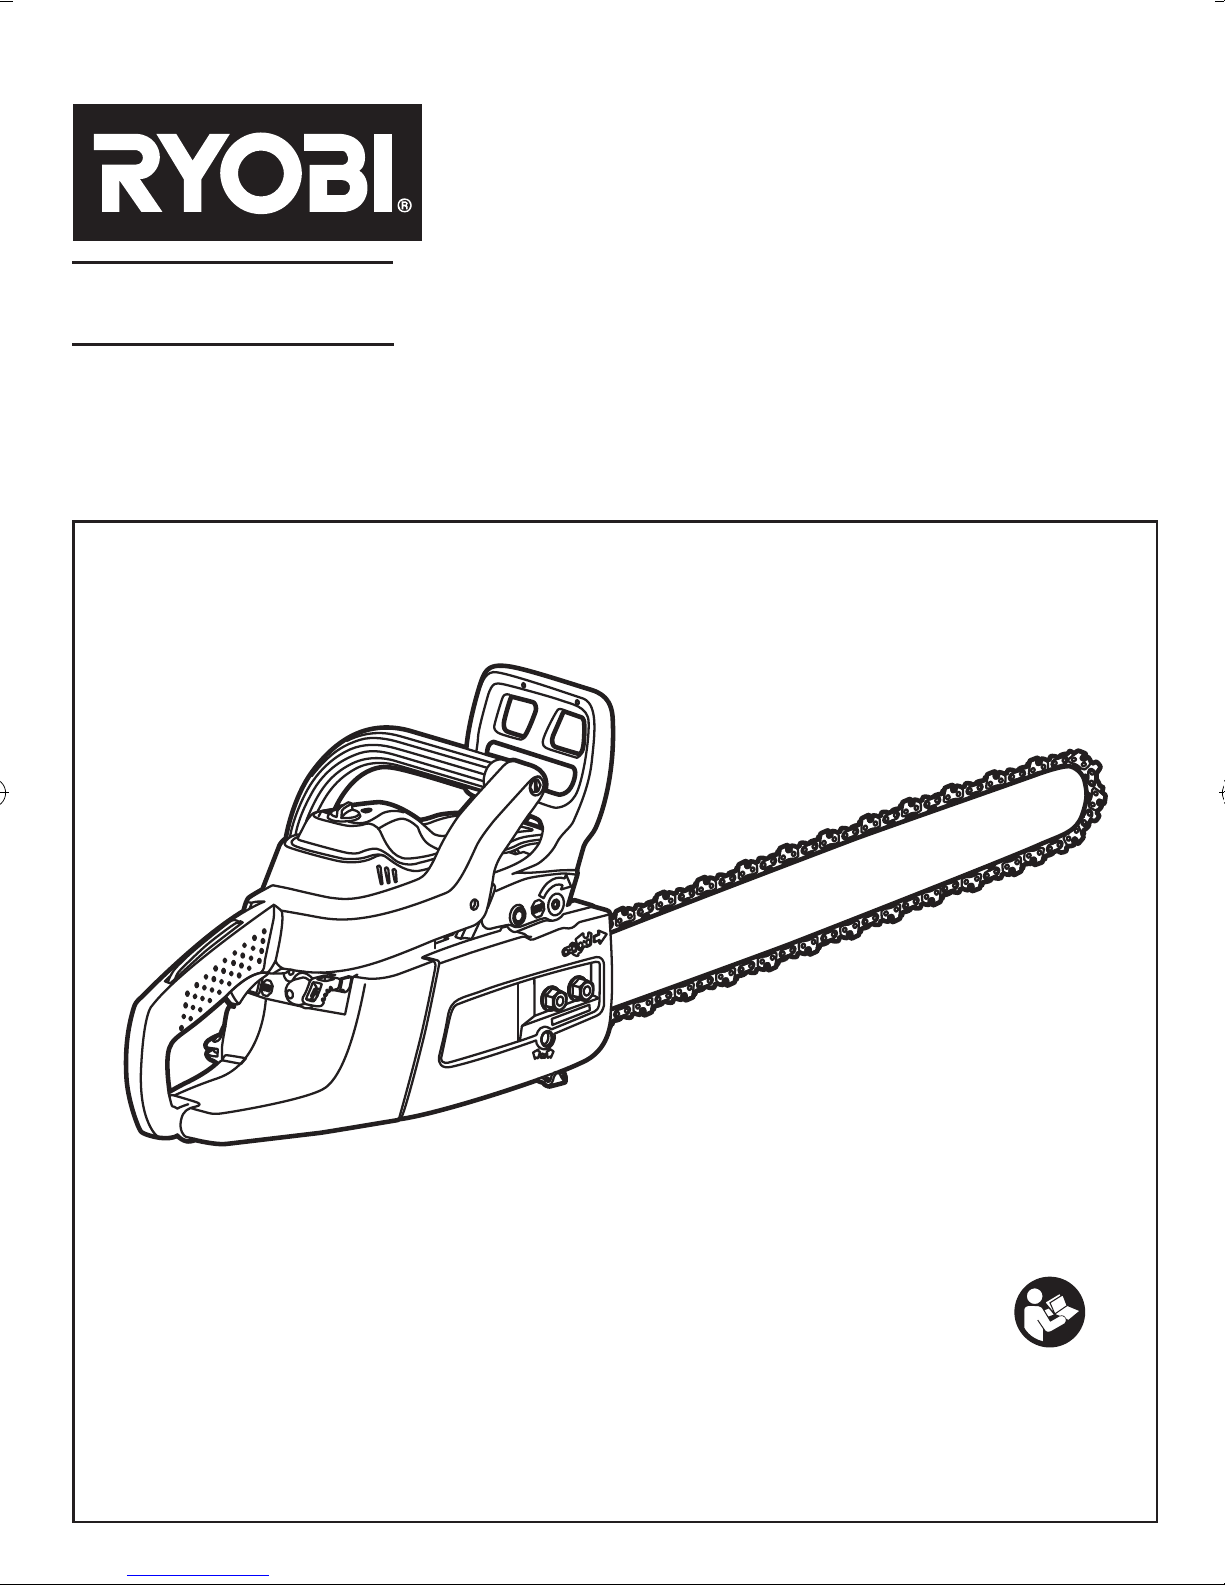
RCS5145N
PETROL CHAINSAW
Important!
It is essential that you read the instructions in this manual before
assembling, maintaining and operating this machine.
Page 2

English (Original Instructions)
Thank you for buying a Ryobi chainsaw.
Your chainsaw has been engineered and manufactured to
Ryobi’s high standard for dependability, ease of operation,
and operator safety. Properly cared for, it will give you
years of rugged, trouble-free performance.
Some regions have regulations that restrict the use of
the product to some operations. Check with your local
authority for advice.
READ ALL INSTRUCTIONS
Intended use
This chainsaw is designed for cutting branches, trunks,
logs and beams of a diameter determined by the cutting
length of the guide bar. It is only designed to cut wood. It
is only to be used outdoors, by adults.
Do not use the chainsaw for any purpose not listed above.
This chainsaw is not to be used for professional tree
services. It is not to be used by children or by persons
not wearing adequate personal protective equipment and
clothing.
Residual risks
Even when using the chainsaw as intended, there remains
a residual risk of harm which cannot be fully prevented.
The following list of potential hazards should be read and
understood. You should pay extra attention and care to
these items to reduce the risk of occurrence or injury.
■ Contact with exposed cutting teeth and saw chain.
■ Access to rotating parts (the saw chain).
■ Unexpected, abrupt movement (kick back) of the
guide bar.
■ Flying chain parts (thrown off or broken).
■ Flying material (cut from the work piece).
■ Inhalation of saw dust and particles or emissions from
the petrol engine.
■ Skin contact with petrol/oil.
■ Loss of hearing if no hearing protective equipment
worn during use.
GENERAL SAFETY RULES
WARNING
The warnings, labels, and instructions found in this
section of the operator’s manual are for your safety.
Failure to follow all instructions may result in serious
personal injury. Safe operation of this tool requires that
you read and understand this operator’s manual and
all labels afxed to the tool. Safety is a combination of
using common sense, staying alert, and knowing how
your saw works.
■ Do not operate a chainsaw that is damaged, improperly
adjusted, or not completely and securely assembled.
Be sure that the saw chain stops moving when the
throttle control trigger is released.
GENERAL PRECAUTIONS
■ Know your tool. Read the operator’s manual carefully.
Learn the saw’s applications and limitations as well as
the specific potential hazards related to this tool.
■ Do not operate a chainsaw with one hand. Serious
injury to the operator, helpers, and/or bystanders
may result from one-handed operation. A chainsaw is
intended for two-handed use.
■ Do not operate a chainsaw when you are fatigued.
Never operate a chainsaw when you are tired or under
the influence of medication, drugs, or alcohol.
■ Keep all parts of your body away from the saw chain
when the engine is running.
■ Always carry the chainsaw with the engine stopped
and the brake engaged, the guide bar and saw chain
to the rear, and the silencer away from your body.
When transporting the chainsaw, use the appropriate
guide bar scabbard.
■ Turn off the engine before putting the chainsaw down.
Do not leave the engine running unattended. As an
additional safety precaution, apply the chain brake
before putting down the saw.
■ Do not cut vines and/or small undergrowth (less than
76 mm (3 inch) in diameter).
■ Silencer surfaces are very hot during and after
operation of the chainsaw; keep all body parts away
from the silencer. Serious burns may occur if contact
is made with the silencer.
■ Always hold the chainsaw with both hands when the
engine is running. Use a firm grip with thumbs and
fingers encircling the chainsaw handles.
■ Never let anyone use your chainsaw who has not
received adequate instructions in its proper use. This
applies to rentals as well as privately owned saws.
■ Before you start the engine, make sure the saw chain
is not contacting any object.
■ Operate the chainsaw only in well ventilated areas.
■ Always have a fire extinguisher available when using
chainsaw.
■ Use guide bar cover during transport and storage.
■ The chainsaw should always be used with correctly
mounted spiked bumper.
■ Do not adapt your powerhead to a bow guide or use
it to power any attachments or devices not listed for
your saw.
1
Page 3

English (Original Instructions)
PROPER CLOTHING FOR SAFETY
■ Clothing must be sturdy and snug-fitting but allow
complete freedom of movement. Always wear long
pants made of heavy material to help protect your
legs from contact with branches and brush. To reduce
the risk of cut injuries,wear pants or chaps that
contain pads of cut retardant material. Never wear
scarves,ties,jewellery or other items of clothing,which
might get caught in the equipment, in brush or on
branches. Secure hair so it is above shoulder.
■ Wear safety boots with a good tread (with non-slip
soles).
■ Wear non-slip, heavy-duty protective gloves.
■ Wear eye protection with side shields marked to
comply with EN 166 as well as hearing and head
protection when operating the product.
REFUELLING (DO NOT SMOKE!)
■ To reduce the risk of fire and burn injury, handle fuel
with care. It is highly flammable.
■ Mix and store fuel in a container approved for petrol.
■ Mix fuel outdoors where there are no sparks or flames.
■ Select bare ground, stop the engine, and allow it to
cool before refuelling.
■ Loosen the fuel cap slowly to release pressure and to
keep fuel from escaping around the cap.
■ Tighten the fuel cap securely after refuelling.
■ Wipe spilled fuel from the unit. Move 9 m away from
refuelling site before starting engine.
■ Never attempt to burn off spilled fuel under any
circumstances.
BASIC PRECAUTIONS IN THE CUTTING/WORK AREA
■ Do not stand on any unstable surface while using your
chainsaw, that includes ladders, scaffolds, trees, etc.
■ Do not start cutting until you have a clear work area,
secure footing, and a planned retreat path from the
falling tree.
■ Do not cut from a ladder, this is extremely dangerous.
■ Use extreme caution when cutting small-size brush
and saplings because slender material may catch the
saw chain and be whipped toward you or pull you off
balance.
■ When cutting a limb under tension, be alert for spring-
back so that you will not be struck when the tension in
the wood fibres is released.
■ Do not operate a chainsaw in a tree unless you have
been specifically trained to do so.
■ Beware of the emission of exhaust gases, lubricant
mist and saw dust.
■ This product is very noisy when operating, to prevent
long term hearing damage, wear hearing protection
and keep other persons 15 m away from the work
area. Operating similar tools nearby increases risk of
injury. Take frequent breaks.
■ Use of hearing protection reduces the ability to hear
warnings (shouts or alarms). The operator must pay
extra attention to what is going on in the work area.
■ Keep bystanders and animals out of the work area. Do
not allow other persons to be nearby during starting or
cutting with the chainsaw.
NOTE: The size of the work area depends on the job being
performed as well as the size of the tree or work piece
involved. For example, felling a tree requires a larger work
area than making other cuts, i.e., bucking cuts etc.
PUSH AND PULL
The reaction force is always opposite to the direction the
chain is moving. Thus, the operator must be ready to
control the pull when cutting on the bottom edge of the bar
and the push when cutting along the top edge.
NOTE: Your chainsaw has been fully factory tested. It is
normal to nd some slight lubricant residue on the saw.
MAINTENANCE PRECAUTIONS
■ Never operate a chainsaw that is damaged, improperly
adjusted, or is not completely and securely assembled.
■ Be sure that the saw chain stops moving when the
throttle control trigger is released. If the saw chain
moves at idling speed, the carburettor may need
adjusting. Refer to “Operation-adjusting idling speed”
later in this manual. If the saw chain still moves at
idling speed after adjustment has been made, contact
a service dealer for adjustment and discontinue use
until the repair is made.
■ Keep the handles dry, clean, and free of lubricant or
fuel mixture.
■ Follow the sharpening and maintenance instructions
for the saw chain.
■ Use only the replacement guide bars and low kickback
chains specified for your saw. You must never modify
or remove parts from this product or use parts not
recommended by Ryobi. This will increase the risk of
injury.
WARNING
The risk of kickback may increase if non-approved
guide bar and chain combinations are used. Refer to
specications table for qualied replacement guide bar
and chain combinations.
2
Page 4
English (Original Instructions)
WARNING
All chainsaw service, other than the items in the
operator’s manual maintenance instructions, should be
performed by competent chainsaw service personnel.
If improper tools are used to remove the ywheel or
clutch, or if an improper tool is used to hold the ywheel
in order to remove the clutch, structural damage to the
ywheel could occur which could subsequently cause
the ywheel to burst and serious injury could result.
KICK-BACK
■ Kick-back may occur when the nose of the guide bar
touches an object or when the wood closes in and
pinches the saw chain in the cut. The nose of guide
bar contact in some cases may cause a lightning-fast
reverse reaction kicking the guide bar up and back
toward the operator. Pinching the saw chain along the
top of the guide bar may push the guide bar rapidly
back toward the operator. Either of these reactions
may cause you to lose control of the saw which could
result in serious personal injury. Do not rely exclusively
upon the safety devices built into your saw. As a
chainsaw user, you should take several steps to keep
your cutting jobs free from accident or injury.
1. With a basic understanding of kick-back, you can
reduce or eliminate the element of surprise. Sudden
surprise contributes to accidents.
2. Keep a good rm grip on the saw with both hands
when the engine is running. Place your right hand on
the rear handle and your left hand on the front handle
with your thumbs and ngers encircling the chainsaw
handles. A rm grip together with a stiff left arm will
help you maintain control of the saw if kick-back
occurs.
3. Make sure that the area in which you are cutting is free
from obstructions. Do not let the nose of the guide bar
contact a log, branch, fence, or any other obstruction
that could be hit while you are operating the saw.
4. Cut at high engine speeds. Always cut with the engine
running at full speed. Fully squeeze the throttle trigger
and maintain a steady cutting speed.
5. Do not overreach or cut above chest height.
6. Follow the manufacturer’s sharpening and
maintenance instructions for the saw chain.
7. Use only replacement bars and chains specied by the
manufacturer or the equivalent.
NOTE: Refer to “Operation” in this manual for information
on kick-back and how to avoid serious personal injury.
WHITE FINGER RISKS
Prolonged use of chainsaws expose operators to harmful
vibration that may lead to white nger risks. Symptoms
include episodic blanching of ngers in response to cold,
numbness and tingling. In extreme cases, it will cause loss
of touch sensation.
Anti-vibration system does not guarantee that you will
not suffer white nger risks. Operators should observe
their hands and ngers. If the above symptoms occur,
operators should seek medical advice immediately.
It has been reported that vibrations from hand-held tools
may contribute to a condition called Raynaud’s Syndrome
in certain individuals. Symptoms may include tingling,
numbness and blanching of the Fingers, usually apparent
upon exposure to cold.
Hereditary factors, exposure to cold and dampness, diet,
smoking and work practices are all thought to contribute to
the development of these symptoms. There are measures
that can be taken by the operator to possibly reduce the
effects of vibration:
a. Keep your body warm in cold weather. When operating
the unit wear gloves to keep the hands and wrists
warm. It is reported that cold weather is a major factor
contributing to Raynaud’s Syndrome.
b. After each period of operation, exercise to increase
blood circulation.
c. Take frequent work breaks. Limit the amount of
exposure per day.
d. Injuries may be caused, or aggravated by prolonged
use of a tool. When using any tool for prolonged
periods, ensure you take regular breaks.
If you experience any of the symptoms of this condition,
immediately discontinue use and see your doctor about
these symptoms.
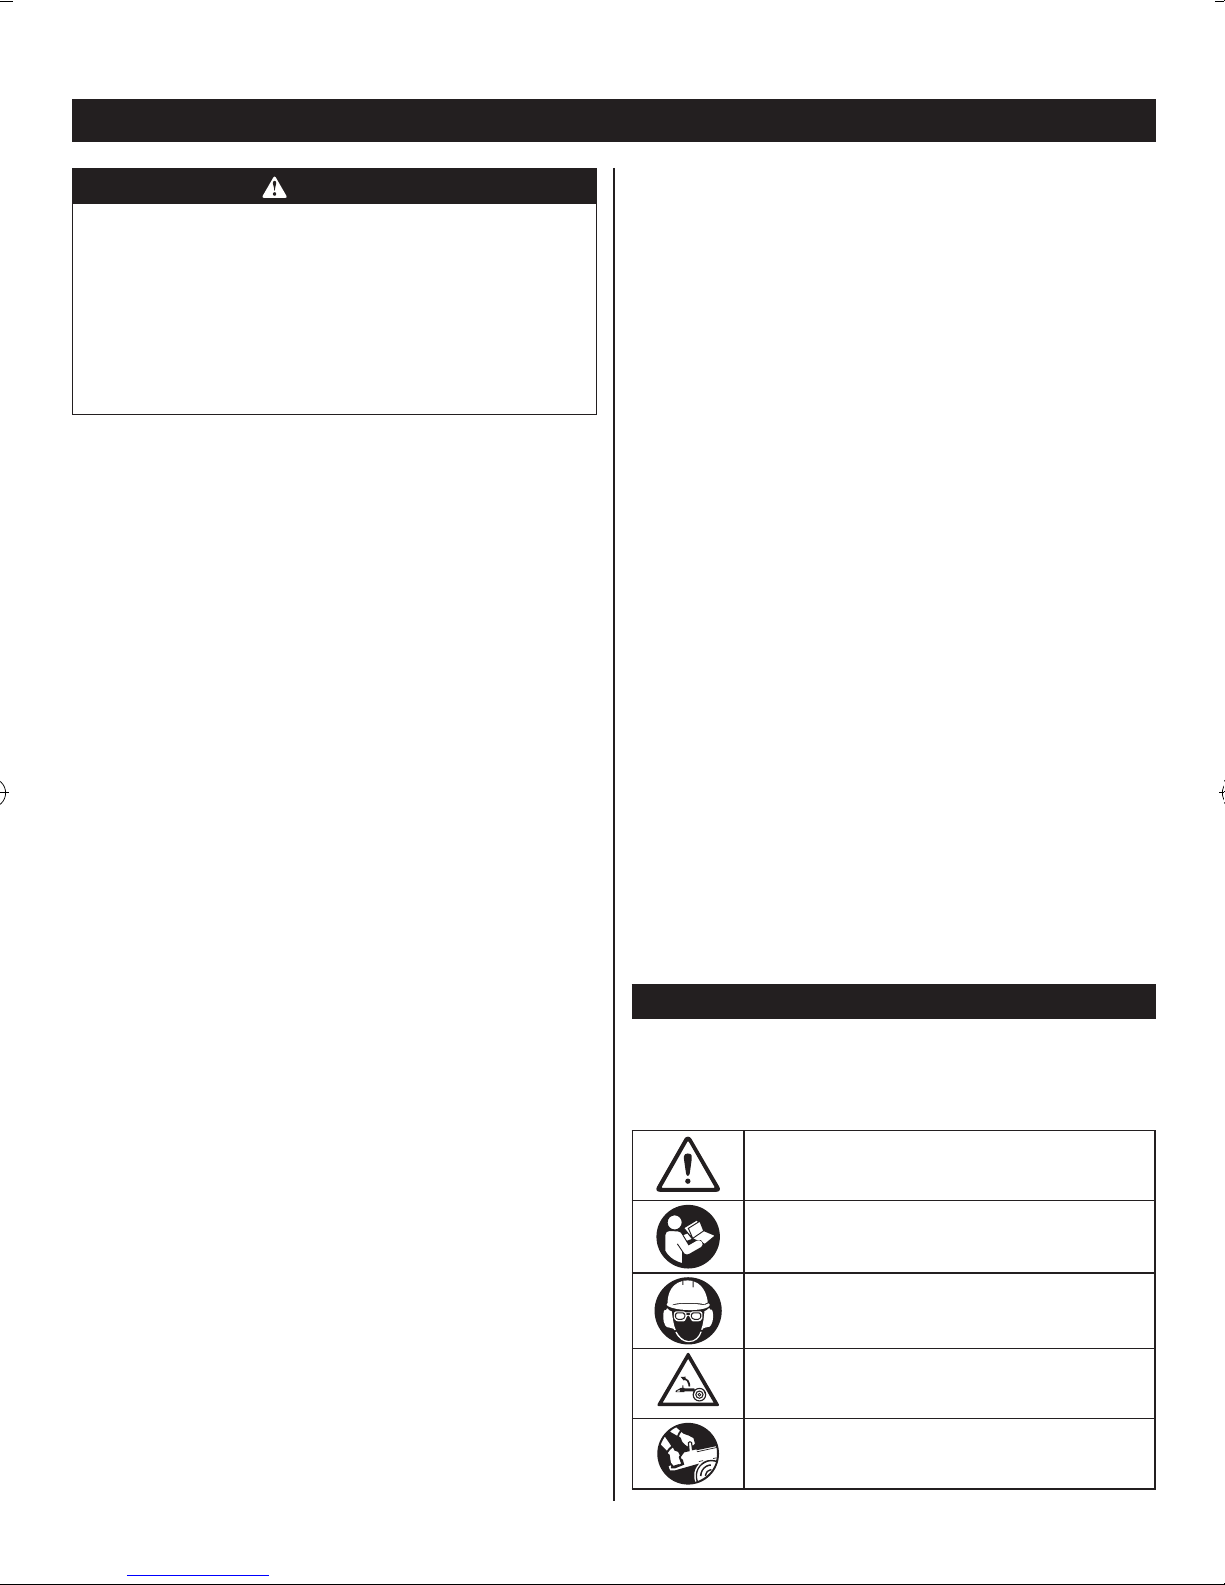
SYMBOL
Some of the following symbols may be used on this
product. Please study them and learn their meaning.
Proper interpretation of these symbols will allow you to
operate the product better and safer.
Indicates a potential personal injury
hazard.
To reduce the risk of injury, user must read
and understand operator’s manual before
using this product.
Wear eye, hearing and head protection
when operating this equipment.
Beware of chain saw kickback and avoid
contact with bar tip.
Hold and operate the saw properly with
both hands.
3
Page 5
English (Original Instructions)
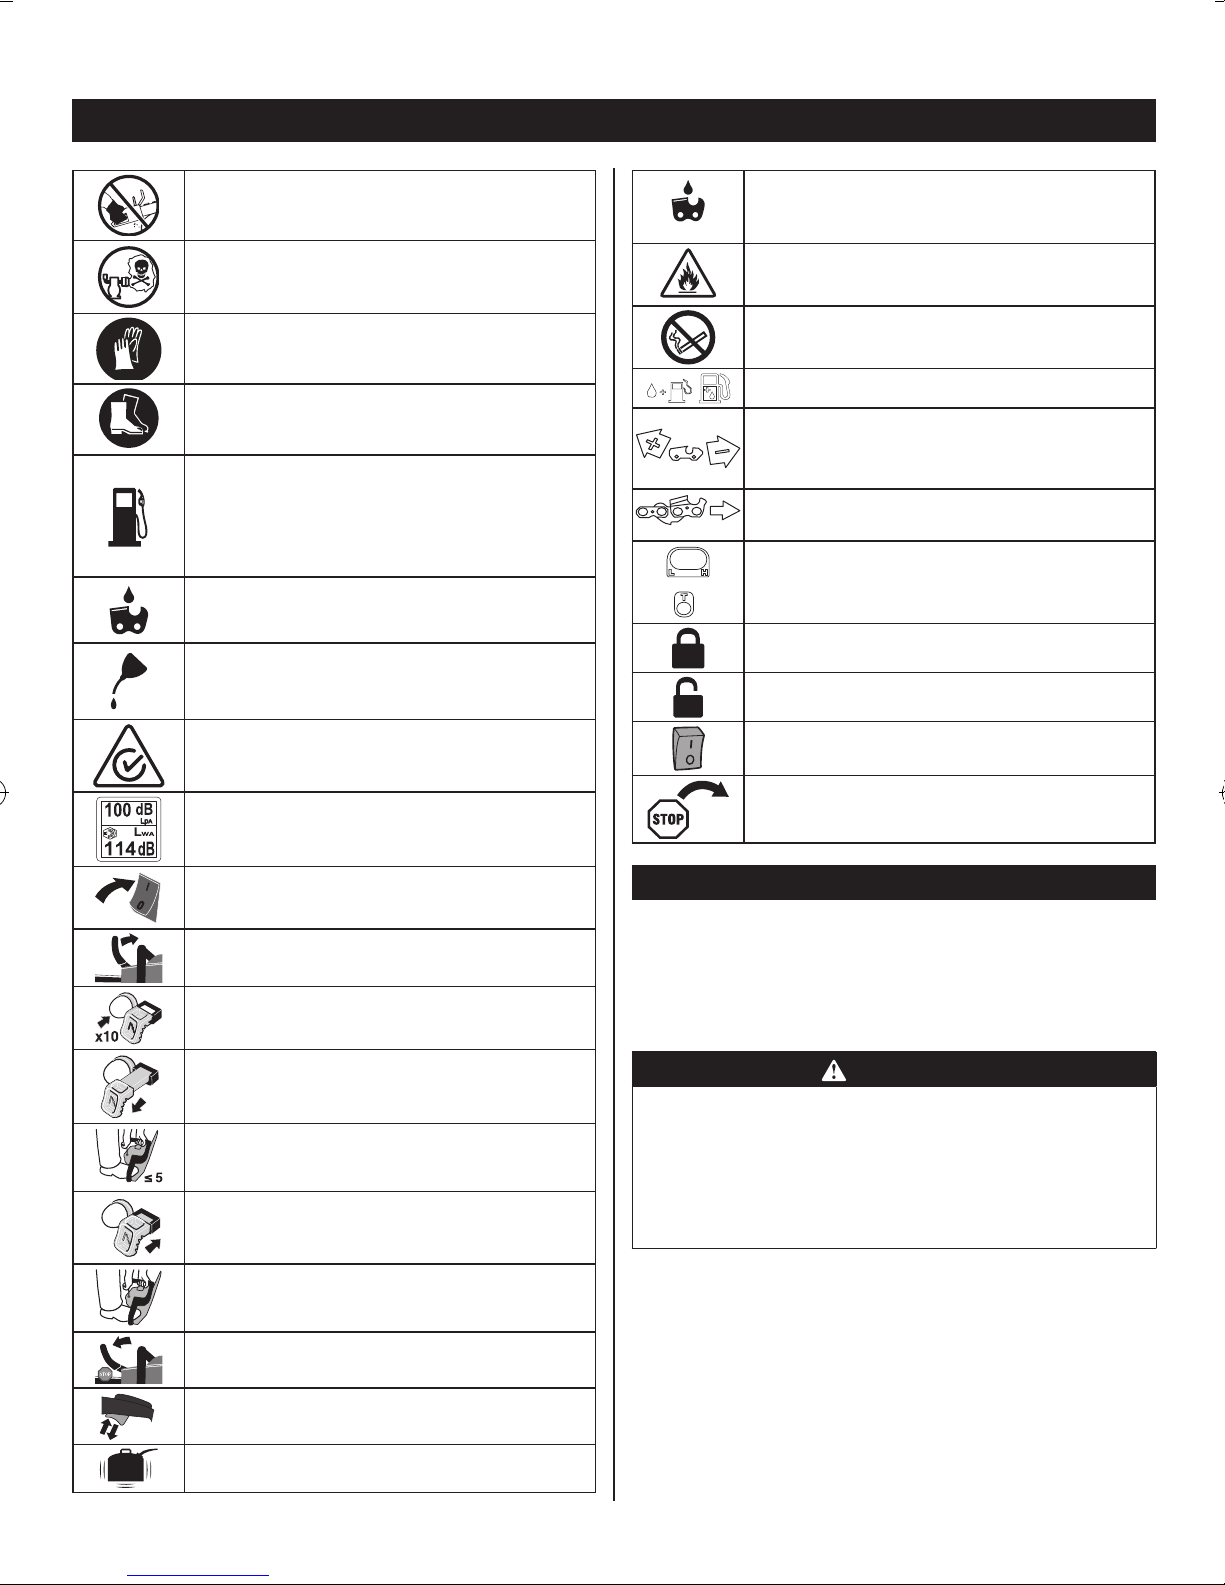
Do not operate the saw using only one
hand.
Engines produce carbon monoxide which
is an odorless, deadly poison. Do not
operate in an enclosed area.
Wear non-slip, heavy-duty protective
gloves when handling the chainsaw.
Always wear safety boots with non-slip
sole.
Use unleaded petrol intended for motor
vehicle use with an octane rating of 91 [(R
+ M)/2] or higher. This product is powered
by 2-stroke cycle engine and requires premixing petrol and 2-stroke lubricant.
Bar and chain lubricant
Use 2-stroke oil for air cooled engines.
Regulatory Compliance Mark (RCM).
This product meets applicable regulatory
requirements.
Guaranteed sound pressure and sound
power lever
Add bar and chain oil (to the bar and chain
reservoir) every time that fuel is added to
the chainsaw’s fuel tank.
Mix fuel outdoors where there are no
sparkles or ames.
Do not smoke when mixing fuel or lling
fuel tank.
Fuel and oil
Rotate to adjust chain tension
"+" = Tighten the chain
"-" = Loosen the chain
Moving direction of the chain
H = High speed adjustment needle
L = Low speed adjustment needle
T = Idle adjustment screw
Lock the lter access cover.
Unlock the lter access cover.
Ignition switch:
I = ON, O = Stop
Set the brake lever to Brake (Stop) position
Set ignition switch to RUN (I) position.
Make sure chain brake is disengaged.
Fully press and release primer bulb 10
times.
Pull choke lever all the way out. This also
sets the throttle to fast idle.
Pull starter until engine attempts to start
(no more than 5 pulls).
Push choke lever all the way in.
Pull starter until engine runs (6x Max).
Chain brake ON.
Squeeze and release throttle.
Mix the fuel mix thoroughly and also each
time before refueling.
SERVICE
Servicing requires extreme care and knowledge
and should be performed only by a qualied service
technician. For service we suggest you return the product
to your nearest authorised service center for repair. When
servicing, use only identical replacement parts.
WARNING
To avoid serious personal injury, do not attempt
to use this product until you read thoroughly and
understand completely the operator’s manual. If you
do not understand the warnings and instructions in the
operator’s manual, do not use this product. Call Ryobi
customer service for assistance.
4
Page 6
English (Original Instructions)
WARNING
The operation of any power tool can result in foreign
objects being thrown into your eyes, which can result
in severe eye damage. Before beginning power tool
operation, always wear safety goggles or safety glasses
with side shields and, when needed, a full face shield.
We recommend Wide Vision Safety Mask for use
over eyeglasses or standard safety glasses with side
shields. Always use eye protection which is marked to
comply with EN 166.
WARNING
Long term inhalation of the engine's exhaust fumes,
chain oil mist and sawdust can result in serious
personal injury.
Save these instructions and pass them on if the saw is to
be used by another person.
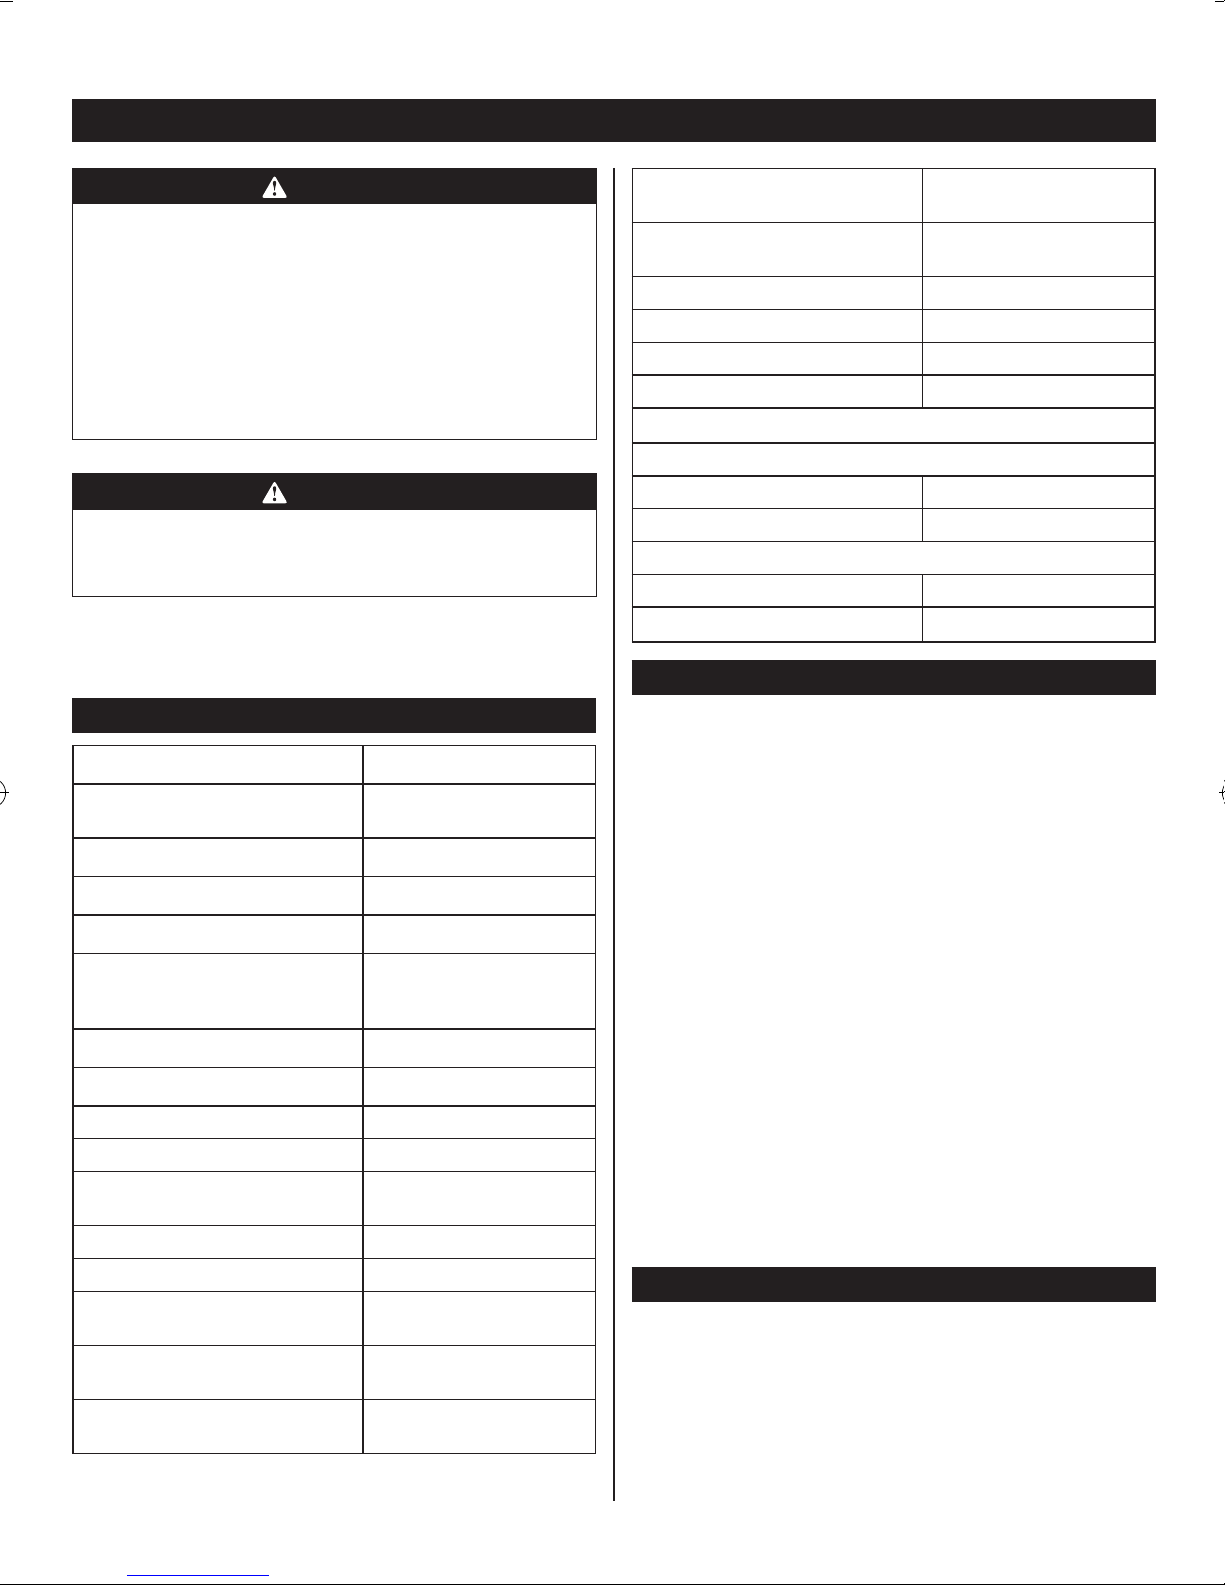
SPECIFICATIONS
Model name RCS5145N
Description
Weight - no bar, chain, fuel 5.3 kg
Fuel tank capacity 575 cm
Lubricant tank capacity 350 cm
Maximum chain speed at the
recommended maximum engine
speed
Bar length 45 cm
Usable cutting length 425 mm
Chain pitch 8.26 mm (0.325")
Chain gauge 1.27 mm (0.05")
Chain type
Drive sprocket 7 teeth x 0.325''
Engine displacement 51 cm
Maximum engine power (ISO
7293)
Recommended maximum engine
speed with cutting attachment
Recommended engine speed
at idling
51cc 45 cm (18'') gasoline
chain saw
3
3
22.2 m/s
0.325" low prole full
complement
3
2.0 kW
11,500 min
2,600-3,600 min
-1
-1
Specic fuel consumption at
maximum engine power
Sound pressure level (ISO 22868)
Sound power level (ISO 22868) 114 dB(A)
Vibration (ISO 22867): Oregon
– Front handle 8.12 m/s2, K=1.5
– Rear handle 8.0 m/s2, K=1.5
490 g/kWh
LpAav: 100 dB(A),
KpA=3 dB(A)
Bar & Chain
Guide bar (no silkscreen)
– Oregon part number 180 PXB K041
– Colour Black
Chain
– Oregon part number 20BPX-72
File size (to sharpen chain) 5/32" (4 mm)
DESCRIPTION
1. Front hand guard/Chain brake
2. Front handle
3. Engine cover
4. Primer bulb
5. Choke lever
6. Chain
7. Starter grip
8. Guide bar
9. Chain catcher
10. Trigger release
11. Chain lubricant cap
12. Silencer
13. Idle adjustment screw
14. Rear handle
15. Throttle trigger
16. Fuel mix cap
17. On/Off switch
18. Starter/Fan housing
19. Spiked bumper
20. Air lter access cover assembly
21. Screw
22. Air lter
OPERATION
For your safety, study this entire manual before operating
the saw. Pay particular attention to the precautions and
instructions listed in the operator’s manual.
5
Page 7

English (Original Instructions)
WARNING
The warnings and instructions in this section of the
operator’s manual are for your safety and to prevent
serious personal injury.
UNDERSTANDING YOUR CHAINSAW SAFETY
DEVICES
Low kick-back saw chain
A low-kick-back saw chain is a chain which has met the
kickback performance requirements.
The rakers (depth gauges) ahead of each cutter can
minimise the force of a kick-back reaction by preventing
the cutters from digging in too deeply at the kick-back
zone. Only use replacement chain that is equivalent to
the original chain or has been certied as a low kick-back
chain.
As saw chains are sharpened, they lose some of the low
kickback qualities and extra caution is required.
Spiked bumper
See gure 1.
The integral bumper spike may be used as a pivot when
making a cut.
Guide bars
Generally, guide bars with small radius tips have
somewhat lower kick-back potentials.
Chain brake
See gure 3.
Chain brakes are designed to quickly stop the chain from
rotating. When the chain brake lever/hand guard is pushed
towards the bar, the chain should stop immediately. A
chain brake does not prevent kick-back. The chain brake
should be cleaned and tested daily. Refer to “operation”
later in this manual for additional information.
(A) Run position
(B) Brake position
WARNING
Even with daily cleaning of the mechanism, the
dependability of a chain brake to perform under eld
conditions cannot be certied.
WARNING
Kick-back occurs when the moving chain contacts
an object at the upper portion of the tip of the guide
bar or when the wood closes in and pinches the saw
chain in the cut. Contact at the upper portion of the tip
of the guide bar may cause the chain to dig into the
object and stop the chain for an instant. The result is
a lightning-fast, reverse reaction which kicks the guide
bar up and back towards the operator. If the saw chain
is pinched along the top of the guide bar, the guide bar
can be driven rapidly back towards the operator. Either
of these reactions may cause you to lose control of the
saw, which could result in serious injury.
Do not rely exclusively upon the safety devices built into
your saw. As a chainsaw user, you should take several
steps to keep your cutting jobs free from accident or injury.
KICK-BACK PRECAUTIONS
See gure 4 - 5.
Rotational kick-back occurs when the moving chain
contacts an object at the kick-back danger zone of the
guide bar. The result is a lightning-fast, reverse reaction
which kicks the guide bar up and back towards the
operator. This reaction can cause loss of control which
may result in serious injury.
WARNING
Skating - when the chainsaw fails to dig in during a
cut, the guide bar can begin hopping or dangerously
skidding along the surface of the log or branch, possibly
resulting in the loss of control of the chainsaw. To
prevent or reduce the skating, hold the chainsaw with
two hands and make sure the saw chain establishes a
groove for cutting.
WARNING
Bouncing - never cut small, exible branches or brushes
with your chainsaw. Their size and exibility can easily
cause the saw to bounce towards you or bind up with
enough force to cause a kickback. The best tool for that
kind of work is a hand saw, pruning shears, an axe or
other hand tools.
6
Page 8
English (Original Instructions)
FUEL AND REFUELLING
Handling the fuel safely
WARNING
Always turn off engine before refuelling. Never add fuel
to a machine with a running or hot engine. Move at
least 9 m (30 ft) from refuelling site before starting the
engine. Do not smoke! Failure to heed this warning can
result in possible personal injury.
WARNING
Check for fuel leaks. If any are found, correct them
before using the saw to prevent re or burn injury.
■ Always handle fuel with care. It is highly flammable.
■ Always refuel outdoors where there are no sparks and
flames. Do not inhale fuel vapour.
■ Do not let petrol or lubricant come in contact with your
skin.
■ Keep petrol and lubricant away from the eyes. If petrol
or lubricant comes in contact with the eyes, wash
them immediately with clean water. If irritation is still
present, see a doctor immediately.
■ Clean up spilled fuel immediately.
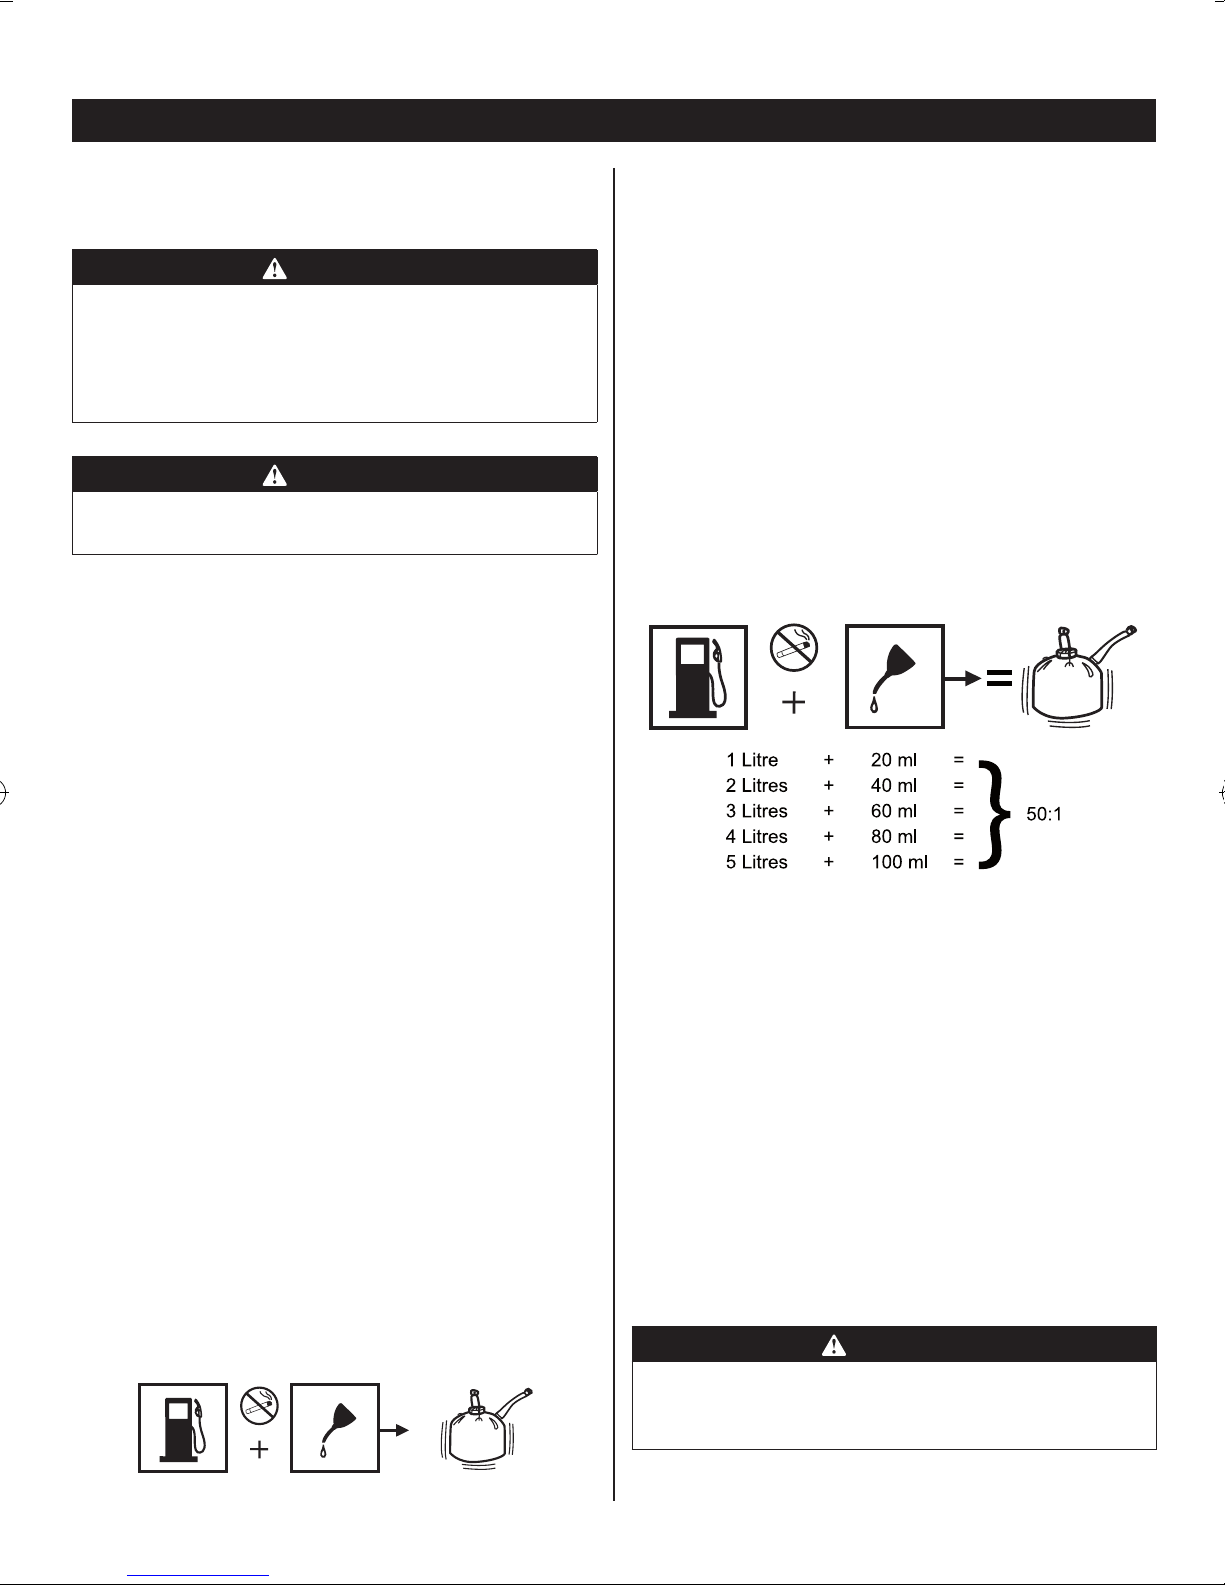
Mixing the fuel
■ This product is powered by a 2-stroke engine and
requires pre-mixing petrol and 2-stroke lubricant.
Premix unleaded petrol and 2-stroke engine lubricant
in a clean container approved for petrol.
■ This engine is certified to operate on unleaded petrol
intended for motor vehicle use with an octane rating of
91 ([R + M]/2) or higher.
■ Do not use any type of pre-mixed petrol/lubricant from
fuel service stations. This includes the premixed petrol/
lubricant intended for use in mopeds, motorcycles etc.
■ Use synthetic 2-stroke lubricant only.
■ Mix 2% lubricant into the petrol. This is a 50:1 ratio.
■ Mix the fuel thoroughly and also each time before
refuelling.
■ Mix in small quantities. Do not mix quantities larger
than usable in a 30-day period. A synthetic 2-stroke
lubricant containing a fuel stabiliser is recommended.
Filling the tank
See gure 6.
Refer to “Safety Rules - Refuelling” earlier in this manual
for additional safety information.
1. Clean surface around fuel cap to prevent
contamination.
2. Loosen fuel cap slowly to release pressure and to
keep fuel from escaping around the cap.
3. Carefully pour fuel mixture into the tank. Avoid spillage.
4. Prior to replacing the fuel cap, clean and inspect the
gasket.
5. Immediately replace fuel cap and hand tighten. Wipe
up any fuel spillage. Move 9 m (30 ft) away from
refuelling site before starting engine.
NOTE: It is normal for smoke to be emitted from a new
engine during and after first use.
CHAIN LUBRICANT SYSTEM
See gure 7.
Use Ryobi bar and chain lubricant. It is designed for
chains and chain lubricating, and is formulated to perform
over a wide temperature range with no dilution required.
Chainsaw should use approximately one tank of lubricant
per tank of fuel.
NOTE: Do not use dirty, used or otherwise contaminated
lubricants. Damage may occur to the lubricant pump, bar,
or chain.
1. Carefully pour the bar and chain lubricant into the tank.
2. Fill the lubricant tank every time you fuel the engine.
STARTING THE ENGINE
See gure 8.
WARNING
Keep your body to the left of the chain line. Never
straddle the saw or chain, or lean past over the chain
line.
7
Page 9

English (Original Instructions)
1. Place the chainsaw on level ground and ensure that
no objects or obstructions which could come in contact
with the bar and chain are in the immediate vicinity.
2. Hold the front handle rmly with the left hand and put
your right foot onto the base of the rear handle.
NOTE: In the following starting instruction, when the choke
lever is pulled all the way out to the START position, the
throttle is set for starting. To reset the throttle to the RUN
position, squeeze and then release the throttle trigger.
STARTING A COLD ENGINE
See gure 3. See gure 8 - 14.
1. Make sure the chain brake is in the brake position
(Fig.3, B) by pushing forwards on the lever/hand
guard.
2. Set the ignition switch to the run (I) position.
3. Fully press and release the primer bulb 10 times.
4. Pull choke lever (Fig.11, 5) all the way out to full
position. The partial throttle position is automatically
set when the choke lever is set at full choke.
5. Pull starter (Fig.12, 7) until engine attempts to start.
Slowly pull the starter grip out for a short distance until
you feel the starter engage, then briskly pull straight
up. Do not pull to the end of the rope; this may damage
the starter. Hold onto the grip during rewinding. Pull
the starter rope until the rst ring of the engine is
heard (no more than ve pulls).
NOTE: A new unit may require additional pulls.
6. Push choke lever (Fig.13, 5) all the way in.
7. Pull starter until engine runs.
8. Depress the trigger release. Squeeze and then release
the throttle trigger (Fig.14) to return the engine to idle
speed. Then you MUST release the brake lever to
RUN position by pulling back on the brake lever/hand
guard before accelerating the engine or cutting wood.
CAUTION
Failure to release partial throttle when chain brake lever
is in the brake position will result in serious damage to
the unit. Never squeeze and hold the throttle trigger
while the chain brake is in the brake position.
Now you are ready to pick up the saw. Use the proper
grip for both handles. Refer to “Operation-proper grip on
handles” later in this manual for additional information.
STOPPING THE ENGINE
See gure 15.
Release the throttle trigger and let the engine return to
idle. To stop the engine, move the ignition switch to the “O”
stop position (17). Do not put the chainsaw on the ground
when the chain is still moving. For additional safety, set
the chain brake when the saw is not in use.
In the event that the ignition switch will not stop the saw,
pull the choke lever out to the fully extended position (Full
Choke) and engage chain brake to stop the engine. If the
ignition switch will not stop the saw when set to the “O”
stop position, have the ignition switch repaired before
using the chainsaw again to prevent unsafe conditions or
serious injury.
IMPORTANT: When you have nished using the saw,
relieve tank pressures by loosening the chain lubricant
and fuel mix caps. Then retighten the caps. Cover the
sharp chain and bar with the appropriate scabbard. Allow
the engine to cool before storing.
PREPARING FOR CUTTING
Proper clothing for safety
See gure 16.
■ Wear safety working clothes (A). Always wear heavy,
long trousers (B), boots (C), and gloves (D). Do not
wear jewellery, shorts, sandals, or go barefoot. Do not
wear loose fitting clothing, which could be drawn into
the engine or catch the chain or undergrowth. Wear
overalls, jeans, or leggings made of cut-resistant
material or ones that contain cut-resistant inserts.
Secure hair so that it is above shoulder level.
■ Wear non-slip safety footwear and heavy-duty gloves
to improve your grip and to protect your hands.
■ Wear eye (E), hearing (F), and head (G) protection
when operating this equipment.
Proper grip on handles
See gure 17 - 18.
Refer to “Specic Safety Rules – proper clothing for safety”
earlier in this manual for appropriate safety equipment.
■ Wear non-slip gloves for maximum grip and protection.
■ Hold the saw firmly with both hands. Always keep your
left hand on the front handle and your right hand on
the rear handle so that your body is to the left of the
chain line.
STARTING A WARM ENGINE
Follow the instructions for starting a cold engine (steps
1-8), but do not attempt to start in the full choke position
(skip step 5). Push and release primer bulb 10 times. Pull
the choke out and push it back to the original run position.
WARNING
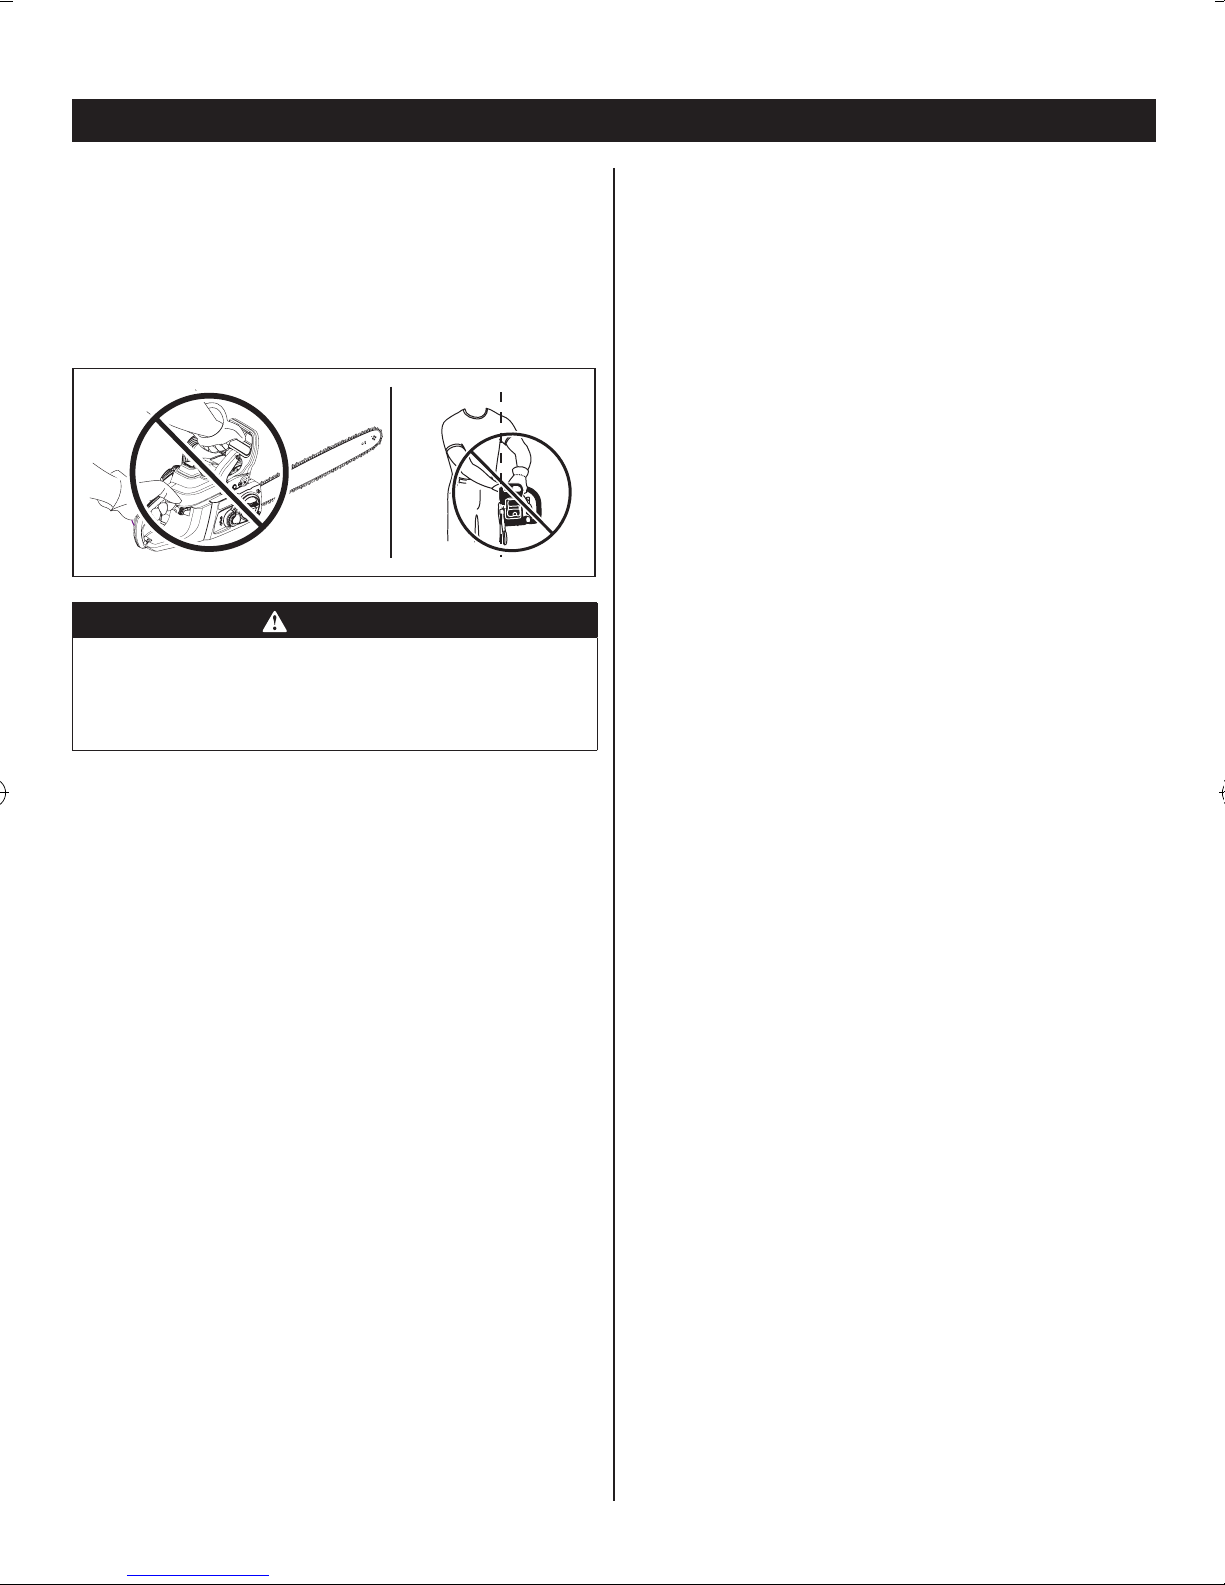
Never use a left-handed (cross-handed) grip or any
stance that would place your body or arm across the
chain line.
8
Page 10
English (Original Instructions)
■ Maintain a proper grip on the saw whenever the engine
is running. The fingers should encircle the handle and
the thumb be wrapped under the handlebar. This grip
is least likely to be broken (by a kick-back or other
sudden reaction of the saw). Any grip in which the
thumb and fingers are on the same side of the handle
is dangerous because a slight kick of the saw can
cause loss of control.
WARNING
Do not operate the throttle trigger with your left hand
and hold the front handle with your right hand. Never
allow any part of your body to be in the chain line while
operating a saw.
PUSH AND PULL
See gure 19.
The reaction force is always opposite to the direction the
chain is moving. Thus, the operator must be ready to
control the pull (A) when cutting on the bottom edge of
the bar and the push (B) when cutting along the top edge.
NOTE: Your chainsaw has been fully factory tested. It is
normal to nd some slight lubricant residue on the saw.
PROPER CUTTING STANCE
See gure 20.
■ Balance your weight with both feet on solid ground.
■ Keep left arm with elbow locked in a “straight arm”
position (B) to withstand any kick-back force.
■ Keep your body to the left of the chain line (A).
■ Keep your thumb on underside of handlebar (C).
BASIC OPERATING/CUTTING PROCEDURES
Practise cutting a few small logs using the following
technique to get the “feel” of using your saw before you
begin a major sawing operation.
1. Take the proper stance in front of the wood with the
saw idling.
2. Accelerate the engine to full throttle just before
entering the cut by squeezing the throttle trigger.
3. Begin cutting with the saw against the log.
4. Keep the engine at full throttle the entire time you are
cutting.
5. Allow the chain to cut for you; exert only light downward
pressure. Forcing the cut could result in damage to the
bar, chain, or engine.
6. Release the throttle trigger as soon as the cut is
completed, allowing the engine to idle. Running the
saw at full throttle without a cutting load may result in
unnecessary wear to the chain, bar, and engine.
7. Do not put pressure on the saw at the end of the cut.
WORK AREA PRECAUTIONS
See gure 21. See gure 27 - 28.
■ Cut only wood or materials made from wood; no sheet
metal, no plastics, no masonry, no non-wood building
materials.
■ Never allow children to operate your saw. Allow no
person to use this chainsaw who has not read this
operator’s manual or received adequate instructions
for the safe and proper use of this chainsaw.
■ Keep everyone – helpers, bystanders, children, and
animals, a safe distance from the cutting area. During
felling operations, the safe distance should be at least
twice the height of the largest trees in the felling area.
During bucking operations, keep a minimum distance
of (4.5 m) 15 ft between workers.
■ Always cut with both feet on solid ground to prevent
being pulled off balance.
■ Do not cut above chest height as a saw held higher is
difficult to control against kick-back forces.
■ Do not fell trees near electrical wires or buildings.
Leave this operation for professionals.
■ Cut only when visibility and light are adequate for you
to see clearly.
ADJUSTING THE CARBURETTOR
See gure 22 - 24.
Before adjusting the carburettor, clean the air lter (A) and
the starter cover vents (B). Allow the engine to warm up
prior to carburettor adjustment. Refer to “Maintenance”
later in this manual.
The carburettor is factory set and should not require
adjusting. The carburettor will permit only limited
adjustment of the “L” (Low Jet) and “H” (High Jet) needles.
Any adjustment should be done by a service dealer.
Under no circumstances should the “L” (Low Jet) and
“H” (High Jet) needles be forced outside the range of
adjustment.
9
Page 11

English (Original Instructions)
CAUTION
Serious damage may occur to the engine if improper
adjustments are made to the “L” and “H” needles. Do
not force the “L” and “H” needles outside the adjustment
range!
ADJUSTING IDLING SPEED
See gure 24.
■ If the engine starts, runs, and accelerates but will
not idle, turn the idling speed screw “T” clockwise to
increase idling speed.
■ If the chain turns at idle, turn the idling speed screw
“T” anticlockwise to reduce the idle RPM and stop the
chain movement. If the saw chain still moves at idling
speed, contact a service dealer for adjustment and
discontinue use until the repair is made.
WARNING
The saw chain should never turn at idle. Turn the idling
speed screw “T” anticlockwise to reduce the idle RPM
and stop the chain, or contact a service dealer for
adjustment and discontinue use until the repair is made.
Serious personal injury may result from the saw chain
turning at idle.
OPERATING THE CHAIN BRAKE
See gure 25 - 26.
Refer to “Safety” earlier in this manual for additional
information. Check the operating condition of the chain
brake prior to each use.
1. Start the engine and grasp the front and rear handles
securely with both hands.
2. Pull the throttle trigger to bring the chainsaw up to full
speed. Using the back of your left hand, engage the
chain brake (A) by pushing the chain brake lever/hand
guard toward the bar while the chain is rotating rapidly.
NOTE: The chain brake should engage and stop the
chain immediately. If not, stop the saw by placing the
ignition switch in the “O” stop position. Take the saw to
service dealer for repair and discontinue use until the
repair is made.
3. Reset the chain brake back into the run position (B) by
grasping the right-hand side (from operator’s position)
of the chain brake lever/hand guard and pull towards
the front handle until you hear a click.
FELLING TREES – HAZARDOUS CONDITIONS
See gure 27.
WARNING
Do not fell trees during periods of high wind or heavy
precipitation. Wait until the hazardous weather has
ended.
When felling a tree, it is important that you heed the
following warnings to prevent possible serious injury.
■ Wear eye, hearing, and head protection (A) when
operating this equipment.
■ Do not cut down trees having an extreme lean or large
trees with rotten or dead limbs, loose bark, or hollow
trunks. Have these trees pushed or dragged down with
heavy equipment, then cut them up.
■ Consider the distribution and weight of heavy limbs
(B).
■ Clear out the undergrowth around the tree to be felled
(C).
■ Do not cut trees near electrical wires or buildings (D).
■ Consider the direction in which the tree leans (E).
■ Check the tree for damaged or dead branches which
could fall and hit you during felling (F).
■ Periodically glance at the top of the tree during the
back-cut to assure the tree is going to fall in the
desired direction.
■ Keep all bystanders at a safe distance (G) (at least
twice the height of the tree).
■ Prepare a path of safe retreat (H).
■ If the tree starts to fall in the wrong direction, or if the
saw gets caught or hung up during the fall, leave the
saw and save yourself!
■ Consider the wind direction before felling a tree.
■ Do not fell trees near power lines or near buildings
which could be struck by falling limbs or the tree itself.
■ The chainsaw operator should keep on the uphill side
of the terrain as the tree is likely to roll or slide downhill
after it is felled.
■ Remove dirt, stones, loose bark, nails, staples, and
wire from the tree where felling cuts are to be made.
WARNING
Do not fell trees near power lines or near buildings
which could be struck by falling limbs or the tree itself.
10
Page 12

English (Original Instructions)
PROPER PROCEDURE FOR TREE FELLING
See gure 28 - 31.
1. Pick your escape route (or routes in case the intended
route is blocked). Clear the immediate area around the
tree and make sure there are no obstructions in your
planned path of retreat. Clear the path of safe retreat
approximately 135° from the planned line of fall (A).
2. Consider the force and direction of the wind, the lean
and balance of the tree, and the location of large limbs.
These things inuence the direction in which the tree
will fall. Do not try to fell a tree along a line different
from its natural line of fall (B).
3. Cut a notch about 1/3 the diameter of the trunk in
the side of the tree (C). Make the notch cuts so they
intersect at right angles to the line of fall. This notch
should be cleaned out to leave a straight line. To keep
the weight of the wood off the saw, always make the
lower cut of the notch before the upper cut.
4. Make the back-cut (D) level and horizontal, and at a
minimum of 2 inches (5 cm) above the horizontal cut
of the notch.
NOTE: Never cut through to the notch. Always leave
a band of wood between the notch and back cut
(approximately 2 inches (5 cm) or 1/10 the diameter of
the tree). This is called a “hinge” or “hingewood” (E).
It controls the fall of the tree and prevents slipping or
twisting or shooting-back of the tree off the stump.
On large diameter trees, stop the back cut before it is
deep enough for the tree to either fall or settle back on
the stump. Then insert soft wooden or plastic wedges
(F) into the cut so they do not touch the chain. Drive
wedges in, little by little, to help jack the tree over.
5. As tree starts to fall, stop the chainsaw and put it down
immediately. Retreat along the cleared path, but watch
the action in case something falls your way.
BUCKING
See gure 33.
Bucking is the term used for cutting a fallen tree to the
desired log length.
■ Cut only one log at a time.
■ Support small logs on a sawing stand or another log
while bucking.
■ Keep a clear cutting area. Make sure that no objects
can contact the guide bar nose and chain during
cutting, this can cause kick-back (A).
■ During bucking operations, stand on the uphill side so
that the cut-off section of the log cannot roll over you.
■ Sometimes it is impossible to avoid pinching (with
just standard cutting techniques) or difficult to predict
which way a log will settle when cut.
BUCKING WITH A WEDGE
See gure 34.
If the wood diameter is large enough for you to insert a soft
bucking wedge (B) without touching the chain, you should
use the wedge to hold the cut open to prevent pinching.
BUCKING LOGS UNDER STRESS
See gure 35.
(D) Log supported at one end.
(C) Log supported at both ends.
Make the rst bucking cut (E) 1/3 of the way through the
log and nish with a 2/3 cut (F) on the opposite side. As
you cut the log, it will tend to bend. The saw can become
pinched or hung in the log if you make the rst cut deeper
than 1/3 of the diameter of the log.
Give special attention to logs under stress (G) to prevent
the bar and chain from pinching.
WARNING
Never cut through to the notch when making a back cut.
The hinge controls the fall of the tree, this is the section
of wood between the notch and backcut.
REMOVING BUTTRESS ROOTS
See gure 32.
A buttress root is a large root extending from the trunk of
the tree above the ground. Remove large buttress roots
prior to felling. Make the horizontal cut (A) into the buttress
rst, followed by the vertical cut (B). Remove the resulting
loose section (C) from the work area. Follow the correct
tree felling procedure after you have removed the large
buttress roots. Refer to “Operation – Proper Procedure for
Tree Felling” earlier in this manual.
OVERBUCKING
See gure 19.
Begin from the top side of the log with the bottom of the
saw against the log; exert light pressure downward. Note
that the saw will tend to pull away from you (A).
UNDERBUCKING
Begin from the under side of the log with the top of the
saw against the log; exert light pressure upward. During
underbucking, the saw will tend to push back at you (B).
Be prepared for this reaction and hold the saw rmly to
maintain control.
LIMBING AND PRUNING
See gure 36.
■ Work slowly, keeping both hands on the saw with a
11
Page 13

English (Original Instructions)
firm grip. Maintain secure footing and balance.
■ Keep the tree between you and the chain while
limbing. Cut from the side of the tree opposite the
branch you are cutting.
■ Do not cut from a ladder, this is extremely dangerous.
Leave this operation for professionals.
■ Do not cut above chest height as a saw held higher is
difficult to control against kick-back.
WARNING
Never climb into a tree to limb or prune. Do not stand on
ladders, platforms, a log, or in any position which may
cause you to lose your balance or control of the saw.
■ When pruning trees it is important not to make the
flush cut next to the main limb or trunk until you have
cut off the limb further out to reduce the weight. This
prevents stripping the bark from the main member.
1. Underbuck the branch 1/3 through for your rst cut (A).
2. Overbuck the branch to drop it (B).
3. Finish by cutting smoothly and neatly against the main
member (C) so the bark will grow back to seal the
wound.
WARNING
If the limbs to be pruned are above chest height, hire a
professional to perform the pruning.
CUTTING SPRING POLES
See gure 37.
A spring pole (A) is any log, branch, rooted stump, or
sapling which is bent under tension by other wood so that
it springs back if the wood holding it is cut or removed.
On a fallen tree, a rooted stump has a high potential of
springing back to the upright position during the bucking
cut to separate the log from the stump. Watch out for
spring-poles; they are dangerous.
WARNING
Spring poles are dangerous and could strike the
operator causing the operator to lose control of the
chainsaw. This could result in severe or fatal injury to
the operator.
MAINTENANCE
REPLACING THE BAR AND CHAIN
See gure 3. See gure 38 - 47.
DANGER
Never start the engine before installing the guide bar,
chain, drivecase cover, and clutch drum. Without all
these parts in place, the clutch can y off or explode,
exposing the user to possible serious injury.
WARNING
To avoid serious personal injury, read and understand
all the safety instructions in this section.
1. Always place the switch in the stop “O” position before
you work on the saw.
2. Make sure the chain brake is not set by pulling the
chain brake lever/hand guard towards the front handle
to the run position.
3. Wear gloves when handling the chain and bar. These
components are sharp and may contain burrs.
4. Remove the bar mounting nuts (B) using a combination
wrench (C) or a 13mm socket wrench spanner.
5. Remove the clutch cover (D).
6. Lay out the new saw chain in a loop and straighten any
kinks. The cutters should face in the direction of chain
rotation. If they face backwards, turn the loop over.
7. Place the chain drive links into the bar groove.
8. Position the chain so there is a loop at the back of
the bar.
9. Hold the chain in position on the bar and place the loop
around the sprocket (J).
10. Fit the bar ush against the mounting surface so that
the bar studs (P) in the chassis are in the long slot of
the bar.
11. Replace the clutch cover ensuring that the adjusting
pin (L) in the clutch cover is in the bar tensioning pin
hole and that both bar studs (P) are in their respective
holes (K) in the clutch cover.
NOTE: The adjusting pin (L) may need to be slightly
repositioned with the chain tensioning screw so that it
is aligned with the position of the bar chain tensioning
pin hole.
12. Replace and nger tighten the bar mounting nuts. The
bar must be free to move for tension adjustment.
13. Remove all slack from the chain by turning the chain
tensioning screw (M) clockwise until the chain seats
snugly against the bar with the drive links in the bar
groove.
14. Lift the tip of the guide bar up to check for sagging (N).
12
Page 14

English (Original Instructions)
15. Release the tip of the guide bar and turn the chain
tensioning screw (M) 1/2 turn clockwise. Repeat this
process until sagging does not exist.
16. Hold the tip of the guide bar up and tighten the bar
mounting nuts (B) securely.
The chain is correctly tensioned when there is no sagging
on the underside of the guide bar, the chain is snug, but
can be turned by hand without binding. Ensure that the
chain brake is not set.
NOTE: If chain is too tight, it will not rotate. Loosen the
bar nuts slightly and turn the tension adjuster 1/4 turn
anticlockwise. Lift the tip of the guide bar up and retighten
the bar nuts securely. Ensure that the chain will rotate
without binding.
ADJUSTING THE CHAIN TENSION
See gure 48 - 50.
WARNING
Never touch or adjust the chain while the motor is
running. The saw chain is very sharp. Always wear
protective gloves when performing maintenance on the
chain.
1. Stop the engine before setting the chain tension.
2. Make sure the guide bar mounting nuts are loosened
to nger tight and turn the chain tensioning screw (M)
clockwise to tension the chain.
NOTE: A cold chain is correctly tensioned when there
is no slack on the underside of the guide bar, the chain
is snug, and it can be turned by hand without binding.
3. Re-tension the chain whenever the ats on the drive
links hang out of the bar groove.
NOTE: During normal saw operation, the temperature
of the chain increases. The drive links of a correctly
tensioned warm chain will hang approximately
1.25 mm (0.05 inch) out of the bar groove. To help
determine the correct warm chain tension, the tip of
the combination wrench (C) can be used as a guide.
NOTE: New chain tends to stretch. Check the chain
tension frequently and tension as required.
CHAIN MAINTENANCE
See gure 51 - 52.
WARNING
Check that the switch is in the STOP “O” position before
you work on the saw.
Use only a low-kick-back chain on this saw. This
fastcutting chain provides kick-back reduction when
properly maintained.
For smooth and fast cutting, maintain the chain properly.
The chain requires sharpening when the wood chips are
small and powdery, the chain must be forced through the
wood during cutting, or the chain cuts to one side. During
maintenance of the chain, consider the following:
1. Improper ling angle of the side plate can increase the
risk of a severe kick-back.
2. Raker (depth gauge) clearance (A).
– Too low increases the potential for kick-back.
– Not low enough decreases cutting ability.
If the cutter teeth hit hard objects such as nails and
stones, or are abraded by mud or sand on the wood,
have a service dealer sharpen the chain.
NOTE: Inspect the drive sprocket for wear or damage
when replacing the chain (B). If signs of wear or
damage are present in the areas indicated, have the
drive sprocket replaced by a service dealer.
SHARPENING THE CUTTERS
See gure 53 - 56.
Parts of a cutter
(A) Cutting corner (E) Gullet
(B) Side plate (F) Heel
(C) Depth gauge (G) Rivet hole
(D) Toe (H) Top plate
Be careful to le all cutters to the specied angles and to
the same length, as fast cutting can only be obtained when
all cutters are uniform.
CAUTION
A chain tensioned while warm may be too tight upon
cooling. Check the “Adjusting the chain tension” before
next use.
1. Wear gloves for protection.
2. Tension the chain prior to sharpening.
NOTE: Refer to “Maintenance – adjusting the chain
tension” earlier in this manual.
3. Use a 4 mm (5/32 inch) diameter round le and holder.
Do all your ling at the midpoint of the bar.
4. Keep the le level with the top plate of the tooth. Do
not let the le dip or rock.
5. Using light but rm pressure, stroke towards the front
corner of the tooth.
13
Page 15
English (Original Instructions)
6. Lift the le away from the steel on each return stroke.
7. Put a few rm strokes on every tooth. File all left-hand
cutters (A) in one direction. Then move to the other
side and le the right-hand cutters (B) in the opposite
direction.
8. Remove lings from the le with a wire brush.
CAUTION
A dull or improperly sharpened chain can cause
excessive engine speed during cutting which may result
in severe engine damage.
WARNING
Improper chain sharpening increases the potential of
kick-back.
WARNING
Failure to replace or repair a damaged chain can cause
serious injury.
WARNING
The saw chain is very sharp. Always wear protective
gloves when performing maintenance to the chain.
TOP PLATE FILING ANGLE
See gure 57.
(A) Correct 30° – le holders are marked with guide marks
to align le properly to produce correct top plate angle.
(B) Less than 30° – for cross cutting.
(C) More than 30° – feathered edge dulls quickly.
SIDE PLATE ANGLE
See gure 58.
(D) Correct 80° – produced automatically if you use the
correct diameter le in the le holder.
(E) Hook – “Grabs” and dulls quickly, increases the
potential of kick-back. Results from using a le with a
diameter too small or a le held too low.
(F) Backward slope – needs too much feed pressure,
causes excessive wear to the bar and chain. Results from
using a le with a diameter too large or le held too high.
depth gauge clearances.
■ Every time the chain is filed, check the depth gauge
clearance.
■ Use a flat file (B) (not provided) and a depth gauge
jointer (C) (not provided) to lower all gauges uniformly.
Use a 0.6 mm (0.025 inch) depth gauge jointer. After
lowering each depth gauge, restore original shape
by rounding the front (D). Be careful not to damage
adjoining drive links with the edge of the file.
■ Depth gauges must be adjusted with the flat file in the
same direction the adjoining cutter was filed with the
round file. Use care not to contact cutter face with flat
file when adjusting depth gauges.
MAINTAINING THE GUIDE BAR
See gure 61.
WARNING
Make sure the chain has stopped before you do any
work on the saw.
Every week of use, reverse the guide bar on the saw to
distribute the wear for maximum bar life. The bar should
be cleaned every day of use and checked for wear and
damage.
Feathering or burring of the bar rails is a normal process
of bar wear. Such faults should be smoothed with a le as
soon as they occur.
A bar with any of the following faults should be replaced:
■ Wear inside the bar rails which permits the chain to lie
over sideways;
■ Bent guide bar;
■ Cracked or broken rails;
■ Spread rails.
In addition, lubricate guide bars (with a sprocket at their
tip) weekly. Using a grease syringe, lubricate weekly in
the lubricating hole.
Turn the guide bar and check that the lubrication holes (A)
and chain groove are free from impurities.
CLEANING THE AIR FILTER
See gure 62 - 64.
NOTE: Always clean the air lter before making any
mixture adjustments of the carburettor.
MAINTAINING DEPTH GAUGE CLEARANCE
See gure 51. See gure 59 - 60.
■ Maintain the depth gauge (A) at a clearance of 0.6 mm
(0.025 inch). Use a depth gauge tool for checking the
1. Push down on the knob on the top of the air lter access
cover assembly (20) and rotate counterclockwise to
unlock. Lift the cover straight up to remove; set aside.
2. Before removing the air lter from the carburettor, blow
or brush as much loose dirt and sawdust from around
14
Page 16

English (Original Instructions)
the carburettor and chamber as possible.
NOTE: Be sure to pull the choke rod out to keep the
carburettor from being contaminated.
3. Using the combination wrench provided or a at blade
screwdriver, remove the screw securing the air lter.
4. Position a at screw driver between the tabs and twist
as shown in the illustration.
5. Lift the air lter off the air lter base.
Choose one of the following cleaning options:
● To lightly clean, tap the filter against a smooth, flat
surface to dislodge most of the saw dust and dirt
particles.
● For a more thorough cleaning, clean in warm
soapy water, rinse, and let dry completely.
● Replace with a new air filter after every 25 hours
of use.
NOTE: An alternative method is to clean the filter with
compressed air (always wear eye protection to avoid
eye injury).
6. Reinstall the air lter, making sure that the tabs on the
air lter are located in channels on the air lter bottom.
7. Reinstall air lter cover assembly. Push down on knob
and rotate clockwise to secure.
8. Clean the pre-lter (D) every 25 tanks of fuel or
sooner, if required. Remove the engine cover (3),
starter assembly (E) and the fan housing bafe (F) for
access to the pre-lter in the engine housing.
NOTE: If you use an air hose for drying, blow through
both sides of filter.
WARNING
Never run the engine without the air lter, serious
damage could result. Make sure the air lter is correctly
placed in the air lter cover before reassembly.
WARNING
Never run the saw without all the parts, including the
drivecase cover and starter housing, securely in place.
Because parts can fracture and pose a danger of
thrown objects, leave repairs of the ywheel and clutch
to trained service dealer personnel.
NOTE: Depending on the type of fuel used, the type and
amount of lubricant used, and/or your operating conditions,
the exhaust port and silencer may become blocked with
carbon deposits. If you notice a power loss with your
petrol-powered tool, you may need to remove these
deposits to restore performance. We highly recommend
that only qualied service technicians perform this service.
CHECKING THE FUEL FILTER
See gure 68.
Check the fuel lter (A) periodically. Replace it if
contaminated or damaged.
REPLACING THE SPARK PLUG
See gure 69 - 70.
This engine uses a Champion RCJ4 spark plug with 0.63
mm (0.025 inch) electrode gap. Use an exact replacement
and replace every six months, or more frequently if
necessary.
1. Loosen the spark plug by turning it anticlockwise with
a spanner.
2. Remove the spark plug.
3. Hand thread the new spark plug, turning it clockwise.
NOTE: Be careful not to cross-thread the spark plug.
Cross-threading will seriously damage the engine.
WARNING
CLEANING THE STARTER UNIT
See gure 64 - 65.
Use a brush or compressed air to keep the cooling vents
of the starter assembly free and clean of debris.
CLEANING THE ENGINE
See gure 66 - 67.
Clean the engine ns and ywheel ns with compressed
air or a brush periodically. Dangerous overheating of the
engine may occur due to impurities on the engine.
Silencer surfaces are very hot during and after
operation of the chainsaw. Keep all body parts away
from the silencer. Serious burns may occur if contact is
made with the silencer.
SPARK ARRESTOR
This product is tted with a spark arrestor screen (inside the
mufer / silencer). If loss of engine power is experienced
the mufer may need to be replaced. Take the tool to a
service dealer to have this maintenance performed.
15
Page 17

English (Original Instructions)
CHAIN BRAKE
See gure 71 - 72.
■ Remove the clutch cover and clean the chain brake
components. Check wear on the brake band (A).
If brake band is worn or deformed, have it serviced
at your nearest authorised service dealer. The band
thickness should not be less than 0.60 mm (0.024
inch), or worn halfway through.
■ Always keep the chain brake mechanism clean (B)
and lightly lubricate the linkage (C).
■ Always test the chain brake performance after
servicing or cleaning. Refer to “Operation – Operating
Chain Brake” earlier in this manual for additional
information.
■ Check and, if damaged, replace the chain catcher.
TRANSPORTING THE PRODUCT
■ When carrying the product for short distance (from
one working area to the next), always apply the chain
brake so that the product is blocked with the engine
off.
■ Never carry or transport the product while the it is
running.
■ To prevent the leakage of fuel or oil and damage in
general, secure the product when it is transported.
■ Check the fuel and chain lubricant tanks for leaks.
Drain the tanks prior to transport.
STORING THE CHAINSAW (1 MONTH OR LONGER)
1. Drain all fuel from tank into a container approved for
petrol.
2. Run the engine until it stops. This will remove all
fuel-lubricant mix that could become stale and leave
varnish and gum in the fuel system.
3. Drain all bar and chain lubricant from tank into a
container approved for lubricant.
4. Clean all foreign material from the saw.
5. Store it in a well-ventilated place that is inaccessible
to children.
NOTE: Keep away from corrosive agents such as garden
chemicals and de-icing salts.
Abide by all government and local regulations for the safe
storage and handling of petrol. Excess fuel should be
used in other 2-cycle engine powered equipment.
MAINTENANCE SCHEDULE
Daily check before use
Fuel mixture level ..................Before each use
Bar lubrication.....................Before each use
Chain tension . . . . . . . . . . . . . . . . . . . . .Before each use
Chain engagement
(no chain movement at idling speed) . . .Before each use
Chain sharpness...................Before each use
For damaged parts .................Before each use
For loose fasteners.................Before each use
For loose parts . . . . . . . . . . . . . . . . . . . .Before each use
Chain brake function................Before each use
For fuel leaks .....................Before each use
INSPECT AND CLEAN:
Bar .............................Before each use
Complete saw......................After each use
Air filter ...........................Every 5 hours*
Chain brake .......................Every 5 hours*
Replace spark plug........................Yearly
Replace fuel filter . . . . . . . . . . . . . . . . . . . . . . . . . Yearly
* Hours of Operation
INSPECTION AFTER DROPPING OR OTHER IMPACTS
Thoroughly inspect the unit and identify any affections or
damage with the unit. Any damage must be replaced by
an authorised service center prior to use.
■ For fuel or chain lubrication leaks
■ Chain brake function
■ Chain tension
■ For damaged, loose or broken parts
■ For loose or damaged fasteners
■ Handles and hand guards
16
Page 18

English (Original Instructions)
TROUBLESHOOTING
Problem Possible cause Solution
Engine will not start (Make
sure ignition switch is in
start position “I”).
Engine starts but will not
accelerate properly.
No spark. The spark plug could be cracked or damaged.
Replace the old spark plug with a new one and
try to start again. If engine will still not start,
return the product to a service dealer for further
checking.
Flooded engine. With the ignition switch off, remove spark plug
from the engine and the spark plug boot. Move
choke lever to run position (pushed in completely)
and pull starter cord 15 to 20 times. This will clear
excess fuel from engine. Clean and reinstall spark
plug. Set ignition switch to run (I) position. Push
and fully release primer bulb 10 times. Pull starter
three times with choke lever at run. If engine does
not start, move choke lever to choke and repeat
normal starting procedure. If engine still fails to
start, repeat procedure with a new spark plug.
Carburettor requires “L” (Low
jet) adjustment.
Contact a service dealer for carburettor
adjustment.
Engine starts but will not run
properly at high speed.
Engine does not reach
full speed and/or emits
excessive smoke.
Engine starts, runs, and
accelerates but will not idle.
Engine starts and runs, but
chain is not rotating.
Carburettor requires “H” (High
jet) adjustment.
Contact a service dealer for carburettor
adjustment.
Check lubricant fuel mixture. Use fresh fuel and the correct 2-stroke lubricant
mix ratio.
Air lter dirty. Clean air lter. Refer to "Maintenance – cleaning
the air lter” earlier in this manual.
Spark arrester screen dirty. Clean spark arrester screen. Refer to
“Maintenance – cleaning the spark arresting
silencer” earlier in this manual.
Carburettor requires “H” (High
jet) adjustment.
Contact a service dealer for carburettor
adjustment.
Carburettor requires adjustment. Turn idling speed screw “T” clockwise to increase
idling speed. If chain turns at idle, turn idling
speed screw “T” anticlockwise to decrease
speed. Wear protective equipment and observe
all safety instructions.
Chain lubricant tank empty. That
Lubricant tank should be lled every time.
fuel tank is lled.
Check chain tension for
overtight condition.
Tension chain per instructions in “Maintenance –
adjusting the chain tension” earlier in this manual.
20131220v2
17
Page 19

English (Original Instructions)
Engine starts but will not
accelerate properly.
Bar and chain running hot
and smoking.
Check for lubricating function. Run at half throttle 30 to 45 seconds. Stop saw
and check for lubricant dripping from guide bar. If
lubricant is present, the chain may be dull or bar
may be damaged. If no lubricant is on the guide
bar, contact a service dealer.
Chain brake engaged. Release chain brake, refer to “Operation –
operating chain brake” earlier in this manual.
Chain tension too tight. Tension chain per instructions in “Maintenance –
adjusting the chain tension” earlier in this manual.
Check guide bar and chain
assembly.
Check guide bar and chain for
damage.
Refer to “Maintenance – assembling the bar and
chain” earlier in this manual.
Inspect guide bar and chain for damage.
18
Page 20

Techtronic Industries (Australia) Pty. Ltd.
Level 1, 660 Doncaster Road
Doncaster, VIC 3108, Australia
Techtronic Industries New Zealand Ltd.
18-26 Amelia Earhart Avenue
Mangere, Auckland 2022, New Zealand
960439011-02
 Loading...